hp officejet pro l7300/l7500/l7600/ · pdf fileto print a borderless document ... (parallel...
TRANSCRIPT

HP Officejet Pro L7300/L7500/L7600/L7700User Guide


HP Officejet Pro L7300/L7500/L7600/L7700 All-in-One seriesUser Guide

Copyright information© 2007 Copyright Hewlett-PackardDevelopment Company, L.P.Edition 1, 10/2006Reproduction, adaptation ortranslation without prior writtenpermission is prohibited, except asallowed under the copyright laws.The information contained herein issubject to change without notice.The only warranties for HP productsand services are set forth in theexpress warranty statementsaccompanying such products andservices. Nothing herein should beconstrued as constituting anadditional warranty. HP shall not beliable for technical or editorial errorsor omissions contained herein.Copyright (C) 1991-2, RSA DataSecurity, Inc. Created 1991. All rightsreserved.License to copy and use this softwareis granted provided that it is identifiedas the "RSA Data Security, Inc. MD4Message-Digest Algorithm" in allmaterial mentioning or referencingthis software or this function.License is also granted to make anduse derivative works provided thatsuch works are identified as "derivedfrom the RSA Data Security, Inc. MD4Message-Digest Algorithm" in allmaterial mentioning or referencing thederived work.RSA Data Security, Inc. makes norepresentations concerning either themerchantability of this software or thesuitability of this software for anyparticular purpose. It is provided "asis" without express or impliedwarranty of any kind.These notices must be retained in anycopies of any part of thisdocumentation and/or software.
TrademarksIntel®, Pentium® is a registeredtrademark of Intel Corporation or itssubsidiaries in the United States andother countries.Microsoft®, Windows®, and Windows®
XP are U.S. registered trademarks ofMicrosoft Corporation.
Secure Digitalmemory card is supported by theproduct. SD Logo is a trademark of itsproprietor.
Copy limitationsIt is not lawful in many places to makecopies of the following items. When indoubt, check with a legalrepresentative first.• Governmental paper or
documents:• Passports
• Immigration papers
• Selective service papers
• Identification badges, cards,or insignias
• Governmental stamps:• Postage stamps
• Food stamps
• Checks or drafts drawn ongovernmental agencies
• Paper currency, traveler'schecks, or money orders
• Certificates of deposit
• Copyrighted works
Safety information
Always follow basic safetyprecautions when using this productto reduce risk of injury from fire orelectric shock.1. Read and understand allinstructions in the documentation thatcomes with the HP All-in-One.2. Use only a grounded electricaloutlet when connecting this product toa power source. If you do not knowwhether the outlet is grounded, checkwith a qualified electrician.3. Observe all warnings andinstructions marked on the product.4. Unplug this product from walloutlets before cleaning.5. Do not install or use this productnear water, or when you are wet.6. Install the product securely on astable surface.7. Install the product in a protectedlocation where no one can step on ortrip over the line cord, and the linecord cannot be damaged.8. If the product does not operatenormally, see Maintain andtroubleshoot.9. There are no user-serviceable partsinside. Refer servicing to qualifiedservice personnel.
Product restricted materialThis HP product contains thefollowing material that might requirespecial handling at end-of-life:
Mercury in the fluorescent lamp in thescanner (< 1.5 mg)For recycling information, contacthttp://www.hp.com/go/recycle, localauthorities, or the ElectronicsIndustries Alliance at http://www.eiae.org.For more information, see Recycling.

Contents
1 Get startedFind other resources for the product .......................................................................................10Accessibility ............................................................................................................................11Understand the HP All-in-One parts .......................................................................................12
Front view .........................................................................................................................13Printing supplies area .......................................................................................................14Memory card slots ............................................................................................................14Back view .........................................................................................................................15Control panel ....................................................................................................................15
Control panel buttons and lights .................................................................................16Color display ...............................................................................................................18Two-line display ..........................................................................................................19
Connection information .....................................................................................................19
2 Install the accessoriesInstall the duplexer .................................................................................................................21Install Tray 2 ...........................................................................................................................21Turn on accessories in the print driver ....................................................................................22
To turn on accessories on Windows computers ...............................................................23To turn on accessories on Macintosh computers .............................................................. 23
3 Use the all-in-oneUse control panel menus ........................................................................................................24Control-panel message types .................................................................................................25
Status messages ..............................................................................................................25Warning messages ...........................................................................................................25Error messages ................................................................................................................25Critical error messages .....................................................................................................25
Change device settings ..........................................................................................................25Use the HP Solution Center (Windows) ..................................................................................26Use the HP photo and imaging software ................................................................................26Text and symbols ...................................................................................................................28
Type numbers and text on the control-panel keypad ........................................................28To enter text ................................................................................................................ 28To enter a space, pause, or symbol ............................................................................28To erase a letter, number, or symbol ..........................................................................28
Type text using the visual keyboard (some models only) .................................................29Available symbols for dialing fax numbers (some models only) ........................................30
Load the originals ...................................................................................................................30Load an original in the automatic document feeder (ADF) ................................................30Load an original on the scanner glass ..............................................................................31
1

Select print media ...................................................................................................................32Tips for selecting and using print media ...........................................................................32Understand specifications for supported media ................................................................33
Understand supported sizes .......................................................................................33Understand supported media types and weights ........................................................36
Set minimum margins .......................................................................................................37Load media .............................................................................................................................37Configure trays .......................................................................................................................40Print on special and custom-sized media ...............................................................................41
To print on special or custom-sized media (Windows) ......................................................41To print on special or custom-sized media (Mac OS) .......................................................41
Print borderless ......................................................................................................................42To print a borderless document (Windows) ......................................................................42To print a borderless document (Mac OS) ........................................................................43
Set up speed-dial entries (some models only) ........................................................................43Set up fax numbers as speed-dial entries or groups ......................................................... 43
To set up speed-dial entries ........................................................................................ 44To set up a speed-dial group ......................................................................................44
Set up network folders as speed-dial entries (some models) ...........................................45To set up speed-dial entries ........................................................................................ 45
Print and view a list of speed-dial entries ..........................................................................46To print a list of speed-dial entries ..............................................................................46To view a list of speed-dial entries ..............................................................................46
4 PrintChange print settings ..............................................................................................................47
To change settings from an application for current jobs (Windows) ..................................47To change default settings for all future jobs (Windows) ..................................................47To change settings (Mac OS) ...........................................................................................47
Print on both sides (duplexing) ...............................................................................................48Guidelines for printing on both sides of a page .................................................................48To perform duplexing (Windows) ......................................................................................48To perform automatic duplexing (Mac OS) .......................................................................49
Cancel a print job ....................................................................................................................49
5 CopyMake copies from the control panel ........................................................................................50Change the copy settings .......................................................................................................50Crop an original (color display models only) ...........................................................................50Cancel a copy job ...................................................................................................................51
6 ScanScan an original ......................................................................................................................52
Set up Direct Digital Filing (some models only) ................................................................52Scan an original to a network folder ..................................................................................53Scan an original to a program on a computer (direct connection) .....................................54Scan an original to a memory device ................................................................................55
Use Webscan via embedded Web server ...............................................................................55Scan from a TWAIN-compliant or a WIA-compliant program ..................................................55
To scan from a TWAIN-compliant program ......................................................................56To scan from a WIA-compliant program ...........................................................................56
2

Edit a scanned original ...........................................................................................................56Edit a scanned photo or graphic .......................................................................................56Edit a scanned document using optical character recognition (OCR) software ................56
Change scan settings .............................................................................................................57Cancel a scan job ...................................................................................................................57
7 Work with memory devices (some models only)Insert a memory card ..............................................................................................................58Connect a digital camera ........................................................................................................59Connect a storage device .......................................................................................................61View photos ............................................................................................................................62
View photos (color display models only) ...........................................................................62View photos using your computer .....................................................................................62
Print photos from the control panel .........................................................................................62Print photos using a proof sheet .......................................................................................62Print panoramic photos .....................................................................................................65Print passport photos ........................................................................................................66Print video action photos ..................................................................................................67
Save photos to your computer ................................................................................................68
8 Fax (some models only)Send a fax ..............................................................................................................................70
Send a basic fax ...............................................................................................................70Send a fax manually from a phone ...................................................................................71Send a fax using monitor dialing .......................................................................................72Send a fax using the broadcast fax option (color display models only) .............................73
Receive a fax ..........................................................................................................................73Receive a fax manually .....................................................................................................73Set up backup fax reception .............................................................................................74Reprint received faxes from memory ................................................................................75Forward faxes to another number .....................................................................................76Block junk fax numbers .....................................................................................................77
Set the junk fax mode .................................................................................................77Add numbers to the junk fax list ..................................................................................77Remove numbers from the junk fax list .......................................................................78View a list of blocked fax numbers ..............................................................................78
Change fax settings ................................................................................................................79Configure the fax header ..................................................................................................79Set the answer mode (Auto answer) .................................................................................79Set the number of rings before answering ........................................................................80Change the answer ring pattern for distinctive ring ...........................................................80Set the fax error correction mode .....................................................................................81
To set the fax error-correction mode ...........................................................................81Set the dial type ................................................................................................................81
To set the dial type .....................................................................................................81Set the redial options ........................................................................................................81
To set the redial options .............................................................................................82Set the fax speed ..............................................................................................................82
Fax over the Internet ............................................................................................................... 82Test fax setup .........................................................................................................................83
Contents
3

Use reports .............................................................................................................................83Print fax confirmation reports ............................................................................................84Print fax error reports ........................................................................................................84Print and view the fax log ..................................................................................................85
Cancel a fax ............................................................................................................................85
9 Configure and manageManage the device .................................................................................................................86
Overview of management tasks ........................................................................................ 86Monitor the device ............................................................................................................87Administer the device .......................................................................................................88
Use device management tools ...............................................................................................90Embedded Web server .....................................................................................................90
To open the embedded Web server ...........................................................................90Embedded Web server pages ....................................................................................91
Toolbox (Windows) ...........................................................................................................91To open the Toolbox ...................................................................................................91Toolbox tabs ...............................................................................................................92
HP Printer Utility (Mac OS) ...............................................................................................93To open the HP Printer Utility .....................................................................................93HP Printer Utility panels ..............................................................................................93
Network Printer Setup Utility (Mac OS) .............................................................................94HP Web Jetadmin software ..............................................................................................94HP Instant Support ...........................................................................................................94
Security and privacy ...................................................................................................95To gain access to HP Instant Support ........................................................................95
myPrintMileage .................................................................................................................95Understand the self-test diagnostic page ................................................................................96Understand the network configuration page ...........................................................................98
Channel range definitions .................................................................................................99Configure network options ......................................................................................................99
Change basic network settings .........................................................................................99Use the Wireless Setup Wizard ................................................................................100View and print network settings ................................................................................100Turn the wireless radio on and off .............................................................................100
Change advanced network settings ................................................................................100Set link speed ...........................................................................................................100To View IP settings ...................................................................................................101To Change IP settings ..............................................................................................101
4

Set up faxing for the device (some models only) ..................................................................101Set up faxing (parallel phone systems) ...........................................................................102
Choose the correct fax setup for your home or office ...............................................102Select your fax setup case ........................................................................................104Case A: Separate fax line (no voice calls received) ..................................................105Case B: Set up the device with DSL .........................................................................106Case C: Set up the device with a PBX phone system or an ISDN line .....................107Case D: Fax with a distinctive ring service on the same line ....................................108Case E: Shared voice/fax line ...................................................................................109Case F: Shared voice/fax line with voice mail ...........................................................110Case G: Fax line shared with computer modem (no voice calls received) ................111Case H: Shared voice/fax line with computer modem ..............................................113Case I: Shared voice/fax line with answering machine .............................................117Case J: Shared voice/fax line with computer modem and answering machine .........118Case K: Shared voice/fax line with computer dial-up modem and voice mail ...........122
Serial-type fax setup .......................................................................................................124Configure the device (Windows) ...........................................................................................125
Direct connection ............................................................................................................125To install the software before connecting the device (recommended) ......................125To connect the device before installing the software ................................................126To share the device on a locally shared network ......................................................126
Network connection ........................................................................................................127To install the device on a network .............................................................................127To install the device software on client computers ....................................................127To install the printer driver using Add Printer ............................................................128
Configure the device (Mac OS) ............................................................................................128To install the software for network or direct connection ..................................................128To share the device on a locally shared network ............................................................129
Set up the device for wireless communication (some models only) ......................................129Understand 802.11 wireless network settings ................................................................. 130To set up wireless communication using the control panel with wireless setup wizard ...131To set up wireless communication using the installer (Windows) ...................................132To set up wireless communication using SecureEasySetup (SES) ................................133To set up the device on a wireless network (Mac OS) ....................................................133To turn off wireless communication ................................................................................134Guidelines for reducing interference on a wireless network ............................................134Guidelines for ensuring wireless network security ..........................................................134
To add hardware addresses to a WAP .....................................................................134Other guidelines ........................................................................................................135
Set up the device for Bluetooth communication ....................................................................135To set up the device for Bluetooth communication via the embedded Web server .........136Connect the device with Bluetooth .................................................................................. 136
Connecting the device with Bluetooth on Windows ..................................................136Connect the device with Bluetooth on Mac OS .........................................................138
Set Bluetooth security for the device ..............................................................................138Use a passkey to authenticate Bluetooth devices .....................................................139To set the device to be visible or not visible to Bluetooth devices ............................139Reset Bluetooth settings via the embedded Web server ..........................................140
Uninstall and reinstall the software .......................................................................................140
Contents
5

10 Maintain and troubleshootSupported ink cartridges .......................................................................................................143Replace the ink cartridges ....................................................................................................144Maintain the printheads ........................................................................................................145
To check printhead health ..............................................................................................145To print the print quality diagnostic page ........................................................................145To align the printheads ...................................................................................................146To calibrate the linefeed .................................................................................................147To clean the printheads ..................................................................................................147To clean the printhead contacts manually ......................................................................147To replace the printheads ...............................................................................................150
Store printing supplies ..........................................................................................................152Store ink cartridges .........................................................................................................152Store printheads .............................................................................................................152
Clean the device ...................................................................................................................152Clean the scanner glass .................................................................................................153Clean the automatic document feeder (ADF) .................................................................. 153Clean the exterior ...........................................................................................................157
Troubleshooting tips and resources ......................................................................................157Solve printing problems ........................................................................................................158
The device shuts down unexpectedly .............................................................................158Error message appears on control-panel display ............................................................ 158The device is not responding (nothing prints) .................................................................158Device does not accept printhead ................................................................................... 159Device takes a long time to print .....................................................................................160Blank or partial page printed ...........................................................................................160Something on the page is missing or incorrect ...............................................................161Placement of the text or graphics is wrong .....................................................................161The device prints half a page, then ejects the paper ......................................................162
Poor print quality and unexpected printouts ..........................................................................162Poor quality printouts ......................................................................................................162Meaningless characters print ..........................................................................................163Ink is smearing ................................................................................................................ 163Ink is not filling the text or graphics completely ...............................................................164Output is faded or dull colored ........................................................................................164Colors are printing as black and white ............................................................................164Wrong colors are printing ................................................................................................164Printout shows bleeding colors .......................................................................................165Colors do not line up properly .........................................................................................165Lines or dots are missing from text or graphics ..............................................................165
Solve paper-feed problems ...................................................................................................165Optional Tray 2 cannot be inserted .................................................................................165Another paper-feed problem is occurring ........................................................................165
6

Solve copy problems ............................................................................................................167No copy came out ...........................................................................................................167Copies are blank .............................................................................................................167Wrong original was copied ..............................................................................................167Documents are missing or faded ....................................................................................168Size is reduced ...............................................................................................................168Copy quality is poor ........................................................................................................168Copy defects are apparent .............................................................................................168Error messages appear ..................................................................................................169The device prints half a page, then ejects the paper ......................................................169
Solve scan problems ............................................................................................................169Scanner did nothing ........................................................................................................170Scan takes too long ........................................................................................................170Part of the document did not scan or text is missing .......................................................170Text cannot be edited .....................................................................................................171Error messages appear ..................................................................................................171Scanned image quality is poor ........................................................................................171Scan defects are apparent ..............................................................................................173Unable to scan to network folder (Direct Digital Filing) ...................................................173
Solve fax problems ...............................................................................................................174The fax test failed ...........................................................................................................174
Solve photo (memory card) problems ...................................................................................185The device cannot read the memory card ......................................................................186The device cannot read photos on the memory card ......................................................186Some photos on the memory card will not print, causing the print job to cancel .............186The device prints half a page, then ejects the paper ......................................................187
Solve device management problems ....................................................................................187Embedded Web server cannot be opened .....................................................................187
Troubleshoot installation issues ............................................................................................188Hardware installation suggestions ..................................................................................188Software installation suggestions .................................................................................... 188Solve alignment page problems ...................................................................................... 189Solve software installation problems ...............................................................................189Solve network problems .................................................................................................190Solve wireless problems .................................................................................................191
Clear jams ............................................................................................................................192Clear a jam in the device ................................................................................................193Clear jams in the ADF .....................................................................................................195Tips for avoiding jams .....................................................................................................197
A HP supplies and accessoriesOrder printing supplies online ...............................................................................................198Accessories ..........................................................................................................................198Supplies ................................................................................................................................198
Ink cartridges ..................................................................................................................198Printheads ......................................................................................................................199HP media ........................................................................................................................199
B Support and warrantyObtain electronic support ......................................................................................................200
Contents
7

Obtain HP telephone support ...............................................................................................200Before you call ................................................................................................................200Telephone support numbers ...........................................................................................201
Hewlett-Packard limited warranty statement .........................................................................203Prepare the device for shipment ...........................................................................................204
Remove the ink cartridges and printheads before shipment ...........................................204Remove the control-panel faceplate ...............................................................................205
Pack the device ....................................................................................................................206
C Device specificationsPhysical specifications ..........................................................................................................208Product features and capacities ...........................................................................................208Processor and memory specifications ..................................................................................209System requirements ............................................................................................................209Network protocol specifications ............................................................................................210Embedded Web server specifications ................................................................................... 210Print specifications ................................................................................................................210
Print resolution ................................................................................................................210Copy specifications ...............................................................................................................211Fax specifications .................................................................................................................211Scan specifications ...............................................................................................................212Direct Digital Filing specifications .........................................................................................212Environmental specifications ................................................................................................212Electrical specifications .........................................................................................................212Acoustic emission specifications (print in Draft mode, noise levels per ISO 7779) ...............212Supported devices ................................................................................................................213Memory card specifications ..................................................................................................213
D Regulatory informationFCC statement .....................................................................................................................214
Shielded cables ..............................................................................................................214Exposure to radio frequency radiation (wireless products only) ......................................215Notice to users of the U.S. telephone network ................................................................216
Notice to users of the Canadian telephone network .............................................................217Notice to users in the European Economic Area ..................................................................218Other regulatory information .................................................................................................218
EMI statement (Korea) ....................................................................................................218VCCI statement (Japan) .................................................................................................219Regulatory model number ..............................................................................................219Power cord statement .....................................................................................................219LED classification ...........................................................................................................219
Regulatory information for wireless products ........................................................................219Notice to users in Canada/Note à l'attention des utilisateurs Canadien ..........................220Notice to users in Brazil/Notificação de Normas de Uso de Dispositivos Sem Fio doBrasil ...............................................................................................................................220Notice to users in the European Union (English) ............................................................221Notice to users in France ................................................................................................222Notice to users in Germany ............................................................................................223Notice to users in Italy ....................................................................................................224Notice to users in Spain ..................................................................................................225
Declaration of conformity ......................................................................................................226
8

Environmental sustainability program ...................................................................................228Reduction and elimination ..............................................................................................228Power consumption ........................................................................................................228Battery information ..........................................................................................................228Material safety data sheets .............................................................................................229Recycling ........................................................................................................................229
Product packaging ....................................................................................................229Plastics .....................................................................................................................229Disposal of waste equipment by users in private households in the EuropeanUnion ........................................................................................................................229HP products and supplies .........................................................................................229
Index...........................................................................................................................................230
Contents
9

1 Get startedThis guide provides details about how to use the device and to resolve problems.
• Find other resources for the product• Accessibility• Understand the HP All-in-One parts
Find other resources for the product You can obtain product information and further troubleshooting resources that are notincluded in this guide from the following resources:
Resource Description Location
Setup poster Provides illustrated setupinformation.
A printed version of thedocument is provided withthe device.
Getting started guide Provides instructions forsetting up the device andinformation about thewarranty and safety issues.
A printed version of thedocument is provided withthe device.
Readme file and release notes Provide late-breakinginformation andtroubleshooting tips.
Included on the Starter CD.
Embedded Web server(network connection)
Allows you to view statusinformation, change settings,and manage the device fromany computer on the network.For more information, seeEmbedded Web server.
Available through anystandard Web browser.
Toolbox (Microsoft®
Windows®)Provides information aboutprinthead health and accessto maintenance services.For more information, seeToolbox (Windows).
The Toolbox is typicallyinstalled with the devicesoftware as an availableinstallation option.
HP Printer Utility (Mac OS) Contains tools to configureprint settings, calibrate thedevice, clean the printheads,print the configuration page,order supplies online, andfind support information fromthe Web site. You can alsoconfigure settings forwireless printing.For more information, see HPPrinter Utility (Mac OS).
The HP Printer Utility istypically installed with thedevice software.
10 Get started

Resource Description Location
HP Instant Support Helps you quickly identify,diagnose, and resolveprinting problems.For more information, see HPInstant Support.
Available through anystandard Web browser orthrough the Toolbox(Windows).
Control panel Provides status, error, andwarning information aboutoperations.
For more information, seeControl panel.
Logs and reports Provides information aboutevents that have occurred.
For more information, seeMonitor the device.
Self-test diagnostic page • Device information:• Product name• Model number• Serial number• Firmware version
number• Accessories installed (for
example, the duplexer)• Number of pages printed
from the trays andaccessories
• Ink levels• Printhead health status
For more information, seeUnderstand the self-testdiagnostic page.
Network configuration page Provides networkconfiguration information.
For more information, seeUnderstand the networkconfiguration page.
Print quality diagnostic page Diagnoses issues that affectprint quality and helps youdecide whether to run anymaintenance tools to improvethe print quality of yourprintouts.
For more information, see Toprint the print qualitydiagnostic page.
HP Web sites Provide the latest printersoftware, and product andsupport information.
www.hp.com/supportwww.hp.com
HP telephone support Lists information to contactHP. During the warrantyperiod, this support is oftenfree of charge.
For more information, seeObtain HP telephone support.
HP photo and imagingsoftware help
Provides information aboutusing the software.
For more information, seeUse the HP photo andimaging software.
AccessibilityThe device provides a number of features that make it accessible for people withdisabilities.
(continued)
Accessibility 11

VisualThe device software is accessible for users with visual impairments or low visionthrough the use of your operating system's accessibility options and features. It alsosupports most assistive technology such as screen readers, Braille readers, and voice-to-text applications. For users who are color blind, colored buttons and tabs used inthe software and on the control panel have simple text or icon labels that convey theappropriate action.
MobilityFor users with mobility impairments, the device software functions can be executedthrough keyboard commands. The software also supports Windows accessibilityoptions such as StickyKeys, ToggleKeys, FilterKeys, and MouseKeys. The devicedoors, buttons, paper trays, and paper guides can be operated by users with limitedstrength and reach.
SupportFor more details about the accessibility of this product and HP's commitment toproduct accessibility, visit HP's Web site at www.hp.com/accessibility.
For accessibility information for the Mac OS, visit the Apple Web site atwww.apple.com/accessibility.
Understand the HP All-in-One parts• Front view• Printing supplies area• Memory card slots• Back view• Control panel• Connection information
Chapter 1
12 Get started

Front view
1 Automatic document feeder (ADF)
2 Scanner glass
3 Control panel (differs based on the HP All-in-One model that you have)
4 Display (differs based on the model that you have)
5 Output tray
6 Output tray extension
7 Length/width guides
8 Tray 1
9 Tray 2 (available with some models)
10 Front universal serial bus (USB) port (PictBridge-enabled)
11 Memory card slots
12 Memory device light
13 Document feeder tray
14 Width guides
Understand the HP All-in-One parts 13

Printing supplies area
1 Ink cartridge door
2 Ink cartridges
3 Print-carriage access door
4 Printheads
5 Printhead latch
Memory card slots
1 CompactFlash (types I and II)
2 Secure Digital, MultimediaCard (MMC), Secure MMC
3 xD
4 Memory Stick, Magic Gate Memory Stick, Memory Stick Duo, Memory Stick Pro
5 Front universal serial bus (USB) port (PictBridge-enabled)
Chapter 1
14 Get started

Back view
1 Power input
2 Ethernet network port
3 Rear universal serial bus (USB) port
4 Fax ports (1-LINE and 2-EXT) (available on some models)
5 Rear access panel (for models with no duplexer)
6 Automatic two-sided printing accessory (duplexer) (available on some models)
Control panelThe layout and functions available on the control panel depend on which model thatyou have.The following sections describe control panel buttons, lights, and displays. Your modelmight not have all of the features described.
Understand the HP All-in-One parts 15

Control panel buttons and lightsThe following diagram and related table provide a quick reference to the control panelfeatures.
Label Name and Description
1 One-touch speed-dial buttons: Access the first five speed-dial numbers.
2 Speed Dial: Selects a speed-dial number.
3 Scan Menu: Presents the Scan To menu for selecting a scan destination.
4 Digital Filing: Scans and saves a document to a folder and shares documents with otherpeople on your network.
5 Fax Menu: Presents the Fax menu for selecting options.
6 The button name and functionality depends on the country/region in which the device is sold.Resolution: Adjusts the resolution for the fax you are sending.Junk Fax Blocker: Presents the Junk Fax Blocker Set Up menu for managing unwanted faxcalls. You are required to subscribe to a caller ID service to use this feature.
7 Keypad: Enters fax numbers, values, or text.
8 Display: View menus and messages.
9 Left arrow: Decreases values on the display.
10 OK: Selects a menu or a setting on the display.
11 Right arrow: Increases values on the display.
12 Attention light: When blinking, the attention light indicates an error has occurred that requiresyour attention.
13 Reduce/Enlarge: Changes the size of a copy for printing.
14 Copy Menu: Presents the Copy menu for selecting options.
15 Number of Copies: Select the number of copies to be printed.
16 Photo Menu: Presents the Photo menu for selecting options.
Chapter 1
16 Get started

Label Name and Description
17 The button name and functionality depends on the model and the country/region in which thedevice is sold.Proof Sheet: Prints a proof sheet when a memory card is inserted in a memory card slot. Aproof sheet shows thumbnail views of all the photos on the memory card. You can selectphotos on the proof sheet, and then print those photos by scanning the proof sheet.Rotate: Rotate the current image on the display. The rotated image can be printed.
18 Power: Turns the device on or off. The Power button is lit when the device is on. The lightblinks while performing a job.When the device is turned off, a minimal amount of power is still supplied. To completelydisconnect the power supply, turn the device off, and then unplug the power cord.
19 Zoom Out: Reduces the size of the image on the display.
20 Zoom In: Increases the size of the image on the display.
21 PRINT PHOTOS: Selects the photo function. Use this button to print photos from a memorycard or storage device, or to save photos to your computer.
22 Quality: Selects Best, Normal, or Fast quality for copying.
23 START COPY Color: Starts a color copy job.
24 START COPY Black: Starts a black-and-white copy job.
25 Collate: Organizes the copies in order so they are ready to use when the copying job finishes.
26 Cancel: Stops a job, exits a menu, or exits settings.
27 Help: Displays the Help menu. You can choose from a list of help topics. When you make aselection, the detailed help information is displayed on the monitor of a connected computer.
28 Back: Moves you one level up in the menu.
29 2-sided: Performs a two-sided copy or fax job.
30 Setup: Presents the Setup Menu for generating reports, changing fax and other maintenancesettings, and accessing the Help menu. The topic that you select from the Help menu opensa help window on your computer screen.
31 Auto Answer: When this button is lit, the device automatically answers incoming phonecalls. When off, the device does not answer any incoming fax calls.
32 START FAX Color: Starts a color fax.
33 START FAX Black: Starts a black-and-white fax.
34 Redial/Pause: Redials the most recently dialed number, or inserts a 3-second pause in a faxnumber.
35 START SCAN: Starts a scan job and sends it to the destination you selected using the ScanTo button.
(continued)
Understand the HP All-in-One parts 17

Color display
NOTE: This type of display is available on some models.
The following icons appear at the bottom of the color display to provide importantinformation. Some of the icons appear only if your device has network capability. Formore information about networking, see Configure network options.
Icon Purpose
Shows the amount of ink in the ink cartridge. The color of the iconcorresponds to the color of the ink cartridge, and the fill level of the iconcorresponds to the fill level of the ink cartridge.
Shows that an unknown ink cartridge is inserted. This icon might appear if anink cartridge contains non-HP ink.
Shows that a wired network connection exists.
Shows that the device has wireless networking capability, but no wirelessnetwork connection exists. This icon is gray when a wireless network signal isnot available, and blue when a signal exists. This is for infrastructure mode.(This feature is supported on some models.) For more information, see Set upthe device for wireless communication (some models only).
Shows that a wireless network connection exists. The signal strength isindicated by the number of curved lines. This is for infrastructure mode. (Thisfeature is supported on some models.) For more information, see Set up thedevice for wireless communication (some models only).
Shows that an ad hoc, or computer-to-computer, wireless network connectionexists. (This feature is supported on some models.) For more information, seeSet up the device for wireless communication (some models only).
Shows that a Bluetooth adapter is installed, and a connection exists. Aseparate Bluetooth adapter is required. For more information, see Accessories.For more information on setting up Bluetooth, see Guidelines for ensuringwireless network security.
Chapter 1
18 Get started

Two-line display
NOTE: This type of display is available on some models.
The two-line display shows status and error messages, menu options, and advisorymessages. If you insert a memory card or connect a camera, the display goes intophoto state and shows the top of the Photo menu.
Connection information
Description Recommendednumber of connectedcomputers for bestperformance
Supported softwarefeatures
Setup instructions
USB connection One computerconnected with a USBcable to the rear USB2.0 high-speed port onthe device.
All features aresupported, exceptWebscan. Forinformation, see UseWebscan via embeddedWeb server.
Follow the gettingstarted guide fordetailed instructions.
Ethernet (wired)connection
Up to five computersconnected to the deviceusing a hub or router.
All features aresupported, includingWebscan.
Follow the instructionsin the getting startedguide, and then see Toshare the device on alocally shared networkin this guide for furtherinstructions.
Printer sharing Up to five computers.The host computer mustbe turned on at alltimes, or the othercomputers cannot printto the device.
All features resident onthe host computer aresupported. Only print issupported from theother computers.
Follow the instructionsin To share the deviceon a locally sharednetwork.
802.11 wireless Up to five computersconnected to the deviceusing a hub or router.
All features aresupported, includingWebscan.
Follow the instructionsin Set up the device forwireless communication(some models only).
HP bt300, Printer andPC Adapter with
One Bluetooth device orcomputer.
Printing from aBluetooth device such
Follow the instructionsin Set up the device for
Understand the HP All-in-One parts 19

Description Recommendednumber of connectedcomputers for bestperformance
Supported softwarefeatures
Setup instructions
Bluetooth® WirelessTechnology
as a PDA, cameraphone, or Bluetooth-enabled computer.
Bluetoothcommunication.
Chapter 1
20 Get started

2 Install the accessoriesThis section contains the following topics:
• Install the duplexer• Install Tray 2• Turn on accessories in the print driver
Install the duplexerNOTE: This feature is available with some models of the device.
You can print on both sides of a sheet of paper automatically when the optionalautomatic two-sided printing accessory (duplexer) is installed. For information on usingthe duplexer, see Print on both sides (duplexing).
To install the duplexer1. Push the buttons on the rear access panel and remove the panel from the device.2. Slide the duplexer into the device until the unit locks into place. Do not press the
buttons on either side of the duplexer when installing the unit; use them only forremoving the unit from the device.
Install Tray 2NOTE: This feature is available with some models of the device.
Install the accessories 21

Tray 2 can hold up to 350 sheets of plain paper. For ordering information, seeAccessories.
To install Tray 21. Unpack the tray, remove the packing tapes and materials, and move the tray to the
prepared location. The surface must be sturdy and level.
2. Turn off the device, and disconnect the power cord.3. Set the device on top of the tray.
CAUTION: Be careful to keep your fingers and hands clear of the bottom ofthe device.
4. Connect the power cord and turn on the device.5. Enable Tray 2 in the print driver. For more information, see Turn on accessories in
the print driver.
Turn on accessories in the print driver• To turn on accessories on Windows computers• To turn on accessories on Macintosh computers
Chapter 2
22 Install the accessories

To turn on accessories on Windows computersAfter you install the device software on Windows computers, Tray 2 must be turned onin the print driver in order for it to work with the device. (The duplexer does not need tobe turned on.)
1. Click Start, point to Settings, and then click Printers or Printers and Faxes.- Or -Click Start, click Control Panel, and then double-click Printers.
2. Right-click the printer icon, and then click Properties, Document Defaults, orPrinting Preferences.
3. Select one of these tabs: Configure, Device Settings, or Device Options. (Thename of the tab depends on the print driver and the operating system.) On theselected tab, click the accessory that you want to turn on, click Installed from thedrop-down menu, and then click OK.
To turn on accessories on Macintosh computersThe Mac OS automatically turns on all accessories in the print driver when you installthe device software. If you add a new accessory later, follow these steps:
1. Click the Printer Setup Utility icon in the Dock.2. On the Printer List window, click once on the device you want to set up to select it.3. From the Printers menu, select Show info.4. Click the Names and Location drop-down menu and select Installable Options.5. Check the accessory that you want to turn on.6. Click Apply Changes.
Turn on accessories in the print driver 23

3 Use the all-in-oneThis section contains the following topics:
• Use control panel menus• Control-panel message types• Change device settings• Use the HP Solution Center (Windows)• Use the HP photo and imaging software• Text and symbols• Load the originals• Select print media• Load media• Configure trays• Print on special and custom-sized media• Print borderless• Set up speed-dial entries (some models only)
Use control panel menusThe following sections provide a quick reference to top-level menus that appear on thecontrol-panel display. To display a menu, press the menu button for the function youwant to use.
NOTE: The type of display on the control panel—color display or two-line display—depends on the model you have.
• Scan menu: Presents a list of destinations; for example, HP photo and imagingsoftware. On some models, you can scan and reprint a photo or scan to a memorycard.
• Fax menu: Allows you to enter a fax or speed-dial number, or display the Faxmenu. Menu options include:• Modifying resolution• Lightening/darkening• Sending delayed faxes• Setting up new defaults
• Copy menu: Menu options include:• Selecting copy quantities• Reducing/enlarging• Selecting media type and size
• Photo menu: Menu options include:• Selecting print options• Using special features• Editing
24 Use the all-in-one

• Transferring to a computer• Selecting a proof sheet
Control-panel message typesThis section contains the following topics:
• Status messages• Warning messages• Error messages• Critical error messages
Status messagesStatus messages reflect the current state of the device. They inform you of normaloperation and require no action to clear them. They change as the state of the devicechanges. Whenever the device is ready, not busy, and has no pending warningmessages, the status message READY appears if the device is turned on.
Warning messagesWarning messages inform you of events that require your attention, but they do notprevent the device from operating. An example of a warning message is CYAN INKLOW. These messages appear until you resolve the condition.
Error messagesError messages communicate that some action must be performed, such as addingmedia or clearing a media jam. These messages are usually accompanied by ablinking red Attention light. Take the appropriate action to continue printing.
If the error message shows an error code, press the Power button to turn off thedevice, and then turn it on again. In most situations, this action solves the problem. Ifthe message persists, your device might need service. Write down the error code, andthen go to HP Instant Support to learn more about possible causes for the message.For more information, see HP Instant Support.
Critical error messagesCritical error messages inform you of a device failure. Some of these messages canbe cleared by pressing the Power button to turn off the device, and then turning it onagain. If a critical error persists, service is required. For more information, see Supportand warranty.
Change device settingsYou can change the device settings from these places:
• From the control panel.• From the HP Solution Center (Windows) or HP Device Manager (Mac OS). For
more information, see Use the HP photo and imaging software.• From the embedded Web server. For more information, see Embedded Web server.
Control-panel message types 25

NOTE: When you are configuring settings in HP Solution Center or in HP DeviceManager, you cannot see the settings that have been configured from the controlpanel (such as the scan settings).
To change settings from the control panel1. At the control panel, press the menu button for the function you are using (for
example, Copy Menu).2. To reach the option that you want to change, use one of the following methods:
• Press a control-panel button, and then use the left or right arrow keys to adjustthe value.
• Select the option from the menu on the control-panel display.3. Select the value that you want, and then press OK.
To change settings from the HP photo and imaging software (Mac OS)1. Click the HP Device Manager icon in the Dock.2. Select the device in the Devices drop-down menu.3. On the Information and Settings menu, click an item that you want to change.
To change settings from the embedded Web server1. Open the embedded Web server.2. Select the page with the setting you want to change.3. Change the setting and then click Apply.
Use the HP Solution Center (Windows)On a Windows computer, the HP Solution Center is the entry point for theHP Photosmart Software. Use the HP Solution Center to change print settings, startthe Fax Setup Wizard, order supplies, and access the onscreen Help.
The features available in the HP Solution Center vary depending on the devices youhave installed. The HP Solution Center is customized to show icons that areassociated with the selected device. If the selected device is not equipped with aparticular feature, then the icon for that feature does not appear in the HP SolutionCenter.If the HP Solution Center on your computer does not contain any icons, an error mighthave occurred during the software installation. To correct this, use the Control Panel inWindows to completely uninstall the HP Photosmart Software, and then reinstall thesoftware. For more information, see the onscreen Help that came with the device.
For information about opening the HP Solution Center, see Use the HP photo andimaging software.
Use the HP photo and imaging softwareYou can use the HP photo and imaging software to access many features that are notavailable from the control panel.
Chapter 3
26 Use the all-in-one
The software is installed on your computer during setup. For further information, seethe setup documentation that came with your device.
Access to the HP photo and imaging software differs by operating system (OS). Forexample, if you have a Windows computer, the HP photo and imaging software entrypoint is the HP Photosmart Software window. If you have a Macintosh computer, theHP photo and imaging software entry point is the HP Photosmart Studio window.Regardless, the entry point serves as the launching pad for the HP photo and imagingsoftware and services.
To open the HP Photosmart Software on a Windows computer1. Do one of the following:
• On the Windows desktop, double-click the HP Photosmart Software icon.• In the system tray at the far right of the Windows taskbar, double-click the HP
Digital Imaging Monitor icon.• On the taskbar, click Start, point to Programs or All Programs, select HP,
and then click the HP Photosmart Software.2. If you have more than one HP device installed, select the tab with your product's
name.
NOTE: On a Windows computer, the features available in the HP PhotosmartSoftware vary depending on the devices you have installed. The software iscustomized to show icons that are associated with the selected device. If theselected device is not equipped with a particular feature, then the icon for thatfeature does not appear in the software.
TIP: If the HP Photosmart Software on your computer does not contain anyicons, an error might have occurred during the software installation. To correctthis, use the Control Panel in Windows to completely uninstall theHP Photosmart Software; then reinstall the software. For more information, seethe Getting Started Guide that came with your device.
To open the HP Photosmart Studio software on a Macintosh computer1. Click the HP Photosmart Studio icon in the Dock.
The HP Photosmart Studio window appears.2. In the HP Photosmart Studio task bar, click Devices.
The HP Device Manager window appears.3. Select your device from the Device drop-down menu.
From here, you can scan, send faxes, import documents, and performmaintenance procedures such as checking the ink levels for the ink cartridges.
NOTE: On a Macintosh computer, the features available in theHP Photosmart Studio software vary depending on the selected device.
TIP: When the HP Photosmart Studio software is opened, you can gainaccess to the Dock menu shortcuts by selecting and holding the mouse buttonover the HP Photosmart Studio icon in the Dock.
Use the HP photo and imaging software 27
Text and symbolsYou can use the keypad on the control panel to enter text and symbols. You can alsoenter text and symbols from the control panel by using the visual keyboard (somemodels only). The visual keyboard appears automatically on the color display whenyou set up a wired or wireless network, the fax header, or speed-dial entries.You can also enter symbols from the keypad when you dial a fax or phone number.When the device dials the number, it interprets the symbol and responds accordingly.For example, if you enter a dash in the fax number, the device will pause beforedialing the remainder of the number. A pause is useful if you need to gain access to anoutside line before dialing the fax number.
NOTE: If you want to enter a symbol in your fax number, such as a dash, youneed to enter the symbol by using the keypad.
Type numbers and text on the control-panel keypadYou can enter text or symbols by using the keypad on the control panel.
After you are done entering text, press OK to store your entry.
To enter text1. Press the keypad numbers that correspond to the letters of a name. For example,
the letters a, b, and c correspond to the number 2, as shown on the button below.
TIP: Press a button multiple times to see the available characters. Dependingon your language and country/region setting, other characters might beavailable in addition to the ones shown on the keypad.
2. After the correct letter appears, wait for the cursor to advance automatically to theright, or press the right arrow button. Press the number that corresponds to thenext letter in the name. Press the button multiple times until the correct letterappears. The first letter of a word is automatically set to uppercase.
To enter a space, pause, or symbol• To insert a space, press Space.• To enter a pause, press Redial/Pause. A dash appears in the number sequence.• To enter a symbol, such as @, press the Symbols button repeatedly to scroll
through the list of available symbols: asterisk (*), dash (-), ampersand (&), period(.), slash (/), parentheses ( ), apostrophe ('), equals (=), number sign (#), at (@),underscore (_), plus (+), exclamation (!), semicolon (;), question (?), comma (,),colon (:), percent (%), and approximation (~).
To erase a letter, number, or symbol▲ If you make a mistake, press the left arrow button to clear it, and then make the
correct entry.
Chapter 3
28 Use the all-in-one
Type text using the visual keyboard (some models only)You can enter text or symbols by using the visual keyboard that automatically appearson the color display when you must enter text. For example, the visual keyboardautomatically appears when you are setting up a wired or wireless network, the faxheader, or speed-dial entries.
To enter text by using the visual keyboard1. To select a letter, number, or symbol using the visual keyboard, press the arrow
keys to highlight the appropriate selection.
To enter lowercase letters, uppercase letters, numbers, and symbols• To enter lowercase letters, select the abc button on the visual keyboard, and
then press OK.• To enter uppercase letters, select the ABC button on the visual keyboard, and
then press OK.• To enter numbers and symbols, select the 123 button on the visual keyboard,
and then press OK.
To add a spaceTo add a space, press the right arrow button on the visual keyboard, and thenpress OK.
NOTE: Make sure you use the right arrow button on the visual keyboard toadd a space. You cannot add a space by using the arrow buttons on thecontrol panel.
2. When you have highlighted the appropriate letter, number, or symbol, press OK onthe control panel to select it.The selection appears on the color display.
TIP: To erase a letter, number, or symbol, select Clear on the visualkeyboard, and then press OK.
3. When you are finished entering text, numbers, or symbols, select Done on thevisual keyboard, and then press OK.
Text and symbols 29

Available symbols for dialing fax numbers (some models only)To enter a symbol, such as *, press Symbols repeatedly to scroll through the list ofsymbols. The following table provides the symbols that you can use in a fax or phonenumber sequence, fax header information, and speed-dial entries.
Availablesymbols
Description Available when entering
* Displays an asterisk symbol whenrequired for dialing.
Fax header name, speed-dialnames, speed-dial numbers, fax orphone numbers, and monitor dialentries
- When auto-dialing, the device enters apause in the number sequence.
Fax header name, fax headernumber, speed-dial names, speed-dial numbers, and fax or phonenumbers
( ) Displays a left or right parenthesis toseparate numbers, such as area codes,for easier reading. These symbols donot affect dialing.
Fax header name, fax headernumber, speed-dial names, speed-dial numbers, and fax or phonenumbers
W When auto-dialing, W causes the deviceto wait for a dial tone before continuingto dial.
Speed-dial numbers and fax orphone numbers
R During auto-dialing, the R functions thesame as a Flash button on yourtelephone.
Speed-dial numbers and fax orphone numbers
+ Displays a plus symbol. This symboldoes not affect dialing.
Fax header name, fax headernumber, speed-dial names, speed-dial numbers, and fax or phonenumbers
Load the originalsYou can load an original for a copy, fax, or scan job in the automatic document feederor on the scanner glass. Originals that are loaded in the automatic document feederare automatically fed into the device.
Load an original in the automatic document feeder (ADF)You can copy, scan, or fax a one-sided or two-sided, single- or multiple-page, A4- orletter-size document by placing it in the document feeder tray.
CAUTION: Do not load photos in the ADF; this might cause damage to yourphotos.
NOTE: Two-sided legal-size documents cannot be scanned, copied, or faxedusing the ADF. Some features, such as the Fit to Page copy feature, do not workwhen you load your originals in the ADF. You must load your originals on the glass.
The document feeder tray holds a maximum of 50 sheets of plain paper.
Chapter 3
30 Use the all-in-one

To load an original in the document feeder tray1. Load your original, with the print side up, into the document feeder tray. Place the
pages so that the top edge of the document goes in first. Slide the media into theautomatic document feeder until you hear a beep or see a message on the displayindicating that the loaded pages were detected.
TIP: For more help on loading originals in the automatic document feeder,refer to the diagram engraved in the document feeder tray.
2. Slide the width guides inward until they stop at the left and right edges of the media.
NOTE: Remove all originals from the document feeder tray before lifting the lid onthe device.
Load an original on the scanner glassYou can copy, scan, or fax up to letter- or A4-size originals by loading them on theglass. Some models support legal-size originals on the glass. If your original containsmultiple full-size pages, load it in the automatic document feeder. If your model doesnot support legal-size originals on the glass, load legal-size originals in the automaticdocument feeder.
NOTE: Many of the special features will not work correctly if the glass and lidbacking are not clean. For more information, see Clean the device.
To load an original on the scanner glass1. Remove all originals from the document feeder tray, and then lift the lid.2. Load your original print side down in the right front corner of the glass.
TIP: For more help on loading an original, refer to the engraved guides alongthe edge of the glass.
Load the originals 31

3. Close the lid.
Select print mediaThe device is designed to work well with most types of office media. It is best to test avariety of print media types before buying large quantities. Use HP media for optimumprint quality. Visit the HP Web site at www.hp.com for more information about HPmedia.
Tips for selecting and using print mediaFor the best results, observe the following guidelines.
• Always use media that conforms to the device specifications. For moreinformation, see Understand specifications for supported media.
• Load only one type of media at a time into a tray.• For Tray 1 and Tray 2, load media print-side down and aligned against the right
and back edges of the tray. Tray 2 is available with some models. For moreinformation, see Load media.
• Tray 2 is designed to hold only plain paper.• Do not overload the trays. For more information, see Understand specifications for
supported media.• To prevent jams, poor print quality, and other printing problems, avoid the following
media:• Multipart forms• Media that is damaged, curled, or wrinkled• Media with cutouts or perforations• Media that is heavily textured, embossed, or does not accept ink well• Media that is too lightweight or stretches easily
Cards and envelopes• Avoid envelopes that have a very slick finish, self-stick adhesives, clasps, or
windows. Also avoid cards and envelopes with thick, irregular, or curled edges, orareas that are wrinkled, torn, or otherwise damaged.
• Use tightly constructed envelopes, and make sure the folds are sharply creased.• Load envelopes with the flaps facing up.
Chapter 3
32 Use the all-in-one

Photo media• Use the Best mode to print photographs. Note that in this mode, printing takes
longer and more memory is required from your computer.• Remove each sheet as it prints and set it aside to dry. Allowing wet media to stack
up may cause smearing.
Transparencies• Insert transparencies with the rough side down and the adhesive strip pointing
towards the back of the device.• Use the Normal mode to print transparencies. This mode provides longer drying
time and ensures that the ink dries completely before the next page is delivered tothe output tray.
• Remove each sheet as it prints and set it aside to dry. Allowing wet media to stackup may cause smearing.
Custom-sized media• Use only custom-sized media that is supported by the device.• If your application supports custom-sized media, set the media size in the
application before printing the document. If not, set the size in the print driver. Youmight need to reformat existing documents to print them correctly on custom-sizedmedia.
Understand specifications for supported mediaUse the Understand supported sizes and Understand supported media types andweights tables to determine the correct media to use with your device, and determinewhat features will work with your media.
• Understand supported sizes• Understand supported media types and weights
Understand supported sizes
NOTE: Tray 2 and the duplexer are available with some models.
Media size Tray 1 Tray 2 Duplexer ADF
Standard media sizes
U.S. Letter (216 x 279 mm; 8.5 x11 inches)
8.5 x 13 inches (216 x 330 mm)*
U.S. Legal (216 x 356 mm; 8.5 x14 inches)
A4 (210 x 297 mm; 8.3 x 11.7inches)
U.S. Executive (184 x 267 mm;7.25 x 10.5 inches)
Select print media 33

Media size Tray 1 Tray 2 Duplexer ADF
U.S. Statement (140 x 216 mm;5.5 x 8.5 inches)
B5 (182 x 257 mm; 7.17 x 10.12inches)
A5 (148 x 210 mm; 5.8 x 8.3inches)
6 x 8 inches*
Borderless A4 (210 x 297 mm;8.3 x 11.7 inches)*
Borderless A5 (148 x 210 mm;5.8 x 8.3 inches)*
Borderless B5 (182 x 257 mm;7.17 x 10.12 inches)*
Envelopes
U.S. #10 Envelope (105 x 241mm; 4.12 x 9.5 inches)*
Monarch Envelope (98 x 191 mm;3.88 x 7.5 inches)*
HP Greeting Card Envelope (111x 152 mm; 4.38 x 6 inches)*
A2 Envelope (111 x 146 mm;4.37 x 5.75 inches)*
DL Envelope (110 x 220 mm; 4.3x 8.7 inches)*
C5 Envelope (162 x 229 mm; 6.4x 9 inches)*
C6 Envelope (114 x 162 mm; 4.5x 6.4 inches)*
Japanese Envelope Chou #3(120 x 235 mm; 4.7 x 9.3 inches)*
Japanese Envelope Chou #4 (90x 205 mm; 3.5 x 8.1 inches)*
Cards
Index card (76.2 x 127 mm; 3 x 5inches)*
Index card (102 x 152 mm; 4 x 6inches)*
Index card (127 x 203 mm; 5 x 8inches)*
A6 card (105 x 148.5 mm; 4.13 x5.83 inches)*
Chapter 3(continued)
34 Use the all-in-one

Media size Tray 1 Tray 2 Duplexer ADF
Borderless A6 card (105 x 148.5mm; 4.13 x 5.83 inches)*
Hagaki** (100 x 148 mm; 3.9 x5.8 inches)*
Photo media
Photo media (76.2 x 127 mm; 3 x5 inches)*
Photo media (102 x 152 mm; 4 x6 inches)*
Photo media (5 x 7 inches)*
Photo media (8 x 10 inches)*
Photo media (10 x 15 cm)*
Photo L (89 x 127 mm; 3.5 x 5inches)*
Borderless photo media (102 x152 mm; 4 x 6 inches)*
Borderless photo media (5 x 7inches)*
Borderless photo media (8 x 10inches)*
Borderless photo media (8.5 x 11inches)*
Borderless photo media (10 x 15cm)*
Borderless Photo L (89 x 127mm; 3.5 x 5 inches)*
Other media
Custom-sized media between76.2 to 216 mm wide and 127 to356 mm long (3 to 8.5 incheswide and 5 to 14 inches long) *
Custom-sized media (ADF)between 127 to 216 mm wide and241 to 305 mm long (5 to 8.5inches wide and 9.5 to 12 incheslong)
Panorama (4 x 10 inches, 4 x 11inches, and 4 x 12 inches) *
Borderless panorama (4 x 10inches, 4 x 11 inches, and 4 x 12inches) *
(continued)
Select print media 35

* Not compatible for use with the ADF for single- or double- sided printing
** The device is compatible with plain and inkjet hagaki from Japan Post only. It is notcompatible with photo hagaki from Japan Post.
Understand supported media types and weights
NOTE: Tray 2 and the duplexer are available with some models.
Tray Type Weight Capacity
Tray 1 Paper 60 to 105 g/m2
(16 to 28 lb bond)Up to 250 sheets ofplain paper(25 mm or 1 inchstacked)
Transparencies Up to 70 sheets(17 mm or 0.67 inchstacked)
Photo media 280 g/m2
(75 lb bond)Up to 100 sheets(17 mm or 0.67 inchstacked)
Labels Up to 100 sheets(17 mm or 0.67 inchstacked)
Envelopes 75 to 90 g/m2
(20 to 24 lb bondenvelope)
Up to 30 sheets(17 mm or 0.67 inchstacked)
Cards Up to 200 g/m2
(110 lb index)Up to 80 cards
Tray 2 Plain paper only 60 to 105 g/m2
(16 to 28 lb bond)Up to 350 sheets ofplain paper(35 mm or 1.38 inchstacked)
Duplexer Paper 60 to 105 g/m2
(16 to 28 lb bond)Not applicable
Output-bin All supported media Up to 150 sheets ofplain paper (textprinting)
Chapter 3
36 Use the all-in-one

Set minimum marginsThe document margins must match (or exceed) these margin settings in portraitorientation.
Media (1) Leftmargin
(2) Rightmargin
(3) Topmargin
(4) Bottommargin*
U.S. LetterU.S. LegalA4U.S. ExecutiveU.S. Statement8.5 x 13 inchB5A5CardsCustom-sized mediaPhoto media
3.3 mm (0.13inch)
3.3 mm (0.13inch)
3.3 mm (0.13inch)
3.3 mm (0.13inch)
Envelopes 3.3 mm (0.13inch)
3.3 mm (0.13inch)
16.5 mm(0.65 inch)
16.5 mm(0.65 inch)
* To achieve this margin setting on a computer running Windows, click the Advancedtab in the print driver, and select Minimize Margins.
NOTE: If you are using the duplexer (available with some models), the minimumtop and bottom margins must match or exceed 12 mm (0.47 inch).
Load mediaThis section provides instructions for loading media into the device.
NOTE: Tray 2 is available with some models. For ordering information, see Orderprinting supplies online.
Load media 37

To load Tray 1 (main tray)1. Lift the output tray.
2. Insert the media print-side down along the right of the tray. Make sure the stack ofmedia aligns with the right and back edges of the tray, and does not exceed theline marking in the tray.
NOTE: Do not load paper while the device is printing.
3. Slide the media guides in the tray to adjust them for the media size that you haveloaded, and then lower the output tray.
4. Pull out the extension on the output tray.
Chapter 3
38 Use the all-in-one

To load Tray 21. Pull the tray out of the device by grasping under the front of the tray.
2. Insert the paper print-side down along the right of the tray. Make sure the stack ofpaper aligns with the right and back edges of the tray, and does not exceed theline marking in the tray.
NOTE: Tray 2 can be loaded only with plain paper.
3. Slide the media guides in the tray to adjust them for the size that you have loaded.
Load media 39

4. Gently reinsert the tray.5. Pull out the extension on the output tray.
Configure traysNOTE: Tray 2 is available with some models. For ordering information, see Orderprinting supplies online.
By default, the device draws media from Tray 1. If Tray 1 is empty, the device drawsmedia from Tray 2 (if it is installed and loaded with media). You can change thisdefault behavior by using the following features:• Tray Lock: Use this feature to protect special media such as letterhead or
preprinted media from accidental use. If the device runs out of media while printinga document, it will not use media from a locked tray to complete the print job.
• Default Tray: Use this feature to determine the first tray from which the devicedraws media.
NOTE: To use the tray lock and default tray settings, you must select theautomatic tray selection option in the device software. If the device is on a networkand you set a default tray, the setting will affect all users of the device.
Tray 2 is designed to hold only plain paper.
The following table lists possible ways you can use the tray settings to meet yourprinting needs.
I want to... Follow these steps
Load both trays with the same media, andhave the device pick media from one tray ifthe other one is empty.
• Load media in Tray 1 and Tray 2. Formore information, see Load media.
• Make sure tray lock is disabled.
Have both special media (such astransparencies or letterhead) and plain paperloaded in the trays.
• Load special media in Tray 1 and plainpaper in Tray 2.
• Make sure tray lock is set to Tray 1.
Load media in both trays but have the devicepick media from a specific tray first.
• Load media in Tray 1 and Tray 2.• Make sure default tray is set to the
appropriate tray.
Chapter 3
40 Use the all-in-one

To configure the trays1. Make sure the device is turned on.2. Perform one of the following:
• Embedded Web server: Click the Settings tab and click Paper Handling inthe left panel.
• Print driver (Windows): Click the Printer services button on either theFeatures or Color tab, and then select Paper Handling.
• Toolbox (Windows): Click the Services tab and click Paper Handling.• HP Printer Utility (Mac OS): Click Paper Handling from the Printer Settings
panel.• Control panel: Press the Setup button, select Preferences, and then select
Default Tray or Tray Lock.3. Click OK or Apply after changing the desired tray settings.
Print on special and custom-sized media• To print on special or custom-sized media (Windows)• To print on special or custom-sized media (Mac OS)
To print on special or custom-sized media (Windows)1. Load the appropriate media. For more information, see Load media.2. With a document open, click Print on the File menu, and then click Setup,
Properties, or Preferences.3. Click the Paper/Features tab.4. Select the media size from the Size is drop-down list.
To set a custom media size:a. Click the Custom button.b. Type a name for the new custom size.c. In the Width and Height boxes, type the dimensions, and then click Save.d. Click OK twice to close the properties or preferences dialog box. Open the
dialog box again.e. Select the new custom size.
5. To select the media type:a. Click More in the Type is drop-down list.b. Click the desired media type, and then click OK.
6. Select the media source from the Source is drop-down list.7. Change any other settings, and then click OK.8. Print your document.
To print on special or custom-sized media (Mac OS)1. Load the appropriate media. For more information, see Load media.2. On the File menu, click Page Setup.3. Select the media size.
Print on special and custom-sized media 41

4. To set a custom media size:a. Click Manage Custom Sizes in the Paper Size pull-down menu.b. Click New and type a name for the size in the Paper Size Name box.c. In the Width and Height boxes, type the dimensions and set the margins, if
desired.d. Click Done or OK, and then click Save.
5. On the File menu, click Page Setup, and then select the new custom size.6. Click OK.7. On the File menu, click Print.8. Open the Paper Handling panel.9. Under Destination Paper Size, click the Scale to fit paper size tab, and then
select the customized paper size.10. Change any other desired settings, and then click OK or Print.
Print borderlessBorderless printing lets you print to the edges of certain media types and a range ofstandard media sizes.
NOTE: Open the file in a software application and assign the image size. Makesure the size corresponds to the media size on which you are printing the image.
You can also gain access to this feature from the Printing Shortcuts tab. Openthe printer driver, select the Printing Shortcuts tab, and select the printingshortcut for this print job drop-down list.
To print a borderless document (Windows)1. Load the appropriate media. For more information, see Load media.2. Open the file that you want to print.3. From the application, open the print driver:
a. Click File, and then click Print.b. Click Properties or Setup.
4. Click the Paper/Quality tab.5. Select the media size from the Size is drop-down list.6. Select the Borderless Printing check box.7. Select the media source from the Source is drop-down list.8. Select the media type from the Type is drop-down list.9. If you are printing photos, select Best from the Print Quality drop-down list.
Alternatively, select Maximum dpi, which provides up to 4800 x 1200 optimizeddpi* for optimum print quality.*Up to 4800 x 1200 optimized dpi for color printing and 1200 input dpi. This settingmight temporarily use a large amount of hard disk space (400 MB or more) and willprint more slowly.
10. Change any other print settings, and then click OK.
Chapter 3
42 Use the all-in-one
11. Print the document.12. If you printed on photo media with a tear-off tab, remove the tab to make the
document completely borderless.
To print a borderless document (Mac OS)1. Load the appropriate media. For more information, see Load media.2. Open the file that you want to print.3. Click File, and then click Page Setup.4. Select the borderless media size, and then click OK.5. Click File, and then click Print.6. Open the Paper Type/Quality panel.7. Click the Paper tab, and then select the media type from the Paper type drop-
down list.8. If you are printing photos, select Best from the Quality drop-down list.
Alternatively, select Maximum dpi, which provides up to 4800 x 1200 optimizeddpi*.*Up to 4800 x 1200 optimized dpi for color printing and 1200 input dpi. This settingmight temporarily use a large amount of hard disk space (400 MB or more) and willprint more slowly.
9. Select the media source. If you are printing on thick or photo media, select themanual feed option.
10. Change any other print settings, and then click Print.11. If you printed on photo media with a tear-off tab, remove the tab to make the
document completely borderless.
Set up speed-dial entries (some models only)You can set up frequently used fax numbers and network folders as speed-dialentries. This lets you dial those numbers quickly by using the control panel. The firstfive entries for each of these destinations are associated with the five speed-dialbuttons on the control panel.
Set up fax numbers as speed-dial entries or groupsYou can store fax numbers or groups of fax numbers as speed-dial entries. Speed-dialentries 1 through 5 are associated with the corresponding five speed-dial buttons onthe control panel.
For information about printing a list of the speed-dial entries that are set up, see Printand view a list of speed-dial entries.
Set up speed-dial entries (some models only) 43

To set up speed-dial entries• Embedded Web server (network connection): Open the embedded Web server,
click the Settings tab, and then click Fax Speed-dial in the left pane.• To add an entry: Type the required information in the fields in the Quick Add
Fax Speed-Dial Entry section.• To edit or remove an entry, in the Fax Speed-dial Address Book section,
select the entry and click either the Edit or Delete icon.• Click Apply when you are finished.
• HP Photosmart Software: Open the HP Photosmart Software and follow theinstructions in the onscreen Help.
• HP Device Manager (Mac OS): Launch HP Device Manager, click Informationand Settings, and then select Fax Speed Dial Settings from the drop-down list.
• Control panel: Press Setup, and then select the Speed Dial Setup option.• To add or change an entry: Select Individual Speed Dial or Group Speed
Dial and press the arrow keys to move to an unused entry number, or type anumber on the keypad. Type the fax number, and then press OK. Include anypauses or other required numbers, such as an area code, an access code fornumbers outside a PBX system (usually a 9 or 0), or a long-distance prefix.Type the name, and then press OK.
• To delete one entry or all entries: Select Delete Speed Dial, press the arrowkeys to highlight the speed-dial entry that you want to delete, and then press OK.
To set up a speed-dial groupIf you send information to the same group of fax numbers on a regular basis, you canset up a speed-dial entry for a group in order to simplify the task. The speed-dial entryfor a group can be associated with a speed-dial button on the control panel.
A group member must be a member of the speed-dial list before you can add themember to a speed-dial group. You can add up to 20 fax numbers to each group (withup to 50 characters for each fax number).
• Embedded Web server (network connection): Open the embedded Web server,click the Settings tab, and then click Fax Speed-dial in the left pane. Click the linkthat contains the number for the entry (for example, 26-50) in the Fax Speed-dialAddress Book.• To add a group, in the Fax Speed-dial Address Book, click the New Group
button, and then select the individual entries from the selection. Enter theappropriate group information and click Apply.
• To edit or remove an entry, in the Fax Speed-dial Address Book, select theentry and click either the Edit or Delete icon.
• To delete a group: Select the entries and click theDelete button.• Click Apply when you are finished.
• HP Photosmart Software: Open the HP Photosmart Software and follow theinstructions in the onscreen Help.
Chapter 3
44 Use the all-in-one

• HP Device Manager (Mac OS): Launch HP Device Manager, click Informationand Settings, and then select Fax Speed Dial Settings from the drop-down list.
• Control panel: Press the Setup button, and then select the Speed Dial Setupoption.• To add a group: Select Group Speed Dial, select an unassigned speed-dial
entry, and then press OK. Use the arrow keys to highlight a speed-dial entry,and then press OK to select it (a check mark appears next to the speed-dialentry). Repeat this step to add additional speed-dial entries to this group.When finished, select the Done Selecting option, and then press OK. Use theonscreen keyboard to enter a group speed-dial name, and then select Done.
• To add entries to a group: Select Group Speed Dial, select the group speed-dial entry that you want to change, and then press OK. Use the arrow keys tohighlight a speed-dial entry, and then press OK to select it (a check markappears next to the speed-dial entry). Repeat this step to add additional speed-dial entries to this group. When finished, select the Done Selecting option,and then press OK. Select Done at the Group Name screen.
• To delete an entry from a group: Select Group Speed Dial, select the groupspeed-dial entry that you want to change, and then press OK. Use the arrowkeys to highlight a speed-dial entry, and then press OK to select it (the checkmark is removed from the speed-dial entry). Repeat this step to removeadditional speed-dial entries from this group. When finished, select the DoneSelecting option, and then press OK. Select Done at the Group Name screen.
• To delete a group: Select Delete Speed Dial, press the arrow keys to highlightthe speed-dial entry that you want to delete, and then press OK.
Set up network folders as speed-dial entries (some models)You can store up to ten network folders as speed-dial entries. Five entries areassociated with the corresponding five speed-dial buttons on the control panel. Youcannot set up group speed-dial entries. The Direct Digital Filing Speed-dial allows youto create folders to scan and store digital documents for speed-dial sending. Use theFriendly Name, Network Path, User Name, Password and Optional PIN fields to add anew Direct Digital Filing speed-dial entry.
For information about printing a list of the speed-dial entries that are set up, see Printand view a list of speed-dial entries.
To set up speed-dial entriesEmbedded Web server (network connection): Open the embedded Web server,click the Settings tab, and then click Direct Digital Filing Speed-dial in the left pane.• To add or change an entry: Select an entry in the Direct Digital Filing Speed-dial
Address Book, click the Edit button, make necessary changes, and then clickApply.
• To delete an entry: Select the entry and then click the Delete button.• Click Apply when you are finished.
Set up speed-dial entries (some models only) 45

Print and view a list of speed-dial entriesYou can print or view a list of all of the speed-dial entries that have been set up. Eachentry in the list contains the following information:
• Speed-dial number (the first five entries correspond to the five speed-dial buttonson the control panel)
• Name associated with the fax number or group of fax numbers• For the fax speed-dial list, the fax number (or all of the fax numbers for a group)• For the network folder list, the folder path name
To print a list of speed-dial entriesEmbedded Web server: Select the Settings tab, select Fax Speed-dial from the leftpane, and then print the Fax Speed-dial Address Book page from your browser.
To view a list of speed-dial entries• Embedded Web server (network connection): Open the embedded Web server,
click the Settings tab, and then click Fax Speed-dial in the left pane.• HP Device Manager (Mac OS): Launch HP Device Manager, click Information
and Settings, and then select Fax Speed Dial Settings from the drop-down list.• HP Photosmart Software: Open the HP Photosmart Software and follow the
instructions in the onscreen Help.
Chapter 3
46 Use the all-in-one

4 PrintThis section contains the following topics:
• Change print settings• Print on both sides (duplexing)• Cancel a print job
Change print settingsYou can change print settings (such as paper size or type) from an application or theprinter driver. Changes made from an application take precedence over changesmade from the printer driver. However, after the application is closed, the settingsreturn to the defaults configured in the driver.
NOTE: To set print settings for all print jobs, make the changes in the printerdriver.
For more information about the features of the Windows printer driver, see theonline help for the driver. For more information about printing from a specificapplication, see the documentation that came with the application.
To change settings from an application for current jobs (Windows)1. Open the document that you want to print.2. On the File menu, click Print, and then click Setup, Properties, or Preferences.
(Specific options may vary depending on the application that you are using.)3. Change the settings that you want, and then click OK, Print, or a similar command.
To change default settings for all future jobs (Windows)1. Click Start, point to Settings, and then click Printers or Printers and Faxes.
- Or -Click Start, click Control Panel, and then double-click Printers.
2. Right-click the printer icon, and then click Properties, Document Defaults, orPrinting Preferences.
3. Change the settings that you want, and then click OK.
To change settings (Mac OS)1. On the File menu, click Page Setup.2. Change the settings that you want (such as paper size), and then click OK.3. On the File menu, click Print to open the print driver.4. Change the settings that you want (such as media type), and then click OK or Print.
Print 47

Print on both sides (duplexing)You can print on both sides of a sheet of media, either automatically by using theoptional automatic two-sided printing accessory (duplexer), or manually by turning themedia over and feeding it into the device again.
• Guidelines for printing on both sides of a page• To perform duplexing (Windows)• To perform automatic duplexing (Mac OS)
Guidelines for printing on both sides of a page• Always use media that conforms to the device specifications. For more
information, see Understand specifications for supported media.• Specify duplex options in your application or in the printer driver.• Do not print on both sides of transparencies, envelopes, photo paper, glossy
media, or paper lighter than 16 lb bond (60 g/m2) or heavier than 28 lb bond (105 g/m2). Jams might occur with these media types.
• Several kinds of media require a specific orientation when you print on both sidesof a page, such as letterhead, preprinted paper, and paper with watermarks andprepunched holes. When you print from a computer running Windows, the deviceprints the first side of the media first. When you print from a computer using theMac OS, the device prints the second side first. Load the media with the front sidefacing down.
• For auto-duplexing, when printing finishes on one side of the media, the deviceholds the media and pauses while the ink dries. Once the ink dries, the media ispulled back into the device and the second side is printed. When printing iscomplete, the media is dropped onto the output tray. Do not grab it before printingis complete.
• You can print on both sides of supported custom-sized media by turning the mediaover and feeding it into the device again. For more information, see Understandspecifications for supported media.
To perform duplexing (Windows)1. Load the appropriate media. For more information, see Guidelines for printing on
both sides of a page and Load media.2. Make sure the duplexer is properly installed. For more information, see Install the
duplexer.3. With a document open, click Print on the File menu, and then click Setup,
Properties, or Preferences.4. Click the Features tab.5. Select the Two-sided printing drop-down list. For auto-duplexing, ensure that
Automatic is selected.6. To automatically resize each page to match the document's onscreen layout,
ensure Preserve Layout is selected. Clearing this option might result in unwantedpage breaks.
7. Select or clear the Flip Pages Up check box depending on which way you wantthe binding. See the graphics in the print driver for examples.
Chapter 4
48 Print

8. Choose a booklet layout from the Booklet Layout drop-down list, if you want.9. Change any other settings, and then click OK.10. Print your document.
To perform automatic duplexing (Mac OS)1. Load the appropriate media. For more information, see Guidelines for printing on
both sides of a page and Load media.2. Make sure the duplexer is properly installed. For more information, see Install the
duplexer.3. On the File menu, click Print.4. Open the Two-Sided Printing panel.5. Select the option to print on both sides.6. Select the binding orientation by clicking the appropriate icon.7. Change any other settings, and then click Print.
Cancel a print jobYou can cancel a print job using one of the following methods.
Control panel: Press (Cancel button). This clears the job that the device iscurrently processing. It does not affect jobs waiting to be processed.Windows: Double-click the printer icon that appears in the lower-right corner of thecomputer screen. Select the print job, and then press the Delete key on the keyboard.Mac OS: Double-click the printer in the Printer Setup Utility. Select the print job, clickHold, and then click Delete.
Cancel a print job 49

5 CopyYou can produce high-quality color and grayscale copies on a variety of paper typesand sizes.
This section contains the following topics:
• Make copies from the control panel• Change the copy settings• Crop an original (color display models only)• Cancel a copy job
Make copies from the control panelYou can make quality copies from the control panel.
To make a copy from the control panel1. Make sure you have paper loaded in the input tray.2. Load your original using the scanner glass or the ADF. For more information, see
Load the originals3. Do one of the following:
• Press START COPY Black to start a black-and-white copy job.• Press START COPY Color to start a color copy job.
NOTE: If you have a color original, pressing START COPY Black produces ablack-and-white copy of the color original, while pressing START COPY Colorproduces a full-color copy of the color original.
Change the copy settingsYou can customize the copy settings to handle nearly any task.
When you change copy settings, the changes are for the current copy job only. Youmust set the changes as defaults for the settings to apply to all future copy jobs.
To save the current settings as defaults for future jobs1. Make any necessary changes to the settings in the Copy Menu.2. Press Copy Menu, and then press the arrow keys until Set New Defaults appears.3. Press the arrow keys to select Yes, and then press OK.
Crop an original (color display models only)Before copying an original, you might want to select an area to copy using the Cropsetting from the Copy Menu. Selecting the Crop setting starts a scan and shows apreview of the original on the color display.
Cropping changes the dimensions of the image, thus decreasing its physical size.
50 Copy

TIP: You can resize the cropped image by changing the Reduce/Enlarge setting.Use Fit to Page to make a copy with borders. Enlarging a cropped image mightaffect print quality depending on the resolution of the image.
To crop an image from the control panel1. In the Copy area, press Copy Menu and then select Crop.2. Use the arrow buttons to set the position of the upper-left corner of the crop area.3. Press OK.4. Use the arrow buttons to set the position of the lower-right corner of the crop area.5. Press OK.
The cropped image is displayed on the color graphics display.
Cancel a copy job▲ To stop copying, press Cancel on the control panel.
Cancel a copy job 51

6 ScanYou can scan originals and send them to a variety of destinations, such as a folder onthe network or a program on a computer. You can use the control panel, the HP photoand imaging software, and TWAIN-compliant or WIA-compliant programs on acomputer.
This section contains the following topics:
• Scan an original• Use Webscan via embedded Web server• Scan from a TWAIN-compliant or a WIA-compliant program• Edit a scanned original• Change scan settings• Cancel a scan job
Scan an originalYou can start a scan from a computer or from the control panel. This section explainshow to scan from the control panel only.
NOTE: You can also use the HP Photosmart Software to scan an image,including panorama images. Using this software, you can edit a scanned imageand create special projects using a scanned image. For information about how toscan from the computer, and how to adjust, resize, rotate, crop, and sharpen yourscans, see the onscreen HP Photosmart Software Help that came with yoursoftware.
To use the scan features, your device and computer must be connected and turnedon. The printer software must also be installed and running on your computer prior toscanning. To verify that the printer software is running on a computer runningWindows, look for the device icon in the system tray at the lower-right side of thescreen, near the clock. To verify this on a computer using the Mac OS, open the HPDevice Manager, and click Scan Picture. If a scanner is available, it will launch the HPScanPro application. If it is not available, a message appears to let you know that ascanner was not found.
NOTE: Closing the HP Digital Imaging Monitor icon in your Windows system traycan cause your device to lose some of its scan functionality and result in the NoConnection error message. If this happens, you can restore full functionality byrestarting your computer or by starting the HP Photosmart Software.
Set up Direct Digital Filing (some models only)Direct Digital Filing is a feature that allows you to scan and save a document to afolder and share documents with other people on your network. You can set up DirectDigital Filing speed-dial by using the embedded Web server on your computer.
52 Scan

NOTE: The implementation of Direct Digital Filing requires a basic understandingof networking concepts. Setup of these features should be completed by users withsome networking experience.
To set up a network folder▲ Create a folder on your network. This folder is used to store files that are scanned
by using the Direct Digital Filing feature.
NOTE: Make sure that all of the people using the network folder havepermission to access the folder, including the ability to write and change thecontents of the folder. To change the permissions for folders, see thedocumentation available for your operating system.
To set up a speed-dial entry1. Open a Web browser and type in the IP Address that is assigned to the device. For
example, if the IP address is 123.123.123.123, type the following address into theWeb browser: http://123.123.123.123
NOTE: The printer must be connected to the network. The IP address of thedevice can be obtained from the control panel.
2. Click the Settings tab.3. Under Address Book, click Direct Digital Filing Speed-dial.4. Enter the information for the speed-dial entry, and then modify any scan settings
that you want to change.
NOTE: You can also add a personal identification number (PIN) to helpprevent unauthorized people from using this speed-dial. After the PIN is set,the device control panel prompts for the PIN whenever the speed-dial is used.To disable the PIN, leave the PIN field blank.
5. Click Add. The entry is added to the Direct Digital Filing Speed-dial Address Book.
Scan an original to a network folderYou can scan originals directly into a network folder without any computer-basedsoftware. The shared folder can reside on a file server or on any computer on yournetwork.
Before using this feature, you must set up a folder location in the Direct Digital FilingSpeed-dial address book by using the embedded Web server (EWS) as described in
Scan an original 53

the previous section. For more information, also see Set up network folders as speed-dial entries (some models) or the Getting Started Guide that came with the device.
To send a scan to a network folder1. Load the original on the scanner glass or in the automatic document feeder (ADF).
For more information, see Load the originals.2. Press Digital Filing, and then do one of the following:
• Select a destination from the speed-dial entries on the display.• Select a destination by pressing one of the five speed-dial buttons on the
display.
NOTE: If a PIN has been set up for the speed-dial entry, you must enter yourPIN before continuing.
3. Press START SCAN.
NOTE: The connection might take some time, depending on network traffic andconnection speed.
Scan an original to a program on a computer (direct connection)Use the following steps if your device is directly connected to a computer via a USBcable.
When the scan is complete, the program that you have selected opens and displaysthe document that you have scanned.
To send a scan to a program on a computer from the HP photo and imagingsoftware1. At the computer, open the HP photo and imaging software. For more information,
see Use the HP photo and imaging software.2. See the onscreen Help for further instructions.
To send a scan to a program on a computer from the control panel (directconnect)1. Load the original on the scanner glass or in the ADF. For more information, see
Load the originals.2. Press the Scan Menu or Scan To button.3. Press the arrow keys to select the program that you want to use (such as the HP
photo and imaging software), and then press OK.4. Press START SCAN.
To send a scan to a program on a computer from the control panel (networkconnection)1. Load the original on the scanner glass or in the ADF. For more information, see
Load the originals.2. Press the Scan Menu or Scan To button.3. Select Select Computer.
Chapter 6
54 Scan

4. Select a computer name from the list of available computers, and then press OK.5. Press the arrow keys to select the program that you want to use (such as the HP
photo and imaging software).6. Press OK or START SCAN.
Scan an original to a memory deviceYou can send the scanned image as a JPEG image or a PDF file to the memory cardthat is currently inserted, or to a storage device that is currently attached to the frontUSB port. You also have other scanning options including quality and paper sizesettings.
To scan to a memory device1. Load your original print-side down in the right-front corner of the glass or in the ADF.2. Insert the memory device.3. Press START SCAN.
• The Scan Menu appears, listing various options or destinations. The defaultdestination is whichever one you selected the last time you used this menu.
• If your device is directly connected to your computer, the Scan To menuappears.
4. Press the arrow keys to highlight Memory Device, and then press OK.The device scans the image and saves the file to the memory card or storagedevice.
Use Webscan via embedded Web serverWebscan is a feature of the embedded Web server that lets you scan photos anddocuments from your device to your computer using a Web browser. This feature isavailable even if you did not install the device software on your computer.
▲ Click the Information tab, click Webscan in the left pane, make selections forImage Type and Document Size, and then click Scan or Preview.
For more information on the embedded Web server, see Embedded Web server.
Scan from a TWAIN-compliant or a WIA-compliant programThe device is TWAIN-complaint and WIA-compliant and works with programs thatsupport TWAIN-compliant and WIA-compliant scanning devices. While you are in aTWAIN-compliant or WIA-compliant program, you can gain access to the scanningfeature and scan an image directly into the program.
TWAIN is supported for all Windows and Mac OS operating systems, for both networkconnections and direct connections.
For Windows operating systems, WIA is supported only for Windows XP directconnections. It is not supported for the Mac OS.
Use Webscan via embedded Web server 55

To scan from a TWAIN-compliant programGenerally, a software program is TWAIN-compliant if it has a command such asAcquire, File Acquire, Scan, Import New Object, Insert from, or Scanner. If youare unsure whether the program is compliant or you do not know what the command iscalled, see the software program Help or documentation.
Start the scan from within the TWAIN-compliant program. See the software programHelp or documentation for information about the commands and steps to use.
NOTE: If you start a TWAIN scan while a fax is being received, an error messagewill be displayed and the scan is not performed. Wait until the fax has beenreceived and then restart the scan.
To scan from a WIA-compliant programGenerally, a software program is WIA-compliant if it has a command such as Picture/From Scanner or Camera in the Insert or File menu. If you are unsure whether theprogram is compliant or you do not know what the command is called, see thesoftware program Help or documentation.
Start the scan from within the WIA-compliant program. See the software program Helpor documentation for information about the commands and steps to use.
Edit a scanned originalYou can edit a scanned image using the HP Photosmart Software. You can also edit ascanned document by using your Optical Character Recognition (OCR) software.
Edit a scanned photo or graphicYou can edit a scanned photo or graphic using the HP Photosmart Software. Use thissoftware to adjust the brightness, contrast, color saturation, and more. You can alsorotate the image using the HP Photosmart Software.
For more information, see the onscreen HP Photosmart Software Help.
Edit a scanned document using optical character recognition (OCR) softwareYou can use OCR software to import scanned text into your preferred word-processingprogram for editing. This allows you to edit faxes, letters, newspaper clippings, andmany other documents.
You can specify the word-processing program that you want to use for editing. If theword-processing icon is not present or active, either you do not have word-processingsoftware installed on your computer, or the scanner software did not recognize theprogram during the installation. See the onscreen Help for the HP photo and imagingsoftware for information about how to create a link to the word-processing program.
The OCR software does not support scanning colored text. Colored text is alwaysconverted to black-and-white text before being sent to OCR. Thus, all text in the finaldocument is in black and white, regardless of the original color.
Because of the complexity of some word-processing programs and their interactionwith the device, it is sometimes preferable to scan to Wordpad (a Windows
Chapter 6
56 Scan

accessory), and then cut and paste the text into the preferred word-processingprogram.
Change scan settings
To change scan settings• HP Device Manager (Mac OS): Launch HP Device Manager, click Information
and Settings, and then select Scan Preferences from the drop-down list.• Windows: Open the device software, select Settings, select Scan Settings and
Preferences, then select from the available options and make your selections.
Cancel a scan job▲ Press Cancel on the control panel.
Change scan settings 57

7 Work with memory devices(some models only)The device comes with a memory card reader that can read several types of digitalcamera memory cards. You can use the device to save photos from these memorycards. You can also print a proof sheet, which shows thumbnail views of photos thatare stored on a memory card.
This section contains the following topics:
• Insert a memory card• Connect a digital camera• Connect a storage device• View photos• Print photos from the control panel• Save photos to your computer
Insert a memory cardIf your digital camera uses a memory card to store photos, you can insert the memorycard into the device to print or save your photos.
CAUTION: Attempting to remove a memory card while it is being accessed candamage files on the card. You can safely remove a card only when the photo lightis not blinking. Also, never insert more than one memory card at a time as this canalso damage files on the memory cards.
The device supports the memory cards described below. Each type of memory cardcan only be inserted in the appropriate slot for that card.
1 CompactFlash (types I and II)
2 Secure Digital, MultimediaCard (MMC), Secure MMC
3 xD
4 Memory Stick, MagicGate Memory Stick, Memory Stick Duo, and Memory Stick Pro
58 Work with memory devices (some models only)

5 Front universal serial bus (USB) port (PictBridge-enabled)
To insert a memory card1. Turn the memory card so that the label faces left, and the contacts are facing the
device.2. Insert the memory card into the corresponding memory card slot.
Connect a digital cameraThe PictBridge-enabled front USB port is located beneath the memory card slots.
NOTE: If your USB device does not fit into this port due to size limitations, or ifthe connector on the device is shorter than 11 millimeters, you will need topurchase a USB extension cable in order to use your device with this port.
Camera-selected photos are photos you marked for printing with your digital camera.Depending on your camera, the camera might identify page layout, number of copies,rotation, and other print settings.
(continued)
Connect a digital camera 59

The device supports two industry-standard formats, PictBridge and Digital Print OrderFormat (DPOF) file format 1.1, so you do not have to reselect the photos to print.
• The PictBridge standard saves the print instructions on the camera itself. In orderto print photos using PictBridge, you need to put the camera into PictBridge mode,and then plug the camera into the front USB port of the device with a USB cable.
• The DPOF standard saves the print instructions as a file on your memory card. Inorder to print photos from a DPOF file, you need to remove the memory card fromyour camera and then insert the memory card into the appropriate slot on thedevice.
When you print camera-selected photos, the device print settings do not apply; thePictBridge or DPOF settings for page layout and number of copies override those ofthe device.
NOTE: Not all digital cameras enable you to tag your photos for printing. See thedocumentation that came with your digital camera to see if your camera supportsthe PictBridge standard or DPOF file format 1.1.
To print camera-selected photos using the PictBridge standard1. Connect your digital camera to the front USB port on the device using the USB
cable supplied with your camera.2. Turn on your camera and make sure it is in PictBridge mode.
NOTE: Check your camera documentation to verify how to change the USBmode to PictBridge. Different cameras use different terms to describePictBridge mode. For instance, some cameras have a digital camera settingand a disk drive setting. In this instance, the digital camera setting is thePictBridge mode setting.
To print camera-selected photos using the DPOF standard1. Insert your memory card into the appropriate slot on the device.2. When prompted, do one of the following:
• Press OK to print all DPOF-tagged photos.The device prints all DPOF-tagged photos.
• Press the arrow keys to highlight No, and then press OK.This bypasses DPOF printing.
Chapter 7
60 Work with memory devices (some models only)

Connect a storage deviceYou can connect a storage device such as a keychain drive, portable hard drive, or adigital camera in storage mode to the front USB port. The front USB port is locatedbeneath the memory card slots.
NOTE: Digital cameras that are in storage mode can be attached to the front USBport. The device treats cameras that are in this mode as a normal storage device.Digital cameras in storage mode are referred to as storage devices throughout thissection.
If your USB device does not fit into this port due to size limitations, or if theconnector on the device is shorter than 11 millimeters, you will need to purchase aUSB extension cable in order to use your device with this port. For moreinformation on supported USB devices, see Supported devices.
Check your camera documentation to verify how to change the USB mode tostorage mode. Different cameras use different terms to describe the storage mode.For instance, some cameras have a digital camera setting and a disk drivesetting. In this instance, the disk drive setting is the storage mode setting. Ifstorage mode does not work on your camera, you might need to upgrade thecamera firmware. For more information, see the documentation that came with thecamera.
Once you have connected the storage device, you can do the following with the filesthat are stored on your storage device:
• Transfer the files to your computer• View photos (color display only)• Edit photos using the control panel (color display only)• Print photos
CAUTION: Never attempt to disconnect a storage device while it is beingaccessed. Doing so can damage files on the storage device. You can safelyremove a storage device only when the status light next to the memory card slotsis not blinking.
Connect a storage device 61

View photosYou can view photos on the color display of your device. You can also view photosusing the HP Photosmart Software.
View photos (color display models only)You can view and select photos on the color display of your device.
To view a photo1. Insert the memory card into the appropriate slot on your device, or connect a
storage device to the front USB port.2. Press Photo Menu.
The Photosmart Express menu appears. By default, View & Print is highlighted.3. Press the arrow keys until the photo you want to view appears on the color display.
TIP: You can press and hold down the arrow keys to quickly navigate throughall photos.
View photos using your computerYou can view and edit photos using the HP Photosmart Software that came with yourdevice.
For more information, see the onscreen HP Photosmart Software Help.
Print photos from the control panelThe device enables you to print photos directly from your memory card or storagedevice without first transferring the files to a computer. You can print borderless photos(one per sheet of paper) or you can print multiple photos on a single sheet of paper.
This section contains the following topics:
• Print photos using a proof sheet• Print panoramic photos• Print passport photos• Print video action photos
Print photos using a proof sheetA proof sheet is a simple and convenient way to select photos and make prints directlyfrom a memory card or storage device without a computer. A proof sheet (which mightbe several pages long) shows thumbnail views of the stored photos. The file name,index number, and date appear under each thumbnail.
Chapter 7
62 Work with memory devices (some models only)

Proof sheets are also a quick way to create a printed catalog of your photos.
NOTE: From the device, you can only access JPEG and TIFF image files. Toprint other types of files, transfer the files from your memory card or storage deviceto your computer and use the HP Photosmart Software.
Printing photos from a proof sheet requires three steps:
• Print a proof sheet of the photos on your memory card or storage device• Complete the proof sheet• Scan the proof sheet
To print a proof sheet1. Insert a memory card into the appropriate slot on the device, or connect a storage
device to the front USB port.2. Choose the appropriate display:
For color display modelsa. Press the Photo Menu button, and then select View & Print.
When you press OK, the most recent photo appears on the display.b. Press OK to display the Print Menu.c. Press the arrow keys to select Projects.d. Press the arrow keys to select Proof Sheet.e. Press the arrow keys to select Print Proof Sheet, and then press OK.f. Press the arrow keys to select the appropriate Paper Size and Paper Type.
For two-line display modelsa. Press the Photo Menu button.
A message displays with the number of files found on the card or storagedevice.
b. Press the Proof Sheet button, press the arrow keys to select Print, and thenpress OK.
Print photos from the control panel 63

To complete a proof sheet1. Select the photos to print by using a dark pen or pencil to fill in the circles located
under the thumbnail images on the proof sheet. If you want to print more than onecopy of a photo, fill in the second or third circle. You can print up to three copies ofeach selected photo.
TIP: If you want to print all the photos on the memory card, fill in the SelectAll Photos circle below the layout options in step 2 of the proof sheet. Onecopy of each photo prints.
2. Select one layout style by filling in a circle in step 2 of the proof sheet.
NOTE: If you need more control over print settings than the proof sheetprovides, you can print photos directly from the control panel.
3. (Optional) If you want to print a date/time stamp on your photos, fill in the DateStamp circle below the layout options in step 2 of the proof sheet.
To scan a completed proof sheet1. Load the proof sheet print-side down on the right-front corner of the glass. Make
sure the sides of the proof sheet touch the right and front edges. Close the lid.
2. Make sure the same memory card or storage device you used to print the proofsheet is still inserted in the device when you scan that proof sheet.
3. Make sure you have photo media loaded into the device.
Chapter 7
64 Work with memory devices (some models only)

4. Press the Photo Menu button.5. Choose the appropriate display:
For color display modelsa. Press the arrow keys to select View & Print, and then press OK.b. Press the arrow keys to select Projects, and then select Proof Sheet.c. Press the arrow keys to select Scan Proof Sheet, and then press OK.d. When prompted, select the paper size and paper type, and then press OK.
For two-line display models▲ Press the Proof Sheet button, press the arrow keys to select Scan, and then
press OK.The device scans the proof sheet and prints the selected photos.
Print panoramic photosThe device enables you to select multiple panoramic photos from your memory card orstorage device and print them.
NOTE: The device will not stitch multiple photos together to create a panoramicphoto, you must use another software application, such as HP Photosmart software.
To print a panoramic photo1. Insert a memory card into the appropriate slot on the device, or connect a storage
device to the front USB port.2. Press Photo Menu.
The Photosmart Express menu appears. By default, View & Print is highlighted.3. Press OK to select View & Print.
When you press OK, the most recent photo appears on the display.4. Press the arrow keys to scroll through the photos on your memory card or storage
device.5. When the photo you want to print appears, press OK.
The Print menu appears.6. Press the arrow keys to highlight Projects, and then press OK.
The Projects menu appears.7. Press the arrow keys to highlight Panorama Prints, and then press OK.8. When prompted, load 10 x 30 cm (4 x 12 inch) panorama photo paper in the input
tray, and then press OK.When you press OK, the selected photo reappears.
9. (Optional) Change print settings or select additional photos to print.
To print more than one copy of the selected photoa. Press OK to display the selection menu.b. Press the arrow keys to highlight Number of Copies, and then press OK.c. Press the arrow keys to increase or decrease the number of copies, and then
press OK.
Print photos from the control panel 65

To edit the selected photo before printinga. Press OK to display the selection menu.b. Press the arrow keys to highlight Edit, and then press OK.
To select additional photos for printinga. Press the arrow keys to scroll through the photos on your memory card or
storage device.b. When the photo you want to print appears, press OK.c. Press OK to select Select to Print.d. Repeat these steps for each photo you want to print.
10. When you are done changing print settings and selecting photos, press OK todisplay the selection menu.
11. Press the arrow keys to highlight Done Selecting, and then press OK.The Print Summary screen appears.
12. Press the arrow keys to highlight one of the following options, and then press OK.
Print Options Enables you to manually specify the type of paper on which you areprinting and whether you want to print a date and time stamp on yourphoto.By default, the Date Stamp setting is set to Off. If you want, you canchange the default of this setting with the Set New Defaults option.
Print Preview(color display only)
Displays a preview of what your printed page will look like. Thisenables you to verify your settings before printing and wasting paperand ink on potential mistakes.
Print Now Prints your photos with the size and layout you selected.
Print passport photosYou can print your own passport-size photos from your memory card or storagedevice. If you have questions on guidelines or restrictions for passport photos, contacta local passport service agency.
To print passport photos1. Insert a memory card into the appropriate slot on the device, or connect a storage
device to the front USB port.The Photosmart Express menu appears. By default, View & Print is highlighted.
2. Press OK to select View & Print.When you press OK, the most recent photo appears on the display.
3. Press the arrow keys to scroll through the photos on your memory card or storagedevice.
4. When the photo you want to print appears, press OK.The Print menu appears.
5. Press the arrow keys to highlight Projects, and then press OK.The Projects menu appears.
6. Press the arrow keys to highlight Passport Photos, and then press OK.
Chapter 7
66 Work with memory devices (some models only)

7. Press the arrow keys to highlight the size you want to print, and then press OK.When you press OK, the selected photo reappears.
8. (Optional) Change print settings or select additional photos to print.
To print more than one copy of the selected photoa. Press OK to display the selection menu.b. Press the arrow keys to highlight Number of Copies, and then press OK.c. Press the arrow keys to increase or decrease the number of copies, and then
press OK.
To edit the selected photo before printinga. Press OK to display the selection menu.b. Press the arrow keys to highlight Edit, and then press OK.
To select additional photos for printinga. Press the arrow keys to scroll through the photos on your memory card or
storage device.b. When the photo you want to print appears, press OK.c. Press OK to select Select to Print.d. Repeat these steps for each photo you want to print.
9. When you are done changing print settings and selecting photos, press OK todisplay the selection menu.
10. Press the arrow keys to highlight Done Selecting, and then press OK.The Print Summary screen appears.
11. Press the arrow keys to highlight one of the following options, and then press OK.
Print Options Enables you to manually specify the type of paper on which you areprinting and whether you want to print a date and time stamp on yourphoto.By default, the Paper Type is set to Plain and the Date Stampsetting is set to Off. If you want, you can change the defaults of thesesettings with the Set New Defaults option.
Print Preview(color display only)
Displays a preview of what your printed page will look like. Thisenables you to verify your settings before printing and wasting paperand ink on potential mistakes.
Print Now Prints your photos with the size and layout you selected.
Print video action photosYou can use the Video Action Prints option to print a sequence of photos from avideo file on a memory card or a storage device. This option prints nine frames of a
Print photos from the control panel 67

video on one sheet of paper in the order that they appear in the video. The videoframes are automatically selected by your device.
To create video action prints1. Insert a memory card into the appropriate slot on the device, or connect a storage
device to the front USB port.The Photosmart Express menu appears. By default, View & Print is highlighted.
2. Press OK to select View & Print.When you press OK, the most recent photo appears on the display.
3. Press the arrow keys to scroll through the photos and videos on your memory cardor storage device.
4. When the video you want to print appears, press OK.The Print menu appears.
5. Press the arrow keys to highlight Projects, and then press OK.The Projects menu appears.
6. Press the arrow keys to highlight Video Action Prints, and then press OK.7. Press the arrow keys to highlight the size you want to print, and then press OK.8. Press the arrow keys to highlight the type of paper you are printing on, and then
press OK.9. The video reappears, press OK to continue.10. (Optional) Edit the video or print the video.
To edit the selected photo before printinga. Press OK to display the selection menu.b. Press the arrow keys to highlight Edit, and then press OK.
To print now▲ Select Print Now, press OK.
Save photos to your computerAfter you take photos with your digital camera, you can print them immediately or savethem to your computer. To save the photos to your computer, remove the memorycard from your digital camera and insert it in the appropriate memory card slot on thedevice.
You can also save photos from a storage device (such as a digital camera or keychaindrive) by plugging the device into the front USB port on the device.
Chapter 7
68 Work with memory devices (some models only)

To save photos1. Insert a memory card into the appropriate slot on the device, or connect a storage
device to the front USB port.2. Press Photo Menu.3. Choose the appropriate display:
For color display modelsa. Press the arrow keys and select Save.b. Press the arrow keys and select Transfer to computer, and then select the
name of your computer.c. Follow the onscreen prompts on your computer to save the photos to your
computer.
For two-line display modelsa. Press the arrow keys and select Photo Transfer, and then press OK.b. Press the arrow keys and select Yes.c. Press the arrow keys and select Transfer to computer, and then select the
name of your computer.d. Follow the onscreen prompts on your computer to save the photos to your
computer.
Save photos to your computer 69

8 Fax (some models only)You can use the device to send and receive faxes, including color faxes. You canschedule faxes to be sent at a later time and set up speed-dials to send faxes quicklyand easily to frequently used numbers. From the control panel, you can also set anumber of fax options, such as resolution and the contrast between lightness anddarkness on the faxes you send.
If the device is directly connected to a computer, you can use the HP photo andimaging software to perform fax procedures that are not available from the controlpanel. For more information about using the HP photo and imaging software, see Usethe HP photo and imaging software.
NOTE: Before you begin faxing, make sure you have set up the device properlyfor faxing. You might have already done this as part of the initial setup, by usingeither the control panel or the software that came with the device. You can verifythe fax is set up correctly by running the fax setup test from the control panel. Torun the fax test, press Setup, select Tools, select Run fax test, and then press OK.
This section contains the following topics:
• Send a fax• Receive a fax• Change fax settings• Fax over the Internet• Test fax setup• Use reports• Cancel a fax
Send a faxYou can send a fax in a variety of ways. Using the control panel, you can send a black-and-white or color fax. You can also send a fax manually from an attached phone.This allows you to speak with the recipient before sending the fax.
Send a basic faxYou can easily send a single- or multiple-page black-and-white fax by using the controlpanel.
NOTE: If you need printed confirmation that your faxes were successfully sent,enable fax confirmation before sending any faxes.
TIP: You can also send a fax manually from a phone or by using monitor dialing.These features allow you to control the pace of your dialing. They are also usefulwhen you want to use a calling card to charge the call and you have to respond totone prompts while dialing.
70 Fax (some models only)

To send a basic fax from the control panel1. Load your originals. For additional information, see Load media.
NOTE: If you are sending a multiple-page fax, you must load the originals inthe document feeder tray. You cannot fax a multiple-page document from theglass.
2. Enter the fax number by using the keypad, press Speed Dial or a one-touch speeddial button to select a speed dial, or press Redial/Pause to redial the last numberdialed.
TIP: To add a pause in the fax number you are entering, press Redial/Pause,or press the Symbols (*) button repeatedly, until a dash (-) appears on thedisplay.
3. Press START FAX Black or START FAX Color.• If the device detects an original loaded in the automatic document feeder,
it sends the document to the number you entered.• If the device does not detect an original loaded in the automatic
document feeder, the Fax from glass? prompt appears. Make sure youroriginal is loaded print-side down on the glass, and then select Yes.
TIP: If the recipient reports issues with the quality of the fax you sent, you cantry changing the resolution or contrast of your fax.
Send a fax manually from a phoneYou can send a fax from a telephone on the same phone line if you prefer to use thekeypad on your phone, instead of the keypad on the control panel of the device. Youcan do this by plugging in a phone into the 2–EXT port on the back of the device.When you send a fax manually, you can hear the dial tones, telephone prompts, orother sounds through the handset on your telephone. This makes it easy for you touse a calling card to send your fax.Depending on how the recipient has their fax machine set up, the recipient mightanswer the phone, or the fax machine might take the call. If a person answers thephone, you can speak with the recipient before sending the fax. If a fax machineanswers the call, you can send the fax directly to the fax machine when you hear thefax tones from the receiving fax machine.
To send a fax manually from a phone1. Load your originals. For additional information, see Load media.
NOTE: This feature is not supported if you load your originals on the glass.You must load your originals in the document feeder tray.
2. Dial the number by using the keypad on the phone that is connected to the device.
NOTE: Do not use the keypad on the control panel of the device whenmanually sending a fax. You must use the keypad on your phone to dial therecipient's number.
Send a fax 71

3. If the recipient answers the telephone, you can engage in a conversation beforesending your fax.
NOTE: If a fax machine answers the call, you will hear fax tones from thereceiving fax machine. Proceed to the next step to transmit the fax.
4. When you are ready to send the fax, press START FAX Black or START FAXColor.
NOTE: If prompted, select Send Fax, and then press START FAX Black orSTART FAX Color again.
If you were speaking with the recipient before sending the fax, inform the recipientthat they should press Start on their fax machine after they hear fax tones.The telephone line is silent while the fax is transmitting. At this point, you can hangup the telephone. If you want to continue speaking with the recipient, remain onthe line until the fax transmission is complete.
Send a fax using monitor dialingMonitor dialing allows you to dial a number from the control panel as you would dial aregular telephone. When you send a fax using monitor dialing, you can hear the dialtones, telephone prompts, or other sounds through the speakers on the device. Thisenables you to respond to prompts while dialing, as well as control the pace of yourdialing.
TIP: If you do not enter your calling card PIN fast enough, the device might startsending fax tones too soon and cause your PIN not to be recognized by the callingcard service. If this is the case, you can create a speed dial entry to store the PINfor your calling card.
NOTE: Make sure the volume is turned on, or you will not hear a dial tone.
To send a fax using monitor dialing from the control panel1. Load your originals. For additional information, see Load media.
NOTE: If you are sending a multiple-page fax, you must load the originalsprint-side up in the document feeder tray. You cannot fax a multiple-pagedocument from the glass. For additional information, see Load media.
2. Press START FAX Black or START FAX Color.• If the device detects an original loaded in the automatic document feeder,
you will hear a dial tone.• If the device does not detect an original loaded in the automatic
document feeder, the Fax from glass? prompt appears. Make sure that youroriginal is loaded on the glass, and then select Yes.
Chapter 8
72 Fax (some models only)

3. When you hear the dial tone, enter the number by using the keypad on the controlpanel.
4. Follow any prompts that might occur.
TIP: If you are using a calling card to send a fax and you have your callingcard PIN stored as a speed dial, when prompted to enter your PIN, pressSpeed Dial or a one-touch speed dial button to select the speed dial entrywhere you have your PIN stored.
Your fax is sent when the receiving fax machine answers.
Send a fax using the broadcast fax option (color display models only)You can send a fax to multiple recipients without first setting up a group speed dial.
NOTE: The list of recipients you specify for this fax is not saved and only worksfor sending faxes in black. If you intend to send other faxes to the same recipientlist, you should create a group speed dial list. For more information, see Set up faxnumbers as speed-dial entries or groups
To broadcast a fax to multiple recipients from the control panel1. Press Fax Menu and select Broadcast Fax.2. Enter a fax number by using the keypad, or use the arrow keys to access speed
dials.
NOTE: You can add up to 20 individual fax numbers.
3. Press START FAX Black.4. When prompted, load your originals print side up and top first in the center of the
document feeder tray. For additional information, see Load media.5. Press START FAX Black again.
Receive a faxYou can receive faxes automatically or manually. If you turn off the Auto Answeroption, you must receive faxes manually. If you turn on the Auto Answer option (thedefault setting), the device automatically answers incoming calls and receives faxesafter the number of rings that are specified by the Rings to Answer setting. (Thedefault Rings to Answer setting is five rings.)
If you receive a legal-size fax and the device is not currently set to use legal-sizepaper, the device reduces the fax so that it fits on the paper that is loaded. If you havedisabled the Automatic Reduction feature, the device prints the fax on two pages.
Receive a fax manuallyWhen you are on the phone, the person you are speaking with can send you a faxwhile you are still connected. This is referred to as manual faxing. Use the instructionsin this section to receive a manual fax.
Receive a fax 73

You can receive faxes manually from a phone that is:
• Directly connected to the device (on the 2-EXT port)• On the same phone line, but not directly connected to the device
To receive a fax manually1. Make sure the device is turned on and you have paper loaded in the input tray.2. Remove any originals from the document feeder tray.3. Set the Rings to Answer setting to a high number to allow you to answer the
incoming call before the device answers. Or, turn off the Auto Answer setting sothat the device does not automatically answer incoming calls.
4. If you are currently on the phone with the sender, instruct the sender to press Starton their fax machine.
5. When you hear fax tones from a sending fax machine, do the following:a. Press START FAX Black or START FAX Color on the control panel.b. When prompted, select Fax Receive.c. After the device begins to receive the fax, you can hang up the phone or
remain on the line. The phone line is silent during fax transmission.
Set up backup fax receptionDepending on your preference and security requirements, you can set up the device tostore all the faxes it receives, only the faxes it receives while the device is in an errorcondition, or none of the faxes it receives.
The following Backup Fax Reception modes are available:
On The default setting. When Backup Fax Reception is On, the devicestores all received faxes in memory. This enables you to reprint up toeight of the most recently printed faxes if they are still saved in memory.
NOTE: When device memory is low, it overwrites the oldest, printedfaxes as it receives new faxes. If the memory becomes full of unprintedfaxes, the device stops answering incoming fax calls.
NOTE: If you receive a fax that is too large, such as a very detailedcolor photo, it might not be stored in memory due to memory limitations.
On Error Only Causes the device to store faxes in memory only if an error conditionexists that prevents the device from printing the faxes (for example, if thedevice runs out of paper). The device continues to store incoming faxesas long as there is memory available. (If the memory becomes full, thedevice stops answering incoming fax calls.) When the error condition isresolved, the faxes stored in memory print automatically, and then theyare deleted from memory.
Off Faxes are never stored in memory. For example, you might want to turnoff Backup Fax Reception for security purposes. If an error conditionoccurs that prevents the device from printing (for example, the deviceruns out of paper), the device stops answering incoming fax calls.
Chapter 8
74 Fax (some models only)

NOTE: If Backup Fax Reception is enabled and you turn off the device, all faxesstored in memory are deleted, including any unprinted faxes that you might havereceived while the device was in an error condition. You must contact the sendersto ask them to resend any unprinted faxes. For a list of the faxes you havereceived, print the Fax Log. The Fax Log is not deleted when the device is turnedoff.
To set backup fax reception from the control panel1. Press Setup.2. Select Advance Fax Setup, and then select Backup Fax Reception.3. Press the right arrow button to select On, On Error Only, or Off.4. Press OK.
To set backup fax reception via the embedded Web server▲ Select the Settings tab, select Fax from the left pane, select the Advanced sub-
tab, and then select On in the Backup Fax Reception drop-down menu.
Reprint received faxes from memoryIf you set the Backup Fax Reception mode to On, the received faxes are stored inmemory, whether the device has an error condition or not.
NOTE: After the memory becomes full, the oldest, printed faxes are overwrittenas new faxes are received. If all the stored faxes are unprinted, the device doesnot receive any fax calls until you print or delete the faxes from memory. You mightalso want to delete the faxes in memory for security or privacy purposes.
Depending on the sizes of the faxes in memory, you can reprint up to eight of the mostrecently printed faxes, if they are still in memory. For example, you might need toreprint your faxes if you lost the copy of your last printout.
To reprint faxes in memory from the control panel1. Make sure you have paper loaded in the input tray.2. Press Setup.3. Select Tools, and then select Reprint Faxes in Memory.
The faxes are printed in the reverse order from which they were received with themost recently received fax printed first, and so on.
4. If you want to stop reprinting the faxes in memory, press Cancel.
To delete all the faxes in memory from the control panel▲ Depending on the model you have, do one of the following:
• Two–line display: Turn off the device by pressing the Power button.All faxes stored in memory are deleted from memory when you turn off thepower.
• Color display: Press Setup, select Tools, and then select Clear Fax Log.
Receive a fax 75

To clear fax logs via the embedded Web server▲ Select the Settings tab, select Fax from the left pane, select the Options sub-tab,
and then click the Clear button under the Clear Fax Logs heading.
Forward faxes to another numberYou can set up the device to forward your faxes to another fax number. A receivedcolor fax is forwarded in black and white.
HP recommends that you verify the number you are forwarding to is a working fax line.Send a test fax to make sure the fax machine is able to receive your forwarded faxes.
To forward faxes from the control panel1. Press Setup.2. Select Advance Fax Setup, and then select Fax Forwarding Black Only.3. Press the right arrow button until On-Forward or On-Print & Forward appears,
and then press OK.• Choose On-Forward if you want to forward the fax to another number without
printing a backup copy on the device.
NOTE: If the device is not able to forward the fax to the designated faxmachine (for example, if it is not turned on), the device prints the fax. If youset up the device to print error reports for received faxes, it will also print anerror report.
• Choose On-Print & Forward to print a backup copy of your received fax whileforwarding the fax to another number.
4. At the prompt, enter the number of the fax machine that will receive the forwardedfaxes.
5. At the prompt, enter a start time and date and a stop time and date.6. Press OK.
Fax Forwarding appears on the control-panel display.If the device loses power when Fax Forwarding is set up, it saves the FaxForwarding setting and phone number. When power is restored to the device, theFax Forwarding setting is still On.
NOTE: You can cancel fax forwarding by pressing Cancel on the controlpanel when the Fax Forwarding message is visible on the display, or you canselect Off from the Fax Forwarding Black Only menu.
To forward faxes using the embedded Web server1. Click the Settings tab, click Fax in the left pane, and then click the Options sub-
tab.2. Select On — Print and Forward or On — Forward from the Fax Forwarding
drop-down menu.3. Type a Fax Forward Number in the box, and then click Apply.
Chapter 8
76 Fax (some models only)

Block junk fax numbersIf you subscribe to a caller ID service through your phone provider, you can blockspecific fax numbers so the device does not print faxes received from those numbers.When an incoming fax call is received, the device compares the number to the list ofjunk fax numbers to determine if the call should be blocked. If the number matches anumber in the blocked fax numbers list, the fax is not printed. (The maximum numberof fax numbers you can block varies by model.)
NOTE: This feature is not supported in all countries/regions. If it is not supportedin your country/region, Junk Fax Blocker Set Up does not appear in the BasicFax Setup menu.
Set the junk fax modeBy default, Block Junk Fax mode is turned On. If you do not subscribe to a caller IDservice through your phone provider, or do not want to use this feature, you can turnoff this setting.
To set the junk fax mode▲ Some models have a Block Junk Fax button. Depending on the model you have,
do one of the following:• Block Junk Fax button: Press the Junk Fax Blocker button, select the Block
Junk Fax option, and then select On or Off.• Color display menu: Press Setup, select Basic Fax Menu, select Junk Fax
Blocker Setup, select Block Junk Fax, and then select On or Off.
Add numbers to the junk fax listThere are two ways to add a number to your junk list. You can select numbers fromyour caller ID history, or you can enter new numbers. The numbers in your junk list areblocked if Block Junk Fax mode is set to On.
To select a number from the caller ID list1. Press Setup.2. Press Basic Fax Setup, and then press Junk Fax Blocker Setup.3. Press Add number to Junk List, and then press Select Number.4. Press the right arrow button to scroll through the numbers from which you have
received faxes. When the number you want to block appears, press OK to select it.5. When the Select Another? prompt appears, do one of the following:
• If you want to add another number to the list of junk fax numbers, pressYes, and then repeat step 4 for each number you want to block.
• If you are done, press No.
To manually enter a number to block1. Press Setup.2. Press Basic Fax Setup, and then press Junk Fax Blocker Setup.3. Press Add number to Junk List, and then press Enter Number.
Receive a fax 77

4. Use the keypad to enter a fax number to block, and then press OK.Make sure you enter the fax number as it appears on the control-panel display,and not the fax number that appears on the fax header of the received fax, asthese numbers can be different.
5. When the Enter Another? prompt appears, do one of the following:• If you want to add another number to the list of junk fax numbers, press
Yes, and then repeat step 4 for each number you want to block.• If you are done, press No.
To enter numbers to block via the embedded Web server▲ Select the Settings tab, select Fax from the left pane, select the Blocked Fax sub-
tab, and then enter numbers to block in the Fax Number fields. Click the Applybutton.
Remove numbers from the junk fax listIf you no longer want to block a fax number, you can remove a number from your junkfax list.
To remove numbers from the list of junk fax numbers1. Press Setup.2. Press Basic Fax Setup, and then press Junk Fax Blocker Setup.3. Press Remove Number from Junk List.4. Press the right arrow button to scroll through the numbers you have blocked.
When the number you want to remove appears, press OK to select it.5. When the Delete Another? prompt appears, do one of the following:
• If you want to remove another number from the list of junk fax numbers,press Yes, and then repeat step 4 for each number you want to block.
• If you are done, press No.
To remove numbers from the list of junk fax numbers via the embedded Webserver▲ Open the embedded Web server. For more information, see To open the
embedded Web server. Click the Settings tab, select Fax from the left pane, clickthe Junk Fax Blocker sub-tab, add or remove numbers to block in the FaxNumber fields, and then click Apply.
View a list of blocked fax numbersYou can view a list of blocked fax numbers only from the embedded Web server,which requires a network connection.
To view a list of blocked numbers via the embedded Web server▲ Open the embedded Web server. For more information, see To open the
embedded Web server. Click the Settings tab, select Fax from the left pane, andthen click the Junk Fax Blocker sub-tab.
Chapter 8
78 Fax (some models only)

Change fax settingsAfter completing the steps in the getting started guide that came with the device, usethe following steps to change the initial settings or to configure other options for faxing.
Configure the fax headerThe fax header prints your name and fax number on the top of every fax you send. HPrecommends that you set up the fax header by using the software that you installedwith the device. You can also set up the fax header from the control panel, asdescribed here.
NOTE: In some countries/regions, the fax header information is a legalrequirement.
To set or change the fax header1. Press Setup.2. Press Basic Fax Setup, and then press Fax Header.3. Enter your personal or company name using the numeric keypad, and then press OK.4. Enter your fax number by using the numeric keypad, and then press OK.
To set or change the fax header via the embedded Web server▲ Select the Settings tab, select Fax from the left pane, select the Basic sub-tab,
and then enter the Fax Header Name and Fax Number. Click the Apply button.
Set the answer mode (Auto answer)The answer mode determines whether the device answers incoming calls.• Turn on the Auto Answer setting if you want the device to answer faxes
automatically. The device answers all incoming calls and faxes.• Turn off the Auto Answer setting if you want to receive faxes manually. You must
be available to respond in person to the incoming fax call or the device does notreceive faxes.
To set the answer mode to manual or automatic via the control panel▲ Press Auto Answer to turn the light on or off, as appropriate for your setup.
When the Auto Answer light is on, the device answers calls automatically. Whenthe light is off, the it does not answer calls.
To set the answer mode to manual or automatic via the embedded Web server1. Open the embedded Web server, click the Settings tab, click Fax in the left pane,
and then click the Basic sub-tab.2. Select On or Off in the Auto Answer drop-down menu in the Other Basic Fax
Settings section.
Change fax settings 79

Set the number of rings before answeringIf you turn on the Auto Answer setting, you can specify how many rings occur beforeincoming calls are automatically answered.
The Rings to Answer setting is important if you have an answering machine on thesame phone line as the device, because you want the answering machine to answerthe phone before the device does. The number of rings to answer for the deviceshould be greater than the number of rings to answer for the answering machine.
For example, set your answering machine to a low number of rings and the device toanswer in the maximum number of rings. (The maximum number of rings varies bycountry/region.) In this setup, the answering machine answers the call and the devicemonitors the line. If the device detects fax tones, it receives the fax. If the call is avoice call, the answering machine records the incoming message.
To set the number of rings before answering via the control panel1. Press Setup.2. Press Basic Fax Setup, and then press Rings to Answer.3. Enter the appropriate number of rings by using the keypad, or press the left or right
arrow button to change the number of rings.4. Press OK to accept the setting.
To set the number of rings before answering via the embedded Web server1. Open the embedded Web server, click the Settings tab, click Fax in the left pane
and then click the Basic sub-tab.2. Select a number in the Rings-to-answer drop-down menu in the Other Basic Fax
Settings section.
Change the answer ring pattern for distinctive ringMany phone companies offer a distinctive ring feature that allows you to have severalphone numbers on one phone line. When you subscribe to this service, each numberis assigned a different ring pattern. You can set up the device to answer incoming callsthat have a specific ring pattern.
If you connect the device to a line with distinctive ring, have your telephone companyassign one ring pattern to voice calls and another ring pattern to fax calls. HPrecommends that you request double or triple rings for a fax number. When the devicedetects the specified ring pattern, it answers the call and receives the fax.If you do not have a distinctive ring service, use the default ring pattern, which is AllRings.
To change the answer ring pattern for distinctive ring via the control panel1. Verify that the device is set to answer fax calls automatically.2. Press Setup.3. Press Advance Fax Setup, and then press Distinctive Ring.4. Press the right arrow button to select an option, and then press OK.
When the phone rings with the ring pattern assigned to your fax line, the deviceanswers the call and receives the fax.
Chapter 8
80 Fax (some models only)

To set the answer ring pattern via the embedded Web server▲ Click the Settings tab, click Fax in the left pane, click the Advanced sub-tab,
select a ring pattern in the Distinctive Ring drop-down menu, and then click theApply button.
Set the fax error correction modeTypically, the device monitors the signals on the phone line while it is sending orreceiving a fax. If it detects an error signal during the transmission and the error-correction setting is on, the device can request that a portion of the fax be resent.
Turn off error correction only if you are having trouble sending or receiving a fax, andyou want to accept the errors in the transmission. Turning off the setting might beuseful when you are trying to send a fax to another country/region or receive a faxfrom another country/region, or if you are using a satellite phone connection.
To set the fax error-correction mode• Embedded Web server (network connection): Open the embedded Web server,
click the Settings tab, click Fax in the left pane, click the Advanced tab, select Onor Off in the Error Correction Mode drop-down menu, and then click the Applybutton.
• Control panel: Press Fax Menu, open the Advance Fax Setup menu, and thenuse the Error correction mode option.
Set the dial typeUse this procedure to set tone-dialing or pulse-dialing mode. The factory-set default isTone. Do not change the setting unless you know that your phone line cannot usetone dialing.
NOTE: The pulse-dialing option is not available in all countries/regions.
To set the dial type• Embedded Web server (network connection): Open the embedded Web server,
click the Settings tab, click Fax in the left pane, click the Basic tab, make aselection in the Tone or Pulse Dialing drop-down menu, and then click the Applybutton.
• Control panel: Press Setup, press Basic Fax Setup, and then use the Tone orPulse Dialing option.
Set the redial optionsIf the device was unable to send a fax because the receiving fax machine did notanswer or was busy, the device attempts to redial based on the settings for the busy-redial and no-answer-redial options. Use the following procedure to turn the options onor off.
• Busy redial: If this option is turned on, the device redials automatically if itreceives a busy signal. The factory-set default for this option is ON.
• No answer redial: If this option is turned on, the device redials automatically if thereceiving fax machine does not answer. The factory-set default for this option is OFF.
Change fax settings 81

To set the redial options• Embedded Web server (network connection): Open the embedded Web server,
click the Settings tab, click Fax in the left pane, and then click the Advanced tab.• Control panel: Press Setup, press Advance Fax Setup, and then use the Busy
Redial or No Answer Redial options.
Set the fax speedYou can set the fax speed used to communicate between your device and other faxmachines when sending and receiving faxes. The default fax speed is Fast.If you use one of the following, setting the fax speed to a slower speed might berequired:
• An Internet phone service• A PBX system• Fax over Internet Protocol (FoIP)• An integrated services digital network (ISDN) service
If you experience problems sending and receiving faxes, you might want to try settingthe Fax Speed setting to Medium or Slow. The following table provides the availablefax speed settings.
Fax speed setting Fax speed
Fast v.34 (33600 baud)
Medium v.17 (14400 baud)
Slow v.29 (9600 baud)
To set the fax speed from the control panel1. Press Setup.2. Select Advanced Fax Setup, and then press Fax Speed.3. Select an option using the arrow keys, and then press OK.
Fax over the InternetYou may subscribe to a low cost phone service that allows you to send and receivefaxes with your device by using the Internet. This method is called Fax over InternetProtocol (FoIP). You probably use a FoIP service (provided by your telephonecompany) if you:
• Dial a special access code along with the fax number, or• Have an IP converter box that connects to the Internet and provides analog phone
ports for the fax connection.
NOTE: You can only send and receive faxes by connecting a phone cord to theport labeled "1-LINE" on the device and not from the Ethernet port. This meansthat your connection to the Internet must be done either through a converter box(which supplies regular analog phone jacks for fax connections) or your telephonecompany.
Chapter 8
82 Fax (some models only)
Some Internet faxing services do not work properly when the device is sending andreceiving faxes at high speed (33600bps). If you experience problems sending andreceiving faxes while using an Internet fax service, use a slower fax speed. You cando this by changing the Fax Speed setting from High (the default) to Medium. Forinformation on changing this setting, see Set the fax speed.You should also check with your telephone company to make sure their Internet faxingservice supports faxing.
Test fax setupYou can test your fax setup to check the status of the device and to make sure it is setup properly for faxing. Perform this test after you have completed setting up the devicefor faxing. The test does the following:
• Tests the fax hardware• Verifies the correct type of phone cord is connected to the device• Checks that the phone cord is plugged into the correct port• Checks for a dial tone• Checks for an active phone line• Tests the status of your phone line connectionThe device prints a report with the results of the test. If the test fails, review the reportfor information on how to fix the problem and rerun the test.
To test fax setup1. Set up the device for faxing according to your particular home or office setup
instructions.2. Make sure the ink cartridges and printheads are installed, and that full-size paper
is loaded in the input tray before starting the test.3. From the control panel, press Setup.4. Select Tools, and then select Run Fax Test.
The device displays the status of the test on the display and prints a report.5. Review the report.
• If the test passes and you are still having problems faxing, check the faxsettings listed in the report to verify the settings are correct. A blank orincorrect fax setting can cause problems faxing.
• If the test fails, review the report for more information on how to fix anyproblems found.
Use reportsYou can set up the device to print error reports and confirmation reports automaticallyfor each fax you send and receive. You can also manually print system reports asrequired; these reports provide useful system information about the device.
By default, the device is set to print a report only if there is a problem sending orreceiving a fax. A confirmation message that indicates whether a fax was successfullysent appears briefly on the control-panel display after each transaction.
Test fax setup 83

Print fax confirmation reportsIf you require printed confirmation that your faxes were successfully sent, follow theseinstructions to enable fax confirmation before sending any faxes. Select either On FaxSend or Send & Receive.
The default fax confirmation setting is Off. This means that a confirmation report is notprinted for each fax sent or received. A confirmation message indicating whether a faxwas successfully sent appears briefly on the control-panel display after eachtransaction.
To enable fax confirmation1. Press Setup.2. Press Print Report, and then Fax Confirmation.3. Press the right arrow button to select one of the following, and then press OK.
Off Does not print a fax confirmation report when you send and receivefaxes successfully. This is the default setting.
On Fax Send Prints a fax confirmation report for every fax you send.
On Fax Receive Prints a fax confirmation report for every fax you receive.
Send & Receive Prints a fax confirmation report for every fax you send and receive.
TIP: If you choose On Fax Send or Send & Receive, and scan your fax tosend from memory, you can include an image of the first page of the fax on theFax Sent Confirmation report. Press Setup, press Fax Confirmation, andthen press On Fax Send again. Select On from the Image on Fax SendReport menu.
Print fax error reportsYou can configure the device so that it automatically prints a report when there is anerror during transmission or reception.
To set the device to print fax error reports automatically1. Press Setup.2. Press Print Report, and then press Fax Error Report.3. Press the right arrow button to select one of the following, and then press OK.
Send & Receive Prints whenever a fax error occurs. This is the default setting.
Off Does not print any fax error reports.
On Fax Send Prints whenever a transmission error occurs.
On Fax Receive Prints whenever a receiving error occurs.
Chapter 8
84 Fax (some models only)

Print and view the fax logYou can print a log of faxes that have been received and sent by the device. Eachentry in the log contains the following information:
• Transmission date and time• Type (whether received or sent)• Fax number• Duration• Number of pages• Result (status) of transmissionThe logs list faxes that have been sent from the control panel and all faxes that havebeen received.
To view the fax log from the embedded Web server▲ On the Information tab, click Log in the left pane, then click the Fax Log sub-tab.
The log lists faxes that have been sent from the HP photo and imaging software andall faxes that have been received.
To view the fax log from the HP photo and imaging software1. At the computer, open the HP photo and imaging software. For more information,
see Use the HP photo and imaging software.2. See the onscreen Help for the HP photo and imaging software for further
instructions.
The log lists faxes that have been sent from the control panel and the HP photo andimaging software and all faxes that have been received.
To print the fax log from the control panel1. On the control panel, press Setup.2. Press the arrow key to move down to Print Report, and then press OK.3. Press the arrow key to move down to Fax Log, and then press OK.4. Press OK again to print the log.
Cancel a faxYou can cancel a fax you are sending or receiving at any time.
To cancel a fax▲ Press Cancel on the control panel to stop a fax you are sending or receiving. If the
device does not stop faxing, press Cancel again.The device prints any pages it has already started printing and then cancels theremainder of the fax. This can take a few moments.
To cancel a number you are dialing▲ Press Cancel to cancel a number you are currently dialing.
Cancel a fax 85
9 Configure and manageThis section is intended for the administrator or individual who is responsible formanaging the device. This section contains information about the following topics.
• Manage the device• Use device management tools• Understand the self-test diagnostic page• Understand the network configuration page• Configure network options• Set up faxing for the device (some models only)• Configure the device (Windows)• Configure the device (Mac OS)• Set up the device for wireless communication (some models only)• Set up the device for Bluetooth communication• Uninstall and reinstall the software
Manage the device• Overview of management tasks• Monitor the device• Administer the device
Overview of management tasksThe following table lists common tools that can be used to manage the device.Specific procedures might include other methods. For information about accessingand using the tools, see Use device management tools.
NOTE: Mac OS users can use the control panel, the embedded Web server, andthe HP Printer Utility. Windows users can use the control panel, the embeddedWeb server, the printer driver, the Toolbox, the HP Web Jetadmin, andmyPrintMileage.For more information about the HP Web Jetadmin software, open the HP WebJetadmin software and see its documentation. For more information aboutmyPrintMileage, visit the myPrintMileage Web site.
If you wantto...
use these tools...
Controlpanel parts
EmbeddedWeb server
Toolbox(Windows)
HP PrinterUtility(Mac OS)
HP WebJetadminsoftware
myPrint-Mileage*
Monitor the device
Status ofsupplies
86 Configure and manage

If you wantto...
use these tools...
Usage ofsupplies andmedia
Operation andstatus
Administer the device
Devicemaintenance
Device security
Scanner bulbtime
Tray settings
Device volumeor controlbutton volumesettings
Alerts andnotifications
* Available if myPrintMileage is installed.
Monitor the deviceThis section provides instructions for monitoring the device.
Use this tool... to obtain the following information....
Control panel Obtain information about the status of jobsthat are being processed, the operating statusof the device, and the status of ink cartridgesand printheads.
Embedded Web server • Printer status information: Click theInformation tab, and then click an optionavailable on the left pane.
• Ink cartridge and printhead status:Click the Information tab, and then clickInk Supplies in the left pane.
• Accumulated ink and media usage:Click the Information tab, and then clickUsage in the left pane.
Toolbox (Windows) Ink cartridge information: Click theEstimated Ink Levels tab to view the ink-level information, and then scroll to displaythe Cartridge Details button. Click theCartridge Details button to view information
(continued)
Manage the device 87

Use this tool... to obtain the following information....
about replacement ink cartridges andexpirations dates.
NOTE: The ink levels shown are anestimate only. Actual ink volumes may vary.
HP Printer Utility (Mac OS) Ink cartridge information: Open theInformation and Support panel and clickSupplies Status.
Administer the deviceThis section provides information about administering the device and modifyingsettings.
Use this tool... to do the following...
Control panel • Language and country/region: Press Setup,and then open the Preferences menu.
• Control panel volume: Press Setup, and thenopen the Preferences menu.
• Fax sound volume: Press Setup, and thenselect Fax Sound Volume.
• Automatic report printing: Press Setup, andthen open the Advance Fax Setup menu.
• Set the dial type: Press Setup, and then openthe Basic Fax Setup menu.
• Set up redial options: Press Setup, and thenopen the Advance Fax Setup menu.
• View the IP address of the device (seeChange advanced network settings).
• Set the date and time: Press Setup, pressTools, and then press Date and Time.
• Set the scanner bulb time: Press Setup,select Preferences, and then select Set BulbTime.
Embedded Web server • Set embedded Web server password: Clickthe Settings tab, and then click Security in theleft pane.
• Change tray settings: Click the Settings tab,and then click Paper Handling in the left pane.
• Perform device maintenance tasks: Click theSettings tab, and then click Device Servicesin the left pane.
• Language and country/region: Click theSettings tab, and then click International inthe left pane.
• Fax sound volume: Click the Settings tab,click Fax in the left pane, and then adjust theFax Sound Volume option.
Chapter 9(continued)
88 Configure and manage

Use this tool... to do the following...
• Configure network settings: Click theNetworking tab, and then click an option in theleft pane.
• Set a static IP address: Click the Networkingtab, and then click either Wired 802.3 orWireless 802.11. In the IP AddressConfiguration section, select Manual IP andenter the static IP address. Enter the ManualSubnet Mask and Manual Default Gateway, ifnecessary, and then click Apply. For moreinformation, see Troubleshooting tips andresources.
NOTE: It is not recommended that you assigna static IP address to the device. However, astatic IP address might resolve certain setupand printing problems, such as a conflict with apersonal firewall.
• Configure Direct Digital Filing settings:Click the Settings tab, and then click DirectDigital Filing Speed-dial.
• Automatic fax report printing: Click theSettings tab, and then click Fax in the leftpane. Then click the Advanced tab.
• Setting up the dial type: Click the Settingstab, and then click Fax in the left pane. Thenclick the Basic tab.
• Setting up redial options: Click the Settingstab, and then click Fax. Click the Advanced tab.
• Order supplies: On any tab, click the OrderSupplies button, and then follow the onscreeninstructions.
• Support: On any tab, click the Support button,and then select a support option.
• Configure Bluetooth settings: Click theBluetooth tab.
• Set the date and time: Click the Settings tab,click Time Services in the left pane, type thenecessary values in the fields, and then clickApply.
Toolbox (Windows) • Change tray settings: Click Paper Handlingon the Services tab.
• Perform device maintenance tasks: Click theServices tab.
HP Printer Utility (Mac OS) • Change tray settings: Click Paper Handlingfrom the Printer Settings panel.
• Perform device maintenance tasks: Openthe Information and Support panel, and thenclick the option for the task that you want toperform.
(continued)
Manage the device 89

Use device management tools• Embedded Web server• Toolbox (Windows)• HP Printer Utility (Mac OS)• Network Printer Setup Utility (Mac OS)• HP Web Jetadmin software• HP Instant Support• myPrintMileage
Embedded Web serverWhen the device is connected to a network, you can use the embedded Web server toview status information, change settings, and manage it from your computer.
NOTE: For a list of system requirements for the embedded Web server, seeEmbedded Web server specifications.
Some settings might be restricted by the requirement for a password.
You can open and use the embedded Web server without being connected to theInternet; however, some features will not be available.
To open the embedded Web serverYou can open the embedded Web server by using these methods:
NOTE: To open the embedded Web server from the printer driver (Windows), orthe HP Printer Utility (Mac OS), the device must be on a network and must have anIP address.
• Web browser: In a supported Web browser on your computer, type the IP addressthat has been assigned to the device.For example, if the IP address is 123.123.123.123, type the following address intothe Web browser: http://123.123.123.123The IP address for the device is listed on the self-test diagnostic page. For moreinformation, see Understand the network configuration page.After opening the embedded Web server, you can bookmark it so that you canreturn to it quickly in the future.
• HP Printer Utility (Mac OS): On the Printer Settings panel, click AdditionalSettings, and then click the Open Embedded Web Server button.
Chapter 9
90 Configure and manage

Embedded Web server pagesThe embedded Web server contains pages that you can use to view productinformation and change device settings. The pages also contain links to other e-services.
Pages/buttons Contents
Information page Shows status information about the device, its inksupplies and usage, and a log of device events(such as errors).
Settings page Shows the settings that have been configured forthe device and gives you the ability to changethese settings.
Networking page Shows network status and the network settings thathave been configured for the device. These pagesonly appear if the device is connected to a network.For more information, see Configure network options.
Bluetooth page Shows the Bluetooth settings that have beenconfigured for the device and gives you the abilityto change these settings.
Support and Order Supplies buttons Support provides a number of support services,including e-services such as HP Instant Support,myPrintMileage. For more information, see HPInstant Support and myPrintMileage.Order Supplies connects you to online ordering ofsupplies.
Toolbox (Windows)The Toolbox provides maintenance information about the device.
NOTE: The Toolbox can be installed from the Starter CD by selecting the fullinstallation option if the computer meets the system requirements.
To open the Toolbox• From the HP Solution Center, click the Settings menu, point to Print Settings,
and then click Printer Toolbox.• Right-click the HP Digital Imaging Monitor in the tray, point to Printer Model Name
and then click Display Printer Toolbox.
Use device management tools 91

Toolbox tabsThe Toolbox contains the following tabs.
Tabs Contents
Estimated Ink Level • Ink Level Information: Shows estimated inklevel for each cartridge.
NOTE: The ink levels shown are an estimateonly. Actual ink volumes may vary.
• Shop Online: Provides access to a Web sitefrom which you can order printing supplies forthe device online.
• Order by Phone: Shows telephone numbersthat you can call to order supplies for thedevice. Telephone numbers are not availablefor all countries/regions.
• Cartridge Details: Shows order numbers andexpiration dates of the installed ink cartridges.
Information Printer Information: Provides a link tomyPrintMileage and shows the device hardwareand printhead health information. Information taboptions include:• Hardware information• myPrintmileage (if installed)• HP Instant Support• HP printhead health
Services • Print PQ (print quality) Diagnostic Page:Allows you to diagnose issues affecting theprint quality of the device. For moreinformation, see To print the print qualitydiagnostic page.
• Print Self-Test Diagnostic Page: Allows youto print the self-test diagnostic page of thedevice. This page contains information aboutthe device and the supplies. For moreinformation, see Understand the self-testdiagnostic page.
• Align Printheads: Guides you throughaligning the printheads. For more information,see To align the printheads.
• Clean Printheads: Guides you throughcleaning the printheads. For more information,see To clean the printheads.
• Calibrate Linefeed: Allows you to performlinefeed calibration. For more information, seeTo calibrate the linefeed.
• Paper Handling: Allows you to set the traylock and select a default tray (if Tray 2 isinstalled). For more information, see Configuretrays.
Chapter 9
92 Configure and manage

HP Printer Utility (Mac OS)The HP Printer Utility contains tools to configure print settings, calibrate the device,clean the printheads, print the self-test diagnostic page, order supplies online, and findWeb site support information.
To open the HP Printer Utility1. From the Finder, select Computer from the Go menu.2. Select Library, and then select Printers.3. Select hp, select Utilities, and then select HP Printer Selector.4. Select the device and click Launch Utility.
HP Printer Utility panels
Information and Support panel• Supplies Status: Shows the information about currently installed printheads and
ink cartridges.• Supply Info: Shows the ink cartridge replacement options.• Device Information: Displays information about the model and serial number.
Also allows you to print the self-test diagnostic page of the device. This pagecontains information about the device and the supplies. For more information, seeUnderstand the self-test diagnostic page.
• Print Quality Diagnostics: Allows you to diagnose issues affecting the printquality of the device. For more information, see To print the print quality diagnosticpage.
• Clean: Guides you through cleaning the printheads. For more information, see Toclean the printheads.
• Align: Guides you through aligning the printheads. For more information, see Toalign the printheads.
• Calibrate Linefeed: Allows you to perform linefeed calibration. For moreinformation, see To calibrate the linefeed.
• HP Support: Gain access to HP Web site where you can find support for thedevice, register the device, and find information about returning and recycling usedprinting supplies.
Printer Settings panel• Trays Configuration: Set the default media type and size for a tray, and set the
tray priority. For more information, see Configure trays.• Additional Settings: Launch the embedded Web server to change network
settings. Configure IP settings for network connectivity.
Use device management tools 93

Network Printer Setup Utility (Mac OS)This tool allows you to configure network settings for the device. You can configurewireless settings such as network location name and wireless mode, and wiredsettings such as TCP/IP address, router, and subnet mask.
To open the Network Printer Setup Utility1. From the Finder, select Computer from the Go menu.2. Select Library, and then select Printers.3. Select hp, select Utilities, and then select Network Printer Setup Utility.4. Follow the onscreen instructions to configure network settings for the device.
HP Web Jetadmin softwareThe HP Web Jetadmin software is a Web-based management solution for remotelyinstalling, configuring (both individually or in batch mode), monitoring status (includinglevels for supplies), conducting remote diagnostics, and troubleshooting a wide varietyof HP and non-HP network peripherals.
After the software is installed, you can gain access to it from anywhere within yourintranet by using a standard Web browser. To get more information or to download thesoftware, go to www.hp.com/go/webjetadmin.
HP Instant SupportHP Instant Support is a suite of Web-based troubleshooting tools. It helps you quicklyidentify, diagnose, and resolve printing problems.
HP Instant Support provides the following information about your device:
• Easy access to troubleshooting tips: Provides tips that are customized for yourdevice.
• Resolution of specific device errors: Provides immediate access to informationthat can help you resolve error messages specific to your device. To see adescription of the problem, as well as recommendations for solving or preventingthe problem, click the link within the message.
• Notification of print driver updates: Alerts you when there is an update for theprinter driver. A message appears on the HP Instant Support homepage; click thelink within the message to go directly to the download section of the HP Web site.
• Obtaining support services: Provides a list of the support services that areavailable for your device.
• Managing ink and media usage (myPrintMileage): Helps you manage andforecast device supplies usage.
• Self diagnostic testing for your device: Runs a diagnostic test of your device.Select Printer on the Self Help menu on the Instant Support page to startdiagnosing the devices. HP Instant Support checks the computer, and a list ofconfigured devices appears. When you select the device that you want todiagnose, HP Instant Support can help you with tasks.
Chapter 9
94 Configure and manage

• HP expert help online (Active Chat): Provides personalized help from an HPsupport expert over the Web at any time through real-time chat. Simply submit aquestion or a description of your problem. Your recent device history, systemconfiguration, and any actions that you have attempted are automaticallyforwarded to HP (upon your approval) so that you will not need to describe theproblem again.
• Knowledge database: Use the HP knowledge database to quickly find answers toyour questions.
Security and privacyWhen you use HP Instant Support, detailed device information, such as the serialnumber, error conditions, and status, is sent to HP. HP respects your privacy andmanages this information according to the guidelines that are outlined in the HPOnline Privacy Statement (welcome.hp.com/country/us/en/privacy.html).
NOTE: To view all the data that is sent to HP, select Source (for Internet Explorerand Opera) or Page Source (for Netscape and Mozilla Firefox) from the Viewmenu in your Web browser.
To gain access to HP Instant Support• Toolbox (Windows): Click the Information tab, and then click HP Instant Support.• Embedded Web server: Click the Support button, then click HP Instant Support.
NOTE: The Support button is available in all pages.
NOTE: Do not bookmark the Web pages that are used to open HP InstantSupport. If you bookmark the site and connect to it by using the bookmark, thepages do not contain the current information.
myPrintMileagemyPrintMileage is a service that HP provides to help you track and forecast yourdevice usage and plan the purchase of supplies.To use myPrintMileage, you must have the following:
• Internet connection• Device connected
Use device management tools 95

On the myPrintMileage Web site, you can see the print analysis, such as the amountof ink you have used, whether you use more black or color ink, and the estimatednumber of pages you can print with the remaining amount of ink
To gain access to myPrintMileage• Embedded Web server: Click the Support button, and then click myPrintMileage.
NOTE: The Support button is available in all pages.
• Toolbox (Windows): Click the Information tab, and then click myPrintMileageand follow the onscreen instructions.
• Windows taskbar: Right-click the HP Digital Imaging icon in the Windowstaskbar, choose the device you wish to view, and then click myPrintMileage.
NOTE: Do not bookmark the Web pages that are used to open myPrintMileage. Ifyou bookmark the site and connect to it by using the bookmark, the pages do notcontain the current information.
Understand the self-test diagnostic pageUse the self-test diagnostic page to:
• View current device information, ink cartridge status, and printhead health status• Help troubleshoot problems• Verify installation of optional accessories, such as the duplexer
The self-test diagnostic page also contains a log of recent events.
Chapter 9
96 Configure and manage

If you need to call HP, it is often useful to print the self-test diagnostic page beforecalling.
1. Printer Information: Shows device information (such as the product name, modelnumber, serial number, and firmware version number), the accessories that areinstalled (such as the duplexer), and the number of pages printed from the traysand accessories.
2. Ink Cartridge Status: Shows the estimated ink levels (represented in graphicalform as gauges) and the part numbers and expiration dates of the ink cartridges.
NOTE: The ink levels shown are an estimate only. Actual ink volumes mayvary.
3. Printhead Status: Shows the status of the printhead health and the part numbers,first-installation dates, and end-of-warranty dates of the printheads, as well as theaccumulated ink usage. The status options for the printhead are: good, fair, andreplace. If the status is 'fair,' then the print quality must be monitored, but theprinthead does not need to replaced. If the status is 'replace,' then the printheadshould be replaced, as the device will not function until it is.
4. Event Log: Shows a log of recent events that have occurred.
To print the Self-Test Diagnostic Page• Control panel: Press Setup, select Print Report, select Self-Test Report, and
then press OK.• Toolbox (Windows): Click the Services tab, and then click Print Self-test
Diagnostic Page.• HP Printer Utility (Mac OS): Click Device Information from the Information and
Support panel, and then click Print Configuration Page.
Understand the self-test diagnostic page 97

Understand the network configuration pageIf the device is connected to a network, you can print a network configuration page toview the network settings for the device. You can use the network configuration pageto help troubleshoot network connectivity problems. If you need to call HP, it is oftenuseful to print this page before calling.
Network Configuration Page1. General Information: Shows information about the current status and active
connection type of the network, and other information, such as the URL of theembedded Web server.
2. 802.3 Wired: Shows information about the active wired network connection, suchas the IP address, subnet mask, default gateway, as well as the hardware addressof the device.
3. 802.11 Wireless: Shows information about the active wireless network connection,such as the IP address, the communication mode, the network name,authentication type, and signal strength.
4. Bluetooth: Shows information about the active Bluetooth wireless connection,such as the device name and address, as well as the passkey.
5. SNMP: Shows information about the current SNMP settings and status, includingthe community name settings.
Chapter 9
98 Configure and manage
To print the network configuration page from the control panel• If the device has a two-line display: Press the Setup button, select Network
Setup, select Print Network Settings, and then press OK.• If the device has a color display: Press the Setup button, select Network, select
View Network Settings, select Print Network Configuration Page, and thenpress OK.
Channel range definitionsThe following table lists the 802.11 Wireless channel range definitions.
The first digit stands for Locale Number
Locale 0: Channels 1-11:
• high-power 802.11b• low-power 802.11g
Locale 1: Channels 1-13:
• low-power 802.11b• low-power 802.11g
Locale 2: Channels 1-14:
• low-power 802.11b• low-power 802.11g
NOTE: 802.11g is not allowed on channel 14.
The second digit stands for Ad-HocCompatibility Mode
0: Ad-Hoc connection status nominal1: Ad-Hoc always appears connected
The third digit stands for Infrastructure RateRestriction
0: 802.11b or 802.11g1: 802.11b only
The fourth digit stands for Ad-Hoc RateRestriction
0: 802.11b or 802.11g1: 802.11b only
Configure network optionsYou can manage network settings for the device through the control panel asdescribed in the next section. Additional advanced settings are available in theembedded Web server, a configuration and status tool you access from your Webbrowser using an existing network connection to the device. For more information, seeEmbedded Web server.
Change basic network settingsThe control-panel options enable you to set up and manage a wireless connection andto perform a variety of network management tasks. This includes viewing the networksettings, restoring the network defaults, turning the wireless radio on and off, andchanging the network settings.
Configure network options 99

Use the Wireless Setup WizardThe Wireless Setup Wizard provides an easy way to set up and manage a wirelessconnection to your device. For more information on setting up a wireless connectionand the Wireless Setup Wizard, see Set up the device for wireless communication(some models only).
View and print network settingsYou can display a summary of the network settings on the control panel, or you canprint a more detailed network configuration page. The network configuration page listsall of the important network settings such as the IP address, link speed, DNS, andmDNS. For information on the network settings, see Understand the networkconfiguration page.
1. Press the Setup button.2. Press the arrow keys until Network is highlighted, and then press OK.3. Do one of the following:
• To display wired (Ethernet) network settings, select View Network Settings,and then select Display Wired Summary.
• To display wireless network settings, select View Network Settings, and thenselect Display Wireless Summary.
• To print the network configuration page, select View Network Settings, andthen select Print Network Configuration Page.
Turn the wireless radio on and offThe wireless radio is on by default, as indicated by the blue light on the front of thedevice. In order to stay connected to a wireless network, the radio must stay on.However, if your device is connected to a wired network or you have a USBconnection, the radio is not used. In this case you might want to turn the radio off.
1. Press the Setup button.2. Press the arrow keys until Network is highlighted, and then press OK.3. Select Wireless Radio, and then select Yes to turn the radio on, or No to turn the
radio off.
Change advanced network settingsThe advanced network settings are provided for your convenience. However, unlessyou are an advanced user, you should not change any of these settings. Theadvanced settings include Link Speed, IP Settings, and Memory Card Security.
Set link speedYou can change the speed at which data is transmitted over the network. The defaultis Automatic.1. Press the Setup button.2. Press the arrow keys until Network is highlighted, then press OK.
Chapter 9
100 Configure and manage

3. Select Advanced Setup, then select Link Speed.4. Press the number next to the link speed that matches your network hardware:
• 1. Automatic• 2. 10-Full• 3. 10-Half• 4. 100-Full• 5. 100-Half
To View IP settings• Color display: To view the IP address of the device from the control panel, press
the Setup button, select Network, select View Network Settings, and then selecteither Display Wired Summary or Display Wireless Summary.
• Two-line display: To view the IP address of the device, you must print the networkconfiguration page. For more information, see Understand the networkconfiguration page.
To Change IP settingsThe default IP setting for the IP settings is Automatic, which sets the IP settingsautomatically. However, if you are an advanced user, you might want to manuallychange the IP address, subnet mask, or the default gateway.
CAUTION: Be careful when manually assigning an IP address. If you enter aninvalid IP address during the installation, your network components will not be ableto connect with the device.
1. Press the Setup button.2. Press the arrow keys until Network is highlighted, and then press OK.3. Select Advanced Setup, select IP Settings, and then select Manual IP Settings.4. Press the number next to the IP setting:
• 1. IP Address• 2. Subnet Mask• 3. Default Gateway
5. Enter your changes, and then press OK.
Set up faxing for the device (some models only)After completing all the steps in the getting started guide, use the instructions in thissection to complete your fax setup. Keep your getting started guide for later use.
In this section, you will learn how to set up the device so that faxing works successfullywith equipment and services you might already have on the same phone line.
TIP: You can also use the Fax Setup Wizard (Windows) or HP Fax Setup Utility(Mac OS) to help you quickly set up some important fax settings such as theanswer mode and fax header information. You can access the Fax Setup Wizard(Windows) or HP Fax Setup Utility (Mac OS) through the software you installedwith the device. After you run the Fax Setup Wizard (Windows) or HP Fax SetupUtility (Mac OS), follow the procedures in this section to complete your fax setup.
Set up faxing for the device (some models only) 101

Set up faxing (parallel phone systems)Before you begin setting up the device for faxing, determine which kind of phonesystem your country/region uses. The instructions for fax setup differ depending onwhether you have a serial- or parallel-type phone system.
• If you do not see your country/region listed in the table below, you probably have aserial-type phone system. In a serial-type phone system, the connector type onyour shared telephone equipment (modems, phones, and answering machines)does not allow a physical connection to the "2-EXT" port on the device. Instead, allequipment must be connected at the telephone wall jack.
NOTE: In some countries/regions that use serial-type phone systems, thephone cord that came with the device might have an additional wall plugattached to it. This enables you to connect other telecom devices to the walljack where you plug in the device.
• If your country/region is listed in the table below, you probably have a parallel-typetelephone system. In a parallel-type phone system, you are able to connect sharedtelephone equipment to the phone line by using the "2-EXT" port on the back ofthe device.
NOTE: If you have a parallel-type phone system, HP recommends you usethe 2-wire phone cord supplied with the device to connect it to the telephonewall jack.
Table 9-1 Countries/regions with a parallel-type phone system
Argentina Australia Brazil
Canada Chile China
Colombia Greece India
Indonesia Ireland Japan
Korea Latin America Malaysia
Mexico Philippines Poland
Portugal Russia Saudi Arabia
Singapore Spain Taiwan
Thailand USA Venezuela
Vietnam
If you are unsure which kind of telephone system you have (serial or parallel), checkwith your telephone company.
Choose the correct fax setup for your home or officeTo fax successfully, you need to know what types of equipment and services (if any)share the same phone line with the device. This is important because you might need
Chapter 9
102 Configure and manage

to connect some of your existing office equipment directly to the device, and you mightalso need to change some fax settings before you can fax successfully.
To determine the best way to set up the device in your home or office, first readthrough the questions in this section and record your answers. Next, refer to the tablein the following section and choose the recommended setup case based on youranswers.
Make sure to read and answer the following questions in the order they are presented.
1. Do you have a digital subscriber line (DSL) service through your telephonecompany? (DSL might be called ADSL in your country/region.)If you answered Yes, proceed directly to Case B: Set up the device with DSL. Youdo not need to continue answering questions.If you answered No, continue answering questions.
2. Do you have a private branch exchange (PBX) phone system or an integratedservices digital network (ISDN) system?If you answered Yes, proceed directly to Case C: Set up the device with a PBXphone system or an ISDN line. You do not need to continue answering questions.If you answered No, continue answering questions.
3. Do you subscribe to a distinctive ring service through your telephone company thatprovides multiple phone numbers with different ring patterns?If you answered Yes, proceed directly to Case D: Fax with a distinctive ring serviceon the same line. You do not need to continue answering questions.If you answered No, continue answering questions.Are you unsure if you have distinctive ring? Many phone companies offer adistinctive ring feature that allows you to have several phone numbers on onephone line.When you subscribe to this service, each phone number will have a different ringpattern. For example, you can have single, double, and triple rings for the differentnumbers. You might assign one phone number with a single ring to your voicecalls, and another phone number with double rings to your fax calls. This allowsyou to tell the difference between voice and fax calls when the phone rings.
4. Do you receive voice calls at the same phone number you will use for fax calls onthe device?Continue answering questions.
5. Do you have a computer dial-up modem on the same phone line as the device?Are you unsure if you use a computer dial-up modem? If you answer Yes to any ofthe following questions, you are using a computer dial-up modem:• Do you send and receive faxes directly to and from your computer software
applications through a dial-up connection?• Do you send and receive e-mail messages on your computer through a dial-up
connection?• Do you access the Internet from your computer through a dial-up connection?Continue answering questions.
Set up faxing for the device (some models only) 103

6. Do you have an answering machine that answers voice calls at the same phonenumber you will use for fax calls on the device?Continue answering questions.
7. Do you subscribe to a voice mail service through your telephone company at thesame phone number you will use for fax calls on the device?After you have completed answering the questions, proceed to the next section toselect your fax setup case.
Select your fax setup caseNow that you have answered all the questions about the equipment and services thatshare the phone line with the device, you are ready to choose the best setup case foryour home or office.
From the first column in the following table, choose the combination of equipment andservices applicable to your home or office setting. Then look up the appropriate setupcase in the second or third column based on your phone system. Step-by-stepinstructions are included for each case in the sections that follow.
If you have answered all the questions in the previous section and have none of thedescribed equipment or services, choose "None" from the first column in the table.
NOTE: If your home or office setup is not described in this section, set up thedevice as you would a regular analog phone. Make sure you use the phone cordsupplied in the box to connect one end to your telephone wall jack and the otherend to the port labeled 1-LINE on the back of the device. If you use another phonecord, you might experience problems sending and receiving faxes.
Other equipment/servicessharing your fax line
Recommended fax setupfor parallel-type phonesystems
Recommended fax setupfor serial-type phonesystems
None(You answered No to allquestions.)
Case A: Separate fax line (novoice calls received)
Refer to your country inSerial-type fax setup
DSL service(You answered Yes toquestion 1 only.)
Case B: Set up the devicewith DSL
Refer to your country inSerial-type fax setup
PBX or ISDN system(You answered Yes toquestion 2 only.)
Case C: Set up the devicewith a PBX phone system oran ISDN line
Refer to your country inSerial-type fax setup
Distinctive ring service(You answered Yes toquestion 3 only.)
Case D: Fax with a distinctivering service on the same line
Refer to your country inSerial-type fax setup
Voice calls(You answered Yes toquestion 4 only.)
Case E: Shared voice/fax line Refer to your country inSerial-type fax setup
Voice calls and voice mailservice
Case F: Shared voice/fax linewith voice mail
Refer to your country inSerial-type fax setup
Chapter 9
104 Configure and manage

Other equipment/servicessharing your fax line
Recommended fax setupfor parallel-type phonesystems
Recommended fax setupfor serial-type phonesystems
(You answered Yes toquestions 4 and 7 only.)
Computer dial-up modem(You answered Yes toquestion 5 only.)
Case G: Fax line shared withcomputer modem (no voicecalls received)
Not applicable.
Voice calls and computer dial-up modem(You answered Yes toquestions 4 and 5 only.)
Case H: Shared voice/fax linewith computer modem
Not applicable.
Voice calls and answeringmachine(You answered Yes toquestions 4 and 6 only.)
Case I: Shared voice/fax linewith answering machine
Not applicable.
Voice calls, computer dial-upmodem, and answeringmachine(You answered Yes toquestions 4, 5, and 6 only.)
Case J: Shared voice/fax linewith computer modem andanswering machine
Not applicable.
Voice calls, computer dial-upmodem, and voice mail service(You answered Yes toquestions 4, 5, and 7 only.)
Case K: Shared voice/fax linewith computer dial-up modemand voice mail
Not applicable.
Case A: Separate fax line (no voice calls received)If you have a separate phone line on which you receive no voice calls, and you haveno other equipment connected on this phone line, set up the device as described inthis section.
Figure 9-1 Back view of the device
(continued)
Set up faxing for the device (some models only) 105

1 Telephone wall jack
2 Use the phone cord supplied in the box with the device to connect tothe 1-LINE port
To set up the device with a separate fax line1. Using the phone cord supplied in the box with the device, connect one end to your
telephone wall jack, then connect the other end to the port labeled 1-LINE on theback of the device.
NOTE: If you do not use the supplied cord to connect from the telephone walljack to the device, you might not be able to fax successfully. This specialphone cord is different from the phone cords you might already have in yourhome or office.
2. Turn on the Auto Answer setting.3. (Optional) Change the Rings to Answer setting to the lowest setting (two rings).4. Run a fax test.
When the phone rings, the device answers automatically after the number of rings youset in the Rings to Answer setting. The device begins emitting fax reception tones tothe sending fax machine and receives the fax.
Case B: Set up the device with DSLIf you have a DSL service through your telephone company, and do not connect anyequipment to the device, use the instructions in this section to connect a DSL filterbetween the telephone wall jack and the device. The DSL filter removes the digitalsignal that can interfere with the device, so the device can communicate properly withthe phone line. (DSL might be called ADSL in your country/region.)
NOTE: If you have a DSL line and you do not connect the DSL filter, you will notbe able to send and receive faxes with the device.
Figure 9-2 Back view of the device
1 Telephone wall jack
2 DSL (or ADSL) filter and cord supplied by your DSL provider
Chapter 9
106 Configure and manage

3 Use the phone cord supplied in the box with the device to connect tothe 1-LINE port
To set up the device with DSL1. Obtain a DSL filter from your DSL provider.2. Using the phone cord supplied in the box with the device, connect one end to the
open port on the DSL filter, and then connect the other end to the port labeled 1-LINE on the back of the device.
NOTE: If you do not use the supplied cord to connect from the DSL filter tothe device, you might not be able to fax successfully. This special phone cordis different from the phone cords you might already have in your home or office.
As only one phone cord is supplied, you may will need to obtain additionalphone cords for this setup.
3. Connect an additional phone cord from the DSL filter to the telephone wall jack.4. Run a fax test.
Case C: Set up the device with a PBX phone system or an ISDN lineIf you are using either a PBX phone system or an ISDN converter/terminal adapter,make sure you do the following:
• If you are using either a PBX or an ISDN converter/terminal adaptor, connect thedevice to the port that is designated for fax and phone use. Also, make sure thatthe terminal adapter is set to the correct switch type for your country/region, ifpossible.
NOTE: Some ISDN systems allow you to configure the ports for specificphone equipment. For example, you might have assigned one port fortelephone and Group 3 fax and another port for multiple purposes. If you haveproblems when connected to the fax/phone port of your ISDN converter, tryusing the port designated for multiple purposes; it might be labeled "multi-combi" or something similar.
• If you are using a PBX phone system, set the call waiting tone to "off."
NOTE: Many digital PBX systems include a call-waiting tone that is set to "on"by default. The call waiting tone will interfere with any fax transmission, andyou will not be able to send or receive faxes with the device. Refer to thedocumentation that came with your PBX phone system for instructions on howto turn off the call-waiting tone.
• If you are using a PBX phone system, dial the number for an outside line beforedialing the fax number.
• Make sure you use the supplied cord to connect from the telephone wall jack tothe device. If you do not, you might not be able to fax successfully. This specialphone cord is different from the phone cords you might already have in your homeor office. If the supplied phone cord is too short, you can purchase a coupler fromyour local electronics store and extend it.
(continued)
Set up faxing for the device (some models only) 107

Case D: Fax with a distinctive ring service on the same lineIf you subscribe to a distinctive ring service (through your telephone company) thatallows you to have multiple phone numbers on one phone line, each with a differentring pattern, set up the device as described in this section.
Figure 9-3 Back view of the device
1 Telephone wall jack
2 Use the phone cord supplied in the box with the device to connect tothe 1-LINE port
To set up the device with a distinctive ring service1. Using the phone cord supplied in the box with the device, connect one end to your
telephone wall jack, then connect the other end to the port labeled 1-LINE on theback of the device.
NOTE: If you do not use the supplied cord to connect from the telephone walljack to the device, you might not be able to fax successfully. This specialphone cord is different from the phone cords you might already have in yourhome or office.
2. Turn on the Auto Answer setting.3. Change the Distinctive Ring setting to match the pattern that the telephone
company assigned to your fax number.
NOTE: By default, the device is set to answer all ring patterns. If you do notset the Distinctive Ring to match the ring pattern assigned to your faxnumber, the device might answer both voice calls and fax calls or it might notanswer at all.
4. (Optional) Change the Rings to Answer setting to the lowest setting (two rings).5. Run a fax test.The device automatically answers incoming calls that have the ring pattern youselected (Distinctive Ring setting) after the number of rings you selected (Rings toAnswer setting). The device begins emitting fax reception tones to the sending faxmachine and receives the fax.
Chapter 9
108 Configure and manage

Case E: Shared voice/fax lineIf you receive both voice calls and fax calls at the same phone number, and you haveno other office equipment (or voice mail) on this phone line, set up the device asdescribed in this section.
Figure 9-4 Back view of the device
1 Telephone wall jack
2 Use the phone cord supplied in the box with the device to connect tothe 1-LINE port
3 Telephone (optional)
To set up the device with a shared voice/fax line1. Using the phone cord supplied in the box with the device, connect one end to your
telephone wall jack, then connect the other end to the port labeled 1-LINE on theback of the device.
NOTE: If you do not use the supplied cord to connect from the telephone walljack to the device, you might not be able to fax successfully. This specialphone cord is different from the phone cords you might already have in yourhome or office.
2. Do one of the following:• If you have a parallel-type phone system, remove the white plug from the port
labeled 2-EXT on the back of the device, and then connect a phone to this port.• If you have a serial-type phone system, you might plug your phone directly on
top of the device cable which has a wall plug attached to it.
Set up faxing for the device (some models only) 109

3. Now you need to decide how you want the device to answer calls, automatically ormanually:• If you set up the device to answer calls automatically, it answers all incoming
calls and receives faxes. The device will not be able to distinguish between faxand voice calls in this case; if you suspect the call is a voice call, you will needto answer it before the device answers the call. To set up the device to answercalls automatically, turn on the Auto Answer setting.
• If you set up the device to answer faxes manually, you must be available torespond in person to incoming fax calls or the device cannot receive faxes. Toset up the device to answer calls manually, turn off the Auto Answer setting.
4. Run a fax test.If you pick up the phone before the device answers the call and hear fax tones from asending fax machine, you will need to answer the fax call manually.
Case F: Shared voice/fax line with voice mailIf you receive both voice calls and fax calls at the same phone number, and you alsosubscribe to a voice mail service through your telephone company, set up the deviceas described in this section.
NOTE: You cannot receive faxes automatically if you have a voice mail service atthe same phone number you use for fax calls. You must receive faxes manually;this means you must be available to respond in person to incoming fax calls. If youwant to receive faxes automatically instead, contact your telephone company tosubscribe to a distinctive ring service, or to obtain a separate phone line for faxing.
Figure 9-5 Back view of the device
1 Telephone wall jack
2 Use the phone cord supplied in the box with the device to connect tothe "1-LINE" port
Chapter 9
110 Configure and manage

To set up the device with voice mail1. Using the phone cord supplied in the box with the device, connect one end to your
telephone wall jack, then connect the other end to the port labeled 1-LINE on theback of the device.
NOTE: If you do not use the supplied cord to connect from the telephone walljack to the device, you might not be able to fax successfully. This specialphone cord is different from the phone cords you might already have in yourhome or office.
2. Turn off the Auto Answer setting.3. Run a fax test.
You must be available to respond in person to incoming fax calls, or the device cannotreceive faxes.
Case G: Fax line shared with computer modem (no voice calls received)If you have a fax line on which you receive no voice calls, and you also have acomputer modem connected on this line, set up the device as described in this section.
NOTE: If you have a computer dial-up modem, your computer dial-up modemshares the phone line with the device. You will not be able to use both your modemand the device simultaneously. For example, you cannot use the device for faxingwhile you are using your computer dial-up modem to send an e-mail or access theInternet.
• Set up the device with a computer dial-up modem• Set up the device with a computer DSL/ADSL modem
Set up the device with a computer dial-up modemIf you are using the same phone line for sending faxes and for a computer dial-upmodem, follow these directions for setting up the device.
Figure 9-6 Back view of the device
Set up faxing for the device (some models only) 111

1 Telephone wall jack
2 Use the phone cord supplied in the box with the device to connect tothe "1-LINE" port
3 Computer with modem
To set up the device with a computer dial-up modem1. Remove the white plug from the port labeled 2-EXT on the back of the device.2. Find the phone cord that connects from the back of your computer (your computer
dial-up modem) to a telephone wall jack. Disconnect the cord from the telephonewall jack and plug it into the port labeled 2-EXT on the back of the device.
3. Using the phone cord supplied in the box with the device, connect one end to yourtelephone wall jack, then connect the other end to the port labeled 1-LINE on theback of the device.
NOTE: If you do not use the supplied cord to connect from the telephone walljack to the device, you might not be able to fax successfully. This specialphone cord is different from the phone cords you might already have in yourhome or office.
4. If your modem software is set to receive faxes to your computer automatically, turnoff that setting.
NOTE: If you do not turn off the automatic fax reception setting in yourmodem software, the device will not be able to receive faxes.
5. Turn on the Auto Answer setting.6. (Optional) Change the Rings to Answer setting to the lowest setting (two rings).7. Run a fax test.When the phone rings, the device automatically answers after the number of rings youset in the Rings to Answer setting. The device begins emitting fax reception tones tothe sending fax machine and receives the fax.
Set up the device with a computer DSL/ADSL modemIf you have a DSL line and use that phone line to send faxes, follow these instructionsto set up your fax.
Chapter 9
112 Configure and manage

1 Telephone wall jack
2 Parallel splitter
3 DSL/ADSL splitterConnect one end of the phone jack that was supplied with the deviceto connect to the 1-LINE port on the back of the device. Connect theother end of the cord to the DSL/ADSL filter.
4 Computer
5 Computer DSL/ADSL modem
NOTE: You will need to purchase a parallel splitter (also called a coupler). Aparallel splitter has one RJ-11 port on the front and two RJ-11 ports on the back.Do not use a 2–line phone splitter, a serial splitter, or a parallel splitter which hastwo RJ-11 ports on the front and a plug on the back.
To set up the device with a computer DSL/ADSL modem1. Obtain a DSL filter from your DSL provider.2. Using the phone cord provided in the box with the device, connect one end to the
DSL filter, and then connect the other end to the port labeled 1-LINE on the backof the device.
NOTE: If you do not use the supplied cord to connect from the DSL filter tothe back of the device, you might not be able to fax successfully. This specialphone cord is different from the phone cords you might already have in yourhome or office.
3. Connect the DSL filter to the parallel splitter.4. Connect the DSL modem to the parallel splitter.5. Connect the parallel splitter to the wall jack.6. Run a fax test.When the phone rings, the device automatically answers after the number of rings youset in the Rings to Answer setting. The device begins emitting fax reception tones tothe sending fax machine and receives the fax.
Case H: Shared voice/fax line with computer modemIf you receive both voice calls and fax calls at the same phone number, and you alsohave a computer modem connected on this phone line, set up the device as describedin this section.
Set up faxing for the device (some models only) 113

NOTE: Since your computer modem shares the phone line with the device, youcannot use both your modem and the device simultaneously. For example, youcannot use the device for faxing while you are using your computer modem tosend an e-mail or access the Internet.
• Shared voice/fax with computer dial-up modem• Shared voice/fax with computer DSL/ADSL modem
Shared voice/fax with computer dial-up modemIf you use your phone line for both fax and telephone calls, use these instructions toset up your fax.
There are two different ways to set up the device with your computer based on thenumber of phone ports on your computer. Before you begin, check your computer tosee if it has one or two phone ports.
• If your computer has only one phone port, you will need to purchase a parallelsplitter (also called a coupler), as shown below. (A parallel splitter has one RJ-11port on the front and two RJ-11 ports on the back. Do not use a two-line phonesplitter, a serial splitter, or a parallel splitter which has two RJ-11 ports on the frontand a plug on the back.)
Figure 9-7 Example of a parallel splitter
• If your computer has one phone port, set up the device as described below.
Figure 9-8 Back view of the device
1 Telephone wall jack
2 Phone cord provided with the device plugged into the 1-LINE port onthe back of the device
3 Parallel splitter
Chapter 9
114 Configure and manage

4 Computer
5 Telephone
To set up the device on the same phone line as a computer with one phone port1. Remove the white plug from the port labeled 2-EXT on the back of the device.2. Find the phone cord that connects from the back of your computer (your computer
dial-up modem) to a telephone wall jack. Disconnect the cord from the telephonewall jack and plug it into the parallel splitter.
3. Connect a phone cord from the parallel splitter to the port labeled 2-EXT on theback of the device.
4. Connect a phone to the parallel splitter.5. Using the phone cord supplied in the box with the device, connect one end to your
telephone wall jack, then connect the other end to the port labeled 1-LINE on theback of the device.
NOTE: If you do not use the supplied cord to connect from the telephone walljack to the device, you might not be able to fax successfully. This specialphone cord is different from the phone cords you might already have in yourhome or office.
6. If your modem software is set to receive faxes to your computer automatically, turnoff that setting.
NOTE: If you do not turn off the automatic fax reception setting in yourmodem software, the device will not be able to receive faxes.
7. Now you need to decide how you want the device to answer calls, automatically ormanually:• If you set up the device to answer calls automatically, it answers all incoming
calls and receives faxes. The device will not be able to distinguish between faxand voice calls in this case; if you suspect the call is a voice call, you will needto answer it before the device answers the call. To set up the device to answercalls automatically, turn on the Auto Answer setting.
• If you set up the device to answer faxes manually, you must be available torespond in person to incoming fax calls or the device cannot receive faxes. Toset up the device to answer calls manually, turn off the Auto Answer setting.
8. Run a fax test.
NOTE: If your computer has two telephone ports on the back, you do not need touse a parallel splitter. You can plug the telephone into the “OUT” port on thecomputer dial-up modem.
If you pick up the phone before the device answers the call and hear fax tones from asending fax machine, you will need to answer the fax call manually.
If you use your phone line for voice, fax, and your computer dial-up modem, followthese directions to set up your fax.
Set up faxing for the device (some models only) 115

Shared voice/fax with computer DSL/ADSL modemUse these instructions if your computer has a DSL/ADSL modem
1 Telephone wall jack
2 Parallel splitter
3 DSL/ADSL filter
4 Phone cord supplied with the device
5 DSL/ADSL modem
6 Computer
7 Telephone
NOTE: You will need to purchase a parallel splitter (also called a coupler). Aparallel splitter has one RJ-11 port on the front and two RJ-11 ports on the back.Do not use a 2–line phone splitter, a serial splitter, or a parallel splitter which hastwo RJ-11 ports on the front and a plug on the back.
Chapter 9
116 Configure and manage

To set up the device with a computer DSL/ADSL modem1. Obtain a DSL filter from your DSL provider.
NOTE: Phones in other parts of the home/office sharing the same phonenumber with DSL service will need to be connected to additional DSL filters,otherwise you will experience noise when making voice calls.
2. Using the phone cord supplied in the box with the devices, connect one end to theDSL filter, then connect the other end to the port labeled 1-LINE on the back of thedevice.
NOTE: If you do not use the supplied cord to connect from the DSL filter tothe device, you might not be able to fax successfully. This special phone cordis different from phone cords you might already have in your home or office.
3. If you have a parallel-type phone system, remove the white plug from the portlabeled 2-EXT on the back of the device, and then connect a phone to this port.
4. Connect the DSL filter to the parallel splitter.5. Connect the DSL modem to the parallel splitter.6. Connect the parallel splitter to the wall jack.7. Run a fax test.When the phone rings, the device automatically answers after the number of rings youset in the Rings to Answer setting. The device begins emitting fax reception tones tothe sending fax machine and receives the fax.
Case I: Shared voice/fax line with answering machineIf you receive both voice calls and fax calls at the same phone number, and you alsohave an answering machine that answers voice calls at this phone number, set up thedevice as described in this section.
Figure 9-9 Back view of the device
1 Telephone wall jack
2 Use the phone cord provided to connect to the 1-LINE port on the back ofthe device
3 Answering machine
4 Telephone (optional)
Set up faxing for the device (some models only) 117

To set up the device with a shared voice/fax line with answering machine1. Remove the white plug from the port labeled 2-EXT on the back of the device.2. Unplug your answering machine from the telephone wall jack, and connect it to the
port labeled 2-EXT on the back of the device.
NOTE: If you do not connect your answering machine directly to the device,fax tones from a sending fax machine might be recorded on your answeringmachine, and you probably will not be able to receive faxes with the device.
3. Using the phone cord supplied in the box with the device, connect one end to yourtelephone wall jack, then connect the other end to the port labeled 1-LINE on theback of the device.
NOTE: If you do not use the supplied cord to connect from the telephone walljack to the device, you might not be able to fax successfully. This specialphone cord is different from the phone cords you might already have in yourhome or office.
4. (Optional) If your answering machine does not have a built-in phone, forconvenience you might want to connect a phone to the back of your answeringmachine at the "OUT" port.
NOTE: If your answering machine does not let you connect an externalphone, you can purchase and use a parallel splitter (also known as a coupler)to connect both the answering machine and telephone to the device. You canuse standard phone cords for these connections.
5. Turn on the Auto Answer setting.6. Set your answering machine to answer after a low number of rings.7. Change the Rings to Answer setting on the device to the maximum number of
rings supported by your device. (The maximum number of rings varies by country/region.)
8. Run a fax test.When the phone rings, your answering machine answers after the number of rings youhave set, and then plays your recorded greeting. The device monitors the call duringthis time, "listening" for fax tones. If incoming fax tones are detected, the device emitsfax reception tones and receives the fax; if there are no fax tones, the device stopsmonitoring the line and your answering machine can record a voice message.
Case J: Shared voice/fax line with computer modem and answering machineIf you receive both voice calls and fax calls at the same phone number, and you alsohave a computer modem and answering machine connected on this phone line, set upthe device as described in this section.
Chapter 9
118 Configure and manage

NOTE: Since your computer dial-up modem shares the phone line with thedevice, you cannot use both your modem and the device simultaneously. Forexample, you cannot use the device for faxing while you are using your computerdial-up modem to send an e-mail or access the Internet.
• Shared voice/fax line with computer dial-up modem and answering machine• Shared voice/fax line with computer DSL/ADSL modem and answering machine
Shared voice/fax line with computer dial-up modem and answering machineThere are two different ways to set the device with your computer based on thenumber of phone ports on your computer. Before you begin, check your computer tosee if it has one or two phone ports.
• If your computer has only one phone port, you will need to purchase a parallelsplitter (also called a coupler), as shown below. (A parallel splitter has one RJ-11port on the front and two RJ-11 ports on the back. Do not use a two-line phonesplitter, a serial splitter, or a parallel splitter which has two RJ-11 ports on the frontand a plug on the back.)
Figure 9-10 Example of a parallel splitter
• If your computer has one phone port, set up the device as described below.
Figure 9-11 Back view of the device
1 Telephone wall jack
2 Telephone cord connected to the parallel splitter
3 Parallel splitter
4 Telephone (optional)
5 Answering machine
6 Computer with modem
Set up faxing for the device (some models only) 119

7 Use the phone cord supplied in the box with the device to connect tothe "1-LINE" port
To set up the device on the same phone line as a computer with one phone port1. Remove the white plug from the port labeled 2-EXT on the back of the device.2. Find the phone cord that connects from the back of your computer (your computer
dial-up modem) to a telephone wall jack. Disconnect the cord from the telephonewall jack and plug it into the port labeled 2-EXT on the back of the device.
3. Unplug your answering machine from the telephone wall jack, and connect it to theport labeled 2-EXT on the back of the device.
NOTE: If you do not connect your answering machine directly to the device,fax tones from a sending fax machine might be recorded on your answeringmachine, and you probably will not be able to receive faxes with the device.
4. Using the phone cord supplied in the box with the device, connect one end to yourtelephone wall jack, then connect the other end to the port labeled 1-LINE on theback of the device.
NOTE: If you do not use the supplied cord to connect from the telephone walljack to the device, you might not be able to fax successfully. This specialphone cord is different from the phone cords you might already have in yourhome or office.
5. (Optional) If your answering machine does not have a built-in phone, forconvenience you might want to connect a phone to the back of your answeringmachine at the "OUT" port.
NOTE: If your answering machine does not let you connect an externalphone, you can purchase and use a parallel splitter (also known as a coupler)to connect both the answering machine and telephone to the device. You canuse standard phone cords for these connections.
6. If your modem software is set to receive faxes to your computer automatically, turnoff that setting.
NOTE: If you do not turn off the automatic fax reception setting in yourmodem software, the device will not be able to receive faxes.
7. Turn on the Auto Answer setting.8. Set your answering machine to answer after a low number of rings.9. Change the Rings to Answer setting on the device to the maximum number of
rings supported by your device. (The maximum number of rings varies by country/region.)
10. Run a fax test.
NOTE: If you are using a computer with two telephone ports, you do not needa parallel splitter. You can plug the answering machine into the “OUT” port onthe back of the computer.
Chapter 9
120 Configure and manage

When the phone rings, your answering machine answers after the number of rings youhave set, and then plays your recorded greeting. The device monitors the call duringthis time, "listening" for fax tones. If incoming fax tones are detected, the device emitsfax reception tones and receives the fax; if there are no fax tones, the device stopsmonitoring the line and your answering machine can record a voice message.
Shared voice/fax line with computer DSL/ADSL modem and answering machine
1 Telephone wall jack
2 Parallel splitter
3 DSL/ADSL filter
4 Phone cord provided with the device connected to the 1-LINE port onthe back of the device
5 DSL/ADSL modem
6 Computer
7 Answering machine
8 Telephone (optional)
NOTE: You will need to purchase a parallel splitter (also called a coupler). Aparallel splitter has one RJ-11 port on the front and two RJ-11 ports on the back.Do not use a 2–line phone splitter, a serial splitter, or a parallel splitter which hastwo RJ-11 ports on the front and a plug on the back.
Set up faxing for the device (some models only) 121

To set up the device with a computer DSL/ADSL modem1. Obtain a DSL/ADSL filter from your DSL/ADSL provider.
NOTE: Phones in other parts of the home/office sharing the same phonenumber with DSL/ADSL service will need to be connected to additional DSL/ADSL filters, otherwise you will experience noise when making voice calls.
2. Using the phone cord supplied in the box with the device, connect one end to theDSL/ADSL filter, then connect the other end to the port labeled 1-LINE on the backof the device.
NOTE: If you do not use the supplied cord to connect from the DSL/ADSLfilter to the device, you might not be able to fax successfully. This specialphone cord is different from the phone cords you might already have in yourhome or office.
3. Connect the DSL/ADSL filter to the splitter.4. Unplug the answering machine from the telephone wall jack, and connect it to the
port labeled 2-EXT on the back of the device.
NOTE: If you do not connect your answering machine directly to the device,fax tones from a sending fax machine might be recorded on your answeringmachine, and you probably will not be able to receive faxes with the device.
5. Connect the DSL modem to the parallel splitter.6. Connect the parallel splitter to the wall jack.7. Set your answering machine to answer after a low number of rings.8. Change your Rings to Answer setting on the device to the maximum number of
rings supported by the device.
NOTE: The maximum number of rings varies by country/region
9. Run a fax test.When the phone rings, your answering machine will answer after the number of ringsyou have set, and then play your recorded greeting. The device monitors the callduring this time, “listening” for fax tones. If incoming fax tones are detected, the devicewill emit fax reception tones and receive the fax; if there are no fax tones, the devicestops monitoring the line and your answering machine can record a voice message.
If you use the same phone line for telephone, fax, and have a computer DSL modem,follow these instructions to set up your fax.
Case K: Shared voice/fax line with computer dial-up modem and voice mailIf you receive both voice calls and fax calls at the same phone number, use acomputer dial-up modem on the same phone line, and subscribe to a voice mailservice through your telephone company, set up the device as described in this section.
Chapter 9
122 Configure and manage

NOTE: You cannot receive faxes automatically if you have a voice mail service atthe same phone number you use for fax calls. You must receive faxes manually;this means you must be available to respond in person to incoming fax calls. If youwant to receive faxes automatically instead, contact your telephone company tosubscribe to a distinctive ring service, or to obtain a separate phone line for faxing.
Since your computer dial-up modem shares the phone line with the device, you cannotuse both your modem and the device simultaneously. For example, you cannot usethe device for faxing if you are using your computer dial-up modem to send an e-mailor access the Internet.
There are two different ways to set up the device with your computer based on thenumber of phone ports on your computer. Before you begin, check your computer tosee if it has one or two phone ports.
• If your computer has only one phone port, you will need to purchase a parallelsplitter (also called a coupler), as shown below. (A parallel splitter has one RJ-11port on the front and two RJ-11 ports on the back. Do not use a two-line phonesplitter, a serial splitter, or a parallel splitter which has two RJ-11 ports on the frontand a plug on the back.)
Figure 9-12 Example of a parallel splitter
• If your computer has two phone ports, set up the device as described below.
Figure 9-13 Back view of the device
1 Telephone wall jack
2 Use the phone cord supplied in the box with the device to connect tothe 1-LINE port
3 Computer with modem
4 Telephone
Set up faxing for the device (some models only) 123

To set up the device on the same phone line as a computer with two phone ports1. Remove the white plug from the port labeled 2-EXT on the back of the device.2. Find the phone cord that connects from the back of your computer (your computer
dial-up modem) to a telephone wall jack. Disconnect the cord from the telephonewall jack and plug it into the port labeled 2-EXT on the back of the device.
3. Connect a phone to the "OUT" port on the back of your computer dial-up modem.4. Using the phone cord supplied in the box with the device, connect one end to your
telephone wall jack, then connect the other end to the port labeled 1-LINE on theback of the device.
NOTE: If you do not use the supplied cord to connect from the telephone walljack to the device, you might not be able to fax successfully. This specialphone cord is different from the phone cords you might already have in yourhome or office.
5. If your modem software is set to receive faxes to your computer automatically, turnoff that setting.
NOTE: If you do not turn off the automatic fax reception setting in yourmodem software, the device will not be able to receive faxes.
6. Turn off the Auto Answer setting.7. Run a fax test.You must be available to respond in person to incoming fax calls, or the device cannotreceive faxes.
Serial-type fax setupFor information on setting up the device for faxing using a serial-type phone system,see the Fax Configuration Web site for your country/region.
Austria www.hp.com/at/faxconfig
Germany www.hp.com/de/faxconfig
Switzerland (French) www.hp.com/ch/fr/faxconfig
Switzerland (German) www.hp.com/ch/de/faxconfig
United Kingdom www.hp.com/uk/faxconfig
Finland www.hp.fi/faxconfig
Denmark www.hp.dk/faxconfig
Sweden www.hp.se/faxconfig
Norway www.hp.no/faxconfig
Netherlands www.hp.nl/faxconfig
Belgium (Dutch) www.hp.be/nl/faxconfig
Belguim (French) www.hp.be/fr/faxconfig
Portugal www.hp.pt/faxconfig
Chapter 9
124 Configure and manage

Spain www.hp.es/faxconfig
France www.hp.com/fr/faxconfig
Ireland www.hp.com/ie/faxconfig
Italy www.hp.com/it/faxconfig
Configure the device (Windows)You can connect the device directly to a computer, or you can share the device amongother users on a network.
NOTE: Microsoft Internet Explorer 6.0 must be installed on the computer systemto run the installation program.
Also, you must have administrator privileges to install a printer driver on Windows2000, Windows XP, or Windows Server 2003.
When setting up the device, HP recommends that you connect it after you install thesoftware because the installation program is designed to provide you with the easiestsetup experience. However, if you have connected the cable first, see To connect thedevice before installing the software.
Direct connectionYou can connect the device directly to your computer using a USB cable.
NOTE: If you install the device software and connect the device to a computerrunning Windows, you can connect additional devices to the same computer withUSB cables without reinstalling the device software.
When setting up the device, HP recommends that you connect the device after youinstall the software because the installation program is designed to provide you withthe easiest setup experience. However, if you have connected the cable first, see Toconnect the device before installing the software.
To install the software before connecting the device (recommended)1. Close any applications that are running.2. Insert the Starter CD into the CD drive. The CD menu runs automatically. If the CD
menu does not start automatically, double-click the setup icon on the Starter CD..3. On the CD menu, click Install and follow the onscreen instructions.4. When prompted, turn on the device and connect it to the computer using a USB
cable. The Found New Hardware wizard appears on the computer screen, andthe device icon is created in the Printers folder.
NOTE: You may connect the USB cable at a later time when you need to use thedevice.
You can also share the device with other computers using a simple form ofnetworking known as locally shared networking. For more information, see Toshare the device on a locally shared network.
(continued)
Configure the device (Windows) 125

To connect the device before installing the softwareIf you connected the device to the computer before installing the device software, theFound New Hardware wizard displays on the computer screen.
NOTE: If you turned on the device, do not turn it off or unplug the cable from thedevice while the installation program is running. If you do so, the installationprogram will not finish.
1. In the Found New Hardware dialog box that displays methods for locating theprinter driver, select the Advanced option, and then click Next.
NOTE: Do not allow the Found New Hardware wizard to perform anautomatic search for the printer driver.
2. Select the check box for specifying the driver location, and ensure that the othercheck boxes are clear.
3. Insert the Starter CD into the CD drive. If the CD menu appears, close it.4. Browse to locate the root directory on the Starter CD (for example, D), and then
click OK.5. Click Next and follow the onscreen instructions.6. Click Finish to close the Found New Hardware wizard. The wizard automatically
starts the installation program (this might take a short while).7. Complete the installation process.
NOTE: You can also share the device with other computers using a simple formof networking known as locally shared networking. For more information, see Toshare the device on a locally shared network.
To share the device on a locally shared networkIn a locally shared network, the device is connected directly to the USB connector of aselected computer (known as the server) and is shared by other computers (clients).
NOTE: When sharing a directly connected device, use the computer with thenewest operating system as the server. For example, if you have a computerrunning Windows XP and another computer running an older version of Windows,use the computer running Windows XP as the server.Use this configuration only in small groups or when usage is low. The connectedcomputer is slowed down when many users print to the device.
Only the printing function is shared. Scan, Copy, and Fax functions are not shared.
1. Click Start, point to Settings, and then click Printers or Printers and Faxes.- Or -Click Start, click Control Panel, and then double-click Printers.
2. Right-click the device icon, click Properties, and then click the Sharing tab.3. Click the option to share the device, and give it a share name.4. To share the device with client computers that use other versions of Windows,
click Additional Drivers to install those drivers as a convenience to the users. Youmust have the Starter CD in your CD drive.
Chapter 9
126 Configure and manage

Network connectionIf the device has network capability, it can be shared in a network environment byconnecting it directly to the network. This type of connection offers the ability tomanage the device using the embedded Web server from any computer on thenetwork.
NOTE: Microsoft Internet Explorer 6.0 must be installed on the computer systemto run the installation program.
Choose the installation option for the type of network you have:
• Client/server network: If your network has a computer acting as a dedicated printserver, install the device software on the server, and then install the devicesoftware on the client computers. For more information see To install the device ona network and To install the device software on client computers. This methoddoes not allow you to share the full functionality of the device. Client computerscan only print from the device.
• Peer-to-peer network: If you have a peer-to-peer network (a network without adedicated print server), install the software on the computers that will be using thedevice. For more information, see To install the device on a network.
In addition, you can connect to a network printer on both types of networks using theAdd Printer wizard in Windows. For more information, see To install the printer driverusing Add Printer.
To install the device on a networkUse the following steps to install the device software in the following networkingscenarios:
You have a peer-to-peer network (a network without a dedicated print server)1. Remove the protective cover from the device's network port and connect the
device to the network.2. Close any third-party firewall and any applications that are running on the
computer system that are acting as the print server.3. Insert the Starter CD into the CD drive. The CD menu starts automatically. If the
CD menu does not start automatically, browse to the CD drive of the computer anddouble-click Setup.exe.
4. On the CD menu, click Install, and then follow the onscreen instructions.5. On the Connection Type screen, select Wired network/Wireless, and then click
Next.6. Follow the onscreen instructions to complete the installation.
NOTE: To share the device with Windows client computers, see To install thedevice software on client computers and To share the device on a locally sharednetwork.
To install the device software on client computersAfter printer drivers are installed on the computer that is acting as the print server, theprinting functionality can be shared. Individual Windows users who want to use thenetwork device must install the software on their computers (clients).
Configure the device (Windows) 127

A client computer can connect to the device in the following ways:
• In the Printers folder, double-click the Add Printer icon and follow the instructionsfor a network installation. For more information, see To install the printer driverusing Add Printer.
• On the network, browse to the device and drag it to your Printers folder.• Add the device and install the software from the INF file on your network. On the
Starter CD, the INF files are stored in the root directory of the CD.
To install the printer driver using Add Printer1. Click Start, point to Settings, and then click Printers or Printers and Faxes.
- Or -Click Start, click Control Panel, and then double-click Printers.
2. Double-click Add Printer, and then click Next.3. Select Network Printer or Network Printer Server.4. Click Next.5. Do one of the following:
Type in the network path or queue name of the shared device, and then click Next.Click Have Disk when prompted to select the device model.Click Next and locate the device in the list of shared printers.
6. Click Next and follow the onscreen instructions to complete the installation.
Configure the device (Mac OS)You can use the device with a single Macintosh computer using a USB cable, or youcan share it among other users on a network.
This section contains the following topics:
• To install the software for network or direct connection• To share the device on a locally shared network
To install the software for network or direct connection1. Connect the device to your computer with a USB cable.2. Insert the Starter CD into the CD drive. Double-click the CD icon on the desktop,
and then double-click the setup icon. Also, you can locate the Installer folder onthe Starter CD.
3. Click Install Software and follow the onscreen instructions.4. If necessary, share the device with other Macintosh computer users.
• Direct connection: Share the device with the other Macintosh computerusers. For more information, see To share the device on a locally sharednetwork.
• Network connection: Individual Macintosh computer users who want to usethe device on the network must install the device software on their computers.
Chapter 9
128 Configure and manage

To share the device on a locally shared networkWhen you connect the device directly, you can share it with other computers using asimple form of networking known as locally shared networking. Use this configurationonly in small groups or when usage is low. The connected computer is slowed downwhen many users print to the device.Basic requirements for sharing in the Mac OS environment include the following items:
• The Macintosh computers must be communicating on the network using TCP/IP,and they must have IP addresses. (AppleTalk is not supported.)
• The device that is being shared must be connected to a built-in USB port on thehost Macintosh computer.
• Both the host Macintosh computer and the client Macintosh computers that areusing the shared device must have device sharing software installed, and thedriver or PPD for the device that is installed. (You can run the installation programto install the device sharing software and associated Help files.)
For more information about USB device sharing, see the support information on theApple Web site (www.apple.com) or the Apple Macintosh Help on the computer.
To share the device among computers running Mac OS1. Turn on printer sharing on all Macintosh computers (host and clients) that are
connected to the printer. Depending on the OS version you are using, do one ofthe following:• Mac OS 10.3: Open System Preferences, click Print & Fax, and then check
the box next to Share my printers with other computers.• Mac OS 10.4: Open System Preferences, click Print & Fax, click the Sharing
tab, check the box next to Share these printers with other computers, andthen select the printer to be shared.
2. To print from the other Macintosh computers (the clients) on the network, do thefollowing:a. Click File, and then select Page Setup in the document you want to print.b. In the drop-down menu next to Format for, select Shared Printers, and then
select your device.c. Select the Paper Size, and then click OK.d. In the document, click File, and then select Print.e. From the drop-down menu next to Printer, select Shared Printers, and then
select your device.f. Make additional settings, if necessary, and then click Print.
Set up the device for wireless communication (somemodels only)
You may set up the device for wireless communication using one of the following ways:
Wireless communication mode Infrastructure Ad hoc*
Control panel
Set up the device for wireless communication (some models only) 129

Network cableFor more information, see To set up the device ona wireless network (Mac OS) or To set up wirelesscommunication using the installer (Windows).
SecureEasySetup (SES)For more information, see To set up wirelesscommunication using SecureEasySetup (SES).
* An ad hoc network can be set up using the Wireless Connection Utility on the StarterCD.
NOTE: If you encounter problems, see Solve wireless problems.
To use the device with any wireless connection, you must run the installationprogram at least once from the Starter CD and create a wireless connection.
Make sure the device is not connected to the network using a network cable.
The sending device must have built-in 802.11 capabilities or an 802.11 wirelesscard installed.
The device and the computers that use it must be on the same subnet.
Before installing the device software, you may wish to find out the settings of yournetwork. Obtain the information from your system administrators, or complete thefollowing tasks:
• Obtain your network's network name or Service Set Identifier (SSID) andcommunication mode (infrastructure or ad hoc) from the configuration utility for thenetwork's wireless access point (WAP) or the computer's network card.
• Find out the type of encryption your network uses, such as Wired EquivalentPrivacy (WEP).
• Find out the security password or encryption key of the wireless device.
Understand 802.11 wireless network settingsNetwork name (SSID)By default, the device looks for the wireless network name or SSID named "hpsetup."Your network may have a different SSID.
Communication modeThere are two communication mode options:
• Ad hoc: On an ad hoc network, the device is set to ad hoc communication modeand communicates directly with other wireless devices without the use of a WAP.All devices on the ad hoc network must:• Be 802.11 compatible• Have ad hoc as the communication mode• Have the same network name (SSID)
Chapter 9(continued)
130 Configure and manage

• Be on the same subnet and same channel• Have the same 802.11 security settings
• Infrastructure (recommended): On an infrastructure network, the device is set toinfrastructure communication mode and communicates with other devices on thenetwork, whether the devices are wired or wireless, through a WAP. WAPscommonly act as routers or gateways on small networks.
Security settings
NOTE: For the available settings for the device, see Understand the networkconfiguration page.
For more information on wireless security, visit www.weca.net/opensection/pdf/whitepaper_wi-fi_security4-29-03.pdf.
• Network authentication: The device's factory default setting is 'Open,' whichdoes not require security for authorization or encryption. The other possible valuesare 'OpenThenShared,' 'Shared,' and 'WPA-PSK' (Wi-Fi® Protected Access Pre-Shared Key).WPA increases the level of over-the-air data protection and access control onexisting and future Wi-Fi networks. It addresses all known weaknesses of WEP,the original native security mechanism in the 802.11 standard.WPA2 is the second generation of WPA security; it provides enterprise andconsumer Wi-Fi users with a high level of assurance that only authorized userscan access their wireless networks.
• Data encryption:• Wired Equivalent Privacy (WEP) provides security by encrypting data sent over
radio waves from one wireless device to another wireless device. Devices on aWEP-enabled network use WEP keys to encode data. If your network usesWEP, you must know the WEP key(s) it uses.
• WPA uses the Temporal Key Integrity Protocol (TKIP) for encryption andemploys 802.1X authentication with one of the standard ExtensibleAuthentication Protocol (EAP) types available today.
• WPA2 provides a new encryption scheme, the Advanced Encryption Standard(AES). AES is defined in counter cipher-block chaining mode (CCM) andsupports the Independent Basic Service Set (IBSS) to enable security betweenclient workstations operating in ad hoc mode.
To set up wireless communication using the control panel with wireless setupwizard
The Wireless Setup Wizard provides an easy way to set up and manage a wirelessconnection to your device.
NOTE: To use this method, you must have a wireless network set up and running.
1. Set up the device hardware (see the getting started guide or the setup poster thatcame with your device).
2. On the control panel, press the Setup button.3. Press an arrow button to move to Network, and then press OK.
Set up the device for wireless communication (some models only) 131

4. Press an arrow button to move to Wizard, and then press OK.5. Follow the display instructions to complete the setup.
To set up wireless communication using the installer (Windows)For this method, you will need to have a network set up and running.
1. Set up the device hardware (see the getting started guide).2. Remove the protective cover from the device's network port.3. Close any applications that are running on your computer system.4. Insert the Starter CD into the CD drive. The CD menu runs automatically. If the CD
menu does not start automatically, double-click the setup icon on the Starter CD.5. On the CD menu, click Install and follow the onscreen instructions.6. On the Connection Type screen, select Wireless, and then click Next.
NOTE: If the device cannot be found, you will have the option to temporarilyuse a network cable to communicate with the device and configure its wirelesssettings.
Complete the following steps to temporarily connect the printer to yournetwork if you are unable to establish wireless communication.a. Temporarily connect the device to the network with an Ethernet cable.
b. Follow the onscreen instructions and disconnect the cable when prompted.7. On the Select a Network Name (SSID) screen, click Select a detected Wireless
Network Name (SSID) to select the wireless network, or click Specify a wirelessnetwork to enter a new network name.
8. If you chose to enter a new network name, enter it on the control panel, and thenpress Done.
NOTE: If the SSID that you entered is not found, you will be asked to providesecurity information. If the network does not use encryption, setup will attemptto verify the SSID before continuing.
9. If the device cannot connect to the network name, supply the appropriate WEP keyor WPA passphrase on the keypad when prompted, and then press Done.
Chapter 9
132 Configure and manage

NOTE: Be sure to unplug the Ethernet cable when you are done.
To set up wireless communication using SecureEasySetup (SES)If your wireless router is SES compatible, see the following instructions to set up usingSES.
NOTE: You will need a wireless access point with SecureEasySetup to use thismethod. Set your access point to SecureEasySetup mode. Refer to your accesspoint documentation for more instructions.
1. Press the SES button on the wireless router.
2. Within 2 minutes, press Setup. If the device has a two-line display, selectNetwork, select Wireless Setup Wizard, select SecureEasySetup, and thenfollow the onscreen instructions.
3. Wait about 2 minutes, print the device's self-test diagnostic page, and verify thatthe SES settings match the router's wireless settings.
NOTE: If the connection fails, you might need to reset the device's networksettings or modify the wireless settings and repeat the steps. For moreinformation, see Solve wireless problems.
4. Close any applications that are running on your computer system.5. Insert the Starter CD into the CD drive. The CD menu runs automatically. If the CD
menu does not start automatically, double-click the setup icon on the Starter CD.6. On the CD menu, click Install and follow the onscreen instructions.7. At the Connection Type dialog, select Wired network/Wireless and follow the
onscreen instructions.
To set up the device on a wireless network (Mac OS)1. Set up the device hardware (see the getting started guide).2. Ensure an AirPort card is installed on the computer.3. Close any applications that are running on your computer system.4. Open the AirPort Setup Assistant from the Utilities folder. Refer to the AirPort
documentation for details on setting up on wireless networks.
Set up the device for wireless communication (some models only) 133
5. For ad hoc networks, click the AirPort icon on the menu bar and select "hpsetup"under Computer to Computer Networks. For wireless networks, click the AirPorticon, and then click Other to join the network.
6. Insert the Starter CD into the CD drive. The CD menu runs automatically. If the CDmenu does not start automatically, double-click the setup icon on the Starter CD.
7. On the CD menu, click Install Software and follow the onscreen instructions.8. On the Connection Type screen, select the wireless network option, and then
click Done.9. Follow the onscreen instructions in the Network Printer Setup Utility, which starts
running automatically, to install the printer driver.
To turn off wireless communicationOn the control panel, press Setup, then select Network Menu, then select WirelessRadio, and then select either On or Off.
Guidelines for reducing interference on a wireless networkThe following tips will help reduce the chances for interference in a wireless network:
• Keep the wireless devices away from large metal objects, such as filing cabinets,and other electromagnetic devices, such as microwaves and cordless telephones,as these objects can disrupt radio signals.
• Keep the wireless devices away from large masonry structures and other buildingstructures as these objects can absorb radio waves and lower signal strength.
• For an infrastructure network, position the WAP in a central location in line of sightwith the wireless devices on the network.
• Keep all wireless devices on the network within range of one another.
Guidelines for ensuring wireless network security• To add hardware addresses to a WAP• Other guidelines
To add hardware addresses to a WAPMAC filtering is a security feature in which a WAP is configured with a list of MACaddresses (also called "hardware addresses") of devices that are allowed to gainaccess to the network through the WAP.
If the WAP does not have the hardware address of a device attempting to access thenetwork, the WAP denies the device access to the network.
If the WAP filters MAC addresses, then the device's MAC address must be added tothe WAP's list of accepted MAC addresses.
1. Print the network configuration page. For information on the network configurationpage, see Understand the network configuration page.
2. Open the WAP's configuration utility, and add the device's hardware address to thelist of accepted MAC addresses.
Chapter 9
134 Configure and manage

Other guidelinesTo keep the wireless network secure, follow these guidelines:
• Use a password with at least 20 random characters. You can use up to 63characters in a WPA password.
• Avoid any common words or phrases, easy sequences of characters (such as all1s), and personally-identifiable information for passwords. Always use randomstrings composed of uppercase and lowercase letters, numbers, and if allowed,special characters such as punctuation.
• Change the password periodically.• Change the default password provided by the manufacturer for administrator
access to the access point or wireless router. Some routers let you change theadministrator name as well.
• Place the access point or router in the center of a room and not near a window.• Turn off administrative access over wireless if possible. If you do this, you need to
connect to the router with a wired Ethernet connection when you want to makeconfiguration changes.
• Turn off remote administrative access over the Internet on your router, if possible.You can use Remote Desktop to make an encrypted connection to a computerrunning behind your router and make configuration changes from the localcomputer you are accessing over the Internet.
• To avoid accidentally connecting to another party's wireless network, turn off thesetting to automatically connect to non-preferred networks. This is disabled bydefault in Windows XP.
Set up the device for Bluetooth communicationThe HP Bluetooth Wireless Printer Adapter allows you to print documents fromBluetooth devices without a cable connection. Simply insert the HP Bluetooth adapterinto the front USB port and print from a Bluetooth device such as a PDA or cameraphone. You can also use Bluetooth technology to print from a computer to the device.
To set up the device for Bluetooth communication from the control panel1. Insert the HP Bluetooth Adapter into the front USB port (shown in the graphic
below).
Set up the device for Bluetooth communication 135

2. Some Bluetooth devices exchange addresses when they communicate with eachother and establish a connection. Also, some Bluetooth devices display the nameof the other device when connected. If you do not want the default name displayedas the name of your device, you can change the device name.Do the following, as appropriate:
To find out the address of the devicea. Press Setup.b. Select Bluetooth, and then select Device Address. The device address is
displayed, which is read only.c. To enter the address into your all-in-one, follow the instructions that came with
your Bluetooth device.
To change the name of the device from the defaulta. Press Setup.b. Select Bluetooth, and then select Device Name.
NOTE: The device ships with the predefined name of "Officejet L7XXXSeries."
c. Use the keypad to enter a new name.d. When you have finished entering a name for the device, press OK.
The name you entered will appear on your Bluetooth device when you connectto the device to print.
3. Press OK to exit the Setup menu.
To set up the device for Bluetooth communication via the embedded Web server▲ Open the embedded Web server, click the Bluetooth tab, complete the required
fields in each section, and then click Apply.
To change the device name from the default via the embedded Web server▲ Open the embedded Web server, click the Bluetooth tab, type a new name in the
Device Name field, and then click Apply.
Connect the device with BluetoothWith a Bluetooth connection you can access many of the same printing features aswith a USB connection. For example, you can check the device status, as well as theestimated amount of ink remaining in your ink cartridges.
NOTE: The only software functionality available with a Bluetooth connection isprinting. Scanning and software-based faxing cannot be done over a Bluetoothconnection. However, stand-alone copy and fax functions are still available.
Connecting the device with Bluetooth on WindowsYou must have Windows XP and either the Microsoft Bluetooth Protocol Stack or theWidcomm/Broadcom Bluetooth Protocol Stack installed in order to connect the device.
Chapter 9
136 Configure and manage

It is possible to have both the Microsoft Stack and the Widcomm/Broadcom Stack onyour computer, but use only one of them to connect the device.
• Microsoft stack: If you have Windows XP with Service Pack 2 installed on yourcomputer, then your computer has the Microsoft Bluetooth Protocol Stack. TheMicrosoft stack allows you to install an external Bluetooth adapter automatically. Ifyour Bluetooth adapter supports the Microsoft stack but it does not installautomatically, then you do not have the Microsoft stack on your computer. Checkthe documentation that came with the Bluetooth adapter to see if it supports theMicrosoft stack.
• Widcomm/Broadcom stack: If you have an HP computer with Bluetooth built in,or if you have installed an HP Bluetooth adapter, then your computer has theWidcomm/Broadcom stack. If you have an HP computer and plug in anHP Bluetooth adapter, it will install automatically using the Widcomm/Broadcomstack.
To install and print using the Microsoft stack
NOTE: Make sure that you have installed the device software on the computer.The purpose of installing the software is to make sure the printer driver is availablefor the Bluetooth connection. Therefore, if you have already installed the software,you do not need to reinstall it. If you want both a USB and a Bluetooth connectionto the device, install the USB connection first. For more information, see Directconnection. However, if you do not want a USB connection, select Directly to thecomputer on the Connection Type screen. Also, on the Connect Your DeviceNow screen, select the check box next to If you are unable to connect yourdevice now... at the bottom of the screen.
1. Attach an HP Bluetooth adapter to the front USB port of the device.2. If you are using an external Bluetooth adapter for your computer, make sure your
computer is started and then attach the Bluetooth adapter to a USB port on thecomputer. If you have Windows XP with Service Pack 2 installed, the Bluetoothdrivers are installed automatically. If you are prompted to select a Bluetooth profile,select HCRP.If your computer has Bluetooth built in, just make sure the computer is started.
3. On the Windows taskbar, click Start, and then click Printers and Faxes.4. Double-click the Add Printer icon.5. Click Next, and then select A Bluetooth Printer.6. Follow the onscreen instructions to finish the installation.7. Print as you would to any printer.
To install and print using the Widcomm/Broadcom stack1. Make sure that you have installed the device software on the computer.2. Attach an HP Bluetooth adapter to the front USB port.3. Click the My Bluetooth Places icon on the desktop or in the taskbar.4. Click View devices in range.5. Once the available devices are discovered, double-click the name of the device to
finish the installation.6. Print as you would to any device.
Set up the device for Bluetooth communication 137

Connect the device with Bluetooth on Mac OSYou can connect the device to a Mac that has Bluetooth built in, or you can install anexternal Bluetooth adapter.
To install and print using Bluetooth
NOTE: Mac Bluetooth must be enabled in the OS. To verify, open SystemPreferences, click on Network, select Network Port Configurations, and thenassure that Bluetooth is checked.
1. Make sure that you have installed the device software on the computer.2. Attach an HP Bluetooth Adapter to the front USB port of the device.3. Press the Power button on the control panel to turn the device off, and press it
again to turn it on.4. Attach an HP Bluetooth adapter to the computer and turn it on. Make sure that you
have installed the software that came with the adapter. Or, if your computer hasBluetooth built in, just turn on your computer.
5. Open the Printer Setup Utility.6. In the Printer List, click Add.
The computer searches for the device.7. Depending on the Mac OS version you are using, do one of the following:
▲ Mac OS 10.3: Select Bluetooth from the pull-down menu.▲ Mac OS 10.4: Assure that connection type Bluetooth is selected in the
Default Browser tab.8. Select Bluetooth from the pull-down menu. Select the all-in-one and click Add.
The all-in-one is added to the device list.9. Print as you would to any device.
Set Bluetooth security for the deviceYou can enable the following device security settings either through the control panelmenu or the embedded Web server:
• Require passkey authentication prior to someone printing to the device from aBluetooth device.
• Make the device visible or invisible to Bluetooth devices that are within range.
Chapter 9
138 Configure and manage

Use a passkey to authenticate Bluetooth devicesYou can set the security level of the device to either High or Low.
• Low: The device does not require a passkey. Any Bluetooth device within rangecan print to it.
NOTE: The default security setting is Low. Low level security does notrequire authentication.
• High: The device requires a passkey from the Bluetooth device before allowing itto send a print job to it. The passkey must be 1 to 4 characters long, and can onlyconsist of numbers.
NOTE: The device ships with a predefined passkey that is set to four zeroes"0000".
To set the device to require passkey authentication via the control panel1. Press Setup.2. Select Bluetooth, and then select Passkey.3. Use the keypad to enter a new passkey.4. When you have finished entering your passkey, press OK.5. Select Security Level, and then select High.6. Press OK.
High level security requires authentication.Passkey authentication is now set for the device.
To set the device to require passkey authentication via the embedded Web server▲ Open the embedded Web server, click the Bluetooth tab, enter a new passkey in
the Passkey section, click High in the Security Level section, and then click Apply.
To set the device to be visible or not visible to Bluetooth devicesYou can set the device to be either visible to Bluetooth devices (public) or not visible toany (private).
• Visible: Any Bluetooth device within range can print to the device.• Not visible: Only Bluetooth devices that have stored the device address of the all-
in-one can print to it.
NOTE: The device ships with a default accessibility level of Visible.
To set the device to be not visible from the control panel1. Press Setup on the control panel.2. Press Bluetooth, and then press Visibility.3. Use the arrow buttons to select Not Visible, and then press OK.
The all-in-one is inaccessible to Bluetooth devices that have not stored its deviceaddress.
Set up the device for Bluetooth communication 139

To set the device to be not visible from the embedded Web server▲ Open the embedded Web server, click the Bluetooth tab, select Not Visible in the
Visibility section, and then click Apply.
Reset Bluetooth settings via the embedded Web serverTo reset Bluetooth settings on the device to the factory defaults:
1. Open the embedded Web server, and then click the Bluetooth tab.2. Click Reset Bluetooth in the Reset Bluetooth section, and then click Apply.
Uninstall and reinstall the softwareIf your installation is incomplete, or if you connected the USB cable to the computerbefore prompted by the software installation screen, you might need to uninstall andthen reinstall the software. Do not simply delete the device application files from yourcomputer. Make sure to remove them properly using the uninstall utility provided whenyou installed the software that came with the device.
There are three methods to uninstall the software on a Windows computer, and onemethod to uninstall on a Macintosh computer.
To uninstall from a Windows computer, method 11. Disconnect the device from your computer. Do not connect it to your computer until
after you have reinstalled the software.2. Press the Power button to turn off the device.3. On the Windows taskbar, click Start, select Programs or All Programs, select
HP, select Officejet Pro L7XXX Series, and then click Uninstall.4. Follow the onscreen instructions.5. If you are asked whether you would like to remove shared files, click No.
Other programs that use these files might not work properly if the files are deleted.6. Restart your computer.7. To reinstall the software, insert the device Starter CD into your computer's CD-
ROM drive, follow the onscreen instructions, and also see To install the softwarebefore connecting the device (recommended).
8. After the software is installed, connect the device to your computer.9. Press the Power button to turn the device on.
After connecting and turning on the device, you might have to wait several minutesfor all of the Plug and Play events to complete.
10. Follow the onscreen instructions.When the software installation is complete, the HP Digital Imaging Monitor iconappears in the Windows system tray.
To uninstall from a Windows computer, method 2
NOTE: Use this method if Uninstall is not available in the Windows Start menu.
Chapter 9
140 Configure and manage

1. On the Windows taskbar, click Start, select Settings, select Control Panel, andthen click Add/Remove Programs.- Or -Click Start, click Control Panel, and then double-click Programs and Features.
2. Select HP Officejet Pro All-in-One Series, and then click Change/Remove orUninstall/Change.Follow the onscreen instructions.
3. Disconnect the device from your computer.4. Restart your computer.
NOTE: It is important that you disconnect the device before restarting yourcomputer. Do not connect the device to your computer until after you havereinstalled the software.
5. Insert the device Starter CD into your computer's CD-ROM drive and then start theSetup program.
6. Follow the onscreen instructions and also see To install the software beforeconnecting the device (recommended).
To uninstall from a Windows computer, method 3
NOTE: Use this method if Uninstall is not available in the Windows Start menu.
1. Insert the device Starter CD into your computer's CD-ROM drive, and then startthe Setup program.
2. Disconnect the device from your computer.3. Select Uninstall and follow the onscreen directions.4. Restart your computer.
NOTE: It is important that you disconnect the device before restarting yourcomputer. Do not connect the device to your computer until after you havereinstalled the software.
5. Start the Setup program for the device again.6. Select Install.7. Follow the onscreen instructions and also see To install the software before
connecting the device (recommended).
To uninstall from a Macintosh computer1. Launch HP Device Manager.2. Click Information and Settings.3. Select Uninstall HP AiO Software from the pull-down menu.
Follow the onscreen instructions.4. After the software is uninstalled, restart your computer.5. To reinstall the software, insert the device Starter CD into your computer's CD-
ROM drive.
Uninstall and reinstall the software 141

6. On the desktop, open the CD-ROM, and then double-click HP All-in-One Installer.7. Follow the onscreen instructions and also see To install the software before
connecting the device (recommended).
Chapter 9
142 Configure and manage

10 Maintain and troubleshootThis section contains the following topics:
• Supported ink cartridges• Replace the ink cartridges• Maintain the printheads• Store printing supplies• Clean the device• Troubleshooting tips and resources• Solve printing problems• Poor print quality and unexpected printouts• Solve paper-feed problems• Solve copy problems• Solve scan problems• Solve fax problems• Solve photo (memory card) problems• Solve device management problems• Troubleshoot installation issues• Clear jams
Supported ink cartridgesThe availability of ink cartridges varies by country/region. The ink cartridges mightcome in different sizes. To obtain a list of supported ink cartridges for your device,print the self-test diagnostic page and read the information in the ink cartridge statussection. [For more information, see Understand the self-test diagnostic page .]
You can find the ink cartridge number in the following places:
• On the self-test diagnostic page (see Understand the self-test diagnostic page).• On the label of the ink cartridge you are replacing.• Windows: From the Toolbox, if you have bidirectional communication, click the
Estimated Ink Levels tab, scroll to display the Cartridge Details button, and thenclick Cartridge Details.
• Mac OS: From the HP Printer Utility, click Supply Info from the Information andSupport panel, and then click Retail Supplies Information.
NOTE: Ink from the cartridges is used in the printing process in a number ofdifferent ways, including in the initialization process, which prepares the device andcartridges for printing, and in printhead servicing, which keeps print nozzles clearand ink flowing smoothly. In addition, some residual ink is left in the cartridge afterit is used. For more information see www.hp.com/go/inkusage.
Maintain and troubleshoot 143

Replace the ink cartridgesYou can check the estimated ink levels from the Toolbox (Windows), the HP PrinterUtility (Mac OS), or the embedded Web server. For information about using thesetools, see Use device management tools. You can also print the self-test diagnosticpage to view this information (see Understand the self-test diagnostic page).
NOTE: The ink levels shown are an estimate only. Actual ink volumes may vary.
After removing a cartridge from its package, install it right away. Do not remove acartridge from the device for long periods of time.
To find out which ink cartridges work with your device, see Supplies.
To replace the ink cartridges1. Gently pull open the ink cartridge cover.
2. Remove the ink cartridge that requires replacement by grasping it between yourthumb and forefinger and pulling it firmly toward you.
3. Remove the new ink cartridge from its package.4. Align the cartridge with its color-coded slot and insert the cartridge into the slot.
Press down firmly on the cartridge to ensure proper contact.5. Close the ink cartridge cover.
Chapter 10
144 Maintain and troubleshoot

Maintain the printheadsIf printed characters are incomplete, or dots or lines are missing from printouts, inknozzles might be clogged and you might need to clean the printheads.
When the quality of printouts deteriorates, complete the relevant steps based on thefollowing sequence:
1. Check the health of the printheads. For more information, see To check printheadhealth.
2. Print the print quality diagnostic page on a clean sheet of white paper. Evaluateany problem areas, and perform the recommended actions. For more information,see To print the print quality diagnostic page.
3. Manually clean the printhead contacts. For more information, see To clean theprintheads.
4. Replace the printheads if the problems persist after cleaning. For moreinformation, see To replace the printheads.
CAUTION: HP is not responsible for damage to the device that results frommodifying the printheads.
To check printhead healthUse one of the following means to check the printhead health. If the status of anyprinthead is not good or fair, then perform one or more of the maintenance functions,or clean or replace the printhead.
• Self-Test Diagnostic page: Print the self-test diagnostic page on a clean sheet ofwhite paper, and check the printhead health section. For more information, seeUnderstand the self-test diagnostic page.
• Embedded Web server: Open the embedded Web server. For more information,see To open the embedded Web server. Click the Information tab, and then clickInk Supplies in the left pane.
• Toolbox (Windows): Open the Toolbox. For more information, see To open theToolbox. Click the Information tab, and then click Printhead Health.
To print the print quality diagnostic pageUse the print quality diagnostic page to diagnose issues affecting the print quality. Thiswill help you decide whether to run any maintenance tools to improve the print qualityof your printouts. You can also view the ink level information, and the printhead healthstatus on the page.
• Control panel: Press the Setup button, select Print Report, select Print QualityPage, and then press OK.
• Embedded Web server: Click the Settings tab, click Device Services in the leftpane, select Print PQ (print quality) diagnostic page from the drop-down list inthe Print Quality section, and then click Run Diagnostic.
• Toolbox (Windows): Click the Services tab, and then click Print PQ (printquality) diagnostic page and follow the onscreen instructions.
• HP Printer Utility (Mac OS): Click Print Quality Diagnostics from theInformation and Support panel.
Maintain the printheads 145

1 Printer Information: Shows device information (such as the product model number, serialnumber, and firmware version number), the number of pages printed from the trays andduplexer, the ink level information, and the printhead health status.
2 Test Pattern 1: If the lines are not straight and connected, align the printheads. For moreinformation, see To align the printheads.
3 Test Pattern 2: If there are thin white lines across any of the colored blocks, clean theprintheads. For more information, see To clean the printheads.
4 Test Pattern 3: If there are dark lines or white gaps where the arrows are pointing,calibrate the linefeed. For more information, see To calibrate the linefeed.
To align the printheadsWhenever you replace a printhead, the device automatically aligns the printheads toensure the best print quality. However, if the appearance of your printed pagesindicates that the printheads are misaligned, you can start the alignment processmanually.
• Control panel: Press the Setup button, select Tools, select Align Printer, andthen press OK. Press OK when the alignment is done to continue.
• Embedded Web server: Click the Settings tab, click Device Services in the leftpane, select Align Printheads from the drop-down list in the Print Qualitysection, and then click Run Diagnostic.
• Toolbox (Windows): Click the Services tab, and then click Align Printheads andfollow the onscreen instructions.
• HP Printer Utility (Mac OS): Click Align from the Information and Support panel.
Chapter 10
146 Maintain and troubleshoot

To calibrate the linefeed• Control panel: Press theSetup button, select Tools, select Calibrate Linefeed,
and then press OK.• Embedded Web server: Click the Settings tab, click Device Services in the left
pane, select Calibrate Linefeed from the drop-down list in the Print Qualitysection, and then click Run Diagnostic.
• Toolbox (Windows): Click the Services tab, and then click Calibrate Linefeedand follow the onscreen instructions.
• HP Printer Utility (Mac OS): Click Calibrate Linefeed from the Information andSupport panel.
To clean the printheads
NOTE: Cleaning uses ink, so clean the printheads only when necessary.
The cleaning process takes up to 3.5 minutes. Some noise might be generated inthe process.
• Control panel: Press the Setup button, select Tools, and then select CleanPrinthead.
• Embedded Web server: Click the Device Settings tab, click Device Services inthe left pane, select Clean printheads from the drop-down list in the Print Qualitysection, and then click Run Diagnostic.
• Toolbox (Windows): Click the Services tab, and then click Clean Printheadsand follow the onscreen instructions.
• HP Printer Utility (Mac OS): Click Clean from the Information and Support panel.
To clean the printhead contacts manuallyAfter the printheads are installed, you might get a control panel message telling youthe device will not print. If you receive this message, you might need to clean theelectrical contacts on the printheads and in the device.
CAUTION: Clean the electrical contacts only after you have attempted to cleanthe printheads. Electrical contacts contain sensitive electronic components that canbe damaged easily. For more information, see To clean the printheads.
1. Open the top cover.2. If the carriage does not move to the left automatically, press and hold the OK
button for five seconds. Wait for the carriage to stop moving, and then unplug thepower cord from the printer.
Maintain the printheads 147
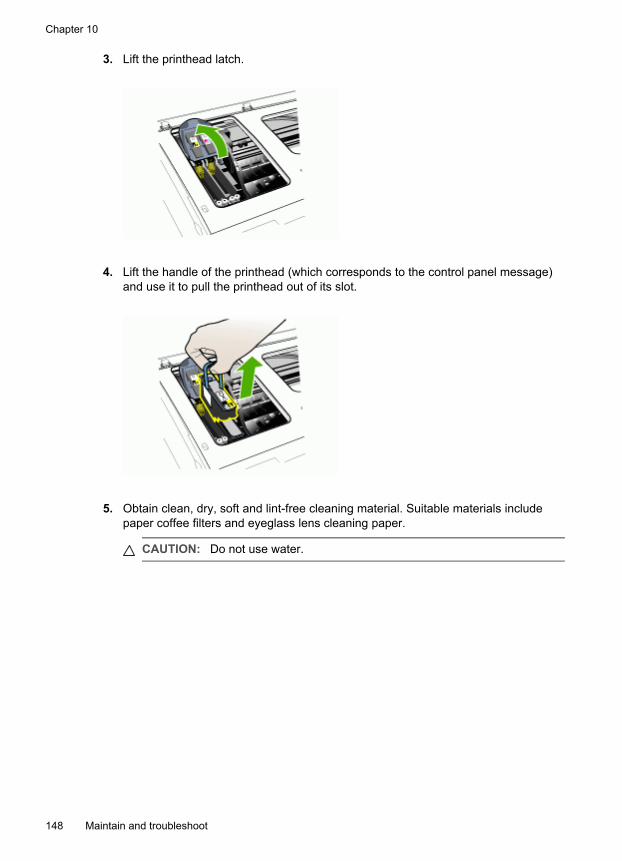
3. Lift the printhead latch.
4. Lift the handle of the printhead (which corresponds to the control panel message)and use it to pull the printhead out of its slot.
5. Obtain clean, dry, soft and lint-free cleaning material. Suitable materials includepaper coffee filters and eyeglass lens cleaning paper.
CAUTION: Do not use water.
Chapter 10
148 Maintain and troubleshoot

6. Wipe the electrical contacts on the printhead but do not touch the nozzles.
NOTE: The electrical contacts are small copper-color squares, grouped onone face of the printhead.The nozzles are on a different face of the printhead. Ink will be visible on thenozzles.
CAUTION: Touching the nozzles can cause permanent nozzle damage. Also,ink can permanently mark clothing.
7. After cleaning, place the printhead on a sheet of paper or paper towel. Make surethe nozzles are facing up and are not in contact with the paper.
Maintain the printheads 149

8. Clean the electrical contacts in the printhead slot inside the device with a clean,dry, soft and lint-free cloth.
9. Plug in the power cord and turn on the device. The control panel should indicatethat the printhead is missing.
10. Insert the printhead into its color-coded slot (the label on the printhead must matchthe label on the printhead latch). Press down firmly on the printhead to ensureproper contact.
11. Pull the printhead latch all the way forward, and then press down to ensure thatthe latch is properly engaged. You might have to apply some pressure to engagethe latch.
12. Where necessary, repeat the above steps for the remaining printhead.13. Close the top cover.14. If the control panel message remains, repeat the cleaning procedure described
above for the printhead which corresponds to the message.15. If the control panel message remains, replace the printhead which corresponds to
the message.16. Wait while the device initializes the printheads and prints the alignment pages. If
the device does not print the pages, start the alignment process manually. Formore information, see To align the printheads.
To replace the printheads
NOTE: To find out which printheads work with your printer, see Supplies.
1. Open the top cover.2. If the carriage does not move to the left automatically, press and hold the OK
button for 5 seconds. Wait for the carriage to stop moving.
Chapter 10
150 Maintain and troubleshoot

3. Lift the printhead latch.
4. Lift the handle of a printhead and use it to pull the printhead out of its slot.
5. Before installing a printhead, shake the printhead up and down at least six timeswhile the printhead is still in its packaging.
Maintain the printheads 151

6. Remove the new printhead from its package, and then remove its orangeprotective caps.
CAUTION: Do not shake printheads after the caps are removed.
7. Insert the printhead into its color-coded slot (the label on the printhead must matchthe label on the printhead latch). Press down firmly on the printhead to ensureproper contact.
8. Pull the printhead latch all the way forward, and then press down to ensure thatthe latch is properly engaged. You might have to apply some pressure to engagethe latch.
9. Close the top cover.10. Wait while the device initializes the printheads and prints the alignment pages. If
the device does not print the pages, start the alignment process manually. Formore information, see To align the printheads.
Store printing suppliesThis section covers the following topics:
• Store ink cartridges• Store printheads
Store ink cartridgesInk cartridges can be left in the device for extended periods of time. If you remove theink cartridges, place them in an airtight container, such as a resealable plastic bag.
Store printheadsPrintheads can be left in the device for extended periods of time. If you remove theprintheads, place them in an airtight container, such as a resealable plastic bag.
Clean the deviceThis section provides instructions for keeping the device in top working condition.Perform these maintenance procedures as necessary.
Chapter 10
152 Maintain and troubleshoot

Dust or dirt on the scanner glass, ADF lid backing, or ADF frame can slow downperformance, degrade the quality of scans, and affect the accuracy of special featuressuch as fitting copies to a certain page size.
Clean the scanner glass
To clean the scanner glass1. Turn off the device.2. Lift the ADF.3. Clean the glass by using a soft, lint-free cloth that has been sprayed with a mild
glass cleaner. Dry the glass with a dry, soft, lint-free cloth.
CAUTION: Use only glass cleaner to clean the scanner glass. Avoid cleanersthat contain abrasives, acetone, benzene, and carbon tetrachloride, all of whichcan damage the scanner glass. Avoid isopropyl alcohol because it can leavestreaks on the glass.
CAUTION: Do not spray the glass cleaner directly on the glass. If too muchglass cleaner is applied, the cleaner could leak under the glass and damagethe scanner.
4. Close the ADF, and turn on the device.
Clean the automatic document feeder (ADF)The ADF requires periodic cleaning depending on the amount of use and the type ofpaper that is fed through it. If you use the ADF several times per week, monthlycleaning is recommended. Set up a cleaning routine that is appropriate for the device.
If streaks exist on scanned documents, cleaning the ADF frame might solve theproblem.
Clean the device 153

To clean the ADF1. Turn off the device.2. Lift the ADF.
3. Locate the ADF frame on the underside of the ADF.
4. Press the ADF frame release.
Chapter 10
154 Maintain and troubleshoot

5. Unhook and remove the ADF frame.
6. Clean the ADF frame by using a soft, lint-free cloth that has been sprayed with amild glass cleaner. Clean both sides of the transparent film, including the whitestrip on the inside of the ADF frame.
CAUTION: Use only glass cleaner. Avoid cleaners that contain abrasives,acetone, benzene, and carbon tetrachloride, all of which can damage the ADFframe. Avoid isopropyl alcohol because it can leave streaks.
7. Follow these steps to replace the ADF frame:a. Lift the ADF lid backing, and then hook the ADF frame into the ADF lid.
Clean the device 155

b. Slide the ADF frame under the backing, and then snap it into place.
CAUTION: ADF frame must be under the backing for ADF to function.
8. Close the ADF and then turn on the device.
To clean the ADF lid backing1. Turn off the device.2. Lift the ADF.3. Clean the white ADF lid backing by using a soft, lint-free cloth that has been
sprayed with a mild glass cleaner. Wash the backing gently to loosen debris; donot scrub the backing.
4. Dry the backing with a dry, soft, lint-free cloth.
CAUTION: Do not use paper-based wipes, because these might scratch thebacking.
5. If this does not clean the backing thoroughly, repeat the previous steps usingisopropyl (rubbing) alcohol. Wipe the backing with a damp cloth to remove anyresidual alcohol, and then dry the backing with a dry, soft, lint-free cloth.
6. Close the ADF and then turn on the device.
Chapter 10
156 Maintain and troubleshoot

Clean the exterior
NOTE: Before cleaning the device, turn off the power and unplug the power cordfrom the electrical socket.
Use a soft, damp, lint-free cloth to wipe dust, smudges, and stains off of the case. Theexterior of the device does not require cleaning. Keep fluids away from the interior ofthe device, as well as from the control panel.
Troubleshooting tips and resourcesUse the following tips and resources to resolve printing problems.
• For a paper jam, see Clear a jam in the device.• For paper-feed problems, such as the paper skew and paper pick, see Solve
paper-feed problems.• Power light is on and not blinking. When the device is turned on for the first time, it
takes approximately 12 minutes to initialize it after the printheads are installed.• No error messages appear on the computer screen.• Power cord and other cables are working, and are firmly connected to the device.
Make sure the device is connected firmly to a functioning alternating current (AC)power outlet, and is turned on. For voltage requirements, see Electricalspecifications.
• Media is loaded correctly in the tray and is not jammed in the device.• Printheads and ink cartridges are properly installed in their correct color-coded
slots. Press down firmly on each one to ensure proper contact. Ensure you haveremoved the orange protective caps from each printhead.
• Printhead latch and all covers are closed.• The rear access panel or optional duplexer is locked into place.• All packing tapes and materials are removed.• The device can print a self-test diagnostic page. For more information, see
Understand the self-test diagnostic page.• The device is set as the current or default printer. For Windows, set it as the
default in the Printers folder. For the Mac OS, set it as the default in the PrinterSetup Utility. See your computer's documentation for more information.
• Pause Printing is not selected if you are using a computer running Windows.• You are not running too many programs when you are performing a task. Close
programs that you are not using or restart the computer before attempting the taskagain.
• You can have a static IP address for wired networking, and have a dynamic IPaddress for wireless networking, and vice versa. For more information, see ToChange IP settings.
Troubleshooting tips and resources 157

To set a static IP address1. Open the embedded Web server, click the Networking tab, click Wired (802.3) or
Wireless (802.11) in the left pane, and then click the IP Configuration sub-tab.2. Select Manual IP, and then type the static IP address in the Manual IP Address
box.3. Enter the Manual Subnet Mask and the Manual Default Gateway, if necessary,
and then click Apply.
CAUTION: Changing the IP address can disrupt the current connection to theembedded Web server.
Solve printing problems• The device shuts down unexpectedly• Error message appears on control-panel display• The device is not responding (nothing prints)• Device does not accept printhead• Device takes a long time to print• Blank or partial page printed• Something on the page is missing or incorrect• Placement of the text or graphics is wrong• The device prints half a page, then ejects the paper
The device shuts down unexpectedly
Check the power and power connectionsMake sure the device is connected firmly to a functioning alternating current (AC)power outlet. For voltage requirements, see Electrical specifications.
Error message appears on control-panel display
A non-recoverable error has occurredDisconnect all cables (such as power cord, network cable, and USB cable), wait about20 seconds, and reconnect the cables. If the problem persists, visit the HP Web site(www.hp.com/support) for the latest troubleshooting information, or product fixes andupdates.
The device is not responding (nothing prints)If the device supports wireless communication, see also Solve wireless problems.
Check the device setupFor more information, see Troubleshooting tips and resources.
Chapter 10
158 Maintain and troubleshoot

Check the printhead initializationWhen printheads are installed or replaced, the device automatically prints a fewalignment pages to align the printheads. This process takes about 12 minutes. Untilthis process is complete, only the automatic alignment pages can be printed.
Check the device software installationIf the device is turned off when printing, an alert message should appear on yourcomputer screen; otherwise, the device software might not be installed correctly. Toresolve this, uninstall the software completely, and then reinstall the device software.For more information, see Uninstall and reinstall the software.
Check the cable connections• Make sure both ends of the network/USB cable are secure.• If the device is connected to a network, check the following:
• Check the Link light on the back of the device.• Make sure you are not using a phone cord to connect the device.• The network hub, switch, or router is turned on and working properly.
Check the device setup for a network environmentEnsure the correct device driver and printer driver port are being used. For moreinformation about network connections, see Configure the device (Windows),Configure the device (Mac OS), or the documentation provided by your networkvendors.
Check any personal firewall software installed on the computerThe personal software firewall is a security program that protects a computer fromintrusion. However, the firewall might block communication between the computer andthe device. If there is a problem communicating with the device, try temporarilydisabling the firewall. If the problem persists, the firewall is not the source of thecommunication problem. Re-enable the firewall.If disabling the firewall allows you to communicate with the device, you might want toassign a static IP address to the device and re-enable the firewall. For moreinformation, see To Change IP settings.
Device does not accept printhead
Check the printhead latchMake sure the printhead latch is properly closed.
Check the printhead• Make sure the printhead is inserted into its correct color-coded slot. For more
information, see To replace the printheads.• Remove the printhead, and check to make sure the orange protective caps have
been removed from the printhead.
Solve printing problems 159

Clean the printheadComplete the printhead cleaning procedure. For more information, see Maintain theprintheads.
Turn off the device after removing the printheadAfter removing the printhead, turn off the device, wait about 20 seconds, and turn it onagain without the printhead installed. After the device has restarted, reinsert theprinthead.
Device takes a long time to print
Check the system configurationMake sure the computer meets the minimum system requirements for the device. Formore information, see System requirements.
Check the device software settingsPrint speed is slower when Best or Maximum dpi is selected as the print quality. Toincrease the print speed, select different print settings in the device driver. For moreinformation, see Change print settings.
Check for radio interferenceIf the device is connected using wireless communication and is printing slowly, thenthe radio signal might be weak. For more information, see Guidelines for reducinginterference on a wireless network.
Blank or partial page printed
Check for empty ink cartridgesCheck the control panel to see which cartridge is low or empty. The Toolbox(Windows), HP Printer Utility (Mac OS), and the self-test diagnostic page (seeUnderstand the self-test diagnostic page) provide information about ink levels. If youare printing black text and a blank page prints, the black cartridge might be empty. Formore information, see Replace the ink cartridges.
Check the printhead latchMake sure the printhead latch is properly closed.
Check the printhead• Make sure the printhead is inserted into its correct color-coded slot. For more
information, see To replace the printheads.• Remove the printhead, and check to make sure the orange protective caps have
been removed from the printhead.
Clean the printheadComplete the printhead cleaning procedure. For more information, see Maintain theprintheads.
Chapter 10
160 Maintain and troubleshoot

Turn off the device after removing the printheadAfter removing the printhead, turn off the device, wait about 20 seconds, and turn it onagain without the printhead installed. After it has restarted, reinsert the printhead.
Something on the page is missing or incorrect
Check the printheadsPrint the print quality diagnostic page on a clean sheet of white paper. Evaluate anyproblem areas, and perform the recommended actions. For more information, see Toprint the print quality diagnostic page.
Check the margin settingsMake sure the margin settings for the document do not exceed the printable area ofthe device. For more information, see Set minimum margins.
Check the color print settingsMake sure Print in Grayscale is not selected in the print driver.
Check the device location and length of USB cableHigh electromagnetic fields (such as those generated by USB cables) can sometimescause slight distortions to printouts. Move the device away from the source of theelectromagnetic fields. Also, it is recommended that you use a USB cable that is lessthan 3 meters (9.8 feet) long to minimize the effects of these electromagnetic fields.
Placement of the text or graphics is wrong
Check how the media is loadedMake sure the media width and length guides fit snugly against the edges of the stackof media, and make sure the trays are not overloaded. For more information, see Loadmedia.
Check the media size• Content on a page might be cut off if the document size is larger than the media
that you are using.• Make sure the media size selected in the printer driver match the size of media
loaded in the tray.
Check the margin settingsIf the text or graphics are cut off at the edges of the page, make sure the marginsettings for the document do not exceed the printable area of your device. For moreinformation, see Set minimum margins.
Check the page-orientation settingMake sure the media size and page orientation selected in the application match thesettings in the printer driver. For more information, see Change print settings.
Solve printing problems 161

Check the device location and length of USB cableHigh electromagnetic fields (such as those generated by USB cables) can sometimescause slight distortions to printouts. Move the device away from the source of theelectromagnetic fields. Also, it is recommended that you use a USB cable that is lessthan 3 meters (9.8 feet) long to minimize the effects of these electromagnetic fields.
If the above solutions do not work, the problem may be caused by the inability of theapplication to interpret print settings properly. See the release notes for knownsoftware conflicts, refer to the application's documentation, or contact the softwaremanufacturer for specific help.
The device prints half a page, then ejects the paper
Check the ink cartridgesThe ink cartridges may have run out of ink, and the print job was cancelled. Replacethe ink cartridges, and then resend the print job to the device. For more information,see Replace the ink cartridges.
Poor print quality and unexpected printouts• Poor quality printouts• Meaningless characters print• Ink is smearing• Ink is not filling the text or graphics completely• Output is faded or dull colored• Colors are printing as black and white• Wrong colors are printing• Printout shows bleeding colors• Colors do not line up properly• Lines or dots are missing from text or graphics
Poor quality printouts
Check the printheads and ink cartridgesPrint the print quality diagnostic page on a clean sheet of white paper. Evaluate anyproblem areas, and perform the recommended actions. For more information, see Toprint the print quality diagnostic page.
Check the paper qualityThe paper might be too moist or too rough. Make sure the media meets HPspecifications, and try to print again. For more information, see Select print media.
Chapter 10
162 Maintain and troubleshoot

Check the type of media loaded in the device• Make sure the tray supports the type of media you have loaded. For more
information, see Understand specifications for supported media.• Make sure you have selected the tray in the print driver that contains the media
that you want to use.
Check the device location and length of USB cableHigh electromagnetic fields (such as those generated by USB cables) can sometimescause slight distortions to printouts. Move the device away from the source of theelectromagnetic fields. Also, it is recommended that you use a USB cable that is lessthan 3 meters (9.8 feet) long to minimize the effects of these electromagnetic fields.
Meaningless characters printIf an interruption occurs to a job that is printing, the device might not recognize the restof the job.
Cancel the print job and wait for the device to return to the ready state. If the devicedoes not return to the ready state, cancel all jobs and wait again. When the device isready, resend the job. If prompted by the computer to retry the job, click Cancel.
Check the cable connectionsIf the device and computer are connected with a USB cable, the problem may be dueto a poor cable connection.Make sure the cable connections at both ends are secure. If the problem persists, turnoff the device, disconnect the cable from the device, turn on the device withoutconnecting the cable, and delete any remaining jobs from the print spooler. When thePower light is on and not flashing, reconnect the cable.
Check the document fileThe document file may be damaged. If you can print other documents from the sameapplication, try printing a backup copy of your document, if available.
Ink is smearing
Check the print settings• When you print documents that use much ink, allow more time to dry before
handling the printouts. This is especially true for transparencies. In the printerdriver, select the Best print quality, and also increase the ink drying time andreduce the ink saturation using the ink volume under the advanced features(Windows) or ink features (Mac OS). However, note that decreasing ink saturationmight give printouts a "washed-out" quality.
• Color documents that have rich, blended colors can wrinkle or smear when printedusing the Best print quality. Try using another print mode, such as Normal, toreduce ink, or use HP Premium Paper designed for printing vivid color documents.For more information, see Change print settings.
Poor print quality and unexpected printouts 163

Check the media typeSome types of media do not accept ink well. For these types of media, ink will drymore slowly and smearing may occur. For more information, see Select print media.
Ink is not filling the text or graphics completely
Check the media typeSome media types are not suitable for use with the device. For more information, seeSelect print media.
Check the printheadsPrint the print quality diagnostic page on a clean sheet of white paper. Evaluate anyproblem areas, and perform the recommended actions. For more information, see Toprint the print quality diagnostic page.
Output is faded or dull colored
Check the print modeThe Draft or Fast mode in the printer driver allows you to print at a faster rate, which isgood for printing drafts. To get better results, select Normal or Best. For moreinformation, see Change print settings.
Check the paper type settingWhen printing on transparencies or other special media, select the correspondingmedia type in the print driver. For more information, see To print on special or custom-sized media (Windows).
Colors are printing as black and white
Check the print settingsMake sure Print in Grayscale is not selected in the printer driver.
Wrong colors are printing
Check the print settingsMake sure Print in Grayscale is not selected in the printer driver.
Check the printheadsPrint the print quality diagnostic page on a clean sheet of white paper. Evaluate anyproblem areas, and perform the recommended actions. For more information, see Toprint the print quality diagnostic page.
Chapter 10
164 Maintain and troubleshoot

Printout shows bleeding colors
Check the ink cartridgesMake sure ink cartridges have not been tampered with. Refilling processes and theuse of incompatible inks can disrupt the intricate printing system and result in reducedprint quality and damage to the device or printhead. HP does not guarantee or supportrefilled ink cartridges. For ordering information, see HP supplies and accessories.
Check the printheadsPrint the print quality diagnostic page on a clean sheet of white paper. Evaluate anyproblem areas, and perform the recommended actions. For more information, see Toprint the print quality diagnostic page.
Colors do not line up properly
Check the printheadsPrint the print quality diagnostic page on a clean sheet of white paper. Evaluate anyproblem areas, and perform the recommended actions. For more information, see Toprint the print quality diagnostic page.
Check the graphics placementUse the zoom or print preview feature of your software to check for gaps in theplacement of graphics on the page.
Lines or dots are missing from text or graphics
Check the printheadsPrint the print quality diagnostic page on a clean sheet of white paper. Evaluate anyproblem areas, and perform the recommended actions. For more information, see Toprint the print quality diagnostic page.
Solve paper-feed problemsFor information on resolving jams, see Clear a jam in the device.
Optional Tray 2 cannot be inserted • Reinsert the tray. Make sure it is aligned with the device opening.• Check for a paper jam. For more information, see Clear a jam in the device.
Another paper-feed problem is occurring
Media is not supported for the printer or trayUse only media that is supported for the device and the tray being used. For moreinformation, see Understand specifications for supported media.
Solve paper-feed problems 165

Media is not picked up from a tray• Make sure media is loaded in the tray. For more information, see Load media. Fan
the media before loading.• Make sure the paper guides are set to the correct markings in the tray for the
media size you are loading. Also make sure the guides are snug, but not tight,against the stack.
• Make sure media in the tray is not curled. Uncurl paper by bending it in theopposite direction of the curl.
• Make sure that the tray is completely loaded. If you are using special media that isonly available in small quantities, try placing the special media on top of otherpaper of the same size to help fill the tray. (Some media is picked up more easily ifthe tray is full.)
• Make sure Tray 2 (optional) is inserted properly.
Media is not coming out correctly• Make sure the output tray extension is extended; otherwise, printed pages may fall
off the device.
• Remove excess media from the output tray. There is a limit to the number ofsheets the tray can hold.
Pages are skewing• Make sure the media loaded in the trays is aligned to the paper guides. If needed,
pull out the trays from the device and reload the media properly, making sure thatthe paper guides are properly aligned.
• Make sure the rear access panel or duplexer is properly installed.• Load media into the device only when it is not printing.
Multiple pages are being picked up• Fan the media before loading.• Make sure the paper guides are set to the correct markings in the tray for the
media size you are loading. Also make sure the guides are snug, but not tight,against the stack.
• Make sure the tray is not overloaded with paper.
Chapter 10
166 Maintain and troubleshoot

• Make sure that the tray is completely loaded. If you are using special media that isonly available in small quantities, try placing the special media on top of otherpaper of the same size to help fill the tray. (Some media is picked up more easily ifthe tray is full.)
• When reinserting Tray 2 (optional) into the device, do so gently. Forceful insertionwith a full stack of paper may cause sheets to slide up within the device, causingthe device to jam or pick multiple sheets at one time.
• Use HP media for optimum performance and efficiency.
Solve copy problemsIf the following topics do not help, see Support and warranty for information about HPsupport.
No copy came out• Check the power
Make sure that the power cord is securely connected, and the device turned on.• Check the status of the device
• The device might be busy with another job. Check the control-panel display forinformation about the status of jobs. Wait for any job that is processing to finish.
• The device might be jammed. Check for jams. See Clear jams.• Check the trays
Make sure that media is loaded. See Load media for more information.
Copies are blank• Check the trays
• If you are copying from the ADF, make sure that the originals have beenloaded correctly. For more information, see Load an original in the automaticdocument feeder (ADF).
• If you are copying from the scanner glass, make sure that the ADF is empty.• Check the media
The media might not meet Hewlett-Packard media specifications (for example, themedia is too moist or too rough). See Select print media for more information.
• Check the settingsThe contrast setting might be set too light. Use the Copy button on the controlpanel to create darker copies.
Wrong original was copiedCheck the traysIf you are copying from the scanner glass, make sure that the ADF is empty.
Solve copy problems 167

Documents are missing or faded• Check the media
The media might not meet Hewlett-Packard media specifications (for example, themedia is too moist or too rough). See Select print media for more information.
• Check the settingsThe quality setting of Fast (which produces draft-quality copies) might beresponsible for the missing or faded documents. Change to the Normal or Bestsetting.
• Check the original• The accuracy of the copy depends on the quality and size of the original. Use
the Copy menu to adjust the brightness of the copy. If the original is too light,the copy might not be able to compensate, even if you adjust the contrast.
• Colored backgrounds might cause images in the foreground to blend into thebackground, or the background might appear in a different shade.
Size is reduced• The reduce/enlarge or other copy feature might have been set from the control
panel to reduce the scanned image. Check the settings for the copy job to makesure that they are for normal size.
• The HP photo and imaging software settings might be set to reduce the scannedimage. Change the settings, if needed. See the onscreen Help for the HP photoand imaging software for more information.
Copy quality is poor• Take steps to improve the copy quality
• Use quality originals.• Load the media correctly. If the media is loaded incorrectly, it might skew,
causing unclear images. See Select print media for more information.• Use or make a carrier sheet to protect your originals.
• Check the device• The ADF might not be closed properly.• The scanner glass, ADF lid backing, or ADF window might need cleaning. See
Clean the device for more information.
Copy defects are apparent• Vertical white or faded stripes
The media might not meet Hewlett-Packard media specifications (for example, themedia is too moist or too rough). See Select print media for more information.
• Too light or darkTry adjusting the contrast and copy-quality settings.
• Unwanted linesThe scanner glass, ADF lid backing, or ADF frame might need cleaning. SeeClean the device for more information.
Chapter 10
168 Maintain and troubleshoot

• Black dots or streaksInk, glue, correction fluid, or an unwanted substance might be on the scannerglass or ADF lid backing. Try cleaning the device. See Clean the device for moreinformation.
• Unclear text• Try adjusting the contrast and copy-quality settings.• The default enhancement setting might not be suitable for the job. Check the
setting and change it to enhance text or photographs, if needed. For moreinformation, see Change the copy settings.
• Incompletely filled text or graphicsTry adjusting the contrast and copy-quality settings.
• Copy is slanted or skewed• Make sure that the ADF input tray is not too full.• Make sure that the ADF width adjusters are snug against the sides of the media.
• Large, black typefaces look splotchy (not smooth)The default enhancement setting might not be suitable for the job. Check thesetting and change it to enhance text or photographs, if needed. For moreinformation, see Change the copy settings.
• Horizontal grainy or white bands in light-gray to medium-gray areasThe default enhancement setting might not be suitable for the job. Check thesetting and change it to enhance text or photographs, if needed. For moreinformation, see Change the copy settings.
Error messages appear“Reload document and then reload job”Press the OK button, and then reload the remaining documents (up to 50 pages) inthe ADF. For more information see Load media.
The device prints half a page, then ejects the paper
Check the ink cartridgesThe ink cartridges may have run out of ink, and the print job was cancelled. Replacethe ink cartridges, and then resend the print job to the device. For more information,see Replace the ink cartridges.
Solve scan problemsIf the following topics do not help, see Support and warranty for information about HPsupport.
NOTE: If you are starting the scan from a computer, see the software Help fortroubleshooting information.
Solve scan problems 169

Scanner did nothing• Check the original
Make sure that the original is loaded correctly. For more information, see Load anoriginal on the scanner glass.
• Check the deviceThe device might be coming out of PowerSave mode after a period of inactivity,which delays processing a short while. Wait until the device reaches the READYstate.
Scan takes too long• Check the settings
• If you set the resolution too high, the scan job takes longer and results in largerfiles. To obtain good results when scanning or copying, do not use a resolutionthat is higher than needed. You can lower the resolution to scan more quickly.
• If you acquire an image through TWAIN, you can change the settings so thatthe original scans in black and white. See the onscreen Help for the TWAINprogram for information.
• Check the status of the deviceIf you sent a print or copy job before you tried to scan, the scan starts if thescanner is not busy. However, the printing and scanning processes share memory,which means that the scan might be slower.
Part of the document did not scan or text is missing• Check the original
• Make sure that you loaded the original correctly. For more information, seeLoad the originals.
• If you scanned the document from the ADF, try scanning the document directlyfrom the scanner glass. For more information, see Load an original on thescanner glass.
• Colored backgrounds can cause images in the foreground to blend into thebackground. Try adjusting the settings before you scan the original, or tryenhancing the image after you scan the original.
• Check the settings• Make sure that the input media size is large enough for the original that you
are scanning.• If you are using the HP photo and imaging software, the default settings in the
HP photo and imaging software might be set to automatically perform aspecific task other than the one that you are attempting. See the onscreenHelp for the HP photo and imaging software for instructions about changing theproperties.
Chapter 10
170 Maintain and troubleshoot

Text cannot be edited• Check the settings
• Make sure that the OCR software is set to edit text.• When you scan the original, make sure that you select a document type that
creates editable text. If text is classified as a graphic, it is not converted to text.• Your OCR program might be linked to a word-processing program that does
not perform OCR tasks. See the product software Help for more informationabout linking programs.
• Check the originals• For OCR, the original must be loaded into the ADF with the top forward and
face-up. Make sure that you loaded the original correctly. For more information,see Load the originals.
• The OCR program might not recognize text that is tightly spaced. For example,if the text that the OCR program converts has missing or combined characters,"rn" might appear as "m."
• The accuracy of the OCR program depends on the image quality, text size,and structure of the original and the quality of the scan itself. Make sure thatyour original has good image quality.
• Colored backgrounds can cause images in the foreground to blend too much.Try adjusting the settings before you scan the original, or try enhancing theimage after you scan the original. If you are performing an OCR operation onan original, any colored text on the original does not scan well, if at all.
Error messages appear• "Unable to activate TWAIN source" or "An error occurred while acquiring the
image"• If you are acquiring an image from another device, such as a digital camera or
another scanner, make sure that the other device is TWAIN-compliant. Devicesthat are not TWAIN-compliant do not work with the device software.
• Make sure that you have connected the USB Device Cable to the correct porton the back of your computer.
• Verify that the correct TWAIN source is selected. In the software, check theTWAIN source by selecting Select Scanner on the File menu.
• “Reload document and then restart job”Press the OK button, and then reload the remaining documents (up to 50 pages)in the ADF. For more information see Load media.
Scanned image quality is poorThe original is a second-generation photo or pictureReprinted photographs, such as those in newspapers or magazines, are printed byusing tiny dots of ink that make an interpretation of the original photograph, whichdegrades the quality. Often, the ink dots form unwanted patterns that can be detectedwhen the image is scanned or printed or when the image appears on a screen. If the
Solve scan problems 171

following suggestions do not solve the problem, you might need to use a better-qualityversion of the original.• To eliminate the patterns, try reducing the size of the image after scanning.• Print the scanned image to see if the quality is better.• Make sure that the resolution and color settings are correct for the type of scan job.• For best results, use the flatbed scanner for scanning rather than the ADF.• Text or images on the back of a two-sided original appear in the scan
Two-sided originals can "bleed" text or images from the back side to the scan if theoriginals are printed on media that is too thin or too transparent.
• The image quality is better when printedThe image that appears on the screen is not always an accurate representation ofthe quality of the scan.• Try adjusting your computer monitor settings to use more colors (or levels of
gray). On Windows computers, you typically make this adjustment by openingDisplay on the Windows control panel.
• Try adjusting the resolution and color settings.• The scanned image is skewed (crooked)
The original might have been loaded incorrectly. Be sure to use the media guideswhen you load the originals into the ADF. For more information, see Load theoriginals.
• The scanned image shows blots, lines, vertical white stripes, or other defects• If the scanner glass is dirty, the image produced does not have optimum
clarity. See Clean the device for cleaning instructions.• The defects might be on the original and not a result of the scanning process.
• Graphics look different from the originalThe graphics settings might not be suitable for the type of scan job that you areperforming. Try changing the graphics settings.
• Take steps to improve the scan quality• Use the flatbed scanner to scan rather than the ADF.• Use high-quality originals.• Load the media correctly. If the media is loaded incorrectly, it might skew,
which causes unclear images. For more information, see Load the originals.• Adjust the software settings according to how you plan to use the scanned
page.• Use or make a carrier sheet to protect your originals.• Clean the scanner glass. See Clean the scanner glass for more information.
Chapter 10
172 Maintain and troubleshoot

Scan defects are apparent• Blank pages
• The original might have been loaded upside down. Make sure that you loadedthe original correctly. For more information, see Load the originals.
• If you are producing blank pages when you scan from the flatbed scanner,make sure that the original document is loaded correctly. Place the originaldocument face down on the flatbed scanner with the top-left corner of thedocument located in the lower-right corner of the scanner glass. Also, makesure that the ADF is empty.
• Too light or dark• Try adjusting the settings. Be sure to use the correct resolution and color
settings.• The original image might be very light or dark or might be printed on colored
paper.• Unwanted lines
Ink, glue, correction fluid, or an unwanted substance might be on the scannerglass. Try cleaning the scanner glass. See Clean the device for more information.
• Black dots or streaks• Ink, glue, correction fluid, or an unwanted substance might be on the scanner
glass, the scanner glass might be dirty or scratched, or the ADF lid backingmight be dirty. Try cleaning the scanner glass and lid backing. See Clean thedevice for more information. If cleaning does not correct the problem, thescanner glass or ADF lid backing might need to be replaced.
• The defects might be on the original and not a result of the scanning process.• Unclear text
Try adjusting the settings. Make sure that the resolution and color settings arecorrect.
• Size is reducedThe HP software settings might be set to reduce the scanned image. See theproduct software Help for more information about changing the settings.
Unable to scan to network folder (Direct Digital Filing)
NOTE: The Direct Digital Filing feature does not support Windows Active Directory.
• The device is not set up correctly on the networkMake sure that the device is set up properly and connected to the network. PINGthe device and make sure that it is responding.
• The network folder has not been set up correctly• Make sure the folder is created on the server. For more information, see the
documentation available for your operating system.• Make sure the folder name uses only the letters A through Z (uppercase or
lowercase) and the numbers 1 through 9.• Some common punctuation marks are also supported. However, do not use
accented or special characters in the folder name.
Solve scan problems 173

• Make sure the folder has been shared and that users can both read and writeto the folder. For more information, see the documentation available for youroperating system.
• Make sure the folder name is entered in the correct format in the EWS and thatthe username and password are entered correctly. For more information, seethe information in the EWS.
• The disk is fullMake sure the server containing the folder has enough disk space available.
• The device cannot create a unique filename using the assigned prefix andsuffixThe device can create up to 9,999 files using the same prefix and suffix. If youhave scanned many files to a folder, change the prefix.
• The filename prefix has not been set up correctlyMake sure the folder name and filename prefix uses only the letters A through Z,uppercase or lowercase; the numbers 1 through 9. Some common punctuationmarks are also supported. However, do not use accented or special characters inthe folder name. If unsupported characters are used in filename prefixes, they willnot appear correctly when the file is created.
• The server name cannot be resolvedSending to network folder might fail if the server name provided during setupcannot be resolved to specific IP addresses. When setting up the Direct DigitalFiling feature, be sure to do the following:• Try to use fully qualified DNS names.• Make sure the DNS server is set up correctly on the device.
• TIP: If you have recently changed the DNS settings, turn off and then turnon the all-in-one.
Solve fax problemsThis section contains fax setup troubleshooting information for the device. If the deviceis not set up properly for faxing, you might experience problems when sending faxes,receiving faxes, or both.
If you are having faxing problems, you can print a fax test report to check the status ofthe device. The test will fail if the device is not set up properly for faxing. Perform thistest after you have completed setting up the device for faxing. For more information,see Test fax setup.
If the test fails, review the report for information on how to fix any problems found. Formore information, see The fax test failed.
The fax test failedIf you ran a fax test and the test failed, review the report for basic information aboutthe error. For more detailed information, check the report to see which part of the testfailed, and then review the appropriate topic in this section for solutions to try.• The "Fax Hardware Test" failed• The "Fax Connected to Active Telephone Wall Jack" test failed
Chapter 10
174 Maintain and troubleshoot

• The "Phone Cord Connected to Correct Port on Fax" test failed• The "Using Correct Type of Phone Cord with Fax" test failed• The "Dial Tone Detection" test failed• The "Fax Line Condition" test failed
The "Fax Hardware Test" failed
Solution:• Turn off the device by using the Power button located on the control panel and
then unplug the power cord from the back of the device. After a few seconds,plug the power cord in again, and then turn the power on. Run the test again. Ifthe test fails again, continue reviewing the troubleshooting information in thissection.
• Try to send or receive a test fax. If you can send or receive a fax successfully,there might not be a problem.
• If you are running the test from the Fax Setup Wizard (Windows) or HP FaxSetup Utility (Mac OS), make sure the device is not busy completing anothertask, such as receiving a fax or making a copy. Check the display for amessage indicating that the device is busy. If it is busy, wait until it is finishedand in the idle state before running the test.
• Make sure you use the phone cord that came with the device. If you do not usethe supplied phone cord to connect from the telephone wall jack to the device,you might not be able to send or receive faxes. After you plug in the phonecord that came with the device, run the fax test again.
• If you are using a phone splitter, this can cause faxing problems. (A splitter is atwo-cord connector that plugs into a telephone wall jack.) Try removing thesplitter and connecting the device directly to the telephone wall jack.
After you resolve any problems found, run the fax test again to make sure itpasses and the device is ready for faxing. If the Fax Hardware Test continues tofail and you experience problems faxing, contact HP Support. Go to www.hp.com/support. If prompted, choose your country/region, and then click Contact HP forinformation on calling for technical support.
The "Fax Connected to Active Telephone Wall Jack" test failed
Solution:• Check the connection between the telephone wall jack and the device to make
sure the phone cord is secure.• Make sure you use the phone cord that came with the device. If you do not use
the supplied phone cord to connect from the telephone wall jack to the device,you might not be able to send or receive faxes. After you plug in the phonecord that came with the device, run the fax test again.
Solve fax problems 175

• Make sure you have correctly connected the device to the telephone wall jack.Using the phone cord supplied in the box with the device, connect one end toyour telephone wall jack, then connect the other end to the port labeled 1-LINEon the back of the device. For more information on setting up the device forfaxing, see Set up faxing for the device (some models only).
• If you are using a phone splitter, this can cause faxing problems. (A splitter is atwo-cord connector that plugs into a telephone wall jack.) Try removing thesplitter and connecting the device directly to the telephone wall jack.
• Try connecting a working phone and phone cord to the telephone wall jack thatyou are using for the device and check for a dial tone. If you do not hear a dialtone, contact your telephone company and have them check the line.
• Try to send or receive a test fax. If you can send or receive a fax successfully,there might not be a problem.
After you resolve any problems found, run the fax test again to make sure itpasses and the device is ready for faxing.
The "Phone Cord Connected to Correct Port on Fax" test failedSolution: Plug the phone cord into the correct port.1. Using the phone cord supplied in the box with the device, connect one end to
your telephone wall jack, then connect the other end to the port labeled 1-LINEon the back of the device.
NOTE: If you use the 2-EXT port to connect to the telephone wall jack,you will not be able to send or receive faxes. The 2-EXT port should onlybe used to connect other equipment, such as an answering machine or atelephone.
Figure 10-1 Back view of the device1 Telephone wall jack
2 Use the phone cord supplied in the box with the device to connect to the "1-LINE"port
Chapter 10
176 Maintain and troubleshoot

2. After you have connected the phone cord to the port labeled 1-LINE, run thefax test again to make sure it passes and the device is ready for faxing.
3. Try to send or receive a test fax.• Make sure you use the phone cord that came with the device. If you do not use
the supplied phone cord to connect from the telephone wall jack to the device,you might not be able to send or receive faxes. After you plug in the phonecord that came with the device, run the fax test again.
• If you are using a phone splitter, this can cause faxing problems. (A splitter is atwo-cord connector that plugs into a telephone wall jack.) Try removing thesplitter and connecting the device directly to the telephone wall jack.
The "Using Correct Type of Phone Cord with Fax" test failed
Solution:• Make sure you used the phone cord supplied in the box with the device to
connect to the telephone wall jack. One end of the phone cord should beconnected to the port labeled 1-LINE on the back of the device, and the otherend to your telephone wall jack, as shown below.
1 Telephone wall jack
2 Use the phone cord supplied in the box with the device to connect to the "1-LINE"port
If the phone cord that came with the device is not long enough, you can use acoupler to extend the length. You can purchase a coupler at an electronicsstore that carries phone accessories. You will also need another phone cord,which can be a standard phone cord that you might already have in your homeor office.
• Check the connection between the telephone wall jack and the device to makesure the phone cord is secure.
Solve fax problems 177

• Make sure you use the phone cord that came with the device. If you do not usethe supplied phone cord to connect from the telephone wall jack to the device,you might not be able to send or receive faxes. After you plug in the phonecord that came with the device, run the fax test again.
• If you are using a phone splitter, this can cause faxing problems. (A splitter is atwo-cord connector that plugs into a telephone wall jack.) Try removing thesplitter and connecting the device directly to the telephone wall jack.
The "Dial Tone Detection" test failed
Solution:• Other equipment, which uses the same phone line as the device, might be
causing the test to fail. To find out if other equipment is causing a problem,disconnect everything from the phone line, and then run the test again. If theDial Tone Detection Test passes without the other equipment, then one ormore pieces of the equipment is causing problems; try adding them back oneat a time and rerunning the test each time, until you identify which piece ofequipment is causing the problem.
• Try connecting a working phone and phone cord to the telephone wall jack thatyou are using for the device and check for a dial tone. If you do not hear a dialtone, contact your telephone company and have them check the line.
• Make sure you have correctly connected the device to the telephone wall jack.Using the phone cord supplied in the box with the device, connect one end toyour telephone wall jack, then connect the other end to the port labeled 1-LINEon the back of the device.
• If you are using a phone splitter, this can cause faxing problems. (A splitter is atwo-cord connector that plugs into a telephone wall jack.) Try removing thesplitter and connecting the device directly to the telephone wall jack.
• If your telephone system is not using a standard dial tone, such as some PBXsystems, this might cause the test to fail. This will not cause a problem sendingor receiving faxes. Try sending or receiving a test fax.
• Check to make sure the country/region setting is set appropriately for yourcountry/region. If the country/region setting is not set or is set incorrectly, thetest might fail and you might have problems sending and receiving faxes.
• Make sure you connect the device to an analog phone line or you will not beable to send or receive faxes. To check if your phone line is digital, connect aregular analog phone to the line and listen for a dial tone. If you do not hear anormal sounding dial tone, it might be a phone line set up for digital phones.Connect the device to an analog phone line and try sending or receiving a fax.
• Make sure you use the phone cord that came with the device. If you do not usethe supplied phone cord to connect from the telephone wall jack to the device,you might not be able to send or receive faxes. After you plug in the phonecord that came with the device, run the fax test again.
After you resolve any problems found, run the fax test again to make sure itpasses and the device is ready for faxing. If the Dial Tone Detection test
Chapter 10
178 Maintain and troubleshoot

continues to fail, contact your telephone company and have them check the phoneline.
The "Fax Line Condition" test failed
Solution:• Make sure you connect the device to an analog phone line or you will not be
able to send or receive faxes. To check if your phone line is digital, connect aregular analog phone to the line and listen for a dial tone. If you do not hear anormal sounding dial tone, it might be a phone line set up for digital phones.Connect the device to an analog phone line and try sending or receiving a fax.
• Check the connection between the telephone wall jack and the device to makesure the phone cord is secure.
• Make sure you have correctly connected the device to the telephone wall jack.Using the phone cord supplied in the box with the device, connect one end toyour telephone wall jack, then connect the other end to the port labeled 1-LINEon the back of the device.
• Other equipment, which uses the same phone line as the device, might becausing the test to fail. To find out if other equipment is causing a problem,disconnect everything from the phone line, and then run the test again.• If the Fax Line Condition Test passes without the other equipment, then
one or more pieces of the equipment is causing problems; try adding themback one at a time and rerunning the test each time, until you identify whichpiece of equipment is causing the problem.
• If the Fax Line Condition Test fails without the other equipment, connectthe device to a working phone line and continue reviewing thetroubleshooting information in this section.
• If you are using a phone splitter, this can cause faxing problems. (A splitter is atwo-cord connector that plugs into a telephone wall jack.) Try removing thesplitter and connecting the device directly to the telephone wall jack.
• Make sure you use the phone cord that came with the device. If you do not usethe supplied phone cord to connect from the telephone wall jack to the device,you might not be able to send or receive faxes. After you plug in the phonecord that came with the device, run the fax test again.
After you resolve any problems found, run the fax test again to make sure itpasses and the device is ready for faxing. If the Fax Line Condition test continuesto fail and you experience problems faxing, contact your telephone company andhave them check the phone line.
The display always shows Phone Off HookSolution: You are using the wrong type of phone cord. Make sure you are usingthe phone cord that came with the device to connect the device to your phone line.If the phone cord that came with the device is not long enough, you can use acoupler to extend the length. You can purchase a coupler at an electronics store
Solve fax problems 179

that carries phone accessories. You will also need another phone cord, which canbe a standard phone cord that you might already have in your home or office.
Solution: Other equipment that uses the same phone line as the device might bein use. Make sure extension phones (phones on the same phone line, but notconnected to the device) or other equipment are not in use or off the hook. Forexample, you cannot use the device for faxing if an extension phone is off thehook, or if you are using a computer dial-up modem to send e-mail or access theInternet.
The device is having problems sending and receiving faxesSolution: Make sure the device is turned on. Look at the display on the device. Ifthe display is blank and the Power light is not lit, the device is turned off. Makesure the power cord is firmly connected to the device and plugged into a poweroutlet. Press the Power button to turn on the device.
After turning on the device, HP recommends you wait five minutes before sendingor receiving a fax. The device cannot send or receive faxes while it is initializingafter being turned on.
Solution:• Make sure you used the phone cord supplied in the box with the device to
connect to the telephone wall jack. One end of the phone cord should beconnected to the port labeled 1-LINE on the back of the device and the otherend to your telephone wall jack, as shown below.
1 Telephone wall jack
2 Use the phone cord supplied in the box with the device to connect to the "1-LINE"port
If the phone cord that came with the device is not long enough, you can use acoupler to extend the length. You can purchase a coupler at an electronicsstore that carries phone accessories. You will also need another phone cord,
Chapter 10
180 Maintain and troubleshoot

which can be a standard phone cord that you might already have in your homeor office..
• Try connecting a working phone and phone cord to the telephone wall jack thatyou are using for the device and check for a dial tone. If you do not hear a dialtone, call your local telephone company for service.
• Other equipment, which uses the same phone line as the device, might be inuse. For example, you cannot use the device for faxing if an extension phoneis off the hook, or if you are using a computer dial-up modem to send an e-mailor access the Internet.
• Check to see if another process has caused an error. Check the display oryour computer for an error message providing information about the problemand how to solve it. If there is an error, the device will not send or receive a faxuntil the error condition is resolved.
• The phone line connection might be noisy. Phone lines with poor sound quality(noise) can cause faxing problems. Check the sound quality of the phone lineby plugging a phone into the telephone wall jack and listening for static or othernoise. If you hear noise, turn Error Correction Mode (ECM) off and try faxingagain. For information about changing ECM, see the onscreen Help. If theproblem persists, contact your telephone company.
• If you are using a digital subscriber line (DSL) service, make sure that youhave a DSL filter connected or you will not be able to fax successfully. Formore information, see Case B: Set up the device with DSL.
• Make sure the device is not connected to a telephone wall jack that is set upfor digital phones. To check if your phone line is digital, connect a regularanalog phone to the line and listen for a dial tone. If you do not hear a normalsounding dial tone, it might be a phone line set up for digital phones.
• If you are using either a private branch exchange (PBX) or an integratedservices digital network (ISDN) converter/terminal adapter, make sure thedevice is connected to the correct port and the terminal adapter is set to thecorrect switch type for your country/region, if possible. For more information,see Case C: Set up the device with a PBX phone system or an ISDN line.
• If the device shares the same phone line with a DSL service, the DSL modemmight not be properly grounded. If the DSL modem is not properly grounded, itcan create noise on the phone line. Phone lines with poor sound quality (noise)can cause faxing problems. You can check the sound quality of the phone lineby plugging a phone into the telephone wall jack and listening for static or othernoise. If you hear noise, turn off your DSL modem and completely removepower for at least 15 minutes. Turn the DSL modem back on and listen to thedial tone again.
NOTE: You might notice static on the phone line again in the future. If thedevice stops sending and receiving faxes, repeat this process.
If the phone line is still noisy, contact your telephone company. For informationon turning your DSL modem off, contact your DSL provider for support.
• If you are using a phone splitter, this can cause faxing problems. (A splitter is atwo-cord connector that plugs into a telephone wall jack.) Try removing thesplitter and connecting the device directly to the telephone wall jack.
Solve fax problems 181

The device is having problems sending a manual fax
Solution:
NOTE: This possible solution applies only in the countries/regions thatreceive a 2-wire phone cord in the box with the device, including: Argentina,Australia, Brazil, Canada, Chile, China, Colombia, Greece, India, Indonesia,Ireland, Japan, Korea, Latin America, Malaysia, Mexico, Philippines, Poland,Portugal, Russia, Saudi Arabia, Singapore, Spain, Taiwan, Thailand, USA,Venezuela, and Vietnam.
• Make sure the telephone you use to initiate the fax call is connected directly tothe device. To send a fax manually, the telephone must be connected directlyto the port labeled 2-EXT on the device, as shown below.
1 Telephone wall jack
2 Use the phone cord supplied in the box with the device to connect to the "1-LINE"port
3 Telephone
• If you are sending a fax manually from your phone that is connected directly tothe device, you must use the keypad on the telephone to send the fax. Youcannot use the keypad on the control panel of the device.
NOTE: If using a serial-type phone system, please connect your phonedirectly on top of the device cable which has a wall plug attached to it.
The device cannot receive faxes, but can send faxes
Solution:• If you are not using a distinctive ring service, check to make sure that the
Distinctive Ring feature on the device is set to All Rings. For moreinformation, see Change the answer ring pattern for distinctive ring.
• If Auto Answer is set to Off, you will need to receive faxes manually;otherwise, the device will not receive the fax. For information on receivingfaxes manually, see Receive a fax manually.
Chapter 10
182 Maintain and troubleshoot

• If you have a voice mail service at the same phone number you use for faxcalls, you must receive faxes manually, not automatically. This means that youmust be available to respond in person to incoming fax calls. For informationon setting up the device when you have a voice mail service, see Case F:Shared voice/fax line with voice mail. For information on receiving faxesmanually, see Receive a fax manually.
• If you have a computer dial-up modem on the same phone line with the device,check to make sure that the software that came with your modem is not set toreceive faxes automatically. Modems that are set up to receive faxesautomatically take over the phone line to receive all incoming faxes, whichprevents the device from receiving fax calls.
• If you have an answering machine on the same phone line with the device, youmight have one of the following problems:• Your answering machine might not be set up properly with the device.• Your outgoing message might be too long or too loud to allow the device to
detect fax tones, and the sending fax machine might disconnect.• Your answering machine might not have enough quiet time after your
outgoing message to allow the device to detect fax tones. This problem ismost common with digital answering machines.
The following actions might help solve these problems:• When you have an answering machine on the same phone line you use for
fax calls, try connecting the answering machine directly to the device asdescribed in Case I: Shared voice/fax line with answering machine.
• Make sure the device is set to receive faxes automatically. For informationon setting up the device to receive faxes automatically, see Receive a fax.
• Make sure the Rings to Answer setting is set to a greater number of ringsthan the answering machine. For more information, see Set the number ofrings before answering.
• Disconnect the answering machine and then try receiving a fax. If faxing issuccessful without the answering machine, the answering machine mightbe causing the problem.
• Reconnect the answering machine and record your outgoing messageagain. Record a message that is approximately 10 seconds in duration.Speak slowly and at a low volume when recording your message. Leave atleast 5 seconds of silence at the end of the voice message. There shouldbe no background noise when recording this silent time. Try to receive afax again.
NOTE: Some digital answering machines might not retain therecorded silence at the end of your outgoing message. Play back youroutgoing message to check.
Solve fax problems 183

• If the device shares the same phone line with other types of phone equipment,such as an answering machine, a computer dial-up modem, or a multi-portswitch box, the fax signal level might be reduced. The signal level can also bereduced if you use a splitter or connect extra cables to extend the length ofyour phone. A reduced fax signal can cause problems during fax reception.To find out if other equipment is causing a problem, disconnect everythingexcept the device from the phone line, and then try to receive a fax. If you canreceive faxes successfully without the other equipment, one or more pieces ofthe other equipment is causing problems; try adding them back one at a timeand receiving a fax each time, until you identify which equipment is causing theproblem.
• If you have a special ring pattern for your fax phone number (using a distinctivering service through your telephone company), make sure that the DistinctiveRing feature on the device is set to match. For more information, see Changethe answer ring pattern for distinctive ring.
The device cannot send faxes, but can receive faxes
Solution:• The device might be dialing too fast or too soon. You might need to insert
some pauses in the number sequence. For example, if you need to access anoutside line before dialing the phone number, insert a pause following theaccess number. If your number is 95555555, and 9 accesses an outside line,you might insert pauses as follows: 9-555-5555. To enter a pause in the faxnumber you are typing, press Redial/Pause, or press the Space (#) buttonrepeatedly, until a dash (-) appears on the display.You can also send the fax using monitor dialing. This enables you to listen tothe phone line as you dial. You can set the pace of your dialing and respond toprompts as you dial. For more information, see Send a fax using monitor dialing.
• The number you entered when sending the fax is not in the proper format orthe receiving fax machine is having problems. To check this, try calling the faxnumber from a telephone and listen for fax tones. If you cannot hear fax tones,the receiving fax machine might not be turned on or connected, or a voice mailservice could be interfering with the recipient's phone line. You can also askthe recipient to check the receiving fax machine for any problems.
Chapter 10
184 Maintain and troubleshoot

Fax tones are recorded on my answering machine
Solution:• When you have an answering machine on the same phone line you use for fax
calls, try connecting the answering machine directly to the device as describedin Case I: Shared voice/fax line with answering machine. If you do not connectthe answering machine as recommended, fax tones might be recorded on youranswering machine.
• Make sure the device is set to receive faxes automatically and that the Ringsto Answer setting is correct. The number of rings to answer for the deviceshould be greater than the number of rings to answer for the answeringmachine. If the answering machine and the device are set to the same numberof rings to answer, both devices answer the call and fax tones are recorded onthe answering machine.
• Set your answering machine to a low number of rings and the device to answerin the maximum number of rings supported. (The maximum number of ringsvaries by country/region.) In this setup, the answering machine answers thecall and the device monitors the line. If the device detects fax tones, the devicereceives the fax. If the call is a voice call, the answering machine records theincoming message. For more information, see Set the number of rings beforeanswering.
The phone cord that came with my device is not long enoughSolution: If the phone cord that came with the device is not long enough, youcan use a coupler to extend the length. You can purchase a coupler at anelectronics store that carries phone accessories. You will also need another phonecord, which can be a standard phone cord that you might already have in yourhome or office.
TIP: If the device came with a 2-wire phone cord adaptor, you can use it witha 4-wire phone cord to extend the length. For information on using the 2-wirephone cord adaptor, see the documentation that came with it.
To extend your phone cord1. Using the phone cord supplied in the box with the device, connect one end to
the coupler, then connect the other end to the port labeled 1-LINE on the backof the device.
2. Connect another phone cord to the open port on the coupler and to thetelephone wall jack.
Solve photo (memory card) problemsIf the following topics do not help, see Support and warranty for information about HPsupport.
Solve photo (memory card) problems 185

NOTE: If you are starting a memory card operation from a computer, see thesoftware Help for troubleshooting information.
The device cannot read the memory card• Check the memory card
• Make sure that the memory card is one of the supported types. For CompactFlash II - solid state memory only. For more information, see Insert a memorycard.
• Some memory cards have a switch that controls how they can be used. Makesure that the switch is set so that the memory card can be read.
• Inspect the ends of the memory card for dirt or material that closes a hole orspoils a metal contact. Clean the contacts with a lint-free cloth and smallamounts of isopropyl alcohol.
• Assure that the memory card is working properly by testing it with other devices.• Check the memory card slot
• Make sure that the memory card is fully inserted into the correct slot. For moreinformation, see Insert a memory card.
• Remove the memory card (when the light is not blinking) and shine a flashlightinto the empty slot. See if any of the small pins inside are bent. When thecomputer is off, you can straighten slightly bent pins by using the tip of a thin,retracted ballpoint pen. If a pin has bent in such a way that it touches anotherpin, replace the memory card reader or have the device serviced. For moreinformation, see Support and warranty.
• Make sure that only one memory card has been inserted at a time in the slots.An error message should appear on the control-panel display if more than onememory card is inserted.
The device cannot read photos on the memory cardCheck the memory card• The memory card might be corrupt.• The photos might be in a format that is not recognized. An error message should
appear on the control-panel display if the format is unrecognizable. Use theprocedure for printing photos from the control panel, because more formats mightbe recognized. For more information, see Print photos from the control panel. If thedevice is connected to a computer, you can save the photos from the memory cardto your computer and then print them from a software program.
Some photos on the memory card will not print, causing the print job to cancelCheck the photo filesPrint a proof sheet and note which photos are corrupt. Set up the print job so that itdoes not include the corrupted photos. For more information, see Print photos using aproof sheet.
Chapter 10
186 Maintain and troubleshoot

The device prints half a page, then ejects the paper
Check the ink cartridgesThe ink cartridges may have run out of ink, and the print job was cancelled. Replacethe ink cartridges, and then resend the print job to the device. For more information,see Replace the ink cartridges.
Solve device management problemsThis section provide solutions to common problems that involve managing the device.This section contains the following topic:
Embedded Web server cannot be opened
Embedded Web server cannot be opened
Check your network setup• Make sure you are not using a phone cord or a cross cable to connect the device
to the network. For more information, see Configure the device (Windows) orConfigure the device (Mac OS).
• Make sure the network cable is securely connected to the device.• Make sure the network hub, switch, or router is turned on and working properly.
Check the computerMake sure the computer that you are using is connected to the network.
Check your Web browserMake sure the Web browser meets the minimum system requirements. For moreinformation, see System requirements.
Check the device IP address• To check the IP address of the device from the control panel (color display models
only), press the Setup button, select Network, select View Network Settings,and then select either Display Wired Summary or Display Wireless Summary.For devices with a two-line display, the user must obtain the IP address by printinga network configuration page. Press the Setup button, select Network, selectNetwork Settings, and then select Print Network Configuration Page.
• Ping the device using the IP address from the command prompt.For example, if the IP address is 123.123.123.123, type the following at the MS-DOS prompt:C:\Ping 123.123.123.123
If a reply appears, the IP address is correct. If a time-out response appears, the IPaddress is incorrect.
Solve device management problems 187

Troubleshoot installation issuesIf the following topics do not help, see Support and warranty for information about HPsupport.
• Hardware installation suggestions• Software installation suggestions• Solve alignment page problems• Solve software installation problems• Solve network problems• Solve wireless problems
Hardware installation suggestions
Check the device• Make sure that all packing tape and material have been removed from outside and
inside the device.• Make sure that the device is loaded with paper.• Make sure that no lights are on or blinking except the Ready light, which should be
on. If the Attention light is blinking, check for messages on the control panel.• Make sure that the device can print a self-test diagnostic page.
Check the hardware connections• Make sure that any cords and cables that you are using are in good working order.• Make sure that the power cord is connected securely to both the device and to a
working power outlet.• Make sure that the phone cord is connected to the 1-LINE port.
Check the printheads and ink cartridges• Make sure that you have removed the orange caps from the printheads.• Make sure that all of the printheads and ink cartridges are firmly installed in their
correct, colorcoded slot. Press down firmly on each one to ensure proper contact.The device cannot work if they are not all installed.
• Make sure that the printhead latch is closed properly.• If the display shows a printhead error message, clean the contacts on the
printheads.
Software installation suggestions
Check the computer system• Make sure that your computer is running one of the supported operating systems.• Make sure that the computer meets at least the minimum system requirements.
Chapter 10
188 Maintain and troubleshoot

Verify installation preliminaries• Make sure to use the Starter CD that contains the correct installation software for
your operating system.• Before installing software, make sure that all other programs are closed.• If the computer does not recognize the path to the CD-ROM drive that you type,
make sure that you are specifying the correct drive letter.• If the computer cannot recognize the Starter CD in the CD-ROM drive, inspect the
Starter CD for damage. You can download the device driver from the HP Web site(www.hp.com/support).
Solve alignment page problems
Check the device to ensure the following:• Power light is on and not blinking. When the device is first turned on, it takes
approximately 45 seconds to warm up.• The device is in the Ready state, and no other lights on the control panel are lit or
blinking. If lights are lit or blinking, see the message on the control panel.• Ensure power cord and other cables are working, and are firmly connected to the
device.• All packing tapes and materials are removed from the device.• Rear access panel or duplexer is locked into place.• Paper is loaded correctly in the tray, and is not jammed in the device.• Ensure the orange protective caps have been removed from each printhead.• Printheads and ink cartridges are properly installed in their correct color-coded
slots. Press down firmly on each one to ensure proper contact.• Printhead latch and all covers are closed.
Solve software installation problems
Check or perform the following:• Make sure the computer meets the system requirements.• Before installing software on a Windows computer, ensure all other programs are
closed.• If the computer does not recognize the path to the CD drive that you typed, ensure
you are specifying the correct drive letter.• If the computer cannot recognize the Starter CD in the CD drive, inspect the CD for
damage. You can download the device driver from the HP Web site (www.hp.com/support).
• In the Windows device manager, make sure that the USB drivers have not beendisabled.
• If you are using a computer running Windows, and the computer cannot detect thedevice, run the uninstallation utility (util\ccc\uninstall.bat on the Starter CD) toperform a clean uninstallation of the device driver. Restart your computer, andreinstall the device driver.
Troubleshoot installation issues 189

Solve network problems
NOTE: After correcting any of the following, run the installation program again.
General network troubleshooting• If you are unable to install the device software, verify that:
• All cable connections to the computer and the device are secure.• The network is operational and the network hub is turned on.• All applications, including virus protection programs, spyware protection
programs, and firewalls, are closed or disabled for computers running Windows.• Make sure the device is installed on the same subnet as the computers that
will be using the device.• If the installation program cannot discover the device, print the network
configuration page, and enter the IP address manually in the installationprogram. For more information, see Understand the network configuration page
• If you are using a computer running Windows, make sure that the network portscreated in the device driver match the device IP address:• Print the device’s network configuration page.• Click Start, point to Settings, and then click Printers or Printers and Faxes.
- Or -Click Start, click Control Panel, and then double-click Printers.
• Right-click the device icon, click Properties, and then click the Ports tab.• Select the TCP/IP port for the device, and then click Configure Port.• Compare the IP address listed in the dialog box and make sure it matches the
IP address listed on the network configuration page. If the IP addresses aredifferent, change the IP address in the dialog box to match the address on thenetwork configuration page.
• Click OK twice to save the settings and close the dialog boxes.
Problems connecting to a wired network• If the Link light on the network connector does not turn on, make sure that all of
the “General network troubleshooting” conditions are met.• Though it is not recommended that you assign the device with a static IP address,
you might resolve some installation problems (such as a conflict with a personalfirewall) by doing so.
Chapter 10
190 Maintain and troubleshoot
Solve wireless problemsIf the device is unable to communicate with the network after completing the wirelesssetup and software installation, perform one or more of the following tasks.
Check the wireless communication settings• Make sure the computer’s wireless card is set to the correct wireless profile. A
wireless profile is a set of network settings unique to a given network. A singlewireless card might have several wireless profiles (for example, one for a homenetwork and one for an office network). Open the Configuration utility for thenetwork card installed on your computer, and ensure that the profile selected is theprofile for the device’s network.
• Make sure the device’s network settings match those of your network. Do one ofthe following to find the settings for your network:• Infrastructure communication: Open the wireless access point’s (WAP)
Configuration utility.• Ad hoc communication: Open the Configuration utility for the network card
installed in your computer.• Compare the network’s settings to those on the device’s network configuration
page, and note any differences. For more information, see Understand the networkconfiguration page. Possible problems include the following:• The WAP filters hardware addresses (MAC addresses).• One of these settings in the device might be incorrect: communication mode,
network name (SSID), channel (ad hoc networks only), authentication type,encryption.
• Print a document. If the document still does not print, then reset the device’snetwork settings and reinstall the device software.
If the wireless network settings are correct, the computer might be associated withanother wireless network. Ensure that the computer is associated with the samewireless network as that of the device.
Users can ensure this by checking the wireless settings on their respective computers.In addition, ensure that the computers have access to the wireless network.
If the wireless network settings are incorrect, follow these steps to correct the device’ssettings:
1. Connect the device to your network with a network cable or to the computer usingthe network cable.
2. Open the device’s embedded Web server.3. Click the Networking tab, and then click Wireless (802.11) in the left pane.4. Use the Wireless Setup wizard on the Wireless Setup tab to change the device’s
settings to match the settings of the network.5. Close the device’s embedded Web server, and then disconnect the network cable
from the device.6. Uninstall the device software completely, and then reinstall the software.
Troubleshoot installation issues 191

Add hardware addresses to a wireless access point (WAP)MAC filtering is a security feature in which a wireless access point (WAP) is configuredwith a list of MAC addresses (also called “hardware addresses”) of devices that areallowed to gain access to the network through the WAP. If the WAP does not have thehardware address of a device attempting to access the network, the WAP denies thedevice access to the network. If the WAP filters MAC addresses, then the device’sMAC address must be added to the WAP’s list of accepted MAC addresses.
• Print the network configuration page. For more information, see Understand thenetwork configuration page.
• Open the WAP’s configuration utility, and add the device’s hardware address tothe list of accepted MAC addresses.
Reset network configuration settingsIf the device is still unable to communicate with the network, reset the device’s networksettings.
• Press Setup. Press an arrow button to move to Network, and then press OK.• Press an arrow button to move to Restore Network Defaults, and then press OK.• Print the network configuration page and verify that the network settings have
been reset. For more information, see Understand the network configuration page.By default, the network name (SSID) is “hpsetup” and the communication mode is“ad hoc.”
Clear jamsOccasionally, media becomes jammed during a job. Try the following remedies beforeyou attempt to clear the jam.
• Make sure that you are printing with media that meets specifications. For moreinformation, see Select print media.
• Make sure that you are printing with media that is not wrinkled, folded, or damaged.• Make sure that the device is clean. For more information, see Clean the device.• Make sure that the input trays are loaded correctly and are not too full. For more
information, see Load media.
Chapter 10
192 Maintain and troubleshoot

Clear a jam in the device
To clear a jam1. Remove all media from the output tray.2. Check the rear access panel or the duplexer.
a. Push the button on either side of the rear access panel or the duplexer, andthen remove the panel or unit.
b. Locate any jammed media inside the device, grasp it with both hands and thenpull it towards you.
c. If the jam is not there, push the latch on the top of the duplexer and lower itscover. If the jam is inside, carefully remove it. Close the cover.
d. Reinsert the rear access panel or the duplexer into the device.
Clear jams 193

3. If you cannot locate the jam, lift the output tray and check for a jam in Tray 1. Ifmedia is jammed in the tray, do the following:a. Raise the output tray.b. Pull the paper towards you.
c. Lower the output tray.4. If you have not found the jam and have Tray 2 installed, pull out the tray and
remove the jammed media, if possible. If not, do the following:a. Ensure the device is turned off and disconnect the power cord.b. Lift the device off Tray 2.c. Remove the jammed media from the bottom of the device or from Tray 2.d. Reposition the device on top of Tray 2.
5. Open the print carriage access door. If there is paper remaining inside the device,ensure the carriage has moved to the right of the device, free any paper scraps orwrinkled media, and pull the media towards you through the top of the device.
WARNING! Do not reach into the device when it is on and the carriage isstuck. When you open the print carriage access door, the carriage shouldreturn to its position on the right side of the device. If it does not move to theright, turn off the device before you remove any jam.
6. After clearing the jam, close all covers, turn on the device (if you turned it off) andresend the print job.
Chapter 10
194 Maintain and troubleshoot

Clear jams in the ADFIf media is jammed in the ADF, use the following instructions below to clear the jam.For information about how to avoid jams, see Tips for avoiding jams.
To clear a jam in the ADF1. If a page is sticking out of an area, gently try to remove it without tearing the page.
If you feel resistance, continue with the following steps.2. Remove the document feeder and open the ADF cover.
3. Remove the jam cleanout part. Using both hands, lift up on the two handles untilthe part unsnaps. Rotate and lift out the cleanout and set it aside.
Clear jams 195

4. While lifting the green lever, rotate the pick mechanism until it stays open.
5. Gently try to remove the page without tearing it. If you feel resistance, continuewith the next step.
6. Open the ADF and gently loosen the media by using both hands.7. When the media is free, gently pull it out.8. Close the ADF.9. Lower the green lever.10. Reinstall the jam cleanout part by inserting it as shown. Push down on the two tabs
until the part snaps into place.
NOTE: If the cleanout part is not replaced correctly, future jamming mightoccur.
Chapter 10
196 Maintain and troubleshoot

11. Close the ADF and replace the document feeder tray.
Tips for avoiding jams• Make sure that nothing is blocking the paper path.• Do not overload the trays. For more information, see Understand specifications for
supported media.• Load paper properly and when the device is not printing. For more information, see
Load media and Load an original in the automatic document feeder (ADF).• When reinserting Tray 2 (optional) into the device, do so gently. Forceful insertion
with a full stack of paper may cause sheets to slide up within the device, causing itto jam or pick multiple sheets at one time.
• Do not use media that is curled or crumpled.• Always use media that conforms with specifications. For more information, see
Select print media.• Make sure the output tray is not overly full.• Make sure media is aligned against the right side of a tray.• Make sure the media length and width guides are adjusted snugly against the
media, but do not crinkle or bend it.
Clear jams 197

A HP supplies and accessoriesThis section provides information on HP supplies and accessories for the device. The informationis subject to changes, visit the HP Web site (www.hpshopping.com) for the latest updates. Youmay also make purchases through the Web site.• Order printing supplies online• Accessories• Supplies
Order printing supplies onlineBesides the HP Web site, you may order printing supplies using the following tools:• Embedded Web server: Click the Order Supplies button from any page in the embedded
Web server.• Toolbox (Windows): On the Estimated Ink Level tab, click Shop Online.• HP Printer Utility (Mac OS): Click Supplies Status from the Information and Support
panel, click the Shop for HP Supplies drop-down menu, and then choose Online.
Accessories
HP automatic two-sidedprinting accessory
C9278A Auto-duplexer allowing printing onboth sides of a sheet of paperautomatically
350-sheet input tray CB007A Optional second tray for up to 350pages of plain paper
HP Jetdirect 175x PrintServer-Fast Ethernet*
J6035C External print server (USB 1.0)
HP Jetdirect en3700 FastEthernet Print Server*
J7942A External print server (USB 2.0)
HP Jetdirect ew2400 802.11gWireless Print Server*
J7951A Wireless or wired external print server
HP bt300, Bluetooth WirelessPrinter Adapter
Q3395A Bluetooth compatible USB adapter
*Only supports print functionality.
Supplies• Ink cartridges• Printheads• HP media
Ink cartridgesUse only the replacement cartridges that have the same cartridge number as the ink cartridgeyou are replacing. You can find the cartridge number in the following places:• On the self-test diagnostic page. For more information, see Understand the self-test
diagnostic page.• On the label of the ink cartridge you are replacing.
198 HP supplies and accessories

• Embedded Web server: Click the Information tab, and then click Ink Supplies in the leftpane.
• Toolbox (Windows): Click the Estimated Ink Level tab, and then click the CartridgeDetails button to view information about replacement ink cartridges.
• HP Printer Utility (Mac OS): Open the Information and Support panel, and then clickSupply Info.
NOTE: The availability of ink cartridges varies by country/region. If you live in Europe, go towww.hp.com/eu/hard-to-find-supplies to locate information on HP ink cartridges.
Printheads
HP 88 Black and Yellow C9381A
HP 88 Magenta and Cyan C9382A
HP mediaTo order media such as HP Premium Plus Photo Paper or HP Premium Paper, go to www.hp.com.Choose your country/region, and then select Buy or Shopping.
Supplies 199
B Support and warrantyThe information in Maintain and troubleshoot suggests solutions to common problems. If yourdevice is not operating correctly and those suggestions did not solve your problem, try using oneof the following support services to obtain assistance.This section contains the following topics:• Obtain electronic support• Obtain HP telephone support• Hewlett-Packard limited warranty statement• Prepare the device for shipment• Pack the device
Obtain electronic supportTo find support and warranty information, go to the HP Web site at www.hp.com/support. Ifprompted, choose your country/region, and then click Contact HP for information on calling fortechnical support.This Web site also offers technical support, drivers, supplies, ordering information and otheroptions such as:• Access online support pages.• Send HP an e-mail message for answers to your questions.• Connect with an HP technician by using online chat.• Check for software updates.You can also obtain support from HP from the following electronic sources:• Toolbox (Windows): The Toolbox provides easy, step-by-step solutions to common printing
problems. For more information, see Toolbox (Windows).• Embedded Web server: When the device is connected to a network, you can use the
embedded Web server to view status information, change settings, and manage the device atyour computer. For more information, see Embedded Web server.
Support options and availability vary by product, country/region, and language.
Obtain HP telephone supportDuring the warranty period, you may obtain assistance from the HP Customer Care Center.This section contains the following topics:• Before you call• Telephone support numbers
Before you callVisit the HP Web site (www.hp.com/support) for the latest troubleshooting information, or productfixes and updates.To assist our Customer Care Center representatives to serve you better, prepare the followinginformation if you need to call HP.1. Print the self-test diagnostic page of the device. For more information, see Understand the
self-test diagnostic page. If the device does not print, get the following information ready:• Device model• Model number and serial number (check the back of the device)
2. Check the operating system that you are using, such as Windows XP.3. If the device is connected to the network, check the network operating system.
200 Support and warranty

4. Note how the device is connected to your system, such as through USB or networkconnection.
5. Obtain the version number of the printer software, such as HP Officejet Pro L7500 SeriesVersion: 60.52.213.0. (To find the version number of the printer driver, open the printersettings or properties dialog box, and click the About tab.)
6. If you have a problem printing from a particular application, note the application and versionnumber.
Telephone support numbersIn many locations, HP provides toll free telephone support during the warranty period. However,some of the support numbers listed below may not be toll free.For the most current list of telephone support numbers, see www.hp.com/support.
Obtain HP telephone support 201

Appendix B
202 Support and warranty

Hewlett-Packard limited warranty statement
Hewlett-Packard limited warranty statement 203

Prepare the device for shipmentIf after contacting HP Customer Support or returning to the point of purchase, you are requestedto send the device in for service, make sure you remove and keep the following items beforereturning your device:• The ink cartridges and printheads• The control-panel faceplate• The power cord, USB cable, and any other cable connected to the device• Any paper loaded in the input tray• Remove any originals you might have loaded in the deviceThis section contains the following topics:• Remove the ink cartridges and printheads before shipment• Remove the control-panel faceplate
Remove the ink cartridges and printheads before shipmentBefore you return the device, make sure you remove your ink cartridges and printheads.
NOTE: This information does not apply to customers in Japan.
To remove ink cartridges before shipment1. Turn on the device and wait until the print carriage is idle and silent. If the device will not turn
on, skip this step and go to step 2.
NOTE: If the device does not turn on, you can unplug the power cord and thenmanually slide the print carriage to the far right side to remove the ink cartridges.
2. Gently pull open the ink cartridge cover.
Appendix B
204 Support and warranty

3. Remove the ink cartridges from their slots by grasping each between your thumb andforefinger and pulling it firmly toward you.
4. Place the ink cartridges in an airtight plastic container so they will not dry out, and put themaside. Do not send them with the device unless the HP customer support call agent instructsyou to.
5. Close the ink cartridge door and wait a few minutes for the print carriage to move back to itshome position (on the left side).
6. After the scanner is idle and has returned to its parked position, press the Power button toturn off the device.
To remove printheads before shipment1. Open the top cover.2. If the carriage does not move to the left automatically, press and hold the OK button for 5
seconds. Wait for the carriage to stop moving.3. Lift the printhead latch.4. Lift the handle of a printhead and use it to pull the printhead out of its slot.5. Place the printheads in an airtight plastic container so they will not dry out, and put them
aside. Do not send them with the device unless the HP customer support call agent instructsyou to.
6. Close the top cover.7. After the scanner is idle and has returned to its parked position, press the Power button to
turn off the device.
Remove the control-panel faceplateComplete the following steps once you have removed the ink cartridges and printheads.
NOTE: This information does not apply to customers in Japan.
CAUTION: The device must be unplugged before following these steps.
CAUTION: The replacement device will not be shipped with a power cord. Store the powercord in a safe place until the replacement arrives.
To remove the control-panel faceplate1. Press the Power button to turn off the device.2. Unplug the power cord, and then disconnect it from the device. Do not return the power cord
with the device.
Prepare the device for shipment 205

3. Remove the control-panel faceplate as follows:a. Lift the ADF lid.
b. Use either your finger or insert a thin object in the tab on the upper right corner of thecontrol-panel faceplate to pry the control-panel faceplate off.
4. Retain the control-panel faceplate. Do not return the control-panel faceplate with the HP All-in-One.
CAUTION: The replacement device might not come with a control-panel faceplate.Store your control-panel faceplate in a safe place, and when the replacement devicearrives, reattach your control-panel faceplate. You must attach your control-panelfaceplate to use the control-panel functions on the replacement device.
NOTE: See the setup poster that came with the device for instructions on how to attachyour control-panel faceplate. The replacement device might come with instructions forsetting up your device.
Pack the deviceComplete the following steps after you have prepared the device for shipment.
Appendix B
206 Support and warranty

To pack the device1. If available, pack the device for shipment by using the original packaging materials, or use
the packaging materials that came with your replacement device.
If you do not have the original packaging materials, please use other adequate packagingmaterials. Shipping damage caused by improper packaging and/or improper transportation isnot covered under the warranty.
2. Place the return shipping label on the outside of the box.3. Include the following items in the box:
• A complete description of symptoms for service personnel (samples of print qualityproblems are helpful).
• A copy of the sales slip or other proof of purchase to establish the warranty coverageperiod.
• Your name, address, and a phone number where you can be reached during the day.
Pack the device 207

C Device specificationsFor media and media-handling specifications, see Understand specifications for supported media.
Physical specificationsSize (width x depth x height)• Device with A4/Letter-size scanner glass (L7300, L7500): 505 x 402 x 356 mm (19.9 x
15.8 x 14 inches)• Device with Legal-size scanner glass (L7600, L7700): 531 x 465 x 356 mm (20.9 x 18.3 x
14 inches)• With Duplexer: Adds 64 mm (2.5 inches) to the rear of the device.• With Tray 2: Adds 76 mm (3 inches) to the height of the device.
Device weight (does not include printheads or ink cartridges)• Device with A4/Letter-size scanner glass (L7300, L7500): 14.2 kg (31.3 lb)• Device with Legal-size scanner glass (L7600, L7700): 14.76 kg (32.5 lb)• With Duplexer: Adds 0.95 kg (2.0 lb)• With Tray 2: Adds 2.5 kg (5.5 lb)
Product features and capacities
Feature Capacity
Connectivity • USB 2.0-compliant high speed• USB host connector is only supported up
to full speed.• Fast Ethernet 10/100Base-TX for wired
network connection (some models only)• 802.11b/g wireless network (some
models only)
Print method Drop-on-demand thermal inkjet printing
Ink cartridges Four ink cartridges (one each for black, cyan,magenta, and yellow)
Printheads Two printheads (one black and yellow, andone magenta and cyan)
Supply yields Visit www.hp.com/pageyield/ for moreinformation on estimated ink cartridge yields.
Device languages HP PCL 3 enhanced
Font support US fonts: CG Times, CG Times Italic,Universe, Universe Italic, Courier, CourierItalic, Letter Gothic, Letter Gothic Italic.
Duty cycle Up to 7500 pages per month
Control panel language supportLanguage availability varies by country/region.
Bulgarian, Croatian, Czech, Danish, Dutch,English, Finnish, French, German, Greek,
208 Device specifications

Feature Capacity
Hungarian, Italian, Japanese, Korean,Norwegian, Polish, Portuguese, Romanian,Russian, Simplified Chinese, Slovak,Slovenian, Spanish, Swedish, TraditionalChinese, Turkish, Ukrainian.
Processor and memory specificationsDevice processor192 MHz ARM946ES, ETM9 (medium)
Device memory• L7300/L7500: 64 MB built-in RAM, 16 MB built-in MROM + 2 MB built-in Flash ROM• L7600: 64 MB built-in RAM, 16 MB built-in MROM + 4 MB built-in Flash ROM• L7700: 64 + 32 MB built-in RAM, 16 MB built-in MROM + 4 MB built-in Flash ROM
System requirementsNOTE: For the most current information about supported operating systems and systemrequirements, visit http://www.hp.com/support/
Operating system compatibility• Windows 2000, Windows XP, Windows XP x64* (Professional and Home Editions)• Mac OS X (10.3, 10.4)• Linux
NOTE: Printer and scanner drivers for Windows Server 2003 (both 32-bit and 64-bitversions) require a minimum of an Intel® Pentium® II or Intel Celeron® processor, 128 MBRAM, 200 MB free hard disk space. The drivers are available at http://www.hp.com/support/.
Minimum requirements• Windows 2000: Intel Pentium II or Celeron processor, 128 MB RAM, 280 MB free hard disk
space• Windows XP (32-bit): Intel Pentium II or Celeron processor, 128 MB RAM, 280 MB free hard
disk space• Windows XP x64: Intel Pentium II or Celeron processor, 128 MB RAM, 280 MB free hard
disk space• Mac OS X (10.3.8, 10.4.x): 400 MHz Power PC G3 (v10.3.8 and v10.4.x) or 1.83 GHz Intel
Core Duo (v10.4.x), 128 MB memory, 300 MB free hard disk space• Microsoft Internet Explorer 6.0
Recommended requirements• Windows 2000: Intel Pentium III or higher processor, 256 MB RAM, 500 MB free hard disk
space• Windows XP (32-bit): Intel Pentium III or higher processor, 256 MB RAM, 500 MB free hard
disk space• Windows XP x64: Intel Pentium III or higher processor, 256 MB RAM, 500 MB free hard disk
space
Processor and memory specifications 209

• Mac OS X (10.3.8, 10.4.x): 400 MHz Power PC G3 (v10.3.8 and v10.4.x) or 1.83 GHz IntelCore Duo (v10.4.x), 256 MB memory, 600 MB free hard disk space
• Microsoft Internet Explorer 6.0 or later
Network protocol specificationsNetwork operating system compatibility• Windows 2000, Windows XP (32-bit), Windows XP x64 (Professional and Home Editions)• Mac OS X (10.3, 10.4)• Microsoft Windows 2000 Server Terminal Services with Citrix Metaframe XP with Feature
Release 3• Microsoft Windows 2000 Server Terminal Services with Citrix Presentation Server 4.0• Microsoft Windows 2000 Server Terminal Services• Microsoft Windows 2003 Server Terminal Services• Microsoft Windows 2003 Server Terminal Services with Citrix Presentation Server 4.0• Microsoft Windows 2003 Server Terminal Services with Citrix Metaframe XP with Feature
Release 3• Novell Netware 6, 6.5, Open Enterprise Server 6.5
Compatible network protocolsTCP/IP
Network management• HP Web Jetadmin plug-ins• Embedded Web server
Features• Ability to remotely configure and manage network devices• myPrintMileage
Embedded Web server specificationsRequirements• A TCP/IP-based network (IPX/SPX-based networks are not supported)• A Web browser (either Microsoft Internet Explorer 5.5, Netscape 7.0, Opera 7.54, Mozilla
Firefox 1.0, or Safari 1.2, or later)• A network connection (you cannot use the embedded Web server connected directly to a
computer with a USB cable)• An Internet connection (required for some features)
NOTE: You can open the embedded Web server without being connected to theInternet. However, some features will not be available.
• It must be on the same side of a firewall as the device.
Print specifications
Print resolution
BlackUp to 1200 dpi with pigmented black ink
Appendix C
210 Device specifications

ColorHP enhanced photo quality with Vivera inks (up to 4800 by 1200 dpi Optimized on HP PremiumPlus photo papers with 1200 by 1200 input dpi)
Copy specifications• Digital image processing• Up to 100 copies from original (varies by model)• Digital zoom: from 25 to 400% (varies by model)• Fit to page, pre-scan• Copy speed: up to 30 copies per minute black; 24 copies per minute color (varies by model)• Copy speeds vary according to the complexity of the document
Mode Type Speed (ppm) Scan resolution (dpi)1
Best Black up to 0.8 up to 600 x 1200
Color up to 0.8 up to 600 x 1200
Normal Black up to 8.5 up to 300 x 300
Color up to 5.1 up to 300 x 300
Fast Black up to 30 up to 300 x 300
Color up to 24 up to 300 x 300
1 Maximum at 400% scaling.
Fax specifications• Walk-up black-and-white and color fax capability.• Up to 110 speed dials (varies by model).• Up to 120-page memory (varies by model, based on ITU-T Test Image #1 at standard
resolution). More complicated pages or higher resolution takes longer and uses more memory.• Manual fax send and receive.• Automatic busy redial up to five times (varies by model).• Automatic no-answer redial one time (varies by model).• Confirmation and activity reports.• CCITT/ITU Group 3 fax with Error Correction Mode.• 33.6 Kbps transmission.• 3 seconds per page speed at 33.6 Kbps (based on ITU-T Test Image #1 at standard
resolution). More complicated pages or higher resolution take longer and use more memory.• Ring detect with automatic fax/answering machine switching.
Photo (dpi) Very Fine (dpi) Fine (dpi) Standard (dpi)
Black 196 x 203 (8-bitgrayscale)
300 x 300 196 x 203 196 x 98
Color 200 x 200 200 x 200 200 x 200 200 x 200
Copy specifications 211

Scan specifications• Image editor included• Integrated OCR software automatically converts scanned text to editable text• Scan speeds vary according to the complexity of the document• Twain-compliant interface• Resolution: 2400 x 4800 ppi optical, up to 19,200 ppi enhanced• Color: 16-bit per RGB color, 48-bit total• Maximum scan size from glass: 216 x 297 mm (8.5 x 11.7 inches)
Direct Digital Filing specifications• Scan a hardcopy original from the ADF or scanner glass to create a digital document (with
network connection) that is placed in a network folder• Supports pre-programmed network folder path• Supports Digital Filing Speed-dials• Resolution: 75 dpi, 200 dpi, 300 dpi, 600 dpi• Supported file formats: PDF, JPG• Supported network configuration: TCP/IP network
Environmental specificationsOperating environmentOperating temperature: 5° to 40° C (41° to 104° F)Recommended operating conditions: 15° to 32° C (59° to 90° F)Recommended relative humidity: 25 to 75% noncondensing
Storage environmentStorage temperature: -40° to 60° C (-40° to 140° F)Storage relative humidity: Up to 90% noncondensing at a temperature of 65° C (150° F)
Electrical specificationsPower supplyUniversal power adapter (external)
Power requirementsInput voltage: 100 to 240 VAC (± 10%), 50/60 Hz (± 3Hz)Output voltage: 32 Vdc, 2500 mA
Power consumption• L7300/L7500: 32 watts printing; 35 watts faxing or copying• L7600/L7700: 33 watts printing; 37 watts faxing or copying
Acoustic emission specifications (print in Draft mode, noise levelsper ISO 7779)
Sound pressure (bystander position)LpAd 55 (dBA)
Sound powerLwAd 6.9 (BA)
Appendix C
212 Device specifications

Supported devicesUSB flash drivesHP has fully tested the following USB flash drives with the device:• SanDisk Cruzer Micro: High-speed, 0120-256, 256 MB• Iomega Micro Mini: Full-speed, 064-0417450-YCAE032171, 128 MB• Kingston DataTraveler II: High-speed, KF112504 f5274-006, 128 MB and 256 MB• Sony Microvault: High-speed, D04825AB, 256 MB• Lexar Media JumpDrive: 256 MBNote: You might be able to use other USB flash drives with the device. However, HP cannotguarantee that they will function properly with the device because they have not been fully tested.
Memory card specifications• Maximum recommended number of files on a memory card: 1,000• Maximum recommended individual file size: 12 megapixel maximum, 8 MB maximum• Maximum recommended memory card size: 1 GB (solid state only)
NOTE: Approaching any of the recommended maximums on a memory card might causethe performance of the device to be slower than expected.
Supported memory card types• CompactFlash• Memory Stick• Memory Stick Duo• Memory Stick Pro• Secure Digital• MultiMediaCard (MMC)• xD-Picture CardOther memory cards, including Memory Stick Magic Gate Duo, Memory Stick Duo, and SecureMultimedia Card, are supported with the use of an adapter. See the instructions that came withyour memory card for more information.
Supported devices 213

D Regulatory informationThis section contains the following topics:• FCC statement• Notice to users of the Canadian telephone network• Notice to users in the European Economic Area• Other regulatory information• Regulatory information for wireless products• Declaration of conformity• Environmental sustainability program
FCC statementThe United States Federal Communications Commission (in 47 cfr 15.105) has specified that thefollowing notices be brought to the attention of users of this product. This device complies withpart 15 of the FCC rules. Operation is subject to the following two conditions: (1) This device maynot cause harmful interference, and (2) this device must accept any interference received,including interference that may cause undesired operation.
Shielded cablesUse of a shielded data cable is required to comply with the Class B limits of Part 15 of the FCCRules.Pursuant to Part 15.21 of the FCC Rules, any changes or modifications to this equipmentnot expressly approved by the Hewlett-Packard Company, may cause harmful interferenceand void the FCC authorization to operate this equipment.This equipment has been tested and found to comply with the limits for a Class B digital device,pursuant to Part 15 of the FCC Rules. These limits are designed to provide reasonable protectionagainst harmful interference in a residential installation. This equipment generates, uses and canradiate radio frequency energy and, if not installed and used in accordance with the instructions,may cause harmful interference to radio communications. However, there is no guarantee thatinterference will not occur in a particular installation. If this equipment does cause harmfulinterference to radio or television reception, which can be determined by turning the equipmentoff and on, the user is encouraged to try to correct the interference by one or more of thefollowing measures:• Reorient or relocate the receiving antenna.• Increase the separation between the equipment and receiver.• Connect the equipment into an outlet on a circuit different from that to which the receiver is
connected.• Consult the dealer or an experienced radio/TV technician for help.For further information, contact:Manager of Corporate Product RegulationsHewlett-Packard Company3000 Hanover StreetPalo Alto, CA 94304(650) 857-1501
214 Regulatory information

Exposure to radio frequency radiation (wireless products only)
FCC statement 215

Notice to users of the U.S. telephone network
Appendix D
216 Regulatory information

Notice to users of the Canadian telephone network
Notice to users of the Canadian telephone network 217

Notice to users in the European Economic Area
Other regulatory information• EMI statement (Korea)• VCCI statement (Japan)• Regulatory model number• Power cord statement• LED classification
EMI statement (Korea)
Appendix D
218 Regulatory information

VCCI statement (Japan)
Regulatory model numberFor regulatory identification purposes, your product is assigned a Regulatory Model Number. TheRegulatory Model Number for your product is SNPRC-0602–01 or SNPRC-0602–02. Thisregulatory number should not be confused with the marketing name (HP Officejet Pro L7300/L7500/L7600/L7700) or product number (CB778A, C8157A, C8158A, C8159A).
Power cord statementThe power cord cannot be repaired. If it is defective, it should be discarded or returned to thesupplier.
LED classification
Regulatory information for wireless products• Notice to users in Canada/Note à l'attention des utilisateurs Canadien• Notice to users in Brazil/Notificação de Normas de Uso de Dispositivos Sem Fio do Brasil• Notice to users in the European Union (English)• Notice to users in France• Notice to users in Germany• Notice to users in Italy• Notice to users in Spain
Regulatory information for wireless products 219

Notice to users in Canada/Note à l'attention des utilisateurs Canadien
Notice to users in Brazil/Notificação de Normas de Uso de Dispositivos Sem Fio doBrasil
Appendix D
220 Regulatory information

Notice to users in the European Union (English)
Regulatory information for wireless products 221

Notice to users in France
Appendix D
222 Regulatory information

Notice to users in Germany
Regulatory information for wireless products 223

Notice to users in Italy
Appendix D
224 Regulatory information

Notice to users in Spain
Regulatory information for wireless products 225

Declaration of conformityHP Officejet Pro L7500/L7600
Appendix D
226 Regulatory information

HP Officejet Pro L7700
Declaration of conformity 227
Environmental sustainability programHewlett-Packard is committed to providing quality products in an environmentally sound manner.HP continuously improves the design processes of its products to minimize the negative impacton the office environment and on the communities where devices are manufactured, shipped,and used. HP has also developed processes to minimize the negative impact of the disposal ofthe device at the end of its printing life.For more information about HP's environmental sustainability program, see www.hp.com/hpinfo/globalcitizenship/environment/index.html.
Reduction and eliminationPaper useThis product's two-sided (duplex) printing and N-up printing feature (which allows you to printmultiple pages of a document on one sheet of paper) can reduce paper usage and the resultingdemands on natural resources. See this guide for more information about using these features.Ink useThis product's draft mode uses less ink, which might extend the life of the cartridges. See theprint driver's online Help for more information.Ozone-depleting chemicalsOzone-depleting chemicals, such as chlorofluorocarbons (CFCs), have been eliminated from HPmanufacturing processes.
Power consumptionPower usage drops significantly while in PowerSave/Sleep mode, which saves natural resourcesand saves money without affecting the high performance of this product.
Battery informationThis device contains the following, mercury-free battery:
Specification Value
Battery part numbe 1420-0887
Battery material Lithium polycarbon monfluoride
Battery type Button/coin cell battery
Quantity per product 1
Weight 2.50 grams (0.09 ounces)
Battery manufacturer Panasonic, Japan
NOTE: The battery might require recycling or proper disposal at end-of-life.
Appendix D
228 Regulatory information

Material safety data sheetsMaterial safety data sheets (MSDSs) can be obtained from the following HP Web site:www.hp.com/go/msds.
RecyclingDesign for recycling has been incorporated into this device:• The number of materials has been kept to a minimum while ensuring proper functionality and
reliability.• Dissimilar materials have been designed to separate easily.• Fasteners and other connections are easy to locate, access, and remove using common tools.• High-priority parts have been designed so that they can be accessed quickly for efficient
disassembly and repair.
Product packagingThe packaging materials for this device have been selected to provide maximum protection forthe least cost possible, while attempting to minimize environmental impact and facilitate recycling.The rugged design of the device assists in minimizing both packaging materials and damage rates.
PlasticsPlastic parts over 25 grams are marked according to international standards that enhance theability to identify plastics for recycling purposes at the end of the product's life.
Disposal of waste equipment by users in private households in the EuropeanUnion
This symbol on the product or on its packaging indicates that thisproduct must not be disposed of with your other householdwaste. Instead, it is your responsibility to dispose of your wasteequipment by handing it over to a designated collection point forthe recycling of waste electrical and electronic equipment. Theseparate collection and recycling of your waste equipment at thetime of disposal will help to conserve natural resources andensure that it is recycled in a manner that protects human healthand the environment. For more information about where you candrop off your waste equipment for recycling, please contact yourlocal city office, your household waste disposal service or theshop where you purchased the product.
HP products and suppliesHP's Planet Partners™ recycling service provides an easy way to recycle any brand of computerequipment or HP printing supplies. HP's state-of-the-art processes ensure that your unwantedhardware or HP printing supply is recycled in a way that conserves resources.For more information, see www.hp.com/recycle.
Environmental sustainability program 229

Index
Aaccessibility 11accessories
installation 21order 198self-test diagnostic page 97turn on and off in driver 22warranty 203
acoustic emissions 212Add Printer installation 128ADF (automatic document
feeder)capacity 30clean 153clear jams 195load originals 30media sizes supported 33
administratormanagement tools 86settings 88
ADSL, fax setup withparallel phone systems 106
aligning printheads 146answer ring pattern
change 80parallel phone systems 108
answering machinefax tones recorded 185set up with fax (parallel
phone systems) 117set up with fax and
modem 118Attention light 16Auto Answer button 17automatic document feeder
(ADF)capacity 30clean 153clear jams 195load originals 30media sizes supported 33
BBack button 17backup fax reception 74baud rate 82
black and white pagescopy 50fax 70troubleshoot 164
black dots or streaks,troubleshootcopies 169scan 173
blank pages, troubleshootcopy 167print 160scan 173
blocked fax numberscontrol panel button 16set up 77view list 78
Bluetoothcolor display icon 18connect devices 136dongle, order online 198features available 20Mac OS, print from 138security settings 138setup 135Windows, print from 136
borderless printingMac OS 43Windows 42
both sides, print on 48broadcast faxing
send 73buttons, control panel 16
Ccables
order USB 198regulatory compliance 214
calibrate linefeed 147cameras
connect 59, 61control panel display
mode 19insert memory cards 58port, locating 14, 59print DPOF files 59save photos to computer 68
cancelcopy 51print job 49scan 57
Cancel button 17capacity
ADF 30trays 36
cardsguidelines 32sizes supported 34tray supporting 36
cartridges. See ink cartridgeschlorofluorocarbons (CFCs) 228clean
ADF 153exterior 157printheads 147scanner glass 152
color copy 50colored text, and OCR 56colors
bleeding 165faded or dull 164print black and white,
troubleshoot 164specifications 210troubleshoot 165wrong 164
CompactFlash memory cardinsert 58slot, locating 14
computer modemshared with fax (parallel
phone systems) 111shared with fax and
answering machine(parallel phonesystems) 118
shared with fax and voiceline (parallel phonesystems) 113
shared with fax and voicemail (parallel phonesystems) 122
confirmation reports, fax 84
230

connectionsBluetooth 135features available 19
connectors, locating 15control panel
administrator settings 88buttons 16copy from 50crop images 51display 19enter text and symbols 28faceplate, removing 205lights 16locating 13manage device 86menus 24messages 25network settings 99print photos 62scan from 52send faxes 71send scans to
programs 54settings, change 25status icons 18
copycancel 51crop originals 50from the control panel 50quality 168settings 50specifications 211troubleshoot 167
Copy button 16Copy menu 24correct port test, fax 176critical error messages 25crop originals 50custom-sized media
guidelines 33print on 41sizes supported 35
customer supportelectronic 200HP Instant Support 94phone support 200
cut-off pages, troubleshoot 161
Ddark images, troubleshoot
copies 168scans 173
Declaration of Conformity(DOC) 226
default settingscontrol panel 25copy 50driver 47print 47
deleting faxes from memory 75dial tone test, failure 178dial type, setting 81dial-up modem
shared with fax (parallelphone systems) 111
shared with fax andanswering machine(parallel phone syanstems) 118
shared with fax and voiceline (parallel phonesystems) 113
shared with fax and voicemail (parallel phonesystems) 122
digital camerasconnect 59, 61control panel display
mode 19insert memory cards 58port, locating 14, 59print DPOF files 59save photos to computer 68
Digital Filingscan to 54
digital filingset up 52
Digital Filing button 16display, control panel 19distinctive ringing
change 80parallel phone systems 108
DOC 226documentation 10dots or streaks, troubleshoot
copies 169dots per inch (dpi)
fax 16print 210
dots, troubleshootscan 173
double-sided printing 48DPOF files 59driver
accessories settings 22
settings 47version 201warranty 203
DSL, fax setup withparallel phone systems 106
duplex printing accessoryorder online 198
duplexerclear jams 192installation 21locating 15margins, minimum 37media sizes supported 33media types and weights
supported 36turn on and off in driver 22using 48
duty cycle 208
Eedit
scanned images 56text in OCR program 56
electrical specifications 212embedded Web server
about 90administrator settings 88answer ring pattern, fax 81backup fax reception, set
up 75blocked fax numbers,
view 78clear fax log 76fax header, setting 79fax log, view 85features 86forwarding faxes 76opening 90pages 91system requirements 210troubleshoot, cannot be
opened 187Webscan 55
envelopesguidelines 32sizes supported 34tray supporting 36
environmentalspecifications 212
environmental sustainabilityprogram 228
Index
231

error messagescontrol panel 25unable to activate TWAIN
source 171error reports, fax 84error-correction mode, fax 81Ethernet connections 19Ethernet network port,
locating 15European Union waste
disposal 229event log 97EWS. See embedded Web
server
Ffaded copies 168faded stripes on copies,
troubleshoot 168fax
answer mode 79answering machine and
modem, shared with(parallel phonesystems) 118
answering machinetroubleshoot 185
answering machine, set up(parallel phonesystems) 117
auto answer 17, 79backup fax reception 74block numbers 16blocking numbers 77clear log 76confirmation reports 84deleting from memory 75dial tone test, failed 178dial type, setting 81distinctive ringing setup
(parallel phonesystems) 108
distinctive ringing, changepattern 80
DSL, set up (parallel phonesystems) 106
enter text and symbols 28error reports 84error-correction mode 81forwarding 76header 79Internet, over 82
ISDN line, set up (parallelphone systems) 107
line condition test, failed 179log, print 85manual receive 73modem and answering
machine, shared with(parallel phonesystems) 118
modem and voice line,shared with (parallelphone systems) 113
modem and voice mail,shared with (parallelphone systems) 122
modem, shared with(parallel phonesystems) 111
monitor dialing 72, 73network folder speed-dial
entries 45parallel phone systems 102pause 28PBX system, set up
(parallel phonesystems) 107
phone cord connection test,failed 176
phone cord too short 185phone cord type test,
failed 177receive 73receive, troubleshoot 180,
182redial options 81Redial/Pause button 17reports 83reprint 75rings to answer 80scan 17send 70send, troubleshoot 180,
182, 184separate line setup (parallel
phone systems) 105set up 101settings, change 79setup types 102shared phone line setup
(parallel phonesystems) 109
specifications 211speed 82
speed-dial entries, set up 43speed-dial groups, set up 44test failed 174test setup 83troubleshoot 174voice mail, set up (parallel
phone systems) 110wall jack test, failed 175
Fax menu 24Fax Menu button 16fax port, locating 15FCC statement 214firewalls, troubleshoot 159FoIP 82fonts supported 208forwarding faxes 76
Ggetting started guide 10glass, scanner
clean 152load originals 31locating 13
grainy or white bands oncopies, troubleshoot 169
graphicsincompletely filled on
copies 169ink not filling in 164look different from original
scan 172missing lines or dots 165
groups, speed-dialset up 44
Hhardware, fax setup test 175header, fax 79help
HP Instant Support 94see also customer support
Help button 17HP Instant Support
about 94accessing 95myPrintMileage 94security and privacy 95
HP Photosmart Softwaresend scans to programs 54
HP Photosmart Studiosend scans to programs 54
HP Planet Partners 229
232

HP Printer Utility (Mac OS)administrator settings 89features 86opening 93panels 93
HP Solution Center 26HP Web Jetadmin
about 94features 86
humidity specifications 212
IInformation tab, Toolbox
(Windows) 92ink cartridge door, locating 14ink cartridges
expiration dates 97locating 14order online 198part numbers 97, 198remove 204replace 144status 87, 97supported 143, 208warranty 203yields 208
ink level icons 18ink smearing, troubleshoot 163installation
accessories 21Add Printer, Windows 128duplexer 21ink cartridges 144software for Mac OS 128software for Windows 125tray 2 21troubleshoot 188Windows network
software 127Internet
fax, using 82IP address
checking for device 187static, setting 158
IP settings 101ISDN line, set up with fax
parallel phone systems 107
Jjams
ADF 195clear 192
media to avoid 32prevent 197
Japanese VCCI statement 219jobs
settings 25Junk Fax Blocker button 16junk fax mode 77
Kkeypad, control panel
enter text and symbols 28locating 16
Korean EMI statement 218
Llanguage, printer 208LED classification
statement 219left arrow 16light images, troubleshoot
copies 168scans 173
lights, control panel 16line condition test, fax 179linefeed, calibrate 147lines
copies, troubleshoot 168scans, troubleshoot 172,
173link speed, setting 100load
originals in ADF (automaticdocument feeder) 30
tray 1 38tray 2 39
locking trays 40log, clear fax 76log, fax
print 85view 85
MMac OS
Bluetooth 138borderless printing 43duplexing 49HP Photosmart Studio 26HP Printer Utility 93install software 128Network Printer Setup
Utility 94
print on special, or custom-sized media 41
print settings 47sharing device 129system requirements 209turn accessories on and off
in driver 22uninstall software 141wireless communication
setup 133management tools 86manual faxing
receive 73send 71, 72
marginsduplexer 37setting, specifications 37
material safety data sheets(MSDSs) 229
mediaADF capacity 30borderless printing 42clear jams 192duplexing 48HP, order 199load tray 1 37load tray 2 39locking trays 40print on custom-sized 41selecting 32skewed pages 166specifications 33supported sizes 33troubleshoot feeding 166types and weights
supported 36usage 87
memorydeleting faxes 75reprint faxes 75save faxes 74specifications 209
memory cardscontrol panel display
mode 19fax 17insert 58print DPOF files 59print photos 62proof sheets 62save photos to computer 68scan to 55slots, locating 14
Index
233

specifications 213troubleshoot 186
memory device light, locating 13Memory Stick cards
insert 58slot, locating 14, 58
menus, control panel 24missing lines or dots,
troubleshoot 165missing or incorrect
information, troubleshoot 161MMC memory card
insert 58slot, locating 14
model number 97modem
shared with fax (parallelphone systems) 111
shared with fax andanswering machine(parallel phonesystems) 118
shared with fax and voiceline (parallel phonesystems) 113
shared with fax and voicemail (parallel phonesystems) 122
monitor dialing 72, 73monitoring tools 87multi-feeds, troubleshoot 166myPrintMileage
about 95accessing 96features 86
Nnetwork folders
scan to 53troubleshoot 173
network folders, as speed-dialentries 45
Network Printer Setup Utility(Mac OS) 94
networksadvanced settings 100connector illustration 15Digital Filing button 16Ethernet connections 19firewalls, troubleshoot 159HP Web Jetadmin 94IP settings 101link speed 100
Mac OS setup 128operating systems
supported 210protocols supported 210self-test diagnostic page 96settings, change 99sharing, Windows 126static IP address,
setting 158system requirements 210view and printsettings 100Windows setup 127wireless communication
setup 129wireless settings 98, 130Wireless Setup Wizard 100
noise information 212Number of Copies button 16
OOCR
edit scanned documents 56troubleshoot 171
OK button 16On button 17one-touch speed dial buttons 16operating environment
specifications 212operating systems
supported 209originals
crop 50edit scans 56load ADF (automatic
document feeder) 30scan 52
output traylocating 13media supported 36
ozone-depleting chemicals 228
Ppacking the device 206pages per month (duty
cycle) 208panoramic photos 65paper. See mediapaper-feed problems,
troubleshoot 165parallel phone systems
answering machinesetup 117
countries/regions with 102distinctive ringing setup 108DSL setup 106ISDN setup 107modem and answering
machine setup 118modem and voice mail
setup 122modem setup 111modem shared with voice
line setup 113PBX setup 107separate line setup 105setup types 102shared line setup 109
part numbers, supplies andaccessories 198
passkey authentication,Bluetooth 138
passport photos 66PBX system, set up with fax
parallel phone systems 107PCL 3 support 208phone cord
connected to correct porttest failed 176
correct type test failed 177extend 185
phone customer support 200phone line, answer ring
pattern 80phone, fax from
receive 73send, 71
photo mediaguidelines 33sizes supported 35
Photo menu 24Photo Menu button 16photos
borderless printing 42connect a PictBridge
camera 59connect storage device 61edit scans 56insert memory cards 58panoramic 65passport 66print from control panel 62print from DPOF files 59proof sheets 62save to computer 68
234

troubleshoot memorycards 186
video action prints 67view 62
Photosmart Softwaresend scans to programs 54
Photosmart Studiosend scans to programs 54
PictBridge mode 59, 60PictBridge-enabled digital
camera port, locating 14, 59ports, specifications 208power
consumption 228specifications 212troubleshoot 158
power cord statement 219power input, locating 15power on button 17print
Bluetooth 135cancel 49double-sided 48fax logs 85fax reports 83faxes 75panoramic photos 65passport photos 66photos from DPOF file 59photos from memory card 62proof sheets 62self-test diagnostic page 97settings 47slow 160speed-dial entries 46troubleshoot 158video action photos 67
print cartridges. See inkcartridges
print driveraccessories settings 22settings 47version 201warranty 203
print qualitydiagnostic page 145troubleshoot 162
Print quality diagnosticpage 145
print-carriage access door,locating 14
printer driveraccessories settings 22
settings 47version 201warranty 203
printhead latch, locating 14printheads
aligning 146clean 147clean contacts manually 147health, check 145locating 14maintaining 145order online 198part numbers 199remove 204replace 150status 87, 97, 145supported 208troubleshoot 159warranty 203
privacy, HP Instant Support 95processor specifications 209Proof Sheet button
control panel button 17proof sheet button 17proof sheets
fill in 64print 62scan 64
pulse dialing 81
QQuality button 17quality, troubleshoot
copy 168diagnostic page 145print 162scan 171
Rradio frequency radiation 215radio interference
reducing 134regulatory information 219
radio, turn off 100readme 10rear access panel
clear jams 192illustration 15
receive faxesauto answer mode 79automatically 73blocking numbers 77
forwarding 76manually 73rings to answer 80troubleshoot 180, 182
recycling 229redial options, setting 81Redial/Pause button 17Reduce/Enlarge button 16regulatory information 214, 219regulatory model number 219release notes 10remove ink cartridges and
printheads 204replace
ink cartridges 144printheads 150
reportsconfirmation, fax 84error, fax 84fax test failed 174
reprintfaxes from memory 75
resolutionfax 16, 17print 210
Resolution button 16Right arrow 16rings to answer 80Rotate button 17
Ssave
default settings 25faxes in memory 74photos to computer 68
scancancel 57Direct Digital Filing 52edit images 56error messages 171from a TWAIN- or WIA-
compliant program 55from control panel 52from Webscan 55OCR 56proof sheets 64quality 171Scan Menu button 16scan specifications 212send to a program 54settings for 57slow 170Start Color Photo button 17
Index
235

Start Color Scan button 17to memory card 55troubleshoot 169
Scan menu 24Scan Menu button 16scanner glass
clean 152load originals 31locating 13
Secure Digital memory cardinsert 58slot, locating 14
Secure MMC memory cardslot, locating 14
SecureEasySetup (SES),wireless communication 133
securityBluetooth 138HP Instant Support 95manage 87wireless communication 134wireless settings 131
self-test diagnostic pageinformation on 96print 97
send faxesbasic fax 70manually 71monitor dialing 72, 73troubleshoot 180, 182, 184
send scansfor OCR 56to a program 54troubleshoot 169
serial number 97serial phone systems
countries/regions with 102setup types 102
Services tab, Toolbox(Windows) 92
settingsadministrator 88control panel 25copy 50driver 47network 99scan 57speed, fax 82
setupanswering machine
(parallel phonesystems) 117
answering machine andmodem (parallel phonesystems) 118
Bluetooth 135computer modem (parallel
phone systems) 111computer modem and
answering machine(parallel phonesystems) 118
computer modem andvoice line (parallel phonesystems) 113
computer modem andvoice mail (parallelphone systems) 122
connection types 19distinctive ringing 80distinctive ringing (parallel
phone systems) 108DSL (parallel phone
systems) 106fax 101fax scenarios 102fax, with parallel phone
systems 102ISDN line (parallel phone
systems) 107PBX system (parallel
phone systems) 107separate fax line (parallel
phone systems) 105shared phone line (parallel
phone systems) 109test fax 83voice mail (parallel phone
systems) 110voice mail and computer
modem (parallel phonesystems) 122
Windows 125Windows networks 127
Setup button 17setup poster 10sharing 19sharing device
Mac OS 129Windows 126
shipping the device 204size
scans, troubleshoot 173troubleshoot copy 168
skew, troubleshootcopy 169print 166scan 172
slow print, troubleshoot 160software
accessories settings 22connection types 19HP Photosmart 26installation on Mac OS 128installation on Windows 125management tools 86OCR 56uninstall from Mac OS 141uninstall from Windows 140warranty 203Webscan 55
Solution Center 26sound pressure 212specifications
acoustic emissions 212electrical 212media 33network protocols 210operating environment 212physical 208processor and memory 209storage environment 212system requirements 209
speedtroubleshoot for
scanner 170troubleshoot print 160
speed dialbuttons 16Digital Filing 53fax numbers, set up 43groups, set up 44network folders 45one-touch buttons 16print and view 46send fax 70
Start Color Photo button 17Start Color Scan button 17Start Copy buttons
black 17color 17
Start Fax buttonsblack 17color 17
static IP address, setting 158status
messages 25
236

network configurationpage 98
self-test diagnostic page 97supplies 86, 87
status icons 18storage devices
connect 61USB flash drives
supported 213storage environment
specifications 212streaks, troubleshoot
copies 169scan 173
stripes on scans,troubleshoot 172
subscriber identification code 79supplies
myPrintMileage 95order online 198self-test diagnostic page 97status 86, 87yields 208
support. See customer supportsymbols, enter 28system requirements 209
Ttechnical information
copy specifications 211fax specifications 211memory card
specifications 213scan specifications 212
telephone customer support 200telephone line, answer ring
pattern 80telephone wall jack, fax 175telephone, fax from
receive 73send 71
temperature specifications 212tests, fax
dial tone, failed 178failed 174fax line condition 179fax phone cord type test
failed 177hardware, failed 175port connection, failed 176setup 83telephone wall jack 175
textcannot be edited after
scan, troubleshoot 171enter from control panel 28incompletely filled on
copies 169missing from scan,
troubleshoot 170splotchy on copies 169troubleshoot 161, 164, 165unclear on copies,
troubleshoot 169unclear scans 173
tone dialing 81Toolbox (Windows)
about 91administrator settings 89Estimated Ink Level tab 92features 86Information tab 92opening 91Services tab 92
transparencies 33tray 1
capacity 36load media 38locating 13media sizes supported 33media types and weights
supported 36tray 2
capacity 36installation 21load media 39locating 13media sizes supported 33media types and weights
supported 36order online 198troubleshoot installation 165turn on and off in driver 22
trayscapacities 36clear jams 192installation tray 2 21load media 37locating 13locking 40management tools 87media sizes supported 33media types and weights
supported 36paper guides illustration 13
setting default 40troubleshoot feeding 166turn on and off in driver 22
troubleshootanswering machines 185blank pages printed 160bleeding colors 165colors 164, 165control panel messages 25copy 167copy quality 168cut-off pages, incorrect text
or graphicsplacement 161
embedded Web server 187fax 174fax dial tone test failed 178fax hardware test failed 175fax line test failed 179fax phone cord connection
test failed 176fax phone cord type test
failed 177fax tests 174fax wall jack test, failed 175firewalls 159HP Instant Support 94ink not filling text or
graphics 164ink smearing 163installation 188meaningless characters
print 163media not picked up from
tray 166memory cards 186missing lines or dots 165missing or incorrect
information 161multiple pages are
picked 166network configuration
page 98nothing prints 158paper-feed problems 165power 158print 158print quality 162printheads 159receive faxes 180, 182scan 169scan quality 171self-test diagnostic page 96
Index
237

send faxes 180, 182, 184skewed copies 169skewed pages 166slow print 160tips 157tray 2 installation 165
TWAINscan from 55unable to activate
source 171two-line display, control
panel 19Two-sided button 17two-sided printing 48two-sided printing accessory.
See duplexer
Uuninstall software
Mac OS 141Windows 140
USB cable, order 198USB connection
Bluetooth adapter 135digital cameras 59features available 19port, locating 13, 15setup Mac OS 128setup Windows 125specifications 208
USB flash drives 213
Vvertical stripes on copies,
troubleshoot 168videos
print action photos 67view
blocked fax numbers 78fax log 85network settings 100photos 62speed-dial entries 46
voice mailset up with fax (parallel
phone systems) 110set up with fax and
computer modem(parallel phonesystems) 122
voltage specifications 212
Wwall jack test, fax 175warning messages 25warranty 203Web sites
accessibilty information 12Apple 129customer support 200environmental
programs 228European ink cartridges 199HP Web Jetadmin 94material safety data
sheets 229order supplies and
accessories 198recycling 229supply yield data sheet 208wireless security 131
Webscan 55white bands or stripes,
troubleshootcopies 168, 169scans 172
WIA (Windows ImageApplication), scan from 55
WindowsAdd Printer installation 128Bluetooth 136borderless printing 42duplexing 48HP Photosmart Software 26HP Solution Center 26install software 125network setup 127print on special or custom-
sized media 41print settings 47set up wireless
communication 132sharing device 126system requirements 209turn accessories on and off
in driver 22uninstall software 140
Windows Image Application(WIA), scan from 55
wireless communicationBluetooth 135Ethernet setup 132radio, turn off 100reducing interference 134regulatory information 219
SecureEasySetup(SES) 133
security 134set up 129set up on Mac OS 133settings 130turn off 134wizard 131
wireless connection iconsad hoc 18no connection exists 18
Wireless Setup Wizard 100
XxD-Picture memory card
insert 58slot, locating 14, 58
ZZoom in button 17Zoom out button 17
238


© 2007 Hewlett-Packard Development Company, L.P.
www.hp.com