hrss-xeg program command€¦ · 2 . 2019-03 1. foreword hiwin robot system software ) is a...
TRANSCRIPT

www.hiwin.tw
User Manual
HRSS-XEG Program Command
Original Instruction

INDUSTRIE 4.0 Best Partner
Multi-Axis RobotPick-and-place / Assembly / Array and packaging / Semiconductor / Electro-Optical industry / Automotive industry / Food industry• Articulated Robot• Delta Robot• SCARA Robot• Wafer Robot• Electric Gripper • Integrated Electric Gripper• Rotary Joint
Single-Axis RobotPrecision / Semiconductor /Medical / FPD• KK, SK• KS, KA • KU, KE, KC
Torque Motor Rotary TableAerospace / Medical / Automotive industry / Machine tools / Machinery industry• RAB Series• RAS Series• RCV Series• RCH Series
BallscrewPrecision Ground / Rolled• Super S series• Super T series• Mini Roller• Ecological & Economical
lubrication Module E2• Rotating Nut (R1)• Energy-Saving & Thermal-
Controlling (Cool Type)• Heavy Load Series (RD) • Ball Spline
Linear GuidewayAutomation / Semiconductor / Medical• Ball Type--HG, EG, WE, MG, CG• Quiet Type--QH, QE, QW, QR• Other--RG, E2, PG, SE, RC
BearingMachine tools / Robot• Crossed Roller Bearings • Ballscrew Bearings • Linear Bearing• Support Unit
DATORKER® Robot ReducerRobots / Automation equipment / Semiconductor equipment / Machine tools• WUT Type-Combination Type (P) • WUI Type-Component Type (C) • WTI Type-Combination Type (P)• WTI Type-Sealed type (A)
AC Servo Motor & DriveSemiconductor / Packaging machine /SMT / Food industry / LCD• Drives-D1, D1-N, D2T • Motors-50W~2000W
Medical EquipmentHospital / Rehabilitation centers /Nursing homes• Robotic Gait Training System• Hygiene System• Robotic Endoscope HolderS
Linear MotorAutomated transport / AOI application / Precision / Semiconductor• Iron-core Linear Motor• Coreless Linear Motor • Linear Turbo Motor LMT • Planar Servo Motor • Air Bearing Platform• X-Y Stage • Gantry Systems
Torque Motor & Direct Drive MotorInspection / Testing equipment / Machine tools / Robot• Rotary Tables-TMS,TMY,TMN• TMRW Series• TMRI Series

2019-03
Table of Contents 1. Foreword ............................................................................................................... 2
2. Safety and Notice .................................................................................................. 2
3. Product Description .............................................................................................. 3
3.1. Overview of Hardware Components ........................................................................ 3
3.2. Overview of Software Components ......................................................................... 7
3.3. HRSS Overview ....................................................................................................... 7
4. Programming Commands .................................................................................... 8
4.1. Command Description ............................................................................................. 8
4.2. Example Commands .............................................................................................. 13
5. Operation Flow ................................................................................................... 15
5.1. Open HRSS ............................................................................................................ 15
5.2. Switch to T1 Mode ................................................................................................. 16
5.3. Install Electric Gripper Driver ............................................................................... 17
5.4. Expert Login .......................................................................................................... 19
5.5. New File ................................................................................................................. 20
5.6. Programming .......................................................................................................... 21
5.7. Running .................................................................................................................. 22
5.8. Run Error ............................................................................................................... 23
5.9. Status Detection ..................................................................................................... 25
6. Error Message and Troubleshooting ................................................................ 26
6.1. Hardware Error ...................................................................................................... 26
6.2. Operation Error ...................................................................................................... 26

2
2019-03
1. Foreword
HIWIN ROBOT SYSTEM SOFTWARE (HRSS) is a human-machine interface
developed by HIWIN, including all functions for HIWIN’s ROBOT, where the
programming parts contain the command sets of XEG Series Electric Gripper. By
programming high-resource language (HRL), you can operate XEG Series Electric
Gripper, such as move, grip, identify and supervise. Owing to the functions above,
HRSS enables you to quickly achieve all task requirements by running HIWIN XEG
Series Electric Gripper.
2. Safety and Notice
The safety descriptions in the manual will allow the users to correctly update and
use auxiliary software, avoiding injury and damage. Please carefully read the
manual before operating, and strictly follow the related standards and steps to ensure
your safety.
3
2019-03
3. Product Description
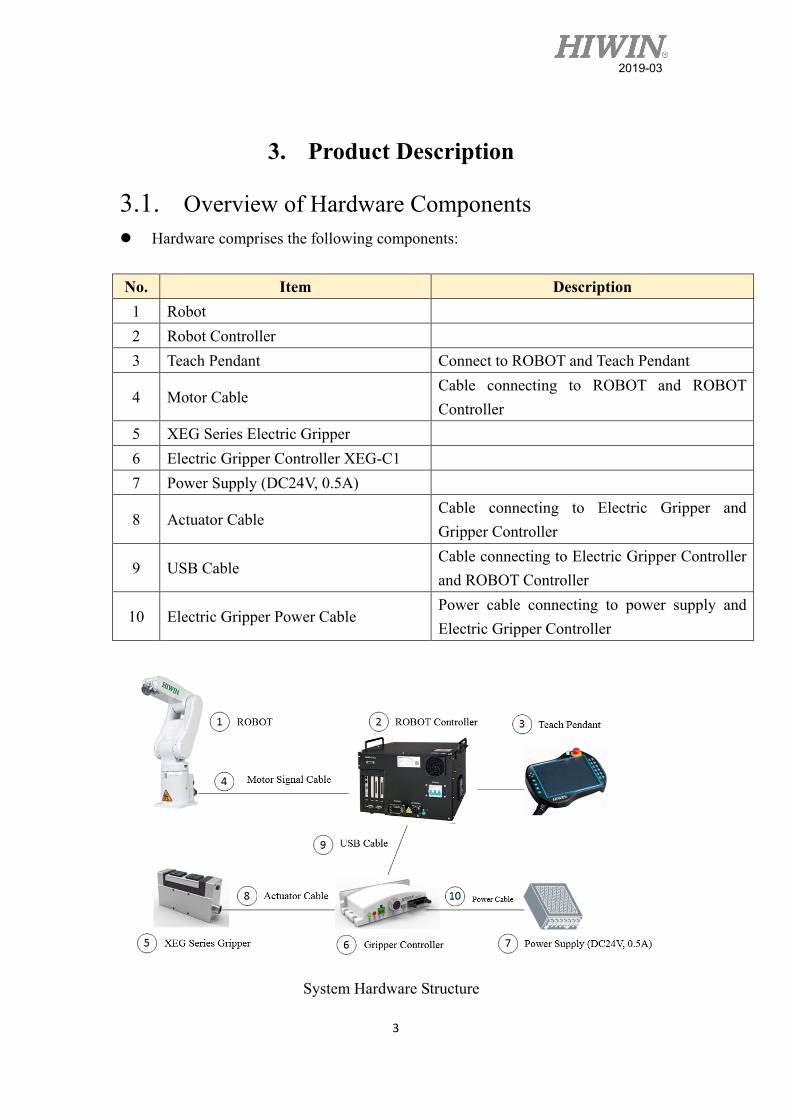
3.1. Overview of Hardware Components Hardware comprises the following components:
No. Item Description 1 Robot 2 Robot Controller 3 Teach Pendant Connect to ROBOT and Teach Pendant
4 Motor Cable Cable connecting to ROBOT and ROBOT Controller
5 XEG Series Electric Gripper 6 Electric Gripper Controller XEG-C1 7 Power Supply (DC24V, 0.5A)
8 Actuator Cable Cable connecting to Electric Gripper and Gripper Controller
9 USB Cable Cable connecting to Electric Gripper Controller and ROBOT Controller
10 Electric Gripper Power Cable Power cable connecting to power supply and Electric Gripper Controller
System Hardware Structure

4
2019-03
Component Names and Functions of ROBOT Controller
5
2019-03
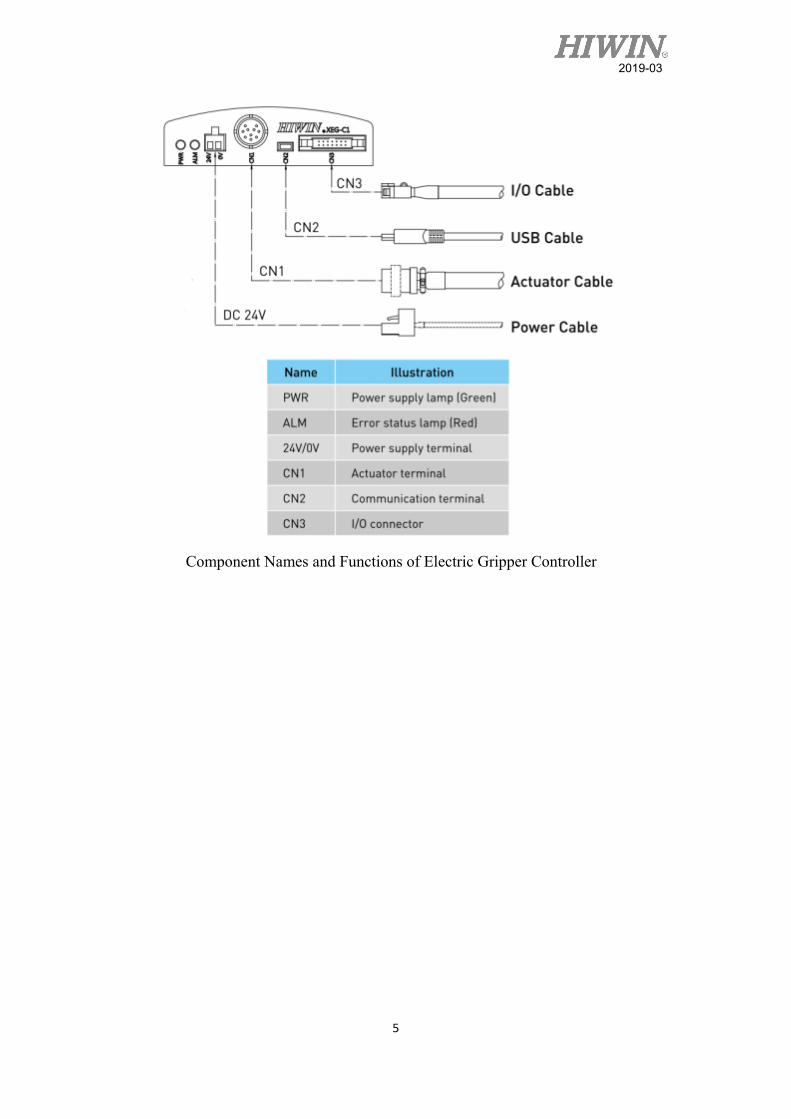
Component Names and Functions of Electric Gripper Controller
6
2019-03
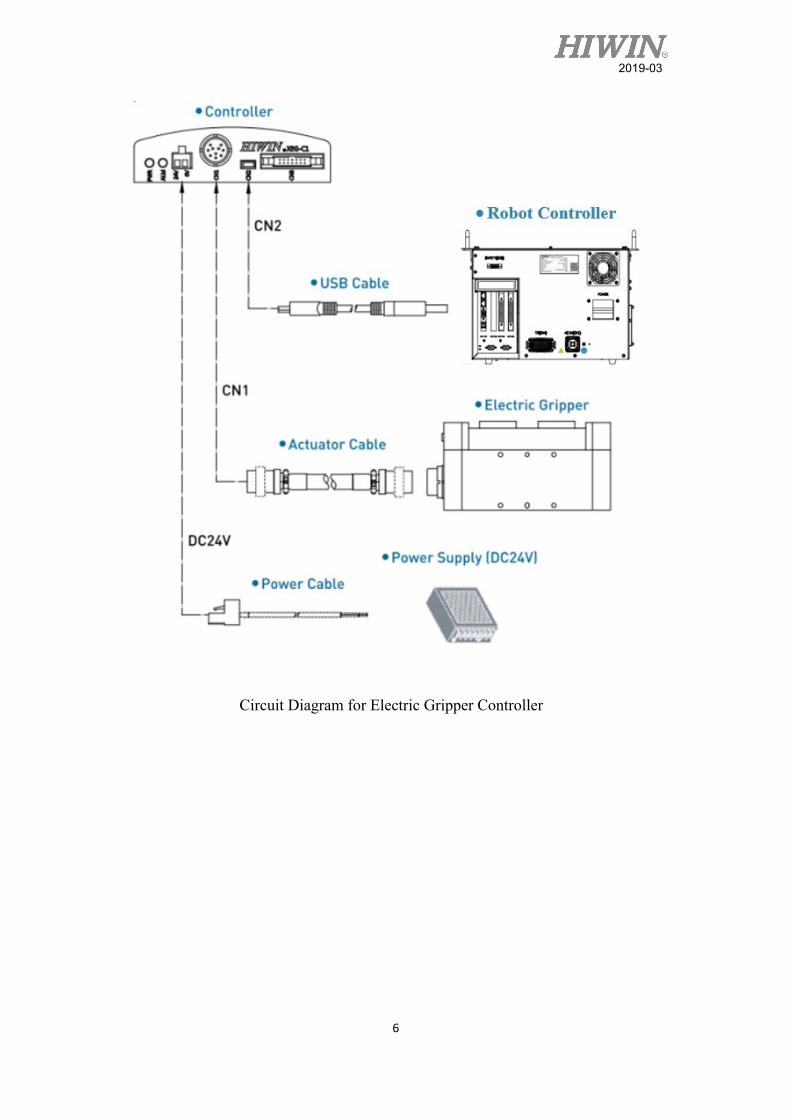
Circuit Diagram for Electric Gripper Controller

7
2019-03
3.2. Overview of Software Components Overview
The software components below are applied to: HRSS (EtherCAT) 3.2.5 or above Windows 7 Embedded Firmware version of Electric Gripper Controller 2.0.13 or above
3.3. HRSS Overview

8
2019-03
4. Programming Commands
4.1. Command Description In HRSS, there are eight commands related to XEG Series Electric Gripper. All commands will be continuously executed after they are executed or completed. The commands contain as follows: Communication commands: EG_OPEN(str Type)
EG_CLOSE
Get information: EG_GET_STATUS
EG_GET_POS
Motion commands: EG_RESET
EG_RUN_MOVE(double MovPos, int MovSpeed)
EG_RUN_GRIP(str Dir, int Str, str GriSpeed, str GriForce)
EG_RUN_EXPERT(str Dir, double MovStr, int MovSpeed, double GriStr, int GriSpeed, int
GriForce)
4.1.1 EG_OPEN(str Type) Description:
When connecting to XEG Series Electric Gripper, this command must be entered to open the connection of Electric Gripper before other commands are run.
Format:
EG_OPEN(Type)
Description: The Type shows the model number connected to XEG Series Electric Gripper. All model Types are as follows:
Type Model Number X16 XEG-16

9
2019-03
X32 XEG-32 X64 XEG-64
4.1.2 EG_CLOSE Description:
Close the current connection of XEG Series Electric Gripper. It can be used to close the current connection of XEG Series Electric Gripper and open the connection with other XEG Series Electric Grippers.
Format: EG_CLOSE
Additional Description: No other parameters
4.1.3 EG_GET_STATUS Description:
Get the status of XEG Series Electric Gripper, where all types are as follows:
Type Status 0 Idle Ready 1 Running Busy 2 Gripping Hold -1 Position Error Alarm 1 -2 Over Travel Alarm 2 -3 Reset Error Alarm 3
Used to determine the Electric Gripper is holding an object or running as one of object identifications.
Format: IF EG_GET_STATUS == 2 THEN … ENDIF

10
2019-03
Format Description: Use IF Statement to program and determine the status of XEG Series Electric Gripper.
4.1.4 EG_GET_POS Description:
Get the position of XEG Series Electric Gripper, where a minimum unit of 0.01mm is set and used to ensure the Gripper moves to the appointed position or within the range as one of object identifications.
Format: IF EG_GET_POS > 5.00 AND EG_GET_POS < 7.00 THEN … ENDIF
Format Description: Use IF Statement to program and determine the position of XEG Series Electric Gripper.
4.1.5 EG_RESET Description:
Reset XEG Series Electric Gripper. After connecting to the Gripper, you must reset to ensure all parameter read/write are correct; if the error alarm is triggered to automatically exit program in RESET, please refer to 6. Error Message and Troubleshooting.
Format: EG_RESET
Format Description: No other parameters.
4.1.6 EG_RUN_MOVE(double MovPos, int MovSpeed) Description:

11
2019-03
Move XEG Series Electric Gripper. According to the speed set by a user, the Gripper will be moved to the appointed position (absolute coordinates); if the error alarm is triggered to automatically exit program after MOVE is ended, please refer to 6. Error Message and Troubleshooting.
Format: EG_RUN_MOVE(MovPos, MovSpeed)
Format Description: - MovPos shows the absolute position where the Electric Gripper is moved, where a minimum unit of 0.01mm is set; - MovSpeed shows the speed that the Electric Gripper is moved, where a minimum unit of 1mm/s is set; The ranges of all Electric Grippers are set as follows:
Model Number MovPos MovSpeed XEG-16 0~16 (mm) 0~60 (mm/s) XEG-32 0~32 (mm) 0~80 (mm/s) XEG-64 0~64 (mm) 0~100 (mm/s)
4.1.7 EG_RUN_GRIP(str Dir, int Str, str GriSpeed, str GriForce)
Description: Run the gripping mode of XEG Series Electric Gripper. Based on the parameters of direction, stroke, speed and force set by a user, the Gripper will be able to easily execute gripping action (relative coordinates); if the error alarm is triggered to automatically exit program after GRIP is ended, please refer to 6. Error Message and Troubleshooting; GRIP will be provided to detect the status (Gripping Status Detection), used to automatically trigger or ignore the option when no object is held. Please refer to 5.9 Operation Flow.
Format: EG_RUN_GRIP(Dir, Str, GriSpeed ,GriForce)
Format Description: - Dir shows the moving direction, where C and O represent inward and outward

12
2019-03
respectively; - Str shows the holding stroke, where a minimum unit of 1mm is set; (XEG-16, XEG-32 and XEG-64 are set as 0~16mm, 0~32mm and 0~64mm, respectively) - GriSpeed shows the gripping speed, where L, M and H represent low, middle and high, respectively; - GriForce shows the gripping force, where L, M and H represent low, middle and high, respectively.
4.1.8 EG_RUN_EXPERT(str Dir, double MovStr, int MovSpeed, double GriStr, int GriSpeed, int GriForce)
Description: Run the expert mode of XEG Series Electric Gripper. According to the moving and gripping direction, moving stroke and speed, gripping stroke, speed and force set by a user, the Gripper will be quickly moved and slowly gripped (relative coordinates); if the error alarm is triggered to automatically exit program after EXPERT is ended, please refer to 6. Error Message and Troubleshooting; EXPERT will be provided to detect the status (Gripping Status Detection), used to automatically trigger or ignore the option when no object is held. Please refer to 5.9 Operation Flow.
Format: EG_RUN_EXPERT(Dir, MovStr ,MovSpeed,GriStr,GriSpeed,GriForce)
Format Description: - Dir shows the moving and gripping direction, where C and O represent inward and outward respectively; - MovStr shows the moving stroke, where a minimum unit of 0.01mm is set; - MovSpeed shows the moving speed, where a minimum unit of 1mm/s is set; - GriStr shows the gripping stroke, where a minimum unit of 0.01mm is set; - GriSpeed shows the gripping speed, where a minimum unit of 1mm/s is set; - GriForce shows the gripping force, where a minimum unit of 1% is set. The ranges of all Electric Grippers are set as follows:
Model Number
MovStr MovSpeed GriStr GriSpeed GriForce
XEG-16 0~16 (mm) 0~60 (mm/s) 0~16 (mm) 0~10 (mm/s) 50~100%

13
2019-03
XEG-32 0~32 (mm) 0~80 (mm/s) 0~32 (mm) 0~20 (mm/s) 40~100% XEG-64 0~64 (mm) 0~100 (mm/s) 0~64 (mm) 0~20 (mm/s) 40~100%
4.2. Example Commands Because the End Effector is applied to the ROBOT, some examples of basic language for ROBOT are provided for your reference here. Model Number for ROBOT: HIWIN RT605-710-GB Model Number for Electric Gripper: XEG-32 Note that the Gripping Status Detection is not selected. (Please refer to 5.9.) If you want to run the Electric Gripper, please Execute the following procedures in order: Reset (Must be reset once when the power is connected). Release (This step can be ignored for the Gripper Controller V.2.0.16 or above). ROBOT will be moved to P1. Grip. ROBOT will be moved to P2 or P3 according to the gripping status. See the programming language for ROBOT below: 1. Connect to Electric Gripper; 2. EG_OPEN(X32); 3. Execute reset; 4. EG_RESET; 5. Outwardly open the Gripper to the limit (This step can be ignored for the
Gripper Controller V.2.0.16.); 6. EG_RUN_MOVE(32,80); 7. ROBOT will be moved to P1; 8. PTP P1 FINE Vel=100% Acc=100% TOOL[0] BASE[0] 9. Execute Grip; 10. EG_RUN_GRIP(C,32,H,M) 11. Confirm the object has been gripped and moved to P2 or P3 according to the
gripping status; 12. IF EG_GET_STATUS==2 AND EG_GET_POS>=18.5 AND EG_GET_POS
<=20.5 THEN; 13. PTP P2 FINE Vel=100% Acc=100% TOOL[0] BASE[0];

14
2019-03
14. ELSE; 15. IF EG_GET_STATUS==2 AND EG_GET_POS>=20.5 AND EG_GET_POS
<=22.5 THEN; 16. PTP P3 FINE Vel=100% Acc=100% TOOL[0] BASE[0]; 17. ENDIF;

15
2019-03
5. Operation Flow This chapter will describe how the XEG Series Electric Gripper is run in HRSS, where the methods and steps are the same with those in HRL. The detailed flows and procedures are described as follows.
5.1. Open HRSS The commands and functions of XEG Series Electric Gripper are saved in HRSS. A user must open HRSS.
Open HRSS

16
2019-03
5.2. Switch to T1 Mode Switch the key on the Teach Pendant to the Manual Mode, and enter T1 Mode.
Switch to T1 Mode
17
2019-03
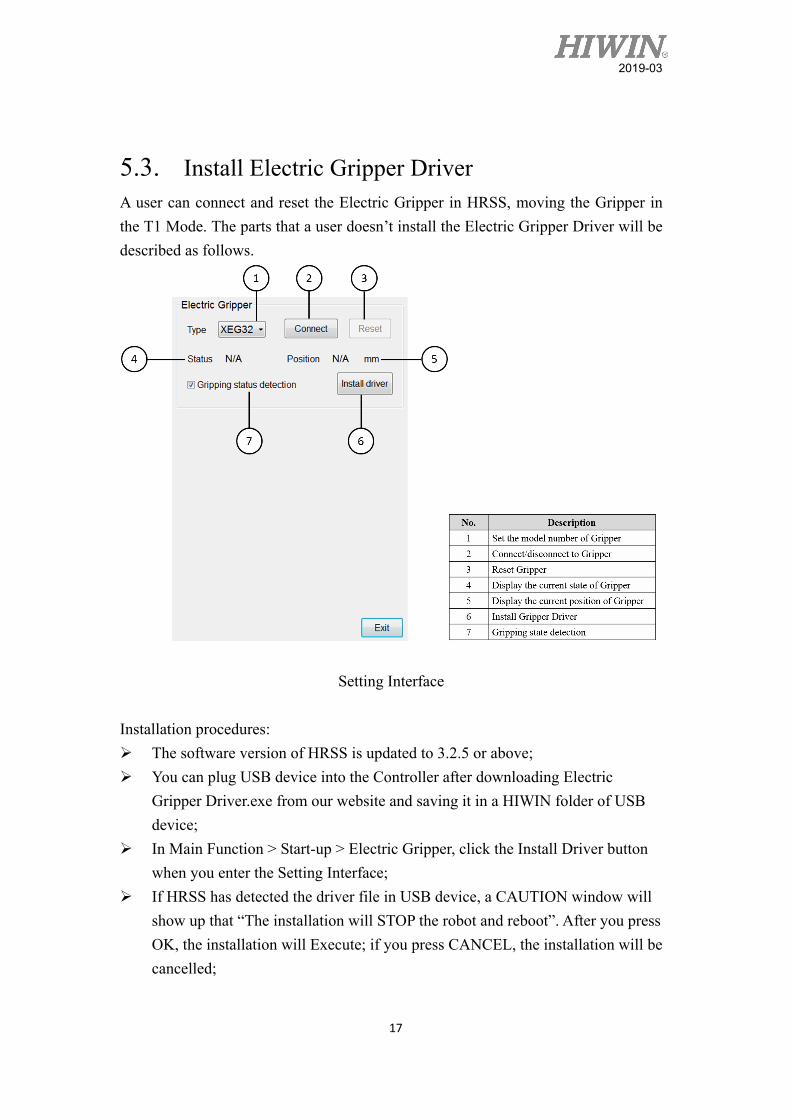
5.3. Install Electric Gripper Driver A user can connect and reset the Electric Gripper in HRSS, moving the Gripper in the T1 Mode. The parts that a user doesn’t install the Electric Gripper Driver will be described as follows.
Setting Interface
Installation procedures: The software version of HRSS is updated to 3.2.5 or above; You can plug USB device into the Controller after downloading Electric
Gripper Driver.exe from our website and saving it in a HIWIN folder of USB device;
In Main Function > Start-up > Electric Gripper, click the Install Driver button when you enter the Setting Interface;
If HRSS has detected the driver file in USB device, a CAUTION window will show up that “The installation will STOP the robot and reboot”. After you press OK, the installation will Execute; if you press CANCEL, the installation will be cancelled;
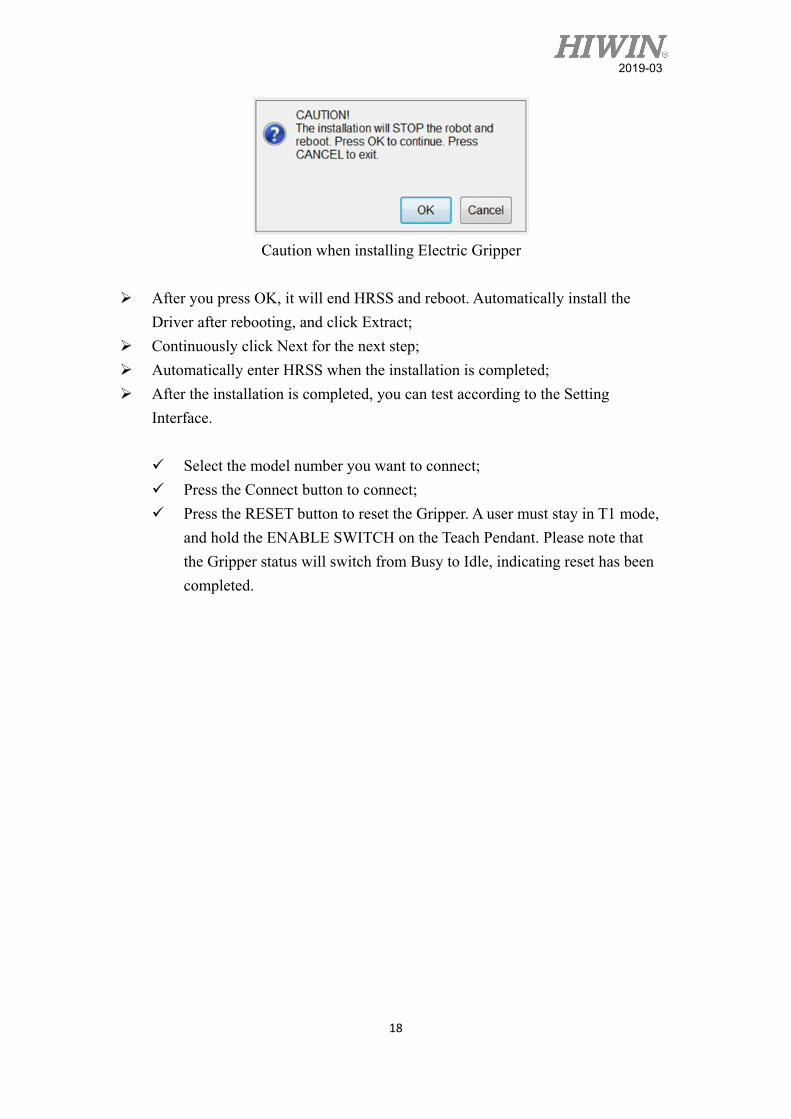
18
2019-03
Caution when installing Electric Gripper
After you press OK, it will end HRSS and reboot. Automatically install the
Driver after rebooting, and click Extract; Continuously click Next for the next step; Automatically enter HRSS when the installation is completed; After the installation is completed, you can test according to the Setting
Interface. Select the model number you want to connect; Press the Connect button to connect; Press the RESET button to reset the Gripper. A user must stay in T1 mode,
and hold the ENABLE SWITCH on the Teach Pendant. Please note that the Gripper status will switch from Busy to Idle, indicating reset has been completed.

19
2019-03
5.4. Expert Login Click Expert Login on the Users Page, and enter password as hiwin.
Switch to Expert User

20
2019-03
5.5. New File Create and name a new file in Program Menu.
Create a new file

21
2019-03
5.6. Programming You can directly use the keyboard to program the commands for XEG Series Electric Gripper, and change the line after you press Enter. If the color on the command is changed, it will indicate correct programming.
Programming XEG Series Electric Gripper

22
2019-03
5.7. Running Run programs. If correctly run, the XEG Series Electric Gripper will execute the programming commands.
Running

23
2019-03
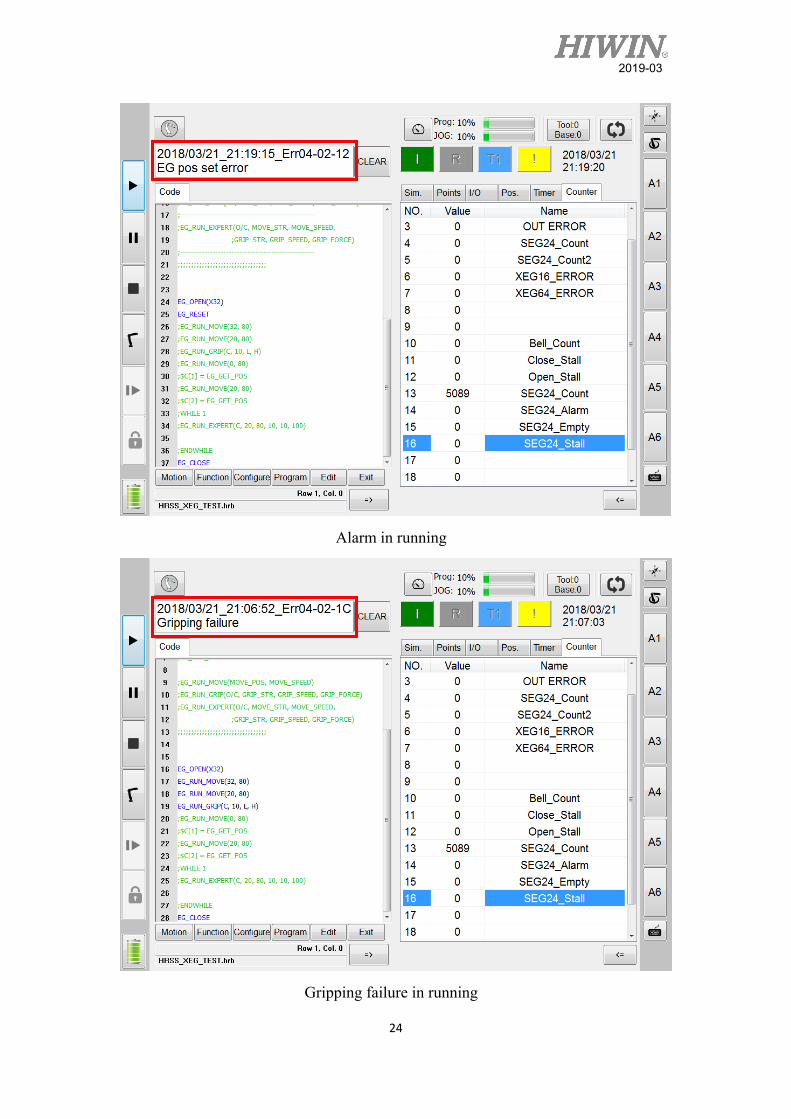
5.8. Run Error If the command format or parameter is incorrectly set to alarm by the Gripper or the gripping failure occurs, HRSS will show up a warning message window to explain the wrong line, content and correct value. A user can modify the program code according to the messages. Incorrect command format or parameter; Alarm in running; Gripping failure in running.
Incorrect command format or parameter
24
2019-03
Alarm in running
Gripping failure in running

25
2019-03
5.9. Status Detection A user can open Gripping Status Detection on HRSS according to the conditions, and use EG_GET_STATUS in program to determine if the object is gripped.
Setting Interface The detection is set as follows: Main Function > Start-up > Electric Gripper; The Gripping Status Detection is checked on default. The purpose is to notify a
user by alarm when the Gripper doesn’t grip the object. You can uncheck it if no gripping status detection is needed.

26
2019-03
6. Error Message and Troubleshooting
6.1. Hardware Error Alarm No. Indication Reason Solution
04-01-10 Connection
failure
Connection failure and
no data sent back.
Check the power is normally
supplied or serial port is
correctly set.
04-01-11 Electric Gripper
data return error EG data return error Check the USB port.
04-01-12
Bad connection
of actuator
cable
Power from the
actuator cable is
incorrectly supplied.
Check the actuator cable is
normally connected.
04-01-13 Electric Gripper
connection error
EG connection error
and no data send back. Check connection state.
04-01-14 Initialization
failure Circuit error
Reconnect or check USB is
correctly connected.
04-01-15 Serial port close
Serial port connected
to the Gripper is
closed.
Reconnect.
04-01-16 Incorrect serial
port close
Don’t close serial port
connected to the
Gripper.
Close the serial port.
6.2. Operation Error Alarm No. Indication Reason Solution
04-02-10
Incorrect
Gripper
setting
The Gripper status is
incorrectly set.
Check the Gripper status is
correctly set.
04-02-11
Incorrect
position
setting
The position setting is
larger than the total
stroke.
Check the position to move
the Gripper is correctly
entered.
Alarm No. Indication Reason Solution

27
2019-03
04-02-12
Incorrect
position
setting
The position is set
less than 0.
Check the position to move
the Gripper is correctly
entered.
04-02-13
Incorrect
speed setting
The moving speed is
set larger than the
default range. Check the speed to move the
Gripper is correctly entered.
04-02-14
The moving speed is
set less than the
default range.
04-02-15
Incorrect
direction
setting
The direction to
move the Gripper is
incorrectly set.
Check the direction to move
the Gripper is correctly
entered.
04-02-16
Incorrect
gripping stroke
The gripping stroke
is set larger than the
motion range. Check the gripping stroke is
correctly entered.
04-02-17
The gripping stroke
is set less than the
motion range.
04-02-18
Incorrect
gripping speed
The gripping speed
is set larger than the
default range. Check the gripping speed is
correctly entered.
04-02-19
The gripping speed
is set less than the
default range.
04-02-1A
Incorrect
gripping force
The gripping force is
set larger than the
default range. Check the gripping force is
correctly entered.
04-02-1B
The gripping force is
set less than the
default range.
04-02-1C Gripping
failure
No object is detected
by gripping after a
user open the
Gripping Status
Detection.
This alarm is used to detect
the object is gripped by the
Gripper. If the alarm isn’t
needed, you can cancel it on
the Setting Interface.

1. HIWIN is a registered trademark of HIWIN Technologies Corp. For your protection, avoid buying counterfeit products from unknown sources.
2. Actual products may differ from specifications and photos provided in this catalog. These differences may be the result of various factors including product improvements.
3. HIWIN will not sell or export products or processes restricted under the "Foreign Trade Act" or related regulations. Export of restricted products should be approved by proper authorities in accordance with relevant laws and shall not be used to manufacture or develop nuclear, biochemical, missiles or other weapons.
4. HIWIN website for patented product directory: http://www.hiwin.tw/Products/Products_patents.aspx
Publication Date:March 2019
HRSS-XEG Program Command (Original Instruction) User Manual
Copyright © HIWIN Technologies Corp.

Copyright © HIWIN Technologies Corp.©2019 FORM 2019-03 (PRINTED IN TAIWAN)The specifications in this catalog are subject to change without notification.
HIWIN TECHNOLOGIES CORP.No. 7, Jingke Road, Taichung Precision Machinery Park,Taichung 40852, TaiwanTel: +886-4-23594510Fax: [email protected]
Subsidiaries / Research Center
HIWIN Schweiz GmbHJONA, [email protected]
HIWIN s.r.o.BRNO, CZECH [email protected]
HIWIN [email protected]
HIWIN KOREASUWON‧MASAN, [email protected]
HIWIN CHINASUZHOU, [email protected]
Mega-Fabs Motion Systems, Ltd.HAIFA, [email protected]
HIWIN GmbHOFFENBURG, [email protected]
HIWIN JAPANKOBE‧TOKYO‧NAGOYA‧NAGANO‧TOHOKU‧SHIZUOKA.HOKURIKU‧HIROSHIMA‧FUKUOKA‧KUMAMOTO, [email protected]
HIWIN USACHICAGO, U.S.A. [email protected]
HIWIN SrlBRUGHERIO, [email protected]