huit.harvard.eduhuit.harvard.edu/files/huit/files/ic_huit_citrix_install... · web viewyou created...
TRANSCRIPT

Using HUIT CITRIX Hosted Applications
Installing the CITRIX Web Client Plug-in
Use this process if you receive the INSTALL Prompt when accessing the HUIT CITRIX Site. If you do not have permission to load applications on the local PC, please consult your local Desktop Support for assistance.
NOTE: After installing the software, you will need to close all open browsers to complete the install process; and before proceeding with the login process.
SELECT: The LISENCE AGREEMENT CheckboxCLICK: The INSTALL Button

CLICK: RUN when presented with the File Download Window CLICK: RUN when presented with the Internet Explorer Security Window
NOTE: After clicking RUN, it may take up to five minutes for the install process to complete.
CLICK: OK when presented with the Installation Complete Window
CLOSE: All open browsers to complete the install process.

Logging onto the Interaction Client
GO TO: https://harvardapps.harvard.edu/citrix/uc to access the login page
NOTE: Use Internet Explorer, as it is the currently supported Web Browser
ENTER: Your Contact Center UserID (three initials + three numbers), in the User Name Field
ENTER: The PASSWORD you created during the ‘IC Quest Psswrd Reset’ process, in the Password Field
CLICK: The LOG ON Button and the Workspace Window will open

CLICK: On the INTERACTION CLIENT Icon and the Interaction Client Login Window will open
NOTE: It may take up to a minute for the Login Window to appear
SELECT: The USE WINDOWS LOGIN AUTHENTICATION CheckboxENTER: UISWAPPSIASS000 in the Host Field (if not already populated)
SELECT: REMOTE NUMBER from the Station Type Drop-down listENTER: The PHONE NUMBER where your calls should ring in the Remote
Number FieldLEAVE: The PERSISTANT Checkbox unselected
CLICK: The CONNECT Button and the Interaction Client application will openNOTE: It may take up to a minute for the Interaction Client to appear

HUIT CITRX Preference Settings
Security Preference Settings:
After logging onto the IC Client, use the following instructions to adjust the security settings for your HUIT CITRIX Account. These should be done once you have logged onto the HUIT CITRIX Farm and the Interaction Client; but before making any changes to the application itself:
DOUBLE-CLICK: On the CITRIX RECEIVER Icon located in the Task Tray, and the CITRIX Receiver - Preferences Window will open
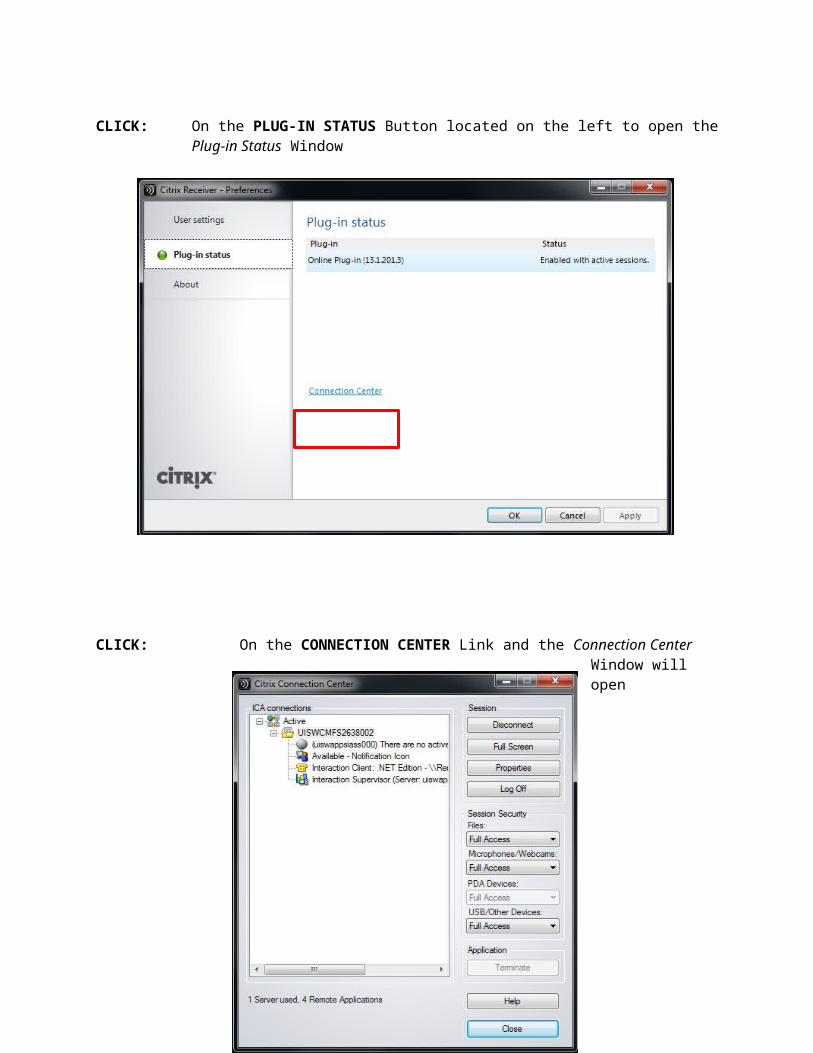
CLICK: On the PLUG-IN STATUS Button located on the left to open the Plug-in Status Window

CLICK: On the CONNECTION CENTER Link and the Connection Center Window will open
CLICK: On the ARROW next to the Files FieldSELECT: FULL ACCESS from the list of options
CLICK: On the ARROW next to the Microphones / Webcams Field
SELECT: FULL ACCESS from the list of options

CLICK: On the ARROW next to the USB / Other Devices Field
SELECT: FULL ACCESS from the list of options
CLICK: The CLOSE Button when the changes have been completed and you will be returned to the CITRIX Receiver - Preferences Window

CLICK: The OK Button to close the CITRIX Receiver - Preferences Window
CLOSE: All open browsers to complete the preference settings process.

Configuring the Interaction Client Rings Sounds
Using a WAV File located on your local PC:
Use this process if you want to access a WAV file that is located on your PC (note the location of your WAV File may be different if not installed in accordance with the IC Client Reference Guide):
CLICK: On OPTIONS located in the Menu Bar of the Interaction ClientSELECT: CONFIGURATION… from the Drop-down List and the Configurations
Window will open

SELECT: MY INTERACTION RING SOUNDS from the left-hand pane
CLICK: The ‘…’ Button located to the right of the Calls Field and the Open Window will open
DOUBLE-CLICK: On COMPUTER located in the left-hand pane

DOUBLE-CLICK: On LOCAL DISK (C: On [local computer name]) located in the left-hand pane
DOUBLE-CLICK: On PROGRAM FILES located in the right-hand pane
DOUBLE-CLICK: On INTERACTIVE INTELLIGENCE located in the right-hand paneDOUBLE-CLICK: On ICUSERAPPS located in the right-hand pane
DOUBLE-CLICK: On RESOURCES located in the right-hand paneSELECT: The RINGIN.WAV File located near the bottom of the list
CLICK: The OPEN Button located at the bottom of the Open Window and the Open Window will close
NOTE: If the process has been completed properly, the ARROW Button next to the Calls Field should turn green
CLICK: On OK at the bottom of the Configuration Window to close it.

Using a WAV File located on the HUIT CITRIX Servers:
Use this process if you do not have a WAV File on your local PC, and want to utilize the wav file that is located on the CITRIX Server:
CLICK: On OPTIONS located in the Menu Bar of the Interaction Client
SELECT: CONFIGURATION… from the Drop-down List and the Configurations Window will open

SELECT: MY INTERACTION RING SOUNDS from the left-hand paneCLICK: The ‘…’ Button located to the right of the Calls Field, and the Open
Window will open
DOUBLE-CLICK: On COMPUTER located in the left-hand pane

DOUBLE-CLICK: On DATA (D:) located in the left-hand pane
DOUBLE-CLICK: On PROGRAM FILES (x86) located in the right-hand paneDOUBLE-CLICK: On INTERACTIVE INTELLIGENCE located in the right-hand pane
DOUBLE-CLICK: On ICUSERAPPS located in the right-hand paneDOUBLE-CLICK: On RESOURCES located in the right-hand pane
SELECT: The RINGIN.WAV File, located near the bottom of the listCLICK: The OPEN Button located at the bottom of the Open Window and the
Open Window will closeNOTE: If the process has been completed properly, the ARROW Button next to
the Calls Field should turn greenCLICK: On OK at the bottom of the Configuration Window to close it.