humane animal trap small med
TRANSCRIPT

http://www.instructables.com/id/Humane-Animal-Trap-Small-Med/
Food Living Outside Play Technology Workshop
Humane Animal Trap (Small-Med)by badpanda on August 2, 2011
Table of Contents
Humane Animal Trap (Small-Med) . . . . . . . . . . . . . . . . . . . . . . . . . . . . . . . . . . . . . . . . . . . . . . . . . . . . . . . . . . . . . . . . . . . . . . . . . . . . . . . . . . . . . . . . . . . . . . . . . 1
Intro: Humane Animal Trap (Small-Med) . . . . . . . . . . . . . . . . . . . . . . . . . . . . . . . . . . . . . . . . . . . . . . . . . . . . . . . . . . . . . . . . . . . . . . . . . . . . . . . . . . . . . . . . . 2
Step 1: Plywood Prep . . . . . . . . . . . . . . . . . . . . . . . . . . . . . . . . . . . . . . . . . . . . . . . . . . . . . . . . . . . . . . . . . . . . . . . . . . . . . . . . . . . . . . . . . . . . . . . . . . . . . . . 14
Step 2: Cutting Windows . . . . . . . . . . . . . . . . . . . . . . . . . . . . . . . . . . . . . . . . . . . . . . . . . . . . . . . . . . . . . . . . . . . . . . . . . . . . . . . . . . . . . . . . . . . . . . . . . . . . . 15
Step 3: Recess for Windows . . . . . . . . . . . . . . . . . . . . . . . . . . . . . . . . . . . . . . . . . . . . . . . . . . . . . . . . . . . . . . . . . . . . . . . . . . . . . . . . . . . . . . . . . . . . . . . . . . 16
Step 4: Cut and attach the plexiglass windows . . . . . . . . . . . . . . . . . . . . . . . . . . . . . . . . . . . . . . . . . . . . . . . . . . . . . . . . . . . . . . . . . . . . . . . . . . . . . . . . . . . . . 17
Step 5: Routing the door grooves . . . . . . . . . . . . . . . . . . . . . . . . . . . . . . . . . . . . . . . . . . . . . . . . . . . . . . . . . . . . . . . . . . . . . . . . . . . . . . . . . . . . . . . . . . . . . . 18
Step 6: Assembling the box walls . . . . . . . . . . . . . . . . . . . . . . . . . . . . . . . . . . . . . . . . . . . . . . . . . . . . . . . . . . . . . . . . . . . . . . . . . . . . . . . . . . . . . . . . . . . . . . 19
Step 7: The Door . . . . . . . . . . . . . . . . . . . . . . . . . . . . . . . . . . . . . . . . . . . . . . . . . . . . . . . . . . . . . . . . . . . . . . . . . . . . . . . . . . . . . . . . . . . . . . . . . . . . . . . . . . . 21
Step 8: Door Jam . . . . . . . . . . . . . . . . . . . . . . . . . . . . . . . . . . . . . . . . . . . . . . . . . . . . . . . . . . . . . . . . . . . . . . . . . . . . . . . . . . . . . . . . . . . . . . . . . . . . . . . . . . 21
Step 9: Door hook . . . . . . . . . . . . . . . . . . . . . . . . . . . . . . . . . . . . . . . . . . . . . . . . . . . . . . . . . . . . . . . . . . . . . . . . . . . . . . . . . . . . . . . . . . . . . . . . . . . . . . . . . . 23
Step 10: The Trigger . . . . . . . . . . . . . . . . . . . . . . . . . . . . . . . . . . . . . . . . . . . . . . . . . . . . . . . . . . . . . . . . . . . . . . . . . . . . . . . . . . . . . . . . . . . . . . . . . . . . . . . . 23
Step 11: Trigger hole . . . . . . . . . . . . . . . . . . . . . . . . . . . . . . . . . . . . . . . . . . . . . . . . . . . . . . . . . . . . . . . . . . . . . . . . . . . . . . . . . . . . . . . . . . . . . . . . . . . . . . . . 24
Step 12: The Lever . . . . . . . . . . . . . . . . . . . . . . . . . . . . . . . . . . . . . . . . . . . . . . . . . . . . . . . . . . . . . . . . . . . . . . . . . . . . . . . . . . . . . . . . . . . . . . . . . . . . . . . . . 24
Step 13: The Fulcrum . . . . . . . . . . . . . . . . . . . . . . . . . . . . . . . . . . . . . . . . . . . . . . . . . . . . . . . . . . . . . . . . . . . . . . . . . . . . . . . . . . . . . . . . . . . . . . . . . . . . . . . 25
Step 14: Fulcrum Base . . . . . . . . . . . . . . . . . . . . . . . . . . . . . . . . . . . . . . . . . . . . . . . . . . . . . . . . . . . . . . . . . . . . . . . . . . . . . . . . . . . . . . . . . . . . . . . . . . . . . . 27
Step 15: Assembling the whole mess . . . . . . . . . . . . . . . . . . . . . . . . . . . . . . . . . . . . . . . . . . . . . . . . . . . . . . . . . . . . . . . . . . . . . . . . . . . . . . . . . . . . . . . . . . . . 27
Step 16: The breakdown and optional handle . . . . . . . . . . . . . . . . . . . . . . . . . . . . . . . . . . . . . . . . . . . . . . . . . . . . . . . . . . . . . . . . . . . . . . . . . . . . . . . . . . . . . . 29
Related Instructables . . . . . . . . . . . . . . . . . . . . . . . . . . . . . . . . . . . . . . . . . . . . . . . . . . . . . . . . . . . . . . . . . . . . . . . . . . . . . . . . . . . . . . . . . . . . . . . . . . . . . . . . 29

http://www.instructables.com/id/Humane-Animal-Trap-Small-Med/
Intro: Humane Animal Trap (Small-Med)This is my first Instructable. I apologize in advance for the semi-lubricated state I was in when creating it.
I built this trap to snag a couple of raccoons that have been getting into my dog and chicken feed, knocking over trash cans and trying to get into the garage. Once theystarted getting a little brave and getting into actual fights with the dogs I knew something had to be done before somebody got rabies, and I didn't want to shoot theraccoons because, well... I don't like shooting something I don't intend to eat or that doesn't intend to eat me. I also think this trap is sensitive enough to catch the fairlylarge mice and rats that nest in the large field behind my house and like to chew on hot tub wiring and steal animal feed. We'll see.
Tools and Materials:
Tools:Table SawDrillDremel Tool (or any rotary/cut off type of tool)ClampsStraight Edge (carpenters square, quick square, whatever)Router w/ straight bit (Optional)Hole Saw (Optional)
Materials:1 Sheet of 1/2 PlywoodEnough plexiglass to make a window or two1 3" piece of PVC ~4'1 1" piece of PVC ~4'1 => 1" piece of PVC ~ 3'1 2x4 ~1'Wood glue=<1" wood screws<3" small diameter bolt with wingnut2 ~2" bolts w/nutsOne small screw in hook or eyeletSmall amount of paracord or other small diameter ropeOne empty tin can
http://www.instructables.com/id/Humane-Animal-Trap-Small-Med/

http://www.instructables.com/id/Humane-Animal-Trap-Small-Med/

http://www.instructables.com/id/Humane-Animal-Trap-Small-Med/

http://www.instructables.com/id/Humane-Animal-Trap-Small-Med/

http://www.instructables.com/id/Humane-Animal-Trap-Small-Med/
Image Notes1. 3" from the end

http://www.instructables.com/id/Humane-Animal-Trap-Small-Med/

http://www.instructables.com/id/Humane-Animal-Trap-Small-Med/

http://www.instructables.com/id/Humane-Animal-Trap-Small-Med/

http://www.instructables.com/id/Humane-Animal-Trap-Small-Med/

http://www.instructables.com/id/Humane-Animal-Trap-Small-Med/

http://www.instructables.com/id/Humane-Animal-Trap-Small-Med/

http://www.instructables.com/id/Humane-Animal-Trap-Small-Med/
Step 1: Plywood PrepUsing a table saw or circular saw with straight edge guide, rip 4 pieces of 1/2" thick plywood 36"x16". I did this out of a 4'x4x piece of plywood, which left a perfect sizedpiece for the back of the box once assembled.

http://www.instructables.com/id/Humane-Animal-Trap-Small-Med/
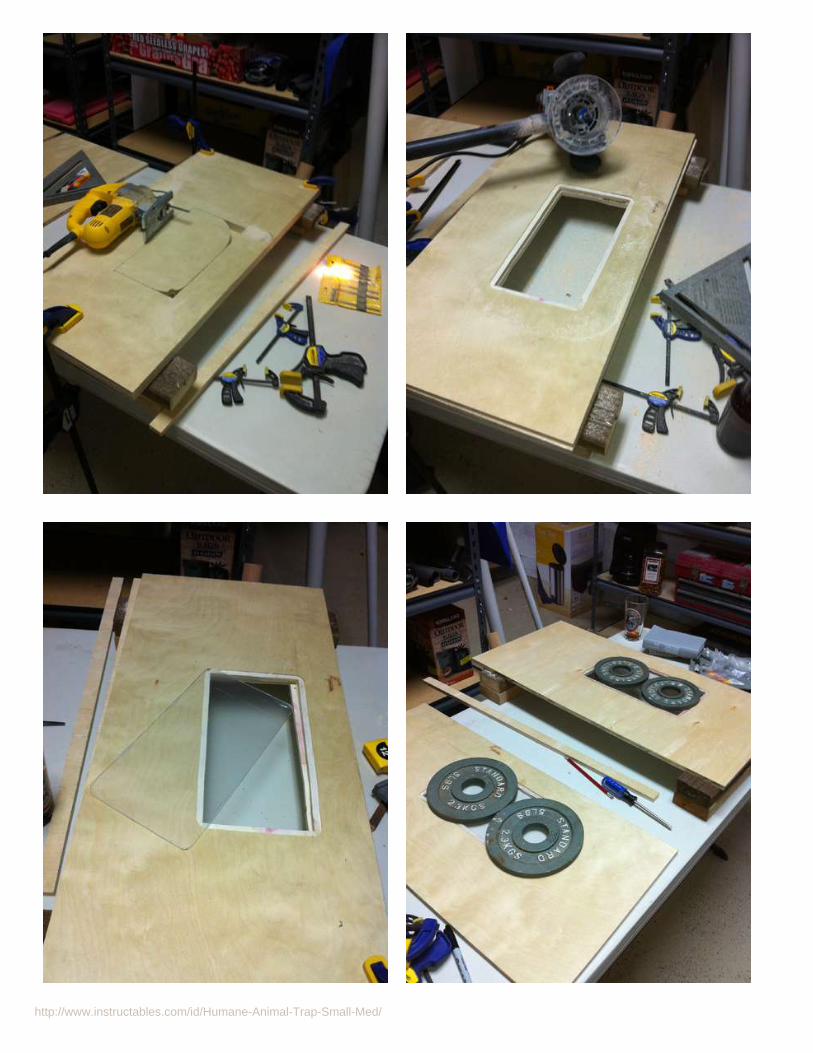
Step 2: Cutting WindowsIn two of the pieces from the previous step cut holes for windows. In my case I cut a hole in each piece approx 6"x16" because I had enough scrap plexiglass to cover it. I imagine you could use chicken wire or anything else, but I think the trick here is to create windows that let in enough light to be able to view whatever critter you end upcatching, which is why I don't think just a few small holes would work and large holes would probably get chewed on.

http://www.instructables.com/id/Humane-Animal-Trap-Small-Med/
Step 3: Recess for WindowsI used a router to cut out a recess for the plexiglass windows to drop down into. This step is most likely purely cosmetic, and I primarily did it because I had just gottenthis new router and was looking for any excuse to route stuff. You would probably be just as well off gluing down or screwing down the plexiglass to the outside of thebox. Anyway, I think the end result is pretty sweet looking.

http://www.instructables.com/id/Humane-Animal-Trap-Small-Med/
Step 4: Cut and attach the plexiglass windowsCut the plexiglass using a Dremel, razor or whatever you have that can cut it to size with your previously cut windows. I used a Rotozip with the 90deg attachment and acut off wheel and it worked great... if you didn't cut a recess with the router like in the previous step make sure you have enough overlap to be able to glue or screw downthe plexiglass to the outside or inside. When working with plexiglass if it still has the protective film on it always leave that on until it absolutely has to be taken off toprevent scratching during the assembly process.
Once the plexiglass is cut to size attach it in whatever way you've deemed fit. In this case I dropped a bead of wood glue around the recess, dropped in the glass and puta couple of weights I wasn't using to get all crazy ripped with down and let the glue dry.
http://www.instructables.com/id/Humane-Animal-Trap-Small-Med/
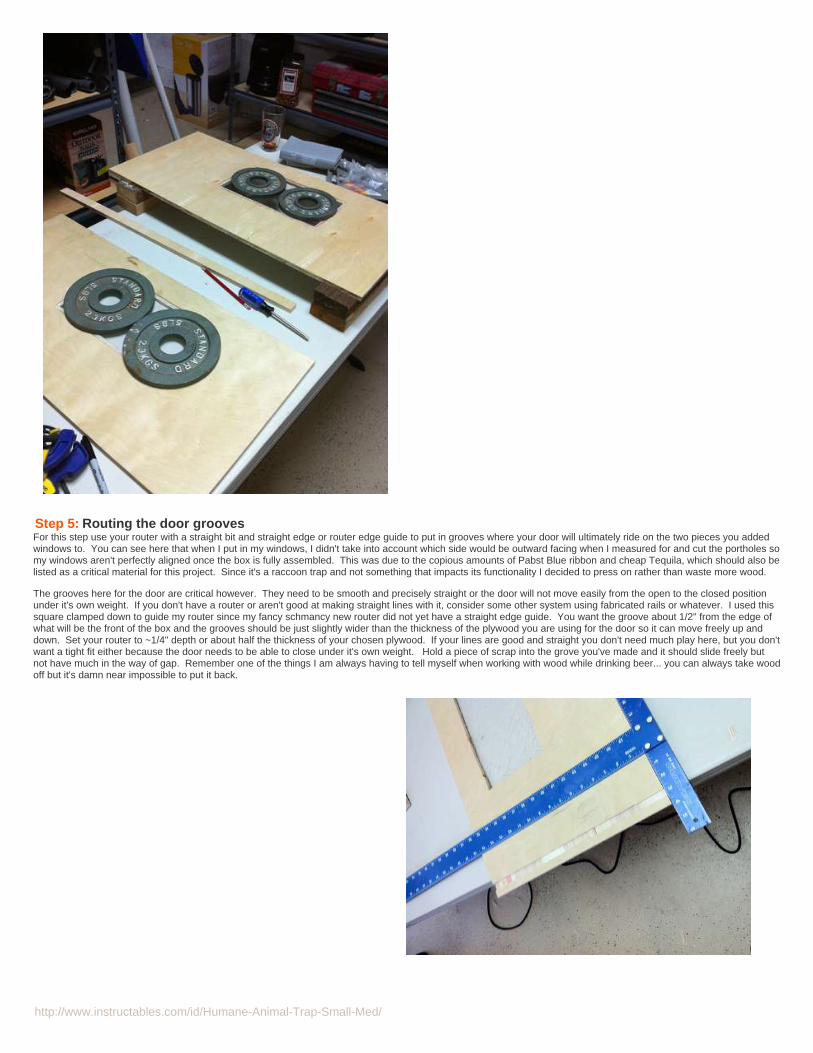
Step 5: Routing the door groovesFor this step use your router with a straight bit and straight edge or router edge guide to put in grooves where your door will ultimately ride on the two pieces you addedwindows to. You can see here that when I put in my windows, I didn't take into account which side would be outward facing when I measured for and cut the portholes somy windows aren't perfectly aligned once the box is fully assembled. This was due to the copious amounts of Pabst Blue ribbon and cheap Tequila, which should also belisted as a critical material for this project. Since it's a raccoon trap and not something that impacts its functionality I decided to press on rather than waste more wood.
The grooves here for the door are critical however. They need to be smooth and precisely straight or the door will not move easily from the open to the closed positionunder it's own weight. If you don't have a router or aren't good at making straight lines with it, consider some other system using fabricated rails or whatever. I used thissquare clamped down to guide my router since my fancy schmancy new router did not yet have a straight edge guide. You want the groove about 1/2" from the edge ofwhat will be the front of the box and the grooves should be just slightly wider than the thickness of the plywood you are using for the door so it can move freely up anddown. Set your router to ~1/4" depth or about half the thickness of your chosen plywood. If your lines are good and straight you don't need much play here, but you don'twant a tight fit either because the door needs to be able to close under it's own weight. Hold a piece of scrap into the grove you've made and it should slide freely butnot have much in the way of gap. Remember one of the things I am always having to tell myself when working with wood while drinking beer... you can always take woodoff but it's damn near impossible to put it back.

http://www.instructables.com/id/Humane-Animal-Trap-Small-Med/
Step 6: Assembling the box wallsTo start putting the pieces together I used some corner clamps to hold the pieces together then pre-drilled some holes for the screws. I pulled it back apart beforescrewing it together and put a bead of wood glue between the pieces then screwed it all together. This might be overkill for this application and screws alone wouldprobably suffice, but I intend to have this thing for awhile since I have a lot of critters around my house and friends who might want to borrow this contraption. The moststable way to perform this operation is to first assemble the bottom with one of the sides, then the small square for the back end of the box, then add the third side on. Once I had the two window sides, the bottom and the back on I went ahead and put in some steel corner brackets just on the front since there is less support on the frontthan there is on the back due to the free floating door. After all that is done you're going to have to rip a little bit off the top piece so that the grooves you routed areexposed for the door to slide in. You want it to be close to the groove so there isn't a big gap when the door is shut for the critters to gnaw on. Once it's cut to size fastenit with screws and glue in the same manner as the last pieces and add corner brackets for stability if you want to behind the groove.

http://www.instructables.com/id/Humane-Animal-Trap-Small-Med/

http://www.instructables.com/id/Humane-Animal-Trap-Small-Med/
Step 7: The DoorRip the door to the width of the grooves so it can slide in. Remember it's easier to take wood off than to add it so don't worry if you have to cut a little more off of your firstcut. You should be able to hold the door up in the grooves and let it go, and it should plunge shut under it's own weight. If it just needs a little assistance try using a fileto smooth out your grooves so it can't snag on anything.
Step 8: Door JamRip a small strip the width of the opening on the front of the box and thin enough to sit in front of routed grooves. This small piece will help prevent some wild beast frommanaging to screw up your trap by bashing at the door. This might be overkill if your grooves were done well and the door fits snug enough but still slides freely, but Ifigure it can't hurt. Glue this piece in place making sure it doesn't impede your door from closing.

http://www.instructables.com/id/Humane-Animal-Trap-Small-Med/

http://www.instructables.com/id/Humane-Animal-Trap-Small-Med/
Step 9: Door hookHere is where the small hook or eyelet from the materials list comes in. Fit the door into it's grooves then put this hook in as show, centered on the door. The cord tosupport the open door will attach here. I chose to use a hook here so I didn't have to tie and untie knots every time I set this up, but if you don't mind that you could justuse a round eyelet screw or maybe just get away with drilling a small hole in the door.
Step 10: The TriggerHere you'll be making the trigger or lynchpin for this trap. Use the smaller diameter (1" in my case) piece of PVC for this. First cut the piece to length by holding it upagainst your box from bottom to top and make the length approximately the same height as the box. It's okay for now to make it a couple of inches longer so you havesome to play with. Once you have cut the piece to length mark a line 3" from one end, then a line about 1/2" farther than the thickness of the plywood you used for thetop of your box. Once you have those lines marked used a Dremel or other tool to cut out a notch, make sure you keep that bottom line as flat as possible since this iswhat will be bearing the pressure of this whole contraption and you want good contact later on. You can always use a file to tidy this up. After the notch is cut drill a holeabove it splitting the difference between the top of the notch and the top of the PVC of a large enough diameter that your paracord or other rope can easily slide throughthe hole since it will be tied off here later.
Image Notes1. 3" from the end

http://www.instructables.com/id/Humane-Animal-Trap-Small-Med/
Step 11: Trigger holeAt the back of your box, you'll need to cut a hole using a hole saw or other means about 1/8-1/4" greater in diameter than the piece of PVC you used for the trigger. Center the hole on the width of the box and about 4" from the back of it. Once the hole is cut slide your piece of PVC from the trigger step into it with the notch facing upas shown. You should be able to seat the notch on the plywood used for the top of the box and towards the front of the box and pull directly straight up on the PVC with afair amount of pressure without the PVC sliding off. If your piece is sliding out the hole when pulling straight try filing one side of the hole a little flat like shown so thenotch has more of a purchase on the plywood.
Step 12: The LeverNow you're going to make the piece that acts as the lever between the door and the trigger. Use the 1.5" or if you must a 1" piece of PVC here. Cut it to lengthmeasuring roughly from the center of the hole you drilled for the notch to the hook you placed in the door. Once you've cut it to length drill a hole at each end at the sameangle straight through the PVC the diameter of your paracord or rope so that the trigger and one end can be tied together as shown. Don't waste any rope here or giveyourself a lot of slack to cut off later because some knot adjustments will be required later on.
http://www.instructables.com/id/Humane-Animal-Trap-Small-Med/
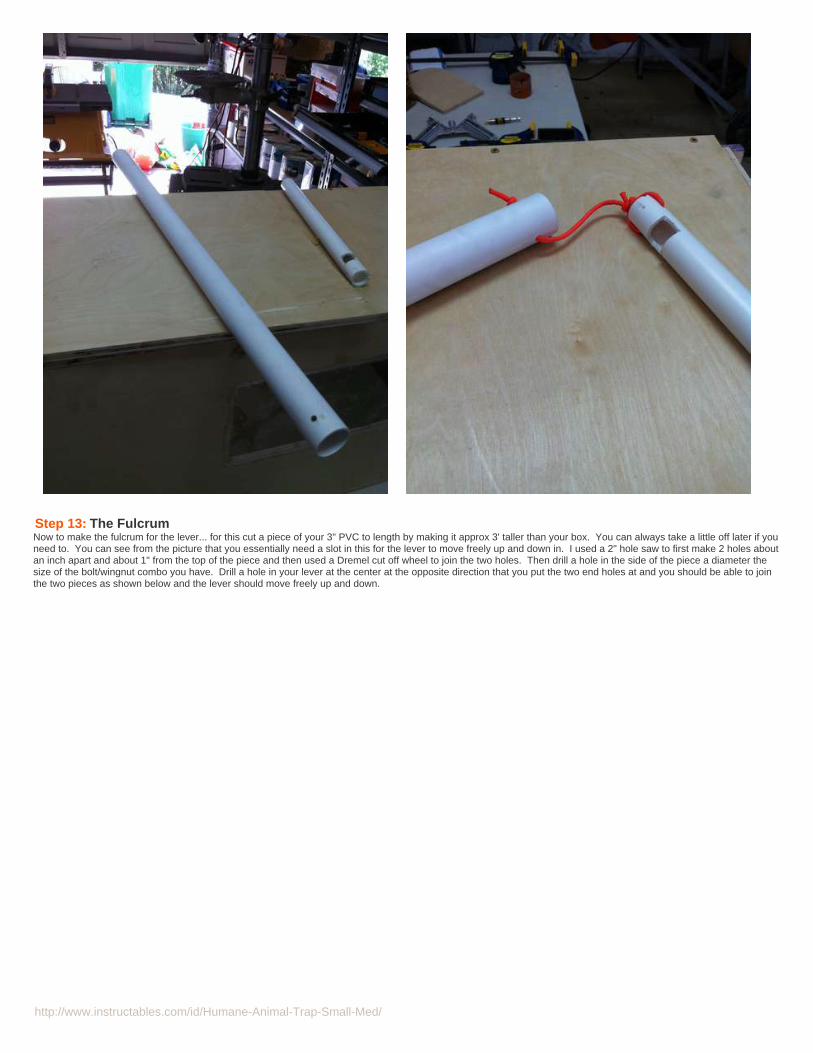
Step 13: The FulcrumNow to make the fulcrum for the lever... for this cut a piece of your 3" PVC to length by making it approx 3' taller than your box. You can always take a little off later if youneed to. You can see from the picture that you essentially need a slot in this for the lever to move freely up and down in. I used a 2" hole saw to first make 2 holes aboutan inch apart and about 1" from the top of the piece and then used a Dremel cut off wheel to join the two holes. Then drill a hole in the side of the piece a diameter thesize of the bolt/wingnut combo you have. Drill a hole in your lever at the center at the opposite direction that you put the two end holes at and you should be able to jointhe two pieces as shown below and the lever should move freely up and down.

http://www.instructables.com/id/Humane-Animal-Trap-Small-Med/

http://www.instructables.com/id/Humane-Animal-Trap-Small-Med/
Step 14: Fulcrum BaseNow you need to make the piece that is going to hold the whole mechanical contraption onto your box. I used a short piece of 2x4 which turned out to be a very stableplatform. Use a hole saw or some other means to make a hole the diameter of your 3" PVC. I used a hole saw slightly smaller than the diameter of the PVC then used arounded file to expand the hole so that the fit is very snug for the 3" PVC... not so snug it it gets stuck but snug enough to prevent a lot of wiggle. Then drill two wholes atdiagonal corners as shown the correct diameter for a couple of short bolts with nuts. I had a couple of bolts lying around that were only 1.5" long so I drilled holes thenused a larger bit to counter sink the bolts so they could pass through both the 2x4 and the top of the box which is why you see them sunk in here. Then place your 2x4on the top of your box and center it between the middle of the trigger hole and the hook you placed on the door. Use the 2x4 as a template to mark the top of your boxwhere the two diagonal holes are and drill the top of your box at the marks so that you can use your two bolts and nuts to hand join the 2x4 to the top of the box. I tookthe picture of this seen after attaching a handle, which will come later.
Step 15: Assembling the whole messIf you've made it this far you have all the essential pieces for a successful trap. Put your PVC lever contraption together, stick the trigger though the hole and down intowhat will be your bait can with pressure upward on the notch via the lever as you attach the door. Start off with two pieces of paracord or rope with enough extra lengthon each piece to make adjustments. Once you get everything just right and the trap is working the way you want it, you can cut the scrap off the rope. When the deviceis triggered, the trigger PVC itself should come flying out of the hole, this will keep the critter you catch from chewing on it and ruining it if it were left inside the box.

http://www.instructables.com/id/Humane-Animal-Trap-Small-Med/

http://www.instructables.com/id/Humane-Animal-Trap-Small-Med/
Step 16: The breakdown and optional handleYou can see here that the entire thing breaks down and fits inside the box. I also used an old piece of webbing to make a handle for easy carrying. This is recommendedespecially if you plan on transporting the animal you catch (the box isn't very heavy empty, but with a raccoon in it may be a different story), but isn't required for the trapto function.
Related Instructables
How to get ridof unwantedanimals -Updated byRadBear
live catch trapby robert
Turn yourrecycle bin intoa rabbit trap byelectric_piano_5k
How to end yourmosquitoproblems -make a $1Mosquito bagfan trap (video)by mrhulot
Feed a snakethe safe waywith CO2 byiPodGuy
How to make aslingshot byhellrider75