hycu user guide · nutanix,andmakesdataprotectioneasytodeployandsimpletouse....
TRANSCRIPT

HYCU Data Protectionfor Nutanix
Version: 3.0.0Product release date: April 2018Document release date: April 2018
USER GUIDE
2
Legal noticesCopyright notice© 2017–2018 HYCU. All rights reserved.
This document contains proprietary information, which is protected by copyright. No partof this documentmay be photocopied, reproduced, distributed, transmitted, stored in aretrieval system, modified or translated to another language in any form by anymeans,without the prior written consent of HYCU.
TrademarksHYCU logos, names, trademarks and/or service marks and combinations thereof are theproperty of HYCU or its affiliates. Other product names are the property of their respectivetrademark or service mark holders and are hereby acknowledged.
Acropolis and Nutanix are trademarks of Nutanix, Inc. in the United States and/or otherjurisdictions.
Azure®, Internet Explorer®, Microsoft®, Microsoft Edge™, and Windows® are eitherregistered trademarks or trademarks of Microsoft Corporation in the United States and/orother countries.
Linux® is the registered trademark of Linus Torvalds in the U.S. and other countries.
Red Hat Enterprise Linux is a registered trademark of Red Hat, Inc. or its subsidiaries in theUnited States and other countries.
DisclaimerThe details and descriptions contained in this document are believed to have been accurateand up to date at the time the document was written. The information contained in thisdocument is subject to change without notice.
HYCU provides this material "as is" and makes no warranty of any kind, expressed orimplied, including, but not limited to, the implied warranties of merchantability and fitnessfor a particular purpose. HYCU shall not be liable for errors and omissions containedherein. In no event shall HYCU be liable for any direct, indirect, consequential, punitive,special or incidental damages, including, without limitation, damages for loss and profits,loss of anticipated savings, business interruption, or loss of information arising out of theuse or inability to use this document, or any action taken based on the informationcontained herein, even if it has been advised of the possibility of such damages, whetherbased on warranty, contract, or any other legal theory.
The only warranties for HYCU products and services are set forth in the express warrantystatements accompanying such products and services. Nothing herein should beconstrued as constituting an additional warranty.
3
NoticeThis document is provided in connection with HYCU products. HYCUmay have copyright,patents, patent applications, trademark, or other intellectual property rights covering thesubjectmatter of this document.
Except as expressly provided in any written license agreement from HYCU, the furnishing ofthis document does not give you any license to these patents, trademarks, copyrights, orother intellectual property on HYCU products. Use of underlying HYCU product(s) isgoverned by their respective Software License and Support Terms.
Important: Please read Software License and Support Terms before using theaccompanying software product(s).
HYCUwww.hycu.com
4
Contents1 About HYCU 8
HYCU key features and benefits 9
HYCU backup environment overview 9
2 Deploying the HYCU virtual appliance 11
Sizing your backup infrastructure for HYCU 11
Firewall settings 12
Deploying HYCU on a Nutanix AHV cluster 12
Uploading the HYCU virtual appliance image to a Nutanix AHV cluster 14
Creating a virtual machine for HYCU deployment on a Nutanix AHV cluster 14
Configuring HYCU on the virtual machine 15
Deploying HYCU to a Nutanix ESXi cluster 16
Logging on to HYCU 17
3 Establishing a backup environment 19
Adding Nutanix clusters 20
Setting up backup targets 21
How to set up an AWS S3/Compatible target 21
How to set up an Azure target 22
How to set up an NFS target 23
How to set up an SMB target 24
How to set up an iSCSI target 26
Defining your backup policy strategy 27
Applying a predefined backup policy 28
Creating a custom backup policy 29
Setting a default backup policy 36
4 Protecting data 37
Enabling access to data 39
Assigning credentials to virtual machines 40
Assigning credentials to applications 41

5
Backing up virtual machines 42
Backing up applications 43
Performing a manual backup 45
5 Restoring data 46
Restoring virtual machine data 46
Restoring an entire virtual machine 46
Restoring individual files 50
Restoring application data 52
Restoring a whole application 52
Restoring application items 56
6 Protecting the HYCU backup controller 62
Backing up the HYCU backup controller 62
Recovering the HYCU backup controller 63
7 Performing daily tasks 66
Using the HYCU dashboard 66
Checking the status of jobs 68
Viewing events 69
Viewing backup source details 69
Viewing the backup status of backup sources 70
Filtering data in panels 71
Filtering options in the Applications panel 72
Filtering options in the Virtual Machines panel 72
Filtering options in the Policies panel 73
Filtering options in the Targets panel 74
Filtering options in the Jobs panel 74
Filtering options in the Events panel 75
Filtering options in the Self-Service panel 75
Managing backup targets 75
Viewing backup target information 76
Editing a backup target 77
Activating or deactivating a backup target 77

6
Increasing the size of an iSCSI backup target 78
Deleting a backup target 78
Managing backup policies 78
Viewing backup policy information 79
Editing a backup policy 79
Deleting a backup policy 80
Expiring backups manually 80
Adjusting the HYCU virtual machine resources 81
8 Managing HYCU users 82
Setting up user groups and users 83
Creating a new user group 83
Adding a new user 83
Activating or deactivating a user group or a user 84
Setting ownership of virtual machines 84
Assigning owners to virtual machines 84
Removing owners from virtual machines 85
9 Administering 86
Licensing 87
Creating a license request 88
Requesting and retrieving licenses 88
Activating licenses 89
Upgrading HYCU 90
Upgrading HYCU on a Nutanix AHV cluster 90
Upgrading HYCU on a Nutanix ESXi cluster 92
Changing network settings 94
Changing the HYCU listening port number 95
Configuring the SSL certificate 95
Creating a new self-signed certificate 96
Importing a CA certificate 96
Configuring FIPS-compliantmode for HYCU 96
Enabling FIPS-compliantmode for HYCU 97

7
Disabling FIPS-compliantmode for HYCU 97
Setting the iSCSI Initiator secret 98
Configuring backup target encryption 98
Setting power options 98
Configuring Active Directory authentication 99
Setting up logging 99
Accessing the HYCU backup controller virtual machine by using SSH 100
Using the command-line interface 102
Using the HYCU REST API Explorer 102
Enabling HTTPS for WinRM connections 102
Increasing the size of the HYCU virtual disk 103
Increasing the HYCU disk size in a Nutanix AHV cluster 104
Increasing the HYCU disk size in a Nutanix ESXi cluster 104
Removing HYCU 105
A Customizing HYCU configuration settings 106
How to customize HYCU configuration settings 106
Email notification settings 107
Snapshot settings 109
Utilization threshold settings 109
Display settings 109
SQL Server application settings 110
Settings for aborting jobs 110
Azure account settings 110
B Restoring to a different hypervisor 111
Restoring a Nutanix ESXi virtual machine to a Nutanix AHV cluster 111

8
About HYCUHYCU Data Protection for Nutanix (HYCU) is a high performing backup and recoverysolution for Nutanix. It is the first data protection solution that is fully integrated withNutanix, and makes data protection easy to deploy and simple to use.
Figure 1–1: Introduction to HYCU
Chapter 1
1 About HYCU
9
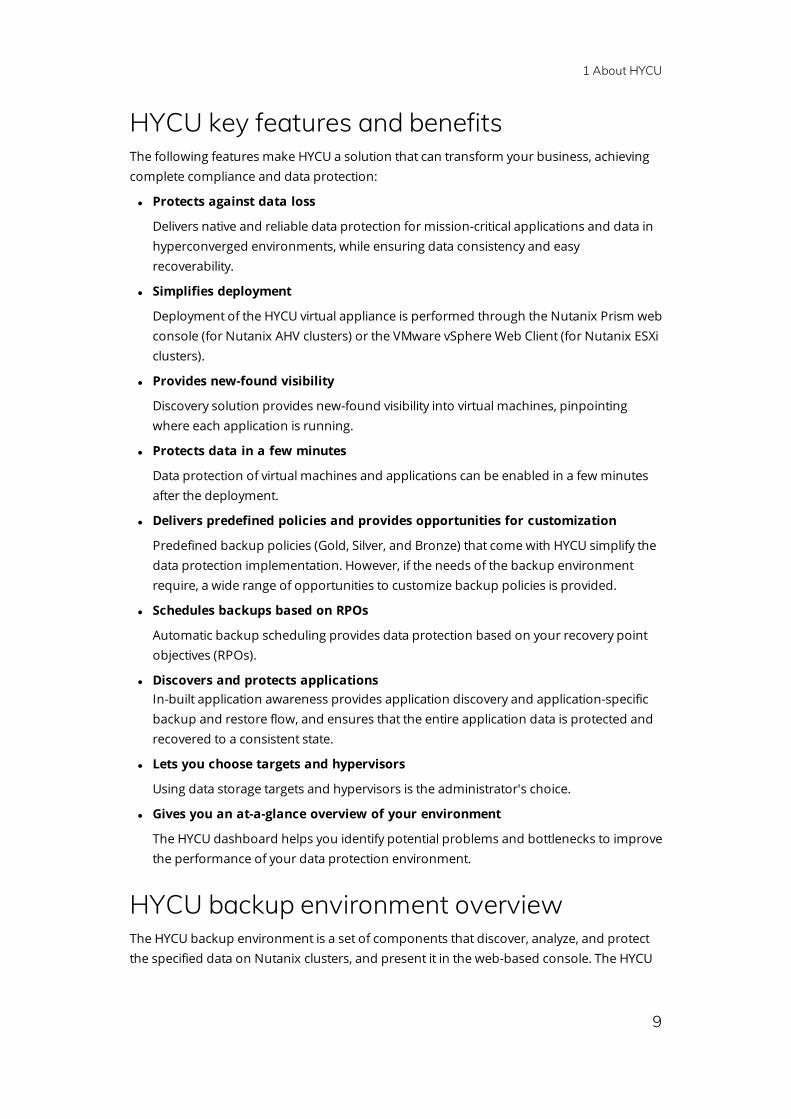
HYCU key features and benefitsThe following features make HYCU a solution that can transform your business, achievingcomplete compliance and data protection:
l Protects against data loss
Delivers native and reliable data protection for mission-critical applications and data inhyperconverged environments, while ensuring data consistency and easyrecoverability.
l Simplifies deployment
Deployment of the HYCU virtual appliance is performed through the Nutanix Prism webconsole (for Nutanix AHV clusters) or the VMware vSphere Web Client (for Nutanix ESXiclusters).
l Provides new-found visibility
Discovery solution provides new-found visibility into virtual machines, pinpointingwhere each application is running.
l Protects data in a few minutes
Data protection of virtual machines and applications can be enabled in a few minutesafter the deployment.
l Delivers predefined policies and provides opportunities for customization
Predefined backup policies (Gold, Silver, and Bronze) that come with HYCU simplify thedata protection implementation. However, if the needs of the backup environmentrequire, a wide range of opportunities to customize backup policies is provided.
l Schedules backups based on RPOs
Automatic backup scheduling provides data protection based on your recovery pointobjectives (RPOs).
l Discovers and protects applicationsIn-built application awareness provides application discovery and application-specificbackup and restore flow, and ensures that the entire application data is protected andrecovered to a consistent state.
l Lets you choose targets and hypervisors
Using data storage targets and hypervisors is the administrator's choice.
l Gives you an at-a-glance overview of your environment
The HYCU dashboard helps you identify potential problems and bottlenecks to improvethe performance of your data protection environment.
HYCU backup environment overviewThe HYCU backup environment is a set of components that discover, analyze, and protectthe specified data on Nutanix clusters, and present it in the web-based console. The HYCU

1 About HYCU
10
environment consists of the following parts:
HYCU backup controller
A virtual machine hosted by a Nutanix cluster where HYCUresides. The HYCU backup controller processes the datacollected in the Nutanix environment and presents it in theweb user interface.
HYCU interface
A system from which you access HYCU. It also providesadministration tools to adjust the environment to your needs.The HYCU interface has an established connection to theHYCU backup controller. You can use the HYCU web userinterface or command-line interface (hyCLI).
HYCU targetsStorage locations that HYCU uses for storing the protecteddata.
Nutanix clustersA backup environment for which HYCU provides dataprotection.
The following diagram shows the HYCU environment and its components:
Figure 1–2: HYCU architecture

11
Deploying the HYCU virtualapplianceThe HYCU virtual appliance is a preconfigured HYCU software solution that you can easilydeploy by using the Nutanix Prism web console (for Nutanix AHV clusters) or the VMwarevSphere Client (for Nutanix ESXi clusters). The virtual appliance is distributed as a virtualdisk image (for Nutanix AHV clusters) or an OVF package (for Nutanix ESXi clusters).
Make sure you first size the backup infrastructure for HYCU as described in “Sizing yourbackup infrastructure for HYCU” below, and then follow the instructions in one of thefollowing sections:
l “Deploying HYCU on a Nutanix AHV cluster” on the next page
l “Deploying HYCU to a Nutanix ESXi cluster” on page 16
After you successfully deploy the HYCU virtual appliance, you can access HYCU by using asupported web browser. For details on how to log on to HYCU, see “Logging on to HYCU”on page 17.
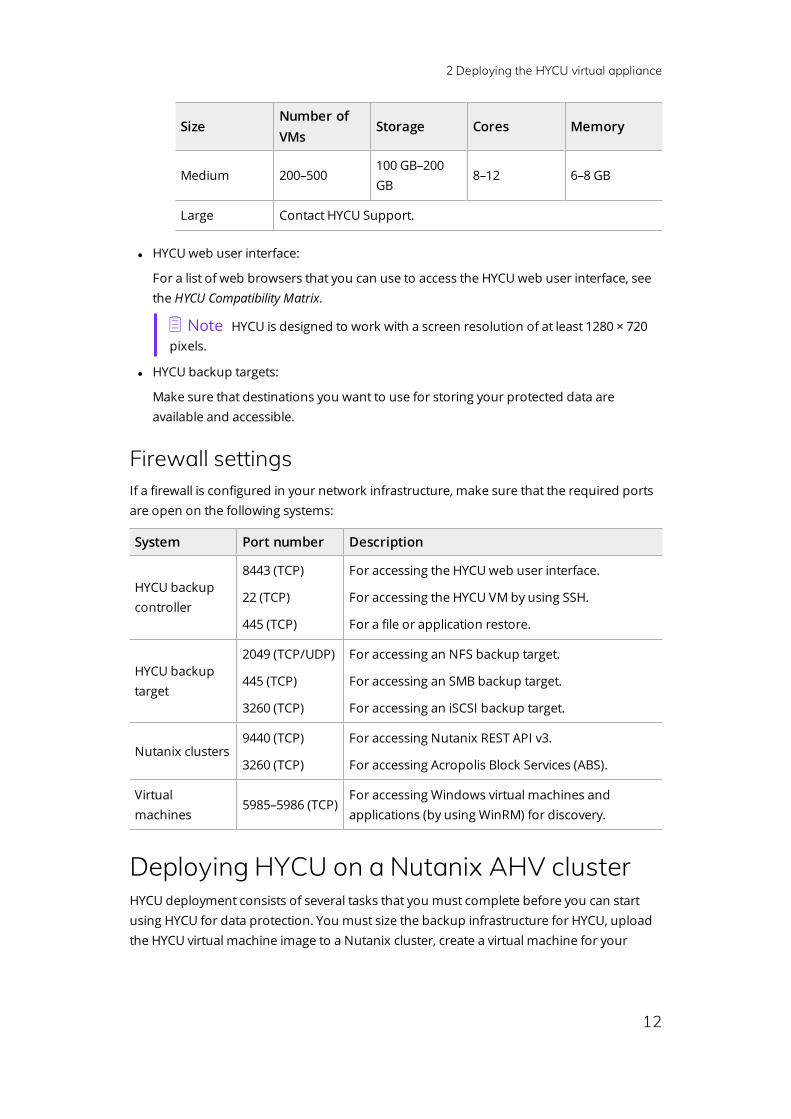
Sizing your backup infrastructure for HYCUBefore you start deploying the HYCU virtual appliance, size the backup infrastructureaccording to the following requirements:
l HYCU backup controller:
o Network connection
Make sure that you reserve an IP address for your virtual machine.
o System requirements
For HYCU backup controller deployment and configuration, at least 4 GB of RAM isrequired.
Ensure that your environmentmeets the following sizing requirements:
SizeNumber ofVMs
Storage Cores Memory
Small 100–200 20 GB–40 GB 4–6 4 GB
Chapter 2
2 Deploying the HYCU virtual appliance
12
SizeNumber ofVMs
Storage Cores Memory
Medium 200–500100 GB–200GB
8–12 6–8 GB
Large Contact HYCU Support.
l HYCUweb user interface:
For a list of web browsers that you can use to access the HYCU web user interface, seethe HYCU Compatibility Matrix.
n Note HYCU is designed to work with a screen resolution of at least 1280 × 720pixels.
l HYCU backup targets:
Make sure that destinations you want to use for storing your protected data areavailable and accessible.
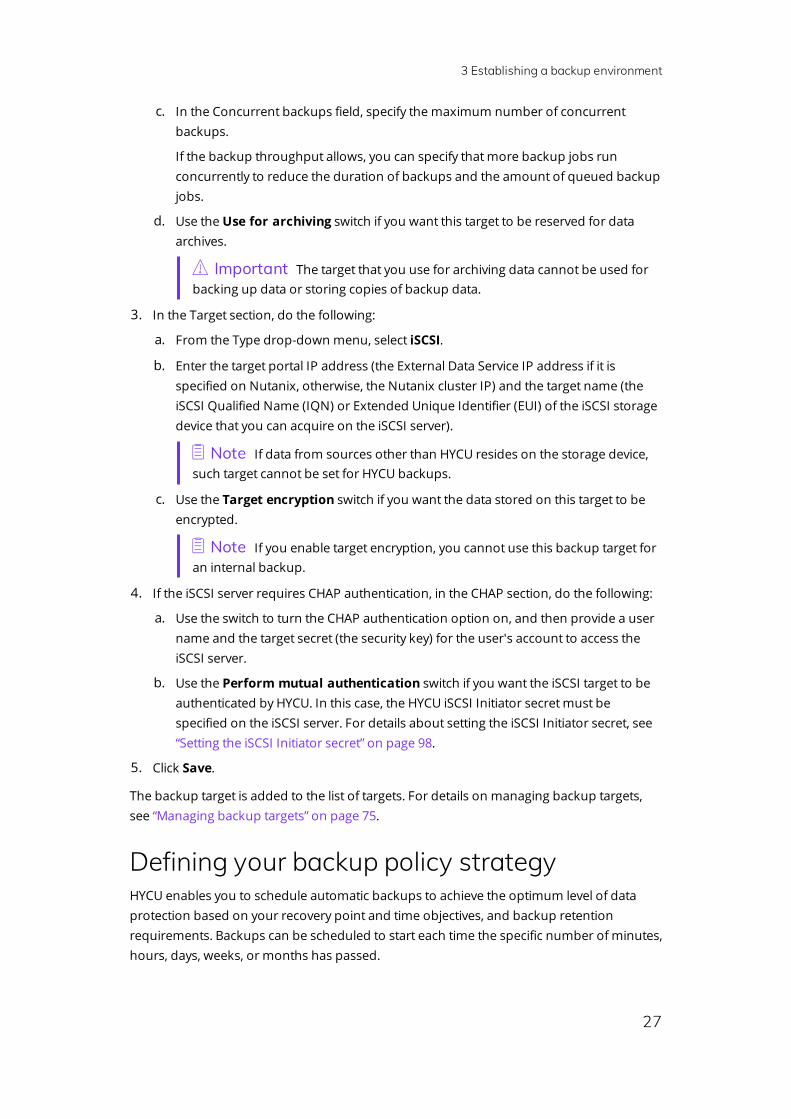
Firewall settingsIf a firewall is configured in your network infrastructure, make sure that the required portsare open on the following systems:
System Port number Description
HYCU backupcontroller
8443 (TCP)
22 (TCP)
445 (TCP)
For accessing the HYCU web user interface.
For accessing the HYCU VMby using SSH.
For a file or application restore.
HYCU backuptarget
2049 (TCP/UDP)
445 (TCP)
3260 (TCP)
For accessing an NFS backup target.
For accessing an SMB backup target.
For accessing an iSCSI backup target.
Nutanix clusters9440 (TCP)
3260 (TCP)
For accessing Nutanix REST API v3.
For accessing Acropolis Block Services (ABS).
Virtualmachines
5985–5986 (TCP)For accessing Windows virtual machines andapplications (by using WinRM) for discovery.
Deploying HYCU on a Nutanix AHV clusterHYCU deployment consists of several tasks that you must complete before you can startusing HYCU for data protection. You must size the backup infrastructure for HYCU, uploadthe HYCU virtual machine image to a Nutanix cluster, create a virtual machine for your

2 Deploying the HYCU virtual appliance
13
HYCU deployment, and configure HYCU on the virtual machine, as shown in the followingflowchart:
Figure 2–1: Overview of HYCU deployment tasks
To deploy HYCU, I need to... Where can I find instructions?
1. Upload the HYCU virtual applianceimage to a Nutanix AHV cluster.
“Uploading the HYCU virtual applianceimage to a Nutanix AHV cluster” on the nextpage
2. Create a virtual machine for HYCUdeployment.
“Creating a virtual machine for HYCUdeployment on a Nutanix AHV cluster” onthe next page
3. Configure HYCU on the created virtualmachine.
“Configuring HYCU on the virtual machine”on page 15

2 Deploying the HYCU virtual appliance
14
Uploading the HYCU virtual appliance image to aNutanix AHV clusterTo upload the HYCU virtual appliance image to a Nutanix AHV cluster, follow these steps:
1. Log on to the Nutanix Prism web console by using your Nutanix logon credentials.
2. In the menu bar, click , and then select Image Configuration.
3. In the Image Configuration dialog box, click Upload Image.
4. In the Create Image dialog box, provide the following information:
a. Enter the HYCU image name in the format that should correspond to that of theHYCU image file you are uploading. Optionally, enter an annotation.
i Important The HYCU virtual appliance image must be uploaded to theNutanix cluster in the following format:hycu-<version>-<revision>
For example: hycu-3.0.0-3634
Make sure to leave out the .qcow2 extension when entering the HYCU imagename. If you enter the HYCU image name in a different format, you will not beable to use this image for an upgrade.
b. From the Image Type drop-down menu, selectDISK.
c. From the Storage Container drop-down menu, select a container for the image tobe uploaded.
d. In the Image Source section, select one of the following:
l From URL
Specify the location of the image file by using a URL.
l Upload a file
Specify the location of the image file saved on your file system.
5. Click Save.
6. Click Close after the image is successfully uploaded.
Creating a virtual machine for HYCU deployment on aNutanix AHV clusterTo create a virtual machine for HYCU deployment on a Nutanix AHV cluster, in the NutanixPrism web console, do the following:
1. In the menu bar, click Home, and then select VM.
2. Click Create VM at the upper right of the screen.
3. In the Create VM dialog box, provide the following information:

2 Deploying the HYCU virtual appliance
15
a. Enter a virtual machine name and, optionally, its description.
b. In the Compute Details section, enter the number of CPUs and cores per CPU, anda desired amount of RAM.
c. In the Disks section, click Add New Disk, and then, in the Add Disk dialog box,
complete the following information:
i. From the Type drop-down menu, selectDISK.
ii. From the Operation drop-down menu, select Clone from Image Service.
iii. From the Bus Type drop-down menu, select SCSI.
iv. From the Image drop-down menu, select the name of the image you uploaded.
v. In the Size (GiB) field, leave the default size of the virtual disk (10 GB).
n Note You can later increase the size of the HYCU virtual disk if needed.For details, see “Increasing the HYCU disk size in a Nutanix AHV cluster” onpage 104.
Click Add.
d. Specify an additional data disk. Click Add New Disk, and then, in the Add Disk
dialog box, leave the default settings. In the Size (GiB) field, enter 32.
n Note You can later increase the size of the HYCU virtual disk if needed. Fordetails, see “Increasing the HYCU disk size in a Nutanix AHV cluster” onpage 104.
Click Add.
4. In the Network Adapters (NIC) section, click Add New NIC, and then, in the Create NICdialog box, select a VLAN from the VLAN Name drop-down menu. Click Add.
5. Click Save.
Configuring HYCU on the virtual machineTo configure HYCU on the created virtual machine, in the Nutanix Prism web console, dothe following:
1. From the list of virtual machines, select the one you created, and then click Power on.
2. When the virtual machine is turned on, click Launch Console.
In the HYCU Network Configuration dialog box, do the following:
a. Enter the values for the following:
l Optional.Host name for the HYCU virtual machine
n Note The default host name is generated automatically during theHYCU virtual appliance deployment. The host name should begin with aletter and may contain only letters, numbers, and hyphens (-).
l IPv4 address (for example, 10.1.100.1)

2 Deploying the HYCU virtual appliance
16
l Subnetmask (for example, 255.0.0.0)
l Default gateway (for example, 10.1.1.1)
l Optional. DNS server (for example, 10.1.1.5)
l Optional. Search domain (for example, domain.com)
n Note The domain name should begin with a letter and contain one ormore periods. It may also contain only letters, numbers, and hyphens (-).
b. Click OK.
3. The progress of the HYCU backup controller configuration displays. After the HYCUbackup controller is configured, confirm the summarymessage by clicking OK.
You can start using HYCU immediately with a prebuilt Instant-on license. This licenseexpires automatically after 60 days and cannot be reused. Therefore, make sure to obtain apermanent license within this 60-day period. For instructions, see “Licensing” on page 87.
Deploying HYCU to a Nutanix ESXi clusterHYCU deployment includes creating the HYCU backup controller virtual machine in theVMware vSphere environment by deploying the HYCU virtual appliance package. Make sureyou first size the backup infrastructure for HYCU.
PrerequisiteVMware vSphere 6.x only. Client Integration Plug-In is installed. For instructions, see theVMware documentation at: https://docs.vmware.com/en/VMware-vSphere/6.0/com.vmware.vsphere.install.doc/GUID-CA16F78B-7890-4357-9760-AF8648806FE7.html
To deploy HYCU to a Nutanix ESXi cluster, follow these steps:
1. Log on to the VMware vSphere Web Client.
2. Click the VMs tab, and then click Deploy OVF Template.... The Deploy OVF Templatedialog box opens.
3. In the Select template context, select Local files, and then click Browse.
4. Navigate to the HYCU virtual appliance package, select the HYCU disk image file (.vmdk)and the OVF template (.ovf), and then click Open.
5. In the Select template context, click Next.
6. In the Select name and location context, select the location where you want to deployHYCU backup controller.
VMware vSphere 6.x only. Enter the HYCU image name in the format that shouldcorrespond to that of the HYCU image file you are uploading.
i Important The following format is required:hycu-<version>-<revision>

2 Deploying the HYCU virtual appliance
17
For example: hycu-3.0.0-3634
Make sure to leave out the .qcow2 extension when entering the HYCU image name.If you enter the HYCU image name in a different format, you will not be able to usethis image for an upgrade.
Click Next.
7. In the Select a resource context, select the Nutanix cluster where the HYCU backupcontroller will reside. Click Next.
8. In the Review details context, verify the template details. Click Next.
9. In the Select storage context and Select Network context, leave the default values, andthen click Next.
10. In the Customize template context, enter the values for the following:
l Optional.Host name for the HYCU virtual machine
n Note The default host name is generated automatically during the HYCUvirtual appliance deployment. The host name should begin with a letter andmay contain only letters, numbers, and hyphens (-).
l IPv4 address (for example, 10.1.100.1)
l Subnetmask (for example, 255.0.0.0)
l Default gateway (for example, 10.1.1.1)
l Optional. DNS server (for example, 10.1.1.5)
l Optional. Search domain (for example, domain.com)
n Note The domain name should begin with a letter and contain one ormore periods. It may also contain only letters, numbers, and hyphens (-).
Click Next.
11. In the Ready to complete context, review the settings, and then click Finish.
12. In the list of virtual machines on the Nutanix ESXi cluster, select the newly created HYCUvirtual machine, and then click Power on.
n Note Creating the HYCU virtual machine may take a few moments. The Poweron icon is enabled only after a virtual machine is created.
You can start using HYCU immediately with a prebuilt Instant-on license. This licenseexpires automatically after 60 days and cannot be reused. Therefore, make sure to obtain apermanent license within this 60-day period. For instructions, see “Licensing” on page 87.
Logging on to HYCUAfter you successfully deploy the HYCU virtual appliance, you can access HYCU by using asupported web browser. For a list of supported web browsers, see the HYCU CompatibilityMatrix.
To log on to HYCU, follow these steps:

2 Deploying the HYCU virtual appliance
18
1. In a supported browser, enter the following URL:
https://<server_name>:8443
In this instance, <server_name> is the fully qualified domain name of the HYCU server.
For example:
https://hycu.example.com:8443
2. On the logon page, enter your logon name and password. You can use the default username and password for initial access to HYCU:
User name: admin
Password: admin
For security purposes, it is highly recommended that you change the default password.
n Note The level of access depends on your HYCU user permissions. For details, see“Managing HYCU users” on page 82.
You can now start establishing your backup environment to enable data protection. Formore information, see “Establishing a backup environment” on page 19.
After you log on to the HYCU web user interface, you can configure your environment touse also the HYCU command-line interface (hycli). For more information, see “Using thecommand-line interface” on page 102.

19
Establishing a backupenvironmentAfter you deploy the HYCU virtual appliance and log on to HYCU, you must establish abackup environment in which data will be effectively protected. Establishing the backupenvironment involves adding Nutanix clusters, setting up backup targets, and, if yourenvironment requires custom policies, creating them.
The following flowchart explains the tasks you need to perform to establish your backupenvironment:
Figure 3–1: Establishing a backup environment
Chapter 3

3 Establishing a backup environment
20
The tasks that are required to establish a backup environment can be performed only byan administrator, and are as follows:
l “Adding Nutanix clusters” below
l “Setting up backup targets” on the next page
Depending on the backup environment, the following task may also have to be performed:
l Creating your own backup policies
If you do not want to use any of the predefined backup policies that come with HYCU,you must create your own backup policies. For details, see “How to create a custombackup policy” on page 30.
After the backup environment is established, data protection can be accomplished inseveral ways to fulfill the needs of particular business. For details, see “Protecting data” onpage 37.
Adding Nutanix clustersA Nutanix environment consists of one or more Nutanix clusters, each of which hosts aseries of virtual machines that run applications. You can add one or more Nutanix clustersthat host virtual machines you want to include in the backup.
For backing up virtual machines from their replicas in remote office/branch office (ROBO)environments, you must add both the central site Nutanix cluster and the branch office sitecluster.
Nutanix ESXi cluster prerequisiteYour Nutanix cluster is registered to the vCenter Server through the Prism web console. Fordetails on how to do this, see Nutanix documentation.
Accessing the Nutanix Clusters dialog boxTo access the Nutanix Clusters dialog box, clickAdministration, and then selectNutanix Clusters.
To add a Nutanix cluster, follow these steps:
1. In the Nutanix Clusters dialog box, clickNew. The New dialog box appears.
2. Enter the name of the Nutanix cluster in URL format: https://<server_name>:<port>.
3. Enter the user name and password of the user with cluster administrative rights.
4. Click Save.
You can also edit any of the existing Nutanix clusters (clickEdit and make the requiredmodifications) or delete the ones that you do not need anymore (clickDelete).
i Important In Nutanix environments that use VMware ESXi hypervisors, makesure to configure your Windows virtual machines to not go into sleep mode after acertain amount of time. Otherwise, the network settings are not recognized, and

3 Establishing a backup environment
21
consequently such virtual machines cannot be protected by HYCU.
Setting up backup targetsBackup targets are locations where the protected data is stored. HYCU allows you to storeyour data to AWS S3 or S3-compatible storage, Azure storage, an NFS share, an SMB share,and an iSCSI storage device.
The approach to set up backup targets is common for different target types. However, thereare specific prerequisites and steps that are required for each target type. Depending onwhich backup target you want to set up, see one of the following sections:
l “How to set up an AWS S3/Compatible target” below
l “How to set up an Azure target” on the next page
l “How to set up an NFS target” on page 23
l “How to set up an SMB target” on page 24
l “How to set up an iSCSI target” on page 26
How to set up an AWS S3/Compatible targetPrerequisitesl The target is configured and accessible.
l The bucket is created.
RecommendationIt is recommended that the backup target is dedicated only to a single HYCU backupcontroller.
Accessing the Targets panelTo access the Targets panel, in the navigation pane, clickTargets.
To set up an AWS S3/Compatible target, follow these steps:
1. In the Targets panel, clickNew. The New Target dialog box appears.
2. In the General section, do the following:
a. Enter the name of a target and, optionally, its description.
b. In the Size field, enter the maximum storage space that should be reserved for thebackup files (in MB, GB, or TB).
c. In the Concurrent backups field, specify the maximum number of concurrentbackups.
If the backup throughput allows, you can specify thatmore backup jobs runconcurrently to reduce the duration of backups and the amount of queued backupjobs.

3 Establishing a backup environment
22
d. Use the Use for archiving switch if you want this target to be reserved for dataarchives.
i Important The target that you use for archiving data cannot be used forbacking up data or storing copies of backup data.
3. In the Target section, do the following:
a. From the Type drop-down menu, selectAWS S3/Compatible.
b. Enter the service endpoint URL, the bucket name, the access key ID, and the secretaccess key. The access key and the secret access key are used to authenticateAmazon API service calls.
4. Click Save.
The backup target is added to the list of targets. For details on managing backup targets,see “Managing backup targets” on page 75.
How to set up an Azure targetPrerequisitesl The target is configured and accessible.
l Only if using an Azure Government account. The target.azure.government.cloudconfiguration setting is enabled. For details, see “Azure account settings” on page 110.
RecommendationIt is recommended that the backup target is dedicated only to a single HYCU backupcontroller.
Accessing the Targets panelTo access the Targets panel, in the navigation pane, clickTargets.
To set up an Azure backup target, follow these steps:
1. In the Targets panel, clickNew. The New Target dialog box appears.
2. In the General section, do the following:
a. Enter the name of a target and, optionally, its description.
b. In the Size field, enter the maximum storage space that should be reserved for thebackup files (in MB, GB, or TB).
c. In the Concurrent backups field, specify the maximum number of concurrentbackups.
If the backup throughput allows, you can specify thatmore backup jobs runconcurrently to reduce the duration of backups and the amount of queued backupjobs.
d. Use the Use for archiving switch if you want this target to be reserved for data

3 Establishing a backup environment
23
archives.
i Important The target that you use for archiving data cannot be used forbacking up data or storing copies of backup data.
For details on how HYCUmanages archiving data to the Azure cloud, see “Archivingdata to the Azure archive storage tier” on page 35.
3. In the Target section, do the following:
a. From the Type drop-down menu, selectAzure.
b. Enter the storage account name, the secret access key, and the container name.
n Note If the container does not exist, it is created automatically.
4. Click Save.
The backup target is added to the list of targets. For details on managing backup targets,see “Managing backup targets” on page 75.
How to set up an NFS targetPrerequisitesl The target is configured and accessible.
l There is enough free space to store the backup data in the target location.
l If deduplication is enabled on the backup target, the backup target is dedicatedexclusively to HYCU backups. By dedicating a backup target exclusively to HYCUbackups, you ensure that accurate storage utilization reports are provided.
l If the target resides on Windows, local permissions (security) are set to Full Control
for Everyone. If you want to limit access to this system only for HYCU, use the HYCUbackup controller IP address for this purpose.
RecommendationIt is recommended that the backup target is dedicated only to a single HYCU backupcontroller.
Accessing the Targets panelTo access the Targets panel, in the navigation pane, clickTargets.
To set up an NFS backup target, follow these steps:
1. In the Targets panel, clickNew. The New Target dialog box appears.
2. In the General section, do the following:
a. Enter the name of a target and, optionally, its description.
b. Optional. In the Size field, enter the maximum storage space that should bereserved for the backup files (in MB, GB, or TB). If your backup target is notdedicated exclusively to HYCU backups, you must leave this field empty.

3 Establishing a backup environment
24
When this field is left empty, HYCU retrieves the available amount of storage spacefrom the backup target itself.
n Note If the target has deduplication enabled, HYCU's estimation ofrequired storage space on the targetmay be higher than the actual amount ofspace required on the storage media. Therefore, it is recommended to leavethis field empty in such cases.
c. In the Concurrent backups field, specify the maximum number of concurrentbackups.
If the backup throughput allows, you can specify thatmore backup jobs runconcurrently to reduce the duration of backups and the amount of queued backupjobs.
d. Use the Use for archiving switch if you want this target to be reserved for dataarchives.
i Important The target that you use for archiving data cannot be used forbacking up data or storing copies of backup data.
3. In the Target section, do the following:
a. From the Type drop-down menu, selectNFS.
b. Enter the NFS server name or IP address and the path to the NFS shared folderfrom the root of the server (for example, /backups/HYCU).
c. Use the Target encryption switch if you want the data stored on this target to beencrypted.
If you enable target encryption, keep in mind the following:
l The deduplication ratio may be affected by it (in cases where the backup targethas deduplication enabled).
l You cannot use this backup target for an internal backup.
4. Click Save.
The backup target is added to the list of targets. For details on managing backup targets,see “Managing backup targets” on page 75.
How to set up an SMB targetPrerequisitesl The target is configured and accessible.
l There is enough free space to store the backup data in the target location.
l If deduplication is enabled on the backup target, the backup target is dedicatedexclusively to HYCU backups. By dedicating a backup target exclusively to HYCUbackups, you ensure that accurate storage utilization reports are provided.

3 Establishing a backup environment
25
l The supported SMB version is used. For a list of supported SMB versions, see the HYCUCompatibility Matrix.
RecommendationIt is recommended that the backup target is dedicated only to a single HYCU backupcontroller.
Accessing the Targets panelTo access the Targets panel, in the navigation pane, clickTargets.
To set up an SMB backup target, follow these steps:
1. In the Targets panel, clickNew. The New Target dialog box appears.
2. In the General section, do the following:
a. Enter the name of a target and, optionally, its description.
b. Optional. In the Size field, enter the maximum storage space that should bereserved for the backup files (in MB, GB, or TB). If your backup target is notdedicated exclusively to HYCU backups, you must leave this field empty.
When this field is left empty, HYCU retrieves the available amount of storage spacefrom the backup target itself.
n Note If the target has deduplication enabled, HYCU's estimation ofrequired storage space on the targetmay be higher than the actual amount ofspace required on the storage media. Therefore, it is recommended to leavethis field empty in such cases.
c. In the Concurrent backups field, specify the maximum number of concurrentbackups.
If the backup throughput allows, you can specify thatmore backup jobs runconcurrently to reduce the duration of backups and the amount of queued backupjobs.
d. Use the Use for archiving switch if you want this target to be reserved for dataarchives.
i Important The target that you use for archiving data cannot be used forbacking up data or storing copies of backup data.
3. In the Target section, do the following:
a. From the Type drop-down menu, select SMB.
b. Optional. Enter the domain and user credentials.
c. Enter the SMB server name or IP address and the path to the SMB shared folderfrom the root of the server (for example, /backups/HYCU).
d. Use the Target encryption switch if you want the data stored on this target to beencrypted.

3 Establishing a backup environment
26
If you enable target encryption, keep in mind the following:
l The deduplication ratio may be affected by it (in cases where the backup targethas deduplication enabled).
l You cannot use this backup target for an internal backup.
4. Click Save.
The backup target is added to the list of targets. For details on managing backup targets,see “Managing backup targets” on page 75.
How to set up an iSCSI targetPrerequisitesl The target is configured and accessible.
l The target has not been initialized yet.
l The iSCSI storage device is dedicated only to a single HYCU backup controller.
C Caution Disregarding this prerequisite may result in data loss or corruption.Therefore, make sure to avoid the following scenarios:o Several HYCU backup controllers are using the same backup target
simultaneously.
o Any appliance other than HYCU and HYCU itself are using the same backuptarget simultaneously.
l The HYCU iSCSI Initiator secret is added on the iSCSI server if you want to enablemutual authentication between HYCU and the iSCSI server.
l For improved backup and restore performance, the iSCSI Data Service IP address is
specified on the Nutanix cluster by using the Prism console ( > Cluster Details).
This automatically enables the Nutanix load balancing feature during backup andrestore, which eliminates heavy I/O load on the Nutanix cluster and containers. Fordetails, see Nutanix documentation.
Accessing the Targets panelTo access the Targets panel, in the navigation pane, clickTargets.
To set up an iSCSI backup target, follow these steps:
1. In the Targets panel, clickNew. The New Target dialog box appears.
2. In the General section, do the following:
a. Enter the name of a target and, optionally, its description.
b. Optional. In the Size field, enter the maximum storage space that should bereserved for the backup files (in MB, GB, or TB).
If you leave this field empty, HYCU retrieves the available amount of storage spacefrom the backup target itself.
3 Establishing a backup environment
27
c. In the Concurrent backups field, specify the maximum number of concurrentbackups.
If the backup throughput allows, you can specify thatmore backup jobs runconcurrently to reduce the duration of backups and the amount of queued backupjobs.
d. Use the Use for archiving switch if you want this target to be reserved for dataarchives.
i Important The target that you use for archiving data cannot be used forbacking up data or storing copies of backup data.
3. In the Target section, do the following:
a. From the Type drop-down menu, select iSCSI.
b. Enter the target portal IP address (the External Data Service IP address if it isspecified on Nutanix, otherwise, the Nutanix cluster IP) and the target name (theiSCSI Qualified Name (IQN) or Extended Unique Identifier (EUI) of the iSCSI storagedevice that you can acquire on the iSCSI server).
n Note If data from sources other than HYCU resides on the storage device,such target cannot be set for HYCU backups.
c. Use the Target encryption switch if you want the data stored on this target to beencrypted.
n Note If you enable target encryption, you cannot use this backup target foran internal backup.
4. If the iSCSI server requires CHAP authentication, in the CHAP section, do the following:
a. Use the switch to turn the CHAP authentication option on, and then provide a username and the target secret (the security key) for the user's account to access theiSCSI server.
b. Use the Perform mutual authentication switch if you want the iSCSI target to beauthenticated by HYCU. In this case, the HYCU iSCSI Initiator secretmust bespecified on the iSCSI server. For details about setting the iSCSI Initiator secret, see“Setting the iSCSI Initiator secret” on page 98.
5. Click Save.
The backup target is added to the list of targets. For details on managing backup targets,see “Managing backup targets” on page 75.
Defining your backup policy strategyHYCU enables you to schedule automatic backups to achieve the optimum level of dataprotection based on your recovery point and time objectives, and backup retentionrequirements. Backups can be scheduled to start each time the specific number of minutes,hours, days, weeks, or months has passed.

3 Establishing a backup environment
28
When defining your backup policy strategy, take into account the specific needs of yourenvironment and consider the following:
l Recovery Point Objective (RPO)
RPO is the maximum tolerable data loss interval (in months, weeks, days, hours, orminutes). This is a time period in which data can be lost after an event that causes avirtual machine or an application to go offline occurs.
l Recovery Time Objective (RTO),
RTO is the maximum tolerable time of disruption (in months, weeks, days, hours, orminutes). This is a time period that is needed before a virtual machine or an applicationis brought back online.
Decide which of the following two approaches best suits the needs of your environment:
l Applying a predefined backup policy
You can use any of the predefined backup policies (Gold, Silver, or Bronze) to simplifythe data protection implementation. For details, see “Applying a predefined backuppolicy” below.
l Creating a custom backup policy
If none of the predefined backup policies meets the needs of your environment, youcan create a new backup policy and tailor it to your needs. For details, see “Creating acustom backup policy” on the next page.
If you consider one of the predefined or custom backup policies satisfies all data protectiongoals of your environment, you can set such a policy as default. For details, see “Setting adefault backup policy” on page 36.
Applying a predefined backup policyWhen establishing a backup environment, you can take advantage of the predefinedbackup policies that provide a fast and convenient way of enabling data protection, andcover the most common data protection scenarios.
HYCU comes with the following predefined backup policies:
Type of predefinedbackup policy
Description
Gold Data is backed up every 4 hours and restored within 4 hours.
Silver Data is backed up every 12 hours and restored within 12 hours.
Bronze Data is backed up every 24 hours and restored within 24 hours.
If you want to exclude backup sources from being backed up, you can use the Excludedbackup policy.

3 Establishing a backup environment
29
Creating a custom backup policyIf the needs of your environment are not covered with any of the predefined backuppolicies, you can create a new backup policy and tailor it to your needs. While tailoring abackup policy to your needs and setting the desired RPO, RTO, and backup targets, you canalso enable one or more policy options for optimal policy implementation. These policyoptions are the following:
Policy option Description
Backup windowAllows you to run all backup jobs within a specific time frameto improve effectiveness and avoid overload of yourenvironment.
Backup from replica
Allows you to back up your virtual machines from theirreplicas in remote office/branch office (ROBO) environments.To be able to do so, you must create a protection domain thatwill include the virtual machines that you want to protect andspecify the schedule, retention, and remote sites forreplicating the virtual machines.
Make sure that the replication retention on the Nutanixcluster is adjusted to the backup policy's RPO. This allowsHYCU to use the Changed Block Tracking (CBT) feature to geta list of changed data since the last snapshot and perform anincremental backup. For example, if the Nutanix scheduleinterval is two hours and the RPO of the HYCU backup policyis eight hours, the retention policy for the remote site must beset to 4 or more snapshots (that is, at least the last foursnapshots must be kept).
For details on protecting virtual machines through theNutanix Prism web console, see Nutanix documentation.
Archiving Allows you to preserve your data for future reference.
Copy Allows you to create a copy of backup data.
Fast restore
Allows you to restore a virtual machine or an application tothe original container in a fast way by keeping local snapshotson the Nutanix cluster for the specified retention time.
By default, HYCU keeps one snapshot on the Nutanix cluster.With this option enabled, HYCU will keep more than onesnapshot on the Nutanix cluster (depending on yourretention settings), which allows you to restore a virtualmachine or an application in a fast way, reducing downtime.

3 Establishing a backup environment
30
How to create a custom backup policyYou can create a custom backup policy that will meet all the needs of your data protectionenvironment.
Prerequisitesl If you plan to enable the Backup window policy option, make sure you have created a
backup window. For details on how to do this, see “How to create a backup window” onpage 32.
l If you plan to enable the Archiving policy option, make sure you have created a dataarchive. For details on how to do this, see “How to create a data archive” on page 34.
l For backing up from replicas only. A protection domain that includes the virtual machinesthat you want to protect is created and the schedule, retention, and remote sites forreplicating the virtual machines are specified. For details on protecting virtual machinesthrough the Nutanix Prism web console, see Nutanix documentation.
LimitationFor backing up from replicas only. If your Nutanix cluster is running AHV, you can back upvirtual machines from both AHV and ESXi branch office environments. However, if yourNutanix cluster is running ESXi, you can back up virtual machines only from AHV branchoffice environments.
Accessing the Policies panelTo access the Policies panel, in the navigation pane, clickPolicies.
To create a custom backup policy, follow these steps:
1. In the Policies panel, clickNew. The New Policy dialog box appears.
2. Enter a name and, optionally, a description of your backup policy.
3. Add any of the following policy options to the list of the enabled options by clicking it:
l Backup (enabled by default)
l Backup window
l Backup from replica (available only if the Fast restore option is disabled)
l Archiving
l Copy
l Fast restore (available only if the Backup from replica option is disabled)
4. Depending on which policy options you have enabled, do the following:
Enabledoption
Procedure
Backup To back up data, in the Backup section, do the following:

3 Establishing a backup environment
31
Enabledoption
Procedure
a. In the Backup every field, set the RPO (in months, weeks, days,hours, or minutes).
b. In the Recover within field, set the RTO (in months, weeks, days,hours, or minutes).
c. In the Retention field, set a retention period (in months, weeks,or days) for the data.
d. From the Targets drop-down menu, select one or more backuptargets that you want to use for storing protected data.
If you want your target to be selected automatically, make surethe Automatically selected option is selected. In this case, theHYCU advanced scheduler automatically selects only targets thatcan guarantee compliance with the RPO and RTO policysettings. Backup targets that have their estimated backup timelower than the RPO and estimated recovery time lower than theRTO are added to the pool of targets. Based on each backupsource size, as well as target backup and restore throughputand queue, the HYCU advanced scheduler calculates the backupand recovery end time and selects the target where the backupwill complete fastest.
n Note The target for incremental backups can be anytarget in the selected pool of targets. To have a single targetfor all backups in a backup chain, make sure to select asingle target per policy.
e. In the Backup threshold field, specify a backup threshold valueof 0 through 100 percent (the default value is 25%). When theamount of changes on a virtual machine since the last fullbackup reaches the specified value, a new full backup isperformed instead of an incremental one.
Backupwindow
To specify a backup window, in the Backup section, from theBackup window drop-down menu, select a backup window forbackup jobs. If no backup window is available and you want tocreate one, see “How to create a backup window” on the next page.
If you do not select a backup window, the Always option is shown,which means that your backups are allowed to run at any time.
Backup fromreplica
To back up virtual machines from their replicas, in the Backup fromreplica section, from the Central site cluster drop-down menu, select

3 Establishing a backup environment
32
Enabledoption
Procedure
the cluster on which the replicas of your virtual machines reside.
Archiving
To archive data, in the Archiving section, from the Data archive drop-down menu, select a data archive. If no data archive is available andyou want to create one, see “How to create a data archive” onpage 34.
Copy
To create a copy of backup data, in the Copy section, do thefollowing:
a. Set a retention period (in months, weeks, or days) for the copyof backup data.
b. From the Targets drop-down menu, select one or more backuptargets that you want to use for storing the copy of backup data.
If you want your target to be selected automatically, make surethe Automatically selected option is selected. The backupcopy target will be different from the backup target for datasafety reasons.
n Note When there are several backup targets availablefor storing the copy of backup data and multiple copies ofbackup data are being created in parallel, HYCU distributesthese copies accordingly among backup targets based onthe estimated size of queued and running backups on them.
Fast restore
To keep more than one snapshot on the Nutanix cluster, whichallows a fast restore, in the Fast restore section, set a retentionperiod (in months, weeks, days, hours, or minutes) for snapshots.For example, if you set the RPO to two days and the snapshotretention period to four days, you will have two snapshots availableon the Nutanix cluster.
n Note The snapshot retention period cannot be shorterthan the RPO or longer than the backup retention period.
5. Click Save.
The custom backup policy is created and added to the list of backup policies. For details onmanaging backup policies, see “Managing backup policies” on page 78.
How to create a backup windowHYCU enables you to define a time frame when your backup jobs are allowed to run. Youcan use this backup window to improve effectiveness and avoid an overloaded

3 Establishing a backup environment
33
environment. For example, you can schedule your backup jobs to run on non-productionhours to reduce loads during peak hours.
You can use backup windows with both predefined backup policies and custom backuppolicies.
n Note If you use a backup window, the backup jobs run only during the specifiedhours. Make sure that the RPO specified in the affected policy can be achieved withinthis backup window. If the RPO is shorter than the largest time frame in which backupsdo not run, such RPO cannot be achieved during the hours out of the backup window.
Accessing the Policies panelTo access the Policies panel, in the navigation pane, clickPolicies.
To create a backup window, follow these steps:
1. In the Policies panel, clickBackup Window.
2. In the Backup Window dialog box that appears, clickNew.
3. In the New dialog box that appears, enter a name for your backup window and,optionally, a description.
4. Select the week days and hours during which you want backups to run. You can clickand drag to quickly select a time frame that includes the days and hours you want toadd.
i Important All scheduled backup jobs are run based on the HYCU backupcontroller time zone.
The selected time frames are displayed in the Time Frames field. If you want to deleteany of the selected time frames, clickx next to it.
5. Click Save.
6. In the Backup Window dialog box, click Close.
You can later edit any of the existing backup windows (clickEdit and make the requiredmodifications) or delete the ones that you do not need anymore (clickDelete).
After you create a backup window, you can do the following:
l Specify a backup window when creating a new policy. For details, see “How to create acustom backup policy” on page 30.
l Assign a backup window to the existing backup policy. To do so, select the backuppolicy, clickEdit, and then make the required modifications.

3 Establishing a backup environment
34
ExampleYou have selected the Bronze policy and specified the time frame for the backup jobs tobe from Monday to Friday from 6 PM to 6 AM, and from Saturday to Sunday all day long.
In this case, the backup jobs will be run every 24 hours at any point of time within thespecified backup window.
How to create a data archiveHYCU enables you to create an archive of your data and keep it for a longer period of time.By archiving data, the data is stored for future reference on a weekly, monthly, or yearlybasis. Your data is isolated from current activity and safely stored in a secure local or cloudarchive location.
Prerequisitesl The archive target is reserved only for data archives (no backup data is stored on the
archive target).
l Only for archiving data to the Azure archive storage tier. Data archives are stored in theAzure cloud with the Blob Storage or General Purpose v2 (GPv2) accounts.
Azure archive storage tier limitationsl General Purpose v1 (GPv1) accounts do not supportmoving data archives to the
archive storage tier.
l Data archives created with any of the previous versions of HYCU are notmoved to thearchive storage tier.
Accessing the Policies panelTo access the Policies panel, in the navigation pane, clickPolicies.

3 Establishing a backup environment
35
To create a data archive, follow these steps:
1. In the Policies panel, click Archiving.
2. In the Archiving dialog box that appears, clickNew .
3. In the New dialog box that appears, enter a name for your data archive and, optionally,a description.
4. Add any of the desired archiving options to the list of the enabled options by clicking it.The following options are available:
Weekly Allows you to create a weekly archive of data.
Monthly Allows you to create a monthly archive of data.
Yearly Allows you to create a yearly archive of data.
5. Specify the hour and the minute when the archive job should begin running.
6. Provide information about when to archive data, the retention period to be used, andthe archive target.
For details on how HYCUmanages archiving data to the Azure cloud, see “Archivingdata to the Azure archive storage tier” below.
7. Click Save.
You can later edit any of the existing data archives (clickEdit and make the requiredmodifications) or delete the ones that you do not need anymore (clickDelete). Keep inmind that you cannotmodify an archive target if an archiving job is in progress on thattarget.
After you create a data archive, you can do the following:
l Specify a data archive when creating a new policy. For details, see “How to create acustom backup policy” on page 30.
l Assign a data archive to the existing backup policy. To do so, select the backup policy,clickEdit, and then make the required modifications.
Archiving data to theAzure archive storage tierHYCU automatically moves each data archive that has a retention period set to at least 180days from the Azure cool or hot storage tier to the archive storage tier. Bymoving dataarchives to the archive storage tier, HYCU ensures your data is stored most cost-efficientlybecause the archive storage tier is optimized for storing data that is not accessed frequentlyand is stored for at least 180 days.
If you are using the hot storage tier for archiving data, you get a warning that the coolstorage tier is recommended for archiving.
i Important When restoring data archives, HYCU performs a data rehydration taskduring which the tier of the Blob object storage is changed from the archive storage tierto the hot storage tier. Keep in mind that this task can take a few hours to complete.
3 Establishing a backup environment
36
Setting a default backup policyYou can select one of the predefined or custom backup policies to be the default backuppolicy for your HYCU environment. After you set a default backup policy, it is assigned to allexisting backup sources that do not have an assigned policy yet, and to all newly discoveredones.
Accessing the Policies panelTo access the Policies panel, in the navigation pane, clickPolicies.
To set a default backup policy, follow these steps:
1. In the Policies panel, select the policy that you want to set as default, and then click Set Default.
2. In the Set Default Policy dialog box that appears, do one of the following:
l Click Yes if you want to assign the default backup policy to all backup sources thatdo not have an assigned policy (that is, existing and newly discovered ones).
l Click No if you want to assign the default backup policy only to newly discoveredbackup sources.
If you later decide not to use this backup policy as the default one, click Clear Default.

37
Protecting dataWith the HYCU backup and recovery solution, you can be confident that your business datais protected, which means that it is backed up in a consistent state, stored, can be restored,accessed, and is not corrupted.
HYCU enables you to back up virtual machines residing on Nutanix clusters andapplications running on virtual machines. After you establish your backup environment(that is, add Nutanix clusters, set up backup targets, and, optionally, create backup policies),you can enable data protection. When you complete the first backup, you can restore thedata that is backed up if it becomes damaged or corrupted.
Because HYCU is application-aware, when you set credentials for virtual machines, itdiscovers if any applications are installed and running on them. In addition, it also detectsdetails about the discovered applications such as their versions, the hosts where individualcomponents for the discovered application are installed, and the role of each host. Toensure application consistency, HYCU provides the application-aware backup and restore.
The approach you choose for backing up your data largely depends on the type of restoreyou want to perform. You may want to perform the restore at the virtual machine orapplication level, or be able to restore only specific files inside the virtual machines. HYCUprovides different levels of data consistency depending on your restore strategy.
Chapter 4

4 Protecting data
38
The following flowchart explains the process of enabling data protection:
Figure 4–1: Enabling data protection
The following table explains which approach you should use for protecting your data andprovides quick access to the backup instructions:
What do I want torestore?
Which type of backupshould I select?
Which tasks do I need toperform?
Virtual machine data Basic backup
1. Back up virtualmachines. Forinstructions, see“Backing up virtualmachines ” on page 42.

4 Protecting data
39
What do I want torestore?
Which type of backupshould I select?
Which tasks do I need toperform?
Individual files within virtualmachine file systems
File-level backup
1. Enable access to data.For instructions, see“Enabling access to data”below.
2. Back up virtualmachines. Forinstructions, see“Backing up virtualmachines ” on page 42.
Application data Application-aware backup
1. Enable access to data.For instructions, see“Enabling access to data”below.
2. Back up applications.For instructions, see“Backing upapplications” onpage 43.
Enabling access to dataWhen the recovery goals of your environment require backing up data inside the virtualmachine file systems, you must enable HYCU to access the files and applications residing onthe virtual machines.
PrerequisitesBefore you start enabling access to data, make sure the following prerequisites are met:
l On Windows 7 and 2008 R2, Windows PowerShell 3.0 is installed. For an application-aware backup, the Windows PowerShell Script Execution Policy (Set-ExecutionPolicy) is set to RemoteSigned.
l On Windows 7, 8, and 10, and Windows Server 2008 R2, WinRM is enabled andconfigured by using the winrm quickconfig command.
l Windows user account with WinRMpermissions exists. For an application-awarebackup, this account should have access to the application.
l On Linux, port 22 is open and the SSH daemon is running.
l For the Nutanix cluster running on ESXi: VMware Tools and the Nutanix Guest Tools(NGT) software bundle are installed on the client virtual machine. For detailed

4 Protecting data
40
information about installing VMware Tools, see VMware documentation. For detailedinformation about installing NGT, see Nutanix documentation.
For detailed information, see Microsoft documentation.
Oracle-specific considerationsl When an operating system is used to authenticate Oracle database users, the Oracle
database can be accessed with the OS user credentials, which allows you to skip theprocedure of providing access to application data. To enable such authenticationmode, contact the Oracle database administrator.
l The OS user must have sudo privileges.
To enable access to files and applications residing on the virtual machines, complete thesetasks:
1. For a file-level backup and an application-aware backup, provide access to files insidevirtual machines or application data. For details, see “Assigning credentials to virtualmachines” below.
2. Not applicable for Active Directory. For an application-aware backup, provide access toapplication data if the discovered applications do not use virtual machine credentials.For details, see “Assigning credentials to applications” on the next page.
Assigning credentials to virtual machinesA file-level backup enables you to back up virtual machines in environments where youforesee that you will want to restore only specific files inside the virtual machines.
Accessing the Virtual Machines panelTo access the Virtual Machines panel, in the navigation pane, click Virtual Machines.
To be able to perform a file-level backup, assign credentials to virtual machines:
1. Select which virtual machines you want to back up.
2. ClickCredentials. The Credential Groups dialog box appears.
3. ClickNew.
4. Enter the credentials that are required for accessing the virtual machines.
5. Click Save.
6. Click Assign.
You can also edit any of the existing credentials (clickEdit and make the requiredmodifications) or delete the ones that you do not need anymore (clickDelete).
i Important You can unassign or delete credentials from a virtual machine only ifthe discovered applications running on it do not have assigned policies or availablerestore points. Therefore, before unassigning or deleting credentials, make sure tounassign policies or mark restore points as expired.
4 Protecting data
41
Application discoveryThe process of application discovery starts automatically after you assign credentials tovirtual machines. HYCU can discover the following applications that are running on virtualmachines:
l SQL Server
l Active Directory
n Note The following roles are supported for Active Directory: Active DirectoryDomain Services, Active Directory Lightweight Directory Services, Active DirectoryCertificate Services, Active Directory Federation Services, and Active Directory RightsManagement Services.
l Exchange Server
l Oracle
For a list of supported application versions, see the HYCU Compatibility Matrix.
When the application discovery job completes, the discovered applications are listed in theApplications panel.
Assigning credentials to applicationsIf you can access the discovered application you want to protect with the virtual machinecredentials, the Discovery status for these applications in the Application panel is green andyou can start protecting such applications. For instructions, see “Backing up applications”on page 43.
If the virtual machine credentials do not have proper permissions to access any of thediscovered applications that you want to protect, the Discovery status for these applicationsin the Application panel is red. For such applications, you must assign specific credentialswith permissions to access them.
n Note Because access to Active Directory is always granted with the virtual machinecredentials, you do not need to assign credentials to it.
Accessing the Applications panelTo access the Applications panel, in the navigation pane, click Applications.
To assign credentials to applications, follow these steps:
1. Select which applications you want to back up.
2. ClickCredentials. The Credentials dialog box appears.
3. Use the switch to enable using operating system credentials with enough permissionsto access the application.
4. Enter credentials for the user account with required permissions and access to theapplication. Make sure the following requirements are met:

4 Protecting data
42
l For applications running on Windows virtual machines. The specified accountmust be amember of the virtual machine's local Administrators or Backup Operators group.
l SQL Server only. The specified accountmust have the sysadmin role on theSQL Server application instance. The SQL Server account that connects by usingSQL Server Authentication is not supported.
5. Click Save.
Backing up virtual machinesHYCU provides you with two types of virtual machine backup, a basic backup and a file-levelbackup. Both these types enable you to back up your virtual machine data in a fast andefficient way. The only difference is that for the file-level backup, where the recovery goals ofyour environment require backing up data inside the virtual machine file systems, you mustmake sure that access to data is provided. For detailed information, see “Enabling access todata” on page 39.
Limitationl Only a backup of local fixed disks is supported. When backing up a virtual machine with
remote volumes (for example, iSCSI, disk arrays, mapped network disks), such volumesare not included in the snapshot and are consequently not backed up.
Accessing the Virtual Machines panelTo access the Virtual Machines panel, in the navigation pane, click Virtual Machines.
To back up virtual machines, follow these steps:
1. Select the virtual machines that you want to back up.
t Tip You can update the list of virtual machines by clicking Synchronize. Tonarrow down the list of displayed virtual machines, you can use the filtering optionsdescribed in “Filtering data in panels” on page 71.
2. ClickPolicies. The Policies dialog box appears.
3. From the list of policies, select the desired backup policy.
n Note If the backup policy is already assigned to the applications that arerunning on the selected virtual machines, a dialog box appears that enables you toautomatically unassign the backup policy from the applications and assign it to theselected virtual machines. In this case, application consistency will not bemandatory for a successful virtual machine backup.
4. Click Assign to assign the backup policy to the selected virtual machines.
After you assign the backup policy, the backup is scheduled according to the values thatyou defined for your backup policy.
n Note If required, you can also perform a manual backup at any time. For details,see “Performing a manual backup” on page 45.

4 Protecting data
43
Backing up applicationsAn application-aware backup allows a consistent backup of the following applications:
l SQL Server
l Active Directory
l Exchange Server
l Oracle
PrerequisitesBefore you start backing up applications, the following prerequisites must be met:
SQL Server
l Databases reside on the local disks in the Nutanix environment.
l Credentials are assigned to applications. For detailed informationabout assigning credentials to applications, see “Enabling access todata” on page 39.
l If you plan to restore an SQL Server database to a point in time. Thedatabase is online and is set to the full or bulk-logged recoverymodel during the backup.
l If you plan to restore databases that are part of an AlwaysOn AvailabilityGroup. Either all nodes in the AlwaysOn Availability Group areprotected by HYCU or only the node with the synchronizeddatabases of the AlwaysOn Availability Group (must be onlinewhen being protected). In the latter case, the risk of data loss isincreased if the node goes offline or the databases get out of sync.
Active DirectoryThe Nutanix Guest Tools (NGT) software bundle is installed on theclient virtual machine. For detailed information about installing NGT,see Nutanix documentation.
Exchange Server
l The Nutanix Guest Tools (NGT) software bundle is installed on theclient virtual machine. For detailed information about installingNGT, see Nutanix documentation.
l All databases are mounted.
l Credentials are assigned to applications. For detailed informationabout assigning credentials to applications, see “Enabling access todata” on page 39.
l The Active Directory application is protected.
Because Exchange Server stores all configuration information inActive Directory, make sure that you also back up your ActiveDirectory application so that you can retrieve the information aboutthe configuration if required. For example, if an entire database is

4 Protecting data
44
deleted by accident and you want to restore it, you first need torestore the Active Directory application, and then you can restorethis database by performing the Exchange Server restore. However,if only the contents of the database is deleted, you need to restoreonly the Exchange Server application.
OracleThe SSH service is enabled on the Oracle server and listening on port22, which is open for incoming connections.
LimitationsBefore you start backing up applications, keep in mind the following application-specificlimitations:
SQL Server
l Backing up SQL Servers with failover clusters is not supported.Consequently, assigning policies to such applications is notpossible.
l The tempdb SQL Server system database is excluded from allbackups.
l Only a full backup of the master, model, and msdb SQL Serversystem databases is supported. You can restore an SQL Serversystem database only as a whole instance.
l A point-in-time restore of the master, model, msdb, or tempdbSQL Server system database is not possible.
OracleYou can protect data only for single-instance Oracle databases. Backingup Oracle Real Application Clusters (RAC) databases is not supported.Consequently, assigning policies to such databases is not possible.
n Note If Active Directory and Exchange Server applications are running on the samevirtual machine and you plan to use the same approach for protecting bothapplications, you can assign a backup policy only to the Exchange Server application. Inthis case, the state of Active Directory application is backup consistent state and it isbacked up together with Exchange Server automatically.
After you make sure that all the prerequisites are met and that you are familiar with all thelimitations, you can continue with backing up applications.
Accessing the Applications panelTo access the Applications panel, in the navigation pane, click Applications.
To back up applications, follow these steps:
1. In the Applications panel, select the applications that you want to back up.
t Tip To narrow down the list of all displayed applications, you can use thefiltering options described in “Filtering data in panels” on page 71.
4 Protecting data
45
2. ClickPolicies. The Policies dialog box appears.
3. From the list of policies, select the desired backup policy.
n Note If the backup policy is already assigned to the virtual machines on whichthe selected applications are running, a dialog box appears that enables you toautomatically unassign the backup policy from the virtual machines and assign it tothe selected applications. In this case, the virtual machines on which theapplications are running are also protected by the same backups.
4. Click Assign to assign the backup policy to the selected applications.
After you assign the backup policy to the selected applications, the backup is scheduledaccording to the values that you defined for your backup policy.
n Note If required, you can also perform a manual backup of any application at anytime. For details, see “Performing a manual backup” below.
Performing a manual backupHYCU backs up your data automatically after you assign a backup policy to the selectedbackup sources. However, you can also back up your data manually at any time (forexample, for testing purposes or if the backup fails).
To perform a manual backup, follow these steps:
1. In the Virtual Machines or Applications panel, select which backup sources you want toback up.
2. ClickBackup to perform the backup of the selected backup sources.
3. Use the Force full backup switch if you want to perform a full backup. Otherwise,HYCU will perform a full or incremental backup based on the amount of changed data.
4. Click Yes to confirm that you want to start the manual backup.
t Tip In the navigation pane, clickJobs to check the overall progress of thebackup.
46
Restoring dataYou can start restoring data when at least one successful backup is performed. HYCUenables you to restore virtual machines, virtual machine disk files, individual files withinvirtual machine file systems, applications and application items to any available restorepoint. Depending on what kind of data you want to restore, see one of the followingsections:
l “Restoring virtual machine data” below
l “Restoring application data” on page 52
Restoring virtual machine dataYou can perform a restore of virtual machine data on a virtual machine level or a file level.This means that you can restore an entire virtual machine or only specific files within virtualmachine file systems. Depending on what kind of virtual machine data restore you want toperform, see one of the following sections:
l “Restoring an entire virtual machine” below
l “Restoring individual files” on page 50
Restoring an entire virtual machineWhen restoring an entire virtual machine, you can select among the following restoreoptions:
Restore option Description
Restore VMa
Enables you to restore a virtual machine to its original or a newlocation with original settings. Select this option if you want toreplace the original virtual machine with the restored one. In thiscase, the original virtual machine is deleted automatically beforethe restore. For instructions, see “How to restore a virtual machine”on the next page.
Clone VM
Enables you to create a clone of the original machine by restoringit to a new location with custom settings. Select this option if youwant to keep the original virtual machine. For instructions, see“How to clone a virtual machine” on page 48.
Chapter 5

5 Restoring data
47
Restore option Description
n Note By using the Clone VM option, you can also restore aNutanix ESXi virtual machine to a Nutanix AHV cluster. Fordetails, see “Restoring to a different hypervisor” on page 111.
Restore VM DiskFiles
Enables you to restore virtual machine disk files to an NFS or SMBshared location. Select this option if you want to use the virtualmachine disk files later to create a new virtual machine. Forinstructions, see “How to restore virtual machine disk files” on thenext page.
aNot supported for Nutanix ESXi clusters.
Accessing the Virtual Machines panelTo access the Virtual Machines panel, in the navigation pane, click Virtual Machines.
How to restore a virtual machine
LimitationRestoring a virtual machine running on a Nutanix ESXi cluster is not supported.
To restore a virtual machine to its original location or a new location with original settings,follow these steps:
1. In the Virtual Machines panel, click the virtual machine that you want to restore to openthe Details section. The Details section appears only if you click a virtual machine.Selecting the check box before the name of the virtual machine will not open the Detailssection.
2. In the Details section that appears at the bottom of the screen, select the desiredrestore point.
3. ClickRestore VM. The VM Restore Options dialog box opens.
4. Select Restore VM, and then click Next.
5. From the drop-down menu, select where you want to restore the virtual machine.
n Note By default, the original location is selected. If you decide to restore thevirtual machine to another container, it will not be restored from the snapshot, butfrom the target. Therefore, no fast restore will be performed.
6. Use the Power virtual machine on switch if you want to turn the restored virtualmachine on after the restore. The original virtual machine is deleted automatically.
7. Click Restore.
n Note Nutanix ESXi clusters only. Because the minimum RAM required for restoring avirtual machine is 256MB, any virtual machine with less RAM is automatically set to 256MB during the restore.

5 Restoring data
48
How to clone a virtual machineTo create a clone of the original virtual machine, restore it to a new location with customsettings. To do so, follow these steps:
1. In the Virtual Machines panel, click the virtual machine that you want to restore to openthe Details section. The Details section appears only if you click a virtual machine.Selecting the check box before the name of the virtual machine will not open the Detailssection.
2. In the Details section that appears at the bottom of the screen, select the desiredrestore point.
3. ClickRestore VM. The VM Restore Options dialog box opens.
4. Select Clone VM, and then click Next.
5. From the drop-down menu, select where you want to restore the virtual machine.
n Note By default, the original location is selected. If you decide to restore thevirtual machine to another container, it will not be restored from the snapshot, butfrom the target. Therefore, no fast restore will be performed.
6. Specify a new name for the virtual machine.
7. Use the Power virtual machine on switch if you want to turn the restored virtualmachine on after the restore. If you turn the restored virtual machine on, the originalvirtual machine will be turned off automatically.
8. Click Restore.
After cloning a virtualmachineIf you restored a virtual machine to a new location on another Nutanix cluster, make sureto add a network adapter to the virtual machine afterward. For details on how to do this,see Nutanix documentation.
How to restore virtual machine disk filesYou can restore virtual machine disk files to a shared location. Access to the shared locationcan be limited to specific accounts in your organization that can later use these disk files tocreate a new virtual machine. By doing so, you provide greater flexibility when restoringdata and optimize restore data management. To restore virtual machine disk files, followthese steps:
1. In the Virtual Machines panel, click the virtual machine that you want to restore to openthe Details section. The Details section appears only if you click a virtual machine.Selecting the check box before the name of the virtual machine will not open the Detailssection.
2. In the Details section that appears at the bottom of the screen, select the desiredrestore point.
3. ClickRestore VM. The VM Restore Options dialog box opens.
5 Restoring data
49
4. Select Restore VM disk files, and then click Next.
i Important During the restore of virtual machine disk files, you cannotperform additional restores or expire backups for this virtual machine.
5. From the drop-down menu, select where you want to restore the disk files, and thenprovide the required information:
l NFS
Enter the NFS server name or IP address and the path to the NFS shared folderfrom the root of the server (for example, /backups/HYCU).
l SMB
a. Optional. Enter the domain and user credentials.
b. Enter the SMB server name or IP address and the path to the SMB shared folderfrom the root of the server (for example, /backups/HYCU).
6. Click Restore.
After restoring virtualmachine disk filesAfter the restore of the virtual machine disk files is complete, you can upload them to theNutanix image service (for Nutanix AHV clusters) or to the VMware datastore (for NutanixESXi clusters) and create a new virtual machine by using them. You do not need HYCU tocreate a virtual machine from the restored disk files.
n Note Keep in mind that due to features such as data resiliency and provisioning,the disk files may require more space than on the shared location. Therefore, makesure to reserve enough space in the Nutanix container or the VMware datastore. Fordetails on how to do this, see Nutanix or VMware documentation.
Data is restored to the following location:
/<sharedpath>/<vmname>/<timestamp>/<filename>
In this instance, <sharedpath> is the path to the shared folder, <vmname> is the virtualmachine name, <timestamp> is the time of the restore, and <filename> is the virtualmachine disk UUID.
i Important Nutanix ESXi clusters only. Because the format in which the data isrestored is not a native VMware format, you must convert the disk image file to theVMDK format before uploading it to the VMware datastore. To do so, follow these steps:
1. Navigate to the folder where the disk image file is located.
2. As the root user, run the following command:
qemu-img convert -f raw -O vmdk <source_disk_image> <target_disk_image>.vmdk

5 Restoring data
50
Restoring individual filesYou can restore individual files within virtual machine file systems to their original or a newlocation on the original Windows or Linux virtual machine, or to a shared SMB location.This alternative to restoring an entire virtual machine allows you to restore only one ormore individual files (that have been deleted for some reason and are now missing on thevirtual machine) without the need to restore all virtual machine data.
Prerequisitesl When restoring to the original virtual machine. You have enabled access to the virtual
machine file system. For details, see “Enabling access to data” on page 39.
l One of the following file systems is used:
o On Windows: NTFS, FAT, or FAT32
o On Linux: xfs, ext4/ext3/ext2, reiserfs, or btrfs
Limitationsl Performing a file-level restore on dual-boot systems is not supported.
l On Linux, a file-level restore of symbolic links and soft links is performed only whenrestoring to the original location.
Accessing the Virtual Machines panelTo access the Virtual Machines panel, in the navigation pane, click Virtual Machines.
To restore individual files, follow these steps:
1. In the Virtual Machines panel, click the virtual machine that contains the files that youwant to restore to open the Details section. The Details section appears only if you clicka virtual machine. Selecting the check box before the name of the virtual machine willnot open the Details section.
2. In the Details section that appears at the bottom of the screen, select the desiredrestore point.
3. Depending on whether the snapshot for the selected restore point is online, do one ofthe following:
l If the snapshot is online, theRestore Files option is available and you can startthe procedure for restoring the files by clicking it.
l If the snapshot is not online, you first need to prepare the files for the restore:
a. ClickPrepare for Restore Files. The Prepare for Restore Files dialog boxappears.
b. Use the Restore with original settings switch if you want to restore data withoriginal settings.

5 Restoring data
51
If you choose to use different settings for restoring data, select a container.
c. Click Prepare.
TheRestore Files option becomes available and you can start the procedure forrestoring the files by clicking it.
4. In the Restore Files dialog box, from the list of available files, select the ones that youwant to restore, and then click Next.
t Tip If there are too many files to be displayed on one page, you can movebetween the pages by clicking and.You can also search for a file or a folder by entering its name and then pressingEnter in the Search field.
The Single File Restore dialog box appears.
5. Select where you want to restore the individual files:
Original virtualmachine
To restore the individual files to the original virtual machine,follow these steps:
a. Click Virtual machines, and then click Next.
b. Select the location on the virtual machine where you wantto restore the individual files, and provide the requiredinformation:
l Original location
Select how the restore should save the files when thereis a file with the same name and location on the virtualmachine (overwrite the file, rename the original file, orrename the restored file).
l Alternate location (on the same VM)
Specify the path to an alternate location on the samevirtual machine in the following format:
C:\<path>
c. Use the Restore ACL switch if you want to restore theoriginal access control list.
i Important If the original virtual machine is notaccessible due to various reasons (for example, credentialsare not assigned to it, discovery was not successful, or it isturned off or deleted from the Nutanix cluster), you cannotselect it for restoring the individual files.
SMB shareTo restore the individual files to an SMB share, follow thesesteps:

5 Restoring data
52
a. Click Fileshares, and then click Next.
b. Specify the path to a shared folder in the following format:
\\server\<path>
c. Optional. Provide user credentials to access the SMB share.
6. Click Restore.
Restoring application dataYou can perform a restore of application data on an application level or an application itemlevel. This means that you can restore a whole application or only specific application itemsfor which you have performed an application-aware backup. Depending on what kind ofapplication data restore you want to perform, see one of the following sections:
l “Restoring a whole application” below
l “Restoring application items” on page 56
Restoring a whole applicationWith HYCU, you can restore a whole application to its original or a new location by restoringthe virtual machine on which the application is running. In addition, you can restore thedisk files of the virtual machine on which the application is running to a shared location.
n Note Active Directory only.HYCU does not perform an authoritative restore.
When restoring a whole application, you can select among the following restore options:
Restore option Description
Restore VMa
Enables you to restore an application by restoring the virtual machineon which it is running to its original or a new location with originalsettings. Select this option if you want to replace the original virtualmachine on which your application is running with the restored one. Inthis case, the original virtual machine is automatically deleted beforethe restore. For instructions, see “How to restore a virtual machine” onthe next page.
Clone VM
Enables you to create a clone of the original machine by restoring it to anew location with custom settings. Select this option if you want tokeep the original virtual machine on which your application is running.For instructions, see “How to clone a virtual machine” on page 54.
RestoreVM disk files
Enables you to restore an application by restoring the disk files of thevirtual machine on which it is running to an NFS or SMB sharedlocation. Select this option if you want to use these virtual machine disk

5 Restoring data
53
Restore option Description
files later to create a new virtual machine. For instructions, see “How torestore virtual machine disk files” on page 55.
aNot supported for Nutanix ESXi clusters.
Accessing the Applications panelTo access the Applications panel, in the navigation pane, click Applications.
How to restore a virtual machineC Caution When you are restoring the application to the original location, therestored data overrides the data in the original location. To avoid data loss, make surethat you back up the potentially unprotected data—the data that appeared between thelast successful backup and the restore. To start a manual backup, see “Performing amanual backup” on page 45.
LimitationRestoring a virtual machine running on a Nutanix ESXi cluster is not supported.
To restore a virtual machine to the original location or a new location with original settings,follow these steps:
1. In the Applications panel, click the application that you want to restore to open theDetails section. The Details section appears only if you click an application. Selecting thecheck box before the name of the application will not open the Details section.
2. In the Details section that appears at the bottom of the screen, select the desiredrestore point, and then clickRestore.
i Important If the backup status for the selected restore point shows that thebackup is crash consistent, you cannot use this restore point for restoring theapplication.
3. Select Restore whole server, and then click Next.
4. Select Restore VM, and then click Next.
5. From the drop-down menu, select where you want to restore the virtual machine.
n Note By default, the original location is selected. If you decide to restore thevirtual machine to another container, it will not be restored from the snapshot, butfrom the target. Therefore, no fast restore will be performed.
6. Use the Power virtual machine on switch if you want to turn the restored virtualmachine on after the restore. The original virtual machine is deleted automatically.
7. Click Restore.
n Note Nutanix ESXi clusters only. Because the minimum RAM required for restoring avirtual machine is 256MB, any virtual machine with less RAM is automatically set to 256

5 Restoring data
54
MB during the restore.
During the restore, the original application instance is offline and not accessible.
After restoring a virtualmachineAfter restoring an Exchange Server or Active Directory application, reinstall the NutanixGuest Tools (NGT) software bundle to ensure the future successful backups of applicationdata.
How to clone a virtual machineTo create a clone of the original virtual machine, restore it to a new location with customsettings. To do so, follow these steps:
1. In the Applications panel, click the application that you want to restore to open theDetails section. The Details section appears only if you click an application. Selecting thecheck box before the name of the application will not open the Details section.
2. In the Details section that appears at the bottom of the screen, select the desiredrestore point, and then clickRestore.
i Important If the backup status for the selected restore point shows that thebackup is crash consistent, you cannot use this restore point for restoring theapplication.
3. Select Restore whole server, and then click Next.
4. Select Clone VM, and then click Next.
5. From the drop-down menu, select where you want to restore the virtual machine.
n Note By default, the original location is selected. If you decide to restore thevirtual machine to another container, it will not be restored from the snapshot, butfrom the target. Therefore, no fast restore will be performed.
6. Specify a new name for the virtual machine.
7. Use the Power virtual machine on switch if you want to turn the restored virtualmachine on after the restore. If you turn the restored virtual machine on, the originalvirtual machine will be turned off automatically.
8. Click Restore.
During the restore, the original application instance is offline and not accessible.
After cloning a virtualmachineIf you restored a virtual machine to a new location on another Nutanix cluster, make sureto add a network adapter to the virtual machine afterward. For details on how to do this,see Nutanix documentation.

5 Restoring data
55
How to restore virtual machine disk filesYou can restore virtual machine disk files to a shared location. Access to the shared locationcan be limited to specific accounts in your organization that can later use these disk files tocreate a new virtual machine. By doing so, you provide greater flexibility when restoringdata and optimize restore data management. To restore virtual machine disk files, followthese steps:
1. In the Applications panel, click the application that you want to restore to open theDetails section. The Details section appears only if you click an application. Selecting thecheck box before the name of the application will not open the Details section.
2. In the Details section that appears at the bottom of the screen, select the desiredrestore point, and then clickRestore.
i Important If the backup status for the selected restore point shows that thebackup is crash consistent, you cannot use this restore point for restoring theapplication.
3. Select Restore whole server, and then click Next.
4. Select Restore VM disk files, and then click Next.
i Important During the restore of virtual machine disk files, you cannotperform additional restores or expire backups for this virtual machine.
5. From the drop-down menu, select where you want to restore the disk files, and thenprovide the required information:
l NFS
Enter the NFS server name or IP address and the path to the NFS shared folderfrom the root of the server (for example, /backups/HYCU).
l SMB
a. Optional. Enter the domain and user credentials.
b. Enter the SMB server name or IP address and the path to the SMB shared folderfrom the root of the server (for example, /backups/HYCU).
6. Click Restore.
During the restore, the original application instance is offline and not accessible.
After restoring virtualmachine disk filesAfter the restore of the virtual machine disk files is complete, you can upload them to theNutanix image service (for Nutanix AHV clusters) or to the VMware datastore (for NutanixESXi clusters) and create a new virtual machine by using them. You do not need HYCU tocreate a virtual machine from the restored disk files.
n Note Keep in mind that due to features such as data resiliency and provisioning,the disk files may require more space than on the shared location. Therefore, makesure to reserve enough space in the Nutanix container or the VMware datastore. For

5 Restoring data
56
details on how to do this, see Nutanix or VMware documentation.
Data is restored to the following location:
/<sharedpath>/<vmname>/<timestamp>/<filename>
In this instance, <sharedpath> is the path to the shared folder, <vmname> is the virtualmachine name, <timestamp> is the time of the restore, and <filename> is the virtualmachine disk UUID.
i Important Nutanix ESXi clusters only. Because the format in which the data isrestored is not a native VMware format, you must convert the disk image file to theVMDK format before uploading it to the VMware datastore. To do so, follow these steps:
1. Navigate to the folder where the disk image file is located.
2. As the root user, run the following command:
qemu-img convert -f raw -O vmdk <source_disk_image> <target_disk_image>.vmdk
Restoring application itemsHYCU enables you to restore SQL Server, Exchange Server, and Oracle application items.Depending on which application items you want to restore, see one of the followingsections:
l “How to restore SQL Server databases” below
l “How to restore Exchange Server databases, mailboxes, and public folders” on page 58
l “How to restore Oracle database instances and tablespaces” on page 60
i Important If a virtual machine is deleted from the Nutanix cluster, but it still hasat least one valid restore point available, it is considered protected. In this case, thestatus of the virtual machine or any discovered applications running on it isPROTECTED_DELETED.When restoring application items of such an application, keep inmind that you cannot restore them to the original application instance.
How to restore SQL Server databasesWith HYCU, you can restore SQL Server databases to the original or a different SQL Serverinstance.
Limitationsl The restore of discovered applications is available for the NTFS, FAT, and FAT32 file
systems.
l Restoring SQL Server databases to another SQL Server application instance issupported only if you are restoring to the same or higher version of the application.
5 Restoring data
57
l Databases that are part of an AlwaysOn Availability Group can be restored only to aprimary node (from a secondary or primary node) and cannot be restored to a point intime.
Accessing the Applications panelTo access the Applications panel, in the navigation pane, click Applications.
To restore SQL Server databases, follow these steps:
1. In the Applications panel, click the application whose databases you want to restore toopen the Details section.
n Note The Details section appears only if you click an application. Selecting thecheck box before the name of the application will not open the Details section.
2. In the Details section that appears at the bottom of the screen, select the desiredrestore point.
i Important If the backup status for the selected restore point shows that thebackup is crash consistent, you cannot use this restore point for restoring thedatabases.
3. ClickRestore. The Restore MS SQL Server dialog box opens.
4. Select Restore databases, and then click Next.
5. From the Target instance drop-down menu, select where you want to restore thedatabases.
n Note If you are restoring the databases to a different SQL Server instance, theywill be renamed and copied to the default SQL Server location of the selected target.However, if you are restoring the databases that are part of the AlwaysOn AvailabilityGroup to a different SQL Server instance, they will not be renamed.
6. Select theWhole instance check box if you want to restore the whole applicationinstance or, from the list of databases that are available for a restore, select the onesthat you want to restore.
7. Optional. Specify a point in time to which you want to restore data. The databases willbe restored to the state they were in at the specified time.
i Important For a successful point-in-time restore, make sure that thedatabase recoverymodel is set to full or bulk-logged.
8. Click Restore.
9. SQL Server 2012 and 2014 AlwaysOn Availability Groups. Join the restored databases to anAlwaysOn Availability Group by using SQL Server Management Studio. For details onhow to do this, see Microsoft documentation.
n Note After you join the restored databases to the AlwaysOn Availability Group,it is recommended to perform a new backup of your AlwaysOn Availability Group.

5 Restoring data
58
How to restore Exchange Server databases, mailboxes, andpublic foldersWith HYCU, you can restore Exchange Server databases, mailboxes, and public folders.When restoring Exchange Server databases, you can choose between restoring to theoriginal mailbox server and, if the mailbox server is a member of a Database AvailabilityGroup, to another mailbox server inside the DAG.When restoring mailboxes and publicfolders, the recovery database is restored to the original mailbox server. From there, theactual restore is performed to anymailbox or public folder within the organization.
PrerequisiteOnly when restoring public folders. The public folder exists in the public folder mailbox. If itdoes not exist, recreate it manually with the same name it had at backup time.
Limitationsl The restore of discovered applications is available for the NTFS, FAT, and FAT32 file
systems.
l Restoring data to the hycu subfolder (the Restore to subfolder option) is currently notsupported for public folders.
l Restoring multiple databases, mailboxes, and/or public folders at the same time is notsupported.
Accessing the Applications panelTo access the Applications panel, in the navigation pane, click Applications.
To restore Exchange Server application items, follow these steps:
1. In the Applications panel, click the application whose application items you want torestore to open the Details section.
n Note The Details section appears only if you click an application. Selecting thecheck box before the name of the application will not open the Details section.
2. In the Details section that appears at the bottom of the screen, select the desiredrestore point.
i Important If the backup status for the selected restore point shows that thebackup is crash consistent, you cannot use this restore point for restoring theapplication items.
3. ClickRestore. The Restore MS Exchange Server dialog box appears.
4. Select which application items you want to restore, and then click Next:
Restore databases
To restore the databases, do the following:
a. From the Target server drop-down menu, select where youwant to restore data.

5 Restoring data
59
You can select a restore location only if your mailbox serveris a member of a DAG and you want to restore data toanother mailbox server inside the DAG. Otherwise, you canrestore only to the original mailbox server.
i Important Only if your mailbox server is a memberof a DAG.Make sure to select the target server on whichthe databases are currently active.
b. From the list of databases that are available for a restore,select the database that you want to restore.
i Important Only if you plan to restore multipledatabases.Make sure that you restore databases one byone.
c. Use the Enable restore to recovery database switch ifyou want to enable restoring data to a recovery database. Ifenabled, provide a recovery database path. The default oneis C:\ProgramData\Hycu.
d. Click Restore.
After you restore one database, you can continue with restoringanother one, as long as you do it one by one.
Restore mailboxesand/or publicfolders
To restore the mailboxes and/or public folders, do thefollowing:
a. In the Search field, enter the name of a mailbox and/orpublic folder that you want to restore, or, from the list ofmailboxes and/or public folders that are available for arestore, select the one that you want to restore, and thenclick Next.
i Important Only if you plan to restore multiplemailboxes and/or public folders.Make sure that yourestore mailboxes and/or public folders one by one.
t Tip If there are too manymailboxes and/or publicfolders to be displayed on one page, you can movebetween the pages by clicking and. You can alsouse to set the number of mailboxes and/or publicfolders to be displayed per page.
b. Select where you want to restore data:
l Original mailbox
l Alternate mailbox, and then enter an alternatemailbox name.

5 Restoring data
60
c. Select the mode for restoring data:
l Restore in place
Enables you to restore data to the original location.
l Restore to subfolder (not supported for public folders)
Enables you to restore data to the hycu subfolder that iscreated automatically.
d. Only if restoring data to the original location. Use the Conflictresolution switch if you want to resolve any potential dataconflict by keeping the most recent version of the items inconflict. Otherwise, HYCU will overwrite the existing itemswith the ones from the backup.
e. Enter a temporary recovery database path. The default oneis C:\ProgramData\Hycu.
f. Click Restore.
How to restore Oracle database instances and tablespacesWith HYCU, you can restore the whole Oracle database instance or the selected tablespacesto the original location.
LimitationTablespaces can be restored only from the latest restore point in the backup chain andcannot be restored to a point in time.
Restore considerationsWhen performing a database instance or tablespace restore, you can perform a completeor point-in-time restore:
l Complete restore
HYCU performs a complete restore of the whole database instance or tablespaces fromthe latest backup in the backup chain.
When performing the complete restore, the control file and archive log files are notrestored, and only existing archive log files are applied. If the control file or the existingarchive log files are lost, a complete restore is not possible and a point-in-time restoremust be performed.
l Point-in-time restore
To perform a point-in-time restore to the latest backup state, you must select a backupthat was performed before the specified point in time so that the database instance canbe brought to the last backup state by applying the archive log files from the lastbackup.

5 Restoring data
61
When performing the point-in-time restore, the control file, database files, and requiredarchive log files are restored.
i Important After a successful point-in-time restore, the archive log files arereset. Therefore, it is highly recommended to perform a backup immediately afterperforming the point-in-time restore because the database will not be protected interms of a complete restore until a new backup is performed.
Accessing the Applications panelTo access the Applications panel, in the navigation pane, click Applications.
To restore an Oracle database instance or tablespaces, follow these steps:
1. In the Applications panel, click the application whose database you want to restore toopen the Details section.
n Note The Details section appears only if you click an application. Selecting thecheck box before the name of the application will not open the Details section.
2. In the Details section that appears at the bottom of the screen, select the desiredrestore point.
i Important If the backup status for the selected restore point shows that thebackup is crash consistent, you cannot use this restore point for restoring thedatabase instance.
3. ClickRestore. The Restore Oracle Server dialog box opens.
4. Select Restore database, and then click Next.
5. Select theWhole instance check box if you want to restore the whole databaseinstance or, from the list of tablespaces that are available for a restore, select the onesthat you want to restore.
6. Whole database instance restore only.Optionally, specify a point in time to which you wantto restore data. The database instance will be restored to the state it was in at thespecified time.
7. Click Restore.
62
Protecting the HYCU backupcontrollerIt is crucial for your HYCU backup environment that the strategy you choose to protect yourHYCU backup controller is highly reliable and ensures security and recoverability.
HYCU provides an internal backup as a disaster protection strategy for your HYCU backupcontroller virtual machine. If a disaster with the HYCU backup controller occurs (forexample, if it is deleted by accident or if the Nutanix cluster on which it is running goesdown), use this strategy to successfully protect and recover the HYCU backup controller.
n Note HYCU uses synthetic full backups for backing up the HYCU backup controller.This means that each backup represents a consolidation of the full backup and anumber of incremental backups. After a new backup is created, all old backups aremarked as expired.
To improve protection of your HYCU backup controller and increase its invulnerability, it ishighly recommended to combine the internal backup strategy with the native Nutanix dataprotection strategy (for example, by including the HYCU backup controller to the Nutanixprotection domain). For detailed instructions on how to implement data protection forvirtual machines in Nutanix, see Nutanix documentation.
LimitationFor an internal backup, you can use only NFS, SMB, and iSCSI targets that are notencrypted.
Backing up the HYCU backup controllerAfter you deploy the HYCU virtual appliance, perform an internal backup of your HYCUbackup controller by assigning a backup policy to it.
Internal backup considerationsl Make sure that your backup policy has only one backup target selected (NFS, SMB, or
iSCSI) and that it does not have the Archiving and Copy options enabled. Otherwise,assigning the backup policy to the HYCU backup controller will not be possible. Fordetailed information about backup policies, see “Defining your backup policy strategy”
Chapter 6

6 Protecting the HYCU backup controller
63
on page 27.
l If you use an iSCSI backup target for the internal backup, take a note which one you setup. You will need this information for recovery purposes.
l It is recommended that the RPO value in the backup policy that you intend to assign tothe HYCU backup controller, is lower than any RPO already set for other virtualmachines in the HYCU backup environment.
To assign a backup policy, perform these steps:
1. In the navigation pane, click Virtual Machines.
2. From the list of virtual machines, select your HYCU backup controller, and then clickPolicies. The Policies dialog box appears.
3. Select the backup policy for your HYCU backup controller.
4. Click Assign to assign the backup policy to the HYCU backup controller.
If you change the backup policy in any of the following ways after assigning it to the HYCUbackup controller, keep in mind the following:
l If you add multiple backup targets to the policy (or automatic selection is enabled), anew full backup will be performed every time the target is changed.
l If you add one or more backup copy targets, every backup copy size will be equal to thesize of the full backup.
Location of backup filesl Backup files are located on the backup target (as specified in the backup policy) in the
following folder:
o On SMB and NFS targets: /bkpctrl/<controllerUuid>
o On an iSCSI target: /mnt/i_scsi-<iscsi_ID>/bkpctrl/<controllerUuid>
n Note You can use the console or a file transfer client (for example, WinSCP)to browse the target.
In this instance, <controllerUuid> is the HYCU backup controller UUID, which you cansee in the Licensing dialog box, in the Controller string. To access the Licensing dialogbox, clickAdministration, and then select Licensing.
n Note Take a note of the target and the backup location.
l Every time the target is changed, the information in the Events panel is updated andshows a message about the new location of the backup files.
Recovering the HYCU backup controllerPrerequisite
iSCSI target only.Make sure to establish a connection to the iSCSI target you used forbacking up the HYCU backup controller.
6 Protecting the HYCU backup controller
64
To recover the HYCU backup controller, follow these steps:
1. iSCSI target only. Perform the following steps to retrieve the disk image files from thebackup target:
a. Log on to the Nutanix Prism web console (for Nutanix AHV clusters) or the VMwarevSphere Web Client (for Nutanix ESXi clusters).
b. Deploy a temporary HYCU backup controller virtual machine that will be used forretrieving files from the target. For details on how to do this, see one of thefollowing sections:
l “Deploying HYCU on a Nutanix AHV cluster” on page 12
l “Deploying HYCU to a Nutanix ESXi cluster” on page 16
c. Log on to HYCU.
d. Set up the same iSCSI target as you used for the HYCU backup controller you wantto recover. For details, see “How to set up an iSCSI target” on page 26.
2. Retrieve two HYCU backup controller disk image files from the backup target and savethem to a temporary location. Access the HYCU logical volume that is located on thebackup target (you can identify the HYCU logical volume by its hycu_lv prefix). Thelocation of the disk image files is as follows:
l On SMB and NFS targets: /bkpctrl/<controllerUuid>
l On iSCSI target: /mnt/i_scsi-<iscsi_ID>/bkpctrl/<controllerUuid>
n Note You can use the console or a file transfer client (for example, WinSCP)to browse the target.
The bkpctrl folder contains the folders of the both newly created HYCU backupcontroller and the HYCU backup controller you want to recover. To determine inwhich folder the required disk image files reside, check the HYCU backup controllerID or search both folders—the required disk image file is the one whose size isapproximately 32 GB.
To locate the disk image files in the /bkpctrl/<controllerUuid>, consider their size.The size of the HYCU backup controller data disk image file is equal to or greater than32 GB, whereas the size of the HYCU backup controller OS disk image file isapproximately 10 GB. Besides the HYCU backup controller disk image files, this foldermay also contain subfolders with other virtual machine backups. Ignore thesesubfolders when recovering the HYCU backup controller.
3. Nutanix ESXi clusters only. Convert the disk image files from RAW format to VMDKformat:
a. Navigate to the folder where the disk image file is located.
b. As the root user, run the following command:
qemu-img convert -f raw -O vmdk <source_disk_image> <target_disk_image>.vmdk
6 Protecting the HYCU backup controller
65
4. Upload the disk image files to the image service by using the Prism web console (forNutanix AHV clusters) or to the datastore by using the VMware vSphere Web Client (forNutanix ESXi clusters).
5. After you upload the disk image files, depending on whether the HYCU backupcontroller is present in the list of virtual machines, select one of the followingprocedures:
l HYCU backup controller is present:
Shut the HYCU backup controller down, remove the old disks from it, and then addnew disks based on the disk image files you uploaded. After the new disks areadded, make sure to turn the HYCU backup controller on.
For details, see Nutanix or VMware documentation.
l HYCU backup controller is not present:
a. Log on to the Nutanix Prism web console (for Nutanix AHV clusters) or theVMware vSphere Web Client (for Nutanix ESXi clusters).
b. Create a new virtual machine. For details on how to do this, see one of thefollowing sections:
o “Creating a virtual machine for HYCU deployment on a Nutanix AHV cluster”on page 14
o “Deploying HYCU to a Nutanix ESXi cluster” on page 16
c. Click Power on to turn on the HYCU backup controller.
d. Configure the network settings for the new virtual machine because a newnetwork card is assigned to it.
iSCSI target only. After you recovered the HYCU backup controller, you can delete thetemporary HYCU backup controller virtual machine you created for retrieving the diskimage files. For details, see Nutanix or VMware documentation.

66
Performing daily tasksTo ensure the secure and reliable performance of the data protection environment, HYCUprovides various mechanisms to support your daily activities.
I want to... Procedure
Get an at-a-glance overview of the data protectionenvironment state, identify eventual bottlenecks, andinspect different areas of the HYCU environment.
“Using the HYCU dashboard”below
Track tasks that are running in my environment andget an insight into the specific task status.
“Checking the status of jobs” onpage 68
View all events that occurred in my environment. “Viewing events” on page 69
View the backup status of backup sources.“Viewing backup source details ”on page 69
Narrow down the list of displayed elements inpanels.
“Filtering data in panels” onpage 71
View backup target information, activate ordeactivate a backup target, increase the size of aniSCSI backup target, or edit or delete a backup target.
“Managing backup targets” onpage 75
View backup policy information, or edit or delete abackup policy.
“Managing backup policies” onpage 78
Mark restore points as expired.“Expiring backups manually” onpage 80
In case of the recognized problems in the Nutanix environment that can degrade theefficiency and reliability of data protection (for example, when storage, vCPU, or memoryutilization is exceeded), you can make adjustments to better meet your data protectiongoals. For details, see “Adjusting the HYCU virtual machine resources” on page 81.
Using the HYCU dashboardThe HYCU dashboard provides you with an at-a-glance overview of the data protectionstatus in your environment. This intuitive dashboard enables you to monitor all data
Chapter 7

7 Performing daily tasks
67
protection activity and to quickly identify areas that need your attention. You can use thisdashboard as a starting point for your everyday tasks because it enables you to easilyaccess the area of interest by simply clicking the corresponding widget.
Accessing the Dashboard panelTo access the Dashboard panel, in the navigation pane, clickDashboard.
i Important Your user permissions define which widgets you are allowed to seeand access.
The following table describes what kind of information you can find within each widget:
Dashboard widget Description
Policies
Shows the percentage of policies that are compliant, and the exactnumber of compliant and incompliant policies. A policy isconsidered compliant if all virtual machines and applicationswithin this policy are compliant with the policy settings. Fordetailed information about policies, see “Defining your backuppolicy strategy” on page 27.
Virtual Machines
Shows the percentage of protected virtual machines in yourenvironment, and the exact number of protected and unprotectedvirtual machines. A virtual machine is considered protected if it hasan assigned policy and if there is at least one valid backup withinthe defined retention period. For detailed information aboutprotecting virtual machines, see “Backing up virtual machines ” onpage 42.
ApplicationsShows the percentage of protected applications, and the exactnumber of protected and unprotected applications. An application

7 Performing daily tasks
68
Dashboard widget Description
is considered protected if it has an assigned policy and if there is atleast one valid backup within the defined retention period. Fordetailed information about protecting applications, see “Backingup applications” on page 43.
Backups Shows the backup job success rate for the last seven days.
Targets*
Shows the number of existing backup targets, overall capacityutilization, and the utilization per target type. For detailedinformation about setting up backup targets, see “Setting upbackup targets” on page 21.
Controller*
Shows the resource information about the virtual machine wherethe HYCU backup controller resides (storage, vCPU, and memory).For details about what to do if any of these values reaches a criticalvalue (that is, if any of the values that are indicated by circlesbecomes red), see “Adjusting the HYCU virtual machine resources”on page 81.
Jobs
Shows the number of jobs in the HYCU environment in the last 48hours. It also shows how many jobs succeeded, failed, are inprogress or in a queue. For details, see “Checking the status ofjobs” below.
EventsShows the number of events in the HYCU environment in the last48 hours. It also shows the number of the events according totheir severity. For details, see “Viewing events” on the next page.
* An administrator only.
Checking the status of jobsYou can use the Jobs panel to check the overall status of jobs.
Accessing the Jobs panelTo access the Jobs panel, in the navigation pane, clickJobs.
In the Jobs panel, you can do the following:
l Check the status of processes that are currently running.
l Check the status of completed and stopped processes.
l Check more details about a specific job in the Details section that appears at the bottomof the screen after you select the job.
t Tip To minimize the Details section, clickMinimize or press Spacebar. To
7 Performing daily tasks
69
return it to its original size, clickMaximize or press Spacebar.
l Generate a report about a specific job by selecting it, and then clickingView Report.To copy the report to the clipboard, in the Job Report dialog box that opens, click Copyto clipboard.
l Cancel a currently running job by selecting it, and then clickingAbort Job.
The following table shows the job information:
Job information Description
NameName of the job that was performed (for example, adding acluster, adding a target, running a backup, and so on).
StatusCurrent status of a job (for example, Queued, a progress barindicating the Executing status, OK, or Error).
Started When a job was started.
Finished When a job finished.
Viewing eventsThe Events panel enables you to view all events that occurred in your environment, to checkdetails about the selected event, and to list events thatmatch the specified filter.
Accessing the Events panelTo access the Events panel, in the navigation pane, clickEvents.
The following information is available for each event:
Level Severity level of the event (Info, Warning, or Error)
Message Description of the event
CategoryCategory to which the event belongs (for example, Policies, Backup,Credentials, System in case of an internal event, and so on)
Timestamp Event creation time
To open the Details section where you can find the event summary and more details aboutthe event, click the desired event.
t Tip To minimize the Details section, clickMinimize or press Spacebar. To returnit to its original size, clickMaximize or press Spacebar.
Viewing backup source detailsYou can view the details about each virtual machine and discovered application in theDetails section of the Virtual Machines or Applications panel. The following details are
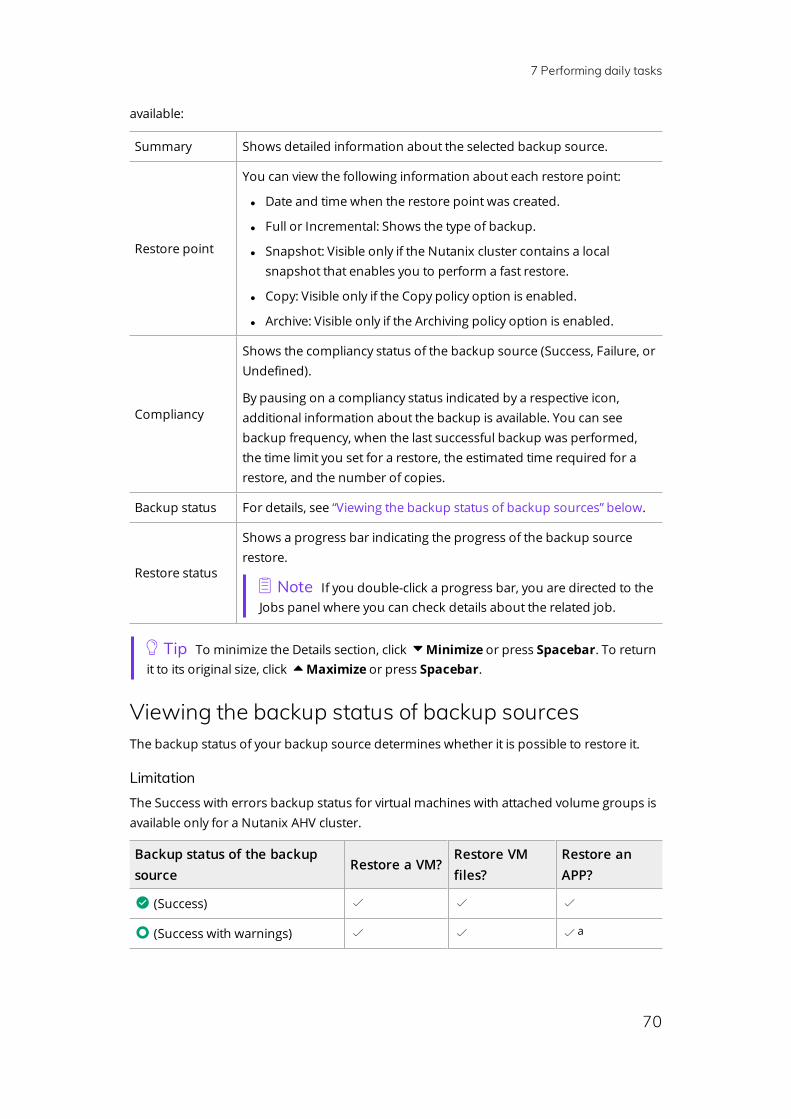
7 Performing daily tasks
70
available:
Summary Shows detailed information about the selected backup source.
Restore point
You can view the following information about each restore point:
l Date and time when the restore point was created.
l Full or Incremental: Shows the type of backup.
l Snapshot: Visible only if the Nutanix cluster contains a localsnapshot that enables you to perform a fast restore.
l Copy: Visible only if the Copy policy option is enabled.
l Archive: Visible only if the Archiving policy option is enabled.
Compliancy
Shows the compliancy status of the backup source (Success, Failure, orUndefined).
By pausing on a compliancy status indicated by a respective icon,additional information about the backup is available. You can seebackup frequency, when the last successful backup was performed,the time limit you set for a restore, the estimated time required for arestore, and the number of copies.
Backup status For details, see “Viewing the backup status of backup sources” below.
Restore status
Shows a progress bar indicating the progress of the backup sourcerestore.
n Note If you double-click a progress bar, you are directed to theJobs panel where you can check details about the related job.
t Tip To minimize the Details section, clickMinimize or press Spacebar. To returnit to its original size, clickMaximize or press Spacebar.
Viewing the backup status of backup sourcesThe backup status of your backup source determines whether it is possible to restore it.
LimitationThe Success with errors backup status for virtual machines with attached volume groups isavailable only for a Nutanix AHV cluster.
Backup status of the backupsource
Restore a VM?Restore VMfiles?
Restore anAPP?
(Success) h h h
(Success with warnings) h h ha

7 Performing daily tasks
71
Backup status of the backupsource
Restore a VM?Restore VMfiles?
Restore anAPP?
(Success with errors) hb hc hd
(Error) x x x
a You cannot specify a point in time to which you want to restore data. This backup statusmay occur because disk mapping failed or a virtual machine does not have an NIC, or, incase of applications, at least one database log backup failed (whereas all other databasesare in a consistent state).
b Because not all virtual machine disk files were backed up successfully, the virtual machinecan be partially restored. It may not be possible to turn it on if one of the system disks wasnot backed up.
c Because not all virtual machine disk files were backed up successfully, the individual filescan be partially restored (only the files that are displayed in the Restore Files dialog box).
d An application can be partially restored (only the databases that are displayed in therespective restore dialog boxes).
n Note By pausing on a backup status indicated by an icon, additional informationabout the backup is available. You can see the backup type, backup consistency, theduration and size of the backup, which backup target was used, and the backup UUID.
If you double-click a backup status icon, you are directed to the Jobs panel where youcan check details about the related job.
Filtering data in panelsHYCU enables you to filter data in the panels so you can easily find what you need. Eachpanel contains different filtering options and displays only the information thatmeets thespecified filter criteria (for example, filtering the data in the Virtual Machines panel helpsyou to focus only on the virtual machines that you are interested in or responsible for).
To filter data in panels, follow these steps:
1. ClickFilters. The Filters side panel opens.
2. Select your filter criteria.
3. Click Apply Filters.
Depending on the panel the contents of which you want to filter, see one of the followingsections for the details about available filtering options:
l “Filtering options in the Applications panel” on the next page
l “Filtering options in the Virtual Machines panel” on the next page
l “Filtering options in the Policies panel” on page 73

7 Performing daily tasks
72
l “Filtering options in the Targets panel” on page 74
l “Filtering options in the Jobs panel” on page 74
l “Filtering options in the Events panel” on page 75
l “Filtering options in the Self-Service panel” on page 75
Filtering options in the Applications panelIn the Filters side panel, select one or more filtering options:
Filtering option Action
Search Enter a search term. You can filter by the name of the application.
ClustersFrom the drop-down menu, select the clusters that host the virtualmachines on which the applications are running.
PoliciesFrom the drop-down menu, select the backup policies that areassigned to the virtual machines on which the applications arerunning.
OwnersFrom the drop-down menu, select the owners that are assigned tothe virtual machines on which the applications are running.
Application types From the drop-down menu, select the application types.
Compliancy
Select one or more check boxes to filter by the compliancy status:
l Success: Discovered applications are compliant.
l Failure: Discovered applications are not compliant.
l Undefined: The compliancy status cannot be retrieved.
Protection
Select one or more check boxes to filter by the protection status:
l Yes
l No
l Deleted
Discovery
Select one or more check boxes to filter by the applicationdiscovery status:
l Success: One or more applications are discovered.
l Failure: No applications were discovered.
l Warning: Application discovery failed because the virtualmachine is offline or not reachable.
Filtering options in the Virtual Machines panelIn the Filters side panel, select one or more filtering options:

7 Performing daily tasks
73
Filtering option Action
SearchEnter a search term. You can filter by the virtual machine name,the HYCU UUID, or the Nutanix UUID.
ClustersFrom the drop-down menu, select the clusters that host the virtualmachines.
Credential groupsFrom the drop-down menu, select the credentials for the virtualmachines.
PoliciesFrom the drop-down menu, select the backup policies that areassigned to the virtual machines.
OwnersFrom the drop-down menu, select the owners that are assigned tothe virtual machines.
Compliancy
Select one or more check boxes to filter by the compliancy status:
l Success: Virtual machines are compliant.
l Failure: Virtual machines are not compliant.
l Undefined: The compliancy status cannot be retrieved.
Discovery
Select one or more check boxes to filter by the applicationdiscovery status:
l Success: One or more applications are discovered.
l Failure: No applications were discovered.
l Warning: Application discovery failed because the virtualmachine is offline or not reachable.
l Undefined: Information about the application discovery statusis not available.
Protection
Select one or more check boxes to filter by the protection status:
l Yes
l No
l Deleted
Filtering options in the Policies panelIn the Filters side panel, select one or more filtering options:
Filtering option Action
SearchEnter a search term. You can filter by the name of the backuppolicy.
Compliancy Select one or more check boxes to filter by the compliancy status:

7 Performing daily tasks
74
Filtering option Action
l Success
l Failure
l Undefined
Filtering options in the Targets panelIn the Filters side panel, select one or more filtering options:
Filtering option Action
SearchEnter a search term. You can filter by the name of the backuptarget.
Target type
Select one or more check boxes to filter by the target type:
l AWS S3/Compatible
l Azure
l NFS
l SMB
l iSCSI
Status
Select one or more check boxes to filter by the status of the target:
l Ok
l Warning
l Error
l Undefined
Filtering options in the Jobs panelIn the Filters side panel, select one or more filtering options:
Filtering option Action
SearchEnter a search term. You can filter by the job name or the jobUUID.
Status
Select one or more check boxes to filter by the status of the job:
l Ok
l Warning
l Failed
l Queued
l Executing

7 Performing daily tasks
75
Filtering option Action
l Aborted
Filtering options in the Events panelIn the Filters side panel, select one or more filtering options:
Filtering option Action
MessageEnter a text string to filter the list to include only the messages withthe specified string.
Username From the drop-down menu, select the user name.
CategoryEnter a text string to filter the list to include only the categories withthe specified string.
Severity
Select one or more check boxes to filter by the severity of theevent:
l Success
l Warning
l Failed
Filtering options in the Self-Service panelIn the Filters side panel, select one or more filtering options:
Filtering option Action
User group name Enter the user group name.
Protection service
Select one of the following to filter by the protection service:
l Tenant
l Administrator
Status
Select one of the following to filter by the status of the user groupor user (that is, which user groups or users are allowed to log onto HYCU and which are not):
l Active
l Inactive
Managing backup targetsIf you have the proper permissions, you can view backup target information, edit backuptarget properties, activate or deactivate a backup target, or delete a backup target if you do

7 Performing daily tasks
76
not want to use it for storing protected data anymore.
Accessing the Targets panelTo access the Targets panel, in the navigation pane, clickTargets.
Viewing backup target informationYou can view information about each backup target in the list of backup targets in theTargets panel. This allows you to have an overview of the general status of the backuptargets. The following information is available for each backup target:
Backup targetinformation
Description
Name Name of the backup target.
Type Type of backup target (AWS S3/Compatible, Azure, SMB, NFS, or iSCSI).
Health
Health status of the backup target:
l Grey: Shows the initial backup target status before a health test. Italso indicates an inactive backup target.
l Green: The backup target is in a healthy state with backup targetutilization of less than the configured value (by default, 90%).
l Yellow: Backup target utilization is over the configured value (bydefault, 90%).
l Red: Backup target utilization is over the configured value (bydefault, 95%). It also indicates a backup target error state after a testtask (for example, an I/O error occurred, the backup target is notaccessible, the permission is denied, and so on).
When HYCU checks if there is enough space on the backup target toperform a backup, it calculates it by using the total provisioned spaceof all disks on the virtual machine, regardless of whether the backup isfull or incremental.
SizeEstimation of the amount of storage space that should be reserved forthe backup files (in MB, GB, or TB).
UtilizationPercentage of the specified backup target size that is already used forstoring protected data.
Mode
Mode of the backup target:
l Read/Write: You can use this backup target for backing up andrestoring data.
l Read Only: You can use this backup target only for restoring data.
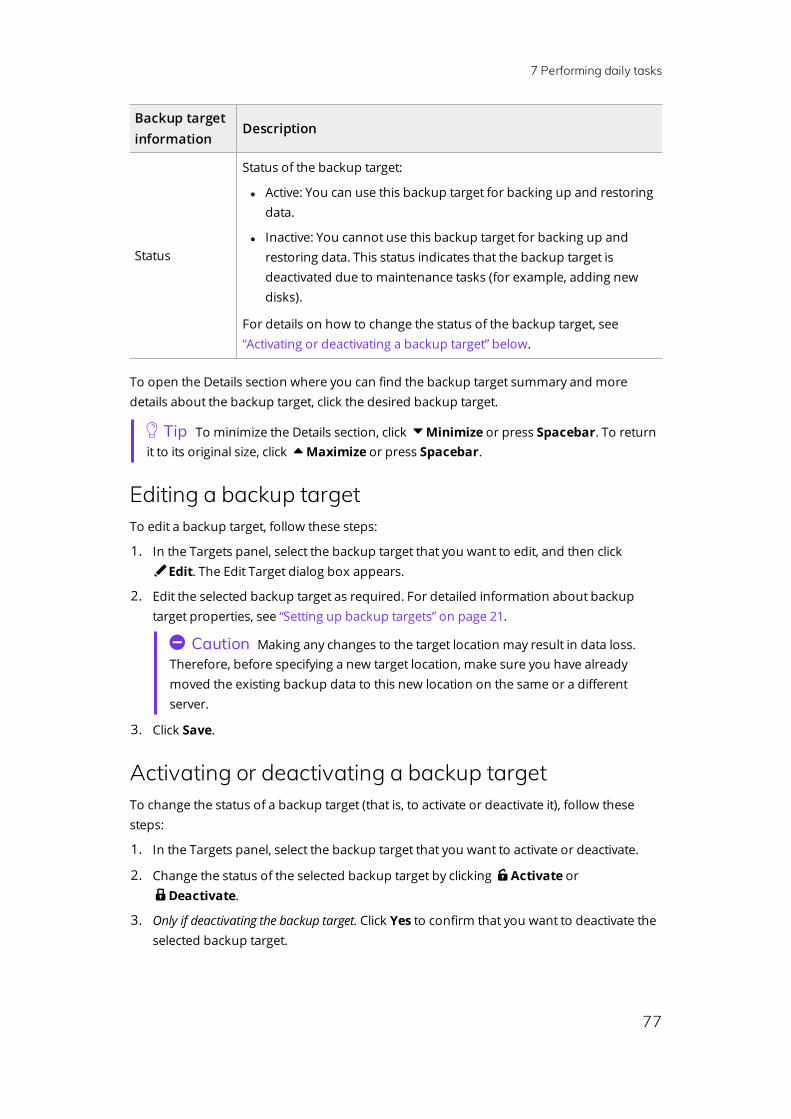
7 Performing daily tasks
77
Backup targetinformation
Description
Status
Status of the backup target:
l Active: You can use this backup target for backing up and restoringdata.
l Inactive: You cannot use this backup target for backing up andrestoring data. This status indicates that the backup target isdeactivated due to maintenance tasks (for example, adding newdisks).
For details on how to change the status of the backup target, see“Activating or deactivating a backup target” below.
To open the Details section where you can find the backup target summary and moredetails about the backup target, click the desired backup target.
t Tip To minimize the Details section, clickMinimize or press Spacebar. To returnit to its original size, clickMaximize or press Spacebar.
Editing a backup targetTo edit a backup target, follow these steps:
1. In the Targets panel, select the backup target that you want to edit, and then clickEdit. The Edit Target dialog box appears.
2. Edit the selected backup target as required. For detailed information about backuptarget properties, see “Setting up backup targets” on page 21.
C Caution Making any changes to the target location may result in data loss.Therefore, before specifying a new target location, make sure you have alreadymoved the existing backup data to this new location on the same or a differentserver.
3. Click Save.
Activating or deactivating a backup targetTo change the status of a backup target (that is, to activate or deactivate it), follow thesesteps:
1. In the Targets panel, select the backup target that you want to activate or deactivate.
2. Change the status of the selected backup target by clickingActivate orDeactivate.
3. Only if deactivating the backup target. Click Yes to confirm that you want to deactivate theselected backup target.

7 Performing daily tasks
78
If you deactivate a backup target, this target will not be used for backup and restoreoperations anymore.
Increasing the size of an iSCSI backup targetHYCU enables you to increase the size of your iSCSI backup target by extending the HYCUlogical volume.
Prerequisitesl The size of the backup target has been increased on the iSCSI server.
l No backup or restore job is in progress on the selected backup target.
l No other maintenance task is already running on the selected backup target (such asediting the backup target and updating the iSCSI Initiator secret or resetting mutualCHAP authentication sessions for the backup targets with CHAP authenticationenabled).
l No other size increase of the selected backup target has already been started.
To increase the size of an iSCSI backup target, follow these steps:
1. In the Targets panel, select the backup target whose size you want to increase.
2. In the Details section that appears at the bottom of the screen, click Extend.
3. Click Yes to confirm that you want to increase the size of the selected backup target.
You will receive a message that indicates whether increasing the size of the iSCSI backuptarget completed successfully.
Deleting a backup targetYou can delete a backup target if it does not contain protected data. After deleting a backuptarget, no backup or restore actions including this backup target are possible anymore.
To delete a backup target, follow these steps:
1. In the Targets panel, select the backup target that you want to delete, and then clickDelete.
n Note If the target that you want to delete is used for archiving, make sure thatno data archive with the specified archive target is used by any policy.
2. Click Yes to confirm that you want to delete the selected backup target.
Managing backup policiesIf you have the proper permissions, you can view backup policy information, edit backuppolicy properties, or delete a backup policy if you do not want to use it for protecting dataanymore.
Accessing the Policies panel

7 Performing daily tasks
79
To access the Policies panel, in the navigation pane, clickPolicies.
Viewing backup policy informationYou can view information about each backup policy in the list of backup policies in thePolicies panel. This allows you to have an overview of the general status of the backuppolicies. The following information is available for each backup policy:
Backup policyinformation
Description
Name Name of the backup policy.
Compliancy
Compliancy status of the backup policy:
l Success
l Failure
l Undefined
A policy is considered compliant if all virtual machines and applicationswithin this policy are compliant with the policy settings.
VM CountTotal number of virtual machines that have the particular backup policyassigned to them.
APP CountTotal number of applications that have the particular backup policyassigned to them.
DescriptionDescription of the backup policy (how often backup and restore jobsare performed).
To open the Details section where you can find the backup policy summary and moredetails about the backup policy, click the desired backup policy.
t Tip To minimize the Details section, clickMinimize or press Spacebar. To returnit to its original size, clickMaximize or press Spacebar.
Editing a backup policyTo edit a backup policy, follow these steps:
1. In the Policies panel, select the backup policy that you want to edit, and then clickEdit. The Edit Policy dialog box appears.
2. Edit the selected backup policy as required. For detailed information about backuppolicy properties, see “How to create a custom backup policy” on page 30.
3. Click Save.
When editing a backup policy that is assigned to several virtual machines, one of which isthe HYCU backup controller, make sure that the backup policy remains applicable for an

7 Performing daily tasks
80
internal backup. For details on protecting the HYCU backup controller, see “Protecting theHYCU backup controller” on page 62.
Deleting a backup policyTo delete a backup policy, follow these steps:
1. In the Policies panel, select the backup policy that you want to delete, and then clickDelete.
2. Click Yes to confirm that you want to delete the selected backup policy.
Expiring backups manuallyIf there is a restore point that you do not want to use for data restore anymore, you canmark it as expired. If the most recent restore point is marked as expired, the next backupwill be a full backup.
Depending on which backup sources you want to expire, access one of the followingpanels:
l Accessing the Virtual Machines panelTo access the Virtual Machines panel, in the navigation pane, click VirtualMachines.
l Accessing the Applications panelTo access the Applications panel, in the navigation pane, click Applications.
To mark a restore point as expired, follow these steps:
1. In the Virtual Machines or Applications panel, select the backup source for which youwant the old backups to be marked as expired.
2. In the Details section that appears at the bottom of the screen, select the restore pointthat you want to mark as expired.
3. ClickExpire. Keep in mind that an expire action cannot be undone.
4. Click Yes to confirm that you want the selected restore point to be marked as expired.
i Important Any subsequent incremental backups will also be marked asexpired unless the status of the selected restore point is Error. In this case, only theselected restore point is expired and not the whole backup chain.
After you mark a recovery point as expired, the HYCU cleaning process removes expiredbackups from the backup target.

7 Performing daily tasks
81
Adjusting the HYCU virtual machineresourcesWhen storage, vCPU, or memory utilization is exceeded (that is, when the utilization of anyof these resources is greater than 90 percent), their values that are indicated by circlesbecome red in the Controller widget in the Dashboard panel. To adjust the HYCU virtualmachine resources, follow these steps:
1. Log on to Nutanix Prism. For details about the Prism web console, see Nutanixdocumentation.
2. In the menu bar, click Home, and then select VM.
3. Click the Table tab to display the VM Table view.
4. From the list of virtual machines, select your HYCU virtual machine, and then clickPower Off Actions to shut down the virtual machine.
i Important Wait a moment for the virtual machine to shut down completely.
5. Click Update, and then, in the Update VM dialog box, modify the configuration asrequired, and click Save.
6. Click Power on to turn on the virtual machine.

82
Managing HYCU usersThe HYCU user management system provides security mechanisms that help preventunauthorized users from accessing backup data. Only HYCU users have access to thebackup environment and can benefit from all the features that HYCU offers.
Each HYCU user belongs to one of the two user groups with different protection services:
Protectionservice
Description
Administrator
A user group with an administrator protection service (anadministrator user group) is created by default and includes thefollowing types of users:
l Built-in administrator ()
Created during the deployment of the HYCU virtual appliance andcannot be edited or deleted.
l Administrator
Can be created, edited, and deleted by the built-in administrator orany other administrator.
Users belonging to the administrator user group have permissions to:
l Perform all configuration tasks in HYCU and all the tasks related tothe backup and restore of virtual machines that are not owned byany tenant user group.
l Create new user groups and users, edit or delete the existing ones,set ownership for virtual machines, and enable or disable access toHYCU.
An administrator can monitor virtual machines owned by tenant usergroups, but does not have access to backup resources.
Tenant
A user group with a tenant protection service (a tenant user group)represents a specific customer or department. An administratorassigns selected virtual machines to a tenant user group that getsaccess to backup resources and is authorized to perform backup andrestore tasks. Can be created, edited, and deleted by an administrator.
Chapter 8
8 Managing HYCU users
83
Protectionservice
Description
i Important If a specific tenant user group is deleted, all datathat is backed up by this user group is deleted from the database.
Setting up user groups and usersTo give users specific rights to access only certain data protection areas within the HYCUenvironment, complete these tasks:
1. Create a new user group. For details, see “Creating a new user group” below.
n Note The administrator user group is created by default. If you plan to add anadministrator user, you can skip this task.
2. Add a new user to an already existing user group. For details, see “Adding a new user”below.
Accessing the Self-Service panelTo access the Self-Service panel, in the navigation pane, clickSelf-Service.
After you set up user groups and users, continue with setting ownership of virtualmachines. For details, see “Setting ownership of virtual machines” on the next page.
n Note Depending on the nature of your business, you can at any time enable ordisable specific user groups or users from logging on to HYCU. For details, see“Activating or deactivating a user group or a user” on the next page.
Creating a new user groupTo create a new user group, follow these steps:
1. In the Self-Service panel, clickNew. The New User Group dialog box opens.
2. Enter a user group name and, optionally, its description.
3. Click Save.
You can also edit any of the existing tenant user groups (clickEdit and make therequired modifications) or delete the tenant user groups that you do not need anymore(clickDelete).
Adding a new userPrerequisiteOnly if you plan to use an Active Directory for authentication. Active Directory authentication isconfigured. For details on how to do this, see “Configuring Active Directory authentication”on page 99.

8 Managing HYCU users
84
To add a new user, follow these steps:
1. In the Self-Service panel, click a user group to which you want to add a new user. If youwant to add a user to a new user group, first create the user group as described in“Creating a new user group” on the previous page.
2. In the section that appears at the bottom of the panel and shows details about theselected user group, clickAdd User. The New Account dialog box opens.
3. Enter the user name.
4. Select one of the following user authentication types:
l HYCU, and then enter the user password and, optionally, email address.
n Note The minimum password length is six characters.
l AD, and then, from the Active Directory drop-down menu, select the ActiveDirectory the user account belongs to.
5. Click Save.
You can also edit any of the existing users (clickEdit User and make the requiredmodifications) or delete them (clickRemove User). Keep in mind that the built-inadministrator cannot be edited or deleted.
Activating or deactivating a user group or a userTo activate or deactivate a user group or a user (that is, enable or disable specific usergroups or users from logging on to HYCU), follow these steps:
1. In the Self-Service panel, check the status of the user group or user that you want toactivate or deactivate.
2. Do one of the following:
l If the status of the selected user group or user is active and you want to deactivateit, clickDeactivate.
l If the status of the selected user group or user is inactive and you want to activate it,clickActivate.
Setting ownership of virtual machinesAs an administrator, you can set ownership of virtual machines, enabling specific usergroups to access specific virtual machines and backup resources in the HYCU environment,and to perform backup and restore tasks.
Accessing the Virtual Machines panelTo access the Virtual Machines panel, in the navigation pane, click Virtual Machines.
Assigning owners to virtual machinesTo assign owners to virtual machines, follow these steps:

8 Managing HYCU users
85
1. In the Virtual Machines panel, select virtual machines to which you want to assignowners, and then clickOwner. The Accounts dialog box opens.
2. Select which user group you want to assign as an owner of the selected virtualmachines, and then click Assign.
i Important If a virtual machine or an application has backup or restore jobsin progress, or a scheduled backup task in the queue, you cannot assign a new usergroup to the relevant virtual machine.
Removing owners from virtual machinesTo remove owners from virtual machines, follow these steps:
1. In the Virtual Machines panel, select virtual machines from which you want to removeowners, and then clickOwner. The Accounts dialog box opens.
2. Select which user group you want to remove as an owner of the selected virtualmachines, and then click Unassign.
i Important If you change an owner of virtual machines, all restore points forthese virtual machines are deleted.

86
AdministeringAfter you deploy HYCU, you can perform various tasks to administer and customize HYCUfor your data protection environment.
I want to... Procedure
Obtain a permanent HYCU license. “Licensing” on the next page
Upgrade HYCU to a new available version. “Upgrading HYCU” on page 90
Change network settings. “Changing network settings” on page 94
Change the HYCU listening port number.“Changing the HYCU listening port number”on page 95
Configure the SSL certificate. “Configuring the SSL certificate” on page 95
Configure FIPS-compliantmode for HYCU.“Configuring FIPS-compliantmode forHYCU” on page 96
Set the iSCSI Initiator secret.“Setting the iSCSI Initiator secret” onpage 98
Configure encryption for backup targets.“Configuring backup target encryption” onpage 98
Set power options. “Setting power options” on page 98
Configure Active Directory authentication.“Configuring Active Directoryauthentication” on page 99
Configure log file settings to troubleshootproblems if HYCU does not perform asexpected.
“Setting up logging” on page 99
Access the HYCU backup controller virtualmachine by using SSH.
“Accessing the HYCU backup controllervirtual machine by using SSH” on page 100
Use hyCLI.“Using the command-line interface” onpage 102
Use the HYCU REST API to automate tasks. “Using the HYCU REST API Explorer” on
Chapter 9

9 Administering
87
I want to... Procedure
page 102
Enable HTTPS for WinRM connections.“Enabling HTTPS for WinRM connections”on page 102
Increase the size of the HYCU virtual disk.“Increasing the size of the HYCU virtual disk”on page 103
If for whatever reason you decide that you no longer want to use HYCU for protecting yourdata, you can easily remove it from your system. For details, see “Removing HYCU” onpage 105.
LicensingAfter you deploy the HYCU virtual appliance, you can start using HYCU immediately with aprebuilt Instant-on license. This license expires automatically after 45 days and cannot bereused. Therefore, make sure to obtain a permanent license within this 45-day period.
The HYCU license is linked to the HYCU backup controller and you can decide on the licensetype that best suits your environment. The following license types are available:
l Socket-based licenses
Licenses are based on the number of CPU sockets on all Nutanix clusters. You shoulddetermine the total number of CPU sockets on all the Nutanix clusters that you plan toprotect by using HYCU, so that you purchase the required number of licenses.
l VM-based licenses
Licenses are based on the number of protected virtual machines on all Nutanixclusters. You should determine the total number of virtual machines on all the Nutanixclusters that you plan to protect by using HYCU, so that you purchase the requirednumber of licenses.
Nutanix environment considerationsl Remote office/branch office (ROBO) environment only. The number of sockets and virtual
machines residing in the ROBO environment is calculated and added to the totalnumber of HYCU licenses.
l Nutanix Community Edition (CE) environment only.No HYCU licenses are required.
Perform the following tasks:
1. Buy a needed number of HYCU licenses. To discuss the options, contact your Salesrepresentative.
2. Create a license request. For details, see “Creating a license request” on the next page.
3. Request and obtain licenses from the web licensing portal. For details, see “Requestingand retrieving licenses” on the next page.
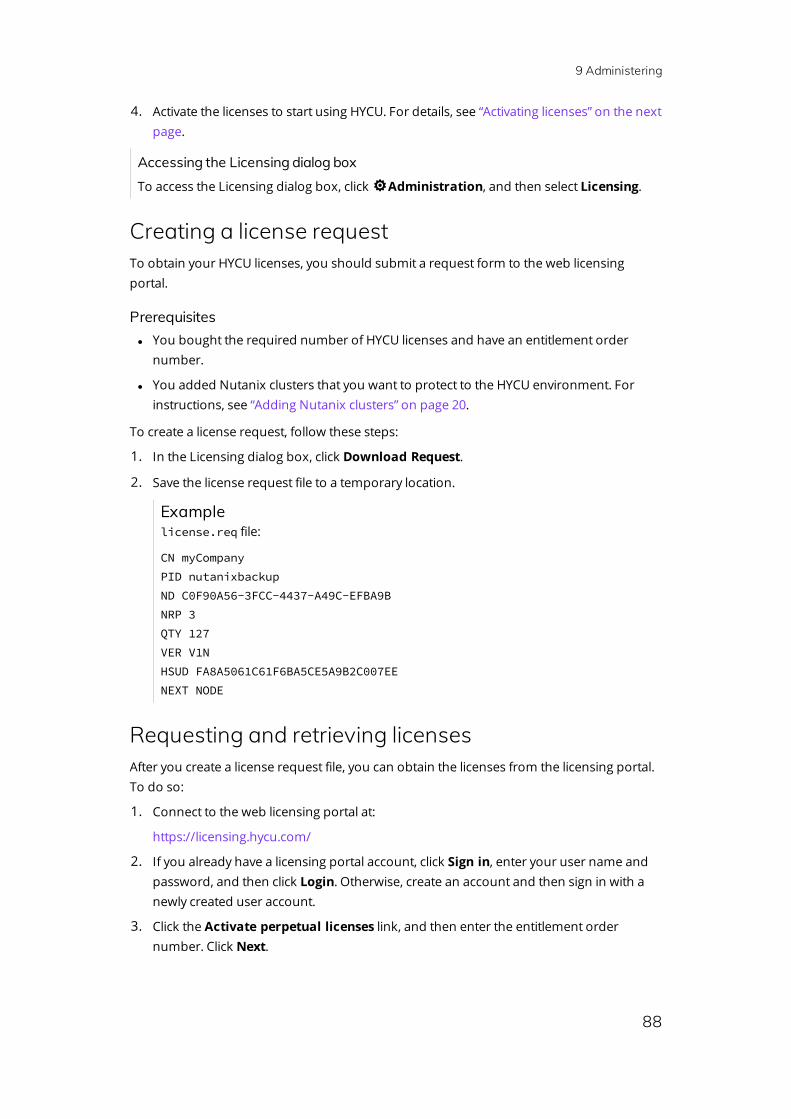
9 Administering
88
4. Activate the licenses to start using HYCU. For details, see “Activating licenses” on the nextpage.
Accessing the Licensing dialog boxTo access the Licensing dialog box, clickAdministration, and then select Licensing.
Creating a license requestTo obtain your HYCU licenses, you should submit a request form to the web licensingportal.
Prerequisitesl You bought the required number of HYCU licenses and have an entitlement order
number.
l You added Nutanix clusters that you want to protect to the HYCU environment. Forinstructions, see “Adding Nutanix clusters” on page 20.
To create a license request, follow these steps:
1. In the Licensing dialog box, click Download Request.
2. Save the license request file to a temporary location.
Examplelicense.req file:
CN myCompanyPID nutanixbackupND C0F90A56-3FCC-4437-A49C-EFBA9BNRP 3QTY 127VER V1NHSUD FA8A5061C61F6BA5CE5A9B2C007EENEXT NODE
Requesting and retrieving licensesAfter you create a license request file, you can obtain the licenses from the licensing portal.To do so:
1. Connect to the web licensing portal at:
https://licensing.hycu.com/
2. If you already have a licensing portal account, click Sign in, enter your user name andpassword, and then click Login. Otherwise, create an account and then sign in with anewly created user account.
3. Click the Activate perpetual licenses link, and then enter the entitlement ordernumber. Click Next.

9 Administering
89
4. Perform the following:
a. Browse for the license request file, and then click Request License.
b. In the Activate perpetual licenses page, specify the license type (Socket based or VMbased licenses) and the number of licenses you want to activate. By default, thenumber of licenses from the license request file is provided. You can specify adifferent value thatmay not exceed the number of purchased licenses. ClickActivate Licenses.
Within a few minutes, you should receive an email with a license file license.datattached.
Examplelicense.dat file:
CN myCompanyPID nutanixbackupND C0F90A56-3FCC-4437-A49C-EFBA9BD8FC0FNRP 3EXP 02.08.2017VER V1NLK D29CB215357FED55304012B02143CA9437ED5D8FC556NEXT NODE
5. Save the license file locally.
Activating licensesAfter you submit your license request for theHYCU licenses to the web licensing portal, you
get an email with a product license file attached. Activate the licenses in HYCU as follows:
1. In the Licensing dialog box, click Upload License.
2. Browse for the license file that you received by email, and then click Upload.
After the licenses are activated, the information related to licensing is updated.
n Note You can always add new licenses for your grown environment. Contact yourHYCU Sales representative.
You can check the information related to licensing at any time. The following information isdisplayed in the Licensing dialog box:
l License type
l Backup controller ID
l Status
l Actual number of sockets
l Licensed number of sockets

9 Administering
90
l Actual number of protected virtual machines
l Licensed number of protected virtual machines
Upgrading HYCUYou can upgrade HYCU when a new software version is available.
Because the upgrade process aborts all currently running jobs, make sure that the jobs youdo not want to be aborted are finished and targets are deactivated before you start theupgrade.
Besides a new version of the HYCU virtual appliance, which you will use for upgrading yourcurrent product version, a HYCU patch is provided to prepare your current version for anupgrade to version 3.0.0.
Depending on which hypervisor is running on your Nutanix cluster, follow the instructionsin one of the following sections:
l “Upgrading HYCU on a Nutanix AHV cluster” below
l “Upgrading HYCU on a Nutanix ESXi cluster” on page 92
Upgrading HYCU on a Nutanix AHV clusterPrerequisiteCreate a snapshot of the HYCU backup controller. For instructions, see Nutanixdocumentation.
To upgrade HYCU on a Nutanix AHV cluster, follow these steps:
1. Log on to the Nutanix Prism web console, and then do the following:
a. In the menu bar, click Home, and then select VM.
b. Navigate to the HYCU backup controller virtual machine that you want to upgrade,and then double-click it. The Update VM dialog box opens.
c. In the Disks section, click Add New Disk. This disk will be used by HYCU as a new
data disk.
d. In the Add Disk dialog box, leave the default settings. In the Size (GiB) field, enter thedisk size that is equal to or greater than the current HYCU disk size.
n Note You can later increase the size of the HYCU virtual disk if needed. Fordetails, see “Increasing the HYCU disk size in a Nutanix AHV cluster” onpage 104.
e. Click Add.
f. In the Update VM dialog box, click Save.
2. Install the HYCU patch. To do so, perform these steps:

9 Administering
91
a. Log on to HYCU. For details, see “Logging on to HYCU” on page 17.
b. ClickAdministration, and then select Power Options.
c. In the Power Options dialog, select Suspend.
d. Unpack the hycu-2.0.1-<revision>.zip patch file to the /home/hycu folder onthe HYCU backup controller.
e. In the Nutanix Prism web console, select the HYCU backup controller virtualmachine, and then click Launch Console.
f. Log on to the HYCU backup controller console. The following are the defaultcredentials:
User name: hycu
Password: hycu/4u
g. Navigate to the /home/hycu folder, and then run the patch installation script:
sh /opt/grizzly/bin/HycuPatch.sh
h. Run the migration script:
sh /opt/grizzly/bin/migrate.sh
The HYCU backup controller restarts.
3. Upload the HYCU virtual appliance image that you want to use for an upgrade to yourNutanix cluster. To do so, follow these steps:
a. In the Nutanix Prism web console, click , and then select Image Configuration.
b. In the Image Configuration dialog box, click Upload Image.
c. In the Create Image dialog box, provide the following information:
i. Enter the HYCU image name in the format that should correspond to that of theHYCU image file you are uploading. Optionally, enter an annotation.
i Important The HYCU virtual appliance image must be uploaded tothe Nutanix cluster in the following format:hycu-<version>-<revision>
For example: hycu-3.0.0-3634
Make sure to leave out the .qcow2 extension when entering the HYCUimage name. If you enter the HYCU image name in a different format, youwill not be able to use this image for an upgrade.
ii. From the Image Type drop-down menu, selectDISK.
iii. From the Storage Container drop-down menu, select a container for the imageto be uploaded.
iv. In the Image Source section, select one of the following:

9 Administering
92
i. From URL
Specify the location of the image file by using a URL.
ii. Upload a file
Specify the location of the image file saved on your file system.
d. Click Save.
e. Click Close after the image is successfully uploaded.
4. Log on to HYCU.
5. ClickAdministration, and then selectUpgrade Software.
6. In the Upgrade Software dialog box, check the current version of HYCU and all availableversions.
7. From the list of the available versions, select the one to which you want to upgradeHYCU, and then click Upgrade.
i Important Before you first log on to HYCU, make sure to perform a hard reloadof the HYCU webpage in your browser.
The old HYCU backup controller virtual machine will remain on the Nutanix AHV cluster andwill be renamed to <HYCU_BC_name>_version_<old_HYCU_version>. After you make sureHYCU was upgraded successfully, you can safely delete it.
Upgrading HYCU on a Nutanix ESXi clusterPrerequisitesl Create a snapshot of the HYCU backup controller using the Nutanix protection domain.
For instructions, see Nutanix documentation.
l If there are any HYCU snapshots created by using VMware vSphere, make sure toremove them.
To upgrade HYCU on a Nutanix ESXi cluster, do the following:
1. Add a new disk to the HYCU backup controller. To do so, follow these steps:a. Log on to the VMware vSphere Web Client.
b. Browse for and select the HYCU backup controller virtual machine.
c. Click the Configure tab, and then click Edit.
d. In the Edit Settings dialog box, click the Virtual Hardware tab.
e. From the New device drop-down menu, selectNew Hard Disk, and then click Addfollowed byOK. Make sure the disk size is equal to or greater than the current HYCUdisk size.
2. Install the HYCU patch. To do so, perform these steps:

9 Administering
93
a. Log on to HYCU. For details, see “Logging on to HYCU” on page 17.
b. ClickAdministration, and then select Power Options.
c. In the Power Options dialog, select Suspend.
d. Unpack the hycu-2.0.1-<revision>.zip patch file to the /home/hycu folder onthe HYCU backup controller.
e. In the Nutanix Prism web console, select the HYCU backup controller virtualmachine, and then click Launch Console.
f. Log on to the HYCU backup controller console. The following are the defaultcredentials:
User name: hycu
Password: hycu/4u
g. Navigate to the /home/hycu folder, and then run the patch installation script:
sh /opt/grizzly/bin/HycuPatch.sh
h. Run the migration script:
sh /opt/grizzly/bin/migrate.sh
The HYCU backup controller restarts.
3. In the VMware vSphere Web Client, follow these steps:a. Click the VMs tab, and then click Deploy OVF Template...
b. In the Select template context of the Deploy OVF Template dialog box, select Localfiles, and then click Browse.
c. Navigate to the HYCU virtual appliance package, select the HYCU disk image file(.vmdk) and the OVF template (.ovf), and then click Open.
d. In the Select template context, click Next.
e. In the Select name and location context, select the location where you want todeploy HYCU backup controller, and then click Next.
f. In the Select a resource context, select the Nutanix cluster where the HYCU backupcontroller will reside, and then click Next.
g. In the Review details context, verify the template details, and then click Next.
h. In the Select storage context, select the same Datastore as you are using for theHYCU backup controller virtual machine, and then click Next.
i. In the Select Network context, select the desired VMNetwork, and then click Next.
j. In the Customize template context, enter the values for the following:
l Optional.Host name for the HYCU virtual machine
n Note The default host name is generated automatically during the

9 Administering
94
HYCU virtual appliance deployment. The host name should begin with aletter and may contain only letters, numbers, and hyphens (-).
l IPv4 address (for example, 10.1.100.1)
l Subnetmask (for example, 255.0.0.0)
l Default gateway (for example, 10.1.1.1)
l Optional. DNS server (for example, 10.1.1.5)
l Optional. Search domain (for example, domain.com)
n Note The domain name should begin with a letter and contain one ormore periods. It may also contain only letters, numbers, and hyphens (-).
Click Next.
k. In the Ready to complete context, review the settings, and then click Finish. Leavethe newly created virtual machine turned off.
n Note Creating a HYCU virtual machine may take a few moments.
4. Log on to HYCU.
5. ClickAdministration, and then selectUpgrade Software.
6. In the Upgrade Software dialog box, check the current version of HYCU and all availablevirtual machines.
7. From the list of the available virtual machines, select the one you created, and then clickUpgrade.
After the upgrade process completes, the upgraded HYCU virtual machine is poweredon automatically.
i Important Before you first log on to HYCU, make sure to perform a hard reloadof the HYCU webpage in your browser.
The old HYCU backup controller virtual machine will remain on the Nutanix ESXi cluster andwill be renamed to <HYCU_BC_name>_version_<old_HYCU_version>. After you make sureHYCU was upgraded successfully, you can safely delete it.
Changing network settingsThis section describes the steps you must perform if you want to change your networksettings.
Accessing the Network dialog boxTo access the Network dialog box, clickAdministration, and then selectNetwork.
To change network settings, follow these steps:
1. In the General tab of the Network dialog box, enter a new host name, the IP address,the netmask associated with the chosen IP address, and the IP address of the gateway

9 Administering
95
that HYCU should use.
i Important Make sure that the IP address is set correctly so that it accuratelyreflects your network environment.
2. In the DNS Addresses tab, click Add to add a new DNS address.
If you want to delete any DNS address, clickDelete to the right of it.
3. In the Domains tab, click Add to add a new domain.
If you want to delete any existing domain, clickDelete to the right of it.
4. Click Save.
Changing the HYCU listening port numberThis section describes the steps you must perform if you want to change the HYCU listeningport number.
Accessing the Management Port dialog boxTo access the Management Port dialog box, clickAdministration, and then selectManagement Port.
To change the listening port number of the HYCU web user interface, follow these steps:
1. In the Management Port dialog box, change the existing port number to the desiredone.
i Important Make sure that the port you choose is not used by any otherprocess.
2. Click Save.
Configuring the SSL certificateThis section describes the steps you must perform if you want to configure theSSL certificate.
Accessing the SSL Certificate dialog boxTo access the SSL Certificate dialog box, clickAdministration, and then selectSSL Certificate.
In the SSL Certificate dialog box that appears, you can view the information about your SSLcertificate, such as the certificate holder's name, the certificate's expiry date, and thestrength of the certificate keys.
Depending on whether you want to create a new self-signed certificate or import a CAcertificate into HYCU, do one of the following:
l “Creating a new self-signed certificate” on the next page
l “Importing a CA certificate” on the next page

9 Administering
96
n Note It is recommended that you replace the default self-signed certificate with aCA signed certificate.
Creating a new self-signed certificateTo create a new self-signed certificate, do the following:
1. Click Regenerate.
2. Click Yes to confirm that you want to regenerate your SSL certificate.
Importing a CA certificateYou can import only CA certificates that are compliant with the PKCS#7 standard andencoded in the DER or PEM format. The HYCU backup controller holds only one customSSL certificate. When you import a new certificate, the previous certificate is discarded.
n Note If the certificate that you want to import uses a wildcard for the CommonName (CN), make sure that the Certificate Subject Alt Name field exists and contains thelist of all possible host names or FQDNs, and their corresponding IP addresses.Otherwise, the certificate may be recognized as invalid by your browser or hyCLI.
To import a CA certificate, do the following:
1. Click Import. The Import dialog box appears.
2. Browse for the following imported files:
l Private key: Click Browse to select the private key associated with the certificate tobe imported.
The private key should be created by using RSA or DSA algorithm and be compliantwith the PKCS#1 or PKCS#8 standard.
l Public certificate: Click Browse to select the signed public part of the servercertificate corresponding to the private key.
l CA certificate/chain: This field is optional, if the public certificate contains CAcertificate/chain. Click Browse to select the certificate or chain of the signingauthority for the public certificate.
3. Click Import.
i Important Any changes that you make to your SSL certificate will result in anautomatic logoff.
Configuring FIPS-compliant mode for HYCUHYCU can be configured to operate in a way that is compliant with the Federal InformationProcessing Standards (FIPS), which establish security requirements for cryptographymodules (which encryption algorithms and methods for generating encryption keys can beused).

9 Administering
97
HYCU employs a FIPS-compliant security provider that uses a cryptographically strongrandom number generator (RNG). For the RNG to generate truly random numbers, anadequate source of entropy is required. Because HYCU is running on a virtual machine, theamount of entropy that is available to it is limited and therefore an additional hardwaresource of entropy is needed. This source is usually provided by the real CPU or chipset. Toenable access to this hardware entropy source, an additional service (rngd.service) isenabled on the HYCU backup controller.
Depending on the nature of your business, you can either enable or disable FIPS-compliantmode for HYCU.
LimitationWhen FIPS-compliantmode is enabled, you cannot assign credentials to Linux virtualmachines, and consequently restore individual files.
Enabling FIPS-compliant mode for HYCUTo enable FIPS-compliantmode for HYCU, as the root user or by using sudo, do thefollowing:
1. Stop the HYCU web server:
systemctl stop grizzly.service
2. Enable FIPS-compliantmode:
/opt/grizzly/bin/enable_fips.sh
3. Start the HYCU web server:
systemctl start grizzly.service
Disabling FIPS-compliant mode for HYCUIf the nature of your business changes, you can easily disable FIPS-compliantmode. To doso, as the root user or by using sudo, do the following:
1. Stop the HYCU web server:
systemctl stop grizzly.service
2. Disable FIPS-compliantmode:
/opt/grizzly/bin/enable_fips.sh -d
3. Start the HYCU web server:
systemctl start grizzly.service
9 Administering
98
Setting the iSCSI Initiator secretDuring the HYCU deployment, the HYCU iSCSI client, referred to as the iSCSI Initiator, is setup so that HYCU can use iSCSI targets for storing data.
If you want to configure mutual CHAP authentication between the iSCSI Initiator and theiSCSI target, you must specify the iSCSI Initiator secret (the security key). For details on howto enable mutual authentication, see “Setting up backup targets” on page 21.
Accessing the iSCSI Initiator dialog boxTo access the iSCSI Initiator dialog box, clickAdministration, and then select iSCSIInitiator.
To set the iSCSI Initiator secret, follow these steps:
1. In the iSCSI Initiator dialog box, enter the secret.
2. Click Save.
Configuring backup target encryptionIf you enabled backup target encryption when setting up your backup target, you can getinformation about which algorithm is used, view a list of currently encrypted backuptargets, and export the encryption key to a file.
Accessing the Encryption dialog boxTo access the Encryption dialog box, clickAdministration, and then select Encryption.
To export the encryption key to a file, in the Encryption dialog box, click Export.
Setting power optionsYou can set power options for the HYCU backup controller so that its activities aresuspended or resumed.
Accessing the Power Options dialog boxTo access the Power Options dialog box, clickAdministration, and then select PowerOptions.
Power option Description
Suspend
Pauses all HYCU backup controller activities.
All currently running jobs are allowed to complete normally. All jobsthat are in the queue will start when the HYCU backup controller isresumed. While activities are paused, you cannot start any new jobs.
Resume Allows HYCU backup controller activities to continue.

9 Administering
99
Configuring Active Directory authenticationIn addition to standard HYCU authentication, you can also configure Active Directoryauthentication. This allows users to log on to HYCU with their Active Directory domainaccount.
Accessing the Active Directory dialog boxTo access the Active Directory dialog box, clickAdministration, and then selectActiveDirectory.
To configure Active Directory authentication, add one or more Active Directories as yourauthentication sources in HYCU. To do so, follow these steps:
1. In the Active Directory dialog box, clickNew. The New dialog box appears.
2. In the Name field, enter a name for the Active Directory.
3. In the Domain field, enter the domain name or the domain alias name.
For example, if you enter mycompany.com as the domain name or mc as the aliasdomain name, the user will be able to log on to HYCU with <username>@mycompany.com
or mc\<username>.
n Note You can enter more than one domain or domain alias name. In this case,make sure to press Enter after entering each one.
4. In the Provider URL field, enter the Active Directory URL in the following format:
ldap://<hostname_or_IP_address>:<port>
Entering the port is optional if the default value is used, 389.
n Note You can enter more than one Active Directory URL. In this case, makesure to press Enter after entering each one.
5. Click Save.
You can also edit any of the existing Active Directories (clickEdit and make the requiredmodifications) or delete the ones that you do not need anymore (clickDelete).
After you configure Active Directory authentication, you can specify the AD userauthentication type when creating a new user. For details on how to do this, see “Adding anew user” on page 83.
Setting up loggingThis section describes the steps you must perform if you want to set up logging to help youanalyze and troubleshoot the entire HYCU operation and the backup and restorefunctionality.
Accessing the Logging dialog boxTo access the Logging dialog box, clickAdministration, and then select Logging.

9 Administering
100
To set up logging , follow these steps:
1. In the Logging dialog box, set the maximum log file size and the number of log files tokeep. The default log file size is 10 MB.
2. Select one of the following log levels:
Log level Description
All All activity is recorded to log files.
SevereErrors that affect the immediate operation of HYCU are recorded tolog files.
WarningPotentially harmful situations that do not represent an immediatethreat to the operation of HYCU are recorded to log files.
InformationalInformational messages about the operation of HYCU are recordedto log files.
3. When required, you can download log files by clicking Download Logs. After youextract the log.zip file, check the log files at the following location:
/opt/grizzly/logs/
4. Click Save.
Accessing the HYCU backup controller virtualmachine by using SSHYou can perform most administrative tasks of the HYCU backup controller by using theHYCU web user interface or command-line user interface (hyCLI). The only two exceptionsfor which you should use SSH are restarting the HYCU web server (the Grizzly server) or theentire appliance.
i Important Using SSH to perform any tasks other than restarting the HYCU webserver or the entire appliance is not recommended.
After you deploy the HYCU virtual appliance, you can use the following default credentials toaccess the HYCU backup controller virtual machine by using SSH:
User name: hycu
Password: hycu/4u
Changing the default SSH passwordFor security purposes, it is highly recommended that you change the default SSH password.To do so, follow these steps:

9 Administering
101
1. Open a remote session to the HYCU backup controller virtual machine:
ssh hycu@<HYCU_backup_controller_IP_address>
When requested, enter the default password.
2. Change the password for the hycu user:
passwd
When requested, enter the default password again, and then enter and verify your newpassword.
Disabling SSH accessYou can disable SSH access at any time. To do so, follow these steps:
1. Open a remote session to the HYCU backup controller virtual machine:
ssh hycu@<HYCU_backup_controller_IP_address>
When requested, enter the password for the hycu user.
2. Shut down the SSH service:
sudo service sshd stop
When requested, enter the password for the hycu user.
3. Disable the SSH service:
sudo chkconfig sshd off
If requested, enter the password for the hycu user.
After performing this procedure, your SSH connection will be disabled. To re-enable SSH,you need to connect to the HYCU backup controller virtual machine through the NutanixPrism web console.
Managing the HYCUweb serverTo manage the HYCU web server, follow these steps:
1. Open a remote session to the HYCU backup controller virtual machine:
ssh hycu@<HYCU_backup_controller_IP_address>
When requested, enter the password for the hycu user.
2. Perform the desired operation on the HYCU web server:
sudo service grizzly {start | stop | restart}
When requested, enter the password for the hycu user.

9 Administering
102
Using the command-line interfaceYou can manage your backup environment also by using the HYCU command-line userinterface (hyCLI). hyCLI provides the functionality comparable to the HYCU web userinterface and enables you to implement scripts for automating certain tasks.
To enable the usage of hyCLI, follow these steps:
1. Download the hycli.zip package. To do so, click at the upper right of the screen,and then selectDownload hyCLI.
2. Save and extract the hyCLI.zip file to any location on your system.
3. Add the directory containing the extracted files to the PATH environment variable.
n Note hyCLI log files are located at .Hycu/log in the user's home directory. You canchange logging settings for hyCLI in the logging.properties and log4j.properties
files located in the directory containing the extracted files.
For detailed information about hyCLI, see the README.txt file that you can find in thedirectory containing the extracted files.
For more information on the hyCLI structure, commands, and usage, run the hycli help
command.
Using the HYCU REST API ExplorerHYCU provides a REST API that can be used by external applications to interact with theHYCU backup controller, retrieve information from it, and automate tasks. All functionalityexposed through the HYCU user interface is also available through the HYCU REST API. Youcan use the HYCU REST API Explorer to interact with the API and view the expected inputand output formats for each endpoint.
To access the HYCU REST API Explorer, follow these steps:
1. Click at the upper right of the screen, and then select REST API Explorer. The HYCUREST API Explorer opens.
2. In the list of functionality groups, you can expand the desired group by clicking ListOperations. A list of API endpoints is displayed.
3. Click any of the endpoints to show the description, the parameters, and the outputformat. You can fill in the fields, and then click Try it out! to call an API and get outputdata.
Enabling HTTPS forWinRM connectionsIf you want to add an additional layer of security, you can configure HYCU to use HTTPS forWinRM connections to virtual machines.

9 Administering
103
For each virtual machine for which you want to enable HTTPS for WinRM connections, dothe following:
1. Set up a virtual machine for WinRM over HTTPS by using PowerShell:
a. Create a new self-signed certificate:
$cert = New-SelfSignedCertificate -Type Custom -Subject"CN=<hostname>" -CertStoreLocation "Cert:\LocalMachine\My"
b. Only if an HTTPS WinRM listener already exists. Remove the existing HTTPS WinRMlistener:
winrm delete winrm/config/Listener?Address=*+Transport=HTTPS
c. Recommended. Remove the HTTP WinRM listener if it exists:
winrm delete winrm/config/Listener?Address=*+Transport=HTTP
d. Create an HTTPS WinRM listener that uses the self-signed certificate from step 1:
New-Item -Path WSMan:\LocalHost\Listener -Transport HTTPS -Address *-CertificateThumbPrint $cert.Thumbprint -Force
e. Add a new firewall rule to allow incoming connections on TCP port 5986, if it hasnot already been added:
New-NetFirewallRule -DisplayName 'Windows Remote Management (HTTPS-In)' -Name 'Windows Remote Management (HTTPS-In)' -Profile Any -LocalPort 5986 -Protocol TCP
2. Open a remote session to the HYCU backup controller, and then do the following:
a. Run the add_certificate.sh script:
sudo /opt/grizzly/bin/add_certificate.sh <hostname>
In this instance, <hostname> is the host name of the virtual machine for which youwant to establish an HTTPS connection.
b. Enter the password to access the trust store. The default password is hycu/4u.
After you run the add_certificate.sh script, it connects to the virtual machine,imports the self-signed certificate, and adds it to the trust store. You get the informationabout the certificate that you must check and confirm. If the certificate is valid andmatches the information of the certificate on the virtual machine, type y followed byEnter. Otherwise, type n followed by Enter to reject the certificate.
Increasing the size of the HYCU virtual diskIf you are running out of disk space on your HYCU backup controller, you can increase thesize of the HYCU virtual disk as needed. Depending on which hypervisor is running on your
9 Administering
104
Nutanix cluster, follow the instructions in one of the following sections:
l “Increasing the HYCU disk size in a Nutanix AHV cluster” below
l “Increasing the HYCU disk size in a Nutanix ESXi cluster” below
Increasing the HYCU disk size in a Nutanix AHVclusterTo increase the size of the HYCU virtual disk in a Nutanix AHV cluster, follow these steps:
1. Log on to the Nutanix Prism web console.
2. In the menu bar, click Home, and then select VM.
3. Click the Table tab to display the VM Table view.
4. From the list of virtual machines, select your HYCU backup controller, and then clickPower Off Actions followed by Power off to shut it down.
i Important Wait a moment for the virtual machine to shut down completely.
5. Click Update, and then do the following:
a. Navigate to the Disks section, and then click Edit next to the HYCU virtual disk.
b. In the Size (GiB) field, increase the size of the disk as required.
c. Click Update.
6. Click Power on to turn on the HYCU backup controller.
Increasing the HYCU disk size in a Nutanix ESXiclusterTo increase the size of the HYCU virtual disk in a Nutanix ESXi cluster, follow these steps:
1. Log on to the VMware vSphere Web Client.
2. Click the VMs tab, and then navigate to your HYCU backup controller.
3. Right-click the HYCU backup controller, and then select Power > Power Off to shut itdown.
i Important Wait a moment for the virtual machine to shut down completely.
4. Right-click the HYCU backup controller, and then select Edit Settings.
5. Use theHard disk slider to increase the size of the HYCU virtual disk, and then click OK.
6. Right-click the HYCU backup controller, and then select Power > Power On to turn iton.
For details on how to manage a virtual machine in a Nutanix AHV or ESXi cluster, seeNutanix documentation.

9 Administering
105
Removing HYCUWhen you remove HYCU from your environment, you also need to perform additionalcleanup tasks.
To remove HYCU, follow these steps:
1. Log on to HYCU, and then unassign policies from all backup sources as follows:
l To unassign policies from virtual machines:
a. In the navigation pane, click Virtual Machines.
b. Select all virtual machines, and then clickPolicies. The Policies dialog boxappears.
c. Click Unassign. The Unassign Policy prompt appears.
d. Click Yes to confirm that you want to unassign the policies from the selectedvirtual machines.
l To unassign policies from applications:
a. In the navigation pane, click Applications.
b. Select all discovered applications, and then clickPolicies. The Policies dialogbox appears.
c. Click Unassign. The Unassign Policy prompt appears.
d. Click Yes to confirm that you want to unassign the policies from the selectedapplications.
2. On the HYCU backup controller virtual machine, run the/opt/grizzly/bin/HycuCleanup.pl script as follows:
sudo perl HycuCleanup.pl -c <Nutanix_cluster> -u <user_name> -p<password>
In this instance, <Nutanix_cluster> is the name of the Nutanix cluster in URL format:https://<server_name>:<port>.
i Important By running this command, you will also remove all third-partysnapshots created by using Nutanix REST API v3, not only those created by HYCU.
3. Log on to the Nutanix Prism web console by using your Nutanix logon credentials.Delete the HYCU backup controller virtual machine as follows:
a. In the menu bar, click Home, and then select VM.
b. Click the Table tab, and then, from the list of virtual machines, select the HYCUbackup controller virtual machine.
c. Click Delete. In the dialog box that appears, click Delete to confirm that you want
to delete the HYCU backup controller virtual machine.

106
Customizing HYCUconfiguration settingsYou can find all HYCU configuration settings in the config.properties.template file in the/opt/grizzly folder on your HYCU backup controller. This file contains a list of all availableconfiguration settings and their default values. If you want to adjust any of theseconfiguration settings to meet your specific backup environment needs and provideoptimal performance, create a new config.properties file in the same folder, and thenspecify the desired configuration settings and their new values.
n Note When you upgrade HYCU, the config.properties file will be kept. However,you may want to check the updated config.properties.template file for newconfiguration settings that you can use with the new HYCU version.
Depending on which configuration settings you want to customize, see one of the followingsections:
l “Email notification settings” on the next page
l “Snapshot settings” on page 109
l “Utilization threshold settings” on page 109
l “Display settings” on page 109
l “SQL Server application settings” on page 110
l “Settings for aborting jobs” on page 110
l “Azure account settings” on page 110
How to customize HYCU configurationsettingsTo customize HYCU configuration settings, follow these steps:
1. Open a remote session to the HYCU backup controller virtual machine:
ssh hycu@<HYCU_backup_controller_IP_address>
When requested, enter the password for the hycu user.
Appendix A

A Customizing HYCU configuration settings
107
For detailed information about accessing the HYCU backup controller virtual machineby using SSH, see “Accessing the HYCU backup controller virtual machine by using SSH”on page 100.
2. Use the following command to access and open the config.properties file:
sudo vi /opt/grizzly/config.properties
n Note Because you will use the vi console text editor to customize HYCUconfiguration settings, basic knowledge of using the editor is required.
3. Edit any of the existing configuration settings as required.
4. Save and exit the config.properties file. To do so, press the Esc key, and then typethe following:
:wq!
5. Restart the HYCU web server (the Grizzly server) for the changes to take effect:
sudo service grizzly restart
Email notification settingsIf you want HYCU to send email notifications based on the occurrence of a specific event,adjust the following settings:
Setting Description
event.notification.smtp.serverHost name or IP address of the SMTP serverfrom which email notifications are sent.
event.notification.smtp.portPort number of the SMTP server from whichemail notifications are sent (usually set to25).
event.notification.smtp.tlsIf the server from which email notificationsare sent uses TLS, set this setting to true.Otherwise, leave the default false value.
event.notification.smtp.sslIf the server from which email notificationsare sent uses SSL, set this setting to true.Otherwise, leave the default false value.
event.notification.smtp.usernameUser name of the account on the SMTPserver from which email notifications aresent.
event.notification.smtp.passwordPassword of the account on the SMTPserver from which email notifications aresent.
A Customizing HYCU configuration settings
108
Setting Description
event.notification.sender.emailEmail from which email notifications aresent.
event.notification.sender.name Display name of the email sender.
event.notification.sender.subject Subject for the sent email.
event.notification.green.receiver.list
List of email recipients that will get the Infonotifications. To separate multiple emailrecipients, use a comma.
If you leave this setting blank, HYCU will notsend email notifications for this severity levelof the event.
event.notification.orange.receiver.list
List of email recipients that will get theWarning notifications. To separate multipleemail recipients, use a comma.
If you leave this setting blank, HYCU will notsend email notifications for this severity levelof the event.
event.notification.red.receiver.list
List of email recipients that will get the Errornotifications. To separate multiple emailrecipients, use a comma.
If you leave this setting blank, HYCU will notsend email notifications for this severity levelof the event.
event.notification.green.category.block.list
List of blocked event categories for the Infonotifications for which no email notificationswill be sent. To separate multiple blockedcategories, use a comma.
If you leave this setting blank, HYCU willsend email notifications for all categories ofthis severity level.
event.notification.orange.category.block.list
List of blocked event categories for theWarning notifications for which no emailnotifications will be sent. To separatemultiple blocked categories, use a comma.
If you leave this setting blank, HYCU willsend email notifications for all categories ofthis severity level.

A Customizing HYCU configuration settings
109
Setting Description
event.notification.red.category.block.list
List of blocked event categories for the Errornotifications for which no email notificationswill be sent. To separate multiple blockedcategories, use a comma.
If you leave this setting blank, HYCU willsend email notifications for all categories ofthis severity level.
Snapshot settingsYou can customize the maximum number of snapshots to be retained by adjusting thesesettings:
Setting Description
max.snapshots.per.vmMaximum number of snapshots that are retained per virtualmachine. The default value is 24.
max.snapshots.per.clusterMaximum number of snapshots that are retained perNutanix cluster. The default value is 2400.
Utilization threshold settingsYou can use the following settings to configure the backup target utilization thresholds:
Setting Description
target.utilization.threshold.health.red
If the HYCU backup controller utilization of thebackup target exceeds the specified value, itshealth status indicator becomes red. Thedefault value is 0.95.
target.utilization.threshold.health.yellow
If the HYCU backup controller utilization of thebackup target exceeds the specified value, itshealth status indicator becomes yellow. Thedefault value is 0.90.
For detailed information about the health status of the backup target, see “Viewing backuptarget information” on page 76.
Display settingsYou can use the following settings to customize the maximum number of displayed items:

A Customizing HYCU configuration settings
110
Setting Description
items.per.directory.in.flrMaximum number of files that are displayed for eachdirectory when restoring individual files. The default value is1000.
max.backups.displayedMaximum number of backups that are displayed for a virtualmachine. The default value is 100.
SQL Server application settingsYou can use the following setting to customize the backup of SQL Server applications:
Setting Description
sql.translog.compress
During the backup of an SQL Server application, transactionlog compression is enabled by default (the default value is 1).If you want to disable it, make sure to set the value for thissetting to 0.
Settings for aborting jobsYou can use the following settings to configure when a job that has the Executing status willbe aborted automatically:
Setting Description
jobs.abort.deadline.minutesTime (in minutes) within which a job must be completed.The default value is 1440.
jobs.abort.interval.minutes
Time interval (in minutes) at which all jobs that have theExecuting status are retrieved and stopped if they havebeen in this status longer than specified in thejobs.abort.deadline.minutes setting. The default value is 15.
Azure account settingsYou can use the following setting to configure which Azure cloud will be used by backuptargets:
Setting Description
target.azure.government.cloud
If set to true, backup targets use the Azure GovernmentCloud. Otherwise, they use the standard Azure publiccloud. Keep in mind that the value you set for thisconfiguration setting will affect all Azure backup targets.

111
Restoring to a differenthypervisorWhen restoring a virtual machine, you can choose to restore it to a different hypervisor byusing the Clone VM option:
l From Nutanix ESXi to Nutanix AHV
For details, see “Restoring a Nutanix ESXi virtual machine to a Nutanix AHV cluster”below.
For details on how to restore a virtual machine by using the Clone VM option, see“Restoring an entire virtual machine” on page 46.
Restoring a Nutanix ESXi virtual machine to aNutanix AHV clusterThe additional steps that are required for a successful restore of a Nutanix ESXi virtualmachine to a Nutanix AHV cluster differ based on whether VMware Tools was installed onthe virtual machine.
Prerequisitesl A Nutanix AHV cluster is added to HYCU. For details on how to do this, see “Adding
Nutanix clusters” on page 20.
l Only for a Windows virtual machine on which no VMware Tools was installed. The NutanixVirtIO package was installed on the virtual machine that you want to restore to aNutanix AHV cluster before the virtual machine was backed up.
Depending on whether VMware Tools was installed on the virtual machine that you want torestore to a Nutanix AHV cluster, do one of the following:
l VMware Tools was installed on the virtual machine:
1. Make sure vCenter Server is configured in a way that allows the virtual machine tobe reachable also from the associated Nutanix ESXi cluster.
2. Through the Nutanix Prism web console, enable, mount, and install the NutanixGuest Tools software bundle on the virtual machine that you want to restore to a
Appendix B

B Restoring to a different hypervisor
112
Nutanix AHV cluster.
For details on Nutanix Guest Tools requirements and limitations, as well as how toinstall the software bundle on a virtual machine, see Nutanix documentation.
3. Perform a restore of the selected virtual machine by selecting the Clone VM option.
After the restore is performed, the virtual machine can be turned on on a NutanixAHV cluster.
l No VMware Tools was installed on the virtual machine:
Windowsvirtualmachine
1. Perform a restore of the selected virtual machine to a NutanixAHV cluster by selecting the Clone VM option.
n Note Wait a few moments for the restored virtual machine toturn on.
2. Through the Nutanix Prism web console, enable, mount, and installthe Nutanix Guest Tools software bundle on the virtual machine.
For details on Nutanix Guest Tools requirements and limitations, aswell as how to install the software bundle on a virtual machine, seeNutanix documentation.
Linuxvirtualmachine
After you perform a restore of the selected virtual machine to a NutanixAHV cluster by selecting the Clone VM option, the restored virtualmachine might not turn on or goes into rescue mode. To be able to turnon the virtual machine, for each of the virtual machine disks, do thefollowing:
1. Make sure that the restored virtual machine is turned off.
2. As an administrator, log on to the Nutanix AHV cluster by using SSH.
3. List the virtual machine details:
acli vm.get <VM_name>
4. Take a note of the current bus and index values in the disk_listsection.
5. Clone the existing disk to a new disk on the compatible bus:
acli vm.disk_create <VM_name> bus=<bus_type>clone_from_vmdisk=vm:<VM_name>:<current_bus>.<current_index>
In this instance, <VM_name> is the name of the restored virtualmachine, <bus_type> is scsi, ide, or sata, <current_bus> is the busvalue from the disk_list section, and <current_index> is the indexvalue from the disk_list section.
If the original virtual machine has the SATA or SCSI disks, clone them

B Restoring to a different hypervisor
113
to the SATA disks. For example:
acli vm.disk_create test-vm bus=sataclone_from_vmdisk=vm:test-vm:scsi.0
If the original virtual machine has the IDE disks, clone them to the IDEdisks. For example:
acli vm.disk_create test-vm bus=ideclone_from_vmdisk=vm:test-vm:scsi.0
After you perform the previous procedure for all the disks, do thefollowing:
1. Log on to the Nutanix Prism web console.
2. In the menu bar, click Home, and then select VM.
3. Click the Table tab to display the VM Table view.
4. From the list of virtual machines, select the restored virtual machine,and click Update.
5. Select the boot disk and delete source disks, and then click Save.
6. Click Power on to turn on the restored virtual machine.
7. Enable, mount, and install the Nutanix Guest Tools software bundleon the virtual machine.
For details on how to update a virtual machine on a Nutanix cluster, seeNutanix documentation.

Provide feedbackFor any suggestions and comments regarding this product or its documentation, send usan e-mail to:
We will be glad to hear from you!
