645 i es your new white sewing machine comes equipped with the following set of accessories to make...
TRANSCRIPT

MODEL 645
a

You are now the owner of a new zigzag sewingmachine, the most versatile type of its kind you canpossess.
Buttonholes, monogramming, stretch stitching,overcasting and creative embroidery are done with easeand speed.
To aid you in obtaining the greatest performancefrom your new WHITE,this book on its care and usehas been written for you. Read the instructionscarefully, as a thorough understanding of your machinewill reward you with many hours of trouble free.creative sewing.
Time-saving attachments such as rufflers, binders,edgestitchers, hemmers and others to complement - -
the accessories furnished with your WHITE areavailable from the store where you purchased yourmachine.
WHITE SEWING MACHINE COMPANYCleveland, Ohio 44111
WHITE CONSOLIDATED INDUSTRIES, LTD.Scarborough, Ontario, Canada

CONTENTS
PAGE
SECTION;IPRE1JMINARY INFORMATION
____ ____
Parts IndentiticationPrinciple Parts 4Accessories 6
Installing Machine Head onto portable caseor cabinet and Connecting Machine 7
selection ot Needles and I hreads 8Needle-Thread-Fabric-Stitching Guide 9
Changing Needle 10Changing Needle Plate 10Selection of Presser Foot iiWinding Bobbin 12Upper Threading 13Threading Bobbin Case 14Placing Bobbin Case in Shuttle 14
SECTION III...GETflNG TO KNOW YOUR MACHINE- -:
Selection of StitchStitch Length Control 15Push Reverse Button 15Stitch Width Control 16Relating Stitch Length to Stitch Width 16Stretch Stitch Lever 17Stitch Pattern Selector 17Buttonhole Reverse Stitch Tuner 18
ControlsAdjusting Thread Tensions 18Adjusting Pressure on Fabric and Feed Dog Height 19Sewing Light 20
Preparing to Sew 21Guiding Fabric 21Turning Corners 21Curveçl Seams 22Sewing Across Heavy Seams 22Removing the Work 22
SEC11ON.V STITcHINGS -.: - :Straight Stitch
Seams 23Basting/Topstitching 23Darning 23Cording/Sewing on Zipper 24Quilting 24
Zigzag StitchOvercasting 25
2

PAGESewing Knits 25Sewing on Buttons 25
With a Thread Shank 26Satin Stitching 26Built-in Utility Stitches 27Twin Needle Sewing 27Freehand Monogramming 28Applique/Patching 28Gathering Over a Cord 29Lace Application 29Flutter Hem 29Sewing Tips 30Shaping Dart in Interfacings 30
Multiple Zigzag Stitch 30Buttonholes
Preparation 31Built-In Buttonhole 32Corded Buttonhole 33
Blind Hem Stitch 34Straight Stretch Stitch 35
Topstitching 35Ultra-Stretch Stitch
Rick-Rack Stretch 35Pine-Leaf StretchSpecial Ultra-Stretches 35Elastic Application 36Overlock Application 37
SECTION VI CARE AND MAINTENANCE OF YOUR MACHINE -
Oiling Machine 38Cleaning and Oiling Shuttle Area 39Adjusting Bobbin Winder 40Adjusting and Changing Motor Belt 40Problem and Remedies 41
1 iiei’. i rw•t’I’lIi.. .
Attachment Foot 43Edgestitcher 43Binder 44
Folded Binding 44Two-Tone Binding 44Hand-Cut Bias Binding 44
The Set of Hemmers 45Ruffler 46Narrow Hemmer 47
Lace Trimmed Hems 48Lace Edge with Invisible Stitching 48French Seam 48Hemming Across A Seam 48

-n 0 2 -1 m
mm
-0
2,
x1-n
H— H 0 2
3.I I-
oz
C,
U
()

U
1.Take-up
2. Pressure Control3. Top Thread Guides4. Stitch Pattern Selector5. Stretch Stitch Control
6. Stretch Stitch PatternMarking
7. Stitch Width Control8. Bobbin Winder9. Hand Wheel
10. Stitch Length Control
11. Reverse Push Button
12. Feed Dog HeightControl
13. Needle Plate14. Presser Foot15. Feed Dog16. Slide Plate17. Thumb Screw18. Check Spring
19. Light Switch20. Face Plate
21. Tension Dial22. Needle Clamp23. Spool Pins24. Buttonhole Reverse
Stitch Tuner25. Bobbin Winder
Tension Disc26. Presser Foot Lever27. Thread Cutter
28. Head Hinge Holes
29. Clutch-nut
Allways at its highest position when beginning or ending sewing.For regulating the pressure on fabric.For leading thread to Tension Control for sewing.For selecting the stitch pattern and buttonholing steps.For changing ordinary stitch to triple back-and forthstitch (stretch stitch>.Cross reference by color between ordinary stitchpatterns and stretch stitch patterns performed withstretch stitch control at “STRETCH STITCH”.For setting stitch width.For winding thread on bobbin.For the control of the up and .down movement of the
;needle. -
For selecting stitch length between no feeding and maxto about 6 stitches per inchFor easy back-tacking to lock thread ends by pushing thebutton.For regulating feed dog height for various materials andtypes of sewing.With guide lines for sewing accuracy. -
For holding fabric when sewing.Diamond point to move fabric accurately.For opening an access to bobbin and bobbin case.For tightening presser foot in place on presser bar. -
For automatic precise adjustment of flow of upperthread.For turning on or off the light inside face cover.Hinge-open type for replacement of light bulb andoiling.For regulating the amount of tension on upper thread.For holding needle in place in the slot of needle bar.For holding spools, preventing over-spin of spools.For adjustment for the buttonhole reverse stitch density.
For providing proper tension on thread when bobbinwinding.For lifting or lowering presser bar and presser foot.For convenience to cut both upper and lower threadsafter sewing.For installation of machine head onto portable case orcabinet.For the releasing movement of the needle bar in orderto wind bobbin.
5
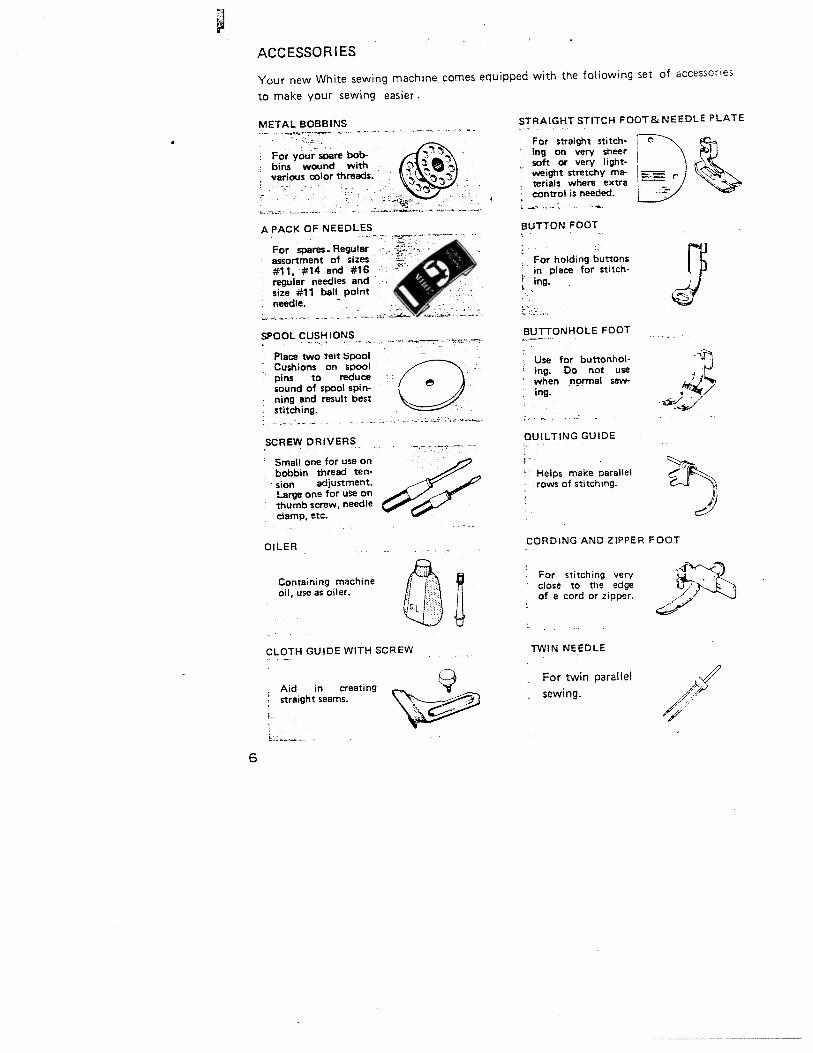
ACCESSOR I ES
Your new White sewing machine comes equipped with the following set of accessories
to make your sewing easier.
A PACK OF NEEDLES
For spares Regularassortment of sizes#11. #14 and #16regular needles and - -
ball point
SPOOL CUSHIONS
Place two te)t pooICushions on spoolpins to reducesound of spool spinring and result beststitching.
SCREW DRIVERS
Small one for use onbobbin thread tension adjustment.Large one for uSe onthumb screw, needleclamp, etc.
OILER
STRAIGHT STITCH FOOT& NEEDLE PLATE
For straight stitching on very sheersoft or very lightweight stretchy materials where extracontrol is needed.
BUTTON FOOT
For holding buttonsin place for stitching.
BUTTONHOLE FOOT
Use for buttonholing. Do not usewhen nprmal sewirig.
METAL BOBBINS
For yàur spare bob-bins wound with
- various color threads
Containing machineoil, use as oiler.
QUILTING GUIDE
Helps make parallelrows of stitching.
CORDING AND ZIPPER FOOT
For stitching veryclose to the edgeof a cord or zipper.
TWIN NEEDLE
For twin parallel
sewing.
CLOTH GUIDE WITH SCREW
- Aid in creatingstraight seams.
6

INSTALLING MACHINE HEAD ONTO PORTABLE CASEOR CABINET-AND CONNECTING MACHINE
__zl7*.
(_Q_
Loosen both head hinge set screwson the back of machineed plateuntil head hinge holes are clear.Tilt head hinge pins up and backas far as they will go.Carefully slip machine head ontohinges — making sure the headhinge pins are inserted as far asthey can go into head hinge holes.
Allow machine head to rest in itstilted back position.Tighten both set screws securelywith screwdriver.Plug electrical leads from machinehead into sockets located insidecabinet or portable case. Cordidentified with ‘motor” tag mustbe plugged into socket marked“motor”. Untagged cord goes to•“light” socket.
Insert plug into a wall outlet of110—115 Volts.
7

— I I
SELECTION OF NEEDLES AND THREADS
The needle and thread you choose dependsupon the fabric you are stitching. The correct
selection of needle and thread is very importantto avoid damaging the fabrics of light weight,or tightly woven fabrics, and to prevent skip
ped stitches when sewing on very sheer or
stretchy fabrics or needle breakage when stitch
ing heavy or stiff fabrics. For best results, sewingmachine needles should be replaced when they
become even slightly dull or bent or at the completion of every other garment.
A regular needle is suggested for use withwoven fabrics. Needles, style 15 x 1, of therange in size from 8 to 20 are used on thismachine. The lower number indicates the finerneedle. The most commonly used sizes are 11and 14.
A ball point needle is recommended for usewith tricots, jerseys, lingeries and power nets.Unlike sharp pointed needles, which piercefibers of knit fabrics destroying elasticity,theball point needle s1ips between fibers withoutdamage to fabric and skipped stitches.
A wedge point needle is recommended for usewith leather and leather-look vinyls. A wedgecutting point pierces leather more easily thanordinary sewing machine needles, resulting inmore satisfactory stitching.
Although it is recommended to use a ball pointneedle for knit fabrics, when sewing on verystretchy fabrics of knits,the placement of a thinpaper below the fabric and the use of a finerneedle are suggested to prevent skip stitches.
Always use the same type and size of threadin both needle and bobbin. Use goodquality thread without knots for best stitches.
BALL POINTNEEDLE
WEDGE POINTNEEDLE
8

NEEDLE — THREAD— FABRIC — STITCHiNG GUIDE
Fabric -
Extremely heavytarpaulin, sacking,canvas, duck, etc.
Heavy upholsteryfabric, ticking,denim, leatherette.
Medium heavy draperyfabric, velveteen,jiting, felt, terry, etc.
Medium broadcloth,percale, gingham, linen,chintz, taffeta, sheerwool, shantung, etc.
Sheer voile, lawn,dimity, crepe,handkerchief linen,Plastic film, etc.
Very sheer chiffon,batiste, lace, organdy,nylon net, marquisette, etc.
18
18
16
14
11
MachineStitching‘Per inch
6to8
8to10
10to12
12to14
14to16
(plastic film)8tolO
9 to20
Heavy Duty
Heavy Duty
Heavy Duty
50
50
60
SynThetic:
0
0
0
9

CHANGING NEEDLE
Always change the needle after everyother garment especially when sewing onpolyester and nylon fabrics which dullneedles much faster. When needles aredull or bent, they damage both yourfabric and the machine. A general rulewhen placing sewing machine needles isthat the flat side of the needle is placed.to the back of the machine, when thebobbin is put in from the front. If theneedle is inserted incorrectly, the stitcheswill not form.
To change the needle1. Raise the needle bar to its highest
position by turning the hand wheeltoward you.
2. Loosen needle clamp to remove theneedle.
3. Place needle (flat side to the back andlong groove, to thefront)in the needleclamp and push it upward as far as itwill go, tighten needle clamp.
4. After changing the needle, make onecomplete turn of the hand wheel byhand to be sure the needle is clearingthe needle plate.
CHANGING NEEDLE PLATE
Although an all-purpose, utility needleplate is fixed on your machine, forstraight sewing on fine fabric or soft orvery stretchy fabric, you may want to usethe straight stitch needle plate togetherwith the straight stitch foot, both ofwhich are included in your accessory box.To change the needle plate, simply slidethe slide plate as far forward as possible..Remove the two screws holding theplate in place. Lift the needle plate andreplace.
The needle plate is removed for cleaningthe lint which may pile up betweenneedle plate and feed dogs.
STRAIGHT STITCHNEEDLE PLATE
‘C i:i
UTI LITYNEEDLE PLATE
/
10

SELECTION OF PRESSER FOOT
For most ordinary sewing the original all-purpose foot can be used. However, its recommended to use the following special feet in your accessory box wheneveryou want a better stitching result.
1;-
LOOSEN
Straight Stitch FootThis has only a narrow hole to accommodate only straight stitching. It may beused on sheer or soft fabrics for morecontrol. When using this foot, the StitchWidth should be “0” to avoid hitting thefoot and breaking the needle.
ButtonhoLe Foot
This foot has a groove underneath, toallow the narrow satin stitch or buttonhole to form evenly. However, if skip-stitch occurs on sheer fabrics with thisfoot, it may be necessary to use thinpaper underneath.
Cording or Zipper Foot, and Button FootUse for sewing very close to the edge of acord or zipperS and sewing on buttonsrespectively.
CHANGING FOOTUse the large screwdriver to loosen thumbscrew. Turn the screw backward until thefoot becomes loose. Then, lift up onpresser foot lever until it is in its highestposition in order to remove the foot.Replace with desired foot and tightenthumb screw securely.

WINDING BOBBIN
Disengage the hand wheel (1) fromthe stitching mechanism by turningthe clutch nut (2) toward you orcounter-clockwise.
Place a spool of thread on one ofthe spool pins and lead threadthrough the rear Top Thread Guide(3) after winding around Bobbin,Winder Tension Disc.
Run the end of thread through ahole in the bobbin edge and placebobbin on spindle of bobbin winder(4) fitting the notch on bobbin oversmall spring on spindle.
Push bobbin winder latch (4), andhold the thread erd loosely thenstart machine slowly, and bobbinwinder latch will be released tostop winding when bobbin is full.
Turn clutch nut away from youuntil sewing mechanism is againengaged so that needle moves whenyou turn the hand wheel.
Break off loose thread end used tostart the winding and cut otherthread end. Then remove bobbinfrom bobbin winder.
F
_
‘A
- _z_

1. Turn the hand wheel towardyou to raise the take-up leverto its highest position.
2. Place a spool of thread on thespool pin.
3. Lead the thread through thetop thread guides.
4. Down and between the tensiondiscs, from right to left.
5. Draw the thread up through thecheck-spring and with a slighttug into the hook.
6. Up and through the eye of take-up lever from right to left.
7. Lead thread down through thethread guide at the bottom of
the threading slot, then, throughthe needle bar thread guide fromthe back.
8. Thread the needle FROMFRONT TO BACK, drawing itthrough about 3 or 4 inches.Hold the end of the upperthread loosely and turn thehand wheel toward you untilthe needle goes all the waydown and comes back up. Athread loop will form over theupper thread which then can bepulled out straight. Place boththread ends under presser footand draw toward the back ofthe machine, leaving boththreds three or four incheslong.
In case of twin needle sewing,place two spools of thread,matching or contrasting in color,one on each spool pin, lead boththreads through top thread guides,bring threads.down and pass onethread between the back discs andthe other between the front discs,then treat both thread as one untilthreading each thread througheach needle eye of twin needle.
UPPER THREADING
r-—- -.- -----
.:
ZAO:
13
9

THREADING BOBBIN CASE
1. Hold bobbin case betweeri thumb and forefinger of left hand, sothat the slot in the edge
of the bobbin case is on
top. Take the bobbinbetween thumb and f ore-
finger of right hand sothat the thread on topleads from left to right
2. Insert bobbin into bobbin case, pull the threadinto the slot of the
bobbin case and draw itunder tension spring andinto the fork-shapedopening of the spring.
\i U
TENSION SPRING
PLACING BOBBIN CASE IN SHUTTLE
Raise needle bar to its highest position, and slide plate
forward. Hold the bobbin case latch (D) between the
thumb and forefinger of the left hand, with at least three
inches of thread running from the top of the bobbin case
to the right. Insert and center the bobbin case on the
stud of the shuttle body (C). Be sure the bobbin case
finger (E), is opposite the shuttle race notch (A). Press
the bobbin case (B) into the shuttle as far as possible
until the latch catches on the center post of the shuttle.
Then release the bobbin case latch (D). Press the bobbin
case again after the latch has been released to make sure
the bobbin case is locked securely in place. Close theslide plate.
14
rGErflNG ôiCNóii
SELECTION OF STITCH:
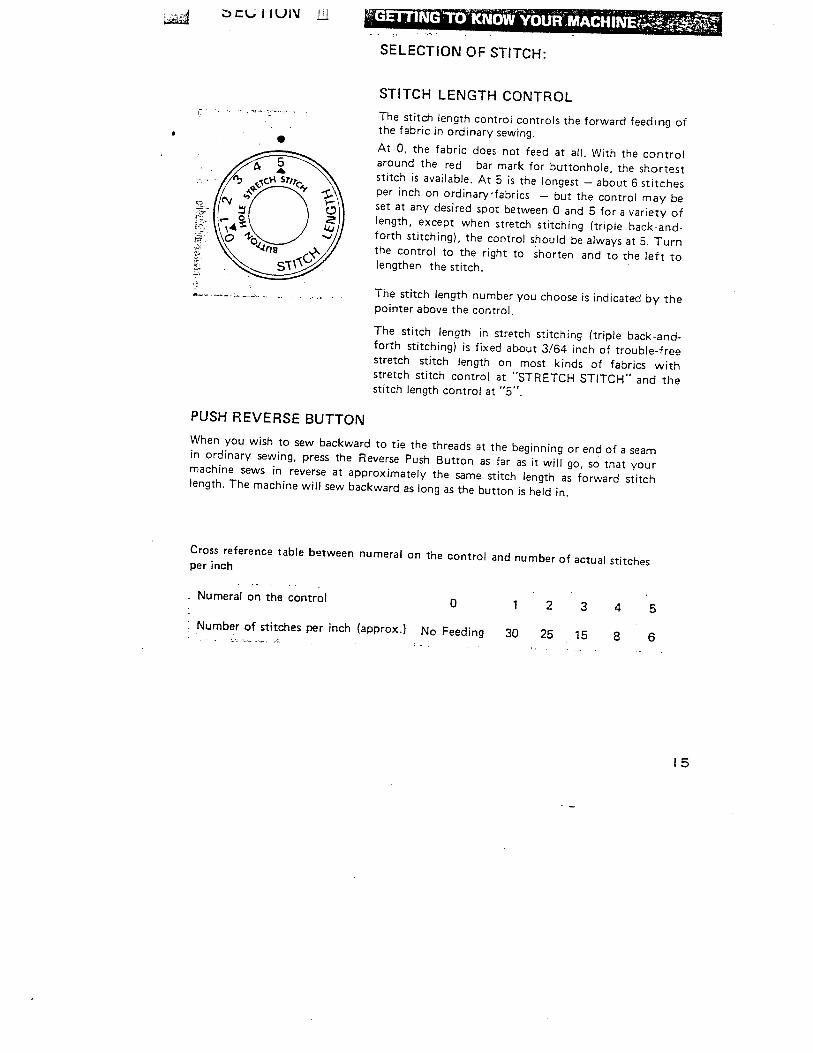
STITCH LENGTH CONTROLThe stitch length control controls the forward feeding ofthe fabric in ordinary sewing.At 0, the fabric does not feed at all. With the controlaround the red bar mark for buttonhole, the shorteststitch is available. At 5 is the longest — about 6 stitchesper inch on ordinary’fabrics — but the control may beset at any desired spot between 0 and 5 for a variety oflength, except when stretch stitching triple backandforth stitching), the control should be always at 5. Turnthe control to the right to shorten and to the left tolengthen the stitch.
The stitch length number you choose is indicated by thepointer above the control.
The stitch length in stretch stitching triple back-and-forth stitching) is fixed about 3/64 inch of trouble-freestretch stitch length on most kinds of fabrics withstretch stitch control at “STRETCH STITCH” and thestitch length control at “5”.
When you wish to sew backward to tie the threads at the beginning or end of a seamin ordinary sewing, press the Reverse Push Button as far as it will go, so that yourmachine sews in reverse at approximately the same stitch length as forward stitchlength. The machine will sew backward as long as the button is held in.
Cross reference table between numeral on the control and number of actual stitchesper inch
Numeral on the control 0
Number of stitches per inch (approx.) No Feeding 30 25 15 8 6
llU Ill
PUSH REVERSE BUTTON
1 2 3 4 5
15

STITCH WIDTH CONTROLThis control controls the side sewing of the needle for various width of stitches. At 0,
the straight stitch line results in ordinary sewing. Also, the widest special stitch
patterns as per those shown on the stitch pattern selector are made with this control at
5.The narrow special stitch patterns including buttonhole are made with this control at
the less number, and with this control at 0, only straight sewing is made regardless the
selection of stitch patterns.With the control at any other point than ‘O”, ordinary straight stitch varies to zigzag
stitches. At 1, the needle takes a narrow swing resulting in narrow column of stitching
and, at 5, the needle takes a large swing resulting in a wide column of stitches.
In case of twin needle sewing, thiscontrol should be set in the range of red
. 7bar or less than Number 3 otherwise .. ...
needle hits needle plate
RELATING STITCH LENGTH TOSTITCH WIDTHWhen the stitch width control is set atone particular width (such as 5), thestitch length control will now control howclose those stitches come together. Atlength 0, the fabric does not move,resulting in a bar of stitches formed oneon top of the other, as is used in buttonsewing. At red bar mark or near 0, thefeed pulls the fabric through slowly,resulting in a dense column of stitchescalled a satin stitch. At length 5, a verylong open zigzag results.
I
*. [:1Wo 1 2L2)2 272’
.11,11. 1,11:1vv 4 5 5 5 5 5 5 5L 2)2)4’O:j’’i..2 3...4 .5
16

STRETCH STITCH LEVER
Selection between ordinary stitching and triple auto
matic backand4orth stitching called stretch stitch is
made by the stretch stitch lever. With the lever up at
“REGULAR STITCH” position, ordinary sewing is
performed.With the lever down at “STRETCH STITCH”position, your machine automatically performs the
stretch stitch with the repetition of two forward and onebackward stitch combination.A reinforced seam of stretch stitch that will stretchconsiderably more than the fabric used is the mostwanted feature in a sewing machine today.Its uses are almost unlimited and the more you useyour machine the more it wilt become apparent toyou.When stretch stitching, the stitch length control shouldbe always set at 5.
STITCH PATTERN SELECTOR
In addition to ordinary straight and zigzag stitches, three consecutive buttonholing-step stitches, 3 different kinds of utility forward stitches, 3 special stretch stitchesand straight and Rick-Rack stretches as shown on the Stretch Stitch PatternsMarking can be selected by this selector. This selector can be turned only to theright, except for it’s buttonhole step selection range where the selector can be turnedto both directions.For regular stitch patterns, set the pattern selector at the selected pattern positionand the stretch stitch lever at “REGULAR STITCH”.The regular stitch patterns selected by the selector are turned to the stretch stitchpatterns shown in same color as those of regular stitch patterns on the selectorrespectively, simply by setting stretch stitch lever at “STRETCH STITCH”.All regular stitches are made by forward sewing at an optional forward stitch lengthselected by stitch length control. All stretch stitches are made at the fixed stretch
stitch length with the stitch length controlat 5 and the stretch stitch lever at“STRETCH STITCH”. To balance the leftside of the buttonhole, first step, with theright side of the buttonhole, third step,
‘ adjust the buttonhole reverse stitch tuner.- With the selector at buttonhole step (2—4),
your machine does not feed fabric forbartacking the buttonhole ends and, withit at buttonhole step (3), it feeds fabric in
- reverse to sew the right buttonhole edgewith the preset reverse satin stitch lengthautomatically, regardless the setting ofstitch length control.

BUTTONHOLE REVERSE STITCH TUNER
CONTROLS:ADJUSTING THREAD TENSIONSAlways adjust the upper threadtension with the presser foot down,as the tension is released when it israised. To increase the tension onthe upper thread, turn tensioncontrol to the, right. To decrease,turn to the left. Before adjustingthe tension be sure that themachine is threaded properly.It is seldom required to adjust
the bobbin thread tension,however, when necessary to changebobbin thread tension, turn smallscrew on side of the bobbin caseclockwise to tighten , counterclockwise to loosen.When both tensions are properlybalanced, a perfect stitch will beformed with both threads interlocking in fabric (A).When the upper tension is too tight,the bobbin thread is pulled up overthe upper thread which is lying flaton the fabric (B).When the upper tension is tooloose, the upper thread forms loopsover the bobbin thread lying flat onthe fabric (C).When the upper and bobbin threadtensions are balanced but fabric ispuckered in sewing direction onsheer fabrics, both tensions are tootight. Loosen both tensions evenly.
It is recommended to adjust thetension balance under mediumstitch length. In case of satinstitching for buttonholes and embroidery shghtly loosen the upperthread tension.
izuLrLr
r
S
The tuner is for the adjustment of preset right buttonhole side- reverse stitch density,while it may be seldom required as far as the left buttonhole forward satin stitch inbuttonhole step (1 (is properly set by the stitch length control. The adjustment is madeby screwdriver, setting the stitch selector at buttonhole step (3). Turning tuner to theright (+), the preset reverse buttonhole stitch density is increased and, to the left)—).it becomes rough.
0
lC)
lB

ADJUSTING PRESSURE ON FABRIC AND FEED DOG HEIGHT
. GENERAL SEWING
P VVVVV.V•V___•__V__ Usually for normal sewing, except for sewing on
very heavy and bulky fabrics and very stretchyknit fabrics, the center pin (B) of the pressurecontrol be at its lowest position, also, the feeddog height control be turned to the right, “High”position, except for sewing on very sheer fabrics.For aboe exceptional fabrics, refer to belowtable. To reduce half the pressure, press theouter ring (A> of the pressure control, thenpress the center pin (B) down again to halfway.To reduce half the feed dog height, turn the feeddog height control to “LOW” position.
Ordinary fabric of less elasticity: -
Heavy and bulky fabricsMedium weight fabrics
-
Light weight soft fabrics
Very stretchy fabrics and knits:Heavy and bulky ones
V
Medium weight onesV
- Light weight and sheer ones
In order to move the fabric freely in any direction for darning and mending, releasethe center pin (B> completely by pressing down on the outer ring (A(. Turn the feeddog height control to “DOWN” position, which drops the feed dog well below theneedle plate. To return the feed dog height to normal, turn the control to “HIGH”position. -
‘9
fabric Pressure on V Feed dogV
fabric V height V
HalfFullFull
FullHalfHalf
HighHighLow
HighHighLow
. MENDING AND DRANING:

SEWING LIGHT
The sewing light is located in face cover directly over theneedle so as to better illuminate the stitching area.Turn the light on and off by pushing the switchon face cover.
To replace bulb, turn light off and open face cover tothe left. Unscrew bulb as you do a conventional lightbulb. Place new bulb in socket and screw in place.
20

SECTION N
PREPARING TO SEW
Hóiii&sEW_______________
Have take-up lever at highest position before starting to sew. Pinning may be usedas a time saver instead of hand basting. It is possible to sew over pins when placed atright angles to the edge of fabric with the pin head at the raw edge, but for bestresults it is recommended that the pins be removed as you approach the presser foot.Sewing over pins can result in damaged needles.Place material and threads under presser foot and lower the presser foot. Lower theneedle by turning hand wheel by hand to check if the needle will pierce the stitchingline you want to sew. You are now ready to begin sewing. Press the speed control.The speed of the machine running is regulated by increasing ordecreasing the amountof pressure exerted on the control. Never run machine without material underpresser foot.
GUIDING FABRIC
The scale is etched with every 1/8 inch distance measured from the center of needleplate. Let the edge of fabric follow the line selected for the seam, and let your eyesfollow the etched line you selected for the seam, not the needle, during sewing. Tohelp you guide the fabric, place cloth guide attachment securing it by the extrathumb screw Onto machine bedplate. Cloth guide and extra thumb screw areincluded in your accessory box.Do not try to help the feeding by pulling the material as this may deflect the needleand cause it to break.
TURNING CORNERS
To pivot at a corner, leave the needle in the fabric while its upward stroke. Lift thepresser foot, turn the fabric, then lower the presser foot and continue sewing.
2)

CURVED SEAMS
Use slightly shorter stitch lengththan that of the rest of the seams.On the part where elasticity isrequired on the seam, sew bystretch stitch. The cloth guide maybe used on angle as shown.
SEWINGSEAMS
ACROSS HEAVY
When approaching heavy seam,hold the fabric upward on an angleso that the heavy seam falls underthe front curved sled of presserfoot.
REMOVING THE WORK
Be sure to stop the machine whenthe thread take-up lever or needlebar is at the highest position.Now raise the presser foot and drawthe fabric back and to the leftand pass the threads over thethread cutter.Pull down slightly, holding threadin both hands, so as not to bend theneedleLeave the ends of threads underthe presser foot.
22

SECTiON V
___
•
STRAIGHT STITCH:
SEAMS
The normal stitch length for most fabricsis between 2—3 but the length chosenshould depend on the fabric and area ofusage. Usually, heavier fabrics requirelonger stitches, and lighter weight fabricsrequire shorter stitches. For curved seamsand bias cut areas use a shorter stitchlength. Be sure to set the stitch widthcontrol at U
BASTI NG/TOPSTITCH ING
Sewing a seam with a longer stitch isuseful for temporary seams prior tofitting. Basting stitches also may be usedwhen gathering in fullness.Topstitching can be done very effectivelywith the long straight stitch. For a bolderstitch, two threads of the same type canbe threaded through one needle (size 14or 16). A heavier thread such asbuttonhole twist may be used fortopstitchihg, but be sure to use a largerneedle (size 16 or 18).
Worn spots or small holes can be darnedvery easily. Use of an embroidery hoop isoptional depending on the fabric. A finethread is recommended so that the fabricand thread will blend together invisibly.Trim the ragged edges from the area to bedarned. Hold the threads to start, thenmove the fabric slowly backwards andforwards while running the machine veryfast to fill the area. Professional resultswill be attained by moving the fabric ina figure eight pattern while sewing. Afterfilling in the area lengthwise, reweavewith crosswise stitches in the samemanner.
I
Pattern:Length: 2—3Width: 0Feed Dog: HighPressure: FullFoot: Straight Stitch or
All PurposeStretch Control:
REGULAR
Pattern:Length:4_5Width: 0Feed Dog: HighPressure: FullFoot: Straight StitchStretch Control:
REGULAR
DARNING
Pattern:Length: 0Width: 0Feed Dog: DownPressure: 0Foot: All Purpose, orDarning Spring of WhiteSpecial attachment
Stretch Control:REGULAR
23

CORDING/SEWING IN ZIPPER
• INSERT CORDING
(A) Fold bias strip of fabric overcord. Loosen the adjustingscrew on the back of cording!zipper foot and set the foot tothe left of needle.
(B) Sandwich the welting betweentwo layers of fabric with rightsides together. Stitch a secondtime with cording/zipper footto the right of needle so thatthe needle stitches close to thecord through all thicknesses.
• ZIPPERS
Swing the foot to left or right ofthe needle as needed so that thefoot sews very close to zipper teeth.
QUiLTING
Parallel straight lines are easy tosew with the quilting guide. Toattach the guide, loosen thumbscrew and slip the Ushaped holderof the guide between presser footand thumb screw. Tighten thethumb screw securely. Adjust thecurved bar to the desired distancefrom the needle. Sew the first lineof stitching as desired, then, for thesucceeding rows let the guidefollow along the previous stitchline. A straight stitch, zigzag, or anyother stitch may be used.
24

Pattern:Length: 1—3Wdth: 5Feed Dog: HighPressure: FullFoot: All PurposeStretch Control:
REGULAR
Pattern:Length: 1—2Width: 1Feed Dog: HighPressure: FullFoot: All PurposeStretch Control:
REGULAR
Pattern:Length: 0Width: 2—5Feed Dog: DownPressure: FullFoot: Button FootStretch Control:
REGULAR
e
ZIGZAG STITCH:OVERCASTINGPlace the edge of the material underneaththe opening of the sewing foot and guideraw edge along the center slot of the footallowing stitch to form half on and halfoff the fabric.The multiple stitch zigzag s a wiserchoice for most fabrics.See page 30.
SEWING KNITSThe narrow zigzag can be used in seamsof firm knits for added strength. Aftersewing, open seam and press flat. Tinyzigzag stitches can hardly be seen and theseam will give when stretched.Generally on knits, however, try thestraight stretch or ultra stretch stitches. Seepage 35.
SEWING ON BUTTONPlace the button so that the holes ofbutton are positioned in same distancefrom the center straight stitch needleposition respectively.Turn hand wheel by hand until needlepoint lowers close to the face of button.Turn stitch width control until the needlecomes just above a hole of button.Turn hand wheel slowly by hand to checkif the needle comes just above anotherhole of button after clearing the firstchecked hole of button, If necessary,readjust the button position belowbutton foot and repeat above checkingand adjustment of stitch width.Note: Be sure the needle clears the holesof the button . by moving the handwheel by hand before running the machine fast.Usual 6 to 8 stitches are adequate forsecuring a button in place.To lock the threads, set the stitch widthat 0, readjust the button position to thata hole of button is just below the needle,and take a few stitches in the hole.
25

SEWING ON BUTTONWITH A THREAD SHANK
Buttons sewn on coats or jackets shouldhave a thread shank to make them standaway from the fabric. To form a threadshank, sew over a pin or roundedtoothpick.After stitching the button to the fabric,remove work from under the presser footleaving threads about six inches fromfabric. Remove pin or toothpick. Pull thethreads to back of button and form ashank between button and fabric bywinding threads tightly around the attaching stitches. Pull threads to back of thefabric and tie thread ends securely.
SATIN STITCHING
This is useful for decoration such astapering, manual designed embroidery,monogramming and applique.The satin stitch, which is really just avery close zigzag stitch, is obtained bysetting th stitch length as near to “0”as possible without stopping the feedingaction or at the red bar marked “buttonhole”. The setting will vary for differentfabrics, It may be desirable to loosen theupper tension slightly to cause thethreads to lock underneath in order tomake the top surface look especiallysmooth. For lightweight fabrics, place apaper underneath the fabric for best
Pattern:Length: ‘/ or “Buttonhole”Width: 1—5Feed Dog: HighPressure: FullFoot: All PurposeStrttch CGntrol:REGULAR
t..
results.
26

Regular Stitch Stretch Stitch
rrrA A A
I “. 1 I
/ V V \
BUILT-IN UTILITY STITCHESThe most popular three kinds of utilitystitches can be made by simply selectingwith stitch pattern selector, also thosecomplex stitch pattern of back-and-forthfeeding action are made with stretchstitch control at STRETCH STITCH.The overall width of those built-in stitchpattern can be varied by stitch widthcontrol.
TWIN NEEDLE SEWING
Attractive parallel straight stitch effectsand decorative zigzag patterns can beeasily made by sewing with the twin-needle, and they are very effective forvarious kinds of garment finish sewingsuch as top stitching, border sewing. etc.Except buttonhole stitches, all built-inspecial stitch patterns can be applied withthe twin needle sewing.In case of twin needle sewing, the stitchwidth control should be at less numberthan ‘3” or in red marking.The use of color-matched or contrastedtwo threads will result more attractivefinish.
Pattern: Other than buttonhole stitchesLength: 1—5Width: Less than 3Foot All-purpose
27

FREEHAND MONOGRAMMINGFor giving garments and linens a personalized touch, first transfer the designto the right side of the fabric. Anembroidery hoop is recommended especially for soft fabrics and toweling.In order to monogram, you must movethe fabric slowly and run the machinerapidly. Monogramming is like writing bymoving the paper under a stationary pen.Guide the fabric slowly so that the zigzagfalls close together like a satin stitch, butbe careful that the stitches do not pile up.When guiding from side to side, movefabric slightly faster to avoid a heavyarea.Practice by forming loops. Once this isaccomplished any letter is easy.Sometimes the use of paper or non-woveninterfacing under the fabric may makeguiding the fabric easier. The paper orinterfacing may be torn or cut away atthe completion of the monogram.Whenmonogramming towels, plastic film placed on the top will help cover ioops andmake the monogram smooth. Pull or cutaway remaining plastic film when finish-ed.
APPLIQUE/PATCHINGApplying decorative shapes of fabricscraps to household articles and clothingis a very interesting way of trimming anotherwise plain article. First, trace thedesign on fabric to be appliqued, orpatched tfen pin or baste it securely inplace on garment. With a small straightstitch or narrow zigzag, sew around thetransferred design or patch.After excess fabric is trimmed away, sewaround the applique or patch with a satinstitch or short length zigzag stitch. For asmooth curve, stop frequently at theinside edge of the curve to pivot thefabric slightly. Corners look much betterwhen the point is stitched by pivotingrather than just turned.As with all decorative stitches, paper maybe used to give more body to the fabricwhen stitching and can be torn awaywhen the applique is completed.
°attern:Length: 0Width: 1—5Feed Dog: DownPressure: 0Foot: All Purpose or
Darning Spring ofWhite specialattachment
Stretch Control;REGULAR
I
StepiPattern:Length: 1Width: 0—2Feed Dog: HighPressure: FullFoot: All PurposeStretch Control;
REGULAR
\. -‘
Step2Pattern;Length: ‘/.—Width: 2—5Feed Dog: HighPressure: FullFoot: All PurposeStretch Control:
REGULAR
28

GATHERING OVER A CORDOrdinary gathering with a basting stitchoften breaks while pulling in fullness. Asmall zigzag across a cord such as crochetthread or carpet thread, gives a muchstronger cord for gathering fullness intofabrics. Once the gathers have beenstitched in place, the cord can be pulledout in order to eliminate bulk.
,Pattern:Length: 2Width: 2—3Feed Dog: HighPressure: FullFoot: All PurposeStretch Control: REGULAR
L -
Attaching laces or trims adds a specialtouch to lingerie, dresses, or linens. Pin orbaste lace in place easing or miteringcorners where neccessary.A straight edged lace or braid has aconvenient line to follow when sewing.When using a scalloped edged lace followthe design of the lace for an almostinvisible application.Pattern:Length: t4—1Width: 1—3Feed Dog: HighPressure: FullFoot: All PurposeStretch Control: REGULAR
FLUTTER HEMAn unusual way of hemming or finishingedges of tricot or soft knits is by a flutteredge. Hemming in this manner is just likeovercasting an edge, but the fabric isstretched in back and in front of theneedle as you sew. For best results, pullthe fabric equally, making sure the needlegoes over the edge. When you stop toreposition your hands, keep the needle inthe fabric.,
Pattern:Length: ‘4—YWidth: 4—SFeed Dog: HighPressure: FullFoot: All PurposeStretch Control: REGULAR
1
LACE APPLICATION
29

SEWING TIPSWhen a dainty hair line finish isparticularly desirable for the inside seamsof sheer collars, facings, and yokes, seamallowance that would ordinarily showthrough is eliminated by following theseam outline with a narrow zigzag stitch.Trim seam allowance close to line ofstitching. Turn and press.
Pattern:Length: ‘/2—1Width: %—2Feed Dog: HighPressure: FullFoot: All PurposeStretch Control:
REGULAR
SHAPING DARTS ININTERFACINGS
Cut interfacing down center between dartlines. Overlap cut edges, matching dartlines. Zigzag stitch along marking linefrom point to wide end of dart. Trimboth raw edges close to stitching.Pattern:Length: t4—1Width: Y2—1Feed Dog: HighPressure: FullFoot: All PurposeStretch Control:
REGULAR
MULTIPLE ZIGZAG STITCH
The multiple zigzag stitch can be used for
hundreds of various kinds of sewing applications,
such as replacing worn blanket bindings for both
a decorative and durable finish, overcasting an
edge to prevent fraying, applying elastic waist
bands to skirts and dresses, sewing a zigzag stitch
on soft or sheer material preventing puckering,
etc.2( Just sew like ordinary zigzag stitching.
p..
n
Pettern:Stitch Length: 4—SWidth: 3—SFeed Dog: HighPressure: FullFoot: All PurposeStretch Control:
REGULAR
30

BUTTONHOLES
Various fabrics require various methods of sewingC
‘ A buttonholes. Four different methods are given below,. C C with suggested uses. If you are in doubt as to which
method is best for your fabric, test the methods inquestion and choose the best according to the finishedappearance.
PREPARATION
For the best results, a good quality mercerized cottonthread should be used. Polyester threads often result inpuckered or heavy unattractive buttonholes. The fineryour fabric is, the finer your cotton thread should be.An interfacing should be used under the buttonholes togive body, to strengthen, and to help them withstandwear.
To establish the correct length of the buttonhole, addthe length of the button (A), plus the thickness of thebutton (B), plus 1/32 inch for the bartacks. The lengthmay be marked on the garment with a basting stitch,tailor’s chalk, or an invisible cellophane tape, as shown.Horizontal buttonholes should extend 1/8 inch beyondthe centerline of the garment. Vertical buttonholes areplaced so that the cutting space of the buttonhole isdirectly on the center line.
Always make a practice buttonhole on a scrap of thegarment fabric before making any buttonholes on yourgarment. On your test sample, duplicate the thicknessesfound in the garment and be sure to include theinterfacing. The test sample should help determine thelength needed for the button to pass through the holeeasily, as well as the stitch length needed for theparticular fabric. As with the satin stitch, the stitchesshould be close together, but not so close that they pileup. Be sure to use the buttonhole foot.
F I
OF GARMENT
CENTER LINEOF GARMENT
31

BUILT-IN BUTTONHOLE
This buttonhole eliminates the needle for pivoting the
fabric. It is used most often on light and medium woven
fabric. The narrowest buttonhole is made with stitch
width control at 3 and the widest one is done with it
at 5. The stitch length control should be at “BUTTON
HOLE” or near 0 not to without stop feeding action.
With stitch width at your desired position between 3
and 5, a buttonhole can be made by simply turning
stitch pattern selector from buttonhole position 1 to
those 2, 3 and 4 in sequence on the stitch pattern
selector panel.
2€
1. Set stitch pattern selector at buttonhole (1). Lower
needle into the mark at the top left end of button
hole. Lower buttonhole foot and sew on the left side I
of buttonhole until you reach the bottom end of
buttonhole.
2. Turn pattern selector to buttonhole (2-4> and take
just a few stitch to bartack the bottom end of button
hole.
3. With needle up, turn the pattern selector to the
buttonhole (3) to sew on the right side of buttonhole.
The stitch density in this step to make it even to the
left edge forward stitch can be adjusted by the
buttonhole reverse stitch tuner at the top of machine
arm, though the evenness of both stitch densities
should be roughly adjusted in advance by the stitch
length control on the forward stitch density of the
left buttonhole edge. To increase the stitch density
on this right buttonhole edge, turn the tuner by
screwdriver to the right (4-), and, to lengthen stitch
length to decrease the stitch density turn to the left
4. With the needle out of the cloth, turn again to the
buttonhole (4) position and complete the buttonhole
by bartacking just a few stitch on the top end of
buttonhole.
5. To lock the stitch, make sure the needle is out of the
fabric and set the pattern selector at ordinary sewing
position, the stitch width control at 0, and feed dog
height down. Then take a few stitches.
6. To prevent cutting through the bartack insert a
straight pin through the bartack and cut buttonhole
open.
-
Pattern: IJ——t1--Length: ButtonholeWidth: 3—5Feed Dog: High-Down
Pressure: FullFoot: Buttonhole FootStretch Stitch:REGUL.AR
32

For best buttonhole finish, it is suggested to test
buttonholings on scrap of same fabric as that you want
to buttonhole, for selection of buttonhole width andstitch density best suited to your fabric.
WPattern:Length: Red bar markWidth: 5-2-2-5-2-0Feed Dog: Down-High-Down-High-DownPressure: FullFoot: Buttonhole FootStretch Control: REGULAR
CORDED BUTTONHOLE
Cording gives a reinforced raised buttonhole. It isexcellent for use on bulky, woven fabric, or knitsin which the stitching often gets buried andmakes cutting difficult. On knits, a cordedbuttonhole will help keep the fabric fromstretching out of shape.Choose a heavy cotton crochet thread orbuttonhole twist to use for the cording. Proceedas for the turn-around buttonhole having cordthe under the presser foot in such a way thatthe zigzag stitch covers the cord.At the completion of the buttonhole snip theexcess cord close to the bartack on wovenfabrics. For knitted garments, always pull thecords to the wrong side by using a darning needleor needle threader, and knot the cord endsbefore clipping.
33

TEP1 -
:::::..--....:.............
-
.V -.-.--.:-:-- -
>>
>- - - •-.-••
:-:.-. >
>)• -:.;...
••-.:-•-•-.- >
I
BLIND HEM STITCH
The blind hem stitch provides a durable hemfinish that is almost invisible on garments.
drapes, and curtains. It is done easily with
straight or slightly curved hems. With a little
practice it will be a very quick and easy hem
application and the hem will never need
repairing.
Procedure:(1 )Prepare raw edge of hem in desired manner,
such as overcast, 1/4 inch stitched under
pinked, hem tape, or just plain. (Step 1>
(2)Fold hem up desired length. Baste or pin 1/2
inch from upper edge. Press in place. (Step 2)(3)FoId hem back toward right side of fabric
leaving about 1/4 inch extended. (Step 3)
(4) Guide the fold of the fabric into the center
cut of the presser foot so that the zigzag bite
of the stitch comes just slightly to the left of
the center cut of the presser foot. The straight
or narrow zigzag stitches should be formed on
the single thickness of fabric, and the zigzag
wide bite should catch just barely into thefold of the fabric at the left.
(5)When stitching is completed, remove fabric
from machine and turn to right side. Press
completed hem.When hemming an A-line skirt, place a machine
basting stitch along the raw edge of the hem. At
an ironing board, fold up the hem, matching the
seams. Ease in the excess fabric by pulling on
basting thread. Press with steam, then apply hem
tape. Baste or pin hem 1/2” from taped edge,
then continue into step 3.
Pattern: orLength: 2-3Width: 3-5Feed Dog: HighPressure: FullFoot: All PurposeStretch Control:
REGULAR
• STEP4 - V
I34

STRAIGHT STRETCH STITCH:This stitch may be used on knits and wovens in areas of
stress as a reinforcement stitch. It is excellent for curved
seams such as armholes and crotch seams. For active wear
such as ski pants and girdle fabrics which endure a lot ofstress in .bending and stretching, this stitch may be usedfor seaming throughout the garment. With stretch stitchcontrol at “STRETCH STITCH” position, sew in samemanner as for ordinary sewing.
CAUTION — It is difficult to remove this stitch from
fabric. Pre-fit garment before using this stitch.
• TOPSTJTCHJNG
Because this stitch is heavier than an ordinary straightstitch, it is ideal for topstitching, particularly on knits.
ULTRA-STRETCH STITCH:The Ultra-Stretch Stitches are excellent for stretch fabrics such as lingerie, sweaterknits, bathing suit knits, and cotton knits, It has the greatest strength and elasticityof all.
• RICK-RACK STRETCHThis is most common utility ultrastretch of a tripleback-and-forth zigzag stitches with more elasticitythan regular zigzag.
Pattern:Special stitches
Length: 5Width:2—5Feed Dog: HighPressure: FullFoot: All PurposeStretch Control:
STRETCH
I
Pattern:Lenoth: 5Width: 0Feed Dog: HighPresti,rs: FullFoot: All PurposeStretch Control:
STRETCH
Pattern:Length: 5Width: 2—5Feed Dog: HighPressure: FullFoot: All purposeStretch Control:
STRETCH
Pattern:Length: 5Width: 2-5Feed Dog: HighPressure: Full—HalfFoot: All purposeStretch Control:
STRETCH
• PINE-LEAF STRETCHThis is the combined stitch of straight stretch andsingle sideward stitches, useful for hemming onmost knits and stretchy fabrics,
• SPECIAL ULTRA-STRETCH STITCHESThese are very useful ultra-stretch stitches called smocking, and BlindStretch, as shown on pattern marking for various purpose.
35

APPLICATIONS:
On most knits, an about 3/16 inch finishedseam, such as pine-leaf or special ultra-stretch stitches are more desirablethan a
5/8 inch opened seam allowance. These
stitches can create a neater, more
professional finish, eliminate bulky
seams, prevent curling, permit the gar
ment to “give” under stress, and at the
same time they cut down on the amount
of work involved in making a garment. If
ever in doubt as to which of thosestitches to use, test them on the particular
fabric in question and choose according
to their performance.
Its uses are almost unlimited and the
more you use your machine the more jwill become apparent to you
• ELASTIC APPLICATION
Fold fabric over the elastic and stitchelastic and fabric at one time, using
smocking, pine-leaf, or other ultra-stretch
stitch. The double layer of fabric next tothe elastic should be stitched with theone-side of ultra-stretch seam and the
elastic should be caught by another side.
NT1e sthdi’’lngth control shouId’’
be a)ways”-at number 5 whenstretch stitching, otherwise thea
: machine will be noisy and the -
-materia1 may feed in reverse onlywith uneven forward and reverse
-stitch length
36
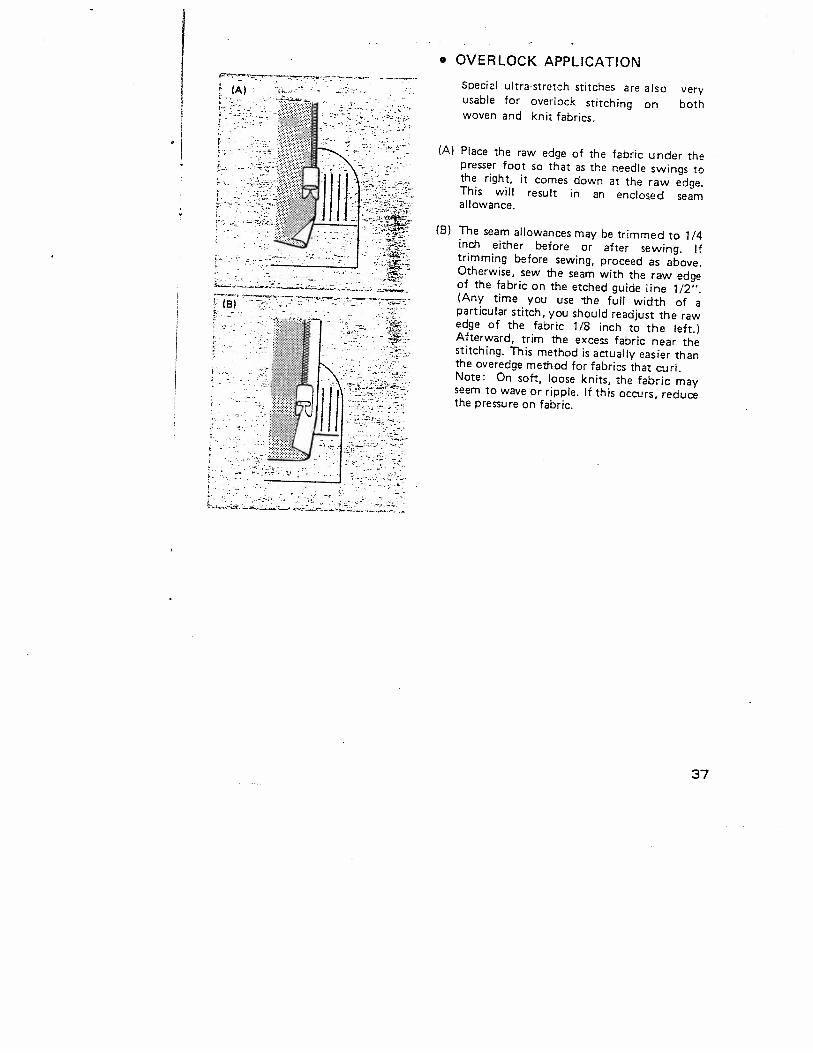
. OVERLOCK APPLICATION
Special ultra-stretch stitches are also veryusable for overlock stitching on bothwoven and knit fabrics.
(A) Place the raw edge of the fabric under thepresser foot so that as the needle swings tothe right, it comes down at the raw edge.This will result in an enclosed seamallowance.
(B) The seam allowances may be trimmed to 1/4inch either before or after sewing. Iftrimming before sewing, proceed as above.Otherwise, sew the seam with the raw edgeof the fabric on the etched guide line 1/2”.(Any time you use the full width of aparticular stitch, you should readjust the rawedge of the fabric 1/8 inch to the left.)Afterward, trim the excess fabric near thestitching. This method is actually easier thanthe overedge method for fabrics that curl.Note: On soft, loose knits, the fabric mayseem to wave or ripple. If this occurs, reducethe pressure on fabric.
37

SECTION VI
OILING MACHINE
Use only a good sewing machine
oil, do not use any common
household oils.Your machine should be oiled
occasionally to keep it operating
smoothly. How often depends on
the amount of sewing you do.
Once a year oil your machine
thoroughly as indicated by the
arrows on illustrations.Avoid over oiling.
cAREANt ‘MAINtENANCE OFYOURMAHIN
__.:‘
1
38
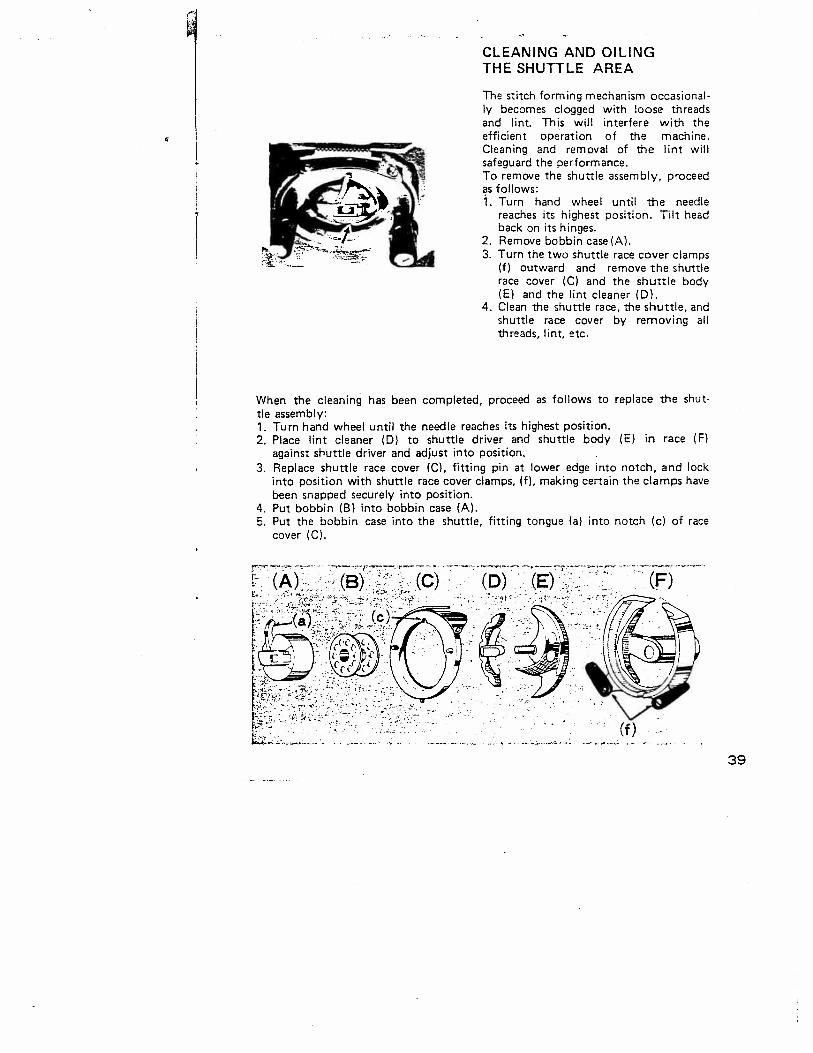
CLEANING AND OILINGTHE SHUTTLE AREA
The stitch forming mechanism occasionally becomes clogged with loose threadsand lint. This will interfere with theefficient operation of the machine.Cleaning and removal of the lint willsafeguard the performance.To remove the shuttle assembly, proceedas follows:1. Turn hand wheel until the needle
reaches its highest position. Tilt headback on its hinges.
2. Remove bobbin case (A).3. Turn the two shuttle race cover clamps
(f) outward and remove the shuttlerace cover (C) and the shuttle body(E) and the lint cleaner (D).
4. Clean the shuttle race, the shuttle, andshuttle race cover by removing allthreads, lint, etc.
When the cleaning has been completed, proceed as follows to replace the shut•tIe assembly:1. Turn hand wheel until the needle reaches its highest position.2. Place lint cleaner (D) to shuttle driver and shuttle body (E) in race (F)
against shuttle driver and adjust into position.3. Replace shuttle race cover (C), fitting pin at lower edge into notch, and lock
into position with shuttle race cover clamps, (f), making certain the clamps havebeen snapped securely into position.
4. Put bobbin (B) into bobbin case (A).5. Put the bobbin case into the shuttle, fitting tongue (a) into notch (c) of race
cover (C).
(A) (B) (C) (D) CE) (F)
39

illADJUSTING BOBBIN WINDER
It may be sometime required to adjust
the level of rear top thread guide to
conform with the level of bobbin winder,
especially, when thread winds unevenly
on bobbin.
If the thread winds unevenly on bobbin
as shown (A), loosen set screw of rear top
thread guide and move the thread guide
up slightly. If the thread winds as shown
(B), move the thread guide down slightly.
ADJUSTiNG AND CHANGING
MOTOR BELT
Following are the instructions for adjust
ing and changing the motor belt:
(1) Remove four screws holding rear
cover by tipping it out at the bottom
and pivoting around the hand wheel
away from the front of the machine
(2) To adjust motor belt, loosen screws
(A)and move bracket (B)up to loosen
belt and down to tighten.
(3) To remove motor belt:• Remove top cover.• Loosen clutch (C).• Loosen screws (A) and move
bracket (B) to its highest posi
tion.• Slip belt off motor pulley and
then over hand wheel.• Replace motor belt by slipping it
over hand wheel and then over
motor pulley.• Adjust as noted under No. 2.
-
-
- -
©
40

PROBLEM AND REMEDIESTrouble Probable Cause Remedies
-‘—• ‘--‘ ‘‘- - -.F . If Machine 3hread or hat rn race- C)ean and oil mactune the shuttle
__•J
F -- Skipping- Bent needle Replace to new needle (See page 10)
Stftthes-- - —- .—--.-
-I— Needle
need correctly (See page 10)
Too fine a needle for Replace needle or thread to conformthread being used . each other (See page 9)r- Too stróhy fabric. Place a paper beneath fabric or use-
— Ball Point needle
I-I j nute
-. Improper threading. 5ee threading instruction page 13Bobbin nOt -
Adjust bobbin winder (See page 40)—- —-.,—---—--. --——-—.‘.-. -
Unevi —-- flgioldi Avodpungormateri& justr Stitches -matenal. - ide it.r Not enough tension — — -- on upper thread Increase tension
Po& uality thread - -Try different thread
P Seeeedle and thread chart page 9—--S - - - —----.- t-ZL_ ts*_L -
- Upper Thread - -“ ;s— Refer to threadinó instructions, seeBreaking - -mProperlythreaded.- page 13, and rethread machine.r ‘Too much -tension Loosen upper thread tension-
—
(See pagel8Starting with tak p-, Always start sewing with take-up leverin incorrect position - in highest position
- I Improper setting of -
‘. Refer toneedle settinginstruction see-
- needle. - page 10. . -
Bent or eye of needle Tryariew needle.- too shp. -
--
Discard all blunt or bent needles and- Bent or blunt needle. : replace with new.
Material - rT. too tight. See tension adjustment, page 18. -PuckeringDull needle. Change needle.
-
Stitch length too long. Reduce stitch length.
• Machine noisy Stitch length control-‘
- & material “ is set at other than Set stitch length control at Number 5
--••-
Improper- Lint in feed d -
Remove needle plate and clean lint fromfeeding, - -. feeddog. - - --•—---—-- ,—.--—--———---- -—-*-.- - — a———-.- - •.
41
SECTION V SPEC1AL ATrACHMENTS
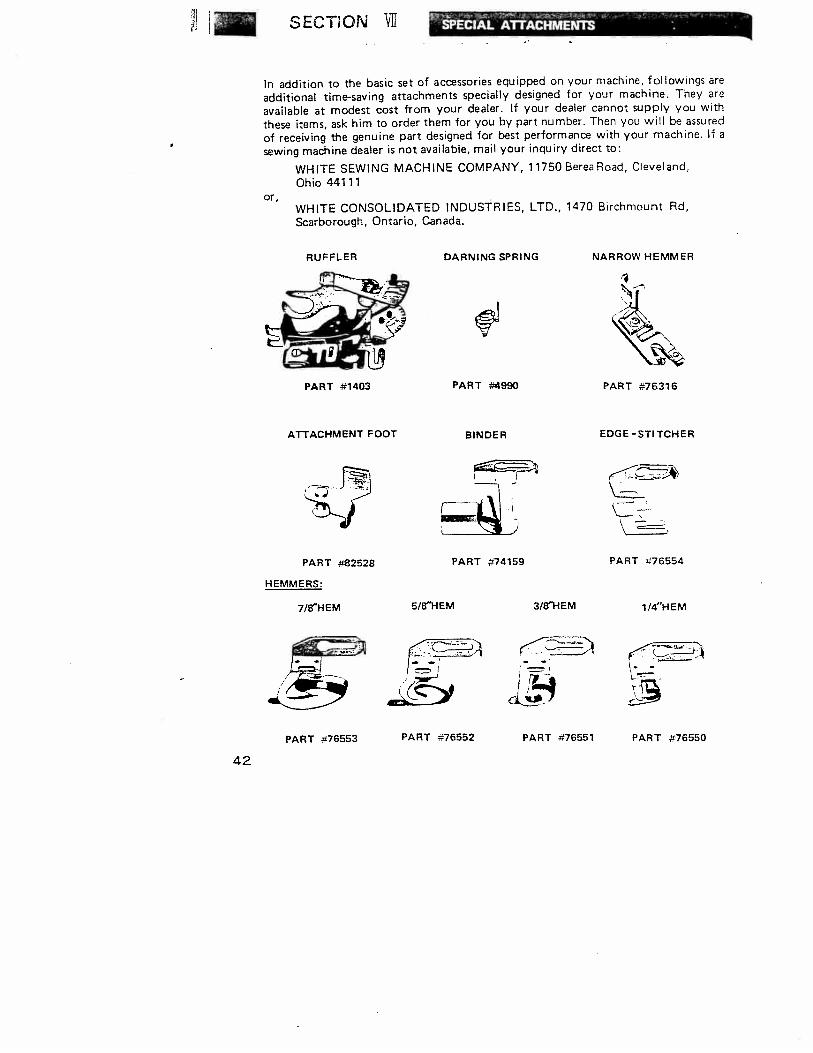
In addition to the basic set of accessories equipped on your machine, followings are
additional time-saving attachments specially designed for your machine. They are
available at modest cost from your dealer. If your dealer cannot supply you with
these items, ask him to order them for you by part number. Then you will be assured
of receiving the genuine part designed for best performance with your machine. If a
sewing machine dealer is not available, mail your inquiry direct to:
WHITE SEWING MACHINE COMPANY, 11750 Berea Road, Cleveland,Ohio 4411 1
WHITE CONSOLIDATED INDUSTRIES, LTD., 1470 Birchmount Rd,Scarborough, Ontario, Canada.
RUFFLER DARNING SPRING
PART #4990
NARROW HEMMER
ATTACHMENT FOOT BINDER EDGE -STITCHER
PART #76553 PART #76652
ii-;,
PART #76551 PART #76550
or,
PART #1403 PART #76316
PART #82528
LJ
PART #74159
5/8”HEM 3/8”HEM
HEMMERS:
7l8’HEM
PART #76554
1 /4”HEM
42

ATTACHMENT FOOT
In order to attach binder, edgestitcher and thehemmers, it is necessary to remove the presserfoot and replace it with the attachment foot.Mount binder, edgestitcher or hemmers bysliding the attachment to the left as far aspossible and tightening the screw.The mounting slot enables you to sew as close toor as far away from the edge as desired. Justmove, the attachment to the correct positionbefore tightening the mounting screw.
EDGESTITCHERThe edgestitcher is used in making dainty laceinsertions, edgings and piping.The slots in the edgestitcher serve as guides insewing together various pieces of material. If youwant to sew lace, lace and embroidery, or laceand tucked strips together, place the piece ofmaterial that will be on top in slot 1 and thelower fabric in slot 4. For instance, if you aresewing lace edging to a finished edge of fabric,place the fabric in slot 1 and the lace in slot 4.Be sure to draw the lace and material under theneedle and back of the edgestitcher so that thefeed will carry it backward as you stitch. Holdthe fabric in the left hand and the lace in theright, being sure the fabric overlaps the laceslightly.Rick-rack-stretch can be sewn to the edge of thematerial in the same manner.To trim with wide piping place the fabric in slot4, and the fold of the piping to the left in solt 3,for a narrow piping place fabric in slot 2 and thefolded edge of the piping to the right in slot 3.Slot 5 may be used as a guide in stitching aFrench seam.
43

BINDERThis attachment folds bias bindingand applies it to the edge ofmaterial in one operation. Slots onscroll of the binder are for corresponding widths of commerciallyfolded bias binding.The open mouth of binder scroll isused for unfolded bias strips cut15-16 inch wide.
FOLDED BINDING
Cut folded binding to a point,insert in appropriate slot. Drawthrough slot and under binder withstrong pin. Test stitching to be sureit is on the edge. Adjust by slidingbinder to right or left.
TWO-TONE BINDING
Two bindings can be sewn on fabricedge also in one operation. Whentwo are used always skip one sizebetween widths, inserting each incorrect size slot.
44
Cut 15-16 inch bias binding fold inhalf for a couple of inches. Cutbinding diagonally toward end,almost to fold. Slip fold into centerof binder. Draw back until cutopens and binding encircles openend of scroll. Test stitching to besure it is on the edge, adjust ifnecessary.See suggestions on how to use thebinder. There are hundreds of otheruses.
S
HAND-CUT BIAS BINDING
I

THE SET OF HEMMERSBefore attaching any of the hemmers, be sure bobbin thread is pulled up.Then, with hemmer in place, hold top thread loosely and turnhandwheel one full turn toward you, making a loop underhemmer. Grasp bobbin thread with both hands and slip horizontally under hemmertoward back. Bobbin thread will catch loop and carry upper thread to back ofhemmer.Fold material to suit for two inches along edge, hold at each end of fold. Slip foldinto guide and up over spoon. Fold hem in material back of hemmer. Draw forwardto end of hem and fastn with point of needle. Pull on threads gently as you startstitching.
You can make a hem 1/4”, 3/8’, 5/8” or 7/8” in width, depending upon whichhemmer you use A few uses are shown below.
46
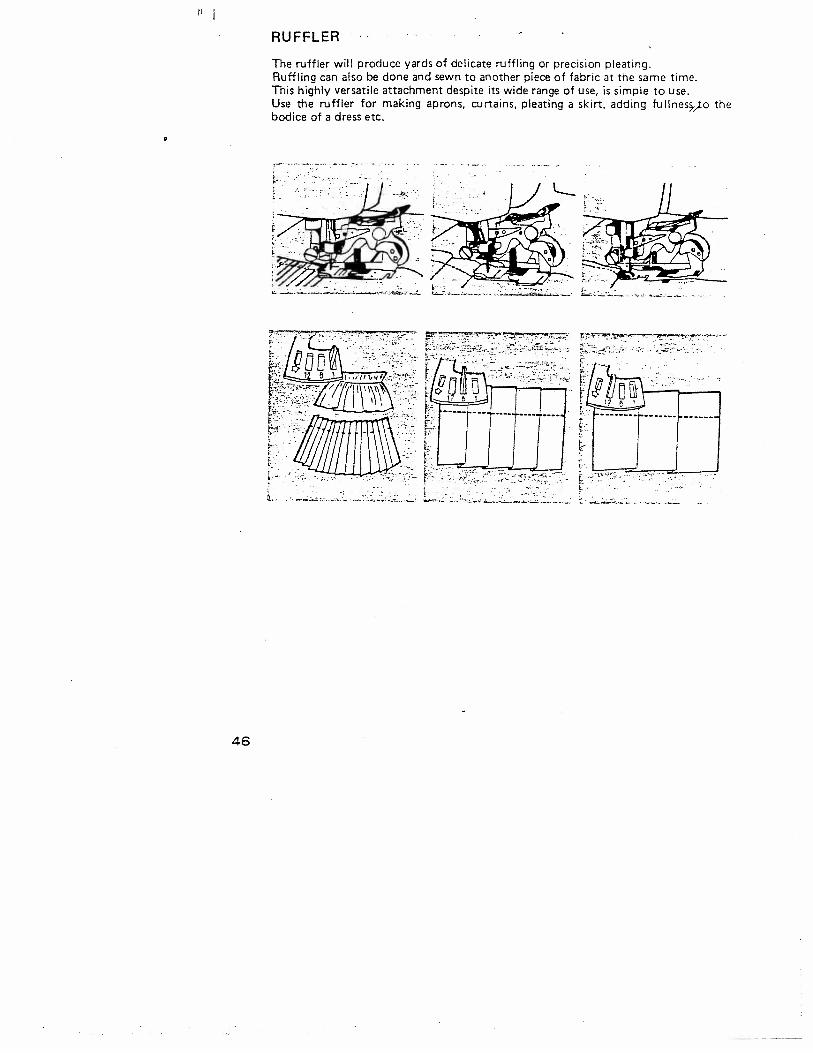
RUFFLER
The ruffler will produce yards of delicate ruffling or precision pleating.Ruffling can also be done and sewn to another piece of fabric at the same time.This highly versatile attachment despite its wide range of use, is simple to use.Use the ruffler for making aprons, curtains, pleating a skirt, adding fullnes,,.Io thebodice of a dress etc.
I

CO
CDc
2.C
,
OD
CC
D1
,-‘
,-+
3-O
CC
Z1
—Z
r-,
CD
Di
CO
0Z
rZ
r
o g.g
Di
DC
CD
-4 DC -4-4 z
— -4Z
rD
i
-4’
CD0 ‘
Di
‘““O
C-i
--C
,.+
-4’:
00
‘C
D4
ci—
-,
1,,
-ct
i0
.,
Di
S.0
r.
$?Z
rZ
r-
3°.
o!co
CD
-.,”
‘-.g
0C
CD
‘400
L;
Zr
—0C
D
0Di
OD
iC
CO
CD‘4
Zr
0—
.
CD
D-i
C,
CD
CC
D-
U,’
Dio
U,
() 2:.
OtJ
PCD
DCCO
COO
,+
CD
ZrC
>
CO
CD
C)C
D0
•Z
‘CD
I m fri
CI)
CD
CO
OZ
rI
QC
DD
CD
COZ
rC
I)-
CD“
CC)
0j
— C)
04
-.
Zr
0 —0
,O
DZ
Zr
CO0
.3
-,
‘CD
CDZ
rC
Zr
-‘
—0
-0
CDD
iDC
-‘
D0
2.2.
‘P(P

LACE TRIMMED HEM
To sew a narrow hem and attachlace in one stitching, insert lace inthe slot next to needle.Sew hem asshown, guiding lace under needleand hem into scroll. Rickrackstretch may be used in the sameway.
LACE EDGE WITH INVISIBLE STITCHING
Hold lace 1/8 inch from raw edgeon right hand side of fabric. Insertboth in scroll, as for plain narrowhem, let hem roll over and sew inlace. When the stitching is compIeted the hem is pressed on the wrongside.
FRENCH SEAM
Place material with right sidesfacing each other and the top pieceof material 1/8 inch from righthand edge of lower piece. Insert inhemmer scroll allowing hem to rollover and sew in top fabric makingFrench seam. For cording effect,use zigzag stitch wide enough tocatch both edges of the narrowrolled hem and sew with satinstitch. This can be used For coveringchairs and so forth.
HEMMING ACROSS A SEAM
To hem across a seam, cut the seamfolds at an angle so they will leadinto the hemmer gradually. Pressseam open. Stitch across the seamat the extreme edge to hold ittogether and for added firmness, Itmay be necessary to pull thematerial slightly when hemmingover the seam.
48
