i n s t r u aumentos - disminuciones increasing - … › files › tut ›...
TRANSCRIPT

I
N
S
T
R
U
C
C
I
O
N
E
S
I
N
S
T
R
U
C
T
I
O
N
S
Ver videos en www.katia.com/aprende-videos o en nuestro canal de filkatia
Bases para aprender a realizar una prendaLearning how to make a garment
En esta segunda parte os damos las nociones básicas que se necesitan para poder realizar una prenda.
In this second part we give you the basic instructions for completing a garment
AUMENTOS - DISMINUCIONES Y/O MENGUADOS
INCREASING - DECREASING AND/OR BINDING/CASTING OFF
Pasar 1 p. sin hacer clavando la ag. derecha como si se fuera a tejer al revés, trabajar el siguiente p. al derecho y pasar el p. sin hacer por encima de este punto.
Slip 1 stitch purlwise (as if to purl it) onto RH needle, knit the next stitch, with the tip of the LH needle pass the slipped stitch over the knitted stitch.
Tejer 1 p. al derecho y pasar el punto de la aguja derecha por encima de este punto, repetir este paso hasta tener cerrados el número de puntos indicados, al principio de la siguiente vta, revés de la labor, cerrar los p. igual pero trabajados al revés.
Knit 1 stitch, pass the second stitch on RH needle over the new stitch. Repeat for the required number of stitches to be bound/cast off, making sure that the tension is not too tight. Bind/cast off the stitches in the same manner at the beginning of the next row = wrong side, but working them in purl.
Al empezar la siguiente vta. cerrar de nuevo los p. que indique la revista, de esta manera se consigue la forma redondeada que tienen sisas y escotes.
On the following row, continue the shap-ing as indicated in the instructions until the rounded form of the armhole or neckline has been completed.
Disminuciones al principio de la vta. Decreasing at the beginning of a row
Cuando se cierran puntos para formar una sisa o un escote, se cierran al principio de la vta.
When forming an armhole or neckline shaping, binding/casting off is done at the beginning of the row.
Al Inicio de la vta, siempre por el derecho de la labor, trab. 1 p. der. pasar 1 p. de la aguja izquierda sin hacer a la aguja der., trab. 1 p. al der., y pasar el p. sin hacer por encima de este p. al der.
Disminuciones en ambos lados de la misma vta. Decreasing at both edges of the same row
Se usan para las sisas vistas y para hacer la manga raglán.Son las disminuciones en las que se ven los p. de la orilla incli-nados, se trabajan normalmente por el derecho de la labor.Las disminuciones se hacen siempre a x puntos de los extre-mos. Ponemos un ejemplo a 1 p. de la orilla.
Often used for raglan sleeves or to highlight an armhole.
These are the decreases where you can see the sloping edges and are normally worked on the right side of the garment.
The decreases are always worked at a dis-tance of x number of stitches from the edge. Here is an example of decreasing at a dis-tance of 1 stitch in from the edge.
At the beginning of the row, always with the right side of work facing you; K1, slip stitch onto RH needle, K1, PSSO.
At the end of the row, always with the right side of work facing you, (the instructions indicate to decrease x number of sts in from the edge, and following an example of 1 st), work to the last 3 stitches, K2 tog, K1.
Al Final de la vta., siempre por el derecho de la labor, (en las explicaciones se indica menguar a x p. de la orilla y siguiendo el ejemplo a 1 p.), cuando faltan 3 p. para terminar la vta., trab. 2 p. juntos al der. y 1 p. al der.14
Copyri
ght ©
FIL KATIA
, S.A
.

I
N
S
T
R
U
C
C
I
O
N
E
S
I
N
S
T
R
U
C
T
I
O
N
S
Find more videos under www.katia.com/EN/learn-to-knit-videos.html or on filkatia channel
Trabajar estos p. al derecho o al revés según se requiera.
Knit or purl the additional stitches following the instructions.
Aumentos al principio de la vta. Increasing at the beginning of a row
Añadir puntos al inicio de la vta., como si se montaran, tantos como aumentos queramos. Realizar lo mismo al terminar la vuelta.
Es para aumentar más de 1 p.
At the beginning of the row, cast on the des-ignated number of stitches. At the end of the row do the same.
When increasing more than one stitch.
Al Inicio de la vta., siempre por el derecho de la labor. Trab. 1 p. al der. y después con la ag. derecha recoger la baga horizontal que queda entre el p. de la ag. derecha y el 1º p. de la ag. izquierda y ponerla en la ag. izquierda.
At the beginning of the row, always with the right side of work facing you; K1, and with the tip of the RH needle pick up the horizontal bar of yarn between the last worked stitch and the next stitch on the LH needle and put it onto the LH needle.
Trabajarla al derecho pero clavando la ag. por detrás del p.
Work the stitch in knit but inserting the needle through back of loop.
De esta forma se evita que quede un agujero en la base del punto aumentado.
In this manner a hole is prevented from forming at the base of the increased stitch.
Al final de la vta., siempre por el derecho de la labor, (en las explicaciones se indica aumentar a x p. de la orilla y siguiendo el ejemplo a 1 p.), cuando falta 1 p. para terminar la vta., con la ag. derecha recoger la baga horizontal que queda entre el ultimo p. de la ag. derecha y el primero de la ag, izquierda y ponerla en la ag. izquierda.
At the end of the same right side row, (in the instructions it is indicated to increase at x number of stitches from the edge, and following the example of 1 st), work to the last stitch and with the tip of the RH needle pick up the horizontal bar of yarn between the last worked stitch on the RH needle and the first stitch on the LH needle, place this loop onto the LH needle.
Trabajarla al derecho clavando la ag. por detrás del p. y al der. el p. restante.
Work the stitch in knit but inserting the needle through back of loop and knit the remaining st.
Aumentos en ambos lados de la misma vta. Increasing at both edges of the same row
Son los aumentos que se trabajan normalmente por el derecho de la labor.Estos aumentos se hacen siempre a x puntos de los extremos.Ponemos un ejemplo a 1 p. de la orilla.
These kind of increases are usually worked on a right side row and are always worked at a distance of x number of stitches from the edge. Here is an example of increasing at a distance of 1 stitch in from the edge.
15
Copyri
ght ©
FIL KATIA
, S.A
.
I
N
S
T
R
U
C
C
I
O
N
E
S
I
N
S
T
R
U
C
T
I
O
N
S
Ver videos en www.katia.com/aprende-videos o en nuestro canal de filkatia
FORMAS DE CERRAR BINDING/CASTING OFF
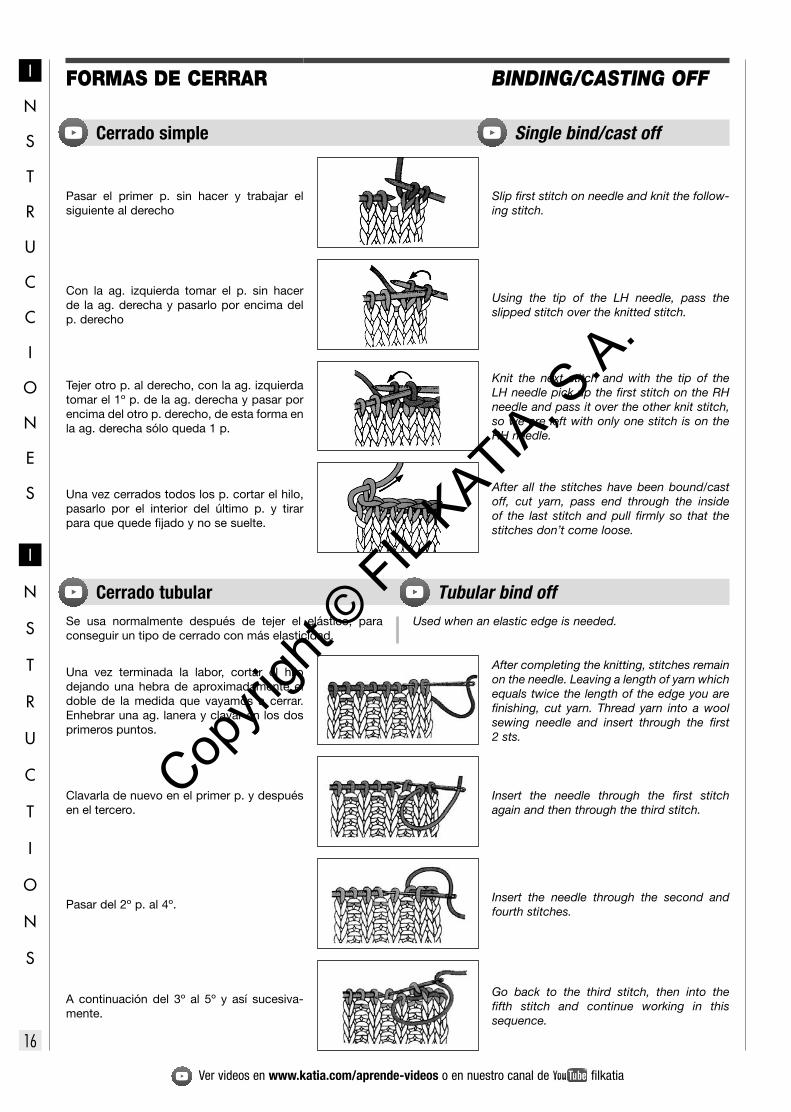
Pasar el primer p. sin hacer y trabajar el siguiente al derecho
Slip first stitch on needle and knit the follow-ing stitch.
Cerrado simple Single bind/cast off
Con la ag. izquierda tomar el p. sin hacer de la ag. derecha y pasarlo por encima del p. derecho
Using the tip of the LH needle, pass the slipped stitch over the knitted stitch.
Tejer otro p. al derecho, con la ag. izquierda tomar el 1º p. de la ag. derecha y pasar por encima del otro p. derecho, de esta forma en la ag. derecha sólo queda 1 p.
Knit the next stitch and with the tip of the LH needle pick up the first stitch on the RH needle and pass it over the other knit stitch, so we are left with only one stitch is on the RH needle.
Una vez cerrados todos los p. cortar el hilo, pasarlo por el interior del último p. y tirar para que quede fijado y no se suelte.
After all the stitches have been bound/cast off, cut yarn, pass end through the inside of the last stitch and pull firmly so that the stitches don’t come loose.
Una vez terminada la labor, cortar el hilo dejando una hebra de aproximadamente el doble de la medida que vayamos a cerrar. Enhebrar una ag. lanera y clavar en los dos primeros puntos.
After completing the knitting, stitches remain on the needle. Leaving a length of yarn which equals twice the length of the edge you are finishing, cut yarn. Thread yarn into a wool sewing needle and insert through the first 2 sts.
Cerrado tubular Tubular bind off
Clavarla de nuevo en el primer p. y después en el tercero.
Insert the needle through the first stitch again and then through the third stitch.
Pasar del 2º p. al 4º.Insert the needle through the second and fourth stitches.
Se usa normalmente después de tejer el elástico, para conseguir un tipo de cerrado con más elasticidad.
Used when an elastic edge is needed.
A continuación del 3º al 5º y así sucesiva-mente.
Go back to the third stitch, then into the fifth stitch and continue working in this sequence.
16
Copyri
ght ©
FIL KATIA
, S.A
.

I
N
S
T
R
U
C
C
I
O
N
E
S
I
N
S
T
R
U
C
T
I
O
N
S
Find more videos under www.katia.com/EN/learn-to-knit-videos.html or on filkatia channel
ACABADOS FINISHES
Añadir una hebra o baga y hacer dos puntos juntos al derecho.
Add a YO (yarn over) on needle and knit 2 stitches together.
Ojales redondos Round buttonholes
A partir de la siguiente vta trabajar los p. como corresponda.
From the following row work the stitches and the yon as corresponds.
Una vez llegado al último p. clavar la aguja de nuevo desde el penúltimo al último, rematar y cortar el hilo.
After reaching the last stitch insert the nee-dle through the penultimate stitch again then into the last stitch. Cut yarn and fasten off.
Cuando el botón que queremos poner es pequeño o estamos trabajando una lana muy gruesa, es recomendable hacer un ojal pequeño.
When the button that we want to use is very small or the yarn is very thick, it’s recommendable to make a small buttonhole.
Una vez terminadas las piezas de una prenda para hacer el cuello o las tapetas de los delanteros, se recogen los p. clavando la aguja en la orilla.
Stitches can be picked up along the edge of a knitted gar-ment to add a collar or front bands. This is usually done with the right side of the garment facing you.
Cerrar tantos p. como indique la revista (por ejemplo: ojal de 3 p.), en la siguiente vta. montar en la ag. los mismos p. que se cerraron.
The designated stitches are bound/cast off, and on the following row, the same number of stitches are cast on.
Ojales horizontales Horizontal buttonholes
Cuando se recogen los p. en el mismo sen-tido que la labor, clavar la aguja en el centro de cada p. de la última vta., poner hilo sobre la ag. y formar un punto.
When picking up stitches in the same direc-tion as the work along a bound off or cast on edge, insert needle into centre of each stitch on the row below and work as corresponds.
Cuando se recogen los p. en un lado de la labor, clavar la ag. en el centro del p. de la orilla, poner hilo y formar un punto.
When picking up stitches along the edge of a piece of work, insert the needle through the centre of the edge stitch, wrap yarn around needle and form a stitch.
Recoger puntos Picking up stitches
17
Copyri
ght ©
FIL KATIA
, S.A
.

I
N
S
T
R
U
C
C
I
O
N
E
S
I
N
S
T
R
U
C
T
I
O
N
S
Ver videos en www.katia.com/aprende-videos o en nuestro canal de filkatia
Clavar la ag. siempre en el p. de la orilla pero en todas las vtas. Después de recoger todos los p. al trab. la 1ª vta. aumentar o menguar puntos repartidos para obtener el nº de pun-tos indicados en la explicación.
Always insert the needle in the edge stitch in all rows. After picking up all the stitches, on the following row increase or decrease the stitches evenly across the row in order to obtain the required number of stitches as indicated in the pattern.
COSTURAS SEAMS
Encarar las piezas derecho con derecho y coser siguiendo el contorno de las piezas.
With right sides together, work a back stitch along the edges of the pieces.
Pespunte Back stitch
Este tipo de costura también llamada invisible, se realiza por el derecho de la labor. Poner las dos piezas a coser, una al lado de la otra alineadas. Pasar la aguja por la entremalla (el hilo que une un punto con el siguiente) de la primera vta. de una pieza y después, clavarla en la entremalla de la 2ª vta. de la otra pieza. Continuar clavando la ag. de una a otra pieza como muestra el dibujo.
This type of seam is also invisible and is worked with the right sides facing. Place the two pieces together with straight edges touching and work back and forth from one piece to the other picking up the bar of yarn of the first row at the side of the edge stitch of one side, then draw the pieces together by picking up the bar of the second row on the opposite side. Continue inserting the needle from one piece to the other as shown in the diagram.
Punto de lado Side seams
Cuando se termina una pieza, no se cierran los p., se dejan en espera. Enhebrar una ag., encarar las dos piezas y coser los puntos clavando la ag. en el centro de los p., alternando un punto de una pieza con el de la otra y siempre cogiendo el punto anterior para que quede bien unido e ir soltándolos de la aguja a medida que se van cosiendo. Como se muestra en la foto.
When a piece is finished and the stitches are not bound off, but left on hold on the needles. Thread a wool sewing needle and with the right sides facing you, sew the stitches together inserting the needle in the centre and alternating one stitch from one piece with one from the other and always inserting the needle through the previous stitch again so that the pieces are firmly joined. Release the stitches from the needle once they have been sewn as shown in the diagram.
These seams are flat and invisible from the right side.
Grafting Grafting
Estas costuras quedan planas e invisibles ya que el resultado es como una continuación del tejido.
18
Copyri
ght ©
FIL KATIA
, S.A
.
I
N
S
T
R
U
C
C
I
O
N
E
S
I
N
S
T
R
U
C
T
I
O
N
S
Find more videos under www.katia.com/EN/learn-to-knit-videos.html or on filkatia channel
ADORNOS DECORATIONS
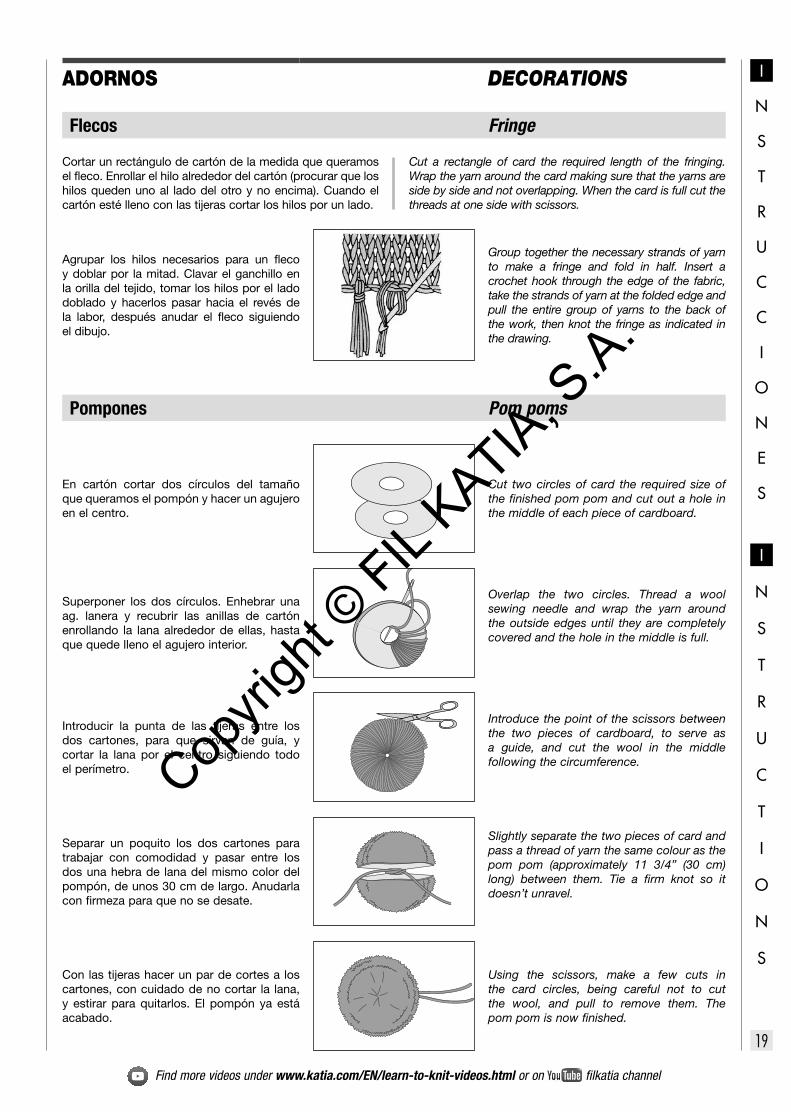
Agrupar los hilos necesarios para un fleco y doblar por la mitad. Clavar el ganchillo en la orilla del tejido, tomar los hilos por el lado doblado y hacerlos pasar hacia el revés de la labor, después anudar el fleco siguiendo el dibujo.
Group together the necessary strands of yarn to make a fringe and fold in half. Insert a crochet hook through the edge of the fabric, take the strands of yarn at the folded edge and pull the entire group of yarns to the back of the work, then knot the fringe as indicated in the drawing.
Flecos Fringe
Cortar un rectángulo de cartón de la medida que queramos el fleco. Enrollar el hilo alrededor del cartón (procurar que los hilos queden uno al lado del otro y no encima). Cuando el cartón esté lleno con las tijeras cortar los hilos por un lado.
Cut a rectangle of card the required length of the fringing. Wrap the yarn around the card making sure that the yarns are side by side and not overlapping. When the card is full cut the threads at one side with scissors.
En cartón cortar dos círculos del tamaño que queramos el pompón y hacer un agujero en el centro.
Cut two circles of card the required size of the finished pom pom and cut out a hole in the middle of each piece of cardboard.
Superponer los dos círculos. Enhebrar una ag. lanera y recubrir las anillas de cartón enrollando la lana alrededor de ellas, hasta que quede lleno el agujero interior.
Overlap the two circles. Thread a wool sewing needle and wrap the yarn around the outside edges until they are completely covered and the hole in the middle is full.
Introducir la punta de las tijeras entre los dos cartones, para que sirvan de guía, y cortar la lana por el centro siguiendo todo el perímetro.
Introduce the point of the scissors between the two pieces of cardboard, to serve as a guide, and cut the wool in the middle following the circumference.
Separar un poquito los dos cartones para trabajar con comodidad y pasar entre los dos una hebra de lana del mismo color del pompón, de unos 30 cm de largo. Anudarla con firmeza para que no se desate.
Slightly separate the two pieces of card and pass a thread of yarn the same colour as the pom pom (approximately 11 3/4” (30 cm) long) between them. Tie a firm knot so it doesn’t unravel.
Con las tijeras hacer un par de cortes a los cartones, con cuidado de no cortar la lana, y estirar para quitarlos. El pompón ya está acabado.
Using the scissors, make a few cuts in the card circles, being careful not to cut the wool, and pull to remove them. The pom pom is now finished.
Pompones Pom poms
19
Copyri
ght ©
FIL KATIA
, S.A
.

I
N
S
T
R
U
C
C
I
O
N
E
S
I
N
S
T
R
U
C
T
I
O
N
S
Ver videos en www.katia.com/aprende-videos o en nuestro canal de filkatia
BORDADO EMBROIDERY
Punto de cruz
Cross stitch
Punto margarita
Lazy daisy stitch
Punto bastillas
Basting stitch
Punto de cadeneta
Chain stitch
Punto jacquard bordado
Embroidered jacquard
Punto carril
Bullion stitch
Punto festón
Buttonhole stitch
Punto de nudo
French knot
Punto de tallo
Stem stitch
Punto llano
Satin stitch
20
Copyri
ght ©
FIL KATIA
, S.A
.