i sense timer thermostat - remeha commercial boilers · • adjust the boiler so that it can be...
TRANSCRIPT

1
i SenseTimer thermostat
User manual

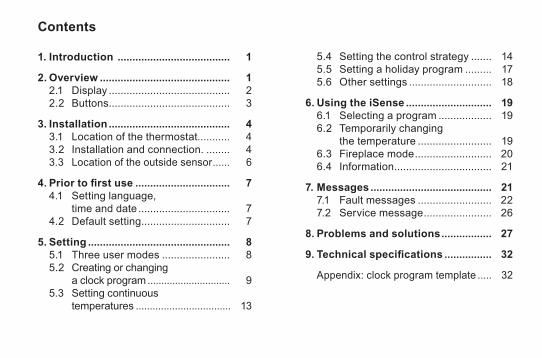
Contents
1. Introduction ...................................... 1
2. Overview ............................................ 1 2.1 Display ......................................... 2 2.2 Buttons ......................................... 3
3. Installation ......................................... 4 3.1 Location of the thermostat........... 4 3.2 Installation and connection. ........ 4 3.3 Location of the outside sensor ...... 6
4.Priortofirstuse ................................ 7 4.1 Setting language,
time and date ............................... 7 4.2 Default setting .............................. 7
5. Setting ................................................ 8 5.1 Three user modes ....................... 8 5.2 Creating or changing
a clock program .............................. 9 5.3 Setting continuous
temperatures .................................. 13
5.4 Setting the control strategy ....... 14 5.5 Setting a holiday program ......... 17 5.6 Other settings ............................ 18
6. Using the iSense ............................. 19 6.1 Selecting a program .................. 19 6.2 Temporarily changing
the temperature ......................... 19 6.3 Fireplace mode .......................... 20 6.4 Information ................................. 21
7. Messages ......................................... 21 7.1 Fault messages ......................... 22 7.2 Service message ....................... 26
8. Problems and solutions ................. 27
9.Technicalspecifications ................ 32
Appendix: clock program template ..... 32

1
1. IntroductionThe Remeha iSense is an OpenTherm timer thermostat with many enhanced functions.The iSense is supplied in two versions:• iSenseOpenTherm• iSenseRF(wireless),withtheiBaseRFtransmitterThis manual covers both versions. Where information only pertains to one of the two versions then this is clearly stated.A full description of the Remeha iSense can be found in the Installation and Service manual. This can be downloaded from www.remeha.nl.
2. OverviewThe iSense is menu-controlled, which means it is very simple to operate: it only has three buttons.
Menu Program
Button A
T000059-06-A
Display
Button BButton C,
(push-turn)

2
2.1 Display
Textboxmenus
T000060-06-A
Mode button BMode button A
TemperatureTime
Pictograms
Menu Program
Most important pictograms
T001001-A
Clock program active Controller requesting heatContinuous day temperature Central heating boiler on for hot waterContinuous night temperature Central heating boiler on for central heatingFrost protectionSummer mode Warning symbolsManual setting Water pressure in central heating boiler too lowHoliday program General warning symbolDHW standby function switched off Central heating boiler requires servicingCurrent room temperature Battery in controller almost emptyRoom temperature set No wireless connection
T001007-A

3
2.2 ButtonsThe function of button A and button B depends on the task you are carrying out. The function is shown in the display, immediately above the buttons.
A
T000059-06-B
BC
Button C is a push-turn button. You press it to confirmchoices,suchasmenuselections.Byturning it you can perform various tasks such as scrolling through menus or changing values such as the temperature, time, date and language.
T000153-A

4
3. Installation3.1 Location of the thermostatThe iSense is set to room control by default, which means that the inside temperature is used to control the central heating. That is why it is best to locate the iSense on an internal wall in the room in which you spend the most time, such as the living room.
Donotlocatethecontrollertooclosetoheatsources(fireplace,radiator,lamp,candles,directsunlightetc.),orinplaceswhereitmaybedraughty.
iSense RFThe following also apply for the iSense RF:• PositiontheiSenseatleast1metrefromequipmentwithelectromagneticemissionssuchas
wireless telephones, TVs, computers, microwave ovens, etc.• PositiontheiSensesothatithasgoodreception.Takeaccountofthefactthatobjects
containing metal will affect the reception. These include steel-reinforced concrete, mirrors andwindowswithametalcoating,insulatingfilmsetc.
i The signal strength can be viewed via Menu > Information.

5
3.2 Installation and connectionThe following must be done before you install and connect the iSense:• AdjusttheboilersothatitcanbeconnectedtoanOpenThermthermostat.• Turnofftheboiler.Consult the boiler documentation for this process.
Do this as follows:1. Open the housing by pulling the front and the base plate apart.
2. Attach the base plate of the controller to the wall using the screws and plugs supplied. Ensure that the boiler's connecting wires are protruding through the hole in the base plate.
3. Connect the thermostat to the boiler OpenTherm connection and the controller OT connection. OpenTherm is polarity insensitive; you may therefore swap the wires.
T001046-C
T000062-C
OT
OT

6
4. PlacethreeAAbatteriesinthethermostatifrequired. These are not provided. The batteries ensure that the clock keeps running when the boiler is switched off.
The batteries also power the backlight for the iSense for boilersthatdonothaveOpenThermSmartPower.Ifyou haveaboilerwithSmartPower,thenthebacklightfortheiSense also works without batteries. (iSense RF only)Place3AAbatteriesinthethermostat.These are required to operate the iSense RF.
T001042-B
i The programs that are set are saved if the boiler or the iSense is switched off (even if there are no batteries).
The iSense RF automatically starts communicating with the iBase.
3.3 Location of the outside sensorAn outside temperature sensor is not supplied as standard with the iSense.You only require this sensor if you want weather-compensated control of the inside temperature.The following guidelines apply with regard to choosing a location for an outside temperature sensor:• Install the outside sensor on the north or north-west side of the home, away from direct sunlight.• Thesensormustbepositionedatleast2.5metresabovegroundlevel.• Donotinstalltheoutsidesensornearwindows,doors,ventilationgrills,extractors,etc.
Consult the documentation for your boiler for information on connecting an outside temperature sensor.

7
4. Priortofirstuse4.1 Setting language, time and dateThemenuforselectingthelanguage(internationalversion)orsettingthetime(Dutchversion)appears when you connect the iSense.1. SelectthedesiredlanguageifapplicablebyturningbuttonCandthenpushbuttonCtoconfirm.2. Follow the instructions on the display to select the time, year, month and day.
The controller is now ready for use. After installation, the default program is activated (seeparagraph4.2).Thetemperatureisnowcontrolledbythisclockprogram.
i The thermostat automatically switches between summer time and winter time settings.
4.2 Default settingRoom controlTheiSenseissettoroomcontrolbydefault.Thismeansthattheflowtemperatureofthe central heating water is controlled by the temperature in the room where the iSense is installed.Weather-compensatedboilercontrolisalsopossible(withoutsidesensor);inotherwordsbasedonthe outside temperature. The controller has a programmed heating curve which determines the water flowtemperaturetogetherwiththeoutsidetemperature.Theheatingcurvemustbechosensothattheleastfavourableroomcanbeefficientlyheatedevenwhentheoutsidetemperatureisverylow.See paragraph 5.4 for further information about weather-compensated control.

8
Clock programThe default clock program sets the temperature each day as follows:
•06:00–19:00: 20°C(7days)•19:00–23:00: 21°C(7days)•23:00–06:00: 15°C+(7days)
You can of course adapt the clock programs to your own requirements. See Chapter 5.
5. Setting5.1 Three usage modesThe iSense has three usage modes:• Basic: no clock programs are used in this mode.
You can only set the temperature on the thermostat manually.• Normal: this is the standard mode. Most options are available, such as the clock program.• Advanced:thismodeletsyouusetwostandardclockprograms(AandB),changemore
settings and request more detailed information.
You can change the usage mode via the menu: Menu > Settings > User settings > Usage mode. i This manual deals with most functions relating to the 'Normal' mode.
This is the default mode after initial start-up.

9
5.2 Creating or changing a clock programA clock program automatically controls the temperature for a day, and can be set for each individualday.Youcanadjustthedefaultclockprogramorenteracompletelynewprogram.
i The iSense starts pre-heating prior to the set time by default, so that the room has reached the desired temperature at the correct time.
Making an overviewIt is useful to draw up your own overview with switch times: what temperature does it need to be and when in your home? This of course depends on who is at home when, what time you get up etc. You can set up to six switch times per day.

10
An example of an overview is shown below:
Time MO. TU. WE. TH. FR. SA. SU.
7:00
9:00
11:00
13:00
15:00
17:00
19:00
21:00
23:00
0:00T001003-06-A
i There is an overview template at the back of this manual that you can use for your own clock program.

11
Creating a new clock program1. Select Menu > Program > Clock program > New.2. Selectaninitialprogramifappropriate(Daytimehome,MidweekhomeorWeekendhome).
You can now create your own clock program based on this program. PressbuttonCtoconfirm.
3. Go to the day for which you want to set the clock program. PressbuttonCtoconfirm.
4. Gotothetimeyouwanttoset.PressbuttonCtoconfirm.
i You can use the Remove button to remove the selected switch time.
5. Use button C to set the time and the corresponding desired temperature.6. Once you have set all switch times for a particular day, you can copy the settings for that day
to other days: - Go to the day. -PressCopy. - Selecttheday(s)towhichyouwanttocopythesettingsusingbuttonCandpress Save.7. Go to the day. Then press button C.8. Go to step 3 to set the next day, or press Back to close this menu.

12
Changing an existing clock program1. Select Menu > Program > Clock program > Change.2. Go to the day for which you want to change the clock program.
PressbuttonCtoconfirm.3. Gotothetimeyouwanttochange.PressbuttonCtoconfirm.
i You can use the Remove button to remove the selected switch time.
4. Use button C to set the time and the corresponding desired temperature.5. Once you have set all switch times for a particular day, you can copy the settings for that day to
other days:- Go to the day.- PressCopy.- Selecttheday(s)towhichyouwanttocopythesettingsusingbuttonCandpressSave.6. Go to the day. Then press button C.7. Go to step 2 to set the next day, or press Back to close this menu.
Restoring the default settingsSelect Menu > Program > Clock program > Factory program to restore the settings for the default clock program.

13
5.3 Setting continuous temperaturesInstead of the clock program, you can also set the room temperature continuously to a particular value. You can set three different continuous temperatures via Menu > Program:• Day temp.: room temperature during the day, corresponding to the “Continuous day”
program. • Night temp.: room temperature at night, corresponding to the “Continuous night” program.• Frost temp.: room temperature to protect the room where the controller is installed from
freezing. This setting comes under the “Frost protected” program.
i The programs mentioned are explained in paragraph 6.1.

14
5.4 Setting the control strategyThe iSense lets you use the room control and/or weather-compensated control strategies in various ways.You can select a control strategy via Menu > Settings > System > Control strategy.
Specificsettingsforweather-compensatedcontrolIf you have opted for a weather-compensated control strategy, a number of extra settings are available via Menu > Settings > System > OTC settings.Heating curve:• Base point outside: outside temperature base point• Basepointflow:flowtemperaturebasepoint• Climate point outside: outside temperature climate point• Climatepointflow:flowtemperatureclimatepoint• Curvature: degree of curvature of the heating curve, depending on your central heating system.
Selecttherelevanttypeofheaters:underfloorheating,radiatorsorconvectors. This will provide more comfort early and late in the year.
i The heating curve is based on an outside temperature of 20°C. When the desired room temperature is increased, the heating curve shifts upwards. The degree of increase is determined using the “RT effect” function.
• RT effect:factorinfluencingtheshiftintheheatingcurve• Day temperature limit: outside temperature above which the central heating is switched off
during the day. The day temperature limit is relevant when the desired room temperature is
15
higher than the night temperature that has been set via Menu > Program > Night temperature• Night temperature limit: outside temperature above which the central heating is switched
off during the night. The night temperature limit is relevant when the desired room temperature is the same as or lower than the night temperature that has been set via Menu > Program > Night temperature

16
Heating curve – an example
-5-15 5 15 25Outside temperature (ºC)
Boi
ler t
empe
ratu
re (º
C)
100
90
80
70
60
50
40
30
20
100
0
Base point
T001032-06-A
Climate point
Desired room temperature of 15ºC during the night
Increased room temperature during the day
Desired room temperature of 20ºC during the day
i See also see day/night temperature limit 12.4
The settings for the heating curve are highly dependent on the design of the central heating system and the home. This means that no clear advice can be given on this matter. The heating curve can be optimised during use. The heating curve also shifts upwards or downwards when the temperature is increased or decreased.

17
5.5 Setting a holiday program It can be useful to set a holiday program if you are away from home for some time.This ensures a constant temperature in your home for the period you set. You set the temperature yourself.
A holiday program automatically takes effect at 0.00 hours on the start date and ends at 0.00 on the end date.
The T001001-B
symbol appears in the display.This program is switched off and removed once the period set has ended.
You can set a maximum of 16 holiday programs. You do this via Menu > Program > Holiday prog.:• Select View to look at the holiday programs set.• SelectChange to change or remove programs.• SelectEnter to add a new program.• SelectDesired temp. to set the constant temperature.

18
5.6 Other settingsYou can change a number of settings via the Settings menu. These are summarised here; a more detailed explanation can be found in the Installation and Service manual.• Language and display settings.• Calibration: you can calibrate the sensor by positioning an accurate thermometer
next to the controller.• Comfort correction: iSense takes into account the perceived temperature.• Frost protection: if an external sensor is connected, the outside temperature will be used
to switch on the frost protection automatically. If the outside temperature falls below the set value,thepumpwillcontinuetorunandthecentralheatingwaterwillnotgetcolderthan10°C.
• Anti-legionella(onlyforcalorifiers): to prevent legionella growth, you are advised to heat thecalorifierupto65°Conceaweek.
• Tap water temperature: set the desired tap water temperature; for boilers with a temperature program where applicable.
• DHW standby: used to indicate when the tap water needs pre-heating. If the tap water is pre-heated, hot water will be available more quickly.
• Digital input: to have the iSense carry out tasks from an external module, for example during overtime.
• 5differentcontrol strategies based on room control and/or weather-compensated control.• Specificcentral heating system settings, such as the home's heating and cooling rate.

19
6. Using the iSense6.1 Selecting programYou can select one of the following programs via Program in the main display:• Clock program: the central heating temperature is controlled by the program you have set.• Continuous day: the temperature remains constant at the day temperature you have set.• Continuous night: the temperature remains constant at the night temperature you have set.• Frost protection: the temperature remains constant at the frost protection temperature you
have set. DHW standby is switched off for this program.• Continuous summer: the temperature remains constant at the night temperature, whereby
thetapwaterisonstandbybetween6.00and23.00(whichmeansthatyouwillgethotwatermorequickly).
6.2 Temporarily changing the temperatureYoucan(temporarily)switchoffaselectedclockprogramorcontinuousprogramatanytimebysetting the temperature manually. 1. Turn button C from the main display to set a new temperature.2. PressAdjust time if you also want to set an end time for the manually-selected temperature,
and select this time using push-turn button C.
i If you do not select an end time and a clock program was active, that clock program will become active again at the next switch point. Manual operation will then be switched off.

20
3. PressAdjust date if you also want to set an end date for the manually selected temperature, and select this time using push-turn button C.
4. Pressbutton Ctoreturntothemainmenuorwaitfivesecondsuntilthethermostatautomaticallyreturns to the main menu.
PresstheNext program button to cancel the manual temperature change.
6.3 Fireplace modeOnce the temperature has reached the desired level in the room where the iSense has been positioned, thecentralheatingswitchesoff.Thismaybeinconvenientif,forexample,youhaveanopenfireorifalotofpeople are present in that room. Other rooms in the house are also no longer heated in this situation.
YoucanswitchonthefireplacemodeviatheProgram button so that the other rooms are still heated. This switches off the built-in room sensor in the iSense. The temperature of the central heating water at that point is then maintained.
If it becomes too cold or too hot in the other rooms, you can increase or decrease the room temperature there using push-turn button C on the iSense. This increases or decreases the central heating water temperature.Youcanfitthermostatvalvestotheradiatorsinordertoindividuallycontrolthetemperaturesinthese rooms.
i ThefireplacemodeshouldonlybeactivatediftheiSenseusestheroomtemperaturetocontrolthetemperature.

21
i We advise that you close the radiator valves in the room in which the iSense has been positioned to prevent the room temperature there becoming too high.
i The controller switches to weather-compensated control if the outside temperature sensor is used.
6.4 InformationYou can request operating information about your central heating system, such as the water pressure in the central heating system and various temperatures, via Menu > Information. The information available depends on your central heating unit.The “Basic” and “Normal” modes do not show all information categories which are available. Select More information to make all information available.
7. MessagesThis is what a fault message or service message looks like:
Menu
No connectionto outsidesensor
Program
Fault indication
Display text
T000063-06-A

22
7.1 Fault messages
F200: No connection to outside sensor
Fault code F200
and are lit up.
No connection to outside sensor.
Check the boiler's connection to the outside temperature sensor.
Fault indication
Display text
Solution
T001014-06-A
F203: Faulty connection to boiler
Fault code F203
is lit up.
Communication fault. Check the connection.
Check the connection to the boiler.
Fault indication
Display text
SolutionT001009-06-A

23
F214: Incorrect room temperature reading
Fault code F214
is lit up.
Room temperature is out of measuring range or sensor is defective.
Room temperature reading is incorrect. If the room temperature
is between -5ºC and 65ºC, the temperature sensor may be faulty.
Contact your installer.
Fault indication
Display text
Solution
T001015-06-A
F215: Controller failure
Fault code F215
is lit up.
Internal fault. Controller failure.
Contact your installer.
Fault indication
Display text
SolutionT001008-06-A

24
F216: No connection with base station (iSense RF only)
Fault code F216
and are lit up.
Wireless communication fault.
Check whether the iBase for the boiler is on and is functioning correctly
(consult the transmitter manual if necessary).
If there is no connection between the iSense and iBase,
then restore the connection as follows: Put the iBase in connection mode.
Consult the iBase manual for this.
On the iSense select Menu > Settings > User settings > Connection.
If this does not solve the problem, look for another location for the iSense
and/or iBase or remove “obstacles” that could interfere with the RF signal.
Fault indication
Display text
Solution
T001008a-06-A

25
Water pressure too low
Current water pressure
and are lit up.
The water pressure in your central heating system is too low.
Top up the water in the central heating system. See the documentation for your boiler.
Fault indication
Display text
SolutionT001011-06-A
E-code:boilerfailure
E-code
is lit up.
Boiler failure. Consult the fault table in the user manual for the boiler.
Use the E-code to find the fault in the central heating boiler's documentation.
Fault indication
Display text
SolutionT001013-06-A

26
Controllerbatteriesflat
and are lit up.
-
The batteries are almost empty. Replace the three AA batteries.
Fault indication
Display text
Solution
T001016-06-A
7.2 Service messageBoiler service required
Maintenance service type (A, B or C) required. Contact your installer.
is lit up.
Contact your installer to have the central heating boiler serviced.
Fault indication
Display text
SolutionT001033-06-A
27
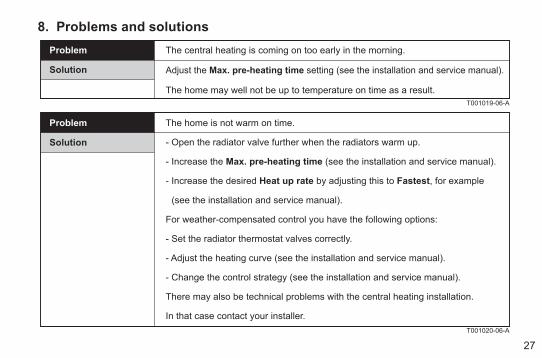
8. Problems and solutionsThe central heating is coming on too early in the morning.
Adjust the Max. pre-heating time setting (see the installation and service manual).
The home may well not be up to temperature on time as a result.
Problem
Solution
T001019-06-A
The home is not warm on time.
- Open the radiator valve further when the radiators warm up.
- Increase the Max. pre-heating time (see the installation and service manual).
- Increase the desired Heat up rate by adjusting this to Fastest, for example
(see the installation and service manual).
For weather-compensated control you have the following options:
- Set the radiator thermostat valves correctly.
- Adjust the heating curve (see the installation and service manual).
- Change the control strategy (see the installation and service manual).
There may also be technical problems with the central heating installation.
In that case contact your installer.
Problem
Solution
T001020-06-A

28
The house is too warm.
Weather-compensated control means that no account is taken of the measured
room temperature. Solve the problem in one of the following ways:
- Set the radiator thermostat valves correctly.
- Reduce the heating curve (see the installation and service manual).
- Change the control strategy (see the installation and service manual).
Room control may mean that the heat up rate is too high or that the controller
is not correctly calibrated.
Problem
Solution
T001021-06-A
The house does not become warm enough.
Weather-compensated control means that no account is taken of the measured
room temperature. Solve the problem in one of the following ways:
- Set the radiator thermostat valves correctly.
- Increase the heating curve (see the installation and service manual).
- Change the control strategy (see the installation and service manual).
Problem
Solution
T001022-06-A

29
It takes too long for the tap water to get up to temperature.
- Boiler: the DHW standby function may be switched off.
In that case the symbol is shown in the display.
Control the DHW standby with the DHW standby setting
(see the installation and service manual).
- Boiler: the boiler may be heated up too late.
Set the tap water temperature using the Tap water temperature setting
(see the installation and service manual).
Problem
Solution
T001023-06-A
The boiler supplies no hot water or hot water only briefly.
The DHW standby function may be switched off.
Switch the DHW standby function to “Continuous” (see paragraph 9.2).
Problem
Solution
T001254-06-A

30
The boiler starts heating the home or the tap water at night
even though the controller is set low.
- Weather-compensated control (OTC) means that the boiler is controlled
by the outside temperature. This can be prevented by adjusting the Night
temperature limit or selecting another control strategy. See the installation
and service manual.
- The boiler can start pre-heating before the following set point. Adjust the
Max. pre-heating time setting (see the installation and service manual).
The home may well not be up to temperature on time as a result.
- The tap water is only heated when the room temperature set is higher than
the night temperature. See the installation and service manual for details
of how to change the night temperature.
Problem
Solution
T001024-06-A

31
The temperature measurement differs from that which I am used to.
Correct the temperature measurement via the Calibration setting
(see the installation and service manual).
Problem
Solution
T001025-06-A
The display does not function.
Check that the wiring is correct and that the plug for the boiler
is in the wall socket.
Problem
Solution
T001026-06-A
The backlight for the display does not work.
Your boiler may not support OpenTherm Smart Power.
In that case fit batteries in the iSense (see paragraph 3.2).
Problem
Solution
T001027-06-A

32
9.Technicalspecifications
Dimensions
96x144x34(lxwxh)inmmHeightexcludingbuttons96x144x25(lxwxh)inmm
Power supplyiSense OpenTherm Via OpenTherm
iSense RF Via batteries
Electrical connectioniSense OpenTherm OpenTherm communication. Connection for low-voltage wires
iSense RF Bi-directional secure communication
Batteries 3 x AA batteries. Lifetime: dependent on the brand of battery
Digital input Potential-freecontact(switch)
Ambient conditionsStorage conditions Temperature:-25°C–60°C
Relativehumidity:5%–90%,nocondensation
Operating conditions Withoutbatteries:0°C–60°C.Withbatteries:0°C–55°C
TemperatureRoom temperature Measurementrange:-5°C–65°C
Maximumtemperaturedeviationat20°C:0.3°C

33
Outside temperature The measurement is taken in the boiler and passed to the controller. Consult the boiler documentation regarding the accuracy of the measurement.
Set temperature range 5–35°C
Calibration options Insideandoutsidetemperaturesensor:-5to+5instepsof0.5°C
Control Modulating temperature control
The control can be optimised
Room control Overshoot:maximum1°Cafterpre-heating
Temperaturevariation:lessthan0.25°C
Control strategies Room temperature control
Weather-compensated control
3 combination options
Features of the controllerBacklight Colour: blue
Date/time indication Time: 24 h clock. Accuracy: to about 365 seconds per year
Date:day–month–year
Automatic switching to summer time
Programs 2 clock programs with 6 switch points per day
Boiler clock program with 6 switch points per day
16 holiday programs
Day, Night, Frost protection, Summer mode, Fireplace

34
Setting accuracy Temperature:0.5°C.
Clock program: 10 minutes
Wirelessrange(iSenseRF) Approximately8metresthrough2concretelayers(dependingonthesurroundings,seeparagraph3.1)
Operation Menu-controlled using push buttons and a push-turn button
Installation Directlyonthewallusingscrewsorbuilt-injunctionboxasperstandards.
Built-insystempossibleusingbuilt-inpart(art.S100994)
Quality marks and compliance with standards
EMC:89/336/EEC–EN50165(1997),55014,55022
Emission EN61000-6-3
Immunity EN61000-6-2
Drop test: IEC 68-2-32
RoHS compliant
OpenThermV3.0certified(iSenseOpenThermonly)
ETSI220-300TBD(iSenseRFonly)
Protectionclass IP20forwallinstallation,IPx4forthebuilt-insystem.

35
Appendix: clock program template
Time MO. TU. WE. TH. FR. SA. SU.
00.__
01.__
02.__
03.__
04.__
05.__
06.__
07.__
08.__
09.__
10.__
11.__
T001004-06-A
Time MO. TU. WE. TH. FR. SA. SU.
12.__
13.__
14.__
15.__
16.__
17.__
18.__
19.__
20.__
21.__
22.__
23.__
i Switch points can be set to a precision of 10 minutes. Enter the switch points as required.

118037 - 260608
118037