iag street series air / oil separator (aos) for 2017 sti · pdf fileiag street series air /...
TRANSCRIPT

IAG Performance | 1203 Baltimore Blvd. Westminster, MD 21157 | Ph: 410-840-3555 | www.iagperformance.com 1
IAG Street Series Air / Oil Separator (AOS) For 2017 STI
Part# IAG-ENG-7151 Tools Required: Ratchet, torque wrench, extensions, needle nose pliers, hose cutter, snips/scissors, flat head screw driver, hose clamping pliers Sockets: 10mm, 12mm, ¼” allen, Wrenches: ⅞”, 11/16”, 8mm, 10mm, 19mm 3mm allen, 5mm allen, pry bar, Other: Electrical Tape Congratulations on the purchase of your Air/Oil Separator (AOS) and thank you for choosing IAG Performance. This installation manual is intended to guide you through the removal of the factory PCV system and the installation of the IAG AOS. If you already have an aftermarket catch can or AOS installed, please consult the specific instructions for your hardware to aid in its removal. Note: The 2015+ STI cars are equipped with a “noise symposer” engine sound enhancing device that connects the intake to the firewall. These instructions do not cover the removal process of this device. Usually this device is already bypassed by the time an AOS is required.
Parts List Part Name Quantity Notes Air/Oil Separator 1 Oil Drain Hose Assembly 1 26” Hose Length, ½” I.D., -8ORB Top Coolant Hose Assembly 1 20” Hose Length, ½” I.D., -8ORB Bottom Coolant Hose Assembly 1 20” Hose Length, ½” I.D., -8ORB Hose 1 39” Hose Length, ½” I.D., -8ORB Block Breather Hose 1 25” Hose Length, P
5P/R8R” ID
Valve Cover Breather Hose 1 74” Hose Length, ½” ID Block Drain Replacement Hose 1 2” Hose Length, ¾” I.D. PCV Check Valve Hose 1 27” Hose Length, 3/8” I.D., Integrated Check Valve Mounting Bracket 1 90° 5/8” Plastic Fitting 1 Block Breather Fitting 90° 1/2” Plastic Fitting 2 PCV Replacement Fitting 1 “Y” Fitting Comp Series Upper Breather Fitting 1 Preinstalled Fasteners for Breather Top Fitting 2 M4x8mm / preinstalled AOS Drain Fitting 1 Preinstalled Spring Clamps 2 Coolant Hose Spring Clamps 6x10mm Bolt 3 Mounting Bracket Hardware P
5P/R8R” High Temp Rubber Cap 1
8” Zip Tie 24 11” Zip Tie 1 Union Fitting 1 ½” – ½” Union Reducer Fitting Union 1 5/8” – ½” (For Plastic Intake Manifold Vehicles)

IAG Performance | 1203 Baltimore Blvd. Westminster, MD 21157 | Ph: 410-840-3555 | www.iagperformance.com 2
For 2008+ Installs (Included in packaging) M6x12mm Hex Flange Bolt 2 08+ Install Only / Mounting bracket to strut tower hardware Harness Relocation Bracket 1 08+ Install Only
URemoval - Please read through the entire removal instructions before proceeding
1. The engine needs to be completely cool before beginning work. 2. Disconnect the negative battery terminal using a 10mm wrench.
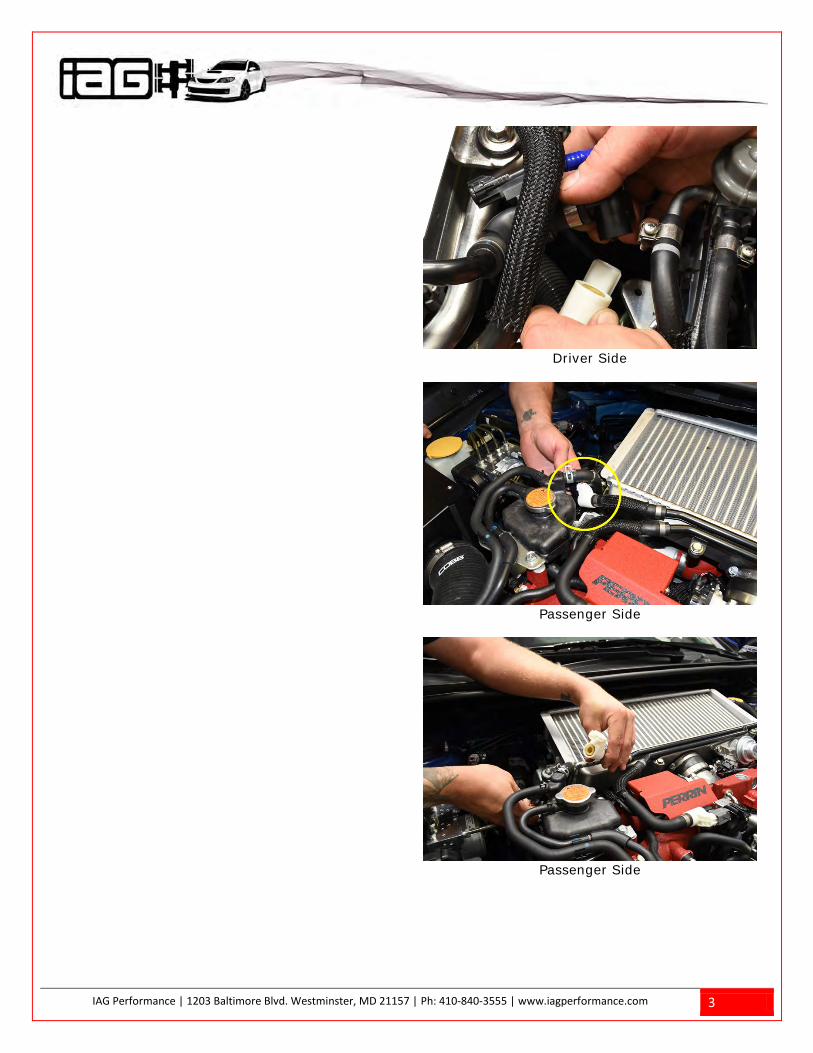
3. Disconnect the (x2) Crankcase Ventilation Sensor electrical connectors located on the driver and passenger side of intercooler. Press the connector clip in and pull the black portion of the sensor from the white portion as shown.
Driver Side
IAG Performance | 1203 Baltimore Blvd. Westminster, MD 21157 | Ph: 410-840-3555 | www.iagperformance.com 3
Driver Side
Passenger Side
Passenger Side
IAG Performance | 1203 Baltimore Blvd. Westminster, MD 21157 | Ph: 410-840-3555 | www.iagperformance.com 4
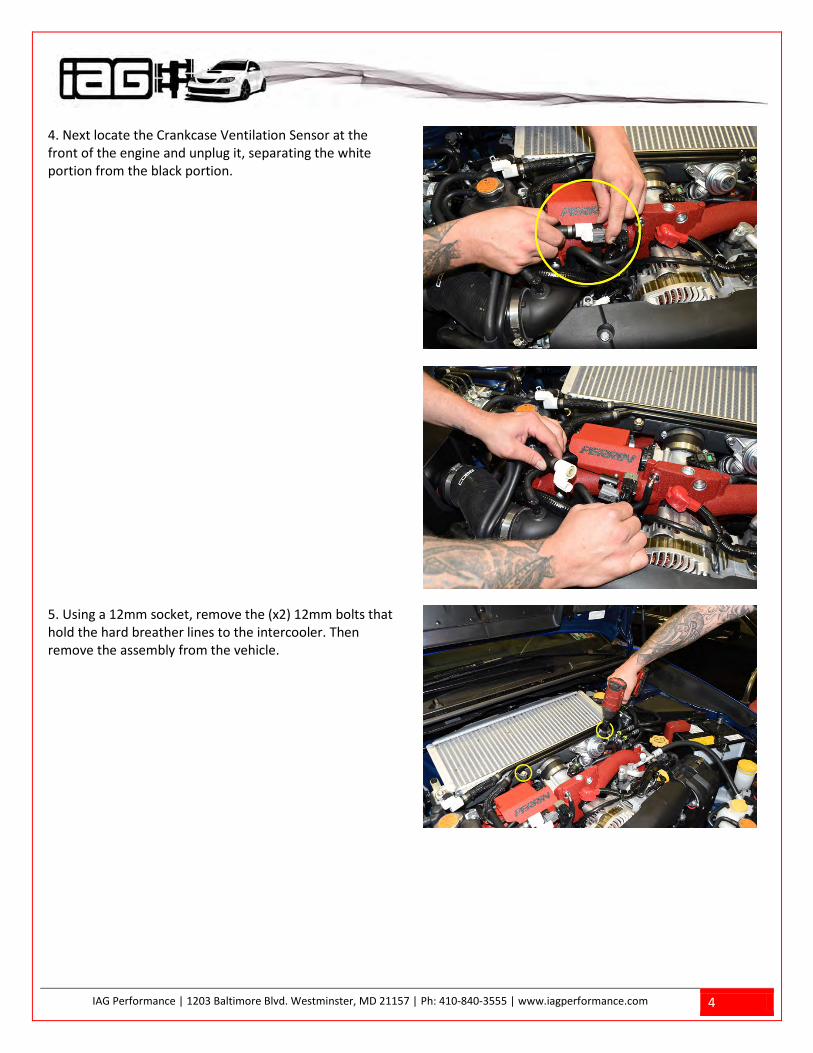
4. Next locate the Crankcase Ventilation Sensor at the front of the engine and unplug it, separating the white portion from the black portion.
5. Using a 12mm socket, remove the (x2) 12mm bolts that hold the hard breather lines to the intercooler. Then remove the assembly from the vehicle.

IAG Performance | 1203 Baltimore Blvd. Westminster, MD 21157 | Ph: 410-840-3555 | www.iagperformance.com 5
6. Using a 12mm socket, remove the (2) 12mm bolts that hold the blow off valve (BOV) to the intercooler. You can leave the BOV where it sits. Be careful not to lose or damage the gasket.

IAG Performance | 1203 Baltimore Blvd. Westminster, MD 21157 | Ph: 410-840-3555 | www.iagperformance.com 6
7. Next pull the brake booster hose free from the driver side intercooler clamp.
8. Using a 12mm socket, remove the intercooler mounting bolts on either side of the intercooler. In addition, remove the driver side intercooler bracket. It is held on by (2) 12mm bolts at the intake manifold.

IAG Performance | 1203 Baltimore Blvd. Westminster, MD 21157 | Ph: 410-840-3555 | www.iagperformance.com 7
9. Using a flat head screw driver or 8mm nut driver, loosen the hose clamp at the intercooler outlet silicone coupler. Then loosen the hose clamp at the intercooler inlet.

IAG Performance | 1203 Baltimore Blvd. Westminster, MD 21157 | Ph: 410-840-3555 | www.iagperformance.com 8
10. Grab the intercooler by the sides and carefully wiggle it out of the engine bay. Be cautious to not damage the A/C line that runs along the fire wall or the intercooler fins.
11. Locate the passenger side Crankcase Ventilation Sensor (Black) and using a small flat head screw driver carefully press in and free the harness clip from the plastic vent tube.

IAG Performance | 1203 Baltimore Blvd. Westminster, MD 21157 | Ph: 410-840-3555 | www.iagperformance.com 9
12. Locate the passenger side valve cover breather line (the one that is closest to the front of the car). Pull the hose off the valve cover port. Use a flat head screw driver if necessary to help free the hose off the port.

IAG Performance | 1203 Baltimore Blvd. Westminster, MD 21157 | Ph: 410-840-3555 | www.iagperformance.com 10
13. Repeat the process on the driver side forward most valve cover breather hose. Remove the driver side hose from the engine bay.

IAG Performance | 1203 Baltimore Blvd. Westminster, MD 21157 | Ph: 410-840-3555 | www.iagperformance.com 11
14. Using a ratchet and a 10mm socket, remove the (4) 10mm bolts that secure the throttle body to the intake manifold. If the throttle body is stuck, gently tap around the sides with a rubber mallet to break the throttle body free. Do not lose or damage the OEM Throttle-body gasket as it is reused.
15. Remove the small pinch clamp and hose from the PCV vacuum nipple under the throttle body on the intake manifold using needle nose pliers.

IAG Performance | 1203 Baltimore Blvd. Westminster, MD 21157 | Ph: 410-840-3555 | www.iagperformance.com 12
16. Next unplug the Passenger side Crankcase Ventilation Sensor that is located behind the intake manifold and in front of the turbo by pressing the gray clip in and pulling outwards.
17. Remove the PCV valve assembly with the Crankcase Ventilation Sensor from the engine. It may come out with the ¾” drain hose. If the OEM drain hose is in good condition you will reuse it. We have supplied you with a new drain hose if the OEM unit is worn or damaged.

IAG Performance | 1203 Baltimore Blvd. Westminster, MD 21157 | Ph: 410-840-3555 | www.iagperformance.com 13
18. Locate the ¾” OEM drain hose that the PCV assembly was connected to. Depending on the removal process it may be on the PCV assembly or still located on the engine. Install the supplied plastic drain fitting into the ¾” drain hose as shown.
Supplied drain fitting shown left
Drain fitting installed into the OEM ¾” hose
IAG Performance | 1203 Baltimore Blvd. Westminster, MD 21157 | Ph: 410-840-3555 | www.iagperformance.com 14
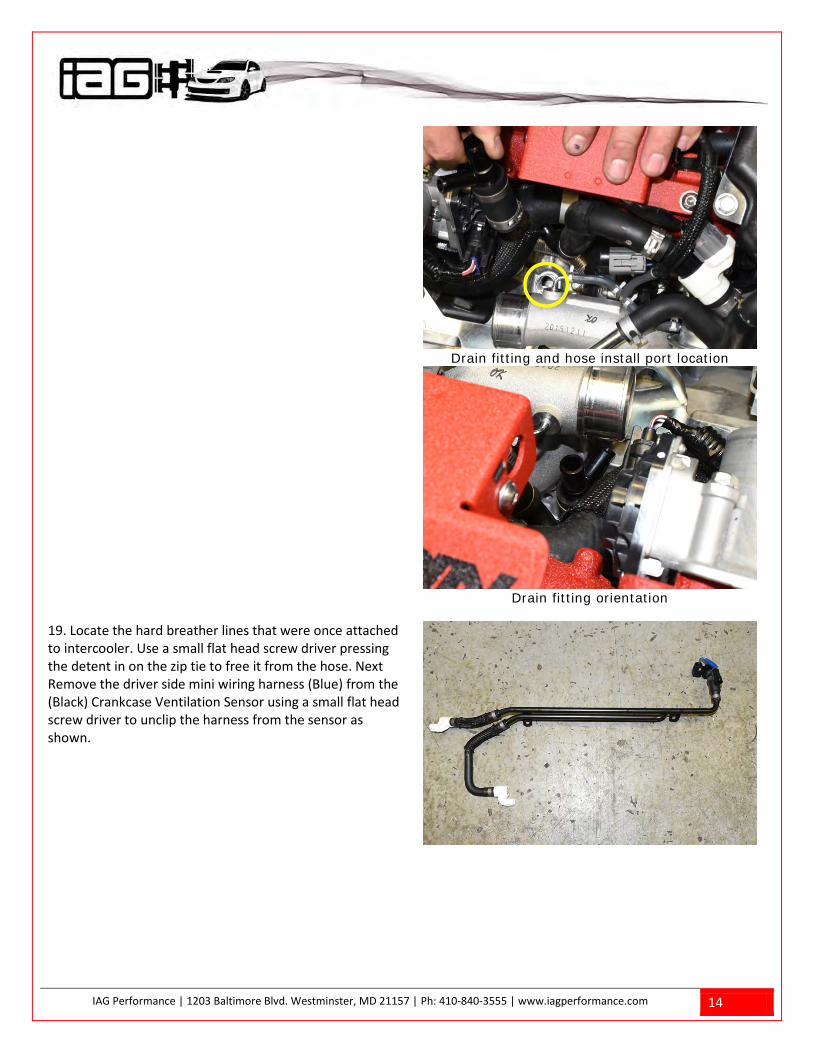
Drain fitting and hose install port location
Drain fitting orientation
19. Locate the hard breather lines that were once attached to intercooler. Use a small flat head screw driver pressing the detent in on the zip tie to free it from the hose. Next Remove the driver side mini wiring harness (Blue) from the (Black) Crankcase Ventilation Sensor using a small flat head screw driver to unclip the harness from the sensor as shown.

IAG Performance | 1203 Baltimore Blvd. Westminster, MD 21157 | Ph: 410-840-3555 | www.iagperformance.com 15

IAG Performance | 1203 Baltimore Blvd. Westminster, MD 21157 | Ph: 410-840-3555 | www.iagperformance.com 16
20. Remove the jumper from the white portion of driver side Crankcase Ventilation Sensor using needle nose pliers. Pull outwards from sensor until it is free. Then insert the jumper into the driver side Crankcase Ventilation Sensor mini connector harness as shown. Tape the connector end with electrical tape to prevent exposure to the elements.

IAG Performance | 1203 Baltimore Blvd. Westminster, MD 21157 | Ph: 410-840-3555 | www.iagperformance.com 17
21. Reinstall the mini Crankcase Ventilation Sensor harness onto driver side hose as shown by reusing the OEM zip tie. Then plug the electrical connector back into mini harness.

IAG Performance | 1203 Baltimore Blvd. Westminster, MD 21157 | Ph: 410-840-3555 | www.iagperformance.com 18
22. Remove the jumper from the white portion of the passenger side Crankcase Ventilation Sensor using needle nose pliers. Pull outwards from sensor until it is free. Then insert the jumper into the passenger side connector harness as shown. Tape the connector end with electrical tape to prevent exposure to the elements and tuck it out of the way.

IAG Performance | 1203 Baltimore Blvd. Westminster, MD 21157 | Ph: 410-840-3555 | www.iagperformance.com 19

IAG Performance | 1203 Baltimore Blvd. Westminster, MD 21157 | Ph: 410-840-3555 | www.iagperformance.com 20
23. Locate the PCV assembly with the Crankcase Ventilation Sensor that was removed from the vehicle. Remove the (White) Crankcase Ventilation sensor from the hose.
24. Plug the white crank case ventilation sensor back in.

IAG Performance | 1203 Baltimore Blvd. Westminster, MD 21157 | Ph: 410-840-3555 | www.iagperformance.com 21
25. Remove the main engine harness from its mounting bracket located on the passenger side strut tower. Using a flat head screw driver pry the harness clip outwards and lift up as shown. In order to make room for the AOS carefully cut the OEM main wiring harness electrical tape at firewall as shown. (Harness is folded over itself under the tape). Refer to picture.
Main wiring harness braket clip
Main Harness wiring

IAG Performance | 1203 Baltimore Blvd. Westminster, MD 21157 | Ph: 410-840-3555 | www.iagperformance.com 22
Main wiring harness shown after cutting tape
26. Locate the primary O2 sensor connection on the passenger side strut tower. To provide additional wiring slack, carefully cut the electrical tape that doubles the wiring harness on itself. Refer to pictures.

IAG Performance | 1203 Baltimore Blvd. Westminster, MD 21157 | Ph: 410-840-3555 | www.iagperformance.com 23
27. Remove main wiring harness bracket using 10mm socket and ratchet, it is held on by (1) 10mm bolt located on the passenger side strut tower.

IAG Performance | 1203 Baltimore Blvd. Westminster, MD 21157 | Ph: 410-840-3555 | www.iagperformance.com 24
28. Using your hands carefully pry and bend the brake lines up next to the strut tower. Next push the rear 3 brake lines back towards the firewall to make space for the AOS. If necessary a pry bar and cloth can be used to carefully manipulate the lines.
IAG Performance | 1203 Baltimore Blvd. Westminster, MD 21157 | Ph: 410-840-3555 | www.iagperformance.com 25
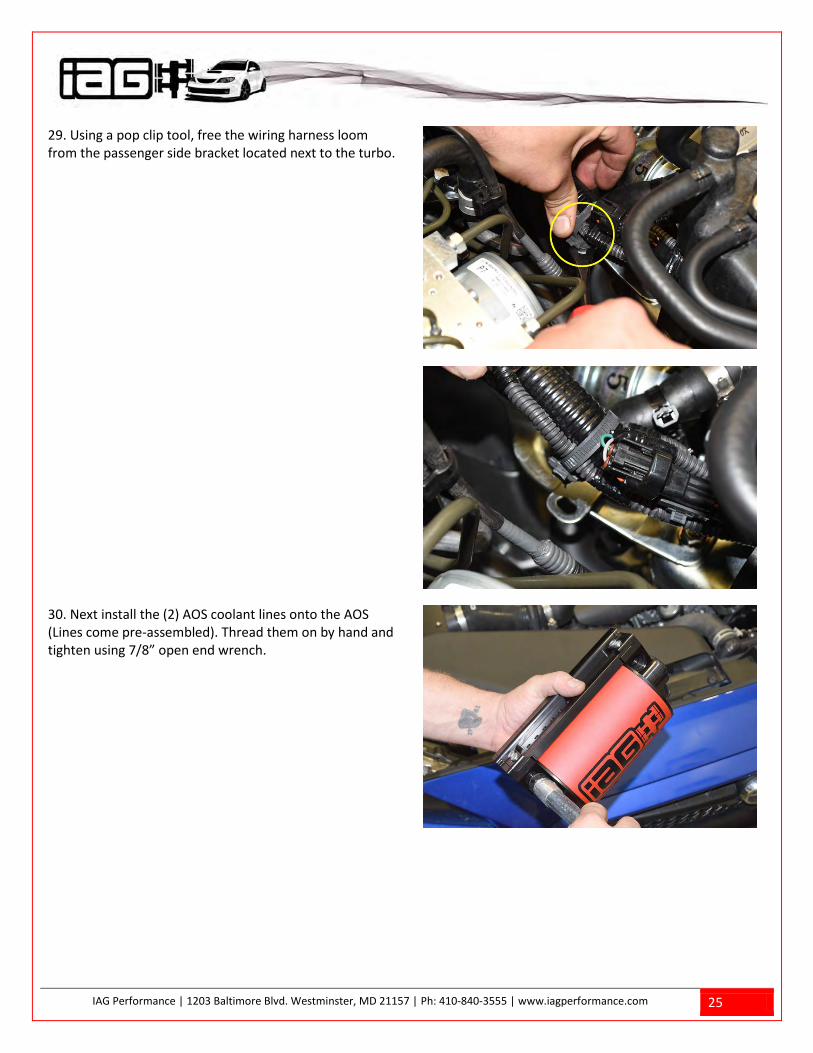
29. Using a pop clip tool, free the wiring harness loom from the passenger side bracket located next to the turbo.
30. Next install the (2) AOS coolant lines onto the AOS (Lines come pre-assembled). Thread them on by hand and tighten using 7/8” open end wrench.

IAG Performance | 1203 Baltimore Blvd. Westminster, MD 21157 | Ph: 410-840-3555 | www.iagperformance.com 26
31. Install the ½” drain hose onto the AOS drain port fitting. Secure with a zip tie and trim the excess off.
IAG Performance | 1203 Baltimore Blvd. Westminster, MD 21157 | Ph: 410-840-3555 | www.iagperformance.com 27
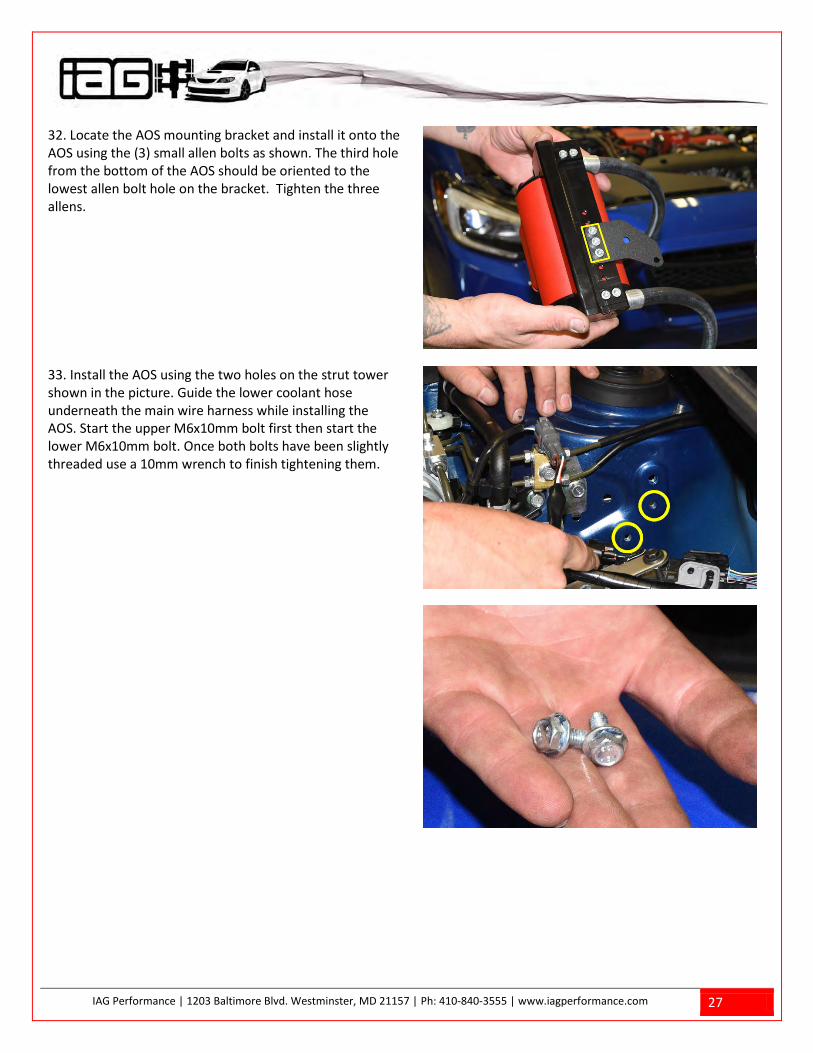
32. Locate the AOS mounting bracket and install it onto the AOS using the (3) small allen bolts as shown. The third hole from the bottom of the AOS should be oriented to the lowest allen bolt hole on the bracket. Tighten the three allens.
33. Install the AOS using the two holes on the strut tower shown in the picture. Guide the lower coolant hose underneath the main wire harness while installing the AOS. Start the upper M6x10mm bolt first then start the lower M6x10mm bolt. Once both bolts have been slightly threaded use a 10mm wrench to finish tightening them.

IAG Performance | 1203 Baltimore Blvd. Westminster, MD 21157 | Ph: 410-840-3555 | www.iagperformance.com 28
34. Use a 10mm socket and ratchet to remove the (1) 10mm bolt from the power steering line bracket located on the passenger side strut tower.
35. Slide the relocation bracket (square hole side) into the harness until it clips into place.

IAG Performance | 1203 Baltimore Blvd. Westminster, MD 21157 | Ph: 410-840-3555 | www.iagperformance.com 29
36. Next install the harness relocation bracket into the same location (power steering line bracket) using the same 10mm bolt. Do not completely tighten the bolt yet. Adjust the position of the main harness for clearance and fitment. Then finish tightening the 10mm bolt. Finally press down on the harness and slightly bend the bracket downwards as shown.

IAG Performance | 1203 Baltimore Blvd. Westminster, MD 21157 | Ph: 410-840-3555 | www.iagperformance.com 30
37. To minimize coolant loss, pinch off the lower coolant hose that connects the turbo to the cylinder head using hose clamping pliers.
38. Using pliers remove the OEM upper coolant expansion tank hose clamp. Pull the OEM expansion hose off.

IAG Performance | 1203 Baltimore Blvd. Westminster, MD 21157 | Ph: 410-840-3555 | www.iagperformance.com 31
39. The IAG AOS upper coolant line will attach to the OEM coolant expansion tank. Trim the upper AOS coolant line to the correct length making sure when the line is routed there are not any kinks or obstructions. Once cut, using pliers pinch and slide the supplied pinch clamp onto the AOS coolant line. Then slide hose over the expansion tank port barb and secure the line with the clamp.

IAG Performance | 1203 Baltimore Blvd. Westminster, MD 21157 | Ph: 410-840-3555 | www.iagperformance.com 32
40. Locate the provided PCV hose as shown to the right. By hand, thread the side with the fitting into the upper AOS breather as shown. Once started use a 11/16 open end wrench to finish tightening the fitting.

IAG Performance | 1203 Baltimore Blvd. Westminster, MD 21157 | Ph: 410-840-3555 | www.iagperformance.com 33
41. Next route the PCV hose behind the AC line and to the breather port that is located under the throttle body. Secure the line with a provided zip tie and trim off the excess.
42. Re-install the throttle body to the intake manifold. Torque the (4) 10mm bolts to 6 P
lbP/RftR.

IAG Performance | 1203 Baltimore Blvd. Westminster, MD 21157 | Ph: 410-840-3555 | www.iagperformance.com 34
43. Locate the AOS lower coolant hose. The hose should be routed under the main harness and lead to the upper coolant hard pipe on the turbocharger. Trim the line to fit onto the upper coolant turbocharger hard pipe.
Yellow stripe shows routing to turbo coolant line
IAG Performance | 1203 Baltimore Blvd. Westminster, MD 21157 | Ph: 410-840-3555 | www.iagperformance.com 35
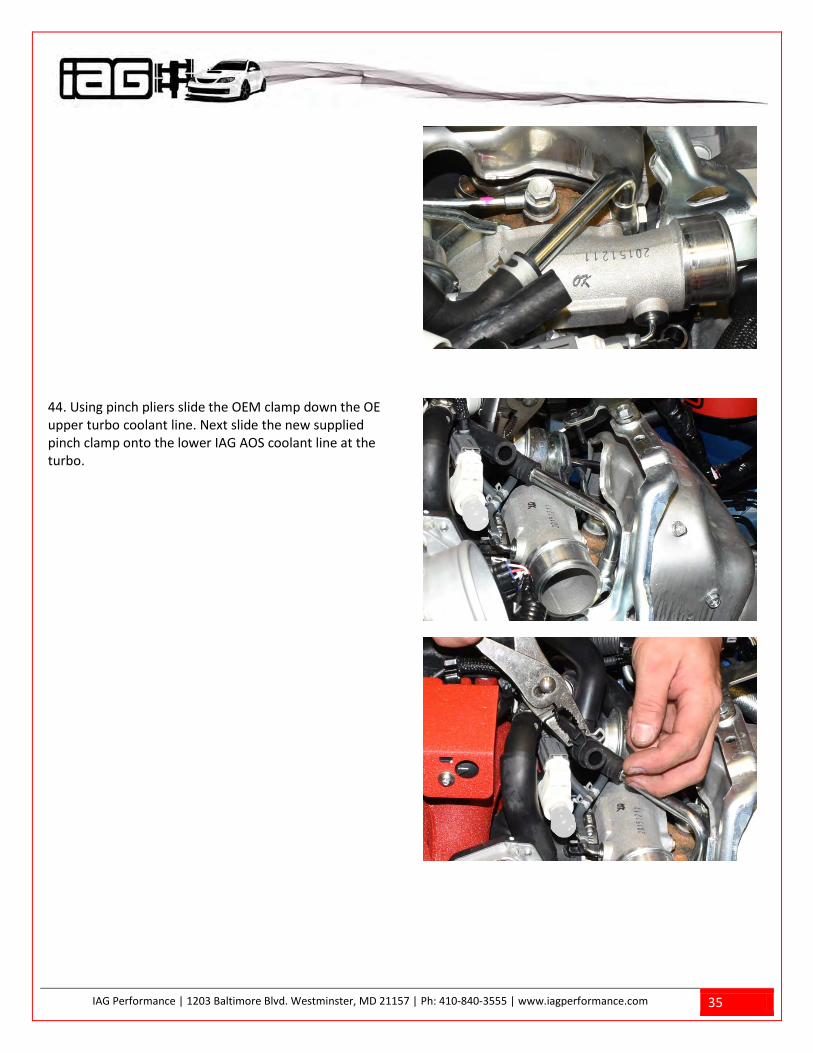
44. Using pinch pliers slide the OEM clamp down the OE upper turbo coolant line. Next slide the new supplied pinch clamp onto the lower IAG AOS coolant line at the turbo.

IAG Performance | 1203 Baltimore Blvd. Westminster, MD 21157 | Ph: 410-840-3555 | www.iagperformance.com 36
45. Pull the OEM upper coolant line off the turbocharger hard pipe and quickly swap the lower IAG AOS coolant line in place. *If done correctly minimal coolant should be lost. If substantial coolant is lost, bleeding the coolant system is required to avoid overheating. Secure the pinch clamp and remove the OEM line from the vehicle.
46. Secure the passenger side lower AOS coolant hose to the wiring loom bracket using a supplied zip tie. Trim off the excess using snips or scissors.

IAG Performance | 1203 Baltimore Blvd. Westminster, MD 21157 | Ph: 410-840-3555 | www.iagperformance.com 37
47. Locate the AOS oil drain line. The line will route over the transmission, thru the turbo support bracket and finally lead to the ½” port on the plastic drain fitting located on the engine block. The hose is supplied long to allow for various turbochargers, intercoolers and downpipes. Make sure when trimming the length that the hose is free of heat sources and the line is not kinked. Once the hose is in place install a zip tie to secure the hose and trim the excess.

IAG Performance | 1203 Baltimore Blvd. Westminster, MD 21157 | Ph: 410-840-3555 | www.iagperformance.com 38
48. Locate the 5/8” breather hose and the plastic 90° fitting included with the AOS kit. Cut 3” off the breather hose. Slide the 3” length of breather hose onto one side of the 90° fitting, then slide the remaining length of 5/8” hose on the other side of the fitting. Zip tie the hoses on to the 90° fitting and trim off the excess.

IAG Performance | 1203 Baltimore Blvd. Westminster, MD 21157 | Ph: 410-840-3555 | www.iagperformance.com 39

IAG Performance | 1203 Baltimore Blvd. Westminster, MD 21157 | Ph: 410-840-3555 | www.iagperformance.com 40
49. Place another zip tie loosely on the 3” length of breather hose end, then slide the 3” breather hose onto the 5/8”port plastic drain fitting located on the top of the engine as shown.
Next route the other long end of the 5/8” hose under the turbo support bracket and to the AOS lower side port. Trim the hose to the correct length and place it on the lower port securing it with a zip tie. Make sure to trim the excess zip tie lengths off.

IAG Performance | 1203 Baltimore Blvd. Westminster, MD 21157 | Ph: 410-840-3555 | www.iagperformance.com 41
50. Locate the ½” breather line included in the AOS kit. Route one side of the line to the driver side most forward valve cover breather port. The line should pass above the AC line and over top the fuel injector cover bracket until it meets the valve cover port. Slide the hose onto the port and secure it with a zip tie.

IAG Performance | 1203 Baltimore Blvd. Westminster, MD 21157 | Ph: 410-840-3555 | www.iagperformance.com 42
51. Trim the ½” hose to fit the center port on the AOS Then install the hose onto the port. Install a zip tie on the hose at the center fire wall AC bracket as well as at the center AOS port. Trim off the excess.
52. Using the remaining length of ½” hose, route it between the main harness and over top the injector cover bracket. Finally slide it onto the passenger side valve cover breather port and secure it with a zip tie and trim the excess off.

IAG Performance | 1203 Baltimore Blvd. Westminster, MD 21157 | Ph: 410-840-3555 | www.iagperformance.com 43
Next route the other side of the ½”hose under the intercooler bracket and alongside the 5/8” breather hose. The line will then lead up to the upper AOS side port. Make sure the line is free of kinks or any obstructions. Trim the line to fit and secure it with a zip tie trimming off the excess.

IAG Performance | 1203 Baltimore Blvd. Westminster, MD 21157 | Ph: 410-840-3555 | www.iagperformance.com 44
53. Locate the breather hard lines and remove the passenger side from crank case breather hose and sensor as shown.

IAG Performance | 1203 Baltimore Blvd. Westminster, MD 21157 | Ph: 410-840-3555 | www.iagperformance.com 45
54. Remove the OEM hose from the crank case breather sensor and plug the white sensor back into the passenger side front electrical connector as shown.
IAG Performance | 1203 Baltimore Blvd. Westminster, MD 21157 | Ph: 410-840-3555 | www.iagperformance.com 46
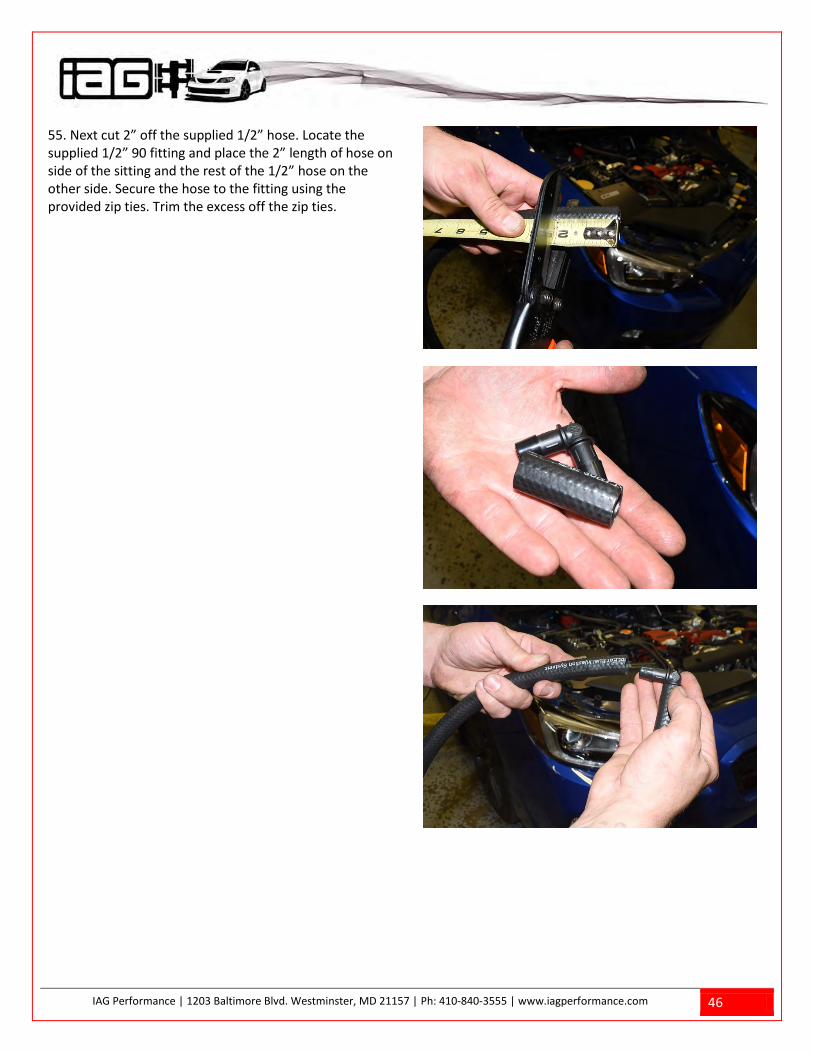
55. Next cut 2” off the supplied 1/2” hose. Locate the supplied 1/2” 90 fitting and place the 2” length of hose on side of the sitting and the rest of the 1/2” hose on the other side. Secure the hose to the fitting using the provided zip ties. Trim the excess off the zip ties.

IAG Performance | 1203 Baltimore Blvd. Westminster, MD 21157 | Ph: 410-840-3555 | www.iagperformance.com 47
56. Route the 2” hose end to the passenger side crank case breather sensor and the remaining length of the 1/2” hose to the AOS upper left breather port. Trim the hose to fit as shown and secure the hose to the AOS and breather port using the supplied zip ties. Trim the excess off the ties when complete.
57. Next cut 2” off the supplied 1/2” hose. Locate the supplied 1/2” 90 fitting and place the 2” length of hose on side of the sitting and the rest of the 1/2” hose on the other side. Secure the hose to the fitting using the provided zip ties. Trim the excess off the zip ties.

IAG Performance | 1203 Baltimore Blvd. Westminster, MD 21157 | Ph: 410-840-3555 | www.iagperformance.com 48
58. Route the 2” hose end to the passenger side rear crank case breather sensor and the remaining length of the 1/2” hose to the AOS upper right breather port. Trim the hose to fit as shown and secure the hose to the AOS and breather port using the supplied zip ties. Trim the excess off the ties when complete.

IAG Performance | 1203 Baltimore Blvd. Westminster, MD 21157 | Ph: 410-840-3555 | www.iagperformance.com 49
59. Reinstall the intercooler and bypass valve using the OEM hardware and gaskets. Reattach the negative battery terminal. Make sure to remove any fluid clamping pliers.
60. Before proceeding, please look over the check list below:
UCheck Over List
Are all coolant fittings tight? Are (2) coolant clamps correctly fitted on the turbo coolant pipe and the expansion tank? Was any coolant spilled in the engine bay cleaned up? Are the hose clamps on the silicone couplers tight? Are the following connections zip tied:
• ½” valve cover ports • Both connections on the Y-fitting that is attached
to the block • All 3 side ports on the AOS • The top breather port

IAG Performance | 1203 Baltimore Blvd. Westminster, MD 21157 | Ph: 410-840-3555 | www.iagperformance.com 50
61. After you have reviewed the check list, proceed to start the vehicle and check for leaks. After the engine has heat cycled, you can check the coolant level and replace any coolant that was lost during installation.