ibm websphere adapter for...
TRANSCRIPT

IBM WebSphere Adapter for Siebel Enterprise Business Applications
Quick Start Scenario V 6.2
December 13, 2007 Page 1 of 137

Note: Before using this information and the product it supports, read the information in "Notices" on page 134.
This edition applies to version 6, release 2, modification 0 of IBM WebSphere Adapter for Siebel and to all subsequent releases and modifications until otherwise indicated in new editions.
© Copyright International Business Machines Corporation 2008. US Government Users Restricted Rights – Use, dupli-cation or disclosure restricted by GSA ADP Schedule Contract with IBM Corp.
December 13, 2007 Page 2 of 137

Table of contents
C h a p t e r 1 . ................................................. Introduction 6
6
6
6
6
7
7
8
1.4.4 Inbound using Siebel Business Object ....................................... 8
9
9
9
12
15
19
24
24
25
27
29
30
33
34
35
35
40
45
45
46
1.1 Learning Objectives ....................................................................... 1.2 Audience ........................................................................................ 1.3 Software prerequisites ................................................................... 1.4 Scenarios in brief:........................................................................... 1.4.1 Outbound using Siebel Business Service ................................... 1.4.2 Inbound using Siebel Integration Object ..................................... 1.4.3 Outbound using Siebel Business Object.....................................
C h a p t e r 2 . ...... Preparing to run through the tutorials
Extracting the sample files ................................................................... Creating the Event table in Siebel........................................................ Create an authentication alias............................................................ Creating the adapter project in WebSphere Integration Developer Start the External Service wizard ....................................................
C h a p t e r 3 . Tutorial for outbound processing using Siebel Business Service...............................................................................
Start the External Service wizard ....................................................... Setting connection properties for the External Service Wizard.......... Selecting the Siebel Business Services............................................. Generating business object definitions and related artifacts ............. Service generation and deployment configuration............................. Configuring the adapter properties..................................................... Deploying the adapter project to the test environment ...................... Testing the adapter application ..........................................................
Running the Insert operation Running the QueryByExample Operation
C h a p t e r 4 . Tutorial for outbound processing using Siebel Business Object ................................................................................
Start the External Service wizard ....................................................... Setting connection properties for the External Service wizard ..........
December 13, 2007 Page 3 of 137

Selecting the Siebel Business Objects............................................... 47
48
49
52
53
54
54
57
59
59
60
60
64
65
67
68
71
72
75
75
76
76
78
79
82
82
86
86
89
89
90
92
97
Generating business object definitions and related artifacts ............. Service generation and deployment configuration............................. Configuring the adapter properties..................................................... Deploying the adapter project to the test environment ...................... Testing the adapter application ..........................................................
Running the Create operation Running the Exists operation
C h a p t e r 5 . Tutorial for inbound processing using Siebel Business Service...............................................................................
Start the External Service wizard ....................................................... Setting connection properties for the External Service wizard .......... Selecting the Siebel Business Services............................................. Generating business object definitions and related Artifacts ............. Service generation and deployment configuration............................. Configuring the adapter properties..................................................... Wiring the Inbound Interface .............................................................. Deploying the adapter project to the test environment ...................... Testing the assembled adapter application .......................................
C h a p t e r 6 . Tutorial for inbound processing using Siebel Business Object............................................................................................
Start the external service wizard ........................................................ Setting connection properties for the external Service Wizard .......... Selecting the Siebel Business Objects............................................... Generating business object definitions and related artifacts ............. Service Generation and Deployment Configuration........................... Configuring the adapter properties..................................................... Wiring the Inbound Interface .............................................................. Deploying the adapter project to the test environment ...................... Testing the assembled adapter application .......................................
C h a p t e r 7 . Tutorial for outbound processing using Siebel Business Service with multiple Integration object .........................
Start the External Service Wizard ...................................................... Setting connection properties for the external service wizard............ Selecting the Siebel Business Services............................................. Generating business object definitions and related artifacts .............
December 13, 2007 Page 4 of 137
December 13, 2007 Page 5 of 137
Service generation and deployment configuration............................. 98
100
101
102
102
106
110
110
111
112
115
117
119
120
124
125
128
128
128
129
132
132
133
133
133
133
133
133
134
136
136
Configuring the adapter properties................................................... Deploying the adapter project to the test environment .................... Testing the adapter application ........................................................
Running the Insert operation Running the Query Operation
C h a p t e r 8 . Tutorial for inbound processing using Siebel Business Object with specific attribute selected-make the font even ....
Start the external service wizard ...................................................... Setting connection properties for the external service wizard.......... Selecting the Siebel Business Objects............................................. Generating business object definitions and related artifacts ........... Service Generation and Deployment Configuration......................... Configuring the adapter properties................................................... Wiring the Inbound Interface ............................................................ Deploying the adapter project to the test environment .................... Testing the assembled adapter application .....................................
C h a p t e r 9 . ..................... Troubleshooting the Tutorial
Deployment Failure .......................................................................... Export project into EAR file ..............................................................
Deploying project through Administrative Console Starting the application through Administrative Console
Create Record Failed .......................................................................
C h a p t e r 1 0 . ...................................................Appendix
Clearing the tutorial content ............................................................. 10.1.1 Business service Siebel Account – Insert operation 10.1.2 Business Service Siebel Account - QueryByExample operation 10.1.3 Business Object Account – ESP - Create operation 10.1.4 Business Object Account – ESP - Exists operation
C h a p t e r 1 1 . ......................................................Notices
Programming interface information .................................................. Trademarks ......................................................................................

C h a p t e r 1 . Introduction
The IBM WebSphere Adapter for Siebel enterprise supports exchange of data with the Siebel enterprise information system (EIS) through two types of Siebel objects – Siebel Business Services and Siebel Business Objects. This guide provides tutorial scenarios that demon-strate how the adapter performs outbound and inbound operations using Siebel Business Services and business components.
1.1 Learning Objectives
After completing a tutorial, you should be able to perform the following tasks:
• Create an adapter project in WebSphere Integration Developer.
• Discover services and associated business objects from the EIS and make them part of the adapter project.
• Create a deployable module that you install on WebSphere Process Server or WebSphere Enterprise Service Bus.
• Test the module and validate the results.
1.2 Audience
These tutorials are for integration developers who design, assemble, test, and deploy business integration solutions.
1.3 Software prerequisites
To use these tutorials, you must have the following applications installed:
• WebSphere Integration Developer, version 6.2
• WebSphere Process Server or WebSphere Enterprise Service Bus, version 6.2
• Siebel 7.8 or 8.0 driver
1.4 Scenarios in brief:
There are four scenarios l:
December 13, 2007 Page 6 of 137version on the server

i) Outbound using Siebel Business Service
ii) Inbound using Integration Object
iii) Outbound using Siebel Business Object
iv) Inbound using Siebel Business Object
The table in each scenario provides the details of the Siebels integration or busi-ness object and the operations to be performed on it.
1.4.1 Outbound using Siebel Business Service
Business Service Siebel Account
Account Interface Integration Object
Event Methods Insert (Tutorial 1)
QueryByExample (Tutorial 2)
There are two operations in this scenario, in order:
• Insert
The Insert operation adds a hierarchy of Account Interface instances to the Siebel EIS using the Siebel Account Business Service.
• QueryByExample.
The QueryByExample operation will retrieve the created Account Interface in-stance from the Siebel EIS.
1.4.2 Inbound using Siebel Integration Object
Integration Object Account Interface
QueryByExample (Tutorial 3)
Event Method
This scenario updates a hierarchy of Account Interface (not through adapter) in-stances in the EIS. For the corresponding update, an event gets added automati-cally (through Siebel script) to the event component . The adapter will poll the event from the event component & retrieve the updated instance hierarchy based on the in-formation available in the event.
December 13, 2007 Page 7 of 137version on the server

1.4.3 Outbound using Siebel Business Object
Business Object Account – ESP
Event Method Create (Tutorial 4)
Exists (Tutorial 5)
There are two operations in this scenario, in order:
• Create -
The Create operation adds a hierarchy of the business object Account - ESP in-stances to the Siebel EIS.
• Exists.
is The Exists operation confirms that a particular Account instance exists in the Sie-bel EIS.
1.4.4 Inbound using Siebel Business Object
Business Object Account – ESP
Retrieve (Tutorial 6) Event Method
This scenario retrieves a hierarchy of updated instances of Account - ESP. For the corresponding update, an event is added automatically (through Siebel script trig-gers) to the event component . The adapter polls the event from the event compo-nent & retrieves the updated instance based on the information available in the event.
Note: For the inbound scenarios, it is necessary to set up the event component in the Siebel EIS. For more information, refer to the WebSphere Adapter for Siebel Busi-ness Applications documentation.
December 13, 2007 Page 8 of 137version on the server

C h a p t e r 2 . Preparing to run through the tutorials
Extracting the sample files
Replicas of the artifacts that you create when using the External Service Wizard are provided as sample files for your reference. Use these files to verify that the files you create with the Ex-ternal Service Wizard are correct. The artifacts generted as part of the tutorials are located in the referencefiles folder within the samples folder. This artifacts can be used for comparison purposes whenever you run the tutorials and generate your own artifacts.
The names of the replica files for the six tutorials are, Tutorial1.zip, Tutorial2.zip, Tutorial3.zip, Tutorial4.zip, Tutorial5.zip, Tutorial6.zip, Tutorial7.zip and Tutorial8.zip. All these tutorial files are located at ./samples/referencefiles. These files can be extracted into the WebSphere In-tegration Developer and the artifacts can be used for reference purposes. The zip files and Siebel scripts accompany each sample scenarios of the tutorial.
Creating the Event table in Siebel
To do the following steps you must be familiar with Siebel tools functionality. For detail informa-tion on any of the steps please refer to Siebel tools documentation.
This procedure uses the Siebel Sales Enterprise application as an example. Substitute all ref-erences to Siebel Sales Enterprise with the name of the Siebel application in use.
For this example IBM Events has been used for Event table name. This name can be changed based on the end user needs. However it will make it simple if the names from Table name to Object, view, etc.. is the same.
To create Event table and Object in Siebel Application please perform the following procedure in Siebel tools:
1. Create IBM project. And lock your project. You need to com-plete all Siebel customizations under this new project. (ex-cept for event triggers)
December 13, 2007 Page 9 of 137version on the server
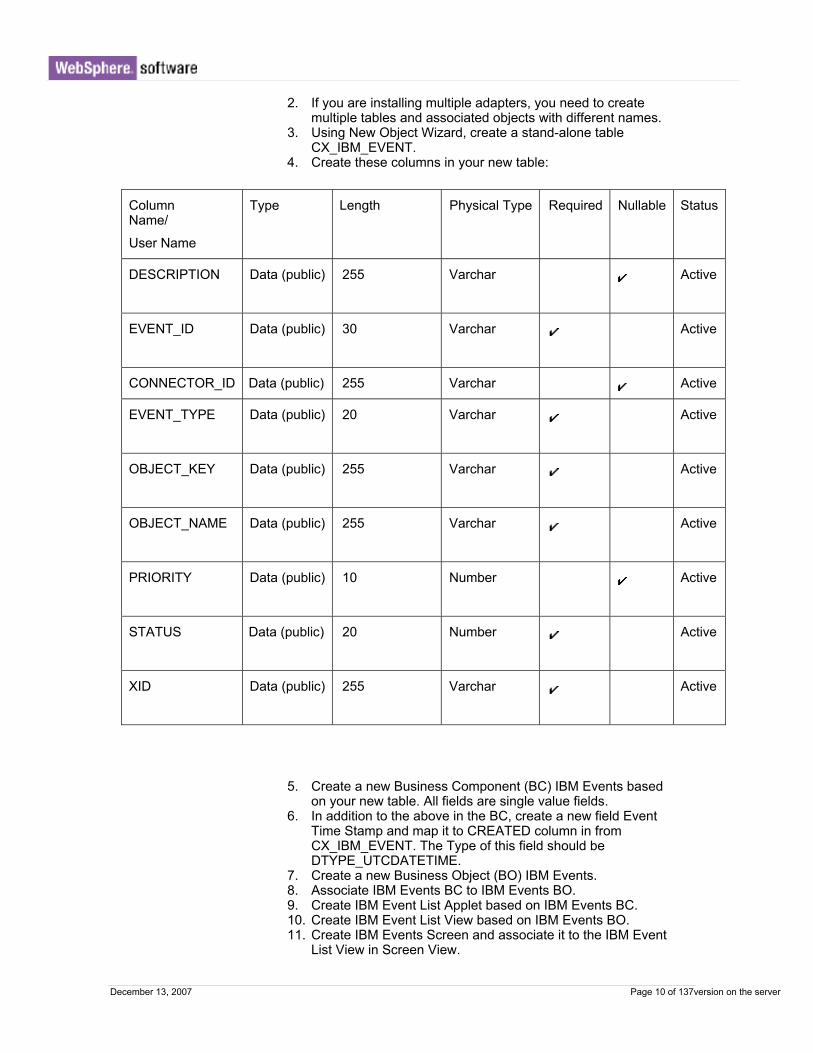
2. If you are installing multiple adapters, you need to create multiple tables and associated objects with different names.
3. Using New Object Wizard, create a stand-alone table CX_IBM_EVENT.
4. Create these columns in your new table:
Column Name/
User Name
Type Length Physical Type Required Nullable Status
Active DESCRIPTION
Data (public) 255 Varchar
EVENT_ID
Data (public) 30 Varchar Active
Active CONNECTOR_ID Data (public) 255 Varchar
EVENT_TYPE
Data (public) 20 Varchar Active
OBJECT_KEY
Data (public) 255 Varchar Active
OBJECT_NAME
Data (public) 255 Varchar Active
Active PRIORITY
Data (public) 10 Number
STATUS
Data (public) 20 Number Active
XID
Data (public) 255 Varchar Active
5. Create a new Business Component (BC) IBM Events based on your new table. All fields are single value fields.
6. In addition to the above in the BC, create a new field Event Time Stamp and map it to CREATED column in from CX_IBM_EVENT. The Type of this field should be DTYPE_UTCDATETIME.
7. Create a new Business Object (BO) IBM Events. 8. Associate IBM Events BC to IBM Events BO. 9. Create IBM Event List Applet based on IBM Events BC. 10. Create IBM Event List View based on IBM Events BO. 11. Create IBM Events Screen and associate it to the IBM Event
List View in Screen View.
December 13, 2007 Page 10 of 137version on the server
12. Create a page tab as follows:
a. Access the Application > Siebel Sales Enterprise > Page tab.
b. Right-click and select New Record from the menu.
c. Enter IBM Events as the screen name and IBM Events for the Text – String Override
e. Leave the inactive field unchecked.
13. Create a screen menu item as follows:
a. Access the Application > Siebel Sales Enterprise > Screen Menu Item.
b. Right-click and select New Record.
c. Enter IBM Events as the screen and IBM Events for the Text – String Override.
e. Leave the inactive field unchecked.
.
14. Create a new Business Object Schema Version for IBM pro-ject and associate it to Schema Version BC.
15. Apply the physical schema for the new tables to your local database. You can do this by querying for the new table, CX_IBM_EVENT_Q. Select the current query to create a physical schema. Make sure that you leave the table space and index space blank.
16. Activate the new schema using the activate button 17. Add or modify the Siebel VB or e-scripts for the BC that cor-
responds to the business objects used at your site. Siebel scripts triggers event notification for BO. (Samples are in the Sample folder) If you are planning to use multiple connec-tors, make sure the correct name is specified in the Siebel script. In Siebel script you need to make sure, event wont get created for the adapter user name to prohibit the ping-pong effect.
18. Compile the updated and locked projects on your local data-base to create a new Siebel repository (.srf) file.
19. Open Siebel Sales Enterprise on your local database. You must have administrative privileges to perform the following:
a. Create a new view called IBM Event List View
b. Create a new responsibility called IBM Responsibility for IBM Event List View.
c. Add the employees or teams who are responsible for re-viewing events to the newly created IBM Responsibility.
d. Create the IBMCONN (or your adapter user name) user and add it to IBM Responsibility and Administrative Respon-sibility.
20. Test the application in your local environment. Ensure that you have visibility to IBM Event List View and that an event is generated in the view after you create a record in sup-ported object. For example, create a new account in Siebel and check that a new account event appears in the IBM Event List View.
December 13, 2007 Page 11 of 137version on the server

21. Check in the new and updated projects to your development server
22. Activate the new table/s in the development database. 23. Compile a new Siebel.srf file I the server.
Note: Enable Enterprise Application Integration by going to:
Sitemap > Server Administration > Component Group and selecting Enable.
To set Siebel JAVABean:
1. Select, Site Map->Server Admin-> Components (Sales Object Manager).
2. In the lower applet, go to Component Parameter and enter a timeout value
Create an authentication alias
Using an authentication alias eliminates the need to store the password in clear text in an adapter configuration property, where it might be visible to others. (The authentication alias needs to be set because the adapter uses the username and password to connect to the database. ) Follow these steps to set the authentication alias in WebSphere Process Server administrative con-sole. This authentication alias is used later while generating the artifacts for the module.
1. In WebSphere Integration Developer, switch to the Servers View by selecting Window Show View Servers.
December 13, 2007 Page 12 of 137version on the server
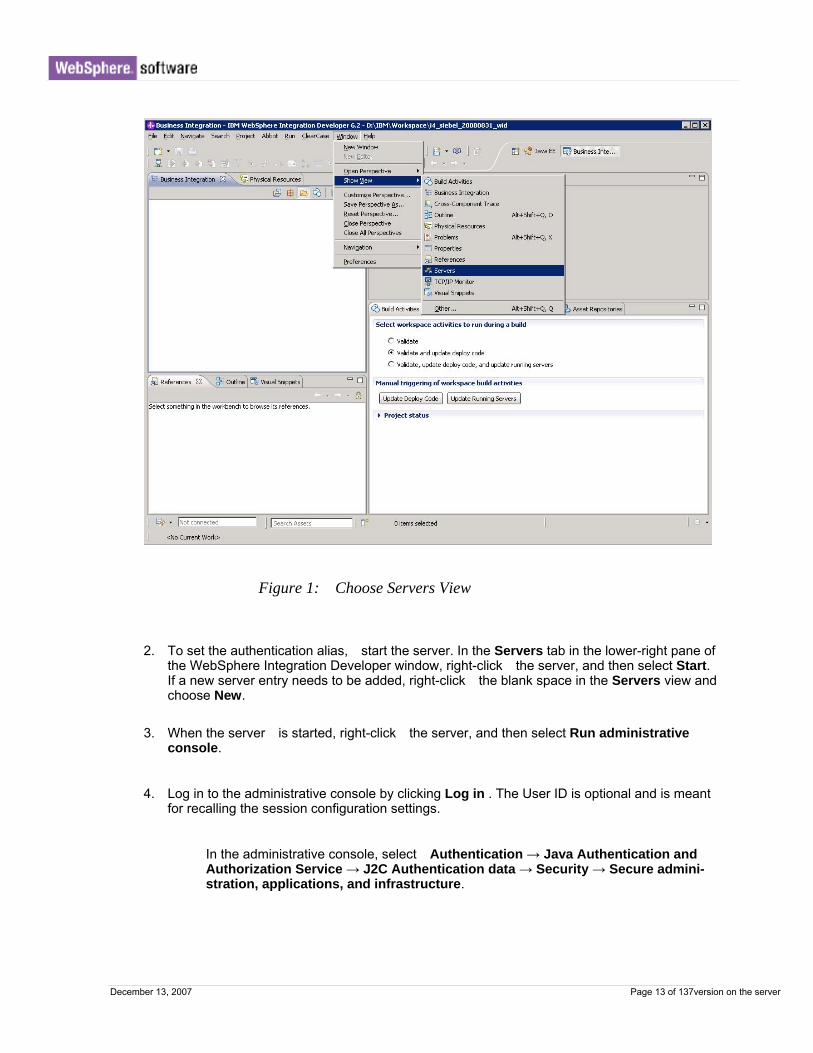
Figure 1: Choose Servers View
2. To set the authentication alias, start the server. In the Servers tab in the lower-right pane of the WebSphere Integration Developer window, right-click the server, and then select Start. If a new server entry needs to be added, right-click the blank space in the Servers view and choose New.
3. When the server is started, right-click the server, and then select Run administrative console.
4. Log in to the administrative console by clicking Log in . The User ID is optional and is meant for recalling the session configuration settings.
In the administrative console, select Authentication → Java Authentication and Authorization Service → J2C Authentication data → Security → Secure admini-stration, applications, and infrastructure.
December 13, 2007 Page 13 of 137version on the server

Figure 2: Java Authentication and Authorization Service (JAAS)
a. In the list of J2C authentication aliases that is displayed, click New.
b. In the Configuration tab, type the name of the authentication alias in the Alias field.
c. Type the user ID and password that are required to establish a connection to the database.
d. Optionally type a description of the alias.
e. Click OK. The newly created alias is displayed. Note the full name of the alias, which includes the node name. This full name is used in subsequent configuration window.
f. Click Save.
Figure 3: Create a New Authentication Alias with User ID, Password
and Description
December 13, 2007 Page 14 of 137version on the server

5. A message appears to confirm and Save changes to the master configuration. Click Save .
Figure 4: Select Authentication Entries
Note: You have created an authentication alias that is used to configure the adapter properties. Restart the server for the changes to take effect.
Creating the adapter project in WebSphere Integration Devel-oper
To import the RAR file into the project, follow these steps:.
1. Open WebSphere Integration Developer.
December 13, 2007 Page 15 of 137version on the server
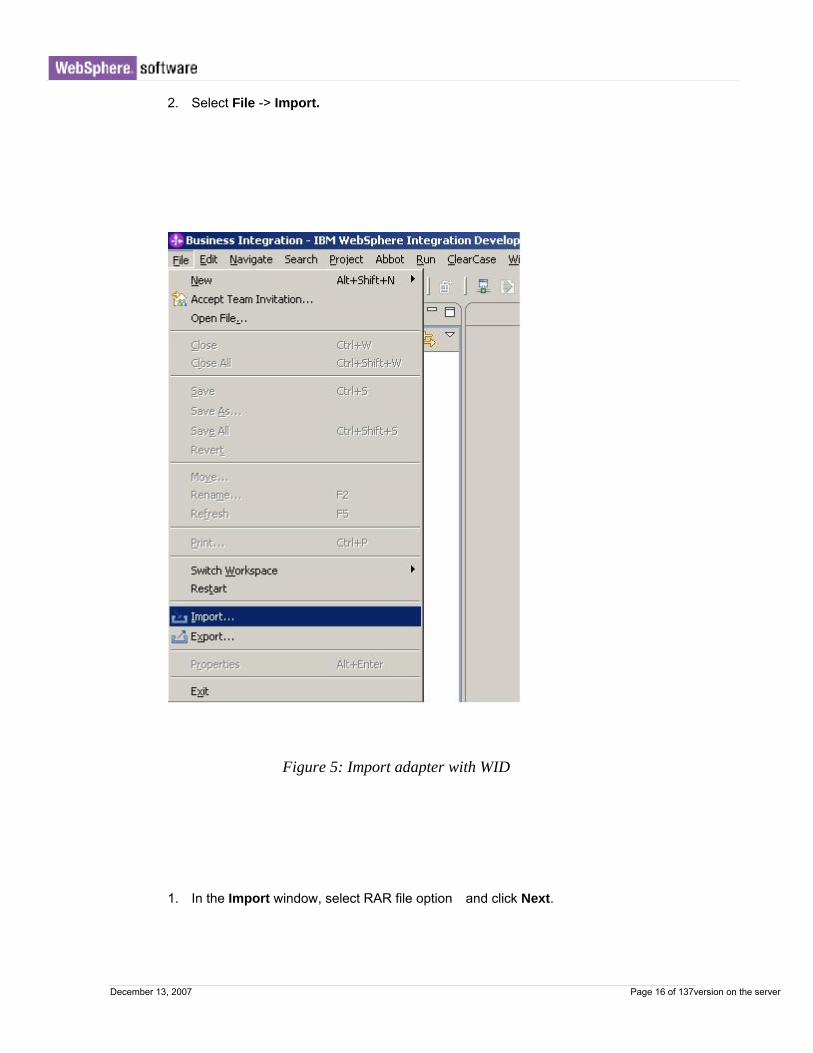
2. Select File -> Import.
Figure 5: Import adapter with WID
1. In the Import window, select RAR file option and click Next.
December 13, 2007 Page 16 of 137version on the server

Figure 6: Import adapter RAR File
2. In the Connector Import window,
1. In the Connector file field, click Browse to locate the folder that contains the adapter file, i.e. CWYEB_SiebelAdapter.rar.
2. Leave the default values as is for the other fields . The connector module is self-named according to the adapter. WebSphere Process Server v6.2 is the expected target runtime.
3. Click Finish.
December 13, 2007 Page 17 of 137version on the server
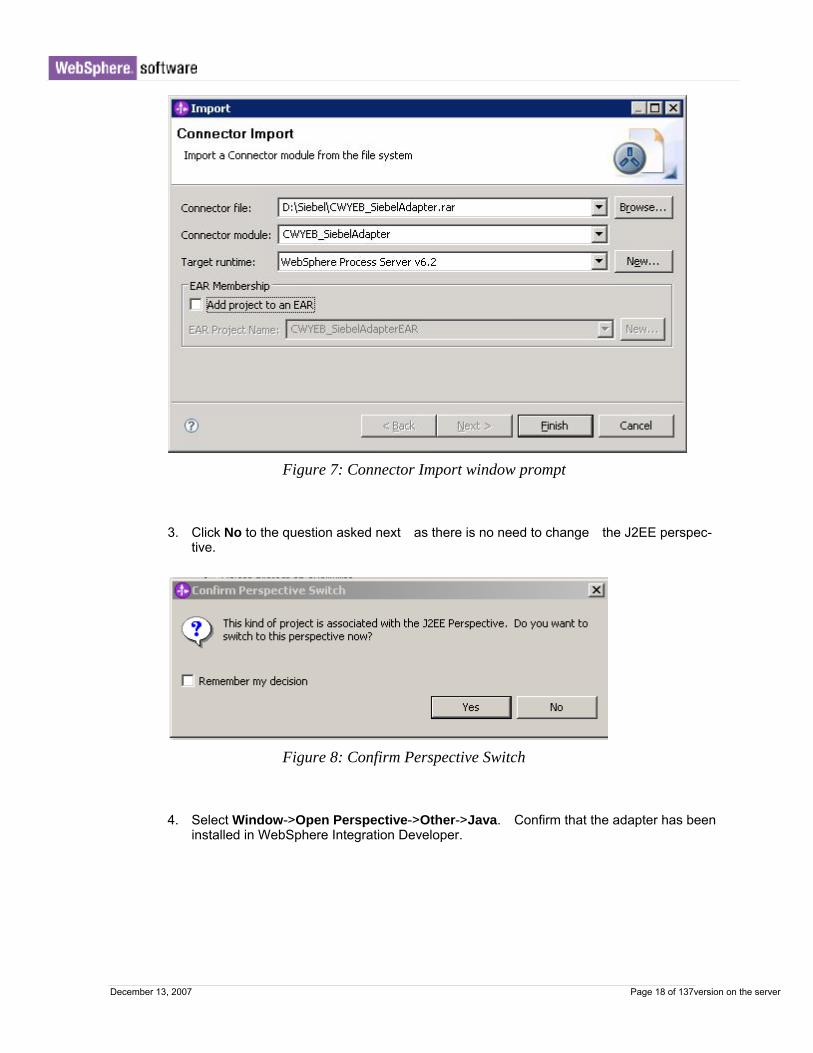
Figure 7: Connector Import window prompt
3. Click No to the question asked next as there is no need to change the J2EE perspec-tive.
Figure 8: Confirm Perspective Switch
4. Select Window->Open Perspective->Other->Java. Confirm that the adapter has been installed in WebSphere Integration Developer.
December 13, 2007 Page 18 of 137version on the server
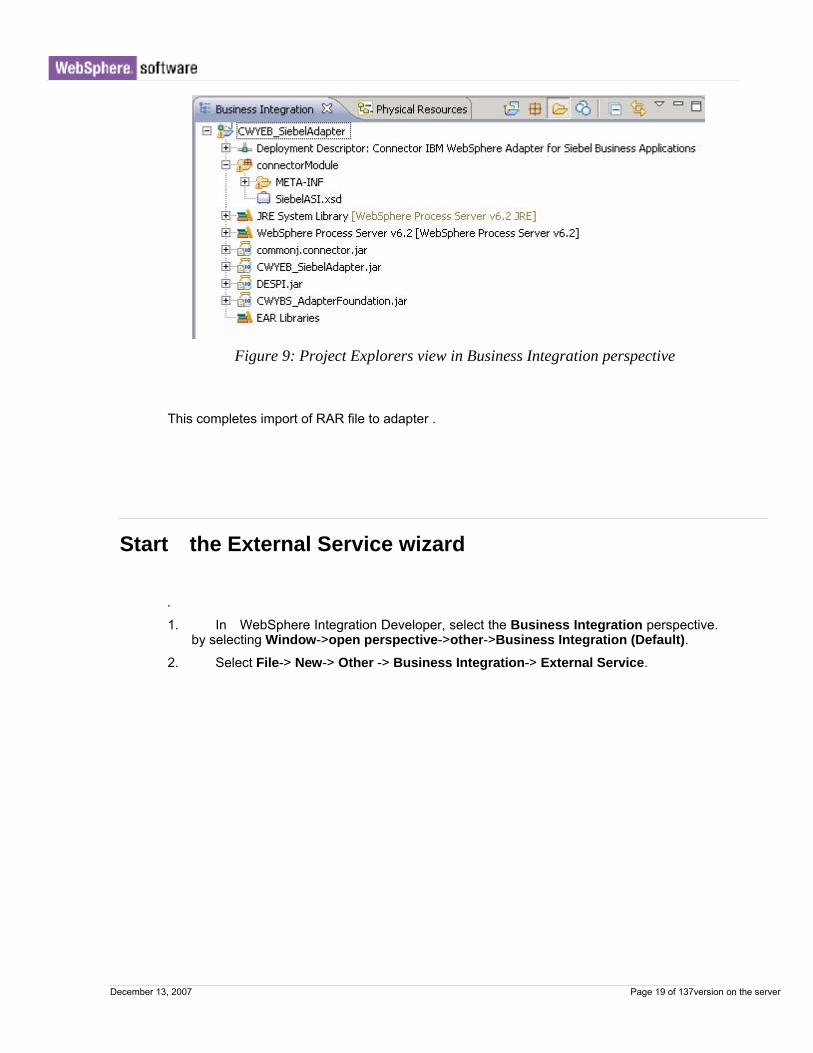
Figure 9: Project Explorers view in Business Integration perspective
This completes import of RAR file to adapter .
Start the External Service wizard
.
1. In WebSphere Integration Developer, select the Business Integration perspective. by selecting Window->open perspective->other->Business Integration (Default).
2. Select File-> New-> Other -> Business Integration-> External Service.
December 13, 2007 Page 19 of 137version on the server

Figure 10: New External Service
3. In the External Service window, select Adapters → Siebel. and click Next. This selection creates a service to connect to an external system
December 13, 2007 Page 20 of 137version on the server

Figure 11: External Services
4. Select IBM WebSphere Adapter for Siebel Business Application (IBM 6.2.0.0) > CWYEB_SiebelAdapter.
December 13, 2007 Page 21 of 137version on the server
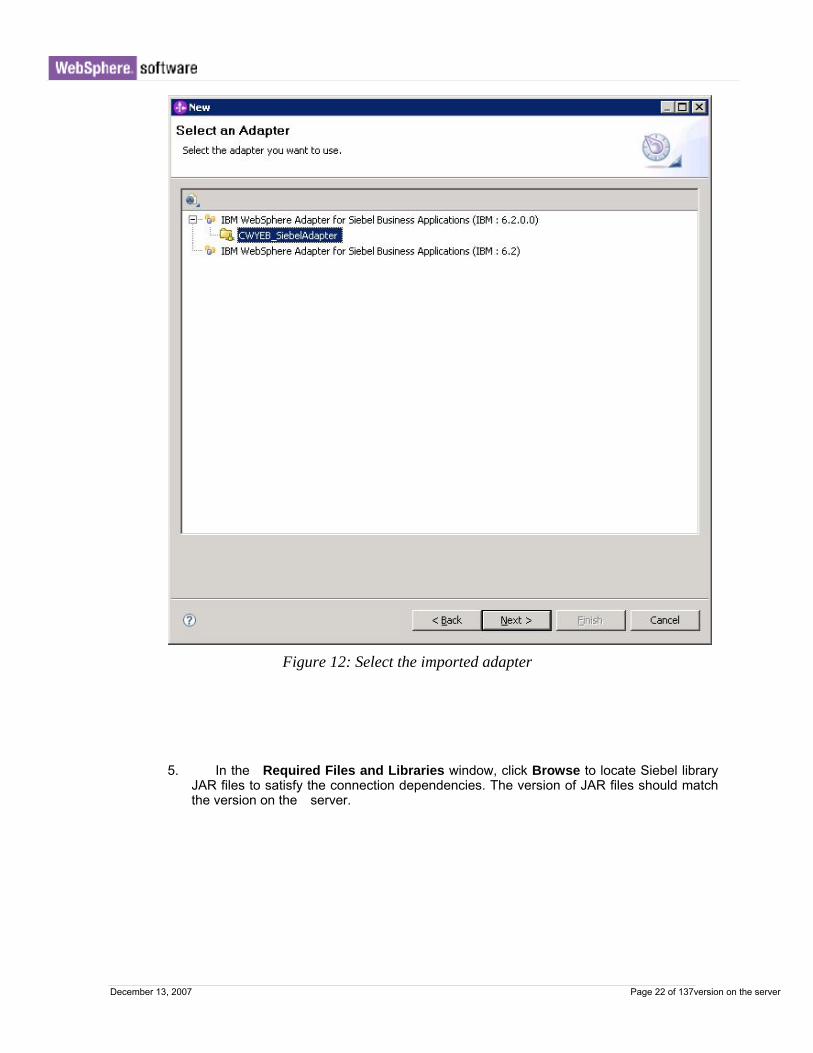
Figure 12: Select the imported adapter
5. In the Required Files and Libraries window, click Browse to locate Siebel library JAR files to satisfy the connection dependencies. The version of JAR files should match the version on the server.
December 13, 2007 Page 22 of 137version on the server

Figure 13: Locate Siebel dependency jar files
The steps performed until now with the wizard are common for all scenarios. The sub-sequent steps vary based on the type of processing that is accomplished for the sce-narios.
December 13, 2007 Page 23 of 137version on the server

C h a p t e r 3 . Tutorial for outbound processing using Siebel Business Service
The following sections describes how to set up the outbound processing through Siebel Business Service account, Siebel Account. . This operates on the integration object Ac-count Interface. The artifacts generated by this process are contained in Tutorial1.zip and Tutorial2.zip (one for Insert and another for QueryByExample).-Do not apply BOLD
Tutorial File Contents
Tutorial Folders Descriptions
SiebelAcctOut Generated artifacts, such as XML Schema Definitions(xsd) and Web Services Defini-tion Language (WDL).
SiebelAcctOutApp EAR application artifacts, such as de-ployment descriptors.
1
SiebelAcctOutEJB EJB module artifacts.
SiebelAcctOut Generated artifacts, such as XML Schema Definitions(xsd) and Web Services Defini-tion Language (WDL).
SiebelAcctOutApp EAR application artifacts, such as de-ployment descriptors.
2
SiebelAcctOutEJB EJB module artifacts.
Start the External Service wizard
• . To set connection properties for the External Service wizard, follow the instructions in Start the External Service Wizard part in section 2
1. Continuing with the wizard, in the Processing Direction window, select Outbound.
December 13, 2007 Page 24 of 137version on the server

Figure 14: Processing Direction
Setting connection properties for the External Service Wizard
To set connection properties for the External Service wizard, follow the instructions ...
1. Selecting Outbound processing type, displays Discovery Configuration window, Change or retain the connection properties displayed as shown in the following figure. .In Type of Siebel objects to discover field, select Siebel Business Services. .
December 13, 2007 Page 25 of 137version on the server
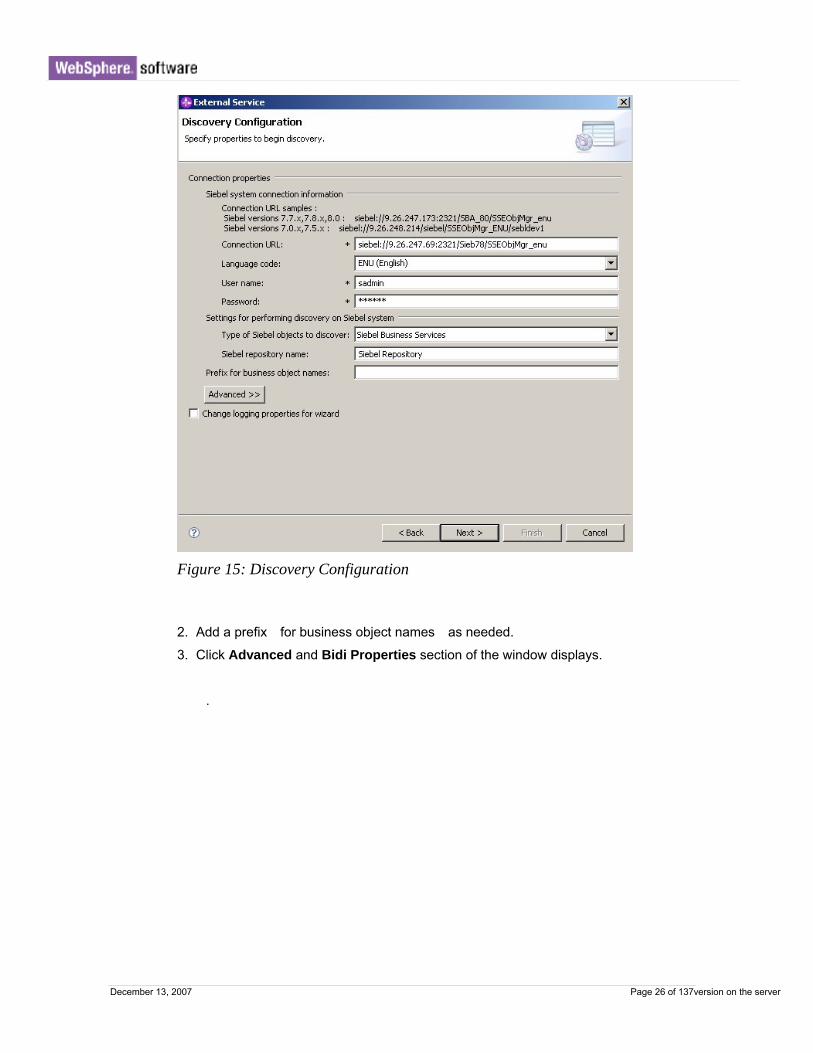
Figure 15: Discovery Configuration
2. Add a prefix for business object names as needed.
3. Click Advanced and Bidi Properties section of the window displays.
.
December 13, 2007 Page 26 of 137version on the server

Figure 16: Discovery Configuration - Bidi Properties and Log Properties
4. Select Bidi transformation
5. Select Implicit or Visual as Bidi ordering schema.
6. In Text direction list, select LTR (Left to Right) or RTL (Right to left) or contextually in one of the directions.
7. Select Specify the level of the logging desired to select the location for the log file output and logging level.
8. Click Browse to change the output location of the log file.
9. Click Next.
Selecting the Siebel Business Services
1. In the Object Discovery and Selection window, click Edit Query.
2. In the Query Properties window, enter the name of the business service. For ex-ample, Siebel Account for Siebel Business Service.
3. Click OK.
December 13, 2007 Page 27 of 137version on the server

Figure 17: Query Properties
4. Click Run Query.
5. In the Object Discovery and Selection window, expand Siebel Account to display the methods supported against the business service.
6. Select Insert and QueryByExample in Siebel Account.
December 13, 2007 Page 28 of 137version on the server

Figure 18: Selected Objects
7. Click Next.
Generating business object definitions and related artifacts
1. In the Configure Composite Properties window, specify the folder to store gener-ated business objects. Leave the other properties, Business object namespace and Generate a business graph for each business object with their default val-ues.
2. Select Generate business objects with shorter names .
December 13, 2007 Page 29 of 137version on the server
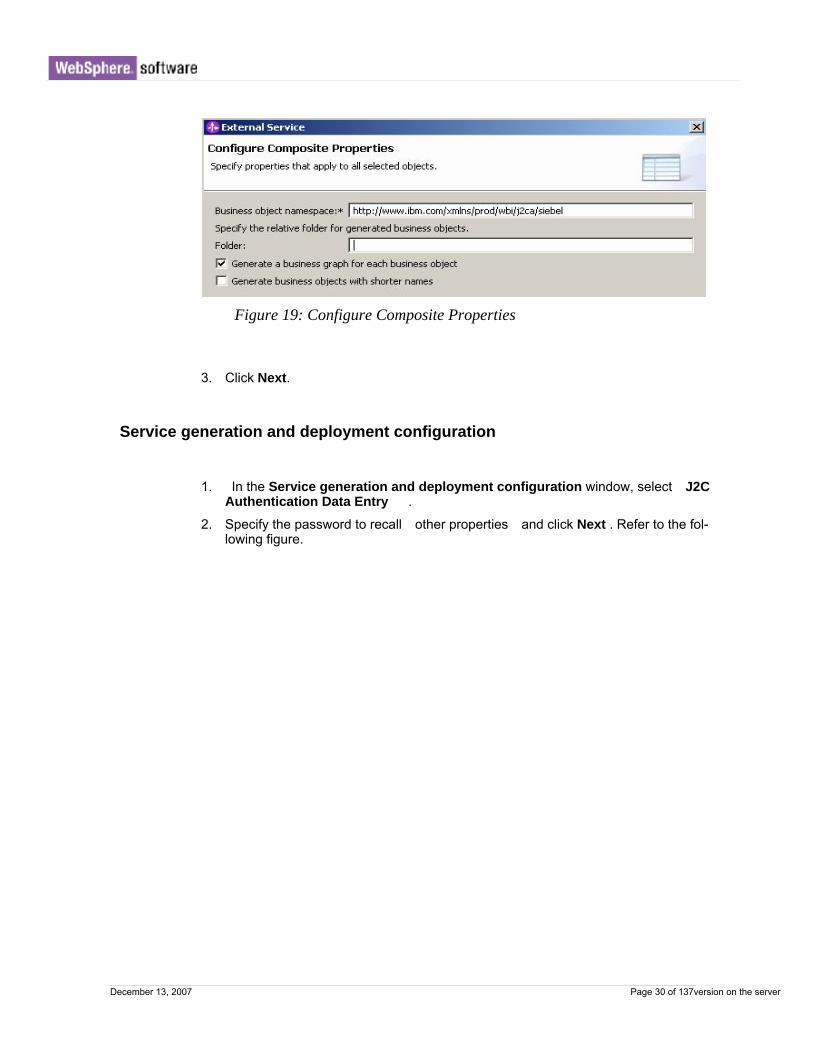
Figure 19: Configure Composite Properties
3. Click Next.
Service generation and deployment configuration
1. In the Service generation and deployment configuration window, select J2C Authentication Data Entry .
2. Specify the password to recall other properties and click Next . Refer to the fol-lowing figure.
December 13, 2007 Page 30 of 137version on the server

Figure 20: Service Generation and Deployment Configuration
3. In the Service Location Properties window, click New for Module filed or choose a preexisting module. Specify the name of the module.
December 13, 2007 Page 31 of 137version on the server
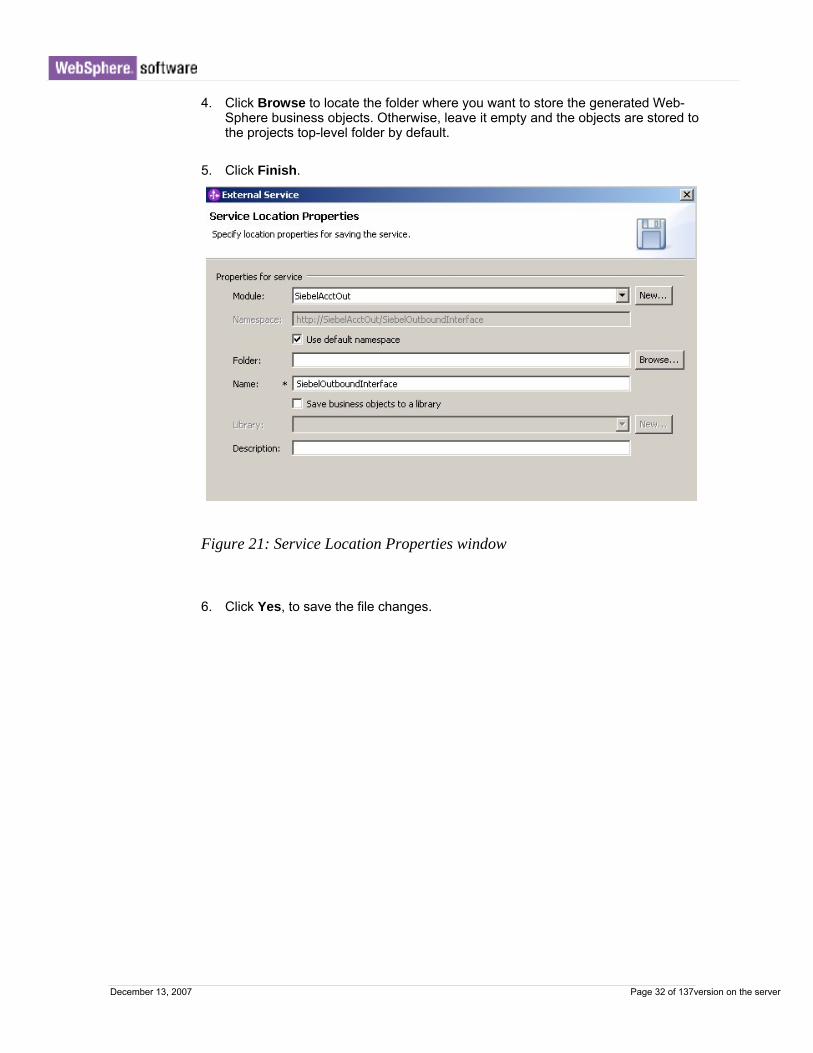
4. Click Browse to locate the folder where you want to store the generated Web-Sphere business objects. Otherwise, leave it empty and the objects are stored to the projects top-level folder by default.
5. Click Finish.
Figure 21: Service Location Properties window
6. Click Yes, to save the file changes.
December 13, 2007 Page 32 of 137version on the server

Figure 22: File Changes Saved
.
Configuring the adapter properties
• The properties were configured earlier when the business objects and artifacts were generated. If any configuration changes are needed, you can make them by using the Assembly Editor.
1. In the Business Integration perspective, open the assembly diagram under the pro-ject and select the SiebelOutboundInterface.
December 13, 2007 Page 33 of 137version on the server
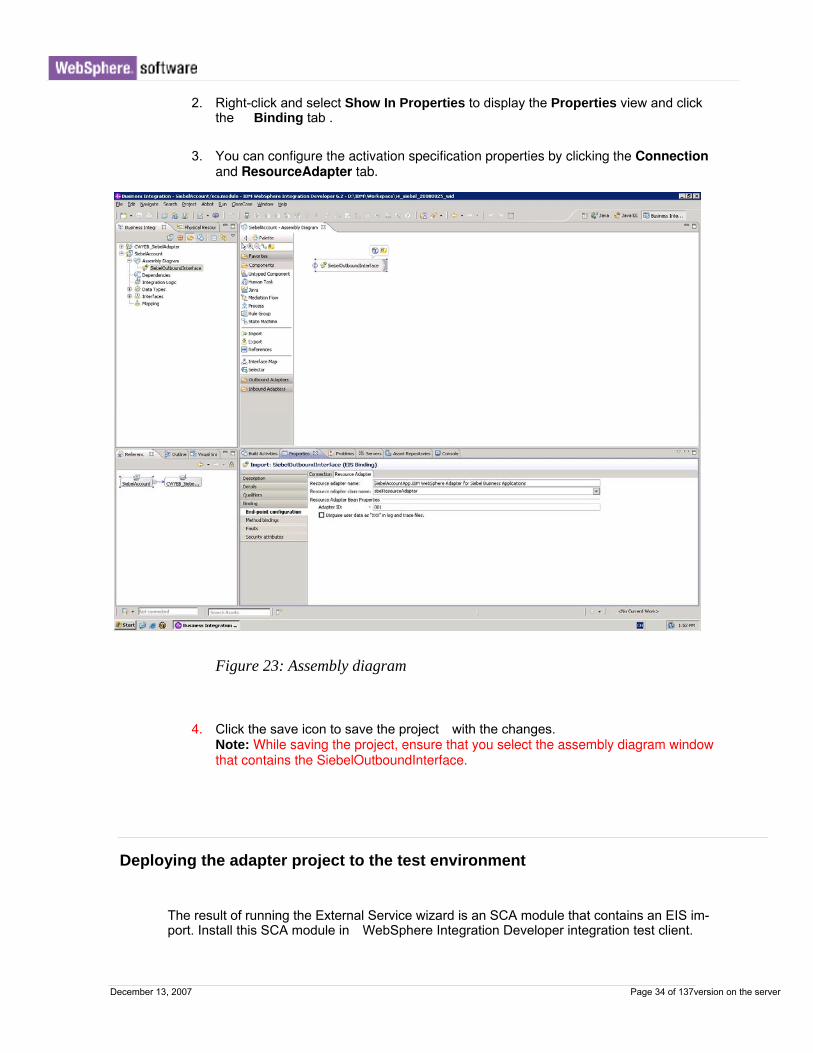
2. Right-click and select Show In Properties to display the Properties view and click the Binding tab .
3. You can configure the activation specification properties by clicking the Connection and ResourceAdapter tab.
Figure 23: Assembly diagram
4. Click the save icon to save the project with the changes. Note: While saving the project, ensure that you select the assembly diagram window that contains the SiebelOutboundInterface.
Deploying the adapter project to the test environment
The result of running the External Service wizard is an SCA module that contains an EIS im-port. Install this SCA module in WebSphere Integration Developer integration test client.
December 13, 2007 Page 34 of 137version on the server

1. Add the SCA module you created earlier to the server using the Servers View in WebSphere Integration Developer. Right-click on the server and select Add and remove projects.
2. Select the project in the Available Projects view. Click Add . It gets added to the Configured Projects on the right panel.
3. Click Finish
4. The SCA module is installed and gets started on the server. Note: If you have any problems installing the application using the previously de-scribed approach, you can export the project as an EAR file and then install and start it through the WebSphere Process Server administrative console. For more information on how to do the same, check out the troubleshooting sections 9.1, 9.2, and 9.3. - remove bold
Testing the adapter application
You test the adapter application through the WebSphere Integration Developer integration test client. The following sub-sections provide information on how to execute the two op-erations, Insert and QueryByExample, against the business service Siebel Account.
Running the Insert operation 1. In the Business Integration profile, select the module, right-click and select Test >
Test Module.
December 13, 2007 Page 35 of 137version on the server
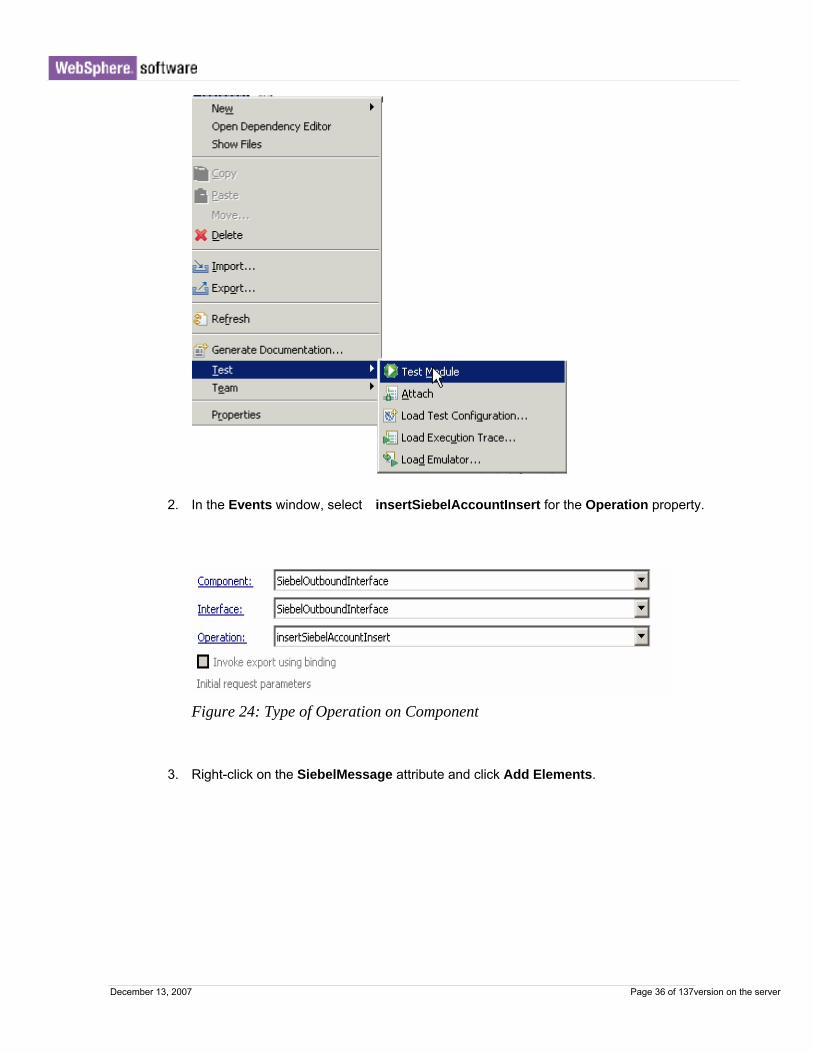
2. In the Events window, select insertSiebelAccountInsert for the Operation property.
Figure 24: Type of Operation on Component
3. Right-click on the SiebelMessage attribute and click Add Elements.
December 13, 2007 Page 36 of 137version on the server

Figure 25: Add Property Object Element
4. Set the values as needed against the attributes of the SiebelMessage element.
Note: Under the SiebelMessage instance (of IOAccountInterfaceICAccount type) Name, PrimaryOrganization, Location and CurrencyCode are mandatory attributes.
.
Also the container attributes, RelatedOrganization and RelatedSalesRep are mandatory. For the remaining attributes, there is no need to set the values. But if there is a specific need in your environment to set any of the other attributes, do so. The following values provided are sample ones that may or may not be valid in your environment. Get the valid values for the attributes by checking existing EIS records for the Account integration object.
Create Instances for the two container attributes RelatedOrganization and Related-SalesRep.
1. RelatedOrganization:
December 13, 2007 Page 37 of 137version on the server

2. RelatedSalesRep:
Where <USERNAME> is the user name you use to login to Siebel. For example, sadmin
5. Select the value null for the container attributes (mandatory) under the SiebelMessage instance with the exception of RelatedOrganization and RelatedSalesRep.
6. Right-click on the selected attributes list and select Set To>Unset. Note that the fol-lowing figure does not show all the non-required attributes. (Do this for the simple non-required attributes within the instances of the container attributes, RelatedOrganiza-tion and RelatedSalesRep).
7. Click Continue.
8. Select the appropriate WebSphere Process Server instance and click Finish to run the operation.
December 13, 2007 Page 38 of 137version on the server

Figure 26: Select Deployment Location
If the process is successful, the resultant business object with the key values are returned. Note down the AccountID key value as it can be used later in the QueryByExample opera-tion. It is also needed for clearing the sample content created.
Figure 27: Business Object Attributes
The process of the Insert operation is successfully completed.
December 13, 2007 Page 39 of 137version on the server

Running the QueryByExample Operation
1. In Business Integration profile, select the module, right-click and select Test > Test Module.
2. In the Events window, select queryByExampleSiebelAccountQueryByExample as the Operation property.
Figure 28: Operation Type
December 13, 2007 Page 40 of 137version on the server

3. Right-click the SiebelMessage attribute and click Add Elements....
Figure 29: Add Elements to Business Object
4. Get the AccountID key value from any existing Account record in the Siebel EIS and set the same against the AccountID attribute of the SiebelMessage element added. Note: Do not use the following values . The AccountID that was generated earlier against the Insert operation is given in the following figure. You can do the same, if you had done the Insert operation prior to running this operation. If not, get the AccountID from any existing record in the EIS.
December 13, 2007 Page 41 of 137version on the server

Figure 30: AccountID of Existing Record
5. Select the simple attributes other than AccountID using Shift key and right-click on the attributes list. Select Set To->Unset.
6. Click Continue.
7. Select the appropriate WebSphere Process Server instance and click Finish to execute the operation.
Figure 31: Select Deployment Location
December 13, 2007 Page 42 of 137version on the server

When the process is successful, the resultant business object hierarchy with the attribute val-ues are returned as shown in the following figure.
Figure 32: Invoke
The process of the QueryByExample operation is successfully completed.
December 13, 2007 Page 43 of 137version on the server

December 13, 2007 Page 44 of 137

C h a p t e r 4 . Tutorial for outbound processing using Siebel Business Object
The following sections describes how to set up the outbound processing through Siebel Business Object account, Account - ESP. The artifacts generated by this process are contained in Tutorial4.zip and Tutorial5.zip (one for Create and another for Exists).
Tutorial Folders Descriptions
SiebelBOAcct2 Generated artifacts, such as XML Schema Definitions (xsd), Web Services Definition Language (WDL), Service Component Ar-chitecture (SCA) module file and etc.
SiebelBOAcct2App EAR application artifacts, such as deploy-ment descriptors.
4
SiebelBOAcct2EJB EJB module artifacts.
SiebelBOAcct2 Generated artifacts, such as XML Schema Definitions (xsd), Web Services Definition Language (WDL), Service Component Ar-chitecture (SCA) module file and etc.
SiebelBOAcct2App EAR application artifacts, such as deploy-ment descriptors.
5
SiebelBOAcct2EJB EJB module artifacts.
Start the External Service wizard
• . To set connection properties for the External Service Wizard, follow the instructions in Start the External Service Wizard part in section 2
1. Continuing with the wizard, in the Processing Direction window, select Outbound.
December 13, 2007 Page 45 of 137
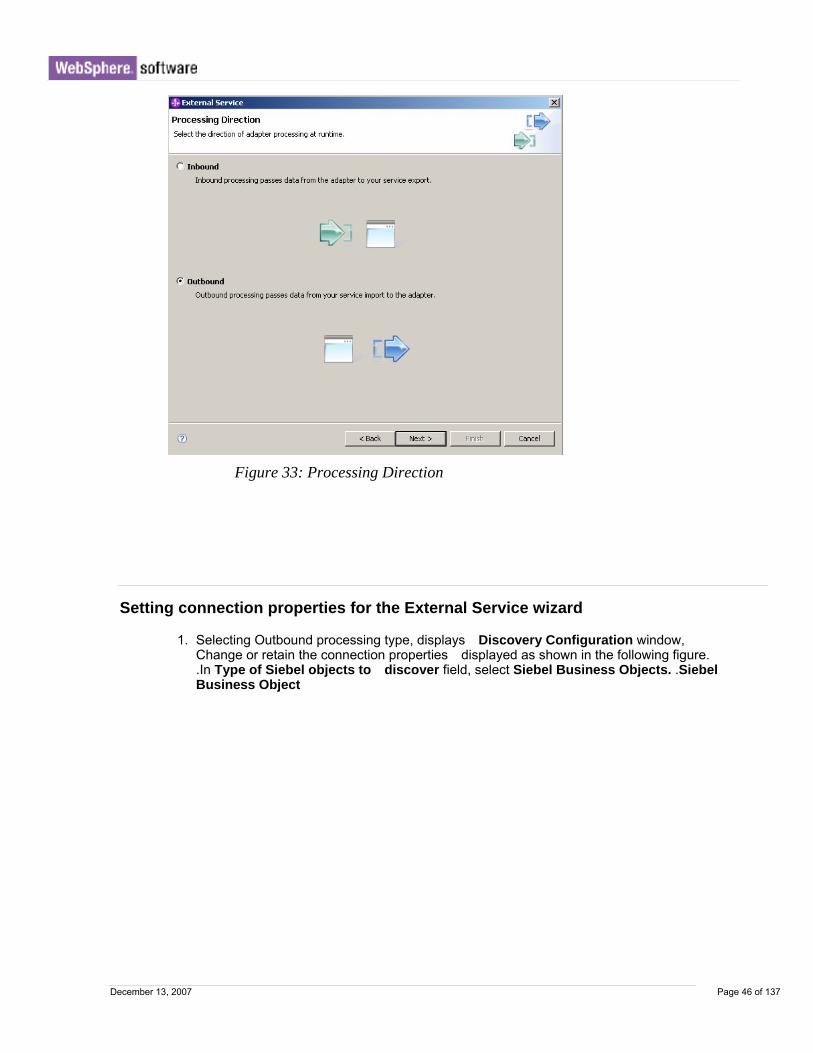
Figure 33: Processing Direction
Setting connection properties for the External Service wizard 1. Selecting Outbound processing type, displays Discovery Configuration window,
Change or retain the connection properties displayed as shown in the following figure. .In Type of Siebel objects to discover field, select Siebel Business Objects. .Siebel Business Object
December 13, 2007 Page 46 of 137

Figure 34: Discovery Configuration
Siebel Business Object
Selecting the Siebel Business Objects
1. In the Object Discovery and Selection window, click Edit Query.
2. In the Query Properties window, provide the name (or the starting characters in the name) of the business object – Account – ESP.
3. Click OK.
December 13, 2007 Page 47 of 137

Figure 35: Object Discovery and Selection
4. Click Run Query. The business object gets listed.
5. Expand Account - ESP tree node to list the business components .
6. Select the business component Account and click Add.
7. Click Next.
Generating business object definitions and related artifacts
December 13, 2007 Page 48 of 137

1. In the Configure Composite Properties window,
provide a out value for Folder for example. This is where the generated WebSphere business objects are stored. Do not change the Namespace value and do not edit the Operations list.
Figure 36: Configure Composite Properties
2. Click Next.
Service generation and deployment configuration
December 13, 2007 Page 49 of 137

1. In the Service generation and deployment configuration window, select J2C Authen-tication Data Entry .
2. Specify the password to recall other properties and click Next . Refer to the following figure.
Figure 37: Service Generation and Deployment Configuration
December 13, 2007 Page 50 of 137

3. In the Service Location Properties window, create a new module by clicking New against the Module field.
Figure 38: Service Location Properties
4. In the Integration Project window, select Create a module project and click Next.
5. Type a module name in the New Module field and click Finish.
6. In the Folder field, type intf . The corresponding folder is created under the module. The generated .import and .wsdl files are stored in this folder.
7. Click Finish..
December 13, 2007 Page 51 of 137

Figure 39: Files Changed
To conclude the changes to the artifacts, files are typically saved based on the con-figurations made earlier throughout the wizard steps.
8. Click Yes to save the files .
Configuring the adapter properties
The properties were configured earlier when the business objects and artifacts were generated. If any configuration changes are needed, you can make them by using the Assembly Editor.
•
December 13, 2007 Page 52 of 137

1. In the Business Integration perspective, open the assembly diagram under the project and select the SiebelOutboundInterface.
2. Open Properties view and click Binding tab .
3. You can configure the activation specification properties by clicking the Connection and ResourceAdapter tab.
Figure 40: Assembly Diagram and Properties View
4. Click the save icon to save the project with the changes.
Note: While saving the project, ensure that you select the assembly diagram window that contains the SiebelOutboundInterface.
Deploying the adapter project to the test environment
The result of running the External Service wizard is an SCA module that contains an EIS im-port. Install this SCA module in WebSphere Integration Developer integration test client.
December 13, 2007 Page 53 of 137
1. Add the SCA module created earlier to the server using the Servers View in WebSphere Integration Developer. Right-click the server, and select Add and remove projects.
2. In the Available Projects on the left hand side, select the project andclick Add . It gets added to the Configured Projects pane on the right hand side.
3. Click Finish.
4. The SCA module successfully gets installed and starts on the server.
Note: If you have any problems installing the application using the previously described approach, you can export the project as an EAR file and then install and start it through the WebSphere Process Server administrative console. For further information, refer to the troubleshooting sections at the end of this tutorial. - remove the bold
Testing the adapter application
The adapter application is tested using WebSphere Integration Developer integration test client. The following sections will provide information on how to execute the two operations, Create and Exists, against the business object Account - ESP.
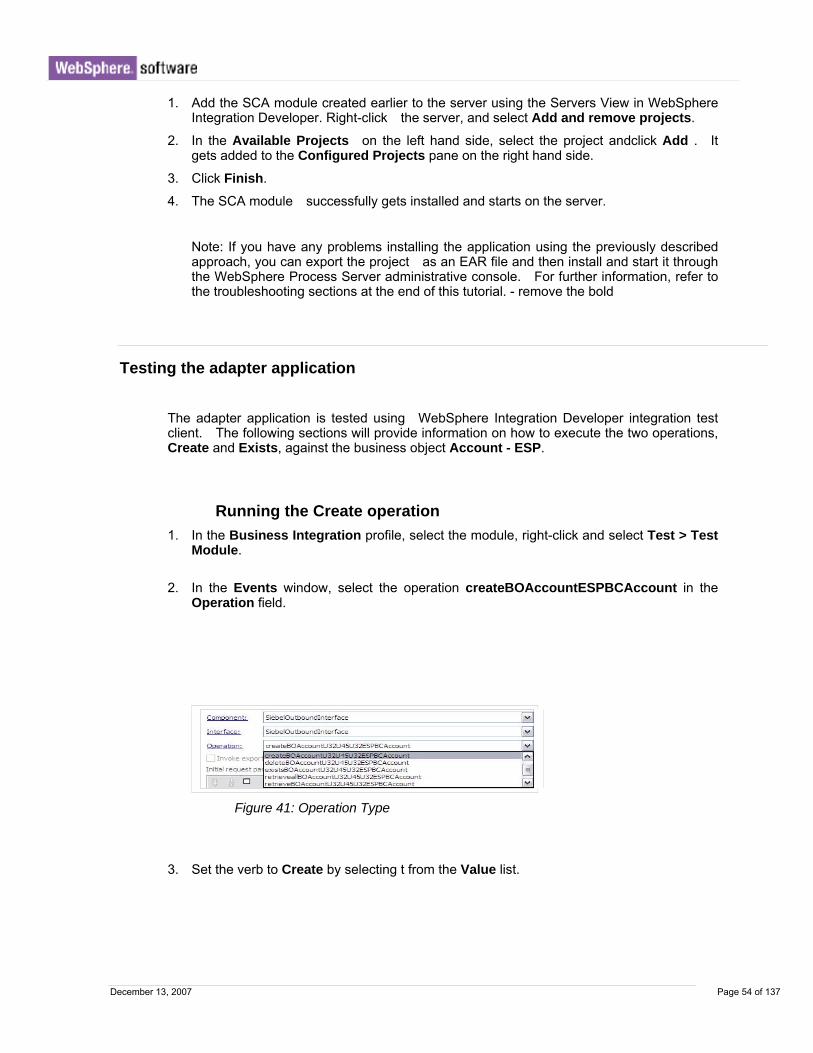
Running the Create operation 1. In the Business Integration profile, select the module, right-click and select Test > Test
Module.
2. In the Events window, select the operation createBOAccountESPBCAccount in the Operation field.
Figure 41: Operation Type
3. Set the verb to Create by selecting t from the Value list.
December 13, 2007 Page 54 of 137

Figure 42: Create a business object
4. Provide the sample values for the following business object attributes. Note: You do not need to set the attributes with the same values as given in the following table. Instead, you can provide your own valid values.
Attribute Name Possible sample value
Currency Code USD
InternalOrgFlag N
Name AccountSample4ID
PartyTypeCode P
PartyUID Q
5. Select the value null for the container attributes under BOAc-countU32U45U32ESPBCAccount (mandatory).
6. Select the simple attributes that do not need to be set using Shift or Ctrl keys and right-click on the selected attributes list. Select Set To->Unset.
7. Click Continue.
8. Select the appropriate WebSphere Process Server instance and click Finish to execute the operation.
December 13, 2007 Page 55 of 137

Figure 43: Select Deployment Location
When the process is successful, the resultant business object with the key values are re-turned. Note down the ID key value as it can be used later in the Exists operation. It is al-so needed for clearing the sample content created.
Figure 44: Return Output
The process of the Create operation is successfully completed.
December 13, 2007 Page 56 of 137
Running the Exists operation
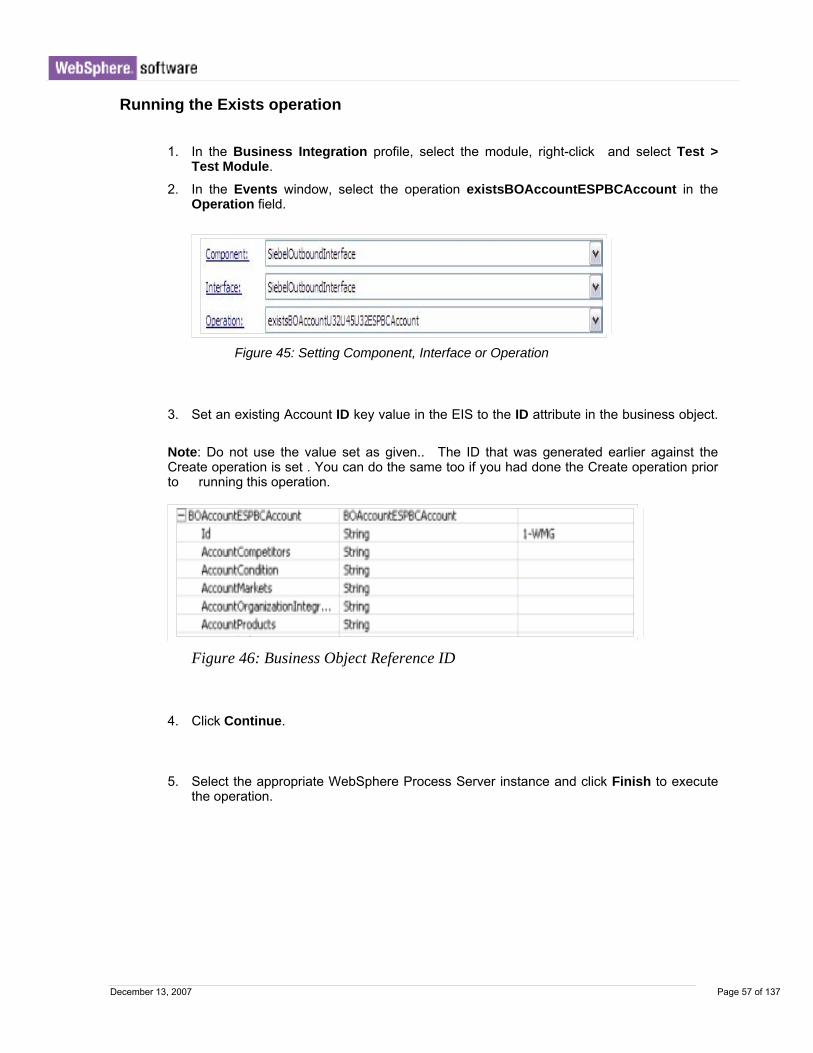
1. In the Business Integration profile, select the module, right-click and select Test > Test Module.
2. In the Events window, select the operation existsBOAccountESPBCAccount in the Operation field.
Figure 45: Setting Component, Interface or Operation
3. Set an existing Account ID key value in the EIS to the ID attribute in the business object.
Note: Do not use the value set as given.. The ID that was generated earlier against the Create operation is set . You can do the same too if you had done the Create operation prior to running this operation.
Figure 46: Business Object Reference ID
4. Click Continue.
5. Select the appropriate WebSphere Process Server instance and click Finish to execute the operation.
December 13, 2007 Page 57 of 137

When the process is successful, the resultant business object of type SiebelExistsResult is returned. This business object has a single Boolean type variable. The value would be re-turned true if the object is present in the Siebel EIS and false if not.
Figure 47: Successful Status Returned
The process of the Exists operation is successfully completed.
December 13, 2007 Page 58 of 137

C h a p t e r 5 . Tutorial for inbound processing using Siebel Business Ser-vice
This scenario describes how to set up the inbound processing through Siebel integration object Account Interface. This integration object comes under the Siebel Business Service Siebel Account. The artifacts generated by this process are contained in Tuto-rial3.zip.
Tutorial Folders Descriptions
SiebelBSAcctIn2 Generated artifacts, such as XML Schema Definitions (xsd), Web Services Definition Language (WDL), Service Component Architecture (SCA) module file and etc.
SiebelBSAcctIn2App EAR application artifacts, such as de-ployment descriptors.
3
SiebelBSAcctIn2EJB EJB module artifacts.
Start the External Service wizard
.
To set connection properties for the External Service wizard, follow the instructions in Start the External Service Wizard part in section 2
December 13, 2007 Page 59 of 137version on the server

Figure 48: Processing Direction
1. Continuing with the wizard, in the Processing direction window, select Inbound.
Setting connection properties for the External Service wizard
Follow Setting connection properties for the External Service Wizard part in section 3.
Selecting the Siebel Business Services
1. In the Discovery Configuration window, besides setting the connection properties, re-tain the other fields as shown in the following figure.
December 13, 2007 Page 60 of 137version on the server

Figure 49: Discovery Configuration - Siebel Business Service
2. Add a prefix for business object names as needed.
3. Clicki Advanced , to display Bidi Properties at the bottom of the window. .
December 13, 2007 Page 61 of 137version on the server
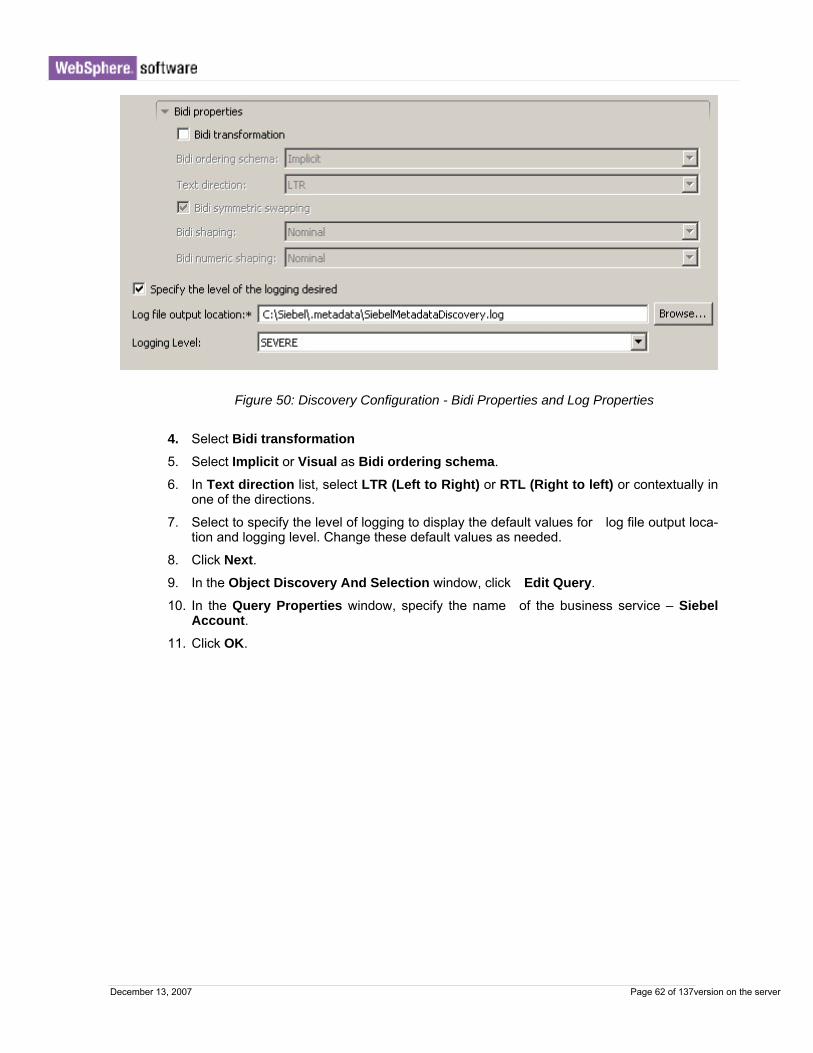
Figure 50: Discovery Configuration - Bidi Properties and Log Properties
4. Select Bidi transformation 5. Select Implicit or Visual as Bidi ordering schema.
6. In Text direction list, select LTR (Left to Right) or RTL (Right to left) or contextually in one of the directions.
7. Select to specify the level of logging to display the default values for log file output loca-tion and logging level. Change these default values as needed.
8. Click Next. 9. In the Object Discovery And Selection window, click Edit Query.
10. In the Query Properties window, specify the name of the business service – Siebel Account.
11. Click OK.
December 13, 2007 Page 62 of 137version on the server
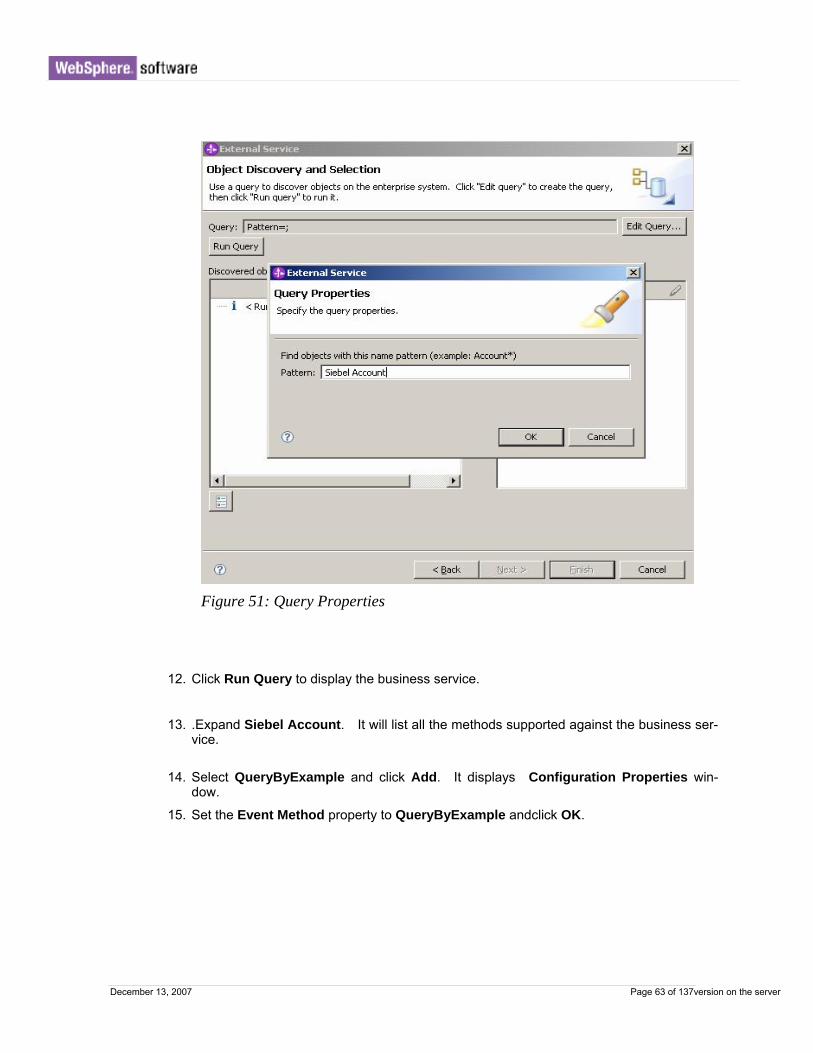
Figure 51: Query Properties
12. Click Run Query to display the business service.
13. .Expand Siebel Account. It will list all the methods supported against the business ser-vice.
14. Select QueryByExample and click Add. It displays Configuration Properties win-dow.
15. Set the Event Method property to QueryByExample andclick OK.
December 13, 2007 Page 63 of 137version on the server

Figure 52: Configuration Properties For QueryByExample
16. Click Next.
Generating business object definitions and related Artifacts
1. In the Configure Composite Properties window, specify the business object name-space if different than the default and the folders name to store the artifacts. As an op-tion, generate a business graph for each business object as part of the artifacts.
Figure 53: Configure Composite Properties
2. Click Next.
December 13, 2007 Page 64 of 137version on the server

Service generation and deployment configuration
1. In the Service generation and deployment configuration window, select J2C Au-thentication Data Entry. Specify the password to recall the exisiting connection prop-erties and click Next . Refer to the following figure.
Figure 54: Service Generation and Deployment Configuration
2. Click New, to create a new module property.
December 13, 2007 Page 65 of 137version on the server

3. In the Integration Project window, select Create a module project option and click Next.
4. Type a module name in the New Module field and click Finish.
5. Specify intf as value against the Folder property. The corresponding folder is created under the module. This is the folder where the generated export and wsdl files are stored.
Figure 55: Service Location Properties
6. Click Finish to end the external service wizard process.
December 13, 2007 Page 66 of 137version on the server
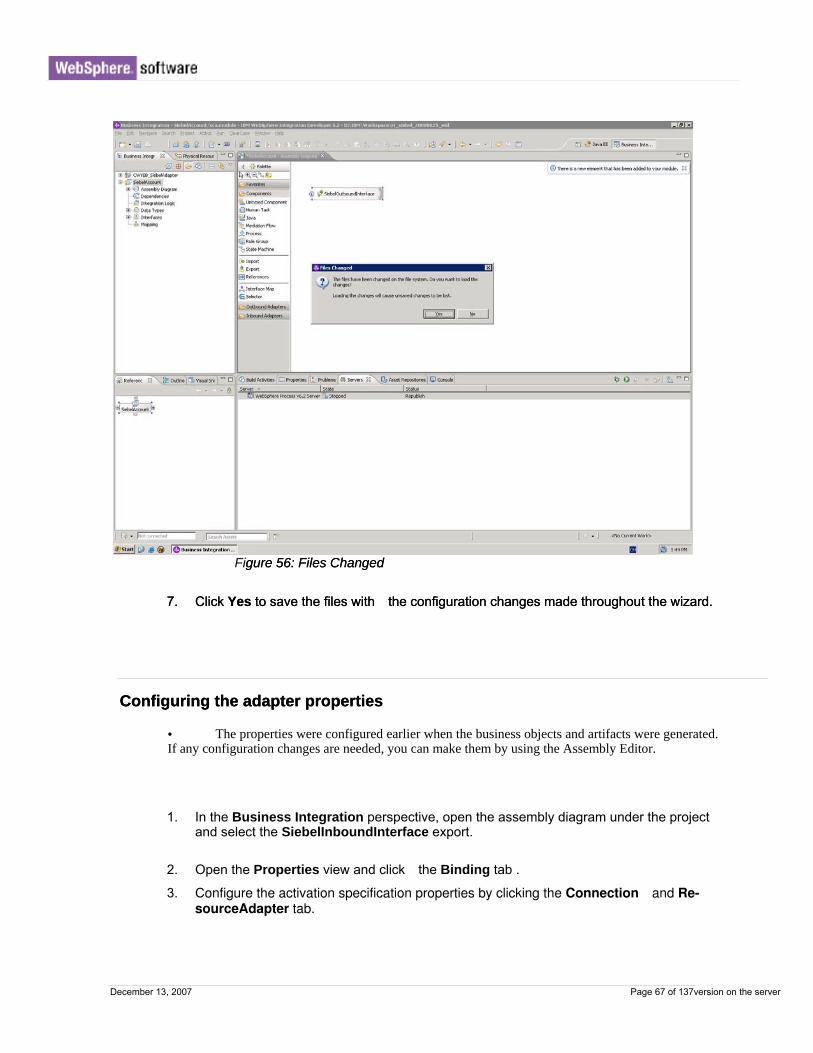
Figure 56: Files Changed gure 56: Files Changed
7. Click Yes to save the files with the configuration changes made throughout the wizard. 7. Click Yes to save the files with the configuration changes made throughout the wizard.
Configuring the adapter properties Configuring the adapter properties
• The properties were configured earlier when the business objects and artifacts were generated. If any configuration changes are needed, you can make them by using the Assembly Editor.
1. In the Business Integration perspective, open the assembly diagram under the project and select the SiebelInboundInterface export.
2. Open the Properties view and click the Binding tab .
3. Configure the activation specification properties by clicking the Connection and Re-sourceAdapter tab.
December 13, 2007 Page 67 of 137version on the server
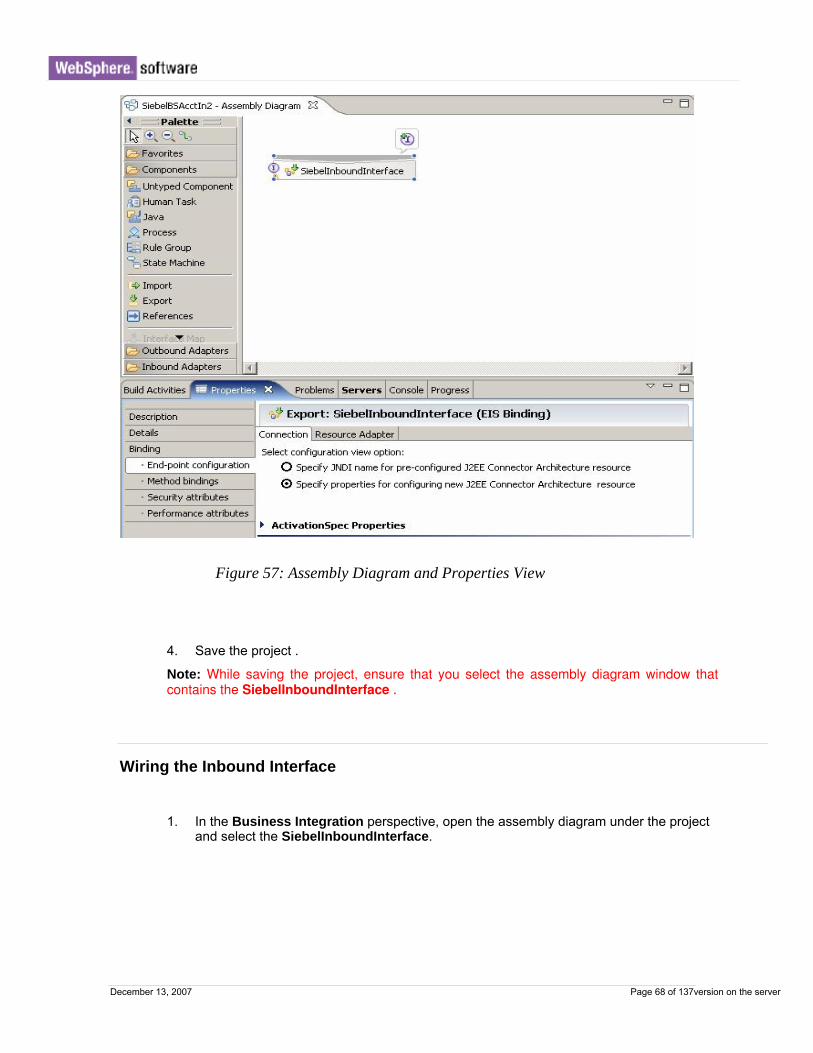
Figure 57: Assembly Diagram and Properties View
4. Save the project .
Note: While saving the project, ensure that you select the assembly diagram window that contains the SiebelInboundInterface .
Wiring the Inbound Interface
1. In the Business Integration perspective, open the assembly diagram under the project and select the SiebelInboundInterface.
December 13, 2007 Page 68 of 137version on the server

Figure 58: Untyped Component Added
2. Select Untyped Component and click on the assembly diagram window.
3. The new element Component1 is added.
4. Link the new element Component1 with the SiebelInboundInterface export.
Figure 59: Component Wired to Interface
5. In the Add Wire window , click OK.
Figure 60: Add Wire Window Prompt
December 13, 2007 Page 69 of 137version on the server

6. Right-click the new element Component1 and select Generate Implementation -> Java. The class file Component1Impl.java gets generated.
Figure 61: Generate Implementation
7. In the Generate Implementation window, ensure default package is selected and. click OK.
Figure 62: Default Package Selected
December 13, 2007 Page 70 of 137version on the server

8. Add the System.out.println statement in the emit methods of the class file Compo-nent1Impl.java, in order to trace the flow of process as shown in the following figure.
Figure 63: Add Trace Statements
9. Save the class file and then the project . Note: While saving the project, ensure that you select the assembly diagram window that contains the SiebelInboundInterface.
Deploying the adapter project to the test environment
The result of running the enterprise service discovery wizard is an SCA module that contains an EIS import. Install this SCA module in WebSphere Integration Developer integration test client.
1. Add the SCA module you created earlier to the server using the Servers View in Web-Sphere Integration Developer. Right-click the serverand select Add and remove pro-jects.
2. In the Available Projects, select the project . Click Add . It gets added to the Con-figured Projects panel on the right hand side.
3. Click Finish.
4. The SCA module gets added successfully to the server.
Note: If you have any problems installing the application using the previously describedap-proach, you can export the project as an EAR file and then install and start it through the
December 13, 2007 Page 71 of 137version on the server

WebSphere Process Server administrative console. For more information on how to do the same, check out the troubleshooting sections.
Testing the assembled adapter application
1. Create a new record in the event component in the Siebel application.using the informa-tion shown in the following table.
Note: If you provided a prefix in the connection properties, you have to use the same prefix for the Object Name field. The Object Key value provided is a sample one. You need to set an appropriate name by selecting the existing Account record in the EIS.
2. In the Administrative Console window, select Applications -> Enterprise Applica-tions.
3. Confirm that the application has started successfully – a message indicates that appli-cation started successfully displays at the top of the window and also the status against
the application will change from to . If not started, start it.
4. Select the Console tab on the bottom of the window to check the WebSphere Proc-ess Server log information.
5. Assuming the event was successfully polled and delivered by the adapter, you can see the trace statement added earlier in the class on the console window.
Figure 64: Trace Statement Captured
December 13, 2007 Page 72 of 137version on the server

December 13, 2007 Page 73 of 137version on the server
This concludes the successful polling and delivery of an event by the adapter using the busi-ness service Siebel Account and its integration object Account Interface.
You can also check the event component using the Siebel client for confirming– the corre-sponding event record would have been deleted from the same

December 13, 2007 Page 74 of 137

C h a p t e r 6 . Tutorial for inbound processing using Siebel Business Ob-ject
The following section describes how to set up inbound processing through the Siebel Busi-ness Object Account ESP. The artifacts generated through this scenario is contained in Tutorial6.zip. - remove bold
Tutorial Folders Descriptions
SiebelBOAcctESPIn4 Generated artifacts, such as XML Schema Definitions (xsd), Web Ser-vices Definition Language (WDL), Ser-vice Component Architecture (SCA) module file and etc.
SiebelBOAcctESPIn4App EAR application artifacts, such as de-ployment descriptors.
6
SiebelBOAcctESPIn4EJB EJB module artifacts.
Start the external service wizard
.
To set connection properties for the External Service Wizard, follow the instructions in Start the External Service Wizard part in section 2
1. Continuing with the wizard, in the Processing Direction window select Inbound.
December 13, 2007 Page 75 of 137

Figure 65: Processing Direction
Continuing with the wizard, in the Processing Direction window select Inbound.
Setting connection properties for the external Service Wizard
Follow the section Start the External Service Wizard in Chapter 3
Selecting the Siebel Business Objects
1. In the Object Discovery and Selection window, click Edit Query.
2. In the Query Properties window, provide the name (or the starting characters in the name) of the business object – Account – ESPand click OK.
December 13, 2007 Page 76 of 137

Figure 66: Object Discovery and Selection
3. Click Run Query.
4. The business object is listed. Expand the Account - ESP to get the list of busi-ness components under the Account – ESP business object.
December 13, 2007 Page 77 of 137

Figure 67: Discovered and Selected Objects
5. Select the business component Account and click Add.
6. Click Next.
Generating business object definitions and related artifacts
To configure the composite properties that apply to all selected objects, you must pro-vide a business object namespace and a folder for storing the generated business objects.
December 13, 2007 Page 78 of 137

1. Type out for Folder for example. This is where the generated WebSphere business objects are stored. Do not change the Namespace value. Do not edit the Opera-tions list.
Figure 68: Configure Composite Properties
1. Click Next.
Service Generation and Deployment Configuration
December 13, 2007 Page 79 of 137

1. In the Service generation and deployment configuration window, select J2C Authentication Data Entry.. .Specify the password to recall other properties and click Next . Refer to the following figure.
Figure 69: Service Generation and Deployment Configuration
December 13, 2007 Page 80 of 137

Figure 70: Service Location Properties
2. In the Service Location Properties window, click New against the Module field.
3. In the Integration Project window, select the option – Create a module project and click Next.
4. Type intf for the Folder field . The corresponding folder is created under the module. This is the folder where the generated .import and .wsdl files are stored.
5. Type a module name in the New Module field and click Finish to end the external service wizard process. Note: If you decide to connect directly, click Advanced to configure the properties as shown in the following figure. .
December 13, 2007 Page 81 of 137

Figure 71: Connection Properties
Configuring the adapter properties
The properties were configured earlier when the business objects and artifacts were gener-ated. If any configuration changes are needed, you can make them by using the Assembly Editor.
1. In the Business Integration perspective, open the assembly diagram under the pro-ject and select the SiebelInboundInterface export.
2. Open the Properties view and click Binding tab under it.
You can configure the activation specification properties by clicking the Connection and ResourceAdapter tab
3. Click Save – check whether it is correct.. Note: While saving the project, ensure that you select the assembly diagram window that contains the SiebelInboundInterface project.
Wiring the Inbound Interface
1. In Business Integration perspective, open the assembly diagram within the pro-ject and select the SiebelInboundInterface export.
December 13, 2007 Page 82 of 137
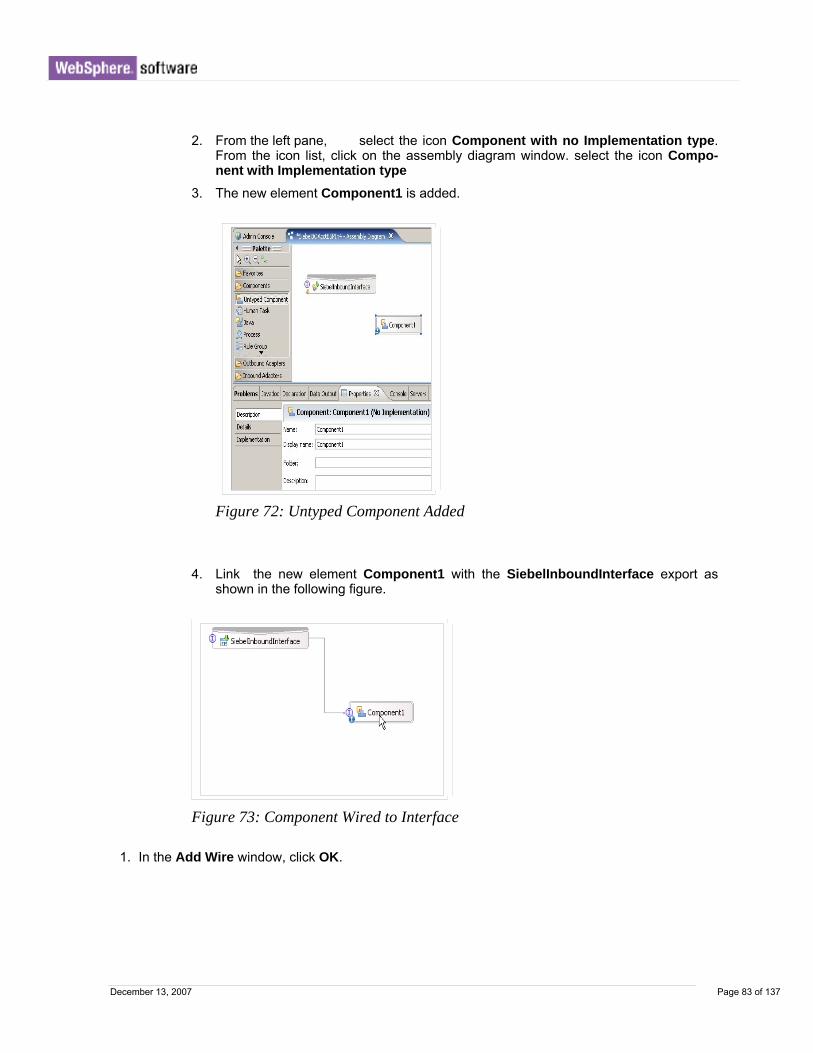
2. From the left pane, select the icon Component with no Implementation type. From the icon list, click on the assembly diagram window. select the icon Compo-nent with Implementation type
3. The new element Component1 is added.
Figure 72: Untyped Component Added
4. Link the new element Component1 with the SiebelInboundInterface export as shown in the following figure.
Figure 73: Component Wired to Interface
1. In the Add Wire window, click OK.
December 13, 2007 Page 83 of 137

Figure 74: Add Wire Window Prompt
5. Right-click the new element Component1. Select Generate Implementation -> Java. The class file, Component1Impl.java gets generated.
Figure 75: Generate Implementation, Java
6. In the Generate Implementation window, ensure default package is selected. Click OK.
December 13, 2007 Page 84 of 137

Figure 76: Default Package Selected
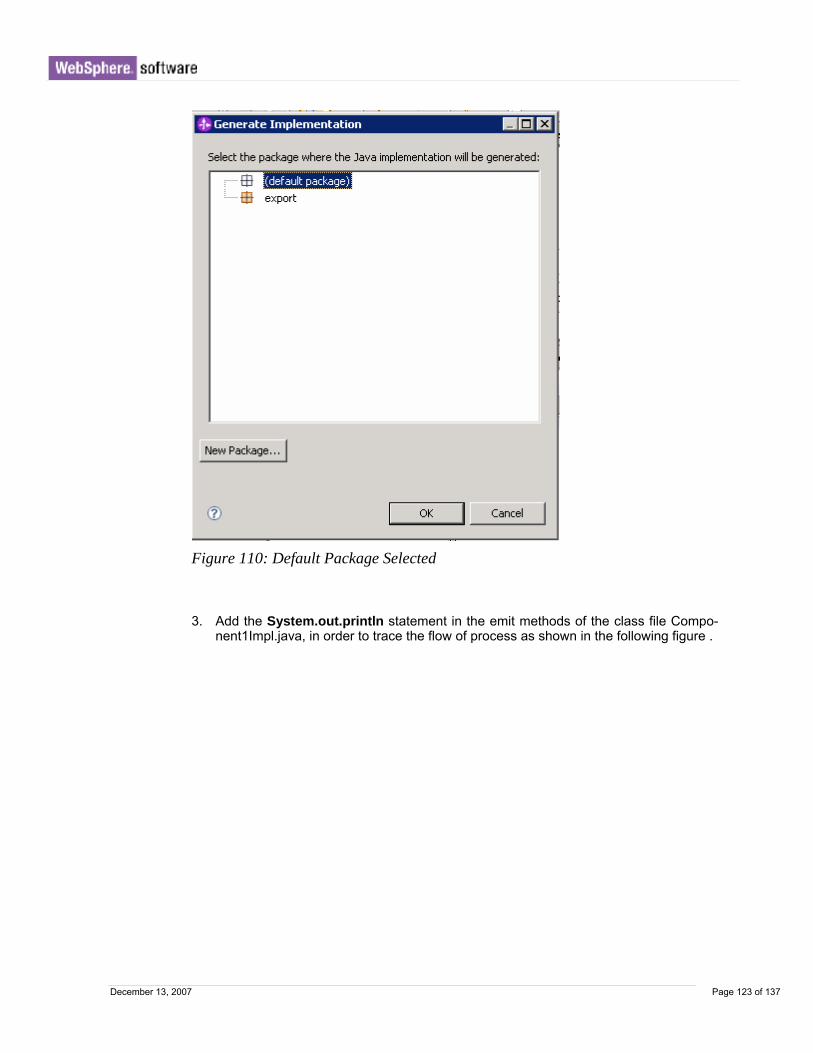
7. Add the System.out.println statement in the emit methods of the class file Compo-nent1Impl.java, in order to trace the flow of process as shown in the following figure .
Figure 77: Add Trace Statements
8. Save the class file and then the project when done with the changes by clicking the Save button. Note: While saving the project, ensure that you select the assembly diagram window that contains the SiebelInboundInterface project.
December 13, 2007 Page 85 of 137

Deploying the adapter project to the test environment
The result of running the enterprise service discovery wizard is an SCA module that contains an EIS import. Install this SCA module in WebSphere Integration Developer integration test client.
1. Add the SCA module you created earlier to the server using the Servers View in WebSphere Integration Developer. Right-click the server, and select Add and remove projects.
2. In the Available Projects, select the project and click Add button. The project gets added to the Configured Projects on the right hand side.
3. Click Finish.
Note: If you have any problems installing the application using the previously de-scribed approach, you can export the project as an EAR file and then install and start it through the WebSphere Process Server administrative console.- re-move the bold
Testing the assembled adapter application
1. Create a new record in the event component in the Siebel application using the information as shown in the following table.
Note: If you provided a prefix in the connection properties, you have to use the same prefix for the Object Name property. The Object Key value provided is a sample one. You need to set an appropriate ID by selecting the existing Account record in the EIS.
2. In the Administrative Console window, select Applications -> Enterprise Ap-plications.
3. Confirm that the application has been started successfully – a message dis-plays at the top of the window and also the status against the application will change from
to .
December 13, 2007 Page 86 of 137
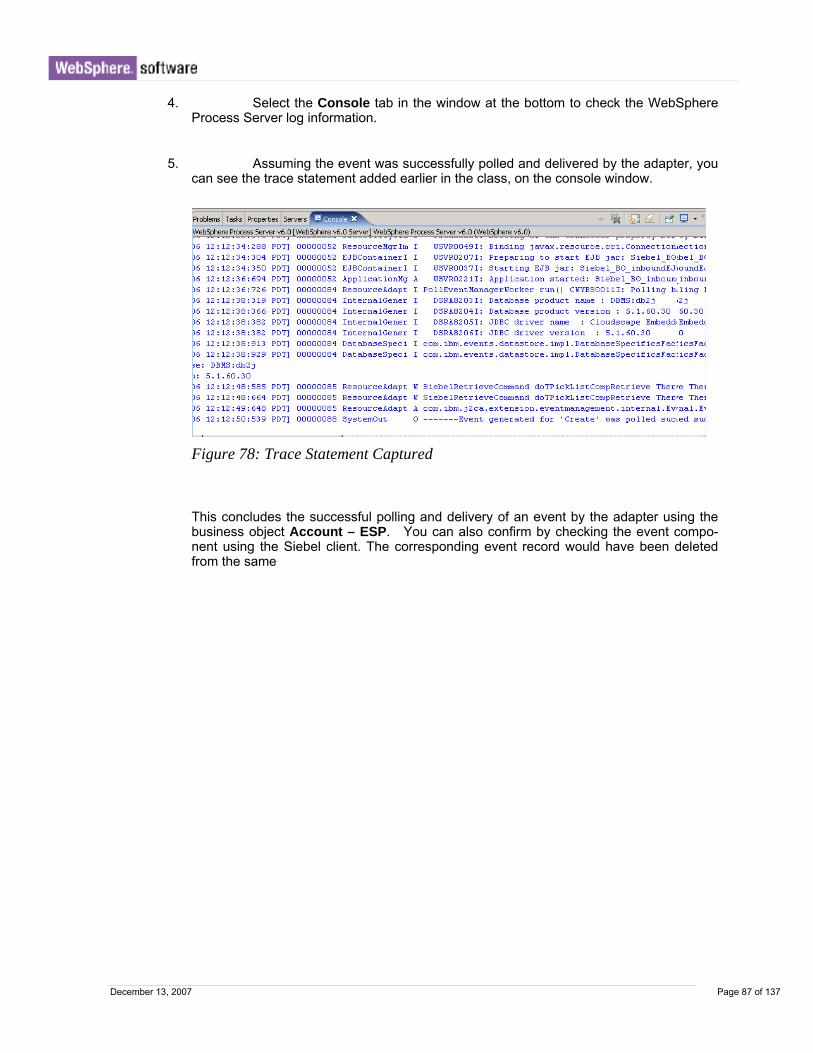
4. Select the Console tab in the window at the bottom to check the WebSphere Process Server log information.
5. Assuming the event was successfully polled and delivered by the adapter, you can see the trace statement added earlier in the class, on the console window.
Figure 78: Trace Statement Captured
This concludes the successful polling and delivery of an event by the adapter using the business object Account – ESP. You can also confirm by checking the event compo-nent using the Siebel client. The corresponding event record would have been deleted from the same
December 13, 2007 Page 87 of 137

December 13, 2007 Page 88 of

C h a p t e r 7 . Tutorial for outbound processing using Siebel Business Service with multiple Integration object
The following sections
describes how to set the outbound processing through Siebel Business Service account, EAI Siebel Adapter I. The artifacts generated by this process is contained in Tutorial7.zip.
File Contents
Tutorial Folders Descriptions
SiebelMessageOutbound Generated artifacts, such as XML Schema Definitions(xsd) and Web Ser-vices Definition Language (WDL).
SiebelMessageOutbound App
EAR application artifacts, such as de-ployment descriptors.
7
SiebelMessageOutbound EJB
EJB module artifacts.
Start the External Service Wizard
To set connection properties for the External Service Wizard, follow the instructions in Start the External Service Wizard part in section 2
1. Continuing with the wizard, in Processing Direction select Outbound.
December 13, 2007 Page 89 of

Figure 79: Processing Direction
Setting connection properties for the external service wizard 1. In Discovery Configuration window change the connection properties displayed if
necessary. The type of Siebel objects to be discovered for this scenario is Siebel Busi-ness Services.
December 13, 2007 Page 90 of

Figure 80: Discovery Configuration
1. Enter the values for the connection properties : Connection URL, User Name, Password, and Language Code.
2. In the miscellaneous section, select the type of Siebel objects as Siebel Business Services.
3. Type Siebel Repository in the Siebel Repository field .
4. Add a prefix for business object names .as needed.
5. Clicki Advanced to display Bidi Properties at the bottom of the window.
December 13, 2007 Page 91 of

Figure 81: Discovery Configuration - Bidi Properties and Log Properties
Select Bidi transformation Select Implicit or Visual as Bidi ordering schema.
In Text direction list, select LTR (Left to Right) or RTL (Right to left) or contextu-ally in one of the directions.
6. Specify the level of logging , the log file output location and logging level are set with default values. These values can be configured as needed.
7. Click Next.
Selecting the Siebel Business Services
1. In the Object Discovery and Selection window, click Edit Query.
2. In the Query Properties window, provide the name (or the starting characters in the name) of the business service – EAI Siebel Adapter and click OK.
December 13, 2007 Page 92 of

Figure 82: Query Properties
3. Click Run Query.
4. The business service is listed. Expand the EAI Siebel Adapter I . It will list all the methods supported against the business service.
December 13, 2007 Page 93 of

Figure 83: Selected Objects
5. Select Insert and Query of EAI Siebel Adapter I discovered objectsand the Con-figuration Properties panel displays.
December 13, 2007 Page 94 of

Figure 84: Configuration Properties
6. Expand Insert. 7. Select Use for SiebelMessage and Integration Object Account (PRM ANI) for
SiebelMessageIN and SiebelMessageOUT.
Figure 85: Integration Object Selection
8. Expand Query.
9. Select Integration Object Account (PRM ANI) for SiebelMessage.
December 13, 2007 Page 95 of

Figure 86: Configuration for Query
10. Click OK.
December 13, 2007 Page 96 of

Figure 87: Object Selection
11. Click Next.
Generating business object definitions and related artifacts
To configure the composite properties that apply to all selected objects, you must pro-vide a business object namespace and a folder for storing the generated business ob-jects.
December 13, 2007 Page 97 of

Figure 88: Configure Composite Properties
1. Type xsd in Folder for example. This is where the generated WebSphere busi-ness objects are stored. Leave Business object namespace and Generate a business graph for each business object fields with the default values.Select Generate the business objects with shorter names .
2. Click Next.
Service generation and deployment configuration
1. In Deployment properties, clear Specify a Java Authentication and Authori-zation Service (JAAS) alias security credential.
December 13, 2007 Page 98 of

2. In Connection properties, enter the password to recall all other properties. . Click Next . Refer to the following figure.
Figure 89: Service Generation and Deployment Configuration
3. In the Service Location Properties window, select New for Module field or choose a preexisting module.
4. Type the name of the module. ype the name of the module.
December 13, 2007 Page 99 of

Figure 90: Service Location Properties window
5. Click Browse to select the Folder, where you want to store the generated Web-Sphere business objects. Otherwise, leave it empty and the objects are stored to the projects top-level folder by default.
6. Click Finish.
Configuring the adapter properties
• The properties were configured earlier when the business objects and artifacts were generated. If any configuration changes are needed, you can make them by using the Assembly Editor.
1. In Business Integration perspective, open the assembly diagram under the project and select the SiebelOutboundInterface import.
December 13, 2007 Page 100 of

2. Right-click and select Show In Properties to display the Properties view and click the Binding tab .
You can configure the activation specification properties by clicking the Connection and ResourceAdapter tab.
Figure 91: Assembly diagram
3. Save the project when done with the changes by clicking Save Note: While saving the project, ensure that you select the assembly diagram window that contains the SiebelInboundInterface project.
Deploying the adapter project to the test environment
The result of running the external eervice wizard is an SCA module that contains an EIS im-port. Install this SCA module in WebSphere Integration Developer integration test client.
December 13, 2007 Page 101 of

1. Add the SCA module you created earlier to the server using the Servers View in WebSphere Integration Developer. Right-click the server, and select Add and remove projects.
2. In the Available Projects, select the project and click Add . The project gets added to the Configured Projects pane on the right hand side.
3. Click Finish.
4. The SCA module is installed and started on the server. Note: If you have any problems installing the application using the previously de-scribed approach, you can export the project as an EAR file and then install and start it through the WebSphere Process Server administrative console. For more information on how to do the same, refer the troubleshooting sections 9.1, 9.2, and 9.3.- remove bold
Testing the adapter application
You test the adapter application through the WebSphere Integration Developer integration test client. The following subsections provide information on how to execute the two op-erations, Insert and Query, against the business service Siebel Account.
Running the Insert operation 1. In Business Integration profile, select the module, right-click , and select Test Com-
ponent.
2. In the Events window, select the operation insertEAISiebelAdapterIInsert against the Operation field.
3. Right-click the SiebelMessage attribute and click Add Elements.
December 13, 2007 Page 102 of

Figure 92: Add Property Object Element
4. Set the values as needed against the attributes of the SiebelMessage element. The values provided in the following figure are sample ones that may or not be valid in your environment. Get the valid values for the attributes by checking existing EIS re-cords for the Account integration object.
December 13, 2007 Page 103 of

5. Click Continue
1. Select the appropriate WebSphere Process Server instance and click Finish to execute the operation.
December 13, 2007 Page 104 of
Figure 93: Select Deployment Location
December 13, 2007 Page 105 of

1. When the process is successfully completed, the resultant business object with the key values is returned .
Figure 94: Returned Object
2. The process of the Insert operation is successfully completed.
Running the Query Operation
1. In Business Integration profile, select the module, right-click , and select Test Com-ponent.
2. In the Events window, select the operation queryEAISiebelAdapterIQuery against the Operation field.
3. Right-click the SiebelMessage attribute and click Add Elements.
4. Set values as shown in the following figure:
December 13, 2007 Page 106 of

Figure 95: Values for Query
5. Click Continue
6. Select the appropriate WebSphere Process Server instance and click Finish to execute the operation.
December 13, 2007 Page 107 of

Figure 96: Select Deployment Location
7. When the process is successfully complete, the resultant business object hierarchy with the attribute values filled is returned as shown in the following figure.
December 13, 2007 Page 108 of

Figure 97: Return Values
The process of the Query operation is successfully completed.
December 13, 2007 Page 109 of

C h a p t e r 8 . Tutorial for inbound processing using Siebel Business Ob-ject with specific attribute selected-make the font even
The following section describes how to set the inbound processing through Siebel Busi-ness Object Account and only the needed attributes for the business object are selected. The artifacts generated by this process is contained in Tutorial8.zip.-remove the bold.
Tutorial Folders Descriptions
SiebelAccountAttributeIn Generated artifacts, such as XML Schema Definitions (xsd), Web Services Definition Language (WDL), Service Component Archi-tecture (SCA) module file and etc.
SiebelAccountAttributeInApp EAR application artifacts, such as deployment descriptors.
8
SiebelAccountAttributeInEJB EJB module artifacts.
Start the external service wizard
.
• Follow the section Start the External Service Wizard in Chapter 3 •
1. Continuing with the wizard, in Processing Direction select Inbound.
December 13, 2007 Page 110 of 137

Figure 98: Processing Direction
Setting connection properties for the external service wizard In Discovery Configuration window change the connection properties displayed if necessary. The type of Siebel objects to be discovered for this scenario is Siebel Busi-ness Services.
December 13, 2007 Page 111 of 137

Figure 99: Discovery Configuration
Note: Make sure the check box Prompt for additional configuration settings when adding a business object is selected.
Selecting the Siebel Business Objects
1. In the Object Discovery and Selection window, click Edit Query.
2. In the Query Properties window, type the name (or the starting characters in the name) of the business object, for example Account. Click OK
December 13, 2007 Page 112 of 137

3. Click Run Query
.
4. The business object is listed. Expand Account to get the list of business compo-nents under the business object, Account.
5. Select the business component Account and click Add.
6. In the Configuration Properties window, you can select the attributes of the busi-ness component and by default all the attributes are selected.
Figure 100: Configuration Properties for Account
December 13, 2007 Page 113 of 137

Figure 101: Select Attributes
1. Select Id, and Location for the business object and click OK.
Note: If you do not select the required attributes, like primary key of the business ob-ject, you will get errors at runtime.
December 13, 2007 Page 114 of 137

Figure 102: Select Objects
The business component is added to the selected object column
Generating business object definitions and related artifacts
1. To configure the composite properties that apply to all selected objects, you must provide a business object namespace and a folder for storing the generated business objects.
December 13, 2007 Page 115 of 137

Figure 103: Configure Composite Properties
6. Type out for Folder . This is where the generated WebSphere business objects are stored. Do not change the Namespace value. Do not edit the Operations list.
re the generated WebSphere business objects are stored. Do not change the Namespace value. Do not edit the Operations list.
December 13, 2007 Page 116 of 137

7. Click Next.
Service Generation and Deployment Configuration
Based on the J2C Authentication alias created earlier on WebSphere, specify it as a J2C Authentication Data Entry on Service generation and deployment configu-ration window. Alternatively, the connection properties can be used instead, simply enter the password as all other properties are recalled. In this Sample, we specify user name and password directly in the connection properties. Click Next when done. Refer the following figure.
8. In the Service Location Properties window, click New in the Module field.
9. In the Integration Project window, select Create a module project and click Next.
December 13, 2007 Page 117 of 137

Figure 104: New Module
10. Specify a value against the Folder property – intf for example. The corresponding folder is created under the module. This is the folder where the generated .import and .wsdl files are stored. - refer the previous review comments
December 13, 2007 Page 118 of 137

December 13, 2007 Page 119 of 137
Figure 105: Service Location Properties
11 rnal service wizard process.
Configuring the adapter properties
. Type a module name in the New Module field and click Finish to end the exte

December 13, 2007 Page 120 of 137
• The properties were configured earlier when the business objects and artifacts were generated. If any configuration changes are needed, you can make them by using the As-sembly Editor.
1. In Business Integration perspective, open the assembly diagram under the project and select the SiebelInboundInterface export.
2. Open the Properties view and click Binding tab . Make sure you have set correct properties for inbound, here is a samples setting
3. Save the project when done with the changes by clicking Save.
Note: While saving the project, ensure that you select the assembly diagram window that contains the SiebelInboundInterface project.
Wiring the Inbound Interface
usiness Integration perspective, open the assembly diagram under the project
. Select the icon Java. and click on the assembly diagram window.
1. In Band select the SiebelInboundInterface export.
4
5. The new element Component1 is added.

December 13, 2007 Page 121 of 137
Figure 106: Java Component Added
6. Link the new element Component1 with the SiebelInboundInterface export as shown in the following figure.
Figure 107: Component Wired to Interface
1. The Add Wire window shows up. Click OK.

December 13, 2007 Page 122 of 137
Figure 108: Add Wire Window Prompt
1. Double-click Component1 to get a default JAVA implementation and Click Yes
Figure 109: Generate Implementation, Java
2. In the Generate Implementation window, ensure default package is selected. Click OK.
December 13, 2007 Page 123 of 137
Figure 110: Default Package Selected
3. Add the System.out.println statement in the emit methods of the class file Compo-nent1Impl.java, in order to trace the flow of process as shown in the following figure .

December 13, 2007 Page 124 of 137
Figure 111: Add Trace Statements
4. Save the class file and then the project when done with the changes by clicking Save.
Deplo
Note: While saving the project, ensure that you select the assembly diagram window that contains the SiebelInboundInterface project.
ying the adapter project to the test environment
The re ng the enterprise service discovery wizard is an SCA module that contains an EIS import. Install this SCA module in WebSphere Integration Developer integration test
nt.
sult of runni
clie
1. Add the SCA module you created earlier to the server using the Servers View in WebSphere Integration Developer. Right-click the server, and select Add and remove projects.
December 13, 2007 Page 125 of 137
4. In the Available Projects, select the project and click Add . The project gets added to the Configured Projects on the right pane.
5. Click Finish.
6. The SCA module has been successfully installed and started on the server. Note: If you have any problems installing the application using the previously de-
pr you can export the project as an EAR file and then install and ar it through the WebSphere Process Server administrative console. - remove
scribed ap oach, st t the bold
Testing the assembled adapter application
1. Create a new record in the event component in the Siebel application using the information as shown in the following table.
Event Component Attrib-ute Name
Attribute Value
Object name BOAccountBCAccountBG
Event Type Create
Status 0
Object Key 1D=1-7EG4
Note: If you provided a prefix in the connection properties, you have to use the same prefix for the Object Name field. The Object Key value provided is a sample one. You need to set an appropriate ID by selecting any existing Account record in the EIS.
2. In the Administrative Console window, select Applications -> Enterprise Applications.
3. Confirm that the application has started successfully – a message displays at
the top of the window and also the status against the application will change from
to .
4. Select the Console tab in the window at the bottom to check WebSphere Proc-ess Server log information.
5. Assuming the event was successfully polled and delivered by the adapter, you should see the trace statement added earlier in the class, on the console window.

December 13, 2007 Page 126 of 137
December 13, 2007 Page 126 of 137
Figure 112: Trace Statement Captured
This conclude the successful polling and delivery of an event by the adapter using the business ob-ject Account. You can also confirm by checking the event component using the Siebel client – the corresponding d have been deleted from the same.
s
event record woul

December 13, 2007 Page 127 of 137
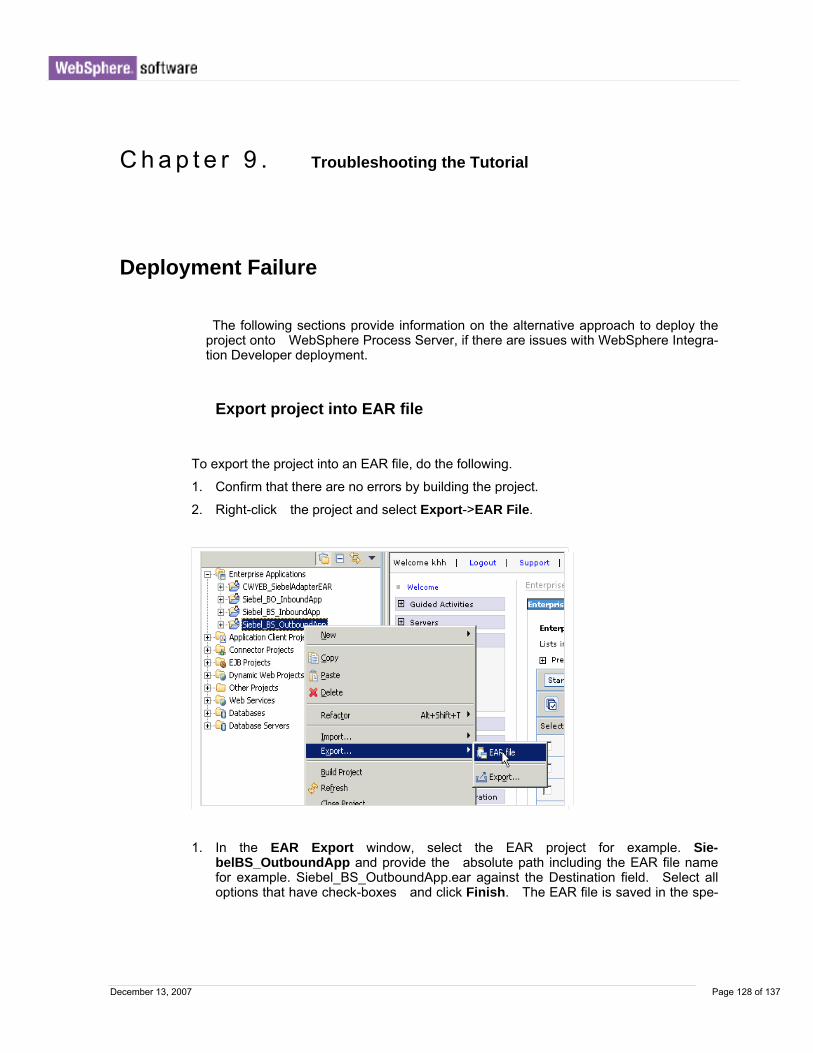
December 13, 2007 Page 128 of 137
C h a p t e r 9 . Troubleshooting the Tutorial
Deployment Failure
The following sections provide information on the alternative approach to deploy the project onto WebSphere Process Server, if there are issues with WebSphere Integra-tion Developer deployment.
Export project into EAR file
To export the project into an EAR file, do the following.
1. Confirm that there are no errors by building the project.
2. Right-click the project and select Export->EAR File.
1. In the EAR Export window, select the EAR project for example. Sie-belBS_OutboundApp and provide the absolute path including the EAR file name for example. Siebel_BS_OutboundApp.ear against the Destination field. Select all options that have check-boxes and click Finish. The EAR file is saved in the spe-

December 13, 2007 Page 129 of 137
cified destination folder.
Deploying the adapter project through the administrative console consists of the following steps.
1. Click Servers view at the bottom right hand side window of the WebSphere Integra-tion Developer.
2. If not already started, right-click on WebSphere Process Server instance and start the same.
3. Confirm that the server is up by checking the status – it should be listed as started.
4. Right-click the server and select Run administrative console. The administrative console window shows up.
5. Click login in the administrative console .
Deploying project through Administrative Console

December 13, 2007 Page 130 of 137
6. Select Applications -> Enterprise Applications
7. In the Enterprise Applications window, select Install option.
In the Path to the new application window, choose the system where the EAR8. file was saved and browse to the corresponding folder on the system. Select the EAR
der Saving the adapter project sec-
9. Click Next.
file from the folder where you saved earlier (untion) and click open.

December 13, 2007 Page 131 of 137
1. Click Next in the Preparing the application for installation window.
2. In theInstall New Application window, click Summary .
ming mes-sage about the successful installation of the application. - How do you confirm.
5. Click Save to Master Configuration option .
3. Click Finish.
4. The project is installed. When installation is done, you will get a confir

December 13, 2007 Page 132 of 137
1. In the Enterprise Application window, click Save .
2. The application is now installed and saved successfully.
s Applications window, select the check-box next to the installed plication.
7. Click
Starting the application through Administrative Console
1. In the Enterpri eap
Start .
8. Confirm that the application has been started successfully – a message is provided at the top of the window and also the Status against the application will change from
to - see the previous review comments
Create Record Failed
In an outbound scenario which requires a business object to be created, the id is not re-quired as input value because its automatically generated. Another possible cause would
e reating a duplicate record; hence, a DuplicateRecordException is thrown. b c

December 13, 2007 Page 133 of 137
C h a p t e r 1 0 . Appendix
Clearing the tutorial content • Needs introduction to explain what the content is and how the user should use it
1 Business service Siebel Account – Insert operation You should have noted down the AccountID generated earlier against the business service Insert opera
10.1.
tion. -provide a link to the section Using Siebel client, you can delete the corresponding Account record.
ample operation
The QueryByExample operation provide a link to the section just re- record and does not create or update any sample content in the
siness service
ration. provide a link to the section Using Siebel client, you can delete ponding Account record.
bject Account – ESP - Exists operation
of a el EIS.
10.1.2 Business Service Siebel Account - QueryByEx
Not applicable. trieves an existingSiebel EIS.
10.1.3 Business Object Account – ESP - Create operation You should have noted down the ID generated earlier against the buCreate opethe corres
10.1.4 Business O
Not applicable. The Exists operation provide a link just checks for the existencerecord and does not create or update any sample content in the Sieb

December 13, 2007 Page 134 of 137
C h a p t e r 1 1 . Notices
This information was developed for products and services offered in the U.S.A.
IBM may not offer the products, services, or features discussed in this document in other countries. Consult your local IBM representative for information on the products
currently available in your area. Any reference to an IBM product, pro-ram, or service is not intended to state or imply that only that IBM product, program,
ht may be used instead. However, it o evaluate and verify the operation of any non-IBM product,
rogram, or service.
shing of this document does not grant you any li-se to these patents. You can send license inquiries, in writing, to:
k, NY 10504-1785
g paragraph does not apply to the United Kingdom or any other ountry where such provisions are inconsistent with local law:
ESS MACHINES CORPORATION PROVIDES THIS PUBLI-
and services gor service may be used. Any functionally equivalent product, program, or service that does not infringe any IBM intellectual property rigis the user's responsibility tp
IBM may have patents or pending patent applications covering subject matter de-scribed in this document. The furnicen
IBM Director of Licensing
IBM Corporation
North Castle Drive
Armon
U.S.A.
For license inquiries regarding double-byte (DBCS) information, contact the IBM Intel-lectual Property Department in your country or send inquiries, in
writing, to:
IBM World Trade Asia Corporation Licensing
2-31 Roppongi 3-chome, Minato-ku
Tokyo 106-0032, Japan
The followinc
INTERNATIONAL BUSINCATION "AS IS" WITHOUT WARRANTY OF ANY KIND, EITHER EXPRESS OR IM-PLIED, INCLUDING, BUT NOT LIMITED TO, THE IMPLIED WARRANTIES OF NON-INFRINGEMENT, MERCHANTABILITY OR FITNESS FOR A PARTICULAR PUR-POSE. Some states do not allow disclaimer of express or
implied warranties in certain transactions, therefore, this statement may not apply to you.
December 13, 2007 Page 135 of 137
This information could include technical inaccuracies or typographical errors. Changes
M may make improvements and/or changes in the product(s) and/or the program(s) escribed in this publication at any time without notice.
b sites are provided for convenience ent of those Web sites.
risk.
tion to you.
ated programs and mutual use of the information which has
ration Department
omers, NY 10589-0100 U.S.A.
Information concerning non-IBM products was obtained from the suppliers of those products, their published announcements or other publicly available sources. IBM has
ed those products and cannot confirm the accuracy of performance, compatibil-y other claims related to non-IBM products. Questions on the capabilities of
non-IBM products should be addressed to the suppliers of those products.
reports used in daily business opera-
esses used by an actual business en-
rmation contains sample application programs in source language, which illus-
le programs in any form without payment to IBM, for the pur-oses of developing, using, marketing or distributing application programs conforming
tion programming interface for the operating platform for which the sam-
ply reliability, serviceability, or func-on of these programs.
are periodically made to the information herein; these changes will be incorporated in new editions of the publication.
IBd
Any references in this information to non-IBM Weonly and do not in any manner serve as an endorsem
The materials at those Web sites are not part of the materials for this IBM product and use of those Web sites is at your own
IBM may use or distribute any of the information you supply in any way it believes ap-propriate without incurring any obliga
Licensees of this program who wish to have information about it for the purpose of enabling: (i) the exchange of information between independently creother programs (including this one) and (ii) thebeen exchanged, should contact:
IBM Corpo
2Z4A/SOM1 294 Route 100
S
not testity or an
This information contains examples of data andtions. To illustrate them as completely as possible, the examples include
the names of individuals, companies, brands, and products. All of these names are fic-titious and any similarity to the names and addrterprise is entirely coincidental.
COPYRIGHT LICENSE:
This infotrate programming techniques on various operating platforms. You may copy, modify, and distribute these samppto the applicaple programs are written. These examples have not been thoroughly tested under all conditions. IBM, therefore, cannot guarantee or imti

December 13, 2007 Page 136 of 137
If you are viewing this information softcopy, the photographs and color illustrations may ot appear.
Programming interface information
n
Programming interface information, if provided, is intended to help you create applica-tion software using this program.
General-use programming interfaces allow you to write application software that obtain the services of this program's tools.
However, this information may also contain diagnosis, modification, and tuning infor-mation. Diagnosis, modification and tuning information is provided
to help you debug your application software.
Warning:
Do not use this diagnosis, modification, and tuning information as a programming inter-face because it is subject to change.
Trademarks IBM, the IBM logo, and ibm.com are trademarks or registered trademarks of Interna-tional Business Machines Corporation in the United States, other countries, or both. These and other IBM trademarked terms are
marked on their first occurrence in this information with the appropriate symbol (® or ™), indicating US registered or common law trademarks owned by IBM at the time this information was published. Such trademarks
may also be registered or common law trademarks in other countries. A complete and current list of IBM trademarks is available on the Web at http://www.ibm.com/legal/copytrade.shtml
Microsoft and Windows are trademarks of Microsoft Corporation in the United States, other countries, or both.
Java and all Java based trademarks and logos are trademarks of Sun Microsystems, Inc. in the United States, other countries, or both.

December 13, 2007 Page 137 of 137
Other company, product, or service names may be trademarks or service marks of others.
This product includes software developed by the Eclipse Project (http://www.eclipse.org).