ibm websphere adapter for peoplesoft enterprise 7.0.0.0...
TRANSCRIPT

August 6, 2009 Page 1 of 99
IBM WebSphere Adapter for PeopleSoft Enterprise 7.0.0.0 Quick Start Scenarios

August 6, 2009 Page 2 of 99
Note: Before using this information and the product it supports, read the information in the “No-tices” section, at the end of this document.
This edition applies to version 7, release 0, and modification 0 of IBM WebSphere Adapter for Peo-pleSoft Enterprise and to all subsequent releases and modifications, until otherwise indicated in new editions. © Copyright International Business Machines Corporation 2008. US Government Users Restricted Rights – Use, duplication or disclosure restricted by GSA ADP Schedule Contract with IBM Corp.

August 6, 2009 Page 3 of 99
Table of contents
Table of contents ...................................................................................... 3
Table of figures......................................................................................... 5
C h a p t e r 1 . Introduction................................................................. 7
1.1 Learning Objectives ......................................................................................................7 1.2 Audience .......................................................................................................................7 1.3 Software prerequisites ..................................................................................................7
C h a p t e r 2 . Preparing to run through the tutorial........................ 9
2.1 Configuration prerequisites ...........................................................................................9 2.2 Import the sample projects into PeopleTools................................................................9 2.3 Add the trigger to WBI_CUSTOMER_COMP component ..........................................12 2.4 Create the Java API for Component Interface ............................................................14 2.5 Create a J2C Authentication Alias in WebSphere Process Server.............................16 2.6 Import the adapter project in the WebSphere Integration Developer .........................21 2.7 Extract the sample files ...............................................................................................25
C h a p t e r 3 . Tutorial 1: Sending data to PeopleSoft Enterprise application (outbound processing)....................................................... 27
Scenario ............................................................................................................................27 3.1 Configuration prerequisites .........................................................................................28 3.2 Configure the adapter for outbound processing..........................................................28 3.3 Set connection properties for the external service wizard ..........................................33 3.4 Select the business objects and services to be used with the adapter.......................34 3.5 Generate business object definitions and related artifacts .........................................36 3.6 Deploy the module to the test environment ................................................................41 3.7 Test the assembled adapter application .....................................................................43
C h a p t e r 4 . Tutorial 2: Receiving events from PeopleSoft Enterprise application (inbound processing) ......................................................... 48
Scenario ............................................................................................................................48 4.1 Configuration prerequisites .........................................................................................48 4.2 Configure the adapter for inbound processing............................................................49 4.3 Set properties for the external service wizard.............................................................54 4.4 Select the business objects and services to be used with the adapter.......................55 4.5 Generate business object definitions and related artifacts .........................................57
August 6, 2009 Page 4 of 99
4.6 Deploy the module to the test environment ................................................................63 4.7 Test the assembled adapter application .....................................................................65
C h a p t e r 5 . Tutorial 3: Effective Sequence number is not required for data insert (outbound processing).................................................. 76
Scenario ............................................................................................................................76 5.1 Configuration prerequisites .........................................................................................77 5.2 Configure the adapter for outbound processing..........................................................77 5.3 Deploy the module to the test environment ................................................................86 5.4 Test the assembled adapter application .....................................................................87
C h a p t e r 6 . Troubleshooting ....................................................... 95
6.1 Improve the WebSphere Process Server trace level ..................................................95 6.2 Connection issues with PeopleSoft Enterprise application.........................................95
Notices..................................................................................................... 96
Programming interface information ...................................................................................98 Trademarks .......................................................................................................................98

August 6, 2009 Page 5 of 99
Table of figures Figure 1: Start WebSphere Process Server ...........................................................................................17 Figure 2: Run Administrative console.....................................................................................................18 Figure 3: select Security .........................................................................................................................18 Figure 4: Java Authentication and Authorization Service (JAAS) ..........................................................19 Figure 5: New Alias ................................................................................................................................19 Figure 6: Create a New Authentication Alias with User ID, Password ...................................................20 Figure 7: Save JAAS Alias .....................................................................................................................20 Figure 8: Select Authentication Entries ..................................................................................................21 Figure 9: Import adapter with WID..........................................................................................................22 Figure 10: Import adapter RAR File........................................................................................................23 Figure 11: Connector Import window prompt .........................................................................................24 Figure 12: Confirm Perspective Switch ..................................................................................................24 Figure 13: Project Explorer's view in Business Integration perspective .................................................25 Figure 14: New External Service ............................................................................................................29 Figure 15: Select the Service Type of Registry ......................................................................................30 Figure 16: Select an Adapter..................................................................................................................31 Figure 17: Locate the Required Files and Libraries ...............................................................................31 Figure 18: Select the Processing Direction ............................................................................................32 Figure 19: Specify the Discovery Properties ..........................................................................................33 Figure 20: Selected Objects ...................................................................................................................34 Figure 21: Specify Composite Properties ...............................................................................................35 Figure 22: Specify the Service Generation and Deployment Properties................................................36 Figure 23: Specify the Location Properties ............................................................................................37 Figure 24: Select a Business Integration Project Type ..........................................................................38 Figure 25: Create a Module....................................................................................................................39 Figure 26: Specify the Location Properties ............................................................................................40 Figure 27: Add and Remove Projects ....................................................................................................41 Figure 28: Add and Remove Projects ....................................................................................................42 Figure 29: Open Test Module.................................................................................................................43 Figure 30: Specify input data..................................................................................................................44 Figure 31: Continue to Run ....................................................................................................................45 Figure 32: Select Deployment Location .................................................................................................46 Figure 33: Invoke Result.........................................................................................................................47 Figure 34: New External Service ............................................................................................................50 Figure 35: Select the Service Type or Registry......................................................................................51

August 6, 2009 Page 6 of 99
Figure 36: Select an Adapter..................................................................................................................52 Figure 37: Locate the Required Files and Libraries ...............................................................................52 Figure 38: Select the Processing Direction ............................................................................................53 Figure 39: Specify the Discovery Properties ..........................................................................................54 Figure 40: Selected Objects ...................................................................................................................55 Figure 41: Specify Composite Properties ...............................................................................................56 Figure 42: Specify the Service Generation and Deployment Properties................................................57 Figure 43: Specify the Location Properties ............................................................................................58 Figure 44: Select a Business Integration Project Type ..........................................................................59 Figure 45: Create a Module....................................................................................................................60 Figure 46: Specify the Location Properties ............................................................................................61 Figure 47: Java Component Added........................................................................................................61 Figure 48: Component Wired to Interface ..............................................................................................62 Figure 49: Add and Remove Projects ....................................................................................................63 Figure 50: Add and Remove Projects ....................................................................................................64 Figure 51: Open Test Attach ..................................................................................................................65 Figure 52: Add Test configuration ..........................................................................................................66 Figure 53: Create new Emulator.............................................................................................................67 Figure 54: Select a Module.....................................................................................................................68 Figure 55: Add Component and Reference Emulator ............................................................................69 Figure 56: Continue to Run ....................................................................................................................70 Figure 57: Select Deployment Location .................................................................................................71 Figure 58: Wbiaddress Properties ..........................................................................................................78 Figure 59: New KeepRelations...............................................................................................................79 Figure 60: WbiAddress properties ..........................................................................................................80 Figure 61: New IgnoreEffectiveSequence..............................................................................................81 Figure 62: New InsAtOldestEffDtPos .....................................................................................................82 Figure 63: Effdt Properties......................................................................................................................83 Figure 64: New EffectiveDate.................................................................................................................84 Figure 65: Addressid Properties .............................................................................................................85 Figure 66: New EffectiveSequence ........................................................................................................86 Figure 67: Open Test Module.................................................................................................................87 Figure 68: Specify input data..................................................................................................................89 Figure 69: Continue to run......................................................................................................................90 Figure 70: Select Deployment Location .................................................................................................91 Figure 71: Invoke result ..........................................................................................................................92

August 6, 2009 Page 7 of 99
C h a p t e r 1 . Introduction
WebSphere Adapter for PeopleSoft Enterprise is a J2EE component compliant with the JCA 1.5 specification. It will enable bidirectional connectivity to a PeopleSoft Enterprise application. The clients can send outbound messages to the resource adapter via the Common Client Interface (CCI) defined by the JCA specification. The resource adapter will perform the appropriate operation on the data based on the content and operation specified in the interaction specification.
For inbound messages, the resource adapter uses the JCA message inflow contact. It will define a message listener interface and the endpoints or the message driven beans should implement this interface. This will enable the endpoints to receive any subscribed events from the resource adapter.
To gain practical knowledge in setting up and deploying the adapter, complete one or more of below tutorials. Everything you need to complete a tutorial is contained in the tu-torial. Perform the prerequisite tasks, before you attempt to complete the tutorials. Each tutorial takes less than an hour to complete.
1.1 Learning Objectives
After completing a tutorial, you should be able to perform the following tasks:
• Create an adapter project in WebSphere Integration Developer
• Discover services and associated business objects from the enterprise information system (EIS) and make them part of the adapter project
• Create a deployable module that you can install on WebSphere Process Server or WebSphere Enterprise Service Bus
• Test the module and validate the results
1.2 Audience
These tutorials are for integration developers who design, assemble, test, and deploy busi-ness integration solutions.
1.3 Software prerequisites
To use these tutorials, you need the following software installed:

August 6, 2009 Page 8 of 99
• WebSphere Integration Developer, version 7.0
• WebSphere Process Server, version 7.0
• PeopleTools, version 8.4x

August 6, 2009 Page 9 of 99
C h a p t e r 2 . Preparing to run through the tutorial
2.1 Configuration prerequisites
Before performing tutorial testing, complete the following tasks:
• Import the sample projects into PeopleTools
• Add the trigger to WBI_CUSTOMER_COMP component
• Create the Java(TM) API for the Component Interfaces
• Create a J2C authentication alias in WebSphere Process Server
• Create an adapter project in the WebSphere Integration Developer
The detailed steps for these tasks are provided in the following sections.
2.2 Import the sample projects into PeopleTools
Perform the following steps to import WBI_CUST_PROJ project into PeopleTools and build it.
1. Copy WBI_CUST_PROJ project from the following weblink to a temp directory (C:\Projects) on the machine where the PeopleTools runs.
http://publib.boulder.ibm.com/bpcsamp/externalconnections/peoplesoftAdapterV70/download/Scripts.zip
2. Log on to the PeopleSoft application designer.
3. Select Tools > Copy Project > From File.
4. Browse to C:\Projects directory. From the Select Project from the List Below, double-click WBI_CUST_PROJ.
5. In the Copy From File dialog, click Copy. Wait for the operation to complete.
6. Select WBI_CUST_PROJ in the left panel, and then select Build > Project from the main menu.
7. In the Build panel, select the following check boxes:
a) Create Tables
b) Create Views
c) Create Trigger
d) Run and build script

August 6, 2009 Page 10 of 99
8. Click Build, to begin to build the project.
9. Click Close, to exit the Build Progress dialog.
10. In the Build Log view of the application designer, check the log messages to confirm that 3 records were processed correctly.
11. Select File > Save All to save the changes.
Repeat the above steps to import IBM_EVENT_V600 project into PeopleTools and build it. This project is under the directory <WID_HOME>\ Resour-ceAdapters\PeopleSoft_7.0.0.0\Scripts.
Then you need to configure the user security for the Component Interfaces.
12. Log into PeopleSoft Web Client with the URL: http://localhost/psp/ps/?cmd=login
13. Go to PeopleTools > Security > Permissions & Roles > Permission Lists.
14. Input PTPT1200 in the edit box of begins with and click Search.
15. Go to the Component Interfaces tab, click to add the Component Interface WBI_CUSTOMER_COMP_INTERFACE.
16. Click Edit of WBI_CUSTOMER_COMP_INTERFACE.

August 6, 2009 Page 11 of 99
17. Select Full Access for all methods and click OK.
18. Go back to the Component Interfaces tab, click to add the Component Interface IBM_EVENT_CI.
19. Click Edit of IBM_EVENT_CI.

August 6, 2009 Page 12 of 99
20. Select Full Access for all methods and click OK.
21. Go back to the Component Interfaces tab and press Save button to save the changes.
2.3 Add the trigger to WBI_CUSTOMER_COMP component
For inbound operation, the adapter needs to retrieve the events from the IBM_EVENT_BC component. Add a trigger to WBI_CUSTOMER_COMP component, so that the events can be generated automatically when the data is created or modified against this component.
Perform the following steps to add a trigger:
1. In PeopleSoft application designer, open WBI_CUST_PROJ project.
2. In the left panel, right-click on WBI_CUSTOMER_COMP and select View People-Code.
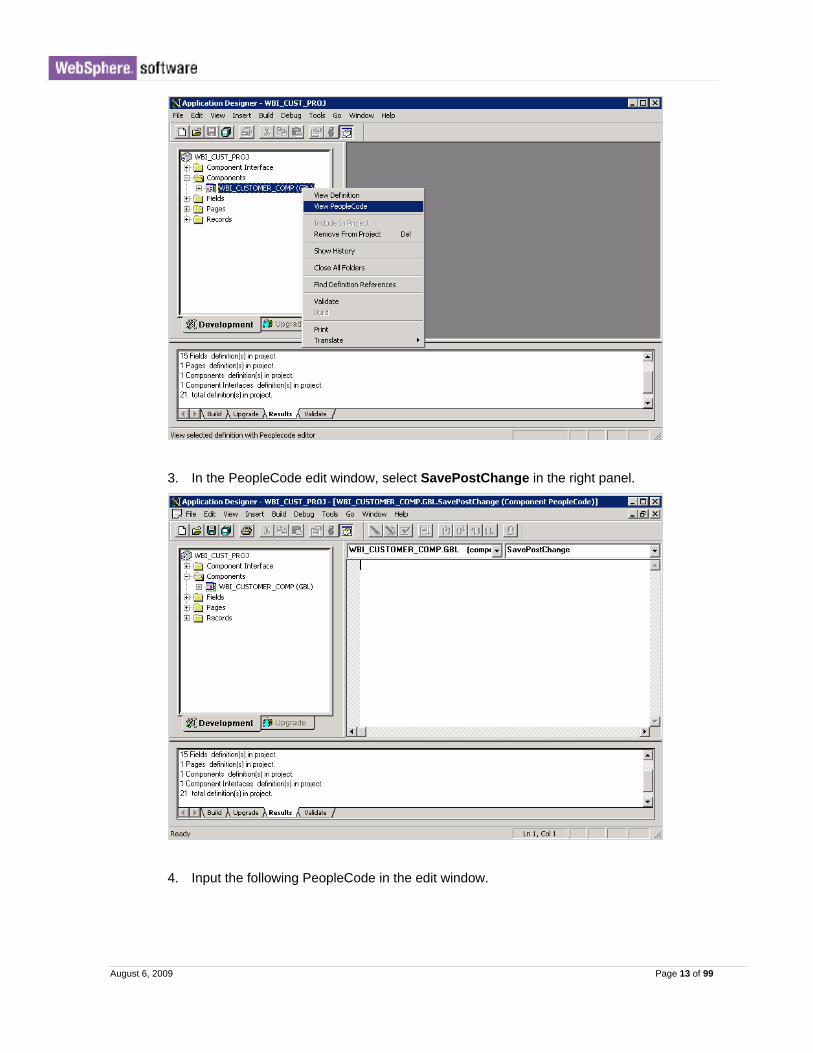
August 6, 2009 Page 13 of 99
3. In the PeopleCode edit window, select SavePostChange in the right panel.
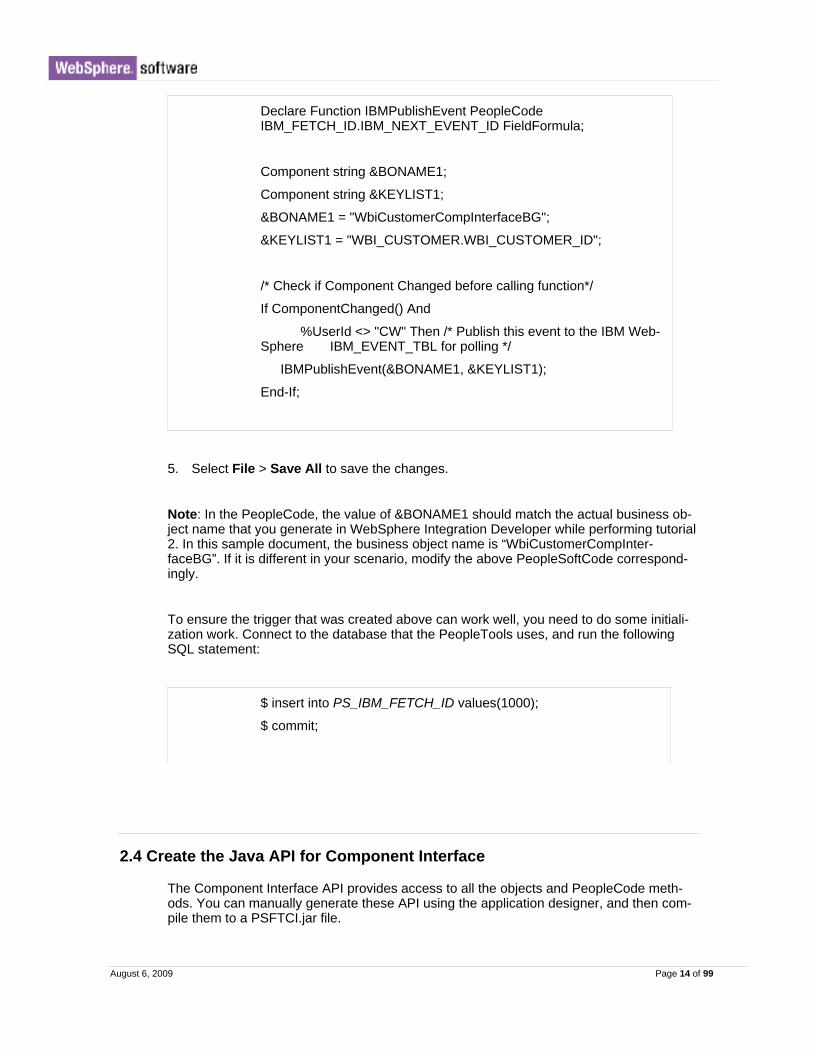
4. Input the following PeopleCode in the edit window.
August 6, 2009 Page 14 of 99
Declare Function IBMPublishEvent PeopleCode IBM_FETCH_ID.IBM_NEXT_EVENT_ID FieldFormula;
Component string &BONAME1;
Component string &KEYLIST1;
&BONAME1 = "WbiCustomerCompInterfaceBG";
&KEYLIST1 = "WBI_CUSTOMER.WBI_CUSTOMER_ID";
/* Check if Component Changed before calling function*/
If ComponentChanged() And
%UserId <> "CW" Then /* Publish this event to the IBM Web-Sphere IBM_EVENT_TBL for polling */
IBMPublishEvent(&BONAME1, &KEYLIST1);
End-If;
5. Select File > Save All to save the changes.
Note: In the PeopleCode, the value of &BONAME1 should match the actual business ob-ject name that you generate in WebSphere Integration Developer while performing tutorial 2. In this sample document, the business object name is “WbiCustomerCompInter-faceBG”. If it is different in your scenario, modify the above PeopleSoftCode correspond-ingly.
To ensure the trigger that was created above can work well, you need to do some initiali-zation work. Connect to the database that the PeopleTools uses, and run the following SQL statement:
$ insert into PS_IBM_FETCH_ID values(1000);
$ commit;
2.4 Create the Java API for Component Interface
The Component Interface API provides access to all the objects and PeopleCode meth-ods. You can manually generate these API using the application designer, and then com-pile them to a PSFTCI.jar file.

August 6, 2009 Page 15 of 99
1. In PeopleSoft application designer, open IBM_EVENT_CI Component Interface.
2. Select Build->PeopleSoft API from the main menu.
3. In the Build PeopleSoft API Bindings dialog, make sure only the Build check box under Java Classes is selected. Set the Target Directory for storing the generated Java files.
In the Select API to Build list, select the following items:
CompIntfc.CompIntfcPropertyInfo CompIntfc.CompIntfcPropertyInfoCollection All beginning with CompIntfc.IBM_EVENT_CI All beginning with CompIntfc.WBI_CUSTOMER_COMP_INTERFACE
4. Click OK. Check the target directory to make sure the Java files are generated cor-
rectly.
5. Copy the generated Java files to C:\Temp directory, then copy psjoa.jar file from <PeopleTools_HOME>\web\psjoa to C:\Temp directory
6. Enter directory as C:\Temp and run the following commands to build the Java files.
$ javac -classpath .\psjoa.jar PeopleSoft\Generated\CompIntfc\*.java
$ jar -cvf PSFTCI.jar PeopleSoft\Generated\CompIntfc\*.class
August 6, 2009 Page 16 of 99
These two JAR files psjoa.jar and PSFTCI.jar are used by the adapter to access the PeopleSoft Enterprise application later.
2.5 Create a J2C Authentication Alias in WebSphere Process Server
Perform the following steps to create a J2C authentication alias in WebSphere Process Server, which will be used by the adapter to access the PeopleSoft Enterprise application.
1. Open WebSphere Integration Developer and switch to Business Integration per-spective.
2. Select Servers tab, right-click on WebSphere Process Server v7.0 and select Start.

August 6, 2009 Page 17 of 99
Figure 1: Start WebSphere Process Server

August 6, 2009 Page 18 of 99
3. After the server starts up, right-click on WebSphere Process Server V7.0 and select Administration -> Run administrative console.
Figure 2: Run Administrative console
4. Log on to the administrative console.
5. Select Security -> Global security.
Figure 3: select Security

August 6, 2009 Page 19 of 99
6. In Global security window, select Authentication -> Java Authentication and Au-thorization Service -> J2C authentication data.
Figure 4: Java Authentication and Authorization Service (JAAS)
7. Click New, to create a new alias.
Figure 5: New Alias
August 6, 2009 Page 20 of 99
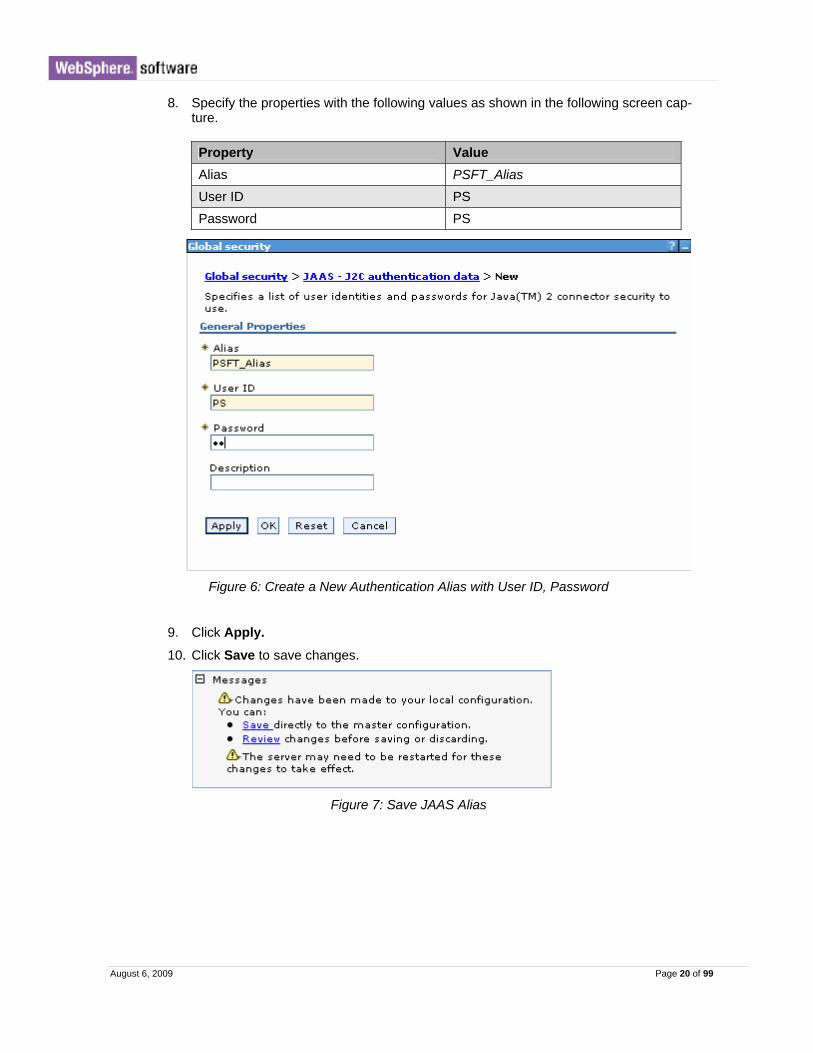
8. Specify the properties with the following values as shown in the following screen cap-ture.
Property Value Alias PSFT_Alias User ID PS Password PS
Figure 6: Create a New Authentication Alias with User ID, Password
9. Click Apply. 10. Click Save to save changes.
Figure 7: Save JAAS Alias

August 6, 2009 Page 21 of 99
11. Then navigate to J2C authentication data to check the alias that was created. It will be used during the later tutorials.
Figure 8: Select Authentication Entries
2.6 Import the adapter project in the WebSphere Integration Developer
To import the RAR file into the project, follow these steps:
1. Open WebSphere Integration Developer.

August 6, 2009 Page 22 of 99
2. Select File -> Import.
Figure 9: Import adapter with WID

August 6, 2009 Page 23 of 99
3. In the Import window, select RAR file option and click Next.
Figure 10: Import adapter RAR File
4. In the Connector Import window, do the following:
In the Connector file field, click Browse to locate the folder that contains the adapter file, i.e. CWYES_PeopleSoft.rar.
Leave the default values as is for the other fields. The connector module is self-named according to the adapter. WebSphere Process Server v7.0 is the expected target runtime.
Click Finish.

August 6, 2009 Page 24 of 99
Figure 11: Connector Import window prompt
5. Click No as there is no need to change to the J2EE perspective.
Figure 12: Confirm Perspective Switch
6. Select Window->Open Perspective->Other->Java. Confirm that the adapter has been in-stalled in WebSphere Integration Developer.

August 6, 2009 Page 25 of 99
Figure 13: Project Explorer's view in Business Integration perspective
This completes import of RAR file to adapter.
2.7 Extract the sample files
Replicas of the artifacts that you create when using the external service wizard are pro-vided as sample files for your reference. Use these files to verify that the files you create with the external service wizard are correct.
Some sample files are provided under “Sample” folder and their detailed contents are shown as below. You can create a temp folder and extract the archives:
File name Description
Samples\referencefiles\Tutorial1.zip
TestOutbound\ PeopleSoftOutbound-Interface.import
Contains the SCA import for the resource adap-ter.
TestOutbound\ PeopleSoftOutbound-Interface.wsdl
Contains the SCA wsdl file for the resource adapter
TestOutbound\ WbiCustomerCompIn-terfaceContainer.xsd
Business object definition for the business ob-ject container.
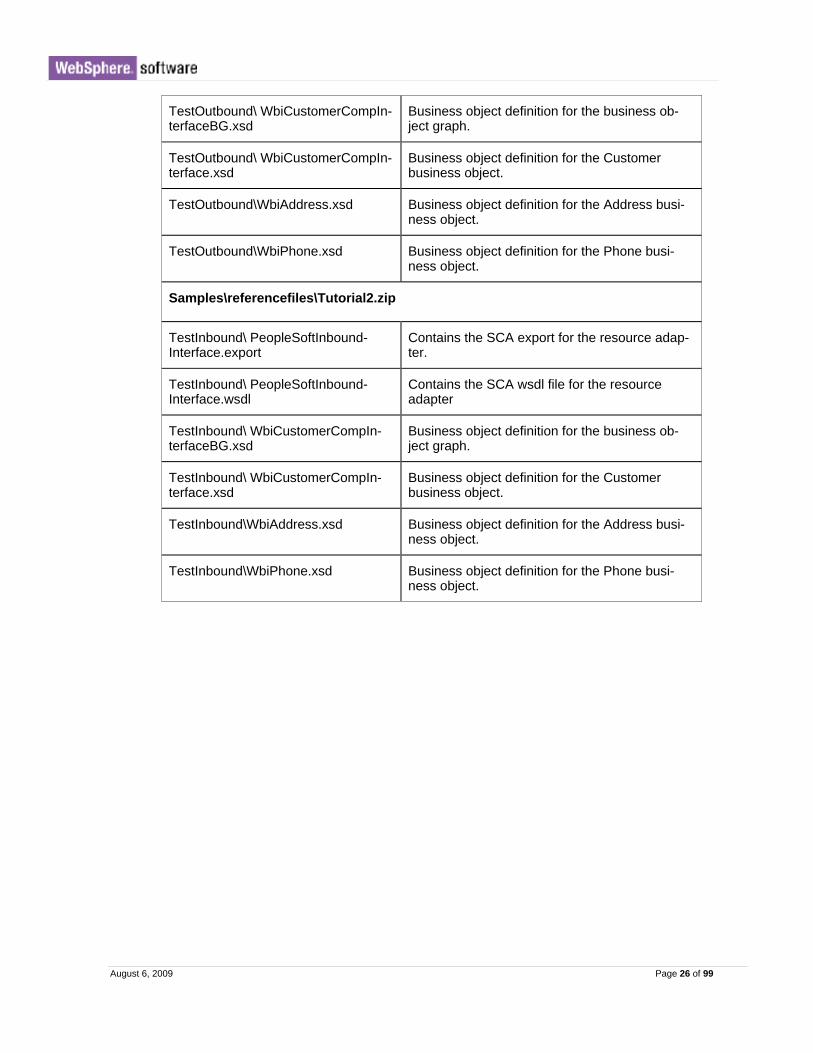
August 6, 2009 Page 26 of 99
TestOutbound\ WbiCustomerCompIn-terfaceBG.xsd
Business object definition for the business ob-ject graph.
TestOutbound\ WbiCustomerCompIn-terface.xsd
Business object definition for the Customer business object.
TestOutbound\WbiAddress.xsd Business object definition for the Address busi-ness object.
TestOutbound\WbiPhone.xsd Business object definition for the Phone busi-ness object.
Samples\referencefiles\Tutorial2.zip
TestInbound\ PeopleSoftInbound-Interface.export
Contains the SCA export for the resource adap-ter.
TestInbound\ PeopleSoftInbound-Interface.wsdl
Contains the SCA wsdl file for the resource adapter
TestInbound\ WbiCustomerCompIn-terfaceBG.xsd
Business object definition for the business ob-ject graph.
TestInbound\ WbiCustomerCompIn-terface.xsd
Business object definition for the Customer business object.
TestInbound\WbiAddress.xsd Business object definition for the Address busi-ness object.
TestInbound\WbiPhone.xsd Business object definition for the Phone busi-ness object.

August 6, 2009 Page 27 of 99
C h a p t e r 3 . Tutorial 1: Sending data to People-Soft Enterprise application (out-bound processing)
This tutorial demonstrates how WebSphere Adapter for PeopleSoft Enterprise sends data to populate customer information into PeopleSoft Enterprise application.
Scenario
The tutorial explains a scenario where a user wants to create a customer record in Peo-pleSoft Enterprise application using a SCA client. In this scenario, the user creates a SCA component which invokes a create operation to the PeopleSoft adapter. The adapter is represented as PeopleSoft outbound interface. The SCA component sends the informa-tion to the outbound interface in the form of business object. The outbound interface in-vokes the PeopleSoft Component Interface to create the customer record in PeopleSoft Enterprise server. The following figure represents this scenario:
This scenario has two steps:
1. Send the request to PeopleSoft Enterprise server for creating a record by using Peo-pleSoft adapter. In this case, a customer whose customer ID is 99122 will be created.
2. After creating the record, the adapter gets the response from PeopleSoft Enterprise server and converts it to a business object which can be understood easily by the SCA component. In the SCA component, users can use response business object for further processing.

August 6, 2009 Page 28 of 99
3.1 Configuration prerequisites
Before starting this tutorial, perform the following tasks:
Ensure the JAR files psjoa.jar and PSFTCI.jar created in section 2.1.3 are added to a directory, like E:\PS.
Ensure the adapter project are imported to WebSphere Integration Developer
Ensure the PeopleSoft Enterprise application is running
3.2 Configure the adapter for outbound processing
Run the external service wizard to specify business objects, services, and configuration to be used in this tutorial.
To generate the business objects and related artifacts, perform the following steps:
August 6, 2009 Page 29 of 99
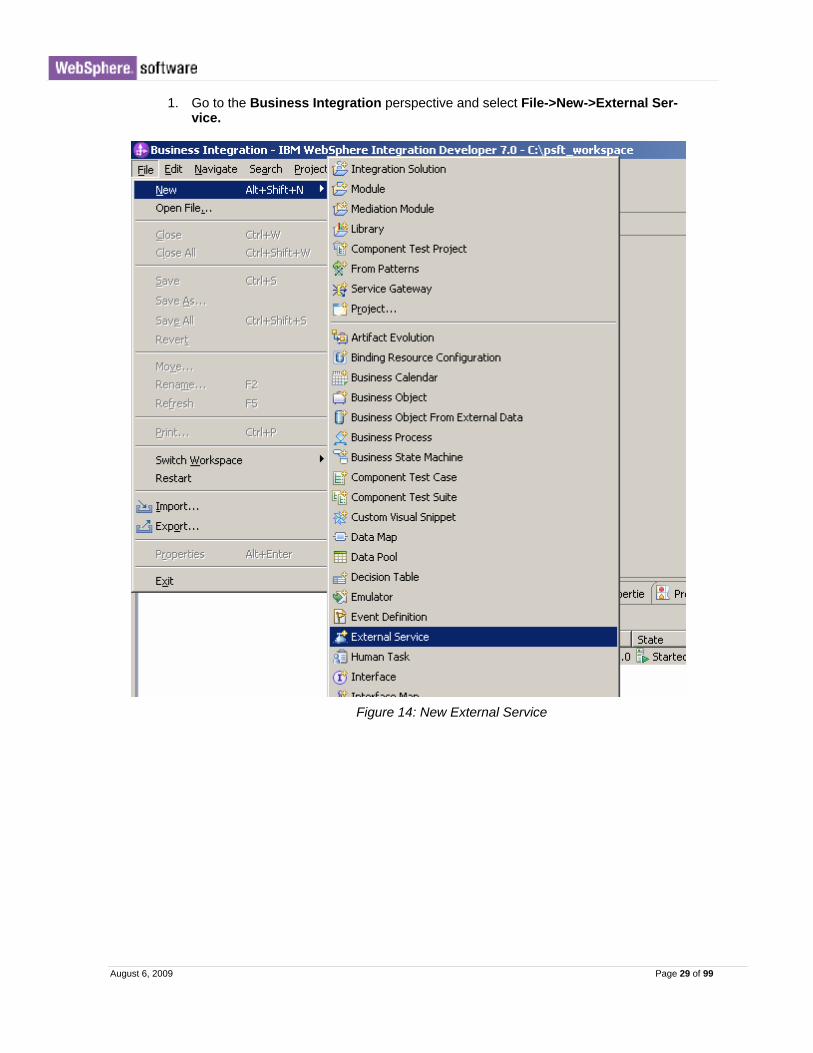
1. Go to the Business Integration perspective and select File->New->External Ser-vice.
Figure 14: New External Service

August 6, 2009 Page 30 of 99
2. In the Select the Service Type of Registry window, select Adapters-> PeopleSoft and click Next.
Figure 15: Select the Service Type of Registry

August 6, 2009 Page 31 of 99
3. In the Select an Adapter window, select IBM WebSphere Adapter for PeopleSoft Enterprise (IBM 7.0.0.0) -> CWYES_PeopleSoft, and click Next.
Figure 16: Select an Adapter
4. In the Locate the Required Files and Libraries window, use Browse to specify the location of psjoa.jar and PSFTCI.jar files and click Next.
Figure 17: Locate the Required Files and Libraries
August 6, 2009 Page 32 of 99
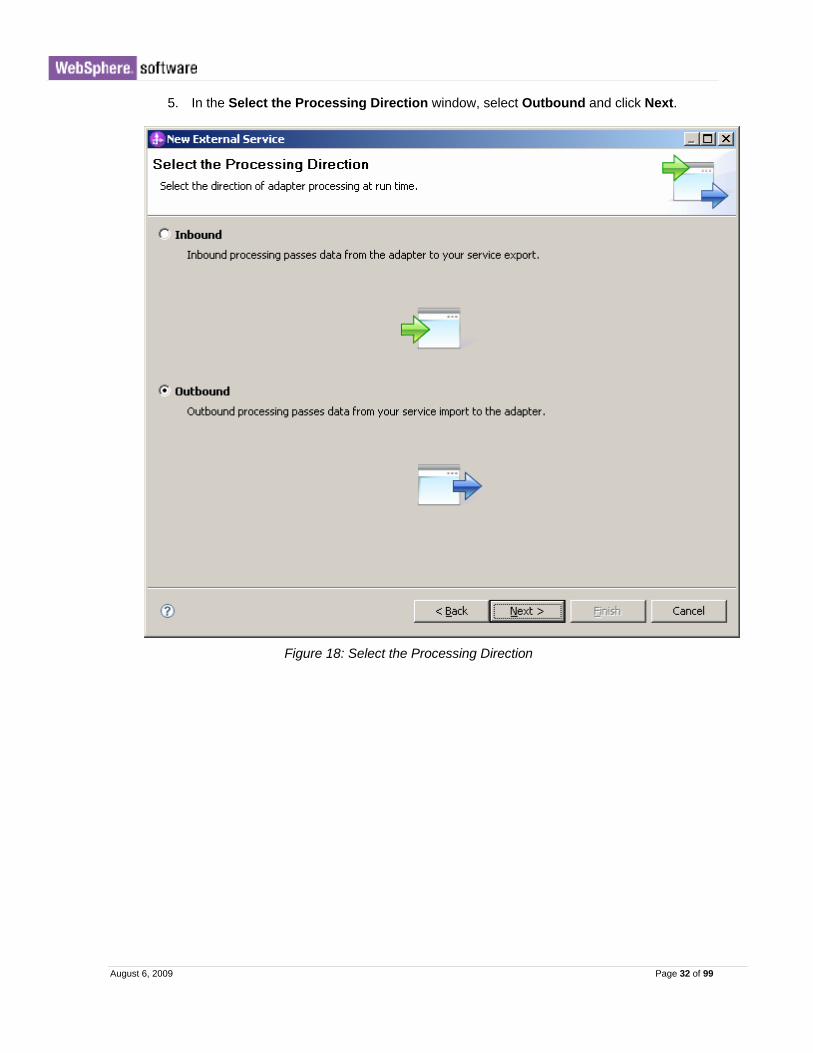
5. In the Select the Processing Direction window, select Outbound and click Next.
Figure 18: Select the Processing Direction
August 6, 2009 Page 33 of 99
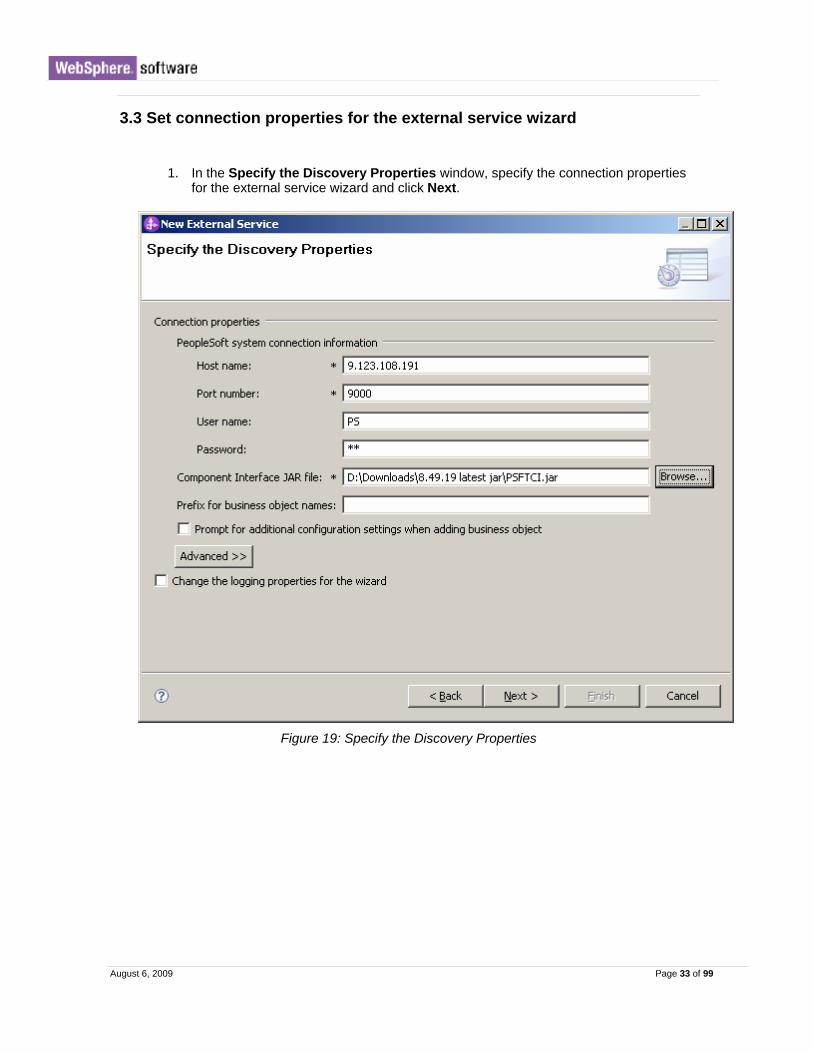
3.3 Set connection properties for the external service wizard
1. In the Specify the Discovery Properties window, specify the connection properties for the external service wizard and click Next.
Figure 19: Specify the Discovery Properties
August 6, 2009 Page 34 of 99
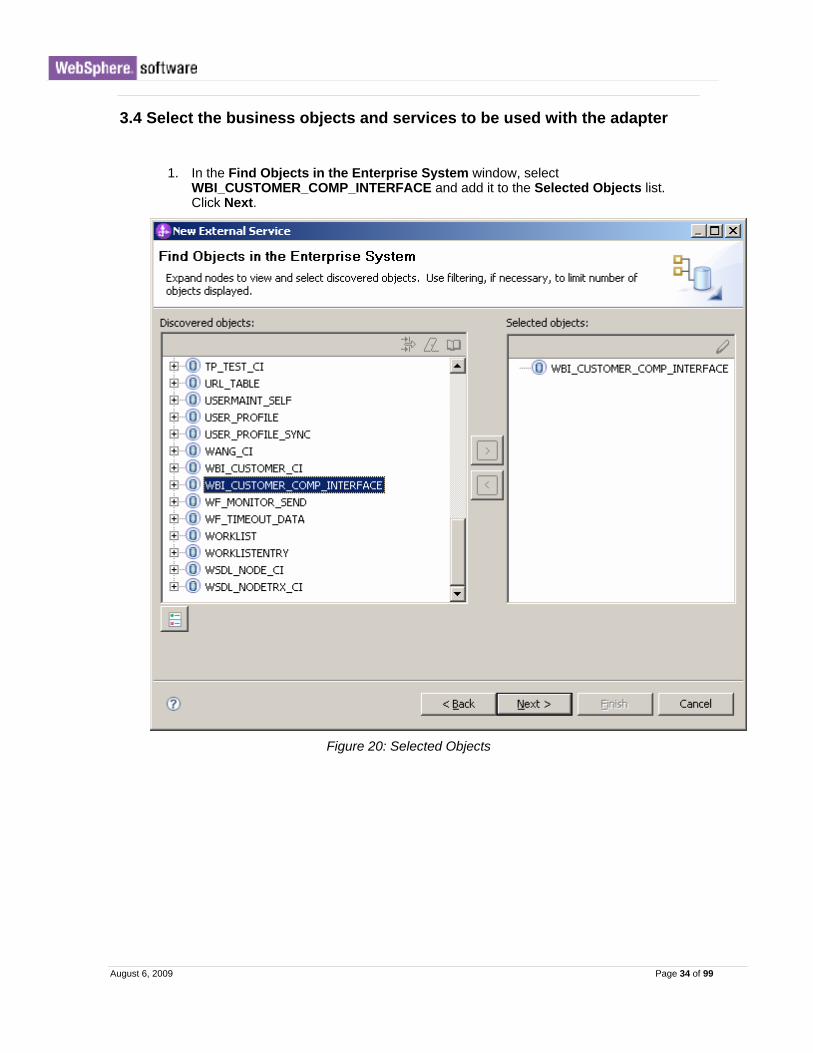
3.4 Select the business objects and services to be used with the adapter
1. In the Find Objects in the Enterprise System window, select WBI_CUSTOMER_COMP_INTERFACE and add it to the Selected Objects list. Click Next.
Figure 20: Selected Objects

August 6, 2009 Page 35 of 99
2. In the Specify Composite Properties window, accept the default settings and click Next.
Figure 21: Specify Composite Properties

August 6, 2009 Page 36 of 99
3.5 Generate business object definitions and related artifacts
1. In the Specify the Service Generation and Deployment Properties window, select Using security properties from the managed connection factory and click Next.
Figure 22: Specify the Service Generation and Deployment Properties

August 6, 2009 Page 37 of 99
2. In the Specify the Location Properties window click New.
Figure 23: Specify the Location Properties

August 6, 2009 Page 38 of 99
3. In the Select a Business Integration Project Type window, select Module and click Next.
Figure 24: Select a Business Integration Project Type

August 6, 2009 Page 39 of 99
4. In the Create a Module window, type TestOutbound in the Module Name field and click Finish.
Figure 25: Create a Module

August 6, 2009 Page 40 of 99
5. Go back to the Specify the Location Properties window and click Finish.
Figure 26: Specify the Location Properties
6. Go back to the Business Integration perspective and select File ->Save All to save the changes.
August 6, 2009 Page 41 of 99
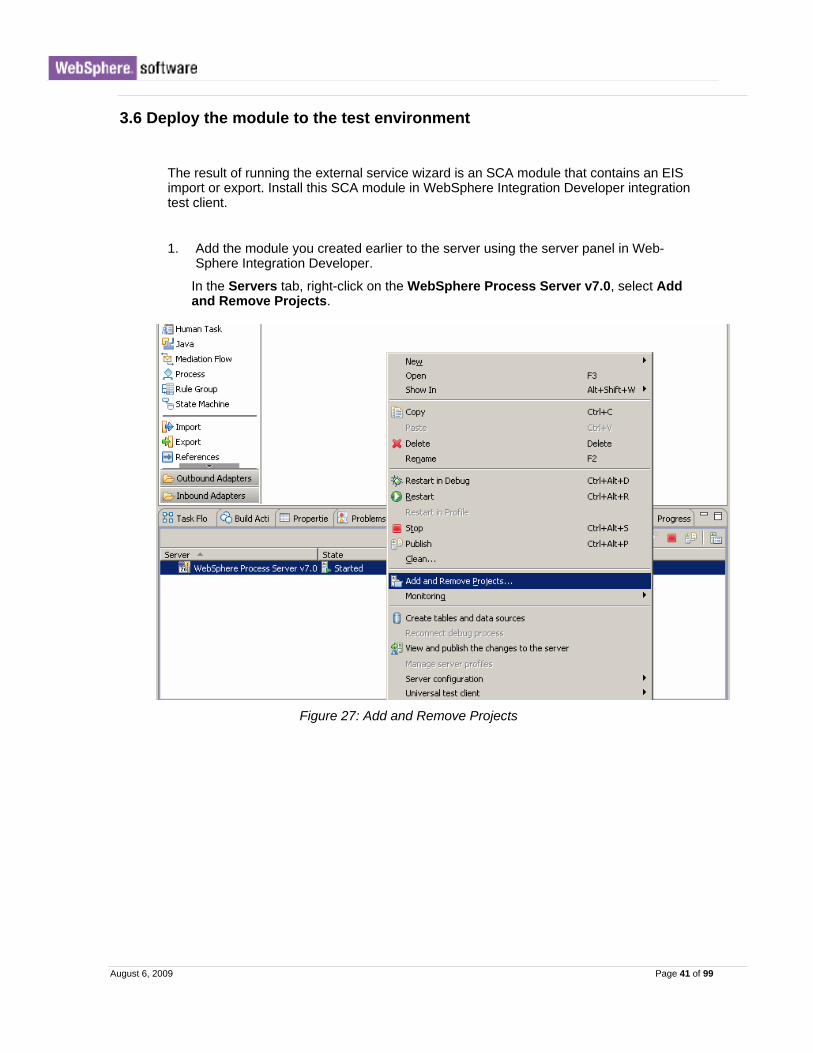
3.6 Deploy the module to the test environment
The result of running the external service wizard is an SCA module that contains an EIS import or export. Install this SCA module in WebSphere Integration Developer integration test client.
1. Add the module you created earlier to the server using the server panel in Web-Sphere Integration Developer.
In the Servers tab, right-click on the WebSphere Process Server v7.0, select Add and Remove Projects.
Figure 27: Add and Remove Projects

August 6, 2009 Page 42 of 99
2. Add the SCA module to the server.
In the Add and Remove projects window, click Add to add TestOutboundApp pro-ject into the Configured projects list and click Finish.
Figure 28: Add and Remove Projects

August 6, 2009 Page 43 of 99
3.7 Test the assembled adapter application
Test the assembled adapter application using the WebSphere Integration Developer inte-gration test client:
1. Select the service you want to test, right-click on TestOutbound module and select Test -> Test Module.
Figure 29: Open Test Module

August 6, 2009 Page 44 of 99
2. Populate the following values for input business objects, as shown in the following screen capture. Specify the input data as the following table shows:
Property Name Property Value
Component PeopleSoftOutboundInterface
Interface PeopleSoftOutboundInterface
Operation createWbiCustomerCompInterface
verb Create
WbiCustomerId 99122
WbiCustomerFname Charlie
WbiCustomerLname Lee
WbiCustomerDob 1980-08-01
Figure 30: Specify input data

August 6, 2009 Page 45 of 99
3. Run the service. Click Continue to run the service.
Figure 31: Continue to Run

August 6, 2009 Page 46 of 99
4. In the Select Deployment Location window, select the server instance you want to deploy the project to and click Finish.
Figure 32: Select Deployment Location

August 6, 2009 Page 47 of 99
5. Check the output of the service and check the data in the EIS to ensure it matches the expected values.
Figure 33: Invoke Result

August 6, 2009 Page 48 of 99
C h a p t e r 4 . Tutorial 2: Receiving events from PeopleSoft Enterprise application (inbound processing)
This tutorial demonstrates how WebSphere Adapter for PeopleSoft Enterprise polls the events from the PeopleSoft Enterprise application.
Scenario
In this scenario, when a new customer record is created in PeopleSoft Enterprise server, the event is generated and recorded. Later, the event is polled by the adapter and trans-formed into business object before delivering to the subscribed SCA component. The fol-lowing figure represents this scenario:
1. User adds a new customer record in PeopleSoft Enterprise server. The PeopleSoft
Enterprise server will generate the corresponding event.
2. The adapter will poll for events from PeopleSoft Enterprise server periodically. The event is captured in the event table and adapter fetches it from the server.
3. Finally, the adapter will convert the event to a business object and send it to the des-tination SCA component.
4.1 Configuration prerequisites
Before starting this tutorial, perform the following tasks:
Ensure the JAR files psjoa.jar and PSFTCI.jar that are created in Chapter 2 are added to E:\PS directory.

August 6, 2009 Page 49 of 99
Ensure the adapter project are imported to WebSphere Integration Developer
Ensure the PeopleSoft Enterprise application is running
4.2 Configure the adapter for inbound processing
Run the external service wizard to specify business objects, services, and configuration to be used in this tutorial.
To generate the business objects and related artifacts, perform the following steps:

August 6, 2009 Page 50 of 99
1. In the Business Integration perspective and select File->New->External Service.
Figure 34: New External Service
August 6, 2009 Page 51 of 99
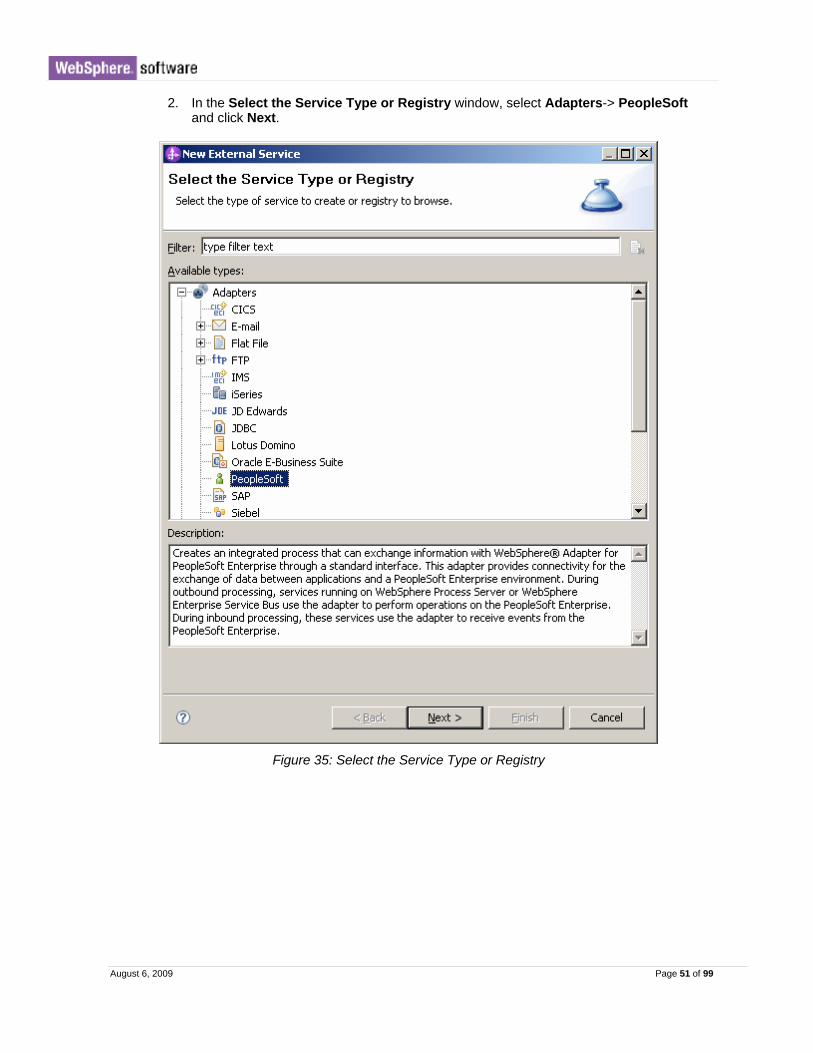
2. In the Select the Service Type or Registry window, select Adapters-> PeopleSoft and click Next.
Figure 35: Select the Service Type or Registry

August 6, 2009 Page 52 of 99
3. In the Select an Adapter window, select IBM WebSphere Adapter for PeopleSoft Enterprise (IBM 7.0.0.0) -> CWYES_PeopleSoft, and click Next.
Figure 36: Select an Adapter
4. In the Locate the Required Files and Libraries window, use Browse to specify the location of psjoa.jar and PSFTCI.jar files and click Next.
Figure 37: Locate the Required Files and Libraries
August 6, 2009 Page 53 of 99
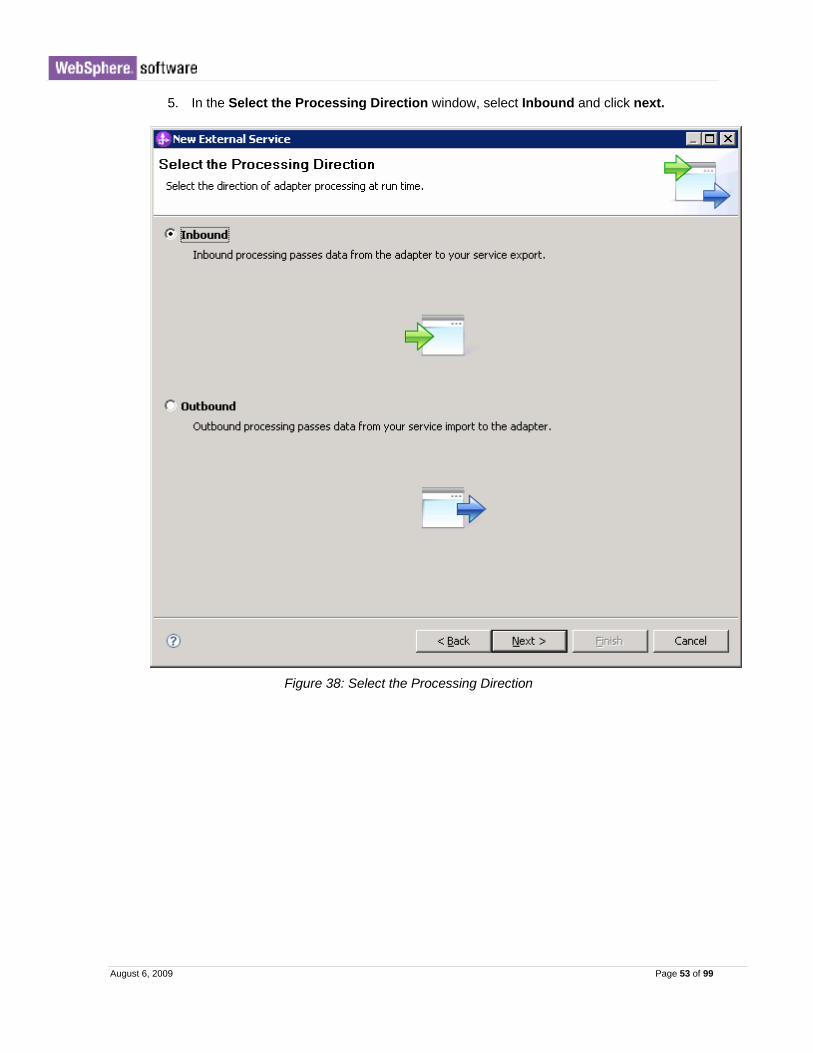
5. In the Select the Processing Direction window, select Inbound and click next.
Figure 38: Select the Processing Direction

August 6, 2009 Page 54 of 99
4.3 Set properties for the external service wizard
1. In the Specify the Discovery Properties window, specify the connection properties for the external service wizard and click Next.
Figure 39: Specify the Discovery Properties
August 6, 2009 Page 55 of 99
4.4 Select the business objects and services to be used with the adapter
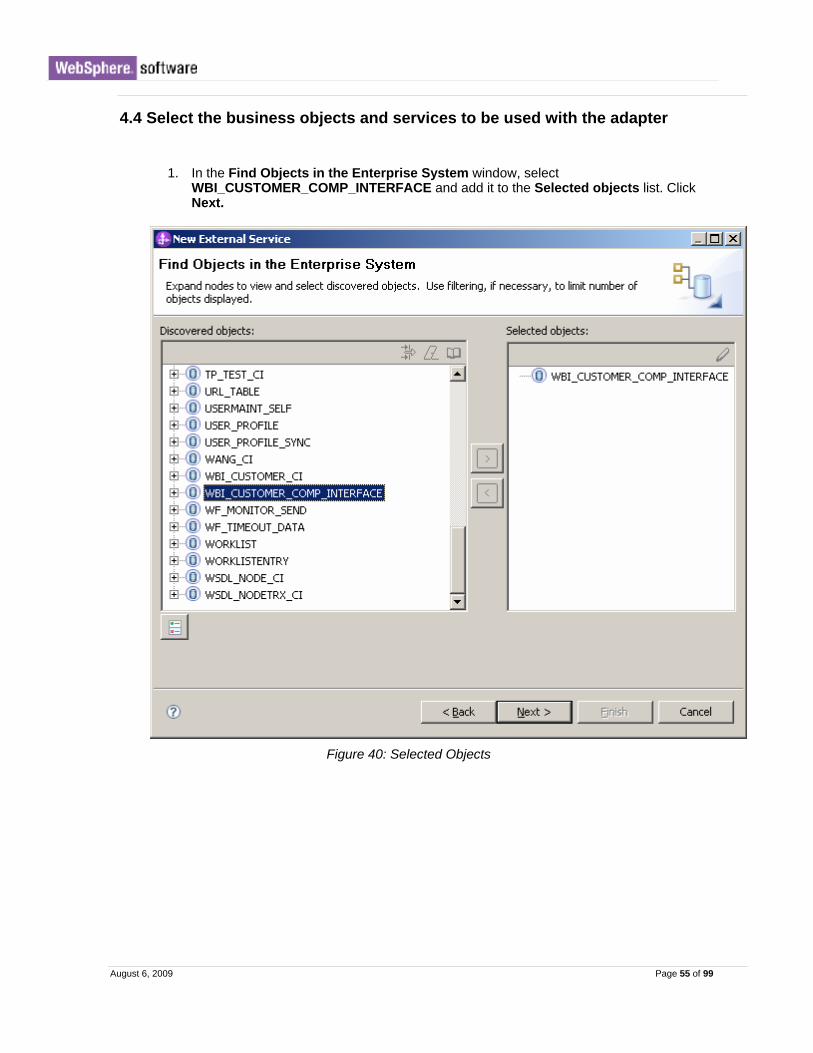
1. In the Find Objects in the Enterprise System window, select WBI_CUSTOMER_COMP_INTERFACE and add it to the Selected objects list. Click Next.
Figure 40: Selected Objects

August 6, 2009 Page 56 of 99
2. In the Specify Composite Properties window click Next.
Figure 41: Specify Composite Properties

August 6, 2009 Page 57 of 99
4.5 Generate business object definitions and related artifacts
1. In the Specify the Service Generation and Deployment Properties panel, select Using security properties from the managed connection factory and click Next.
Figure 42: Specify the Service Generation and Deployment Properties

August 6, 2009 Page 58 of 99
2. In the Specify the Location Properties window click New.
Figure 43: Specify the Location Properties
August 6, 2009 Page 59 of 99
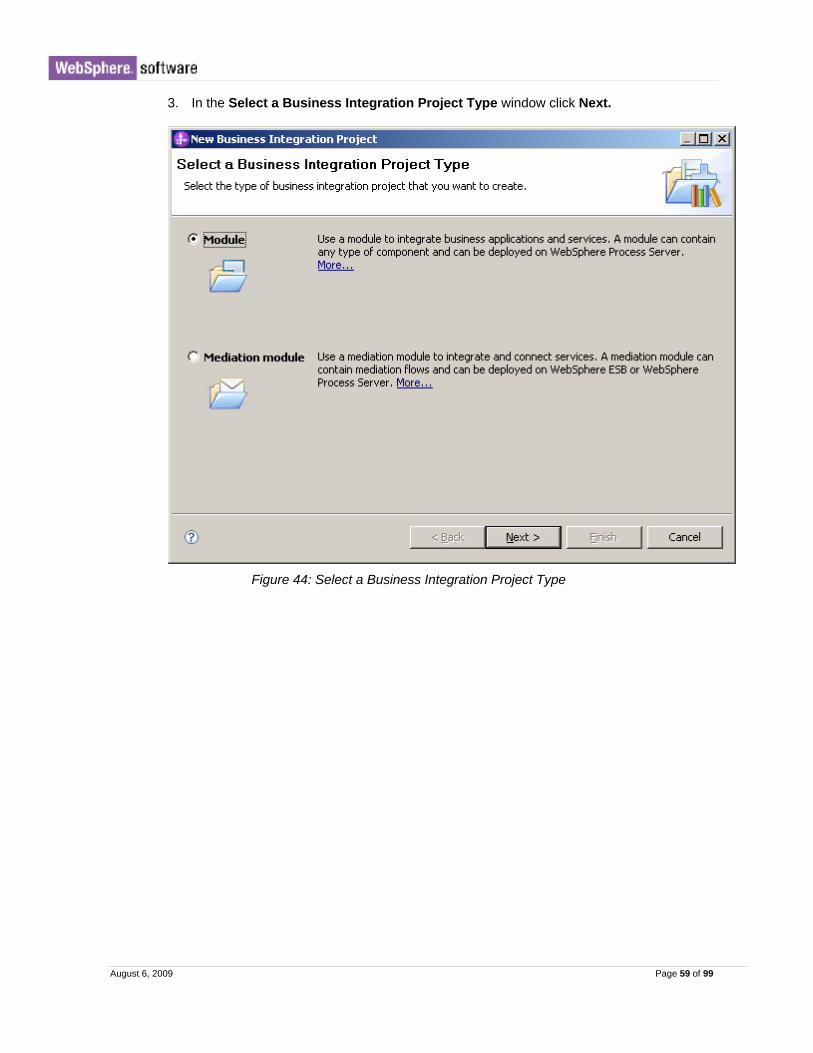
3. In the Select a Business Integration Project Type window click Next.
Figure 44: Select a Business Integration Project Type

August 6, 2009 Page 60 of 99
4. In the Create a Module window, type Test Inbound in the Module Name field and click Finish.
Figure 45: Create a Module

August 6, 2009 Page 61 of 99
5. In the Specify the Location Properties window click Finish.
Figure 46: Specify the Location Properties
6. Go back to Business Integration perspective and drag the Java Component to the Assembly Diagram.
Figure 47: Java Component Added

August 6, 2009 Page 62 of 99
7. Add wire between PeopleSoftInboundInterface and Java Component1.
Figure 48: Component Wired to Interface
8. Select File->Save All to save the changes

August 6, 2009 Page 63 of 99
4.6 Deploy the module to the test environment
After running the external service wizard, you will have an SCA module that contains an EIS import or export. You must install this SCA module in the WebSphere Integration De-veloper integration test client.
1. Add the SCA module to the server using the server panel in WebSphere Integration Developer.
In the Servers tab, right-click on the WebSphere Process Server v7.0 and select Add and Remove Projects.
Figure 49: Add and Remove Projects
August 6, 2009 Page 64 of 99
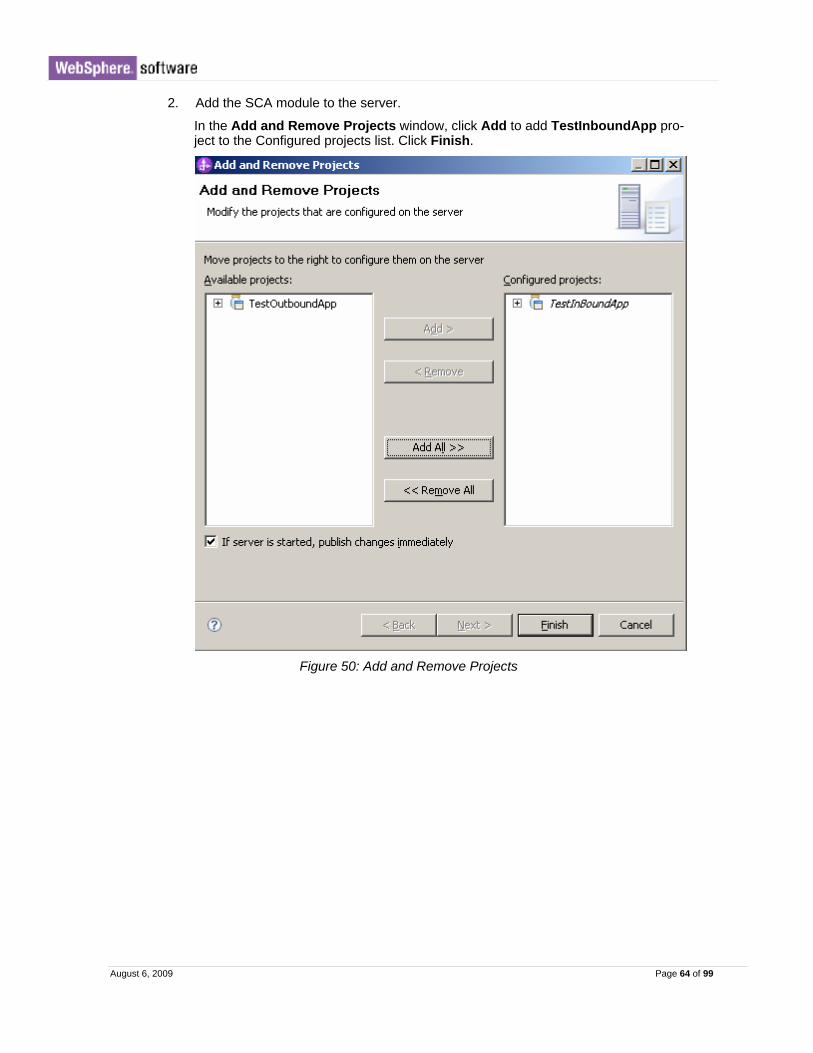
2. Add the SCA module to the server.
In the Add and Remove Projects window, click Add to add TestInboundApp pro-ject to the Configured projects list. Click Finish.
Figure 50: Add and Remove Projects

August 6, 2009 Page 65 of 99
4.7 Test the assembled adapter application
Test the assembled adapter application using the WebSphere Integration Developer inte-gration test client:
1. Attach the integration test client to the EIS export.
a. In WebSphere Integration Developer, right-click on project TestInbound and se-lect Test->Attach.
Figure 51: Open Test Attach

August 6, 2009 Page 66 of 99
b. Switch to Configurations tab and click Add.
Figure 52: Add Test configuration
August 6, 2009 Page 67 of 99
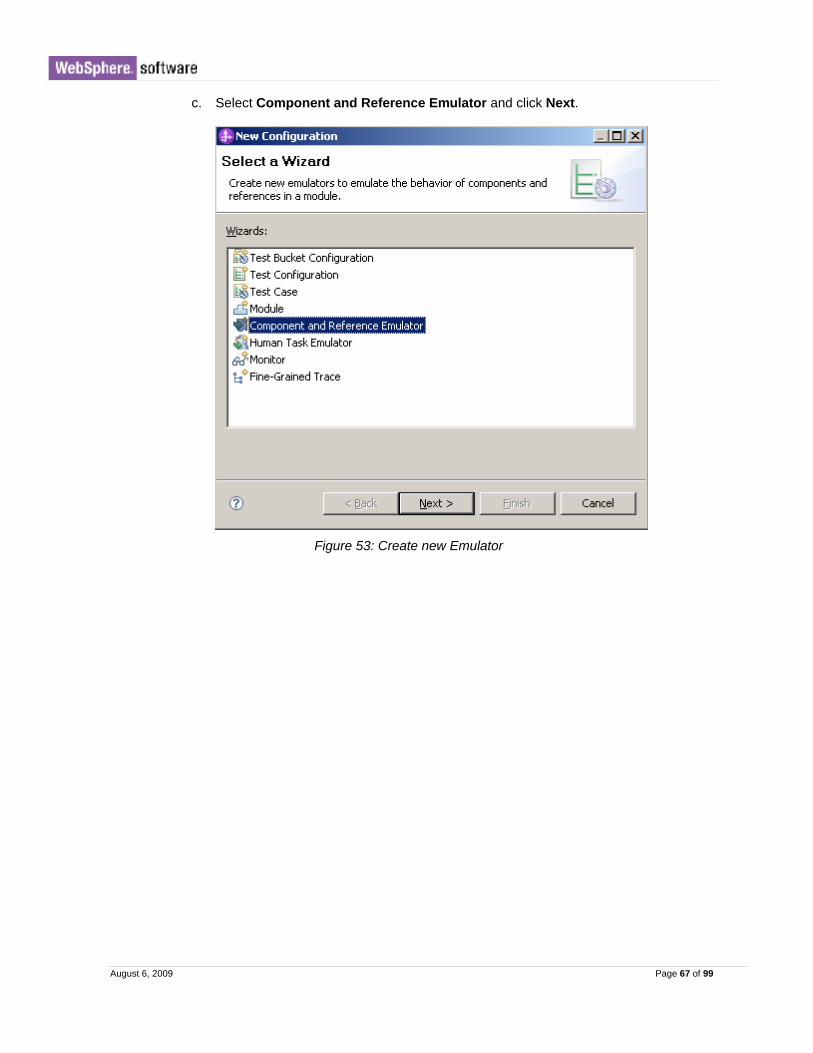
c. Select Component and Reference Emulator and click Next.
Figure 53: Create new Emulator

August 6, 2009 Page 68 of 99
d. Select Module TestInbound and click Next.
Figure 54: Select a Module
August 6, 2009 Page 69 of 99
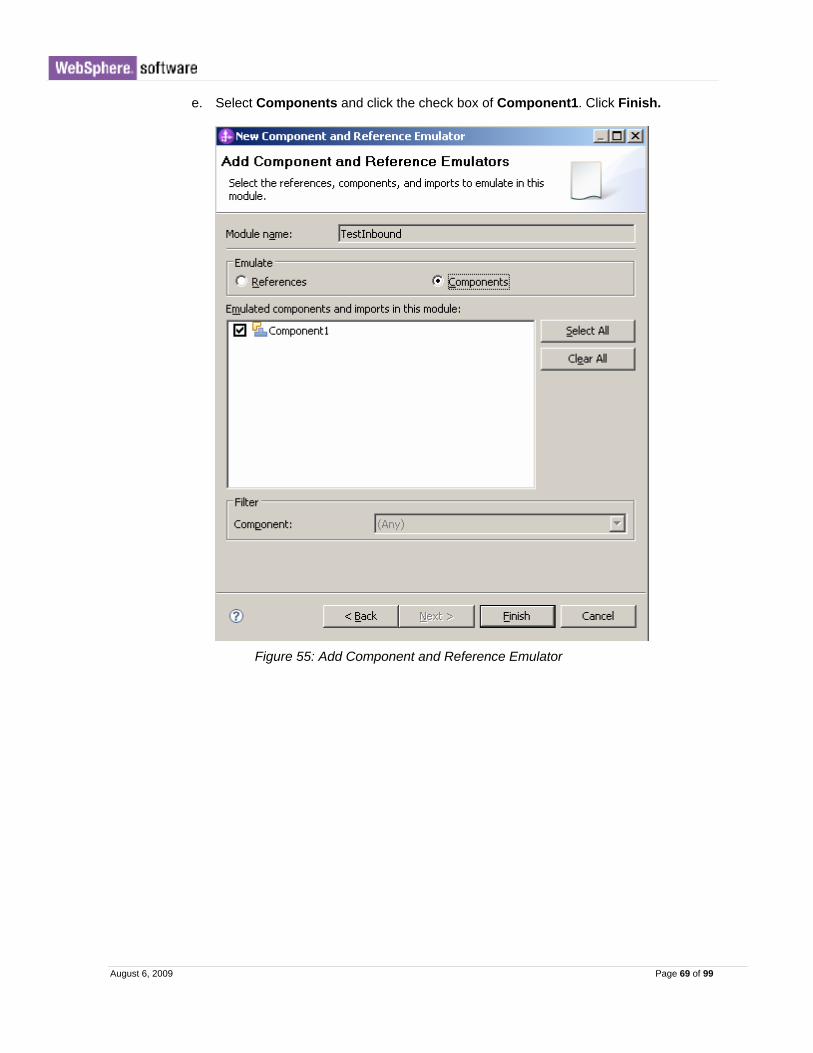
e. Select Components and click the check box of Component1. Click Finish.
Figure 55: Add Component and Reference Emulator
August 6, 2009 Page 70 of 99
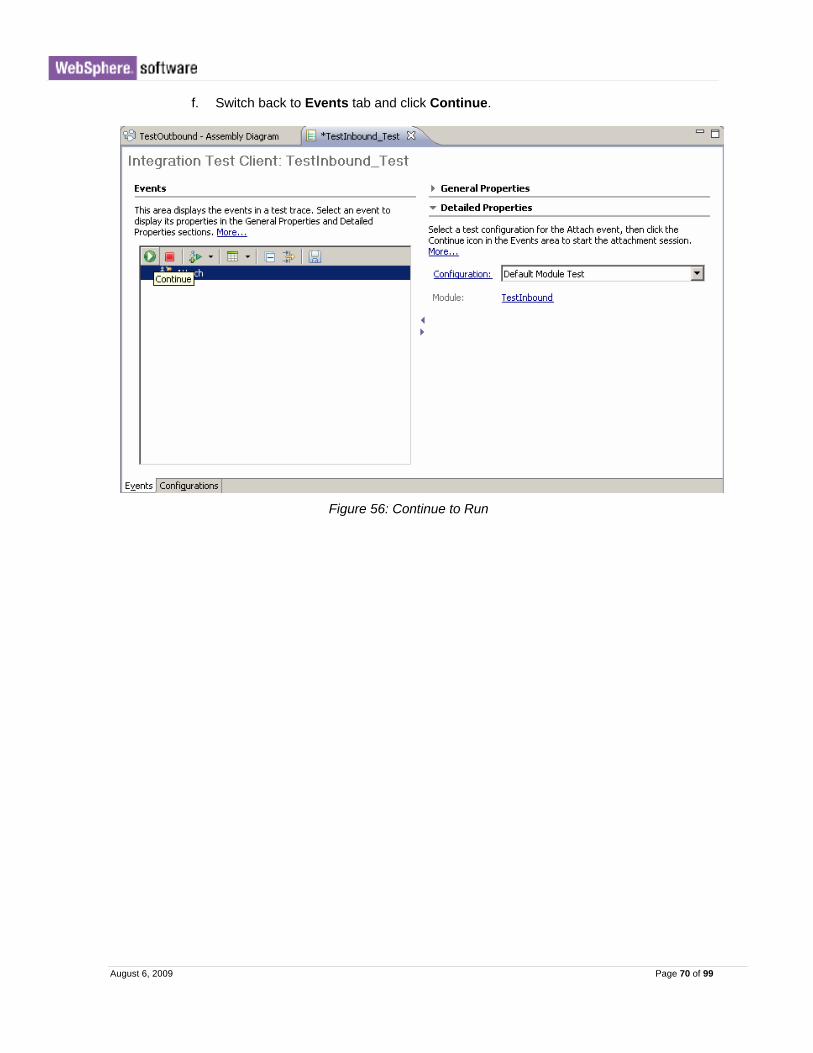
f. Switch back to Events tab and click Continue.
Figure 56: Continue to Run

August 6, 2009 Page 71 of 99
g. In the Select Deployment Location window, select the server instance you want to deploy the project to and click Finish.
Figure 57: Select Deployment Location
2. Enter data in the EIS to trigger an inbound event.
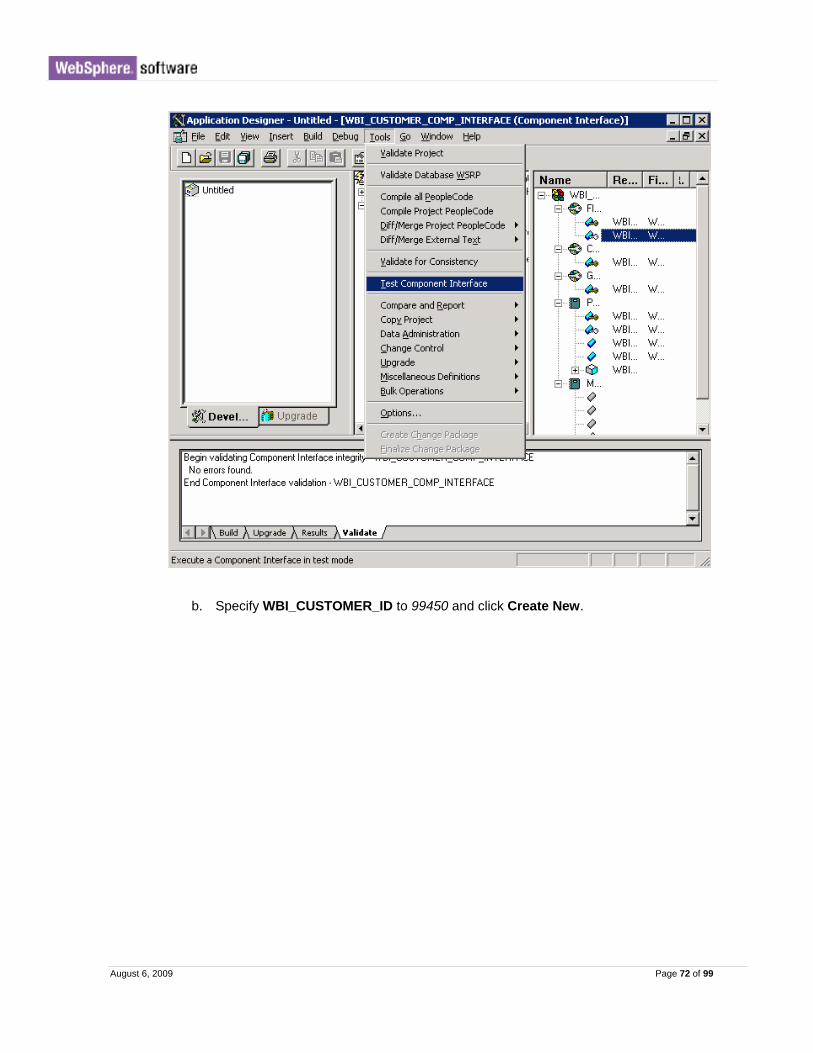
a. In the PeopleSoft application designer, open Component Interface WBI_CUSTOMER_COMP_INTERFACE and select Tools->Test Component In-terface.
August 6, 2009 Page 72 of 99
b. Specify WBI_CUSTOMER_ID to 99450 and click Create New.

August 6, 2009 Page 73 of 99
c. Specify the property values as the following screen capture shows, then right-click on WBI_CUSTOMER_COMP_INTERFACE and select Save.

August 6, 2009 Page 74 of 99
d. Click OK, when the Save() results dialog prompts.
August 6, 2009 Page 75 of 99
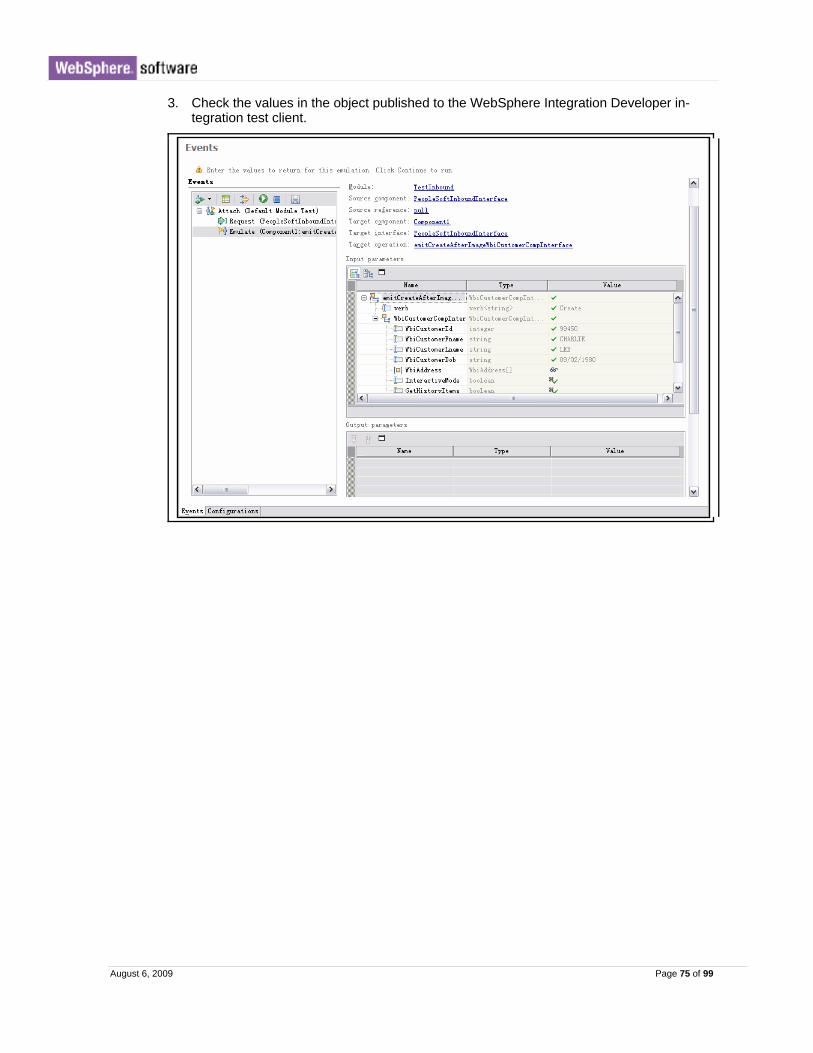
3. Check the values in the object published to the WebSphere Integration Developer in-tegration test client.

August 6, 2009 Page 76 of 99
C h a p t e r 5 . Tutorial 3: Effective Sequence number is not required for data in-sert (outbound processing)
This tutorial demonstrates how WebSphere Adapter for PeopleSoft Enterprise uses Ig-noreEffectiveSequence ASI to insert child data to the PeopleSoft Enterprise application.
Scenario
wherein this scenario, a user wants to insert a new address record under an existing cus-tomer record ignoring the effective sequence number. By using different ASI setting, the new address record can be inserted in either the highest or the lowest index position.
While creating artifacts using PeopleSoft Adapter, users need to set related ASI setting as explained below in section 5.2. Then the user creates a SCA component which invokes two operations - create and update using PeopleSoft Adapter. Create operation is used to create a customer record in PeopleSoft Enterprise server. Then, the same record is used for update operation. The update operation updates the record by inserting a new address record under the customer record. The response object returned at the end contains the new address record inserted ignoring the effective sequence number. The following represents this scenario:
This scenario has four steps:
1. Send the request to PeopleSoft Enterprise server for creating a record with multiple children. In this case, a customer with multiple address information will be created.
2. After creating the customer record, the adapter gets the response from PeopleSoft Enterprise server and converts it to a business object.
3. Send another request to PeopleSoft Enterprise server for updating an existing record with children. In this case, a new address record will be inserted under an existing customer record.
4. The adapter gets the response business object again. From the response, you can identify the new address added in different index position according to the ASI setting.
August 6, 2009 Page 77 of 99
5.1 Configuration prerequisites
Before starting this tutorial, perform the following tasks:
Ensure the JAR files psjoa.jar and PSFTCI.jar that are created in section 2.1.3 are added to some directory, like E:\PS.
Ensure the adapter project are imported to WebSphere Integration Developer
Ensure the PeopleSoft Enterprise application is running.
5.2 Configure the adapter for outbound processing
Run the external service wizard to specify business objects, services, and configuration to be used in this tutorial.
To generate the business objects and related artifacts, first perform steps in chapter 3. Then perform the following steps to set the related ASI to ignore effective sequence num-ber, including IgnoreEffectiveSequence, EffectiveDate, EffectiveSequence, KeepRela-tions, InsAtOldestEffDtPos. For details of the usage of these ASIs, refer to the PeopleSoft user guide.

August 6, 2009 Page 78 of 99
1. In Business Integration perspective, expand Data Types under TestOutbound module and click WbiCustomerCompInterface. In the right panel, right-click Wbiad-dress->Properties View.
Figure 58: Wbiaddress Properties

August 6, 2009 Page 79 of 99
2. In Properties->Application Info tab, right-click PeopleSoftAttributeTypeMetadata->New->KeepRelations.
Figure 59: New KeepRelations

August 6, 2009 Page 80 of 99
3. In TestOutbound > Data Types module click Wbiaddress. In the right panel, right-click Wbiaddress -> Properties View
Figure 60: WbiAddress properties

August 6, 2009 Page 81 of 99
4. In Properties->Application Info tab, right-click PeopleSoftBusinessObjectType-Metadata->New->IgnoreEffectiveSequence and PeopleSoftBusinessOb-jectTypeMetadata->New->InsAtOldestEffDtPos
Figure 61: New IgnoreEffectiveSequence

August 6, 2009 Page 82 of 99
Figure 62: New InsAtOldestEffDtPos

August 6, 2009 Page 83 of 99
5. In WbiAddress tab, right-click Effdt -> Properties View
Figure 63: Effdt Properties

August 6, 2009 Page 84 of 99
6. In Properties>Application Info tab, right-click PeopleSoftAttributeTypeMeta-data>New>EffectiveDate
Figure 64: New EffectiveDate

August 6, 2009 Page 85 of 99
7. In WbiAddress tab, right-click WbiAddressId > Properties View
Figure 65: Addressid Properties

August 6, 2009 Page 86 of 99
8. In Properties >Application Info tab, right-click PeopleSoftAttributeTypeMetadata >New >EffectiveSequence.
Figure 66: New EffectiveSequence
9. Select File >Save All to save the changes.
5.3 Deploy the module to the test environment
The result of running the external service wizard is an SCA module that contains an EIS import or export. Install this SCA module in WebSphere Integration Developer integration test client.
Perform step 1 and step 2 in section 3.6.

August 6, 2009 Page 87 of 99
5.4 Test the assembled adapter application
Test the assembled adapter application using the WebSphere Integration Developer inte-gration test client:
1. Select the service you want to test, right-click TestOutbound module and select Test -> Test Module.
Figure 67: Open Test Module

August 6, 2009 Page 88 of 99
2. Populate the following values for input business objects, as shown in the following screen capture. Specify the input data as shown in the following table:
Property Name Property Value
Component PeopleSoftOutboundInterface
Interface PeopleSoftOutboundInterface
Operation createWbiCustomerCompInterface
WbiCustomerId 99123
WbiCustomerFname Charlie
WbiCustomerLname Lee
Effdt 2008-09-16
WbiAddressId 1
WbiAddress[0]
WbiAddressLine1 Line1
Effdt 2008-09-17
WbiAddressId 2
WbiAddress[1]
WbiAddressLine1 Line2
Effdt 2008-09-16
WbiAddressId 3
WbiAddress[2]
WbiAddressLine1 Line3

August 6, 2009 Page 89 of 99
Figure 68: Specify input data

August 6, 2009 Page 90 of 99
3. Run the service. Click Continue to run the service.
Figure 69: Continue to run
August 6, 2009 Page 91 of 99
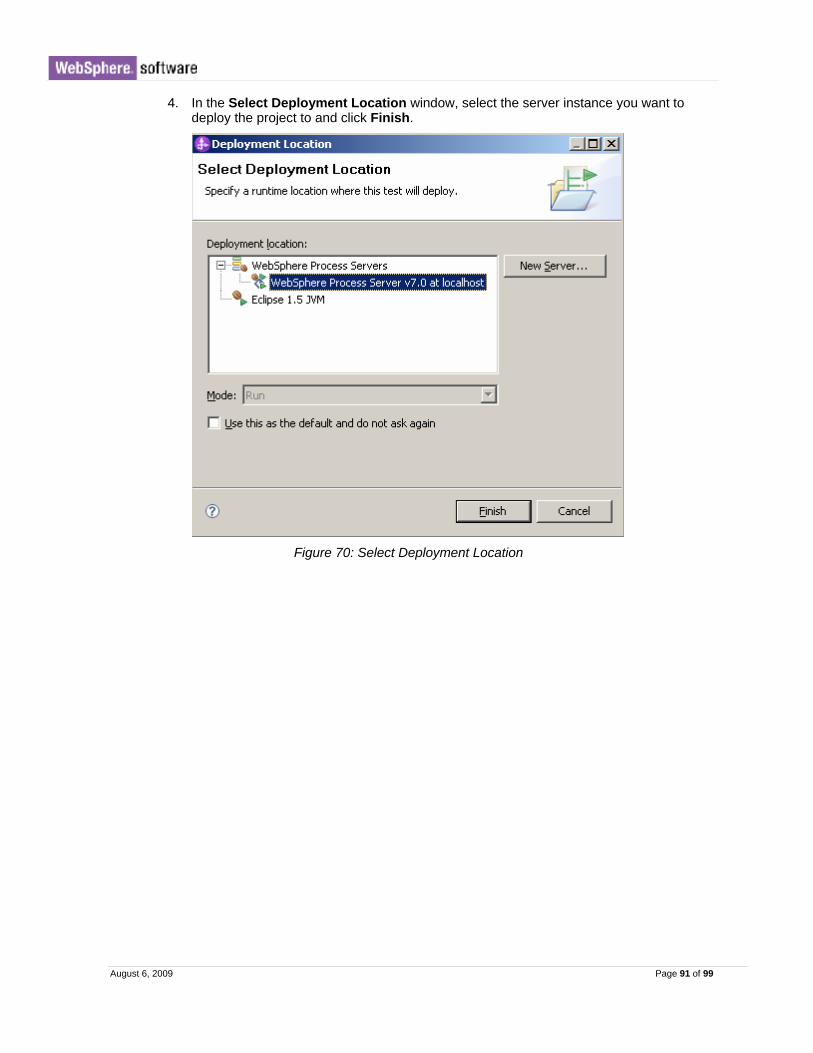
4. In the Select Deployment Location window, select the server instance you want to deploy the project to and click Finish.
Figure 70: Select Deployment Location
August 6, 2009 Page 92 of 99
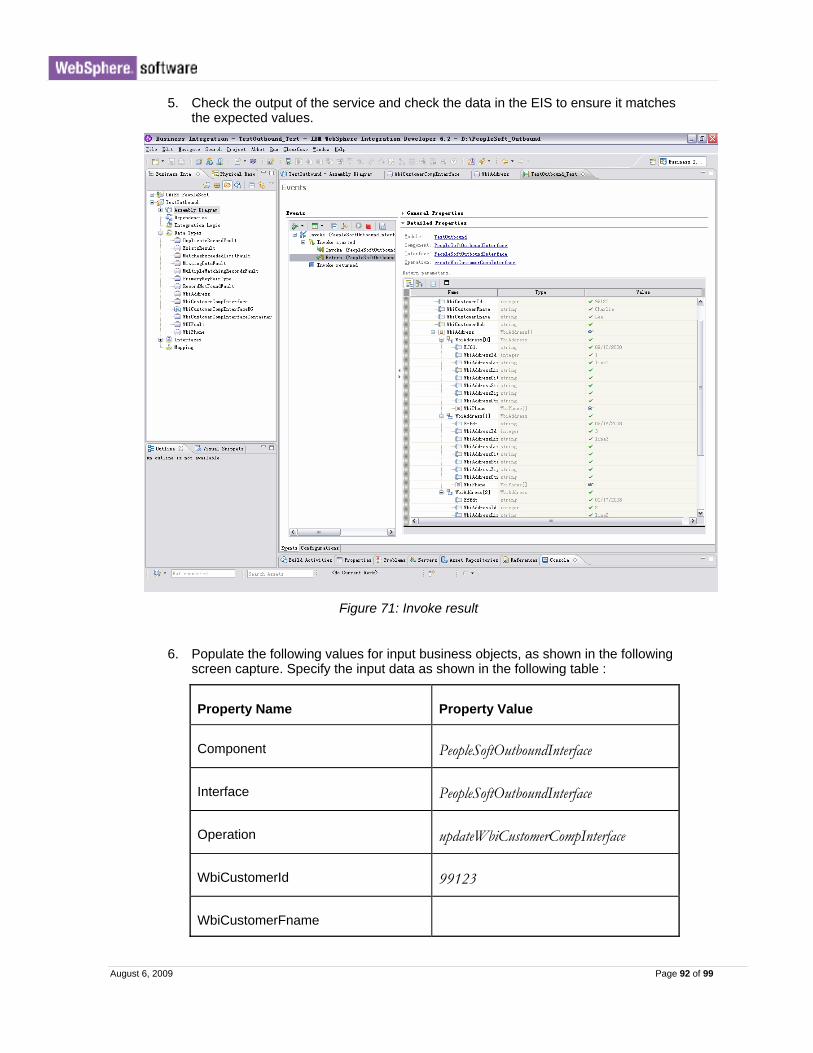
5. Check the output of the service and check the data in the EIS to ensure it matches the expected values.
Figure 71: Invoke result
6. Populate the following values for input business objects, as shown in the following screen capture. Specify the input data as shown in the following table :
Property Name Property Value
Component PeopleSoftOutboundInterface
Interface PeopleSoftOutboundInterface
Operation updateWbiCustomerCompInterface
WbiCustomerId 99123
WbiCustomerFname

August 6, 2009 Page 93 of 99
WbiCustomerLname
Effdt 2008-09-16
WbiAddressId 4
WbiAddress[0]
WbiAddressLine1 Line4
GetHistoryItems true
7. Run the service. Click Continue to run the service.
8. Check the output of the service and check the data in the EIS to see the child data is
added at the highest(oldest) index

August 6, 2009 Page 94 of 99
In Step 4 of Section 5.2, if you add InsAtCurrentEffDtPos ASI instead of InsA-tOldestEffDtPos, the child data will be added at the lowest (current) index in the previous step.

August 6, 2009 Page 95 of 99
C h a p t e r 6 . Troubleshooting
If you encounter any troubles while running the above tutorials, review the following tips for resolving some common problems.
6.1 Improve the WebSphere Process Server trace level
If you are not able to determine the cause of the error based on the exception message in the Component Test Client, you can perform the following steps to improve the Web-Sphere Process Server trace level to get more detailed adapter trace.
a) Log on to WebSphere Process Server administrative console
b) Go to Troubleshooting > Logs and Trace
c) Select server1
d) Select Change Log Detail Levels
e) In the Runtime tab, add setting string “*=info: com.ibm.j2ca.*=all f) Click OK
The trace file can be located at: <Profile Home>\logs\server1\trace.log
6.2 Connection issues with PeopleSoft Enterprise application
If the Adapter meets any problems when it tries to connect to the PeopleSoft Enterprise application, you can check the following things:
a) Ensure the connection properties are correct, such as host name, port number, user-name, and password.
b) Ensure the version of psjoa.jar that the Adapter uses is exactly the same as the ver-sion of the PeopleTools that the Adapter tries to connect to. For example, the Adapter will fail to connect to PeopleSoft Enterprise application if the psjoa.jar ver-sion is “8.48” but the PeopleTools version is “8.49”.
August 6, 2009 Page 96 of 99
Notices
This information was developed for products and services offered in the U.S.A.
IBM may not offer the products, services, or features discussed in this document in other countries. Consult your local IBM representative for information on the products and services currently available in your area. Any reference to an IBM product, pro-gram, or service is not intended to state or imply that only that IBM product, program, or service may be used. Any functionally equivalent product, program, or service that does not infringe any IBM intellectual property right may be used instead. However, it is the user's responsibility to evaluate and verify the operation of any non-IBM product, pro-gram, or service.
IBM may have patents or pending patent applications covering subject matter described in this document. The furnishing of this document does not grant you any license to these patents. You can send license inquiries, in writing, to:
IBM Director of Licensing
IBM Corporation
North Castle Drive
Armonk, NY 10504-1785
U.S.A.
For license inquiries regarding double-byte (DBCS) information, contact the IBM Intel-lectual Property Department in your country or send inquiries, in
writing, to:
IBM World Trade Asia Corporation Licensing
2-31 Roppongi 3-chome, Minato-ku
Tokyo 106-0032, Japan
The following paragraph does not apply to the United Kingdom or any other country where such provisions are inconsistent with local law: INTERNATIONAL BUSINESS MACHINES CORPORATION PROVIDES THIS PUBLI-CATION "AS IS" WITHOUT WARRANTY OF ANY KIND, EITHER EXPRESS OR IM-PLIED, INCLUDING, BUT NOT LIMITED TO, THE IMPLIED WARRANTIES OF NON-INFRINGEMENT, MERCHANTABILITY OR FITNESS FOR A PARTICULAR PUR-POSE. Some states do not allow disclaimer of express or
implied warranties in certain transactions, therefore, this statement may not apply to you.

August 6, 2009 Page 97 of 99
This information could include technical inaccuracies or typographical errors. Changes are periodically made to the information herein; these changes will be incorporated in new editions of the publication.
IBM may make improvements and/or changes in the product(s) and/or the program(s) described in this publication at any time without notice.
Any references in this information to non-IBM Web sites are provided for convenience only and do not in any manner serve as an endorsement of those Web sites.
The materials at those Web sites are not part of the materials for this IBM product and use of those Web sites is at your own risk.
IBM may use or distribute any of the information you supply in any way it believes ap-propriate without incurring any obligation to you.
Licensees of this program who wish to have information about it for the purpose of ena-bling: (i) the exchange of information between independently created programs and other programs (including this one) and (ii) the mutual use of the information which has been exchanged, should contact:
IBM Corporation Department
2Z4A/SOM1 294 Route 100
Somers, NY 10589-0100 U.S.A.
Information concerning non-IBM products was obtained from the suppliers of those products, their published announcements or other publicly available sources. IBM has not tested those products and cannot confirm the accuracy of performance, compatibil-ity or any other claims related to non-IBM products. Questions on the capabilities of non-IBM products should be addressed to the suppliers of those products.
This information contains examples of data and reports used in daily business opera-tions. To illustrate them as completely as possible, the examples include
the names of individuals, companies, brands, and products. All of these names are ficti-tious and any similarity to the names and addresses used by an actual business enter-prise is entirely coincidental.
COPYRIGHT LICENSE:
This information contains sample application programs in source language, which illus-trate programming techniques on various operating platforms. You may copy, modify, and distribute these sample programs in any form without payment to IBM, for the pur-poses of developing, using, marketing or distributing application programs conforming to the application programming interface for the operating platform for which the sample programs are written. These examples have not been thoroughly tested under all condi-tions. IBM, therefore, cannot guarantee or imply reliability, serviceability, or function of these programs.
August 6, 2009 Page 98 of 99
If you are viewing this information softcopy, the photographs and color illustrations may not appear.
Programming interface information
Programming interface information, if provided, is intended to help you create applica-tion software using this program.
General-use programming interfaces allow you to write application software that obtain the services of this program's tools.
However, this information may also contain diagnosis, modification, and tuning informa-tion. Diagnosis, modification and tuning information is provided to help you debug your application software.
Warning: Do not use this diagnosis, modification, and tuning information as a programming inter-face because it is subject to change.
Trademarks
IBM, the IBM logo, and ibm.com are trademarks or registered trademarks of Interna-tional Business Machines Corporation in the United States, other countries, or both. These and other IBM trademarked terms are marked on their first occurrence in this in-formation with the appropriate symbol (® or ™), indicating US registered or common law trademarks owned by IBM at the time this information was published. Such trade-marks may also be registered or common law trademarks in other countries. A com-plete and current list of IBM trademarks is available on the Web at http://www.ibm.com/legal/copytrade.shtml
Linux is a registered trademark of Linus Torvalds in the United States, other countries, or both.
Microsoft and Windows are trademarks of Microsoft Corporation in the United States, other countries, or both.
Java and all Java based trademarks and logos are trademarks of Sun Microsystems, Inc. in the United States, other countries, or both.
UNIX is a registered trademark of The Open Group in the United States and other countries.

August 6, 2009 Page 99 of 99
Other company, product, or service names may be trademarks or service marks of oth-ers.
This product includes software developed by the Eclipse Project (http://www.eclipse.org).