iis web server installation - uw faculty web...
TRANSCRIPT

Using IIS and UltraDev Locally page 1
IIS Web Server Installation
IIS Web Server is the web server provided by Microsoft for platforms running the various versions of the Windows Operating system. It is installed by default and running on server platforms like NT4 server and Windows 2000 server. IIS Server is not installed by default on workstation platforms like Windows 2000 Professional, Windows XP Professional, and Windows NT workstation. To install IIS Server on workstation platforms you need to install it through the additional Windows Components that are available through the control panel. In the Figure 1 we show the installation of IIS Server on a workstation machine.
Figure 1 shows the installation options for IIS Server on Workstations
To access the Windows Components Wizard, you need to first go to the “Control Panel”, then click on “Add or Remove Programs”, and then select “Add/Remove Windows Components”. To start the installation you need to check the box adjacent to Internet Information Services (IIS) and then click on “Next >” and follow the installation instructions.
After installation of the IIS Server it is necessary to check if the server is running on your machine. The easiest way to check for the presence of IIS Server is to use the Internet Explorer browser. To do this, open a web browser and type http://localhost or http://[machinename], where [machinename] is the name of your machine. The web site can also be accessed using the IP Address of the machine. Each machine has a unique IP address that is used to identify it on the network. To connect to your local machine using an IP address, type http://127.0.0.1 on your browser. This is a special address and it is always used to represent the local machine’s IP address. By doing this you are trying to access the web server running on your machine. Figure 2 below shows a snapshot of the screen if IIS Server is running on your machine.

Using IIS and UltraDev Locally page 2
Figure 2 Snapshot of Internet Explorer Windows with IIS running
One of the windows refers to the documentation available with the web server. The second window brings up a default page that describes the status of the web server. This page contains information about the default pages that are acceptable to the web server and the location of the files that belong to the web server. In most of the cases, web site related files are stored in the “/inetpub/wwwroot” folder on your local hard-drive. If you try to access this web server from another machine by typing http://[machine name] on the web browser, you will see an “Under Construction” page. This is displayed because you have not yet build a web page that will be displayed automatically to users connecting to our web server. Later in the appendix we will describe how to add web pages to the web server that can be seen by users trying to access your web server from other machines.
Controlling and Configuring IIS Web Server
To configure the IIS web server open the Internet Services Manager from the “Control Panel” go to “Administrative Tools” and double click on “Internet Information Services”1.
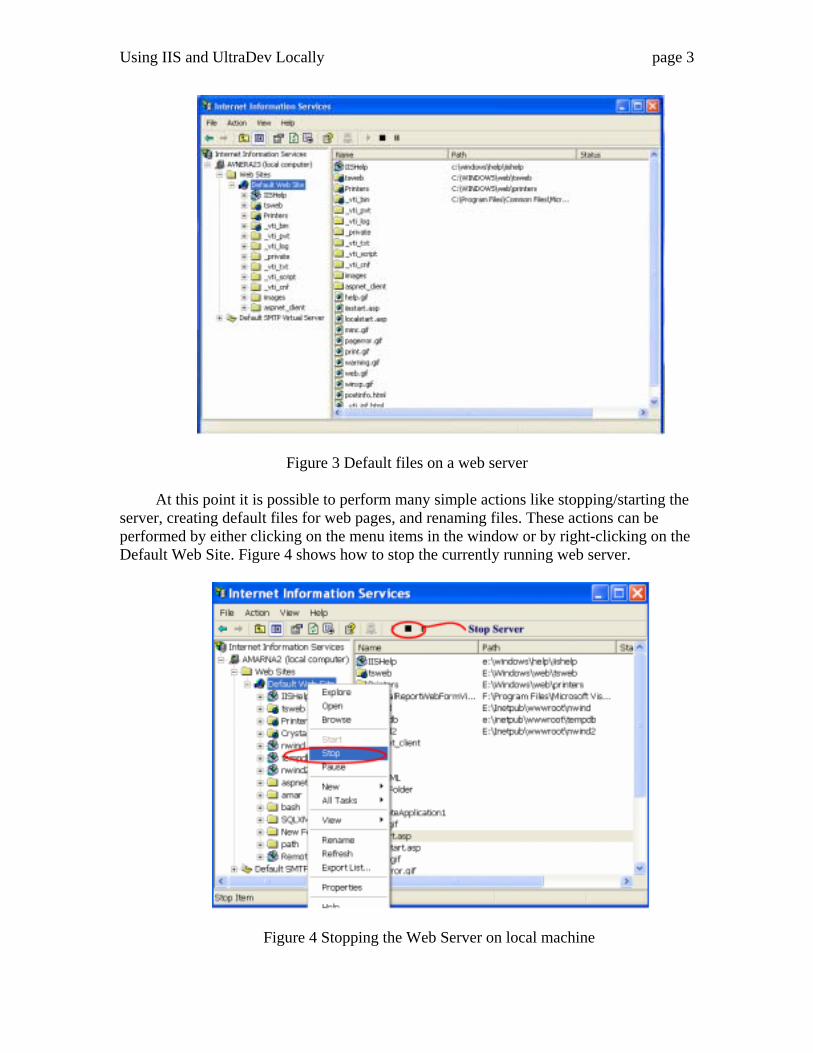
The Internet Services Manager provides configuration options to start or stop the local web server, and to configure the various web sites that are available through the web server. The tool’s interface is divided into two adjacent frames. Figure 3 shows the Default Web Site and other associated files that are initially created when IIS is installed.
1 In Windows 2000 this tool is named Internet Services Manager.
Using IIS and UltraDev Locally page 3
Figure 3 Default files on a web server
At this point it is possible to perform many simple actions like stopping/starting the server, creating default files for web pages, and renaming files. These actions can be performed by either clicking on the menu items in the window or by right-clicking on the Default Web Site. Figure 4 shows how to stop the currently running web server.
Figure 4 Stopping the Web Server on local machine

Using IIS and UltraDev Locally page 4
When the web server is stopped, the web site is no longer available for anyone trying to connect to it and similarly the web applications that are developed are no longer accessible to users. Clicking on the Start button restarts the web server. Note that the options available through the popup menu and through the Action menu depend on the current selection in the left pane. For example if you right click on “local computer”, a different menu pops up.
Virtual Directories
A virtual directory is an alias for a physical directory and it supports the creation of websites with different names and in different directories than the default Inetpub/wwwroot directory. This feature increases the security of the web server by hiding the actual names of the folders, and also allows more flexibility in storing the web site on the machine. The default location for the server website (home directory) is “Inetpub\wwwroot” on the system drive (the drive where Windows is installed – usually the “C:\” drive). Any folder that is created within that folder will automatically be added as a virtual directory to the web server’s default web site.
We can also specify the default homepage for the virtual directory, which will allow us to type the address of the virtual directory name without specifying the file name. The following example shows how to create a new folder under the “c:\inetpub\wwwroot”, setting up the default page for that virtual directory, and viewing a web page created in that folder using an http address. Example 1 Creating new folder in “c:\inetpub\wwwroot”
We begin by creating a new folder under c:\inetpub\wwwroot called “VDirDemo” using the Windows Explorer. In this folder we place a new file (that can be created using Notepad or another text editor) called “welcome.html” that has the following HTML code:
<html> <body> <h3><center>Welcome to my virtual directory</center></h3> </body> </html>
Figure 5 shows the Windows Explorer with the physical folder structure and the Internet Services Manager. You can see that the “VDirDemo” folder we created in “c:\inetpub\wwwroot” was added automatically to the virtual directories list in the Internet Services Manager.2
2 In Windows 2000, you may need to select Refresh from the pop-up menu before you see the virtual directory.

Using IIS and UltraDev Locally page 5
Figure 5 Creation of virtual directory
To set the file named “welcome.html” to be the default page in the VDirDemo virtual directory, use the Internet Services Manager, right-click on the VDirDemo icon and select “Properties”. Then select the “Documents” tab and click on the “Add” button. Figure 6 shows VDirDemo Properties window. You can see in the figure that IIS already has file names that are used as default pages for the virtual directory. You can set the priority of the default page by using the arrows on the left of the file names list (top element has the highest priority).

Using IIS and UltraDev Locally page 6
Figure 6 Virtual directory properties window
In Figure 7 we see the result of calling the virtual directory in the browser without specifying the file name. You can see that the default page has been displayed.

Using IIS and UltraDev Locally page 7
Figure 7 Default page in the virtual directory.
Example 2 Creating a Virtual Directory Outside the Inetpub\wwwroot location
This example shows how to create a new virtual directory using the Virtual Directory Wizard and map it to a folder that exists outside of the root path “c:\inetpub\wwwroot”. We start by creating a folder named “ActualDir” on the “C:\” drive. We then place in that folder the “welcome.html” which we modify to say “Welcome to my page that is located in "C:\ActualDir". In the Internet Services Manager, we right-click on the default website folder and select “New” then “Virtual Directory…”. In the wizard that is opened for us we choose “VDir” as the alias and “C:\ActualDir" as the location (see Figure 8.)

Using IIS and UltraDev Locally page 8
Figure 8 Virtual Directory Creation Wizard – Selecting physical folder
Continue to click through the wizard. When it’s done you can view the web page you saved (see Figure 9) in "C:\ActualDir" using the following address:
http://localhost/VDir/welcome.html
Figure 9 The default web page in the browser

Using IIS and UltraDev Locally page 9
Setting Up a Site in Ultradev Using a Local IIS Virtual Directory
For this example, we have already created a virtual directory in IIS named “eBizDemo”. The virtual directory refers to an actual directory also named eBizDemo located at the following path:
C:\Inetpub\wwwroot\eBizDemo\
After starting UltraDev, start creating a new site. Figure 10 shows the Local Info
pane of the site definition dialog.
Figure 10 Defining the Local Info Next we need to define the remote information. In this scenario, the local and
remote folders will be the same folder. This means that you will not need to upload the files from the local to the remote folder since the local files are already in the remote folder. Figure 11 shows the remote information pane. In addition to noting that the remote folder is the same as the local folder, also note that instead of using FTP for Access mode, we use Local/Network.

Using IIS and UltraDev Locally page 10
Figure 11 Defining the Remote Info Finally you need to define the definitions for the Application Server. Figure 12
shows this.
Figure 12 Defining the Application Server
Using IIS and UltraDev Locally page 11
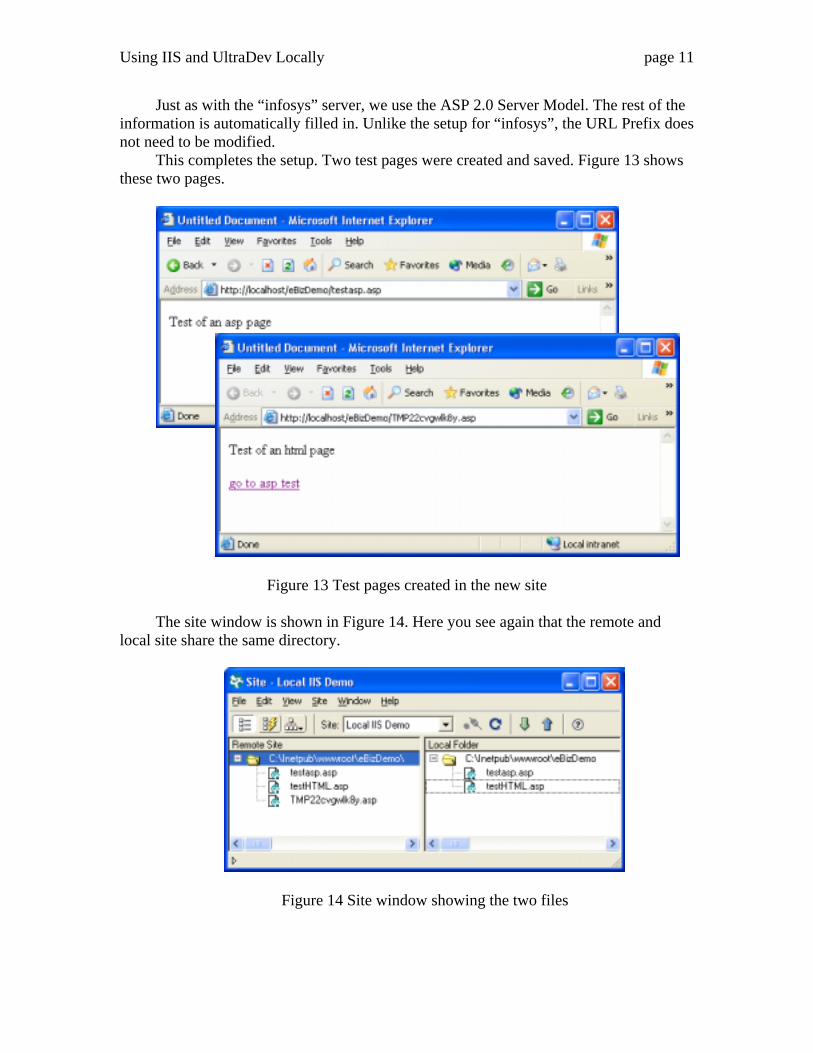
Just as with the “infosys” server, we use the ASP 2.0 Server Model. The rest of the information is automatically filled in. Unlike the setup for “infosys”, the URL Prefix does not need to be modified.
This completes the setup. Two test pages were created and saved. Figure 13 shows these two pages.
Figure 13 Test pages created in the new site
The site window is shown in Figure 14. Here you see again that the remote and local site share the same directory.
Figure 14 Site window showing the two files

Using IIS and UltraDev Locally page 12
Creating a Connection with the Local IIS Server Setting up a custom connection string using a local copy of IIS is very similar to
setting up a connection to the remote server. There is one possible side effect however that you have to watch for that can cause problems. We will cover that problem shortly.
The custom connection string for this example is driver={Microsoft Access Driver (*.mdb)};dbq=C:\Inetpub\wwwroot\eBizDemo\pets.mdb
Note the path matches the root where the virtual directory is stored. You also need to connect using the driver on the local (this) machine as shown in Figure 15.
Figure 15 Defining the connection string The fact that you are using the driver on the local machine can cause a problem.
UltraDev sometimes uses the database and locks it so that other programs, like the asp engine, cannot use it. The folder storing the solution files is shown in Figure 16.
Figure 16 The folder storing the files for the site

Using IIS and UltraDev Locally page 13
After starting UltraDev and building and testing a recordset, the folder changes to that shown in Figure 17. Notice that there is a new files added named pets.ldb. This is a lock file that has been created because UltraDev is using the database.
Figure 17 Site folder with the lock file When this situation exists, you cannot test any pages that use the database. To solve
this problem, simply exit from UltraDev to release the lock and then restart it. You should then be able to perform your tests.