illustrations: janet moneymaker€¦ · 141 introduction. 90 14.2 brief history 90 14.3 basic...
TRANSCRIPT


Illustrations: Janet MoneymakerEditor: Marjie Bassler
Copyright © 2014 Gravitas Publications, Inc.
All rights reserved. No part of this publication may be reproduced, stored in a retrieval system, or transmitted, in any form or by any means, electronic, mechanical, photocopying, recording, or otherwise, without prior written permission from the publisher. No part of this book may be used or reproduced in any manner whatsoever without written permission.
Exploring the Building Blocks of Science Book 2 Student Textbook (softcover)
ISBN 978-1-936114-34-4
Published by Gravitas Publications, Inc.Real Science-4-Kids®
www.realscience4kids.comwww.gravitaspublications.com

Contents
Introduction
CHAPTER 1 THE TOOLS OF SCIENCE 1 1.1 Introduction 2 1.2 Brief History 3 1.3 Basic Tools 6 1.4 Advanced Tools 7 1.5 Summary 8
Chemistry
CHAPTER 2 CHEMIST’S TOOLBOX 9 2.1 Introduction 10 2.2 Brief History 10 2.3 Basic Chemistry Tools 11 2.4 Advanced Chemistry Tools 13 2.5 Summary 14
CHAPTER 3 ACIDS AND BASES 15 3.1 Introduction 16 3.2 Acids and Bases Are Different 16 3.3 H and OH Groups 17 3.4 Both Are Important 19 3.5 Observing Acids and Bases 21 3.6 Summary 22
CHAPTER 4 ACIDS AND BASES REACT 23 4.1 When Acids and Bases Meet 24 4.2 Acid-Base Reactions 25 4.3 Important Acid-Base Reactions 28 4.4 Summary 29
CHAPTER 5 FOOD AND TASTE 30 5.1 Tasty Molecules 31 5.2 The Amazing Tongue 33 5.3 Large Tasty Molecules 34 5.4 Summary 36

Biology
CHAPTER 6 BIOLOGIST’S TOOLBOX 37 6.1 Introduction 38 6.2 Brief History 38 6.3 Basic Biology Tools 40 6.4 Advanced Biology Tools 41 6.5 Summary 43
CHAPTER 7 PROTISTS MOVE 44 7.1 Tiny Creatures 45 7.2 Different Kinds of Tiny Creatures 47 7.3 Sorting Protists 47 7.4 Summary 49
CHAPTER 8 PROTISTS EAT 50 8.1 Euglena Eat 51 8.2 Paramecia Eat 52 8.3 Amoebas Eat 53 8.4 Other Protists Eat 54 8.5 Summary 55
CHAPTER 9 FUNGI: MOLDS, MUSHROOMS, YEASTS 56 9.1 Introduction 57 9.2 Molds 58 9.3 Mushrooms 59 9.4 Yeasts 60 9.5 Summary 61
Physics
CHAPTER 10 PHYSICIST’S TOOLBOX 62 10.1 Introduction 63 10.2 Brief History 63 10.3 Basic Physics Tools 65 10.4 Advanced Physics Tools 65 10.5 Computers and Robotics 67 10.6 Summary 68
CHAPTER 11 WHEN THINGS MOVE 69 11.1 Moving Objects 70 11.2 Keeping Objects in Motion 70 11.3 Marbles and Bowling Balls 72 11.4 Friction 73 11.5 Summary 74

CHAPTER 12 LINEAR MOTION 75 12.1 Introduction 76 12.2 How Far? 76 12.3 Average Speed 78 12.4 Acceleration 79 12.5 Summary 80
CHAPTER 13 NON-LINEAR MOTION 81 13.1 Introduction 82 13.2 Throwing a Ball 82 13.3 Riding a Bike 83 13.4 Easy and Hard Gears 85 13.5 Summary 88
Geology
CHAPTER 14 GEOLOGIST’S TOOLBOX 89 14.1 Introduction 90 14.2 Brief History 90 14.3 Basic Tools: Hammers and Lenses 91 14.4 Advanced Geology Tools 94 14.5 Summary 95
CHAPTER 15 EARTH’S SPHERES 96 15.1 Introduction 97 15.2 Why Spheres? 99 15.3 Why Study Earth’s Spheres Separately? 100 15.4 Putting Them All Together 101 15.5 Summary 103
CHAPTER 16 THE GEOSPHERE 104 16.1 Introduction 105 16.2 More About Layers 106 16.3 Evidence and Guessing 108 16.4 The Geosphere and Other Spheres 110 16.5 Summary 111
CHAPTER 17 THE AIR WE BREATHE 112 17.1 Introduction 113 17.2 The Atmosphere 113 17.3 What Is Air? 114 17.4 Why Doesn’t Air Float Away? 117 17.5 Summary 118

Astronomy
CHAPTER 18 ASTRONOMER’S TOOLBOX 119 18.1 Introduction 120 18.2 Brief History of a Basic Tool 120 18.3 What Is a Telescope? 122 18.4 Early Telescopes 123 18.5 Advanced Telescopes 124 18.6 Summary 125
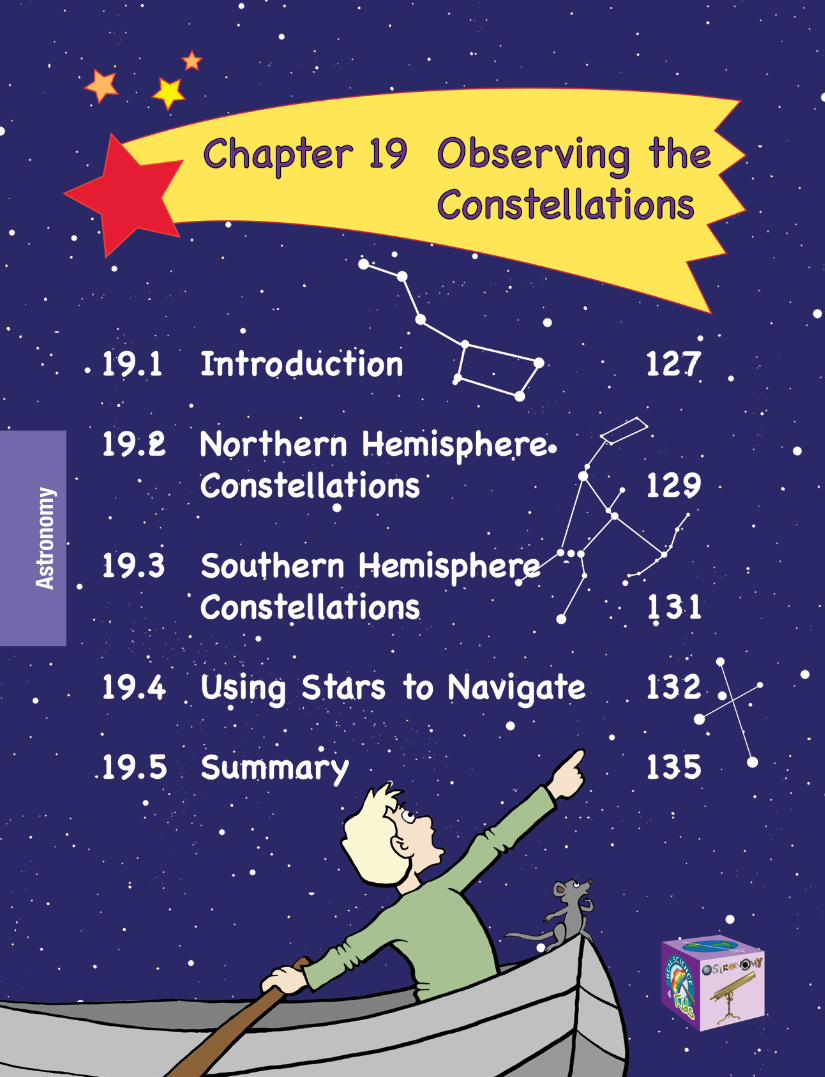
CHAPTER 19 OBSERVING CONSTELLATIONS 126 19.1 Introduction 127 19.2 Northern Hemisphere Constellations 129 19.3 Southern Hemisphere Constellations 131 19.4 Using Stars to Navigate 132 19.5 Summary 135
CHAPTER 20 EARTH’S NEIGHBORHOOD 136 20.1 Introduction 137 20.2 Our Solar Neighborhood 137 20.3 Orbits 140 20.4 Why Is Earth Special? 143 20.5 Summary 144
CHAPTER 21 BEYOND THE NEIGHBORHOOD 145 21.1 Introduction 146 21.2 Nearest Star 146 21.3 Brightest Star 148 21.4 Biggest Star 149 21.5 Stars With Planets 150 21.6 Summary 151
Conclusion
CHAPTER 22 PUTTING IT ALL TOGETHER 152 22.1 Tools and Science 153 22.2 Sharing Tools 153 22.3 Working Together 154 22.4 Summary 155
Chemistry

16 Exploring the Building Blocks of Science: Book 2
3.1 IntroductionWhen atoms and molecules meet, they can trade places, join together, or separate from each other. A chemical reaction happens when atoms or molecules meet and any of these changes take place. A chemical reaction is one of the events chemists measure with tools.
In this chapter we will look at some special kinds of chemical reactions. These reactions are called acid-base reactions. Acid-base reactions are easy for chemists to study with some basic tools.
3.2 Acids and Bases Are DifferentHave you ever noticed that when you bite a lemon it tastes sour and makes your cheeks pucker?
Have you ever tasted mineral water or baking soda water? They are not sour like a lemon. They are bitter or salty.
Chemistry — Chapter 3: Acids and Bases 17
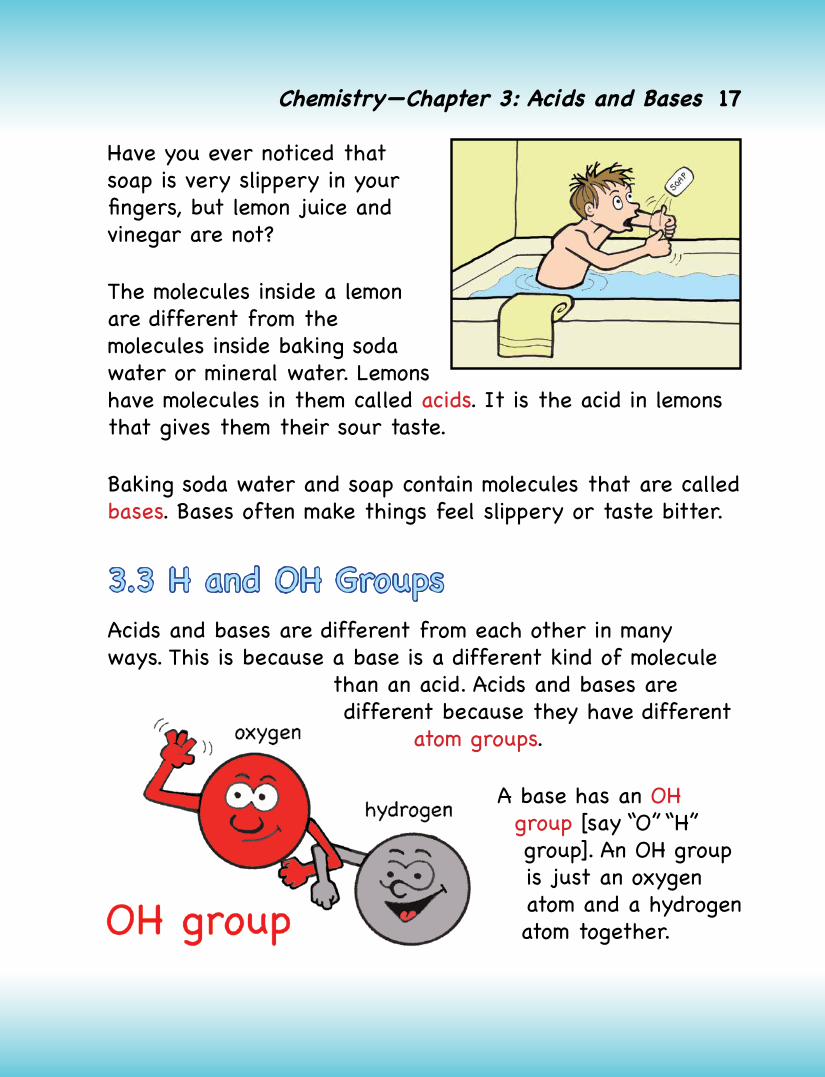
Have you ever noticed that soap is very slippery in your fingers, but lemon juice and vinegar are not?
The molecules inside a lemon are different from the molecules inside baking soda water or mineral water. Lemons have molecules in them called acids. It is the acid in lemons that gives them their sour taste.
Baking soda water and soap contain molecules that are called bases. Bases often make things feel slippery or taste bitter.
3.3 H and OH GroupsAcids and bases are different from each other in many ways. This is because a base is a different kind of molecule
than an acid. Acids and bases are different because they have different
atom groups.
A base has an OH group [say “O” “H” group]. An OH group is just an oxygen atom and a hydrogen atom together.

18 Exploring the Building Blocks of Science: Book 2
Most common acids have an H group [say “H” group]. An H group is just a hydrogen atom.
We can see in the next picture that sodium hydroxide (a base) has an OH group and hydrogen chloride (an acid) has an H group.
Chemistry — Chapter 3: Acids and Bases 19
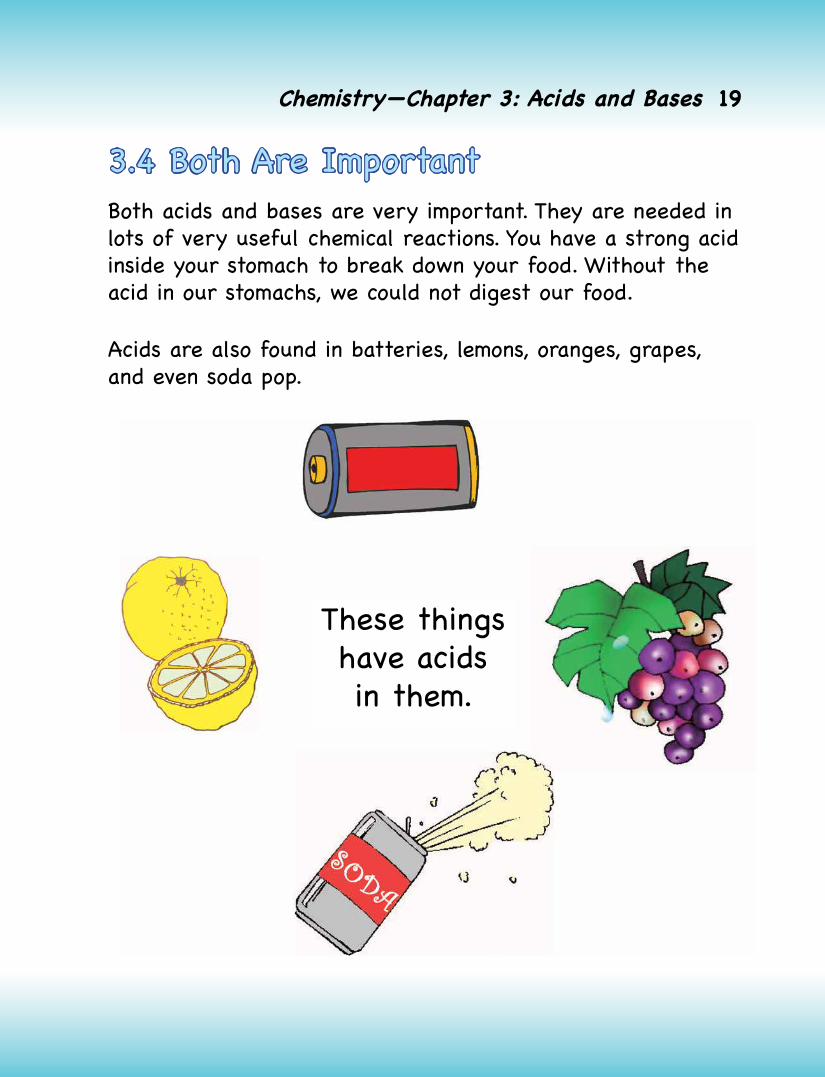
3.4 Both Are ImportantBoth acids and bases are very important. They are needed in lots of very useful chemical reactions. You have a strong acid inside your stomach to break down your food. Without the acid in our stomachs, we could not digest our food.
Acids are also found in batteries, lemons, oranges, grapes, and even soda pop.
These things have acids in them.

20 Exploring the Building Blocks of Science: Book 2
Bases are found in lots of cleaners, like window cleaner, bathroom cleaner, and soap. They are also found in some foods like bananas and dates. Bases are even used to make your stomach feel better! We’ll see why in the next chapter.
These things have bases in them.

Chemistry — Chapter 3: Acids and Bases 21
3.5 Observing Acids and BasesChemists can use basic tools to see an acid-base reaction. Some acids and bases give off heat or explode when they react. Other times we cannot tell when an acid-base reaction happens. When we can’t see an acid-base reaction, we can put something into the acid-base mixture that will show us that the reaction is taking place. This “something” is called an indicator because it indicates, or tells us, something is happening or has happened.
We use different kinds of indicators all the time. Stop lights indicate when we can go or when we should stop. When we turn on the oven, an indicator tells us when it is hot enough. A thermometer is an indicator. It can tell when your body has a fever. Indicators are also used in chemistry.

22 Exploring the Building Blocks of Science: Book 2
An acid-base indicator tells us whether we have an acid or a base. There are different kinds of acid-base indicators. A simple acid-base indicator is red cabbage juice! Red cabbage juice turns pink with acids and green with bases.
3.6 Summary• Acids taste sour.
• Bases taste bitter and are slippery.
• Acids have an H group and bases have an OH group.
• Acids and bases are found everywhere — in batteries, in your stomach, in household cleaners, and even in bananas and lemons!
• An acid-base indicator tells us whether we have an acid or a base.

Biol
ogy

Biology — Chapter 7: Protists Move 45
7.1 Tiny CreaturesHow tiny is the smallest living creature? If you look at yourself, you might think you are pretty small compared to
your dad, but are you the smallest living creature? No! You are not as small as
your cat. The cat is smaller than you are. But is a cat the smallest living thing? No. In fact, the cat chases (and sometimes eats) moths or
birds or mice that are smaller than the cat.
How about a moth? Do you think the moth is the
smallest living creature?
No. A ladybug is smaller than a moth, and an ant is smaller than
a ladybug, and a gnat is even
smaller than an ant. So how small is the smallest living creature?

46 Exploring the Building Blocks of Science: Book 2
The smallest living creatures are so small that you can’t even see them when looking with just your eyes. There is a whole world of tiny creatures that you can’t see that live in ponds, in oceans, in dirt, and even inside of you!
One type of tiny creature you can’t see with only your eyes is called a protist (also called a protozoan). A protist is a small creature that can do many of the things bigger creatures (like you) can do. Protists can crawl and swim and eat and sense light. Protists are very small but can do amazing things.
To observe protozoa (protists), you have to use a microscope. The first person to see protists was a man from Holland named Anton van Leeuwenhoek. With his microscope he saw little animals in pond water. He also found them in his mouth!

Biology — Chapter 7: Protists Move 47
7.2 Different Kinds of Tiny CreaturesThere are many different kinds of protists that can be seen only with a microscope. But how do you know what kinds of creatures you are seeing?
When scientists sort living things into groups, they are easier to study. The kingdom Protista is a very large group with over sixty thousand different kinds of protists. Because it is such a large group, scientists need to sort the protists into even smaller groups.
7.3 Sorting ProtistsOne way to sort protists into smaller groups is to notice the different ways protists move and then group them by how they move.
One way protists move is to swim with a long tail called a flagellum. Some protists, like euglena, have a flagellum. Protists that move by using a flagellum are called Flagellates.

48 Exploring the Building Blocks of Science: Book 2
Another way protists move is by using small hair-like features called cilia. Cilia beat fast in the water, making the protists move forwards and backwards and sideways. A paramecium uses cilia to move. Protozoa that move with cilia are called Ciliates.
Some protists move by crawling. Amoebas are protists that use false feet called pseudopods to crawl from one place to another. Protists that use false feet to move are called Amoeboids.

Biology — Chapter 7: Protists Move 49
7.4 Summary
• There are many small creatures that we cannot see by using just our eyes.
• Scientists use a microscope to see small creatures.
• Protists (also called protozoa) are small creatures that can be found in pond water and ocean water.
• One way scientists sort protists is by how they move. Three groups of protists are Flagellates, Ciliates, and Amoeboids.
• Many protists move by using a flagellum, by using cilia, or by using pseudopods (false feet) to crawl.
Astro
nom
y

Astronomy — Chapter 19: Observing the Constellations 127
19.1 IntroductionNo matter where you are on Earth, if you look up to the sky on a clear, dark night, you can see stars. If you are far away from city lights, it looks like the sky is filled with thousands and thousands of stars. There are so many stars that it is difficult to know the name of each star in the sky.
Even without using a telescope, modern satellites, or space probes, we can learn something about the cosmos by observing stars that form constellations. A constellation is a group of stars that together appear to form a shape or image in the sky. By grouping stars into constellations, a lot can be learned about the sky without knowing all the individual stars.
Some common constellations easily observed in the Northern Hemisphere include the Big Dipper and Cassiopeia. Favorite Southern Hemisphere constellations include the Archer and the Whale.
128 Exploring the Building Blocks of Science: Book 2
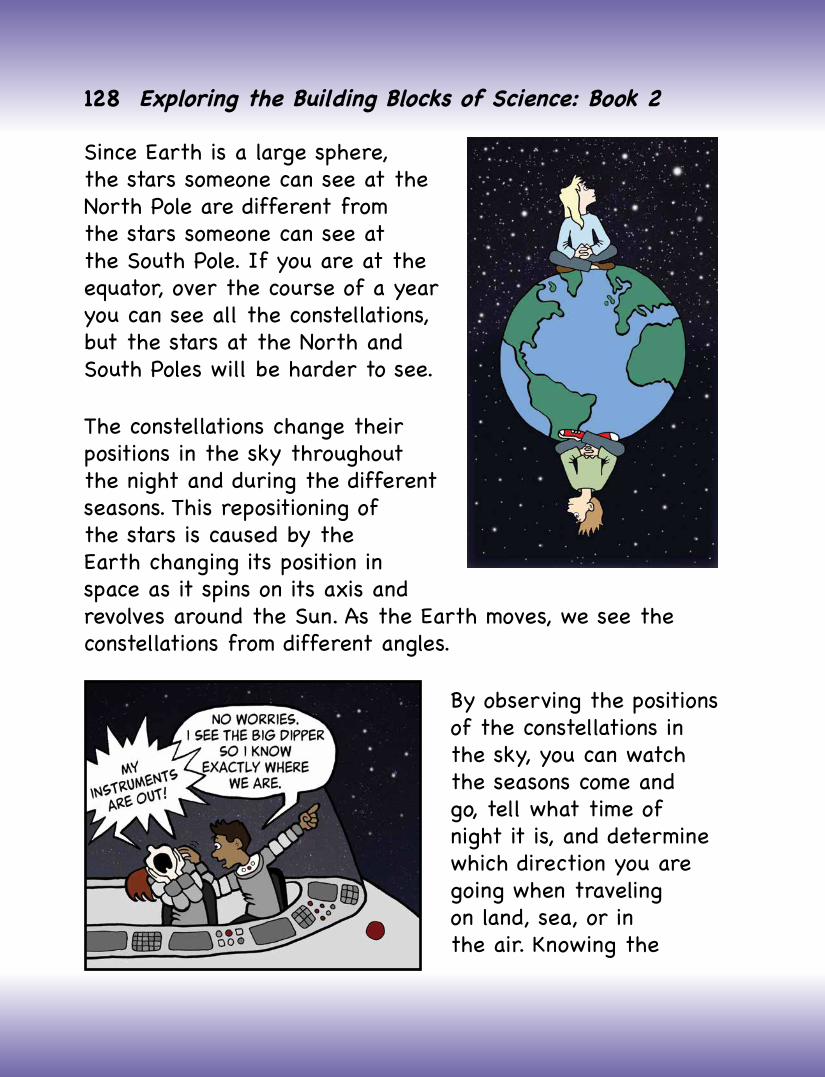
Since Earth is a large sphere, the stars someone can see at the North Pole are different from the stars someone can see at the South Pole. If you are at the equator, over the course of a year you can see all the constellations, but the stars at the North and South Poles will be harder to see.
The constellations change their positions in the sky throughout the night and during the different seasons. This repositioning of the stars is caused by the Earth changing its position in space as it spins on its axis and revolves around the Sun. As the Earth moves, we see the constellations from different angles.
By observing the positions of the constellations in the sky, you can watch the seasons come and go, tell what time of night it is, and determine which direction you are going when traveling on land, sea, or in the air. Knowing the

Astronomy — Chapter 19: Observing the Constellations 129
constellations could even help you find your way home if you were taking a trip in outer space!
19.2 Northern Hemisphere ConstellationsIf you live in the Northern Hemisphere there are many constellations you can easily find. A favorite group of stars in the northern sky is called the Big Dipper because its shape looks like a dipper, or ladle. The Big Dipper has 7 stars, three of which form the “handle” and four that form the “bowl” of the dipper. The best time to see The Big Dipper is from February through June.
The Big Dipper can be used to locate the star Polaris, which is also called the North Star. Polaris can be found by imagining a line going between the two stars located at the end of the bowl of the Big Dipper and extending the line to a lone star that has no other stars nearby. This star is Polaris.
Polaris is above the northernmost point of the Earth. Because it is near enough to true north, it can be used as a navigational marker. If you were on a boat sailing from Maine to England on a clear night, you could use Polaris to keep your boat on track.
The Big Dipper
Polaris

130 Exploring the Building Blocks of Science: Book 2
Another interesting constellation to find in the Northern Hemisphere is the Great Bear. The Great Bear includes the Big Dipper. To locate the Great Bear, first find the Big Dipper, and while keeping the Big Dipper in view, expand your gaze to include the three pairs of stars that form the Bear’s
paws. Once you have these stars and the Big Dipper in view, you can see the rest of the stars that make up the Great Bear. The best time to see the Great Bear is from February through June.
Another favorite constellation is Orion the Hunter. The stars that make up Orion are bright and beautiful which makes it easy to pick out this constellation. A good way to find Orion is to find his belt. Orion’s belt is made of three bright stars close together in a straight row. From there you can pick out the shield and raised club. The best time to see Orion is December through March.
Big Dipper
The Great Bear
Orion

Astronomy — Chapter 19: Observing the Constellations 131
19.3 Southern Hemisphere ConstellationsIf you live in the Southern Hemisphere, there are lots of fun constellations you can find. One of the largest southern constellations is the Whale. The stars that make up the Whale are dim, but because there are fewer stars to observe in this section of the sky, the Whale can be easily seen on a dark night when there is no Moon or city lights.
To find the Whale, first locate the Great Square. As the name suggests, the Great Square is a set of four bright stars that form a square. Once you locate The Great Square, the Whale is easy to spot. Just follow the
line made by the two stars on the side of the Great Square until you see a cluster of 4 to 5 stars. These are the stars that make up the head of the Whale. The best time to see the Whale is October through January.
Great Square
The Whale

132 Exploring the Building Blocks of Science: Book 2
Another favorite constellation in the Southern Hemisphere is Pegasus, the winged horse. Part of the Pegasus constellation includes three of the four stars of the Great Square. These three stars make up the wing of Pegasus which sits on the hind end of the horse. Two little stars
near the hind end make up the tail and the head extends in the opposite direction from the tail. The best time of the year to see Pegasus is from August to October.
19.4 Using Stars to NavigateHow do you find your way to the grocery store? How do you know which street to take to the park? If you need to go to a friend’s house, do you turn to your right, left, or go straight ahead from your front door?
In each of these situations, you are navigating your way from one place to another place. Navigation simply means to make one’s way from one location to another. There are several different techniques people use to navigate.
Great Square
Pegasus

Astronomy — Chapter 19: Observing the Constellations 133
One way to navigate is to use landmarks. If you walk to the grocery store with your parents, you might notice that it is located just across from a park and next to a gas station. The next time you need to go to the grocery store, you can use your knowledge of the park and the gas station as landmarks to guide you to the store. However, if you were far out to sea where there are no landmarks, how would you find your way home?
This was a problem for early sailors. When traveling along the coast, they could use landmarks to find their way, but what happened when they traveled far enough out in the ocean that they could no longer see the shore? Early sailors discovered that they could use the stars as a way to navigate across the sea. Using the stars is

134 Exploring the Building Blocks of Science: Book 2
a great way to find your way, whether you are on land, sea, in an airplane or even in space!
One easy star to use for navigation in the Northern Hemisphere is Polaris. Unlike other stars, Polaris actually stays in the same place in the sky and doesn’t appear to move. The north pole of Earth’s axis points almost directly at Polaris. If you can find Polaris, you can tell which way is north, and once you locate north, you can find south, east, and west.
In the Southern Hemisphere people use the Southern Cross constellation for navigation. Although Earth’s axis at the South Pole doesn’t point directly at an individual star, the two stars that form the long part of the constellation can be used to find south.
Southern Cross

Astronomy — Chapter 19: Observing the Constellations 135
19.5 Summary
• A constellation is a group of stars that together form a particular shape.
• Common constellations in the Northern Hemisphere include the Big Dipper, the Great Bear, and Orion.
• Common constellations in the Southern Hemisphere include the Whale and Pegasus, both of which can be located by finding the Great Square.
• Stars can be used to navigate, or find the way, from one location to another.

LABORATORY NOTEBOOKLABORATORY NOTEBOOK

Illustrations: Janet Moneymaker
Copyright © 2014 Gravitas Publications, Inc.
All rights reserved. No part of this publication may be reproduced, stored in a retrieval system, or transmitted, in any form or by any means, electronic, mechanical, photocopying, recording, or otherwise, without prior written permission from the publisher. The only exception is that this publication may be photocopied without permission from the publisher if the copies are to be used only for teaching purposes within a family.
Exploring the Building Blocks of Science Book 2 Laboratory NotebookISBN 978-1-936114-35-1
Published by Gravitas Publications Inc.www.realscience4kids.comwww.gravitaspublications.com

ContentsINTRODUCTIONExperiment 1 Can You See? 1
CHEMISTRYExperiment 2 The Clay Crucible 8Experiment 3 Sour or Not Sour? 15Experiment 4 Pink and Green Together 27Experiment 5 Salty or Sweet? 34
BIOLOGYExperiment 6 Taking Notes 46Experiment 7 Little Creatures Move 60Experiment 8 Little Creature Eat 72Experiment 9 Oldy Moldy 84
PHYSICSExperiment 10 Measuring Time 92Experiment 1 1 Rolling Marbles 100Experiment 12 Speed It Up! 108Experiment 13 Keep the Train on Its Tracks! 113
GEOLOGYExperiment 14 Smashing Hammers 124Experiment 15 All the Parts 141Experiment 16 Edible Earth Parfait 152Experiment 17 What’s the Weather? 158
ASTRONOMYExperiment 18 Building a Telescope 170Experiment 19 Tracking a Constellation 179Experiment 20 Modeling an Orbit 189Experiment 21 Brightest or Closest? 197
CONCLUSIONExperiment 22 Teamwork 208
CH
EMIST
RY
○ ○○◯
○○
○
BIO
LOG
YPH
YSIC
S⚡⚡⚡⚡⚡⚡⚡
GEO
LOG
Y
VVVV
VVVV
AST
RO
NO
MY
☆☆☼
☆☆

Experiment 3
Sour or Not Sour?

○○○◯○○○○○○◯○○○ ○○○◯○○○ ○○○◯○○○ ○○○◯○○○ ○○○◯○○○ ○○○◯○○○ ○○○◯○○○ ○○○ ◯○○○ ○○○ ○○○◯○○○○○○◯○○○ ○○○◯○○○ ○○○◯○○○ ○○○◯○○○ ○○○◯○○○ ○○○◯○○○
16 Exploring the Building Blocks of Science Laboratory Notebook Book 2
CH
EMIS
TR
Y○○○◯○○○
I. Think About It
Think about each of the liquids listed in the chart below and whether it would taste “sour” or “not sour.” Use a check mark to record your answer.
Liquid Sour Not Sour
white grape juice
milk
lemon juice
grapefruit juice
mineral water
antacid
distilled water
baking soda water

○○○◯○○○○○○◯○○○ ○○○◯○○○ ○○○◯○○○ ○○○◯○○○ ○○○◯○○○ ○○○◯○○○ ○○○◯○○○ ○○○ ◯○○○ ○○○ ○○○◯○○○○○○◯○○○ ○○○◯○○○ ○○○◯○○○ ○○○◯○○○ ○○○◯○○○ ○○○◯○○○
Chemistry — Experiment 3: Sour or Not Sour? 17
CH
EMIST
RY
○ ○○◯
○○○
II. Observe It
Tear out the following pages labeled “SOUR” and “NOT SOUR,” and place them on a table. Next, taste the liquids and record which are sour and which are not sour. After you test each liquid, place the cup on the paper that has the label that matches the taste.
Liquid Sour Not Sour
white grape juice
milk
lemon juice
grapefruit juice
mineral water
antacid
distilled water
baking soda water

○○○◯○○○○○○◯○○○ ○○○◯○○○ ○○○◯○○○ ○○○◯○○○ ○○○◯○○○ ○○○◯○○○ ○○○◯○○○ ○○○ ◯○○○ ○○○ ○○○◯○○○○○○◯○○○ ○○○◯○○○ ○○○◯○○○ ○○○◯○○○ ○○○◯○○○ ○○○◯○○○
18 Exploring the Building Blocks of Science Laboratory Notebook Book 2
CH
EMIS
TR
Y○○○◯○○○

○○○◯○○○○○○◯○○○ ○○○◯○○○ ○○○◯○○○ ○○○◯○○○ ○○○◯○○○ ○○○◯○○○ ○○○◯○○○ ○○○ ◯○○○ ○○○ ○○○◯○○○○○○◯○○○ ○○○◯○○○ ○○○◯○○○ ○○○◯○○○ ○○○◯○○○ ○○○◯○○○
Chemistry — Experiment 3: Sour or Not Sour? 19
CH
EMIST
RY
○ ○○◯
○○○
SOUR

○○○◯○○○○○○◯○○○ ○○○◯○○○ ○○○◯○○○ ○○○◯○○○ ○○○◯○○○ ○○○◯○○○ ○○○◯○○○ ○○○ ◯○○○ ○○○ ○○○◯○○○○○○◯○○○ ○○○◯○○○ ○○○◯○○○ ○○○◯○○○ ○○○◯○○○ ○○○◯○○○
20 Exploring the Building Blocks of Science Laboratory Notebook Book 2
CH
EMIS
TR
Y○○○◯○○○

○○○◯○○○○○○◯○○○ ○○○◯○○○ ○○○◯○○○ ○○○◯○○○ ○○○◯○○○ ○○○◯○○○ ○○○◯○○○ ○○○ ◯○○○ ○○○ ○○○◯○○○○○○◯○○○ ○○○◯○○○ ○○○◯○○○ ○○○◯○○○ ○○○◯○○○ ○○○◯○○○
Chemistry — Experiment 3: Sour or Not Sour? 21
CH
EMIST
RY
○ ○○◯
○○○
NOT SOUR(sweet or salty)

○○○◯○○○○○○◯○○○ ○○○◯○○○ ○○○◯○○○ ○○○◯○○○ ○○○◯○○○ ○○○◯○○○ ○○○◯○○○ ○○○ ◯○○○ ○○○ ○○○◯○○○○○○◯○○○ ○○○◯○○○ ○○○◯○○○ ○○○◯○○○ ○○○◯○○○ ○○○◯○○○
22 Exploring the Building Blocks of Science Laboratory Notebook Book 2
CH
EMIS
TR
Y○○○◯○○○

○○○◯○○○○○○◯○○○ ○○○◯○○○ ○○○◯○○○ ○○○◯○○○ ○○○◯○○○ ○○○◯○○○ ○○○◯○○○ ○○○ ◯○○○ ○○○ ○○○◯○○○○○○◯○○○ ○○○◯○○○ ○○○◯○○○ ○○○◯○○○ ○○○◯○○○ ○○○◯○○○
Chemistry — Experiment 3: Sour or Not Sour? 23
CH
EMIST
RY
○ ○○◯
○○○
Liquid Color change?(yes or no)
What is the color?
white grape juice
milk
lemon juice
grapefruit juice
mineral water
antacid
distilled water
baking soda water
Next, pour 60 milliliters (1/4 cup) of red cabbage juice into a plastic cup that contains a liquid you tasted.
Observe what happens. Does the red cabbage juice change color? Record your observations below.
Repeat Steps - for each of the liquids you tasted.
○○○◯○○○○○○◯○○○ ○○○◯○○○ ○○○◯○○○ ○○○◯○○○ ○○○◯○○○ ○○○◯○○○ ○○○◯○○○ ○○○ ◯○○○ ○○○ ○○○◯○○○○○○◯○○○ ○○○◯○○○ ○○○◯○○○ ○○○◯○○○ ○○○◯○○○ ○○○◯○○○
24 Exploring the Building Blocks of Science Laboratory Notebook Book 2
CH
EMIS
TR
Y○○○◯○○○
III. What Did You Discover?
Which liquids were sour?
Which liquids were not sour?
When you added the cabbage juice to the “sour” liquids, what color did the cabbage juice become?
When you added the cabbage juice to the “not sour” liquids, what color did the cabbage juice become?
Why do you think the “sour” liquids and “not sour” liquids turned the cabbage juice different colors?
If you added cabbage juice to a drink and it turned pink, do you think that drink would taste sour?

○○○◯○○○○○○◯○○○ ○○○◯○○○ ○○○◯○○○ ○○○◯○○○ ○○○◯○○○ ○○○◯○○○ ○○○◯○○○ ○○○ ◯○○○ ○○○ ○○○◯○○○○○○◯○○○ ○○○◯○○○ ○○○◯○○○ ○○○◯○○○ ○○○◯○○○ ○○○◯○○○
Chemistry — Experiment 3: Sour or Not Sour? 25
CH
EMIST
RY
○ ○○◯
○○○
IV. Why?
You may have observed that the liquids that were very sour, or even a little bit sour, turned the cabbage juice pink when it was added. You may also have noticed that the liquids that were not sour, and maybe tasted bitter or salty, turned the cabbage juice green when it was added. You may have noticed that milk and water didn’t change the color of the cabbage juice, but instead the cabbage juice turned the milk and water purple. Do you know why?
The red cabbage juice is called an indicator. In chemistry an indicator is something that tests a substance. In this case, the red cabbage juice is an indicator that tests whether a liquid is an acid or a base. The sour liquids are acids, and the bitter or salty liquids are bases. Milk and water don’t change the color of the red cabbage juice indicator at all, so they are neither acids nor bases. They are called neutral.
An acid will always change the color of the red cabbage juice indicator to pink, and a base will always change the color of the red cabbage juice indicator to green. A neutral liquid, like milk or water, will never change the color of the red cabbage juice indicator.
This is why the liquids turned pink, green, or purple when the red cabbage juice was added!

○○○◯○○○○○○◯○○○ ○○○◯○○○ ○○○◯○○○ ○○○◯○○○ ○○○◯○○○ ○○○◯○○○ ○○○◯○○○ ○○○ ◯○○○ ○○○ ○○○◯○○○○○○◯○○○ ○○○◯○○○ ○○○◯○○○ ○○○◯○○○ ○○○◯○○○ ○○○◯○○○
26 Exploring the Building Blocks of Science Laboratory Notebook Book 2
CH
EMIS
TR
Y○○○◯○○○
V. Just For Fun
Look around for some other liquids you can test with the red cabbage juice indicator. Observe whether the cabbage juice changes color when added to the liquids.
Do not taste these liquids, but decide if each is an acid, a base, or neutral according to the color change. Record your observations.
LIQUID ACID, BASE, OR NEUTRAL

Experiment 7
Little Creatures Move

Biology — Experiment 7: Little Creatures Move 61
BIO
LOG
Y
Introduction
In this experiment you will take a look at some tiny creatures that are too small to see when you use only your eyes.
I. Think About It
If you look at some pond water with a microscope, what do you think you will see? Draw what you think you will see.

62 Exploring the Building Blocks of Science Laboratory Notebook Book 2
BIO
LOG
Y
II. Observe It
Take some pond water and put it under the microscope. Draw what you see.

Biology — Experiment 7: Little Creatures Move 63
BIO
LOG
Y
See if you can observe moving creatures that are different from each other. Draw one here.

64 Exploring the Building Blocks of Science Laboratory Notebook Book 2
BIO
LOG
Y
Draw a different moving creature here.

Biology — Experiment 7: Little Creatures Move 65
BIO
LOG
Y
Draw a different moving creature here. Note if it moves differently.

66 Exploring the Building Blocks of Science Laboratory Notebook Book 2
BIO
LOG
Y
Draw a different moving creature here. Note if it moves differently.

Biology — Experiment 7: Little Creatures Move 67
BIO
LOG
Y
Are there two creatures that are similar? Draw them here.

68 Exploring the Building Blocks of Science Laboratory Notebook Book 2
BIO
LOG
Y
Are there two creatures that are different? Draw them here.

Biology — Experiment 7: Little Creatures Move 69
BIO
LOG
Y
III. What Did You Discover?
Did the pond water look like you thought it would? Why or why not?
What was the first thing you noticed about the pond water?
Was there anything you did not expect to find in the pond water? Describe it.
How many different creatures did you find?
Did you find two or more that moved in different ways?
Describe your favorite creature. Explain why it is your favorite.

70 Exploring the Building Blocks of Science Laboratory Notebook Book 2
BIO
LOG
Y
IV. Why?
Pond water is full of little creatures. In fact, little creatures are found in soil, in hay, and in oceans and rivers. You might also find unwanted creatures on your toothbrush! Many of these little creatures are called protists (also called protozoa).
There are many different kinds of protists. Many types of protists move by using a large whip-like tail called a flagellum. Other types of protists use small hairs called cilia to move. And still other types of protists crawl using “false feet.”
Using a microscope, you can observe protists move. You might see them move forward and backward. You might see them bump into a piece of food or even bump into each other. You can see them roll and stop and turn and then start moving again.
Protists need to move to find food or escape from danger or find a place to rest, just like you do. Humans have legs to move. If your mom calls you for dinner, you need to get up from reading this book and walk to the table to eat. If you are strolling in the park and a big dog starts barking, you might want to run away as fast as your legs will move. When it gets dark and you are ready for bed, you walk to your room (after using your new protist-free toothbrush on your teeth) to go to sleep. You are designed differently from a protist, but protists can also use their bodies to move just like you do!
Biology — Experiment 7: Little Creatures Move 71
BIO
LOG
Y
What’s In Your Mouth?
V. Just For Fun
Leeuwenhoek looked at organisms in his mouth. What’s in your mouth?
Spit onto a slide and see if you can observe any moving things in your saliva. Draw anything you discover.

Experiment 19
Tracking a Constellation

180 Exploring the Building Blocks of Science Laboratory Notebook Book 2
☆☆☼☆☆☼☆☆☆☼☆☆☼☆☆☆☼☆☆☼☆☆☆☼☆☆☼☆☆☆ ☼☆☆☼☆☆☆☼☆☆☼☆☆☆☼☆☆☼☆☆☆☼☆☆☼☆☆☆☼
AST
RO
NO
MY
☆☆☼
☆☆
Introduction
Do you think the stars are always in the same position when you look at the sky? Make some observations to find out.
I. Think About It
How many constellations do you think you could find in the night sky?
Do you think they would change position over the course of a single night? Why or why not?
If you were standing on the North Pole could you see the constellations in the Southern Hemisphere? Why or why not?
If you were standing on the South Pole could you see the Northern Hemisphere constellations? Why or why not?

Astronomy — Experiment 19: Tracking a Constellation 181
☆☆☼☆☆☼☆☆☆☼☆☆☼☆☆☆☼☆☆☼☆☆☆☼☆☆☼☆☆☆ ☼☆☆☼☆☆☆☼☆☆☼☆☆☆☼☆☆☼☆☆☆☼☆☆☼☆☆☆☼
AST
RO
NO
MY
☆☆☼
☆☆
II. Observe It
Pick your favorite constellation to observe for one week.
On the first night of the experiment, go outside and look for your constellation. If you don’t see it the first time out, you can go outside for several nights in a row until you find it.
Note the time, day, and month you first see your constellation.
Once you find your constellation, record where in the sky you found it. Was it directly above you? Lower in the sky? Towards the east or west?
Constellation
Time
Day
Month
Position of the Constellation

182 Exploring the Building Blocks of Science Laboratory Notebook Book 2
☆☆☼☆☆☼☆☆☆☼☆☆☼☆☆☆☼☆☆☼☆☆☆☼☆☆☼☆☆☆ ☼☆☆☼☆☆☆☼☆☆☼☆☆☆☼☆☆☼☆☆☆☼☆☆☼☆☆☆☼
AST
RO
NO
MY
☆☆☼
☆☆
Follow your constellation by observing it at the same time every day for six more days. Note if it changes location. Record your observations in the following boxes.
Observations Date
Observations Date
Observations Date

Astronomy — Experiment 19: Tracking a Constellation 183
☆☆☼☆☆☼☆☆☆☼☆☆☼☆☆☆☼☆☆☼☆☆☆☼☆☆☼☆☆☆ ☼☆☆☼☆☆☆☼☆☆☼☆☆☆☼☆☆☼☆☆☆☼☆☆☼☆☆☆☼
AST
RO
NO
MY
☆☆☼
☆☆
Notes
Observations Date
Observations Date
Observations Date

184 Exploring the Building Blocks of Science Laboratory Notebook Book 2
☆☆☼☆☆☼☆☆☆☼☆☆☼☆☆☆☼☆☆☼☆☆☆☼☆☆☼☆☆☆ ☼☆☆☼☆☆☆☼☆☆☼☆☆☆☼☆☆☼☆☆☆☼☆☆☼☆☆☆☼
AST
RO
NO
MY
☆☆☼
☆☆
III. What Did You Discover?
What is the name of your favorite constellation?
What was the day, time, and month that you first observed your favorite constellation?
What was the season? (summer, spring, fall, or winter?)
How easy or difficult was it to find your constellation? Why?
How easy or difficult was it to follow your constellation for a week? Why?
During that week, did your constellation move?

Astronomy — Experiment 19: Tracking a Constellation 185
☆☆☼☆☆☼☆☆☆☼☆☆☼☆☆☆☼☆☆☼☆☆☆☼☆☆☼☆☆☆ ☼☆☆☼☆☆☆☼☆☆☼☆☆☆☼☆☆☼☆☆☆☼☆☆☼☆☆☆☼
AST
RO
NO
MY
☆☆☼
☆☆
IV. Why?
Seasonal Movement of Constellations
In this experiment you observed your favorite constellation at the same time each night. You might have discovered that the constellation’s position in the sky changed from one night to the next. This occurs because as the Earth orbits the Sun, Earth’s position relative to the constellations changes. Each night you are seeing the constellations from a slightly different location in space. The night sky changes during the course of the year as Earth orbits the Sun and changes its position in space.
Try this experiment. Wait a month. Then go outside at the same time you did when viewing the constellation for a week. Look for the constellation. How much has it moved?
Nightly Movement of Constellations
With the exception of Polaris, the North Star, all of the stars and constellations appear to move in the sky during the course of a single night. This is due to Earth’s rotation on its axis. As the place where you are located moves around Earth’s axis during the night, you see the constellations from different angles. This makes it appear that the constellations are moving through the sky, but actually you are moving. This is similar to the way the Sun appears to move around the Earth. It is really the Earth moving around its axis that causes the Sun’s change of position above a particular location on Earth’s surface.

186 Exploring the Building Blocks of Science Laboratory Notebook Book 2
☆☆☼☆☆☼☆☆☆☼☆☆☼☆☆☆☼☆☆☼☆☆☆☼☆☆☼☆☆☆ ☼☆☆☼☆☆☆☼☆☆☼☆☆☆☼☆☆☼☆☆☆☼☆☆☼☆☆☆☼
AST
RO
NO
MY
☆☆☼
☆☆
V. Just For Fun
Constellations go back to ancient times when people looked at the night sky and noticed groups of stars that reminded them of the shapes of people, animals, and other objects.
For this experiment look at clouds in the sky in the daytime. What do their shapes look like? You may want to lie on your back in the grass while performing this experiment. If there aren’t any clouds around, look for a textured surface (like a wall or rock cliff) and see what shapes you can find there.
Once you’ve found a shape that interests you, draw a picture of it and write a short story about it.
What I See — The Drawing

Astronomy — Experiment 19: Tracking a Constellation 187
☆☆☼☆☆☼☆☆☆☼☆☆☼☆☆☆☼☆☆☼☆☆☆☼☆☆☼☆☆☆ ☼☆☆☼☆☆☆☼☆☆☼☆☆☆☼☆☆☼☆☆☆☼☆☆☼☆☆☆☼
AST
RO
NO
MY
☆☆☼
☆☆
What I See — The Story

TEACHER’S MANUAL

Copyright © 2014 Gravitas Publications, Inc.
All rights reserved. No part of this publication may be reproduced, stored in a retrieval system, or transmitted, in any form or by any means, electronic, mechanical, photocopying, recording, or otherwise, without prior written permission from the publisher. The only exception is that this publication may be photocopied without permission from the publisher if the copies are to be used only for teaching purposes within a family.
Exploring the Building Blocks of Science Book 2 Teacher’s ManualISBN 978-1-936114-36-8
Published by Gravitas Publications Inc.www.realscience4kids.comwww.gravitaspublications.com

Exploring the Building Blocks of Science Teacher’s Manual Book 2 iii
A Note From the AuthorThis curriculum is designed for elementary level students and provides an introduction to the scientific disciplines of chemistry, biology, physics, geology, and astronomy. Exploring the Building Blocks of Science Book 2 Laboratory Notebook accompanies the Building Blocks of Science Book 2 Student Textbook. Together, both provide students with basic science concepts needed for developing a solid framework for real science investigation. The Laboratory Notebook contains 44 experiments—two experiments for each chapter of the Student Textbook. These experiments allow students to further explore concepts presented in the Student Textbook. This teacher’s manual will help you guide students through laboratory experiments designed to help students develop the skills needed for the first step in the scientific method — making good observations.
There are several sections in each chapter of the Laboratory Notebook. The section called Think About It provides questions to help students develop critical thinking skills and spark their imagination. The Observe It section helps students explore how to make good observations. In every chapter there is a What Did You Discover? section that gives the students an opportunity to summarize the observations they have made. A section called Why? provides a short explanation of what students may or may not have observed. And finally, in each chapter an additional experiment is presented in Just For Fun.
The experiments take up to 1 hour. The materials needed for each experiment are listed on the following pages and also at the beginning of each experiment.
Enjoy!
Rebecca W. Keller, PhD

Materials at a Glance
Experiment 7
Experiment 8
Experiment 9
Experiment 10
Experiment 11
microscope with a 10x or 20x objective lens (look online for sources such as Carolina Biological Supply)1
plastic microscope slideseye dropperpond water or protozoa
kit 1
Protists (protozoa) can also be observed in hay water. To make hay water, cover a clump of dry hay with water and let it stand for several days at room temperature. Add water as needed.
(see Experiment 7)small piece of chocolate
Optionalbaker’s yeastEosin Y stain2
distilled water
6-8 sealable plastic bagswaterproof disposable
glovespiece of newspaper or
plastic2 pieces of fruit2-3 pieces of bread
(works best if bread does not have preservatives)
marking penwater
Optionalcolored pencils
clock or stopwatch 1 small glass marble1 large glass marble
Experiment 1
Experiment 3
Experiment 4
Experiment 5
Experiment 6
magnifying glassbutterfly or bug’s wing
(or substitute a leaf, flower, piece of wood, or rock)
colored pencilsmicroscope (or
additional object to observe with a magnifying glass)
12 (or more) clear plastic cups
measuring cupmeasuring spoonsmarking penone head of red cabbageknifecooking pot, largefood items:
• distilled water, 1.25- 1.75 liters (5-7 c.)• white grape juice, 60 ml (¼ cup)• milk, 60 ml (¼ cup)• lemon juice, 60 ml (¼ cup)• grapefruit juice, 60 ml (¼ cup)• mineral water, 60 ml (¼ cup)
antacid tablets—3 extra-strength unflavored white Tums
baking soda, 5 ml (1 tsp.)other substances (see Just
For Fun section)Optionalsmall plastic bagwooden mallet or
other hard object for crushing antacids
18 or more clear plastic cups
measuring cupmeasuring spoonsmarking penleftover red cabbage
juice from Experiment 3 or one head of red cabbage
food items, approx 300 ml (1¼ c) each:• vinegar• lemon juice• mineral water• distilled water
(if you need to make red cabbage juice, you will need 1.5 liters more)
baking soda, 25 ml (5 tsp.) or more
antacid tablets, 5 or more (try Tums plain, white, extra strength)
substances of students’ choice to mix together
the following food items: • marshmallows (2-3) • ripe banana • green banana • pretzels or salty crackers, several • raw potato • cooked potato • other food items
blindfold
magnifying glasscolored pencils
Experiment 2
salt, 15 ml (1 Tbsp.) water, 237 ml (1 cup) brick of modeling clay,
1 or 2sugar
1 As of this writing, the following materials are available from Home Science Tools, www.hometrainingtools.com: plastic microscope slides, MS-SLIDSPL or MS-SLPL144, Basic Protozoa Set, LD-PROBASC
2 Eosin Y stain, CH-EOSIN

Experiment 12
Experiment 13
Experiment 14
Experiment 15
Experiment 16
stopwatch or clockan area to run initems for marking
the beginning and ending of the running distance
4 plastic or Styrofoam cups with the mouth larger than the base
2 long poles (dowels work well or any two long sticks that are the same thickness from end to end)
tapea cylinder, 10-13 cm
long (4-5 inches) [such as a pencil, a dowel, a cylindrical block, or a cylindrical drinking glass that is not tapered; a paper towel tube may be used if it is filled with sand and the ends taped]
chalk
plastic hammerregular metal hammer3 pieces of banana3 hardboiled eggs in
the shell3 raw potato halves3 rocks of the same
type and size (students can collect these)
safety glasses
Optional8 pieces of papermarking pen
a toy, small music box, or toy car that can be taken apart
a second similar item that can be taken apart
screwdriversmall hammerother tools as needed
Note: The objects used in this experiment may not work again.
2 clear, tall glasses (drinking or parfait glasses)
spoon (1 or more)3-6 student-chosen food
items for building a parfait model of Earth’s layers (such as: graham crackers, peanut brittle, cookies, hot fudge, Jell-O, pudding, ice cream, cream cheese, cherry, nut, jelly bean. etc.)
student-chosen inedible items that can be used to build a parfait model of Earth’s layers (such as: rocks, mud, dirt, clay, dog or cat food, Legos, etc.)
colored pencils
Experiment 17
Experiment 18
Experiment 19
Experiment 21
Experiment 22
colored pencilsoutdoor thermometerhelium-filled balloonstring
colored pencilsclear night skybasketball or other large
object(s)
Telescope materials*empty cardboard paper
towel tube1-2 sheets of card stock
or 1 manila file folder cut in half
tape2 lenses with different
focal lengths from Home Science Tools: Item# OP-LEN4x15 and Item# OP-LEN4x50 http://www.
hometrainingtools.com
* Alternatively, you can look online for a telescope kit
colored pencilsnight skydaytime sky or textured
surface
Optionalbook or online
information about constellations
globe or basketball
flashlight with new batteries
glow sticks in assorted colors may be found in places such as Walmart, toy stores, and online
10 small pieces of paperbox for the paper pieces2 beakers or jars:
• one with 118 ml (½ cup) of vinegar • one with 118 ml (½ cup) of baking soda and water (5 ml [1 tsp] baking soda in 118 ml (½ cup) water)
magnifying glass2 balls of different
weights (e.g., a glass marble and a metal marble, a plastic ball and a baseball)
rock hammer or regular metal hammer
safety glasses, 1 pairgarden trowel or large
metal spoon10 pieces of paper 5 pens or pencils4 friends or family
members to help with the experiment
scissors
Experiment 20
Styrofoam ballpick, awl, or other thin,
sharp object to poke a hole through the center of the ball
nylon stringscissors2 or more marbles of
different sizescups that are different
sizes

vi Exploring the Building Blocks of Science Teacher’s Manual Book 2
MaterialsQuantities Needed for All Experiments
Equipment Foods Foods (continued)
basketball or other large object(s)beakers or jars, 2blindfoldcooking pot, largeeye dropperflashlight with new batteriesglasses, safety, 1 pairhammer, plastichammer, regular metal or rock
hammerhammer, smallknifemagnifying glass, 1-2measuring cupmeasuring spoonsmicroscope with a 10x or 20x objective
lens (look online for sources such as Carolina Biological Supply)
microscope slides, plastic 1pick, awl, or other thin, sharp object
to poke a hole through the center of a Styrofoam ball
scissorsscrewdriverspoon (1 or more)stopwatch or clockthermometer, outdoortools, misc. as neededtrowel, garden or large metal spoon
Optionalmallet, wooden, or other hard object for
crushing antacid tablets
antacid tablets—8 or more extra-strength unflavored white Tums
baking soda, 35 ml (7 tsp.) or morebanana, green, 1banana, ripe, 2bread, 2-3 pieces (bread without
preservatives works best)cabbage, red, 1-2 headscabbage juice, red, left over from
Experiment 3 or one head of red cabbage to make new cabbage juice
chocolate, small pieceeggs, hardboiled in shell, 3fruit, 2 piecesgrape juice, white, 60 ml (¼ cup)grapefruit juice, 60 ml (¼ cup)lemon juice, 360 ml (1½ cup)marshmallows (2-3)milk, 60 ml (¼ cup)misc. food itemsmisc. student-chosen food items for
building a parfait model of Earth’s layers (such as: graham crackers, peanut brittle, cookies, hot fudge, Jell-O, pudding, ice cream, cream cheese, cherry, nut, jelly bean. etc.)
potato, cooked, 1potato, raw, 3pretzels or salty crackers, severalsalt, 15 ml (1 Tbsp.)sugarvinegar, 415 ml (1¾c)water, distilled, 1.5-3.5 liters (1.5-3.75
qt) or morewater, mineral, 360 ml (1½ cup)water, tap
Optionalbaker’s yeast
1 As of this writing, the following materials are available from Home Science Tools, www.hometrainingtools.com:plastic microscope slides, MS-SLIDSPL or MS-SLPL144, Basic Protozoa Set, LD-PROBASC

Introduction vii
MaterialsQuantities Needed for All Experiments
Materials Materials (continued) Other
ball, Styrofoamballs of different weights (2), e.g., a
glass marble and a metal marble, a plastic ball and a baseball
balloon, helium-filledbook or online information about
constellationscard stock, 1-2 sheets, or 1 manila file
folder cut in halfchalkclay, modeling, 1-2 brickscolored pencilscups, clear plastic, 30 or morecups, 4 plastic or Styrofoam, with the
mouth larger than the basecups, several of different sizescylinder, 10-13 cm long (4-5 inches)
[such as a pencil, a dowel, a cylindrical block, or a cylindrical drinking glass that is not tapered; a paper towel tube may be used if it is filled with sand and the ends taped]
glasses, 2 clear, tall drinking or parfait glasses
gloves, waterproof disposable gloves, 2 pairs
glow sticks in assorted colors—may be found in places such as Walmart, toy stores, and online
items for marking the beginning and ending of a running distance
items, misc.: student-chosen inedible items to use to build a parfait model of Earth’s layers (such as: rocks, mud, dirt, clay, dog or cat food, Legos, etc.)
lenses (2) with different focal lengths Home Science Tools: Item# OP-LEN4x15 and Item# OP-LEN4x50 http://www.hometrainingtools.com (available as of this writing) * Alternatively, you can look online for a telescope kit
marble, glass, 1 largemarble, glass, 1 smallmarbles, 2 or more of different sizesnewspaper or plastic, 2 piecespaper, 10 small pieces and box to put
them inpaper, 18 sheets or morepaper towel tube, emptypen, markingpencils or pens, 5pencils, coloredplastic bags, sealable, 6-8poles, 2 long (dowels work well or any
two long sticks that are the same thickness from end to end)
rocks, 3 of the same type and size (students can collect these)
string, anystring, nylonsubstances of students’ choice to mix
togethertapetoy, small music box, or toy car that
can be taken apart and a second similar item that can be taken apart (they may not work again)
OptionalEosin Y stain2
globe (world) or basketballobject (additional object to observe
with a magnifying glass)plastic bag, small
area to run inbutterfly or bug’s wing (or substitute a
leaf, flower, piece of wood, or rock)friends or family members (4) to help
with experimentsky, clear nightsky, daytime, or textured surfacesubstances, other (see Just For Fun
section, Experiment 3)water, pond or hay, or protozoa kit 1
Protists (protozoa) can be observed in hay water. To make hay water, cover a clump of dry hay with water and let it stand for several days at room temperature. Add water as needed.
2 As of this writing, the following materials are available from Home Science Tools, www.hometrainingtools.com: Eosin Y stain, CH-EOSIN

ContentsINTRODUCTIONExperiment 1 Can You See? 1
CHEMISTRYExperiment 2 The Clay Crucible 4Experiment 3 Sour or Not Sour? 7Experiment 4 Pink and Green Together 13Experiment 5 Salty or Sweet? 18
BIOLOGYExperiment 6 Taking Notes 21Experiment 7 Little Creatures Move 24Experiment 8 Little Creature Eat 28Experiment 9 Oldy Moldy 32
PHYSICSExperiment 10 Measuring Time 36Experiment 1 1 Rolling Marbles 39Experiment 12 Speed It Up! 44Experiment 13 Keep the Train on Its Tracks 47
GEOLOGYExperiment 14 Smashing Hammers 50Experiment 15 All the Parts 54Experiment 16 Edible Earth Parfait 57Experiment 17 What’s the Weather 60
ASTRONOMYExperiment 18 Building a Telescope 64Experiment 19 Tracking a Constellation 68Experiment 20 Modeling an Orbit 71Experiment 21 Brightest or Closest? 75
CONCLUSIONExperiment 22 Teamwork 79
CH
EMIST
RY
○ ○○◯
○○
○
BIO
LOG
YPH
YSIC
S⚡⚡⚡⚡⚡⚡⚡
GEO
LOG
Y
VVVV
VVVV
AST
RO
NO
MY
☆☆☼
☆☆

Experiment 3
Sour or Not Sour?
Materials Needed
• 12 (or more) clear plastic cups• measuring cup• measuring spoons• marking pen• one head of red cabbage• knife• cooking pot, large• the following food items:
distilled water, 1.25-1.75 liters (5-7 cups) white grape juice, 60 ml (1/4 cup) milk, 60 ml (1/4 cup) lemon juice, 60 ml (1/4 cup) grapefruit juice, 60 ml (1/4 cup) mineral water, 60 ml (1/4 cup) antacid tablets—3 extra-strength unflavored white Tums baking soda, 5 ml (1 teaspoon)
• other substances to test (see Just For Fun section)
Optional
• small plastic bag• wooden mallet or other hard object
for crushing antacid tablets

8 Exploring the Building Blocks of Science Teacher’s Manual Book 2
CH
EMIS
TR
Y○○○◯○○○
Objectives
In this experiment students will begin to explore the properties of acids and bases.
The objectives of this lesson are:
• To have students observe that acids and bases have different properties.• To introduce the concept of indicators — in this experiment, red cabbage juice is used as an
acid-base indicator to determine whether liquids are acids or bases.
Experiment
This experiment requires that students taste both acids and bases. It is relatively easy to find foods that are acidic but much more difficult to find foods that are basic. The only two safe products that we could find that are basic are baking soda and antacids. Most household cleaning products are basic, but these are not listed since they are not safe to taste.
Setup
NOTE: Do not use tap water for this experiment. Use only distilled water or you will not get the correct results.
To do 1 hour before the experiment
Chop or shred the head of red cabbage, and boil it in 1-1.5 liters (4-6 cups) of distilled water for 15 minutes. Remove the cabbage and allow the liquid to cool to room temperature.
Prepare liquids to be tested.
Dissolve the antacid tablets in distilled water. Add three extra-strength unflavored white Tums tablets to 60 milliliters (1/4 cup) of distilled water. Crushing the tablets may help in obtaining the color change of the cabbage juice indicator. To crush them, the tablets can be put in a plastic bag and hit with a hard object, such as a wooden mallet. If this mixture does not change the color, try adding more tablets. Other brands of antacids may or may not work.
To make the baking soda water, add 5 milliliters (1 teaspoon) of baking soda to 60 milliliters (1/4 cup) of distilled water.
Pour 60 milliliters (1/4 cup) of each liquid into a separate clear plastic cup, and using a marking pen, label each cup with the name of its contents.
I. Think About It
Read the text with your students.
Have the students make predictions about which liquids will taste sour and which will not taste sour. Help them mark their predictions in the proper column of the table in their Laboratory Notebook. Their answers may vary.

Chemistry — Experiment 3: Sour or Not Sour? 9
CH
EMIST
RY
○ ○○◯
○○○
II. Observe It
Read this section of the Laboratory Notebook with your students.
Have the students tear out the Laboratory Notebook pages that are labeled “SOUR” and “NOT SOUR” and place them on a table.
Have the students taste each liquid and indicate on the chart in the Laboratory Notebook whether it is sour or not sour. Help them try to distinguish between “sour” and “bitter.” The mineral water and the baking soda water will taste “bad” but not sour. They are bitter or salty. The antacid water will taste sweet. Also, white grape juice may be sweet and not necessarily sour. Let the students decide whether they think it is sour or not sour. After recording each answer, have them place the cup of liquid on either the SOUR or NOT SOUR page, according to the taste.
Their answers may look as follows (answers may vary).
Pour into a measuring cup the red cabbage juice that you made earlier and have the students observe the color of the cabbage juice. Then have them select one of the cups of liquid they tasted and observe the color of that liquid. Next, have them add 60 milliliters (1/4 cup) of red cabbage juice to the liquid.
Ask them whether the color changes or stays the same. What they are looking for is the color change of the cabbage juice. Its natural color is a deep red-purple. It will change to pink, green, or light purple when mixed with the other liquids.
Have the students return the cup to the SOUR or NOT SOUR page they took it from, and have them record their results.
Liquid Sour Not Sour
white grape juice X
milk X
lemon juice X
grapefruit juice X
mineral water X
antacid X
distilled water X
baking soda water X

10 Exploring the Building Blocks of Science Teacher’s Manual Book 2
CH
EMIS
TR
Y○○○◯○○○
Have the students repeat Steps - for each of the liquids they tasted. Expected results are shown in the following chart:
III. What Did You Discover?
Have the students look at the cups that are on the SOUR and NOT SOUR pages. Ask them to observe the colors of the liquids and whether they see similarities or differences between those that are on the same page.
Help the students answer the questions in this section. Example answers follow.
Liquid Color change?(yes or no)
What is the color?
white grape juice yes pink
milk no purple
lemon juice yes pink
grapefruit juice yes pink
mineral water yes/no light purple
antacid yes green
distilled water no purple
baking soda water yes green

Chemistry — Experiment 3: Sour or Not Sour? 11
CH
EMIST
RY
○ ○○◯
○○○
IV. Why?
Read the text with your students.
Discuss this section with the students. Have them think about why some of the liquids turned the red cabbage juice pink and some turned it green. Explain to them that the liquids that turned the cabbage juice pink are called acids, and the liquids that turned the cabbage juice green are called bases.
Explain that red cabbage juice is an indicator, which is anything that points out something to us. For example, a gas gauge in a car could be called an indicator—it tells the level of gas in the tank. The thermostat in a house could be called an indicator—it tells the temperature of the room.
In chemistry the term indicator refers to a chemical that tells you something about other chemicals. Red cabbage juice is an acid-base indicator, telling you whether the liquid is acidic or basic.
Explain that red cabbage juice will always turn pink in acids and will always turn green in bases unless there is something wrong with the indicator. Some liquids, such as milk and water, do not turn the indicator another color. Explain that these liquids are called neutral, and they are neither acids nor bases.
(Answers may vary.)
Which liquids were sour? lemon juice and grapefruit juice
Which liquids were not sour? milk, distilled water, mineral water
When you added the cabbage juice to the “sour” liquids, what color did the cabbage juice become? pink
When you added the cabbage juice to the “not sour” liquids, what color did the cabbage juice become? green or purple
Why do you think the “sour” liquids and “not sour” liquids turned the cabbage juice different colors? They have different types of molecules.
If you added cabbage juice to a drink and it turned pink, do you think that drink would taste sour? yes

12 Exploring the Building Blocks of Science Teacher’s Manual Book 2
CH
EMIS
TR
Y○○○◯○○○
V. Just For Fun
Help the students find some other liquids to test with the red cabbage juice indicator. The students are NOT TO TASTE these liquids, so they can select some things like household cleaners that are not edible. They can also mix a powdered substance into distilled water and test the mixture.
Have the students decide whether the liquid is an acid, a base, or neutral, and help them record their observations.
Experiment 7Little Creatures Move
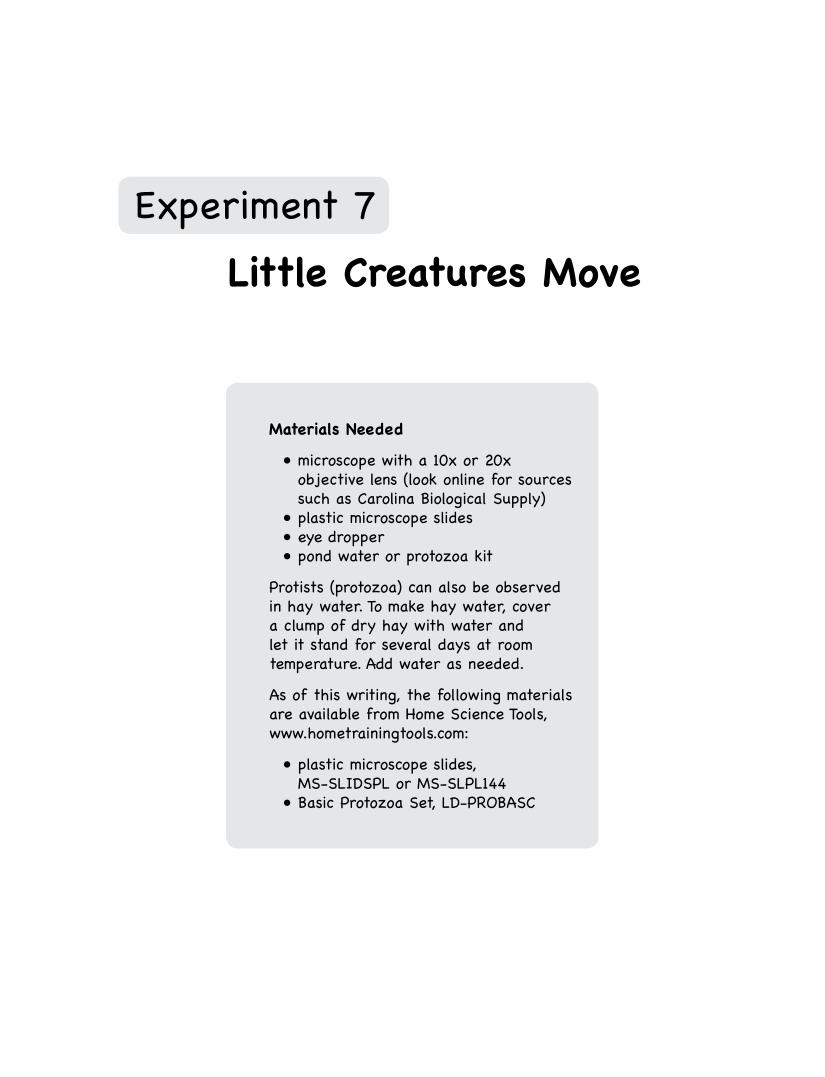
Materials Needed
• microscope with a 10x or 20x objective lens (look online for sources such as Carolina Biological Supply)
• plastic microscope slides• eye dropper• pond water or protozoa kit
Protists (protozoa) can also be observed in hay water. To make hay water, cover a clump of dry hay with water and let it stand for several days at room temperature. Add water as needed.
As of this writing, the following materials are available from Home Science Tools, www.hometrainingtools.com:
• plastic microscope slides, MS-SLIDSPL or MS-SLPL144
• Basic Protozoa Set, LD-PROBASC
Biology — Experiment 7: Little Creatures Move 25
BIO
LOG
Y
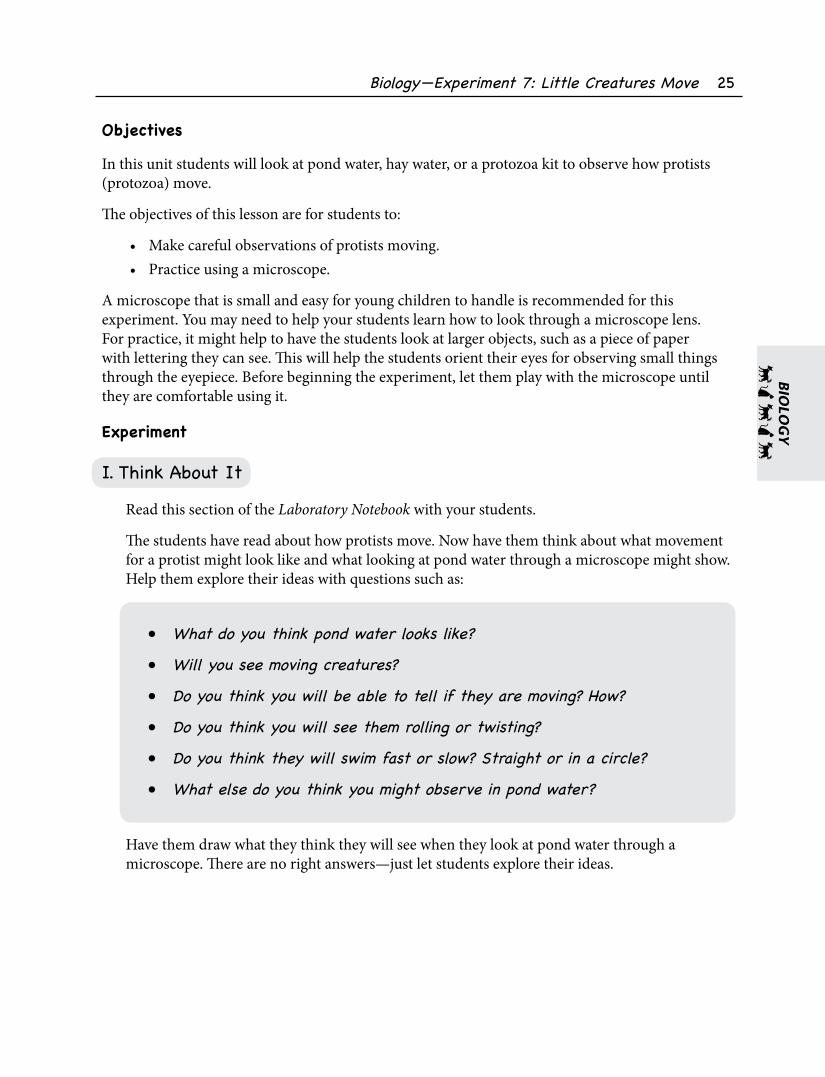
Objectives
In this unit students will look at pond water, hay water, or a protozoa kit to observe how protists (protozoa) move.
The objectives of this lesson are for students to:
• Make careful observations of protists moving.• Practice using a microscope.
A microscope that is small and easy for young children to handle is recommended for this experiment. You may need to help your students learn how to look through a microscope lens. For practice, it might help to have the students look at larger objects, such as a piece of paper with lettering they can see. This will help the students orient their eyes for observing small things through the eyepiece. Before beginning the experiment, let them play with the microscope until they are comfortable using it.
Experiment
I. Think About It
Read this section of the Laboratory Notebook with your students.
The students have read about how protists move. Now have them think about what movement for a protist might look like and what looking at pond water through a microscope might show. Help them explore their ideas with questions such as:
• What do you think pond water looks like?
• Will you see moving creatures?
• Do you think you will be able to tell if they are moving? How?
• Do you think you will see them rolling or twisting?
• Do you think they will swim fast or slow? Straight or in a circle?
• What else do you think you might observe in pond water?
Have them draw what they think they will see when they look at pond water through a microscope. There are no right answers—just let students explore their ideas.

26 Exploring the Building Blocks of Science Teacher’s Manual Book 2
BIO
LOG
Y
II. Observe It
Read this section of the Laboratory Notebook with your students.
This is mainly an observational experiment.
a) Help the students set up the microscope. Placing the microscope on a flat, firm surface will make it easier to use.
b) Help the students put a drop of protozoa water (or pond water or hay water) on a plastic slide.
c) Help the students carefully place the slide in the microscope.
d) Help the students look through the eyepiece at the water on the slide.
It may take several tries before protists can be observed. Help students repeat setting up the slide with samples as many times as necessary.
It is important for students to practice observing as many different details as possible. Have them draw their observations.
- There are several drawing frames in the Laboratory Notebook for students to fill in with drawings of the different features they observe in the pond water. Encourage them to spend plenty of time looking at all the different features they observe. You can encourage them to stay at the microscope by engaging them with questions such as:
• What kind of protist do you think you are seeing?
• Is it moving fast or slowly? Can you see it spin?
• How does it stop? Can it move backwards?
• Do you see an amoeba?
• How fast does an amoeba move?
- Have students compare some of the protists they are observing. They are asked to make comparisons between different protists of the same kind (two paramecia, for example) and protists of different kinds (possibly a paramecium and an amoeba).
Biology — Experiment 7: Little Creatures Move 27
BIO
LOG
Y
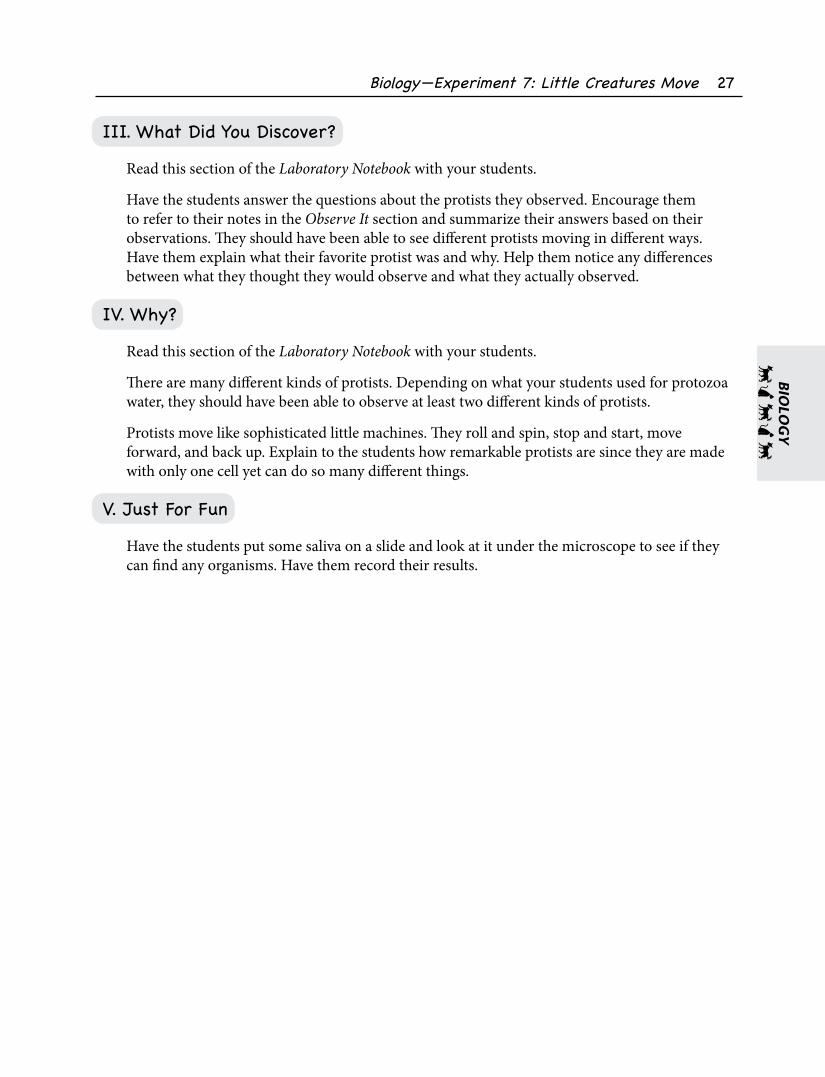
III. What Did You Discover?
Read this section of the Laboratory Notebook with your students.
Have the students answer the questions about the protists they observed. Encourage them to refer to their notes in the Observe It section and summarize their answers based on their observations. They should have been able to see different protists moving in different ways. Have them explain what their favorite protist was and why. Help them notice any differences between what they thought they would observe and what they actually observed.
IV. Why?
Read this section of the Laboratory Notebook with your students.
There are many different kinds of protists. Depending on what your students used for protozoa water, they should have been able to observe at least two different kinds of protists.
Protists move like sophisticated little machines. They roll and spin, stop and start, move forward, and back up. Explain to the students how remarkable protists are since they are made with only one cell yet can do so many different things.
V. Just For Fun
Have the students put some saliva on a slide and look at it under the microscope to see if they can find any organisms. Have them record their results.

Experiment 19
Tracking a Constellation
Materials Needed
• colored pencils• night sky• daytime sky or textured
surface
Optional
• book or online information about constellations
• globe or basketball

Astronomy — Experiment 19: Tracking a Constellation 69
AST
RO
NO
MY
☆☆☼☆☆
Objectives
In this experiment students will observe a constellation of their choice to see whether its position changes in the night sky over the course of a week.
The objectives of this lesson are to have students:
• Make careful observations.• Use their eyes as a tool in a scientific experiment.
Experiment
I. Think About It
Read this section of the Laboratory Notebook with your students.
Have the students answer the questions in this section. There are no right answers. Guide open inquiry with questions such as the following.
• Do you think every star you can see is part of a constellation? Why or why not?
• Do you think there are lots and lots of constellations? Why or why not?
• Do you think people are coming up with new constellations all the time? Why or why not?
• If you look at the sky at different times of the night, do you think you will always see the stars in the same position? Why or why not?
• Do you think you would see the same groups of stars no matter where you are on Earth? Why or why not?
• From what location on Earth do you think you could see the most constellations? Why?
II. Observe It
Read this section of the Laboratory Notebook with your students.
Have the students pick a constellation to observe. To find more constellations than those mentioned in the Student Textbook, they can consult a book about constellations or look online for more information. Guide them in selecting a constellation that will be visible at the time they will be looking for it.

70 Exploring the Building Blocks of Science Teacher’s Manual Book 2
AST
RO
NO
MY
☆☆☼☆☆
Help the students locate the constellation they have chosen to observe. If they can’t find it on the first night, have them try again the next night or several nights until they can see it.
Have the students record the time and date when they first see their constellation. For the following six days they will view the constellation at the same time.
A box is provided for students to record the position of the constellation by drawing or writing. Have them observe how high in the sky the constellation is and in which direction. It can be helpful to have them note a landmark to use to track the relative position of the constellation during the experiment—for example, how the constellations is positioned over a fence post, tree branch, or corner of a building.
Have the students observe the constellation at the same time for six more days and record their observations about its location. If it’s too cloudy to see the constellation, they can either note this for that day’s observation or they can observe the constellation on six clear nights even if there are days in between the observations.
III. What Did You Discover?
Read this section of the Laboratory Notebook with your students.
Have the students answer the questions. Answers will be based on their observations.
IV. Why?
Read this section of the Laboratory Notebook with your students. Answer any questions that may come up.
If you have a globe, it can be used to demonstrate how the spin of Earth on its axis changes the view of the constellations during the course of a night. A globe can also be used show how the constellations that are visible at any one time varies according to one’s location on Earth and how most or possibly all constellations will be visible from the equator. In addition, the globe can be used to show how Earth’s orbit around the Sun changes Earth’s position relative to the constellations and thus changes our view of the stars over the course of a year. A basketball or other ball may be used instead of a globe.
Although over time the stars do change their position in the universe relative to Earth, this happens so slowly that it isn’t obvious in a lifetime.
V. Just For Fun
In this experiment students look at clouds and use their imagination to find shapes that remind them of some person, animal, or other object. Then they are asked to draw a picture of what they see and write a short story about it. The story can be one sentence or longer—wherever their imagination takes them. It can be fiction or nonfiction.
If there are no clouds, help students find a textured surface that provides enough variation to suggest different shapes.


Copyright © 2014 Gravitas Publications, Inc.
All rights reserved. No part of this publication may be reproduced, stored in a retrieval system, or transmitted, in any form or by any means, electronic, mechanical, photocopying, recording, or otherwise, without prior written permission from the publisher. The only exception is that this publication may be photocopied without permission from the publisher if the copies are to be used only for teaching purposes within a family.
Exploring the Building Blocks of Science Book 2 Lesson Plan
Published by Gravitas Publications Inc.www.gravitaspublications.comwww.realscience4kids.com

This Lesson Plan is designed to accompany Exploring the Building Blocks of Science Book 2 Student Textbook, Laboratory Notebook, and Teacher’s Manual. It is designed to be flexible to accommodate a varying schedule as you go through the year’s study. And it makes it easy to chart weekly study sessions and create a portfolio of your student’s yearlong performance. The PDF format allows you to print pages as you need them.
This Lesson Plan file includes:
• Weekly Sheets• Self-Review Sheet• Self-Test Sheet• Sticker Templates
Materials recommended but not included:
• 3-ring binder• Indexing dividers (3)• Labels—24 per sheet,1.5” x 1.5” (Avery 22805)
Use the Weekly Sheets to map out daily activities and keep track of student progress. For each week you decide when to read the text, do the experiment, explore the optional connections, review the text, and administer tests. For those families and schools needing to provide records of student performance and show compliance to standards, there is a section on the Weekly Sheets that shows how the content aligns to the National Science Standards.
To use this Lesson Plan:
• Print the Weekly Sheets• Print Self-Review Sheets• Print Self-Test Sheets• Print the stickers on 1.5” x 1.5” labels• Place all the printed sheets in a three-ring binder separated by index
dividers
At the beginning of each week, use the squares under each weekday to plan your daily activities. You can attach printed stickers to the appropriate boxes or write in the daily activities. At the end of the week, use the Notes section to record student progress and performance for that week.
LESSON PLAN INSTRUCTIONS

○○○◯○○○ ⚡⚡⚡⚡⚡VVVVV☆☆☼☆☆○○○◯○○○ ○○○◯○○○ ⚡⚡⚡⚡⚡VVVVV☆☆☼☆☆○○○◯○○○
Week ___________
Monday Tuesday Wednesday Thursday Friday
Connections¨ History
¨ Philosophy
¨ Art, Music, Math
¨ Technology
¨ Language
Assessment¨ Self-review¨ Self-test¨ Other _____________________
Activity¨ Laboratory Experiment ¨ Other _____________________
Notes
*From the National Science Educational Standards (1996) and the Framework for K-12 Science Education (2012) National Academies Press
¨ Objectives
¨ Educational Standard*✓
✓
LESSON PLAN—Exploring the BUILDING BLOCKS of SCIENCE BOOK 2
WEEKLY LESSON PLAN SAMPLES
○○○◯○○○ ⚡⚡⚡⚡⚡VVVVV☆☆☼☆☆○○○◯○○○ ○○○◯○○○ ⚡⚡⚡⚡⚡VVVVV☆☆☼☆☆○○○◯○○○
Week ___________
Monday Tuesday Wednesday Thursday Friday
Connections History
Philosophy
Art, Music, Math
Technology
Language
Assessment Self-review Self-test Other _____________________
Activity Laboratory Experiment Other _____________________
Notes
*From the National Science Educational Standards (1996) and the Framework for K-12 Science Education (2012) National Academies Press
Objectives
Educational Standard*✓
✓
LESSON PLAN—Exploring the BUILDING BLOCKS of SCIENCE BOOK 2
CHAPTER 3: ACIDS AND BASES
To have students explore the nature of acid/base chemistry.
Content Standard B: Physical Science: Grade K-4Objects have many observable properties including the ability to react with other substances.
Look up the history of soap making and explore how people discovered that soap could be made from lye.
In chemistry, acids and bases are “opposites.” Explore with your student the nature of “opposites.”
Opposites are often used in art to create dramatic effects. Explore artwork that uses opposites (e.g., opposite colors, textures, forms).
Explore how understanding acids and bases has helped scientists create new technology such as batteries.
Look up the word acid in a dictionary or encyclopedia. Discuss the meaning of the word acid.
3

○○○◯○○○ ⚡⚡⚡⚡⚡VVVVV☆☆☼☆☆○○○◯○○○ ○○○◯○○○ ⚡⚡⚡⚡⚡VVVVV☆☆☼☆☆○○○◯○○○
Week ___________
Monday Tuesday Wednesday Thursday Friday
Connections History
Philosophy
Art, Music, Math
Technology
Language
Assessment Self-review Self-test Other _____________________
Activity Laboratory Experiment Other _____________________
Notes
*From the National Science Educational Standards (1996) and the Framework for K-12 Science Education (2012) National Academies Press
Objectives
Educational Standard*✓
✓
LESSON PLAN—Exploring the BUILDING BLOCKS of SCIENCE BOOK 2
Week ___________
Monday Tuesday Wednesday Thursday Friday
Connections History
Philosophy
Art, Music, Math
Technology
Language
Assessment Self-review Self-test Other _____________________
Activity Laboratory Experiment Other _____________________
Notes
*From the National Science Educational Standards (1996) and the Framework for K-12 Science Education (2012) National Academies Press
Objectives
Educational Standard*✓
✓
LESSON PLAN—Exploring the BUILDING BLOCKS of SCIENCE BOOK 2
CHAPTER 7: PROTISTS MOVE
To introduce students to the microscopic organisms called protists.
Content Standard C: Life Science: Grade K-4Organisms have different structures that serve different functions for survival.
Explore the history of protists. When were they first discovered?
Look up Anton van Leeuwenhoek and explore how his discovery changed the way we understand the world around us.
Explore the powers of 10 and magnitude. As of this writing, a good online resource is http://www.teachertube.com/video/power-of-10-119236.
Explore how the microscope has changed what we know about small living things.
Look up the word protist in a dictionary or encyclopedia. Discuss the meaning of the word protist.
7

○○○◯○○○ ⚡⚡⚡⚡⚡VVVVV☆☆☼☆☆○○○◯○○○ ○○○◯○○○ ⚡⚡⚡⚡⚡VVVVV☆☆☼☆☆○○○◯○○○
Week ___________
Monday Tuesday Wednesday Thursday Friday
Connections History
Philosophy
Art, Music, Math
Technology
Language
Assessment Self-review Self-test Other _____________________
Activity Laboratory Experiment Other _____________________
Notes
*From the National Science Educational Standards (1996) and the Framework for K-12 Science Education (2012) National Academies Press
Objectives
Educational Standard*✓
✓
LESSON PLAN—Exploring the BUILDING BLOCKS of SCIENCE BOOK 2
Week ___________
Monday Tuesday Wednesday Thursday Friday
Connections History
Philosophy
Art, Music, Math
Technology
Language
Assessment Self-review Self-test Other _____________________
Activity Laboratory Experiment Other _____________________
Notes
*From the National Science Educational Standards (1996) and the Framework for K-12 Science Education (2012) National Academies Press
Objectives
Educational Standard*✓
✓
LESSON PLAN—Exploring the BUILDING BLOCKS of SCIENCE BOOK 2
CHAPTER 19: OBSERVING CONSTELLATIONS
19
To introduce students to the constellations.
Content Standard D: Earth and Space Science: Grade K-4The Sun, Moon and stars all have properties, locations, and movements that can be observed and described.
Discuss the history of the constellations and the source of their names.
Explore how philosophy and cultural stories have played a role in the naming of the constellations.
Explore how the stars have inspired many popular movies such as Star Wars.
Discuss how being able to use the stars to navigate can be valuable if modern instruments fail.
Look up the word constellation in a dictionary or encyclopedia. Discuss the meaning of the word constellation.

SELF-REVIEW
Think about all of the ideas, concepts, and facts you read about in this chapter. In the space below, write down everything you’ve learned.
Date ______________ Chapter ___________________________________

SELF-TEST
Imagine you are the teacher and you are giving your students an exam. In the space below, write 5 questions you would ask a student based on the information you learned in this chapter.
Date ______________ Chapter ___________________________________

(Print this page and glue to the front of your Study Notebook.)

Illustrations: Janet Moneymaker
Copyright © 2017 Gravitas Publications, Inc.
All rights reserved. No part of this publication may be reproduced, stored in a retrieval system, or transmitted, in any form or by any means, electronic, mechanical, photocopying, recording, or otherwise, without prior written permission from the publisher. No part of this book may be used or reproduced in any manner whatsoever without written permission.
Exploring the Building Blocks of Science Book 2 Study Notebook
Published by Gravitas Publications Inc.Real Science-4-Kids®www.realscience4kids.comwww.gravitaspublications.com

EXPLORING THE BUILDING BLOCKS OF SCIENCE BOOK 2 STUDY NOTEBOOK
This Study Notebook has activities for you to do that will help you learn the ideas presented in each chapter of the Student Textbook.
Materials you will need
• 8.5 x 11 white paper• color printer• scissors• glue or clear tape
Step 1 Printing
• Download the Study Notebook file for the chapter you are reading.• Use the printer settings: portrait, letter, 8.5 x 11.• Print the pages single sided.
Step 2 Activities
• The little blue boxes on the left-hand side of the main pages show you which section of the Student Textbook has the information for that activity.
• For the chapter you are studying, do the activities on the two main pages (those that have page numbers at the bottom): fill in the blanks, answer questions, and follow the directions for other types of activities.
• On the Stuff to Cut Out pages, follow the directions for cutting out the pieces and gluing or taping them to the main pages.
Step 3 Make the Study Notebook pages into a Book
• Cut the file folders in half along the fold.• Separate the file folder halves into two piles, one pile for the pieces that have
tabs and the other pile for the pieces that do not have tabs.• Use two of the pieces without tabs for the front and back covers.• The 6 file folder pieces with tabs will be used to divide your book by subject.
Label the tabs Chemistry, Biology, Physics, Geology, Astronomy, and Conclusion.• Use a 3-hole punch to make holes along the cut edge of the 6 file folder pieces
that have tabs and the front and back cover pieces. • As you complete each chapter, punch holes in the pages and insert them in your
Study Notebook. Chapter 1 will go in between the front cover and the Chemistry tab.
This is your book! Add color to the pages along with doodles, squiggles, and notes in the margins. The backs of the pages are great for writing observations and ideas. Add your own pages with more ideas, observations, questions, science news you have heard about, and anything else you want to remember.
• colored pencils• 6 manila file folders with tabs• 3 brad paper fasteners or 3-ring binder• 3-hole punch
Cut here
Tab
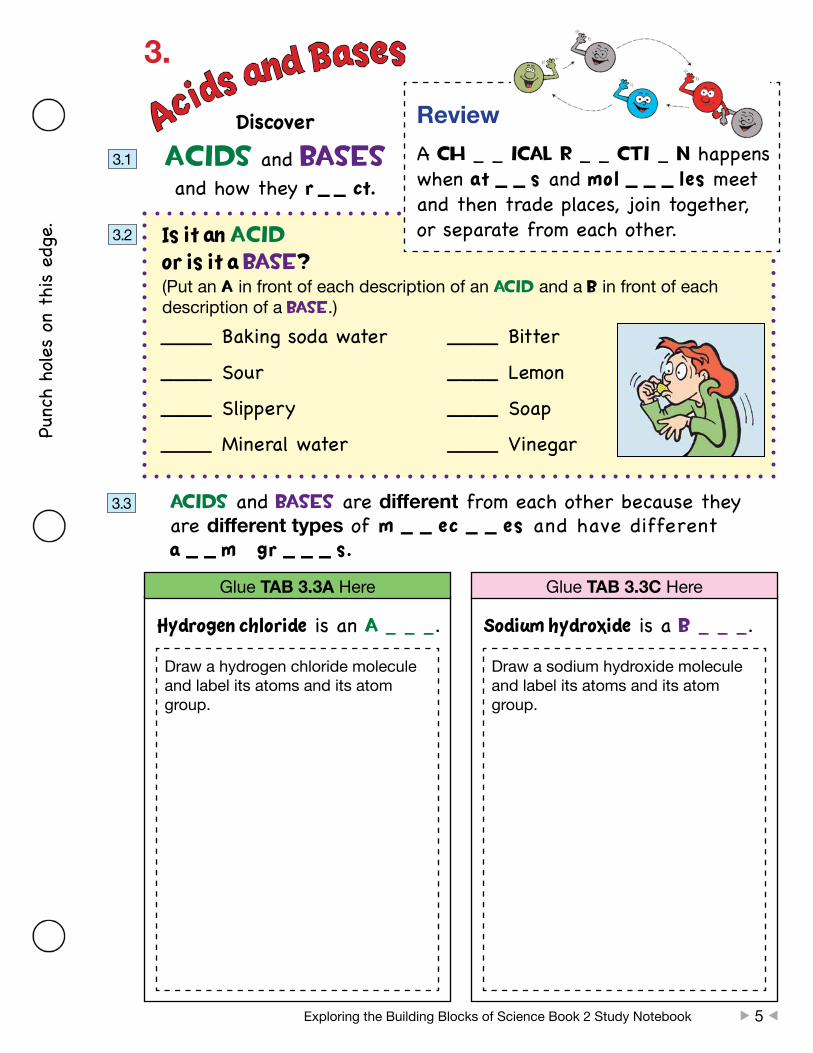
Punc
h ho
les
on t
his
edge
.
Exploring the Building Blocks of Science Book 2 Study Notebook
3.
3.1
3.2
Discover
Acids and basesand how they r _ _ ct.
ReviewA ch _ _ ical r _ _ cti _ n happens when at _ _ s and mol _ _ _ les meet and then trade places, join together, or separate from each other.
Acids and Bases
Is it an Acid or is it a base?(Put an a in front of each description of an acid and a b in front of each description of a base.)____ Baking soda water
____ Sour
____ Slippery
____ Mineral water
____ Bitter
____ Lemon
____ Soap
____ Vinegar
acids and bases are different from each other because they are different types of m _ _ ec _ _ es and have different a _ _ m gr _ _ _ s.
Glue TAB 3.3C Here
Sodium hydroxide is a b _ _ _.
Glue TAB 3.3A Here
Hydrogen chloride is an a _ _ _.
Draw a hydrogen chloride molecule and label its atoms and its atom group.
Draw a sodium hydroxide molecule and label its atoms and its atom group.
3.3
u 5 t
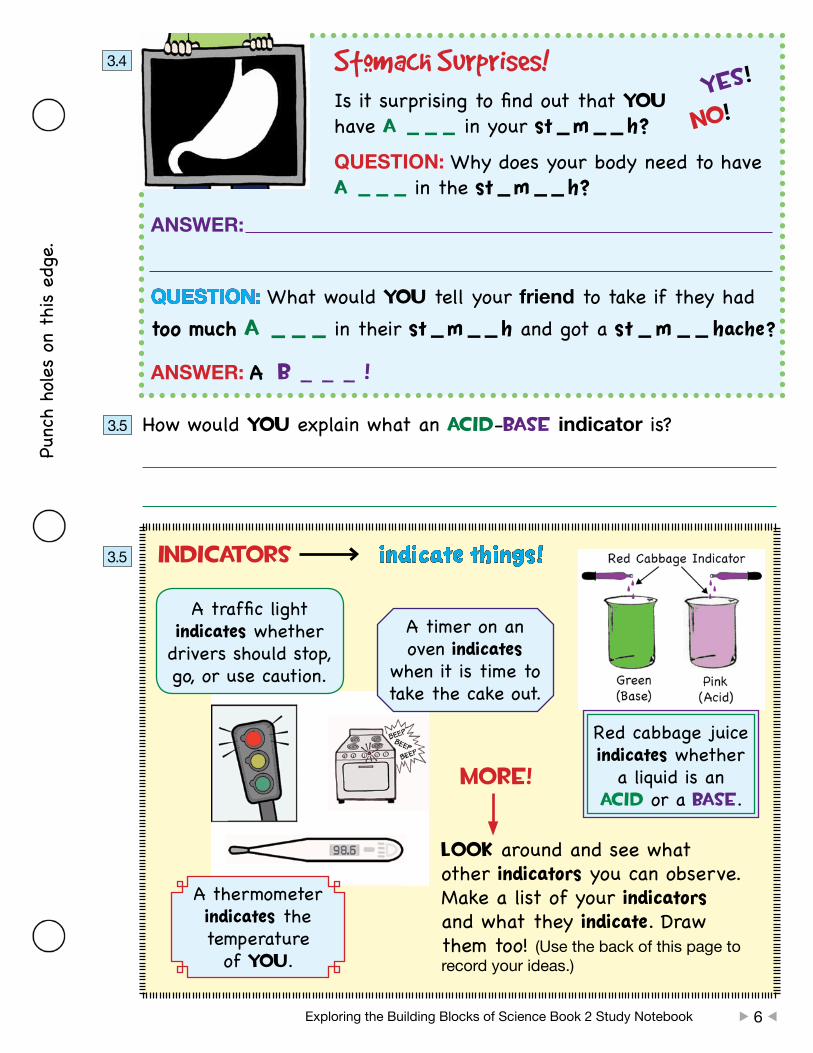
Punc
h ho
les
on t
his
edge
.
Exploring the Building Blocks of Science Book 2 Study Notebook
3.4
3.5
Stomach Surprises!Is it surprising to find out that you have A _ _ _ in your st _ m _ _ h?
QUESTION: Why does your body need to have A _ _ _ in the st _ m _ _ h?
ANSWER:
QUESTION: What would you tell your friend to take if they had too much A _ _ _ in their st _ m _ _ h and got a st _ m _ _ hache?
ANSWER: A b _ _ _ !
no!yes!
How would you explain what an acid-base indicator is?
3.5
A timer on an oven indicates
when it is time to take the cake out.
A traffic light indicates whether
drivers should stop, go, or use caution.
A thermometer indicates the temperature
of you.
Red cabbage juice indicates whether
a liquid is an acid or a base.
MORE!
Look around and see what other indicators you can observe. Make a list of your indicators and what they indicate. Draw them too! (Use the back of this page to record your ideas.)
Indicators > indicate things!
u 6 t

Cut
out
this
pie
ce o
n its
sol
id o
utlin
e an
d m
atch
blu
e TA
B 3.
3C
to th
e pi
nk G
lue
TAB
3.3C
Her
e on
pag
e 5.
Stuff to Cut Out for Chapter 3Cut out each of these pieces on their solid outline. Put glue on the back of the bar
that has the TAB number. Glue to Study Notebook page 5, matching the TAB numbers.
TAB 3.3B
Acids!
Draw some things that have acids in them.
TAB 3.3D
bases!
Draw some things that have bases in them.
An acid has an __ group.
Which atom is in this group?
Draw an __ group and label it.
TAB 3.3A Glue TAB 3.3B Here
A base has an __ __ group. Which atoms are in an __ __ group?
Draw an __ __ group and label the atoms.
TAB 3.3C Glue TAB 3.3D Here
Cut
out
this
pie
ce o
n its
sol
id o
utlin
e an
d m
atch
yel
low
TAB
3.3
A to
the
gree
n G
lue
TAB
3.3A
Her
e on
pag
e 5.
Cut
out
this
pie
ce o
n its
sol
id o
utlin
e an
d m
atch
blu
e TA
B 3.
3D
to th
e pi
nk G
lue
TAB
3.3D
Her
e on
pag
e 5.
Cut
out
this
pie
ce o
n its
sol
id o
utlin
e an
d m
atch
yel
low
TAB
3.3
B to
the
gree
n G
lue
TAB
3.3B
Her
e on
pag
e 5.
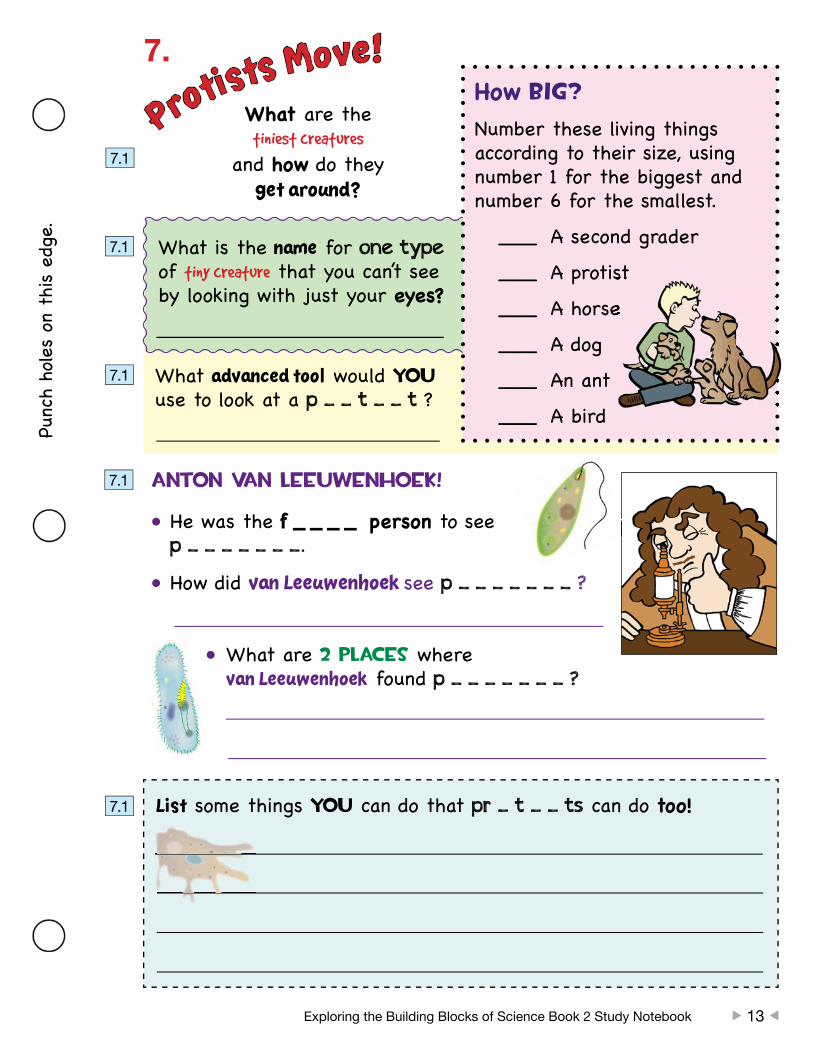
Punc
h ho
les
on t
his
edge
.
Exploring the Building Blocks of Science Book 2 Study Notebook
What is the name for one type of tiny creature that you can’t see by looking with just your eyes?
7.
7.1
Protists Move!
What are the tiniest creatures
and how do they get around?
How Big?
Number these living things according to their size, using number 1 for the biggest and number 6 for the smallest.
___ A second grader
___ A protist
___ A horse
___ A dog
___ An ant
___ A bird
___ A protist
___ A horse
What advanced tool would youuse to look at a p _ _ t _ _ t ?
Anton van leeuwenhoek!
• He was the f _ _ _ _ person to see p _ _ _ _ _ _ _.
• How did van Leeuwenhoek see p _ _ _ _ _ _ _ ?
• What are 2 places where van Leeuwenhoek found p _ _ _ _ _ _ _ ?
List some things you can do that pr _ t _ _ ts can do too!
u 13 t
7.1
7.1
7.1
7.1

Punc
h ho
les
on t
his
edge
.
Exploring the Building Blocks of Science Book 2 Study Notebook
7.2 There are not very many different kinds of P _ _ _ _ _ _ _ .
What is the name of the kingdom for P _ _ _ _ _ _ _ ?
What is one feature scientists can use to group different P _ _ _ _ _ _ _ into smaller groups?
False!true!
Think about different ways that protists move. Imagine you could be a protist for a little while. Which protist do you think it would be the most fun to be able to move like? Why? What could you do? (Use the back of this page to write and draw more ideas.)
Glu
e TA
B 7.
3 H
ere
(Draw an amoeba.) Amoeba
How does an amoeba move?
Amoebas and other p _ _ _ _ _ _ _ that move by using p _ _ _ _ _ _ _ _ _ are called A _ _ _ _ _ _ _ _.
7.3
7.3
7.3
u 14 t
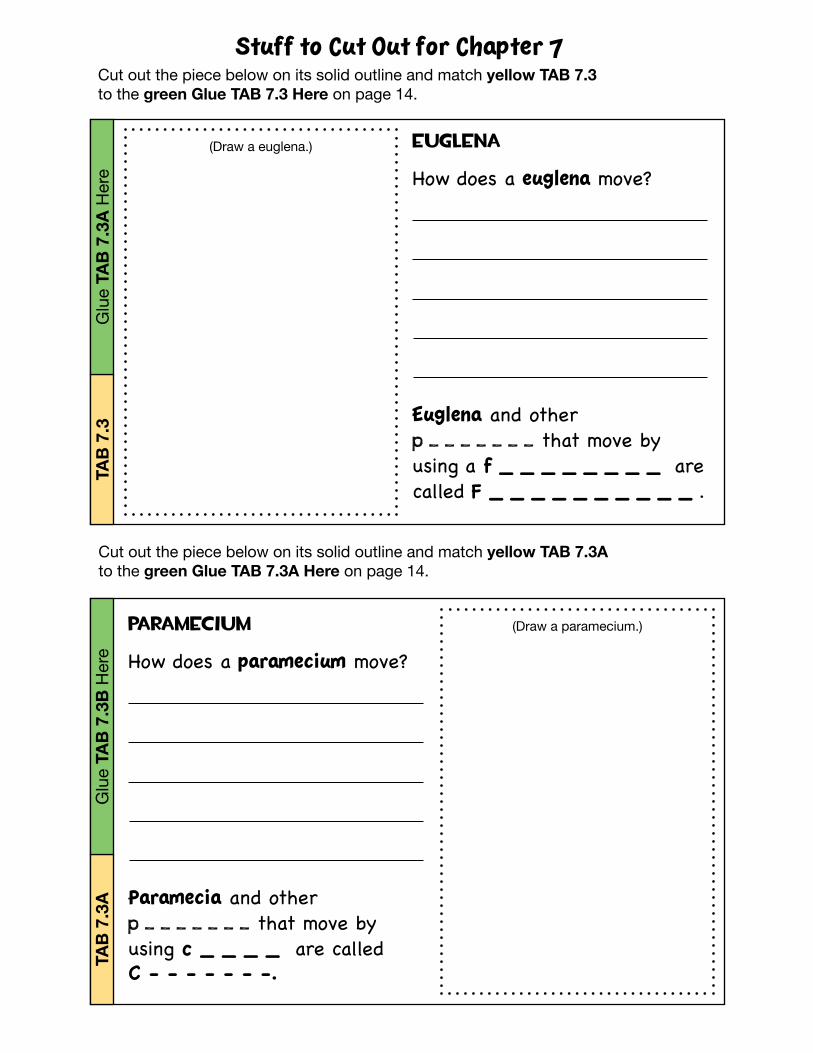
Cut out the piece below on its solid outline and match yellow TAB 7.3 to the green Glue TAB 7.3 Here on page 14.
Stuff to Cut Out for Chapter 7
(Draw a paramecium.)paramecium
How does a paramecium move?
Paramecia and other p _ _ _ _ _ _ _ that move by using c _ _ _ _ are called C - - - - - - -.TA
B 7.
3AG
lue
TAB
7.3B
Her
e
(Draw a euglena.) Euglena
How does a euglena move?
Euglena and other p _ _ _ _ _ _ _ that move by using a f _ _ _ _ _ _ _ _ are called F _ _ _ _ _ _ _ _ _ _ .
TAB
7.3
Glu
e TA
B 7.
3A H
ere
Cut out the piece below on its solid outline and match yellow TAB 7.3A to the green Glue TAB 7.3A Here on page 14.

More Stuff to Cut Out for Chapter 7
TAB
7.3B
How do P _ _ _ _ _ _ _
move?
Cut out the piece below on its solid outline and match yellow TAB 7.3B to the green Glue TAB 7.3B Here on page 14.

Punc
h ho
les
on t
his
edge
.
Exploring the Building Blocks of Science Book 2 Study Notebook
How would you describe what a constellation is?
19.
19.1
19.1
Observing
the Constellations
Find out how shapes in the sky
are made by stars!
When you go outside on a dark, clear night, how many stars do you think you can see?
A little Story
Take a look at these two illustrations. Imagine first that you are in the spaceship and then that you are in the rowboat. Write a little story about how a knowledge of constellations would be a great thing to know in either place.
19.119.4
u 37 t

Punc
h ho
les
on t
his
edge
.
Exploring the Building Blocks of Science Book 2 Study Notebook
Glu
e TA
B19.
2 H
ere
Orion the Hunter
Draw Orion. Label Orion's belt, shield, and raised club.
Do you think knowing the shape of Orion and how the stars are arranged would make this constellation easy to find? Why or why not?
Glue TAB 19.2D Here
Pegasus
Draw Pegasus and show how The Great Square is part of this constellation. Does Pegasus have wings where you'd expect to see them?
no!yes!
Be an astronomer!
Do this little navigation experiment.
1. You have learned that the Sun is a star. You have also learned that stars can be used for navigation. Do you think the Sun is a star that can be used for navigation?
2. Go out in the morning when the Sun is low in the sky. Find a landmark that the Sun is above and record this landmark in your notebook. (Don't look directly at the Sun—it can hurt your eyes.)
3. Repeat Step 2 several times a day for several days. Include observations when the Sun is close to rising and setting.
4. Review your notes. What did you discover? Do you think the Sun can be used for navigation?
Glue TAB 19.4 Here
✹
19.219.1
19.4
19.319.1
u 38 t

Stuff to Cut Out for Chapter 19
Cut out the piece below on its solid outline and match yellow TAB 19.2 to the green Glue TAB 19.2 Here on page 38.
Cut out the piece below on its solid outline and match yellow TAB 19.2B to the green Glue TAB 19.2B Here on page 38.
The Great Bear
Draw the Great bear. Show how the Big Dipper is part of the Great bear and show how to find Polaris from the Great bear.
Why do you think it might be helpful to be able to find Polaris from the Great bear?
TAB
19.2
Glu
e TA
B19.
2B H
ere
The Big Dipper
Draw the Big Dipper. Label Polaris and show how to find Polaris.
What is the great thing about Polaris?
TAB
19.2
BG
lue
TAB1
9.2C
Her
e
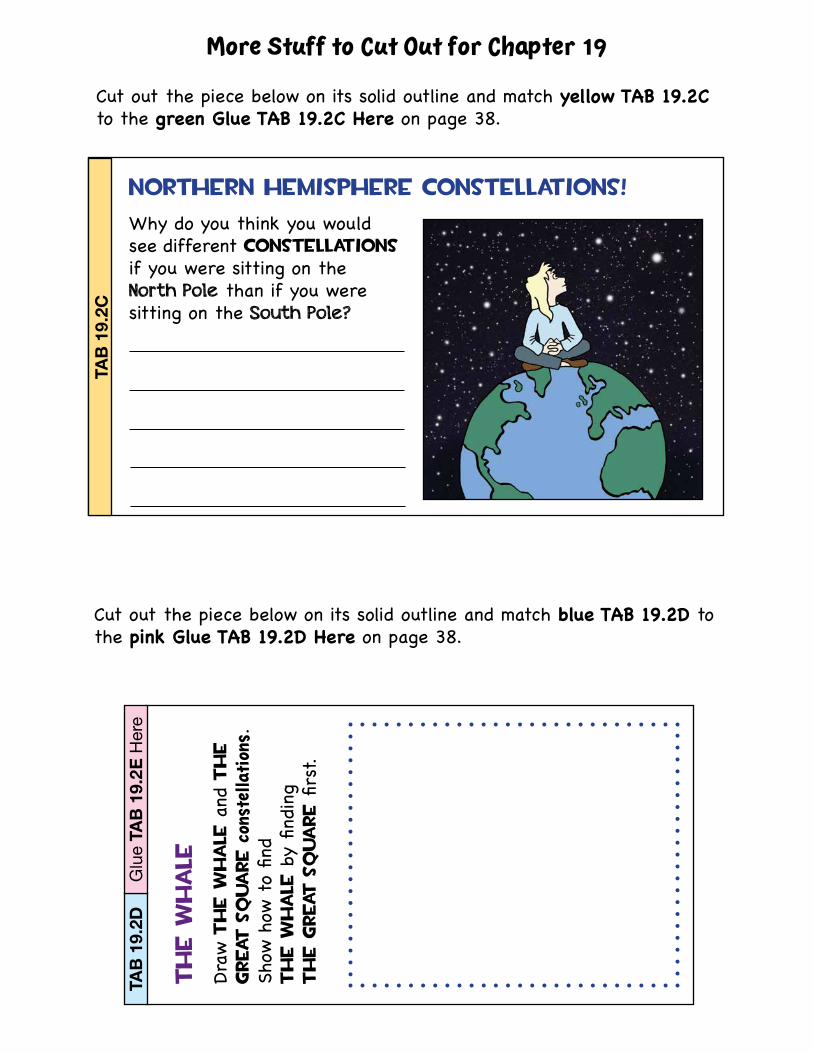
More Stuff to Cut Out for Chapter 19
Cut out the piece below on its solid outline and match yellow TAB 19.2C to the green Glue TAB 19.2C Here on page 38.
TAB
19.2
C
Northern hemisphere constellations!
Why do you think you would see different constellations if you were sitting on the North Pole than if you were sitting on the South Pole?
the W
hale
Draw
The W
hale
and
The
Great
Square c
onst
ella
tion
s. Sh
ow h
ow t
o fin
d
The W
hale
by
finding
The G
reat
Square fi
rst.
TAB
19.2
DG
lue
TAB
19.2
E H
ere
Cut out the piece below on its solid outline and match blue TAB 19.2D to the pink Glue TAB 19.2D Here on page 38.

TAB 19.2E
southern hemisphere
constellations!
Why do you think you would see more constellations if you were sitting on the equator than if you were sitting on the South Pole?
(Write your answer on the back of page 38.)
Be a scientist!
Do this little navigation experiment.
1. Get a notebook and a pencil and take a walk around your neighborhood. End your walk at the spot where you began it.
2. As you walk, look for landmarks that can help tell you where you are. For example, a big tree, a building made of brick, an interesting mailbox, and so on.
3. In your notebook, write and/or draw the landmarks in the order you see them.
4.. When you have finished your walk, give your notebook to a friend and see if they can use your landmarks to follow your route.
TAB 19.4
Even More Stuff to Cut Out for Chapter 19
Cut out the piece below on its solid outline and match blue TAB 19.2E to the pink Glue TAB 19.2E Here on page 38.
Cut out the piece below on its solid outline and match light green TAB 19.4 to the purple Glue TAB 19.4 Here on page 38.


Illustrations: Janet Moneymaker
Copyright © 2017 Gravitas Publications, Inc.
All rights reserved. No part of this publication may be reproduced, stored in a retrieval system, or transmitted, in any form or by any means, electronic, mechanical, photocopying, recording, or otherwise, without prior written permission from the publisher. No part of this book may be used or reproduced in any manner whatsoever without written permission.
Exploring the Building Blocks of Science Book 2 Graphics Package
Published by Gravitas Publications Inc.Real Science-4-Kids®www.realscience4kids.comwww.gravitaspublications.com

Exploring the Building Blocks of Science: Book 2

Exploring the Building Blocks of Science: Book 2

Exploring the Building Blocks of Science: Book 2