ime-100 interdisciplinary design and...
TRANSCRIPT
1
IME-100 Interdisciplinary Design and Manufacturing
Introduction Arduino and Programming
Topics:
1. Introduction to Microprocessors/Microcontrollers
2. Introduction to Arduino
3. Arduino Programming Basics
Several online Tutorials are also available on the Arduino website
http://arduino.cc/en/Tutorial/HomePage
Online Arduino book
http://www.introtoarduino.com/downloads/IntroArduinoBook.pdf
Simulate Arduino online
http://123d.circuits.io/
2
Introduction to Microprocessors
The earlier processors were implemented in multiple printed circuit boards.
Microprocessor is a processor implemented in a single integrated circuit.
Brief history
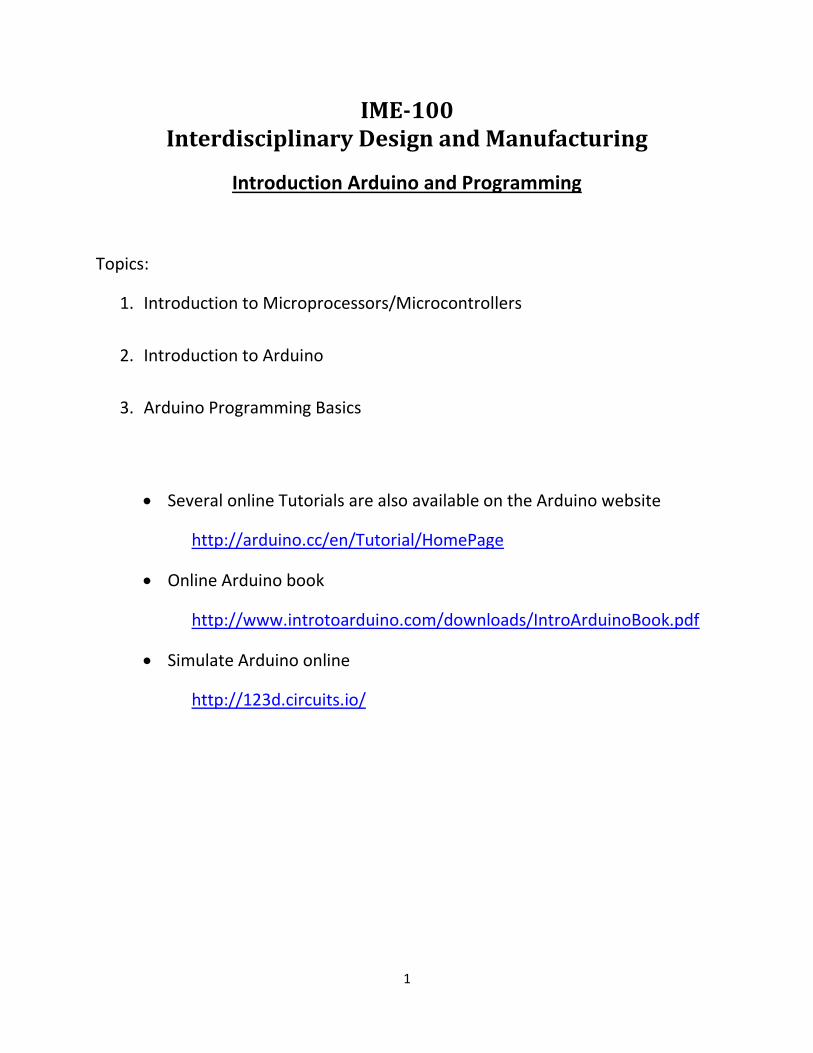
o In 1971, Intel introduced the first
microprocessor in a single chip, the Intel
4004, which was a 4-bit processor running at
400 KHz clock
Disadvantages
o Does not have on-chip memory.
o Cannot drive the I/O devices.
o Does not have peripheral functions such as parallel I/O ports, timers,
A/D converter, and so on.
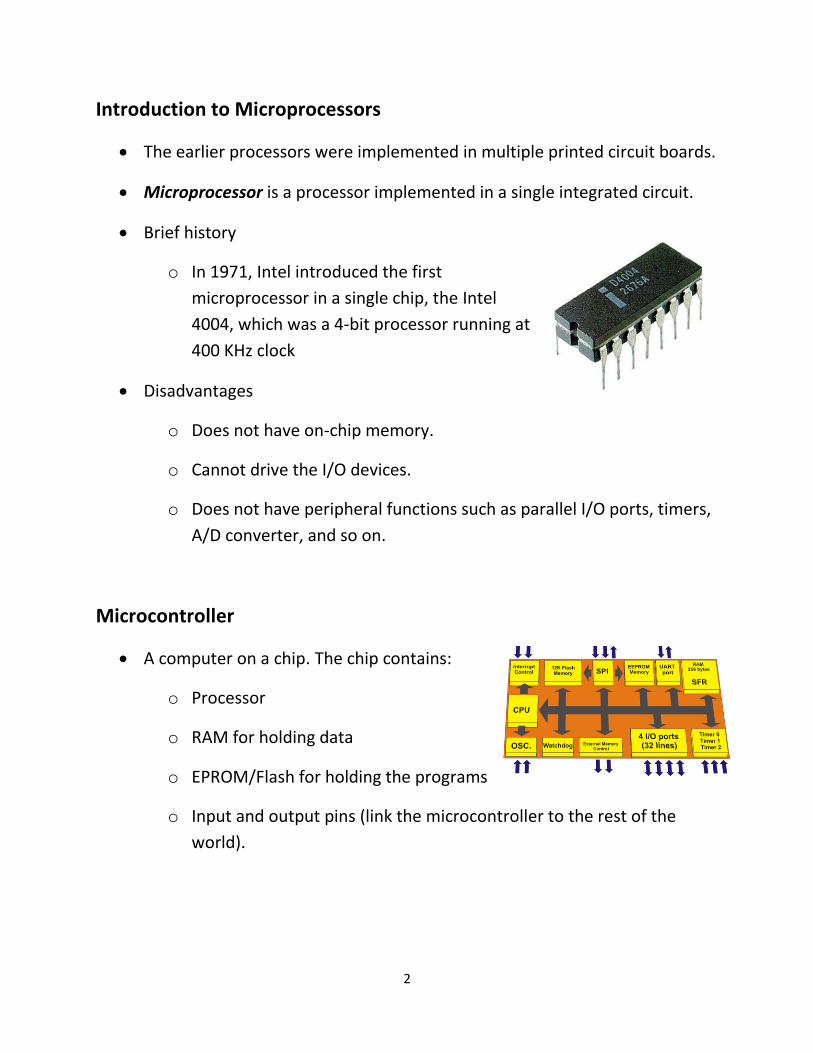
Microcontroller
A computer on a chip. The chip contains:
o Processor
o RAM for holding data
o EPROM/Flash for holding the programs
o Input and output pins (link the microcontroller to the rest of the
world).

3
Introduction to Arduino
Arduino is an open-source physical computing platform based on a simple
microcontroller board
It has development environment for writing software for the board.
Its programming language: Simplified version of C/C++. (Easy to learn)
Why Arduino?
o Inexpensive: ATmega328p: $2.50, Pre-assembled Arduino Uno board < $30
o Cross-platform
o Simple and clear programming environment
o Open source and extensible software
C++ libraries and AVR-C code can be added
o Open source and extensible hardware
Hardware design is also open
Users can extend it
USB interface chip Digital connections
5 V regulator
Crystal
Analog inputs
Power connector
Microcontroller
USB port

4
Arduino Programming Process
Arduino IDE is an Integrated development environment
o Used for writing and downloading program to Arduino chip
Setup process
o Select a board type (the IDE supports several types of Arduino
compatible boards)
o Select a serial port (the communication interface between the
Arduino board and your PC)
Program structure – All Arduino programs (sketches) contain:
o void setup()
o void loop()
Uploading a sketch
1. Verify
your code
2. Convert to binary
3. Upload to Arduino

5
Arduino Prep
This should have already been done on your lab PCs. No need to do it again.
Follow the following steps if you want to set up the Arduino programming
environment on your own computer.
Video tutorial is available on youtube, check out the following:
http://www.youtube.com/watch?v=fCxzA9_kg6s
1. Install the Arduino IDE software
2. Install a USB driver to let your computer recognize an Arduino board. This
will install a serial port device through which the computer can talk to the
Arduino.
Installing the Arduino IDE Software
Go to http://arduino.cc/en/Main/Software
Download the latest version of Arduino for your system.
o For the computers in the lab we the Windows version of the Arduino
IDE software, but it is also available for other operating systems.
o You can download the Windows installer which gets an executable
file that automatically installs the software or get a zip file.
If you get the zip file, you need to unzip it and you will see a folder named
after the zip filename.
o Open the folder. Finally you will see ‘arduino-1.x.x’ folder (where x
represents the version number). This is the folder where the Arduino
software is installed in.
There is no fancy installation tool or setup the software.
o You can just copy the folder to anywhere on your disk drive.
6
Arduino Sketch
Open the folder ‘arduino-1.x.x’
Create a short cut on the Desktop
for the executable, arduino.exe.
o Right click on the exe and select Send to – Desktop.
Execute arduino.exe.
o Ignore Security Warning and click the Run button.
o “Sketchbook folder disappeared” message will be shown.
o Do not worry. Just click ‘OK’
You can find the ‘Arduino’ folder is newly created.
o This is your Sketchbook folder that is a kind of workspace where
your source code will be saved.
o Saving your source code into this folder is strongly recommended
for later uses.
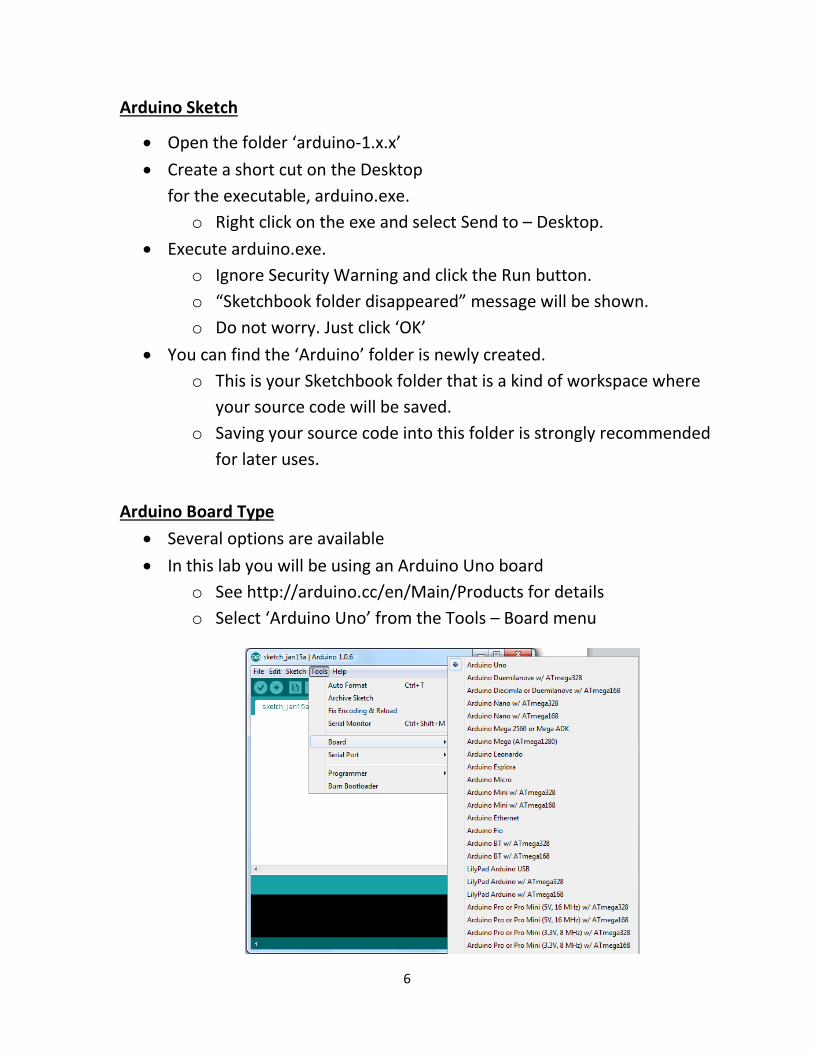
Arduino Board Type
Several options are available
In this lab you will be using an Arduino Uno board
o See http://arduino.cc/en/Main/Products for details
o Select ‘Arduino Uno’ from the Tools – Board menu

7
Serial Port
Serial Port is an entry or exit door through which you can send or
receive data between the Arduino and your PC
Modern laptops do not have serial ports anymore
Do not worry! We can create a virtual serial port from a USB port
o This means that the USB port connected to a cable will be
considered as a serial port
A virtual serial port should be installed for your computer to
communicate with an Arduino board
o The latest versions of the Arduino IDE handle this automatically
o However, if the driver is not installed on your computer you need
to follow the step-by-step instructions given below
Please remember you have to select a serial port in Sketch after
completing the instructions
USB Driver Install
This step is optional. It is needed only if the USB driver was not
automatically installed as part of the Arduino IDE installation through
the Windows installer.
Connect an Arduino board to your computer using a USB cable
o The Driver Software Installation message box will appear
o Sooner or later it will fail
o No need to worry, we are on the right track

8
USB Driver Install …
Open Device Manager from [Control Panel -- System and Security]
Locate “Other devices” – Unknown device
Click Update Driver Software…
Select ‘Browse my computer for device software.’
Find the drivers folder inside the arduino-1.x.x folder.
Ignore this warning. Select ‘Install this driver software anyway.’

9
USB Driver Install …
To verify that the USB Driver is successfully installed:
Make sure that Arduino UNO R3 is installed in the Ports (COM & LPT)
Anytime when you connect the Arduino board to the PC, the port will be
shown under the ports list
Your computer can now talk to the Arduino through the serial port
Selecting the Arduino Serial Port
The final and important step is to select
a serial port for your Arduino Sketch.
Now your PC is ready to talk the
Arduino via the serial port.

10
Arduino Programming Basics
Refer to the Arduino Language Reference: http://arduino.cc/en/Reference/HomePage
Sketch
o That is what a program called in Arduino lingo
o It is code that is uploaded to and run on the Arduino board
Comments – used to enhance program readability and documentation
o Multiline comments
/* comments start with the slash and * sign
it can be multilines
should end with * and the slash just like the line below
*/
Everything between /* and */ is comment and will be
ignored by the processor
o Single line comments
// two slashes are an indicator of starting comments.
Variable
o A place for storing a piece of data
o It has a Name, a Type, a Value
Example: int ledPin = 13;
ledPin is the variable Name, int the Type, 13 is value
o Whenever you use the variable name in the code, the value will
be retrieved
o The value can be changed while your program is running
This is why we call it a variable
Data type
o boolean: true/false
o char: -128 ~ 127 byte: 0 ~ 255
o int: -32,768 ~ 32,767 unsigned int: 0 ~ 65,535
o long: 32-bits integer unsigned long: 32-bits
o float: 32-bits real number double: (= float in Arduino Uno)

11
Function
A named piece of code with a specific task and that can be called/used
as many times as needed form elsewhere in your program
Example
void setup() // return type, name of the function, parameters
pinMode(ledPin, OUTPUT); // call pinMode function with two parameters
Two special functions that you should include in your Arduino sketch:
setup()
This is called once when your program starts
Good place to initialize anything
loop()
This is called over and over, indefinitely
Digital vs. Analog Signals
Digital: Only two values are allowed
o 1 or 0
o True or False
o HIGH or LOW
Analog: Continuous range of values
o 0~1023
The pins on the Arduino
o They can be configured as either inputs or outputs
Sneak peek of basic functions to know
o pinMode: Configure the specified pin to either an input or output
o digitalWrite: Write a HIGH or LOW to a digital PIN
o digitalRead: Read a value from the specified digital pin. Returns HIGH or LOW
o analogRead: Read analog value from the specified analog pin. Returns 0~1023
o analogWrite: Write analog value to the specified pin
o delay: Pauses the program for the amount of the specified time (in milliseconds)
12
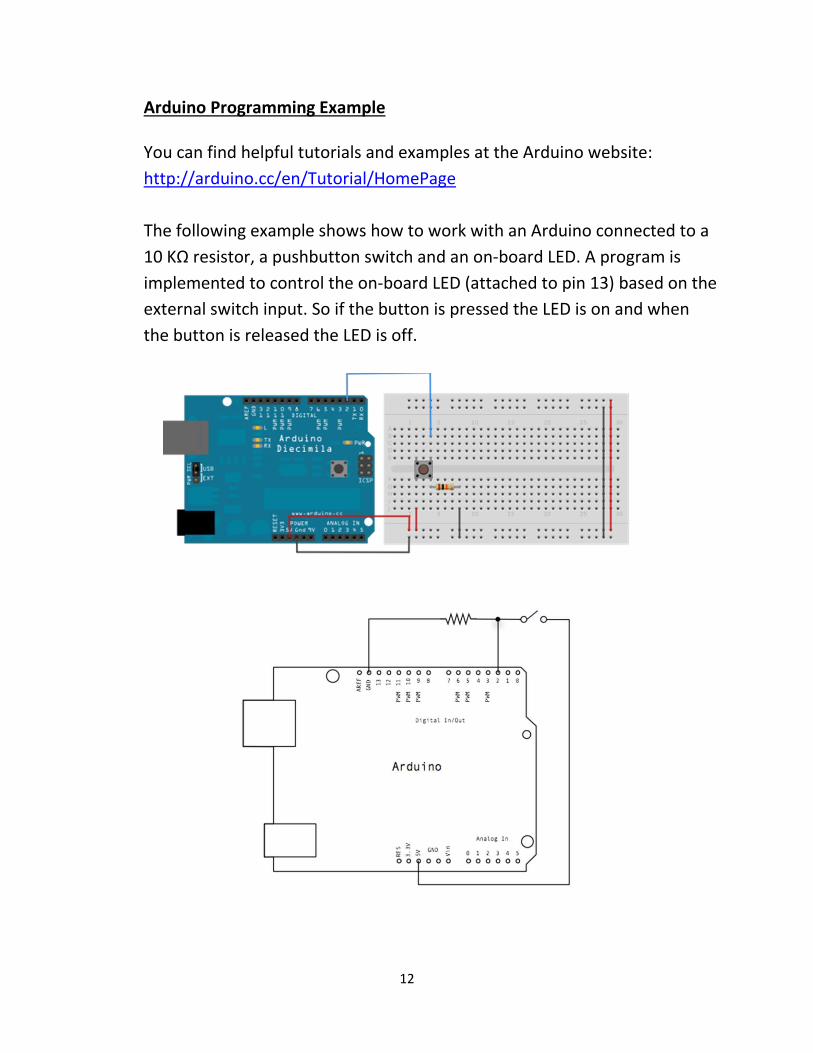
Arduino Programming Example
You can find helpful tutorials and examples at the Arduino website:
http://arduino.cc/en/Tutorial/HomePage
The following example shows how to work with an Arduino connected to a
10 KΩ resistor, a pushbutton switch and an on-board LED. A program is
implemented to control the on-board LED (attached to pin 13) based on the
external switch input. So if the button is pressed the LED is on and when
the button is released the LED is off.
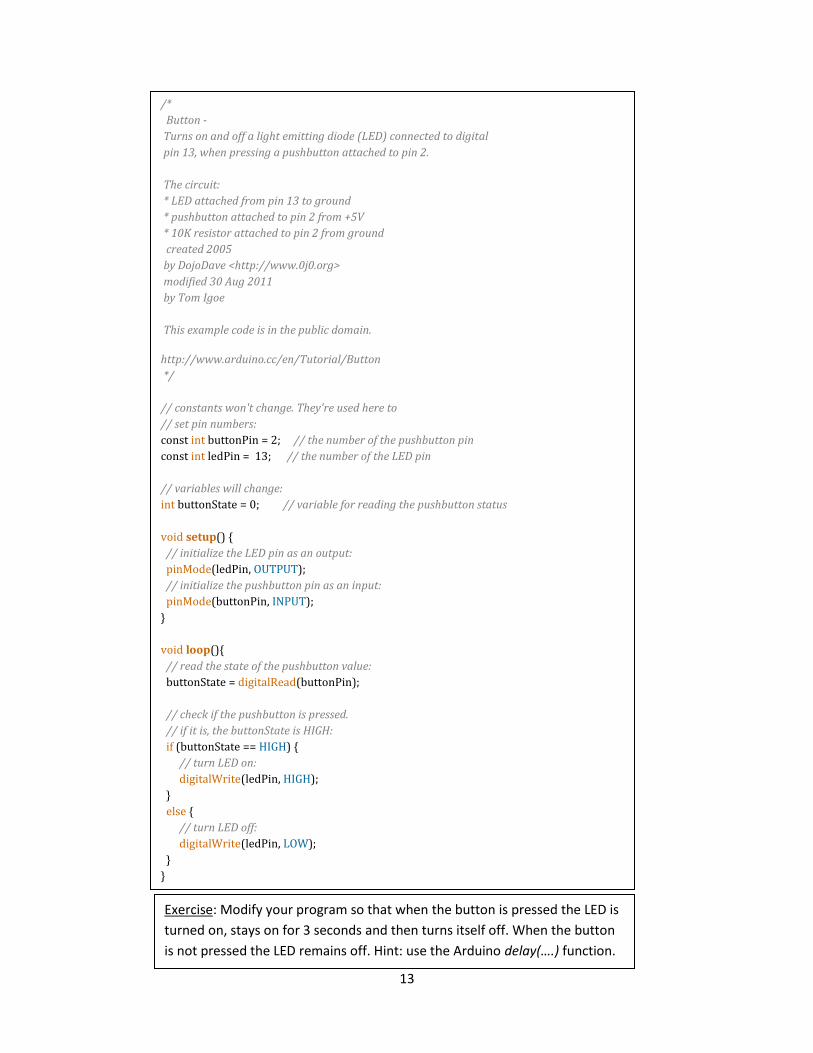
13
/*
Button -
Turns on and off a light emitting diode (LED) connected to digital
pin 13, when pressing a pushbutton attached to pin 2.
The circuit:
* LED attached from pin 13 to ground
* pushbutton attached to pin 2 from +5V
* 10K resistor attached to pin 2 from ground
created 2005
by DojoDave <http://www.0j0.org>
modified 30 Aug 2011
by Tom Igoe
This example code is in the public domain.
http://www.arduino.cc/en/Tutorial/Button
*/
// constants won't change. They're used here to
// set pin numbers:
const int buttonPin = 2; // the number of the pushbutton pin
const int ledPin = 13; // the number of the LED pin
// variables will change:
int buttonState = 0; // variable for reading the pushbutton status
void setup()
// initialize the LED pin as an output:
pinMode(ledPin, OUTPUT);
// initialize the pushbutton pin as an input:
pinMode(buttonPin, INPUT);
void loop()
// read the state of the pushbutton value:
buttonState = digitalRead(buttonPin);
// check if the pushbutton is pressed.
// if it is, the buttonState is HIGH:
if (buttonState == HIGH)
// turn LED on:
digitalWrite(ledPin, HIGH);
else
// turn LED off:
digitalWrite(ledPin, LOW);
Exercise: Modify your program so that when the button is pressed the LED is
turned on, stays on for 3 seconds and then turns itself off. When the button
is not pressed the LED remains off. Hint: use the Arduino delay(….) function.

14
Exercise: Traffic Lights Controller
1. Build the traffic lights circuit
First build the traffic lights circuit by wiring three LEDs (green, yellow, red) in
series to 120Ω resistors each to three digital pins of the Arduino. To control the
operating mode of the traffic lights connect a switch to a digital pin using a 10KΩ
resistor in a configuration similar to that shown in the schematic diagram in page
19.
2. Write Arduino program to control the traffic lights
Write a program that implements the behavior for a proper operation of the
traffic lights similar to what you find at an intersection on a street. The traffic
lights will be controlled by the switch. When the program starts, it checks the
status of the switch and if the switch is ON the lights behave as follows:
a) Green LED is on for 5 seconds (yellow and red are off)
b) Yellow LED is on for 2 seconds (green and red are off)
c) Red LED is on for 3 seconds (green and yellow are off)
d) Red LED goes off for 1 second before returning back to the first step a)
e) The program repeats the above steps a) to d) as long as the switch stays on
When the control switch is turned OFF, the traffic lights switch to flashing red
light mode. In this mode the red LED turns on for 1 second and turns off for 1
second. It repeats this mode as long as the control switch stays off.
The program continues indefinitely, running in either of the two operating modes
based on the status of the switch.