impressionism with chalk pastels: monet's bridge art ... · pdf filetoday we are painting...
TRANSCRIPT

By Lucia Hames and Tricia Hodges©Copyright 2013, Southern Hodgepodge
www.southernhodgepodge.com

Today we are painting with our pastels our version of Monet's water lilies and the bridge. It is surprisingly easy, because you are using the pastels as they should be used…making soft, misty lines of the landscape. We had a picture of the bridge to go by; you can use one online or in a book if you like, or just make a bridge over a pond.
We started by making two arcs or "smiles" (one of my students called it this!). These are the bottom of the bridge and the top handrails. Use a nice bright aqua-blue like Monet did. We looked at the picture and attached the bar-type rails of the bridge next. Taking a dark green, the background was lightly colored in…remember to color between the rails of the bridge. Use your finger to blend the color. Now take that dark green up to the top of your painting; I did not see any sky in Monet's picture, but you can put in some sky color if you like.
I have found that if you draw the banks of a stream or river first, you can then add in the water easily. The banks are also done lightly with dark green. Add some medium green, then a few touches of light
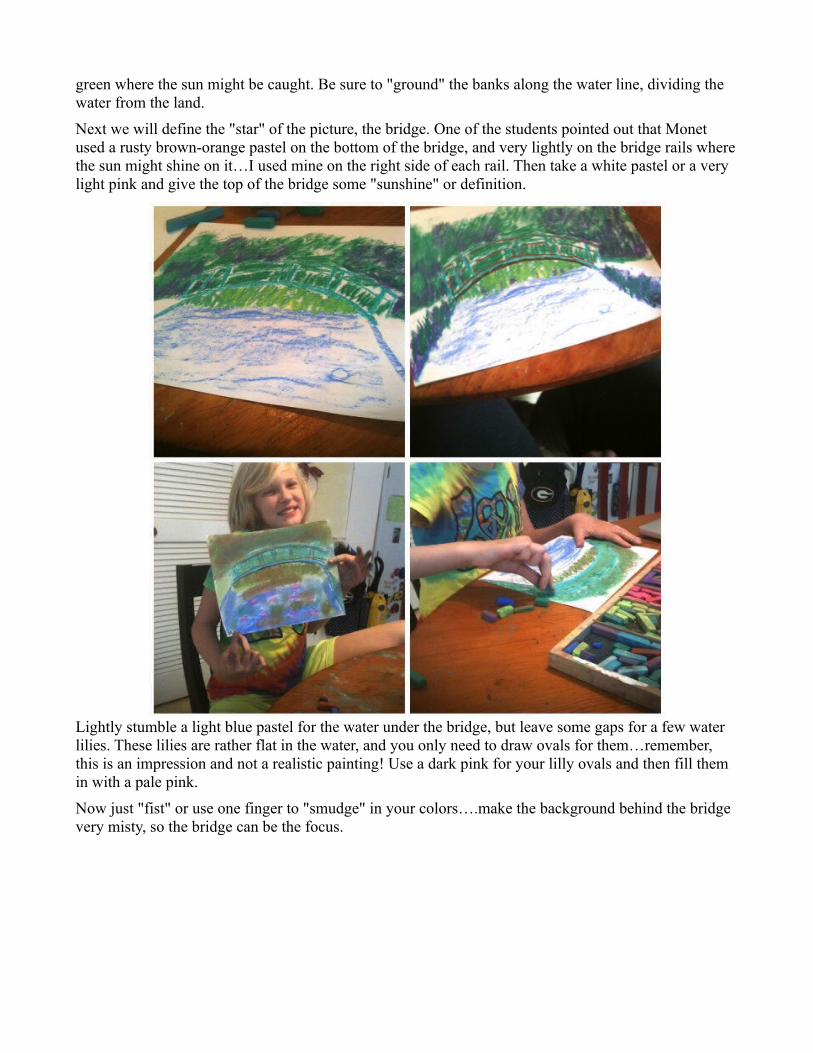
green where the sun might be caught. Be sure to "ground" the banks along the water line, dividing the water from the land.
Next we will define the "star" of the picture, the bridge. One of the students pointed out that Monet used a rusty brown-orange pastel on the bottom of the bridge, and very lightly on the bridge rails where the sun might shine on it…I used mine on the right side of each rail. Then take a white pastel or a very light pink and give the top of the bridge some "sunshine" or definition.
Lightly stumble a light blue pastel for the water under the bridge, but leave some gaps for a few water lilies. These lilies are rather flat in the water, and you only need to draw ovals for them…remember, this is an impression and not a realistic painting! Use a dark pink for your lilly ovals and then fill them in with a pale pink.
Now just "fist" or use one finger to "smudge" in your colors….make the background behind the bridge very misty, so the bridge can be the focus.

You have finished a lovely painting…be sure to sign your name in the corner of the painting, flip it over and write a name for your finished painting and the date. See!!! You CAN be an artist, too! Good job, everyone!
Now you can have a Master Artist teach all your ages! A Simple Start in Chalk Pastels ebook– convenience of our tutorials all in one spot. Just add chalk pastels and paper.
Enjoy!
• A note on chalk pastels: Pastels are an easy, forgiving medium. Fun for children and adults alike! Details on the pastels and paper we use, how and where to purchase, and links to all of Nana’s other pastel lessons (50 free lessons now) are all contained in the post Pastels plus links to tutorials. A simple set is very affordable. Nana also teaches acrylic lessons.
• The practical aspects of a mess: Pastels are blessedly messy. We always have baby wipes close by to wipe hands. We wear something we don’t mind getting stained or don a smock.
• Encouragement: How to Start Art with Little Ones and You CAN Be an Artist series.