in-dash installation kit for select 1982-06 … installation kit for select 1982-06 acura, honda,...
TRANSCRIPT

IN-DASH INSTALLATION KIT FOR SELECT1982-06 ACURA, HONDA, INFINITI, ISUZU,
& NISSAN VEHICLES
NN0321987-up Nissan Vehicles
If you have any further questions call: TECH HELP 1-800-621-3695 x3
©2012 SCOSCHE INDUSTRIES, INC.SI - UI3050A-QS (3000476A) 06/12
Car Stereo ConneCtorSPROVIDE EASY CONNECTION OF YOUR CAR STEREO TO FACTORY WIRING HARNESS.
IM01A1989-up Geo Imports Vehicles
ACURA1996-99 CL ------------------- 81994-01 Integra --------------- 81990-93 Integra --------------- 81986-95 Legend -------------- 82002-06 RSX ------------------ 91996-98 TL -------------------- 91992-94 Vigor ----------------- 9
HONDA1998-02 Accord -------------- 81994-97 Accord -------------101990-93 Accord -------------101999-00 Civic ----------------112002-06 CRV ----------------111997-03 CRV ----------------111999-04 Odyssey ------------121995-98 Odyssey ------------121998-01 Passport -----------121994-01 Passport -----------131997-01 Prelude -------------131992-96 Prelude -------------13
INFINITI1999-02 G20 -----------------141991-96 G20 -----------------141996-99 I30 ------------------141990-93 M30 ----------------141997-01 QX4 -----------------151997-01 Q45 -----------------151990-93 Q45 -----------------15
ISUZU1996-99 Oasis ---------------121998-01 Rodeo --------------121991-95 Rodeo --------------13
NISSAN1995-06 200SX --------------151995-98 240SX --------------161989-94 240SX --------------161990-96 300ZX --------------161998-01 Altima --------------161993-97 Altima --------------171990-91 Axxess -------------17
NISSAN (Cont’d)2000-01 Frontier -------------171998-99 Frontier -------------17 1994-97 Hardbody PU ------181995-99 Maxima ------------141989-94 Maxima (Sedan) --- 181991-93 NX ------------------181996-01 Pathfinder ----------151994-95 Pathfinder ----------181987-90 Pulsar --------------19 3-Door Sport Coupe1995-99 Sentra --------------141991-94 Sentra --------------191987-90 Sentra --------------19 Sedan, Wagon & Hatchback1990-92 Stanza (Sedan) ----191987-89 Stanza --------------20 Sedan & Hatchback1982-86 Stanza --------------20 Liftback & Sedan2000-04 Xterra ---------------20
UI3050A
LIaBILItY DISCLaIMerThis instruction booklet is based on carefully documented data and research of automobile dash disassembly, wire harness/codes and information pertaining to installation of this kit in the listed vehicles. Manufacturer cannot be held responsible for discrepancies/inconsistencies that may occur due to the automobile manufacturing changes or options, or damage that may occur in the automobile during the installation of components while using this booklet.

This premium installation kit is for 1982-08 selected Acura, Honda, Infiniti, Isuzu and Nissan vehicles. Included are all the parts you need to mount your car stereo/cassette, or CD player into your vehicle’s dash. Refer to the individual instruction in this manual to remove your vehicle’s factory radio and assemble the kit.
IntroDUCtIon
ContentS The instructions for each vehicle show which mounting panel and brackets to use. Each piece is clearly identified on the back.
2698 NISSAN TRIM
1855 MOUNTING PANEL
2591 HONDA TRIM
2417 NISSANBRACKET
1862 REAR SUPPORT
1888B REAR SUPPORT
2
2416POCKET
2541 HONDABRACKET
3
PreLIMInarY
BEFORE BEGINNING - Read QUICK START GUIDE PAGES 2-7
Locate your vehicle on the front cover of this instruction, disassemble the dash and remove factory stereo. If your vehicle is not listed on front cover, then this is NOT the correct kit for your vehicle.
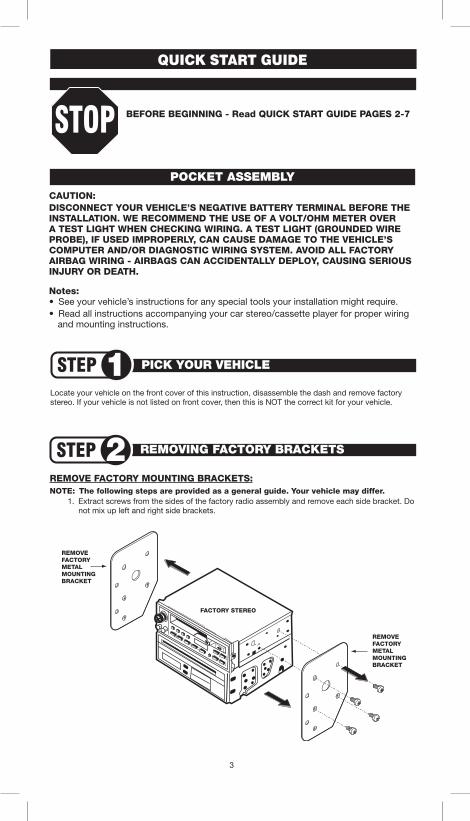
reMoVInG FaCtorY BraCKetS
PICK YoUr VeHICLe
REMOVE FACTORY MOUNTING BRACKETS:NOTE: The following steps are provided as a general guide. Your vehicle may differ. 1. Extract screws from the sides of the factory radio assembly and remove each side bracket. Do
not mix up left and right side brackets.
REMOVE FACTORY METAL MOUNTING BRACKET
REMOVE FACTORY METAL MOUNTING BRACKET
FACTORY STEREO
PoCKet aSSeMBLY
CAUTION:DISCONNECT YOUR VEHICLE’S NEGATIVE BATTERY TERMINAL BEFORE THE INSTALLATION. WE RECOMMEND THE USE OF A VOLT/OHM METER OVER A TEST LIGHT WHEN CHECKING WIRING. A TEST LIGHT (GROUNDED WIRE PROBE), IF USED IMPROPERLY, CAN CAUSE DAMAGE TO THE VEHICLE’S COMPUTER AND/OR DIAGNOSTIC WIRING SYSTEM. AVOID ALL FACTORY AIRBAG WIRING - AIRBAGS CAN ACCIDENTALLY DEPLOY, CAUSING SERIOUS INjURY OR DEATH.
Notes:• See your vehicle’s instructions for any special tools your installation might require.• Read all instructions accompanying your car stereo/cassette player for proper wiring
and mounting instructions.

4
NISSAN/INFINITI TRIM RING #2698 OR HONDA TRIM RING #2591
ATTACHING THE BRACKETS:Slide the right bracket into the corresponding alignment tabs at the front and rear of pocket. NOTE: Besure to slide the small tab at the rear of bracket into the notch on the rear of the pocket. Repeat same steps for left side.
2416 POCKET
LEFT NISSAN / INFINITI BRACKET #2417 OR LEFT HONDA BRACKET #2541
RIGHT NISSAN / INFINITI BRACKET #2417 OR RIGHT HONDA BRACKET #2541
aSSeMBLInG tHe PoCKet
ATTACHING THE TRIM RING:Press the pocket into place on the back of the trim ring and use the screws to secure.
See your vehicle’s instructions for the specific brackets and trim ring it may require.
EXAMPLE:

5
MoUntInG tHe Stereo
REMOVE SLEEVE FROM STEREO1. Locate the locking mechanism on your DIN
stereo sleeve (typically) on the side. 2. Slip mounting sleeve towards rear of stereo
and remove.
PREPARING STEREO:
MOUNTING THE STEREO1. Mount the aftermarket stereo and pocket to the factory metal mounting car stereo using the
factory hardware.2. Secure the radio mounting assembly to the dash using screws used to secure the factory stereo.
FACTORY METAL MOUNTING BRACKET
ISO MOUNT STEREO
POCKET ASSEMBLY
STEREO’S SUPPLIED TRIM RING
(MAY OR MAY NOT BE REQUIRED)
SIDE MOUNTING / HARD-WARE PROVIDED WITH STEREO
STEREO’S SUP-PLIED TRIMPLATE
DIN STEREO
STEREO SLEEVE
REAR SUPPORT STRAP
BEND TABS OUTWARD
1855 MOUNTING PANEL
FACTORY METAL MOUNTING BRACKET
DIN STEREO INSTALLATIONUsing the sleeve supplied with the stereo, secure the stereo’s chassis through the kit with the stereo’s faceplate on the front as shown.
REAR SUPPORT BRACKET: REAR SUPPORTING THE STERE0 ADDS TO THE INSTALLATIONS STRUCTURAL INTEGRITY.
HONDA / ACURA PANEL #1855

6
MoUntInG tHe raDIo (Cont’d)
SHAFT RADIO’S SUP-PLIED FACEPLATE
FACTORY METAL MOUNTING BRACKET
FACTORY METAL MOUNTING BRACKET
SHAFT STEREO
SHAFT STEREO INSTALLATION WITH POCKET
Using the hardware supplied with the stereo, secure the stereo chassis through the kit with the stereo’s faceplate on the front as shown. Using the ISO to shaft brackets (not included).
SHAFT STEREO INSTALLATION HONDA/ACURA PANEL #1855 Snap the shaft tabs (Part #1981, not included) into the stereo opening as shown. Using the stereo’s faceplate and shaft nuts mount the stereo to the panel as shown.
REAR SUPPORT STRAPS NOT INCLUDED
SHAFT STEREO’S SUPPLIED FACEPLATE
#1855MOUNTING PANEL
REAR SUPPORT BRACKET:REAR SUPPORTING THESTEREO ADDS TO THEINSTALLATION’S STRUCTURAL INTEGRITY.
SHAFT STEREO
CAUTION: USE CINCH STUDS AND NUTS SUPPLIED WITH KIT
NOTE: SNAP SHAFT MOUNTING TABS/ISO BRACKETS NOT INCLUDED. IF REQUIRED FOR YOUR STEREO INSTALLATION, CALL 800-621-3695 X3 FOR IMMEDIATE SHIPMENT
*
ISO TO SHAFT BRACK-ETS (SEE NOTE) *
NOTE: SNAP SHAFT MOUNTING TABS/ISO BRACKETS NOT INCLUDED. IF REQUIRED FOR YOUR STEREO INSTALLATION, CALL 800-621-3695 X3 FOR IMMEDIATE SHIPMENT
*
SNAP SHAFT TABS: (SEE NOTE)*

For wiring help, call 1-800-621-3695x3NOTES: • All factory wire locations are shown looking at the front of the plug with the wires exiting the
rear.• Use the wiring codes as a guide. Your vehicle might differ.
FaCtorY WIre CoDeS
7
1982-94 NISSAN VEHICLES (Use Scosche NN032 For Car Stereo Connector, sold separately)
Power and Front Speakers 1 = Left Front Negative 2 = Right Front Negative 3 = Power Antenna 4 = Dimmer 5 = Ground 6 = Left Front Positive 7 = Right Front Positive 8 = +12V Constant, Battery 9 = Illumination/Pilot10 = +12V Switched, Ignition
Rear Speakers1 = Right Rear Positive2 = Left Rear Positive3 = Open4 = Right Rear Negative5 = Left Rear Negative6 = Open
Power/Front Speaker Plug 1 = Chassis Ground (12V) 2 = Variable Illumination Dimmer 3 = 12V Constant, Battery 4 = Power Antenna 5 = Right Front Negative 6 = Left Front Negative 7 = +12V Ignition/Switched 8 = Illumination/Dimmer 9 = Right Front Positive10 = Left Front Positive
Rear Speaker Plug1 = Right Rear Negative2 = Left Rear Positive3 = Left Rear Negative4 = Empty5 = Right Rear Positive6 = Empty
1995-UP NISSAN VEHICLES (Use Scosche NN032 For Car Stereo Connector, sold separately)

8
1996-99 Acura CL1998-02 Honda AccordRadio Removal:NOTE: The factory stereo provision is for a double DIN style stereo or stereo/pocket assembly. An installation kit is not necessary for aftermarket installations if a stereo with ISO side mounting holes is used along with the factory equipped or similar style pocket.1. Extract (2) screws from the bottom of the radio dash bezel.2. Carefully pop out the hazard switch/clock assembly and extract
(1) screw from hehind.3. Carefully pry up on the radio trim bezel to release it from the
dash, unplug the climate controls and remove the dash bezel.
1994-01 Acura IntegraRadio Removal:1. Remove the ashtray and extract the (2) screws securing the ashtray and
lighter assembly to the dash, pull the assembly from the dash, unplug the connectors and remove the assembly.
2. Reach in behind the radio and loosen the (2) 8mm bolts securing the rear of the radio to the sub-dash structure.
3. Pull the radio out of the dash, unplug all connectors and remove the radio.NOTE: A 1/4” socket drive assembly with a 6” extension or a Scosche Skewdriver set will make the job easier.de dados de 1/4” con una extensión de 6”.
FRONT VIEWVISTA FRONTAL
SIDE VIEWVISTA LATERAL
HEAD UNITUNIDAD PRINCIPAL
1855MOUNTING PANELPANEL DE MONTAJE
1888 REAR SUPPORT/BRACKETSOPORTE POSTERIOR/ BRAQUETE
USE THESE TABSUTILICE LAS LENGÜETAS SOMBREADAS
1990-93 Acura Integra Radio Removal:NOTE: Floorboard access - view from the rear of the console.1. Locate and loosen the (2) chrome/silver 8mm bolts securing the rear support of the radio, pull the
radio, pull the radio assembly from the dash. Disconnect the antenna and other connectors, then remove the radio assembly.
NOTE: A 1/4” socket drive assembly with a 6” extension will make the job easier.
1855MOUNTINGPANEL1855 PANELES DE MONTAJE
Read pages 2-7 for kit assembly.
Read pages 2-7 for kit assembly.
Read pages 2-7 for kit assembly.
1986-95 Acura Legend Radio Removal:1. Extract the (2) screws below the ashtray securing the dash bezel to the dash.2. Using a panel removal tool carefully release the metal clip fasteners from around the parameter of
the dash bezel and remove.3. Extract the (2) bolts securing the rear of the radio to the sub-dash structure from under the radio in
the ash tray cavity.4. Pull the radio out of the cavity,
unplug all connectors and remove.
Read pages 2-7 for kit assembly.
SIDE VIEWVISTA LATERAL
HEAD UNITUNIDAD PRINCIPAL
1855MOUNTING PANELPANEL DE MONTAJE
1888 REAR SUPPORT/BRACKETSOPORTE POSTERIOR/ BRAQUETE
1888REAR SUPPORT/BRACKETSOPORTE POSTERIOR/BRAQUETE
1888BSPACER (PRESSED IN)ESPACIADOR (A PRECIÓN)
USE #8 MACHINE SCREW AND NUTUTILICE TORNILLO Y TUERCA #8
BACK VIEW OF THE MOUNTING PANELVISTA POSTERIOR DEL PANELE DE MONTAJE
REAR SUPPORT ASSEMBLYENSAMBLAJE PARA SOPORTE POSTERIOR
1855MOUNTING PANELPANEL DE MONTAJE
1862 REAR SUPPORT/BRACKETSOPORTE POSTERIOR/BRAQUETE
1855MOUNTINGPANEL1855 PANELES DE MONTAJE
2541L HONDA BRACKET2541L HONDA BRAQUETE
2541RHONDA BRACKET2541R HONDA BRAQUETE
2416 POCKET2416 BOLSA
2591HONDATRIM RING2591 HONDA ANILLO BASTIDOR

9
1992-94 Acura VigorRadio Removal: 1. Extract the cover cap in between the heater control sliding adjuster
controls and extract the screw behind. 2. Pull the heater controls assembly out of the dash, disconnect the connector and remove. 3. Extract the (2) screws securing the top of the radio assembly located in the heater control cavity. 4. Remove the ashtray and extract the (2) screws from this location. 5. Remove the cover caps located at the front of the console on each side of the console and extract
the screw behind each. 6. Lift up and remove the carpet, insert piece located in the console pocket. 7. Extract the (2) screws from the console pocket under the previously removed piece of carpet. 8. Carefully lift up on the console and slide it back away from the radio. 9. Pull the radio dash bezel assembly away from the dash, unplug all connectors (see caution) and
remove.10. Extract the (2) rear support bolts securing the rear of the radio to the subframe assembly structure
and remove the radio from the front of the dash bezel.
CAUTION: THIS RADIO IS OF THE ANTI-THEFT DESIGN, INCORPORATING A CODE SYSTEM PREVENTING THE RADIO FROM FUNCTIONING WHEN POWER IS DISCONNECTED AND THEN RECONNECTED. TO RESTORE PROPER FUNCTION IT IS NECESSARY TO ENTER THE SPECIFIC ACCESS CODE FOR THE RADIO. CHECK TO MAKE SURE THAT THE ACCESS CODE IS READILY AVAILABLE BEFORE DISCONNECTING THE RADIO.
Read pages 2-7 for kit assembly.
1855MOUNTINGPANEL1855 PANELES DE MONTAJE
SIDE VIEWVISTA LATERAL
HEAD UNITUNIDAD PRINCIPAL
1855 MOUNTING PANELPANEL DE MONTAJE
1888 REAR SUPPORT/BRACKETSOPORTE POSTERIOR/ BRAQUETE
2002-06 Acura RSX CoupeRadio Removal:NOTE: The factory stereo provision is for a Double DIN radio with a pocket. 1. Pry out lower power panel with power plug on it.2. Remove (2) Phillips head screw securing radio.3. Push radio out from rear to unclip (7) clips holding
radio in.
Read pages 2-7 for kit assembly.
2541L HONDA BRACKET2541L HONDA BRAQUETE
2541RHONDA BRACKET2541R HONDA BRAQUETE
2416 POCKET2416 BOLSA
2591HONDATRIM RING2591 HONDA ANILLO BASTIDOR
1996-98 Acura TLRadio Removal:1. Using a panel removel tool pry out the dashboard center
panel from the dashboard.2. Disconnect the connectors from the climate control unit.3. Remove the radio panel and stereo radio/cassette/CD
Player from the dashboard.4. Disconnect the 16-Pin and 5-Pin connectors, and
antenna lead from the stereo radio/cassette/CD player.5. Remove the stereo radio/cassette/CD player from the
radio panel.
Read pages 2-7 for kit assembly.
2541L HONDA BRACKET2541L HONDA BRAQUETE
2541RHONDA BRACKET2541R HONDA BRAQUETE
2416 POCKET2416 BOLSA
2591HONDATRIM RING2591 HONDA ANILLO BASTIDOR

10
1855MOUNTING PANELPANELES DE MONTAJE
1990-93 Honda Accord Radio Removal:1. Extract the (2) screws - one from each side of the console. Lift off the
console (for manual transmissions remove the shift lever boot first).2. Pull out the ashtray and extract the (2) screws securing the ashtray light and side housing.3. Remove the (2) screws securing the rear of the radio (screws are located to the rear of the dash
cavity, in the support bracket of the radio).4. Pull the radio/pocket assembly out of the sash, flex the trim panel for radio support bracket
clearance.NOTE: For added bracket clearance, remove (2) screws that secure the bottom/backside of the radio trim - (1) from each side of the panel, located just below where the rear radio support screws were removed, then remove (2) screws from the panel just above the radio location. Disconnect the connectors and remove the assembly. BACK VIEW OF THE
MOUNTING PANELVISTA POSTERIORPANELES DE MONTAJE
1862REAR SUPPORT/BRACKETSOPORTE POSTERIOR/BRAQUETE
Read pages 2-7 for kit assembly.
FRONT VIEWVISTA FRONTAL
USE THESE TABSUTILICE LAS LENGÜETAS SOMBREADAS
USE THE SHADED BRACKETS & THE INDICATED HOLE LOCATIONS. CUT OFF THE REMAINING BRACKETS AND DISCARD.Usa los soportes asombrados y las localizaciónes de aberturas indicadas. Corta los soportes que sobran y desechalas.
1994-97 Honda Accord Radio Removal:1. Remove the ashtray and extract the screw located in the ashtray cavity
securing the radio dash bezel to the dash.2. Remove the cup holder located in front of the console storage compartment and extract the screw
from inside the cavity securing the console.3. Carefully pry up on the cover panel located in the console storage pocket with a small screwdriver
and extract the (2) screws securing the console.4. Carefully slide the console back far enough to access and remove the (2) screws behind the shifter
securing the radio dash bezel.5. Using a panel removal tool carefully pry up on the perimeter of the radio trim bezel starting around
the shifter to release the fastening clips securing it to the dash, unplug all connectors and remove the bezel.
6. Extract the (2) bolts securing the rear support of the radio to the dash below the radio/ pocket assembly, pull the radio out of the dash cavity, unplug all connectors and remove the radio.
Read pages 2-7 for kit assembly.
1888 REAR SUPPORT/ BRACKETSOPORTE POSTERIOR/BRAQUETE
BACK VIEW OF THE MOUNTING PANELVISTA POSTERIORPANELES DE MONTAJE
1855MOUNTING PANELPANELES DE MONTAJE
1862REAR SUPPORT/BRACKETSOPORTE POSTERIOR/ BRAQUETE
USE #8 MACHINE SCREW AND NUTUTILICE TORNILLO Y TUERCA #8
REAR SUPPORT ASSEMBLYENSAMBLAJE PARA SOPORTE POSTERIOR
FRONT VIEWVISTA FRONTAL
USE THESE TABS
UTILICE LAS LENGÜETAS
USE THE SHADED BRACKETS & THE INDICATED HOLE LOCATIONS. CUT OFF THE REMAINING BRACKETS AND DISCARD.USA LOS SOPORTES ASOMBRADOS Y LAS LOCALIzACIÓNES DE ABERTURAS INDICADAS. CORTA LOS SOPORTES QUE SOBRAN Y DESECHALAS.

11
1997-03 Honda CRVRadio Removal:1. Unsnap push-pin fasteners from bottom of center console and remove
bottom panel.2. Extract (4) screws from bottom edge of bezel. Extract (4) screws from inside dash below pocket.
Pull cup holder/pocket assembly out of dash and remove.3. Open glove box and remove stoppers. Extract (2) screws from right side of center dash bezel.4. From below steering wheel extract (2) screws from bottom edge or panel, unsnap upper edge of
panel, unplug, and remove.5. Unsnap top edge or center lower bezel, unplug, and remove.6. Extract (2) screws from sides of pocket.7. Unsnap radio/AC control dash bezel, unplug, and remove8. Extract (4) screws from each side
of the radio bracket assembly to remove radio from dash/AC bezel.
2541L HONDA BRACKET2541L HONDA BRAQUETE 2416 POCKET
2416 BOLSA
FRONT VIEWVISTA FRONTAL
USE THESE TABSUTILICE LAS LENGÜETAS
SOMBREADAS
Read pages 2-7 for kit assembly.
1855MOUNTINGPANELPANELES DE MONTAJE
2541R HONDA BRACKET2541R HONDA BRAQUETE
2591HONDATRIM RING2591HONDA ANILLO BASTIDOR
1855 MOUNTING PANELPANELE DE MONTAJE
USE THE SHADED BRACKETS & THE INDICATED HOLE LOCATIONS. CUT OFF THE REMAINING BRACKETS AND DISCARD.
Usa los soportes asombrados y las localizaciónes de aberturas indicadas. Corta los soportes que sobran y desechalas.
1855 MOUNTING PANELPANELES DE MONTAJE
2002-06 Honda CRV RADIO REMOVAL:1. Remove (2) screws from under the center dash air vents.2. Using a panel removal tool pry out the dash bezel around the radio.3. Remove (4) screws securing the radio. Disconnect and remove.
Read pages 2-7 for kit assembly.1999-00 Honda Civic
Radio Removal:1. Extract (2) screws from center panel below radio.2. Extract (4) screws from driver’s side underdash panel, and unsnap to remove.3. Extract (2) screws from left side of center dash panel.4. Open glove box, push stoppers inward to let glove box hang all the way open.5. Extract (2) screws from right side of center
dash panel.6. Pull the center dash panel down, unplug
lighter socket and remove panel.7. Looking up into dash from underneath,
extract (4) screws securing the radio/ pocket assembly.
8. Carefully pull out complete center console/radio/climate control assembly.
9. Unplug all control, radio, antenna, and remove entire assembly.
2541L HONDA BRACKET2541L HONDA BRAQUETE
2541RHONDA BRACKET2541R HONDA BRAQUETE
2416 POCKET2416 BOLSA
2591HONDATRIM RING2591 HONDA ANILLO BASTIDOR
USE THESE TABS
UTILICE LAS LENGÜETAS
USE THE SHADED BRACKETS & THE INDICATED HOLE LOCATIONS. CUT OFF THE REMAINING BRACKETS AND DISCARD.
Usa los soportes asombrados y las localizaciónes de aberturas indicadas. Corta los soportes que sobran y desechalas.
Read pages 2-7 for kit assembly.

12
1995-98 Honda Odyssey 1996-99 Isuzu Oasis Radio Removal:1. Open glovebox and unsnap glove box’s rubber stoppers at the sides and remove (1) screw at
restraining arm at the right side to let glove box open all the way down.2. Extract (2) screws from right side of center console assembly.3. Extract (2) screws from bottom of center console near carpet.4. Open console storage compartment and extract (2) screws from near top.5. Extract (2) screws from driver’s side underdash panel and pop out the right side of panel only to
access (1) screw holding center console assembly.6. Carefully pull back on the lower center console assembly to unsnap, unplug, and remove.7. Extract (2) screws from each side of slide out cup holder and remove cup holder.8. From underneath, extract (2) 8mm screws holding back
edge of radio/pocket to dash structure.9. Slide radio out of dash unplug connectors, antenna
and remove.
1855MOUNTING PANEL
PANELE DE MONTAJE
FRONT VIEWVISTA FRONTAL
USE THESE TABSUTILICE LAS LENGÜETAS
SOMBREADAS
Read pages 2-7 for kit assembly.
1855 MOUNTING PANELPANELES DE MONTAJE
1888 REAR SUPPORT/ BRACKETSOPORTE POSTERIOR/ BRAQUETE
1855 MOUNTING PANELPANELES DE MONTAJE
HEAD UNITUNIDAD PRINCIPAL
SIDE VIEWVISTA LATERAL
USE THE SHADED BRACKETS & THE INDICATED HOLE LOCATIONS. CUT OFF THE REMAINING BRACKETS AND DISCARD.Usa los soportes asombrados y las localizaciónes de aberturas indicadas. Corta los soportes que sobran y desechalas.
Radio Removal:1. Open ashtray and remove ashtray receptacle.2. Extract (1) screw from behind ashtray.3. Carefully pry out on the radio trim bezel to release fasteners,
unplug, and remove the bezel.4. Extract (4) screws holding radio in, unplug
connectors, antenna lead and remove radio.
1998-01 Honda Passport1998-01 Isuzu Rodeo
2416 POCKET2416 BOLSA
2541R HONDA BRACKET2541R HONDA BRAQUETE
2591 HONDA TRIM RING2591 HONDA ANILLO BASTIDOR
Read pages 2-7 for kit assembly.
1999-04 Honda Odyssey Radio Removal:NOTE: The factory radio is a double DIN/ISO.1. Unsnap bezel, lift away, unplug, and remove. 1855 MOUNTING PANEL
PANELES DE MONTAJE
Read pages 2-7 for kit assembly.

13
1997-01 Honda PreludeRadio Removal:1. Carefully unsnap radio/AC control
trim bezel and remove.2. Extract (4) screws from radio/pocket
assembly, unplug radio, and remove. FRONT VIEW
VISTA FRONTAL
USE THESE TABSUTILICE LAS LENGÜETAS
SOMBREADAS
1855 MOUNTING PANELPANELE DE MONTAJE
1855MOUNTINGPANELPANELES DE MONTAJE
USE THE SHADED BRACKETS & THE INDICATED HOLE LOCATIONS. CUT OFF THE REMAINING BRACKETS AND DISCARD.Usa los soportes asombrados y las localizaciónes de aberturas indicadas. Corta los soportes que sobran y desechalas.
Read pages 2-7 for kit assembly.
1992-96 Honda Prelude Radio Removal:1. Extract (2) screws from the bottom of the radio dash bezel.2. Carefully pop out the hazard switch/clock assembly and extract
(1) screw from behind.3. Carefully pry up on the radio trim bezel to release it from the
dash, unplug the climate controls and remove the dash bezel.
SIDE VIEWVISTA LATERAL
DIN RADIORADIO DIN
1855MOUNTING PANELPANELE DE MONTAJE
1888 REAR SUPPORT/ BRACKETSOPORTE POSTERIOR/BRAQUETE
Read pages 2-7 for kit assembly.
1994-01 Honda Passport1991-95 Isuzu Rodeo Radio Removal:1. Remove the ashtray from the console, then extract (2) screws securing the radio/console trim along
bottom.2. Locate and remove (2) screws from along the console sides - (1) from each side of the console.3. Remove the trim knobs from the climate controls.4. Pull the panel off of the console and extract (2) screws fromeach side of the radio (screws secure
the radio/bracket assembly).5. Pull the radio assembly out of the cavity - disconnect the connectors and remove the radio.
Kit Assembly:1. Remove the (4) screws securing the radio to the side mounting brackets.2. Attach the kit side walls to the kit panel using the (4) supplied
#8 x 1/2” screws and speed clips. Slide kit back for flush mount installation.
3. When using a DIN chassis, cut or break away the shaft tabs, by following the DIN cut lines.
Double DIN Installations: (Additional kit required 1. Remove the (2) screws securing the pocket to the side
mounting brackets.2. Repeat steps 2 thru 4 from kit assembly.
2541L HONDA BRACKET2541L HONDA BRAQUETE
2416 POCKET2416 BOLSA
2591HONDATRIM RING2591 HONDAANILLO BASTIDOR 2541R
HONDA BRACKET2541RHONDA BRAQUETE
Read pages 2-7 for kit assembly.
1855MOUNTINGPANELPANELES DE MONTAJE

14
1996-99 Infiniti I301995-99 Nissan MaximaRadio Removal:NOTE: The factory stereo provision is for a double ISO DIN style radio.1. Carefully unsnap shifter trim bezel.2. Remove (1) screw from left side of ashtray assembly.3. Using a panel removal tool, pry out the right side of
the ash tray assembly to unsnap it, unplug wires and remove.
4. Remove (2) screws from the bottom of the radio trim bezel.5. Using a panel removal tool, carefully unsnap the top vent/clock assembly above the heater/A.C.
controls. Unplug wires and remove.6. Remove (2) screws from above the heater/A.C. controls.7. Pull complete radio-pocket-heater/A.C. control portion of the console out of the dash. Unplug all
connectors and remove.8. Extract (2) screws from each side of radio to remove it from steel bracket assembly.9. Repeat step “8” to remove pocket if needed.
2416 POCKET2416 BOLSA
2417R NISSAN BRACKET2417R NISSAN BRAQUETE
2417L NISSAN BRACKET2417L NISSAN BRAQUETE
2698NISSANTRIM RING2698 NISSANANILLO BASTIDOR
Read pages 2-7 for kit assembly.1990-93 Infiniti M30
Radio Removal:1. Open the pocket at the top of the radio/console trim
and extract (2) screws from the top of the pocket.2. Remove (1) screw from above t he cigarette lighter
assembly.3. Using a panel removal tool, carefully pry outward
releasing the trim from the dash. Lift up and out on panel to remove.
4. Extract (4) screws securing the radio/pocket assembly to the dash. Unplug the connectors and remove.
2416 POCKET2416 BOLSA
2417R NISSAN BRACKET2417R NISSAN BRAQUETE
2417L NISSAN BRACKET2417L NISSAN BRAQUETE
2698NISSANTRIM RING2698 NISSANANILLO BASTIDOR
Read pages 2-7 for kit assembly.
Read pages 2-7 for kit assembly.1999-02 Infiniti G20
Radio Removal:1. Extract (2) Philips screws located on the bottom of
the radio trim dash panel.2. Pry up on the panel starting at the bottom working
your way up.3. Unplug (2) plugs and remove.4. Extract (4) screws securing radio to the dash, unplug,
and remove.
1991-96 Infiniti G201995-99 Nissan SentraRadio Removal:1. Using a panel removal tool, carefully unsnap plastic screw cap at top center of the radio trim bezel
and remove the screw.2. Unsnap shifter trim bezel.3. Extract (4) screws from radio assembly, unplug
connectors, antenna lead and remove radio.
1855 MOUNTING PANELPANELES DE MONTAJE
Read pages 2-7 for kit assembly.
2416 POCKET2416 BOLSA
2417R NISSAN BRACKET2417R NISSAN BRAQUETE
2417L NISSAN BRACKET2417L NISSAN BRAQUETE
2698NISSANTRIM RING2698 NISSANANILLO BASTIDOR
2416 POCKET2416 BOLSA
2417R NISSAN BRACKET2417R NISSAN BRAQUETE
2417L NISSAN BRACKET2417L NISSAN BRAQUETE
2698NISSANTRIM RING2698 NISSANANILLO BASTIDOR

15
1990-93 Infiniti Q45Radio Removal:1. Remove the ashtray insert and extract (2) screws from
inside the ashtray assembly.2. Using a panel removal tool, lift upward on the shifter
bezel to release the clips. Disconnect the power window switches and remove the bezel.
3. Extract (2) screws below the ashtray in the shifter cavity. Unplug the connectors and remove the ashtray assembly.
4. Extract (2) screws at the back of the shifter cavity securing the dash bezel.
5. Extract (2) screws at the bottom of the ashtray cavity securing the dash bezel.
6. Using a panel removal tool, carefully pry outward on the dash bezel releasing the clips securing it to the dash. Unplug the defroster and remove.
7. Extract the (4) screws securing the radio to the dash. Pull the unit out of the dash, unplug all connectors, and remove.
Read pages 2-7 for kit assembly.
2416 POCKET2416 BOLSA
2417R NISSAN BRACKET2417R NISSAN BRAQUETE
2417L NISSAN BRACKET2417L NISSAN BRAQUETE
2698NISSANTRIM RING2698 NISSANANILLO BASTIDOR
1995-06 Nissan 200SXRadio Removal:NOTE: The factory stereo provision is for a double ISO / DIN style radio.1. Using a panel removal tool, carefully unsnap plastic screw
cap at top center of the radio trim bezel and remove the screw.
2. Unsnap shifter trim bezel.3. Extract (4) screws from radio assembly, unplug connectors,
antenna lead and remove radio.
Read pages 2-7 for kit assembly.
2417L NISSAN BRACKET2417L NISSAN TOYOTABRAQUETE
2416 POCKET2416 BOLSA
2417R NISSAN BRACKET2417R NISSAN BRAQUETE
2698NISSANTRIM RING2698 NISSANANILLO BASTIDOR
1997-01 Infiniti QX41996-01 Nissan PathfinderRadio Removal:1. Extract (2) screws from the bottom of the radio
dash bezel.2. Carefully unsnap radio dash bezel, unplug all
switches and remove.3. Extract the (4) screws securing the radio to the
dash, unplug connectors and antenna and remove radio.
Read pages 2-7 for kit assembly.
2416 POCKET2416 BOLSA
2417R NISSAN BRACKET2417R NISSAN BRAQUETE
2417L NISSAN BRACKET2417L NISSAN BRAQUETE
2698NISSANTRIM RING2698 NISSANANILLO BASTIDOR
1997-01 Infiniti Q45Radio Removal:NOTE 1: The factory radio provision is for a double DIN ISO stereo assembly that fits behind the dash bezel. For single DIN ermarket applications, we recommend the use of an ISO mount DIN radio.NOTE 2: For aftermarket stereo installations, Scosche Industries recommends a “FAI” factory amp interface and a “FAINN03” harness for BOSE vehicles.NOTE 3: The factory BOSE amplifier is located in the trunk, under the rear deck.1. Carefully pop out the dash vent/trim assembly and
extract (4) screws from behind.2. Lift console/armrest to access lowest storage compartment.3. Pop out trim/latch assembly to access (2) screws and remove them.4. Remove console/gear shift trim. Unplug lighter/ashtray and remove.5. Extract (4) screws from lower radio/console trim.6. Carefully lift away and unplug complete radio/console assembly to remove.7. Extract (4) screws from each side of the double DIN radio to remove the radio from console
assembly.
Read pages 2-7 for kit assembly.
2416 POCKET2416 BOLSA
2417R NISSAN BRACKET2417R NISSAN BRAQUETE
2417L NISSAN BRACKET2417L NISSAN BRAQUETE
2698NISSANTRIM RING2698 NISSANANILLO BASTIDOR

16
RADIO REMOVAL:NOTE: The factory radio provision is for a double DIN ISO stereo or stereo/pocket assembly that fits behind the dash bezel. For single DIN aftermarket applications, we recommend the use of an ISO mount DIN radio.1. Pop up shifter trim from the bracket edge first.2. Extract (2) screws from the bottom of the radio dash bezel.3. Extract (2) screws in the dash bezel from below climate
controls.4. Carefully pull out on the dash radio dash bezel to release.
Unplug lighter and remove the bezel.5. Extract the (4) screws securing the radio to the dash.
Unplug connectors and antenna and remove radio.
Radio Removal:1. Snap off the trim piece from along the top edge of the radio
and remove (2) screws from this location.2. Remove (1) trim cap from each top corner of the dash/
radio trim piece and extract (2) screws from this location.
3. Carefully snap off the trim panel. Spring clips secure the trim in the two lower corners.
4. Extract the (4) screws securing the radio/bracket assembly to the dash. Pull the assembly out of the cavity. Disconnect the wire harnesses and remove the radio.
1990-96 Nissan 300ZX Read pages 2-7 for kit assembly.
1998-01 Nissan Altima Read pages 2-7 for kit assembly.
2417L NISSAN BRACKET2417L NISSAN TOYOTABRAQUETE
2416 POCKET2416 BOLSA
2417R NISSAN BRACKET2417R NISSAN BRAQUETE
2698NISSAN TRIM RING2698 NISSANANILLO BASTIDOR
2417L NISSAN BRACKET2417L NISSAN TOYOTABRAQUETE
2416 POCKET2416 BOLSA
2417R NISSAN BRACKET2417R NISSAN BRAQUETE
2698NISSANTRIM RING2698 NISSANANILLO BASTIDOR
Radio Removal:1. Carefully, release fasteners that secure radio/gear selector
trim panel (panel snaps off) using panel removal tool.2. Extract the (4) screws that secure the radio assembly to
the dash, pull the unit out of the dash cavity, disconnect the wire harness connectors/antenna and remove the radio.
1995-98 Nissan 240SXRadio Removal:NOTE: The factory stereo provision is for a double ISO DIN style radio.1. Carefully pop out ashtray and remove (1) screw from
ashtray cavity.2. Unsnap shifter trim bezel3. Remove (2) screws at bottom of radio trim bezel.4. Carefully pry out upper vent hazard/defroster switch
assembly.5. Extract (2) screws holding top of radio assembly.6. Lift radio assembly up from dash. Unplug all connectors,
antenna, and remove radio.7. Extract (2) screws from each side of radio to remove it from steel bracket
assembly.8. Repeat step “8” to remove pocket if needed.
2417L NISSAN BRACKET2417L NISSAN TOYOTABRAQUETE
2416 POCKET2416 BOLSA
2417R NISSAN BRACKET2417R NISSAN BRAQUETE
2698NISSANTRIM RING2698 NISSANANILLO BASTIDOR
Read pages 2-7 for kit assembly.
1989-94 Nissan 240SX Read pages 2-7 for kit assembly.
2417L NISSAN BRACKET2417L NISSAN TOYOTABRAQUETE
2416 POCKET2416 BOLSA
2417R NISSAN BRACKET2417R NISSAN BRAQUETE
2698 NISSANTRIM RING2698 NISSANANILLO BASTIDOR

17
Radio Removal:NOTE: The factory radio provision is for a Double ISO/DIN style radio. 1. Remove ashtray, extract (2) Philips head screws from
ashtray cavity.2. Using panel removal tool, pry off radio trim bezel. Unplug
cigarette lighter and remove.3. Extract (4) Philips head screws securing radio. Lift away,
unplug, and remove.
2000-01 Nissan Frontier
1998-99 Nissan FrontierRadio Removal:NOTE: The factory radio provision is for a Double DIN ISO stereo or stereo/pocket assembly that fits behind the dash bezel. For single ISO DIN aftermarket applications we recommend the use of an ISO mount DIN radio. 1. Remove ashtray and extract (2) screws from below.2. Carefully pull out on the dash radio dash bezel to release.
Unplug and remove the bezel.3. Extract the (4) screws securing the radio to the dash.
Unplug connectors, antenna and remove radio.
Read pages 2-7 for kit assembly.
2417L NISSAN BRACKET2417L NISSAN TOYOTABRAQUETE
2416 POCKET2416 BOLSA
2417R NISSAN BRACKET2417R NISSAN BRAQUETE
2698NISSAN TRIM RING2698 NISSANANILLO BASTIDOR
Read pages 2-7 for kit assembly.
2417L NISSAN BRACKET2417L NISSAN TOYOTABRAQUETE
2416 POCKET2416 BOLSA
2417R NISSAN BRACKET2417R NISSAN BRAQUETE
2698NISSAN TRIM RING2698 NISSANANILLO BASTIDOR
Radio Removal:1. Extract (2) screws from the top, underside of the radio/
climate control trim panel.2. Pull the panel off and remove it.3. Extract (4) fasteners securing the radio/pocket assembly.4. Pull the assembly out of the dash. Disconnect the radio
harnesses and remove the radio.
1993-97 Nissan AltimaRadio Removal:1. Using a panel removal tool, carefully pry up on shifter trim bezel to release and remove.2. Extract (2) screws from the panel below the steering column. Gently pull the panel down to release the clips along the top
edge of it and remove the panel.3. Extract (2) screws from just above the radio.4. Extract (4) screws in the shifter area holding the lower rear
portion of the radio trim bezel.5. Extract (1) screw at lower left between radio and steering
wheel.6. Carefully pull bezel away from console/ dash to remove
and use caution above radio where this bezel interlocks with the vent trim.
7. Extract 4 screws securing the radio in the dash, unplug and remove.
Read pages 2-7 for kit assembly.
2417L NISSAN BRACKET2417L NISSAN TOYOTABRAQUETE
2416 POCKET2416 BOLSA
2417R NISSAN BRACKET2417R NISSAN BRAQUETE
2698NISSAN TRIM RING2698 NISSANANILLO BASTIDOR
1990-91 Nissan Axxess
2417L NISSAN BRACKET2417L NISSAN TOYOTABRAQUETE
2416 POCKET2416 BOLSA
2417R NISSAN BRACKET2417R NISSAN BRAQUETE
2698NISSAN TRIM RING2698 NISSANANILLO BASTIDOR
Read pages 2-7 for kit assembly.
18
Radio Removal:1. Remove (2) screws above the radio in the trim bezel.2. Remove (2) screws below the ashtray securing the bezel.3. Unsnap the shifter trim and remove.4. Starting from the top, release the bezel from the dash by
pulling outward. Unplug the connectors. Tilt the bezel upward and remove the cable from the air vent at the top of the bezel.
5. Extract the (4) screws securing the radio to the dash. Pull the radio out of the cavity. Unplug all connectors and remove.
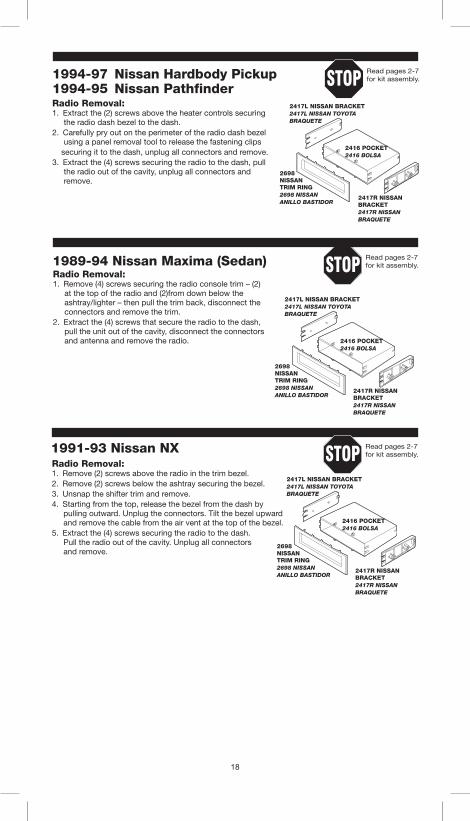
1991-93 Nissan NX Read pages 2-7 for kit assembly.
2417L NISSAN BRACKET2417L NISSAN TOYOTABRAQUETE
2416 POCKET2416 BOLSA
2417R NISSAN BRACKET2417R NISSAN BRAQUETE
2698NISSAN TRIM RING2698 NISSANANILLO BASTIDOR
Radio Removal:1. Remove (4) screws securing the radio console trim – (2)
at the top of the radio and (2)from down below the ashtray/lighter – then pull the trim back, disconnect the connectors and remove the trim.
2. Extract the (4) screws that secure the radio to the dash, pull the unit out of the cavity, disconnect the connectors and antenna and remove the radio.
1994-97 Nissan Hardbody Pickup1994-95 Nissan PathfinderRadio Removal:1. Extract the (2) screws above the heater controls securing
the radio dash bezel to the dash.2. Carefully pry out on the perimeter of the radio dash bezel
using a panel removal tool to release the fastening clips securing it to the dash, unplug all connectors and remove.3. Extract the (4) screws securing the radio to the dash, pull
the radio out of the cavity, unplug all connectors and remove.
Read pages 2-7 for kit assembly.
2417L NISSAN BRACKET2417L NISSAN TOYOTABRAQUETE
2416 POCKET2416 BOLSA
2417R NISSAN BRACKET2417R NISSAN BRAQUETE
2698NISSAN TRIM RING2698 NISSANANILLO BASTIDOR
1989-94 Nissan Maxima (Sedan) Read pages 2-7 for kit assembly.
2417L NISSAN BRACKET2417L NISSAN TOYOTABRAQUETE
2416 POCKET2416 BOLSA
2417R NISSAN BRACKET2417R NISSAN BRAQUETE
2698NISSAN TRIM RING2698 NISSANANILLO BASTIDOR

19
Radio Removal:1. Remove (3) Phillips head sheet metal screws from the
underside of the upper lip of the dash trimpanel.2. Remove (2) Phillips head sheet metal screws from under
the bottom edge of the trimpanel then remove the trimpanel.3. Remove (4) Phillips head sheet metal screws from the radio
mounting brackets, disconnect wiring harnesses, and then remove radio.
1987-90 Nissan Pulsar (3 Door Sport Coupe)
Read pages 2-7 for kit assembly.
2417L NISSAN BRACKET2417L NISSAN TOYOTABRAQUETE
2416 POCKET2416 BOLSA
2417R NISSAN BRACKET2417R NISSAN BRAQUETE
2698NISSAN TRIM RING2698 NISSANANILLO BASTIDOR
Radio Removal:NOTE: The factory radio is a DIN style mounted behind the radio trim bezel.1. Remove (2) screws from above the radio securing the
trim bezel to the dash.2. Remove the ashtray (for added clearance) and extract
(2) screws securing the bottom of the radio trim bezel. 3. Carefully pry outward on radio trim bezel. Using a panel
removal tool, disconnect all connectors and remove.4. Extract the (4) screws securing the radio to the
dash. Unplug the connectors and remove the radio.
1991-94 Nissan SentraRead pages 2-7 for kit assembly.
2417L NISSAN BRACKET2417L NissAN TOYOTABRAQUETE
2416 POCKET2416 BOLSA
2417R NISSAN BRACKET2417R NISSAN BRAQUETE
2698NISSAN TRIM RING2698 NISSANANILLO BASTIDOR
Radio Removal:NOTE: Removal procedures are the same on all models.1. Remove ashtray.2. Remove (2) Phillips head sheet metal screws from underside
of top edge of radio trimpanel.3. Remove (2) Phillips head sheet metal screws from underside
of lower edge of radio trimpanel.4. Disconnect electrical connections from cigarette lighter
and remove trimpanel.5. Remove (2) Phillips head sheet metal screws securing
radio to dash, disconnect power, antenna and all other electrical connections and remove radio.
1987-90 Nissan Sentra (Sedan, Wagon and Hatchback)
Read pages 2-7 for kit assembly.
2417L NISSAN BRACKET2417L NISSAN TOYOTABRAQUETE
2416 POCKET2416 BOLSA
2417R NISSAN BRACKET2417R NISSAN BRAQUETE
2698NISSAN TRIM RING2698 NISSANANILLO BASTIDOR
Radio Removal:1. Extract (2) screws from above the radio location – screws
secure the trimpanel.2. Pull the ashtray out and remove two screws securing the
lower edge of the trim piece.3. Remove (3) screws from the bottom edge of the dash trim
piece – one below the hazard light and defroster switch and two located to the left of the steering column.
4. Release the spring clips that secure the entire top edge of the dash trim – clips may require firm prying at each location.
5. Disconnect the harnesses from the various switches and remove the trim.
6. Four screws secure the radio assembly to the dash.
1990-92 Nissan Stanza (Sedan) Read pages 2-8 for kit assembly.
2417L NISSAN BRACKET2417L NISSAN TOYOTABRAQUETE
2416 POCKET2416 BOLSA
2417R NISSAN BRACKET2417R NISSAN BRAQUETE
2698NISSAN TRIM RING2698 NISSANANILLO BASTIDOR

20
Radio Removal:1. Remove (3) screws from above radio location.2. Remove (2) screws, one from side of heater and one from
A/C controls, remove dash panel.3. Remove (3) screws securing radio assembly to dash, pull
assembly outward.4. Disconnect power, antenna, speaker and all electrical
connections, remove radio.
Radio Removal:1. Remove (2) Phillips head sheet metal screws from top of
radio trimpanel above climate controls.2. Remove (2) Phillips head sheet metal screws from lower
radio trimpanel, one from either side of the ashtray.3. Remove ashtray and trim panel.4. Remove (4) Phillips head sheet metal screws from radio
bracket.5. Disconnect antenna, speaker, power and all electrical
connections, remove radio.
1987-89 Nissan Stanza (Sedan, Hatchback)
1982-86 Nissan Stanza (Liftback, Sedan)
Read pages 2-7 for kit assembly.
2417L NISSAN BRACKET2417L NISSAN TOYOTABRAQUETE
2416 POCKET2416 BOLSA
2417R NISSAN BRACKET2417R NISSAN BRAQUETE
2698NISSAN TRIM RING2698 NISSANANILLO BASTIDOR
Read pages 2-7 for kit assembly.
2417L NISSAN BRACKET2417L NISSAN TOYOTABRAQUETE
2416 POCKET2416 BOLSA
2417R NISSAN BRACKET2417R NISSAN BRAQUETE
2698NISSAN TRIM RING2698 NISSANANILLO BASTIDOR
Radio Removal:NOTE: The factory radio is for a double ISO/DIN radio.1. Remove the ashtray and extract (2) Phillip head screws
from the underside of ashtray.2. Unsnap the radio dash bezel from the bottom edge first,
lift away, disconnect, and remove.3. Extract (4) Phillip head screws securing radio. Lift away,
unplug, and remove.
2000-04 Nissan Xterra
2417L NISSAN BRACKET2417L NISSAN TOYOTABRAQUETE
2416 POCKET2416 BOLSA
2417R NISSAN BRACKET2417R NISSAN BRAQUETE
2698NISSAN TRIM RING2698 NISSANANILLO BASTIDOR
Read pages 2-7 for kit assembly.

16
Remoción de Radio:NOTA: Los procedimientos de desmontaje son los mismos en todos los modelos.1. Retirar el cenicero.2. sacar dos tornillos para metal con
cabeza en cruz de la parte inferior del borde superior de la moldura del radio.
3. sacar dos tornillos para metal con cabeza en cruz de la parte inferior del borde inferior de la moldura del radio.
4. Desconectar los enchufes eléctricos del encendedor y retirar la moldura.5. sacar dos tornillos para metal con cabeza en cruz que fijan el radio al tablero, desconectar el suministro de
energía, la antena y todas las demás conexiones eléctricas, luego retirar el radio.
1987-90 Nissan Sentra (Sedan, Wagon and Hatchback)
1990-92 Nissan Stanza (Sedan)Remoción de Radio:1. Extraer dos tornillos de la parte superior de la ubicación del radio -
los tornillos fijan la moldura.2. sacar el cenicero y sacar dos
tornillos que fijan el borde inferior de la moldura.3. sacar tres tornillos del borde inferior de la moldura del tablero - uno debajo del mando de las luces de
emergencia y descongelador y dos en el lado izquierdo de la columna de dirección.4. soltar los sujetadores tipo resorte que fijan todo el borde superior de la moldura del panel - los sujetadores
pueden requerir que los hagan saltar con fuerza.5. Desconectar los arneses de los distintos mandos y retirar la moldura.6. Cuatro tornillos fijan el ensamblaje del radio al tablero.
“Léase las páginas 2-7 para ensamblar el kit de instalación”
Para illustraciones detallados sobre ensemblar el panal de montaje y el
orificio para este vehiculo, referirse a la seccion en ingles.
Para illustraciones detallados sobre ensemblar el panal de montaje y el orificio para este vehiculo, referirse a la seccion en ingles.
“Léase las páginas 2-7 para ensamblar el kit de instalación”
1987-89 Nissan Stanza (Sedan, Hatchback)Remoción de Radio:1. sacar dos tornillos para metal con cabeza en cruz de la parte superior de la moldura del radio, sobre de los
controles de clima.2. sacar dos tornillos para metal con cabeza en cruz de la parte inferior de la moldura del radio, (1) de cada lado
del cenicero.3. Retirar el cenicero y la moldura.4. Retirarcuatro tornillos para metal con cabeza en cruz del braquete del radio.5. Desconectar la antena, el parlante, el suministro eléctrico y todas las conexiones eléctricas, luego retirar el
radio.Para illustraciones detallados sobre ensemblar el panal de montaje y el orificio para este
vehiculo, referirse a la seccion en ingles.
“Léase las páginas 2-7 para ensamblar el kit de instalación”
Remoción de Radio:1. sacar tres tornillos ubicados sobre
el radio.2. sacar dos tornillos, uno a cada lado de los controles del acondicionador de aire/calefacción y retirar el
tablero.3. sacar tres tornillos que fijan el radio al tablero, sacar el ensamblaje tirando de él.4. Desconectar la energía, la antena, el parlante y todas las conexiones eléctricas, retirar el radio.
1982-86 Nissan Stanza (Liftback, Sedan)
2000-01 Nissan XterraRemoción de Radio:NOTA: El radio provisto por la fábrica es un radio isO/DiN doble.1. Remueva el cenicero y extraiga los (2) tornillos con cabeza Phillips del fondo de la cavidad del cenicero.2. Desprenda primero el bisel bastidor del radio de la orilla inferior, levante hacia afuera, desconecte y remueva.3. Extraiga los (4) tornillos con cabeza
Phillips que sujetan el radio. Levante hacia afuera, desconecte y remueva.
Para illustraciones detallados sobre ensemblar el panal de montaje y el orificio para este vehiculo, referirse a la seccion en ingles.
“Léase las páginas 2-7 para ensamblar el kit de instalación”
Para illustraciones detallados sobre ensemblar el panal de montaje y el orificio para este vehiculo, referirse a la seccion en ingles.
“Léase las páginas 2-7 para ensamblar el kit de instalación”

15
Remoción de Radio:1. sacar cuatro tornillos que fijan la moldura de la consola del radio - dos en la parte superior del radio y dos de
bajo donde se encuentra el cenicero/encendedor - luego tirar de la moldura, desenchufar los conectores y retirar la moldura.
2. Extraer los cuatro tornillos que fijan el radio al tablero, sacar la unidad de la cavidad, desenchufar los conectores, la antena y retirar el radio.
1989-94 Nissan Maxima (Sedan)
1991-93 Nissan NXRemoción de Radio:1. Remueva los (2) tornillos en la parte superior del bisel bastidor del radio.2. Remueva los (2) tornillos en la parte inferior del cenicero que sujeta al bisel.3. Desprenda el bastidor de la palanca de cambios y remueva.4. Comenzando de la parte superior, libere el bisel del tablero, jalando hacia afuera. Desconecte cables. incline
el bisel hacia arriba y remueva el cable de la ventila de aire en la parte superior del bisel.5. Extraiga los (4) tornillos que sujetan el radio al tablero. Jale el radio hacia afuera de la cavidad.
Desconecte todos los cables y remueva.
Para illustraciones detallados sobre ensemblar el panal de montaje y el orificio para este vehiculo, referirse a la seccion en ingles.
“Léase las páginas 2-7 para ensamblar el kit de instalación”
Para illustraciones detallados sobre ensemblar el panal de montaje y el orificio para este vehiculo, referirse a la seccion en ingles.
“Léase las páginas 2-7 para ensamblar el kit de instalación”
1987-90 Nissan Pulsar (3 Door Sport Coupe)Remoción de Radio:1. sacar tres tornillos para metal con
cabeza en cruz de la parte inferior del labio superior de la moldura del tablero.2. sacar dos tornillos para metal con cabeza en cruz de la parte inferior del molde inferior de la moldura y
luego retirar la moldura.3. sacar cuatro tornillos para metal con cabeza en cruz de los braquetes de montaje del radio, desconectar
todos los arneses del cableado y retirar el radio.
Para illustraciones detallados sobre ensemblar el panal de montaje y el orificio para este vehiculo, referirse a la seccion en ingles.
“Léase las páginas 2-7 para ensamblar el kit de instalación”
Remoción de Radio:NOTA: El radio provisto por la fábrica es del tipo DiN montado detrás del bisel del bastidor del radio.1. Remueva los (2) tornillos en la parte superior del radio y que sujetan el bisel del bastidor al tablero.2. Remueva el cenicero (para mayor amplitud) y extraiga los (2) tornillos que sujetan la parte inferior del bisel
bastidor del radio.3. Con cuidado presione hacia afuera
el bisel del bastidor del radio. Utilice la herramienta de remoción de panel, desconecte todos los cables y remueva.
4. Extraiga los (4) tornillos que sujetan el radio al tablero. Desconecte los cables y remueva el radio.
1991-94 Nissan Sentra
Para illustraciones detallados sobre ensemblar el panal de montaje y el orificio para este vehiculo, referirse a la seccion en ingles.
“Léase las páginas 2-7 para ensamblar el kit de instalación”

14
1993-97 Nissan AltimaRemoción de Radio:1. Utllizar una herramienta especial de remocion de paneles para presionar on cuidado
hacia arriba el bisel de moldura de la palanca de velocidades para desprenderlo y removerlo.2. Extraiga (2) tornillos del panel debajo de la columna del volante. Jalar delicadamente el panel hacia abajo
para liberar las grapas a lo largo de la orilla superior y remover el panel.3. Extraiga (2) tornillos justamente arriba del radio.4. Extraiga (4) tornillos en el area de cambio de velocidades que sostienen la
sección inferior trasera del bisel de molduras del radio.5. Extraiga (1) tornillo en la parte inferior izquierda entre el radio y el volante.6. Jalar con cuidado el bisel hacia afuera de la consola/tablero para removerlo y sea precavido ya que arriba del
radio donde se interconectan este bisel con la moldura de ventilación.7. Extraiga (4) tornillos que sujetan el radio al tablero, desconecte y remueva.
“Léase las páginas 2-7 para ensamblar el kit de instalación”
Para illustraciones detallados sobre ensemblar el panal de montaje y el
orificio para este vehiculo, referirse a la seccion en ingles.
Remoción de Radio:1. Extraer dos tornillos de la parte superior al costado del panel del radio/control de clima.2. Tirar del panel y retirarlo.3. Extraer cuatro sujetadores que fijan el radio/placa.4. sacar el ensamblaje del tablero, desconectar el arnés del radio y retirar el radio.
1990-91 Nissan Axxess
2000-01 Nissan FrontierRemoción de Radio:NOTE: El radio provisto por la fábrica es un radio tipo isO/DiN doble.1. Remueva el cenicero, extraiga los (2) tornillos con cabeza Phillips de la cavidad del cenicero.2. Utilice la herramienta de remoción de panel para desprender el bisel bastidor del radio. Desconecte el
encendedor de cigarrillos y remueva.3. Extraiga los (4) tornillos con cabeza
Phillips que sujetan el radio. Levante hacia afuera, desconecte y remueva.
1998-99 Nissan FrontierRemoción de Radio:NOTE: El radio provisto por la fábrica es un estéreo DiN isO doble o un ensamble de estéreo/bolsa que cabe detrás del bisel del tablero. Para aplicaciones DiN simples comprados posteriormente, recomendamos el uso de radios DiN con montaje isO.1. Remueva el cenicero y extraiga los
(2) tornillos del fondo.2. Con cuidado desprenda el bisel del tablero del radio hasta liberarlo. Desconecte y remueva el bisel.3. Extraiga los (4) tornillos que sujetan el radio al tablero. Desconecte cables, antena y remueva el radio.
“Léase las páginas 2-7 para ensamblar el kit de instalación”
Para illustraciones detallados sobre ensemblar el panal de montaje y el orificio para este vehiculo, referirse a la seccion en ingles.
“Léase las páginas 2-7 para ensamblar el kit de instalación”
Para illustraciones detallados sobre ensemblar el panal de montaje y el orificio para este vehiculo, referirse a la seccion en ingles.
“Léase las páginas 2-7 para ensamblar el kit de instalación”
Para illustraciones detallados sobre ensemblar el panal de montaje y el
orificio para este vehiculo, referirse a la seccion en ingles.
1994-97 Nissan Hardbody Pickup1994-95 Nissan PathfinderRemoción de Radio:1. Extraiga los (2) tornillos que se
encuentran arriba de los controles de temperatura y que sujetan el bisel del radio del tablero con el tablero.2. Con cuidado ejerza presión hacia afuera sobre el perímetro del bisel del radio del tablero utilizando una
herramienta especial de remocion de paneles para liberar las grapas sujetadoras que lo mantienen sujetado al tablero, desconecte todos los cables y remueva.
3. Extraiga los (4) tornillos que sujetan el radio al tablero, jalar el radio hacia afuera de la cavidad, desconectar todos los cables y remover.
Para illustraciones detallados sobre ensemblar el panal de montaje y el orificio para este vehiculo, referirse a la seccion en ingles.
“Léase las páginas 2-7 para ensamblar el kit de instalación”

13
1990-93 Infiniti Q45Remoción de Radio:1. Retirar el cenicero y extraer dos tornillos del lado interior del ensamblaje del cenicero.2. Usando una herramienta para sacar paneles, levantar el bisel de la palanca de cambios para hacer saltar los
sujetadores. Desconectar los mandos de la ventana eléctrica y retirar el bisel.3. Extraer dos tornillos de abajo del cenicero dentro de la cavidad de la palanca de cambios, desenchufar los
conectores y retirar el ensamblaje del cenicero.4. Extraer dos tornillos en la parte posterior de la cavidad de la palanca de cambios que sujetan el bisel.5. Extraer dos tornillos en la parte inferior de la cavidad del cenicero que fijan el bisel del tablero.6. Usando una herramienta para sacar paneles, hacer saltar cuidadosamente hacia afuera el bisel del tablero,
soltando los sujetadores que lo fijan al tablero, desconectar el descongelador y retirar el descongelador.7. Extraer los cuatro tornillos que fijan
el radio al tablero, sacar la unidad del tablero, desenchufar todos los conectores y retirar.Para illustraciones detallados sobre ensemblar el panal de montaje y el orificio para este
vehiculo, referirse a la seccion en ingles.
“Léase las páginas 2-7 para ensamblar el kit de instalación”
1995-06 Nissan 200SXRemoción de Radio:NOTE: El estéreo provisto por la fábrica es del tipo isO/DiN doble.1. Utilice una herramienta de remoción de panel para desprender con cuidado las tapas de tornillo de plástico
localizadas en el centro superior del bisel bastidor del radio y remueva el tornillo.2. Desprenda el bisel bastidor de la
palanca de cambios.3. Extraiga los (4) tornillos del ensamble de radio, desconecte cables, antena guía y remueva el radio.
1995-98 Nissan 240SXRemoción de Radio:NOTE: El estéreo provisto por la fábrica es un radio tipo isO DiN doble.1. Con cuidado desprenda el cenicero y remueva un (1) tornillo de la cavidad del cenicero.2. Desprenda el bisel bastidor de la palanca de cambios.3. Remueva los (2) tornillos de la parte inferior del bisel bastidor del radio.4. Con cuidado presione hacia afuera el ensamble superior de selectores de ventiladores/peligro/deshielo.5. Extraiga los (2) tornillos que sujetan la parte superior del ensamble del radio.6. Levante el ensamble del radio hacia afuera del tablero. Desconecte todos los conectores, antena y remueva
el radio.7. Extraiga los (2) tornillos de cada lado del radio para liberarlo del ensamble bastidor de acero.8. Repita el paso “8” para remover la bolsa, en caso de ser necesario.
1989-94 Nissan 240SXRemoción de Radio:1. Usando una herramienta para sacar paneles, soltar cuidadosamente los sujetadores que fijan la moldura del
radio/palanca de cambios (el panel se desengancha).2. Extraer los cuatro tornillos que fijan el ensamblaje del radio al tablero, sacar la unidad del panel de la cavidad
en el tablero, desconectar el arnés de cables/antena y retirar el radio.
Para illustraciones detallados sobre ensemblar el panal de montaje y el orificio para este vehiculo, referirse a la seccion en ingles.
“Léase las páginas 2-7 para ensamblar el kit de instalación”
“Léase las páginas 2-7 para ensamblar el kit de instalación”
“Léase las páginas 2-7 para ensamblar el kit de instalación”
1990-96 Nissan 300ZXRemoción de Radio:1. Desprenda la pieza bastidor a lo largo de la orilla superior del radio y remueva los (2) tornillos que ahí se
encuentran.2. Remueva (1) protector de cada esquina superior del bastidor del tablero/radio y extraiga los (2) tornillos que
ahí se encuentran.3. Con cuidado desprenda el panel bastidor. Los sujetadores con resortes aseguran al bastidor en las dos
esquinas inferiores. Jale el ensamble fuera de la cavidad. Desconecte los arnéses del cableado y remueva el radio.
“Léase las páginas 2-7 para ensamblar el kit de instalación”
1998-01 Nissan AltimaRemoción de Radio:Nota: El radio provisto por la fábrica es un estéreo DiN isO doble o un ensamble de estéreo/bolsa que cabe detrás del bisel del tablero. Para aplicaciones DiN simples comprados posteriormente, recomendamos el uso de radios DiN con montaje isO.1. Desprenda primero la orilla del bastidor de la palanca de cambios.2. Extraiga los (2) tornillos del fondo del bisel del tablero del radio.3. Extraiga los (2) tornillos del bisel del tablero que se encuentran debajo de los controles de clima.4. Con cuidado jale hacia afuera el bisel del radio del tablero hasta liberarlo. Desconecte el encendedor y
remueva el bisel.5. Extraiga los (4) tornillos que sujetan el radio con el tablero. Desconecte cables, antena y remueva el radio.
“Léase las páginas 2-7 para ensamblar el kit de instalación”
Para illustraciones detallados sobre ensemblar el panal de montaje y el
orificio para este vehiculo, referirse a la seccion en ingles.
Para illustraciones detallados sobre ensemblar el panal de montaje y el
orificio para este vehiculo, referirse a la seccion en ingles.
Para illustraciones detallados sobre ensemblar el panal de montaje y el
orificio para este vehiculo, referirse a la seccion en ingles.
Para illustraciones detallados sobre ensemblar el panal de montaje y el
orificio para este vehiculo, referirse a la seccion en ingles.

12
1996-99 Infiniti I301995-99 Nissan MaximaRemoción de Radio:NOTA: El equipo de fábrica provisto es un radio estilo isO/DiN doble.1. Con cuidado desprenda el bisel de precisión del cambiador de velocidades.2. Remueva (1) tornillo del lado izquierdo del ensamble del cenicero.3. Utilice una herramienta de remoción de panel y jale con cuidado el lado derecho del ensamble del cenicero
hasta desprenderlo, desconecte cables y remueva.4. Remueva (2) tornillos de la parte inferior del bisel de precisión del radio.5. Utilice una herramienta de remoción de panel, desprenda con cuidado el ensamble superior vent/reloj sobre
los controles de calefacción/aire acondicionado. Desconecte los cables y remueva.6. Remueva (2) tornillos de la parte superior de los controles de calefacción/aire acondicionado.7. Remueva del tablero el segmento de la consola que corresponde a todos los controles del radio-bolsa-
calefactor/aire acondicionado. Desconecte todos los conectores y remueva.8. Extraiga (2) tornillos de cada lado del radio para removerlo del ensamble de sostén de acero.9. Repita el paso “8” para remover la bolsa, en caso de ser necesario.
1997-01 Infiniti QX41996-01 Nissan PathfinderRemoción de Radio:1. Extraiga (2) tornillos de la parte
inferior del bisel del radio del tablero.2. Con cuidado desprenda el bisel del radio del tablero, desconecte todos los interruptores y remueva.3. Extraiga los (4) tornillos que sujetan el radio al tablero, desconecte cables, antena y remueva el radio.
1990-93 Infiniti M30 Remoción de Radio:1. Abra la bolsa en la parte superior del bastidor del radio/consola y
extraiga (2) tornillos de la parte superior de la bolsa.
2. Remueva (1) tornillo de la parte superior del ensamble del encendedor de cigarrillos.3. Utilice una herramienta de remoción de panel y con cuidado jale a presión hacia afuera
liberando el bastidor del tablero. Levante hacia arriba y fuera del panel para removerlo.4. Extraiga (4) tornillos que sujetan el ensamble radio/bolsa al tablero. Desconecte los conectores y remueva.
Para illustraciones detallados sobre ensemblar el panal de montaje y el orificio para este vehiculo, referirse a la seccion en ingles.
“Léase las páginas 2-7 para ensamblar el kit de instalación”
Para illustraciones detallados sobre ensemblar el panal de montaje y el orificio para este vehiculo, referirse a la seccion en ingles.
“Léase las páginas 2-7 para ensamblar el kit de instalación”
Para illustraciones detallados sobre ensemblar el panal de montaje y el orificio para este vehiculo, referirse a la seccion en ingles.
“Léase las páginas 2-7 para ensamblar el kit de instalación”
1997-01 Infiniti Q45Remoción de Radio:NOTE 1: El radio provisto por la fábrica es un ensamble estéreo DiN/isO doble que se adapta dentro del tablero. Para aparatos comprados posteriormente con solo aplicaciones DiN, se recomienda el uso de un radio DiN con montaje isO.NOTE 2: Para instalaciones de estéreos comprados posteriormente, industrias scosche recomienda una interfase de amplificación FAi de fábrica y un arnés tipo FAiNN03 para vehículos BOsE.NOTE 3: El amplificador de fábrica marca BOsE se encuentra en la cajuela, debajo de la cubierta trasera.1. Desprenda con cuidado el ensamble vent/bastidor del tablero y extraiga (4) tornillos traseros.2. Levante la consola/descansa-brazo para accesar el compartimento inferior de almacenaje.3. Desprenda el ensamble bastidor/picaporte para accesar (2) tornillos y removerlos.4. Remover el bastidor de la consola/cambiador de velocidades. Desconecte el encendedor/ cenicero y
remueva.5. Extraiga (4) tornillos de la parte
inferior del bastidor radio/consola.6. Con cuidado levante y desconecte el ensamble completo radio/consola para removerlo.7. Extraiga (4) tornillos de cada uno de los lados del radio doble DiN para remover el radio del ensamble de la
consola.
Para illustraciones detallados sobre ensemblar el panal de montaje y el orificio para este vehiculo, referirse a la seccion en ingles.
“Léase las páginas 2-7 para ensamblar el kit de instalación”

11
Remoción de Radio:1. Abra el cenicero y remueva el recipiente de cenizas.2. Extraiga (1) tornillo por detrás del cenicero3. Haga palanca con cuidado en el bisel del borde del radio para desprender las grapas aseguradoras,
desconecte y remueva el bisel.4. Extraiga (4) tornillos que sostienen
al radio, desconecte cables, guía de antena y remueva el radio.
1998-01 Honda Passport1998-01 Isuzu Rodeo
1994-01 Honda Passport1991-95 Isuzu Rodeo Remoción de Radio:1. Remueva el cenicero de la consola, extraiga (2) tornillos que sujetan la moldura del radio/consola por la parte
inferior.2. Localice y remueva (2) tornillos de los costados de la consola - (1) de cada lado de la consola.3. Remueva los botones de mando de los controles de temperatura.4. Jalar el panel hacia afuera de la consola y extraiga (2) tornillos de cada lado del radio (los tornillos sujetan el
ensamble radio/soporte).5. Jalar el ensamble del radio hacia afuera de la cavidad - desconecte los cables y quite el radio.
Ensample del Kit:1. Remueva los (4) tornillos que sujetan al radio a las abrazaderas de montaje laterales.2. Unir las paredes laterales del kit con el panel del kit utilizando los (4) tornillos #8 x 1/2” y las grapas de
velocidad que se incluyen. Deslice la parte posterior del kit para una instalación de montaje empotrable.3. Cuando se utilice un chasis DiN, separe o recorte las presillas del eje
siguiendo las líneas de recorte DiN.
Instalaciones con doble DIN: (Require de kit adicional)1. Remueva los (2) tornillos que sujetan al bolsillo con las abrazaderas
de montaje lateral. Repita los pasos 2 y 3 del ensamble del kit.
1997-01 Honda PreludeRemoción de Radio:1. Desprenda con cuidado el bisel de la moldura del control del radio/AC y remueva.2. Extraiga (4) tornillos del ensamble
del radio/bolsillo, desconecte el radio y remueva.
Para illustraciones detallados sobre ensemblar el panal de montaje y el orificio para este vehiculo, referirse a la seccion en ingles.
“Léase las páginas 2-7 para ensamblar el kit de instalación”
“Léase las páginas 2-7 para ensamblar el kit de instalación”
Para illustraciones detallados sobre ensemblar el panal de montaje y el
orificio para este vehiculo, referirse a la seccion en ingles.
Para illustraciones detallados sobre ensemblar el panal de montaje y el orificio para este vehiculo, referirse a la seccion en ingles.
“Léase las páginas 2-7 para ensamblar el kit de instalación”
1992-96 Honda Prelude Remoción de Radio:1. Extraiga (2) tornillos de la parte inferior del bisel del tablero del radio.2. Desprender con cuidado el ensamble de interruptor de peligro/reloj y extraiga (1) tornillo de la parte de atrás.3. Presione con cuidado hacia arriba
en el bisel de la moldura del radio para liberarlo del tablero, desconecte los controles de clima y remueva el bisel del tablero.Para illustraciones detallados sobre ensemblar el panal de montaje y el orificio para este
vehiculo, referirse a la seccion en ingles.
“Léase las páginas 2-7 para ensamblar el kit de instalación”
1999-02 Infiniti G20Remoción de Radio:1. Extraiga (2) tornillos Phillips localizados en la parte inferior del panel de precisión del radio en el tablero.2. Jale hacia afuera el panel comenzando desde la parte inferior y siguiendo hacia arriba.3. Desconecte (2) conectores y remueva.4. Extraiga (4) tornillos que sujetan el
radio al tablero, desconecte y remueva.
“Léase las páginas 2-7 para ensamblar el kit de instalación”
Para illustraciones detallados sobre ensemblar el panal de montaje y el
orificio para este vehiculo, referirse a la seccion en ingles.
1991-96 Infiniti G201995-99 Nissan SentraRemoción de Radio:1. Utilizar una herramienta especial de
remocion de paneles, con cuidado desprenda el tapón de plástico que cubre el tornillo en la parte superior central del bisel de moldura del radio y remueva el tornillo.
2. Desprenda el bisel de moldura de la palanca de velocidades.3. Extraiga (4) tornillos del ensamble del radio, desconecte cables, antena maestra y remueva el radio.
Para illustraciones detallados sobre ensemblar el panal de montaje y el orificio para este vehiculo, referirse a la seccion en ingles.
“Léase las páginas 2-7 para ensamblar el kit de instalación”

10
2002-06 Honda CRV Remoción de Radio:1. Extraiga los (2) tornillos debajo de la
rejilla de ventilación en el centro del tablero de instrumentos.
2. saque el bisel del tablero de instrumentos palanqueándolo cuidadosamente alrededor del radio.3. Extraiga los (4) tornillos que sujetan el radio, desenchúfelo y extraiga el radio.
1997-03 Honda CRVRemoción de Radio:1. Desprenda los sujetadores tipo pin de presión de la parte inferior
del centro de la consola y remueva el panel inferior.2. Exttraiga (4) tornillos de la orilla inferior del bisel. Extraiga (4) tornillos del tablero interior por debajo del
bolsillo. Jalar hacia afuera del tablero el ensamble del porta-vasos/bolsillo y remueva.3. Abrir la guantera y remover los topes. Extraer (2) tornillos del lateral derecho del bisel central del tablero.4. Extraer (2) tornillos debajo del volante en la orilla del panel inferior, desprender la orilla superior del panel,
desconectar y remover. 5. Desprender la orilla superior o bisel inferior central, desconecte y remueva.6. Extraiga (2) tornillos de los laterales del bolsillo.7. Desprender el bisel del tablero de control radio/AC , desconecte y remueva.8. Extraiga (4) tornillos de cada lado del ensamble de soporte del radio y remueva el radio del bisel del tablero/
AC.
“Léase las páginas 2-7 para ensamblar el kit de instalación”
Para illustraciones detallados sobre ensemblar el panal de montaje y el orificio para este vehiculo, referirse a la seccion en ingles.
“Léase las páginas 2-7 para ensamblar el kit de instalación”
Para illustraciones detallados sobre ensemblar el panal de montaje y el
orificio para este vehiculo, referirse a la seccion en ingles.
1999-04 Honda Odyssey Remoción de Radio:NOTA: El radio de fábrica es un DiN/isO doble.1. Desprenda el bisel, desprenda hacia
afuera, desconecte y remueva.Para illustraciones detallados sobre ensemblar el panal de montaje y el orificio para este
vehiculo, referirse a la seccion en ingles.
“Léase las páginas 2-7 para ensamblar el kit de instalación”
1995-98 Honda Odyssey 1996-99 Isuzu Oasis Remoción de Radio:1. Abrir la guantera y desprender los topes de hule que se encuentran a los lados y remover (1) tornillo del
brazo de control que se encuentra del lado derecho para permitir que la puertita se abra totalmente hacia abajo.
2. Extraiga (2) tornillos del lado derecho del ensamble de la consola central.
3. Extraiga (2) tornillos de la parte inferior de la consola central cerca de la alfombra.4. Abrir el compartimento de almacenamiento de la consola y extraer (2) tornillos en la parte superior.5. Extraiga (2) tornillos del panel debajo del tablero del lado del conductor y desprenda el
lado derecho del panel solamente para accesar (1) tornillo que sujeta el ensamble de la consola central.6. Jalar con cuidado la parte inferior del ensamble de la consola central para desprender, desconectar y
remover.7. Extraiga (2) tornillos de cada lado del porta-vasos deslizante y remueva el porta-vasos.8. Desde abajo, extraiga (2) tornillos de 8mm que sostienen la orilla del radio/bolsillo a la estructura del tablero.9. Desllizar el radio hacia afuera del tablero, desconectar cables, antena y remover.
“Léase las páginas 2-7 para ensamblar el kit de instalación”
Para illustraciones detallados sobre ensemblar el panal de montaje y el orificio para este vehiculo, referirse a la seccion en ingles.

9
1992-94 Acura VigorRemoción de Radio: 1. Extraiga el tapón de cubierta que se encuentra entre los controles
de ajuste deslizante del control de temperatura y extraiga el tornillo trasero. 2. Jalar el ensamble del control de temperatura hacia afuera del tablero, desconecte el cable y remueva. 3. Extraiga los (2) tornillos que sujetan la parte superior del ensamble del radio localizado en la cavidad del
control de temperatura. 4. Remueva el cenicero y extraiga los (2) tornillos de este sitio. 5. Remueva las tapones de cubierta localizados en la parte frontal de la consola en cada uno de sus lados y
extraiga el tornillo que se encuentra detrás de cada lado. 6. Levante y remueva la alfombra, inserte la pieza localizada en el bolsillo de la consola. 7. Extraiga los (2) tornillos del bolsillo de la consola debajo de la previamente removida pieza de alfombra. 8. Levante con cuidado la consola y deslice hacia afuera del radio. 9. Jalar el ensamble del bisel del tablero del radio hacia afuera del tablero, desconecte todos los cables (vea la
advertencia) y remueva.10. Extraiga los (2) pernos de soporte posterior que sujetan la parte trasera del radio a la estructura de ensamble
y remueva el radio del frente del bisel del tablero.
ADVERTENCIA: Este radio es de diseño anti-robo, incorpora un sistema de códigos que previene que funcione el radio cuando este se desconecta y se vuelve a conectar. Para restaurar su funcionamiento apropiado es necesario introducir los códigos específicos del radio. Verificar que antes de desconectar el radio se encuentre disponible el código de acceso.
“Léase las páginas 2-7 para ensamblar el kit de instalación”
Para illustraciones detallados sobre ensemblar el panal de montaje y el orificio para este vehiculo, referirse a la seccion en ingles.
1999-00 Honda CivicRemoción de Radio:1. Extraiga (2) tornillos del panel central debajo del radio.2. Extraiga (4) tornillos del panel debajo del tablero del lado del conductor y despréndalo.3. Extraiga (2) tornillos del lado izquierdo del panel del tablero central.4. Abrir la guantera y empujar los topes hacia adentro para que la puerta de la guantera se abra todo lo
permitido.5. Extraiga (2) tornillos del lado
derecho del panel del tablero central. 6. Jalar el panel del tablero central hacia abajo, desconecte el socket del encendedor y remueva el panel.7. Viendo el tablero desde abajo, extraiga (4) tornillos que aseguran el ensamble del radio/bolsillo.8. Jalar con cuidado el ensamble central completo de los controles de consola/radio/clima.9. Desconectar todos los controles, radio, antena y remover el ensamble completo.
1990-93 Honda Accord Remoción de Radio:1. Extraiga los (2) tornillos - uno en cada lado de la consola. Levante
hacia afuera la consola (para transmisiones manuales remover primero la bota de la palanca de velocidades).2. Jalar hacia afuera el cenicero y
extraer los (2) tornillos que sujetan a la luz del cenicero y a su compartimento lateral.3. Remover los (2) tornillos que sujetan la parte posterior del radio (tornillos localizados en la parte trasera de la
cavidad del tablero en la abrazadera de soporte del radio).4. Jalar hacia afuera del tablero al ensamble del radio/bolsillo, flexione la orilla del panel para liberar espacio
para la abrazadera de soporte del radio.NOTA: Para mayor liberación de espacio para la abrazadera, remueva (2) tornillos que sujetan la parte inferior y lateral de la moldura del radio - (1) de cada lado del panel, localizado justamente debajo de donde fueron removidos los tornillos de soporte trasero del radio, enseguida remueva (2) tornillos del panel justamente arriba del sitio donde se encuentra el radio. Desconecte los cables y remueva el ensamble.
1994-97 Honda Accord Remoción de Radio:1. Remover el cenicero y extraer el
tornillo localizado en la cavidad del cenicero y que sujeta el bisel del radio al tablero.
2. Remover el porta-vasos localizado frente al compartimento de almacenamiento de la consola y extraiga el tornillo localizado adentro de la cavidad y que sujeta la consola.
3. Levante a presión utilizando un pequeño desarmador con cuidado el panel de cubierta localizado en el bolsillo de almacenamiento de la consola y extraiga los (2) tornillos que sujetan a la consola.
4. Deslice con cuidado la parte trasera de la consola lo suficiente para remover los (2) tornillos detrás de la palanca de velocidades y que sujetan el bisel del radio del tablero.
5. Utilice una herramienta especial de remocion de paneles para jalar a presión con cuidado el perímetro del bisel del radio del tablero comenzando alrededor de la palanca de velocidades para liberar las grapas sujetadoras que sujetan al tablero, desconecte todos los cables y remueva el bisel.
6. Extraiga los (2) pernos que sujetan el soporte posterior del radio al tablero debajo del ensamble del radio/bolsllo, jale hacia afuera de la cavidad del tablero, desconecte todos los cables y remueva el radio.
“Léase las páginas 2-7 para ensamblar el kit de instalación”
Para illustraciones detallados sobre ensemblar el panal de montaje y el orificio para este vehiculo, referirse a la seccion en ingles.
“Léase las páginas 2-7 para ensamblar el kit de instalación”
Para illustraciones detallados sobre ensemblar el panal de montaje y el orificio para este vehiculo, referirse a la seccion en ingles.
“Léase las páginas 2-7 para ensamblar el kit de instalación”
Para illustraciones detallados sobre ensemblar el panal de montaje y el orificio para este vehiculo, referirse a la seccion en ingles.

8
1996-99 Acura CL1998-01 Honda AccordRemoción de Radio:NOTA: El estéreo provisto por la fábrica es del tipo DiN doble o ensamble estéreo/bolsa. No se requiere de un kit de instalación para equipos estéreo comprados porteriormente si el estéreo cuenta con orificios laterales de montaje isO. Además de usarse con el equipo de fábrica o con tipo de bolsa similar.1. Extraiga los (2) tornillos de la parte inferior del bisel del tablero del radio.2. Desprenda con cuidado el ensamble del interruptor de intermitente/reloj y extraiga (1) tornillo de la parte
trasera.3. Con cuidado jale a presión el bisel
bastidor del radio para liberarlo del tablero, desconecte los controles de clima y remueva el bisel del tablero.
1994-01 Acura IntegraRemoción de Radio:1. Remueva el cenicero y extraiga los (2) tornillos que sujetan el
ensamble del cenicero y encendedor al tablero, jale el ensamble del tablero, desconecte los cables y remueva el ensamble.
2. Alcance detrás del radio y afloje los (2) pernos de 8mm que sujetan la parte posterior del radio a la estructura del sub-tablero.
3. Jalar el radio hacia afuera del tablero, desconecte los cables y quite el radio.NOTA: Para facilitar el trabajo utilice el Juego de Herramientas scosche o el ensamble de dados de 1/4” con una extensión de 6”.
1990-93 Acura Integra Remoción de Radio:NOTA: Acceso al piso - vista desde la parte posterior de la consola.1. Localice y afloje los (2) pernos de cromo/plata de 8mm que sujetan el soporte posterior del radio, jale el
radio, jale el ensamble del radio del tablero. Desconecte la antena y otros cables, entonces remueva el ensamble del radio.
NOTA: Para facilitar el trabajo utilice el Juego de Herramientas scosche o el ensamble de dados de 1/4” con una extensión de 6”.
“Léase las páginas 2-7 para ensamblar el kit de instalación”
1986-95 Acura Legend Remoción de Radio:1. Extraiga los (2) tornillos debajo del cenicero sujetando el bisel del
tablero al tablero.2. Utilice con cuidado la herramienta de remoción del panel para liberar las grapas metálicas de sujeción que
se encuentran alrededor del bisel del tablero y remueva.3. Extraiga los (2) pernos que sujetan la parte posterior del radio a la estructura del sub-tablero que se
encuentra debajo del radio en la cavidad del cenicero.
4. Jalar el radio hacia afuera de la cavidad, desconecte todos los cables y remueva.
“Léase las páginas 2-7 para ensamblar el kit de instalación”
Para illustraciones detallados sobre ensemblar el panal de montaje y el orificio para este vehiculo, referirse a la seccion en ingles.
Para illustraciones detallados sobre ensemblar el panal de montaje y el orificio para este vehiculo, referirse a la seccion en ingles.
“Léase las páginas 2-7 para ensamblar el kit de instalación”
Para illustraciones detallados sobre ensemblar el panal de montaje y el orificio para este vehiculo, referirse a la seccion en ingles.
“Léase las páginas 2-7 para ensamblar el kit de instalación”
Para illustraciones detallados sobre ensemblar el panal de montaje y el orificio para este vehiculo, referirse a la seccion en ingles.
2002-06 Acura RSXRemoción de Radio:NOTA: El diseño de fábrica es para un radio estilo doble DiN con un bolsillo.1. Palanquee el panel inferior de corriente que tiene el conector.2. saque los 2 tornillos con cabeza de ranura en cruz que sujetan el radio.3. Empuje el radio hacia fuera por la parte posterior para desenganchar los 7 retenes.
“Léase las páginas 2-7 para ensamblar el kit de instalación”
Para illustraciones detallados sobre ensemblar el panal de montaje y el orificio para este vehiculo, referirse a la seccion en ingles.
1996-98 Acura TLRemoción de Radio:1. Usando una herramienta, palanquee el panel central del tablero de instrumentos hacia afuera y sáquelo.2. Desenchufe los conectores de la unidad controladora del clima.3. saque el panel con el radio estéreo/casete/Toca discos CD del tablero de instrumentos.4. Desenchufe los conectores de 16 y de 5 espigas y el de la antena del radio estéreo/casete/Toca discos CD.5. saque el radio estéreo/casete/Toca
discos CD de su panel.
“Léase las páginas 2-7 para ensamblar el kit de instalación”
Para illustraciones detallados sobre ensemblar el panal de montaje y el orificio para este vehiculo, referirse a la seccion en ingles.

Para la ayuda del cableado, llamada 1-800-621-3695x3NOTAS: • Todas las ubicaciones del cableado de fábrica se muestran viendo de frente la unidad de contacto con los cables saliendo por atrás.• Utilice estos códigos de cableado como guía. su vehículo puede presentar diferencias.
CÓDIGOS DE CABLEADO DE FÁBRICA
1982-94 NISSAN VEHICLES (Uso Scosche NN032 para el conectador estéreo del coche, vendido por separado)
Bocinas Frontales y Fuente de Poder1 = Frente Negativo Izquierdo2 = Frente Negativo Derecho3 = Antena Electrica4 = Dimmer/Atenuador5 = Tierra6 = Frente Positivo Izquierdo7 = Frente Positivo Derecho8 = +12V Constante, Batería9 = Iluminación/Conductor10 = +12V Interrumpible, Ignición
Bocinas Traseras1 = Trasero Positivo Derecho2 = Trasero Positivo Izquierdo3 = Abierto4 = Trasero Negativo Derecho5 = Trasero Negativo Izquierdo6 = Abierto
7
Unidad de Contacto de Bocinas Frontales y Fuente de Poder1 = Tierra del Chassis (12V)2 = Iluminación Variable/Dimmer3 = +12V Constante, Batería4 = Antena Electrica5 = Frente Negativo Derecho6 = Frente Negativo Izquierdo7 = +12V Interrumpible, Ignición8 = Iluminación/Dimmer9 = Frente Positivo Derecho10 = Frente Positivo Izquierdo
Unidad de Contacto de Bocinas Traseras1 = Trasero Negativo Derecho2 = Trasero Positivo Izquierdo3 = Trasero Negativo Izquierdo4 = Vacío5 = Trasero Positivo Derecho3 = Vacío
1995-UP NISSAN VEHICLES (Uso Scosche NN032 para el conectador estéreo del coche, vendido por separado)

MONTAJE DEL RADIO (Cont’d)
INSTALACIÓN ESTÉREA DEL EJE CON EL BOLSILLOAsegure el chasis del radio al adaptador con los elementos de fijación provistos y con la máscara del radio en el frente como se muestra. Use los soportes adaptadores isO a vástagos (no incluidos).
SOPORTE DE MONTAJE METÁLICO PROVISTO POR FÁBRICA
SOPORTE DE MONTAJE METÁLICO PROVISTO POR FÁBRICA
PLACA FRONTAL DEL STEREO
STEREO CON EJES DE MONTAJE
INSTALACIÓN DE LA ESTEREOFONIA DEL EJE HONDA/ACURA PANEL #1855 inserte a presión las lenguetas de la(s) flecha(s) (componente # 1981) en el espacio del radio como se muestra. Realice el montaje del radio al tablero utilizando la carátula del radio y las tuercas correspondientes a la(s) flecha(s).
TIRANTE DE SOPORTE:EL SOPORTE DE LA PARTE TRASERA DEL ESTÉREO LE AGREGA A LA INSTALACIÓN UNA MAYOR INTEGRACIÓN ESTRUCTURAL.
TIRANTE DE SOPORTE POSTERIOR
ESTÉREO SHAFT
1855PANELES DE MONTAJE
EJE PLACA FRONTAL PROVISTA PARA LOS EJES DEL ESTÉREO
6
NOTA: LENGÜETAS RÁPIDAS DEL MONTAJE DEL EJE/SOPORTES DE ISO NO INCLUIDAS. SI ESTÁ REQUERIDO PARA SU INSTALACIÓN ESTÉREA, LLAME 800-621-3695 X3 PARA EL ENVÍO INMEDIATO.
*
SOPORTES ADAPTADORES ISO A VÁSTAGOS (VEA LA NOTA)
*
NOTA: LENGÜETAS RÁPIDAS DEL MONTAJE DEL EJE/SOPORTES DE ISO NO INCLUIDAS. SI ESTÁ REQUERIDO PARA SU INSTALACIÓN ESTÉREA, LLAME 800-621-3695 X3 PARA EL ENVÍO INMEDIATO.
*
LENGÜETAS RÁPIDAS DEL EJE (VEA LA NOTA)
*

HONDA / ACURA PANEL #1855
MONTAJE DEL RADIO
Saque el borde del estéreo1. Localice el mecanismo de traba en el borde de
su radio DiN (típicamente) en el costado.2. Deslice el borde de montaje hacia la parte de
atrás del estéreo y sáquelo.
MONTANDO EL RADIO:1. Utilice las herramientas provistas por la fábrica para montar el radio y bolsa comprados posteriormente al
ensamble de montaje metálico para estéreo provistos por la fábrica.2. sujete el ensamble de montaje del radio al tablero utilizando los tornillos que se usaron para asegurar el radio
de fábrica.
SOPORTE DE MONTAJE METÁLICO PROVISTO POR FÁBRICA
STEREOCON MONTAJE ISO
ENSAMBLE DE BOLSA
SOPORTE DE MONTAJE METÁLICO PROVISTO POR FÁBRICA
PREPARACIÓN DEL RADIO
ANILLOS DE MOLDURA SUMINISTRADOS PARA RADIOS (PODRÍA REQUERIRSE O NO)
EL MONTAJE/EL HARDWARE LATERALES PROPORCIONÓ ESTEREOFONIA
TIRANTE DE SOPORTE POSTERIOR
1855PANELES DE MONTAJE
MARCO PROVISTO CON EL STEREO
STEREO DIN
MANGA DEL STEREO
DOBLE LAS LENGÜETAS AGUERA
TIRANTE DE SOPORTE:EL SOPORTE DE LA PARTE TRASERA DEL ESTÉREO LE AGREGA A LA INSTALACIÓN UNA MAYOR INTEGRACIÓN ESTRUCTURAL.
5
INSTALACIÓN DEL STEREO CON DINUtilizando la manga incluido con el estereo, asegure el chasis del estereo en el kit y con la caratula del estereo hacia el frente, tal como se muestra.

ENSAMBLAJE DEL BOLSILLO
Para los soportes y anillo de moldura específicos, refiérase a las instrucciones para su vehículo.
INCORPORANDO EL ANILLO BASTIDOR:Presione la bolsa en el lugar que le corresponde en la parte trasera del anillo bastidor y utilice los tornillos para mayor seguridad.
EJEMPLO:
NISSAN/INFINITI ANILLO BASTIDOR #2698 OR HONDA ANILLO BASTIDOR #2591
INCORPORANDO LOS SOPORTES:Deslice el soporte derecho hacia las correspondientes lenguetas de alineación de la parte frontal y trasera de la bolsa.NOTA: Asegúrese de deslizar la pequeña lengueta hacia la parte trasera del soporte en la hendidura trasera de la bolsa. Repita estos mismos pasos para el lado izquierdo.
LEFT NISSAN / INFINITI BRAQUETE #2417 OR LEFT HONDA BRAQUETE #2541
RIGHT NISSAN / INFINITI BRAQUETE #2417 OR RIGHT HONDA BRAQUETE #2541
4

DESMONTE LOS SOPORTE DE MONTAJE DE FÁBRICA:NOTA: Los siguientes pasos son una guía general. Su vehículo podría ser diferente. 1. Extraiga los tornillos de los costados del radio de fábrica y desmonte los soportes laterales. No
confunda el derecho con el izquierdo.
PRELIMINAR
ANTES DE COMENzAR – LEA LA GUÍA RÁPIDA DE LAS PÁGIN-AS 2-7
ESCOJA Su vEhíCuLO
identifique su vehículo en la carátula de este instructivo, desarme el tablero y extraiga el estéreo de fábrica. si su vehículo no aparece en la carátula, este adaptador para instalación NO es para su vehículo
DESMONTAJE DE LOS SOPORTES DE FÁBRICA
STEREO DE FÁBRICA
DESMONTE EL SOPORTE METÁLICO DE FÁBRICA
DESMONTE EL SOPORTE METÁLICO DE FÁBRICA
PRECAUCiÓN:ANTEs DE PROCEDER A LA iNsTALACiÓN DEsCONECTE LA TERMiNAL NEGATiVA DE LA BATERÍA DE sU VEHÍCULO. sE RECOMiENDA LA UTiLiZACiÓN DE UN MULTÍMETRO QUE MiDA VOLTs Y OHMs, EN LUGAR DEL PROBADOR sENCiLLO DE LUZ ENCENDiDA CUANDO sE EsTÉ iNsPECCiONANDO EL CABLEADO. EL PROBADOR DE LUZ ENCENDiDA (CON sENsOR DE CABLE A TiERRA) PUEDE CAUsAR DAÑOs A LA COMPUTADORA DE sU VEHÍCULO AsÍ COMO AL sisTEMA DE CABLEADO PARA EL DiAGNOsTiCO EN CAsO DE UsARLO DE MANERA iNADECUADA. EViTE TODO EL CABLEADO DE LA BOLsA DE AiRE QUE ViENE DE FÁBRiCA - LAs BOLsAs DE AiRE sE PUEDEN ACCiONAR ACCiDENTALMENTE PROVOCANDO HERiDAs GRAVEs, DAÑOs Y HAsTA LA MUERTE.
NOTAS:• Ver las instrucciones del vehículo para determinar si se necesita alguna herramienta
especial.• Leer todas las instrucciones que acompañan el estéreo/tocacasete del vehículo para
el cableado y montaje apropiado.
enSaMBLe De BoLSa
3

Este valioso kit de instalación es para vehículos modelo 1982-08 marca Acura, Honda, infiniti, isuzu y Nissan importados seleccionados. se incluyen todos los componentes que Ud. necesitará para instalar su estéreo/ tocacintas y tocadiscos compactos en el tablero de su vehículo. siga las instrucciones particulares en este manual para quitar el radio automotriz instalado de fábrica y ensamblar el kit.
INTRODuCCION
CONTENIDOLas instrucciones para cada vehículo le indican cual tablero de montaje y abrazaderas a utilizar. Cada pieza se identifica claramente al reverso.
2416BOLSA
2698 NISSAN BASTIDOR
1855 PANELE DE MONTAJE
2591 HONDA BASTIDOR
2541 HONDABRAQUETE
2417 NISSANBRAQUETE
1862 SOPORTE TRASERO
1888B SOPORTE TRASERO
2

UI3050A
si usted tiene preguntas adicionales, por favor llamar a la línea de teléfono gratuita del Departamento de Soporte Técnico de Scosche 1-800-621-3695 x3
KIT DE INSTALLACION DE LA EN-ROCIADA PARA SELECTADOS
1982-06 ACURA, HONDA, INFINITI, ISUZU, & NISSAN VEHICLES
©2012 SCOSCHE INDUSTRIES, INC.SI - UI3050A-QS (3000476A) 06/12
NN0321987-up Nissan Vehicles
ConeCtor Para eStÉreo De VeHÍCULoSCONECTA RÁPIDAMENTE EL ESTÉREO NUEBO A LOS ALAMBRES DE FÁBRICA DEL VEHÍCULO.
IM01A1989-up Geo Imports Vehicles
RENuNCIA A RESPONSABILIDAD CIvILEste manual de instrucciones está basado en información y estudio cuidadosamente documentados sobre el desmontaje de los paneles de instrumentos, arneses y códigos de cables e información pertinente a la instalación de este juego en los vehículos indicados. No se puede hacer al fabricante responsable de discrepancias/inconsistencias debido a cambios, opciones en la fabricación del automóvil, ni por daños que pudiesen ocurrirle al automóvil durante la instalación debido al uso de este manual.
ACURA1996-99 CL -------------------81994-01 Integra ---------------81990-93 Integra ---------------81986-95 Legend --------------82002-06 RSX ------------------81996-98 TL --------------------81992-94 Vigor -----------------9
HONDA1998-02 Accord --------------81994-97 Accord --------------91990-93 Accord --------------91999-00 Civic -----------------92002-06 CRV ----------------101997-03 CRV ----------------101999-04 Odyssey ------------101995-98 Odyssey ------------101998-01 Passport -----------111994-01 Passport -----------111997-01 Prelude -------------111992-96 Prelude -------------11
INFINITI1999-02 G20 -----------------111991-96 G20 -----------------111996-99 I30 ------------------121990-93 M30 ----------------121997-01 QX4 -----------------121997-01 Q45 -----------------121990-93 Q45 -----------------13
ISUZU1996-99 Oasis ---------------101998-01 Rodeo --------------111991-95 Rodeo --------------11
NISSAN1995-06 200SX --------------131995-98 240SX --------------131989-94 240SX --------------131990-96 300ZX --------------131998-01 Altima --------------131993-97 Altima --------------141990-91 Axxess -------------14
NISSAN (Cont’d)2000-01 Frontier -------------141998-99 Frontier -------------14 1994-97 Hardbody PU ------141995-99 Maxima ------------121989-94 Maxima (Sedan) ---151991-93 NX ------------------151996-01 Pathfinder ----------121994-95 Pathfinder ----------141987-90 Pulsar --------------15 3-Door Sport Coupe1995-99 Sentra --------------111991-94 Sentra --------------151987-90 Sentra --------------16 Sedan, Wagon & Hatchback1990-92 Stanza (Sedan) ----161987-89 Stanza --------------16 Sedan & Hatchback1982-86 Stanza --------------16 Liftback & Sedan2000-04 Xterra ---------------16