informatica for powerbi - deployment guide · 6 contact informatica cloud if you need help to setup...
TRANSCRIPT

© 2016 Informatica LLC. No part of this document may be reproduced or transmitted in any form, by any means (electronic, photocopying, recording or otherwise) without prior consent of Informatica LLC. All other company and product names may be trade names or trademarks of their respective owners and/or copyrighted materials of such owners.
Informatica for PowerBI - Deployment Guide
Informatica Cloud for Power BI - Sales Management Solution on Salesforce

2
Table of Contents
Introduction ...................................................................................................................................... 2
Step 1 – Register for an Informatica Cloud Account ....................................................................... 2
Step 2 – Install the Secure Agent .................................................................................................... 3
Step 3 – Register the Secure Agent ................................................................................................ 4
Step 4 – Create a Salesforce Connection ....................................................................................... 6
Step 5 – Create an SQL Server Connection ................................................................................... 7
Step 6 – Create Data Replication Service Task .............................................................................. 9
Step 7 – Getting Ready for Salesforce Object Schema Changes ................................................. 13
Introduction
Informatica Cloud is an integration platform as a service (iPaaS) that combines application and data integration. Informatica Cloud enables development, execution, and governance of integration workflows among on-premises or cloud-based applications as well as traditional and newer data protocols.
You can gain several benefits from bulk and real-time integration leveraging a single and unified platform. One of them is to easily replicate data from your Salesforce account into SQL Server database which is required for PowerBI Sales Management Solution.
This document describes how to setup the data replication process in Informatica Cloud. This is one of the steps of configuring PowerBI Sales Management Dashboard. For details on PowerBI Sales Management Solution see “Power BI Solution Template Deployment Guide - Sales Management.docx” and “Power BI Solution Template Report Walkthrough.docx”.
Step 1 – Register for an Informatica Cloud Account
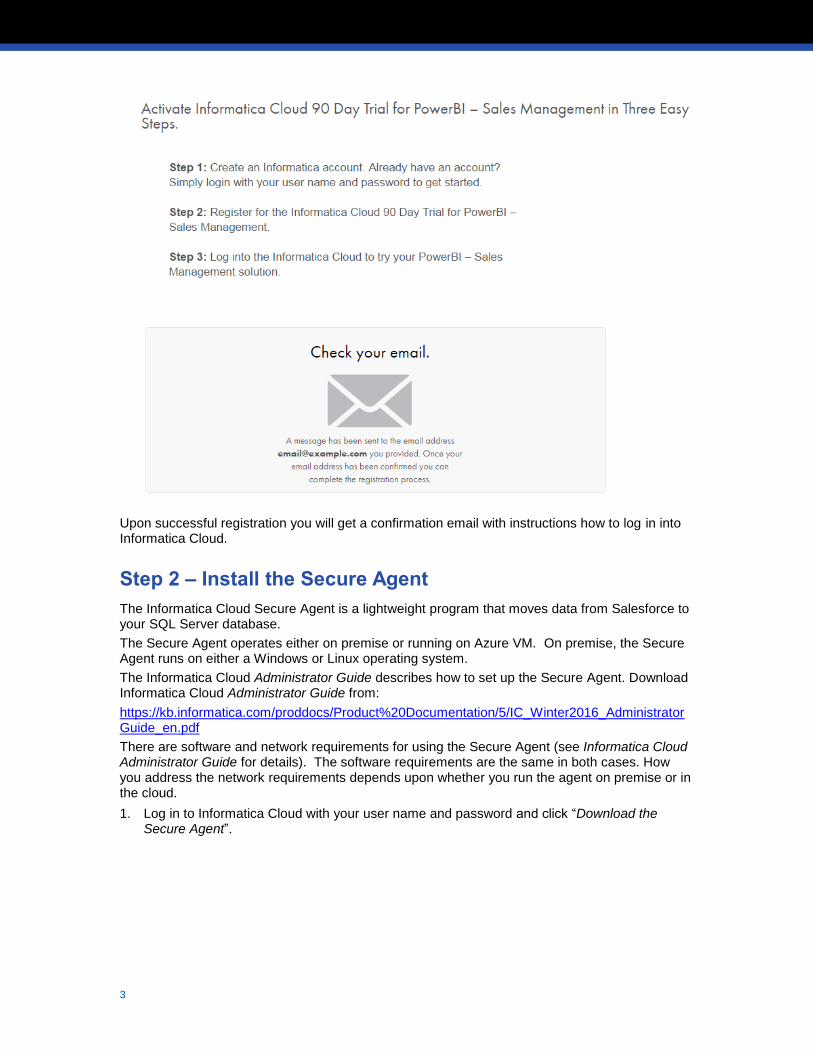
If you do not have an Informatica Cloud account, register for a free 90-day trial at: https://www.informatica.com/informaticaforpowerbi.
3
Upon successful registration you will get a confirmation email with instructions how to log in into Informatica Cloud.
Step 2 – Install the Secure Agent
The Informatica Cloud Secure Agent is a lightweight program that moves data from Salesforce to your SQL Server database.
The Secure Agent operates either on premise or running on Azure VM. On premise, the Secure Agent runs on either a Windows or Linux operating system.
The Informatica Cloud Administrator Guide describes how to set up the Secure Agent. Download Informatica Cloud Administrator Guide from:
https://kb.informatica.com/proddocs/Product%20Documentation/5/IC_Winter2016_AdministratorGuide_en.pdf
There are software and network requirements for using the Secure Agent (see Informatica Cloud Administrator Guide for details). The software requirements are the same in both cases. How you address the network requirements depends upon whether you run the agent on premise or in the cloud.
1. Log in to Informatica Cloud with your user name and password and click “Download the Secure Agent”.

4
2. Download “Windows 64” Secure Agent.
3. Once the download is complete, launch the Secure Agent installer. Follow the installation wizard instructions.
Step 3 – Register the Secure Agent
After the installation process completes, the Secure Agent Management console appears. Enter your Informatica Cloud login credentials to register the installed Secure Agent.
If you have a proxy network setup, configure the proxy during Secure Agent registration. This is an excerpt from Informatica Cloud Administrator Guide:

5
In your environment, you might also need to run Informatica Cloud Windows service under your login account. Your Windows login account needs to have Administrator permissions on the system. To configure the service under your login account:

6
Contact Informatica Cloud if you need help to setup the Secure Agent in your proxy environment at: [email protected].
When the agent registration is done, the secure appears on the Informatica Cloud -> Configure menu:
Now you are ready to create Salesforce and SQL Server connections.
Step 4 – Create a Salesforce Connection
1. Go to Configure -> Connections and click “New” button to create a connection.
2. For Salesforce connections, select Type = „Salesforce‟.
3. Fill in the required credentials (fields with the red asterisk).
4. Verify that “Service URL” value has “34.0” at the end (update the value if it is 31.0).
5. To test the connection, click Test.

7
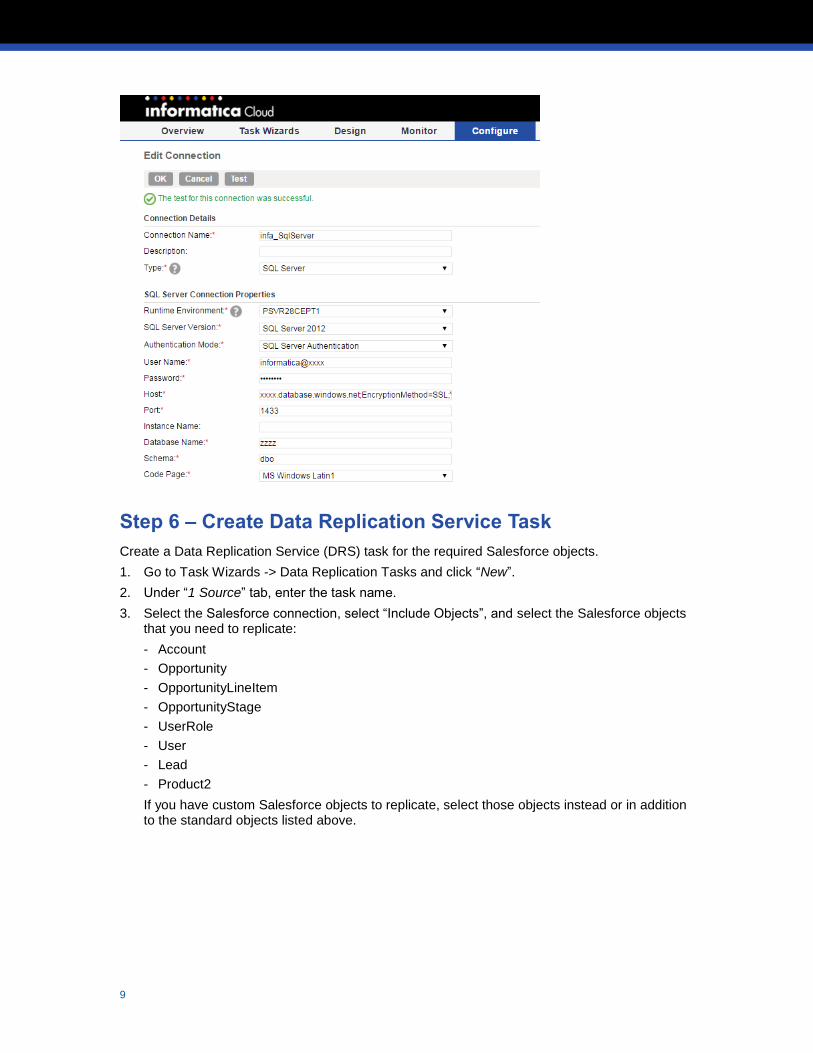
Step 5 – Create an SQL Server Connection
Create a connection to SQL Server. Fill in required credentials.

8
If you are connecting to Azure SQL Server, follow the instructions in this article: https://kb.informatica.com/solution/23/Pages/56/472789.aspx
You will also need to configure your Azure SQL Server IP whitelist to be able to talk to the Secure Agent system.
To test the connection, click Test.
9
Step 6 – Create Data Replication Service Task
Create a Data Replication Service (DRS) task for the required Salesforce objects.
1. Go to Task Wizards -> Data Replication Tasks and click “New”.
2. Under “1 Source” tab, enter the task name.
3. Select the Salesforce connection, select “Include Objects”, and select the Salesforce objects that you need to replicate:
- Account
- Opportunity
- OpportunityLineItem
- OpportunityStage
- UserRole
- User
- Lead
- Product2
If you have custom Salesforce objects to replicate, select those objects instead or in addition to the standard objects listed above.

10
4. Click “Select” to finalize the object selection.
5. Click “Next” to procede to the “2 Target” page.
Keep “Target Prefix” empty. This will create target tables with exact names of their
corresponding Salesforce objects (ACCOUNT, OPPORTUNITY, etc.).

11
6. Click “Next” to go to the “3 Field Exclusions” page.
You can choose to remove the Salesforce object fields that have confidential data and that are not required for the Sales Management Dashboard.
7. Click “Next” to go to the “4 Data Filters” page.
If your Salesforce data needs to be segregated, you can set the row limit and filters.

12
8. Click “Next” to go to “Schedule,” which is the last page of the wizard.
The replication task will be scheduled through the solution SQL Server Agent script so you do not need to create a schedule on this page. Keep the default “Do not run this task on a schedule” option.
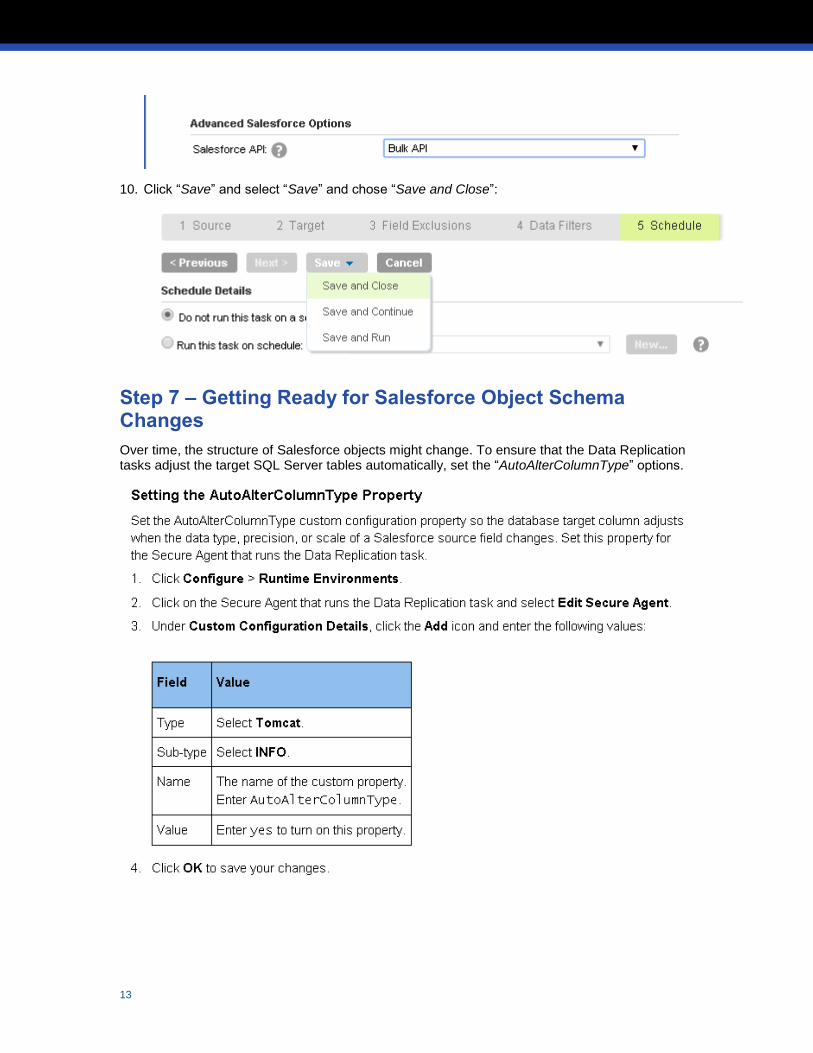
9. To improve the performance of Salesforce data replication, select “Bulk API” (at the bottom of the page).
13
10. Click “Save” and select “Save” and chose “Save and Close”:
Step 7 – Getting Ready for Salesforce Object Schema Changes
Over time, the structure of Salesforce objects might change. To ensure that the Data Replication tasks adjust the target SQL Server tables automatically, set the “AutoAlterColumnType” options.

14