informatica mapping scenarios
DESCRIPTION
Informatica Mapping ScenariosTRANSCRIPT

Mapping Scenarios Scenario:1 : How to achieve the cumulative sum?Source:col1 col27369 8007499 16007521 1250
Target:col1 col2 col37369 800 8007900 950 17507876 1100 28507521 1250 4100
Expression Transformation

Create one variableport :v_cum_sal=v_cum_sal+COL2Create one ouputport:o_cum_sal=v_cum_sql
Scenario 2:member family contr1 A 100002 A 200003 A 100004 B 205 B 20member family contr%1 A 25%2 A 50%3 A 25%4 B 50%5 B 50%
Solution 1: Aggregator Transformation; Source Qualifier;Expression Transformation;
1) Drag same source twice.2) Select Aggregator Transform a) Link second source ports "FAMILY" , "CONTR" to Aggregator Tranf b)Add one output port O_SUM = SUM(contr) b) Select group by "FAMILY"3) Select Joiner Transform: a) Link second pipeline ports "FAMILY" , "O_SUM" to Joiner Tranf and select as Master port b) Renames to port as FAMILY-> FAMILY_M O_SUM -> IN_SUM c) Link first pipeline ports "MEMBER","FAMILY" and "CONTR" to Joiner Tranf4) Select Expression Tranf: a) Link Ports "MEMBER","FAMILY","IN_SUM","CONTR" to Expression Tranf b) Add output port PCNTR: CONTR* 100 ||IN_SUM ||'%' 5) Link Ports "MEMBER","FAMILY","PCNTR" to Target.
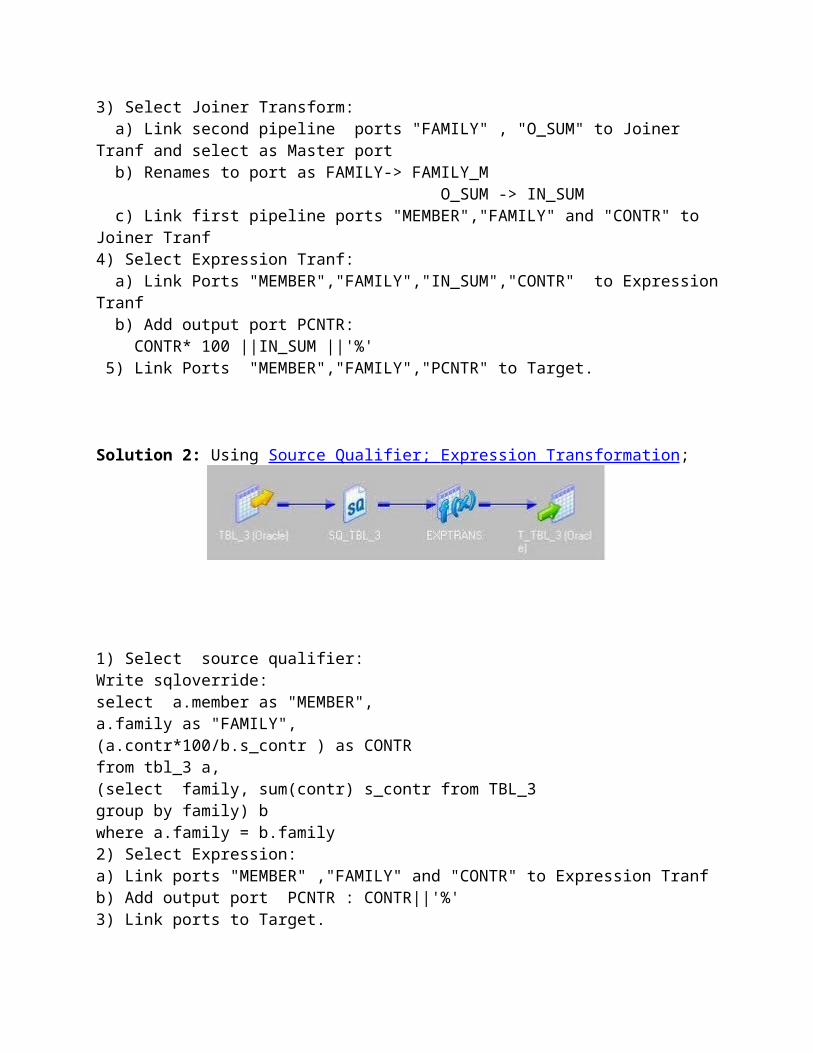
Solution 2: Using Source Qualifier; Expression Transformation ;
1) Select source qualifier:Write sqloverride:select a.member as "MEMBER", a.family as "FAMILY",(a.contr*100/b.s_contr ) as CONTRfrom tbl_3 a,(select family, sum(contr) s_contr from TBL_3 group by family) bwhere a.family = b.family2) Select Expression:a) Link ports "MEMBER" ,"FAMILY" and "CONTR" to Expression Tranfb) Add output port PCNTR : CONTR||'%'3) Link ports to Target.
Scenario 3 : Achieve the the pivoting of records:Source: col2 col1 a 1b 1c 1d 1p 2q 2r 2x 3
Target:col1 col21 a,b,c,d2 p,q,r3 x

Source Qualifier; Expression Transformation ,Sorter Transformation,Aggregator Transformation;
1) Sorter Transform:
Sort by COL1
2) Expression Transform:
Add 2 new variable:v_col_string=decode(v_prev_col,COL1,v_col_string||','||COL2,COL2) v_prev_col =COL1Add 1 ouputport:o_fin_string=v_col_string Port sequence:COL1COL2 v_col_string o_fin_string v_prev_col
3)Aggregator Transformation
When you group values, the Integration Service produces last row for each group.so it will return :1 a,b,c,d2 p,q,r3 x
Scenario 4:I have a scenario in which the source consists of 2 colscol1 col2 10 A10 A20 C30 D40 E20 C
and there are 2 targets one to load distinct values and another one to load duplicate values.T1col1 col210 A20 C

30 D40 E
T2col1 col210 A20 C
Solution:Source Qualifier; Expression Transformation ,Sorter Transformation , Router Transformation
1)Link ports from Source qualifier to sorter transform for key col1, col2sorted data:10 A10 A20 C20 C30 D40 E2)Link ports to Expression Transform:
New ports : v_count =decode(COL1,v_pre_col1 ,decode(COL2,v_pre_col2,v_count+1,1),1)o_count=v_countv_pre_col1=COL1v_pre_col2=COL23)Link to Router Transform:
Group:
4) link all Output ports to target
Scenario 5:Unpivorting the records
Source:col1 qt1 qt2 qt3 qt4
1 100 200 300 4002 100 200 300 4003 100 200 300 400
Target:

col1 col2 col3
1 qt1 1001 qt2 2001 qt3 3001 qt4 4002 qt1 1002 qt2 2002 qt3 3002 qt4 4003 qt1 1003 qt2 2003 qt3 3003 qt4 400Source Qualifier; Normalizer Transformation ;Expression Transformation
1) Drag Source and Normalizer Transform: a) Click on Normalizer: Add two PORTS and add LEVEL EXPREC top of the port exp Ports: COL1, EXP Level : EXPREC b) Port EXP -> Occurs =4 And Level =2
c)Click on Ports tab:
d) Link the source columns to Normalizer :
2) Drag Expression Transform
a) Drag the normalizer columns COL1, exp, GCID_exp to Expression Transf: b) Add new output port :

OUT_EXP=DECODE(GCID_exp,1,'QT1',2,'QT2',3,'QT3','QT4')
3) Link ports Col1, exp and OUT_exp to Target.
Scenario 6 : Get the highest salaried and lowest Salaried employee for each department.?Union Transformation,Rank Transformation
1) Drag 2 rank Transform : RNKTRANS : Get Highest salary Set Properties : Number of Ranks =1 , Top/Bottom = Top
RNKTRANS1: Get Lowest salarySet Properties : Number of Ranks =1 , Top/Bottom = Bottom
2)Drag Union Transform : a) Link all ports to Default Group b) Create two groups : TOP_SAL and BOTTOM_SAL:
3) Link all Ports to target.

Suppose we have customer data coming in below format and we want to have last 3 rows in target
Step1)
Create expression transformation (exp_Build_Logic) drag all three input ports and create three extra ports as below
v_dummy (Output Port) –Assign Value 1 to it v_Total_Count (Variable Port) := v_Total_Count+1 o_Total_Count := v_Total_Count
Step2) Create Aggregator transformation with all ports and do not choose any port as group by port
Step 3)
Create Joiner transformation jnr_Agg_Expression as Sorted Input (You need to choose this option as you are trying to use two sources originating from same source)
Take two ports from aggregator and rest from expression transformation and join on field v_dummy
Output from joiner
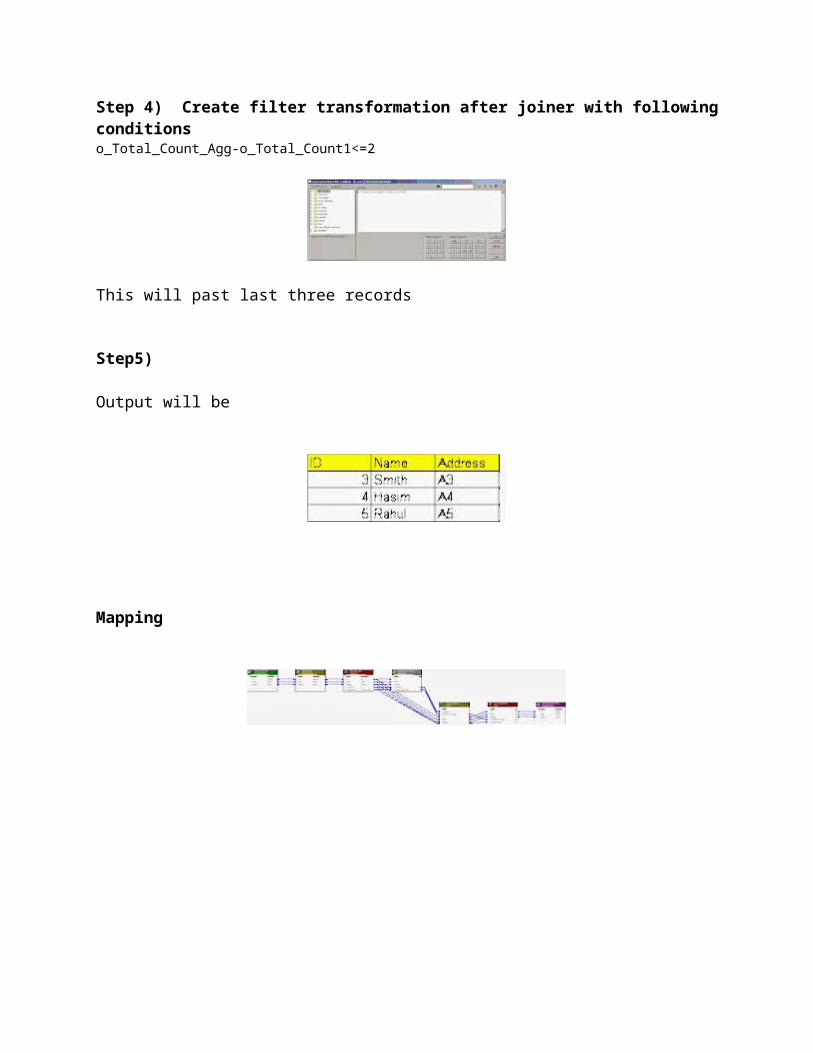
Step 4) Create filter transformation after joiner with following conditions o_Total_Count_Agg-o_Total_Count1<=2
This will past last three records
Step5)
Output will be

Mapping

Informatica Scenario based interview questions (Convert columns into rows) This is the one of most frequently asked informatica scenario based interview question.
We have source data like below in table
A B C
Output required is
A
B
C
I have seen rarely a candidate answer this question correctly. Their answer is mostly a crammed (by reading on various website) without understanding core concept of informatica transformations.
I will explain three methods to achieve this then we will find out which one is best method
1. Router Transformation2. Normalizer Transformation 3. Java Transformation
Router Transformation : This method take advantage of the fact that router is an active transformation and one row can fall into multiple groups i.e. if a row satisfies condition of three groups then it will fall into three groups and will produce three rows for one input row.
Step1)
Suppose we have a source with three input columns
Step2) Create an expression Transformation with field name FLD_OUTPUT to concatenate three fields separated by # sign
Step3) Create a router transformation with three output groups with condition
GROUP1 : substr(FLD_OUTPUT,1,instr(FLD_OUTPUT,'#')-1)=FLD1
GROUP2 : substr(FLD_OUTPUT,instr(FLD_OUTPUT,'#')+1,instr(FLD_OUTPUT,'#',2)-1)=FLD2
GROUP3: substr(FLD_OUTPUT,instr(FLD_OUTPUT,'#',3)+1)=FLD3
Purpose of this is that row will fall into three groups ..we are extracting string from concatenated string are comparing to respective field.i.e value A will be in first group and B in second group and so on…
Step4) Create union transformation to combine output from three output group from router..Take FLD1 from first group, FLD2 from second group ,FLD3 from third group

Output from union will be
A
B
C
Core Concept: if a row satisfies condition of three groups then it will fall into three groups and will produce three rows for one input row.
Easy isn’t it …No need to cram. We will now move to other methods…
Normalizer : Normalizer transformation has a property “Occurs : The number of instances of a column or group of columns in the source row. “
You can define number of occurrence of source field, Once you define number of occurrence then informatica automatically creates that number of input ports. In this case 3

Connect FLD1, FLD2 and FLD3 from source or expression in step2 of first method and FLD as output connected to target.
Output from normalizer will be
A
B
C
Core Concept : Normalizer transformation has a property “Occurs: The number of instances of a column or group of columns in the source row. “
Let us move to final and best method
Java Transformation : We will take advantage of property, Java transformation is most underutilized transformation of informatica, If used properly it can do magic
Generate Transaction The transformation generates transaction rows. You can enable this property

for active Java transformations.
Create a java transformation with one input and one output field
Now connect concatenated field (A#B#C) from expression in step2 of first method to FLD_INPUT of java transformation
Now go to java code and copy below
String[] str_fld_nm=FLD_INPUT.split("#");
for(int i=0; i
FLD_OUTPUT =str_fld_nm[i];
generateRow();
}
It is using java functionality of array to break input field and multiple fld and then taking advantage of generateRow() to produce multiple rows.

Now connect FLD_OUTPUT to target and it will be
A
B
C
Core concept : Java functionality to break concatenated string into multiple fields and generateRow() to produce multiple rows.
Now we have covered all three features. Let us see which one is best
Feature Router Normaliser Java
Flexiblity Low (As you have to hardcode number of fields)
Low (As you have to hardcode number of occurrence )
High (No Hard coding as it can handle any number of fields)
Ease High as developer are comfortable with using router transformation
Medium as developer don’t use it frequently
Low. As most developer are not from java background. It is difficult for them to understand it

If you need xml of mapping then please send a mail to [email protected] or [email protected]
I request again …don’t cram answers..Instead understand the concepts..
Posted by Lalit Sharma at 14:34 1 Comment
Labels: Informatica interview questions, Informatica scenario based questions
Tuesday, 29 October 2013
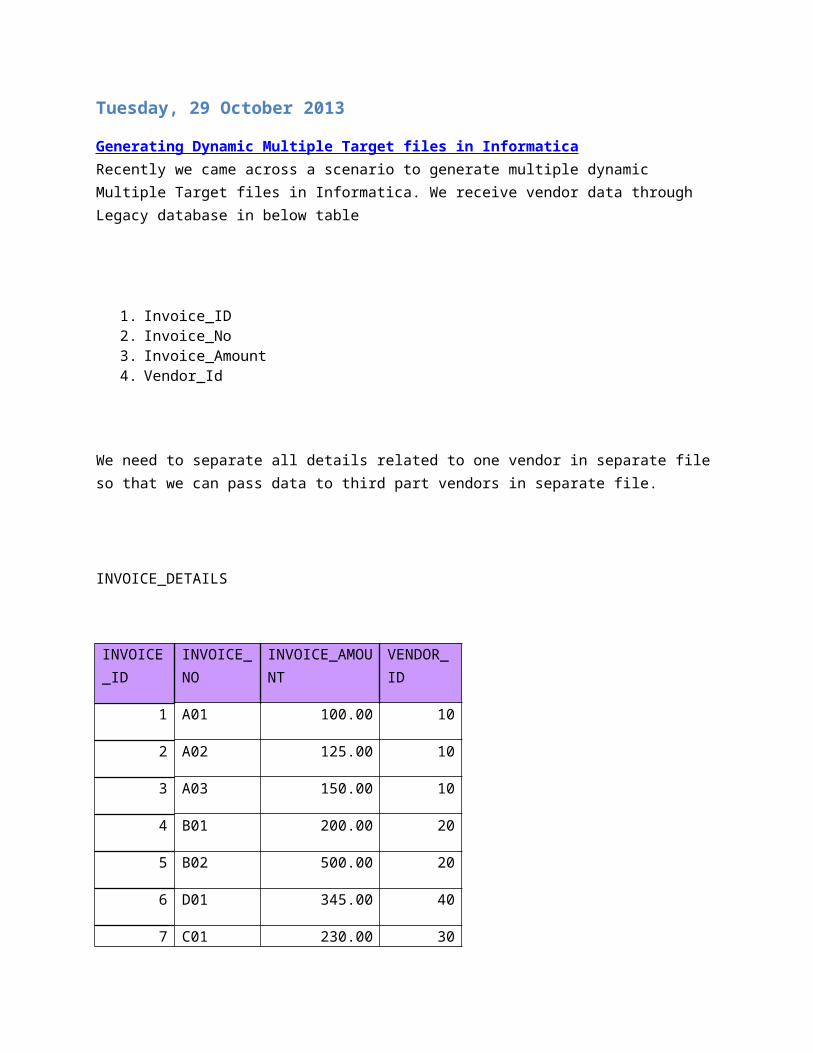
Generating Dynamic Multiple Target files in Informatica Recently we came across a scenario to generate multiple dynamic Multiple Target files in Informatica. We receive vendor data through Legacy database in below table
1. Invoice_ID2. Invoice_No3. Invoice_Amount4. Vendor_Id
We need to separate all details related to one vendor in separate file so that we can pass data to third part vendors in separate file.
INVOICE_DETAILS
INVOICE_ID
INVOICE_NO
INVOICE_AMOUNT
VENDOR_ID
1 A01 100.00 10
2 A02 125.00 10
3 A03 150.00 10
4 B01 200.00 20

5 B02 500.00 20
6 D01 345.00 40
7 C01 230.00 30
8 D02 450.00 40
9 E01 40.00 50
In order to achieve this we need to follow below steps in mapping
Step1 ) Import INVOICE_DETAILS and drag into mapping and connect all port from Source qualifier to expression and do below sql override
SELECT INVOICE_DETAILS.INVOICE_ID, INVOICE_DETAILS.INVOICE_NO, INVOICE_DETAILS.INVOIC_AMOUNT, INVOICE_DETAILS.VENDOR_ID
FROM
INVOICE_DETAILS
order by VENDOR_ID
Step2) Create expression transformation with as below with 4 input port plus
1. 'Vendor_'||VENDOR_ID||'Details.csv'FILE_NAME (Output Port) 2. iif (VENDOR_IDCHECK_VENDOR_ID(Variable Port) <> PREV_VENDOR_ID,1,0)
3. CHECK_VENDOR_IDOUTPUT_VENDOR_ID (Output)

4. PREV_VENDOR_ID (Variable) VENDOR_ID
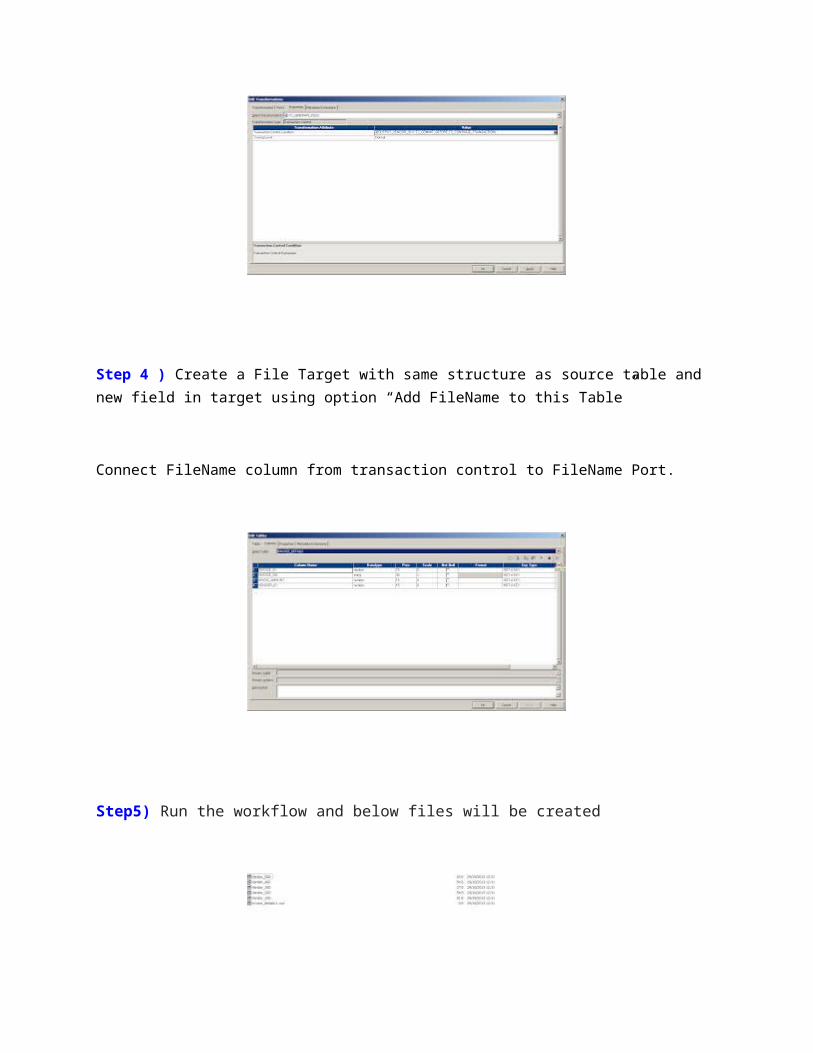
Step 3 ) Create Transaction Control Transformation (TC_GENERATE_FILES) with below logic
iif(OUTPUT_VENDOR_ID=1,TC_COMMIT_BEFORE,TC_CONTINUE_TRANSACTION)
Step 4 ) Create a File Target with same structure as source table and new field in target using option “Add FileName to this Table”
Connect FileName column from transaction control to FileName Port.
Step5) Run the workflow and below files will be created
Posted by Lalit Sharma at 15:45 0 Comments
Labels: Informatica, Informatica interview questions, Informatica scenario based questions

Wednesday, 23 October 2013
Informatica Scenario Based Interview Questions (Part1)
Interviewer asked “How will you get first 3 records from flat file source? “...You will say in your mind that’s simple
You reply “We can use variable in expression and increment it and the use filter transformation to pass just first two records”
Interviewer will come up with a new trick in his sleeve “How will you get last 3 records from flat file source? “
Déjà vu …J
You will think and try to build some logic on the fly and try to explain may we can use this transformation or some another transformation and will get bit confused.
I have tried to explain this with a simple example
Suppose we have customer data coming in below format and we want to have last 3 rows in target

Step1)
Create expression transformation (exp_Build_Logic) drag all three input ports and create three extra ports as below
v_dummy (Output Port) –Assign Value 1 to it
v_Total_Count (Variable Port) := v_Total_Count+1
o_Total_Count := v_Total_Count
Step2) Create Aggregator transformation with all ports and do not choose any port as group by port
Step 3)
Create Joiner transformation jnr_Agg_Expression as Sorted Input (You need to choose this option as you are trying to use two sources originating from same source)
Take two ports from aggregator and rest from expression transformation and join on field v_dummy
Output from joiner

Step 4) Create filter transformation after joiner with following conditions
o_Total_Count_Agg-o_Total_Count1<=2
This will past last three records
Step5)
Output will be


Informatica Common Errors :The Target Definition has more than one Transaction Control point connected to it Error : The Target Definition has more than one Transaction Control point connected to it
Scenario :
Create a mapping with two streams( one with Transaction control and Second without Transaction control)..You will get above error
Src1 - SQ1- EXP1- TGT1
Src2 - SQ2- Exp2-TC-TGT2
Reason :
Informatica processes transactional data row wise, hence,while using Transaction control for one of the targets to define the transaction point, Informatica fails to identify the transaction point for the other targets,This results in "The Target Definition has more than one Transaction Control point connected to it".
Solution :
You need to define Transaction Control transformation in other pipeline with property TC_CONTINUE_TRANSATION.
Posted by Lalit Sharma at 10:59 0 Comments
Labels: Informatica common errors

Friday, 14 February 2014
Issue with informatica client in Dual Monitor Problem
Recently i started with informatica in dual monitor and found few issues (Like Expression editor size and sq editor getting greyed out)
Solution
At commend prompt type regedit and go to below path (Please take backup of registry before making any changes)
HKEY_CURRENT_USER\Software\Informatica\PowerMart Client Tools\9.1.0\Designer\Options\Global\Editor\SQL
Change the values of the following to 0
Expression Editor Position
Expression Editor Splitter Position
SQL Editor Position
SQL Editor Splitter Position
Please restart your pc after changing the registry values.

Informatica Scenario based Questions and Solutions (Part-1) Scenario1:
We have a target source table containing 3 columns : Col1, Col2 and Col3. There is only 1 row in the table as follows:
Col1 Col2 Col3----------------- a b c
There is target table containg only 1 column Col. Design a mapping so that the target table contains 3 rows as follows:
Col-----abc
Solution: Not using a Normalizer transformation:
Create 3 expression transformations exp_1,exp_2 and exp_3 with 1 port each. Connect col1 from Source Qualifier to port in exp_1.Connect col2 from Source Qualifier to port in exp_2.Connect col3 from source qualifier to port in exp_3. Make 3 instances of the target. Connect port from exp_1 to target_1. Connect port from exp_2 to target_2 and connect port from exp_3 to target_3.
Scenario 2:
There is a source table that contains duplicate rows.Design a mapping to load all the unique rows in 1 target while all the duplicate rows (only 1 occurence) in another target.
Solution :
Bring all the columns from source qualifier to an Aggregator transformation. Check group by on the key column. Create a new output port count_col in aggregator transformation and write an expression count(key_column). Make a router transformation with 2 groups:Dup and Non-Dup. Check the router conditions count_col>1 in Dup group while count_col=1 in Non-dup group. Load these 2 groups in different targets.
Scenario 3:

There is a source table containing 2 columns Col1 and Col2 with data as follows:
Col1 Col2 a l b p a m a n b q x y
Design a mapping to load a target table with following values from the above mentioned source:
Col1 Col2 a l,m,n b p,q x y
Solution:
Use a sorter transformation after the source qualifier to sort the values with col1 as key. Build an expression transformation with following ports(order of ports should also be the same):
1. Col1_prev : It will be a variable type port. Expression should contain a variable e.g val2. Col1 : It will be Input/Output port from Sorter transformation3. Col2 : It will be input port from sorter transformation4. val : It will be a variable type port. Expression should contain Col15. Concatenated_value: It will be a variable type port. Expression should be decode(Col1,Col1_prev,Concatenated_value||','||Col2,Col1)6. Concatenated_Final : It will be an outpur port conating the value of Concatenated_value
After expression, build a Aggregator Transformation. Bring ports Col1 and Concatenated_Final into aggregator. Group by Col1. Don't give any expression. This effectively will return the last row from each group.
Connect the ports Col1 and Concatenated_Final from aggregator to the target table.
Scenario 4:
Design an Informatica mapping to load first half records to 1 target while other half records to a separate target.
Solution:

You will have to assign a row number with each record. To achieve this, either use Oracle's psudo column rownum in Source Qualifier query or use NEXTVAL port of a Sequence generator. Lets name this column as rownumber.
From Source Qualifier, create 2 pipelines:
First Pipeline:Carry first port Col1 from SQ transformation into an aggregator transformation. Create a new output port "tot_rec" and give the expression as COUNT(Col1). Do not group by any port. This will give us the total number of records in Source Table. Carry this port tot_rec to an Expression Transformation. Add another port DUMMY in expression transformation with default value 1.
Second Pipeline:from SQ transformation, carry all the ports(including an additional port rownumber generated by rownum or sequence generator) to an Expression Transformation. Add another port DUMMY in expression transformation with default value 1.
Join these 2 pipelines with a Joiner Transformation on common port DUMMY. carry all the source table ports and 2 additional ports tot_rec and rownumber to a router transformation. Add 2 groups in Router : FIRST_HALF and SECOND_HALF. Give condition rownumber<=tot_rec/2 in FIRST_HALF. Give condition rownumber>tot_rec/2 in SECOND_HALF. Connect the 2 groups to 2 different targets.

Normalizer Transformation
Normalizer transformation is an Active and Connected transformation.
The Normalizer transformation receives a row that contains multiple-occurring columns and returns a row for each instance of the multiple-occurring data. The transformation processes multiple-occurring columns or multiple-occurring groups of columns in each source row.
The Normalizer transformation parses multiple-occurring columns from COBOL sources, relational tables, or other sources. It can process multiple record types from a COBOL source that contains a REDEFINES clause.
For example, you might have a relational table that stores four quarters of sales by store. You need to create a row for each sales occurrence. You can configure a Normalizer transformation to return a separate row for each quarter.
You can create a VSAM Normalizer transformation or a pipeline Normalizer transformation:
VSAM Normalizer transformation. A non-reusable transformation that is a Source Qualifier transformation for a COBOL source. The Mapping Designer creates VSAM Normalizer columns from a COBOL source in a mapping. The column attributes are read-only. The VSAM Normalizer receives a multiple-occurring source column through one input port.
Pipeline Normalizer transformation. A transformation that processes multiple-occurring data from relational tables or flat files. You create the columns manually and edit them in the Transformation Developer or Mapping Designer. The pipeline Normalizer transformation represents multiple-occurring columns with one input port for each source column occurrence.
Source Data:
EmpId Ename Salary1 Salary2 Salary3
1001 Raju 5000 8000 10000
1002 Ravi 6000 7000 11000
1003 Anil 4000 3000 5000

Target Data:
EmpId Ename Salary
1001 Raju 5000
1001 Raju 8000
1001 Raju 10000
1002 Ravi 6000
1002 Ravi 7000
1002 Ravi 11000
1003 Anil 4000
1003 Anil 3000
1003 Anil 5000
Sample mapping:
1. Connect and Open the folder if not already opened.
2. Select Tools --> Mapping Designer
3. Select Mappings --> Create
It will pop-up "Mapping Name". Enter the mapping name of your choice" and Click on 'OK'. Example: m_emp_salaries

4. Drag the Source and Target definitions into workspace if they are already exist. If not click here to know how to create or import Table definitions.
5. Select 'Transformation' from Menu --> Create
a) That will appear you 'Select the transformation type to create:'
b) Select 'Normalizer' from drop down and 'Enter a new name for this transformation:' as "nrm_salaries"
c) Click 'Create' and 'Done'

OR
a) Click on Normalizer Transformation icon marked below in below snapshot.
b) Click in the workspace in Mapping Designer.
c) Select NRMTRANS in workspace and Right Click --> Edit.
d) In Transformation tab --> Click on 'Rename' highlighted above which will pop-up 'Rename Transformation'. Enter the Transformation Name: "nrm_salaries"

e) Click on 'OK'
f) Click on 'Apply' and 'OK'.
Note: We cannot drag any port into Normalizer transformation. We have to create port and defined datatypes, length.
6). Select 'nrm_salaries' Normalizer transformation in workspace and Right Click --> Edit.
a) Go to 'Normalizer' tab, to create ports
b) Now, defined the 'SALARY' occurrence as 3. Which tells Informatica who many sequence columns need to loop for the other columns.

c) Now, go to the tab Port and see, we got 3 ports for salary.
d) Go to the Properties tab
Reset: At the end of a session, resets the value sequence for each generated key value to the value it was before the session
Restart: Starts the generated key sequence at 1. Each time you run a session, the key sequence value starts at 1 and overrides the sequence value on the Ports tab.
e) Click 'Apply' and Click 'OK.
7) Drag required ports from 'SQ_emp_salaries' Source Qualifier to 'nrm_salaries' Normalizer Transformation then 'employee_salaries' target.
8) Select 'Mapping' from Menu --> Validate.
9) Select 'Repository' from Menu --> Save


INFORMATICA SCENARIOS
Convert single row from source to three rows in target
Scenario1:
We have a source table containing 3 columns : Col1, Col2 and Col3. There is only 1 row in the table as follows:
Col1 Col2 Col3
a b c
There is target table containg only 1 column Col. Design a mapping so that the target table contains 3 rows as follows:
Col
a
b
c
Without using normaliser transformation.
Solution:

Create 3 expression transformations exp_1,exp_2 and exp_3 with 1 port each. Connect col1 from Source Qualifier to port in exp_1.Connect col2 from Source Qualifier to port in exp_2.Connect col3 from source qualifier to port in exp_3. Make 3 instances of the target. Connect port from exp_1 to target_1. Connect port from exp_2 to target_2 and connect port from exp_3 to target_3.
Split the non-key columns to separate tables with key column in both
Scenario 2:
Split the non-key columns to separate tables with key column in both / How to split the data of source table column-wise with respect to primary key. See the source and target tables below.
source table: ID is the key column, Name and Phone No are non-key columns
ID Name Phone No
10
AAA 123
20
BBB 234

30
CCC 434
40
DDD 343
50
EEE 442
Target Table 1
ID Name
10 AAA
20 BBB
30 CCC
40 DDD
50 EEE
Target Table 2
ID Phone No
10 123
20 234
30 434
40 343

50 442
Solution:
Step 1: Source qualifier: get the source table to the mapping area. See image below.
Step 2: Drag all the port from (from the previous step) to the Aggregator transformation and group by the key column. Since we have to split the columns to two different tables with the key column in each, so we are going use two expression transformation, each will take the key column and one non-key column. Connect aggregator transformation with each of the expression transformation as follows.
Step 3: We need another set of aggregator to be associated with each of the expression tranformation from the previous step.
Step 4: In the final step connect the aggregators with the two target tables as follows.

Here is the iconic view of the entire mapping.
Separating duplicate and non-duplicate rows to separate tables
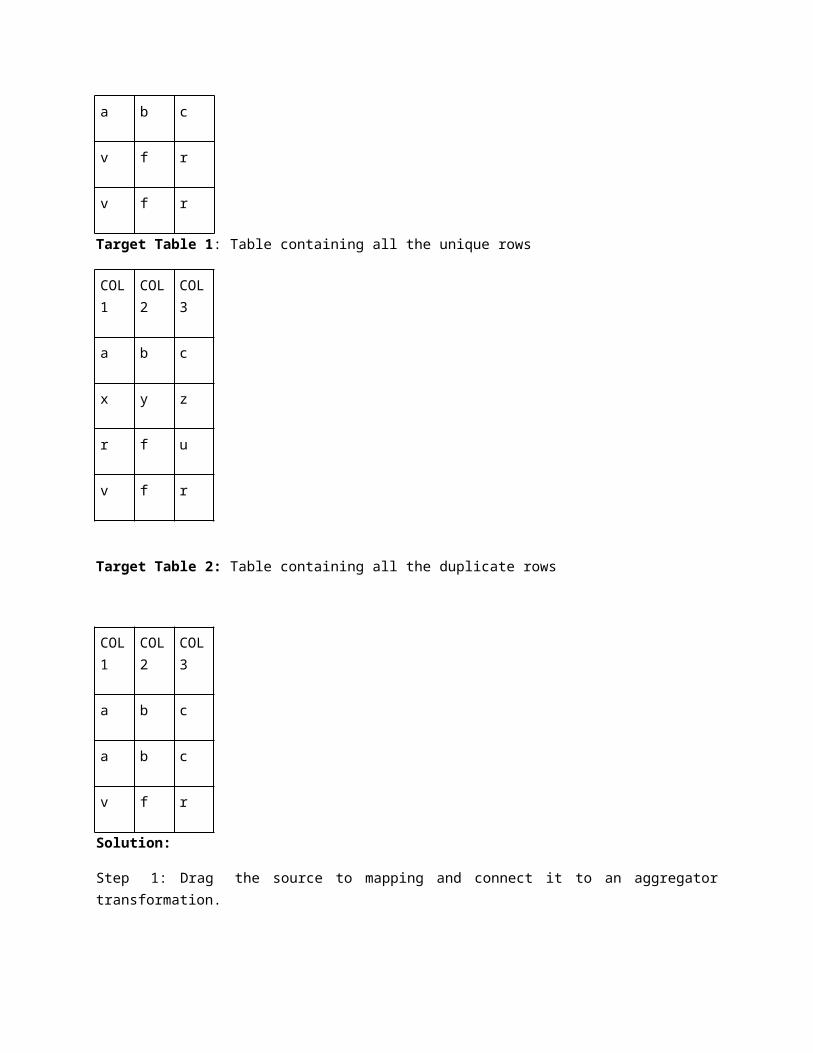
Scenario 3:
How to segregate the duplicate and distinct rows from source table to separate target tables?
source table:

COL1COL2
COL3
a b c
x y z
a b c
r f u
a b c
v f r
v f r
Target Table 1: Table containing all the unique rows
COL1 COL2 COL3
a b c
x y z
r f u
v f r
Target Table 2: Table containing all the duplicate rows
COL1 COL2 COL3
a b c
a b c
v f r
Solution:
Step 1: Drag the source to mapping and connect it to an aggregator transformation.
Step 2: In aggregator transformation, group by the key column and add a new port call it count_rec to count the key column.
Step 3: connect a router to the aggregator from the previous step.In router make two groups one named "original" and another as "duplicate"In original write count_rec=1 and in duplicate write count_rec>1.
The picture below depicting group name and the filter conditions

Step 4: Connect two group to corresponding target table.

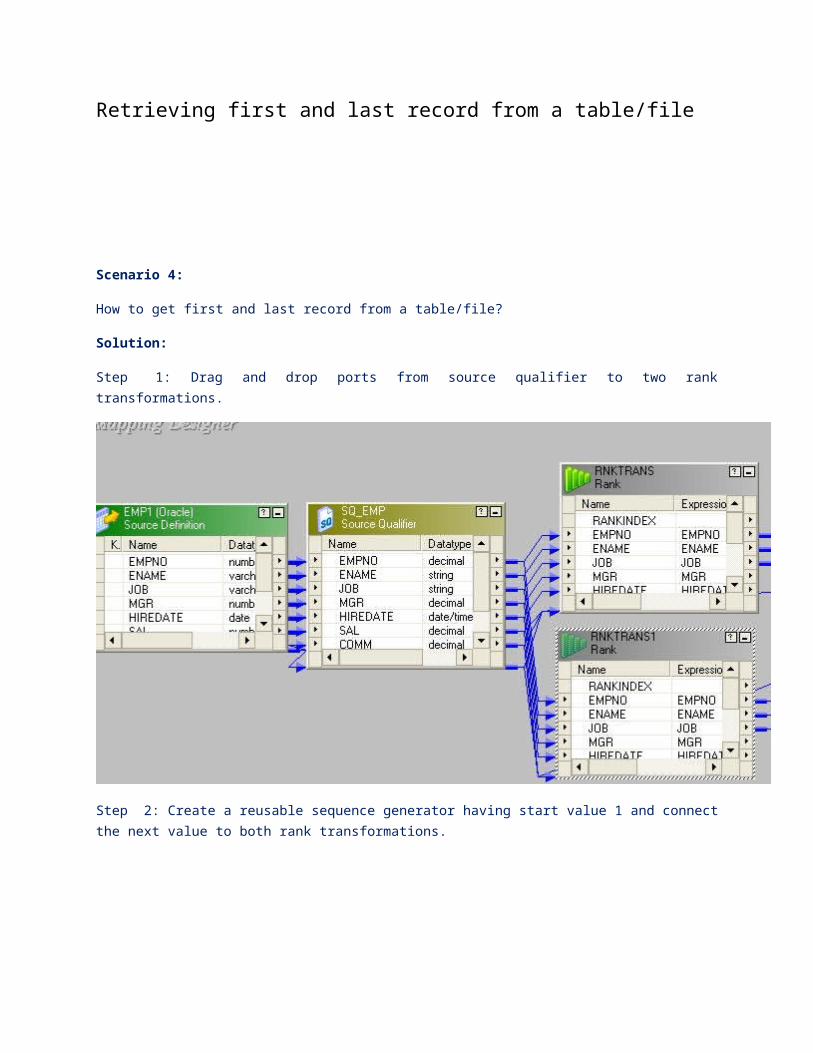
Retrieving first and last record from a table/file
Scenario 4:
How to get first and last record from a table/file?
Solution:
Step 1: Drag and drop ports from source qualifier to two rank transformations.
Step 2: Create a reusable sequence generator having start value 1 and connect the next value to both rank transformations.

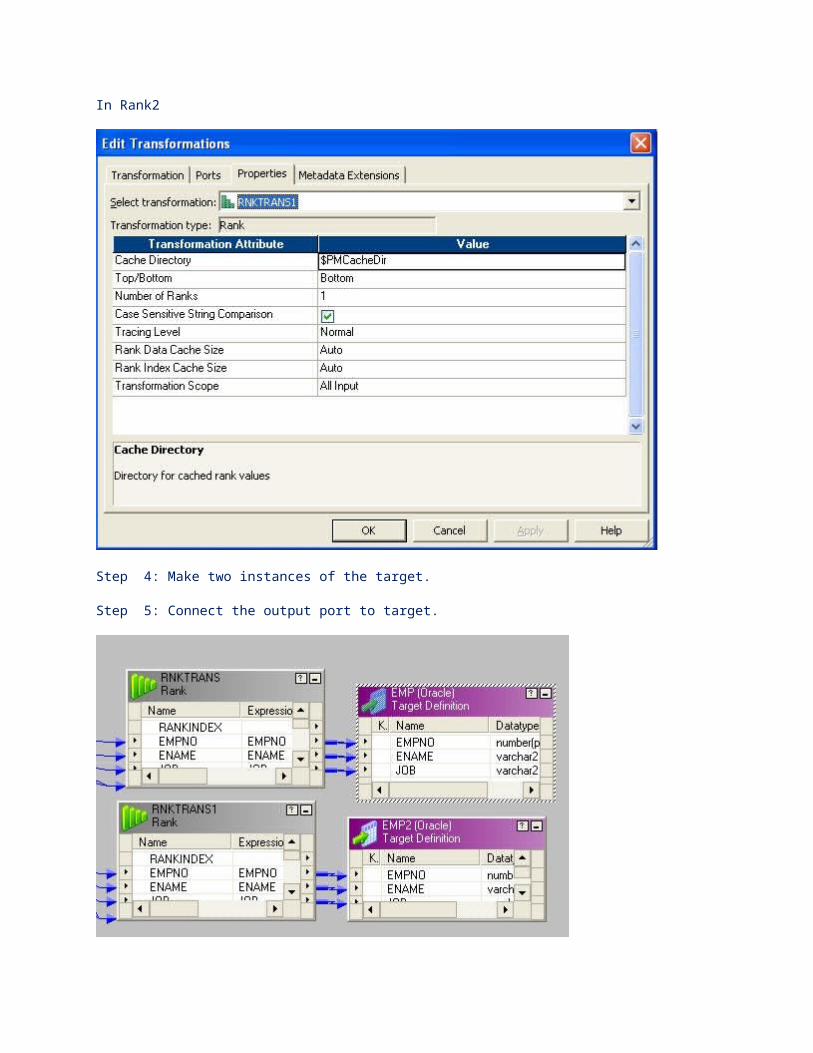
Step 3: Set rank properties as follows
In Rank1

In Rank2
Step 4: Make two instances of the target.
Step 5: Connect the output port to target.

Sending first half record to target
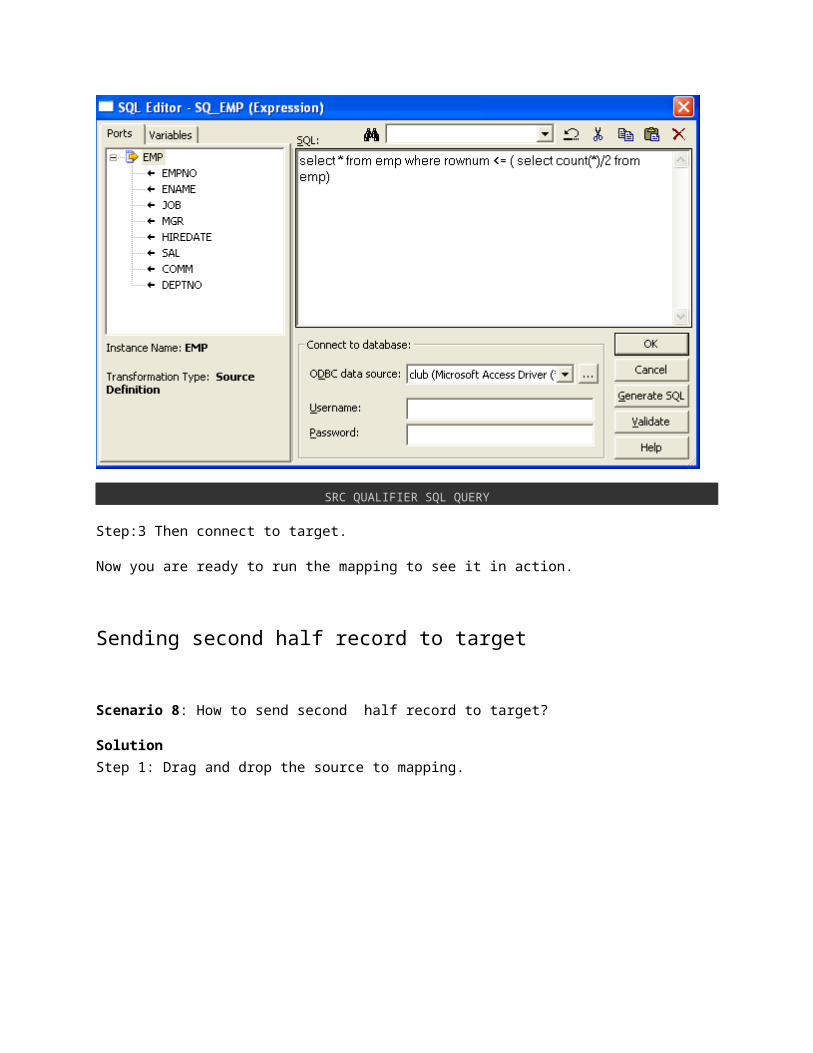
Scenario 6: How to send first half record to target?
Solution:
Step:1 Drag and drop the source to mapping.
SRC TO TARGET MAPPING
Step:2 In source-Qualifier , go to property and write the SQL query like
1.select * from emp where rownum <= ( select count(*)/2 fromemp)

SRC QUALIFIER SQL QUERY
Step:3 Then connect to target.
Now you are ready to run the mapping to see it in action.
Sending second half record to target
Scenario 8: How to send second half record to target?
Solution Step 1: Drag and drop the source to mapping.
SRC TO TGT MAPPING
Step 2: In source-Qualifier , go to propery and write the SQL query like
1.select * from emp minus select * from emp where rownum <= ( select count(*)/2 from emp))
.
SRC QUALIFIER SQL QUERY

Step:3 Then connect to target, and run mapping to see the results.
Sending alternate record to target
Scenario 9: How to send alternate record to target?OrSending Odd numbered records to one target and even numbered records to another target.
Solution:
Step 1: Drag the source and connect to an expression transformation.Step2: Add the next value of a sequence generator to expression transformation.
SCR TO SEQ MAPPING
Step 3: In expression transformation make two port, one is "odd" and another "even".And Write the expression like below

EXPRESSION PROPERTY
Step 4: Connect a router transformation to expression.Make two group in router.And give condition Like below
RTR PROPERTY
Step 5: Then send the two group to different targets.
The entire mapping is as below
FINAL MAPPING VIEW SCENARIO 9

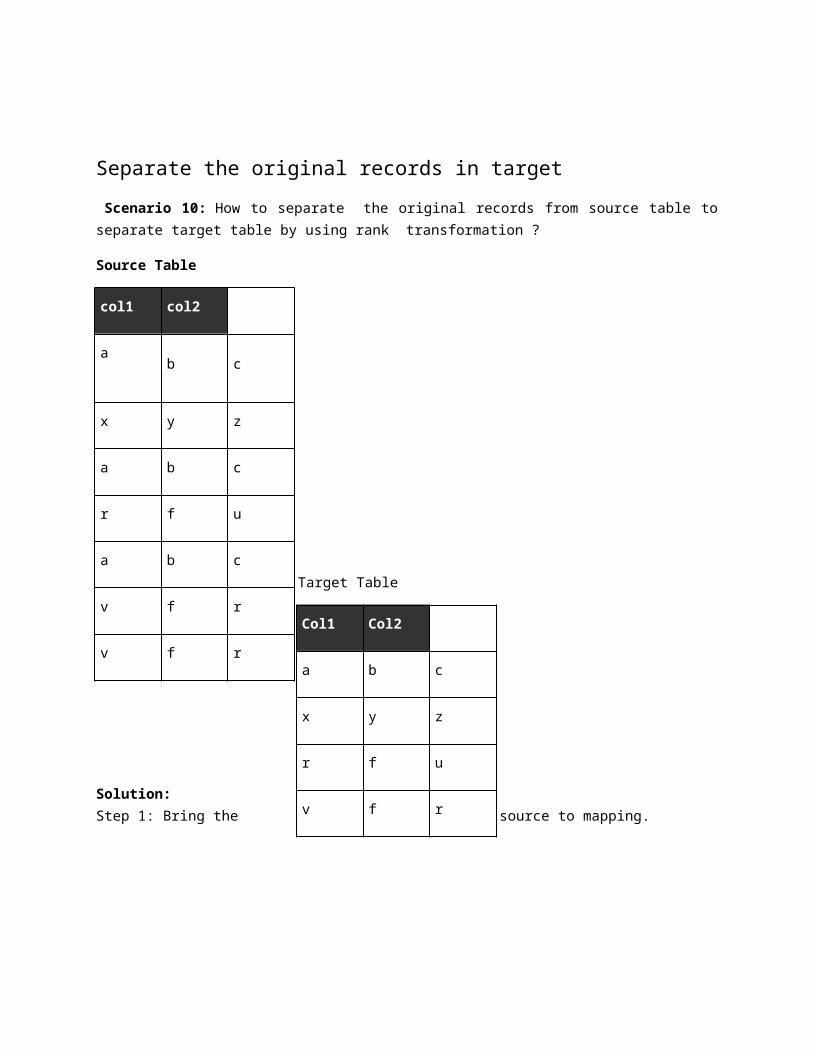
Separate the original records in target
Scenario 10: How to separate the original records from source table to separate target table by using rank
transformation ?
Source Table
Target Table
Solution:
Step 1: Bring the source to mapping.
col1 col2 col3
ab c
x y z
a b c
r f u
a b c
v f r
v f r
Col1 Col2 Col3
a b c
x y z
r f u
v f r
SRC TO RANK MAPPING
Step 2: Connect the rank to source.
Step 3: In rank, set the property like this.
RANK PROPERTY
Step 4: Then send it to target.Run the session to see the result.

Get top 5 records to target without using rank
Scenario 12: How to get top 5 records to target without using rank ?
Solution:
1. Drag the source to mapping and connect it to sorter transformation.
2. Arrange the salary in descending order in sorter as follows and send the record to expression.
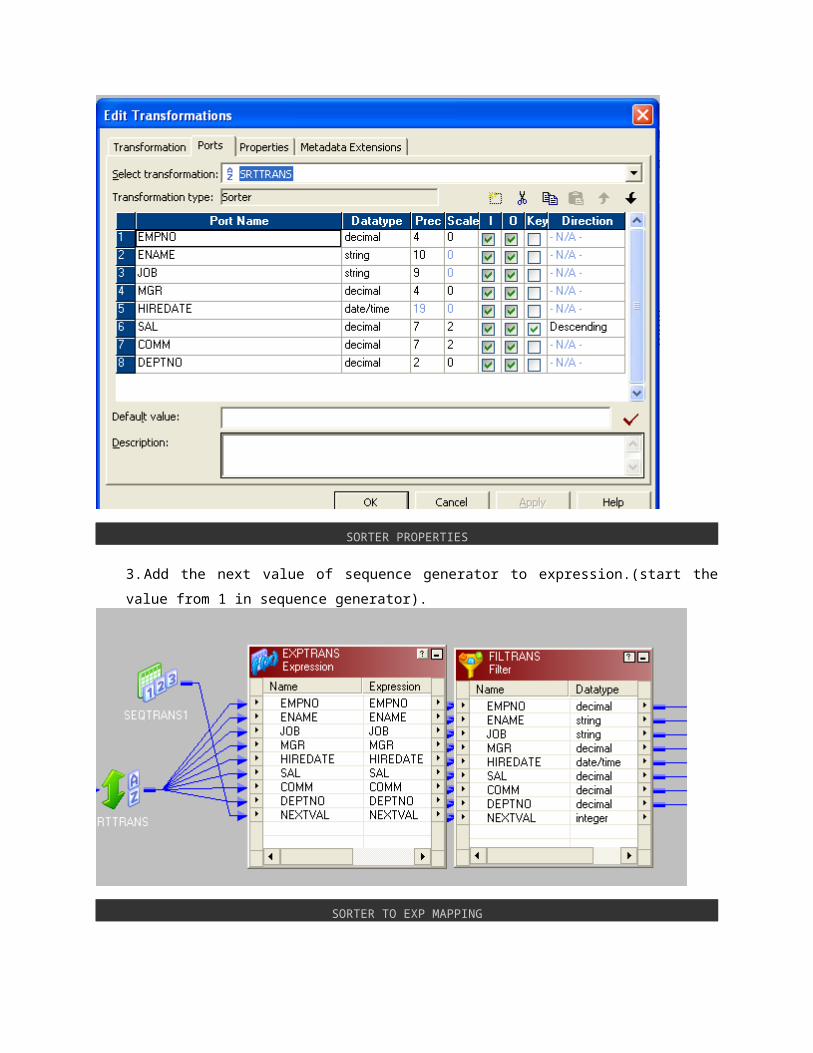
SORTER PROPERTIES
3. Add the next value of sequence generator to expression.(start the value from 1 in sequence
generator).
SORTER TO EXP MAPPING

4. Connect the expression transformation to a filter or router. In the property set the condition as
follows-
5. Finally connect to the target.
FINAL MAPPING SC12
Concatenation of duplicate value by comma separation

Scenario: You have two columns in source table T1, in which the col2 may contain duplicate values.All
the duplicate values in col2 of will be transformed as comma separated in the column col2 of target table
T2.
Source Table: T1
Target Table: T2
col1 col2
a x,m
b y,n
c z
Solution:
1. We have to use the following transformation as below.
First connect a sorter transformation to source and make col1 as key and its order is ascending. After
that connect it to an expression transformation.
Col1 Col2
a x
b y
c z
a m
b n

2. In Expression make four new port and give them name as in picture below.
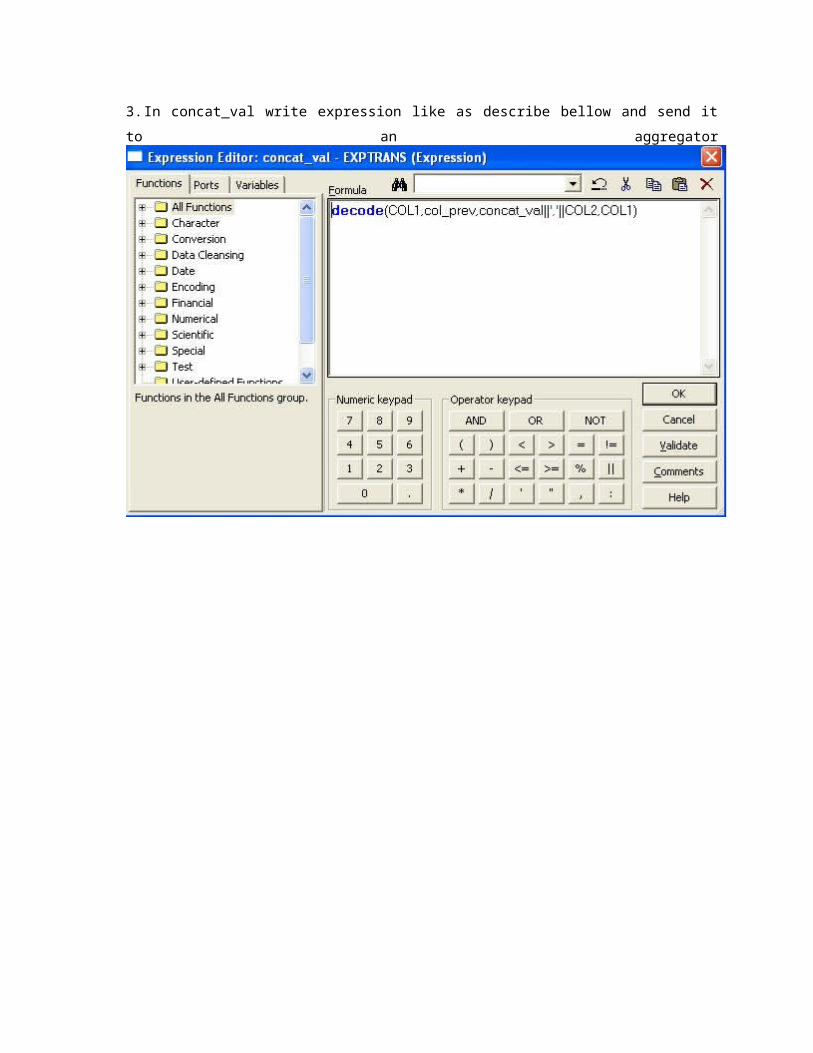
3. In concat_val write expression like as describe bellow and send it to an aggregator

4. In aggregator group it by col1 and send it to target
5. Finally run the session.
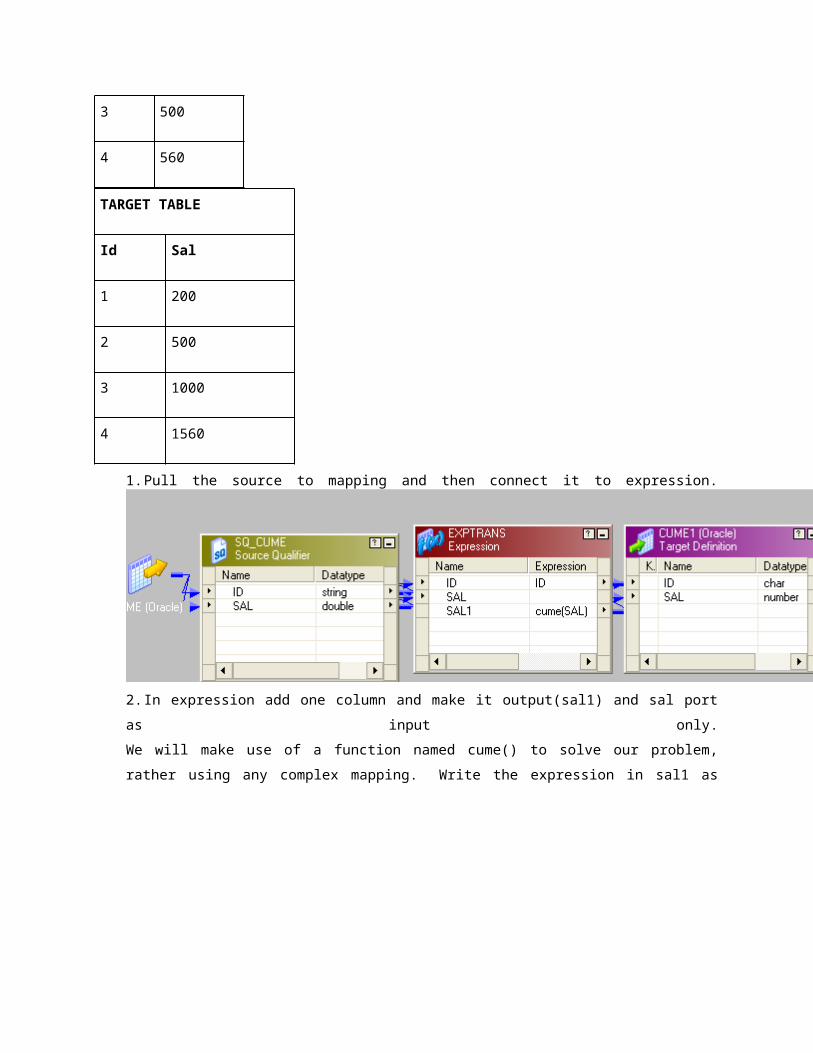
Target table rows , with each row as sum of all previous rows from source table.
Scenario: How to produce rows in target table with every row as sum of all previous rows in source table ?
See the source and target table to understand the scenario.
SOURCE TABLE
id Sal
1 200
2 300
3 500
4 560
TARGET TABLE
Id Sal
1 200
2 500
3 1000
4 1560
1. Pull the source to mapping and then connect it to expression.
2. In expression add one column and make it output(sal1) and sal port as input only.
We will make use of a function named cume() to solve our problem, rather using any complex mapping.

Write the expression in sal1 as cume(sal) and send the output rows to target.
finally run the session...
Produce files as target with dynamic names
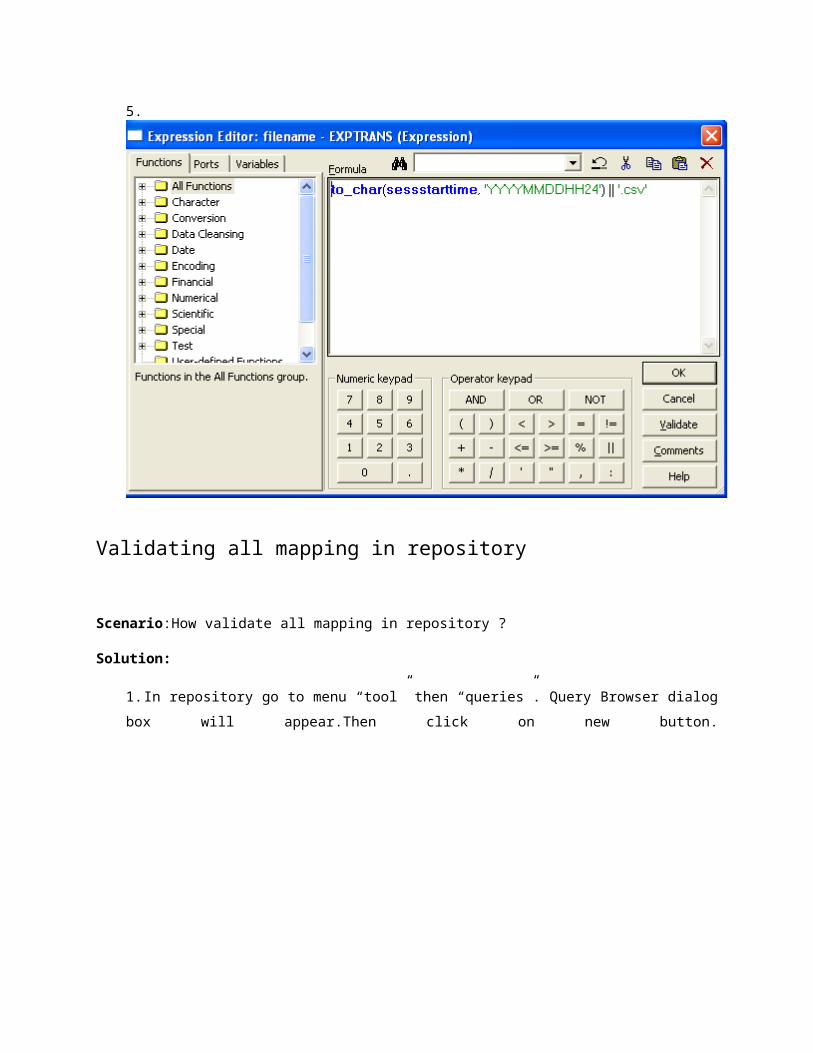
Scenario:How to generate file name dynamically with name of sys date ?
Solution:

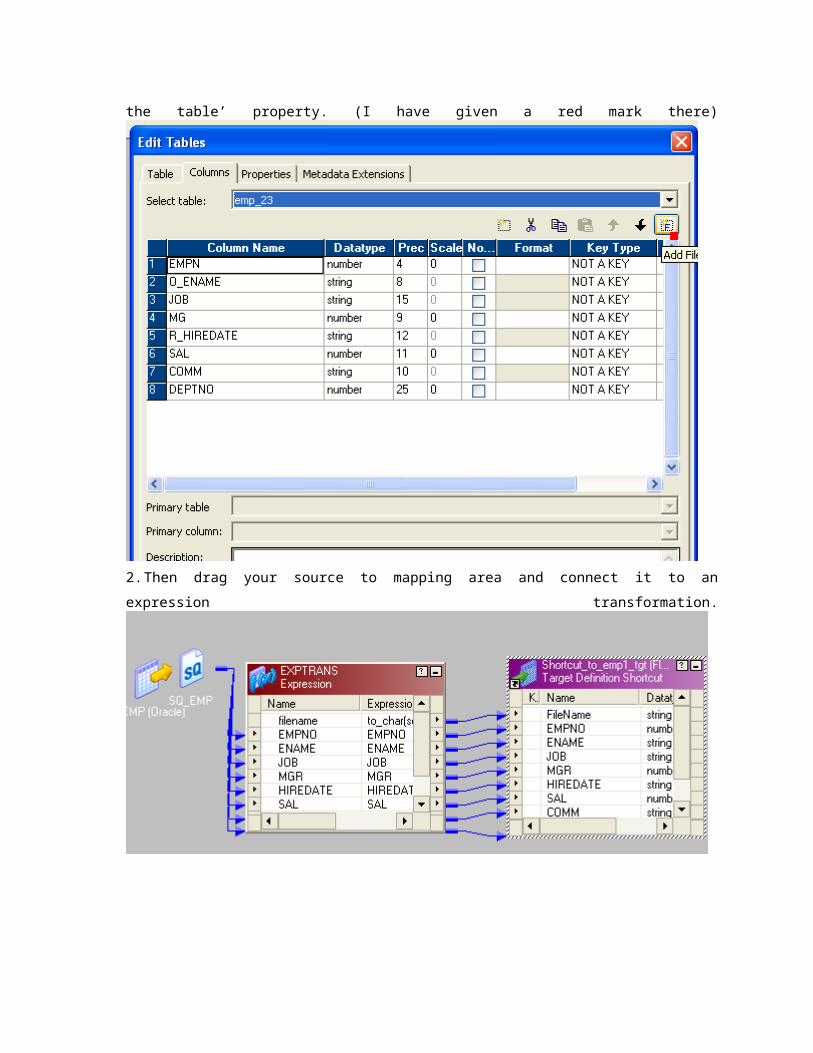
1. Drag your target file to target designer and add a column as show on the picture. It’s not a normal
column .click on the ‘add file name to the table’ property. (I have given a red mark there)
2. Then drag your source to mapping area and connect it to an expression transformation.
3. In expression transformation add a new port as string data type and make it output port.
4. In that output port write the condition like describe as bellow and then map it in to filename port of
target. Also send other ports to target. Finally run the session. You will find two file one with sys date
and other one is ‘.out’ file which one you can delete.

5.
Validating all mapping in repository
Scenario:How validate all mapping in repository ?
Solution:
1. In repository go to menu “tool” then “queries”. Query Browser dialog box will appear.Then click on
new button.


2. In Query Editor, choose folder name and object type as I have shown in the picture.
3. After that, execute it (by clicking the blue arrow button).
4. Query results window will appear. You select single mapping (by selecting single one) or whole
mapping (by pressing Ctrl + A) and go to "tools" then "validate" option to validate it.
Using mapping parameter and variable in mapping
Scenario:How to use mapping parameter and variable in mapping ?
Solution:

1. Go to mapping then parameter and variable tab in the Informatica designer.Give name as $$v1, type
choose parameter (You can also choose variable), data type as integer and give initial value as 20.
2. Create a mapping as shown in the figure( I have considered a simple scenario where a particular
department id will be filtered to the target).
3. In filter set deptno=$$v1 (that means only dept no 20 record will go to the target.)
4. Mapping parameter value can’t change throughout the session but variable can be changed. We can
change variable value by using text file. I’ll show it in next scenario.

In the last blog , we learnt about the Aggregator transformation in Informatica , steps to create it , configuring the port and properties. We also discussed the business scenario of Aggregator Transformation in Informatica. Now this is the time to apply Aggregator Transformation in a sample Informatica mapping. Its a very simple but detailed example of Aggregator Transformation.
Problem Statement :
Create a mapping to populate min , miaximum salary , average and sum of salary for each department based on the employee data with the help of Aggregator Transformation.
Source Data:
EMP Table Data:EMPNO ENAME JOB MGR SAL COMM DEPT
1JOHNSON ADMIN
6 18000 4
2HARDING MANAGER
9 52000 300 3
3TAFT SALES I
2 25000 500 3
4HOOVER SALES I
2 27000 3
5LINCOLN TECH
6 22500 1400 4
6GARFIELD MANAGER
9 54000 4
7POLK TECH
6 25000 4
8GRANT ENGINEER
10 32000 2
9JACKSON CEO
75000 4
10FILLMORE MANAGER
9 56000 2
11ADAMS ENGINEER
10 34000 2
12WASHINGTON ADMIN
6 18000 4
13MONROE ENGINEER
10 30000 2
14ROOSEVELT CPA
9 35000 1
Target Data:
EMP_RES Data:EMPNO ENAME DEPT COUNT MIN_SAL MAX_SAL AVG_SAL SUM_SAL
13MONROE
2 4 30000 56000 38000 152000
4HOOVER
3 3 25000 52000 34666.67 104000
12WASHINGTON
4 6 18000 75000 35416.67 212500
14ROOSEVELT
1 1 35000 35000 35000 35000
Sample Data for above problem can be get from here
Solution:
Below are the steps to create full mapping.
Create a new mapping m_Aggregator_example by Go to toolbar -> click mapping-> Create Drag Source (EMP) and Target (EMP_RES) to the mapping. Add Aggregator Transformation by “Go to Toolbar->click Transformation -> Create. Select the
Aggregator transformation”
Aggregator Transformation Step 2
You can also select Transformation by clicking function button on Informatica Designer

Enter the name “aggr_emp_Salary” and click Done.
Agreegator Transformation Step-2.2
Drag input port from EMPNO,ENAME, SAL, DEPTNO from SQ_EMP (Source Qualifier ) to aggr_emp_Salary
Also add additional below output port (by Clicking on Create port button) o COUNTo MIN_SALo MAX_SALo AVG_SALo SUM_SAL
Check the “Group By” option for the DEPTNO port.
Aggregator Transformation Step 4
Edit the expression for AVG_SAL ( by clicking on expression editor ) and add below expression
AVG(SAL)

Aggregator Transformation Step 5
Similarly add below expression for other port as well o COUNT = COUNT(SAL)o MIN_SAL = MIN(SAL)o MAX_SAL = COUNT(SAL)o SUM_SAL = SUM(SAL)
Click the Transformation tab and configure transformation properties. ( change Tracing Level as per your need)

Aggregator Transformation Step 6
To enhance the performance of Aggregator , it is recommended to provide Sorted Data to it (Via SQ query or by adding Sorter Transformation before it)
In case Sorted Input data is coming to Aggregator, check the “Sorted Input” option under the properties Tab.
Now link all required port from aggr_emp_Salary to EMP_RES Target Definition,
Note: Some extra additional fields like EMPNO , ENAME, (which are not port of aggregation transformation functionally ) are added just to show that during the execution , final output data will contain only the last record per group . Such data is not required allthough.
Click on Mapping ( from tool bar) -> then Validate ( to validate the mapping) Now save the mapping ( by clicking on Repository-> Save or you can also press Ctrl+S) Generate the workflow and run it

Over all Mapping:
Full Mapping of Aggregator Transformation (Without Sorter)
Full Mapping of Aggregator Transformation example in Informatica
Full Mapping of Aggregator Transformation (With Sorter Transformation)
Full Mapping of Aggregator Transformation example in Informatica (With Sorted Data)
So, in this article we have gone through step by step example of Aggregator Transformation in Informatica mapping, learnt the step to add it , configure the port , properties , creating aggregation ports .
- See more at: http://www.tutorial.tecktricks.com/example-of-aggregator-transformation-in-informatica-example-1/#sthash.fZfDnHoQ.dpuf