information and communication units 1 - 3 - wikispacesmods+1-3+rp... · information and...
TRANSCRIPT

AVCE
Information and Communication
Technology
Units 1 - 3
R. P. Richards, B.Sc.(Hons), M.A.
&
P. M. Heathcote, B.Sc.(Hons), M.Sc.
Published by
Payne-Gallway Publishers Limited
26-28 Northgate Street
Ipswich IP1 3DB
Tel: 01473 251097 Fax: 01473 232758
E-mail: [email protected]
Web site: www.payne-gallway.co.uk
2001

ii
Acknowledgements
We would like to thank Nick Burridge, Managing Director of Merrell, for answering innumerable
questions to explain how a footwear distributor operates. The case study ShoeShock is based on the
concepts he explained while being changed in most essential details.
Cover picture © ‘Island Sunset’ reproduced with the kind permission of James Judge
Cover photography © Mike Kwasniak, 160 Sidegate Lane, Ipswich
Cover design by Tony Burton
First edition 2001. Reprinted 2002.
10 9 8 7 6 5 4 3 2
A catalogue entry for this book is available from the British Library.
ISBN 1 903112 29 X
Copyright © R.P. Richards and P.M. Heathcote 2001
All rights reserved
No part of this publication may be reproduced, stored in a retrieval system, or transmitted in any
form or by any means, electronic, mechanical, photocopying, recording, or otherwise, without the
prior permission of the copyright owner.
Printed in Great Britain by
W.M.Print, Walsall, West Midlands

iii
Preface
Vocational A Level qualification
The AVCE (Advanced Vocational Certificate of Education) in Information and Communication
Technology is one of several vocational A Level qualifications offered by the Examining Boards. The
mandatory units and specification for each one is the same for all Boards but the assessment may be
different for different Boards.
This book covers three mandatory units for the 6-unit and 12-unit award. All the theory given in the
specifications is covered, as well as guidance for both internal and external assessments. Unit 1 is a very
practical unit and students are given guidance on creating documents and presentations to put in their
portfolios. In Unit 2, practice is given in answering examination-style questions similar to those that are
set by Edexcel. In Unit 3, a sample spreadsheet project in Excel is worked through to show students the
features they will need to create their own projects for their assessment.
How to use this book
The book is designed to be used in the classroom, and for practice and revision sessions. Suggestions for
activities and discussions are found throughout, and questions and exercises to test students’
understanding and recall can be used either as homework or as class work. In Unit 3, students can work
through the sample application at their own pace, learning the capabilities of MS Excel as they work
through, so that they can then design and implement their own projects.
Extra resources
Extra resources for teachers can be found on our web site www.payne-gallway.co.uk.
Documents used in the exercises in the text may be downloaded by students from the web page
www.payne-gallway.co.uk/avce. These are:
Draftcopy.doc (Chapter 1)
Paraformatting.doc (Chapter 2)
Reporttext.doc (Chapter 3)

iv
Contents
Unit 1 Presenting Information 1
Unit 2 ICT Serving Organisations 79
Unit 3 Spreadsheet Design 127
Appendix A Standard Ways of Working 205
Appendix B Case Study – Victory Publishers Ltd 213
Appendix C Case Study – ShoeShock UK Ltd 217
Appendix D Assessment Evidence for Units 1 – 3 223
Index 227

v
Table of Contents
Preface iii
Unit 1Presenting Information 1
Chapter 1 – Accuracy and style of
writing 2
1.1. Spelling and Grammar – get it
right! 2
1.2. Dictionaries 4
1.3. Writing Style 6
1.4. Using different writing styles to
meet different needs 6
1.5. Using tools to help with style 8
1.6. Using a thesaurus 9
1.7. Producing draft copies 9
1.8. Displaying readability statistics 9
1.9. Proofreading 10
1.10. Software tools to help with
proofreading 13
1.11. Building your portfolio 14
Chapter 2 – Styles of Presentation 15
2.1. Page Layout 15
2.2. Headers and Footers 18
2.3. Paragraph formats 20
2.4. Textual styles 21
2.5. The Drawing toolbar 23
2.6. Special Presentation styles 25
2.7. Bullets and numbers 27
2.8. Tables 29
2.9. Working with columns 31
2.10. Building your portfolio 31
Chapter 3 – Working with longer
documents 33
3.1. Layout features for longer
documents 33
3.2. Setting up the document outline 34
3.3. Adding headers and footers 35
3.4. Inserting a Table of Contents 37
3.5. Creating captions and cross-
references 38
3.6. Creating an index of entries 39
3.7. Creating a bibliography 41
3.8. Building your portfolio 42
Chapter 4 – Maintaining a Consistent
Style 43
4.1. The letter layout 43
4.2. Creating and using a document
template 45
4.3. Defining, assigning and modifying
a style 46
4.4. Inserting fields 48
4.5. Building your portfolio 50
Chapter 5 – Combining Information 51
5.1. Planning the presentation 51
5.2. Starting PowerPoint 51
5.3. Changing the view 54
5.4. Adding a new slide 54
5.5. Viewing the presentation 55
5.6. Saving, closing and opening your
presentation 56
5.7. Making global changes 56
5.8. Editing the Slide Master 56
5.9. Adding charts 58
5.10. Inserting Clip Art pictures,
animation and sound 59
5.11. Adding autoshapes 61
5.12. Adding slide transitions 61
5.13. Adding animation to text and
objects 62
5.14. Printing your slides 63
5.15. Delivery 64
5.16. Building your portfolio 64
Chapter 6 – Managing Information 65
6.1. Printed Questionnaires 65
6.2. Web sites 67
6.3. On-line forms 68
6.4. Faxed Specification for flyer 68
6.5. Publicity flyers 69
6.6. Memos 70
6.7. E-mails 71
6.8. Agendas 71
6.9. Minutes 72
6.10. Itineraries 74

vi
6.11. Sales and Marketing Budgets 74
6.12. Invoices and Delivery notes 75
6.13. Building your portfolio 77
Unit 2 ICT Serving Organisations 79
Chapter 7 – Organisational Structure 80
7.1. How organisations work 80
7.2. Ingredients for success 81
7.3. The people in an organisation 81
7.4. The functions of an organisation 81
7.5. External pressures on an
organisation 82
7.6. ICT in organisations 83
7.7. Organisations and information
systems 83
7.8. Data processing systems 84
7.9. Knowledge work systems 85
7.10. Management information systems 85
Chapter 8 – Studying an
Organisation 86
8.1. Finding out about an organisation 86
8.2. The function of each department 87
8.3. Researching in further detail 88
8.4. Information in organisations 89
8.5. Exercises 90
Chapter 9 – Information Flows 91
9.1. Internal and external information 91
9.2. Formal and informal information
systems 91
9.3. Relationships between departments 92
9.4. Information flow diagram 94
9.5. Other external agencies 95
9.6. Exercises 95
Chapter 10 – Sales Order Processing 96
10.1. Marketing and sales 96
10.2. How is an order processed? 96
10.3. Placing an order 97
10.4. Inputting an order 99
10.5. Processing the order 100
10.6. Receiving payment 100
10.7. Exercises 101
Chapter 11 – Stock Control 102
11.1. Why hold stock? 102
11.2. The function of a stock control
system 103
11.3. Inputs to a stock control system 104
11.4. Outputs from the stock control
system 105
11.5. Purchase ordering 106
11.6. Exercises 107
Chapter 12 – Finance and
Administration 108
12.1. Functions of a Finance Department 108
12.2. A budget for a new product 109
12.3. Cash flow forecast 110
12.4. The Sales Ledger 111
12.5. The Purchase Ledger 112
12.6. The Nominal Ledger 113
12.7. Payroll 115
12.8. Human Resources (Personnel) 115
12.9. Administration 116
12.10.Exercises 116
Chapter 13 – Management
Information Systems 117
13.1. Introduction 117
13.2. Information systems v. data
processing systems 117
13.3. The purpose of a management
information system 117
13.4. What managers do 118
13.5. Types of decision 119
13.6. Stages of decision-making 119
13.7. The benefits of a management
information system 121
13.8. Typical functions of a MIS 122
13.9. Exercises 122
Chapter 14 – E-commerce and Other
Applications 123
14.1. E-commerce 123
14.2. Advantages of e-mail 124
14.3. Using Microsoft Outlook 125
14.4. Computer-aided design 126
14.5. Exercises 126

vii
Unit 3 Spreadsheet Design 127
Chapter 15 – Getting Started 128
15.1. Choosing a project 128
15.2. Starting the sample project 129
15.3. Formatting numbers 129
15.4. Entering a formula 134
15.5. Formatting the presentation of cells 134
Chapter 16 – Manipulating
Spreadsheet Data 137
16.1. Finding and replacing data 137
16.2. Adding worksheets 138
16.3. Repositioning data 139
16.4. Linking worksheets 139
16.5. Relative and absolute cell
referencing 140
16.6. Naming cells 141
Chapter 17 – Formulae and
Functions 143
17.1. Operators in formulae 143
17.2. The SUM function 144
17.3. Functions to calculate averages 145
17.4. MIN and MAX functions 145
17.5. COUNT functions 145
17.6. The Paste Function wizard 146
17.7. IF function 146
Chapter 18 – Data Input 149
18.1. Comments 149
18.2. Data Validation 150
18.3. Forms 151
18.4. Macros 153
18.5. Adding command buttons 154
Chapter 19 – Creating Reports 157
19.1. Creating the monthly pay report 157
19.2. Page Layout 159
19.3. Sorting and subtotalling 162
19.4. Creating a macro to update
Department Summary 164
19.5. Create a routine to print the
Management Summary 165
19.6. Initialising for a new month 166
19.7. Opening the workbook
automatically 166
Chapter 20 – Graphs and Charts 167
20.1. Creating a bar chart 167
20.2. Formatting the bar chart 169
20.3. Using drawing tools 171
20.4. Creating a line chart 172
20.5. Charting more than one data series 172
Chapter 21 – Completing the
Application 175
21.1. Protecting spreadsheet data 175
21.2. Templates 177
21.3. Evaluating your application 177
21.4. Testing 178
21.5. The Auditing toolbar 178
21.6. Displaying formulae 179
21.7. Screenshots 179
Chapter 22 – Design Specification 180
22.1. The contents of a design
specification 180
Chapter 23 – Documentation 192
23.1. Checking the assessment criteria 192
23.2. Keeping a log 192
23.3. The contents of technical
documentation 193
23.4. Sample technical documentation 193
Chapter 24 – User Documentation 200
24.1. Introduction 200
24.2. Word processing your user manual 200
24.3. Sample user manual 200
Appendices
Appendix A
Standard Ways of Working 205
Introduction 206
Managing your work 206
Keeping information secure 207
Working safely 209
Appendix B
Victory Publishers Ltd 213
Introduction 214
The Departments 214

viii
Appendix C
ShoeShock Ltd 217
Introduction 218
The Company structure 218
Organisation Chart for ShoeShock UK 219
Information flow within the organisation 222
Appendix D
Assessment Evidence for
Units 1-3 223
Unit 1: Presenting Information 224
Unit 2: ICT Serving Organisations 225
Unit 3: Spreadsheet Design 226
Index 227

1
Unit 1
Presenting Information
This unit is all about communicating. We communicate with each other in many different ways – speech,
body language, text messaging, writing letters, books, newsletters or reports, filling in forms, making
presentations and so on.
You will mainly be using Microsoft Word and PowerPoint to create different styles of documents and
presentations. You have probably used both these pieces of software before so you’re off to a flying start!
But the new tips and techniques you’ll learn will be useful to you not only to help you pass the unit, but
also in the career you eventually choose.
You can look at other people’s (and organisations’) efforts at communication and judge how well you
think they get the message across to the intended audience.
The unit is assessed through portfolio work, and you will be putting together six different types of
original document or presentation together with a report comparing and evaluating documents from other
organisations. As this is largely a practical unit, you will do most of the work at the computer and there
are lots of short exercises for you to try out as you work through each chapter. At the end of each chapter
longer assignments are included as examples of the type of work you will need to put into your portfolio.

Unit 1 – Presenting Information
2
Chapter 1 – Accuracy and style of writing
Objectives
Use tools to check the spelling accuracy of documents
Use tools to check the grammar in documents
Use different writing styles for different purposes
Produce draft copies of documents
Use manual or electronic techniques for proofreading
Note: You will need to download Draftcopy.doc from www.payne-gallway.co.uk/avce to complete the
exercises in this chapter.
1.1. Spelling and Grammar – get it right!
Getting the content of a document correct is obviously pretty important. People rightly get rather annoyed
if they are sent a bill for the wrong amount (though they may not complain if the amount is too little) or if
the directions they are given for attending an important meeting are wrong.
“He said right, but did he mean left?”
Once you’re sure the content is right, you can check the spelling and grammar – and luckily, the days of
thumbing through a dictionary are long gone for most of us. Microsoft Word has several ways to check
spelling and grammar, and you can choose the options you find most convenient. The main thing is to
realise just how important correct spelling and grammar are in any sort of business communication – for
example, you’ll have great difficulty in getting a job if your CV has these sorts of mistakes in it!
You need to be logged on at a computer running Word (version 97 or 2000) for the rest of this chapter.
Then you can try things out instead of just reading about them.

Chapter 1 – Accuracy and style of writing
3
Automatically correct spelling and grammar
To fix spelling and grammatical errors without having to confirm each correction, use the Autocorrect
feature. For example, if you type adn plus a space, AutoCorrect replaces what you have typed with and.
• Open a new Word document.
• From the Tools menu, select Autocorrect.
• Select the Autocorrect tab.
• A list of autocorrections are displayed (it is also possible to add your own autocorrections).
• Make sure that the Replace text as you type option is selected.
• Type in the following text, including the mistakes.
the day came when caesar had to return to his home adn his poeple.
The Autocorrect feature should have corrected your mistakes automatically.
Automatically check spelling and grammar as you type
To check for spelling and grammatical errors "behind the scenes," use automatic spelling and grammar
checking. As you type, the spelling and grammar checkers check the text and then mark possible errors
with wavy underlines (red for spelling, green for grammar). To correct an error, display a shortcut menu
and select the correction you want.
• From the Tools menu, select Autocorrect.
• Click the Autocorrect tab.
• Ensure that the Replace text as you type option is not selected, and click OK.
• From the Tools menu, select Options.
• Click the Spelling and Grammar tab.
• Ensure that the Check spelling as you type and Check grammar as you type options are selected
and click OK.
Figure 1.1: Controlling automatic spelling and grammar check
Turn automatic
spell-checking on
or off
Turn automatic
grammar checking
on or off

Unit 1 – Presenting Information
4
• Type in the same text as before, including the mistakes.
the day came when caesar had to return to his home adn his poeple.
This time you should see green and red wavy lines indicating the mistakes.
• Right-click on each mistake and select the correction you want from the shortcut menu.
Check spelling and grammar all at once
You need to put the spelling mistakes back again now! Either press the Undo button until the
mistakes are back, or type the line in again with all the mistakes.
• Click the Spelling and Grammar button on the Standard toolbar.
• When Word finds a possible spelling or grammatical error, make your changes in the Spelling and
Grammar dialogue box as shown in Figure 1.2 below.
Figure 1.2: Checking spelling and grammar
1.2. Dictionaries
When you run the spell checker make sure that you have the English dictionary set as the default rather
than the U.S. English dictionary, which will change all your spellings to the American version.
Sometimes the spell-checker will suggest that a word is incorrect when you know that it is correct. This
often happens with proper names such as ‘AVCE’ (though if you have turned on the option to ignore
words in UPPERCASE – see Figure 1.1 – it won’t mark that one). You can add words to the dictionary
by clicking the Add button shown in figure 1.2, but do be careful not to add wrongly-spelt words!
You can also create a special personal dictionary, additional to the main dictionary, which contains any
unusual words you may wish to use.
Ensure
correct
dictionary is
selected
Add a word
to your
dictionary

Chapter 1 – Accuracy and style of writing
5
Task 1.1: Create a custom dictionary to hold words that you are
going to use in an article about text-messaging.
• On the Tools menu, click Options, and then click the Spelling & Grammar tab.
• Click Dictionaries and New.
• In the File name box, type the name Texting for the custom dictionary and click Save.
• Before you can use the custom dictionary to check spelling, you must activate it: In the Custom
Dictionaries dialog box, make sure the check box beside the dictionary’s name is selected.
• Ensure that your dictionary is displayed on the options dialogue box (see figure 1.3 below).
Figure 1.3: Creating a new dictionary
• Enter the text below into a new Word document.
Compose your message by using the letter and number keys on your phone. For example:
HaPEBday Happy Birthday
MkeMyDaSa+! Make my day, say yes
ItsOnlEAGAmShO It’s only a game show
(add your own text!)
• You can now add words to your custom dictionary while you check spelling.
• Try spell-checking your document with your new dictionary activated and deactivated from the
custom dictionaries dialogue box. Note each time you rerun the spell-check on the same piece of
text you must click on the Recheck Document button shown in figure 1.3.
Ensure
correct
dictionary is
selected

Unit 1 – Presenting Information
6
1.3. Writing Style
The test of good writing is whether you can convey to your readers exactly what you intend. You have to
be aware of who your audience is likely to be and what type of language they are likely to understand and
expect. You don’t want to send your audience to sleep, be patronising, mislead them or even unwittingly
cause offence by using the wrong language.
Also, consider the purpose of the document. All written products are created for a reason, which can
include:
to inform (e.g. business letters, memos, instruction manuals)
to entertain (e.g. internal newsletters, web pages)
to educate (e.g. specialist CD-ROM packages)
to persuade (e.g. advertisements, publicity flyers)
to collect information (e.g. forms, questionnaires)
The purpose of the document and the intended audience will dictate the style of language that should be
used. For example a business letter to a client informing them that their payment is overdue would
demand a formal style. An internal newsletter, perhaps including a report on the organisation’s Christmas
party to entertain the staff use a much more informal approach:
Figure 1.4: Different styles of writing
1.4. Using different writing styles to meet different needs
Organisations produce many types of document, each of which requires a different writing style to meet
different needs together with an appropriate document structure. To illustrate the different documents that
an organisation might produce, a fictitious company called Victory Publishing, described in Appendix B,
is used. Basically Victory Publishing produces a range of educational textbooks for schools and colleges.
Examples of some of the documents that Victory Publishing produces together with a description of their
styles are listed below.
Advertisements
Short, bold headlines to attract attention e.g. Half-price Books!
Software instruction manuals
Facts set out clearly using short sentences and simple words. Use of bullet points, figures and
diagrams.
Questionnaires for market research
Extract from a formal
business letter
In spite of several reminders the invoice for the
goods supplied has not been paid.
Unless we receive payment in full within the
next seven days, I shall have no alternative but
to pursue this matter through the Courts and a
claim will include interest on the outstanding
amount and full costs.
Extract from an internal
newsletter
The Christmas Party was great
fun as usual and everyone
had a wonderful evening. The
Chairman showed that he was
human after all and obviously
a very keen disco dancer in
his spare time!!!!

Chapter 1 – Accuracy and style of writing
7
Simple, unambiguous, easy to answer questions which are often multiple choice with tick boxes.
Reminders
Short sentences in informal note form using appropriate abbreviations.
Invoices
Clear table structure with appropriate column headings.
Contracts
Longer sentences using more complex wording.
Letters to customers and suppliers
Formal language.
Reports
Longer sentences in paragraphs which are organised into a consistent format of sections and
subsections.
Figure 1.5: Sample documents from Victory Publishing

Unit 1 – Presenting Information
8
1.5. Using tools to help with style
Software tools exist to help with writing style. For example in MS Word you can select, customise or
create different grammar and writing styles. Figure 1.6 below shows the type of checks you can choose to
apply to your document. You can choose between Casual, Standard, Formal, Technical and Custom
styles.
• Open a new Word document.
• On the Tools menu click Options, click the Spelling and grammar tab and then select Casual
style from the Writing style box. Click OK.
• Type in the following extract1:
“Now it is autumn again; the people are all coming back. The recess of summer is over, when holidays
are taken, newspapers shrink, history itself seems momentarily to falter and stop. But the papers are
thickening and filling again; things seem to be happening; back from Corfu and Sete, Positano and
Leningrad, the people are parking their cars and campers in their drives, and opening their diaries, and
calling up other people on the telephone. The deckchairs on the beach have been put away, and a weak
sun shines on the promenade; there is fresh fighting in Vietnam, while McGovern campaigns ineffectually
against Nixon.”
• Run the Spell Check from the Standard toolbar.
• Note the corrections that it suggests, but do not make them.
• Now change the writing style again by selecting Options from the Tools menu. Select Formal
from the Writing style box this time. Click the Recheck document button and then click OK.
• Run the spell check and note the additional corrections it suggests.
You can also customise one of the existing styles by selecting the grammar and style options you want.
• On the Tools menu click Options then click the Spelling and grammar tab.
• Click Settings and you will see the options available for that particular style.
Figure 1.6: Casual and formal writing style default options
1 Bradbury, Malcolm. The History Man, Martin Secker and Warburg 1975

Chapter 1 – Accuracy and style of writing
9
Note: You can also create a new style by selecting the custom style of writing and then selecting the
grammar and style options you require.
1.6. Using a thesaurus
A thesaurus helps you to replace particular words with either more appropriate ones or different ones to
prevent repetition.
Try this out on the text you typed in section 1.5:
• Highlight the word shrink.
• On the Tools menu, select Language, Thesaurus.
• You will see a list of meanings of the word and a list of synonyms (i.e. words that could be used
instead). Click on a synonym e.g. reduce in size and click Replace.
You can also find a common synonym for a word by right-clicking the word, pointing to Synonyms on
the shortcut menu and then clicking the synonym you want.
1.7. Producing draft copies
After you have used the tools discussed above and read through your work on the screen, you may want
to print a quick draft copy to check it through.
When printing a document in draft quality, Word omits formatting and most of the graphics, which
usually makes the document print faster. However, some printers do not support this option, so check
first.
You can download a document Draftcopy.doc from the web site www.payne-gallway.co.uk/avce to try
this out.
• Open the file Draftcopy.doc that you have downloaded from the Payne-Gallway web site.
• On the Tools menu, click Options, and then click the Print tab.
• Under Printing options, select the Draft output check box.
• From the File menu, select Print and click OK.
The document displayed on your screen will be printed in draft mode with no figures printed.
Many printers have economy or draft quality print settings which save time and ink, so look out for these,
usually accessed from the Properties button in the Print dialogue box.
1.8. Displaying readability statistics
The Flesch Reading Ease index calculates readability based on the average number of syllables per word
and the average number of words per sentence. Scores range from 0 to 100. The average writing score is
approximately 60 to 70. The higher the score a piece of writing is awarded, the greater the number of
people who can readily understand the document. Standard writing approximately equates to the seventh
to eighth grade level on the Flesch-Kincaid scale as shown in Figure 1.7. (equivalent to Year 8 in our
schools).
• Open a new Word document.
• On the Tools menu, click Options, and then click the Spelling & grammar tab. Select the Check
grammar with spelling check box. Select the Show readability statistics check box, and then
click OK.
• Type in the following text which is an extract from a contract between Victory Publishing and one
of their authors.

Unit 1 – Presenting Information
10
The Author shall not during the continuance of this Agreement without the consent of the
Publishers publish any abridgement of the work nor shall the Author prepare otherwise than for
the Publishers any work which reproduces in identical or similar form any considerable part of the
work.
• Click the Spelling and Grammar button on the Standard toolbar.
When Word finishes checking spelling and grammar it displays information about the reading level of the
document (see Figure 1.7 below).
Figure 1.7: Readability statistics
The Reading Ease Score for the passage was only 13.3, which is hardly surprising. The passage could
have been written as follows to convey almost the same information.
The author must not publish any of this work elsewhere unless the Publisher agrees.
• In a new Word document type in the new version and check its Flesch Reading Ease score
In this case there is a Flesch Reading Ease score in excess of 50, which means it is much easier to
understand. However, legal documents which have to make sure that every detail is spelled out are often
very hard to understand.
Task 1.2: Select a piece of your own written work. Type it into
Word and produce readability statistics.
Before you submit assignments try using these tools to test the readability of your work. If a piece of
writing intended for the general public scores less than 60, look at it again and simplify it!
1.9. Proofreading
The software tools that you have been using to check your documents will not guarantee that there are no
errors. To check that your document makes sense, that it is correctly laid out and that the spelling and
grammar are correct and consistent you must also proofread it carefully. When a document is proofread it
Note:
This information can
be useful if you are
asked to write a report
of a specified length

Chapter 1 – Accuracy and style of writing
11
is marked by hand to indicate the changes that are needed. There is a British standard for proofreaders’
symbols. The most commonly used ones are reproduced in figure 1.8.
Discussion: Check the last 6 lines. There are two errors (inconsistencies) in them. Can you find
them?
Figure 1.8: Proof correction marks

Unit 1 – Presenting Information
12
You should get into the habit of using these as they are a clear, quick way of showing corrections that
need to be made. You need a pencil with a very fine point to make the marks in exactly the right place.
It is often a good idea to ask someone else to check your work for you – we often see what we want to
see, not what is really there!
A good proofreader should check for obvious mistakes such as spelling, grammar and typographical
errors and also for clarity, sense and consistency. For example, a section of a report may refer to a
diagram or a chart that has actually been taken out at some stage. It is easy to lose track and not remove
the reference. Another potential area for mistakes is the use of the wrong word. In Microsoft Word Help
you can view their list of commonly-confused words, for example ‘advice’ and ‘advise’ are often
confused, as are ‘affect’ and ‘effect’.
Figure 1.9: A piece of corrected text
Task 1.3: Open a new Word document. Enter the text shown in
Figure 1.9 but incorporating the amendments marked.

Chapter 1 – Accuracy and style of writing
13
1.10. Software tools to help with proofreading
When several people review and edit a document in Word, the changes can be tracked using a feature
called Revision Marks. These marks are similar to editing marks you might use if you were editing on
paper as described above, but with some major advantages. First you can change your mind and reverse
an edit without making the document messy. Word can capture the edits of numerous reviewers and keep
track of each one’s comments individually. Revisions by different people are shown in different colours.
By default any proposed additions are shown as underlined text and deletions as strikethrough text.
Inserting proposed changes and comments
• Open a Word document that contains some text.
• On the Tools menu, select Track Changes, Highlight Changes.
• In the Highlight Changes dialogue box, select Track Changes While Editing and Highlight
Changes on Screen check boxes and click OK.
• Try adding some text – it should appear as underlined text. You should see a vertical change line
appear in the margin, identifying lines containing changes.
• Try deleting some text. The text should appear with a line drawn through it (a strikethrough).
• To insert a comment, click after the word you want to comment on.
• On the Insert menu, click Comment.
A comment reference mark with a sequential number is inserted in the document. The comment pane is
opened at the bottom of the Word window and the insertion point is automatically positioned in it next to
the new comment reference number.
• Type your comment in the comment pane.
• Click the Close button in the comment pane and Save the document.
When you move your mouse over the position of the comment, the comment will be displayed.
Figure 1.10: Tracking proposed changes and inserting a comment

Unit 1 – Presenting Information
14
Reviewing the proposed changes and comments
• On the View menu select Toolbars, Reviewing. The Reviewing toolbar appears.
• Press Ctrl-Home to move to the beginning of the document.
• On the Reviewing toolbar click the Next Change button to move through the proposed changes
you made to the document.
• Click the Accept Change button or the Reject Change button to either accept or reject the
proposed changes.
• After you have read a comment you can delete it by clicking the Delete Comment button.
Figure 1.11: The Reviewing toolbar.
1.11. Building your portfolio
Produce one of the six original documents required for your portfolio using the techniques discussed in
this chapter to check your accuracy and style of writing.
For example write either an instruction leaflet for a machine your parents have difficulty with, such as a
video recorder, mobile phone etc. or an instruction leaflet for a new board game:
• Before you begin identify who your readers will be – this will help you to use a suitable style and
to make sure it is at a level that suits them.
• Experiment with different layouts and keep copies of your different attempts as evidence.
• Print out draft copies showing hand-written annotation marks and/or revision marks inserted with
Microsoft Word.
• Run readability statistics and identify any changes you have made to improve the readability of the
document. Use Print Screen or a screen capture utility as described in Unit 3, Chapter 7 to
provide screenshots as evidence.
• Provide evidence that you have run the spell checker, grammar checker and used the thesaurus (use
screenshots as above).

Chapter 2 – Styles of Presentation
15
Chapter 2 – Styles of Presentation
Objectives
Produce different page layouts
Use different textual styles
Use special presentation styles appropriately
Incorporate lists, columns and tables into documents
Note: You will need to download Paraformatting.doc from www.payne-gallway.co.uk/avce to complete
the exercises in this chapter.
Information has to be presented clearly if you are not going to annoy or confuse your readers. Also, you
have to think about what you want to achieve with your document and what will appeal to your readers.
Different styles of presentation are used to suit different purposes. If you are trying to sell a new brand of
Cola, invite people to send for a pizza or try travelling by rail, you will need a different presentation style
from one used in a document informing them that their house is about to be demolished or a new
motorway is to be built through an area of outstanding natural beauty.
2.1. Page Layout
Different documents use different page layouts to make them easier to read, attract the reader’s attention
and make them generally pleasant to look at. You can normally recognise at a glance the type of
document from its layout.
A one-day communication workshop
Figure 2.1: An advertising leaflet
Eye-catching
Brochures,
Newsletters,
Ads, Reports (and anything else you want people to read)
How to design
Coming soon to your area…
Bath – 27 June
Bristol – 18 May
Cambridge – 25 May
Colchester – 30 May
Ipswich – 6 June
Oxford – 18 May
Plymouth – 25 May
Swindon – 14 June
Torquay – 22 May

Unit 1 – Presenting Information
16
Page Setup
In Microsoft Word page specifications can be viewed and modified from the File menu, Page Setup
command. Settings that are most often modified are paper size and margin sizes.
In countries that use the metric system (such as the UK), the standard paper size is A4 (210 by 297
millimetres), which is narrower and longer than the standard paper size for some other countries, such as
the United Sates, which uses Letter (8.5 by 11 inches). You will often find that the Page Setup in Word,
for example, has a default of Letter paper size. You don’t need to worry about this because Word can
automatically adjust documents so that they print correctly on a different standard paper size (for
example, A4).
• On the Tools menu, select Options. Click the Print tab.
• Under Printing options, select the Allow A4/letter paper resizing check box.
Most business documents are produced in Portrait orientation (‘tall’) but some advertising documentation,
large spreadsheets or charts for example, may be better presented in Landscape orientation (‘wide’). This
can be set from the File menu, Page Setup command.
Figure 2.2: Selecting paper size and orientation
Page margins are the blank space around the edges of the page. In general, you insert text and graphics in
the printable area inside the margins. However, you can position some items in the margins – for example
headers, footers, and page numbers.
Word offers several page margin options. You can use the default page margins or specify your
own, either from the Page setup dialogue box (see Figure 2.3) or switch to print layout view and drag the
margin boundary on the horizontal or vertical ruler bar.
If you are producing a lengthy document such as a report, you may want to bind the document. To
prevent any text becoming obscured by the binding process you should use a gutter margin to add extra
space to the side or top margin of a document you plan to bind. If you plan to print back-to back you
should also turn on mirror margins to place the gutter margin on facing pages rather than on the left side
of every page, as shown in Figure 2.3.

Chapter 2 – Styles of Presentation
17
Figure 2.3: Setting margins
Pagination
When you fill a page with text or graphics, Microsoft Word inserts an automatic page break and starts a
new page. To force a page break at a specific location, you can insert a manual page break from the
Insert menu. However, if you insert manual page breaks, you might have to frequently adjust the page
breaks as you edit the document.
Instead, you might want to set pagination options to control where Word positions automatic page breaks.
Most of these options are set from the Format menu, Paragraph option, Line and Page Breaks tab as
shown below.
Figure 2.4: Setting pagination rules

Unit 1 – Presenting Information
18
These pagination rules are summarised in the table below.
Option Description
Widow/Orphan control Prevents the last line of a paragraph being printed at the top of a
new page (widow) or the first line of a paragraph being printed at
the bottom of a page (orphan).
Keep lines together Keep all lines of a paragraph on the same page.
Keep with next Keeps two paragraphs on same page.
Page break before Forces a page break before a specified paragraph.
Suppress line numbers Line numbers are suppressed if the line numbering feature has
been selected.
Don’t hyphenate Ensures words are not hyphenated at the end of a line.
Task 2.1: Experiment with formatting options as described below.
• Download the file Paraformatting.doc from www.payne-gallway.co.uk/avce
• Select Format, Paragraph and click the Line and Page Breaks tab.
• Ensure that the Widow/Orphan control option is not selected.
• Scroll through the document and note the widow at the top of page two and the orphan at the
bottom of page two.
• Go back and select the Widow/Orphan control option.
• Scroll through the document to see the effect.
• Click before the last paragraph on the first page.
• From the Insert menu, select Break, Page Break.
• Click on the Print Preview button on the Standard toolbar.
• Click the Multiple Pages button.
• You should now see four pages of text.
• Close Print Preview.
• Experiment using the other pagination rules shown in the table above.
• Close the file without saving the changes.
2.2. Headers and Footers
A header consists of text and/or graphics appearing at the top of every page; text or graphics placed in a
footer will appear at the bottom of every page. A header is typically used to identify the section or
chapter in a book, and the footer may contain the page number, a document identification of some kind,
the author’s name and so on.
Headers and footers are also useful when you are designing a letterhead. The header can incorporate a
logo and the organisation’s name. The footer can include the company address (which could alternatively
be placed in the header) and information such as the directors’ names, VAT registration number and so
on.
• In a new Word document, select View, Header and Footer.

Chapter 2 – Styles of Presentation
19
• By default you’re placed in the Header area at the top of your current page. If you already have
text in your document it will appear dimmed, in light-grey text.
• The Header and Footer toolbar is displayed, with buttons to insert various items such as page
number, date, time and so on. The only button you’ll need at the moment is Switch between
Header and Footer.
Figure 2.5: The Header and Footer toolbar
• Insert a text box using the Text Box tool from the Drawing toolbar. A cross-hair appears
allowing you to make the text box the required size, and you can then type text into it.
• Type in a fictitious Company and address – See Figure 2.6.
• Select the text and change the font size or typeface if you like. You can use the Line
Color tool to remove the border, and the Fill Color tool to shade the box.
• Insert some clip art into the header too. Select Insert, Picture, Clip Art.
• Select a suitable image and click Insert clip.
• Size the image as required and position it in your header.
• Use the Line tool to draw a line under the text.
• Use the Switch between Header and Footer button in the Header and Footer toolbar to move to
the Footer.
• Type additional company information in the footer.
• Press the Close button to return to the main document.
• Save this document as Headandfoot.doc.
Figure 2.6: Header and footer
Switch between
Header and Footer
Page numbers
BYES BOOKSBYES BOOKSBYES BOOKSBYES BOOKS
15 The Road
Lexworth
Essex
M24 6YD
01789 45555
Directors: Y & J K Lanes. Registered in England Company no. 7777 VAT reg. 00900

Unit 1 – Presenting Information
20
Task 2.2: Reopen the file Paraformatting.doc and create a
footer to display page numbers.
2.3. Paragraph formats
Indents
Several types of indents are available in MS Word to format text. If you select Paragraph from the
Format menu and then click on the Indents and spacing tab you will see the various options available.
You can specify indentations from the left or the right of selected text and also some special indents.
These include a first line indent which, as you may have guessed, indents the first line only and a
hanging indent, which indents all of the paragraph text except for the first line.
Hanging indents are most useful in numbered and bulleted lists, where the numbers or bullets line up at
the left margin and the rest of the text is indented. Look at the bulleted list in paragraph 2.2.
In that same dialogue box you can also specify line spacing – normally Single or Double. Spacing
Before and Spacing After allows you to leave space between paragraphs. The text in this book is set with
Spacing Before equal to 6 points. The paragraph headings, like 2.3. Paragraph formats above, are set
with Spacing Before equal to 18 points.
Figure 2.7: Specifying indents, spacing and line spacing
Task 2.3: Set paragraph spacing as described in the steps
below.
• Reopen the file Paraformatting.doc if it is not already open.
• In the first paragraph of this document set a first line indent.
• In the second paragraph set a hanging indent.
• Indent the third paragraph by an additional two centimetres from the left and the right.
Note: If your ruler is set to inches, select Options from the Tools menu, click on the General tab and
change the measurement units to centimetres.

Chapter 2 – Styles of Presentation
21
• Set the fourth paragraph to double line spacing.
• Save and close the document.
Hyphenation
You can use the hyphenation feature to give your documents a polished and professional look.
Hyphenation helps eliminate gaps or “rivers of white” in justified text and also helps maintain even line
lengths in narrow columns. On the other hand, hyphenated words are sometimes awkward to read and
many people prefer not to allow hyphenation.
Microsoft Word provides several ways to hyphenate all or part of your document. You can:
Automatically hyphenate text as you type
When you turn on automatic hyphenation, Word automatically inserts hyphens where needed in the
document. If you later edit the document and change line breaks, then Word rehyphenates the document.
• On the Tools menu, select Language, and then click Hyphenation.
• Select the Automatically hyphenate document check box.
Hyphenate text all at once
When you choose manual hyphenation, Word searches for text to hyphenate, asks you to confirm each
proposed optional hyphen, and then inserts it. If you later edit the document and change line breaks, Word
displays and prints only the optional hyphens that still fall at the ends of lines. Word does not rehyphenate
the document.
• To hyphenate part of the document, select the text you want. To hyphenate the entire document,
make sure no text is selected.
• On the Tools menu, select Language, and then click Hyphenation.
• Click Manual.
• If Word identifies a word or phrase to hyphenate, either insert an optional hyphen in the location
Word proposes, click Yes, or insert an optional hyphen in another part of the word, use the arrow
keys or mouse to move the insertion point to that location, and then click Yes.
Task 2.4: Hyphenate a piece of text
• Reopen the file Paraformatting.doc.
• Practise hyphenating the text as described above.
• Close the document without saving the changes.
2.4. Textual styles
The art of designing, selecting and producing typefaces is called typography. There are thousands of
different typefaces and each can have its own variation within that style. A single size and style of a
particular typeface is called a font. There are two main groups of typeface, serif, which are more
decorative, and sans serif which are plainer.
Figure 2.8: Examples of serif (e.g. Times New Roman) and sans serif (e.g. Arial) typefaces
Serif (serifs are the little lines at the top and bottom of the letters)
Sans serif

Unit 1 – Presenting Information
22
Type may be italic, bold or underlined, or in any combination. Other, seldom-used, styles are
strikethrough and SMALL CAPS. Sizes of typefaces are measured in different ways, and the point system is
used in MS Word. There are 12 points in a pica, and 6 picas in one inch. Another way to emphasise text is
to adjust the justification or the alignment. The easiest way to do this is to select the text and use the
toolbar buttons to align the text – Left, Right or Centre. The Justify option means that the text is
aligned down both margins.
Typefaces can also be divided into text or book faces which are used for blocks of text as they are easy to
read even when printed quite small, and display faces which are used to attract attention and so are used
for headings and titles. In a long document it is vital to be consistent with the typefaces you use for body
text (Times New Roman 11pt in this book), chapter headings (Antique Olive 28pt in this book) and so
on.
Ways to raise or lower text
Text in a document is positioned along an invisible horizontal line called the baseline. You can raise or
lower text along the baseline by making it subscript or superscript (this text will be smaller than the text
around it).
• Type the following sentence into a new Word document
The formula for water is H2O
• Highlight the number 2.
• Select Font from the Format menu and click on the Font tab.
• Click on the Subscript check box.
Now the formula reads The formula for water is H2O
• On a new line, type the following equation
22 = 4
• Highlight the second number 2.
• Select Font from the Format menu and click on the Font tab.
• Click on the Superscript check box and click OK.
The equation now looks a bit more sensible! It should say 22 = 4.
You can also shift text vertically without changing its size. You specify the number of points by which
the text is raised or lowered along the baseline.
• Type in the first sentence again.
• Select the text to be raised or lowered.
• On the Format menu, click Font and then click the Character spacing tab.
• In the Position box, click Raised or Lowered.
• Experiment with raising and lowering the text by different numbers of points.
On-screen text animation
Word has a number of built-in text animations which can add visual interest or emphasis to a document.
However it is clearly only effective in documents that will be displayed on screen because in a printed
document, the animations appear as regular text. For example, animating the title of an e-mail memo
would be effective, but animating the headings for a printed report would be completely pointless.
• Prepare the following memo in a new Word document that will later be attached to an e-mail.

Chapter 2 – Styles of Presentation
23
MEMORANDUM
From: Mr Smith
To: All staff
Date: 2.2.01
Subject: Annual holidays
Please note that all holidays for the current year must be booked with my secretary, Miss Peel, by
February 15th.
• Select the heading MEMORANDUM.
• Select Format, Font and click the Text Effects tab.
• In the Animations box, click the effect you want.
2.5. The Drawing toolbar
In Paragraph 2.2 the Drawing toolbar was used to create text boxes and insert clip art. It can also be used
to create lines, arrows, stars, banners and callouts (text used to call attention to pictures and graphics).
Existing graphics can be modified by filling with colour, changing the line size, style or colour or by
adding a shadow or 3-D effect. The WordArt button on the toolbar adds special effects to text which can
then be rotated, sized and fitted to a predefined shape.
These effects can be useful for drawing simple diagrams or to add interest to newsletters, posters,
letterheads and so on.
Task 2.5: Follow the instructions below to create a header and
footer incorporating a company logo for Victory
Publishing.
• Open a new Word document.
• Select View, Header and Footer.
• Insert some blank lines into the header.
• Click the WordArt symbol in the Drawing toolbar.
The WordArt gallery opens.
• Select your desired effect and press OK. (The top left-hand one was chosen in Figure 2.12.)
• A new window opens. Type the name of the company e.g. Victory Publishing Ltd and click OK.
You can edit the text using the WordArt toolbar.
Figure 2.9: The WordArt toolbar
Format
WordArt

Unit 1 – Presenting Information
24
For example, you could change the colour of the text to black by clicking the Format WordArt button.
Then select the Fill and Line Color from the dialogue box, or click Cancel if you change your mind.
Figure 2.10: Formatting WordArt
• Move and size the WordArt to fit in the header. You can size the WordArt object by clicking it and
dragging one of the corner handles, and move it by dragging.
You can now use the tools on the Drawing toolbar to create the logo shown in Figure 2.12.
Figure 2.11: The Drawing toolbar
• On the right-hand side of the header draw a square using the Rectangle tool (keep your finger on
the Shift key to draw a perfect square).
• Draw an overlapping circle using the Oval tool.
• Right-click in the square and select Add Text. Insert the letter V, adjusting the size and style from
the Formatting toolbar.
• Repeat for the circle.
• Use the Arrow tool to draw an arrow across the shapes.
• With the arrow selected, click the Rotate tool. Small green circles will appear at each end of the
arrow. Drag these to rotate the arrow to the correct angle.
• Drag the arrow into position.
Rectangle
Oval Arrow
Line Text
Box
WordArt
Clipart
Fill
Line
Color
Text Color
Rotate Line
Style

Chapter 2 – Styles of Presentation
25
• Click on each shape and increase the line width by clicking the Line Style button.
• Select the three shapes in the graphic by clicking the Select Objects tool and dragging
around them.
• Click on Draw, Group from the Drawing toolbar. All the items will be grouped together as one
object.
• Drag to the correct position.
• The logo consists of the text and the graphic, so group both these objects together. The logo should
look something like Figure 2.12 but it may be a different size, colour or shape – just be creative!
Figure 2.12: The completed header
• Switch to the footer (use the Switch between Header and Footer button on the Header and Footer
toolbar) and insert a text box with the company address details.
Figure 2.13: The completed footer
• Save this document as Victoryheader.doc.
2.6. Special Presentation styles
Borders and shading
You can add a border to any or all sides of each page in a document, to pages in a section, to the first page
only, or to all pages except the first. You can add page borders in many line styles and colours, as well as
a variety of graphical borders.
• Reopen the file Paraformatting.doc.
• From the Format menu, select Borders and Shading.
• Select the Page Border tab.
• Select one of the line styles or artwork from the Art selection.
• Specify that you want to apply it to the first page only and click OK.
Teelmark Business Park, Ipswich, IT64 8PW
Tel: 01473 888999 Fax: 01473 444555
A trading division of Pelon Ltd. Registration no. 66667667 VAT Reg. 8978
Footer

Unit 1 – Presenting Information
26
Figure 2.14: Creating a page border
You can draw attention to paragraphs or selected text by adding borders or applying shading.
• Scroll to the second page of the document Paraformatting.doc and highlight the first paragraph.
• From the Format menu, select Borders and Shading and click the Borders tab.
• Select a Setting and a Style, choose a colour and width and click OK.
• Click the Shading tab and select a fill colour. Click OK.
Use of sounds
To insert an existing sound file into a Word document, you must have a sound program such as Sound
Recorder – a Microsoft Windows accessory that lets you record, edit, and play sound files. You will also
need a sound card and speakers installed in your computer.
• Scroll through to the third page of the document Paraformatting.doc.
• Click after the first paragraph on this page.
• On the Insert menu, select Object, and then click the Create from File tab.
• Click Browse, and then locate the sound file you want to insert.
Note: In Windows 98 and 2000 you will find some sounds in the folder C:\windows\media.
• To display a sound file icon select the Display as icon check box. Click OK.
• To play the sound file, double-click its icon.

Chapter 2 – Styles of Presentation
27
Figure 2.15: Inserting a sound into a Word document
2.7. Bullets and numbers
To create a bulleted list, like the ones we have used for the exercises in this book, click the Bullets
tool on the Formatting toolbar.
To stop the bullets appearing, press Backspace or deselect the Bullets tool before typing. You can
customise the bullets by selecting your bulleted list and then select Format, Bullets and Numbering.
You can then click on the option you prefer.
Task 2.5: Create a bulleted and a numbered list.
• Open a new Word document.
• Enter the following items as a bulleted list:
Art
Biology
Chemistry
English
French
History
• Highlight the list and select Format, Bullets and Numbering. Click on the Bulleted tab and then
on Picture.
• Select a symbol to replace the current bullets.
Numbered list
• Now turn the bulleted list into a numbered list by selecting the list and clicking the
Numbering tool.
You can customise the numbers by selecting Format, Bullets and Numbering and selecting an option.
Sometimes for example you may want your list to start from a number other than 1, or you may want the
list to be numbered Subject 1, Subject 2, Subject 3 or a, b, c instead of 1, 2, 3. You may also want to
change the alignment and/or indentation of the list.

Unit 1 – Presenting Information
28
Figure 2.16: Customising a numbered list
• Save this file as Subjectlist.doc.
Turning off autonumbering
If you start a list by typing a number, Word will automatically number the next line when you press
Enter. If you want to turn this feature off, choose Tools, Autocorrect from the menu. Click the
Autoformat as you type tab and deselect Automatic numbered lists.
Figure 2.17: Turning off automatic numbering

Chapter 2 – Styles of Presentation
29
2.8. Tables
A table is made up of rows and columns of cells that you can fill with text and graphics. Tables are often
used to organise and present information, but they have many other uses as well. You can use tables to
align numbers in columns, and then sort and perform calculations on them. You can also use tables to
create interesting page layouts and arrange text and graphics.
• Open a new Word document.
• From the File menu, select Page Setup and click on the Page Layout tab.
• Select Landscape orientation.
• From the menu bar select Table, Insert Table. Specify a table of 7 columns and 5 rows and click
OK.
• Select the cells in the top row by dragging across them, and select Table, Merge cells.
• Enter the text as shown below, adjusting column widths where necessary by dragging the column
dividers.
• Centre the headings as shown.
Victory Publishing Current Titles
ISBN Title Author No. of
pages
Publication date Price Stock level
1 904113110 Basic Geography R. O’Brien 80 1.9.99 6.95 1375
1 904113111 Science for School Years J. Myers 64 1.8.99 4.95 2195
1 904113112 Basic History notes K Lightfoot 80 1.2.00 6.95 1775
Figure 2.17: Extract from a table
You can also add borders to a table or an individual table cell, and you can use shading to fill in the
background of a table.
• Highlight the top row of the table.
• From the Format menu, select Borders and Shading.
• Click on the Borders tab.
• Click on Box, select a line style and click OK.
• With the row still highlighted select Borders and Shading from the Format menu again.
• Click on the Shading tab.
• Select options for colour or patterns.
• Save the document as Table.doc.
Changing the text orientation
Sometimes you may need to enter text into a table cell in a different direction.
• In the table you have just created highlight the second row.
• From the Format menu select Text Direction.
• Click on an orientation option.

Unit 1 – Presenting Information
30
Figure 2.18: Changing the text direction
The table should now look something like this:
Victory Publishing Current Titles
IS
BN
Tit
le
Au
tho
r
No
. o
f
pa
ges
Pu
bli
ca
tio
n
da
te
Pric
e
Sto
ck
lev
el
1 904113110 Basic Geography R. O’Brien 80 1.9.99 6.95 1375
1 904113111 Science for School Years J. Myers 64 1.8.99 4.95 2195
1 904113112 Basic History notes K Lightfoot 80 1.2.00 6.95 1775
Figure 2.19
Task 2.6: Create a time sheet for Victory Publishers Ltd.
Each week employees at Victory Publishing Ltd complete a Time Sheet to show any overtime they have
worked. Some employees are paid for overtime and others are not, but it is recorded in any event.
The time sheet you are to create will look like the one below in Figure 2.19. You can copy the logo from
the document VictoryHeader.doc created earlier in this chapter. Then insert a table of 15 rows and 3
columns, and merge some of the cells as in the figure. You can alter row heights by selecting them and
then choosing Table Properties from the Table menu. To make the word Overtime align with the
bottom of the cell, right-click it and choose Cell Alignment from the pop-up menu.
Discussion: What other software package could you use to produce the time sheet? What are the
advantages of each method? Which do you favour?

Chapter 2 – Styles of Presentation
31
Figure 2.20: A time sheet
• Save the time sheet as TimeSheetForm.doc.
2.9. Working with columns
With Microsoft Word you can also create a document with newspaper-style or snaking columns in which
text flows from the bottom of one column to the top of the next. You can start a new document with
defined columns or reformat an existing document into up to twelve columns. Use the Column command
from the Format menu to make the settings. Remember that you must be in Print Layout view (select
this from the View menu) to see the column settings.
This type of layout is often used in newsletters produced by companies, clubs, schools etc. However it is
often simpler to use a Desk Top Publishing package such as Microsoft Publisher which provides a good
selection of standard templates for this type of document.
2.10. Building your portfolio
Use some of the different styles of presentation discussed in this chapter to produce at least two of the six
original documents required for your portfolio. Here are three ideas:
1. Write a formal letter from an imaginary company offering employment to an applicant who has
recently attended an interview. It should also include joining instructions.
• Incorporate a header and footer that give the company name and address and a logo (created using
the Microsoft Word Drawing toolbar).
• Lay out the letter in a standard business format.
• Before you begin identify who your reader will be – this will help you to use a suitable style and to
make sure it is at a level that suits them (consider the type of job they have applied for).
• Print out draft copies showing hand-written annotation marks and/or revision marks inserted with
Microsoft Word.

Unit 1 – Presenting Information
32
• Run readability statistics and identify any changes you have made to improve the readability of the
document. Use Print Screen or a screen capture utility as described in Unit 3, Chapter 7 to
provide screenshots as evidence.
• Provide evidence that you have run the spell checker, grammar checker and used the thesaurus (use
screenshots as above).
2. Produce an A4 landscape advertising leaflet for an event, say, a Murder Mystery weekend to be held at
a local hotel, an exhibition or a Pop Festival.
• Use bullet points, borders and shading, paragraph formatting and different textual styles to enhance
the presentation of the leaflet.
• Incorporate some graphics created using the Drawing toolbar.
• Include a table of charges on the leaflet.
• Print out draft copies showing hand-written annotation marks and/or revision marks inserted with
Microsoft Word.
• Provide evidence that you have run the spell checker and grammar checker (use screenshots as
above).
3. Create a blank form to collect information of some kind – for example an expenses form, an
application form or a questionnaire.
• Use tables incorporating some of the features covered in this chapter.
• Make sure the form is easy to understand and to complete.
• Print out draft copies showing hand-written annotation marks.
• Provide evidence that you have tested the form out on some sample users.

Chapter 3 – Working with longer documents
33
Chapter 3 – Working with longer documents
Objectives
Create a multi-page report
Incorporate headers, footers and page numbers
Create a contents page, an index and a bibliography
Insert figures and captions
Set up cross-references
Note: You will need to download Reporttext.doc from www.payne-gallway.co.uk/avce to complete the
exercises in this chapter.
3.1. Layout features for longer documents
There are a number of advanced features in MS Word that you are likely to need in documents containing
multiple pages, such as a report. These include the following:
A Contents page – this normally lists chapter headings, sections and subsections together with the
pages on which they appear. It normally appears at the beginning of the document.
An Index – this lists the terms and topics discussed in a printed document, along with the pages
they appear on. It is normally at the end of the document.
A Bibliography – this lists references to other books, magazines or other sources that have been
made in the document. This is normally placed at the end of the document before the index.
Cross-reference – this is a reference to an item that appears in another location in a document; for
example, "See Figure 1 on page 3."
Figures and captions – automatically numbered captions can be created for diagrams, tables etc.
To include these features in a document you really need to have planned for them before you start. You
must use consistent headings for sections, consistent captions for figures or tables and have a consistent
method of marking footnotes or endnotes so that you can create a bibliography.
Task 3.1: Create a multi-page report.
In this exercise you will use Word’s Outline feature to create an outline for a Victory Publishing
marketing report. The Marketing Manager has been asked to supply the Managing Director with a report
describing the marketing strategy for the following year. You will be able to practise creating a Table of
Contents, an index, a bibliography, cross-references and captions.

Unit 1 – Presenting Information
34
3.2. Setting up the document outline
Word has a useful feature called Outlining. This enables you to create an outline for your document,
breaking it up into sections and subsections, which you can then fill in with text and figures. You can
easily add, delete or rearrange headings at any stage, and at the end of it all you will be able to create an
automatic Table of Contents and an index.
• Create a new document and save it as Report.doc.
• Click the Outline View button at the lower left corner of the Word window.
Figure 3.1: The View buttons
The Outline toolbar appears, the Style box displays Heading 1 style and a minus sign appears in the left
margin.
Figure 3.2: The Outline toolbar
• Type in headings as shown in Figure 3.3 below using the Demote and Promote buttons on the
Outlining toolbar to enter them at the appropriate level.
Figure 3.3: Outline for the Report
Outline View
Demote Promote
Normal View
Print Layout ViewWeb Layout View

Chapter 3 – Working with longer documents
35
• Add numbers to these headings by highlighting the outline and then selecting Format, Bullets and
Numbering.
• Click the Outline Numbered tab and select a numbering format. Your outline will appear
something like Figure 3.4.
Figure 3.4: Adding numbers to the document outline
• Click the Normal View button (see Figure 3.1). All the document needs now is some text.
• Download the file Reporttext.doc from www.payne-gallway.co.uk/avce and copy and paste the
sample text into the appropriate sections of the report.
3.3. Adding headers and footers
For a report of this type the header could contain the report title and the section title and the footer could
contain your name and the page number.
• Insert page breaks between each of your major sections by pressing Ctrl-Enter wherever you want
a page break.
• With the cursor at the beginning of the document, select View, Header and Footer.
• In the header enter the report title on the left-hand side.

Unit 1 – Presenting Information
36
• Tab twice to get to the right-hand side of the header so that a field can be inserted to display the
name of the section.
• Select Insert Field from the Insert menu.
• In the Categories box select Links and References. In the Field Names box select StyleRef.
• After the word STYLEREF enter the style name “Heading 1” in quotes as shown in Figure 3.5.
Figure 3.5: Inserting a field into the header
• Click OK. The header should appear as in Figure 3.6.
Figure 3.6: The header containing the section name
• Click the Switch Between Header and Footer button on the Header and Footer toolbar and
insert your name.
• Tab once to the centre of the footer and click the Insert Page Number button to insert page
numbers.

Chapter 3 – Working with longer documents
37
3.4. Inserting a Table of Contents
The Table of Contents will be inserted at the beginning of the report. This can automatically be updated
at any time by clicking in it and pressing F9.
• Insert a page break at the front of the heading Introduction.
• Click on the Normal View button in the bottom left of the Word window.
• With the cursor at the beginning of the document, click Insert, Index and Tables.
• Click the Table of Contents tab. Leave the other defaults as shown in Figure 3.7.
Figure 3.7: Inserting a Table of Contents
The Table of Contents will appear as shown below.
Figure 3.8: The Table of Contents

Unit 1 – Presenting Information
38
3.5. Creating captions and cross-references
Insert a table into section 1.2.1 as shown in Figure 3.9.
Figure 3.9: The table inserted into the report
• Click in the table and select Insert, Captions.
• Set the options as shown in Figure 3.10.
Figure 3.10: Creating a caption

Chapter 3 – Working with longer documents
39
• Under section 2.2 of the report type The market split for sales direct to schools is shown in.
• Insert a cross-reference back to the table by selecting Cross-reference from the Insert menu. Set
the options as shown in Figure 3.11.
Figure 3.11: Inserting a cross-reference
The figure number will be inserted into section 2.2. When users view this document electronically they
can click on this figure number and a hyperlink will automatically take them back to the figure in Section
1.2.1 of the report.
3.6. Creating an index of entries
Firstly you must mark the index entries by selecting the words in the document.
• Highlight the first occurrence of the word sales in the Introduction of the report.
• Press Alt-Shift-X.
Figure 3.12: Marking an Index entry
• To mark all occurrences of the word click Mark All.
• Repeat for the word market.
• Press Ctrl-End to go to the end of the document.

Unit 1 – Presenting Information
40
When you mark index entries, Word displays all the paragraph markers and the index entries which are
normally hidden. You should hide these before generating the index because they affect the page
numbers on which the text appears. To do this, click the Show/Hide button on the Standard toolbar.
• Leave a few blank lines and type the heading Index and press Enter.
• Select Index and tables from the Insert menu and click the Index tab.
• Select one of the available designs in the Formats box as shown in Figure 3.13 below.
Figure 3.13: Creating an Index
• Click OK.
Word then collects the index entries, sorts them alphabetically, references their page numbers, finds and
removes duplicate entries from the same page, and displays the index in the document. The Index with
just these two entries will look something like this:
Figure 3.14: The Index so far
Indexing is a skilled task and you will generally find that it is not satisfactory simply to mark every
reference to a particular word. People want to be directed to the page where there is a major discussion of
a topic, not to every passing reference. In a recipe book, you might have an entry for ‘eggs’ but you
would not expect to be directed to every recipe that used an egg.
You will also need to edit index entries. You do not want separate entries for ‘egg’ and ‘eggs’, for
example. When you mark a word as an index entry, you can accept the default entry in the Main entry
box (see Figure 3.12) or you can edit it.
Task 3.1: Complete the index for the whole document.

Chapter 3 – Working with longer documents
41
3.7. Creating a bibliography
A bibliography is used to list references to any other sources that you have referred to in your document.
The easiest way to create a bibliography at the end of a Word document is to use the endnote feature. An
endnote consists of two linked parts – the note reference mark and the corresponding note text. You can
automatically number marks or create your own custom marks. When you add, delete, or move notes that
are automatically numbered, Word renumbers the note reference marks. You can add note text of any
length and format note text just as you would any other text. You can customise note separators, the lines
that separate the document text from the note text.
• In Print Layout view, click in front of the text Interim Report – Sales and Marketing June 1999
in section 1.2.1.
• On the Insert menu, click Footnote.
• Click Endnote. Leave the other options as shown in Figure 3.15 below.
Figure 3.15: Creating an endnote to include in a bibliography
• Word inserts the note number and places the insertion point next to the note number.
• Type the bibliography entry as shown in Figure 3.16.
• Repeat for the reference to Sales and Marketing Report January 1998.
• Enter the heading Bibliography above the entries.
Figure 3.16: The bibliography so far
Note the endnote mark in the text of the document. If you hold the mouse pointer over the text you can
view the end note as shown below.

Unit 1 – Presenting Information
42
Figure 3.17: Viewing the endnote in the document
You can also put footnotes or references at the bottom of a page – see the footnote in Chapter 1,
paragraph 1.5.
3.8. Building your portfolio
Use some of the layout features that have been introduced in this chapter to produce the major document
for your portfolio (one of the six original documents required – see Appendix D for unit assessment
evidence details). This must be at least three A4 pages in length and incorporate a range of text styles,
page layout and paragraph formatting features.
For example, you could create a recipe book containing some of your favourite dishes, a visitors’ guide to
your local town highlighting places of interest and forthcoming events or a brochure for your school or
college.
• The document should be at least three pages long.
• It should also incorporate a Table of Contents, an index and a list of information sources either in a
bibliography or as footnotes.
• Use a suitable style and level of writing for your readers.
• Experiment with different layouts and keep copies of your different attempts as evidence.
• Print out draft copies showing hand-written annotation marks and/or revision marks inserted with
Microsoft Word.
• Run readability statistics and identify any changes you have made to improve the readability of the
document. Use Print Screen or a screen capture utility as described in Unit 3, Chapter 7 to
provide screenshots as evidence.
• Provide evidence that you have run the spell checker, grammar checker and used the thesaurus (use
screenshots as above).
• Show that you have thoroughly proofread the document.
• Include scanned images, clip art or digital photographs to add interest to the document.

Chapter 4 – Maintaining a Consistent Style
43
Chapter 4 – Maintaining a Consistent Style
Objectives
Use, define and modify textual styles
Create and use templates
Develop a house style
All organisations should attempt to create a consistent style for the documents they produce. As well as
creating a professional image, this will also make them immediately recognisable to the recipient, whether
it is an internal memo to employees or an external communication to a customer or supplier. A standard
layout or template may be created for each regularly-used document incorporating a company logo and
consistent formats for different types of text, e.g. headings and ‘body text’, i.e. text used in the main body
of a letter or report.
Task 4.1: Create a letter template for Victory Publishing using
instructions given below.
In this exercise you will create a standard letter template for Victory Publishing Ltd. It will include a
header incorporating the company logo and a footer with the company address and details. Styles of text
will be created for different parts of the letter. Fields will be inserted to indicate to the user where
specific parts of the letter should be located.
4.1. The letter layout
A standard business letter layout is shown in Figure 4.1 below. The return address is right-aligned with
all the other text left-aligned. This is the layout that Victory Publishing wants all external letters to
follow. However the company would also like a header and footer to incorporate its logo, address and
company details.

Unit 1 – Presenting Information
44
Victory Publishing
Teelmark Business Park
Ipswich
IT64 8PW
Tel: 01473 888999
Fax: 01473 444555
E-mail: [email protected]
14th
September 2001
Mr G. Holden
Clairey’s Books
29 The Green
London
N98 7HJ
Our ref: TNF/PS/BY4640
Your ref: NC/1451
Dear Mr Holden
Re: New discount structure
Further to your letter dated 8th
September 2001 I can confirm that we are able to increase the
discount levels that we offer you on a number of our titles. This new discount structure will
however be dependent upon minimum order quantities.
The table below summarises the new rates:
Series Title Discount Minimum order
quantity
Practical Science in the Classroom 30% 500
Starting Languages at Sixty 25% 300
Basic Subject notes 25% 300
We hope that you will find this new arrangement satisfactory and we look forward to working with
you in the future. I enclose a copy of our latest catalogue.
Yours faithfully
James Bean
Managing Director
Enc
Figure 4.1: A standard business letter layout

Chapter 4 – Maintaining a Consistent Style
45
4.2. Creating and using a document template
A template is a special type of document used as a basis for new documents. Any document can be saved
as a template. When you create a new document you can specify which template to base it on.
For example, headers and footers can be useful when designing a letterhead for a club or company.
• Open the file Victoryheader.doc that you created in paragraph 2.5.
• Save the document as Lettertemplate.dot as shown below.
Figure 4.2 Saving a document as a template.
As you will see in Figure 4.2 Word attempts to save the template in the default location for templates.
This is fine if you are working at home on a stand-alone PC. However if you are at school or college
working on a network with restricted rights you may have to change the default destination drive. The
easiest way is probably to save the template onto a floppy disk.
Using a template saved in the Document Template folder
If you were able to save the template saved in the standard Templates folder:
• Select File, New.
In the dialogue box you should see the name of your new template (lettertemplate).
• Click on the new template, ensure that Create New Document is selected and click OK.
A new document will open with the Victory header and footer.
• Enter some information into the document.
• Select File, Save As.
• This time save the document as you normally would, with an appropriate name.

Unit 1 – Presenting Information
46
Using a template saved anywhere else (e.g. Drive A:)
If you were not able to save the template in the standard Templates folder you will encounter a problem –
you are not given the option to use a template stored in any other folder. So if, for example, you have
saved the template on a floppy disk, try the following method:
• Minimise any documents and applications that you have running and return to the desktop.
• From the desktop double-click on My Computer.
• Double-click on A:
• Right-click on Lettertemplate.dot and select New.
A new document based on the template will appear on your screen.
4.3. Defining, assigning and modifying a style
In word processing software packages such as Microsoft Word, a style is a collection of character or
paragraph formatting information that can be applied all at once to any selection of text. If a style is
changed, all of the text that has been formatted with that style will change automatically. This feature can
be used to enforce consistency within the documents you create so that similar elements (for example,
paragraph headings) within documents look alike. The Victory Publishing letter template needs some
styles to be defined – for example, the subject line is to be bold, underlined, left-aligned, 12pt Arial.
• Open Lettertemplate.dot as a template so that you can modify the actual template.
• Type in a small amount of text in Arial font, bold, underlined, 12pt size.
• With the insertion point still in the text, click in the Style box at the left end of the Formatting
toolbar.
• Type a name for your new style e.g. Subject and press Enter.
Figure 4.3: Defining a style
The style box

Chapter 4 – Maintaining a Consistent Style
47
Remember that when you create a style in this way, it is associated only with your current document.
Because in this case the current document is a template, this style will be available to all documents based
on the template.
Now try to create two more styles. One style for the recipient’s address should be left-aligned, Times
New Roman, 11pt, not bold. Name this style Address. The other style is for the main body of the letter
and should be the same as Address style but with 6pt spacing before paragraphs (see Figure 2.6). Name
this style Letterbody.
• Save and close the template document.
Now create a letter based on this template.
• Select File, New and click on your template name. (Or, if you saved the template in a different
directory, open a new document as explained in paragraph 4.2.)
• Type in the letter to Clairey’s Books shown in Figure 4.1.
• Assign the new Subject style to the subject line by highlighting the text and clicking the arrow to
the right of the style box.
• Select the style by name and press Enter.
• Assign Address style to Clairey’s name and address.
• Assign Letterbody style to the main part of the letter.
• Save the letter as Claireysletter.doc.
Figure 4.4: The completed letter based on the new template

Unit 1 – Presenting Information
48
It is also possible to modify the styles that you have created:
• Select any example of the style and make manual changes to the format.
• Select the name in the Style box and press Enter.
• In the Modify Style dialogue box select the first option as shown below and click OK.
Figure 4.5: Modifying a style.
All the other parts of the document using this style will change to reflect the new formatting.
4.4. Inserting fields
To ensure that all staff who use this letter template insert the text in the correct location, it would help if
fields were inserted that incorporate boilerplate text that indicates where certain text should be entered.
(See Figure 4.6 below.)
Figure 4.6: The template with boilerplate text shown in fields

Chapter 4 – Maintaining a Consistent Style
49
• Reopen Lettertemplate.dot as a template so that it can be modified.
• Insert a couple of blank lines.
• From the Insert menu, click Field and select Date and Time in Categories, Date in Field names
as shown in Figure 4.7 below.
Figure 4.7: Inserting a date field
• Click Options and select the format d MMMM yyyy.
• Click Add to Field and click OK.
• Click OK. Today’s date should be inserted into the template.
• Insert a blank line.
• From the View menu, select Toolbars and select Forms.
Figure 4.8: The Forms toolbar
• Click on the Text Field button and drag across the screen at the insertion point.
• Right-click the field and select Properties.
• In the Text Form Field Options dialogue box (see Figure 4.9 below) set unlimited length and type
in the following default text:
Click here and type recipient’s name and address
Text field Protect form
Check box Drop-down list Form Field Shading

Unit 1 – Presenting Information
50
Figure 4.9: Setting text field options
• Click OK. The shaded field will be inserted into the template together with the default text.
• Enter the other fields as shown in Figure 4.6 above. Be sure to assign the correct style to each line
of the letter.
• Save the template.
• Create a new letter using the template, clicking in the fields and overwriting the boilerplate text as
appropriate.
4.5. Building your portfolio
Produce one of the six original documents required for your portfolio demonstrating some of the skills
you have learned in this chapter.
• Produce a template for a standard document such as a letter, fax header or memo incorporating
styles and fields for data entry.
• Experiment with different layouts and keep copies of your different attempts as evidence.
• Print out draft copies showing hand-written annotation marks and/or revision marks inserted with
Microsoft Word.
• Provide evidence that you have run the spell checker and have proofread the document carefully.

Chapter 5 – Combining Information
51
Chapter 5 – Combining Information
Objectives
Standardise the styles of presentation
Blend existing and original information
Combine text, sound, graphics and number information
Chapter 4 showed how document templates may be used in Microsoft Word to maintain consistency.
You can also use a template to create an impressive slide presentation combining text, sound and
graphics. One of the software packages most commonly used for this purpose is Microsoft PowerPoint.
Task 5.1: Prepare a PowerPoint presentation for the Sales
Department of Victory Publishing
Victory Publishing often produces this type of presentation to introduce prospective customers
(wholesalers or large booksellers) to their company. The Sales staff know from experience that it is much
easier to keep the listener’s interest and to get their message home if they include some graphics, sound
and animations. To create maximum effectiveness, the speaker normally connects the PC screen to an
overhead projector and provides the audience with printouts of the slides and a copy of their notes.
5.1. Planning the presentation
In designing and planning a presentation you need to take into account how long the presentation is to be,
where and how it is to be delivered, and to whom. The contents of each slide can then be planned and
special effects such as sound and animation added to spice it up and keep your audience riveted. Drawing
out some rough sketches of the slides by hand before you start using PowerPoint is also a good idea.
Here are a few basic tips for designing a presentation:
• Start with a title screen showing what the project is about.
• Do not put more than 4 or 5 points on each slide. People cannot absorb too much information at
once.
• Keep each point short and simple. You can expand on the points shown during your presentation –
the text on the slide acts as a reminder of what you want to cover.
• Use sound, animation and graphics to maintain interest – but don’t overdo them!
5.2. Starting PowerPoint
• To load PowerPoint, you can either double-click the PowerPoint icon, or
• Click Start, Programs, then select Microsoft PowerPoint.

Unit 1 – Presenting Information
52
The following screen appears:
Figure 5.1: The opening Window in PowerPoint 2000
• Leave Design Template selected and click OK.
You will now be asked to select a template. You can browse through to select a suitable one.
Figure 5.2: Selecting a template
• Select the Blends template and click OK.
• In the New Slide dialogue box, choose the first AutoLayout from the selection. This is the most
suitable layout for the title page of your presentation.

Chapter 5 – Combining Information
53
Figure 5.3: Choosing a layout for the first slide
Each slide layout has ‘placeholders’ in appropriate places.
• Click the Title placeholder and insert the Victory Publishing logo that you created in WordArt in
Chapter 2.
• Click where indicated and type the sub-title Educational textbooks and software as shown below.
• You can edit or format the text in a text box by highlighting it and then using the tools on the
Formatting toolbar. The text font in the sub-title below has been changed to Comic Sans MS.
Figure 5.4: Adding text to the title screen

Unit 1 – Presenting Information
54
5.3. Changing the view
You can alternate between various views of the presentation by clicking on the icons at the bottom of the
screen.
Figure 5.5: Presentation views
At the moment, Normal View is highlighted and the screen looks like Figure 5.6. (If it does not, click the
Normal View icon.)
Normal View also displays the outline on the left and the Notes Pane at the bottom right. (This is a new
feature of PowerPoint 2000.) You can make changes to a slide either by altering it in the slide itself or in
the outline on the left.
You can browse through the other views – we will examine them again later when you have more slides
to look at.
Figure 5.6: Normal view
5.4. Adding a new slide
Now you can create the second slide of the presentation.
• Click the New Slide icon on the Standard toolbar.
• The second layout, Bulleted List, is already selected for you. Click OK.
• Click the Slide View button at the bottom of the screen to go to Slide view (see Figure 5.5).
• From the menu you can select View, Zoom to make the slide bigger or smaller.
• Enter the text in the bulleted list as shown in Figure 5.7.
Normal view
Outline view
Slide view
Slide Sorter view
Slide Show

Chapter 5 – Combining Information
55
Figure 5.7: Slide 2 – A bulleted list
• You may need to reduce the default text size to fit all the text in. You can do this by
highlighting the text and using the Font Size button on the Formatting toolbar.
Alternatively, you can use the Increase Font Size and Decrease Font Size buttons to alter the size
of the text to fit into a given space.
• Check the spelling in each box by clicking somewhere in the text and then clicking the
Spelling tool on the Standard toolbar.
• Add one more slide. Make sure the slide shown in Figure 5.7 is on the screen, and then click the
New Slide icon to insert a new slide after the current one.
• Select the first Autolayout again.
• Insert the slide title as for slide 1 and add the text The End as the sub-title.
• Switch to Slide Sorter view and your slides should look something like this:
Figure 5.8: Slide Sorter view
5.5. Viewing the presentation
You can view your slide show by clicking the Slide Show icon at the bottom of the screen.
• On the left of the screen, click the Slide 1 icon.
• Click the Slide Show icon.
• Click the mouse to go to the next slide.

Unit 1 – Presenting Information
56
5.6. Saving, closing and opening your presentation
Don’t forget to save your presentation every few minutes.
• Select File, Save from the menu bar. Save your presentation as VPpresentation.ppt or some
suitable title. You don’t need to type the file extension .ppt which is automatically added by
PowerPoint.
• You can now close your presentation if you wish by selecting File, Close from the menu.
• To open an existing presentation, select Open an existing presentation on PowerPoint’s opening
window (as shown in Figure 5.1). Your most recently saved presentations will be listed and you
can select VPpresentation.ppt from the list.
5.7. Making global changes
As you can see in Figure 5.2, PowerPoint comes with many professionally-created designs that you can
apply to your presentations. We selected the Blends template earlier, but you can apply a different
template to your presentation at any time. You simply click on Format, Apply Design Template and
choose a different template in the dialogue box.
When you apply a design template to your presentation it applies its formatting to the Slide Master. This
looks like a slide but is just a design grid that you can make changes to that will affect every slide in the
presentation. When you apply a template you are actually applying it to the Slide Master, which in turn
applies it to each slide.
You can make global changes to a presentation by editing the Slide Master manually. For example,
Victory Publishing want to include the date at the bottom of each slide and number the slides.
5.8. Editing the Slide Master
• Select View, Master, Slide Master. The Slide Master appears as shown below:
Figure 5.9: The Slide Master
The bullet points show the default styles of text that have been defined on the Slide Master, but you can
change these at this stage if you wish.

Chapter 5 – Combining Information
57
• Click in each line as instructed and change the font to Comic Sans MS.
• Now add the date and page numbers in the Master Slide footer.
• With the Slide Master still displayed, select View, Header and Footer.
The Header and Footer dialogue box appears:
Figure 5.10: Setting up the Slide Master footer
• Select the options shown in Figure 5.10 and click Apply to All.
• In the Slide Master highlight the Date/Time field and replace with a date e.g. January 2001.
• Click on Slide View and check the changes to the slides. The Title slides (i.e. slides 1 and 3) will
only show the page number – it has a different Slide Master which can be edited by selecting View,
Master, Title Master.
Slide 2 should look something like this:
Figure 5.11: The completed Slide 2

Unit 1 – Presenting Information
58
5.9. Adding charts
On another slide you will add a chart that gives some information about Victory Publishing’s book sales
by market sector for two consecutive years.
• Click the Slide 2 icon and the second slide will appear on the screen.
• With the second slide on the screen click the New Slide icon to insert a new slide after
Slide 2.
• Select the Chart layout. Click OK.
Figure 5.12: The Chart layout
• Enter a slide title: Sales by Market Sector (%ge).
• Double-click the Chart placeholder that PowerPoint has created on the slide. The following chart
will appear:
Figure 5.12: Creating a chart
To make your own chart you need to add your own information into the table.
• Edit the table and enter the figures as shown in Figure 5.13.

Chapter 5 – Combining Information
59
Figure 5.13: Entering the chart data
• Click the Slide Show icon to see what your slide looks like.
• Press Esc to return to Normal view.
• To edit a chart, simply double-click it and the spreadsheet appears ready for you to edit. You can
look at Chart, Chart Options on the menu bar for other features.
• Click the By Column button.
• Right click the X-axis label and select Format axis and click the Alignment tab.
• Set the text orientation to 45 degrees.
• Remember to save your work regularly.
Figure 5.14: The completed slide 3
5.10. Inserting Clip Art pictures, animation and sound
On the next slide we will insert a clip art image.
• Return to Normal view.
• Click the Slide 3 icon to select it and then click the New Slide icon to insert a slide after this one.
• Select the Text and Clip Art layout.
• Type the text as shown in Figure 5.15.

Unit 1 – Presenting Information
60
Figure 5.15: Text and Clip Art layout
• Use the Drawing toolbar to draw boxes to represent the books. Enter the titles in small text boxes
as shown above.
• Select Insert, Picture, Clip Art and insert some suitable pictures on the ‘book covers’ (resizing
them to fit).
The Clip Art gallery also includes some animated graphics and sounds that can be inserted into your slide
show. Try these out on slide 1.
• Click on the icon for slide 1.
• Select Insert, Movies and Sounds, Movie from Gallery.
• Click on the Business category and the Sales chart graphic.
• Insert the graphic and size it appropriately.
• Change to Slide Show View to see the animation.
• Return to Slide View.
• Select Insert, Movies and Sounds, Sound from Gallery.
• Click on the Music category and insert a sound clip of your choice.
• Select the option to play the sound automatically.
A sound icon will be inserted onto your slide. You do not really want this to be visible so hide it behind
the animated graphic as follows:
• Drag the speaker icon on top of the animated graphic.
• With the speaker icon still selected click on Draw, Order, Send to Back from the Drawing
toolbar.
• Return to Slide Show View to hear the sound.
A very limited number of clips are supplied with PowerPoint but if you have access to the Internet you
can select Clips Online and gain access to hundreds of suitable clips for almost any presentation.

Chapter 5 – Combining Information
61
5.11. Adding autoshapes
• Return to Slide View and display slide 4.
• In the bottom right-hand corner of the slide add an autoshape from the Drawing toolbar similar to
the one shown below.
Figure 5.16: Adding an autoshape
• Use the Rotate button on the Drawing toolbar and the sizing handles around the shape to create the
effect shown in Figure 5.16.
• Right-click the autoshape and select Edit Text to add the text to the shape.
5.12. Adding slide transitions
Transitions change the way that a slide opens. You can make the next slide open like a blind or a curtain,
for example.
• Click the Slide Sorter View button at the bottom left of the screen.
You will notice that an extra Slide Sorter toolbar appears at the top of the screen. This has all the tools for
adding transitions and effects to your slides.
Figure 5.17: Slide Sorter view with toolbar

Unit 1 – Presenting Information
62
• First select the slides to which you want to apply the transition effect. Select Slide 1, then hold
down Ctrl while you select the other slides.
• Click the Slide Transition icon at the left-hand end of the toolbar.
A Slide Transition window opens:
Figure 5.18: Selecting a slide transition
• Scroll down the list and select an effect – you can experiment to find a suitable one. (You can
choose a sound too if you wish.)
• Click Apply. This will apply the effect to your selected slides.
• Change to Slide Show view and try out the result.
5.13. Adding animation to text and objects
• In Slide Sorter view select Slide 2.
• From the Text Preset Animation list on the Slide Sorter toolbar, select Fly from Bottom.
• Switch to Slide Show View to test the effect. You have to click the mouse button to make each
picture or line of text appear.
You can apply custom animation to individual objects on a slide. To do this, you have to change to
Normal view.
• Select Slide 4.
• Click the Normal View icon at the bottom left of the screen.
• From the menu select Slide Show, Custom Animation.
• Choose effects for each object. For example try making the autoshape fly in from bottom right
when you click the mouse.

Chapter 5 – Combining Information
63
Figure 5.19: Adding custom animation
• Test out the effects. You may find the animation order seems wrong – if so, go back and alter it
using the Move buttons in the Custom Animation dialogue box. (You need to have the Order and
Timing tab selected.)
• Save your presentation.
• EXPERIMENT!
5.14. Printing your slides
You will need to print out your slides to put in your portfolio. You may also want to give hard copy of a
presentation to the audience.
You can print several slides to a page by selecting Handouts.
Figure 5.20: Printing slides

Unit 1 – Presenting Information
64
5.15. Delivery
Presentation skills are an important form of communication, and once learned will stand you in good
stead all your life. Here are a few tips for a successful presentation:
• If you are giving the presentation using an overhead projector, make sure that you have set it up so
that you can face the audience and refer to the screen behind or beside you.
• Double-check before the presentation that all the equipment is functioning correctly, and that the
screen is visible from all seats in the room.
• Make sure the text on each screen is large enough to be read from all parts of the room.
• Introduce yourself and the topic to the audience. Keep your voice bright and enthusiastic, and try to
look as if you are enjoying yourself.
• Don’t rush – give the audience time to absorb what is on the screen, and what you are saying.
• Maintain eye contact with the audience. You can stop and ask a question now and then, to keep
them involved.
• Always rehearse your presentation in advance so that you know exactly how long it will take.
5.16. Building your portfolio
Create the final original document required for your portfolio. Produce a PowerPoint presentation about a
topic that interests you, for example: facilities at a Sports Centre, a local attraction, a music or film genre
or a foreign country. Research the subject thoroughly so that the content is relevant, current, accurate and
above all interesting! Choose a subject that will allow you to incorporate features such as bullets, clip art,
charts, sounds, animation and slide transition effects.
• Consider your likely audience and tailor the content accordingly.
• Experiment with different layouts and keep copies of your different attempts as evidence.
• Provide evidence of the use of a master template into which you have inserted variable data (print
out or take screenshots of master slide layouts).
• Provide evidence that you have run the spell checker and proofread the slides.
• Be prepared to present the presentation on-screen and to print out slides for an audience.

Chapter 6 – Managing Information
65
Chapter 6 – Managing Information
Objectives
Understand how organisations collect their information.
Understand the flow of information into and out of the company.
Learn the commonly accepted standards for document layouts.
All organisations have to communicate both internally (i.e. between different departments) and externally
(i.e. with other organisations such as suppliers and customers). The documents that are used for
communication will vary depending on the type and size of the organisation, but there are some
commonly accepted standards. These include the following:
Methods for gathering information such as written questionnaires, on-line forms for customers to
complete, requests for quotations from suppliers and specifications for work.
Internal communications within the company such as memos, e-mails, agendas, minutes, reports,
itineraries, budgets and sales results.
External communication from the company such as invoices, delivery notes, letters and advertising
flyers.
We have already looked at some of these documents earlier in the unit so you should refer back to these
sections to refresh your memory. Other types of documents used by organisations are described in this
chapter, including several produced by Victory Publishing leading up to and following their attendance at
a large Book Fair.
Remember the importance of consistency between documents and the creation of a corporate image or
house style that was discussed in Chapter 4. See if you think Victory Publishing have achieved this in
their documents.
6.1. Printed Questionnaires
Organisations often need to conduct some market research – perhaps to plan which products to introduce
in the future, to find out more about their competitors or, like Victory Publishing, to determine if their
customer service can be improved in any way.
Questionnaires are a useful research method, especially where the information to be gathered is
quantitative (i.e. facts and figures) rather than qualitative (i.e. opinions, attitudes, behaviour patterns etc.).
They tend to be a relatively cheap and easy method especially if, like Victory, the questionnaire is to be
posted along with a delivery. However the response rate is normally quite low so you need to think of
ways of encouraging people to complete them. The chance of winning a holiday for two in Barbados
would be enough to tempt most people!
Start a questionnaire with a brief sentence to explain its purpose.
Where possible use multiple-choice questions with tick boxes.
If it is not immediately obvious, give brief instructions on how to complete the form.

Unit 1 – Presenting Information
66
Keep the questionnaires anonymous - people are likely to be more honest.
Don’t ask leading questions (e.g. how many times a week do you kick the dog?)
Don’t ask biased questions (e.g. would you agree that advertisements influence weak people?)
Don’t make assumptions about people (e.g. how often do you and your partner holiday abroad?)
Don’t ask hypothetical questions (e.g. Suppose you won a million pounds…)
The simpler you keep the questionnaire the more likely people are to complete it and the easier the results
will be to analyse.
Victory Publishing have recently been analysing how much of their business comes from existing
customers and how much is from new customers. During this process they decided to survey customers
about their level of service. They have asked customers to return the questionnaire in a prepaid envelope.
Figure 6.1: A simple questionnaire
V
P
CUSTOMER SATISFACTION SURVEY
QUESTIONNAIRE
We always strive to improve our customer service. Please help us by taking a few moments to
complete these questions.
Have you bought from us before? YES NO
Did you order by telephone? YES NO
Were our staff helpful and polite? YES NO
Were the books you required in stock? YES NO
Was your order delivered on time? YES NO
Have you called our help line? YES NO
Were you satisfied with the help line service? YES NO
Would you recommend our books to others? YES NO

Chapter 6 – Managing Information
67
6.2. Web sites
Most companies now have a presence on the World Wide Web. Victory Publishing is no exception – its
web site is used to publicise its list of books, any forthcoming titles and any special offers. It also offers
downloadable resources for teachers such as answers to the questions in textbooks, OHP masters and
further tips and advice. The company has found that this facility is very popular with teachers and has
helped to increase sales.
Many companies specialising in web site design have sprung up over recent years. The IT department
within Victory Publishing has developed a company site using Microsoft FrontPage, a web authoring
package.
One of the most important aspects of web design to consider is how easy it will be for users to navigate
around the site – a navigation bar is normally incorporated running either vertically or horizontally across
each page. It is best not to cram too much information onto each page – try not to make visitors scroll
down more than two screens for each page. Pictures and graphics, especially animations, can liven up a
web page but remember that they can make the page much slower to load and your visitors may not be
patient enough to wait!
Figure 6.2: The Victory Publishing homepage

Unit 1 – Presenting Information
68
6.3. On-line forms
In order to access the resources, teachers are required to register using an on-line form from the web site –
this is shown below. When the teacher clicks the Send button an e-mail is transmitted to the marketing
department of Victory Publishing, where a clerk records the details in a customer database and sends the
teacher a return e-mail with a username and password giving them access to the resources.
On-line forms must use simple, clear language and the layout should be easy to understand so that users
can complete it correctly. Validation of certain fields and drop-down boxes offering options can help
reduce data entry errors and make the form quicker to complete. Once the SEND button has been pressed
the user should receive confirmation that their form has been accepted or a clear error message returned.
Figure 6.3: The on-line registration form
6.4. Faxed Specification for flyer
Fax (short for ‘facsimile’) is extensively used by organisations. It has the great advantage that you can
transmit hand-written documents or drawings and they arrive instantly at the other end. In addition to
speed the main advantage of faxing information is that a copy of the original document is sent including
any handwritten or drawn details. Victory Publishing receives faxes such as:
orders from Schools and Colleges on official school order forms;
requests from bookshops to return unsold books;
faxes from other companies selling services/products.
The company also sends faxes to various suppliers. For example the marketing staff often send
amendments to draft documents back to their graphic designers. In the example shown below they have
faxed a header sheet (created from a document template) together with amendments to an advertising
flyer that the designers have been working on. The fax header sheet should include contact details, the

Chapter 6 – Managing Information
69
date and the number of pages in the fax so that the recipient can be sure they have received the complete
communication.
Figure 6.4: The fax header sheet
6.5. Publicity flyers
Companies wanting to advertise products, services or events often use flyers printed on A5 paper (or
smaller). You may have had a flyer advertising a new shop or something similar thrust into your hand
whilst walking along the street.
Victory Publishing often uses these for promotions at exhibitions. The flyer shown below will be used at
the forthcoming book fair. The sales people manning the stand will hand them out to people as they walk
along the aisles. The flyer is A5 portrait layout with large bold headlines and a simple message to attract
people to the Victory Publishing stand.
The flyer has been designed by the graphic design team who have sent a draft to John Brown. He has
marked up some corrections by hand and faxed it back to the graphic designers.

Unit 1 – Presenting Information
70
Figure 6.5: The publicity flyer marked with amendments
6.6. Memos
A memo (short for memorandum) is often used for internal communication where less address
information is required and the wording can be less formal. First names as formal titles are now rarely
used in companies. Memos do not have to be signed, but sometimes if people need written confirmation
on a matter then a signed memo is preferable.
Figure 6.6: A sample memo

Chapter 6 – Managing Information
71
6.7. E-mails
E-mails are now one of the most popular ways of communicating both within an organisation and with
the outside world. They are relatively cheap, quick and secure, and the user can keep an electronic file of
previous messages. Additional files can be attached to e-mails as shown in the example below. Victory
Publishing has received the updated file containing the flyer from IP1 Advertising and John Brown now
needs to get this to the printers as quickly as possible. He decides to e-mail the file to Dave Cox at
Galaxy World Printers. Victory Publishing uses Microsoft Outlook Express, an e-mail package which is
supplied with Internet Explorer. John needs only to enter Dave’s name and his e-mail address will be
picked up from the Outlook address book. If anyone else needs to be sent a copy of the e-mail, then John
needs to enter their name on the Courtesy copy (Cc:) line – if they are in the address book they will
automatically be sent a copy.
Figure 6.7: Sending an e-mail with an attachment
6.8. Agendas
An agenda is a document which is used to inform people of the date and time of a forthcoming meeting,
the topics for discussion and the order in which topics will be discussed. The person who is going to
chair the meeting normally produces the agenda. There are some standard agenda items that are normally
included at the beginning of the meeting, such as:
Apologies for absence
Minutes of the last meeting
Matters arising from the last meeting.
The following items usually appear at the end of the agenda:
Any other business
Date of next meeting.
The management team of Victory Publishing has organised a meeting with representatives from a number
of departments to confirm arrangements for the Book Fair.

Unit 1 – Presenting Information
72
Figure 6.8: A typical agenda
6.9. Minutes
The secretary of the meeting keeps the minutes – sometimes a specific minutes secretary is elected. He or
she records all the matters that were discussed at the meeting, any decisions that were made and any
actions that result, noting what is to be done and by whom. Standard items on the minutes include:
The date of the meeting
A list of attendees
The points discussed.
It is usual to include a heading for each item and to right-align any action points. The minutes of the
meeting held about the forthcoming Book Fair are shown below.
V
P
The next Sales and Marketing meeting will take place on Monday 9th January at
13.30 in the Board Room.
Agenda
1. Apologies for absence.
2. Minutes of last meeting (please have these with you).
3. Matters arising from minutes.
4. Sales & Marketing budget report.
5. Advertising.
6. Stand set up arrangements.
7. Stand break down arrangements.
8. Customer meetings.
9. Any other business.
10. Date of next meeting.

Chapter 6 – Managing Information
73
Figure 6.9: Typical minutes
V
P
Minutes of the Sales and Marketing meeting held on Monday 9th
January 2001.
Present: James Bean (Chair), Jake Hughes (Secretary), John Brown, Kay King, Denise Raymond
Apologies for absence were received from Victor Green.
1. MINUTES OF THE LAST MEETING
The minutes of the last meeting were agreed.
2. MATTERS ARISING
None.
3. SALES AND MARKETING BUDGET REPORT
John Brown presented the projected budget report for the forthcoming book fair. The meeting
agreed with these figures. It was suggested that more advertising flyers should be ordered from
the printers this year.
ACTION: John Brown
4. ADVERTISING
The content of the advertising posters was agreed. It was decided to place an advertisement in the
show guide.
ACTION: John Brown
5. STAND SET UP ARRANGEMENTS
The number of books to be delivered was decided together with catalogues and stationery.
Distribution to organise the delivery of all items.
ACTION: Denise Raymond
6. STAND BREAK DOWN ARRANGEMENTS
Distribution requested that the sales team should remain after the exhibition to assist with break
down.
ACTION: Kay King
7. CUSTOMER MEETINGS
It was confirmed that a meeting area had been incorporated into this years stand. James Bean
already has this booked for several customer meetings.
ACTION: John Brown
8. ANY OTHER BUSINESS
None.

Unit 1 – Presenting Information
74
6.10. Itineraries
An itinerary is a schedule of times and places to visit during a trip (business or holiday), or possibly
during an event. At the Book Fair, Andrea McGregor the Foreign Rights Manager has organised a
number of meetings both within the exhibition hall and in other locations. She prepares the following
itinerary so that colleagues will know her whereabouts.
Figure 6.10: An Itinerary
6.11. Sales and Marketing Budgets
Several departments at Victory Publishing use Microsoft Excel to produce spreadsheets, for example:
Sales and Marketing produce budgets, customer lists and sales targets.
Editorial prepare book lists.
Foreign Rights calculate deals with distributors or publishers overseas.
Distribution record stock levels.
Production keep records of print runs.
Before the exhibition the Managing Director asks John Brown to provide him with an estimated budget
for the book fair.

Chapter 6 – Managing Information
75
Figure 6.11: The budget proposal for the book fair
6.12. Invoices and Delivery notes
Invoices are used to request payment from customers for goods or services. The exhibition caused a
surge in sales as schools and colleges phoned and faxed orders in for books they had seen at the book fair.
The Distribution department sends an invoice to the customer with the books. Sometimes the invoice
address is different to the delivery address for the books. For example in a school or college the invoice
will often be sent to the Finance department for payment but the books will be sent direct to the teacher.
A delivery note will be enclosed with the books.
Invoices and delivery notes should include the following information.
The date and some type of unique invoice number.
The name and address of the company requesting payment. If the company has a logo this is
normally incorporated to help customers identify at a glance who the invoice is from.
The name and address of the recipient of the invoice.
The address to which the goods should be delivered.

Unit 1 – Presenting Information
76
Details of the items purchased including price, delivery and VAT.
The payment terms (i.e. when the invoice has to be paid).
Figure 6.12: An invoice
Discussion: How would a delivery note differ from the invoice shown above?

Chapter 6 – Managing Information
77
6.13. Building your portfolio
This chapter has identified the writing style, presentation style and common standards for layouts in
different types of documents used by organisations.
In earlier chapters of this unit you have produced original documents using different styles of writing and
presentation. Now you should collect six different documents created by other people for your portfolio.
You need two standard documents from each of three different organisations. It may help if you choose
three very different organisations – for example a letter and an advertisement for a brownie pack, a bank
and a charity. They all have different categories of reader and should therefore use different styles and
levels of language. Write a report about these documents in which you must:
• Provide detailed descriptions of the content, layout and purpose of the six collected documents.
• Accurately evaluate the good and bad points about the writing and presentation styles of similar
items.
• Comment on the suitability for purpose of the documents.
• Identify common elements of similar documents.
Carefully check the accuracy and layout of this report before submission with your portfolio.

Unit 1 – Presenting Information
78

79
Unit 2
ICT Serving Organisations
This unit is about different types of organisation and how they use Information and Communication
Technology (ICT). You will see how a typical organisation is organised into departments each with its
own specific function. ICT is used in countless different ways – it is almost impossible to imagine how a
modern organisation could function at all without computers. So whatever career you end up in, you will
almost inevitably be using ICT in some shape or form. Having a working knowledge of how
organisations are structured and the way that ICT is used will help you to choose a job you will enjoy, and
become a valued member of a team when you land it!
This unit is assessed by an external examination. You will be given a case study in advance of the exam
for which you have to make notes and draw charts. You will take these into the exam with you to help
answer the questions. You will hand in these notes with your answer paper.
Doing the exercises given in each chapter of this unit will give you practice in drawing charts, making
notes and answering questions similar to those you will see in the exam. Two sample case studies are
used in the unit, and these are at the end of the book in Appendices A and B.

Unit 2 – ICT Serving Organisations
80
Chapter 7 – Organisational Structure
Objectives
To learn about different types of organisation
To study a typical organisational structure
To understand the external pressures on an organisation
7.1. How organisations work
Very few people live their lives in isolation. From the moment we are born, (probably in a hospital, a
good example of an organisation), through our school and college careers, into various types of work,
shipped off to a ‘retirement home’ and finally cremated or buried, we are in the hands of organisations.
Organisations are entities comprising a group of people and resources which are managed, organised and
coordinated to accomplish goals. The goal of a business organisation is usually to generate a profit; other
types of organisation may have quite different objectives such as the preservation of the environment,
military conquest or gaining religious converts.
Discussion: What are the goals of the following organisations? A College of Further Education, a
hospital, the BBC, McDonald’s, Virgin, Greenpeace?
The three fundamental resources of any organisation are
People;
Organisation;
Technology.
The success of an organisation is determined by how well it manages and controls these three resources
(the ‘pillars’ of an organisation), the components of which include the following:
People Organisation ICT
Career Strategy Hardware
Education Policy Software
Training Mission Statement Telecommunications
Employee Attitudes Culture Information Systems
Employee Participation Management
Employee Monitoring Competition
Work Environment Environment
Figure 7.1: The three pillars of an organisation

Chapter 7 – Organisational Structure
81
7.2. Ingredients for success
A survey commissioned by the Department of Trade and Industry in 1997 came to the following
conclusions about the most successful UK companies.
Winning UK companies:
Are led by visionary, enthusiastic champions of change;
Unlock the potential of their people
- creating a culture in which employees are genuinely empowered and focused on the customer;
- investing in people through good communications, teamwork and training;
Know their customers
- constantly learning from others;
- welcoming the challenge of demanding customers to drive innovation and competitiveness;
Constantly introduce new, differentiated products and services
- by deep knowledge of their competitors;
- encouraging innovation to successfully exploit new ideas;
- focusing on core businesses complemented by strategic alliances;
Exceed their customers’ expectations with new products and services.
Nine out of ten of the winning UK companies studied exhibited these characteristics of innovation best
practice.
Source: DTI ‘Winning’ Report 1997
7.3. The people in an organisation
Successful companies view people as a key resource rather than simply as a cost – the competition may
copy the product but it cannot copy the people. One of the main tasks of management, therefore, is to
enable each person in an organisation to fulfil his or her full potential.
As one MD puts it, “motivated staff will be ten times more productive than unmotivated staff”. There is a
clear recognition that it is employees who most often meet with the company’s customers and that “when
customers meet an employee they meet the whole organisation and often judge the whole on that basis”.
Training is seen as a key component in achieving empowerment of the individual and in maintaining
focus on the customer in order to remain competitive. Not only is training “the epicentre of
empowerment”, with as much as 100% of employees’ time spent on it, but successful companies “use
education as a competitive weapon”.
7.4. The functions of an organisation
Business organisations have four basic internal functions which they must manage and control:
The Production group produces the goods or services;
The Sales and Marketing group sells the product;
The Personnel or Human Resources group hires and trains workers;
The Finance and Accounting group seeks funds to pay for all these activities and keeps track of
the accounts.

Unit 2 – ICT Serving Organisations
82
Traditionally, an organisation is structured in a pyramid fashion, as in Figure 7.2.
Figure 7.2: The traditional organisational structure
In the late 1990s, changes in working practices resulted in ‘flatter’ organisations, with layers of middle
management disappearing in an effort to eliminate the stifling effects of hierarchy and bureaucracy. As
the DTI ‘Winning’ report says:
“Five years ago the corporate structure was like a pyramid with very steep sides, in fact one could say a
stalactite. Now it is more like a plate of peas. The number of levels in an organisation is cut to as few as
possible. In some instances there are only three levels within the organisation: Directors, Managers and
People”.
Discussion: How is the school or college where you are studying structured? How many layers of
management are there?
7.5. External pressures on an organisation
Surrounding the organisation is an environment of customers, competitors, government regulators,
pressure groups and other interested parties, all of which have an influence on how the business is run and
what policy decisions are made. (See Figure 7.3.)
Case study: Preservation vs. the people
In November 1997 the Guardian carried an article describing the four-year battle over local authority
plans to replace the chairlift serving the ski centre of Aviemore with a funicular railway. Conservationists
compare it with driving a motorway through Stonehenge while local people say it will bring much-needed
jobs and money to the area. The RSPB together with the World Wide Fund for Nature (WWF) have
fought the plan to develop a glen that offers one of the most breathtaking views in Scotland, home to the
rare black grouse and scene of Landseer’s famous tribute to the stag, “Monarch of the Glen”. For the
people of Strathspey, the funicular railway holds the key to their economic future, and the Government is
prepared to contribute £9 million to the £17 million scheme.
Managing
Director
Head of
Sales and
Marketing
Head of
Personnel
Head of
Finance and
Accounting
Head of
Production
Line
Manager 1
Line
Manager 2
Invoice
supervisor
Accounts
supervisor
Worker Worker Worker Worker Worker Worker

Chapter 7 – Organisational Structure
83
Discussion: This is a good illustration of the external pressures that can be brought to bear on the
decision-making process within an organisation. Anyone with an interest in a business
is called a “stakeholder”. Who are the stakeholders in this case?
Environment
Cu
sto
mers
Government
Com
petito
rs
ProductionSales and
Marketing
Personnel Finance
Figure 7.3: The activities of a business organisation
7.6. ICT in organisations
In this module, you’ll learn how technology can be used in building and using information systems in
organisations. ICT is the third ‘pillar’ of a successful organisation.
7.7. Organisations and information systems
Most organisations are hierarchical; they are arranged in ascending order of power, pay and privilege. The
three major levels in an organisation are production workers, information workers and management
workers.
Each level in an organisation has its unique class of information system:
Data or transaction processing systems serve the needs of production workers who must deal with
thousands, or even millions, of transactions with customers and suppliers.
Knowledge work systems serve the needs of clerical and professional people to process and create
information and knowledge.
Management information systems serve management’s needs to control and plan the organisation.

Unit 2 – ICT Serving Organisations
84
Managers
Information
workers
Production
workers
Management
Information
Systems
Knowledge Work
Systems
Data Processing/
Transaction Processing
Systems
Figure 7.4: Organisations and Information Systems
Organisations, then, do not have just one information system – they may have hundreds. Each of the basic
types of systems is described below.
7.8. Data processing systems
A data processing system is also known as a transaction processing system. Every time you buy an item
in a supermarket, withdraw some cash from your bank account, make a hospital appointment or sign up
for a college course, a transaction has occurred. Transactions are all the events that are recorded when
goods or services are bought, sold, distributed or dealt with in some manner.
There are two kinds of transaction processing system:
Batch systems, whereby transactions are collected over a period of time (say a day or a week) and
processed together;
On-line systems where the data is processed as soon as it is collected.
When there is no immediate urgency for a response or up-to-the-minute information, a batch processing
system is often suitable. The TV Licensing Authority, for example, may collect requests for TV licences
and process them in batches of 50 or 100 at a time. An airline reservation system, on the other hand,
requires up-to-date information on what seats are available, so an on-line system must be used. Such a
system is also known as a ‘pseudo real-time’ system. The word ‘pseudo’ indicates that processing takes
place effectively but not absolutely immediately: a delay of a couple of minutes is normally acceptable.
Discussion: What type of transaction processing (batch or on-line) would be suitable for the
following?
A mail-order company taking orders by telephone or mail;
A credit-card company processing sales transactions;
A bookshop using electronic point-of-sale tills to keep track of sales and stock;
A hospital appointment system.

Chapter 7 – Organisational Structure
85
7.9. Knowledge work systems
‘Information workers’ are of two general types: office clerical workers and sales personnel, and behind-
the-scenes professionals such as accountants, lawyers, doctors and engineers.
Knowledge work systems are used by information workers to help deal with problems requiring
knowledge or technical expertise. Word processing programs, spreadsheets, databases, computer-aided
design packages and project management software all fall into this category. In addition, software and
hardware that enables groups of people to find out information, communicate or work together as a team,
even though they are geographically separated, is of vital importance in large organisations. Networks,
web browsers, e-mail facilities and the use of video conferencing are examples of such technology.
Figure 7.5: Global communications network
7.10. Management information systems
Management information systems are designed to help managers monitor and control organisational
performance and plan for the future. This type of information system is discussed in more detail in
Chapter 13.
7.11. Questions
1. Think of an organisation where you have worked or with which you are familiar. What are the major
functions and levels in the organisation? How might the information systems used in the organisation
relate to those functions and levels?
2. The major functions of a business organisation are Production, Sales and Marketing, Personnel or
Human Resources, and Finance and Accounting. However, there may be other functions and
departments specific to a particular organisation, such as Research and Development. Name 2 other
departments that you would expect to find in a particular organisation such as, for example, Ford
Motor Company, a large College, an educational publishers or any organisation with which you are
familiar.
3. For a specified product (e.g. a car, a new brand of toothpaste or a textbook, or a product of your
choice) suggest at least 6 ways in which a manufacturing company could market the product. Would
Information Technology be used in any or all of these ways? How?
London office New York office
Satellite link
LAN

Unit 2 – ICT Serving Organisations
86
Chapter 8 – Studying an Organisation
Objectives
To prepare for an interview to find out about an organisation
To write up a case study of an organisation
To study a pre-prepared case study
8.1. Finding out about an organisation
As part of this course you may have the opportunity to select an organisation and make an appointment
with a member of staff to find out more about the organisation, its functions and departments. You need
to have a clear idea of exactly what you are trying to find out, and make a list of points that you want to
address.
You might start by asking questions and making notes about the following:
The main functions of the company
A brief history of the company
The company location
Who are the customers?
Who are the suppliers?
The structure of the organisation
You then need to find out more detail about the many different departments and job functions that an
organisation of any size will have. These may include:
Accounts or Finance
Sales
Distribution
Marketing
Research and Development
Human Resources
Design
Production (or service provision)
ICT services
Administration

Chapter 8 – Studying an Organisation
87
Your notes then need to be structured into a logical order and written up. Two sample case studies are
given in Appendices A and B. In addition, you will be given a case study by the Examination Board on
which you will be expected to make notes. These notes may be taken into the examination and should be
very helpful to you in answering the questions, so be sure to complete the notes, which are themselves to
be handed in for extra marks (Edexcel Board).
8.2. The function of each department
Accounts (Finance)
The Accounts Department is usually subdivided into Purchase and Sales Ledger accounting. The people
dealing with the Purchase Ledger process purchase invoices from the company’s suppliers for goods that
the company needs. These may be raw materials or general purchases such as stationery, services such as
gas, electricity, phones etc. They also arrange payment for these purchases either by direct debit, BACS
or by sending a cheque.
The people dealing with the Sales Ledger send out monthly statements, receive and record payments from
customers who have purchased goods or services. They also have to perform a credit control function,
chasing up customers who are late in paying their invoices.
Sales
The sales order processing team receive and process customer orders. The orders may come in by mail, e-
mail, fax, phone or electronic means. For example, an order may be placed via the company web site.
(Perhaps you have ordered a book, CD or other item over the Internet yourself.) This is a form of
electronic data interchange (EDI), whereby the order placed electronically by the customer is saved
directly into the Sales Order Processing system with no need for re-keying. It has the great advantage that
the customer receives an order acknowledgement very quickly and the order is processed more speedily.
The Sales Department staff also answer customer queries about, for example, the price or availability of
goods. There may be a team of sales people in the same department who go out to customers and show
them what is available, take orders from regular customers and attempt to find new customers.
Marketing
The function of the Marketing Department is both to find out what people want and to find new and better
ways of selling the product to the customer by advertising, producing catalogues, etc. For example, in a
publishing company the cycle might look something like Figure 8.1:
Figure 8.1
Customer feeds back
further requirements Commissioning team
produces books
Sales team
sells books
Marketing team
determines
requirements
Customer
buys books Marketing team
promotes books

Unit 2 – ICT Serving Organisations
88
Distribution
The distribution of goods generally takes place in a warehouse. The functions include:
picking the goods off the shelf;
packing the goods safely and securely;
arranging for collection by courier, air freight, shipping agent etc. or posting the goods;
attaching a delivery note (and/or an invoice) to the goods.
Research and Development
The functions of this department are self-explanatory – whether the company is producing cars, drugs,
washing powder or packaging materials, the personnel are working on, inventing and trying out new and
improved products.
Human Resources (Personnel)
The Personnel Department is in charge of all the employees. Functions include hiring and firing, caring
for, appraising, nurturing, and training and development of employees. They will maintain records
relating to each employee and may agree a training or development program with them.
Design
The Design department also has a self-explanatory role. They may be designing the details of a new
product, the style of the text and cover of a new book, patterns for upholstery fabric, packaging for cereal
boxes, the position of the cigarette lighter in the latest model of car or whatever the requirements of the
company are.
Production
This department is where the products are actually made.
ICT services
The ICT department will be responsible for installing, maintaining and customising hardware and
software. They will be called upon to put things right when a problem with the computer system occurs,
and they will have an important role to play when a new system is being considered.
Administration
This department is responsible for the day-to-day running of the company. They will implement changes
such as restructuring or a change of office premises. They will look after general office maintenance such
as having the gas boiler serviced or a new telephone system installed. An important function is to keep the
whole company informed of what is going on – how the information is circulated will depend on the
nature of the information.
Discussion: A manufacturing company has 100 employees. What would be the best way of
informing staff of: the date of the Christmas party; the retirement of the Managing
Director; a forthcoming downsizing resulting in redundancies; the date that a new
computer system will go live?
8.3. Researching in further detail
In the next few chapters, we will be looking at various aspects of the organisations in the case studies
given in the Appendices and discovering how the systems in each department work.
Read the ShoeShock case study in Appendix C carefully and see if you can answer the questions below.
1. How many main departments does ShoeShock have?
2. Why is there no IT or Personnel department?

Chapter 8 – Studying an Organisation
89
3. What does it mean to say that the company’s turnover is over £15,000,000? How much is spent on
marketing each year?
4. Why is there no Production Department? Where are the shoes made? Why do you think this is?
5. What is the function of a Credit Controller?
6. What is the function of a Pick and Pack Warehouse?
7. What is a Pick Note?
8. Several marketing methods are used by the company. Suggest one other way the shoes could be
marketed in the UK.
9. Are shoes ordered direct from the company by individuals? Who are the ShoeShock’s major
customers?
10. From reading the case study, how do you think customers place their orders?
11. Name 5 different expenses that the company has to budget for, excluding the direct cost of
purchasing the shoes.
12. Does the company use an online or a batch system for processing sales orders?
8.4. Information in organisations
A huge amount of time is spent by employees in most organisations simply exchanging information with
other people inside and outside the company. Walk into a shop, a bank, a travel agent or a school and
observe what the employees are doing. For a large proportion of their time, they are getting information
from or entering information into a computer, talking on the telephone, giving advice to customers,
receiving and noting information about payments, writing memos or letters, sending faxes and so on.
A delivery note, an invoice or a party invitation?
In an organisation such as ShoeShock Ltd, consider what type of information is exchanged between the
people described below.
1. Customers and sales representatives
The sales reps will tell the customers about products, prices, availability, special offers, special
marketing or advertising efforts taking place. The customer will tell the sales reps what is and is not
selling well, what orders they want to place, any problems they are having for example with
quality, returned goods, etc.
2. Customers and Finance Department
The Finance Department will send the customer an invoice for each order placed, and a monthly
statement listing all unpaid invoices. Reminders will be sent or telephoned if bills go unpaid. The

Unit 2 – ICT Serving Organisations
90
customer will send notification if a payment is paid straight into the supplier’s bank account. They
may ask for additional discounts or for a longer credit period, or ask why goods ordered have not
been received.
3. Import/Distribution department and P&P, the warehouse.
Invoices for goods to be sent out from the warehouse are sent to P&P. P&P send the delivery note
with the goods and send information back to ShoeShock about what has been sent out.
Discussion: Think what information is exchanged between managers and employees, between the
Marketing Department and a magazine with whom ShoeShock wishes to book
advertising space, between the Import/Distribution Department and Head Office in
New York.
8.5. Exercises
Each week you need to add to the notes that you will take into the examination and practise answering
questions of the type that you will be faced with.
1. Describe briefly two uses of an organisation chart. (2 marks)
2. List 4 ways in which modern technology has improved or speeded up communication between on an
organisation and its customers. (4 marks)
3. For the case study provided by the examination board:
Draw an organisation chart similar to the one given for ShoeShock Ltd. (5 marks)
• Use Word with drawing tools for this. Open a new document and set the Page Layout
(accessed from the File, Page Setup) to landscape. With the Text Box tool, draw the first
box and put the text inside it. Then copy and paste the box as many times as you need to by
keeping your finger on the Ctrl key while you drag the box. Edit the text in each box, and
add lines using the line tool. Keeping your finger on the Shift key while you draw a line
will keep it horizontal or vertical.
4. Referring to the case study provided by the examination board, or to an organisation you have
studied:
What is the main function of the company?
5. Use PowerPoint to start a presentation on the above company. Create slides that cover its main
function and organisation.

Chapter 9 – Information Flows
91
Chapter 9 – Information Flows
Objectives
To study how information is communicated internally and externally
To distinguish between formal and informal information systems
To draw a diagram showing the relationship between departments and external agencies
9.1. Internal and external information
Much of the information used by management concerns the internal operations of the company.
However, external information about the environment in which an organisation exists is crucial to all
organisations. This may include
Intelligence gathering about competitors’ activities;
Information about population shifts;
Economic and social factors;
Government legislation.
This type of information is of great importance to managers who are trying to shave production costs, find
new markets, develop new products, or make strategic decisions about the future direction of the
company. Information is collected in many ways – through conversations and interpersonal ‘networking’,
reading newspapers, trade reviews and magazines, attending conferences and meetings, browsing the
Internet. A formal information system relies on procedures for the collecting, storing, processing and
accessing of data in order to obtain information.
Discussion: What methods could the management of ShoeShock use to decide what types of shoe
are likely to be popular in the new season?
9.2. Formal and informal information systems
Information flows through an organisation through both formal and informal information systems.
Informal ways of gathering information include face-to-face conversations, meetings, telephone
conversations, reading newspapers and magazines, listening to radio and television and surfing the
Internet.
Information is also circulated through company newsletters, memos and notice boards. The problem with
newsletters and memos is that readers often have so much information to absorb, they quickly forget it.

Unit 2 – ICT Serving Organisations
92
Figure 9.1: Informal information gathering may take place anywhere…
Informal information gathering is a very important tool at all levels of a company from top management
downwards. You probably find yourself that you sometimes learn more about a subject from chatting to
your classmates in break times than you do from reading a textbook or attending a lecture – which is not
to say you should skip lectures! For someone in charge of planning company strategy, inspiration may
well come from a casual conversation with a colleague or fellow conference delegate rather than from
poring over a set of figures.
Formal methods of disseminating information around an organisation include the following:
Computerised information systems which allow users to query databases over a company-wide
network. Internal data is often collected in the first instance through transaction processing systems.
External data can be collected, for example, through agencies such as Dunn and Bradstreet which
produces an on-line electronic data service called ‘DataStream’ to both business and academic
organisations.
Software packages such as Lotus Notes enable people at different locations to have the same
document on their screens and work on it together. Appointments can be held on the systems so
that meetings can be arranged at a time when everyone is free.
E-mail allows correspondence and files to be transmitted throughout an organisation as well as to
others outside the organisation.
Company-wide Intranets are networks which work on the same principle as the Internet but are for use
within the organisation. Information can be disseminated throughout an organisation via the Intranet
rather than in the form of written memos and newsletters.
9.3. Relationships between departments
We will be examining how data flows in and out of an organisation and between the departments in the
organisation. We will take as an example the organisation ShoeShock UK Ltd described in Appendix C.
Look at the case study and make a list of all the departments and external agencies mentioned. You
should come up with a list something like the one below:
Departments:
Sales/Marketing
Import/Distribution
Finance/Credit/IT
External Agencies:
Head Office USA
Manufacturers in Asia
P&P ‘Pick and Pack’ distributors

Chapter 9 – Information Flows
93
Customs and Excise
Payroll (Independent supplier)
Axel (IT functions)
Sales Agents
Customers
A chart may be drawn showing the relationship between these departments and external agencies, as
shown in Figure 9.2.
Figure 9.2: Chart showing relationship between departments and external agencies
The internal departments of ShoeShock UK are shown shaded. The diagram shows which departments or
agencies have a direct relationship with each other. See if you can deduce from the diagram the answers
to the following questions:
Who orders goods from the manufacturers?
Through which department does the sales department place an order?
Who clears imported goods through Customs?
How many different departments or agencies deal directly with customers? What is their
relationship with each of these?
No relationship is shown between P&P Warehouse and the customers. Do you think this is correct?
Justify your answer.
Head Office
New York
Manufacturers
in Asia
Sales /
Marketing
Import /
Distribution
Finance /Credit
Control / IT
Payroll Bureau
AXEL (IT
functions)
Customs and
Excise
P&P Warehouse
and Distribution
Customers
Sales Agents

Unit 2 – ICT Serving Organisations
94
9.4. Information flow diagram
An information flow diagram shows the information that flows between departments. The diagram
showing the relationships has already been drawn. Now you need to add labels to show what information
flows between these departments, and in which direction. This has been done in Figure 9.3.
Figure 9.3: Information flow diagram
Head Office
New York
Manufacturers
in Asia
Sales /
Marketing
Import /
Distribution
Finance /Credit
Control / IT
Payroll Bureau
AXEL
(IT functions)
Customs and
Excise
P&P Warehouse
and Distribution
Customers
Sales Agents
Orders for
shoes
Price, estimated
date of delivery
Orders for
shoes
New season’s
lines
Upgrades
needed
Upgrades
Customs
clearance
Purchase
details
Details of
shipment
Employee
and pay rate
details
monthly pay,
P46, PAYE &
NI due
Orders for
shoes
Availability
of shoes
Availability
of shoes
Orders for
shoes
Orders for
shoes Shipments
due
Dispatch
information
Pick notes
Goods
received
Payments
Statements
Sales details
Availability
of shoes
Availability
of shoes
Sales
figures

Chapter 9 – Information Flows
95
9.5. Other external agencies
Any company has to deal with many more external agencies than those mentioned in the case study.
ShoeShock, for example, will deal with all of the following:
Stationery suppliers
Telephone company
Utilities companies (water, gas, electricity)
Local Council
Accountant
Auditor
Recruitment agency
Inland Revenue
Insurers
Advertising agencies
Bank
VAT office
Training organisations
All these agencies are suppliers of goods and services or, in the case of the Inland Revenue, recipients of
tax owed by both the company and its employees. Communication may be by phone, fax, e-mail or
regular mail.
Discussion: For selected items in the list given above, decide what type of communication is most
efficient. What information passes backwards and forwards between the entities? What
form does this information take? What documents are used?
9.6. Exercises
1. For the case study provided by the Examination Board, or for an organisation you have studied:
(i) Draw a relationship chart showing the main departments in the scenario; (6 marks)
(ii) Name three external agencies that the company deals with; (3 marks)
(iii) Describe the relationship between the company and each of the external organisations (6 marks)
(iv) Draw a diagram showing information flows between the main departments, and between those
departments and external agencies. (5 marks)

Unit 2 – ICT Serving Organisations
96
Chapter 10 – Sales Order Processing
Objectives
To study how a Sales Order Processing System works
To draw an information flow diagram of the subsystems involved
To list personnel involved in processing sales
To examine the role of ICT in the Sales Order Processing System
10.1. Marketing and sales
Many manufacturing companies sell only to wholesalers or shops, not directly to customers. Others sell to
both individuals and to the trade. ‘The trade’ could include both wholesalers and retailers.
Discussion: Who might the company sell to in each of these cases? Think of some other companies
manufacturing goods. Do any of them sell only to the end-user?
i A small company manufacturing cricket bats
ii A publisher of educational textbooks
iii A car manufacturer
iv A computer manufacturer
v A knitwear company employing 300 people making a wide range of knitted goods
such as sweaters, socks, tops etc.
It is the job of the Sales and Marketing Departments to find new customers and persuade them to buy the
company’s product. Sales and Marketing are two separate functions. The Marketing Department is
concerned with finding out what products and services customers want and promoting these products
once they have been produced. The Sales Department is concerned with selling them. There is some
overlap in these functions which is why ‘Sales and Marketing’ are sometimes lumped together.
Discussion: Suggest ways in which the companies listed above could carry out market research and
market their products. In each case, describe what role IT plays.
10.2. How is an order processed?
The business of actually processing an order and doing whatever has to be done to get the goods to the
customer and getting paid for them is called the Sales Order Processing System. In fact, several different
subsystems are involved in the process. These may all be part of one integrated computer system.
Here is a typical scenario for a manufacturing company making bags, cases and rucksacks.
When a customer (typically a High Street store) places an order through the Sales Order Processing
subsystem, information about the products and quantity required is passed to the Stock Control
subsystem. Assuming there is sufficient quantity to fill the order, the ‘free stock’ figure is amended on the
stock file and the order details are sent to the warehouse. When the goods are packed and ready for
despatch, the invoice and despatch note are printed in the Packing and Despatch subsystem. The Accounts

Chapter 10 – Sales Order Processing
97
subsystem receives the invoice details, such as the date and the amount owed by the customer, from the
Sales Order Processing subsystem. Periodically the Marketing Department uses information about who
has purchased goods over a period, say the past two years, so that they can post all their customers a new
catalogue.
The information flow can be shown in a block diagram as follows:
Figure 10.1: Information flow diagram of SOP system and subsystems
10.3. Placing an order
Generally, trade orders (i.e. orders from wholesalers or retailers) are accepted and the customer (the
retailer or wholesaler) is given credit. This means that the customer will receive an invoice (a request for
payment) and will not have to pay for say, 30, 60 or 90 days. Wholesalers generally ask for a longer credit
period and a bigger discount because they order in bulk and have to store the goods until they sell them
on.
New customers may have their credit rating checked before goods are supplied, although if the customer
is large and well-known, this may not be done. Individuals who order say, a bench from a garden
furniture manufacturer may not be given credit, because it is simply too costly to chase up payments that
are not made. A cheque or card number has to be sent with the order.
An order from a customer may be placed in one of several ways. For example:
1. The order is telephoned. A clerk in the Sales Order Department can then type the order straight
into the computer and there is no paper record of the transaction.
2. The order is posted on the customer’s own order form or on a form printed in the manufacturer’s
catalogue, for example. The order is then typed into the computer.
3. An order may be faxed.
4. A salesman may visit retail stores in his area, take orders on a laptop and transmit them directly to
the Sales Order Processing System.
A typical order form is shown on the next page.
Sales Order
Processing
Accounts
Stock Control Marketing
Packing and
Despatch
stock availability stock sold
Customer name
and address,
Items, Quantities
Despatch date,
document number,
carrier reference
Customer credit rating
Customer details, date,
amount owing
Customer details, dates
and size of orders

Unit 2 – ICT Serving Organisations
98
The Hadley Group
Head Office: Belair Court, London Road, Tickton DC2 6QY Telephone: (01234) 456789
Supplier
KOC Ltd
4 Severn Rd
Bristol BR56 4GG
Delivery and Invoice Address
13 Market Square
Tickton
Hants DC4 7HJ
Tel: (01234) 777888
Fax: (01234) 777889
Purchase Order No.
GH 53765
Date:
8 April 2001
Please supply the following goods:
Ordered by: S. Pickwell
Proprietors: Hadley Hall Ltd. Registered in England No. 12309876 Registered Office: Belair Court, London Rd, Tickton.
WHITE COPY – SUPPLIER PINK COPY – ACCOUNTS BLUE COPY - RETENTION
Quantity Ref No. Description Price
6 M1222 Rucksack 215.70
3 B26654 Carrying case 53.85
Subtotal 269.55
VAT @ 17.5% 47.17
TOTAL 316.72
Figure 10.2: Purchase order form

Chapter 10 – Sales Order Processing
99
10.4. Inputting an order
Once the purchase order is received, it is input into a Sales Order screen on the computer. A screen form
similar to the one below may be displayed:
Figure 10.3: Sales Order form
On this form, several fields are entered automatically, including Type, Order No and Order Date. The
field A/C Ref is the customer’s account number. An order cannot be input for a customer who is not
already on the system. As soon as the A/C ref is entered, the name and address of the customer will be
automatically displayed.
Then, as soon as a product code is entered, the description will be displayed.
Once the quantity is entered, if there is insufficient stock to fill the order, a message will be displayed.
Further details are input by clicking the Order Details and Footer Details tabs, bringing up the following
screens:
Figure 10.4: Entering Order details

Unit 2 – ICT Serving Organisations
100
Figure 10.5: Entering Footer details
Discussion: Where does the operator enter the customer’s order number? What fields, other than
the ones already mentioned, may be entered automatically by the computer system?
Where is it getting the information from?
10.5. Processing the order
In a typical system, orders are entered as they come in by mail, phone, fax or e-mail. Then, maybe once or
twice a day, a batch of invoices is printed. These are sent to the Packing and Despatch Department who
pack the goods and enclose the invoice in a sealed pouch on the outside of the box. Alternatively, a
delivery note may be sent with the goods and the invoice posted separately to the Finance or Accounts
Department of an organisation buying goods.
Once the invoices are printed
the stock figures are automatically adjusted by the computer system;
the customer’s record is adjusted to show the total amount outstanding.
10.6. Receiving payment
At the end of every month, statements will be printed for each customer with an outstanding balance,
showing each invoice number and the amount owing. The customer will then pay either by cheque or by
BACS, transferring the money automatically from their account to the supplier’s account.
The Accounts Department will be able to look up any customer’s account. A report of overdue accounts
can be printed at any time and customers who have not paid their bills will then be chased up. This is the
job of the Credit Control Department.
Discussion: Describe some other reports that would be useful to the following departments: Sales,
Marketing, Accounts, Stock Control.

Chapter 10 – Sales Order Processing
101
10.7. Exercises
1. (i) Identify one document that would pass from a customer to the Sales Department. (1 mark)
(ii) Identify one document that would pass from the Despatch Department to a customer. (1 mark)
2. (i) Describe briefly two functions of the Marketing Department in a car manufacturing company.
(2 marks)
(ii) Describe two ways in which each of these functions may be carried out. (4 marks)
3. Name three functions of each of the following departments in a company.
(i) Sales Department (3 marks)
(ii) Despatch Department (3 marks)
(iii) Research and Development Department (3 marks)
(iv) Human Resources Department (3 marks)
4. Using the case study ShoeShock Ltd (Appendix C) explain, using diagrams where appropriate, how a
customer order, which can be wholly filled from finished goods, is processed from receipt of order to
receipt of payment, including:
(i) the departments and external agencies involved; (5 marks)
(ii) descriptions of the data and how it is captured; (5 marks)
(iii) inputs and outputs; (5 marks)
(iv) the use of ICT in each departmental area. (5 marks)
5. Now try the same question (Question 1) for the case study provided for the Examination Board or for
an organisation you have studied.
6. Put your findings into the PowerPoint presentation started at the end of Chapter 8.

Unit 2 – ICT Serving Organisations
102
Chapter 11 – Stock Control
Objectives
To learn what is meant by stock control
To understand the inputs and outputs to a stock control system
To appreciate the role of ICT in maintaining correct stock levels
11.1. Why hold stock?
In the simplest possible manufacturing organisation, all goods are manufactured on demand and there is
no need to hold stock. A customer orders a custom-built table or whatever and the manufacturer makes it.
The customer then receives it in a few days’ or weeks’ time.
Figure 11.1
However in almost all situations it is necessary to hold some stock so that customers do not have to wait
for their goods, and so that the Production Department can be kept working even during slack sales
periods. A company cannot simply lay off all its production workers every time orders are not coming in
fast enough to keep everyone busy. The Stock Control system acts as a buffer between Production and
Sales.
Figure 11.2
Production Sales
Production
requirements
Goods
Production Sales
Production requirements
Goods Goods
Stock Control

Chapter 11 – Stock Control
103
There are some advantages to holding quite large stocks of goods, whether they are clothes, cars, books,
or anything else.
The advantages of holding large stocks are:
It will be possible to fill even large orders from stock, so there will be no danger of the customer
going elsewhere because the items are not in stock.
It is often cheaper to manufacture a large quantity of goods at the same time. There are usually
substantial costs involved in setting up machinery for a production run.
It is usually cheaper to buy raw materials in larger quantities from which to manufacture the
finished goods.
However, there are disadvantages to holding more stock than necessary:
Capital is tied up in stock instead of earning interest in the bank.
It costs money to store both raw materials and finished goods – warehouse space and shelving have
to be bought or rented and maintained.
The goods could go out of fashion, be superseded by a better product or not be popular any more
for various reasons after a period of time, so it is unwise to hold stocks which you do not anticipate
selling within say, 6 months or a year. They may have to be sold very cheaply or even thrown
away.
11.2. The function of a stock control system
The main functions of a stock control system are to
keep track of how much of each item is in stock;
record the reorder level and reorder quantity for each item in stock (whether this is raw materials
stock or stock of finished goods);
generate a reorder report when more stock is required.
Each item manufactured will have a different reorder level. When stock falls below this level, it will be
reordered or more goods manufactured. This is called the reorder level.
In a manufacturing company, someone has to make sure that there are enough raw materials in stock to
make the necessary quantity of finished goods. The reorder level will depend on how much raw material
is used every week and how many weeks it takes for new stock to be delivered.
Example: A particular type of aluminium tubing used in the manufacture of rucksack frames is sold by
the metre. A company uses 200 metres of this tubing every week. They like to reorder stock sufficient for
6 weeks’ manufacture, and it takes 1 week from the date of placing the order for the tubing to be
delivered. Calculate the reorder level and the reorder quantity.
Answer: Since it takes one week for tubing to be delivered, they need to reorder when they have one
week’s supply left. So the reorder level is 200 metres.
They need to order 6 weeks supply, i.e. 1,200 metres. That is the reorder quantity.
The calculation may be much more complex than this. For example, sales may vary according to the time
of year, and the reorder quantity and reorder level will then have to take this into account. Also, there may
be random factors like a special offer on 2,000 metres of tubing which makes it more economical to order
more than usual.

Unit 2 – ICT Serving Organisations
104
11.3. Inputs to a stock control system
Different types of input will automatically update the stock file.
Addition of new items
When a new item is ordered that has not previously been held in stock, details have to be entered. A
typical input screen is shown below.
Figure 11.3: Inputting a new stock record
Customer order
When a customer order is entered and posted to the system, the Free Stock figure will be automatically
updated. If there is insufficient quantity in stock to fill the order, the customer order is added to a Back
Orders file and the Allocated field is updated.
Returns
If a customer returns stock, the In Stock and Free Stock figures will be updated.
Adjustments
When a physical stock-take is done, if the number of items counted does not exactly match the
computer’s figure, a stock adjustment (either In or Out) can be entered.
Figure 11.4: Entering stock adjustments

Chapter 11 – Stock Control
105
Purchase orders
When new stock is ordered, the On Order figure is automatically updated.
11.4. Outputs from the stock control system
A typical stock control system will be able to produce dozens of reports to keep management informed of
stock quantities, values, movements, and so on. Part of a list of reports available in Sage Financial
Controller is shown below:
Figure 11.5: Typical Stock reports
For example, the Editorial Department at Victory Publishers may want to know how well a particular title
is selling, and how profitable the title is. They could print out a Product Profit report.
Figure 11.6: A Product Profit report

Unit 2 – ICT Serving Organisations
106
The Sales Manager may want to know how many of each title is in stock, and what stock movements
there have been. The Product movement list can be printed out:
Figure 11.7: A product report
An organisation may have tailor-made reports for its particular products. For example, ShoeShock needs
to give its sales force a weekly report before they go out on the road to inform them of any stock
shortages. A report may be specially designed for this purpose, looking something like the one below.
Code Product Colour Size Comments
WINTER ANY MAJOR CHANGES TO STOCK
SITUATION HIGHLIGHTED
M9483 Winter Mule Black 7-12M 4-8W good stocks
M9484 Winter Mule Grey 7-12M 4-8W good stocks
M9485 Winter Mule Blue 7-12M 4-8W Sold out until May
M9486 Winter Mule Black 7-12M 4-8W Sold out 10, 11 until May, rest good stocks
M7651 Monterey Cloud 7-12M 4-7W Sold out Wms 6,7
M7652 Monterey Natural 7-12M 4-7W Sold out until May
M7653 Monterey Taupe 7-12M 4-7W Good stocks
M7654 Monterey Black 7-12M 4-7W good stocks
M 6666 Polar Extreme Natural 7-12M 4-8W good stocks
M 6667 Polar Extreme Natural 7-12M 4-8W good stocks
M 6667 Polar Extreme Natural 7-12M 4-8W Sold out Mens 12 until April
etc
Figure11.8: Customised report for ShoeShock Ltd
This report can be e-mailed or faxed to each salesperson at the start of each week.
11.5. Purchase ordering
The Purchasing Department is responsible for making sure that the company does not run out of stock of
any item. In order to do this it needs reports from the stock control department showing which items have
fallen below the reorder level, and how much should be reordered. However, personal experience and
knowledge of particular circumstances will be crucial in composing purchase orders. The manager may

Chapter 11 – Stock Control
107
be aware that a large customer is closing down and will not be ordering any more items. A TV
commercial may have been made which is having a marked effect on sales and extra raw materials need
to be ordered to satisfy expected demand.
In the Sage Line 50 screen shown below, only the supplier’s name and the Product code need to be
entered. The computer system holds the supplier’s details and the product details such as description, unit
cost and reorder quantity. The Order number and today’s date are entered automatically. Any of these
fields can be manually overridden.
Figure 11.9: Entering a Purchase Order
Discussion: Suppose you are in charge of deciding how many of a particular textbook to reprint.
What factors would you take into consideration?
11.6. Exercises
1. Describe briefly:
(i) Two advantages to a manufacturing company of ordering large quantities, say enough for 1
year, of raw materials when they place an order. (2 marks)
(ii) Two disadvantages of ordering large quantities of raw materials. (2 marks)
2. Describe what is meant by:
(i) A reorder level (1 mark)
(ii) A reorder quantity (1 mark)
3. Refer to the ShoeShock case study in your answer to this question.
Ian Bertram is in charge of placing the weekly order with Head Office for shoes. He relies on
information from the Stock Control system as well as his own experience.
(i) What information does he need from the Stock Control system? (3 marks)
(ii) Draw up an example of a possible report which may be useful in assisting with making purchase
orders. (5 marks)
(iii) Give two reasons why Ian may decide to use his own judgement rather than going by the figures
on this report in placing his stock order. (2 marks)

Unit 2 – ICT Serving Organisations
108
Chapter 12 – Finance and Administration
Objectives
To learn the functions of a Finance Department
To learn the functions of an Administration Department
To appreciate the role of ICT in these departments
12.1. Functions of a Finance Department
The role of the Finance Department will vary according to the size and structure of a company. It is from
this department that statements and reminders are issued to customers and payment is received and
recorded. Invoices and statements from suppliers are sent to the Finance Department, which is in charge
of making payments at the proper time. These two functions – dealing with the Sales and Purchase
Ledgers – are usually separated and dealt with by different teams within the Finance Department.
In addition to these operational tasks, one of the main functions of the Finance Department is to be able to
provide, at any time, a picture of the financial health of the organisation. It must be able to answer
questions such as:
Is the company making money?
Is it making more or less than last year?
What are the major expenses?
How much does the company owe its creditors?
How much is owed to the company by its debtors?
Will there be enough cash available for the purchase of say, a new building, new machinery or an
advertising campaign?
If not, will the company be able to raise funds?
Discussion: Think of some other questions relating to the company finances that the Managing
Director of a company may want answered.
The tasks of the Finance Department may be broken down to include any or all of the following:
Producing budgets
Producing a Cash Flow forecast
Looking after the Sales ledger
Looking after the Purchase and Nominal ledgers
Credit control
Administering and recording payments in and out
Producing the monthly and annual accounts
Payroll

Chapter 12 – Finance and Administration
109
12.2. A budget for a new product
When a company is planning to launch, say, a new product, someone has to work out what price to charge
in order to make an acceptable profit. A lot of budgeting will involve guesswork as no one can predict for
certain how many will sell, what unexpected expenses will occur, and so on.
Example: Victory Publishers publish a range of educational computing textbooks. Before they commit
themselves to publishing a new book, a budget is drawn up showing the costs and expenses. They will not
proceed unless the gross margin is 35% or over.
Below is a budget for a new book that Victory Publishers are contemplating publishing.
Figure 12.1
Discussion: Some of the costs are calculated according to a set formula. For example, the printing
costs are £3.00 per copy for 5,000 copies. This reduces by 20p per copy for 6,000 copies,
and by a further 20p for each extra thousand copies printed. Typesetting costs £10.00
per page. The distribution costs are calculated as 10% of the gross sales value plus
£4.50 for every gratis (free) copy sent out. Gratis copies are promotional copies sent
out to lecturers to encourage them to recommend the book to their students. The figure
also includes books that have to be pulped because they are returned damaged or after
they have gone out of print.
What changes to the budget would you suggest to help Victory Publishers reach their
35% gross margin?

Unit 2 – ICT Serving Organisations
110
12.3. Cash flow forecast
A month-by-month cash flow forecast enables the management of a company to predict how much actual
cash they will have in the bank at any time. If the balance goes negative, they will probably need to ask
the bank for a loan. The bank will ask to see the cash flow forecast before giving the loan because they
will want to ensure that the company is making a profit and will be able to repay the money within a
specified period.
Successful companies often experience cash flow difficulties. Some possible reasons are:
The business is extremely successful and needs to expand. However, expansion has to be funded up
front before any returns on the investment are received.
The business has manufactured too many of a particular product, which is now not selling well and
is tying up capital and warehouse space.
Overheads have increased – this includes salaries, rent and rates, utilities and so on.
A customer owing a large amount of money has gone bankrupt and the debt cannot be recovered.
The Victory Publishers Cash Flow forecast below shows that they are going to have difficulties between
June and October even though by the end of the year they will have made a good profit.
Figure 12.2: A cash flow forecast
Discussion: Victory’s biggest sales are made in September. Why do the cash receipts not peak in
September?
In preparing a cash flow forecast many assumptions have to be made and although it will give an
indication of the likely situation it is unlikely to be completely accurate.

Chapter 12 – Finance and Administration
111
12.4. The Sales Ledger
The Sales ledger keeps track of all invoices, credit notes and discounts sent to customers and all receipts
received from customers. This is a vital tool in Credit Control – which is, in other words, making sure
you get paid for goods supplied.
When a new customer makes an order, their details are entered into the computer using a screen similar to
the following:
Figure 12.3: Entering a new customer
Further details can be entered on other screens, for example by clicking the Defaults tab or the Credit
Control tab.
A customer’s activity can be viewed by clicking the Activity tab:
Figure 12.4: Viewing a customer’s activity

Unit 2 – ICT Serving Organisations
112
A number of reports can be printed showing overdue invoices in different amounts of detail or in different
sequences – for example by customer account number or in descending order of outstanding balance.
These customers can then be phoned and reminded to pay. Customers who fail to pay up even after being
reminded are usually put on ‘stop’ – no more goods issued to them – until the bill is paid.
An extract from a report is shown below:
Figure 12.5: The Aged Debtor Analysis report
Discussion: Why would it be useful to the Credit Controller to have a report in descending order of
outstanding balance?
12.5. The Purchase Ledger
The Purchase Ledger records all the company’s suppliers and transactions with these suppliers. When an
invoice from a supplier is received it is entered and in due course a payment is made and recorded. A list
of all outstanding payments can be viewed to assist in this task:
Figure 12.6: List of suppliers and outstanding balances
If the clerk then decides to make a payment to, say, McNally Machinery, the appropriate option brings up
a payment screen and the clerk can choose which invoices to pay:

Chapter 12 – Finance and Administration
113
Figure 12.7: Making a payment to a supplier
12.6. The Nominal Ledger
The Nominal Ledger is affected by all transactions posted in all ledgers. It is the heart of the accounting
system, and the balances on the Nominal Ledger accounts form the Trial Balance, Balance Sheet and
Profit and Loss statements. These documents show the state of the business, and without these the
Managing Director would have very little idea of how well or badly the business is doing.
Figure 12.8: Sample Profit and Loss report

Unit 2 – ICT Serving Organisations
114
A sample balance sheet is shown below:
Figure 12.9: A sample Balance Sheet
A general Accounts package such as Sage Line 50 integrates the functions of Sales Order Processing
(SOP), Purchase Order Processing (POP), Stock Control and Nominal Ledger. By clicking the appropriate
option button, the operator can enter or edit a customer, supplier or Nominal account. Bank payments and
receipts can be recorded, invoices and sales or purchase orders entered and reports printed.

Chapter 12 – Finance and Administration
115
Figure 12.10: The functions of a standard accounting package
12.7. Payroll
Payroll is generally handled by a Payroll package which may interface directly with the Accounts system.
Many smaller companies outsource their payroll to a Payroll Bureau which keeps the records and ensures
that the correct deductions are made.
Payroll is a complex application ideally suited to computerisation because it involves time-consuming and
repetitive calculations. The reports which have to be sent to the Inland Revenue at the end of each
financial year can be quickly produced by the system.
12.8. Human Resources (Personnel)
Small companies will not have a separate Personnel Department and these functions will be carried out by
the Administration Department or by individual managers. In a large company, the functions may include:
liaising with other departments regarding staffing requirements;
designing and placing advertisements for new staff;
sending out application forms to people requesting them;
processing applications;
obtaining references;
interviewing applicants;
preparing induction materials, courses, etc;
keeping personnel records;
dealing with grievances;
dealing with disciplinary matters;

Unit 2 – ICT Serving Organisations
116
liaising with Trade Unions;
supervising personal development (training programmes) for individuals .
12.9. Administration
Administration tasks may include a number of functions such as:
general day-to-day running of the company;
building and office equipment maintenance;
implementing and coordinating changes such as change of office layout, change of offices for
individuals, change of company logo, etc;
keeping people throughout the organisation informed of changes, events, etc.
Discussion: What other tasks would come under the general heading of Administration?
12.10. Exercises
1. Describe three ways in which the Administration Department of a company may use IT to
communicate important information to the employees of the company. (6 marks)
2. Describe briefly 3 tasks of the Human Resource Department of a large company. Describe how IT
will be used to assist each of these tasks. (6 marks)
3. Name or describe briefly a report that would be useful to a credit controller. Describe 5 fields that
you would expect to find on this report. (6 marks)

Chapter 13 – Management Information Systems
117
Chapter 13 – Management Information Systems
Objectives
To understand the difference between a data processing system and a management information
system (MIS)
To see how a MIS can assist management in decision-making
To study the factors influencing the success or failure of a MIS
13.1. Introduction
Over the past two decades, a transformation to an information society has been taking place, and
computers and telecommunications technologies have revolutionised the way that organisations operate.
We live in an information age, and no business of any size can survive and compete without embracing
information technology. Information has come to be recognised as a resource of fundamental importance
to an organisation, in the same way as the more traditional resources of people, materials and finance.
It is not enough to be merely ‘computer-literate’ in order to become an expert in information systems. It is
also necessary to understand how to apply modern technology in a business, commercial or other
environment to achieve the goals of the organisation.
13.2. Information systems v. data processing systems
In Chapter 7 we looked at the different levels of information system in an organisation.
Remember that a data processing system is simply one which records the day-to-day transactions taking
place within an organisation. An information system is one which uses this data and turns it into useful
information. For example:
Data on items sold is collected by the data processing system and stored on a computer file;
An operational information system then reads this data and produces a list of items that need
reordering;
A management information system may analyse the sales data to highlight sales trends and use
this information to plan a new marketing campaign, adjust price levels or plan an increase or
reduction in production facilities.
13.3. The purpose of a management information system
The purpose of a management information system is:
to help managers with decision-making;
to warn managers when something needs action – for example, stock levels are low, the number of
faulty products being produced is higher than expected, etc;
to produce summary reports showing for example actual vs. budget sales;

Unit 2 – ICT Serving Organisations
118
to analyse and report on data over a period of time – for example to show sales trends over a
period of months or years;
to enable a manager to perform ‘what if’ calculations to forecast the likely effect of policy
decisions such as price changes, extra production, additional staff, introduction of new products or
services.
Internal Data
Expert System
Advice
Query Responses
Reports
Storage
Management
Information System
Provision of Access
Processing
Capture
External Data
Environment Organisation
Information Outputs
Figure 13.1: The role of a Management Information System
13.4. What managers do
To understand how information systems can benefit managers, we first need to examine what the
functions of management are and the kind of information they need for decision-making.
The five classical functions of managers (described more than 70 years ago) are:
1. Planning. Managers plan the direction a company is to take, whether to diversify, which areas of the
world to operate in, how to maximise profit.
2. Organising. Resources such as people, space, equipment and services must be organised.
3. Coordinating. Managers coordinate the activities of various departments.
4. Decision-making. Managers make decisions about the organisation, the products or services made or
sold, the employees, the use of information technology.
5. Controlling. This involves monitoring and supervising the activities of others.
Management information systems must be designed to support managers in as many of these functions as
possible, at different levels (operational, tactical, strategic) of an organisation.
Discussion: How could a MIS help the managers at various levels of ShoeShock carry out
activities of planning, organising, coordinating, decision-making and controlling?

Chapter 13 – Management Information Systems
119
A study in 1973 by Henry Mintzberg found that managers divided up their time as shown in the pie chart
below. He described the work of a manager as consisting of hundreds of brief activities of great variety,
requiring rapid shifts of attention from one issue to another, very often initiated by emerging problems.
Half of the activities of chief executives lasted less than 9 minutes.
Figure 13.2: How managers spent their time in 1973
Discussion: Today’s managers still spend their time divided between many activities. Do you think
there are any activities which managers spend more time on than they did in 1973?
13.5. Types of decision
Management decisions can be classified into two types – structured and unstructured. Structured
decisions are repetitive, routine and involve a definite procedure for handling them. Unstructured
decisions on the other hand are decisions which require judgement, insight and evaluation. They are often
important decisions and there is no set procedure for making them.
Discussion: Categorise the following decisions to be made by a department store manager as
structured or unstructured:
In which town shall we open the next branch?
How many extra staff shall we hire to cope with the Christmas rush?
What shall we do about an employee who has had 30 sick days in the last 6 months?
Should we try and increase the number of customers who hold a store card?
13.6. Stages of decision-making
Making unstructured, non-routine decisions is a process that takes place over a period of time, and
consists of several stages. Think of any important decision that you may have to make, like whether to go
on to University or get a job, which college or University to attend, what course or career to follow. You
will probably reach any of these decisions over a period of time, having gathered together information
from various sources and listened to friends, parents or careers advisers.
Desk work
22%
Travel
3%
Unscheduled meetings
10%
Scheduled meetings
59%
Telephone calls
6%

Unit 2 – ICT Serving Organisations
120
The manager who has non-routine decisions to make typically goes through the following stages:
1. Recognition that there is a problem. An information system is useful at this stage to keep managers
informed of how well the department or organisation is performing and to let them know where
problems exist. The principle of exception reporting is especially important in this stage – in other
words, only situations which need some action are reported. (For example, customers with
outstanding accounts, a sudden drop or increase in sales compared with the same period last year or a
rash of staff resignations.)
2. Consideration of possible solutions. More detailed information may be needed at this stage, or
possibly tools such as a spreadsheet which can model the effect of different solutions such as price
increases or decreases, staff pay increases etc.
3. Choosing a solution.
4. Implementing the solution. This may involve setting up a new management information system to
report on the progress of the solution.
Consider
solutions
Choose a
solution
Is there a problem
or opportunity?
Is the choice
working?
Figure 13.3: The decision-making process
Most decisions do not proceed smoothly from one stage to the next, and backtracking to a previous stage
is often required if a chosen solution turns out to be impossible or new information comes to light which
offers alternative choices.
Making structured decisions – often of an operational nature – is made easier by having an information
system which provides the information necessary to make the correct decisions.

Chapter 13 – Management Information Systems
121
Discussion: A car company gathers information about its customer base through many sources,
including market research surveys. One company has discovered that it has relatively
few customers in the 18-30 age range. How can this information be used by the
company to improve its sales?
If you want to purchase a new car from a Ford dealer, chances are that the make and model you want, in
the right colour with the right accessories, is not in stock. It’s just too expensive to have cars with every
possible combination of options sitting in the parking lot waiting for a customer. In the past, it’s been
almost impossible for dealers to track down exactly the model that a customer wants.
With the new information system, the dealer can type the details of the required car into a terminal
connected to the main Ford plant at Dagenham. The information will then come back to tell the dealer
whether there are any cars available of that specification, and exactly where they are. They may be on the
Ford parking lot, or there may be only two available, one at a dealers in Perth and the other in
Bournemouth. There may be none available – in which case Ford will make one for you, though this may
take some time.
Plant production managers are also connected to the system, and so they know exactly what cars have
been ordered and can adjust production to reflect demand every day.
Discussion: This is an example of a management information system. How does it help
– the dealer?
– the customer?
– the manufacturer?
13.7. The benefits of a management information system
Many companies have a computer system which allows them to set up new products, customers and
suppliers, enter sales and purchase orders, and perform stock control and accounting functions. It can still
be difficult for management to extract information useful for making executive decisions.
Additional software is often available as an add-on to extract management information from an
operational system. The software compiles reports by extracting information from the database.
For example, as a rule of thumb, many businesses find that 80% of their revenue comes from 20% of their
products. In other words, they have a few items which are very successful and make a large profit, and a
lot of items which contribute much less to the overall turnover and/or profit. It is obviously very
important for management to be aware of which are their most profitable products, who are their most
valuable customers, what the sales trends are.
Discussion: In ShoeShock Ltd, management wants a report on the contribution to turnover and
profit from each of their product lines. Design the format of a report that will give
them this information.
It is useful to be aware of which customers buy the most goods. If one wholesaler buys 20% of a
company’s output, it will make an enormous difference to the company’s profit if a lower discount can be
negotiated with that customer. There is, on the other hand, no point spending a lot of effort negotiating a
lower discount with a customer who buys hardly anything.

Unit 2 – ICT Serving Organisations
122
A management information system may be able to produce graphs showing, for example, the sales of a
particular product over a period of 12 months. It will also be able to add a trend line to predict probable
sales over the next few months.
Victory Publishers may be able to extract information on the success of a particular promotional or
marketing activity. For example, it might be useful to have a report on how many schools who received a
free sample copy of a book subsequently ordered it. Or, to find out how many schools who ordered one
particular title also ordered another title.
Discussion: How would this sort of information help Victory Publishers to sell more books or make
a bigger profit?
13.8. Typical functions of a MIS
A summary of some of the functions of a MIS, examples of which have been discussed, is given below. A
typical system could include:
a comprehensive database holding all the information about products, customers, suppliers and
finance that would be needed to provide managers with reports for decision-making;
the ability to analyse the information in the database to highlight situations that need attention;
the ability to show figures over a period of time, perhaps in graphical format including production
and sales figures;
ability to show a snapshot of the company’s financial situation over a period of time;
ability to perform ‘what-if’ calculations to show what the effect would be of raising production
levels, hiring more staff, acquiring a new building etc.;
warning signals to indicate that decisions are required, such as low stock levels, expenditure
exceeding information, numbers of faulty products exceeding expectations;
audio and visual warnings when incoming orders exceed production capacity;
daily calculation of productivity levels by analysis of costs and output;
monthly graphs of price comparison with competitor goods or services resulting from regular
market research.
13.9. Exercises
1. (i) Explain the purpose of a MIS. (4 marks)
(ii) Describe three essential features of a MIS. (6 marks)
(iii) Describe three implications of the decision to implement a fully integrated MIS into an
organisation. (3 marks)
2. Refer to the Victory Publishers case study in Appendix B to answer these questions.
(i) Describe two potential benefits which you believe may derive from the implementation of a full
management information system. (4 marks)
(ii) Describe two examples of how such a system could affect decision-making. (4 marks)

Chapter 14 – E-commerce and Other Applications
123
Chapter 14 – E-commerce and Other Applications
Objectives
To appreciate the benefits and pitfalls of e-commerce
To describe the advantages of e-mail
To study other ways in which an organisation uses ICT
14.1. E-commerce
One of the main challenges facing many businesses today is to keep up with the explosion in the use of
online commerce – buying and selling over the Internet. Very many different kinds of company realise
that the future is interactive, and they cannot afford to ignore the new ways of doing business. Even if in
the short term, most sales continue to come from traditional methods, most businesses must offer an
online service.
Discussion: What type of goods and services are available over the Internet? Have you used any of
these?
A typical large mail-order company such as JD Williams produces 16 paper catalogues in a year
promoting thousands of product lines to more than three million companies throughout the UK.
Figure 14.1: The JD Williams home page

Unit 2 – ICT Serving Organisations
124
What are the benefits of e-commerce for a mail order company such as JD Williams? Some of them are
listed below:
They will be able to expand the company’s customer base while increasing sales to existing
customers.
A paper catalogue takes weeks to prepare and, because of its seasonal nature, is not current for very
long. Having an online catalogue enables the company to constantly update its product information.
It can offer new buying opportunities to customers by advertising special offers. This can also be
used to reduce slow-moving stock and keep inventory costs down.
The company can monitor, analyse and exploit individual customers’ buying habits. It can use
online registering, surveys and transaction monitoring to find out all it needs to know about its
customers.
It can offer extra services to customers such as a birthday reminder service to prompt customers
when to buy birthday presents.
It can advertise and sell other services such as loans and insurance services – once customers are
used to buying from an organisation online, they are quite likely to buy other products from them.
Figure 14.2: The week’s special offers
Discussion: What would be the advantages to Victory Publishing of using e-commerce?
14.2. Advantages of e-mail
Compared with other forms of communication such as sending letters by post, e-mail has some
tremendous advantages.
It is very quick, making it possible to send several letters to the other side of the world and back in
a single day. It is also very inexpensive.
It is possible to attach files containing for example text, drawings, photographs etc., to be printed
out by the recipient.
The same message can be sent simultaneously to several people.
Discussion: What would be the advantages to Victory Publishing of using e-mail?

Chapter 14 – E-commerce and Other Applications
125
14.3. Using Microsoft Outlook
Microsoft Outlook is a package in which you can record information that you might record manually in a
number of different places such as an address book, a diary, calendar or Post-it note, as well as handling
e-mail both within an organisation or over the Internet.
For a busy manager, these functions help to ensure that important tasks and appointments are not
forgotten, e-mails are answered and addresses and telephone numbers are ready to hand when required.
Outlook’s functions include:
Outlook today. Provides an overview of today’s appointments and To-Do list.
Inbox. Keeps track of all e-mail and electronic faxes. On a network, you can communicate with co-
workers.
Calendar. Records appointments. On a network using Microsoft Exchange Server, it is possible to
schedule meetings with co-workers.
Contacts. All contacts’ names, addresses, and other details can be held, and activities with different
contacts recorded.
Tasks. Maintains a To-Do list, and an alarm can be set to remind you when an appointment is about
to come up.
Notes. Creates reminders that replace hand-written notes, which can be left open on the Windows
Desktop.
Figure 14.3: Using the Calendar in MS Outlook

Unit 2 – ICT Serving Organisations
126
14.4. Computer-aided design
Computer-aided design is a very important application in many manufacturing companies. Although a
CAD system cannot replace human creativity, it can automate many of the labour-intensive parts of
design work. CAD system can accept descriptions of components or processes and display graphical
representations. They can then create photorealistic representations that allow the designer to see exactly
what an object will look like without ever producing a physical model. Many CAD packages can also
evaluate an object for example by testing a circuit or verifying that a structure is strong enough to fulfil its
purpose.
A computer-aided manufacturing (CAM) system can be integrated with a CAD system so that a part
designed using a CAD system can be automatically manufactured using, for example, a lathe.
14.5. Exercises
1. Referring to the case study ShoeShock Ltd (Appendix C), describe in detail two ways in which the
company may benefit from more extensive use of new communication technologies. (6 marks)
2. Give three advantages of e-mail over regular mail. (3 marks)
3. What are the advantages of placing orders over the Internet, rather than by post or fax, to
(i) the customer; (2 marks)
(ii) the supplier? (2 marks)

127
Unit 3
Spreadsheet Design
This unit covers the design and implementation of a spreadsheet system. It covers the process of
developing a specification based on the requirements of the end-user, to implementing, testing and
documenting the system. For your portfolio you will need to provide evidence that you have worked
through these stages for your own project (see Assessment Evidence in Appendix D).
The system specification for this spreadsheet system can be found in Chapter 22 – it would be a good idea
to read this first so that you can see what you are trying to achieve.
The unit assumes a very basic knowledge of spreadsheets and in particular Microsoft Excel, so you
should be able to start Excel and enter data into a spreadsheet before attempting this unit. By the time
you have worked through these chapters you should be well-equipped to design and implement your own
system using some of the more complex spreadsheet facilities.

Unit 3 – Spreadsheet Design
128
Chapter 15 – Getting Started
Objectives
To select a suitable project
To set cell formats to match the data format
To set cell presentation formats
To enter a simple formula
To set a conditional format
15.1. Choosing a project
Choosing an appropriate project to develop for this unit is very important. You need to choose something
that is a realistic spreadsheet application. It may help to talk to contacts you have (perhaps even your
parents) who work in businesses that use spreadsheets. Although those systems may be far too large and
complex you might be able to implement a cut-down version. The project developed in the following
chapters is in fact similar to a system currently running at a local company. Before developing such a
system, it is desirable to visit, chat to employees about the system and see it in operation.
The specification states that your system must use at least six of the more complex spreadsheet facilities.
It is better to implement a fairly simple system which meets the specification than to try developing a very
complex system which you are unable to get working. Note also that there is a great emphasis on the
project documentation in the assessment criteria. You must plan your work carefully and not use all of
your time trying to get a very complicated spreadsheet to work, neglecting the other important aspects of
the assessment.
Here are a few suggestions for some projects:
an accounts system for a club or society
an analysis of stock market performance
a sales commission system for a company
a stock control system with automatic reorder levels
a company expenses system
a break-even analysis for a manufacturing company
an invoicing system for a small company
a budget for a major event
a record and analysis of experiment results
In the first part of this unit, Chapters 15-21, you will be learning some advanced features of Microsoft
Excel that you can use in your own project. Chapters 22-24 show you how to document a project for your
portfolio evidence. You should start by reading the Design Specification given in Chapter 22 so that you
understand the objectives of this sample project. Before you start on your own project, read the
assessment criteria and follow them!

Chapter 15 – Getting Started
129
15.2. Starting the sample project
We are going to set up one of the worksheets for the new ShoeShock system specified in Chapter 22.
• Start Microsoft Excel and open a new workbook.
• Enter the data shown below into Sheet1. This may take you a little time but you will need it to
complete the rest of the ShoeShock system.
You can speed up some data entry by using the Fill feature. This can be used to copy cell contents into
contiguous (adjoining) cells, to enter series of data and to copy formulae.
• In cell A2 enter 101 and in cell A3 enter 102.
• Highlight the two cells and place the mouse pointer in the lower-right corner of the selected cells.
The pointer becomes a small black plus sign. This is called an AutoFill handle. Drag the AutoFill
handle to cell A21. Excel should complete the series down to Staff No. 120.
• Drag across column headers A to H to select these columns and double-click. This automatically
makes all the selected columns wide enough to display the headings and data.
• Save the file as ShoeShock.xls.
Figure 15.1: The data to be input
15.3. Formatting numbers
Formatting can improve the presentation of a spreadsheet so that the data can be more easily understood
by other people.
When you change a numeric format, you change the appearance of a number, not its value. The default
format for all cells in a new worksheet is the General format, in which leading zeroes and extra zeroes to
the right of the decimal place are left out, all decimal places are shown and numbers are aligned to the
right of the cell.
You can assign a more appropriate format during or after data entry. There are 12 categories of number
formats available in Excel. You can apply any numeric format by accessing the Format Cells dialogue
box.
Column
header
Row
header

Unit 3 – Spreadsheet Design
130
Decimal numbers and currency
By default all text will be left-aligned and all numbers will be right-aligned. If you type the dates as
shown, Excel recognises the date format and right-aligns them. We will format the columns containing
numbers using the Format Cells dialogue box and the toolbar buttons.
Staff No. has a numeric value but would never be represented with decimal places – it will always be an
integer (i.e. no decimal places).
• Highlight column A by clicking in the column header. Select Format, Cells from the menu.
You will see the following dialogue box:
Figure 15.2: The Format Cells dialogue box
• Click on Number and set Decimal places to 0. Click OK.
• To test this, change the value in cell A2 to 101.13.
• Tab out of the cell and the value that you have just entered will be rounded to the nearest whole
number – 101 in this case.
• Change the contents of cell A2 back to 101.
The most commonly used numeric formats are also represented by buttons on the Formatting toolbar.
Figure 15.3: The numeric formatting buttons
Columns F and G contain monetary values which are normally shown to two decimal places with a
comma as a thousand separator.
• Highlight cells F2:F21 and click the Increase Decimal button twice (see Figure 15.3). The
figures should automatically be displayed to 2 decimal places.
• With the column still highlighted practise using the Increase Decimal and Decrease
Decimal buttons. Leave the column formatted to 1 decimal place.
• With the column still highlighted click the Comma style button.
Currency
Percent Comma Increase Decimal
Decrease Decimal

Chapter 15 – Getting Started
131
• To display a £ sign click the Currency button. This automatically displays two decimal
places, thousand separators and a currency symbol all vertically aligned – this is often called
an Accounting format.
Note: If a different currency symbol is displayed (e.g. $) your system settings may not have been set
correctly. Check this from the Control Panel.
• From the Start menu select Settings, Control Panel and double-click on Regional Options.
• In the Regional Options Settings dialogue box click on the Currency tab and then check that the
correct currency symbol has been selected.
• Click Apply and then OK.
You can also change the currency symbol together with some other currency format options from the
Format Cells dialogue box.
• Highlight cells F2:F21 again.
• Select Format, Cells and make sure the Number tab is selected.
Figure 15.4: Formatting number cells
• In the Category list box select Currency.
You can now specify the number of decimal places to display, the currency symbol to use and how to
display negative numbers.
• Set the options as shown in Figure 15.4 and click OK.
Notice that the £ signs are now next to the number entries in the formatted cells.
• Format the empty cells G2:G21 as currency.
Dates
Microsoft Excel treats dates and times as numbers. The way that a time or date is displayed on a
worksheet depends on the number format applied to the cell. When you type a date or time that Excel
recognises, the cell’s format changes from the General number format to a built-in date or time format.
By default, dates and times are right-aligned in a cell. If Excel cannot recognise the date or time format,
the date or time is entered as text, which is left-aligned in the cell.

Unit 3 – Spreadsheet Design
132
Options you select in the Regional Options of Control Panel determine the default format for the current
date and time and the characters recognized as date and time separators – for example, the slash (/) for
dates.
Figure 15.5: Default date settings
Confirm the formatting of the dates in your ShoeShock spreadsheet:
• Click in the column header to highlight column E of the worksheet. Right-justify the column.
• Select Format, Cells and the Date category.
• In the Type list select 14-Mar-98 and click OK.
• In cell E22 type 8/7/99 and tab out of the cell.
The date should automatically be formatted as 08-Jul-99.
• Delete the date in cell E22 by pressing the Delete key.
Note: When entering dates remember to enter a four-digit year. For example, 09/2002 will be displayed
as 01-Sep-02. If you enter only two digits for the year Excel assumes you are specifying a month
of the current year, so 09/02 will be displayed as 09-Feb-01 (if the current year is 2001).
Percentages and fractions
You can also format cells to display numbers as percentages with a specified number of decimal places.
Either select the Percentage type from the Format cells dialogue box shown in Figure 15.4 or use the
Percent Style button on the Formatting toolbar shown in Figure 15.2.
To display a decimal number as a fraction select the Fraction type from the Format Cells dialogue box.
Try this:
• In cell I3 enter the text Overtime Rate and tab out of the cell. Widen cell I3 so that the text is fully
displayed.
• In cell J3 enter the number 1.5 and tab out of the cell.

Chapter 15 – Getting Started
133
• Click in cell J3 again and select Format, Cells. Click on Category Fraction and then click OK.
The number should be displayed as 1½.
• In cell J3 click the Percent Style button.
The number should be displayed as 150%.
Note: You can also enter percentages by typing a number followed by the percent symbol (%).
Custom number formats
You can customise formatting to meet your own specific needs. For example in the spreadsheet we can
add text to show that the salary is per annum.
• Highlight cells F2 to F21. This time, instead of using the Format menu right-click the highlighted
range and click Format Cells.
• Click the Custom Category.
• In the Type list select £ #, # # 0.00.
• Where the cursor is flashing, click after the last 0 and type a space and “per annum” (include the
quotation marks) and click OK.
The custom number format is applied and saved. (You may have to widen the column to see the
contents of the cells.) However, it is superfluous here as the heading says “Annual Salary”, so
click the Undo button to restore the original format.
Format numbers using a conditional format
It can also be useful to format cells only if a certain condition is met. It is easy for operators to make data
entry errors in column H. The ShoeShock company rules state that certain departments are never paid
overtime (i.e. Sales and Management). We will check the contents of the cells in column H and if they
contain the letter y we will make it bold and change the font colour to red. This will bring the entries to
the attention of the operator who will recheck the entry.
• Highlight column H.
• Select Format, Conditional Formatting.
• In the Conditional Formatting dialogue box ensure that Cell Value Is is selected in the box on the
left. In the middle drop-down list select Equal To. In the box on the right type y.
• Click the Format button and the Format Cells dialogue box should appear.
• Select a bold font style and a red colour and click OK. Click OK to close the Conditional
Formatting box.
Figure 15.6: Applying conditional formatting to cells
All the cells containing y will turn red and bold.

Unit 3 – Spreadsheet Design
134
15.4. Entering a formula
The entries for Column G (Normal Gross Monthly Salary) can be inserted using a formula so that they
will be calculated automatically for every employee. Formulae in Excel always begin with an equals sign
(=) and commonly use mathematical operators +, -, *, / (plus, minus, multiplication, division) in order to
perform calculations. Without the equals sign the cell entry is interpreted as ordinary data – that is text,
numbers, or a combination of the two.
We need to calculate the annual salary divided by 12.
• In cell G2 enter the formula =F2/12.
• Drag the AutoFill handle at the bottom right-hand corner of the cell to copy this formula down to
cell G21.
15.5. Formatting the presentation of cells
Cell alignment and wrapping
Before you take a first printout of your spreadsheet it is a good idea to preview it to see how it will look.
This way you get a clear view of the layout of the whole page and can make any adjustments before
printing.
• Click on the Print Preview button on the Standard toolbar.
Only part of the spreadsheet will be displayed, so the page needs to be set up for landscape
orientation (i.e. short and wide).
• Click the Setup button.
• Click on the Page tab. If it is not already selected, select Landscape and click OK.
It would look better if columns A and H were centered and the headings above the columns containing
numbers were right-aligned.
• Press Esc or click the Close button to return to Normal View.
• Select column A by clicking in the column header. With your finger on the Ctrl key, click in the
column header for column H. This selects both columns.
• Click the Center button on the Formatting toolbar.
• Highlight cells E1 to G1 and click the Right Align button on the Formatting toolbar.
The heading in cell G1 is rather wide. Instead of changing the actual text we will wrap the text in
the cell.
• Make column G about half the width.
• Right-click in cell G1 and select Format Cells.
• Click the Alignment tab and select Wrap Text.
• Repeat for cell H1.
• Select cells A1:H1 and make them bold.
Your spreadsheet should now be looking something like this:

Chapter 15 – Getting Started
135
Figure 15.7: The spreadsheet so far
Note: You can also use the Alignment tab in the Format Cells dialogue box to adjust the direction of
text. So, for example, selecting 90oorientation would format the headings at right angles to the
rest of the column – try it out yourself selecting different angles.
Merging Cells
Sometimes you may want some text spread out over several cells in a spreadsheet. For example we will
insert a main heading and centre it across the top of the page.
• Insert a row by right-clicking in row header 1, and selecting Insert.
• Highlight cells A1 to H1 and click the Merge and Center button on the Formatting toolbar.
• Enter the text ShoeShock Staff List & Details and tab out of the cell.
Setting cell presentation formats
Other attributes of a cell can be changed to help make your spreadsheet easy to read and use. You can
group data logically using cell borders and cell shading and make headings and labels stand out by
changing font styles and colours.
• Click on the main heading that you have just entered.
• On the Formatting toolbar, select Comic Sans MS from the Font drop-down list.
• In the Font Size drop-down list select 24 and click the Bold button.
• Change the colour to red using the Font Color button.
• Use the Bold button to make the label in cell I3 bold.
• Click in the main heading and click the Fill Color button drop-down arrow. Choose a pale
grey shading.
• Highlight cells A2 to H2 and click the Borders drop-down arrow.
• Click the Thick Box Border button.

Unit 3 – Spreadsheet Design
136
Figure 15.8: The formatted spreadsheet
• Save your spreadsheet again as ShoeShock.xls.

Chapter 16 – Manipulating Spreadsheet Data
137
Chapter 16 – Manipulating Spreadsheet Data
Objectives
To find and replace data
To add worksheets
To cut, copy, paste, and move data
To use appropriate cell referencing
To name cells
16.1. Finding and replacing data
The spreadsheet that you have created so far represents only a small sample of ShoeShock employees. In
a live system records for the entire workforce will be kept. With this in mind it is useful to identify quick
ways to move around the spreadsheet and to find certain data.
• Test out for yourself some of the keyboard shortcuts listed below:
Page Up Moves you up a whole screen
Page Down Moves you down a whole screen
Ctrl-Home Moves you to the first cell of the spreadsheet
Ctrl-End Moves you to the end of the spreadsheet
To go to a specified cell:
• Select Edit, Go To.
• In the Reference box type the cell reference that you want to go to.
Figure 16.1: Using the Go To feature

Unit 3 – Spreadsheet Design
138
Previous Go To references are stored in the top box – you can click on these again for speed.
If you want to find some particular data entered into a cell, for example the department Mgmnt:
• Press Ctrl-Home to go to the start of the spreadsheet.
• Select Edit, Find.
• In the dialogue box enter the text or number you are looking for e.g. Mgmnt.
• Click on Find Next.
You should move to the first occurrence of the word. If you keep pressing Find Next you will move
through all of the occurrences. However, if you want to change all occurrences of Mgmnt to
Management, you can do this using the same dialogue box.
• Click on the Replace button.
• In the Replace With box type Management.
• Click the Replace All button.
Figure 16.2: Finding and Replacing text
Look through the spreadsheet and the word should have been changed throughout (you might need to
widen column D).
16.2. Adding worksheets
So far we have referred to the window in which you have entered data as a spreadsheet. However in
Microsoft Excel it should strictly be called a worksheet. Excel’s basic working environment is a
workbook that contains multiple worksheets that store your data. If you look at the bottom of the Excel
screen you should see some tabs called Sheet1, Sheet2 etc. which are the default worksheet names that
Excel sets up. You have probably been entering your data into Sheet1 which needs renaming to reflect its
contents.
• Double-click on the name Sheet1. Type Staff List & Details and press Enter.
• Click on Sheet2. You should be presented with a blank worksheet. Rename this sheet Overtime
Collection.
You will also need another worksheet called Home.
• Rename Sheet3 Home (remember to press Enter) and drag its tab to the left of Staff List &
Details so that this becomes the first worksheet in the workbook.
Figure 16.3:The worksheet tabs

Chapter 16 – Manipulating Spreadsheet Data
139
16.3. Repositioning data
In the Overtime Collection worksheet, enter a heading Overtime Collection in cell A1 by copying it from
the previous worksheet and editing the text. There are several ways of copying and pasting cells – you
can choose whichever method you prefer from the alternatives given below.
• Click in cell A1 of the worksheet Staff List & Details.
• Select Edit, Copy or right-click in the cell and select Copy from the shortcut menu or click
the Copy button on the Standard toolbar.
• Click on the worksheet tab Overtime Collection and click in cell A1.
• Select Edit, Paste or right-click in the cell and select Paste or click the Paste button on the
Standard toolbar.
Note: Many menu options have shortcut key combinations (e.g. Ctrl-S for File, Save), specified next to
the menu item.
Look up the shortcut key combinations for Edit, Copy and Edit, Paste.
The formatted heading should be copied to the new worksheet. First you need to clear just the text from
the cell, leaving the formatting as it is. To do this:
• Select Edit, Clear. You will see that there are options to clear everything in the cell, just the
contents, just the formatting, or the comments associated with the cell (these will be discussed
later).
• Clear just the contents of the cell by selecting Contents (Shortcut key Del).
• Enter the text ShoeShock Overtime Collection.
• Enter the following headings, making them bold, centering column A and right-aligning the others:
Figure 16.4: The headings for overtime collection
16.4. Linking worksheets
The staff numbers need to be inserted from the previous sheet. We can do this by linking the two
worksheets.
• In cell A3 of the Overtime Collection sheet type =.
• Return to the Staff List & Details worksheet, click in cell A3 and press Enter.
You will return to the Overtime Collection worksheet. The formula ='Staff List& Details'!A3 will
appear in the formula bar and the number 101 will appear in cell A3. This technique is called 3D (three-
dimensional) referencing and it will be used again in this project to link worksheets together.
• Fill this formula down to cell A22.

Unit 3 – Spreadsheet Design
140
Figure 16.5: Entering a 3D cell reference
• Enter a label Overtime Rate in cell F3. In cell G3, enter 150%. (This is the overtime rate that will
be used in calculations.)
16.5. Relative and absolute cell referencing
In a formula the cell reference is either relative or absolute. When you copy a formula to another cell, any
cell references are automatically updated so that they refer to the cell in the same relative position; these
are called relative cell references. For example in paragraph 15.4 you entered a formula to calculate the
Normal Gross Monthly Salary for the first employee in the list. You then used the AutoFill handle to
copy the formula down the column – if you look at the formulae in some of the cells further down the list
you will see that Excel has automatically updated these relative cell references for you.
Often though you want a formula to refer to the same cell, regardless of where the formula is copied. For
example on the Overtime Collection sheet we will use the overtime rate from cell G3. We do not want
this to change no matter where it is copied to. To ensure this we precede each part of the cell reference by
a $ sign; so that if we use $G$3 in a formula, the value 150% will always be used. This is an absolute cell
reference.
First calculate the pay per hour:
• In cell C3 of the Overtime Collection worksheet enter a formula that calculates the £/Hr as Annual
Salary (from the previous worksheet) divided by [52 (weeks in a year) multiplied by 5 (working
days in a week) multiplied by 8 (hours in working day)]. Be careful you get the brackets in the
right place! Check the results with Figure 16.6.
This should be as follows: ='Staff List & Details'!F3/(52*5*8).
• Fill this formula down to cell C22 and format the column as currency, using Format, Cells,
Number, Currency.
The
formula bar

Chapter 16 – Manipulating Spreadsheet Data
141
Now calculate the overtime pay:
• In cell D3 enter a formula that calculates Overtime Pay as Overtime Hours multiplied by £/Hr
multiplied by Overtime Rate.
This should be as follows: =B3*C3*$G$3.
Note: You can enter the formula by “pointing” at the cells instead of typing in the cell reference. To
turn G3 into an absolute cell reference, enter the first part of the formula =B3*C3*, click in cell
G3, then press function key F4.
• Fill this formula down to cell D22. Because you used an absolute cell reference for the Overtime
Rate, the value 150% in cell G3 will be used all the way down the column.
Of course no values will appear in the column because we have not entered the number of overtime hours
the employees have worked.
• Enter the Overtime Hours as shown in Figure 16.6. Click in the column header and format the
cells to 1 decimal place.
To prevent the zero values being displayed in column D:
• Select column D, then select Tools, Options and click on the View tab.
• Deselect the Zero values check box.
16.6. Naming cells
Assigning a name to a cell can be an easier way of creating an absolute cell reference. If you use a named
cell in a formula it will automatically be an absolute reference. As an example, name cell G3 OTRate:
• Click in cell G3.
• Click in the Name box and type the name OTRate. Press Enter.
Figure 16.6: Naming a cell
Name
box

Unit 3 – Spreadsheet Design
142
You can now use the name OTRate to refer to this cell instead of its cell reference G3. Using an
assigned name also means you do not have to remember column and row labels when writing a formula.
Another advantage is that a cell name can be used in a formula in any worksheet within the same
workbook.
Change the formula in cell D3 to use the new name:
• Click in cell D3 and change the formula to =B3*C3*OTRate.
• Fill the formula down to cell D22. You should get the same values as before.
Note: Here are some rules about naming cells:
a name must begin with a letter
a number can be used so long as it follows a letter or an underscore
a space between words is represented as an underscore
a name cannot resemble a cell reference e.g. B2
single letters can be used except for R and C
Names can also be attached to ranges of cells in the same way.

Chapter 17 – Formulae and Functions
143
Chapter 17 – Formulae and Functions
Objectives
To correctly apply and use arithmetic and relational operators in formulae
To correctly apply and use logical values in formulae
To use common built-in spreadsheet functions
17.1. Operators in formulae
Some simple formulae have already been used to create the ShoeShock spreadsheet. They have been
used to perform operations such as multiplication and division. Excel recognises the following numeric
operators and does not carry out a calculation simply from left to right, but in the order listed here:
^ raising to the power (e.g. 2^2 is 22).
* multiplication
/ division
+ addition
- subtraction
You can also use a minus sign (-) in front of a negative number and the percentage sign (%) after a
number.
The & sign can be used to combine text strings (sometimes called concatenation). Try this out in a blank
area of your spreadsheet:
• On the Overtime Collection worksheet enter the text Mon into cell H16.
• Enter the text day into cell H17.
• In cell H18 enter the formula =H16&H17.
• Tab out of the cell and the text Monday should appear in cell H18.
• Delete the contents of cells H16 to H18.
You can use brackets to change the order of calculation. Anything inside a pair of brackets is calculated
first and then the calculation works outwards. Every opening bracket must have a closing bracket or
Excel will flag up an error. You can nest up to seven pairs of brackets but mistakes can easily be made if
formulae are too complicated. It is best to split a complex formula over several cells as this allows you to
find errors more easily.
• Use a calculator to find out what the answer to this formula is.
=(((500-(8+3)*5)+0.75))/20
• Now enter the formula into a blank cell of your spreadsheet – do your answers agree? Format the
cell to 2 decimal places and the answer should be 22.29.
• Delete the contents of the cell.

Unit 3 – Spreadsheet Design
144
17.2. The SUM function
Excel also contains many built-in functions. These are predefined formulae that perform special or
advanced calculations. They are entered using the function name followed by a pair of brackets
containing one or more arguments separated by commas. The arguments are the data that you use in a
function to produce a value. For example:
=Function Name (argument1, argument2, etc.)
One of the most commonly-used functions is SUM which totals a range of numeric values. We will use
this on the Staff List & Details worksheet to calculate the total monthly wage bill.
• On the Staff List & Details worksheet click in cell G23.
• Enter the formula =SUM(G3:G22). This specifies that we wish to total the range of cells from G3
to G22.
• Tab out of the cell and the answer should be displayed (£31,875.00 if you have entered all the data
correctly!).
Note: Instead of typing in the range you can drag the mouse over the cells to be totalled – this method
sometimes gives you a better chance of getting it right.
The SUM function has a related button on the Standard toolbar called AutoSum. This allows you
to total rows or columns of numbers quickly.
• Delete the contents of cell G23.
• Click in cell G23 and then click the AutoSum button on the Standard toolbar.
The column of numbers above will be highlighted with a dotted line and the SUM function will
automatically be inserted for you.
Figure 17.1: Using AutoSum
• Press Enter and the total should appear in cell G23.

Chapter 17 – Formulae and Functions
145
Note: AutoSum automatically selects the column of numbers above the current cell. If there are none
there it will select the row to the left.
17.3. Functions to calculate averages
You can use the ShoeShock data to try out some Excel functions that calculate averages. The
AVERAGE function calculates the mean of a range of values (i.e. the total of a range of values divided
by the number of values).
The MODE function finds the most frequently occurring value in a range of values.
The MEDIAN function finds the middle value in a range of values.
• Click in cell G23 of the Staff List & Details worksheet and delete the contents.
• Enter the formula =AVERAGE(G3:G22) and press Enter.
The answer £1,593.75 should be displayed
• Delete the contents of cell G23.
• Enter the formula =MODE(G3:G22) and press Enter.
The answer £1,166.67 should be displayed (this is the only value that appears more than once).
• Delete the contents of cell G23.
• Enter the formula =MEDIAN(G3:G22) and press Enter.
The answer £1,354.17 should be displayed.
17.4. MIN and MAX functions
These functions allow you to find the maximum and the minimum values in a range.
• Replace the contents of cell G23 on the Staff List & Details worksheet with the formula
=MIN(G3:G22) and press Enter.
The answer £1000.00 should be displayed.
• Now enter a formula into cell G23 to find the maximum monthly salary using the MAX function –
which employee is the highest paid (before overtime)?
• Delete the contents of cell G23.
17.5. COUNT functions
The COUNT function will count the number of numeric values in a range. For example to count the
number of employees on the Staff List & Details worksheet we will use the COUNT function on the
Staff No. column as it is a numeric field.
• In cell A23 enter the formula =COUNT(A3:A22) and press Enter.
You should get 20. This is a fairly simple calculation that you could do in your head, but this function
can be useful on more complex spreadsheets that have a large number of rows.
COUNTA and COUNTBLANK are variations of the COUNT function. COUNTA calculates the
number of cells in a range that are not empty. COUNTBLANK calculates the number of empty cells in a
range.
• Try out these two functions at the bottom of the Overtime Hours column on the Overtime
Collection worksheet.

Unit 3 – Spreadsheet Design
146
The COUNTIF function counts the number of cells within a range that meet a given condition. For
example, we will use it on the Staff List & Details worksheet to count how many employees are paid
overtime.
• Click in cell H23 on the Staff List & Details worksheet.
• Enter the formula =COUNTIF(H3:H22, “ y”) and press Enter.
The answer 11 should be displayed.
• Delete row 23 by clicking in the row header, right-clicking and selecting Delete. All of the results
of the functions should have been deleted.
17.6. The Paste Function wizard
So far the functions have been entered in full, but for more complex ones it is often easier to use the Paste
Function feature. This is a tool that guides you through creating a function and helps reduce errors that
can occur when you are typing them in. You can also use the Paste Function feature to help you decide
which one to use.
• Display the Staff List & Details worksheet on the screen.
• Click in cell G24 of the worksheet and click the Paste Function button on the Standard
toolbar. (Alternatively, select Insert, Function from the menu.)
The Paste Function dialogue box displays a list of function types in the Function category box and a list
of associated functions in the Function name box.
• Click on some of the categories and have a look at the enormous range of functions that are
available.
• From the All category scroll down to the INT function (this rounds a number to the nearest integer)
and click OK.
Figure 17.2: Using Paste Function
• In the dialogue box enter the cell reference G22 and click OK.
The value £1,041.00 will be displayed in cell G24.
• Delete the contents of cell G24.
17.7. IF function
One of the most useful of Excel’s functions is the IF function. This is a conditional function that
compares two values and returns one of two results depending on the outcome of the comparison.
The function has three arguments:
The comparison to be performed. The following operators can be used in a comparison:

Chapter 17 – Formulae and Functions
147
< Less than
<= Less than or equal to
> Greater than
>= Greater than or equal to
= Equal
<> Not equal
To make the expressions even more complex, comparisons can be combined with the
following logical operators:
AND True if both expressions are true
OR True if either or both expressions are true
NOT reverses the result.
The value to be returned if the result of the comparison is true.
The value to be returned if the result of the comparison is false.
In the ShoeShock system we have calculated overtime pay for everyone, whether or not they are paid
overtime. We could change the formula in the Overtime Pay column of the Overtime Collection
worksheet so that it tested to see if Paid Overtime? column on the Staff List & Details worksheet
contained a y. If it does then their overtime pay will be displayed, otherwise nothing will be displayed.
• Delete the contents of cell D3 in the Overtime Collection worksheet.
• Click in cell D3 and click the Paste Function button on the Standard toolbar.
• Select the Logical category and the IF function and click OK.
• Click in the Logical_test box and then click in cell H3 on the Staff List & Details worksheet to
insert the cell reference. (You can move the dialogue box out of the way by dragging it.) Type
=“y”.
• Complete the dialogue box as shown below.
Figure 17.3: Entering the arguments for the IF function
• Fill the formula down to cell D22.
Overtime payments should only be displayed for those people who get paid overtime. You should see 7
entries as shown in Figure 17.4.

Unit 3 – Spreadsheet Design
148
Figure 17.4: The Overtime Collection worksheet
• Save the spreadsheet.

Chapter 18 – Data Input
149
Chapter 18 – Data Input
Objectives
To attach comments to cells
To validate input data
To create and use data entry forms
To provide users with helpful prompts whilst entering data
To use macros and command buttons to make the spreadsheet user-friendly
18.1. Comments
Because this system is going to be used by several different people in the ShoeShock Finance department,
instructions can be entered in the form of comments to ensure that the spreadsheet is used correctly.
The Finance staff will take the overtime figures from the form that employees are requested to complete
on a weekly basis (shown in Figure 22.4). The information will be entered into column B on the
Overtime Collection worksheet. The smallest unit of overtime that is paid is half an hour, but sometimes
employees specify some other fraction of an hour on their form. The Finance staff are asked to round this
figure to the nearest half hour, but need a prompt to remind them to do this. We will add a comment to
help them.
• Click in cell B2 of the Overtime Collection worksheet.
• Select Insert, Comment.
A comment box labelled with your user name appears:
Figure 18.1: Adding a comment
• Type the text Round to the nearest half hour.
• Click anywhere outside the comment box and it will close.
• Place the mouse pointer over cell B2 and your comment will appear.
You can make a comment appear permanently by right-clicking and selecting Show Comment.
When you want to clear a comment right-click in the cell and select Delete Comment. To edit a
comment, right-click in the cell and select Edit Comment.

Unit 3 – Spreadsheet Design
150
18.2. Data Validation
Data validation helps to prevent users from entering inaccurate or invalid data such as text in a cell that
should contain a number value. We will validate the overtime hours data to ensure that a numeric value
within a specified range is entered.
• Highlight cells B3 to B22 on the Overtime Collection worksheet.
• Select Data, Validation and click on the Settings tab of the Data Validation dialogue box.
• The minimum overtime is half an hour and the maximum is 20 hours per week. Enter the settings
as shown below.
Figure 18.2: Settings for data validation
• Click the Error Alert tab and ensure that the Show Error Alert After Invalid Data Is Entered
check box is selected in the dialogue box. Enter the other settings and the error message as shown
below.
Figure 18.3: Entering an error message
• Click OK.
• In cell B4 enter some text and tab out of the cell.

Chapter 18 – Data Input
151
An error message appears containing the warning that you entered into the Data Validation dialogue box.
• Click Cancel to delete the entry and then type 3.5. Tab out of the cell.
This time your entry will be accepted.
18.3. Forms
One way to speed up and simplify data entry is to use forms. For example, if a new employee joins the
company their details need to be entered on the Staff List & Details worksheet. Similarly if an employee
leaves or their details change the Staff List & Details worksheet must be updated. It is very simple to
create a form for this purpose.
First we must ensure that any new rows that are added to the list are automatically formatted to match the
preceding rows. Formulae that repeat in every row must automatically be copied. This feature is called
Extended list formats and formulas.
Note: To be extended, formats and formulae must appear in at least three of the five list rows preceding
the new row.
• Display the Staff List & Details worksheet on your screen.
• Select Tools, Options and click on the Edit tab.
• Make sure that Extend list formats and formulas is selected and that other options are as shown
in Figure 18.4.
• Click OK.
Figure 18.4: Setting Excel options
• Delete the contents of cells I4 and J4. These cell values are not used (the overtime rate is picked up
from the Overtime Collection worksheet) and Excel gets confused if data is entered to the left or
right of a list from which a form is to be created.
• Click anywhere in the list of staff details and then select Data, Form.
Note: If you get an error message at this point saying that Excel cannot determine which row in your list
contains labels, try deselecting the Merge Cells option for cell A1 and just left-align the text.

Unit 3 – Spreadsheet Design
152
A data form will appear displaying the details of the first employee in the list.
Figure 18.5: Displaying a data entry form
• To add a new employee click the New button and the fields will be cleared for you to enter the
details of the new person.
• Enter the 2 new records shown below, pressing Tab between fields.
• When you have finished typing data, press Enter to add the record.
• When you have entered the data for the last record, click Close to add it and close the data form.
121 Farrow Helen Purchasing 22-May-01 £17,450.00 y
122 Beasley James Sales 22-May-01 £24,750.00 n
Note: Fields that contain formulae display the results of the formula as a label (For example Normal
Gross Monthly Salary in our form). The label cannot be changed in the data form.
If you add a record that contains a formula, the formula is not calculated until you press Enter or
click Close to add the record.
While you are adding a record, you can undo changes if you click Restore before you press
Enter or click Close to add the record.
Microsoft Excel adds the record when you move to another record or close the data form.
To update a record in the employee list:
• Click anywhere in the Staff list details and then select Data, Form.
• To find the record you want to change you can use the Find Previous and Find Next buttons on
the form. To move through records one at a time, use the scroll bar arrows in the dialog box. To
move through 10 records at a time, click the scroll bar between the arrows. Also try entering some

Chapter 18 – Data Input
153
criteria to search for a record. Click Criteria and enter 115 in the Staff No. field. Press Enter and
the details for employee 104 will automatically be displayed.
• Change the information in the record – Marie Phillips has had a pay rise, change her salary to
£24,500 pa.
• When you finish changing the data, press Enter to update the record and move to the next record.
• When you finish changing records, click Close to update the displayed record and close the data
form.
To delete a record using the data form:
• Click a cell in the list.
• On the Data menu, click Form.
• Find the record you want to delete – James Kenyon has left the company so delete him by clicking
Delete.
Note: When you delete a record by using a data form, you cannot undo the deletion. The record is
permanently deleted.
18.4. Macros
A macro is a set of instructions used to automate a lengthy or frequently-repeated task. It is a program that
tells Excel to perform a sequence of commands for you, accomplishing the task much more quickly than
you could yourself.
There are two ways to create a macro. You can record the sequential instructions needed to perform a
task just as you record music with a tape recorder. You then run the macro to play back the commands
and perform the task. Alternatively, you can build the macro using Visual Basic for Applications (VBA)
which you enter in a Visual Basic module in the workbook.
To make macros easy to use you can assign a macro to a key combination, to a button on a toolbar or to a
command that appears on a menu.
We will record a macro that automatically brings up the data form for the Staff List details when you
press Ctrl-m on the keyboard.
• Display the Staff List & Details worksheet on the screen.
• Select Tools, Macro, Record New Macro.
• Enter the name EditStaffList, the shortcut key and a description.
Figure 18.6: Naming a macro

Unit 3 – Spreadsheet Design
154
• Click OK.
Whatever actions you perform will now be recorded and the Stop Recording toolbar is
displayed.
• Click in cell A3.
• Select Data, Form and click the Close button on the form.
• Click the Stop Recording button on the Stop Recording toolbar (the button on the left).
• Now try your macro out by pressing Ctrl-m.
The data form should be displayed ready for you to edit the list.
Note: If you get ### displayed on your data form for the Normal Gross Monthly Salary you will need to
widen cell G2 so that the text is not wrapped. You may get a $ sign here too – another quirk of
Excel!
18.5. Adding command buttons
If you are going to have several macros in a system it can be difficult to remember which key sequence
activates which macro. Adding a labelled command button makes the system easier for people to use.
We will develop the Home worksheet to incorporate buttons for different activities.
• Open the Home worksheet.
• Select the entire worksheet by clicking in the top left-hand corner (to the left of the column A
header) and shade it in light grey.
• In cell A1 enter the company name ShoeShock in Comic Sans MS, 48pt, bold, red. In cell A2 enter
the heading Finance Department and in A3 Overtime Collection, both in Comic Sans MS, 14pt,
bold, black.
• Centre these headings across the screen.
• From the View menu, select Toolbars, Forms.
The Forms toolbar will be displayed.
Figure 18.7: The Forms toolbar
• Click the Command button icon.
• Mark out the position for the button on the Home worksheet.
• Assign the macro EditStaffList. (If you have clicked away from the button, right-click it and
select Assign Macro.)
• Click OK.
• Edit the button name by right-clicking the button and selecting Edit Text. At the cursor type in
Edit Staff.
Command button

Chapter 18 – Data Input
155
Figure 18.8: The Home worksheet
• Try out your new command button.
It either displays an error message or the wrong form! Can you see what is wrong? We have not told the
macro to start on the Staff List & Details sheet.
We will edit the Visual Basic code to do this.
• Close the form that has been displayed.
• Select Tools, Macro, Macros.
• Click on the EditStaffList macro and then on the Edit button.
• The Visual Basic Editor will be displayed and you will see the code for your macro. Add the line
Sheets(“Staff List& Details”).Select as shown below.
• Add the following line at the end:
Sheets(“Home”).Select
This will return you to the Home worksheet.
Figure 18.9: Editing Visual Basic code
• Close the Visual Basic Editor and try out your command button again – it should work correctly
this time.
Task: Create a macro and a command button.
Now it’s your turn – create a macro that moves the user to the Overtime Collection worksheet so that
they can enter the overtime hours. Then create another button on the Home worksheet and assign your
new macro to it. The Visual Basic code for your new macro should read something like Figure 18.10.

Unit 3 – Spreadsheet Design
156
Figure 18.10: The overtime macro
Your Home worksheet should now look like this:
Figure 18.11: The completed Home worksheet
However there is a problem with the spreadsheet as we have developed it so far; if you add a new member
of staff their details do not appear on the Overtime Collection worksheet. This can be fixed quite easily
by filling down the rows in the Overtime Collection worksheet. In order to cater for a maximum number
of 48 staff, it is necessary to copy all formulae down to row 50.
• Click the Overtime Collection worksheet tab.
• Highlight cells A3, C3 and D3.
• Use the AutoFill handle to fill these rows down to row 50.
Try the spreadsheet out again as follows:
• Return to the Home worksheet and try out the Edit Staff button again, adding a new employee
whose details are as follows:
123 Kingsley David Accounts 25-May-01 £16,500.00 y
• You can now click the Overtime button to take you to the Overtime Collection worksheet, enter
his overtime claim of 3 hours and tab out of the cell to see his overtime payment.

Chapter 19 – Creating Reports
157
Chapter 19 – Creating Reports
Objectives
To create a report from a worksheet
To design an appropriate page layout for the report
To use sorting and subtotalling for a summary report
To create a macro which runs automatically on opening the workbook
19.1. Creating the monthly pay report
We now need to create a worksheet which lists and adds the normal basic salary and overtime pay for
employees to arrive at a list of gross salaries for that particular month. This is the worksheet that will be
printed as a report and sent to the Payroll Bureau.
• Open ShoeShock.xls and insert another worksheet by selecting Insert, Worksheet.
• Move the worksheet to after the Overtime Collection sheet by dragging the name tab.
• Double-click the name tab and rename the sheet Gross Monthly Pay.
• Type in the following headings (format them as shown):
Figure 19.1: The Gross Monthly Pay worksheet headings
• In cell A3 enter the = sign, click in cell A3 of the Staff List & Details worksheet and press Enter.
• In the same way link cell B3 in the new worksheet to cell B3 on the Staff List & Details
worksheet.
• Link cell C3 in the new worksheet to cell D3 on the Staff List & Details worksheet.
• Link cell D3 in the new worksheet to cell G3 on the Staff List & Details worksheet.
• Link cell E3 in the new worksheet to cell D3 on the Overtime Collection worksheet.
• In cell F3 enter a formula to add the Overtime payment to the Normal Gross Monthly Salary.
In order to cater for a maximum number of 48 staff, it is necessary to copy all formulae down to row 50.
• Fill cells A3 to F3 down to row 50.
• Highlight columns A to G and choose to suppress the display of zero values by selecting Tools,
Options and deselecting zero values on the View tab.

Unit 3 – Spreadsheet Design
158
• Centre column A and format columns D-F as currency.
• In cell G3 enter a formula =E3/F3 to calculate what percentage of this month’s gross pay is
overtime. Fill the formula down to cell G50.
• Format column G as percentage, 2 decimal places.
A problem arises because copying down the rows causes an error message to be displayed in column G.
Excel knows you have copied a formula which will try to divide a number by zero. We can cure this by
using an IF function in column G to test whether the cell in column F contains zero: if so then enter a zero
otherwise the formula.
• On the Gross Monthly Pay worksheet click in cell G3 and edit the formula to read as follows:
=IF(F3=0,0,E3/F3)
• Fill this down to G50.
If you managed to keep a clear head and follow all that, your last worksheet should now be looking
something like this:
Figure 19.2: The completed Gross Monthly Pay worksheet

Chapter 19 – Creating Reports
159
19.2. Page Layout
Although this is basically an electronic system, parts of it sometimes need to be printed. For example, the
Gross Monthly Pay worksheet is either e-mailed or sent through the post to the Payroll Bureau.
ShoeShock management is sent regular printouts from the system so that they can monitor the overall
expenditure on overtime over a period of time. This means that the printed presentation of the worksheets
is just as important as the screen presentation.
The Page Setup option in the Excel File menu allows you to set options to determine the way in which a
particular worksheet will be printed.
• Select File, Page Setup and have a look at the different options available.
• Click the Page tab.
Figure 19.3: Setting page options
Orientation gives you either tall, narrow pages (portrait) or pages printed sideways (landscape).
Scaling is either a fixed percentage (e.g. 25% to reduce everything to quarter size) or the largest
possible for the sheets to fit the page. To achieve the best-fit scaling you should choose the number
of pages to be printed.
Paper size allows you to choose from a range of standard paper sizes.
Print quality is available only for certain types of printer so generally do not bother with this
setting.
First page number determines the page number for the first page – Auto defaults to 1.
• Set the orientation of the Staff List & Details worksheet in the ShoeShock system to landscape
orientation. Click the Print Preview button in either the dialogue box or on the Standard toolbar to
see what it will look like.
The next tab in the Page Setup dialogue box allows you to set margins (i.e. the blank space at the top,
bottom and sides of the worksheets).

Unit 3 – Spreadsheet Design
160
Figure 19.4: Setting margins
• Try experimenting with different margin sizes and use Print Preview to see the effect of your
changes.
• Click in the Center on Page Horizontally and Vertically boxes to centre the worksheets on the
page.
Headers and footers are pieces of text that are printed at the top and bottom of every page. They both
have three sections: for printing on the left, right or centre of the page. The third tab on the Page Setup
dialogue box allows you to create headers and footers.
Figure 19.5: Inserting a header and footer
• Create a header and footer for your ShoeShock worksheets as shown above. The header is selected
from the drop-down list. Click on Custom Footer and choose to insert the date in the left-hand
section and the page number in the middle section. Put your name in the right-hand section. Check
out the settings in Print Preview.

Chapter 19 – Creating Reports
161
Figure 19.6: The worksheet with header and footer
The final tab on the Page Setup dialogue box allows you to set up options for the way in which the
worksheet will be printed.
Figure 19.7: Setting print options
The Print Area is the default range of cells to be printed.
Print Titles are rows and columns that are to be repeated on every page of a worksheet (for large
sheets that will not fit on one page).
Print options allow you to specify which optional features will be printed.
Page order is for when you are working with large worksheets that will not fit on one page and
specifies how the printing should be done.
• Try setting the print area to print just the first three columns of the Staff List & Details worksheet.
Also select to print gridlines. Don’t actually print it, just look at the effects in Print Preview.

Unit 3 – Spreadsheet Design
162
• Set the print area A1 to G50 on the Gross Monthly Pay worksheet.
Task: Create a command button Print Gross Monthly Pay.
First you need to create a macro that shows the Gross Monthly Pay worksheet in Print Preview mode.
Then on the Home worksheet, create a command button which runs the macro. It will save a lot of paper
to use Print Preview while testing and the user may prefer it too – they can press the Print button when
they have done a visual check to confirm that everything is correct.
19.3. Sorting and subtotalling
Amongst the requirements that ShoeShock management specified at the design stage was the ability to
find totals of overtime pay and gross monthly pay for each department.
To do this we need to sort the Gross Monthly Pay worksheet by department and then create subtotals for
each department.
• Copy the Gross Monthly Pay worksheet by selecting Edit, Move or Copy Sheet.
• In the dialogue box check the Create a copy box and select the options to have the new sheet at the
end of ShoeShock.xls as shown below.
Figure 19.8: Copying a worksheet
• Rename this sheet Department Summary. Change the main heading to read ShoeShock Department
Summary.
• On the new worksheet highlight A2:G24.
• Select Data, Sort and choose to sort on Dept. Click OK.
Note: The data must be sorted into the correct order (in this case Department order) before you create
subtotals.
• Select Data, Subtotals and enter the details below.

Chapter 19 – Creating Reports
163
Figure 19.9: Creating subtotals
The worksheet should now display subtotals for overtime and gross monthly pay for each department.
Figure 19.10: Subtotals
• Click the small 2 to the left of the column headers. This will display just the totals.

Unit 3 – Spreadsheet Design
164
Figure 19.11: The summary management report
You should test your procedures as you go. What happens, for example, if:
Jack Smith’s salary increases to £20,000? Does the Management Summary automatically update
the totals? (It should do.)
Another employee Greg Grey, Staff No.124 joins the Purchasing Department on 1st June at an
annual salary of £20,000. Does the Management Summary update correctly?
You will find that in fact it does not. The management summary will look like this:
Figure 19.12: A new employee has been added
The list needs to be resorted, taking into account the new employee. The subtotals will be correctly
recalculated. Unless you use Visual Basic programming, you will have to get the user to sort the data and
create the subtotals on this sheet manually whenever a new employee joins, which will probably be rarely.
19.4. Creating a macro to update Department Summary
Record the following steps as a macro.
• Select Tools, Macro, Record New Macro.
• Type the name ManagementSummary and click OK.
• Go to the Department Summary worksheet.
• Highlight cells A2 to G50.
• Select Data, Subtotals and click on the Remove All button to remove all subtotals.
• Go to the Gross Monthly Pay worksheet.
• Highlight cells A3 to G50 and copy these cells.
• Go back to the Department Summary worksheet.
• Click in cell A3 and paste the cells.
• Click in cell A2.
• Click the Stop Recording button.

Chapter 19 – Creating Reports
165
• Assign this macro to a command button called Print Management Summary on the Home
worksheet menu.
19.5. Create a routine to print the Management Summary
Before you do this, add a header or a footer giving the current date, which needs to be printed on the
report. Do a Print Preview to make sure the report will print as you want it and make any necessary
adjustments.
The user will have to select the correct range on the Department Summary worksheet. We will place a
message telling the user to do this.
• Merge and centre cells I2 to K2. Colour them pale blue.
• Enter the text Please select the range to be sorted, starting in A2, and then click the button below to
print the summary.
• Select Format, Cells, click the Alignment tab and select Wrap text.
Now you should highlight the range A2 to G25 as if you were the user. A new macro now needs to be
recorded that sorts the data by department, creates the subtotals and displays the summary totals in Print
Preview. This will be assigned to another command button called Print Summary on the Department
Summary worksheet, we will create this button first.
• Create a large command button covering cells I5 to K25 (you will see later why it has to be this
big). Name it Print Summary.
Figure 19.13: The Print Summary button
Now record the macro.
• Select Tools, Macro, Record New Macro.
• Type the name PrintSummary and click OK.
• Select Data, Sort. Check that Dept. is selected as the sort field and click OK.
• Select Data, Subtotals. Check that Gross Monthly Pay, Overtime Pay and This month’s Gross
Pay are selected and click OK.

Unit 3 – Spreadsheet Design
166
• Click the small 2 to the left of the column headers to display only the summary totals.
• Click the Print Preview button.
• Close the Print Preview.
• Click the Stop Recording button.
• Assign this macro to the Print Summary command button.
19.6. Initialising for a new month
At this point the menu looks like this:
Figure 19.14: The Home worksheet menu
When the user wants to enter new overtime figures for a new month the figures for the previous month
must first be cleared out. On the menu there needs to be an Initialise Month option which the user
selects before selecting the Overtime option. The Initialise Month option will simply delete the
Overtime hours.
Task: Create a new button to initialise month.
First of all you will need to record a macro which moves the user to the Overtime Collection worksheet,
deletes the Overtime hours and then returns the user to the Home worksheet. You will have to change
the size of the buttons (look at Figure 24.1) before inserting the new button.
19.7. Opening the workbook automatically
When you open a workbook, Excel automatically runs any macro named Auto_Open. We could use an
Auto_Open macro to make the Home worksheet active on opening. This means that if a user has printed
off a Management Summary report and then closed the system, the next user will be always be presented
with the Home worksheet whenever they reopen the file.
• Select Tools, Macro, Record New Macro.
• Name the new macro Auto_Open.
• When the Stop Recording toolbar appears, click the Home worksheet tab and then click Stop
Recording.
• Click on the Department Summary tab and close the workbook.
• Reopen the file and you should be presented with the Home worksheet.

Chapter 20 – Graphs and Charts
167
Chapter 20 – Graphs and Charts
Objectives
To present spreadsheet results in graphical form
To use built-in drawing tools to improve presentation
20.1. Creating a bar chart
Managers love graphs and charts for their notice boards or to use in impressive presentations to the
Board! They can also be extremely useful as they often make pages of data easier to understand and can
show a trend or be used to forecast figures into the future.
Excel has excellent tools for creating many different types of chart which can be either embedded in an
existing worksheet or placed in a separate chart sheet. Once a chart has been created, any aspect of it can
be easily modified.
A chart is created using the Chart Wizard, which offers 14 different types of chart falling into three broad
categories:
Bar and column charts which have a rectangular bar for each item of data – the height of
which is proportional to the data value.
Graphs which plot a series of points usually joined together by a line.
Pie charts which consist of a circle divided into segments. Each item of data is calculated
as a percentage of the total and represented by one of the segments.
We will produce some charts for the ShoeShock management team.
As a future enhancement to the system, the Finance department might also want to keep a summary of
gross monthly salary details so that management can keep track of how much overtime is being worked
throughout the year (this does not form part of the Overtime Collection system).
• Create a new workbook called Annual Summary.
• Enter the following headings and data (remember to use the AutoFill handle to speed things up –
try it on the months).
Figure 20.1: The annual summary
We will create a column chart to show the total normal monthly pay.

Unit 3 – Spreadsheet Design
168
• Highlight cells A2 to M4.
• Click on the Chart Wizard button.
Figure 20.2: Step 1 of the chart wizard
• Choose a chart type and subtype. In the figure above a clustered column with a 3-D visual effect
has been chosen.
• Click Next.
You are presented with a preview of the chart.
Figure 20.3: A first preview of the chart

Chapter 20 – Graphs and Charts
169
• Click Next.
• In step 3 of the chart wizard enter some titles as shown below.
• Click the Legend tab and deselect the option to display it.
Figure 20.4: Inserting titles
• Click Next.
• In step 4 choose to place the chart as a new sheet.
Figure 20.5: Placing the chart as a new sheet
• Click Finish.
The chart will appear in a new worksheet called Chart1.
20.2. Formatting the bar chart
You will probably find that the chart does not have space to display the months in full. We will change
the alignment of these labels so that they can all be seen.
• Double-click on one of the months.
• In the dialogue box that appears click the Alignment tab.

Unit 3 – Spreadsheet Design
170
Figure 20.6: Changing the alignment of axis labels
• Either drag the line or enter -45 in the degrees box.
• Click OK.
• To change the colour of the columns double-click a column and in the dialogue box click the
Patterns tab.
Figure 20.7: Changing the colour of the columns
• Select a different colour and click OK.
You will see that you can also change the border style and use special Fill Effects. Take some time to try
out some of these options.
The Shape tab on this dialogue box is also quite good fun allowing you to change the columns to
pyramids and cones!
Data labels can be useful if you find it difficult to read values off the chart. These display the values at the
top of the columns within the chart.

Chapter 20 – Graphs and Charts
171
Figure 20.8: The chart so far
20.3. Using drawing tools
There appears to have been a marked reduction in the monthly salary bill from September onwards. This
is because several members of staff left the company. We can use the Drawing toolbar in Excel to add
lines and text to a worksheet to add comments to explain details such as this.
• Display the Drawing toolbar by selecting View, Toolbars, Drawing.
• Click the Arrow tool and draw an arrow pointing to the September column.
• Use the Text Box tool to draw a text box above the arrow and enter the text as shown below.
Figure 20.9: Using the drawing tools
• The arrow and text box can be grouped as one object that can be moved or sized. Press the Shift
key as you select both items, then right-click and select Grouping, Group.

Unit 3 – Spreadsheet Design
172
20.4. Creating a line chart
Now we will produce a line chart to show overtime as a percentage of gross pay.
• In the Annual Summary worksheet enter the formula =B6/B4 into cell B8.
• Format the row as a percentage to 2 decimal places.
• Highlight cells B2 to M2 and B8 to M8. (To select non-adjacent cells hold your finger on the Ctrl
key while you drag.)
• Click the Chart Wizard button.
• Follow the steps through to create a chart something like this on worksheet Chart2.
Figure 20.10: A line chart
• The dip in the line chart over the summer is because when people are taking summer holidays they
are still being paid but not working any overtime. Use the drawing tools to insert a comment on the
worksheet to explain this.
• Select Chart, Add Trendline and select to add a linear trendline.
What was the general trend in overtime as a proportion of gross pay during 2000?
20.5. Charting more than one data series
Charts can get a little more complex when you want to plot more than one series of data. For example
suppose we want to plot the total normal monthly pay for each month in 2000 and compare those with the
figures for 1999. The X-axis will be the months of the year but we will have two Y-series, one for 1999
and one for 2000.
• Try plotting this type of chart. You will have to modify your worksheet first as follows:

Chapter 20 – Graphs and Charts
173
Figure 20.11: The modified worksheet
• Highlight cells B2 to M2, B4 to M4 and cells B11 to M11.
• Click the Chart Wizard button and choose to create a column chart.
• In Step 2 click the Series tab and name the series 2000 and 1999 so that the legend is labelled
correctly, as shown below.
Figure 20.12: Naming the series
The series that we wish to plot have been identified correctly. If, however, you wanted to change the data
range that has been selected it is at this point that you have the opportunity to do so. First click the Data
Range tab. Then either mark the range by dragging the pointer on the worksheet, or edit the range in the
dialogue box. To mark a new range, click the icon on the right of the data range. The Chart Wizard will
be reduced to a small box allowing you to mark the data range. Click the icon again to return to the
dialogue box. (See Figure 20.13.)

Unit 3 – Spreadsheet Design
174
Figure 20.13: Editing a data range
• Insert suitable titles and headings and edit the chart format as you wish.
• This time try placing the chart on the Annual Summary worksheet.
Figure 20.14: An embedded chart
If the data on the worksheet is edited then the chart will automatically be updated. The ShoeShock
Finance department will update the figures each month and print out a chart for the management team.
What general points about monthly pay over the two years do you think the ShoeShock management
might deduce from this chart?
click here

Chapter 21 – Completing the Application
175
Chapter 21 – Completing the Application
Objectives
To protect workbooks and worksheets
To create templates
To evaluate your work
To consider testing procedures
21.1. Protecting spreadsheet data
It is important that a system such as the ShoeShock overtime system is secure with no unauthorised
access allowed. In Excel there are several ways to restrict how users can access, view or change data in
workbooks or worksheets. One way is to assign a password that a user must enter in order to open or save
a workbook. A password can contain any combination of characters and spaces and it is case-sensitive so
rex is a different password from Rex. Make a note of any password you set up – if you lose it you will not
be able to open a password-protected workbook. For this reason it is a good idea to assign a password to
a copy of your current workbook.
• Open ShoeShock.xls.
• On the File menu click Save As.
• Locate the folder you wish to save in and in the File Name box type ShoeShockPW.
• In the Save As dialogue box, click the Tools button and then click General Options.
Figure 21.1: Password protecting a workbook
• In the Password to open box type a password abcd and click OK.
Tools button

Unit 3 – Spreadsheet Design
176
• A Confirm Password dialogue box will appear in which you should re-enter your password. Click
OK.
• In the Save as dialogue box click Save.
ShoeShockPW.xls is now password protected. Try closing and reopening it.
Note: You can also password-protect a workbook or individual worksheets from the Tools, Protection
command.
In the case of the ShoeShock system it would also be a good idea to protect certain cells so that they are
not accidentally overwritten. All cells that contain headings or formulae should be protected. To do this,
you first have to unlock all the cells that users can enter data in, and then protect the whole worksheet.
Protect cells on the Overtime Collection worksheet as follows:
• Return to ShoeShock.xls and display the Overtime Collection worksheet on your screen.
• Highlight cells B3:B50.
• Select Format, Cells and click the Protection tab.
• Deselect the Locked check box and click OK.
Figure 21.2: Protecting cells
• Select Tools, Protection, Protect Sheet.
• Make sure all the check boxes are selected but do not enter a password. Click OK.
Test this out by adding a new member of staff using the Edit Staff button on the Home worksheet. Then
click the Overtime button on the Home worksheet and enter some overtime for this new member of staff.
You should only be able to enter data into column B.
Task: Protect the Gross Monthly Pay worksheet from accidental
changes.

Chapter 21 – Completing the Application
177
21.2. Templates
When you have created a workbook that will be used over and over again with different data each time, it
is a good idea to save the basic structure as a template. The ShoeShock system does not need a template
as each month they need to use the previous month’s data. However, a template may be used to set up the
system in the first instance. Templates are an advanced feature you may like to include in your own
project.
• Make a copy of ShoeShock.xls called ShoeShocktemplate.xls.
• Delete the data from the columns in the Staff List & Details worksheet (row 3 downwards).
• In cell G3 re-enter the formula =F3/12 and fill down to cell G50. Zero values will be displayed
down the column.
Look at the Overtime Collection worksheet and the Gross Monthly Pay worksheet. All the data will
have disappeared, but the formulae will still be there.
• Select File, Save As.
• In the Save As Type box, select Template (*.xlt). The default folder automatically changes to the
Templates folder. Click Save.
• Close the template.
To use the template select File, New and select the ShoeShocktemplate template instead of the general
Workbook template which simply contains 3 empty sheets.
Note: If you are working on a school or college network you may have problems with this as you may
not be able to save anything to the Templates folder. The easiest way around this is probably to
change the destination drive or save the template onto a floppy disk.
If you were not able to save the template in the standard Templates folder you will encounter a
problem when you come to use it – you are not given the option to use a template stored in any
other folder. So, if for example you have saved the template on a floppy disk, try the following
method:
Minimise any documents and applications that you have running and return to the desktop.
From the desktop double-click on My Computer.
Double-click on A:
Right-click on ShoeShocktemplate.xlt and select New.
A new worksheet based on the template will appear on your screen.
21.3. Evaluating your application
When you get to this stage it is a good idea to sit back and consider the application as a whole. Have you
met the first part of the assessment specification given in Appendix D – i.e. does your spreadsheet
solution meet specified user requirements and does it use at least six of the more complex spreadsheet
facilities? The sample project we have just developed appears to meet the requirements of the ShoeShock
Finance Department as given in the System Specification. Examples of ‘complex spreadsheet facilities’
are given in the complete unit specification. We have used the following complex facilities:
Named cells for use in formulae
Auto-fill lists
Data validation
Protecting cells
Data forms
Macros

Unit 3 – Spreadsheet Design
178
Command buttons
Templates
Linked worksheets
Sorting and subtotals
In your technical documentation you will be describing the use of these complex facilities. You must also
specify any limitations of the system that you have identified. For example in the ShoeShock system we
have catered for only 48 members of staff (this could easily be increased if necessary).
21.4. Testing
Your Design Specification should detail a test plan. Your testing must be thorough – remember you are
actually trying to make your system fail. If you are hoping to achieve a good mark for this unit it is
important that you include comprehensive records of testing. These can be included in the Technical
Documentation, as you will see in Chapter 23. As you describe the test results you can show how the
spreadsheet was refined and developed and how problems were resolved. The following two sections
describe some facilities that will help you with your records of testing.
21.5. The Auditing toolbar
Microsoft Excel provides tools that help you track down problems on your worksheets. For example, the
value you see in a cell may be the result of a formula, or it may be used by a formula that produces an
incorrect result. The auditing tools graphically display, or trace, the relationships between cells and
formulas with tracer arrows. These tools are found on the Auditing toolbar. This is not on the shortlist of
toolbars that is available from the View menu: instead select Tools, Auditing, Show Auditing toolbar.
Figure 21.1: The Auditing toolbar
When you audit a worksheet, you can trace the precedents (the cells that provide data to a specific cell) or
you can trace the dependents (the cells that depend on the value in a specific cell).
• Display the Gross Monthly Pay worksheet.
• Click in cell F5.
• Click the Trace precedents button.
A blue arrow appears over cells D5 and E5 showing that this is the data that the formula in F5 needs.
• Click the Trace dependents button.
A blue arrow is inserted to cell G5 showing that this cell depends on the value in F5.
• Click the Remove all arrows button.
Remove all
arrows Trace dependents
Trace precedents
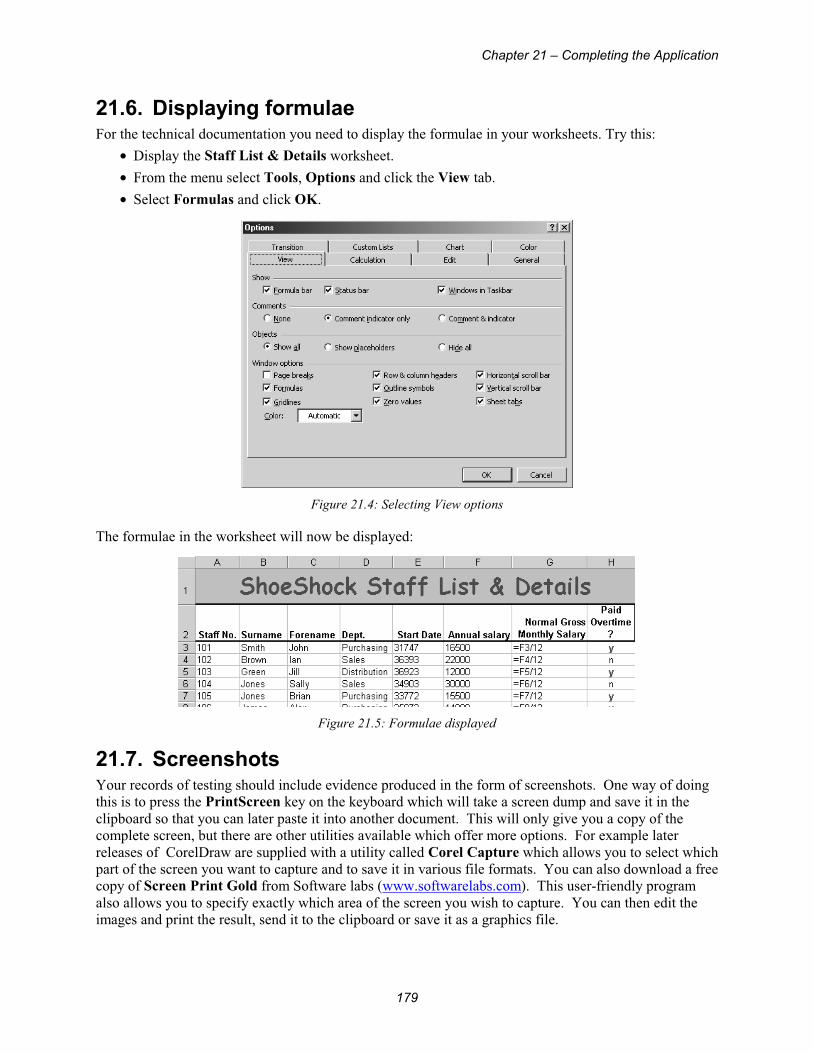
Chapter 21 – Completing the Application
179
21.6. Displaying formulae
For the technical documentation you need to display the formulae in your worksheets. Try this:
• Display the Staff List & Details worksheet.
• From the menu select Tools, Options and click the View tab.
• Select Formulas and click OK.
Figure 21.4: Selecting View options
The formulae in the worksheet will now be displayed:
Figure 21.5: Formulae displayed
21.7. Screenshots
Your records of testing should include evidence produced in the form of screenshots. One way of doing
this is to press the PrintScreen key on the keyboard which will take a screen dump and save it in the
clipboard so that you can later paste it into another document. This will only give you a copy of the
complete screen, but there are other utilities available which offer more options. For example later
releases of CorelDraw are supplied with a utility called Corel Capture which allows you to select which
part of the screen you want to capture and to save it in various file formats. You can also download a free
copy of Screen Print Gold from Software labs (www.softwarelabs.com). This user-friendly program
also allows you to specify exactly which area of the screen you wish to capture. You can then edit the
images and print the result, send it to the clipboard or save it as a graphics file.

Unit 3 – Spreadsheet Design
180
Chapter 22 – Design Specification
Objectives
To write a design specification for a project
22.1. Contents of a design specification
For your assessment you must submit design, user and technical documentation for the work you have
done, and you should look at the Assessment Evidence in Appendix D to check exactly what you need to
produce.
In this chapter we will document the detailed design specification for the ShoeShock Overtime system
that is developed in Chapters 15 to 21 of this unit.
The contents of the specification may vary, but will probably include the following:
A description of the user requirements.
A description of the proposed system and its objectives.
Spreadsheet specification including:
− Workbook structure detailing the individual worksheets and their interconnection.
Input specification including
− Sources of data
− Validation methods
− Data input form or screen layouts
Output specification including
− Screen report layouts
− Printed report layouts
Process specifications showing the calculations required
Test Plan and test data with expected results
Conclusion, including a discussion of
− Software
− Hardware
A sample design specification is given in the rest of the chapter. You need to include some hand-drawn
designs of your worksheets showing their contents, formulae and how they link together. Blank
spreadsheets are given at the end of the book for you photocopy and use in your own project.

Chapter 22 – Design Specification
181
Design Specification Design Specification Design Specification Design Specification
For ShoeShock LtdFor ShoeShock LtdFor ShoeShock LtdFor ShoeShock Ltd
Overtime CollectiOvertime CollectiOvertime CollectiOvertime Collection System on System on System on System
Written by Written by Written by Written by
N. McNeilN. McNeilN. McNeilN. McNeil
19191919----02020202----01010101

Unit 3 – Spreadsheet Design
182

Chapter 22 – Design Specification
183
Description of the proposed systemDescription of the proposed systemDescription of the proposed systemDescription of the proposed system
ShoeShock Ltd does not run a payroll system in-house but employs a Payroll Bureau to provide this service.
The company’s Finance Department supplies details of each employee’s gross pay and the Bureau calculates
deductions for Income Tax and National Insurance, arranges bank transfers and produces payslips for the
employees.
An employee’s gross salary can vary from month to month because of pay rises and overtime payments. The
Head of Finance would like to set up a new system using a spreadsheet that will help record this information
each month. As the department is currently understaffed other administrative members of staff are often
drafted in to help, so the system must be simple to use with clear documentation.
Currently a manual system is used to produce a list of gross salaries which is sent by post to the Payroll
Bureau. Pay rises and overtime payments are made a month in arrears. The list of gross salaries must reach
the Bureau by the 10th of the following month if payments are to be included in that month’s pay packet.
So for example, if an employee works 6 hours overtime in June, assuming the Bureau get that information by
the 10th July he will be paid for that overtime at the end of July.
Not all staff are entitled to overtime payments as their contract may specify that their annual salary includes
any necessary out-of-normal hours working. However, all staff are required to complete a weekly overtime
form and send it to the Finance Department as management reports are created that show all overtime,
either paid or unpaid.
Pay rises are generally negotiated individually with management on the anniversary of an employee’s start
date with the company. Once agreed, managers are required to complete a form and send it to Finance.
If a member of staff’s details change i.e. they change department or change their name they must complete a
form and send it to the Finance department.
If a new member of staff joins the company or an employee leaves the company, their line manager must
notify the Finance department by completing the appropriate form.
It is planned to maintain this method of data collection so employees and managers will complete the same
forms as before. But, as an alternative to completing the forms by hand, electronic versions will be held on
the company network and the facility to e-mail these forms to the Finance Department will be introduced.
Initially the Finance staff will have to transfer the details from these forms into the new system manually.
ObjectivesObjectivesObjectivesObjectives
The new system must
allow the data entry of staff details, regular and overtime pay each month;
have built-in controls to ensure accuracy and completeness of data input;
calculate the overtime payments and total gross salary for each employee each month;
produce a monthly summary by department showing gross pay, overtime pay and overtime as a
percentage of total gross pay.

Unit 3 – Spreadsheet Design
184
Data captureData captureData captureData capture
The Finance department staff will receive input information on the following forms:
Figure 22.1: The Time sheet form
Figure 22.2: The Staff Details form

Chapter 22 – Design Specification
185
The data from the Time Sheet forms will be entered into the spreadsheet each month in order to calculate
the amount of overtime pay earned by each employee. When an employee joins the company, or details on
an existing employee need to be changed, a Staff Details form is completed and the Finance Department
enters this data into the spreadsheet.
Spreadsheet structureSpreadsheet structureSpreadsheet structureSpreadsheet structure
The various functions of the Overtime Collection System will be accessed from a front-end menu which will
have the following structure.
Figure 22.3: The menu structure
Worksheet structureWorksheet structureWorksheet structureWorksheet structure
The layouts for the individual worksheets are shown on the following pages.
Home sheet
Edit Staff
Overtime
Print Gross Monthly Pay
Print Management SummaryStaff List &
details sheet
Overtime
Collection
sheet
Gross Monthly
Pay sheet
Gross Monthly
Pay sheet
Department
Summary
sheet

Unit 3 – Spreadsheet Design
186

Chapter 22 – Design Specification
187
Figure 22.4: Contents of the worksheets

Unit 3 – Spreadsheet Design
188
Data entryData entryData entryData entry
A data entry form will be used to enter staff details. Its format is shown below. Normal Gross Monthly
Pay is a calculated field and will be displayed automatically when the Annual Salary is entered.
Figure 22.5: The data input form
Data entry and validationData entry and validationData entry and validationData entry and validation
The data entry form will be displayed automatically on the Staff List and DetailsStaff List and DetailsStaff List and DetailsStaff List and Details worksheet when the user
selects the Edit StaffEdit StaffEdit StaffEdit Staff option from the menu on the HomeHomeHomeHome worksheet.
Each month, the Overtime hours worked by each employee (if they have worked any overtime) are entered
directly into the Overtime CollectionOvertime CollectionOvertime CollectionOvertime Collection worksheet. The number of hours is validated and, if it is outside the
range 0.5 to 20.0, an error message is displayed.
Not all employees receive overtime pay and so the overtime pay calculation uses an ‘IF’ function to test for
this condition.
Some worksheets will contain comments that will act as reminders to data input staff. Certain areas of
worksheets will be protected so that users cannot accidentally change fixed data.
Command buttons activated by macros will be incorporated to initiate certain actions such as data input and
the printing of reports for management or the Payroll Bureau.
CalculationsCalculationsCalculationsCalculations and functions and functions and functions and functions
The following calculations are performed in order to produce the required output.
Calculation Calculation Calculation Calculation Formula requiredFormula requiredFormula requiredFormula required
Normal Gross Monthly Salary Annual Salary/12
£ per Hr Annual Salary/(52*5*8)
This Month’s Gross Pay Normal Gross Monthly Salary + Overtime Pay

Chapter 22 – Design Specification
189
The following IF functions are used.
Overtime Collection worksheet:
Overtime Pay = (IfIfIfIf Paid Overtime? = “y” Then ThenThenThen Overtime Hours * £ per Hr* Overtime Rate ElseElseElseElse 0)
Gross Monthly Pay worksheet:
%ge Overtime = (If IfIfIf This Month’s Gross Pay =0 ThenThenThenThen “0” ElseElseElseElse Overtime Pay/This Month’s Gross Pay)
UsUsUsUsing a templateing a templateing a templateing a template
The new system will be installed from the template ShoeShocktemplate.xlt. This contains headings and
formulae but no data.
Output Output Output Output
The following printed information must be output from the new system for the Payroll Bureau.
Figure 22.6: Layout for Payroll Bureau Report
The Management Summary Report will have the following format:
Figure 22.7: Layout for the Management Summary Report

Unit 3 – Spreadsheet Design
190
Test PlanTest PlanTest PlanTest Plan
The system testing must cover the following areas:
Checking that validation rules and error messages work correctly on all worksheets by inputting valid,
invalid and extreme data.
Checking that conditional formatting works correctly.
Checking that worksheet/workbook security is working by testing passwords and protected cells.
Using the Auditing toolbar to test that every formula is correct.
Testing command buttons and assigned macros under different circumstances.
End-user testing to establish whether the system meets the requirements of the end-users.
The following tests will be carried out.
Test Test Test Test
No.No.No.No.
Type of testType of testType of testType of test Data to be usedData to be usedData to be usedData to be used Expected resultExpected resultExpected resultExpected result
1111 Test protected cells in worksheets. Any text Error message.
2222 Test Auto_Open macro N/A Should open at Home.
3333 Test the formula to calculate
Normal Gross Monthly Salary.
Random number Result entered into column G of Staff
List & Details worksheet.
4444 Test the formula to calculate
Overtime Pay.
Random number Result entered into column D of
Overtime Collection worksheet.
5555 Test the formula to calculate This
Month’s Gross Pay.
Random number Result entered into column F of
Gross Monthly Pay worksheet.
6666 Test the formula to calculate the
%ge Overtime.
Random number Result entered into column G of
Gross Monthly Pay worksheet.
7777 Enter the details of a new member
of staff using the Edit Staff
command button.
New staff details The details are entered on all
worksheet lists.
8888 Edit the details of a member of staff
using the Edit Staff Command
button.
Change the annual
salary of a staff
member
The details are changed on all
worksheet lists.
9999 Delete the details of a member of
staff using the Edit Staff command
button.
Any of the existing
employees
The details are deleted on all
worksheet lists.
10101010 Move to the Overtime collection
worksheet using the Overtime
button.
N/A The user is moved to the Overtime
Collection sheet and an input
message is displayed.
-2 Error message
0 Error message
0.5 Value accepted
10 Value accepted
20 Value accepted
11111111 Data validation on overtime entries.
52 Error message
12121212 Print out a report using the Print
Gross Monthly Pay button.
N/A Gross Monthly Pay worksheet is
printed.
13131313 Print out a report using the Print
Management Summary button.
N/A Department Summary is printed.
14141414 Print out a Management Summary
after a new member of staff has
been added.
New staff details The subtotals and the summary data
should be updated.

Chapter 22 – Design Specification
191
15151515 Reopen the workbook to test the
Auto_Open macro.
N/A The workbook should reopen at the
Home worksheet.
16161616 Clear out the overtime payments
from previous month
N/A O/T payments deleted
17171717 Attempt to delete formula from
Overtime sheet
N/A Cannot delete formula in protected
sheet
18181818 Print out Management summary for
the new month
N/A Results reflect different amounts of
overtime worked.
Development PlanDevelopment PlanDevelopment PlanDevelopment Plan
The planned schedule for development is shown below:
Week beginning Task Comments
19-02-01 Detailed design specification
26-02-01 Worksheets created
05-03-01 macros written
12-03-01 menu worksheet created
17-03-01 Testing and modifications Complete test plan
24-03-01 Testing and modifications Use ‘real’ data from Finance
Department
31-03-01 Documentation Technical manual and User manual
14-04-01 Installation and user training Delivery to end-user with two days
on-site support

Unit 3 – Spreadsheet Design
192
Chapter 23 – Documentation
Objectives
To keep records of spreadsheet drafting, testing and refinement
To show how problems were resolved
To write technical documentation
To show the results of testing
23.1. Checking the assessment criteria
Developing your spreadsheet is probably going to be the most enjoyable part of the project, but don’t
forget, it is only a small part of the assessment criteria. Look again at the Assessment criteria in
Appendix D. Even to get a Grade E, you must produce Design documentation, clear technical
documentation, clear user documentation and evidence of testing. To get a Grade C you had better get all
this in on time. If you will settle for nothing less than a Grade A, then you must keep comprehensive
records of how you developed your spreadsheet, the problems you encountered and how you solved them.
23.2. Keeping a log
From the day you first start work on your project, you should keep a hand-written log of what you do
each session and what problems you encounter. This will not only help you to remember where you have
got to next time you work on it, but it also forms an essential part of the documentation required for a
Grade A. Your spreadsheet is inevitably going to end up somewhat different from how you originally
planned it. Some things won’t work and you will have to try an alternative. Better ideas will come to you
as you work on the project. Write them all down! Here is a short extract from a developer’s log.
Date Work done/Problems/Solutions
26 Feb Created and named the worksheets Home, Staff List & Details, and Overtime Collection.
Entered 20 lines of test data in Staff List and Details. Links and formulae worked
fine. When I added an extra line the formula did not appear automatically in the new
line.
28 Feb Solved my previous problem. Solution: Tools, Options, Edit, Extend list formats and
formulas.
I intend to use a data entry form to enter staff details and monthly overtime. Data,
Form is supposed to do this but I got an error message that it couldn’t identify the list.
Solved the problem by removing the extra data for overtime rate, from beside the list. It
doesn’t seem to like extra data on the sheet.
…
5th April I was going to use a template containing staff names, pay rates etc which the user
would load up each month and enter the overtime in. However I now realise that if the
staff details change during the month, the template will still have the original data in

Chapter 23 – Documentation
193
it. So it would be better not to use the template, but to load up the previous month’s
spreadsheet and delete the overtime hours before entering the current month’s data. I
probably should put an extra button on the menu to ‘Initialise new month’. This will
run a macro to delete the Overtime hours.
7th April The Management Summary Report does not work when a new member of staff has been
added. I am going to modify the design to allow the user to select the correct range to be
sorted. This also means adding an extra command button on the Department
Summary worksheet.
…
23.3. The contents of technical documentation
A Technical manual is for specialists who are competent Excel users. It records the design and
development of the spreadsheet and would help your successors to install, modify or enhance the system
once you have left the country with your lottery win! This manual could include:
Details of the hardware, software and other resources required – for example, this should specify
which version of Excel is required and the filename of the workbook and where it is stored.
Instructions for opening and configuring the spreadsheet. This must include details of any
passwords or protection that has been applied to the workbook. It should also include details of
any hidden cells.
Details of all calculations, formulae and functions used.
Details of validation procedures that have been applied to certain areas of the spreadsheet.
Details of all macros that have been incorporated into the system. A printout of the Visual Basic
code can also be useful.
Copies of the test strategy and test plan will help others to see any weaknesses that have been
identified in the system and how they have been removed.
Details of backup files.
You may not have a lot of actual program code in your application. However you can print out the Visual
Basic code generated by your macros together with screenshots of worksheets and forms and explain how
and why they are used. One of the aims of this documentation is to prove to the moderator that you have
used advanced features of the package and that you can use technical language fluently, make good use of
graphic images and use annotated screen prints to create effective documentation.
You should include evidence of thorough testing based on the test plan shown in your system
specification. Screenshots can provide evidence of test output that shows the system works correctly.
To print the code generated by the macros select Tools, Macro, Macros. Select the macro you wish to
print and press the Edit button. You can then copy and paste the code into your documentation.
On the following pages extracts from sample technical documentation are given.
23.4. Sample technical documentation
On the following pages is a sample of the type of technical documentation you should provide.

Unit 3 – Spreadsheet Design
194
Technical Documentation
Software and hardware
The system was developed using Excel 2000 on a Pentium PC. The workbook is to be loaded initially from
the template Shoeshock.xltShoeshock.xltShoeshock.xltShoeshock.xlt which is saved in the default TemplatesTemplatesTemplatesTemplates directory. Once the user has typed in the
employees the first time, the workbook will be saved as ShoeshockShoeshockShoeshockShoeshockmonthmonthmonthmonth.xls,.xls,.xls,.xls, where month stands for the
current month name.
Details of Processing
Formulae and FunctionsFormulae and FunctionsFormulae and FunctionsFormulae and Functions
The following formulae are used in the worksheets
Staff List & DetailsStaff List & DetailsStaff List & DetailsStaff List & Details
In column G the Normal Gross Monthly Salary is calculated by dividing the Annual Salary in column F by
12.
Figure 23.1: Displaying formulae on the Staff List & Details worksheet
Overtime CollectionOvertime CollectionOvertime CollectionOvertime Collection
Column A is linked to column A on the Staff List & DetailsStaff List & DetailsStaff List & DetailsStaff List & Details worksheet to insert the Staff No. In column C
the £/Hr is calculated by taking the Annual Salary from the Staff List & DetailsStaff List & DetailsStaff List & DetailsStaff List & Details worksheet and dividing it by
52 (number of weeks in the year) multiplied by 5 (number of working days in a week) multiplied by 8
(number of working hours in a day).

Chapter 23 – Documentation
195
Figure 23.2: Displaying formulae on the Overtime Collection worksheet
Monthly Gross PayMonthly Gross PayMonthly Gross PayMonthly Gross Pay
Column A is linked to column A in the Staff List & DetailsStaff List & DetailsStaff List & DetailsStaff List & Details worksheet to insert the Staff No. The surname,
department and Normal Gross Monthly Pay are linked in the same way. The Overtime Pay in column E is
linked to the Overtime CollectionOvertime CollectionOvertime CollectionOvertime Collection worksheet. This Month’s Gross Pay in column F is calculated by adding
Normal Gross Monthly Pay to Overtime Pay. Percentage Overtime is Overtime Pay divided by This Month’s
Gross Pay – it is blank if there is no This Month’s Gross Pay in column F.
Figure 23.3: Displaying the formulae on the Gross Monthly Pay worksheet
Macros
The following macros are used:
The EditStaffList macro is assigned to the Edit Staff command button situated on the Home worksheet. It
moves the user to the Staff List & Details worksheet and displays a data form. It leaves the user back in the
Home worksheet.

Unit 3 – Spreadsheet Design
196
Figure 23.4: The EditStaffList macro
The Overtime macro takes the user to the Overtime Collection worksheet so that the user can enter
overtime hours.
Figure 23.5: The Overtime macro
The PrintReport macro is assigned to the Print command button on the Home worksheet. This prints the
Gross Monthly Pay worksheet that is sent to the Payroll Bureau.
Figure 23.6: The PrintReport macro
(You should describe all the other macros and command buttons in a similar fashion.)

Chapter 23 – Documentation
197
Testing
The test plan shown in the Design Specification was used. Results of testing are shown below.
Test 1 – Test protected cells in worksheets
Result – An error message is displayed
Figure 23.7: Test 1
Test 2 – Test the Auto_Open macro.
Result – Opens at the menu on the Home worksheet.
Figure 23.8: Test 2
Test 3 – Test the formula to calculate Normal Gross Monthly Salary.
Result – Correct result entered into column G of the Staff List & Details worksheet.
Figure 23.9: Test 3

Unit 3 – Spreadsheet Design
198
Test 4 – Test the formula to calculate Overtime Pay.
Result – Correct result entered into column D of the Overtime Collection worksheet. If a y does not appear
in the Paid Overtime column on the Staff List & Details worksheet then no value is displayed.
Figure 23.10: Test 4
Test 5 – Test the formula to calculate This Month’s Gross Pay.
Result – Correct result entered into column F of the Gross Monthly Pay worksheet.
Figure 23.11: Test 5
Test 6 – Test the formula to calculate the %ge overtime.
Result – Correct result entered into column G of the Gross Monthly Pay worksheet i.e. 10.10 is 0.86% of
1,176.76 (rounded to 2 decimal places).
.
.
.
Test 14 – Print out Management summary after a new member of staff has been added.
Figure 23.12: Test 14
This test did not perform satisfactorily in the original version. The new employee is not included in the
summary. This was a difficult problem to solve and meant a change in the design. The command button on
the menu now goes to the Department Summary Sheet, deletes all the existing subtotals and copies cells A3

Chapter 23 – Documentation
199
to G50 from the Gross Monthly Pay worksheet. A message is displayed asking the user to select the range to
be sorted prior to the summary report being printed, and then to press a command button which will do the
sorting and subtotalling.
(You should show the results of all your tests and explain how you fixed any problems.)
Conclusion
It is extremely difficult in Excel to have everything done from command buttons without using Visual Basic
code. When a new employee is added, the summary report cannot adjust automatically without a new range
being selected. The application will require some knowledge and intelligence on the part of the user.
The system does have some limitations, for example it can only handle 50 members of staff. However, as
there are only currently 18 members of staff this should be adequate.
It is possible to enter duplicate staff numbers into the system. This could be solved quite simply by using a
formula that adds one to the previous staff number. The new staff number would appear automatically on
the data input form.

Unit 3 – Spreadsheet Design
200
Chapter 24 – User Documentation
Objectives
To write a user manual
24.1. Introduction
The User Manual is for a non-technical user and should explain clearly all the functions of the system. It
should help them to use your custom spreadsheet, not explain to them how to use Excel. You must write
user instructions that are simple to understand, including:
an introduction giving an overview of the application;
how to start the program and how to gain access using a password;
examples of the route through the spreadsheet;
instructions about data entry and validation rules that have been applied;
advice on how to respond to error messages if they type in something incorrectly;
examples of data output screens and printed copy;
advice on backing up;
who to contact to get help if they get into trouble;
a title page and Table of Contents.
24.2. Word processing your user manual
In Unit 1 you learned how to use outlining to generate an automatic Table of Contents. You will also
need to use headers and footers to specify what the document is, the page number etc.
24.3. Sample user manual
Sample extracts from a user manual for the Shoe Shock Overtime Collection system are given on the next
few pages. The title page and Table of Contents are omitted but you should include them in your
documentation.

Chapter 24 – User Documentation
201
ShoeShock Overtime Collection System
User Manual
Introduction
ShoeShock does not run a payroll system in-house but employs a Payroll Bureau to provide this service for
them. The company’s Finance Department supplies details of each employee’s gross pay and the Bureau
calculates deductions for Income Tax and National Insurance, arranges bank transfers and produces payslips
for the employees.
The new Overtime Collection System will automate the currently manual system that updates staff details,
enters their monthly overtime hours and calculates their gross monthly pay.
The data to be input will be taken from the Time Sheets submitted by each employee (for overtime claims)
and Change to Staff Detail forms submitted by employees or management (for changes to personal details or
pay rises).
Initial system set up
If this is the first time the system has been used you will have to enter the following details for all members of
staff (supplied by Personnel):
Staff No., Surname, Forename, Department, Start Date, Annual Salary, and “y” or “n” to indicate if they
are paid overtime.
Enter these details as follows:
• Load MS Excel and select FileFileFileFile, New.New.New.New.
• Click on the ShoeShocktemplate.xltShoeShocktemplate.xltShoeShocktemplate.xltShoeShocktemplate.xlt icon and click OKOKOKOK.
The following opening screen will be displayed:
Figure 24.1: The opening screen

Unit 3 – Spreadsheet Design
202
• Click the Staff List & DetailsStaff List & DetailsStaff List & DetailsStaff List & Details tab at the bottom of the screen.
• You will be moved to the Staff List & DetailsStaff List & DetailsStaff List & DetailsStaff List & Details worksheet.
• Enter the details of the employees, pressing TabTabTabTab between fields.
• Save the workbook as ShoeShockmonth.xls, where month is the current month e.g. June.
Editing Staff Details
From time to time the Finance Department will receive Staff Details forms which show any changes to staff
details including details of staff joining or leaving the company.
To edit staff details:
• Open the file ShoeShockShoeShockShoeShockShoeShockmonthmonthmonthmonth.xls (e.g. ShoeShockJune.xls).xls (e.g. ShoeShockJune.xls).xls (e.g. ShoeShockJune.xls).xls (e.g. ShoeShockJune.xls).
• Click the Edit StaffEdit StaffEdit StaffEdit Staff button and use the data form that appears on the Staff List & DetailsStaff List & DetailsStaff List & DetailsStaff List & Details worksheet to
make the changes. Use either the scroll bar or the Find NextFind NextFind NextFind Next and Find PrevFind PrevFind PrevFind Prev buttons to find the record
you wish to edit.
Figure 24.2: Editing Staff Details
• When the edits are complete click CloseCloseCloseClose.
Monthly Procedure
By the beginning of each month the Finance Department will have collected a number of Time Sheet forms
detailing staff overtime claims. These should be collected together ready for input to the system during the
first week of the month.
To initialise for the new month
• Open the file ShoeShockShoeShockShoeShockShoeShockmonthmonthmonthmonth.xls (.xls (.xls (.xls (e.g. ShoeShockJune.xls)e.g. ShoeShockJune.xls)e.g. ShoeShockJune.xls)e.g. ShoeShockJune.xls).
• Save the file with the name for the new month (e.g. ShoeShockJuly.xls)(e.g. ShoeShockJuly.xls)(e.g. ShoeShockJuly.xls)(e.g. ShoeShockJuly.xls).
• Click the Initialise MonthInitialise MonthInitialise MonthInitialise Month button on the HomeHomeHomeHome worksheet menu. This will clear out last month’s
overtime hours.

Chapter 24 – User Documentation
203
Entering overtime payments
• Click the OvertimeOvertimeOvertimeOvertime button on the HomeHomeHomeHome worksheet to take you to the Overtime CollectionOvertime CollectionOvertime CollectionOvertime Collection worksheet.
• In column B enter the overtime hours for each member of staff.
Figure 24.3: Entering overtime payments
Printing the Gross Monthly Payments report
• Return to the HomeHomeHomeHome worksheet by clicking on the HomeHomeHomeHome tab at the bottom of the screen.
• Click the Print Gross Monthly PayPrint Gross Monthly PayPrint Gross Monthly PayPrint Gross Monthly Pay button to print the report to be sent to the Payroll Bureau.
• Return to the HomeHomeHomeHome worksheet by clicking on the HomeHomeHomeHome tab at the bottom of the screen.
The report will be printed as follows:
Figure 24.4: Gross Monthly Payments report

Unit 3 – Spreadsheet Design
204
Printing the Management Summary report
• Click the Print Management SummaryPrint Management SummaryPrint Management SummaryPrint Management Summary button. This will take you to the Department SummaryDepartment SummaryDepartment SummaryDepartment Summary
worksheet, where you will see a message on a blue background asking you to select the range to be
summarised for the report. You should select the heading row and all the data (e.g. A2 to G25 in the
screenshot below).
Figure 24.5: Preparing to print the Management Summary report
• Now press the large Print SummaryPrint SummaryPrint SummaryPrint Summary button. The report will be displayed on screen as follows and if
all is satisfactory, you can press PrintPrintPrintPrint to obtain a hard copy.
Figure 24.6: The Management Summary report
• Save the file as ShoeShockmonth.xls.

205
Appendix A
Standard Ways of Working

Appendix A
206
Introduction
Every organisation has rules about the way it operates. These may not be formal rules and regulations
that are written down – they may be just conventions and ways of working that all members of staff
adhere to. Standard ways of working are important when working with ICT systems because they can
help to protect three of the organisation’s most important assets: information, equipment and employees.
Managing your work
Planning
Whether you are at school, college or in the workplace, you will often be faced with a number of tasks
that need to be completed. If you can plan your work effectively you will be more likely to complete
those tasks successfully. Spending some time drawing up a plan to organise your work will pay off in the
long run and is something you should become used to doing as a matter of course. The plan will depend
on you clearly identifying the task to be completed and discussing the details with whoever has set it.
You need to establish the priority of the task, how long it is likely to take you and what deadline has been
imposed. If you feel that the deadline is unrealistic it is always worth trying to renegotiate it, but you will
have to be able to put up a good case! It is often useful to identify ‘milestones’ leading up to a deadline
so that you can check your progress and that you are on target for completing in time.
Working with files
Almost all of the work that is created using a computer is stored in a file (a ‘unit of storage’). These files
are stored in folders on a storage device – often the hard drive on your computer. Every file is given a
name and it is important that you use sensible filenames that remind you of the contents. Once you are in
the workplace the files that are created and stored belong to the organisation. This means that they need
to be accessible to other people within the organisation so a well-organised file structure is vital.
My Documents is a desktop folder that provides you with a convenient place to store documents,
graphics, or other files you want to access quickly. On your desktop it is represented by a folder with a
sheet of paper in it. Often users will create their own subfolders within My Documents creating a simple
path to where their files are stored.
Fault Logging
Many problems can arise when working with ICT systems. Often the ‘faults’ are not problems with the
system but occur because users do not fully understand how to operate the software, or what messages
mean. This is why initial user training and good user documentation are vital to the success of a new ICT
system.
However the resolution of many genuine faults can be speeded up if clear and precise information is
passed on to the technical people supporting the system. When reporting a fault the following
information should be provided:
The way the fault manifests itself. If there is an error message, it should be relayed exactly as it
appears on the screen.
The exact sequence of events that gave rise to the fault.
Details of the equipment and its precise location.
A fault log should always be kept near to a PC and all details of the problem entered neatly. These
records can help to identify equipment that has a recurring fault and provide information on how the fault
has been fixed in the past.

Standard Ways of Working
207
Keeping information secure
Computer systems must have adequate controls to ensure that only authorised personnel have access to
data. There are a number of ways in which this can be achieved:
Passwords
Most networks require a user to log on with their password before they can gain access to the computer
system. Additional passwords may be required to gain access to certain programs and data. For example
in an organisation everyone may be able to access word processing programs and files, but only people
working in the Finance department may be able to access the accounting system. It is clearly important
that these passwords are not divulged to other people and it is recommended that passwords are frequently
changed. In fact many systems are set up to automatically prompt you after a set number of days to
change your password.
Communications controls
These controls ensure that only authorised people can connect to a computer from an external link. Some
organisations have dial-back systems: when someone attempts to log on to the remote computer, they are
positively identified and the computer disconnects them and immediately dials them back to ensure they
are an authorised user.
Virus checks
Viruses are generally developed with a definite intention to cause damage to computer files or, at the very
least, cause inconvenience and annoyance to computer users. The first virus appeared at the University of
Delaware in 1987, and since then the number of viruses has escalated to tens of thousands. The virus
usually occupies the first few instructions of a particular program on an ‘infected’ disk and relies on a
user choosing to execute that program. When an infected program is executed, the virus is the first series
of instructions to be performed. In most cases the virus’s first action is to copy itself from the diskette
onto the PC and ‘hide’ within obscure files, the operating system code or within unused disk blocks which
are then marked as being ‘bad’ and unavailable for reuse. The virus can then proceed to perform any of a
number tasks ranging from the irritating to the catastrophic such as reformatting the hard disk.
Some viruses lie dormant, waiting to be triggered by a particular event or date – the ‘Friday 13th’ virus
being a well-known one. The virus then infects other diskettes, perhaps by modifying operating system
programs responsible for copying programs. From there, the next PC to use the diskette will be infected.
Virus checkers need to be installed on all computer systems so that they automatically check for any
infected data when the computer is started up. Manual checkers can also be used to check for viruses on
floppy disks.
Backup systems
Routine backups of the computer system should be made so that in the case of serious emergency, the
system can be recreated to the last full backup. Backups can be made to a variety of media – magnetic
tape, CD-ROM, Zip drive etc. They are made on a daily, weekly or monthly basis depending on the
importance of the data to be backed up. The backup media must be clearly labelled and should be stored
in a fire-proof safe, or better still on a different site, so that should a disaster or emergency occur, the
backup media will be safe.
Copyright
Computer software is copyright material – that means it is protected in the UK by the Copyright, Designs
and Patents Act 1988. It is owned by the software producer and it is illegal to make unauthorised copies.
When you buy software it is often supplied in a sealed package (e.g. CD ROM case) on which the terms
and conditions of sale are printed. This is called the software licence and when the user opens the
package they are agreeing to abide by the licence terms.

Appendix A
208
Software licences usually permit the user to use one copy on any single computer. It is considered to be
in use if it is loaded into either the computer’s temporary memory (RAM) or onto the hard disk drive.
With network licences the software is often loaded onto the file server and the licence specifies how many
users on the network can access it at any one time.
It is illegal to make copies of the software, except for backup purposes, so you are breaking the law if you
copy some software from a friend to use on your own computer.
Data that is held on computer is often subject to copyright. For example not everyone has the ability or
opportunity to draw or to take photographs and you often want to include copies of someone else’s work
in your documents. These images may well be copyright and belong to the original artist or
photographer. If this is the case it may be possible to contact the publisher for permission to use the
material, but this can be a lengthy process. To be outside the copyright law, the artist/photographer/writer
has to have been dead for 70 years. If this is the case and you would like to use, for example, some old
photographs, you may do so freely, but it is often best to acknowledge the source somewhere in your
document.
Computer Misuse Act 1990
In the early 1980s in the UK, hacking was not illegal. Some universities stipulated that hacking,
especially where damage was done to data files, was a disciplinary offence, but there was no legislative
framework within which a criminal prosecution could be brought. This situation was rectified by the
Computer Misuse Act of 1990 which defined three specific criminal offences to deal with the problems of
hacking, viruses and other nuisances. The offences are:
unauthorised access to computer programs or data;
unauthorised access with a further criminal intent;
unauthorised modification of computer material (i.e. programs or data).
To date there have been relatively few prosecutions under this law – probably because most organisations
are reluctant to admit that their system security procedures have been breached, which might lead to a loss
of confidence on the part of their clients.
Principles of Data Protection
The Data Protection Act 1998 came into force on 1 March 2000. It sets rules for processing personal
information and applies to paper records as well as those held on computers. It strengthens and extends
the rules about data protection laid down in the Data Protection Act 1984, which it has now replaced.
The rules
Anyone processing personal data must comply with the eight enforceable principles of good practice.
They say that data must be:
fairly and lawfully processed;
processed for limited purposes;
adequate, relevant and not excessive;
accurate;
not kept longer than necessary;
processed in accordance with the data subject’s rights;
secure;
not transferred to countries without adequate protection.
Personal data covers both facts and opinions about a living person. It also includes information regarding
the intentions of the data controller towards the individual, although in some limited circumstances
exemptions will apply. For more information on Data Protection visit the following web site:
www.dataprotection.gov.uk.

Standard Ways of Working
209
Working safely
Computers and health
Computers can be held responsible for a whole raft of health problems, from eyestrain to wrist injuries,
back problems to foetal abnormalities, stomach ulcers to mental collapse. Articles appear regularly in the
newspapers relating stories of employees who are suing their employers for computer-related illnesses.
Not so long ago it was thought that the widespread use of these fantastic machines, that could perform
calculations and process data with lightning speed and complete accuracy, would free up humans to work
maybe only two or three hours a day, while the computer did the lion’s share. In fact, people seem to be
working harder than ever, trying to keep up with the output of their computers. Human beings are the
weak link in the chain, needing food, rest, a social life; prone to headaches, stress, tired limbs and
mistakes.
Figure 1: Stress at work
Stress
Stress is often a major factor in work-related illness. Simply thinking about computers is enough to cause
stress in some people. It is stressful to be asked to perform tasks which are new to you and which you are
not sure you can cope with. It is stressful to know that you have more work to do than you can finish in
the time available. It is stressful, even, to have too little to do and to be bored all day.
The introduction of computers into the workplace can have detrimental effects on the well-being of
information workers at many different levels in an organisation. For example:
Some companies may use computers to monitor their workers’ productivity, which often increases
their stress levels. Symptoms include headaches, stomach ulcers and sleeplessness.
Many people are afraid of computers and fear that they will not be able to learn the new skills
required, or that their position of seniority will be undermined by younger ‘whizz kids’ with a high
level of competence in ICT.
It can be almost impossible for some people to get away from work. Pagers, mobile phones, laptop
computers and modems mean that even after leaving the office, there is no need to stop work –
indeed, should you even think of stopping work? As a busy executive, can you afford to waste 45
minutes on the train to Ipswich reading the newspaper or just gazing out of the window, when you
could be tap-tap-tapping on your laptop, or infuriating your fellow passengers by holding long and
boring conversations on your mobile phone?

Appendix A
210
‘Information overload’ means that managers are often bombarded with far more information than
they can assimilate, producing ‘information anxiety’. Try typing the words ‘Information Overload’
into one of the World Wide Web’s search engines and within seconds, it will have searched
millions of information sources all over the world and come up with thousands of references all
presorted so that those most likely to be of interest are at the top.
A survey of 500 heads of ICT departments revealed that over three-quarters of respondents had
suffered from failing personal relationships, loss of appetite, addiction to work and potential
alcohol abuse. The continuing developments within ICT ensure that it is always in the minds of
business executives and also that it is blamed for most corporate problems. The very speed of
development, for which ICT is now famous, and the need to keep pace with this is also a major
contributing factor to ICT stress-related illness.
Repetitive Strain Injury (RSI)
RSI is the collective name for a variety of disorders affecting the neck, shoulders and upper limbs. It can
result in numbness or tingling in the arms and hands, aching and stiffness in the arms, neck and shoulders,
and an inability to lift or grip objects. Some sufferers cannot pour a cup of tea or type a single sentence
without excruciating pain.
The Health and Safety Executive say that more than 100,000 workers suffer from RSI.
Eyestrain
Computer users are prone to eyestrain from spending long hours in front of a screen. Many computer
users prefer a dim light to achieve better screen contrast, but this makes it difficult to read documents on
the desk. A small spotlight focussed on the desktop can be helpful. There is no evidence that computer
use causes permanent damage to the eyes, but glare, improper lighting, improperly corrected vision
(through not wearing the correct prescription glasses), poor work practices and poorly designed
workstations all contribute to temporary eyestrain.
Extremely low frequency (ELF) radiation
In normal daily life we are constantly exposed to ELF radiation not only from electricity mains and
computer monitors but also naturally occurring sources such as sunshine, fire and the earth’s own
magnetic field. Research into the effects of ELF radiation is increasing and seems to indicate that it may
be connected to some health problems. Several studies have tried to establish whether there is a link
between monitor use and problems in pregnancy such as early miscarriages. The results are not clear-cut,
because although some studies seem to show a correlation between an increased rate of miscarriages and
long hours spent at a VDU in the first trimester of pregnancy, other factors such as stress and poor
ergonomic conditions could have played a part.
Computers, health and the law
Occupational health and safety legislation in Britain is researched, guided and structured by the Health
and Safety Executive (HSE), a government body. An EEC Directive on work with display screen
equipment was completed in the early 1990s, with member states required to adapt it to become part of
their own legislation. As a consequence, the Health and Safety at Work Act of 1974 incorporated
legislation pertaining to the use of VDUs, and the relevant section is now referred to as The Health and
Safety (Display Screen Equipment) Regulations 1992.
This legislation is intended to protect the health of employees within the working environment, and
employers, employees and manufacturers all have some responsibility in conforming to the law.
Employers are required to
Perform an analysis of workstations in order to evaluate the safety and health conditions to which
they give rise.
Provide training to employees in the use of workstation components.

Standard Ways of Working
211
Ensure employees take regular breaks or changes in activity.
Provide regular eye tests for workstation users and pay for glasses.
Employees have a responsibility to
Use workstations and equipment correctly, in accordance with training provided by employers.
Bring problems to the attention of their employer immediately and co-operate in the correction of
these problems.
Manufacturers are required to ensure that their products comply with the Directive. For example,
screens must tilt and swivel, keyboards must be separate and moveable. Notebook PCs are not suitable for
entering large amounts of data.
Figure 2: Workstations must be ergonomically designed
The ergonomic environment
Ergonomics refers to the design and functionality of the environment, and encompasses the entire range
of environmental factors. Employers must give consideration to:
Lighting. The office should be well lit. Computers should neither face windows nor back onto a
window so that the users have to sit with the sun in their eyes. Adjustable blinds should be
provided.
Furniture. Chairs should be of adjustable height, with a backrest which tilts to support the user at
work and at rest, and should swivel on a five-point base. It should be at the correct height relative
to a keyboard on the desk.
Work space. The combination of chair, desk, computer, accessories (such as document holders,
mouse and mouse mats, paper trays and so on), lighting, heating and ventilation all contribute to the
worker’s overall well-being.
Noise. Noisy printers, for example, should be given covers to reduce the noise or positioned in a
different room.
Hardware. The screen must tilt and swivel and be flicker-free, the keyboard must be separately
attached.
Software. Software is often overlooked in the quest for ergonomic perfection. The EEC Directive
made a clear statement about the characteristics of acceptable software, requiring employers to
analyse the tasks which their employers performed and to provide software which makes the tasks
easier. It is also expected to be easy to use and adaptable to the user’s experience.
.. and swivel
Screen must tilt..

Appendix A
212

213
Appendix B
Victory Publishers Ltd

Appendix B
214
Victory Publishing Ltd
Introduction
Victory Publishing Ltd is an educational publishing company publishing a wide range of textbooks for
schools and colleges throughout the UK. The company was founded some 20 years ago and has been
built up by the Managing Director into a company with some 40 employees and an annual turnover of £30
million. They publish approximately 400 different titles.
The company is located in a Business Park in Ipswich. The premises comprise a suite of offices and a
warehouse where the books are stored and dispatched. Most of the offices are fairly large and shared by
several members of a department, with the Heads of each department having their own offices. The
building is cabled up for a computer network and everyone (except the packers in the warehouse, who do
not have desks) has their own computer on their desk. There is comprehensive provision for phone and
fax, and an ISDN line for Internet access. E-mails can be sent and received from any computer both
internally and externally.
The company is divided into several departments, namely Editorial, Foreign Rights, Production, Sales,
Marketing, Distribution, Finance and Administration. The rather ‘flat’ organisation within the company
means that there is a maximum of three levels below the Managing Director, a Head of each department,
sometimes two or more managers in a large department and the rest of the staff in the department.
The Departments
Editorial Department
The Chief Editor is in charge of this department and his job is to decide what titles the company will
produce, commission new authors, decide on print runs and ensure that the quality and profitability of
their range is maintained. Under him there is one commissioning editor and two copy editors who
proofread and edit manuscripts, which are then sent to Production to be typeset.
Foreign Rights
Many of Victory’s titles are published in several other countries, in the local language. It is the task of the
Foreign Rights department to make new overseas contacts, negotiate foreign rights and occasionally also
to buy rights themselves to books published in another country, usually the USA.
Production
The production department does the typesetting of the books and also some of the graphic work such as
cover design. Sometimes this work is contracted out to a firm of graphic designers. They also prepare the
disks to be sent to the printers. The books are not printed by Victory Publishing, but by specialist book
printers in different parts of the country. Sometimes books are printed in Spain, Italy or Hong Kong. They
are also in charge of Stock Control and ensuring that they do not run out of a particular title, or
conversely, get left with thousands of unsaleable books.

Case Study – Victory Publishers Ltd
215
Sales Department
There are basically three different types of customer; wholesale, retail and direct (schools and colleges).
The sales staff is divided into three teams, each with its own manager. One team is assigned to School and
College sales and goes round to various institutions and exhibitions displaying books and talking to
teachers to assess their needs. This information is relayed back to the Marketing Department.
The second team consists of sales people who visit bookshops and wholesalers. Sometimes they travel
abroad, especially to Southern Ireland, where they have a strong presence.
The third team is back in the office taking and entering orders, answering customer queries and liasing
with the Marketing and Distribution Departments. For example when a special promotion is implemented,
such as an advertisement or flyer with an order form for a particular book, they will set up a special
response code for orders resulting from the flyer so that the Marketing team can gauge how successful the
promotion has been.
Marketing Department
The Marketing Department is in charge of designing and sending out catalogues and questionnaires,
organising special promotions, gathering and analysing responses to questionnaires and promotions,
organising stands at exhibitions and placing advertisements in magazines or on web sites belonging to
other organisations.
Distribution
When orders are received they are entered into the Sales Order Processing system and invoices printed
out, usually once a day at about 12 noon. The dispatch notes are sent to the warehouse with a Picking List
showing how many of each book is required to fulfil all the orders. The books are picked off the shelves
and placed in a packing area where the orders are assembled and packed ready for collection by courier at
around 4pm. The invoices are printed in the warehouse and attached to the outside of each parcel.
The Distribution Department is also in charge of receiving stock into the warehouse and recording where
each title is located. The stock file is updated to show the revised quantity in stock.
Finance
The Finance Department is split into two teams each with its own manager, namely Sales Ledger and
Purchase Ledger. Sales Ledger staff are responsible for receiving and recording customer payments and
chasing up late payers. Purchase Ledger staff are responsible for paying suppliers. The Head of
Department is a chartered accountant who keeps the monthly and annual accounts and is responsible for
ensuring that the company is in sound financial health. The payroll is not handled within the company but
is contracted out to a Payroll Bureau. Each month details of salaries, sick pay, pension payments, tax
codes etc are assembled and e-mailed to the Bureau, who calculate the payslips and e-mail the results
back to the payroll clerk in the Finance Department, who transfers the net salaries into the employees’
bank accounts.
Administration
The Administration Department has a Head of Department and 4 other members of staff, two of whom
are computer personnel responsible for keeping all the company’s hardware and software systems running
smoothly. They also install and test new software and customise it to individual or company
requirements. The other staff in this department are responsible for the general running of the company,
from the maintenance of the premises to the hiring, care and training of employees.

Appendix B
216

217
Appendix C
ShoeShock Ltd

Appendix C
218
ShoeShock UK Ltd
Introduction
ShoeShock UK Ltd is a wholly owned subsidiary of SportsShu International Inc. They market, sell and
distribute a range of footwear throughout the UK, including hiking boots, multi-sport high-quality
trainers, after sport shoes (‘jungle mocs’) and sandals. All of the footwear is designed by a Design
Committee comprising 4 people who meet in the Head Office in the USA, and who with the aid of
colourists and designers come up with a range of shoes which then has to be approved. Once approved,
the range is shown to distributors such as ShoeShock UK and their equivalent companies in Europe,
Canada and the US, and each distributor will choose the products he wishes to stock and market, typically
50%-75% of the whole range.
All the footwear is made in Asia, mainly in China, Vietnam and Thailand, and then imported into the UK
by ShoeShock.
The company is run by David Reed, the Managing Director, who for the past 17 years has run a
successful business in Peterborough manufacturing and selling camera cases, bags and rucksacks, from a
building owned by his company, CamCase. Eleven years ago he took the opportunity to expand his
business interests by taking on the distribution of the SportsShu footwear range, and both companies now
operate side-by-side from the same building.
The building is a two-storey block with offices on the top floor. The downstairs is divided into office
space, cutting rooms and warehouse space for CamCase.
This case study is concerned only with ShoeShock UK Ltd, which currently has a turnover of over
£20,000,000.
The Company structure
The company has a total of 18 employees, structured into different departments. The main departments
are Sales/Marketing, Import/Distribution, and Finance/Credit/IT. The structure is shown in graphical form
in Figure 1.

Case Study – Shoeshock UK Ltd
219
Organisation Chart for ShoeShock UK
David Reed
MANAGING
DIRECTOR
Colin Walters
SALES DIRECTOR
Ian Bertram
MERCHANDISING/
IMPORT/
DISTRIBUTION
Barry.Goldman
FINANCE/CREDIT/IT
Alison Campbell
CREDIT CONTROL
Customer Service Mike Lacey
Purchasing
Sales reps and sales
agents
Public Relations/
Marketing
Credit control staff Purchasing staff
Figure 1: Organisation chart for ShoeShock Ltd

Appendix C
220
The Sales/Marketing Department
Charles Walters, the Sales Director, is on the Design Committee and was the brains behind the
extraordinarily successful new range of ‘after-sport’ footwear which resulted in a 30% company growth
in a single year. He also has responsibility for Marketing and uses a variety of methods to market each
season’s footwear including:
Trade shows in the USA, Europe and the UK where the company takes a stand and prospective
customers come to see the range;
Four showrooms in various cities in the UK which trade customers can visit
Sales representatives/agents visit UK stores, taking samples with them. There is also a network of
showrooms throughout the country where the wider range can be displayed.
Point of Sale advertising such as posters, special display stands and shelves in stores.
Advertising in Trade magazines
A film was made last year which was shown in cinemas.
Market Research is also carried out through an agency which interviews people in the street. Five percent
of the company’s turnover is spent on marketing.
ShoeShock distributes to the mid- to upper-end of the market. Their customers include
Outdoor shops such as Field and Trek, Cotswold Camping, Millets/Blacks
Sports outlets such as J D Sports
Style accounts such as Raw, Aspecto, Sole Trader, Office
High Street and Department stores such as Debenhams and Clarks.
There are approximately 600 customer accounts representing about 1,200 different stores – for example
Millets is one account which orders centrally for their many stores nationwide. The company has to be
selective who they sell to because some large customers who purchase say £1 million worth of goods
annually would not purchase if the same product were available in more down-market stores.
Import/Distribution
Ian Bertram is in charge of the import and distribution of the goods. Once the Trade shows have taken
place, an initial order is placed based on the orders already taken and the reaction of major customers. The
order is sent to the Head Office in the US, which then places orders for the finished goods with factories
in China, Vietnam and Thailand. The company has 120 employees in Asia who look for new
manufacturers, negotiate prices, check quality and try to ensure that the rights of the workers are
respected. For example, they will not deal with any factory that employs underage workers or which has
unacceptable working conditions.
Typically, ShoeShock stocks about 300 different styles of shoe, each of them in an average 2.5 different
colours and about 10 different sizes – giving about 7,500 different stock units.
Once the order is placed with Head Office, it is forwarded to a Chinese or Vietnamese factory who give
an estimated date of delivery, which is entered into ShoeShock’s stock control system.

Case Study – Shoeshock UK Ltd
221
It is Ian’s job to decide, based on orders received and potential orders expected, how many of each stock
unit to order. He is also in charge of ordering goods on a weekly basis. Each week he goes through the
stock report which highlights what needs to be ordered, and based on a combination of facts, figures and
experience, places his orders. This process is dependent on the use of a spreadsheet model which Ian
developed himself. It calculates, for each of the 750 different styles and colour of shoe, the breakdown of
sales of each size. For example, if 500 pairs of Black Polar Extremes have been sold and need to be
reordered, the spreadsheet will use detailed sales data collected over a period of weeks to calculate that
say 35 pairs of size 5 should be ordered, 67 pairs of size 6 and so on to make up the 500 pairs.
The company uses a third party ‘Pick and Pack’ warehouse called P&P (located in Bradford) to hold and
dispatch the goods. When the orders arrive in the UK they are cleared through Customs and then sent
directly to P&P, who keep their own separate stock control system. A Goods Received note is sent from
P&P to ShoeShock, where stock quantities are input to the ShoeShock system and the balances updated.
Ian also has to make sure that the goods are dispatched to the customers. When an order is received, a
Pick Note is prepared on the computer system. Each day a batch of Pick Notes is dispatched to P&P, who
use them to pick the goods off their warehouse shelves, pack and dispatch them to the customers with a
delivery note. Data on what has been dispatched is then transmitted back to ShoeShock who invoice the
customer and update the stock control information.
Finance/Credit/IT
Barry Goldman is in charge of Finance. He looks after the financial side of the business, purchasing office
supplies, payment of regular overheads such as rates, electricity, phone bills, etc and prepares the
company accounts.
Reporting to him is Alison Campbell who is in charge of credit control. This involves establishing each
customer’s credit limit, ensuring that customers do not exceed their credit limit without special
dispensation, and chasing up customers who are late with their payments, which she does by telephone.
The Payroll is outsourced to an independent consultant working from home who maintains the payroll
files for the organisation, prepares the weekly and monthly payslips, Inland Revenue returns and any
required forms such as P45 for employees who leave and P46 for end-of-year tax returns.
The IT function is also outsourced to a company who are under contract to maintain both the hardware
and software. The basic accounting and stock control system was originally purchased about 17 years ago
by David Reed, the MD, for CamCase from a company called AXEL. Since then the system has grown
with the needs of both CamCase and ShoeShock, with new functions and reports being added and updated
as required. The staff at AXEL are online to ShoeShock and, if there are any problems, they can view any
particular screen from their offices in Lincoln and generally fix it fairly quickly.
There is no Personnel Department as such. David Reed hires new employees when the need arises and
very occasionally terminates an employee for non-performance or serious breaches. Most employees stay
with the firm for many years and a handful have been with the company since its inception.

Appendix C
222
Information flow within the organisation
Information has to be communicated both internally and externally, for example:
between departments at ShoeShock’s offices in Peterborough
between ShoeShock and P&P, the Pick and Pack warehouse
between ShoeShock and AXEL, the software suppliers
between ShoeShock and the salesmen and agents who go round the stores
between ShoeShock and the WWW Head Office in New York
between ShoeShock and the Customs and Excise Department when goods received from Asia
arrive in the UK and need to be cleared through Customs
between ShoeShock and their customers.

223
Appendix D
Assessment Evidence for Units 1-3

Appendix D
224
Unit 1: Presenting Information
ASSESSMENT EVIDENCE
You need to produce:
six original documents created by you for different purposes to show a range of writing and presentational styles.
The documents may be in printed form or shown on-screen. They must include one designed to gather
information from individuals and one major document of at least three A4 pages
a report describing, comparing and evaluating two different standard documents used by each of three different
organisations (total of six documents).
To achieve a grade E your work must
show:
To achieve a grade C your work
must show:
To achieve a grade A your work
must show:
E1 new information that is clear,
easy to understand, uses a
suitable style and is at a level
that suits the intended readers
E2 text styles, page layout,
paragraph formatting and,
where appropriate, common
standards for layout that suit the
purpose of each document
E3 combinations of text, graphics,
tables, borders and shading used
effectively
E4 location, use and adaptation of
existing information to suit a
presentation, and a list of your
information sources in an
appropriate form
E5 a clear and accurate description
of each of the six collected
documents, which identifies the
common elements of similar
documents
E6 careful checking of the
accuracy of the layout and
content of your six original
documents and your report, and
that you have proof-read them
to ensure that few obvious
errors remain.
C1 by presenting original draft
copies with proof-reading
corrections and annotations,
how you achieved a coherent
and consistent style, made
good use of standard formats,
placed information in
appropriate positions and
ensured correct and meaningful
content
C2 detailed descriptions of the
content, layout and purpose of
the six collected documents,
accurately evaluating good and
bad points about the writing
and presentation styles of
similar items, commenting on
their suitability for purpose and
suggesting how they could be
improved
C3 that you can work
independently to produce your
work to agreed deadlines.
A1 a good understanding of
writing style, presentation
techniques, standards for
special documents and
attention to detail by
organising a variety of types of
information into a single
coherent, imaginative, easy-to-
read presentation of several
pages
A2 effective skills in the
appropriate use of software
facilities to automate aspects of
your document production,
such as bullets and numbering,
paragraph and heading styles,
standardised layout, contents
lists and indexes
A3 appropriate use of lines,
borders, shading, tables,
graphics and writing style to
create a form that is easy to
understand and easy to use to
enter data and retrieve the
information collected
A4 effective skills in the use of
graphics to improve a
presentation by making
appropriate use of pictures,
drawings, clip art, lines and
borders, graphs or charts.

Assessment Evidence for Units 1 – 3
225
Unit 2: ICT Serving Organisations
ASSESSMENT EVIDENCE
You need to produce a case study analysing a suitable organisation.
To achieve a grade E your work
must show:
To achieve a grade C your work
must show:
To achieve a grade A your work must
show:
E1 clear descriptions, with the aid
of diagrams, of the main
function(s) of the organisation,
its associated customers (or
clients) and suppliers, the
function of each department,
the structure of the
organisation and the
relationships between the main
departments and outsiders
E2 descriptions of the ICT
provision for each of the
organisation’s departments (or
functions) and identify possible
extensions or improvements to
the use of ICT that would
benefit the organisation
E3 using diagrams, clearly how
information essential to
successful operation moves
within the organisation and to
and from outsiders
E4 detailed descriptions of the
purpose and operation of an
important ICT application used
within the organisation,
including examples of input
and output data and the job
functions and personnel
involved
E5 that your case study is
presented clearly as a coherent
report and is checked for
meaning and accuracy.
C1 a well-structured case study,
fluent use of technical
language, appropriate
conclusions and suitable
references to the information
sources used
C2 detailed explanations of how
information used in the
organisation is processed,
including details of the data-
capture techniques, any
processing or calculations
involved and the specification
and style of data output
C3 that you can work
independently to produce your
work to agreed deadlines.
A1 detailed explanations, with the
aid of diagrams and definitions
of the data, of how information
moves from a customer or client
through the organisation to
result in the delivery of a
product or service
A2 use of examples to recommend
improvements to the
organisation’s internal ICT
systems (this may cover items
such as integration of existing
systems, specialised equipment
or software, database
development, LAN or WAN –
wide area network – systems)
A3 detailed description of how the
organisation might benefit from
more extensive use of new
communication technologies,
such as the Internet, mobile
communications, E-mail, e-
commerce or EDI
A4 a description of how the
organisation might use a
management information
system to monitor or control
activities and decision making.

Appendix D
226
Unit 3: Spreadsheet Design
ASSESSMENT EVIDENCE
You need to produce:
a spreadsheet solution to meet specified user requirements, involving the use of at least six of the more complex
spreadsheet facilities
user and technical documentation, including a test report.
To achieve a grade E your work
must show:
To achieve a grade C your work
must show:
To achieve a grade A your work must
show:
E1 a clear design specification that
meets user requirements,
including appropriate selection
of more complex facilities,
details of sources of data,
outline screen data entry forms,
calculations required, user aids
to operation and how output is
presented
E2 suitable data entry facilities,
including input messages and
macros that reduce keystrokes
and improve user efficiency
E3 suitable printed or screen
output that makes appropriate
use of cell formats, charts or
graphs, page or screen layout
and graphic images
E4 clear technical documentation
identifying formulae and
functions used, and screen and
printed report layouts
E5 clear user documentation with
copies of menus and screens
and examples of input and
output
E6 testing of your spreadsheet
against the design specification
and careful checking of the
accuracy of the data used and
the output generated.
C1 a good understanding of
spreadsheet design and
attention to detail by creating
an imaginative customised
spreadsheet that makes good
use of design and layout
facilities
C2 detailed test specifications
together with examples of a
full range of acceptable and
unacceptable input, associated
expected output and any
associated error messages
C3 that you can work
independently to produce your
work to agreed deadlines.
A1 a good understanding of the
purpose and value of more
complex facilities by using them
effectively in your spreadsheet
design
A2 customised data input using
facilities such as forms,
dialogue boxes and list boxes
that are clear, well laid out,
suitably labelled and that
validate data input
A3 comprehensive records of
spreadsheet drafting, testing and
refinement that show how the
spreadsheet was developed and
how any problems were
resolved
A4 high-quality, clear user
documentation making good use
of graphic images in detailed
instructions for use with
examples of menus and data
input screens, types of output
available and possible error
messages.

227
IndexAbsolute cell reference.........140
Accounts ................................87
Adding
a new slide.........................54
a worksheet......................138
animation...........................62
charts .................................58
slide transitions..................61
Administration ...............88, 116
Administration Department..108
Agencies, external..................95
Agenda ...................................71
Alignment, text ....................135
Animation ..............................59
adding................................62
Arrow tool..............................24
Assigning a style ....................46
Auditing toolbar ...................178
Auto_Open macro................166
AutoCorrect .............................3
AutoFill handle ....................129
Automatically numbered
captions .............................33
Autonumbering ......................28
Autoshapes.............................61
AutoSum ..............................144
AVERAGE function ............145
Balance Sheet...............113, 114
Bar chart.......................167, 169
Bibliography ..........................33
creating..............................41
Boilerplate text.......................48
Borders...........................25, 135
Budget ............................74, 109
Bullets ....................................27
CAD...........See Computer-aided
design
Calculations .........................188
CAM ..........See Computer-aided
manufacturing
Captions .................................38
Cash flow forecast................110
Cell
absolute reference............140
alignment.........................134
naming.............................141
relative reference .............140
Chart
adding................................58
layout.................................58
Wizard .............................168
Check
grammar...............................3
spelling ................................3
Choosing a project................128
Clip Art pictures .....................59
Columns .................................31
Command buttons ................154
Comments ............................149
Complex spreadsheet
facilities ...........................177
Computer-aided
design...............................126
manufacturing..................126
Computers and health...........209
Concatenation.......................143
Conditional format ...............133
Contents page .........................33
Corel Capture .......................179
COUNT function..................145
COUNTA function...............145
COUNTBLANK function ....145
COUNTIF function ..............146
Courtesy copy.........................71
Creating
a bibliography....................41
a document template ..........45
an index .............................39
Credit Control.......................111
Cross-reference.................33, 38
Currency format ...................131
Custom
dictionary.............................5
number formats................133
Data
capture .............................184
entry.................................188
processing systems ....84, 117
protecting.........................175
validation .................150, 188
Date and Time field................49
Dates.....................................131
Decimal numbers..................130
Decision
structured .........................119
unstructured .....................119
Decision-making ..................119
Decrease Decimal.................130
Decrease Font Size .................55
Defining a style ......................46
Delivery ................................. 64
notes.................................. 75
Department Summary.......... 165
Design.................................... 88
specification .................... 180
Template ........................... 52
Development Plan................ 191
Dictionary ................................ 4
custom................................. 5
Displaying formulae ............ 179
Distribution............................ 88
Draft copy................................ 9
Drawing
toolbar ......................... 23, 24
tools................................. 171
E-commerce......................... 123
ELF radiation....................... 210
E-mail ............................ 71, 124
Entering a formula ............... 134
External
agencies............................. 95
information........................ 91
Fax header sheet .................... 69
Field
Date and Time................... 49
inserting ............................ 48
Fill Color ............................. 135
Finance .................................. 87
Department...................... 108
Flesch Reading Ease index ...... 9
Flyer....................................... 69
Font Color............................ 135
Footer..................................... 18
Footnotes ............................... 42
Formal information systems .. 91
Format
conditional ...................... 133
currency .......................... 131
custom number................ 133
Formatting
bar chart .......................... 169
numbers........................... 129
Forms................................... 151
Formulae
displaying........................ 179
entering ........................... 134
operators in ..................... 143
Fraction................................ 132
Function
AVERAGE ..................... 145

Index
228
COUNT...........................145
COUNTIF .......................146
IF ...................................146
MAX ...............................145
MEDIAN.........................145
MIN.................................145
MODE.............................145
SUM................................144
Functions of an organisation ..81
Global changes.......................56
Grammar ..................................3
check ...................................3
Grouping
objects .......................25, 171
Handouts ................................63
Hanging indent.......................20
Headers and footers........18, 160
adding................................35
Health and Safety
Executive.........................210
Regulations......................210
Human Resources ..........88, 115
Hyphenation...........................21
ICT services ...........................88
IF function............................146
Increase Decimal..................130
Increase Font Size ..................55
Indents....................................20
hanging..............................20
Index ......................................33
creating..............................39
Informal information systems 91
Information
external..............................91
flow diagram .....................94
formal systems ..................91
informal systems ...............91
internal ..............................91
Insert
Field ..................................48
Table..................................29
Worksheet .......................157
Internal information ...............91
Invoices ............................75, 76
Itinerary..................................74
Job functions ..........................86
Keyboard shortcuts ..............137
Knowledge work systems ......85
Layout ....................................33
page .................................159
standard business letter......43
Line chart .............................172
Linking worksheets ..............139
Log .......................................192
Lotus Notes ............................92
Macro ...................................153
Auto_Open ......................166
recording..........................153
Management Information
System .......................85, 117
benefits ............................121
Managers ..............................118
Marketing .........................87, 96
MAX function ......................145
MEDIAN function................145
Memo .....................................70
Merge and Center .................135
Merging cells........................135
Microsoft Outlook ................125
MIN function........................145
Minutes.............................72, 73
MIS..................See Management
Information System
MODE function....................145
Modifying a style ...................46
Moving
a worksheet ......................157
around a spreadsheet........137
Naming cells.........................141
Nominal Ledger....................113
Numbered list .........................27
Numbers, formatting ............129
On-line forms .........................68
On-screen text animation........22
Operators in formulae...........143
Order details ...........................99
Organisational structure .........82
Organisations..........................80
Orientation
cell text ............................135
page .................................159
Outline
feature................................33
toolbar................................34
view ...................................34
Outlining ................................34
Oval tool.................................24
Page
layout .........................15, 159
Setup..................................16
Pagination...............................17
Paragraph formats ..................20
Password ..............................175
Paste Function wizard ..........146
Payroll ..................................115
Percentages...........................132
Personnel ........................88, 115
Placeholder .............................53
PowerPoint .............................51
Presentation
delivery..............................64
planning .............................51
skills .................................. 64
styles ................................. 15
viewing ............................. 55
views ................................. 54
Preview ........................... 134
slides ................................. 63
Summary......................... 165
PrintScreen key.................... 179
Production.............................. 88
Profit and Loss statements ... 113
Proof
correction marks ............... 11
reading .............................. 10
Protecting spreadsheet data.. 175
Purchase Ledger .................. 112
Purchase ordering ................ 106
Questionnaires ................. 65, 66
Radiation, ELF..................... 210
Readability statistics ................ 9
Reading Ease Score ............... 10
Rectangle tool ........................ 24
Regional Options ................. 132
Regulations
Health and Safety............ 210
Relative cell reference ......... 140
Remove subtotals................. 164
Renaming a worksheet......... 138
Reorder
level................................. 103
quantity ........................... 103
Research and Development ... 88
Reviewing toolbar.................. 14
Revision Marks...................... 13
Rotate tool ............................. 24
RSI. See Repetitive Strain Injury
Sales................................. 87, 96
Ledger ............................. 111
Order ................................. 99
Order Processing System .. 96
Sample user manual............. 200
Sans serif ............................... 21
Scaling ................................. 159
Screen Print Gold................. 179
Screenshots .......................... 179
Select Objects tool ................. 25
Serif ....................................... 21
Shading .................................. 25
Shortcut key......................... 139
Show/Hide ............................. 40
Slide
adding ............................... 54
Master ............................... 56
printing.............................. 63
Show ................................. 55
Sorter view........................ 55

Index
229
SOP .See Sales Order Processing
System
Sorting..................................162
Sound ...............................26, 59
Spelling ....................................3
check ...................................3
Spreadsheet structure ...........185
Stakeholder ............................83
Standard business letter
layout.................................44
Stock control ........................102
system..............................104
Stress....................................209
Style
assigning............................46
creating..............................47
defining .............................46
modifying ....................46, 48
presentation .......................15
setting ..................................8
writing .............................6, 8
Subscript ................................22
Subtotalling ..........................162
Subtotals, removing .............164
SUM function.......................144
Superscript .............................22
Suppress display of zero
values ..............................157
Table of Contents ...................37
Tables .....................................29
Technical
documentation .........193, 194
Template...............................177
creating and using..............45
Test Plan...............................190
Testing..........................178, 197
Text
alignment .........................135
Effects................................23
Field...................................49
orientation..........................29
wrapping..........................134
Textual styles..........................21
Thesaurus .................................9
Toolbar
Auditing...........................178
Drawing .......................23, 24
Forms...............................154
Header and Footer .............19
Outline ...............................34
Slide Sorter ........................61
Stop Recording ................154
WordArt.............................23
Tools, Macro ........................155
Track Changes........................13
Transaction processing
system ............................... 84
Transition, slide ..................... 61
Trendline.............................. 172
Trial Balance........................ 113
Typeface ................................ 21
User Documentation ............ 200
Using a document template ... 45
Validation ............................ 150
Viewing the presentation . 54, 55
Viruses................................. 207
Visual Basic
code................................. 155
Editor .............................. 155
Web sites ............................... 67
Widow/Orphan control .......... 18
Wizard
Chart ............................... 168
Paste Function................. 146
WordArt................................. 23
Worksheet
linking ............................. 139
renaming ......................... 138
Worksheet structure ............. 185
Wrapping text ...................... 134
Writing Style............................ 6

230

You may photocopy these blank worksheets to use in your Design documentation. Cut them out and
arrange them on an A3 sheet, and design your sheets using different coloured pens for cell names and
formulae, highlighter pens to show protected or unprotected cells, arrows to indicate links between
sheets, etc.

232