insight ic1g, ic2g dc electric tool controller user manual · pdf fileinsight ic1g, ic2g dc...
TRANSCRIPT

INSIGHT IC1G, IC2GDC ELECTRIC TOOL CONTROLLER
USER MANUAL
Document Part Number P7625
Document Edition Number 1.0
Edition Release Date Jan 2004


Table of ContentsPrecautionary Information ............................................................................................vi
Important Safety Information ...................................................................................viGrounding Instructions ........................................................................................... viiEU Wiring ............................................................................................................... viiWarning Symbol Identification............................................................................... viiiAgency Symbol Identification ............................................................................... viiiExplanation of Symbols Used................................................................................ viiiNotice to Save Instructions.................................................................................... viiiDeclaration of Conformity ........................................................................................ ix
Introduction .................................................................................................................... 1Menu Navigation...................................................................................................... 2
Navigation Keypad .............................................................................................. 3Numeric Keypad.................................................................................................. 4Orientation: Screen Layout ................................................................................. 5Screen Elements................................................................................................. 6
Section 1 – Installation .................................................................................................. 8Mounting.................................................................................................................. 8Electrical Connection............................................................................................... 9Attaching the Spindles............................................................................................. 9Attaching Peripheral Devices ................................................................................ 10
Socket Tray Connection and Setup .................................................................. 10How to Test a Socket Tray............................................................................ 10
External Configuration Switch Connection and Setup ...................................... 11How to Test a Configuration Switch.............................................................. 11
Light Box Connection and Setup....................................................................... 11Parallel Printer Connection and Setup .............................................................. 12Serial Printer Connection and Setup................................................................. 12Computer Connection and Setup via the Serial Port ........................................ 12PLC Connection and Setup............................................................................... 12
Activating an Input ................................................................................................. 13Receiving an Output .............................................................................................. 14Ethernet Connection.............................................................................................. 14Field Bus Card Connection.................................................................................... 15Initial Startup ......................................................................................................... 15The System Initialization Screen ........................................................................... 16
© Ingersoll-Rand Company 2004 Page i

EOR Filter ..........................................................................................................16Data Ports..........................................................................................................16Communication Protocol Setup .........................................................................16
Bar Code................................................................................................................17Description.........................................................................................................17
Passive Bar Code mode................................................................................17Active Bar Code mode...................................................................................17
Bar Code in Passive Mode ................................................................................17Bar Code Setup for Passive Mode ................................................................17Bar Code Operation in Passive Mode ...........................................................18
Bar Code in Active Mode ...................................................................................18Bar Code Setup for Active Mode...................................................................18
Other Bar Code Operations ...............................................................................19Disable Tool Until Scan Option......................................................................19Changing from Active to Passive Bar Code Mode ........................................19Changing from Passive to Active Bar Code Mode ........................................19Removing Bar Code Operation .....................................................................19
Bar Code Compatibility With Other Functions ...................................................19Gang Count ...................................................................................................19Auto Increment ..............................................................................................20Powerhead ....................................................................................................20Field Bus .......................................................................................................20
The Spindle Initialization Screen .......................................................................20Reset TR and ASC Buttons...........................................................................21Prog. Tool Switch ..........................................................................................21Auto Calibration.............................................................................................21
Preventative Maintenance Alarms Screen.........................................................23Password and Powerhead Settings Screen ......................................................23
The Password Function.................................................................................23The Powerhead Function ..............................................................................24Assigning a Powerhead.................................................................................24Deleting a Powerhead ...................................................................................25
Parameter Transfer............................................................................................25Tool Memory......................................................................................................26
Section 2 – Programming ............................................................................................27The Setup Menus...................................................................................................27Prerequisites for All Setup Techniques..................................................................27
Page ii © Ingersoll-Rand Company 2004

Setup ..................................................................................................................... 27Quick Setup: Be operational in minutes ............................................................ 27Programming Tightening Strategies in Quick Setup ......................................... 28How to Program a Torque Control Strategy in Quick Setup ............................. 28How to Program an Angle Control Strategy in Quick Setup.............................. 29How to Program a Yield Control Strategy in Quick Setup................................. 29
Advanced Setup .................................................................................................... 29Introduction to Advanced Setup ........................................................................ 29Advanced Setup Tips ........................................................................................ 30
Strategy Sequence Rules ............................................................................. 30Programming Spindles in a Powerhead............................................................ 30
Insert a Step.................................................................................................. 31Clearing a Step ............................................................................................. 31Clearing a Configuration ............................................................................... 31End of Run Data (EOR) ................................................................................ 31The Engage Step .......................................................................................... 31Gang Count................................................................................................... 32Auto Increment.............................................................................................. 32Torque Filter.................................................................................................. 33
Powerhead Specific Operations and Functions..................................................... 33General: Retry Fault Backout Strategy ............................................................. 33
Fault Backout Angle...................................................................................... 33Fault Backout Speed..................................................................................... 33Number of Retries......................................................................................... 34Retry Fault Action ......................................................................................... 34
General: Final Fault Backout Strategy .............................................................. 34Final Fault Backout Angle ............................................................................. 34Final Fault Backout Hi Torque ...................................................................... 34Fault Action ................................................................................................... 34
How to Program a Torque Control Strategy in Advanced Setup........................... 35How to Program an Angle Control Strategy in Advanced Setup ........................... 35How to Program a Yield Override Strategy in Torque Control or Angle Control Strategy in Advanced Setup.................................................................................. 36How to Program a Yield Control Strategy in Advanced Setup .............................. 37How to Program a Backout Strategy in Advanced Setup...................................... 38How to Program a Prevailing Torque Control Strategy in Advanced Setup .......... 39How to Program a Drag Torque Control Strategy in Advanced Setup .................. 40Delay Control Strategy .......................................................................................... 41
© Ingersoll-Rand Company 2004 Page iii

Jog Control Strategy ..............................................................................................41Bypass Parameters................................................................................................41Retorque Parameters.............................................................................................41
Section 3 – Operating the System ..............................................................................42Selecting the Configuration....................................................................................42Monitoring Operation .............................................................................................43
Section 4 – Quality Control..........................................................................................44The Print Menus.....................................................................................................44The Run Menus .....................................................................................................45
Run Main Screen ...............................................................................................45Tightening Curves Screen .................................................................................47Statistics Summary Screen................................................................................48Cycle Log Screen ..............................................................................................49View Parameters Screen ..................................................................................50
The Statistics Menus..............................................................................................51Summary Screen ...............................................................................................51Export Screen ....................................................................................................52Tightening Curves Screen .................................................................................54Cycle Log Screen ..............................................................................................57Statistics Alarm Setup Screen ...........................................................................58
Main Window Statistics Alarms Discussion ...........................................................59
Section 5 – Diagnostics and Troubleshooting ..........................................................60The Diagnostics Menus .........................................................................................60
System Test Screen ..........................................................................................60Discrete Inputs Screen ......................................................................................62Discrete Outputs Screen....................................................................................63Variable Timer Outputs (Paint Marker and Reject Buzzer)................................63Event Log Screen ..............................................................................................64Diagnostic Tool Test Screen..............................................................................66
Shutdown Codes....................................................................................................67The Help Function..................................................................................................68
Help Main Menu.................................................................................................68Go to Help Topic................................................................................................69Exit.....................................................................................................................70
Appendix 1 – System Parameters...............................................................................71Definitions of System Parameters..........................................................................71
Page iv © Ingersoll-Rand Company 2004

Appendix 2 – System Specs and Spare Parts ........................................................... 77Insight Technical Specifications ............................................................................ 77Pinout Tables ........................................................................................................ 78
Insight IC one or two spindle system with no optional I/O boards..................... 78Inputs ............................................................................................................ 78Outputs ......................................................................................................... 78
Insight IC one or two spindle system with one optional I/O board per spindle.. 79Inputs ............................................................................................................ 79Outputs ......................................................................................................... 80
Recommended Spare Parts List............................................................................ 81Inside the Panel..................................................................................................... 83Inside the Main Door ............................................................................................. 84Right Side.............................................................................................................. 85
Appendix 3 – Communication Protocols ................................................................... 86Overview of Host Data Out.................................................................................... 86
Setup Procedure ............................................................................................... 86Descriptions ...................................................................................................... 87
Overview of Custom Host Data Out ...................................................................... 88Setup Procedure ............................................................................................... 88Descriptions ...................................................................................................... 88
Index.............................................................................................................................. 91
© Ingersoll-Rand Company 2004 Page v

Precautionary Information
Form P7709Edition 1January, 2004CCN 04580262
Important Safety Information
Instructions for Insight IC
DC Electric Torque Management Controller
Models IC1G and IC2G controllers are designed for industrial torque, angle or yield management of assembly operations. Use only with Ingersoll-Rand ‘Q’ family of DC Electric Tools.
• IMPORTANT SAFETY INFORMATION ENCLOSED. SAVE THESE INSTRUCTIONS.
• READ AND UNDERSTAND THIS MANUAL BEFORE OPERATING THIS PRODUCT.
• IT IS YOUR RESPONSIBILITY TO MAKE THIS SAFETY INFORMATION AVAILABLE TO OTHERS THAT WILL OPERATE THIS PRODUCT.
• FAILURE TO OBSERVE THE FOLLOWING WARNINGS COULD RESULT IN ELECTRIC SHOCK, FIRE AND/OR SERIOUS PERSONAL INJURY.
• Keep your work area clean and well lit. Cluttered benches and dark areas invite accidents.
• Do not operate this product in explosive atmospheres, such as in the presence of flammable liquids, gases, or dust. Electrical products can create sparks which may ignite the dust or fumes.
• Grounded products must be plugged into an outlet properly installed and grounded in accordance with all codes and ordinances. Never remove the grounding prong or modify the plug in any way. Do not use any adapter plugs. Check with a qualified electrician if you are in doubt as to whether the outlet is properly grounded. If this product should electrically malfunction or break down, grounding provides a low resistance path to carry electricity away from the user.
• Avoid body contact with grounded surfaces such as pipes, metal structures or other electrical products. There is an increased risk of electric shock if your body is grounded.
• Don't expose this product to rain or wet conditions. Water entering this product will increase the risk of electric shock.
• Don't abuse the cord. Never use the cord to pull the plug from an outlet. Keep cords away from heat, oil, sharp edges or moving parts. Replace damaged cords immediately. Damaged cords increase the risk of electric shock.
• Stay alert, watch what you are doing and use common sense when operating this product. Do not use this product while tired or under the influence of drugs, alcohol, or medication. A moment of inattention while operating this product may result in personal injury.
• Use only accessories that are recommended by Ingersoll-Rand for your model. Accessories that may be suitable for one product may become hazardous when used on another product.
• Service must be performed only by qualified repair personnel. Service or maintenance performed by unqualified personnel could result in a risk of injury.
• When servicing this product, use only identical replacement parts. Follow instructions in the Maintenance Section of this manual. Use of unauthorized parts or failure to follow Maintenance Instructions may create a risk of electric shock or injury.
• Always install, operate, inspect and maintain this product in accordance with all applicable standards and regulations (local, state, country, federal, etc.). Failure to follow standards and regulations can cause personal injury.
• Always use specified supply voltage. Incorrect voltage can cause electrical shock, fire, abnormal operation and may result in personal injury.
• Be sure all electric cords and cables are the correct size and all plugs and connectors are tightly secured. Under-sized wire and loose connections can cause electrical shock, fire and may result in personal injury.
• Ensure an accessible emergency electric power shut off has been installed, and make others aware of its location. In the event of an accident, this shut off may minimize personal injury.
• Do not remove any labels. Replace any damaged label. Labels provide information required for safe use of the product.
• Do not modify this product, safety devices, or accessories. Unauthorized modifications may result in electric shock, fire or personal injury.
• Do not use this product for purposes other than those recommended. Personal injury may result.
• Disconnect power and lockout/tagout machine prior to removal, insertion or servicing of any component or module within this product. Failure to follow instructions can result in risk of electric shock and personal injury.
NOTICE
WARNING
Page vi
Refer All Communications to the NearestIngersoll-Rand Office or Distributor.© Ingersoll-Rand Company 2004Printed in U.S.A

Precautionary Information
• Install this product to a vertical structure capable of safely supporting its total weight. Failure to follow installation instructions properly can result in structure collapse and personal injury.
• Verify the operation of the Earth Leakage Circuit Breaker (ELCB) once per month with the test button. A malfunctioning ELCB can result in risk of electric shock or injury.
• Do not attach or place external loads on any part of the Controller. Loading may cause hinge or mounting failure and result in personal injury.
• Replace battery with the same or equivalent type recommended by the battery manufacturer. Observe correct polarity when installing battery. Dispose of used batteries according to battery manufacturer's instructions. Failure to follow instructions could result in personal injury.
GROUNDING INSTRUCTIONS
FAILURE TO OBSERVE THE FOLLOWING WARNINGS COULD RESULT IN ELECTRIC SHOCK, FIRE AND/OR SERIOUS PERSONAL INJURY.
THE CONTROLLER MUST BE EARTH GROUNDED. The controller is equipped with a three prong plug and cable. Comply with all local electrical codes for connecting to Power Supply. The Power Supply must be within voltage and frequency requirements as specified below. DO NOT use the controller on a 2-prong plug outlet with an adapter. Always check that your ground is operating properly on the outlet by a qualified electrician before using the controller.
EU WIRING
THIS APPARATUS MUST BE EARTH GROUNDED
The three conductors of the mains lead attached to this apparatus are identified with color as shown in the table, together with the matching terminal plug. When connecting the mains lead to a plug, be sure to connect each conductor to the correct terminal as indicated.
• Do not allow chemicals such as acetone benzene, thinner, ketone, trichloroethylene to come in contact with the housing, as damage will result.
• Keep the exterior of the unit clean and dry.
WARNING
WARNING
CAUTION
GROUNDING SPECIFICATIONSModel
IdentificationVoltage Requirement (Single Phase)
Volts, Hertz Amperage
IC1G115, 50/60 16 Amps230, 50/60 8 Amps
IC2G115, 50/60 20 Amps230, 50/60 13 Amps
MAINS LEAD PLUG
Conductor Color Mark on the Matching Terminal
Live Brown Red or letter LNeutral Blue Black or letter N
Grounding Green-Yellow Green, Green-Yellow letter G or symbol ⊥
© Ingersoll-Rand Company 2004 Page vii

Precautionary Information
WARNING SYMBOL IDENTIFICATION
AGENCY SYMBOL IDENTIFICATION
EXPLANATION OF SYMBOLS USED
The use of other than genuine Ingersoll-Rand replacement parts may result in safety hazards, decreased tool performance, and increased maintenance, and may invalidate all warranties.
Repairs should be made only by authorized trained personnel. Consult your nearest Ingersoll-Rand Authorized Servicenter.Notice to Save Instructions
SAVE THESE INSTRUCTIONS. DO NOT DESTROY.
When the life of the Product has expired, it is recommended that the product be disassembled, degreased and the parts be separated by material so that they can be recycled.
WARNINGThis is the safety alert symbol. It is used to alert you to potential personal injury hazards. Obey all safety messages that follow this symbol to avoid possible injury or death.
WARNINGThis symbol is to alert the user and service personnel to the presence of uninsulated dangerous voltage that will cause a risk of electrical shock.
WARNING
Read this manual before operating the tool.
European Community Mark
Indicates compliance with relevant EC directives.
Underwriters Laboratory Mark
Indicates compliance with both Canadian and U.S. requirements.
NOTICE
NOTICE
Electrostatic Sensitive DevicesThis symbol is to inform the user and service personnel to the presence of electrostatic sensitive devices. ESD precautions should be used when handling these devices or component damage could result.
Protective Conductor Terminal
This symbol is to inform the user and service personnel to the presence of the protective ground point.
Page viii © Ingersoll-Rand Company 2004

(FR)(DE(IT)(ES)(NL(DA(SV)(NO(FI) (PT)(EL)
(FRDEC(SV(PT
S
D
(FR(DE(IT)(ES(NL(DA(SV(NO(FI)(PT(EL
(FRdel p(NO(EL
M(FR)(EL)
(FR)standmed (FI) α+#λ
S(FR)mer,
D
(FR)(DA)(EL)
A(FR)(SV)
To
B
objet de ce certificat, est conforme aux prescriptions des Directives:) auf die sich diese Erklärung bezieht, den Richtlinien: a cui si riferisce la presente dichiarazione è conforme alle normative delle direttive: a los que se refiere la presente declaración, cumplen con todo lo establecido en las directivas:) waarop deze verklaring betrekking heeft overeenkomt met de bepalingen van directieven:) som denne erklæring vedrører, overholder bestemmelserne i følgende direktiver: som detta intyg avser, uppfyller kraven i Direktiven: ) som denne erklæringen gjelder for, oppfyller bestemmelsene i EU-direktivene:johon tämä vakuutus viittaa, täyttää direktiiveissä: ao qual se refere a presente declaração, está de acordo com as prescrições das Directivas: τα πία αφρά αυτή η δήλωση‚ είναι σύµφωνα µε τις πρλέψεις των Eντλών:
) CERTIFICAT DE CONFORMITÉ (DE) KONFORMITÄTSERKLÄRUNG (IT) DICHIARAZIONE DI CONFORMITÀ (ES) LARACIÓN DE CONFORMIDAD (NL) SCHRIFTELIJKE VERKLARING VAN CONFORMITEIT (DA) FABRIKATIONSERKLÆRING
) FÖRSÄKRAN OM ÖVERENSSTÄMMELSE (NO) KONFORMITETSERKLÆRING (FI) VAKUUTUS NORMIEN TÄYTTÄMISESTÄ ) DECLARAÇÃO DE CONFORMIDADE (EL) DΗΛΩΣΗ ΑΝΑΓΝΩΡΙΣΗΣ
upplier's Name: Ingersoll-Rand Address: Hindley Green, Wigan WN2 4EZ, UK
eclare under our sole responsibility that the product: IC1G, IC2G Insight Tightening System
) Déclarons sous notre seule responsabilité que le produit: ) Erklären hiermit, gemäß unserer alleinigen Verantwortung, daß die Geräte: Dichiariamo sotto la nostra unica responsabilità che il prodotto: ) Declaramos que, bajo nuestra responsabilidad exclusiva, el producto: ) Verklaren, onder onze uitsluitende aansprakelijkheid, dat het produkt: ) Erklærer som eneansvarlig, at nedenstående produkt: ) Intygar härmed, i enlighet med vårt fullständiga ansvar, att produkten: ) Erklærer som eneansvarlig at produktet: Vakuutamme ja kannamme yksin täyden vastuun siitä, että tuote: ) Declaramos sob a nossa exclusiva responsabilidade que o produto: ) Dηλώνυµε #τι µε δική µας ευθύνη τ πρϊ#ν:
) nom du fournisseur: (DE) Name des Herstellers: (IT) nome del fornitore: (ES) nombre roveedor: (NL) naam leverancier: (DA) naam leverancier: (SV) leverantörens namn: ) leverandørens navn: (FI) Toimittajan nimi: (PT) nome do fornecedor: ) #νµα πρµηθεντή:
(FR) adresse (DA) adresse (DE) Adresse(SV) adress (IT) indirizzo (NO) adresse(ES) domicilio (FI) osoite (NL) adres(PT) endereço (EL) διεύθυνσή
odel: IC1G and IC2G Modele: (DE) Modell: (IT) Modello: (ES) Modelo: (NL) Model: (DA) Model: (SV) Modell: (NO) Modell: (FI) Mallia: (PT) Modelo: Μ(ΝΤΕΛΑ
en observant les normes de principe suivantes: (DE) unter Anlehnung an die folgenden Grundnormen entsprechen: (IT) secondo i seguenti ard: (ES) conforme a los siguientes estándares: (NL) overeenkomstig de volgende hoofdstandaards: (DA) ved at være i overensstemmelse følgende hovedstandard(er): (SV) Genom att använda följande principstandard: (NO) ved å bruke følgende prinsipielle standarder: esitetyt vaatimukset seuraavia perusnormeja käytettäessä: (PT) observando as seguintes Normas Principais: (EL) Xρησιµπιώντας τις υθες Aρ+ές Kανισµών:
erial Number Range: P04A 00001 No. Serie: (DE) Serien-Nr.-Bereich: (IT) Numeri di Serie: (ES) Gama de No. de Serie: (NL) Serienummers: (DA) Serienr: (SV) Serienum-
ate: January, 2004
Date: janvier, 2004: (DE) Datum: Januar, 2004: (IT) Data: gennaio, 2004: (ES) Fecha: enero, 2004: (NL) Datum: januari, 2004: Dato: Januar, 2004: (SV) Datum: januari, 2004: (NO) Dato: Januar, 2004: (FI) Päiväys: tammikuu, 2004: (PT) Data: Janeiro, 2004: Ηµερµηνία: Ιανυάρις, 2004
pproved By: Approuvé par: (DE) Genehmigt von: (IT) Approvato da: (ES) Aprobado por: (NL) Goedgekeurd door: (DA) Godkendt af: Godkänt av: (NO) Godkjent av: (FI) Hyväksytty: (PT) Aprovado por: (EL) Eγκρίθηκε απ#:
which this declaration relates, is in compliance with provisions of Directive(s): 98/37/EC, 92/31/EEC, 89/336/EEC and 73/23/EEC
y using the following Principle Standards: EN60335-1, EN55011/A, EN610000-3-2, EN610000-3-3, EN61000-6-2, EN60204
Harry Seddon John Linehan
DECLARATION OF CONFORMITY


IntroductionThe Insight IC Fastening System with Graphic Display is an electronic tightening controller that can be programmed to operate one or two Ingersoll-Rand DC spindles, depending on the model, to perform repetitive fastening operations. The spindles may be individual hand-held tools, or two may be mounted together (called a powerhead) for automated assembly tasks. This manual addresses the Insight control unit only; the spindles are supplied with their own operating manuals.
It is generally not necessary to access the Insight's interior components, so they are not explained in this section. This manual provides information about your Insight IC Fastening System with Graphics Display, and how to install, setup, program, operate, and troubleshoot your controller.
Figure 1 – Main Panel
Status Display
Sub-Menu Options
Spindle Power Switches
Cabinet Lockout
Numeric Keypad
Main Menu Options
Graphics Display Screen
Navigation Keypad
© Ingersoll-Rand Company 2004 Page 1

Introduction
Menu Navigation
1. Use the cursor (arrow) keys to highlight (select) a menu item and then press the Enter key to start that item.
2. Select the menu section you want to view. There are six sets of menu screens from which you can select: These are located above the large window in the lower part of the front panel:
Run The Run menu displays fastening data (torque, angle, and many other parameters) in tabular form after each fastening operation. Actual torque vs. angle fastening curves can also be displayed. In addition, Run mode provides access to other useful data, such as statistical summaries and historical logs of fastening performance. Run screens provide quick, view-only access to information.
Statistics The Statistics menu displays raw fastening data as well as statistical analyses. Individual tightening curves can be overlaid for comparison and analysis. The operator can display statistical trends and set alarm functions to identify out-of-range fastening statistics.
Setup The Setup menu programs the fastening strategy. A quick setup feature allows rapid programming of standard strategies, while advanced setup offers customized strategies. Setup also controls numerous basic system parameters, such as selecting the display language, setting torque measurement units, and creating operator access passwords.
Diagnostics The Diagnostics menu controls Insight's self-diagnosis programs. Insight continually looks for operating problems or component failures. It alerts the operator to problems with the tools or with the controller electronics, and can even suggest root causes and corrective action.
Print The Print menu prints a variety of fixed-format reports on fastening data, statistics, system settings, and so on.
Help The Help menu accesses operating help and displays the information on the graphics display screen.
NOTE: Selecting the Help option displays information about the highlighted menu topic. Use this option whenever you have a question or need an explanation about any field on the screen.
3. Then select the sub-menu from the selected menu. There are up to six sub-menu options for each menu type and they are located to the right side of the main display.
Page 2 © Ingersoll-Rand Company 2004

Introduction
4. To enter numeric data into a field, simply highlight the desired onscreen element, use the numeric keypad to enter numbers and press the Enter key. To enter alphabetic information, highlight the desired onscreen element and press the Expand key. Use the number keys to enter the desired letter. The right arrow key will move the cursor to the next location. When the entry is complete, press the Enter key to confirm the entry.
Navigation KeypadThe arrows on the navigation keypad (see graphic below) are used to navigate among the screen elements (buttons, drop boxes, etc.). When you have navigated to a screen element it becomes highlighted with a border. Pressing the Enter key on the navigation keypad (or the one on the numeric keypad) will activate the highlighted screen element. (The action is similar to clicking on a screen button with a computer mouse.)
Figure 2 – The Directional Keypad
If you activate or enter a screen element with the Expand symbol on it, that symbol indicates the element can be opened to reveal additional options. Pressing the Expand key located in the center of the navigation keypad will open the element and display the options. You can then use the arrow keys to move to the option you want, and then select that option by pressing Enter. The Escape key on the navigation keypad can be used to cancel certain operations.
Directional Arrow Keys
Enter Key
Escape Key
Expand Key
© Ingersoll-Rand Company 2004 Page 3
Introduction
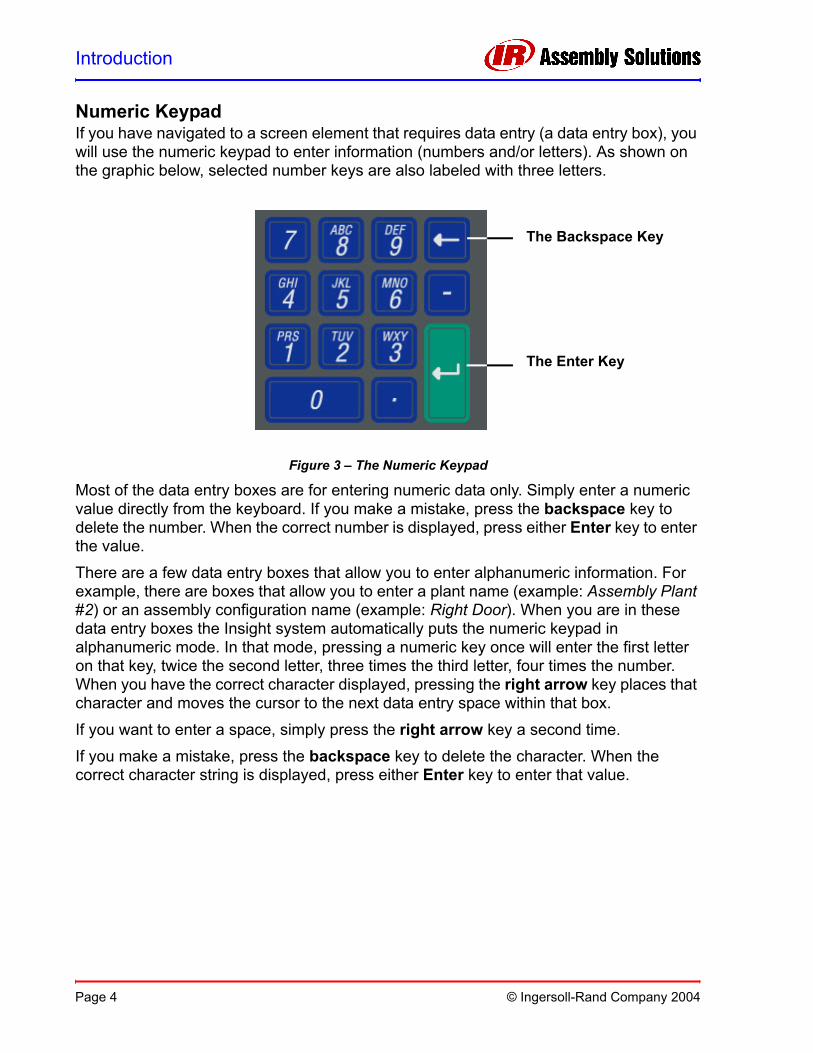
Numeric KeypadIf you have navigated to a screen element that requires data entry (a data entry box), you will use the numeric keypad to enter information (numbers and/or letters). As shown on the graphic below, selected number keys are also labeled with three letters.
Figure 3 – The Numeric Keypad
Most of the data entry boxes are for entering numeric data only. Simply enter a numeric value directly from the keyboard. If you make a mistake, press the backspace key to delete the number. When the correct number is displayed, press either Enter key to enter the value.
There are a few data entry boxes that allow you to enter alphanumeric information. For example, there are boxes that allow you to enter a plant name (example: Assembly Plant #2) or an assembly configuration name (example: Right Door). When you are in these data entry boxes the Insight system automatically puts the numeric keypad in alphanumeric mode. In that mode, pressing a numeric key once will enter the first letter on that key, twice the second letter, three times the third letter, four times the number. When you have the correct character displayed, pressing the right arrow key places that character and moves the cursor to the next data entry space within that box.
If you want to enter a space, simply press the right arrow key a second time.
If you make a mistake, press the backspace key to delete the character. When the correct character string is displayed, press either Enter key to enter that value.
The Backspace Key
The Enter Key
Page 4 © Ingersoll-Rand Company 2004

Introduction
Orientation: Screen LayoutThe Graphics Display Screen has six distinct sections or regions, as shown in the graphic below.
Figure 4 – Graphics Display Screen
Screen Element Description
Header The Header shows the Insight's current menu and sub-menu, the date and the time, and whether the system is locked or unlocked (the padlock icon). If the system is unlocked, the password level to which the system is unlocked (there are four levels) is also shown.
Wizard Box The Wizard Box, located under the header, displays short descriptions of whatever is highlighted on the screen, or may provide abbreviated instructions for performing a task.
Sub-Menu Names The sub-menus are different for each of the four principal Main Menu keys (Run, Statistics, Setup, and Diagnostics).
Main Window The Main Window displays all the parameter selection and data entry fields, and may display tabular or graphical tightening data.
Message Box The Message Box, located at the bottom of the screen, summarizes system status and provides warnings and alarms.
© Ingersoll-Rand Company 2004 Page 5

Introduction
Screen ElementsAll the different menu screens that can appear on the Insight graphics display panel have certain design elements in common. These design elements, called screen elements, appear in the Main Window section of the display, and are shown in the graphics below.
In actual operation, the user will use the arrows on the directional keypad to navigate the cursor to the individual screen elements. A pale blue border around the screen element indicates that the cursor is at that screen element.
Figure 5 – Screen Elements
Data Entry BoxButton
Drop Box Check Box
Display Box
Page 6 © Ingersoll-Rand Company 2004

Introduction
Screen Element Description
Button To click on a button, navigate to it with the arrow keys and press either Enter key.
Drop Box Drop boxes are indicated by the Expand symbol. To open a drop box, navigate to it with the arrow keys and press the Expand key. Use the arrow keys to move to the desired option, then press either Enter key to select that option.
Data Entry Box Navigate to a data entry box with the arrow keys and then use the numeric keypad to enter a value. Press either Enter key to place that value in the data entry box.
Check Box Navigate to a check box using the arrow keys. Press either Enter key to check or uncheck the box.
Display Box Display boxes may contain view-only or editable information. Navigate to the display box with the arrow keys and press Expand to enter the box. Use the arrow keys to scroll up/down and left/right. Press Expand again to move the cursor out of the display box.
© Ingersoll-Rand Company 2004 Page 7

Section 1 – InstallationMounting
Bolt the Insight controller enclosure to a suitable surface near the assembly area using the mounting brackets on the back of the enclosure. See the drawings below for dimensions, information on bracket hole spacing, recommended mounting bolts, door opening clearances, and other mounting information. Make sure the mounting is stable, secure, and level.
Attach the Insight enclosure to a structure capable of safely supporting its total weight. Failure to follow installation instructions properly can result in structure collapse and personal injury.
Figure 6 – Front Dimensional Drawing
WARNING
Leave at least 6" (150mm) room for cables that attach to the right side of the cabinet.
Page 8 © Ingersoll-Rand Company 2004

Section 1 – Installation
Figure 7 – Top Dimensional Drawing
Electrical Connection
Make sure the Main Power Switch is in the Off position.
In the United States, the Insight controller enclosure comes pre-wired with a power cord and the appropriate plug. Insight systems sold outside the USA come with a pigtail (cable tail), and the user must supply the correct power cord connector. Review the electrical circuit information on the Insight's label (on the right-side panel) and in the specifications table. Verify that your electrical circuit meets the Insight's power requirements and circuit breaker ratings. Plug the AC power cord into an appropriate receptacle
It is the user's responsibility to ensure that the Insight controller is installed and wired by a qualified electrician.
Attaching the Spindles
Attach your Ingersoll-Rand spindles (or powerheads) on the right side of the Insight enclosure. One or two spindles may be attached. At the end of each spindle's cable is a twist-to-lock multi-pin connector designated Spindle #1 or Spindle #2. In general, any spindle may be plugged into any spindle connector. However, you may have preferred locations for the spindles based on the fastening applications. Plug each tool into the appropriate connector and lock it in place.
WARNING
© Ingersoll-Rand Company 2004 Page 9

Section 1 – Installation
You can change your Insight Controller from handheld operation to machine mount (or fixtured) mode. A fixtured tool (or machine tool) is one that receives the external start or throttle signal remotely through the Insight's I/O connector on the left-side of the controller. To change from a handheld tool to a fixtured tool, select Machine Mount from the Spindle Operation drop box on the Spindle Initialization screen. To switch back to handheld mode select Handheld Tool from this drop box.
There should be a tool attached to each connector. If no tool is present, when the unit is powered up, no power will be delivered to the empty connector. This is a safety feature. The Insight interprets the lack of a tool as a tool with a possible ground fault, and does not energize that circuit. If a connector is left empty and a tool is added at a later time, first turn the Insight Main Power Switch off, wait five seconds, and turn it back on.
Never connect a spindle to the Insight Controller with the spindle power switch ON.
Attaching Peripheral Devices
NOTE: The current version of this system supports either serial or parallel printers.
Socket Tray Connection and Setup1. Connect the socket tray to the Insight controller's terminal blocks (located on the
controller's left side) with the appropriate accessory cable. (See Appendix 2 – System Specs and Spare Parts for details of the terminal block numbers.)
2. Attach a tool to the Insight controller and turn the controller on using the rotary switch.
3. Push the green Start button on the Spindle Power Switch on the front panel to power the Motor Controller and the tool.
4. Go to the Setup menu and the Spindle Initialization sub-menu screen.5. If your socket tray has more than eight positions, select External Binary from the
Config Select drop box.
If your socket tray has eight or less positions, select External Discrete from the Config Select drop box.
How to Test a Socket Tray 1. After you have connected and setup the device, go to the Diagnostics menu and
the Discrete Inputs sub-menu screen.2. As you lift each socket you should see the appropriate indicator light up on the
screen, indicating activity on the configuration lines. (Note: If you selected External Binary in the Config Select drop box on the Setup menu's Spindle Initialization screen, then the first four configuration lines will indicate the binary encoded number for the configuration selection, with 0000 indicating configuration 1 is selected.)
Page 10 © Ingersoll-Rand Company 2004

Section 1 – Installation
External Configuration Switch Connection and Setup1. Connect the configuration switch to the Insight controller's terminal blocks with the
appropriate accessory cable. (See Appendix 3 – Communication Protocols on page 86 for details on terminal block function numbers.)
2. Ensure each tool is attached to the Insight controller and turn the controller on using the rotary switch.
3. Push the green Start button on the Spindle Power Switch on the front panel to power the Motor Controller and the tool.
4. Go to the Setup menu and the Spindle Initialization sub-menu screen. 5. If your configuration switch has more than eight positions, select External Binary
from the Config Select drop box.
If your configuration switch has eight or less positions, select External Discrete from the Config Select drop box.
Setup of the Configuration switch is now complete.
How to Test a Configuration Switch1. After you have connected and setup the device, go to the Diagnostics menu and
the Discrete Inputs sub-menu screen.2. As you move the switch you should see the appropriate indicator light up on the
screen, indicating activity on the configuration lines. (Note: If you selected External Binary in the Config Select drop box on the Setup menu's Spindle Initialization screen, then the first four configuration lines will indicate the binary encoded number for the configuration selection, with 0000 indicating configuration 1 is selected.)
Light Box Connection and Setup1. Connect the light box to the Insight controller's terminal blocks on the controller's left
side with the appropriate accessory cable. (See Appendix 2 – System Specs and Spare Parts for terminal block details.)
2. Ensure a tool is attached to the Insight controller and turn it on using the controller's rotary switch.
3. Push the green Spindle Power Switch on the front panel to power the Motor Controller and the tool.
4. If you are going to connect a socket tray to the light box, connect it with the appropriate cable and follow the procedure to install the socket tray starting from Step 4.
© Ingersoll-Rand Company 2004 Page 11

Section 1 – Installation
Parallel Printer Connection and Setup1. Connect your printer via a standard parallel printer cable to the 25-pin port labeled
with a printer icon located on the left side of the Insight controller.2. Turn on the printer and make sure it is on line.3. Print a test report to ensure the printer is setup correctly.
Serial Printer Connection and Setup1. Connect your printer via a standard 9-pin serial cable to a serial port located on the
left side of the Insight controller labeled I0I0I. 2. Go to the Setup menu's System Initialization sub-menu screen and select the
desired COM port from the Data Port drop box.3. On the same screen, check that the settings for Baud Rate, Parity, # of Stop Bits,
and Bits Per Character match those settings on the serial printer. Change the settings as necessary.
4. Turn on the printer and make sure it is on line.5. Print a test report to ensure the printer is setup correctly. If you get odd characters
on the printout, verify the settings in Step 3 match those settings on the printer.
Computer Connection and Setup via the Serial Port
NOTE: To connect a computer to the Insight controller you will need a terminal software package, such as Windows 95, 98, or 2000 HyperTerminal, or Win 3.1 Terminal.
1. Connect your computer via a Null Modem 9-pin serial cable to the port located on the left side of the Insight controller labeled I0I0I.
2. Go to the Setup menu's System Initialization sub-menu screen and select the desired COM port from the Data Port drop box.
3. On the same screen, check that the settings for Baud Rate, Parity, # of Stop Bits, and Bits Per Character match those settings on the terminal software package of your computer. Change the settings as necessary.
4. Print a test report to ensure the computer is setup correctly. If you get odd characters on the printout, verify the settings in Step 3 match those settings on the computer.
PLC Connection and Setup
NOTE: All connections to a PLC are made via the Insight's terminal blocks, except data collection. Data collection is done via the serial ports. For data collection, follow the procedures for setup via the serial port. To connect a PLC to the terminal blocks, see the procedure below.
Through the terminal blocks, a PLC can send and receive a variety of outputs to and from the Insight controller. It is important to always use a shielded cable for all PLC signals to
Page 12 © Ingersoll-Rand Company 2004

Section 1 – Installation
the Insight controller, and the shield should only be terminated at the controller end. All inputs and outputs are activated/received in the same way, as discussed below.
Activating an Input
All input signals operate at 24VDC. The Return for the 24V signal must be connected to COM IN for each input bank. It is recommended that you use the internal 24VDC located at the terminals marked 24VDC OUT +/-. Switch the 24VDC back to the desired input signal (FORWARD, REVERSE, FREE SPEED etc).
To use the internal 24VDC, you must connect a jumper wire from 24VDC OUT (-) to COM IN of the input bank. To activate an input you would then provide a contact closure between the desired inputs signals and 24VDC OUT (+).You can daisy chain the COM IN signal to the next input terminal bank as shown in the Input Signal drawing.
Figure 8 – Input Signal Drawing
USER SIGNALS
OUTPUTS
OUTPUTS
CONFIG1
CONFIG2
SP-1 DISABLE
SP-1 ENABLE
FREE SPEED
SOFT START
FORWARD
REVERSE
CONFIG1
CONFIG2
SP-1 DISABLE
SP-1 ENABLE
FREE SPEED
SOFT START
FORWARD
REVERSE
24 V DC OUT
MCEUSER INTERFACE
INPUTS
© Ingersoll-Rand Company 2004 Page 13

Section 1 – Installation
Receiving an Output
All output signals operate at 24VDC. The 24V signal and its return must be connected to the terminal blocks labeled +/- 24VDC EXT on each output connector bank. It is recommended that you use an external 24VDC supply. The output signals will be switched back to you from the appropriate output signal (ACCEPT, REJECT, HIGH TORQUE etc). See the Output Signal drawing. You can daisy chain the +/- 24VDC to the next output bank.
Figure 9 – Output Signal Drawing
Ethernet Connection
See Appendix 3 – Communication Protocols on page 86 for further information.
USER SIGNAL
24VDC MCEOUTPUTS
ACCEPT
REJECT
CYCLE COMP
HIGH TORQUE
LOW TORQUE
HIGH ANGLE
LOW ANGLE
RESERVE
24 V DC EXT
Page 14 © Ingersoll-Rand Company 2004

Section 1 – Installation
Field Bus Card Connection
The Insight IC can connect to a field bus network using either a Profibus card or a Devicenet card. Make sure one of these field bus cards is installed in your system.
Initial Startup
Before starting the Insight IC Fastening System with Graphics Display for the first time, you must go through the following checklist and verify that all of the steps have been completed. If in doubt about any aspect of this checklist, contact Ingersoll-Rand.
The Insight controller enclosure is vertical, level, and securely mounted
For every spindle location that will be used there is a spindle attached to that location in the connector panel (located on the controller's right side), and each spindle connector is locked down.
If the Insight is equipped for attaching external devices (printers, computers, etc.), the proper devices have been attached to the appropriate ports in the connector panel (located on the controller's left side).
The main enclosure is closed and locked.
The AC power cord is plugged into a properly rated electrical circuit. (See the Precautionary Information at the beginning of this manual.)
Once the above checklist is verified, you are ready to power-up the Insight IC Fastening System with Graphics Display.
1. Turn the Main Power Switch to On. This switch sends power to the internal Motor Controllers, the graphics display, and the keypads, but does not send power to the spindle(s) or powerhead.
2. Push the green Spindle Power Switch located on the front panel. The Run Main screen will be displayed on the graphics display panel, indicating the startup was successful and the Insight IC is ready to operate.
• When you want to turn the entire Insight system on or off use the Main Power Switch.
• After turning the system off, wait at least five seconds before turning it on again.
• When you want to turn only the spindles on and off use the Spindle Power Switches.
© Ingersoll-Rand Company 2004 Page 15

Section 1 – Installation
The System Initialization Screen
You can use the Setup menu System Initialization screen to set a broad variety of basic Insight IC parameters. These include General parameters (such as plant name and display language), Date/Time parameters (such as time, date format, and enable daylight savings), and Communications parameters (such as baud rate and communications protocols). Below is a typical System Initialization screen.
Figure 10 – The System Initialization Screen
EOR FilterThe End of Run (EOR) filter determines the data displayed, in addition to torque and angle, at the end of each tightening cycle. Clicking on the EOR Filter button on the System Initialization screen displays a set of parameters that you can set.
Data Ports1. Comm1 – Comm42. Ethernet (see Appendix 3 – Communication Protocols on page 86 for further
information)3. Devicenet (optional)4. Profibus (optional)
Communication Protocol SetupThere are four options in the Comm Protocol drop box.
1. None2. Host Data Out is a handshaking protocol. The host sends a request for data,
Insight sends the data, and the host sends a response that the data was received.
Page 16 © Ingersoll-Rand Company 2004

Section 1 – Installation
3. EOR Data Out sends one line of data after every cycle, without a host request. See Appendix 3 – Communication Protocols on page 86 for further information.
4. Bar Code. Select this option if you have a bar code scanner connected to the COM Port. When you select this option a button labeled Bar Code Settings appears on the lower right corner of the screen. Bar Code use is fully explained in the following section.
Bar Code
DescriptionThe bar code function allows the Insight IC controller to be connected to any serial ASCII bar code scanner. Each spindle can be equipped with its own scanner or in the case of a powerhead one scanner can be assigned to the powerhead. The bar code function has two main operating modes.
Passive Bar Code modeIn this mode bar code data is attached to EOR data and stored in the cycle log, but configurations are not selected via the bar code scan data.
Active Bar Code modeIn this mode configurations are selected via the bar code scan data. The scan data is also attached to the EOR data.
Bar Code in Passive Mode
Bar Code Setup for Passive ModeTo setup the controller for passive bar code operation, follow the directions below.
1. Go to the Setup System Initialization screen.2. Go to the Data Port drop box and select the communications port to which the bar
code scanner will be connected.3. Set the Baud Rate, Parity, # of Data Bits and # of Stop Bits to the same values as
setup for your bar code scanner.4. Go to the Comm Protocol drop box and select Barcode SP1 for spindle 1 or
Barcode SP2 for spindle 2.5. Navigate to the Barcode Setup button and press ENTER.
NOTE: If this is the first time you have setup a scanner for this spindle you will get a warning message indicating that a bar code setup file was not found. Press the ENTER key and a default file will be created.
6. Enter the number of characters that are in the bar code scan into the box labeled Barcode Length.
7. Navigate to the OK button and press ENTER.
© Ingersoll-Rand Company 2004 Page 17

Section 1 – Installation
Bar Code Operation in Passive ModeWhen the bar code function is activated for a spindle, then a Bar code column will be added to the cycle log screen. This column will contain the bar code data that is permanently attached to the cycle (torque and angle) data. Wherever the cycle data is sent (either export cycle log, cycle log report, EOR data or host data out), the bar code data will be sent with it. Upon bootup, if a cycle is run before a barcode is scanned then the bar code data will be recorded as "No Bcode". When a barcode is scanned and is the valid length, then the scan data will be recorded to all subsequent cycles until a new scan is initiated. If an invalid barcode is scanned, then "Invalid BC" will be recorded as the scan data. The bar code data attached to each run can be seen in the Run Main Screen via the "Var1" and "Var2" variable boxes.
Bar Code in Active Mode
Bar Code Setup for Active ModeTo setup the controller for active bar code operation follow the directions below.
1. Go to the Setup System Initialization screen.2. Go to the Data Port drop box and select the communications port the bar code
scanner will be connected to.3. Set the Baud Rate, Parity, # of Data Bits and # of Stop Bits to the same values as
setup for your bar code scanner.4. Go to the Comm Protocol drop box and select Barcode SP1 for spindle 1 or
Barcode SP2 for spindle 2.5. Navigate to the Barcode Setup button and press ENTER.
NOTE: If this is the first time you have setup a scanner for this spindle you will get a warning message indicating that a bar code setup file was not found. Press the ENTER key and a default file will be created.
6. Enter the number of characters that are in the bar code scan into the box labeled Barcode Length.
7. Into the box labeled Use data From, enter the position of the first character in the bar code that specifies the section that will determine which configuration the scan should switch the controller to. In the box labeled to, enter the last character in the bar code that specifies the section that will determine which configuration the scan should switch the controller to.
For example if your bar code has the following structure:
XXXYYYXXXWhere: X= any character in the bar code
Y= characters whose values determine which configuration to switch to.
Then “Use Data From 4 to 6” should be the entry, as the first Y is at character position 4 and the last Y is in character position 6. The actual characters for the bar
Page 18 © Ingersoll-Rand Company 2004

Section 1 – Installation
code section YYY are called the criteria. Different criteria values will instruct the controller to switch to different configurations (see steps 9 and 10 below).
8. Select the first configuration to set criteria, from the configuration selection drop box.
9. Navigate to the top criteria box and press the Expand key. Use the numeric keypad to enter in the criteria value. Note: the keypad will be in alphanumeric mode so once the desired character is on screen, press the right arrow key to move to the next character position. When all characters have been entered press the ENTER key. The numbers of characters entered into each criteria entry box must match exactly the number of characters specified in the Data From and To entry boxes.
10. Repeat steps 9 and 10 until all criteria for all configurations have been entered.11. Navigate to the OK button and press ENTER.
Other Bar Code Operations
Disable Tool Until Scan OptionIn the Bar code settings screen there is a check box labeled “Disable tool until scan”. When checked, the tool will initially be disabled until a valid scan is received. Once enabled the tool will run until either one good cycle is received or until a gang (if programmed) is complete. The tool will then be disabled until another valid scan is received.
Changing from Active to Passive Bar Code ModeTo change from active to passive mode, go to the bar code settings screen and press ENTER on the De-Assign All button.
Changing from Passive to Active Bar Code ModeTo change from passive to active mode go to the bar code settings screen and enter a range in the Use Data From and To entry boxes. Then enter your criteria for each configuration.
Removing Bar Code OperationTo remove bar code operation from a spindle, first go to the System Initialization screen. Then select the com port number that the bar code is connected to, from the Data Port drop box. Go to the drop box labeled Comm Protocol and select none.
Bar Code Compatibility With Other Functions
Gang CountBar code operation will function fully with gang count. The scan data will be attached to all cycles in the gang count. If Disable tool until scan is selected the tool will be disabled once the gang is complete. If a gang count needs to be reset, this must be performed through the I/O or the Run Main screen. A re-scan of a part will not reset the gang count.
© Ingersoll-Rand Company 2004 Page 19

Section 1 – Installation
Auto IncrementAuto increment operation will not function when Disable tool until scan has been selected. In all other cases both bar code and auto increment will operate together. One bar code scan will allow all configurations in auto increment to operate when in active mode. The scan should be set up to select the first configuration in the auto increment chain.
PowerheadFor the barcode function to be used with a powerhead, the powerhead must be created first. Once the powerhead has been created, set up bar code operation for spindle number 1 in the powerhead. This will assign barcode operation to all the spindles in the powerhead. The scan data will be added to all spindles in the powerhead.
Field BusA bar code scan can be added to tightening data on a Device Net or Profibus equipped Insight IC. In the field bus settings screen the user must specify where the scan data will come from. The user has options to send the scan data to the controller via the field bus or via a serial port on the controller through a regular scanner. With field bus equipped controller, the bar code always functions in the Passive mode (i.e. no configuration selection via bar code) and the “Disable tool until scan” option is not functional. This is because the field bus has control of the configuration selection and enable/disable tool functions.
The Spindle Initialization ScreenYou will use this screen to identify which Ingersoll-Rand spindles (tools) are attached to the Insight controller, and to set certain basic spindle operating parameters, such as torque units, start mode, tubenut and so on. This screen also has an Auto Calibration button for calibrating the spindles against an external transducer. Tool calibration information and preventative maintenance alarms can be entered into the tools internal memory. Below is the Spindle Setup screen.
Figure 11 – The Spindle Setup Screen
Page 20 © Ingersoll-Rand Company 2004

Section 1 – Installation
Reset TR and ASC Buttons Activating the Reset TR or ASC button, will return the parameter back to the factory set value.
Prog. Tool SwitchThe QE series tools have a user activated switch onboard that can be programmed to accomplish a particular function. See below for functions that can be assigned to this switch.
Tube Nut 1For this function to activated, tube nut operation must be selected on this screen. When this mode is selected, activating the switch acts as the reverse and throttle for the tool.
Tube Nut 2For this function to be activated, tube nut operation must be selected on this screen. When this mode is selected, activating the switch selects reverse direction. The tool throttle must then be pressed (while the tool programmable switch is activated) to run the tool in reverse.
Gang AdvanceThe gang advance function allows the tool operator to manually advance a gang count by one. Activation of the programmable tool switch shall increment the gang counter by one. The gang advance will only advance the gang count by one in-between cycles. This is in effect an operator override for one bad tightening operation in gang count.
Auto Calibration Auto calibration allows you to calibrate the Transducer Range for the Insight's tool(s) using an external torque transducer. Clicking on the Auto Calibration button on the main Spindle Initialization screen brings up the first of three auto-calibration screens, as shown below.
Figure 12 – The First Auto Calibration Screen
© Ingersoll-Rand Company 2004 Page 21

Section 1 – Installation
Follow the instructions in the wizard box at the top of the screen. When you press the Begin Calibration button, the second auto-calibration screen displays, as shown below.
Figure 13 – The Second Auto Calibration Screen
Follow the instructions in the wizard box to capture each calibration reading. The Status box will remind you where you are in the calibration cycle. Use the Insight's numeric keypad to enter the calibration readings in the Cycle # Measured Reading box. When you have entered readings for the correct number of cycles, the Continue button will become active. Pressing the Continue button will bring up the final auto-calibration screen, as shown below.
Figure 14 – The Third Auto Calibration Screen
This third screen displays the calibration results. You can either accept or reject the new calibration factor. If you reject it, the existing Transducer Range value is retained. After making the selection you are asked if you wish to print an Auto Calibration report. Finally, you will be returned to the main Spindle Initialization screen.
Page 22 © Ingersoll-Rand Company 2004

Section 1 – Installation
Preventative Maintenance Alarms ScreenThe preventative maintenance and alarms screen allows you to set alarm reminders for regular tool preventative maintenance. Up to five different alarms can be set with either a number of cycles or days duration. When an alarm is activated, it will appear in the systems warnings and dialog box, until it is reset from this screen. All preventative maintenance data is stored in the tools onboard memory chip.
Password and Powerhead Settings ScreenThis screen is used to set the Insight's four levels of user passwords, and to setup certain powerhead functions. Below is the Password and Powerhead Settings screen.
Figure 15 – Password and Powerhead Settings Screen
The Password FunctionAccess to Insight IC screens is password controlled. A few screens require no passwords, but most require a certain level of password authorization to make changes to the screen settings. In addition to a no-password option (called Level 0) the Insight has four owner-controlled access levels each requiring a unique four-digit password. Level 1 allows the least access to Insight's functions, while Level 4 allows complete access. The password levels have been designed to accommodate typical industrial job functions. Those job functions, and the factory set password default settings, are shown in the table below.
Password Level Typical Job Functions Factory Set Default Password
Level 0 No password protection NoneLevel 1 Operator, Electrical or Mechanical Maintenance 1111Level 2 Insight IC Programmer 2222Level 3 Quality Control Engineer 3333Level 4 Factory or Line Supervisor 4444
© Ingersoll-Rand Company 2004 Page 23

Section 1 – Installation
If you do not wish to use any passwords (that is, allow all users access to every screen), you must sign in at Level 4 and the set the Access Lockout Time drop box to OFF. If a user attempts to access or change a screen to which he or she is not authorized, a dialogue box will appear requesting the necessary password level. To change a password, the user must sign in on that particular level. The table below shows the password level required to access the Insight IC Menu and Sub Menu screens.
The Powerhead FunctionThe powerhead function offers the user powerful control over tightening operations. The first step in understanding this function is to understand the function's terminology. A Powerhead is two spindles that both start with a common start signal and have a common configuration. A Group is one or more spindles in a powerhead that have an identical number of fastening steps. A Step is one fastening operation (strategy), such as torque control, angle control, etc. A Configuration is a step or sequence of steps that define a distinct tightening operation. For the Insight IC each spindle or powerhead can have up to 32 configurations. A sync (synchronization) point is a parameter that can be set to require both spindles in a group to complete the step before starting the next step.
To perform various powerhead operations, follow the steps below.
Assigning a Powerhead1. Select On from the Powerhead Operation drop box.2. If desired, enter a name in the Powerhead Name data entry box.3. Select the group number for each spindle.To edit a powerhead follow the above steps, changing the group numbers as desired.
Menu Sub Menu Password Level RequiredRun Main 0
Tightening Curves 0Stats Summary 0Cycle Log 2, 3, 4View Parameters 0
Statistics Summary 2, 3, 4Export 2, 3, 4Tightening Curves 2, 3, 4Cycle Log 0Stats Alarm 2, 3, 4
Setup Quick Setup 2, 4Advanced Setup 2, 4System Initialization 2, 4Spindle Initialization 2, 4Password and Powerhead All passwords can change their value.
Page 24 © Ingersoll-Rand Company 2004

Section 1 – Installation
Deleting a Powerhead1. Select Off from the Powerhead Operation drop box.2. When the warning box appears, select Yes.
Parameter Transfer The parameter transfer function is used to download or save Insight IC parameters and user upgradable versions of the Insight application software. The Parameter Transfer screen is shown below.
Figure 16 – The Parameter Transfer Screen
The Load Data button allows data transfer (data refers to Configuration Parameter Sets and System Settings) using either a floppy disk inserted in the floppy disk drive or via a PCMCIA – Flash Disk inserted in the PCMCIA slot in the Insight IC Controller.
The Save Data button allows data (data refers to Configuration Parameter Sets, System Settings and Tightening Data Reports) from the Insight IC Controller to be downloaded and saved on either a floppy disk or PCMCIA – Flash Disk.
The Load Software button allows user upgradable Insight IC application software to be uploaded.
• To upload via Floppy or PCMCIA, select the relevant check box and then select Load Software.
• Only use the Flash Disk option to upgrade MCE (Motor Control Electronics) software after first loading Olympus.bin to Config Directory via FTP.
© Ingersoll-Rand Company 2004 Page 25

Section 1 – Installation
Tool Memory The View Tool Memory button presents the user with a screen displaying all of the parameter values stored on the tools internal memory chip. Data stored on this chip includes, model number, serial number, calibration values, assembly date, number of cycle runs etc.
Page 26 © Ingersoll-Rand Company 2004

Section 2 – ProgrammingThe Setup Menus
The Setup menu and sub-menus are used to program tightening strategies and to set a broad variety of important system parameters. Both basic tightening strategies as well as advanced, customized strategies are created in the Setup menu. In addition to strategies, you can use the Setup menu to set many basic system parameters, such as date and time, display language, measurement units, and communications protocols. The Setup menu is also used to create passwords for controlling access to Insight's software and data records.
Prerequisites for All Setup Techniques
You must know how to use the directional keys, the Expand key, and the ENTER key to navigate on the screen, open a drop box, and select a parameter.
You must know how to use the numeric keypad to enter data.
Setup
Quick Setup: Be operational in minutesThis menu screen is used to get you up and running quickly. Many simple fastening operations can be set up from this screen. These include single-step torque control, angle control, or yield control fastening strategies. Only basic fastening parameters are displayed with this screen. If a more complex, multi-step strategy is needed, or to get access to all possible programming parameters, proceed to the Advanced Setup Menu Screen.
The Quick Setup screen allows you to set key parameters (torque, angle, spindle speed, etc.) for your tightening strategy. You may pre-program up to 32 separate tightening operations per spindle (called Configurations). The parameters displayed on the screen will vary, depending upon the fastening strategy selected.
The goal of this section is to have your Insight IC Fastening System with Graphics Display up and running in just a few minutes. Before proceeding with the steps below, make sure you have completed the steps described in Initial Startup.
© Ingersoll-Rand Company 2004 Page 27

Section 2 – Programming
Programming Tightening Strategies in Quick Setup
Figure 17 – Setup Quick Setup Menu
How to Program a Torque Control Strategy in Quick Setup
Procedure 1. Press the Setup Main Menu key. The Quick Setup screen will be displayed.2. Go to the Select Spindle drop box. Spindle 1 is the default value. If you want to use
Spindle 1 go to Step 3. If you want to use Spindle 2, open the drop box and select Spindle 2.
3. Go to the Configuration drop box, open it, and select the configuration number you wish to program.
4. The Strategy drop box will display Torque (since this is the default strategy). 5. Using the numeric keypad, enter the desired torque value for your fastening
operation into the Torque Target data entry box. (Make sure the torque units displayed are the units you want to use. If not, press the Spindle Initialization Sub-Menu key and change the units in the Torque Units drop box.)
6. The Insight software automatically assigns values to the other torque control parameters displayed in the main menu screen. If you want to edit any of these values, navigate to the data entry box and enter a new value using the numeric keypad.
Page 28 © Ingersoll-Rand Company 2004

Section 2 – Programming
How to Program an Angle Control Strategy in Quick Setup
Procedure1. Press the Setup Main Menu key. The Quick Setup screen will be displayed.2. Go to the Select Spindle drop box. Spindle 1 is the default value. If you want to use
Spindle 1 go to Step 3. If you want to use Spindle 2, open the drop box and select Spindle 2.
3. Go to the Configuration drop box, open it, and select the configuration number you wish to program.
4. Go to the Strategy drop box and select the Angle strategy.5. Using the numeric keypad, enter the desired angle value for your fastening
operation into the Angle Target data entry box.6. The Insight software automatically assigns values to the angle parameters
displayed in the main menu screen. If you want to edit any of these values, navigate to the data entry box and enter a new value using the numeric keypad.
How to Program a Yield Control Strategy in Quick Setup
Procedure1. Press the Setup Main Menu key. The Quick Setup screen will be displayed. 2. Go to the Select Spindle drop box. Spindle 1 is the default value. If you want to use
Spindle 1 go to Step 3. If you want to use Spindle 2, open the drop box and select Spindle 2.
3. Go to the Configuration drop box, open it, and select the configuration number you wish to program.
4. Go to the Strategy drop box and select the Yield strategy.5. Using the numeric keypad, enter the desired yield point for your fastening operation
into the Yield Point % data entry box (50% is recommended). 6. The Insight software automatically assigns values to the yield control parameters
displayed in the main menu screen. If you want to edit any of these values, navigate to the data entry box and enter a new value using the numeric keypad.
Advanced Setup
Introduction to Advanced SetupThe Advanced Setup Menu screen allows you to set a very broad range of tightening parameters. This screen is used if a multi-step fastening strategy is required, and is more complex than the simple torque control, angle control, or yield control strategies offered under the Quick Setup Menu screen. Advanced Setup may also be used if you want to use one of these three basic strategies, but want to be able to adjust all the possible parameters for the strategy.
© Ingersoll-Rand Company 2004 Page 29

Section 2 – Programming
Advanced Setup also gives you access to all of Insight's other, more complex, tightening strategies, such as prevailing torque and drag torque. Finally, Advanced Setup allows you to combine these strategies into a series of up to 128 separate and sequential steps, allowing you to create complex and specialized fastening schemes tailored to your unique assembly requirements.
Figure 18 – Advanced Setup Menu
Advanced Setup Tips In this section we discuss several topics that are essential to understanding the Advanced Setup function.
Strategy Sequence RulesThe Insight’s 128 possible tightening steps and up to 32 separate configurations can be programmed in virtually any sequence. However, there are a few sequence rules dictated by the purpose of certain strategies. Those rules are:
1. The Engage Step must be selected prior to any Advanced Setup tightening strategies. See page 35 for details of the engage step.
2. A Retorque Control strategy must always be preceded by a step programmed for Torque Control or Angle Control.
3. A Jog Control strategy must be the first step after the Engage step.4. The Bypass strategy (which applies only to powerheads) must always be the first
and only step.
Programming Spindles in a PowerheadYou can program the two spindles in a powerhead in a variety of ways. The spindles can be programmed identically, or the spindles can be divided into groups. If divided into
Page 30 © Ingersoll-Rand Company 2004

Section 2 – Programming
groups, those spindles in a group must be programmed the same. The Insight IC keeps track of the spindles in a powerhead and how they are grouped and programmed. If you attempt to change the programming for a spindle that is part of a powerhead, the Insight will bring up a dialogue box for you to confirm the change. If confirmed, the Insight automatically changes the programming for the spindles in that group, where appropriate.
Programming powerheads and their groups can be complex. However, the process is explained fully in the Password and Powerhead Settings section.
Insert a StepSometimes in a complex tightening strategy, you may want to insert one or more steps. To do this, select the Insert after above step button, then program the desired programming strategy in that step.
Clearing a StepSometimes you may want to clear a previously programmed step. You do that by going to the Strategy drop box for the step and selecting None. If you move to another screen and subsequently return to the Advanced Setup screen, you will find that the Insight IC has removed that step from the sequence and left-adjusted all of the subsequent steps.
Clearing a ConfigurationSometimes you may want to eliminate an entire configuration, that is the entire sequence of steps for a particular fastening sequence (including the Engage step). To do this, simply click on the Clear All Steps button on the Advanced Setup screen. A dialogue box will appear for you to confirm the deletion.
End of Run Data (EOR)Remember, the Insight IC controller saves End of Run data at the end of each configuration. If you program configurations with multiple steps, you may only want to retain EOR data for the final step. In which case EOR Data should be set to Disable (which is the default setting) for the intermediate steps.
NOTE: However, if a tightening fails for any reason, the Insight IC controller always records the EOR data. (This is done to help you determine why the tightening failed.) So even if you have set EOR Data to Disable for the intermediate steps in a configuration, if you have a failure you will have the EOR data to review.
The Engage StepThe Engage Step drop box only displays parameters for the Engage strategy. These parameters allow you to specify exactly how the Insight spindle will engage the fastener. The Engage parameters are listed below:
• Tool direction
• Soft Speed
• Reverse Speed
• Acceleration
© Ingersoll-Rand Company 2004 Page 31

Section 2 – Programming
• Gang Count
• Auto Increment
• Cycle time out
• Torque Filter
• Fault backout speed*
• Fault backout angle*
• Final fault backout Hi torque*
• Retry fault action*
• Number of retries*
• Final fault backout angle*
• Fault action*
• Tube nut reverse speed
• Tube nut reverse threshold
* Powerhead function only
Some of these parameters are self explanatory or are described in the Appendix 1 – System Parameters section of this manual. The Gang Count, Auto Increment and Torque Filter parameters require further description.
Gang CountSome assemblies have multiple bolts that must be fastened in sequence (called a "Gang"). For example, if you have a four-bolt assembly you can set the Gang Count to 4. Insight will then keep track of each fastening and when all four fastenings have been completed within specification, a "Gang Complete" message will appear on the display screen.
If the Gang Count is successfully completed, in addition to displaying “Gang Complete” on the screen, the controller provides a gang complete output signal on the spindle’s I/O connector. There are two ways to reset the Gang Count.
1. There is a dedicated reset conductor on the spindle I/O connector.2. While on the Run Main screen, pressing 0 (zero) and then the Enter key will reset
the Gang Count for spindle 1. For a two-spindle controller, pressing 0 twice (00) and then Enter will reset spindle 2.
Auto IncrementAuto Increment allows the Insight to move through a specific sequence of fastening configurations. For example, if you have programmed six different configurations numbered 1 – 6, you can instruct the Insight to perform fastening in the sequence 1-4-6 and 2-3-5. To do this you set the Auto Increment parameter, which is one of the parameters in the Engage strategy drop box. By using this parameter to tell the Insight which configuration to go to next, the system will continue to step through all
Page 32 © Ingersoll-Rand Company 2004

Section 2 – Programming
programmed configurations until it reaches the configuration with the highest configuration number. After completing that configuration, the system will go to the first programmed configuration for the next cycle. Note that the user still has to activate the tool (for example, pull the trigger on a handheld tool) for each step in the Auto Increment sequence.
Auto Increment can be reset in various ways, and has other operating features. Contact Ingersoll-Rand for additional information.
Torque FilterThe Torque Filter parameter is used to filter high frequency noise or “ripple” from the torque signal from the strain gauge transducer to provide a more accurate torque measurement.
The selectable values range from 75Hz to 750Hz and represent the bandwidth of the filter. As a guideline, use:
• Lower values for soft joints such as gasket applications, or those that generate a high angle of rotation, and
• Higher values for hard joints, or those that generate a low angle of rotation.
• The default setting is 150Hz.
When calibrating DC Electric tools, it is advantageous to set the external transducer monitor to the same frequency as the Insight IC controller, in order to get accurate correlation between the two devices.
The parameters marked with an asterisk are specific to the Powerhead function and are described below:
Powerhead Specific Operations and Functions
General: Retry Fault Backout StrategyThis is a strategy that can be programmed in the engage step using various parameters that allows the controller to retry a spindle or spindles when a tightening fault occurs. Whenever a retry fault backout is initiated, the spindle(s) will backout the specified number of degrees and restart the tightening from step 1. The parameters in the engage step that make up retry fault backout are as follows:
Fault Backout AngleThis parameter defines the number of degrees the spindle will rotate during the backout phase. This parameter can be set to different values for each spindle.
Fault Backout SpeedThis parameter sets the speed that the tool will run during the fault backout operation. This parameter can be set to different values for each spindle.
© Ingersoll-Rand Company 2004 Page 33

Section 2 – Programming
Number of RetriesThis defines the number of times a spindle can retry the fastening if a tightening fault occurs. If set to one, the spindle will retry once if a tightening fault occurs. This value must be the same for all spindles in a group or if “Retry Fault Action” is set to 3, the value must be the same for all spindles in a powerhead.
Retry Fault ActionThis parameter defines what spindles will backout when a tightening fault occurs. If this parameter is set to zero, then retry fault backout operation is disabled. If set to 0, 1, or 2, this parameter must be set to the same value for all spindles in a group. If this parameter is set to a value of 3, then it must be set to the same value for all spindles in the powerhead.
General: Final Fault Backout StrategyThis is a strategy that can be programmed in the engage step using various parameters, that allows a controller to do a final backout if all retries have failed. If Retry Fault Action is set to zero and a spindle fails, then the controller will automatically go to the Final Fault Backout (if programmed). The parameters in the engage step that make up Final Fault Backout are as follows:
Final Fault Backout AngleThis parameter defines the number of degrees the spindle will rotate during the final fault backout phase. This parameter can be set to a different value for each spindle.
Final Fault Backout Hi TorqueThis is the high torque limit for the final fault backout operation. This is usually set to the max torque of the tool.
Fault ActionThis parameter defines what spindles will backout when a final fault backout occurs. If this parameter is set to zero, then final fault backout operation is disabled. This value must be the same value for all spindles in a powerhead.
Retry Fault Action Value Operation0 Faulted spindle stops, no retry
1 Only faulted spindles retry
2 All spindles in faulted spindles group, retry
3 All spindles in powerhead retry
Fault Action Value Operation0 Faulted spindle stops, no Final Backout
1 Only faulted spindles backout
2 All spindles in faulted group backout
3 All spindles in powerhead backout
Page 34 © Ingersoll-Rand Company 2004

Section 2 – Programming
How to Program a Torque Control Strategy in Advanced Setup
The Torque Control Strategy is based on reaching a programmed torque target. For any of the Step #n drop boxes, if Torque Control is selected as the strategy, a specific list of parameters is displayed. See Appendix 1 – System Parameters for definitions of the parameters.
Procedure1. Press the Setup Main Menu key and then the Advanced Setup Sub-Menu key.2. In the Select Spindle drop box select the spindle # you want to program.3. In the Config # drop box select the configuration # you want to program.4. Go to the Engage step drop box and select Engage. (If the Engage parameter
default values are acceptable, you can skip to step 6.)5. Go to the list of parameters just below the Engage step drop box and navigate
down through the parameter list. You must enter values (or accept the default values) for the Required Parameters. As appropriate, you may also enter values or accept the default values for the Optional Parameters.
6. Go to the Step #1 Strategy drop box and select Torque.7. Go to the list of parameters just below the Step #1 Strategy drop box and navigate
down through the parameter list. You must enter values (or accept the default values) for the Required Parameters. As appropriate, you may also enter values or accept the default values for the Optional Parameters.
8. If you want to program additional tightening steps, repeat Steps 6 and 7 as appropriate for the desired step.
How to Program an Angle Control Strategy in Advanced Setup
The Angle Control Strategy is based on a programmed angle of rotation after the torque threshold is reached. For any of the Step #n drop boxes, if Angle Control is selected as the strategy, its parameters are displayed. See Appendix 1 – System Parameters for definitions of all parameters.
Procedure1. Press the Setup Main Menu key and then the Advanced Setup Sub-Menu key. 2. In the Select Spindle drop box select the spindle # you want to program. 3. In the Config # drop box select the configuration # you want to program. 4. Go to the Engage step drop box and select Engage. (If the Engage parameter
default values are acceptable, you can skip to step 6.)5. Go to the list of parameters just below the Engage step drop box and navigate
down through the parameter list. You must enter values (or accept the default
© Ingersoll-Rand Company 2004 Page 35

Section 2 – Programming
values) for the Required Parameters. As appropriate, you may also enter values or accept the default values for the Optional Parameters.
6. Go to the Step #1 Strategy drop box and select Angle. 7. Go to the list of parameters just below the Step #1 Strategy drop box and navigate
down through the parameter list. You must enter values (or accept the default values) for the Required Parameters. As appropriate, you may also enter values or accept the default values for the Optional Parameters.
8. If you want to program additional tightening steps, repeat Steps 6 and 7 as appropriate for the desired step.
How to Program a Yield Override Strategy in Torque Control or Angle Control Strategy in Advanced Setup
As previously described, the Torque Control tightening strategy and the Angle Control tightening strategy are based on reaching a programmed torque or angle target respectively.
The Insight IC Controller has an additional selectable feature in Advanced Setup for these two tightening strategies. This is called Yield Override.
When selecting Torque Control or Angle Control in advanced setup, there is an additional check box for Yield Override. When this option is selected, the tightening strategy works like a normal Torque or Angle strategy except it additionally checks that none of the joint components has yielded before the target torque or angle is reached.
If a yield condition is reached before the target torque or angle is reached, a yield override condition is indicated. If the torque or angle achieved at the yield override condition point lies within the programmed torque or angle limits, the default condition is that the tightening will be accepted. If the user does not want to accept this condition, select Fail on Yield Override, in which case the tightening will be rejected, both torque Hi and Lo lamps will be illuminated and a Yield Override Failure will appear in the Message Box.
In cases where yield is detected before the low limit parameter, Final parameter is below low limit in yield override appears in the Message Box.
Procedure1. Press the Setup Main Menu key and then the Advanced Setup Menu key.2. In the Select Spindle drop box, select the spindle # you want to select.3. In the Config # drop box, select the config # you want to select.4. Go to the Engage step drop box and select Engage. (If the Engage parameter
default parameters are acceptable, you can skip to Step 6.)5. Go to the list of parameters just below the Engage step drop box and navigate down
through the parameter list. You must enter values (or accept the default values) for
Page 36 © Ingersoll-Rand Company 2004

Section 2 – Programming
the Required Parameters. As appropriate, you may also enter values or accept default values for the Optional Parameters.
6. Go to the Step #1 strategy drop box and select Torque or Angle as required.7. Go to the list of parameters just below the Step #1 Strategy drop box and navigate
down through the parameter list. You must enter values (or accept the default values) for the Required Parameters. As appropriate, you may also enter values or accept default values for the Optional Parameters.
8. Scroll down to Yield Override check box to enable this feature.9. Scroll to Fail on Yield Override to select this feature.10. If you want to program additional tightening steps, repeat Steps 6 and 7 as
appropriate for the desired step.
How to Program a Yield Control Strategy in Advanced Setup
The Yield Control strategy allows the tightening to be based on the onset of bolt yield. For any Step #n Strategy drop boxes, if Yield Control is selected as the strategy, its parameters will be displayed. See Appendix 1 – System Parameters for definitions of all parameters.
Procedure1. Press the Setup Main Menu key and then the Advanced Setup Sub-Menu key.2. In the Select Spindle drop box select the spindle # you want to program. 3. In the Config # drop box select the configuration # you want to program.4. Go to the Engage step drop box and select Engage. (If the Engage parameter
default values are acceptable, you can skip to step 6.)5. Go to the list of parameters just below the Engage step drop box and navigate down
through the parameter list. You must enter values (or accept the default values) for the Required Parameters. As appropriate, you may also enter values or accept the default values for the Optional Parameters.
6. Go to the Step #1 Strategy drop box and select Yield.7. Go to the list of parameters just below the Step #1 Strategy drop box and navigate
down through the parameter list. You must enter values (or accept the default values) for the Required Parameters. As appropriate, you may also enter values or accept the default values for the Optional Parameters.
8. If you want to program additional tightening steps, repeat Steps 6 and 7 as appropriate for the desired step.
NOTE: Yield Control – I-R recommends setting the torque threshold value to 30% - 60% of the expected yield torque. In general, soft joints require high percentage values to ensure joint consolidation has occurred before yield detection calculations are commenced.
© Ingersoll-Rand Company 2004 Page 37

Section 2 – Programming
How to Program a Backout Strategy in Advanced Setup
The Backout Control strategy allows the user to unfasten bolts for a programmed number of degrees and at a programmed speed. If the torque encountered during the backout exceeds the Torque Hi Limit setting, the operation is aborted.
For any of the Step #n drop boxes, if Backout Control is selected as the strategy, its parameters are displayed. See Appendix 1 – System Parameters for definitions of the parameters.
Procedure1. Press the Setup Main Menu key and then the Advanced Setup Sub-Menu key.2. In the Select Spindle drop box select the spindle # you want to program. 3. In the Config # drop box select the configuration # you want to program. 4. Go to the Engage Step drop box and select Engage. (If the Engage parameter
default values are acceptable, you can skip to step 6.)5. Go to the list of parameters just below the Engage step drop box and navigate down
through the parameter list. You must enter values (or accept the default values) for the Required Parameters. As appropriate, you may also enter values or accept the default values for the Optional parameters.
6. At the appropriate Step #n Strategy drop box select Backout.7. Go to the list of parameters just below the Step #n Strategy drop box and navigate
down through the parameter list. You must enter values (or accept the default values) for the Required Parameters. As appropriate, you may also enter values or accept the default values for the Optional Parameters.
Page 38 © Ingersoll-Rand Company 2004

Section 2 – Programming
How to Program a Prevailing Torque Control Strategy in Advanced Setup
DescriptionThis is useful for thread forming applications where the thread forming torque may have a value similar to, or even greater than, the final tightening torque.
This strategy monitors the initial peak prevailing or driving torque to ensure that it falls between expected limits (cut-in zone). It then checks the subsequent mean and peak prevailing torque as the thread is formed (prevailing zone). Finally, as the fastener seats, the final tightening strategy is invoked which may be torque control, angle control, or yield controlled tightening (tightening zone).
Figure 19 – Prevailing Torque Tightening Strategy
Procedure1. Press the Setup Main Menu key and then the Advanced Setup Sub-Menu key.2. In the Select Spindle drop box select the spindle # you want to program.3. In the Config # drop box select the configuration # you want to program.4. Go to the Engage step drop box and select Engage. (If the Engage default values
are acceptable, you can skip to step 6.)5. Go to the list of parameters just below the Engage step drop box and navigate down
through the parameter list. You must enter values (or accept the default values) for the Required Parameters. As appropriate, you may also enter values or accept the default values for the Optional parameters.
6. Go to the Step #1 Strategy drop box and select Prevailing Torque.7. Go to the list of parameters just below the Step #1 Strategy drop box and navigate
down through the parameter list. You must enter values (or accept the default values) for the Required Parameters. As appropriate, you may also enter values or accept the default values for the Optional Parameters.
8. You must now program a torque or angle step after the prevailing torque step.
Initial peak prevailing torque
Final tightening torque
Cut-in Zone
Prevailing Zone
Tightening Zone
© Ingersoll-Rand Company 2004 Page 39
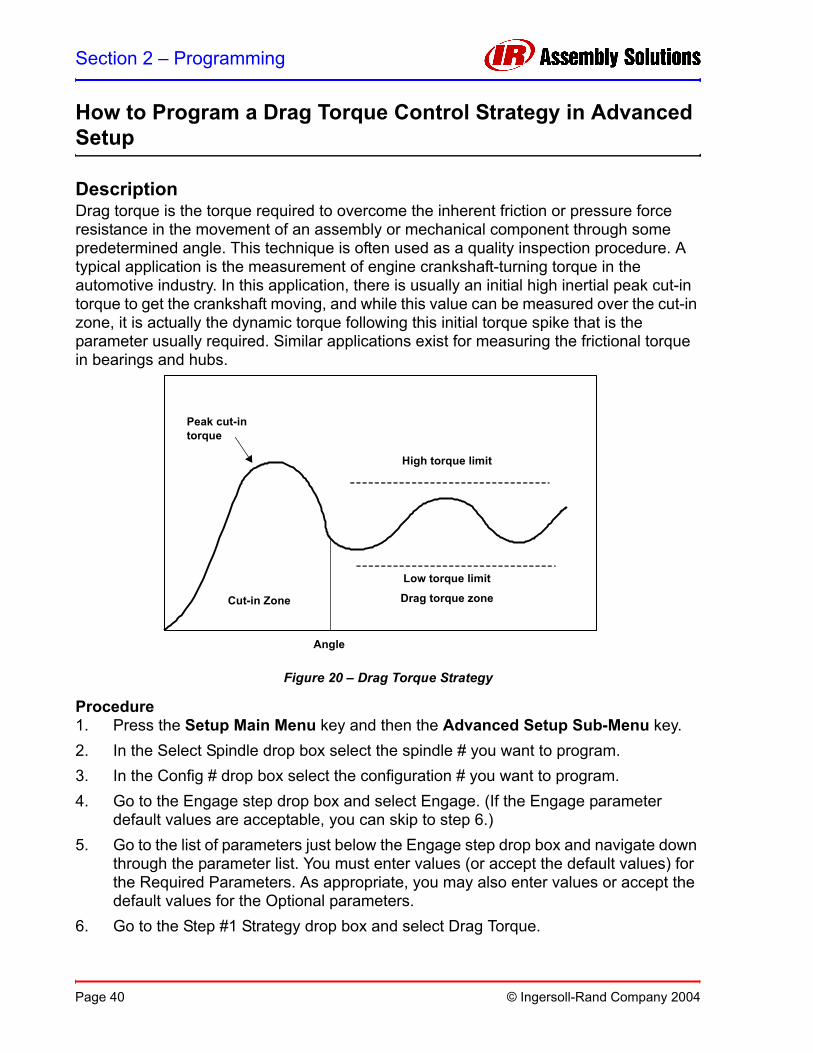
Section 2 – Programming
How to Program a Drag Torque Control Strategy in Advanced Setup
DescriptionDrag torque is the torque required to overcome the inherent friction or pressure force resistance in the movement of an assembly or mechanical component through some predetermined angle. This technique is often used as a quality inspection procedure. A typical application is the measurement of engine crankshaft-turning torque in the automotive industry. In this application, there is usually an initial high inertial peak cut-in torque to get the crankshaft moving, and while this value can be measured over the cut-in zone, it is actually the dynamic torque following this initial torque spike that is the parameter usually required. Similar applications exist for measuring the frictional torque in bearings and hubs.
Figure 20 – Drag Torque Strategy
Procedure1. Press the Setup Main Menu key and then the Advanced Setup Sub-Menu key.2. In the Select Spindle drop box select the spindle # you want to program.3. In the Config # drop box select the configuration # you want to program.4. Go to the Engage step drop box and select Engage. (If the Engage parameter
default values are acceptable, you can skip to step 6.)5. Go to the list of parameters just below the Engage step drop box and navigate down
through the parameter list. You must enter values (or accept the default values) for the Required Parameters. As appropriate, you may also enter values or accept the default values for the Optional parameters.
6. Go to the Step #1 Strategy drop box and select Drag Torque.
Peak cut-in torque
High torque limit
Low torque limit
Drag torque zoneCut-in Zone
Angle
Page 40 © Ingersoll-Rand Company 2004

Section 2 – Programming
7. Go to the list of parameters just below the Step #1 Strategy drop box and navigate down through the parameter list. You must enter values (or accept the default values) for the Required Parameters. As appropriate, you may also enter values or accept the default values for the Optional Parameters.
8. You cannot program additional tightening steps after the Drag Torque strategy.
Delay Control Strategy
The Delay Control strategy allows you to insert a time delay into the tightening. For any of the Step #n Strategy drop boxes, if Delay Control is selected as the strategy, Delay and Sync Enable parameters are displayed.
Jog Control Strategy
The Jog Control strategy allows you to run the tool at a slow speed (the Soft Speed defined in the Engage step) so the tool’s socket can easily engage the bolt head. Jog Control must be used in the Step #1 Strategy box. If Jog Control is selected, parameters for Torque Setpoint, Jog Angle and Sync Enable are listed.
Bypass Parameters
The Bypass strategy is unique in that it is either off or on. It has no selectable parameters. The bypass mode applies only to powerheads. It is used to allow a powerhead to operate with different spindles depending upon the tightening configuration selected. When a powerhead is programmed with different configurations, unwanted spindles can be bypassed so only the desired spindle is used. The bypass strategy can only be programmed in the Engage Step Strategy drop box.
Retorque Parameters
Sometimes a fastener will relax after it is tightened. In the Retorque Control mode the controller reapplies torque to take up relaxation in the joint. This mode can only be used following a Torque Control or Angle Control strategy. The re-torque set point is automatically set at either the Torque Control strategy's target torque value, or the peak torque attained if this step follows an Angle Control strategy. In this mode, the Insight re-tightens the fastener to the same torque value, until either the angle on the retorque tightening is less or equal to the Retorque angle programmed, or ten attempts have been made.
© Ingersoll-Rand Company 2004 Page 41

Section 3 – Operating the System
Operating the System
This section provides the information that will be needed for the assembly technician. At this point, the system should have been properly installed and sets of configurations already defined and programmed into the system.
Selecting the Configuration
See the chapter on Menu Navigation (in the Introduction chapter) for instructions on moving through menu screens.
Figure 21 – Run Main Menu
The Main screen from the Run menu allows you to select the configuration to run for each of the two spindles. For each spindle:
1. From the Select Spindle pulldown menu, select the spindle # to which you will apply a configuration.
2. From the Config # pulldown menu, select the configuration # to apply to the selected spindle.
3. Perform steps 1 and 2 for both spindles.
Page 42 © Ingersoll-Rand Company 2004

Section 3 – Operating the System
Monitoring Operation
The top window in the front panel displays torque and angle information for each tightening operation. See the Status Display callout in Figure 1 in the Introduction chapter.
If red or yellow lights come on, stop operating the equipment until the problem can be resolved as a fault has occurred, or follow the guidelines established for your department.
Each Ingersoll-Rand hand-held spindle also has an indicating light on the tool itself that mimics the Status Lights. If the fastening is within specification the tool light will be green. If either the torque or angle value is too high the tool light will be red, if either value is too low the tool light will be yellow.
See the Menu Navigation section of the Introduction chapter for an image of the Status Display.
Screen Element Description
SPINDLE The Spindle #1 or Spindle #2 light will illuminate white, indicating power is being applied to that spindle.
PASS The green PASS LED will light if the tightening met all of the programmed specifications and requirements.
Torque ↑ Lights red if the torque exceeded the specified upper limit.
Torque ↓ Lights yellow if the torque was less than the specified minimum value.
Angle ↑ Lights red if the angle exceeded the specified upper limit.
Angle ↓ Lights yellow if the angle was less than the specified minimum value.
STATS ALARM Lights if the statistical parameters are outside the user-entered limits.
© Ingersoll-Rand Company 2004 Page 43

Section 4 – Quality ControlA variety of menu options allow you to monitor operations and the quality of the tightening operations as they occur or as historical data. The following menus may be used to determine if operations are as required or if adjustments to programming must be made.
The Print Menus
The Insight IC Fastening System with Graphics Display can print a large number of standard reports on fastening data, statistics, system settings and parameters, and many other topics. From within any of the controller's menus or sub-menus, the user can press the Print Main Menu key on the Insight front panel, and a print menu displays. The display is context sensitive. That is, Insight recognizes what menu it is in (Run, Statistics, Setup, or Diagnostics) when the user presses the Print key, and displays the appropriate report printing options. While Insight offers many printed report options, each one is self-explanatory, and it is not necessary to explain each print screen. Simply use the arrow keys and the Enter key to navigate through and select the option you want. Occasionally, you may be asked to mark a checkbox (use the Enter key to check or uncheck the box) or enter a number in a data entry box (use the numeric keypad).
Page 44 © Ingersoll-Rand Company 2004

Section 4 – Quality Control
The Run Menus
The Run sub-menus display fastening parameters and fastener tightening curves in real time during fastening operations. It also provides quick access to statistics, fastening logs, and other useful information. This section discusses each of the Run sub-menu screens.
Run Main ScreenThis screen displays the actual torque and angle values following each fastening. Below is a typical Run Main screen.
Figure 22 – Run Main Menu (Single Spindle)
Screen Element Description
Select Spindle Use this drop box to select the spindle for which the tightening data will display. You can display the data for Spindle 1, Spindle 2, for both spindles, or for a powerhead. This drop box will not be present if your Insight is a one-spindle model.
Configuration ID Automatically displayed beneath the Spindle drop box are the Configuration name, the Configuration number, and the Strategy name for the tightening sequence. If it is a multi-step sequence, the Strategy name is that of the last step.
© Ingersoll-Rand Company 2004 Page 45

Section 4 – Quality Control
The tightening variables that the user can display in the Var. 1 and Var. 2 drop boxes (see graphic above) are defined in Appendix 1 – System Parameters. Each drop box can display only one variable. To select the desired tightening variable:
1. Navigate to the drop box using the arrow keys. 2. Press the Expand key to display the variables.3. Then use the arrow keys to scroll through the list to the desired variable (or enter
the number of the variable), and 4. Press the Enter key to select the variable. You can change the variable displayed at
any time.
Tightening Values The large primary number is the torque value for the last tightening, unless the strategy is angle control (in which case it will be the angle value). The smaller secondary number is the angle value, unless the strategy is angle control (in which case it will be the torque value). Note that both the primary and secondary numbers show either a degree symbol or torque units, making it clear which parameter is displayed.
Limit Values The three numbers to the right of the primary number are (from top to bottom) the high limit, the target value, and the low limit for the primary parameter. The values displayed are those that were programmed during either the Quick Setup or Advanced Setup operations.
Var. 1 This drop box has a list of tightening variables. The user can select one of these variables to display here during each fastening operation.
Var. 2 This drop box has a list of tightening variables. The user can select one of these variables to display here during each fastening operation.
Message Box The Message Box summarizes system status and provides warnings and alarms.
Screen Element Description
Page 46 © Ingersoll-Rand Company 2004

Section 4 – Quality Control
Tightening Curves ScreenThis screen is used to display tightening curves in real time during fastening operations. It allows the user to view tightening curves, freeze the curves for closer inspection, and display selected parameters. Below is a typical Tightening Curves screen.
Figure 23 – Run Tightening Curves Menu
The information this screen displays depends upon how the Run Main screen is set. Above the main window the spindle number, configuration number, configuration name, and strategy name will be displayed, as described under Run Main Screen on page 45.
Screen Element DescriptionSelect plot type Use this drop box to select the type of plot you wish to display. You can choose
from:• Torque vs Angle• Torque vs Time• Current vs Time
Select Spindle Use this drop box to select the spindle(s) or powerhead whose parameters will display. This drop box will not be present if your Insight is a one-spindle model.
Freeze This button freezes the tightening curve for study. Fastening will continue but the new curves do not display. The frozen curve remains until the user presses the button again, or until the user exits this screen.
Tightening Curve This window displays the current tightening curve in real time. When a fastening is completed and another fastening begins, the previous curve clears and the new curve is drawn.
Parameter Display Box This display box, located on the right hand side of the display, has a list of tightening data parameters captured in real time. The parameters are described below.
Message Box The Message Box, located at the bottom of the display, summarizes system status and provides warnings and alarms.
© Ingersoll-Rand Company 2004 Page 47

Section 4 – Quality Control
Definitions of tightening parameters that appear in the parameter display boxes are defined in Appendix 1 – System Parameters.
Statistics Summary ScreenThis screen displays a large number of fastening statistics for either one or two spindles. If you have a single spindle Insight IC system, the Statistics Summary screen is as shown below. Note that on the left side it displays the statistical data for all the fastenings performed since the statistics were last reset (the Population statistics) and on the right side the statistics for a subset of the cycle (the Sample statistics).
Figure 24 – The Run Statistics Summary Menu
Screen Element Description
Select Spindle Use this drop box to select the spindle whose statistics will display.
Select Config Use this drop box to select the tightening configuration (by number and name) whose statistics will display.
Populations Statistics The statistics for the entire fastening population are displayed here.
Sample Statistics The statistics for the sample subset of the population are displayed here.
Message Box The Message Box summarizes system status and provides warnings and alarms.
Page 48 © Ingersoll-Rand Company 2004

Section 4 – Quality Control
Cycle Log ScreenThis is a view-only screen that displays various tightening parameters monitored, recorded, and stored in memory for all readings in the current fastening series, up to a maximum of 5,000. This screen displays the most recent 1,000 cycles. To view the rest go to the Statistics Menus Cycle Log screen. Below is a typical Run menu Cycle Log screen.
Figure 25 – Run Cycle Log Menu
Note that the Cycle Log main window is a display box. You can enter this box to scroll through the table by first navigating to the Cycle Log main window with the arrow keys. Then press the Expand key to activate the scroll function, and use the arrow keys to scroll through the table.
The Cycle Log table parameters are defined in Appendix 1 – System Parameters.
Screen Element Description
Select Spindle Use this drop box to select the spindle or powerhead for which the cycle log data will display. This drop box will not be present if your Insight is a one-spindle model.
Clear Cycle Data This button will clear the cycle log data table for the displayed spindle.
Reset Cycle Number This button will reset the cycle log number back to 1 for the displayed spindle.
Main Window This window displays the cycle log summary table. Additional information on the parameters displayed is described below.
Message Box The Message Box summarizes system status and provides warnings and alarms.
© Ingersoll-Rand Company 2004 Page 49

Section 4 – Quality Control
View Parameters Screen This is a view-only screen that displays a tabular summary of all of the parameters the user has set for all of the steps in a fastening configuration. Below is a typical View Parameters screen.
Figure 26 – Run View Parameters Menu
Note that the View Parameters main window consists of two display boxes. The user can enter the Programmed Steps drop box by:
1. Navigating to it with the arrow keys. 2. Pressing the Expand key.
Screen Element Description
Select Spindle Use this drop box to select the spindle # or powerhead whose parameters will display. This drop box will not be present if your Insight is a one-spindle model.
Select Configuration Use this drop box to select the tightening configuration (by number and name) whose parameters will display.
Programmed Steps Use this drop box to display all of the steps programmed for the spindle and configuration selected.
Step Parameters This display box shows all the parameters and their values for the step selected in the Programmed Steps drop box.
Message Box The Message Box summarizes system status and provides warnings and alarms.
Page 50 © Ingersoll-Rand Company 2004

Section 4 – Quality Control
3. Selecting a fastening step by using the arrow keys to scroll through the table until the desired step is highlighted.
4. Press Enter. The parameters and their values for the fastening step selected are then shown in the Step Parameters display box on the right side of the main window. Definitions for the listed parameters in the View Parameters and Step Parameters screens are provided in Appendix 1 – System Parameters.
The Statistics Menus
The Statistics menu displays a variety of statistical data on completed fastenings. The user can view actual fastening parameters as well as statistical measurements, and can compare them to desired (target) values. Individual tightening curves can be displayed and overlaid for comparison. The user can set alarm values to alert the operator to fastenings that do not meet the required statistical parameters. Finally, cycle data is exportable to PCs or other devices for additional analysis.
This section discusses each of the Statistics sub-menu screens. The thumbnails will help you recognize each screen's layout.
Summary ScreenBelow is a typical Statistics Summary screen for a two-spindle Insight IC system. Note that both the left side and right side of the screen have boxes for selecting a spindle and a configuration, and a box for displaying statistics. The statistics boxes display either the Population statistics or the Sample statistics.
Figure 27 – Statistics Summary Screen for a Two Spindle System
© Ingersoll-Rand Company 2004 Page 51

Section 4 – Quality Control
The statistical parameters displayed on the Statistics Summary are defined in Appendix 1 – System Parameters. These same statistical parameters display for both the fastening population and the fastening sample. However, if a powerhead is selected, a different set of parameters is displayed.
Export ScreenUsing the Statistics Export screen, you can select, filter, and format cycle data and export that data, via the serial port, to a PC or other device. Below is a typical Statistics Export screen.
Figure 28 – Stats Export Cycle Log Menu
Screen Element ExplanationSelect Spindle Use this drop box to select the spindle # for which the tightening data will
display. You can display the data for Spindle 1, Spindle 2, for both spindles, or for a powerhead.
Clear All Press this button to clear both the population and the sample statistics. Note that this clears the data for statistical analysis only; the raw data remain in memory and may be retrieved using the Statistics Cycle Log screen.
Clear Sample Press this button to clear only the sample statistics. Note that this clears the data for statistical analysis only; the raw data remain in memory and may be retrieved using the Statistics Cycle Log screen.
Stats from Use this drop box to select the entire fastening population or a sample of that population.
Select Config Use this drop box to select the tightening configuration (by number and name) whose statistics will be displayed.
Main Window The statistical data display here. Below is additional information on the parameters displayed.
Message Box The Message Box summarizes system status and provides warnings and alarms.
Page 52 © Ingersoll-Rand Company 2004

Section 4 – Quality Control
Screen Element Description
Wizard Box Displays information or instructions for the screen element that is highlighted.
Send After you have selected and formatted the cycle parameters using other elements on this screen, click this button to send the data to an external device over the serial port.
Data Port Use this drop box to select the serial port for exporting data (COM 1, COM 2, COM 3, or COM 4, or Ethernet.
All Entries Check this box if you want to export all cycle data in memory.
From Last If you want to export data from only a portion of the fastening cycles, enter the range here.
Sort By Use this drop box to select the cycle sorting parameter. Options include Configuration, Cycle Results, Torque Results, or Angle Results.
Then Select This drop box will display different options depending upon the Sort By parameter. If the user sorts by Configuration, he can select either all configurations or a specific one (by number from 1 to 32). If the user sorts by Cycle Result, Torque Result, or Angle Result, he can select either Pass/Fail or Pass/High/Low, as appropriate.
Separate Data Fields by
The user has three check boxes to specify data separation: either a comma, a space, or a semi-colon.
Send Header with Data Checking this box allows a data header to be specified.
Edit Data Format Clicking this button brings up a second Export screen to select the specific statistical data for export. Below is additional information on this screen.
Message Box The Message Box summarizes system status and provides warnings and alarms.
© Ingersoll-Rand Company 2004 Page 53

Section 4 – Quality Control
Clicking on the Edit Data Format button on the screen above brings up the following Export screen.
Figure 29 – Second Statistics Export Cycle Log Screen
The screen above lists 26 statistical parameters. As explained in the screen's wizard box, you can select the specific statistical parameters and their order by entering a sequential number in each parameter box. Entering a zero means that parameter will not be exported.
Tightening Curves ScreenTo improve a fastening sequence or to resolve fastening problems, it is often important to understand the tightening curve in detail. With this screen, the user can view tightening curves and zoom in on those curves to analyze them. In addition, important aspects of
Screen Element DescriptionMake EOR Data Out Same Format
Checking this box gives the “End of Run Data Out” serial protocol the same format as the statistics export data.
OK Clicking this button sets the data export order and returns the user to the main Export screen.
Cancel Clicking this button cancels all changes and returns the user to the main Export screen.
Message Box The Message Box summarizes system status and provides warnings and alarms.
Page 54 © Ingersoll-Rand Company 2004

Section 4 – Quality Control
the curve – such as the number of data points, peak torque value, and so on – are automatically calculated and displayed. Below is a typical Tightening Curves screen.
Figure 30 – Statistics Tightening Curves Menu
Screen Element Description
Select Spindle Use this drop box to select the spindle # or powerhead whose tightening curves will display. This drop box will not be present if your Insight is a one-spindle model.
Select Config Use this drop box to select the tightening configuration # whose curves will display. The options include configuration 01 through 32.
Select Plot Type Use this drop box to select the plot type: Torque vs. Angle, Torque vs. Time, or Current vs. Time.
Select Capture Type Use this drop box to select which fastening curves will be captured and displayed. Options include Last Cycle, Last Reject, Next Cycle, Next 2 Cycles to Next 5 Cycles.
Select Plot If you have multiple plots displayed on the screen, use this drop box to select one for analysis. The selected plot becomes a solid line, distinguishing it from the other plots displayed.
Replace Plot Clicking this button replaces the plot selected in the Select Plot drop box with the next valid plot.
Load Master You may have tightening curves stored in memory that you want to use as a reference or master; a curve against which you can compare other fastenings. Pressing this button brings up a float box that allows you to select one of the stored curves and display it on the screen as the master plot.
© Ingersoll-Rand Company 2004 Page 55

Section 4 – Quality Control
You can examine in detail the tightening curve displayed in the screen's main window by navigating to the plot window and pressing the Expand key. This allows you to take control of the cross hairs in the plot window. (The cross hairs will appear on the curve selected in the Select Plot drop box.) Use the directional keypad's arrow keys to move the cross hairs to the region of interest on the tightening curve. Note that the numerical values for the curve at the cross hairs location display on the screen.
Plot Update Pressing this button removes any plots on the screen (except a Master plot) and places new plots on the screen, as determined by the setting in the Select Capture Type drop box.
Zoom In Clicking this button will zoom in on the tightening curve displayed on the screen. The button name then toggles to Zoom Out, and now clicking it returns the display to normal scale. When zoomed in, use the left and right arrow keys to move along the plot.
Save Master You may have a particular tightening curve that you want to use as a reference or master; a curve against which you can compare other fastenings. Select the plot you want to save with the Select Plot drop box, then press this button to save it as the Master plot. A float box comes up that allows you to select a location to save the plot.
Full View This button expands the plot window to full screen. Pressing the Close button on the bottom of the expanded screen will return the screen to normal view.
Plot Window The tightening curves you have selected with the buttons and drop boxes above display here. Below is additional information on how to analyze the plot(s) displayed.
Plot Summary Window
This window to the right of the tightening curves lists information about the plots displayed. This includes the Plot Number, the number of data points used to create the plot, the Peak Angle, and the Peak Torque (or Peak Time or Peak Current, depending upon the selection made in the Select Plot Type drop box).
Message Box The Message Box summarizes system status and provides warnings and alarms.
Screen Element Description
Page 56 © Ingersoll-Rand Company 2004

Section 4 – Quality Control
Cycle Log ScreenThis is a view-only screen that displays various tightening parameters that are monitored, recorded, and stored in memory for up to the last 5,000 tightening cycles. This screen functions generally the same as the Cycle Log screen under the Run Menu, but with the added ability to sort data. Below is a typical Cycle Log screen.
Figure 31 – Statistics Cycle Log Screen
Note that the Cycle Log screen window is a display box. You can scroll through the table in this window using the arrow keys.
Screen Element Description
Select Spindle Use this drop box to select the spindle # or powerhead for which the cycle log data will display. This drop box will not be present if your Insight is a one-spindle model.
Sort By Use this drop box to select the criteria by which the cycle log data display in the screen's main window. The options include: Cycle, Configuration, Cycle Result, Torque Result, and Angle Result.
View By Use this drop box to select which fastening cycles display in the screen's main window. The options here depend on the criteria selected in the Sort By drop box.
Main Window This window displays the cycle log summary table. The row order of the data will vary depending upon the sorting criteria selected in the Sort By drop box. Below is additional information on the parameters displayed.
Message Box The Message Box summarizes system status and provides warnings and alarms.
© Ingersoll-Rand Company 2004 Page 57

Section 4 – Quality Control
The Cycle Log table parameters are defined in Appendix 1 – System Parameters.
Statistics Alarm Setup ScreenIn many applications it is important to systematically monitor tightening performance using statistical parameters. This screen allows the user to set alarms that will indicate deviations from selected fastening statistics, thereby alerting the Insight operator to a potential quality problem. Below is a typical Statistics Alarm Setup screen.
Figure 32 – Statistics Alarm Setup Menu
Screen Element Description
Select Spindle Use this drop box to select the spindle # for which the alarms will display. This drop box will not be present if your Insight is a one-spindle model.
Select Config Use this drop box to select the tightening configuration whose statistics alarms will display. The options include configuration 01 through 32.
Values for Stats Use this drop box to select what tightening results are included in your statistical calculation. The options are Good Only, All, or All but hardware faults.
Sample Size Using the numeric keypad, enter a sample size. This will be the number of samples used to calculate the sample statistics.
Main Window This window has two boxes, to set the alarms for both torque and angle. The user can set alarms for all of the statistical parameters listed in these boxes, and can individually turn those alarms on or off. Below is additional information on these alarms.
Message Box The Message Box summarizes system status and provides warnings and alarms.
Page 58 © Ingersoll-Rand Company 2004

Section 4 – Quality Control
Main Window Statistics Alarms Discussion
Using the arrow keys, the user can navigate to the Statistics Alarm Setup screen's main window and scroll down through the statistics parameters listed under both Torque and Angle. For each parameter, the user can enter an alarm value using the numeric keypad. Use the check box to the right of each parameter to either turn that alarm on or off.
© Ingersoll-Rand Company 2004 Page 59

Section 5 – Diagnostics and TroubleshootingThe Diagnostics Menus
The Diagnostics menu allows the user to check the overall system health of the Insight IC Fastening System with Graphics Display. This function also diagnoses system problems. The user can view diagnostic test results and store them for future reference. The Diagnostics menu has five sub-menu screens.
System Test ScreenWith this screen the user can request and display diagnostics test results on the tightening tools (spindles) and on the Motor Controllers (MCEs). Below is a typical System Test screen graphic.
Figure 33 – Diagnostics System Test Menu
Page 60 © Ingersoll-Rand Company 2004

Section 5 – Diagnostics and Troubleshooting
The following system test data displays in the main window. For each data element, the table shows the value measured during the test and whether that value is within allowable parameters (PASS) or (FAIL).
Note that the System Test window is a display box. The user can enter this box simply by navigating to the window with the arrow keys, and using the arrow keys to scroll through the table.
As the user scrolls through the System Test parameters, information on each parameter displays in the wizard box. This includes an explanation of the parameter, the expected range (if applicable), and guidance on what to do if the parameter test failed.
Screen Element Function
Wizard Box Displays information or instructions for the screen element that is highlighted.
Select Spindle Use this drop box to select either Spindle 1 or Spindle 2 for testing. This drop box will not be present if your Insight is a one-spindle model.
Start Test This button initiates the system diagnostics test. The test results are then displayed on the left-hand side of the screen’s main window.
Save Results This button stores the system diagnostics test results and displays them on the right-hand side of the screen’s main window.
Main Window When the user performs a systems test, the results are displayed as a table on the left-hand side of this window (the side labeled NEW). If there are test results already displayed there, they are overwritten. If the Save Results button is pressed, the test results displayed on the left-hand side of the window are moved to the right-hand side and stored, overwriting any stored test results previously displayed there. Below is additional information on the specific test results displayed in this window.
Message Box The Message Box summarizes system status and provides warnings and alarms.
Test Data Element ExplanationTOOL
Motor temperature Checks motor temperature and reports PASS or FAIL.Amplifier offset MC's offset voltage (as % of Shunt Cal voltage).Shunt calibration Front-end electronics gain (as % of ideal Shunt Cal voltage).Sine Offset The offset in A/D counts of the resolver sine analog input signal used
for angle measurement.Cosine Offset The offset in A/D counts of the resolver cosine analog input signal
used for angle measurement.Motor Kt The peak torque divided by peak current in the units of Nm/Amp.
Motor ControllerMC temperature Displays MC's internal temperature.
© Ingersoll-Rand Company 2004 Page 61

Section 5 – Diagnostics and Troubleshooting
Discrete Inputs ScreenOn the left side panel of the Insight controller are Spindle I/O (Input/Output) connectors. With this screen, the user can run a test to determine whether any of the required input signals are absent. Below is a typical Discrete Input Test screen graphic.
Figure 34 – Diagnostics Discrete Inputs Menu
Screen Element Function
Select Spindle Use this drop box to select either Spindle 1 or Spindle 2 for testing. This drop box will not be present if your Insight is a one-spindle model.
Main Window The spindle input signals are listed on the screen. If the input signal is present, the circle to the left of the signal will be filled-in. If no signal is present, the circle will be white. The spindle connector pin letter designation that corresponds to the signal input is also shown.
Message Box The Message Box summarizes system status and provides warnings and alarms.
Page 62 © Ingersoll-Rand Company 2004

Section 5 – Diagnostics and Troubleshooting
Discrete Outputs ScreenOn the left side of the Insight controller are Spindle I/O (input/output) connectors. With this screen, you can artificially activate an output signal. This function is typically used for troubleshooting; for example, to send a signal to an external device (such as a PLC) to verify the device is operating correctly.
To manually activate an output, check the checkbox next to the output name.
Below is a typical Discrete Outputs screen.
Figure 35 – Diagnostics Discrete Outputs Menu
Variable Timer Outputs (Paint Marker and Reject Buzzer)The variable timer is one of the features of the Insight IC. It is used to setup the programmable timer discrete outputs.
The timer can be set on the Diagnostics Menu – Discrete Outputs screen by entering the required timer value from 0.1 seconds to 9.9 seconds. The output will remain “ON” until the timer expires for any value other than zero. The default value is zero and the timer is disabled.
© Ingersoll-Rand Company 2004 Page 63

Section 5 – Diagnostics and Troubleshooting
Event Log ScreenThe Event Log screen is a large scrollable window that logs the date and time that certain important Insight events occur. The events recorded include hardware and software faults (such as a tool over-temperature event), and significant user actions (such as changes to a tool’s transducer range or angle constant). This record of significant events can help users investigate and troubleshoot problems.
Figure 36 – Diagnostics Event Log Screen
Page 64 © Ingersoll-Rand Company 2004

Section 5 – Diagnostics and Troubleshooting
The following table provides a listing of Event Log codes and their explanations.
1 Change in transducer range values 32 Motor Controller IGBT Driver Fault
2 Change in angle scale value 33 Tool Overcurrent Detected
3 Change in tool type 34 Low Bus Voltage
4 Power up 35 Tool Stop due to Cycle Timeout
5 Power down 37 Tool Disconnected from Controller
6 Corrupt or lost file 38 Communication Lost between MCE and RISC
7 Loss of CAN bus communications 39 All devices started successfully
8 MC power down 40 Flash Disk Failure or not found
9 MC power up 41 Floppy Disk Failure or not found
10 Retries on CAN bus 42 File 'INSIGHT.BIN' invalid or not found
11 Download new MC software 47 Comm Port #1 failure or not found
12 Download new RISC software 48 Comm Port #2 failure or not found
13 Software lockups/Watchdog timer 49 Comm Port #3 failure or not found
14 Invalid password entered 50 Comm Port #4 failure or not found
15 Removal/Insertion - flash card 51 Parallel Printer failure or not found
17 Removal/Addition - MC 52 Ethernet port failure or not found
18 Removal/Addition - disk drive 53 Devicenet port failure or not found
19 Removal/Addition - field bus card 54 Profibus port failure or not found
23 Change password values 56 PCMCIA Memory failure or not found
24 Keypad disabled 57 MCE #1 failure or not found
25 Keypad enabled 58 MCE #2 failure or not found
26 Change - Target value, Torque/Angle limit, Torque Threshold, Chord length
63 Remote I/O #1 failure or not found
27 Failure of system test 64 Remote I/O #2 failure or not found
28 Load configurations from disk 65 Anybus Master is Offline
30 Tool Shutdown due to stall condition detected 66 Anybus Master is back Online
31 Tool Hall Fault, Replace Tool 67 Ethernet received a NACK message
© Ingersoll-Rand Company 2004 Page 65

Section 5 – Diagnostics and Troubleshooting
Diagnostic Tool Test ScreenThis screen allows the user to interrupt regular tightening operations in order to perform several tool tests. This is useful in troubleshooting any problems that appear to originate with an I-R spindle or tool.
Figure 37 – Diagnostics Tool Test Menu
Page 66 © Ingersoll-Rand Company 2004

Section 5 – Diagnostics and Troubleshooting
Shutdown Codes
At the end of every cycle, the Insight IC logs a shutdown code to the cycle that indicates under what circumstances the tool stopped. This shutdown code can be viewed in the cycle log. Below is a list of the Shutdown Codes.
Shutdown Code #
Description
0 Normal Completion of Cycle
1 Trigger released before system shutdown
2 Tool stop on torque high
3 Tool stop of angle high
4 Tool stop on yield override
5 Prevailing torque seating torque fail
6 Prevailing torque seating angle fail
7 Prevailing torque too high (next step target + prevailing > next step limit)
8 Prevailing torque sync shutdown (forced shutdown because sync flag was set)
9 Min drag torque fail
10 Motor stalled (12t limit reached)
11 Hall transition error (Hall fault)
12 Motor controller IGBT driver fault (bootstrap cap under voltage or IGBT short)
13 Over current (detected by software current loop)
14 Low bus voltage
15 Cycle timeout (cycle timeout time reached before end of cycle)
16 Display processor issued a STOP command to Motor controller
17 Tool was disconnected
18 Communication was lost (unable to send EOR or other asynchronous “event”)
19 Bad torque reference (the torque step reference + tare-overshoot was greater than the step limit)
20 Watchdog monitor shutdown. The MCE hardware watchdog faulted
21 When all re-torque steps are completed without reaching the set-point
22 When Yield Override is enabled and fail on yield is disabled, if the final torque reached is below the torque low limit
© Ingersoll-Rand Company 2004 Page 67

Section 5 – Diagnostics and Troubleshooting
The Help Function
The Help function is designed to assist the user in understanding the terminology required to setup and program the Insight IC Controller.
Pressing the Help key will give the user a screen with a description of all the terms associated with the screen on which the Help key was pressed. See the following figure.
Figure 38 – The Run Help Menu
Additionally, there will be buttons for three options:
Help Main MenuIf you navigate the cursor to the Help Main Menu button and then press the Enter key, a new screen will be displayed that lists the main menu options with their sub-menu options listed below them. See the following figure. The user can navigate to any sub-menu option for an explanation of the terms on that sub-menu.
Page 68 © Ingersoll-Rand Company 2004

Section 5 – Diagnostics and Troubleshooting
Figure 39 – The Help Main Menu
Go to Help TopicSelecting this button will give an alphabetical listing of all topics in the Help Menu. These can be accessed by scrolling through the topics until the desired one is located. Each topic lists an explanation of its meaning.
Figure 40 – The Run Main Help: Go To Topic Menu
© Ingersoll-Rand Company 2004 Page 69

Section 5 – Diagnostics and Troubleshooting
ExitSelecting this button will return the user to the screen displayed when the Help key was pressed.
Page 70 © Ingersoll-Rand Company 2004
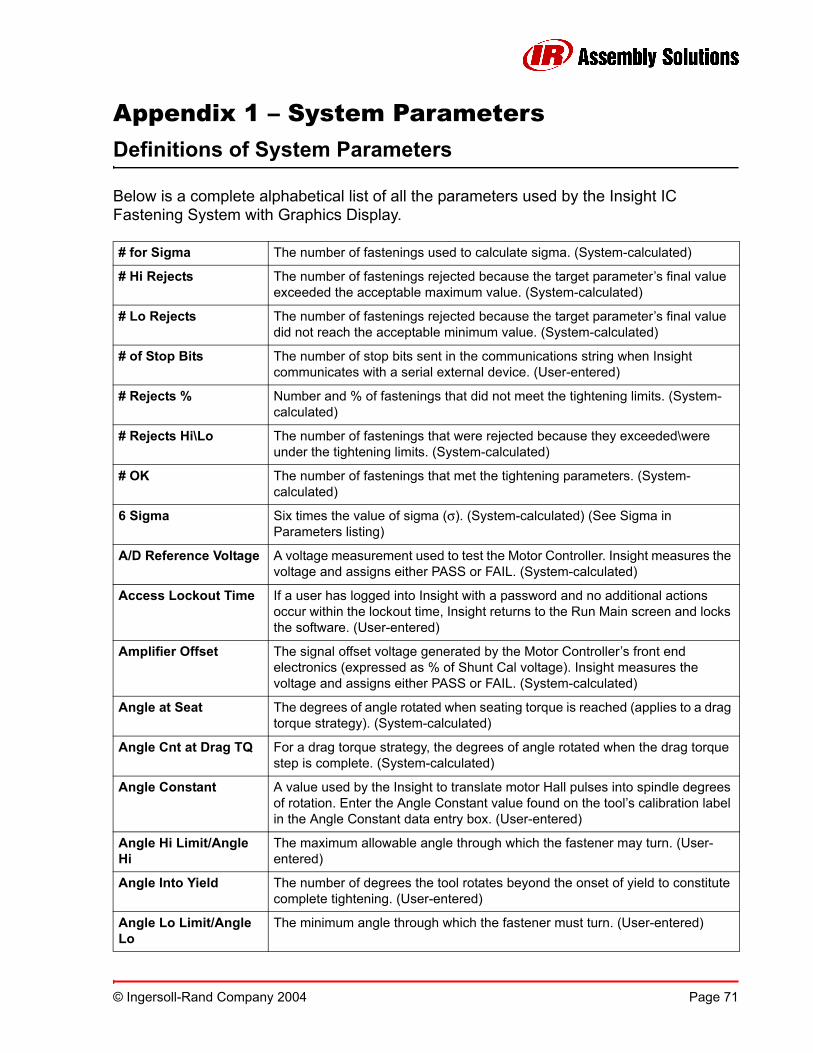
Appendix 1 – System ParametersDefinitions of System Parameters
Below is a complete alphabetical list of all the parameters used by the Insight IC Fastening System with Graphics Display.
# for Sigma The number of fastenings used to calculate sigma. (System-calculated)
# Hi Rejects The number of fastenings rejected because the target parameter’s final value exceeded the acceptable maximum value. (System-calculated)
# Lo Rejects The number of fastenings rejected because the target parameter’s final value did not reach the acceptable minimum value. (System-calculated)
# of Stop Bits The number of stop bits sent in the communications string when Insight communicates with a serial external device. (User-entered)
# Rejects % Number and % of fastenings that did not meet the tightening limits. (System-calculated)
# Rejects Hi\Lo The number of fastenings that were rejected because they exceeded\were under the tightening limits. (System-calculated)
# OK The number of fastenings that met the tightening parameters. (System-calculated)
6 Sigma Six times the value of sigma (σ). (System-calculated) (See Sigma in Parameters listing)
A/D Reference Voltage A voltage measurement used to test the Motor Controller. Insight measures the voltage and assigns either PASS or FAIL. (System-calculated)
Access Lockout Time If a user has logged into Insight with a password and no additional actions occur within the lockout time, Insight returns to the Run Main screen and locks the software. (User-entered)
Amplifier Offset The signal offset voltage generated by the Motor Controller’s front end electronics (expressed as % of Shunt Cal voltage). Insight measures the voltage and assigns either PASS or FAIL. (System-calculated)
Angle at Seat The degrees of angle rotated when seating torque is reached (applies to a drag torque strategy). (System-calculated)
Angle Cnt at Drag TQ For a drag torque strategy, the degrees of angle rotated when the drag torque step is complete. (System-calculated)
Angle Constant A value used by the Insight to translate motor Hall pulses into spindle degrees of rotation. Enter the Angle Constant value found on the tool’s calibration label in the Angle Constant data entry box. (User-entered)
Angle Hi Limit/Angle Hi
The maximum allowable angle through which the fastener may turn. (User-entered)
Angle Into Yield The number of degrees the tool rotates beyond the onset of yield to constitute complete tightening. (User-entered)
Angle Lo Limit/Angle Lo
The minimum angle through which the fastener must turn. (User-entered)
© Ingersoll-Rand Company 2004 Page 71

Appendix 1 – System Parameters
Angle Overshoot If tightenings are consistently overshooting the Angle Target, the tool will be shut off this many degrees before the Angle Target. (User-entered)
Angle Target The desired angle through which the fastener should turn. (User-entered)
Avg Prevailing Torque The average prevailing torque calculated from the last 360° of torque data points prior to the seating torque. (System-calculated)
Backout Angle The number of degrees the tool will reverse to achieve backout. (User-entered)
Backout Speed The tool's speed during the backout phase, or when the tools reverse button is pressed. One of the basic Engage parameters that appears for every fastening strategy. (User-entered)
Backout Torque Hi The maximum allowable torque for the backout step. (User-entered)
Backout Torque Lo The minimum acceptable torque for the backout step. (User-entered)
Baud Rate The data transfer rate Insight uses to communicate with external serial devices. (User-entered)
Bits Per Character The number of bits per character used for external serial communications. (User-entered)
CAM A statistical parameter used to measure system performance. (System-calculated)
Capability A statistical parameter used to measure system performance. (System-calculated)
Change Password Pressing this button brings up a box with the levels and the current passwords. The level 4 user can then change the passwords by entering a new value and then re-entering it to confirm the change. (User-entered)
Config # (Config) Insight can be programmed with up to 32 separate fastening operations, called configurations. Each has a unique Configuration Number from 01 through 32, and may also have a name assigned. (User-entered)
Config Name A suitable alphanumeric name can be assigned to any of Insight’s 32 available configurations. (User-entered)
Config. Sel. Type For those fastenings where the Insight increments through multiple configurations, this parameter defines how the configuration is incremented. (User-entered)
Config. Select Use this drop box to select whether the configuration is selected internally (through the Run Main screen) or externally through the Insight’s I/O connector. (User-entered)
Cp A statistical parameter used to measure system performance. (System-calculated)
CpK A statistical parameter used to measure system performance. (System-calculated)
Cut-In Angle The angle from the start of cut-in (the initial high-torque phase) to the successful completion of the cut-in phase; applies to prevailing torque and drag torque strategies. (User-entered)
Cut-In Torque Limit The maximum permissible torque during the cut-in phase (the initial high-torque phase) of the prevailing torque and drag torque strategies. (User-entered)
Page 72 © Ingersoll-Rand Company 2004

Appendix 1 – System Parameters
Cycle # Each fastening is one cycle, and is incremented by one to give it a unique number. (System-calculated)
Cycle # Measured Reading
A data entry box for entering the measured torque when calibrating a spindle against an external torque transducer. (User-entered)
Cycle Time The elapsed time for a fastening cycle. (System-calculated)
Data Port The port for Insight’s external communications. (User-entered)
Date Data entry box to enter today’s date. (User-entered)
Date Format Data entry box to select the date format. (User-entered)
Daylight Savings Drop box to allow the Insight to automatically adjust the time for the start and end of daylight savings. (User-entered)
Direction Sets the forward direction the Insight spindle turns; clockwise (CW) or counter clockwise (CCW). (User-entered)
Drag Torque Hi Limit Maximum permissible torque in the Drag Torque Zone of the drag torque fastening strategy (User-entered)
Drag Torque Lo Limit Minimum required torque in the Drag Torque Zone of the drag torque fastening strategy (User-entered)
EOR Filter The EOR (End of Run) Filter selects what parameters, in addition to torque and angle, will be recorded for each fastening. (User-entered)
Excitation Voltage During self-testing, the Insight measures the spindle transducer's positive excitation voltage (+ve) and negative excitation voltage (-ve). (System-calculated)
Fall Back Date The date for the end of daylight savings. (User-entered)
Fault Backout Angle Number of degrees the tool will automatically reverse on a tightening fault, before a retry is started. (User-entered)
Final Fault Backout Angle
Number of degrees the tool will automatically reverse on a tightening fault, when all retries have failed. (User-entered)
Free Speed The maximum speed the tool will turn during fastening. (User-entered)
Gang Count Some assemblies have multiple bolts that must be fastened in sequence (called a "Gang"). Setting the Gang Count tells the Insight how many tightenings (bolts) are required to complete the gang assembly. (User-entered)
Hall Signal Test During self-testing, the Insight determines if the Hall sensor is operating correctly. (System-calculated)
Language Specifies the language the Insight uses. (User-entered)
Max Value The maximum value of the control parameter for the selected configuration. (System-calculated)
Mean Slope The average value of the slope of the torque vs. angle curve. (System-calculated)
Meanshift The difference between the mean value and the control point value. (System-calculated)
Minimum Drag Torque The minimum drag torque reached during a drag torque fastening strategy. (System-calculated)
© Ingersoll-Rand Company 2004 Page 73

Appendix 1 – System Parameters
Motor Temperature The Insight spindle’s motor temperature. (System-calculated)
Motor Test The spindle motor's Kt value (Peak Torque/Peak Motor Current). (System-calculated)
Multi Drop Address The address number for the network port's host Data Out protocol. (User-entered)
Parity Sets the communications port parity. (User-entered)
Password A button and a data entry box to enter a previously stored password to gain access to Insight’s functions. (User-entered)
Password Logout A button and a confirmation box to log out of the password screen and relock the Insight system. (User-entered)
Peak Current The maximum current the tool drew during the fastening cycle. (System-calculated)
Peak Cut-In Torque The maximum torque measured during the cut-in phase (the initial high-torque phase) of the prevailing torque and drag torque strategies. (System-calculated)
Peak Drag Torque The maximum torque measured during the drag torque phase of a drag torque strategy. (System-calculated)
Tare Compensation If set to Enable, then the torque for the next step will be offset by an amount equal to the average prevailing torque. If set to disable, no offset. (User-entered)
Peak Prevailing Torque
The maximum torque measured during the prevailing torque phase of a prevailing torque strategy. (System-calculated)
Plant Name A data entry box for assigning a plant name or other plant identifier. (User-entered)
Prevailing Angle Hi Prevailing Angle Hi Limit
The maximum allowable angle of rotation for the prevailing torque phase of a Prevailing Torque fastening strategy. (User-entered)
Prevailing Angle Lo Prevailing Angle Lo Limit
The minimum acceptable angle of rotation for the prevailing torque phase of a Prevailing Torque fastening strategy. (User-entered)
Prevailing Torque Hi Prevailing Torque Hi Limit
The maximum permissible torque for the prevailing torque phase of a Prevailing Torque fastening strategy. (User-entered)
Prevailing Torque Lo Prevailing Torque Lo Limit
The minimum acceptable torque for the prevailing torque phase of a Prevailing Torque fastening strategy. (User-entered)
Range The maximum value less the minimum value for a parameter. (System-calculated)
Record EOR Data When checked, data is recorded for this step in the configuration.
Rem. Tool En/Dis. This parameter allows the tool to be remotely enabled and disabled through the I/O connector; options are Off, 2 line En/Dis, 1 line En. (User-entered)
MC Temperature Displays the temperature of the Motor Controller. (System-calculated)
Page 74 © Ingersoll-Rand Company 2004

Appendix 1 – System Parameters
Shiftdown Point The point during the final stage of tightening at which the tool shifts to a lower speed to improve accuracy. (User-entered)
Shiftdown Speed The tool's speed during the shiftdown phase. (User-entered)
Shunt Calibration A system test that measures the front-end electronics gain (as % of ideal shunt calibration voltage). (System-calculated)
Sigma The standard deviation (σ); used for statistical calculations. (System-calculated)
Slope Chord Length The number of degrees over which the slope is calculated. (User-entered)
Slope Deviation If the prevailing angle is set to zero, then the Insight will define the end of the Prevailing Torque Zone by the slope value entered here. (User-entered)
Slope Interval Number of degrees between each slope calculation. (User-entered)
Snug Torque (also called Torque Threshold)
The torque required to seat components in the joint; also the torque point at which angle begins to be measured. (User-entered)
Softstart Speed The speed the tool will run at when the Softstart input is activated.
Spindle Status Controls spindle operation. Selecting Enabled allows the tool attached to the spindle to operate, selecting Disabled prevents tool operation.
Spring Forward Date The date for the start of daylight savings. (User-entered)
Start Mode Defines the type of signal initiating tool start. For hand-held tools, select throttle. Pulse indicates a momentary external signal. Dual requires two switch closures (because some tools require the operator to activate two switches simultaneously to ensure his hands are safely away from the machinery). (User-entered)
System Name A data entry box for assigning a system name or other system identifier; maximum of 12 letters and numbers. (User-entered)
Tare Compensation Mode
If checked, then the torque of the next step will be offset by an amount equal to the average prevailing torque. (User-entered)
Target Inspection Angle
The number of degrees of rotation required to complete the drag torque phase. (User-entered)
Target Prevailing Angle
The number of degrees of rotation required to complete the prevailing torque phase. (User-entered)
Time Data entry box to enter the current time. (User-entered)
Tool Data entry box to select the specific I-R tool attached to the Insight’s spindle. (User-entered)
Torque at Seat Peak torque value when joint is seated. (User-entered)
Torque Filter Removes high frequency noise (ripple) from the torque signal to improve measurement accuracy.
Torque Hi Limit/Torque Hi
The maximum permissible torque value for a fastening. (User-entered)
Torque Lo Limit/Torque Lo
The minimum acceptable torque value for a fastening. (User-entered)
© Ingersoll-Rand Company 2004 Page 75

Appendix 1 – System Parameters
Torque Overshoot If tightenings are consistently overshooting the Torque Target, the tool will be shut off this many torque units before the Torque Target. (User-entered)
Torque Target The desired final torque for the fastening operation. (User-entered)
Torque Threshold (also called Snug Torque)
The torque required to seat components in the joint; also the torque point at which angle begins to be measured. (User-entered)
Torque Units Use this drop box to select the units the Insight uses to measure torque. (User-entered)
Transducer Range Every I-R tool has a specific, measured Transducer Range. The Insight controller reads the Transducer range value from the tools memory when it is attached. You may overwrite this factory set Transducer Range value if required. (System AND User-entered)
Tube Nut Enable When checked, the Insight controller will correctly operate a tube nut tightening tool. (User-entered)
Tube Nut Rev. Speed The reversing speed when the Insight is operating a tube nut tightening tool. (User-entered)
Tube Nut Rev. Thresh Torque value that a tool will shut off in the reverse direction when in Tube Nut Mode. (User-entered)
View Password A button that allows a Level 4 user (the highest level of access to the Insight’s functions) to view all the current passwords. (User-entered)
X-Bar The average value for the control parameter. (System-calculated)
Yield Point % The average decrease in the slope from the max value of the torque vs. angle curve that signifies onset of yield. (User-entered)
Page 76 © Ingersoll-Rand Company 2004

Appendix 2 – System Specs and Spare PartsInsight Technical Specifications
The specifications for the Insight IC Tightening System are shown below.Measurement Accuracy ±0.2% of torque full scale
±1 count of angle (degrees)Measurement Resolution ±0.025% of torque full scaleTorque Transducer Bridge Excitation ±5VDC/GNDTorque Transducer Zero Offset/Drift Compensation
±0.4% of full scale
Input Signal Sensitivity 2.0 mV/VCalibration Values read from tool memory
Automatic digital correctionFrequency Response (Torque Filter) Selectable 75 Hz, 150 Hz, 350 Hz, 500 Hz, 750 HzKeypad Membrane keypad containing six hot keys, six function keys,
numerical keypad and directional keypad Display 10.4 inches, 256 color, 640 x 480 pixels, 50° viewing angle
Parameter Sets 32 per spindleNumber of Cycles Stored in Memory 5,000 per spindle, 50,000 per spindle with optional PCMCIA flash
cardStatistics Data Memory 100,000 per spindleCommunications 4 Serial RS-232, Ethernet, Parallel printer, optional Profibus and
Devicenet Control Inputs STANDARD Free Speed, Soft Start, Forward, Reverse, Tool
Disable, Tool Enable, Configuration 1, Configuration 2
OPTIONAL Configuration 3-8, Gang Reset, Configuration Reset, Safety Latch, Limit Switch In, Limit Switch Out, Bypass Spindle Control Outputs Accept, Reject, Reject Buzzer, Gang Complete, Cycle Complete, High Torque, High Angle, Low Torque, Low Angle, In Cycle, Statistics Alarm, Spindle in Bypass, Paint Marker Powerhead Accept, Powerhead Reject, Powerhead Cycle Complete, Powerhead In Cycle, Powerhead Paint Marker
Indicators High-intensity LED indicators for Torque High, Torque Low, Angle High, Angle Low and OK. Incandescent lamps for Spindle Power and Statistics Alarm
Optional Devices PCMCIA Flash Card, Floppy Drive, Devicenet Card, Profibus Card, Additional I/O card(s)
Input Voltage Single Phase 120 Volts, 50/60 Hz, 20 Amp Single Phase 230 Volts, 50/60 Hz, 10 Amp
Ambient Operating Conditions 0-50° C, 20/90% non-condensing humidityEnclosure NEMA-12 typeSystem Weight 60 pounds (27kg)
70 pounds (32 kg)
© Ingersoll-Rand Company 2004 Page 77

Appendix 2 – System Specs and Spare Parts
Pinout Tables
Insight IC one or two spindle system with no optional I/O boardsBelow is the Pinout for an Insight IC one or two spindle system with no optional I/O boards.
Inputs
Outputs
Insight IC Base SystemSpindle 1 Spindle 2
Inputs Block # Pin # Block # Pin #Configuration 1 2 I-1 4 I-1Configuration 2 2 I-2 4 I-2Spindle #n Disable 2 I-3 4 I-3Spindle #n Enable 2 I-4 4 I-4Free Speed 2 I-5 4 I-5Soft Start 2 I-6 4 I-6Forward 2 I-7 4 I-7Reverse 2 I-8 4 I-8
Insight IC Base SystemSpindle 1 Spindle 2
Inputs Block # Pin # Block # Pin #Accept 1 O-1 3 O-1Reject 1 O-2 3 O-2Cycle Complete 1 O-3 3 O-3High Torque 1 O-4 3 O-4Low Torque 1 O-5 3 O-5High Angle 1 O-6 3 O-6Low Angle 1 O-7 3 O-7Programmable 1 O-8 3 O-8
Page 78 © Ingersoll-Rand Company 2004

Appendix 2 – System Specs and Spare Parts
Insight IC one or two spindle system with one optional I/O board per spindleBelow are the pinout tables for an Insight IC one or two spindle expanded system with one optional I/O board per spindle.
InputsInsight IC Expanded System
Spindle 1 Spindle 2Inputs Block # Pin # Block # Pin #
Configuration 1 2 I-1 4 I-1Configuration 2 2 I-2 4 I-2Configuration 3 2 I-3 4 I-3Configuration 4 2 I-4 4 I-4Configuration 5 2 I-5 4 I-5Configuration 6 2 I-6 4 I-6Configuration 7 2 I-7 4 I-7Configuration 8 2 I-8 4 I-8Spindle #n Enable 6 I-1 10 I-1Spindle #n Disable 6 I-2 10 I-2Gang Reset 6 I-3 10 I-3Config Reset 6 I-4 10 I-4Safety Latch 6 I-5 10 I-5Limit Switch In 6 I-6 10 I-6Limit Switch Out 6 I-7 10 I-7Bypass Spindle 6 I-8 10 I-8Free Speed 8 I-1 12 I-1Soft Start 8 I-2 12 I-2Forward 8 I-3 12 I-3Reverse 8 I-4 12 I-4Reset Outputs 8 I-5 12 I-5Not Available 8 I-6 12 I-6Not Available 8 I-7 12 I-7Not Available 8 I-8 12 I-8
© Ingersoll-Rand Company 2004 Page 79

Appendix 2 – System Specs and Spare Parts
OutputsInsight IC Expanded System
Spindle 1 Spindle 2Outputs Block # Pin # Block # Pin #
Accept 1 O-1 3 O-1Reject Buzzer 1 O-2 3 O-2High Torque 1 O-3 3 O-3High Angle 1 O-4 3 O-4Low Torque 1 O-5 3 O-5Low Angle 1 O-6 3 O-6Gang Complete 1 O-7 3 O-7Cycle Complete 1 O-8 3 O-8Reject 5 O-1 9 O-1Stats Alarm 5 O-2 9 O-2Programmable 5 O-3 9 O-3Programmable 5 O-4 9 O-4Programmable 5 O-5 9 O-5Programmable 5 O-6 9 O-6Programmable 5 O-7 9 O-7Programmable 5 O-8 9 O-8Programmable 7 O-1 11 O-1Programmable 7 O-2 11 O-2Programmable 7 O-3 11 O-3Programmable 7 O-4 11 O-4Programmable 7 O-5 11 O-5Programmable 7 O-6 11 O-6Programmable 7 O-7 11 O-7Programmable 7 O-8 11 O-8
Page 80 © Ingersoll-Rand Company 2004

Appendix 2 – System Specs and Spare Parts
Recommended Spare Parts List
See the illustrations following the Parts List.
Detail Number Part Number Description
PC80114390 Insight Operations Manual - CD ROM
PC89944326 Label, I/O Configuration A
PC89944334 Label, I/O Configuration B
PC89944342 Label, I/O Configuration C
PC80137524 Door assembly, 1 Spindle
PC80137540 Door assembly, 2 Spindle
PC80124035 Display, Color 10.4” LCD
PC89944383 Inverter, LCD Backlight
6 PC89944391 PCB Assembly, RISC Processor
11 PC89944409 PCB Assembly, 5V Power Supply
9 PC89944417 Power Supply, 12V DC - 60W
PC89944425 PCB Assembly, I/O
5 PC89944433 PCB Assembly, Cycle Status
4 PC80117955 Motor Controller Assembly
1 PC89944565 Connector, Terminal Block - 10 Pin
PC89944573 Power Supply, 24V DC - 100W
2 PC80123664 GFI
PC80123672 Circuit Breaker
3 PC89944599 Floppy Drive Kit
PC89944672 Cord, Power 120V-20A
12 PC89944680 Battery, Processor
PC89944748 Shipping Carton
PC89945331 Label, Operation Manual CD-ROM
PC89945349 Label, ICS Utility CD-ROM
PC89945455 Cover, Safety
7 PC89945497 ProfiBus Kit
8 PC89945505 DeviceNet Kit
10 PC89946669 Flash Memory, PCMCIA Card
© Ingersoll-Rand Company 2004 Page 81

Appendix 2 – System Specs and Spare Parts
Illustrations with detail numbers are shown on the following pages.
PC89947642 Option, Standard I/O
PC89947659 Option, Single I/O Board
PC89947667 Option, 2 I/O Boards
PC89947675 Option, No Floppy Drive
PC89947683 Floppy Drive
PC89947691 Option, Standard Communications
PC89947840 Interface Card, ProfiBus
PC89947857 Interface Card, DeviceNet
PC89947865 Cord, Power - 230V 16A Pigtail
PC80115793 240V US power cord
13 PC80090269 Label, Warning Read Manual
14 1002266 Label, ESD/High Voltage
Detail Number Part Number Description
Page 82 © Ingersoll-Rand Company 2004

Appendix 2 – System Specs and Spare Parts
Inside the Panel
1
4
2
3
14
© Ingersoll-Rand Company 2004 Page 83

Appendix 2 – System Specs and Spare Parts
Inside the Main Door
5
9
10
11
12
7 8
6
14
14
Page 84 © Ingersoll-Rand Company 2004

Appendix 2 – System Specs and Spare Parts
Right Side
13
© Ingersoll-Rand Company 2004 Page 85

Appendix 3 – Communication ProtocolsOverview of Host Data Out
The Host Data Out is one of the features for the Insight-IC. The user can request the EOR after each cycle from the Insight-IC. This host data out can be directed to any one of the comport (COM1-COM4). The detailed set up and its applications are explained below.
Setup ProcedureThe user should follow the following step by step procedure in order to setup the host data out protocol.
1. Select the COM1-COM4 in the “Data Port” dropdown box of the System Initialization Screen.
2. Set the Baud Rate in the System Initialization Screen. For Example “115200”.3. Set the Parity Bit. Select “None” for default option.4. Set the Bits per Character. Usually it should be 8.5. Select the “Host Data Out” in the Comm Protocol drop down box of the System
Initialization Screen.6. Assign the Multi Drop Address. The Default is “00”.7. The user should connect a RS-232 Null Modem Cable from COM1-COM4 of the
Insight-IC to any directed output. The outputs may be hyper terminal or any PLC Based Applications.
8. After each successful data string is sent out, the Host should send an ACK message to the Insight-IC.
9. The host should send the “Clear” message to the Insight-IC in order to clear the EOR and the Insight-IC will be ready for the next data out.
Page 86 © Ingersoll-Rand Company 2004

Appendix 3 – Communication Protocols
DescriptionsThe following format of the Host Data Output will be sent out to the directed terminals upon each request by the host after each tightening.
eeSSCCMMDDYYhhmmhhhhhjkkkkklmmnn<CR><LF>
To request data, Host sends message:
AASSCC<CR><LF>• Where AA is Insight Address Number, SS is Spindle number and CC in the
configuration number. System responds with data stream above if there is data.
• If there is no data, then the controller will respond with "AA@@@@" where AA is the address No.
To clear the Host buffer for a configuration, send the command:
AASSCC01<CR><LF>To clear the Host buffer for all configuration of a spindle, send the command:
AASSCC02<CR><LF>
ee Address Address No. of Insight sent in "Multi Drop Address" entry box
SS Spindle Number CC Configuration Number MMDDYY Month, Day, Yearhhmm Hour, Minutes (24 hr time)hhhhh Torque Four digits plus decimal pointj Torque status space=OK, H=High, L=Lowkkkkk Angle Five digitsl Angle status space=OK, H=High, L=Lowmm Cycle Last two digits of the cycle countnn Check sum Two digits Mod 256
© Ingersoll-Rand Company 2004 Page 87

Appendix 3 – Communication Protocols
Overview of Custom Host Data Out
The Custom Host Data Out is one of the features for the Insight-IC. This protocol is based off of the Standard “Host Data Out” serial protocol offered by the Insight-IC. The Insight-IC will be interfacing with a PLC or PLC Based Applications. This custom host data out can be directed to any one comport (COM1-COM4). The detailed set up and its applications are explained below.
Setup ProcedureThe user should follow the following step by step procedure in order to setup the host data out protocol.
1. Select the COM1-COM4 port in the “Data Port” dropdown box of the System Initialization Screen.
2. Set the Baud Rate in the System Initialization Screen. For example “115200”.3. Set the Parity Bit. Select “None” for default option.4. Set the Bits per Character. Usually it should be 8.5. Select the “Custom Host 1” in the Comm. Protocol dropdown box of the System
Initialization Screen.6. Assign the Multi Drop Address. The default is “00”.7. Connect a RS-232 Null Modem cable from COM1-COM4 of the Insight-IC to any
directed output. The outputs may be hyper terminal or any PLC based Applications.8. After each successful data string is sent out, the host should send an ACK message
to the Insight-IC.9. The host should send the “Clear” message to Insight-IC in order to clear the EOR
and the Insight-IC will be ready for the next data out.
DescriptionsThe following format of the Custom Host Data Output will be sent out from the Insight-IC to the directed terminals upon each request by the host after each tightening. At the end of each request, an ACK Message is sent from the Host to the Insight-IC. The Config Buffer Clear and Spindle Buffer Clear messages can be sent at any time to clear the specified buffer.
SSRTTTT.TAAAAAUUUU.VBBBBBCCCCC<CR><LF>SS Spindle NumberR Total Cycle Flag P=Pass;F=FailTTTT.T Peak Torque measured value AAAAA Peak Angle measured value
UUUU.U Torque Hi Limit This is set at time of receipt of data request message
Page 88 © Ingersoll-Rand Company 2004

Appendix 3 – Communication Protocols
• All torque data shall be sent in the unit of torque selected (on the Spindle Initialization Screen) at the time of the request.
• If there is no data available in the buffer for the requested spindle and configuration, then the controller shall respond with the following message indicating no data.
AASSCC@@@@ <CR><LF>Where:
AA is the address number of the controller
SS is the spindle number whose buffer is empty
CC is the configuration number whose buffer is empty
<CR> is a carriage return
<LF> is a line feed
• The following format of ACK message is sent from the host to the Insight-IC once the data has been received and verified.
AASSCC<ACK>Where:
AA is the address number of the controller
SS is the spindle number whose data is being acknowledged
CC is the configuration number whose data is being acknowledged
<ACK> is an ASCII acknowledge
• The following format of Config Buffer Clear message can be sent by host at any time to clear the buffer for a given spindle and configuration.
AASSCC01<CR><LF>Where:
AA is the address number of the controller
SS is the spindle number whose data should be cleared
CC is the configuration number whose data should be cleared
VVVV.V Torque Low Limit This is set at time of receipt of data request message
BBBBB Angle Hi Limit This is set at time of receipt of data request message
CCCCC Angle Low Limit This is set at time of receipt of data request message
<CR> Carriage Return<LF> Line feed
© Ingersoll-Rand Company 2004 Page 89

Appendix 3 – Communication Protocols
01 is the config buffer clear command
<CR> is a carriage return
<LF> is a line feed
Upon receiving this message, the controller shall respond with the following.
AASSCC@@@@ <CR><LF>Where:
AA is the address number of the controller
SS is the spindle number whose buffer is empty
CC is the configuration number whose buffer is empty
<CR> is a carriage return
<LF> is a line feed
• The Spindle Buffer Clear messages can be sent at any time by the host to clear all buffers for all configurations of a given spindle. The message shall have the following format.
AASSCC02<CR><LF>Where
AA is the address number of the controller
SS is the spindle number whose data should be cleared
CC is the configuration number (ignored for this message)
02 is the spindle buffer clear command
<CR> is a carriage return
<LF> is a line feed
Upon receiving this message, the controller shall respond with the following.
AASSCC@@@@ <CR><LF>Where:
AA is the address number of the controller
SS is the spindle number whose buffer is empty
CC is the configuration number whose buffer is empty (will be set as 00 to indicate all Configurations cleared)
<CR> is a carriage return
<LF> is a line feed
Page 90 © Ingersoll-Rand Company 2004

Index AActivating an Input ............................................... 13Active Bar Code Mode................................... 18–19Advanced Setups................................................. 29
Bypass Parameters ........................................ 41Clearing a Configuration ................................. 31Clearing a Step ............................................... 31Delay Control Strategy.................................... 41Engaging a Step ............................................. 31EOR Data ....................................................... 31Introduction ..................................................... 29Jog Control Strategy ....................................... 41Programming
Angle Control Strategy............................ 35Backout Strategy..................................... 38Drag Torque Control Strategy................. 40Spindles in a Powerhead ........................ 30Torque Control Strategy.................... 35, 39Yield Control Strategy ............................. 37Yield Override Strategy in Torque
Control ................................................. 36Retorque Parmeters ....................................... 41Tips ................................................................. 30
Alarm Setup Screen............................................. 58Alarms.................................................................. 59Angle.................................................................... 40Angle Control Strategy................................... 29, 35Assigning a Powerhead ....................................... 24Attaching Peripheral Devices............................... 10Attaching the Spindles ........................................... 9Auto Calibration ............................................. 20–22Auto Increment..................................................... 32
BBackout Angle................................................ 33–34Backout Speed .................................................... 33Backout Strategy.................................................. 38Backspace Key ...................................................... 4Bar Code.............................................................. 17
Active Mode .............................................. 17–18Compatibility With Other Functions ................ 19
Auto Increment........................................ 20Field Bus ................................................. 20Gang Count............................................. 19Powerhead.............................................. 20
Description...................................................... 17Other Operations ............................................ 19
Changing from Active to Passive Bar Code Mode .......................................... 19
Changing from Passive to Active Bar Code Mode .......................................... 19
Disable Tool Until Scan Option............... 19Removing Bar Code Operation............... 19
Passive Mode ................................................. 17Setup for Active Mode .................................... 18Setup for Passive Mode ................................. 17
Begin Calibration ................................................. 22Button ................................................................ 6–7Bypass Parameters ............................................. 41
CCabinet Lockout..................................................... 1Calibration
Begin .............................................................. 22Spindle Initialization........................................ 21
Check Box ......................................................... 6–7Clearing a Configuration ...................................... 31Clearing a Step.................................................... 31Communication Protocols.................................... 85
Custom Host Data Out ................................... 87Descriptions.............................................. 86–87Host Data Out................................................. 85Setup .............................................................. 16Setup Procedure....................................... 85, 87
Computer Connection and Setup ........................ 12Config Directory ................................................... 25Configuration
Clearing .......................................................... 31Selecting......................................................... 42Switch ............................................................. 11
Configuration SwitchConnection ..................................................... 11Setup .............................................................. 11Testing............................................................ 11
ConnectionsComputer........................................................ 12Configuration Switch....................................... 11Ethernet .......................................................... 14Field Bus Card................................................ 15Parallel Port .................................................... 12Serial Port....................................................... 12Socket Tray .................................................... 10
Continue button ................................................... 22Curves Screen ..................................................... 47Custom Host Data Out......................................... 87
Descriptions.................................................... 87Setup Porcedure............................................. 87
Cut-in Zone.................................................... 39–40Cycle Log Screen .......................................... 49, 57
© Ingersoll-Rand Company 2004 Page 91

Index
DData Entry Box...................................................6–7Data Out.........................................................85, 87Data Ports ............................................................16Definitions of System Parameters........................71Delay Control Strategy.........................................41Deleting a Powerhead..........................................25Devicenet .............................................................16Diagnostics...........................................................60
Menu .................................................................2Shutdown Codes.............................................67
Diagnostics Menus...............................................60Discrete Inputs Screen....................................62Discrete Outputs Screen.................................63Event Log Screen ...........................................64System Test Screen........................................60Tool Test Screen.............................................66Variable Timer Outputs ...................................63
Directional Arrow Keys...........................................3Discrete Inputs Screen.........................................62Discrete Outputs ..................................................63Discrete Outputs Screen......................................63Display
Box................................................................6–7Graphics Display Screen ..................................5
Drag Torque Control Strategy ..............................40Drag Torque Zone................................................40Drop Box ............................................................6–7
EEdit a Powerhead.................................................24Electrical Connection .............................................9End of Run Data...................................................31End of Run Filter ..................................................16Engage Step ........................................................31Enter Key ...........................................................3–4EOR .....................................................................31
Data Advanced Programming.........................31Data Out..........................................................17Filter ................................................................16
Escape Key............................................................3Ethernet ...............................................................16Ethernet Connection ............................................14Event Log Codes..................................................65Event Log Screen.................................................64Expand Key............................................................3Expand Symbol ......................................................3Export Screen ......................................................52External Configuration Switch ..............................11
FFault
Action Value, Retry ......................................... 34Backout Angle........................................... 33–34Backout Speed ............................................... 33Backout Strategy ............................................ 33Number of Retries........................................... 34Retry Fault Action ........................................... 34
Field Bus .............................................................. 20Field Bus Card Connection .................................. 15Final Fault Backout Angle .................................... 34Final Fault Backout Hi Torque ............................. 34Final Fault Backout Strategy................................ 34
GGang Advance ..................................................... 21Gang Count.................................................... 19, 32Graphics Display Screen ................................... 1, 5
HHandheld.............................................................. 10Header ................................................................... 5Help
Function .......................................................... 68Go to Help Topic............................................. 69Main Menu ...................................................... 68Menu........................................................... 2, 68
High Torque Limit................................................. 40Host Data Out .......................................... 16, 85, 87
IIncrement ............................................................. 32Initial peak............................................................ 39Initial Startup ........................................................ 15Initialization Screen, System................................ 16Input Signal Drawing............................................ 13Input, Activation ................................................... 13Insert a Step......................................................... 31Inside the Main Door............................................ 84Inside the Panel ................................................... 83Installation.............................................................. 8Introduction ............................................................ 1
JJog Control Strategy ............................................ 41
KKeypad
Navigation......................................................... 3Numeric ............................................................ 4
Page 92 © Ingersoll-Rand Company 2004

Index
LLight Box Connection and Setup ......................... 11Load Data ............................................................ 25Load Software...................................................... 25Log Codes ........................................................... 65Low torque limit.................................................... 40
MMachine Mounted ................................................ 10Main Door ............................................................ 84Main Menu Options................................................ 1Main Menu, Run................................................... 42Main Power Switch ................................................ 9Main Screen, Run ................................................ 45Main Window ......................................................... 5Menu
Diagnostics ................................................. 2, 60Discrete Inputs................................................ 62Go to Help Topic............................................. 69Help ............................................................ 2, 68Navigation......................................................... 2Print ............................................................ 2, 44Run ................................................................... 2Setup .......................................................... 2, 27Setup Techniques........................................... 27Statistics ............................................... 2, 48, 51
Message Box ......................................................... 5Monitoring Operation ........................................... 43Mounting (IC Controller)......................................... 8
NNavigation
Keypad.......................................................... 1, 3Menu................................................................. 2
Number of Retries................................................ 34Numeric Keypad ................................................ 1, 4
OOlympus.bin ......................................................... 25Operating the System .......................................... 42Orientation: Screen Layout .................................... 5Output, Receiving ................................................ 14Outputs Screen.................................................... 63
PPaint Marker......................................................... 63Panel.................................................................... 83Parallel Printer ..................................................... 12Parameter Transfer.............................................. 25Parameters Screen.............................................. 50Parameters, System ............................................ 71Passive Mode, Bar Code ..................................... 17Password and Powerhead Settings Screen......... 23
Password Function .............................................. 23Password Level ................................................... 23Password Settings ............................................... 23Peak cut-in torque................................................ 40Peripheral Devices, Attaching.............................. 10Pinout Tables................................................. 78–80PLC Connection and Setup ................................. 12Powerhead....................................................... 9, 20
Assigning ........................................................ 24Deleting .......................................................... 25Editing............................................................. 24Function.......................................................... 24Programming Spindles ................................... 30Specific Operations and Functions................. 33
Fault Action............................................. 34Fault Backout Angle................................ 33Fault Backout Speed .............................. 33Final Fault Backout Angle....................... 34General: Final Fault Backout
Strategy ............................................... 34General:Retry Fault Backout
Strategy ............................................... 33Number of Retries................................... 34Retry Fault Action ................................... 34
Powerhead Settings............................................. 23Prevailing Zone.................................................... 39Preventative Maintenance Alarms Screen........... 23Print Menu ....................................................... 2, 44Printer
Parallel............................................................ 12Serial .............................................................. 12
Profibus................................................................ 16Prog. Tool Switch................................................. 21Programming ....................................................... 27
Angle Control Strategy ................................... 29Angle Control Strategy in Advanced Setup .... 35Backout Strategy in Advanced Setup ............. 38Drag Torque Control Strategy in
Advanced Setup .......................................... 40Prevailing Torque Control Strategy ................ 39Spindles in a Powerhead................................ 30Tightening Strategies...................................... 28Torque Control Strategy ........................... 28, 35Yield Control Strategy..................................... 29Yield Control Strategy in Advanced
Setup ........................................................... 37Yield Override Strategy in Torque
Control ......................................................... 36
QQuality Control ..................................................... 44Quick Setup
Be operational in minutes ............................... 27
© Ingersoll-Rand Company 2004 Page 93

Index
Programming a Torque Control Strategy ........28Programming a Yield Control Strategy ...........29Programming an Angle Control Strategy ........29Programming Tightening Strategies ...............28
RReceiving an Output.............................................14Reject Buzzer.......................................................63Reset TR and ASC Buttons .................................21Retorque Parmeters.............................................41Retries..................................................................34Retry Fault Action.................................................34Retry Fault Action Value ......................................34Run Main Menu....................................................42Run Menu...............................................................2Run Menus...........................................................45
Cycle Log Screen............................................49Main Screen....................................................45Statistics Summary Screen.............................48Tightening Curves Screen ..............................47View Parameters Screen ................................50
SSave Data ............................................................25Screen Elements....................................................6Screen Layout Orientation .....................................5Selecting the Configutation ..................................42Sequence Rules...................................................30Serial Port ............................................................12Serial Printer ........................................................12Setup....................................................................27
Advanced ........................................................29Configuration Switch .......................................11Menu ...........................................................2, 27Socket Tray.....................................................10Techniques .....................................................27
Shutdown Codes..................................................67Socket Tray..........................................................10Spare Parts ..........................................................77Spare Parts List....................................................81Specifications.......................................................77Spindle
Initialization .........................................10, 21–22Initialization Screen.........................................20Operation ........................................................10Power Switches ................................................1Setup Screen ..................................................20
SpindlesAttaching ...........................................................9Programming ..................................................30
Startup .................................................................15Statistics
Alarm Setup Screen........................................58
Alarms Discussion .......................................... 59Menu........................................................... 2, 51Summary ........................................................ 48Summary Screen ............................................ 48
Statistics MenusCycle Log Screen ........................................... 57Export Screen ................................................. 52Statistics Alarm Setup Screen ........................ 58Summary Screen ............................................ 51Tightening Curves Screen .............................. 54
STATS ALARM.................................................... 43Status Display ........................................................ 1Step
Clearing .......................................................... 31Engage ........................................................... 31Inserting .......................................................... 31
Strategy Sequence Rules .................................... 30Sub-Menu Names.................................................. 5Sub-Menu Options ................................................. 1Summary Screen ................................................. 51System
Initialization Screen......................................... 16Operating ........................................................ 42Parameters ..................................................... 71Specs.............................................................. 77Test Screen .................................................... 60
TTechnical Specifications ...................................... 77Tightening
Curves Screen .......................................... 47, 54Strategies........................................................ 28Torque ............................................................ 39Zone................................................................ 39
Timer Outputs ...................................................... 63Tool Memory ........................................................ 26Tool Test Screen.................................................. 66Torque
Control ............................................................ 36Control Strategy.................................. 28, 35, 39Filter................................................................ 33Tightening ....................................................... 39
Troubleshooting ................................................... 60Tube Nut 1 ........................................................... 21Tube Nut 2 ........................................................... 21
VVariable Timer Outputs ........................................ 63View Parameters Screen ..................................... 50
WWizard Box............................................................. 5
Page 94 © Ingersoll-Rand Company 2004

Index
YYield Control Strategy.................................... 29, 37Yield Override
Fail on Yield Override ..................................... 36Failure............................................................. 36Strategy .......................................................... 36
ZZone, Tightening.................................................. 39
© Ingersoll-Rand Company 2004 Page 95