insight reporter iso and ova distribution installation and ... · image and ova file for sce...
TRANSCRIPT

Cisco Confidential© 2012 Cisco and/or its affiliates. All rights reserved. 1
Insight ReporterISO and OVA distribution Installation and Setup Guide
Cisco Insight Reporter v3.4.0 for SCE running SCOS 3.5.0 to 3.8.5
EDCS-1218700

Cisco Confidential© 2012 Cisco and/or its affiliates. All rights reserved. 2

Cisco Confidential© 2012 Cisco and/or its affiliates. All rights reserved. 3

© 2012 Cisco and/or its affiliates. All rights reserved. Cisco Confidential 4
• This document explains step-by-step process to install and configure the Insight Reporter v3.4.0 ISO image and OVA File for SCE devices, running SCOS 3.5.0 to 3.8.5.
• The Insight Reporter virtual appliance can be used:
• To collect live data from SCE devices and generate on-demand reports (live scenario).
• To let TME/presales teams showcase reports based on pre-collected data stored on the internal database (offline scenario)

© 2012 Cisco and/or its affiliates. All rights reserved. Cisco Confidential 5
• Single image file (.ISO) containing a complete environment to collect data and showcase reports for SCE devices
• The ISO image can be burnt on a DVD and installed on a physical workstation
• Or, it can be mounted as a Virtual Appliance
• Reports can be generated for:
• live traffic collected by SCE devices (live scenario)
• pre-collected data (offline scenario)

© 2012 Cisco and/or its affiliates. All rights reserved. Cisco Confidential 6
• An OVA (open virtual appliance or application) is a single file distribution of the file package that contains ‘. OVF’ descriptor file, optional manifest (.MF) and certificate files, and other related files, stored in the TAR format. It contains a complete environment to collect data and showcase reports for SCE devices
• The OVA file can be mounted as a Virtual Appliance
• Reports can be generated for:
• live traffic collected by SCE devices (live scenario)
• pre-collected data (offline scenario)
© 2012 Cisco and/or its affiliates. All rights reserved. Cisco Confidential 7
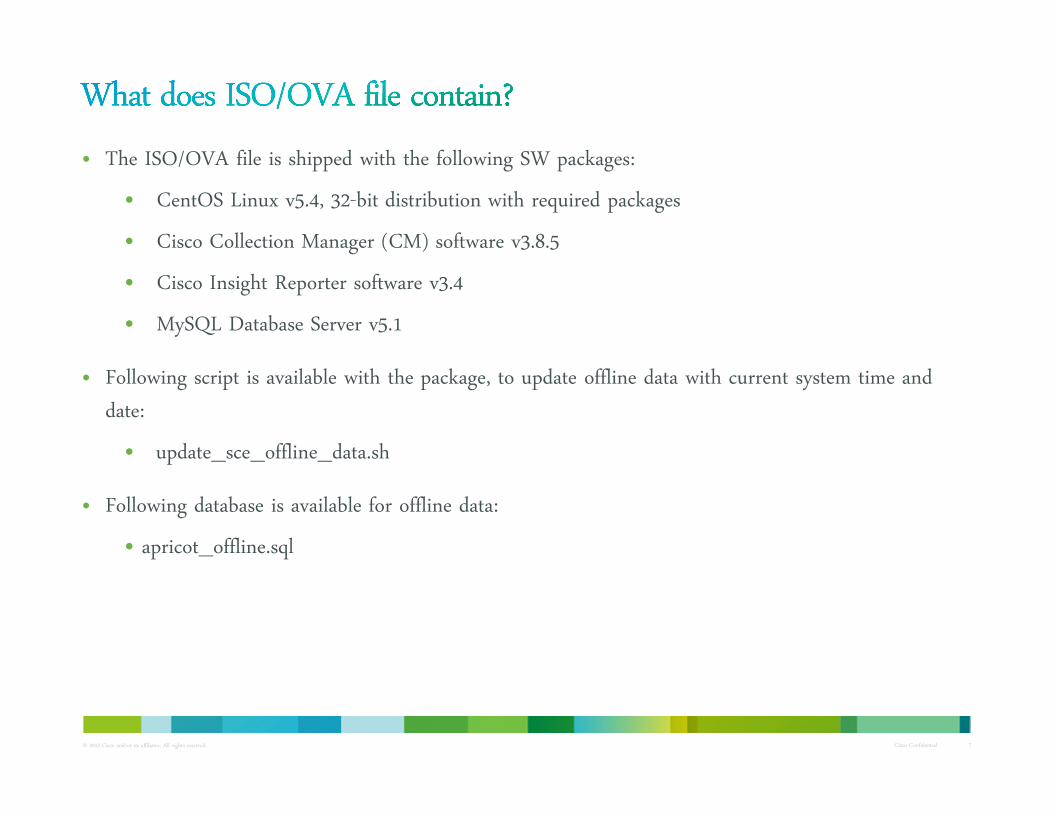
• The ISO/OVA file is shipped with the following SW packages:
• CentOS Linux v5.4, 32-bit distribution with required packages
• Cisco Collection Manager (CM) software v3.8.5
• Cisco Insight Reporter software v3.4
• MySQL Database Server v5.1
• Following script is available with the package, to update offline data with current system time and date:
• update_sce_offline_data.sh
• Following database is available for offline data:
• apricot_offline.sql

© 2012 Cisco and/or its affiliates. All rights reserved. Cisco Confidential 8
Known issue Affected component and possible workaround (if available)
Cisco Confidential© 2012 Cisco and/or its affiliates. All rights reserved. 9

© 2012 Cisco and/or its affiliates. All rights reserved. Cisco Confidential 10
• Knowledge
The user should be familiar with:
• basic Linux OS CLI environment
• basic SQL syntax
• basic Cisco SCE devices configuration
• Recommended Hardware / Software
Physical workstation or virtual appliance* with the following characteristics:
• 4 GB RAM
• 2.0 GHz CPU (or virtual CPUs)
• 40 GB free disk space
* In case of setup of a virtual appliance, make sure the hosting physical workstation has enough resources to create the VM with the
above parameters.

© 2012 Cisco and/or its affiliates. All rights reserved. Cisco Confidential 11
• Installing on a physical appliance proceed by installing the ISO image as shown here
• Installing on a virtual appliance see preliminary VMWare vSphere configuration here

Cisco Confidential© 2012 Cisco and/or its affiliates. All rights reserved. 12
This section is only required when installing the application on a virtual appliance.
To install on a physical host, you can skip this section.

© 2012 Cisco and/or its affiliates. All rights reserved. Cisco Confidential 13
From VMWare vSphere GUI, add a new Virtual Machine. Select Custom to proceed. Click Next to continue.
© 2012 Cisco and/or its affiliates. All rights reserved. Cisco Confidential 14
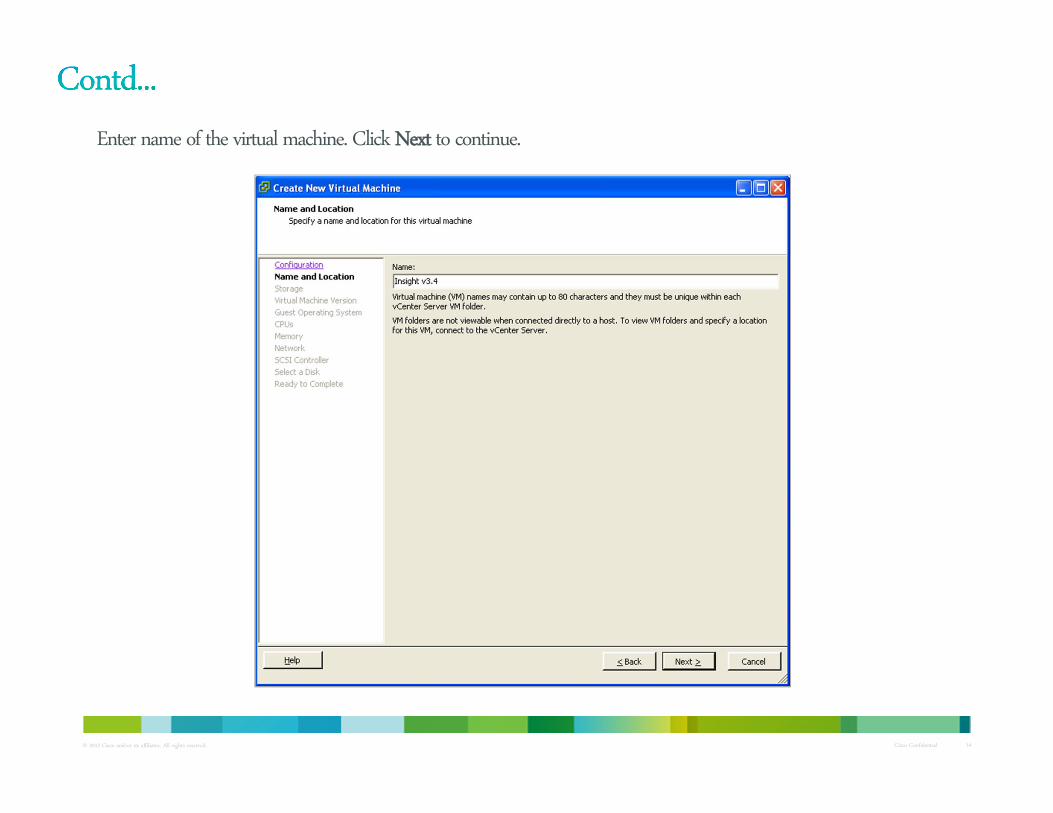
Enter name of the virtual machine. Click Next to continue.

© 2012 Cisco and/or its affiliates. All rights reserved. Cisco Confidential 15
Select data storage destination. Click Next to continue.

© 2012 Cisco and/or its affiliates. All rights reserved. Cisco Confidential 16
Select Virtual Machine Version: 8. Click Next to continue.

© 2012 Cisco and/or its affiliates. All rights reserved. Cisco Confidential 17
Select Linux Guest Operating System, and Version: CentOS 4/5 (32-bit). Click Next to continue.

© 2012 Cisco and/or its affiliates. All rights reserved. Cisco Confidential 18
Select at least 2 virtual processors. Click Next to continue.

© 2012 Cisco and/or its affiliates. All rights reserved. Cisco Confidential 19
Allocate at least 4 GB of memory. Click Next to continue.

© 2012 Cisco and/or its affiliates. All rights reserved. Cisco Confidential 20
Configure Network Interface, leave the Adapter setting to Flexible. Click Next to continue.

© 2012 Cisco and/or its affiliates. All rights reserved. Cisco Confidential 21
For controller type, select LSI Logic Parallel. Click Next to continue.

© 2012 Cisco and/or its affiliates. All rights reserved. Cisco Confidential 22
Select Create a new virtual disk option. Click Next to continue.

© 2012 Cisco and/or its affiliates. All rights reserved. Cisco Confidential 23
Allocate at least 40 GB of disk space to vdisk. Select Thick Provision Lazy Zeroed provisioning for the vdisk. Click Next to continue.

© 2012 Cisco and/or its affiliates. All rights reserved. Cisco Confidential 24
There is no need to change the default Advanced Options. Click Next to continue.

© 2012 Cisco and/or its affiliates. All rights reserved. Cisco Confidential 25
Click Finish to complete the creation of virtual machine.

© 2012 Cisco and/or its affiliates. All rights reserved. Cisco Confidential 26
It will create the new virtual machine. The newly created virtual machine will be available in the left pane.

© 2012 Cisco and/or its affiliates. All rights reserved. Cisco Confidential 27
Select the virtual machine available in the left pane. Power on the virtual machine.

© 2012 Cisco and/or its affiliates. All rights reserved. Cisco Confidential 28
Point the virtual CD/DVD drive to the Insight ISO image file location.

© 2012 Cisco and/or its affiliates. All rights reserved. Cisco Confidential 29
Start the virtual machine to boot from CD. Click Open to continue.

© 2012 Cisco and/or its affiliates. All rights reserved. Cisco Confidential 30
The install CD is loaded, and you will be prompted to delete all the data on vdisk under Console tab, click Yes to continue. It will start the Cent OS Installation .

Cisco Confidential© 2012 Cisco and/or its affiliates. All rights reserved. 31
This section is common to the installation on virtual appliance
and on physical hosts.

© 2012 Cisco and/or its affiliates. All rights reserved. Cisco Confidential 32
• Burn the ISO on a DVD or mount it as virtual DVD-reader on a virtual appliance (see previous section)
• Configure the BIOS settings to boot from DVD and restart the workstation or virtual appliance
• The system will boot from the ISO image and will start the CentOS installation procedure

© 2012 Cisco and/or its affiliates. All rights reserved. Cisco Confidential 33
• When prompted to install CentOS, just press enter or wait for a few seconds. The graphical installation wizard will start automatically.
© 2012 Cisco and/or its affiliates. All rights reserved. Cisco Confidential 34
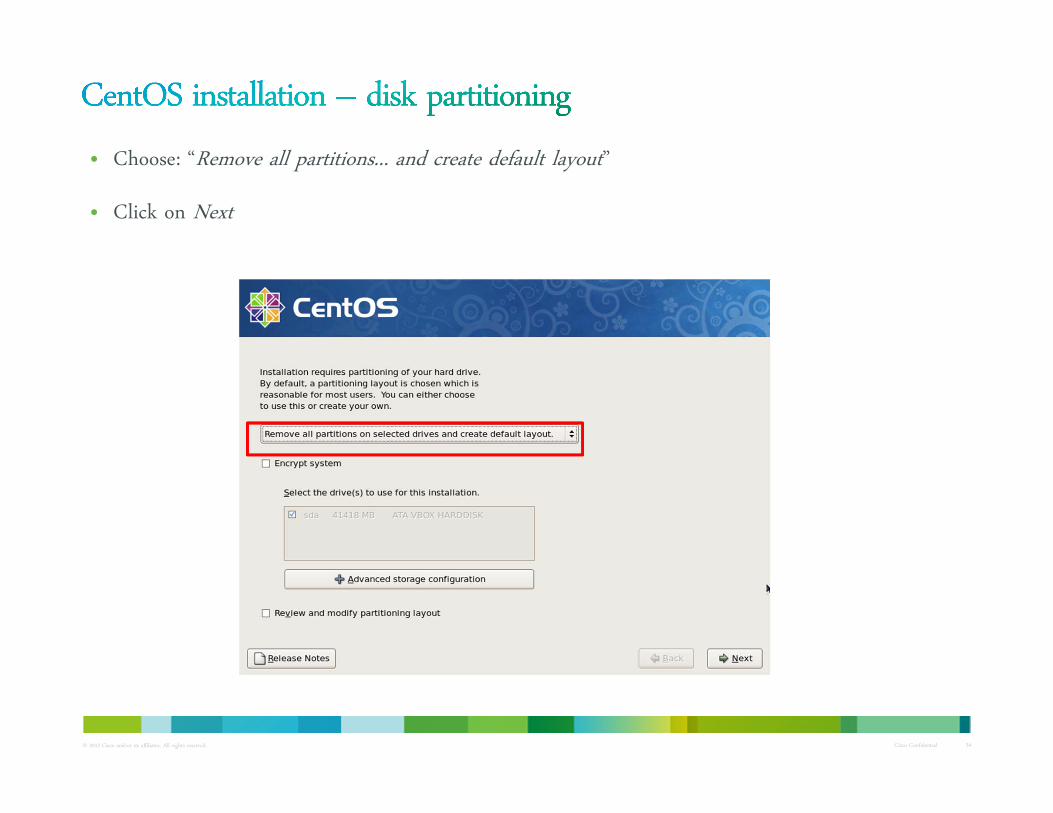
• Choose: “Remove all partitions... and create default layout”
• Click on Next

© 2012 Cisco and/or its affiliates. All rights reserved. Cisco Confidential 35
• In the Network Devices section, click on Edit
© 2012 Cisco and/or its affiliates. All rights reserved. Cisco Confidential 36
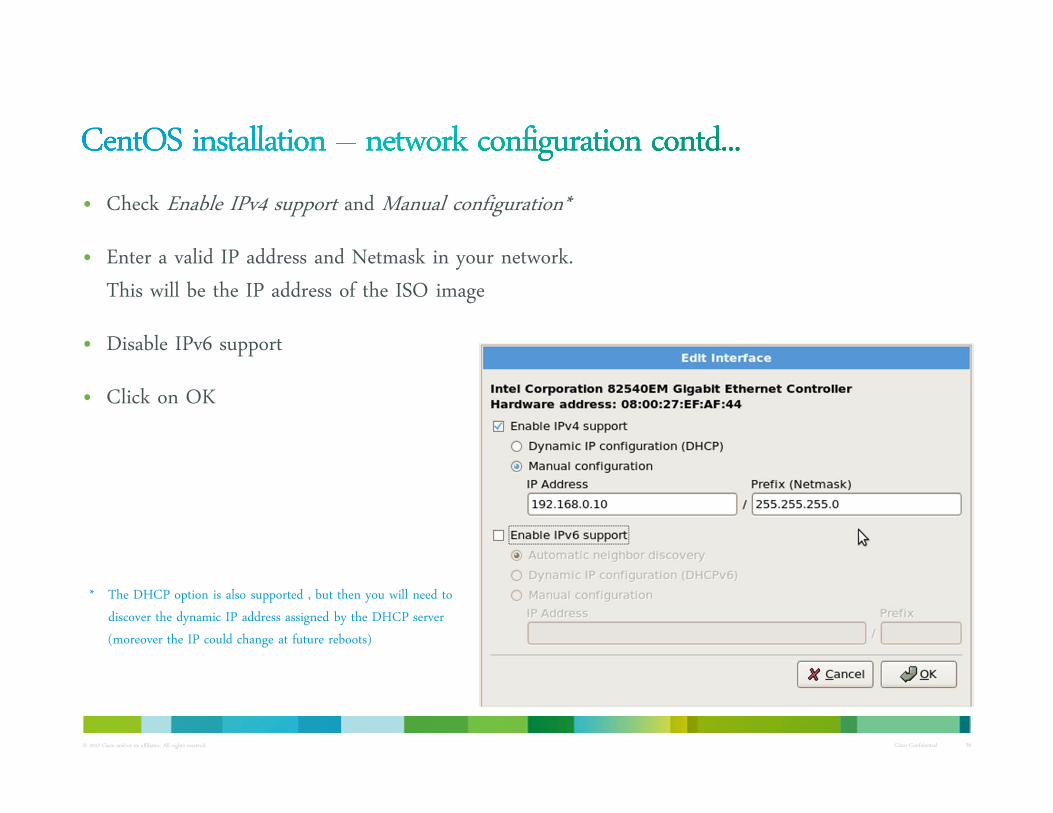
• Check Enable IPv4 support and Manual configuration*
• Enter a valid IP address and Netmask in your network.This will be the IP address of the ISO image
• Disable IPv6 support
• Click on OK
* The DHCP option is also supported , but then you will need to
discover the dynamic IP address assigned by the DHCP server
(moreover the IP could change at future reboots)

© 2012 Cisco and/or its affiliates. All rights reserved. Cisco Confidential 37
• To complete the network settings, you may want to configure:
• The hostname (i.e.: demokit.localdomain)
• The default gateway (needs to match the GW of the target network – i.e.: 192.168.0.1)
• The DNS servers (not required, in general)

© 2012 Cisco and/or its affiliates. All rights reserved. Cisco Confidential 38
• Choose an appropriate time zone where the instance is being set up.

© 2012 Cisco and/or its affiliates. All rights reserved. Cisco Confidential 39
• Set password for the root user.

© 2012 Cisco and/or its affiliates. All rights reserved. Cisco Confidential 40
• The CentOS wizard will automatically invoke the post-installation scripts and then reboot the appliance
IMPORTANT: as soon as the system reboots, unmount the ISO image or eject the DVD, otherwise the CentOS installation process will start again.
• The system needs to reboot from the hard-drive and complete with the installation of the ISO image software packages

© 2012 Cisco and/or its affiliates. All rights reserved. Cisco Confidential 41
• After the CentOS installer has finished the setup of all OS packages, the CM silent installer will be automatically invoked.
• This will create a hard-coded OS user called scmscm and you will be required to enter its password.

© 2012 Cisco and/or its affiliates. All rights reserved. Cisco Confidential 42
• The wizard will now install and start the MySQL DB Server
• Then the pre-populated traffic database will be imported from script files
IMPORTANT: This operation can last 15-30 minutes* and cannot be avoided or interrupted (even if setting up a live environment for which pre-populated data is not needed)
* Depending on the I/O speed of the appliance

© 2012 Cisco and/or its affiliates. All rights reserved. Cisco Confidential 43
• The wizard installs the Collection Manager and starts it
• The wizard installs the Java Run-Time Environment
• The wizard installs the Insight Reporter application
The Tomcat server is started
Now installation is completed. You can start to use Insight Reporter Demokit.

© 2012 Cisco and/or its affiliates. All rights reserved. Cisco Confidential 44
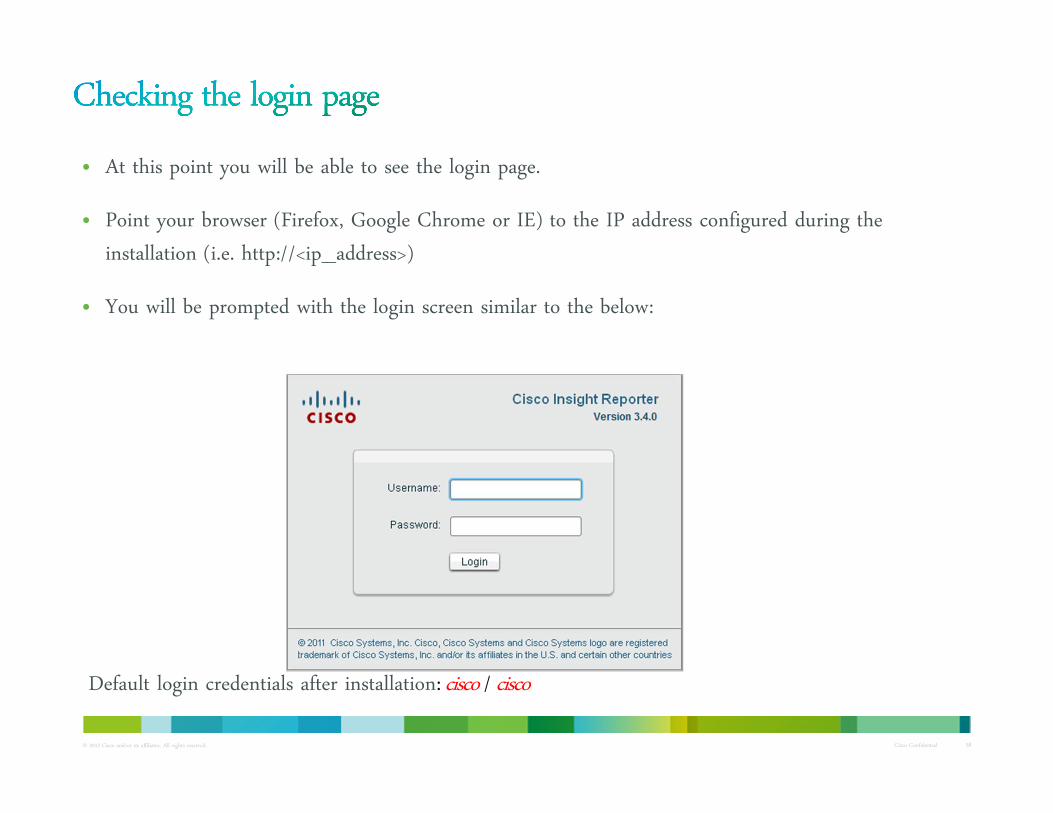
• At this point you will be able to see the login page.
• Point your browser (Firefox, Google Chrome or IE) to the IP address configured during the installation (i.e. http://<ip_address>)
• You will be prompted with the login screen similar to the below:
Default login credentials after installation: cisco / cisco
© 2012 Cisco and/or its affiliates. All rights reserved. Cisco Confidential 45
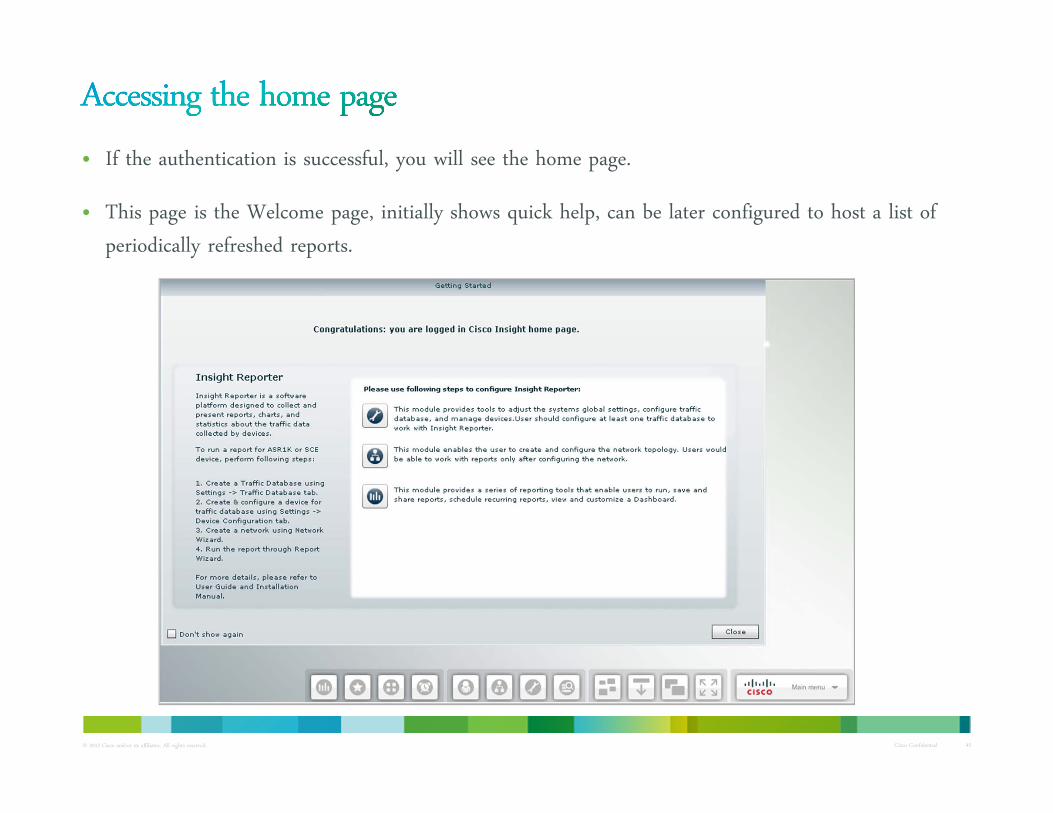
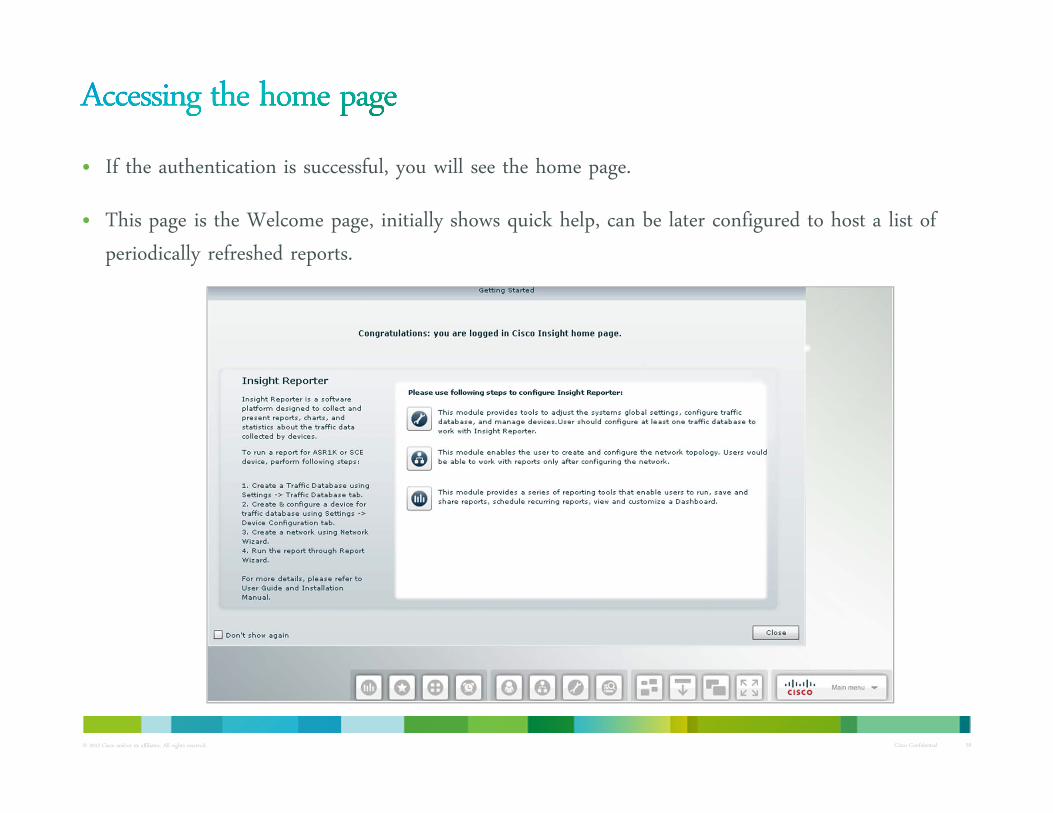
• If the authentication is successful, you will see the home page.
• This page is the Welcome page, initially shows quick help, can be later configured to host a list of periodically refreshed reports.
Cisco Confidential© 2012 Cisco and/or its affiliates. All rights reserved. 46

© 2012 Cisco and/or its affiliates. All rights reserved. Cisco Confidential 47
• Knowledge
The user should be familiar with:
• basic Linux OS CLI environment
• basic SQL syntax
• basic Cisco SCE devices configuration
• Recommended Hardware / Software
Physical workstation or virtual appliance* with the following characteristics:
• 4 GB RAM
• 2.0 GHz CPU (or virtual CPUs)
• 40 GB free disk space
IMPORTANT: Configuration of physical workstation on which virtual appliance is created, should be greater than given above.

© 2012 Cisco and/or its affiliates. All rights reserved. Cisco Confidential 48
Click File menu -> Deploy OVF Template option. Select the OVA file location. Click Next to continue.
IMPORTANT: OVA file can be deployed only on a virtualized environment.

© 2012 Cisco and/or its affiliates. All rights reserved. Cisco Confidential 49
It will display the OVF Template Details. Click Next to continue.

© 2012 Cisco and/or its affiliates. All rights reserved. Cisco Confidential 50
Enter name of the template. Click Next to continue.

© 2012 Cisco and/or its affiliates. All rights reserved. Cisco Confidential 51
Select the data store. Click Next to continue.
IMPORTANT: This screen is available with Vmware vsphere Client v5.1.
© 2012 Cisco and/or its affiliates. All rights reserved. Cisco Confidential 52
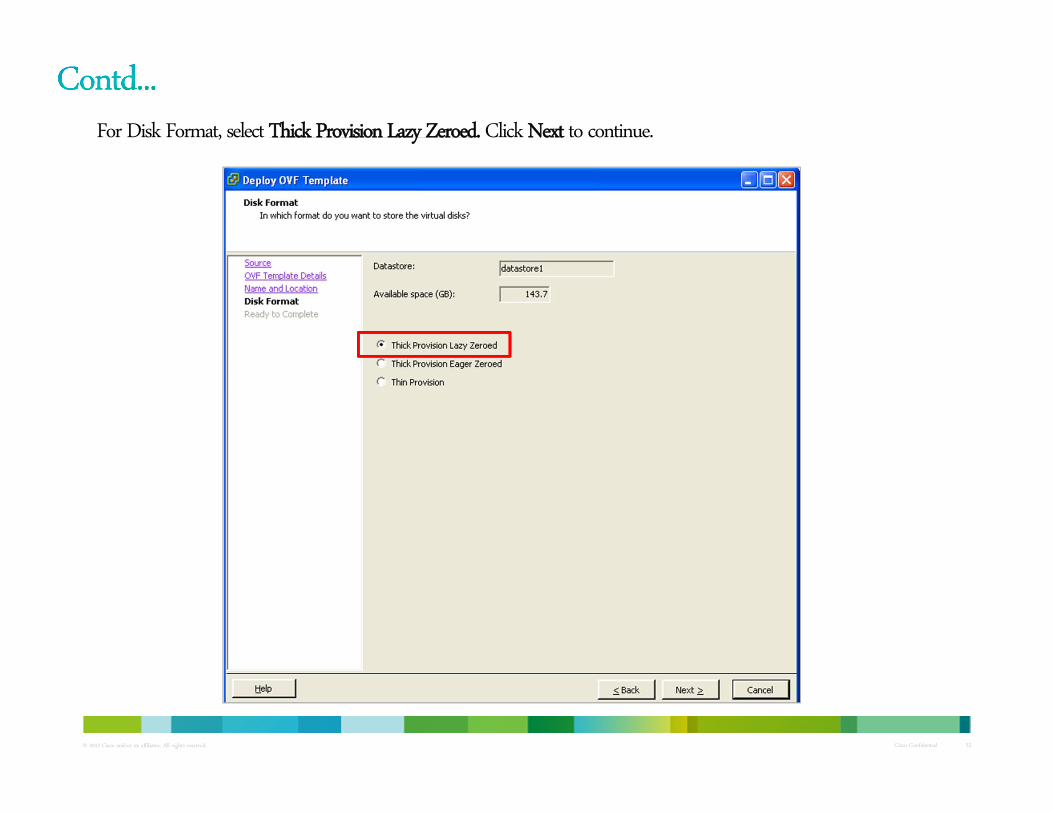
For Disk Format, select Thick Provision Lazy Zeroed. Click Next to continue.

© 2012 Cisco and/or its affiliates. All rights reserved. Cisco Confidential 53
View all the details. Click Finish to start the deployment.

© 2012 Cisco and/or its affiliates. All rights reserved. Cisco Confidential 54
It will start the OVA image deployment. Click Close to finish the deployment.

© 2012 Cisco and/or its affiliates. All rights reserved. Cisco Confidential 55
Select the virtual machine available in the left pane. Power on the virtual machine.

© 2012 Cisco and/or its affiliates. All rights reserved. Cisco Confidential 56
It will start all the components of the application.

© 2012 Cisco and/or its affiliates. All rights reserved. Cisco Confidential 57
• If user has DHCP server, there is no need to configure the IP address as it will automatically upgrade the IP address.
• To configure the IP address manually, perform following steps:
1. Open the following file of VMWare in vi Editor: /etc/sysconfig/network-scripts/ifcfg-eth0
2. Change following configurations to given value:
BOOTPROTO=none
NETMASK=<Netmask of your machine>
IPADDR =<IP address of your machine>
GATEWAY= <Gateway of your machine>
3. Restart the network service using following command:
/etc/init.d/network restart
© 2012 Cisco and/or its affiliates. All rights reserved. Cisco Confidential 58
• At this point you will be able to see the login page.
• Point your browser (Firefox, Google Chrome or IE) to the IP address configured during the installation (i.e. http://<ip_address>)
• You will be prompted with the login screen similar to the below:
Default login credentials after installation: cisco / cisco
© 2012 Cisco and/or its affiliates. All rights reserved. Cisco Confidential 59
• If the authentication is successful, you will see the home page.
• This page is the Welcome page, initially shows quick help, can be later configured to host a list of periodically refreshed reports.

Cisco Confidential© 2012 Cisco and/or its affiliates. All rights reserved. 60

© 2012 Cisco and/or its affiliates. All rights reserved. Cisco Confidential 61
You need to select your time zone in the Account Management module, Personal Profile tab.
IMPORTANT: If you change any of the account settings, you will be required to set a stronger password before saving changes.Example of strong password: Cisco@123

Cisco Confidential© 2012 Cisco and/or its affiliates. All rights reserved. 62

© 2012 Cisco and/or its affiliates. All rights reserved. Cisco Confidential 63
• In the offline scenario, the system is ready to generate reports on the existing data (pre-collected)
• After login, select the:
My Favorites module
OR
Report Wizard module
IMPORTANT: There are a script file ./pkgrpm/update_sce_offline _data.sh to update the offline
data with current system date and time. Run this script manually from $INSIGHT_HOME/apache-
tomcat-6.0.20 to update the date and time.
© 2012 Cisco and/or its affiliates. All rights reserved. Cisco Confidential 64
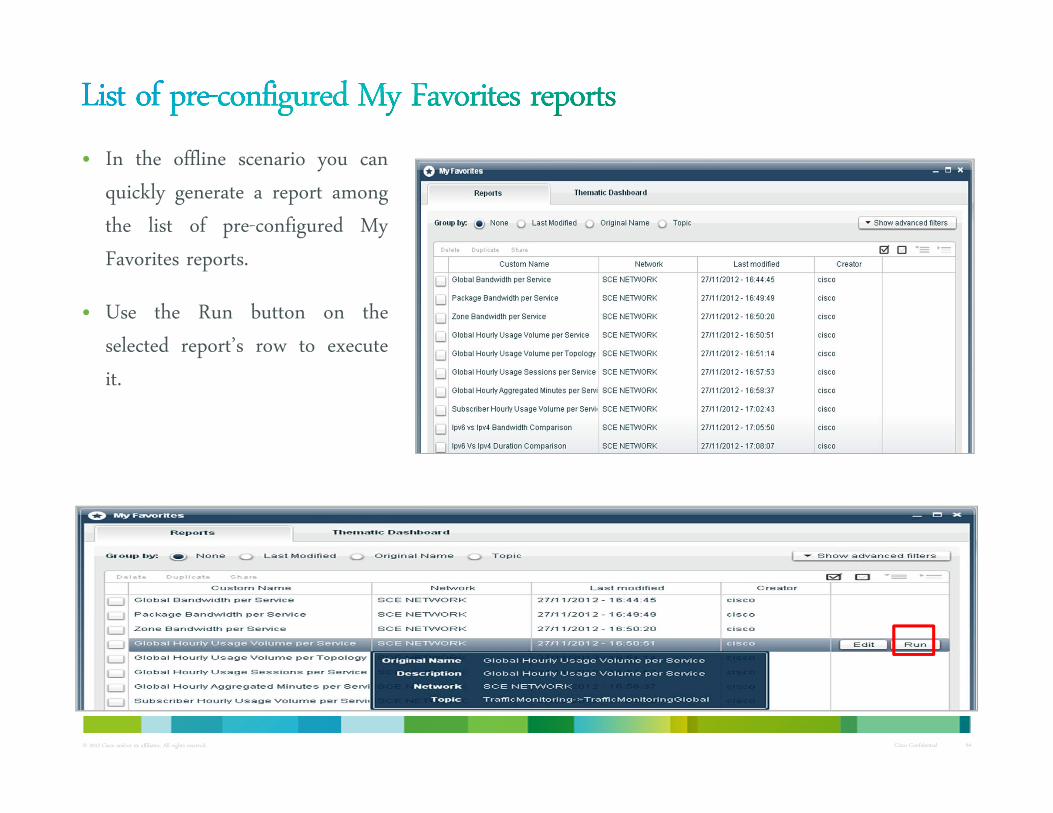
• In the offline scenario you canquickly generate a report amongthe list of pre-configured MyFavorites reports.
• Use the Run button on theselected report’s row to executeit.
© 2012 Cisco and/or its affiliates. All rights reserved. Cisco Confidential 65
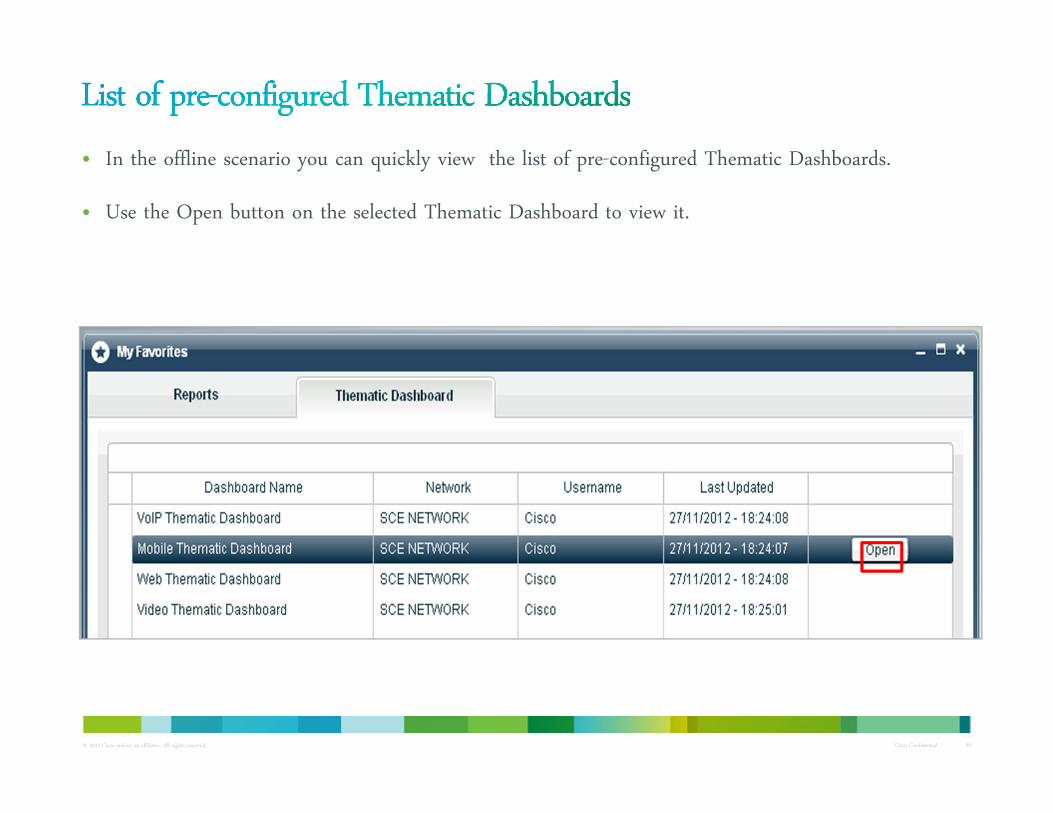
• In the offline scenario you can quickly view the list of pre-configured Thematic Dashboards.
• Use the Open button on the selected Thematic Dashboard to view it.

© 2012 Cisco and/or its affiliates. All rights reserved. Cisco Confidential 66
• If you want to generate an on-demand report, you need toopen the Report Wizard module.
• Choose the preconfigured SCE NETWORK OFFLINE.
• Select a topic pattern of interest.
• Click Next and use the other tabs to fill-in the reportparameters (most of them have default values).

© 2012 Cisco and/or its affiliates. All rights reserved. Cisco Confidential 67

© 2012 Cisco and/or its affiliates. All rights reserved. Cisco Confidential 68
• Contact Cisco support if you have any questions during installation or setup of the ISO/OVA image.

Cisco Confidential© 2012 Cisco and/or its affiliates. All rights reserved. 69

© 2012 Cisco and/or its affiliates. All rights reserved. Cisco Confidential 70
• The CM process populates apricot database schema.
• The apricot database schema is blank database, created to add live traffic database.

Cisco Confidential© 2012 Cisco and/or its affiliates. All rights reserved. 71
© 2012 Cisco and/or its affiliates. All rights reserved. Cisco Confidential 72
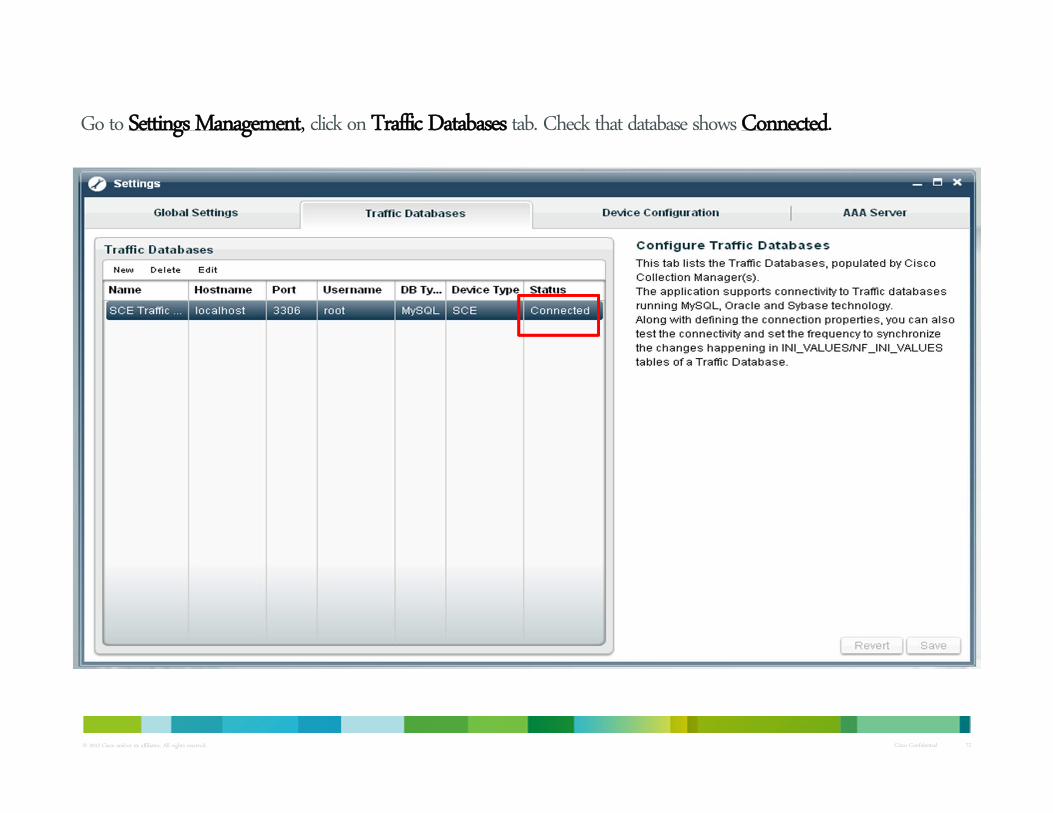
Go to Settings Management, click on Traffic Databases tab. Check that database shows Connected.

© 2012 Cisco and/or its affiliates. All rights reserved. Cisco Confidential 73
Go to Device Configuration tab, select SCE/SCE Traffic Database. You will see one device already listed there,10.10.10.111, which is pre-populated for off-line demo.

© 2012 Cisco and/or its affiliates. All rights reserved. Cisco Confidential 74
Go to Settings Management, click on Device Configuration tab, click Discover Devices, you will see your SCE IPshows in the list of devices.

© 2012 Cisco and/or its affiliates. All rights reserved. Cisco Confidential 75
Now you have to create a network to use in the report, go to Network Wizard, and click New to create new network.Name your new network, i.e. My Demo.

© 2012 Cisco and/or its affiliates. All rights reserved. Cisco Confidential 76
Click on Devices tab, select the SCE/SCE Traffic DatabaseClick on the SCE device in the List of Devices and click Set as Master.IMPORTANT: Leave the device 10.10.10.111 unchecked.

© 2012 Cisco and/or its affiliates. All rights reserved. Cisco Confidential 77
Set as Master should take no more than 20-30 seconds. When it completed, you will see the icon M on the left of yourSCE device.Click Get Master Values. It will not take more than 20-30 seconds.

© 2012 Cisco and/or its affiliates. All rights reserved. Cisco Confidential 78
When you click on the Topology tab, check View by Custom Device groups, and you will see your SCE devices show up here. Click Save on the right. You are done with the Network Wizard.
SAVE
© 2012 Cisco and/or its affiliates. All rights reserved. Cisco Confidential 79
• Contact Cisco support if you have any questions during installation or setup of the ISO/OVA image.
• Next step is: go to Report Wizard and try to generate a report.