install guide ford f150 - amazon s3cdncontent2.idatalink.com/corporate/content/manuals/rr... ·...
TRANSCRIPT

OPTIONAL ACCESSORIESNone
PROGRAMMED FIRMWAREADS-RR(SR)-FO2-DS
PRODUCTS REQUIREDiDatalink Maestro RR Radio Replacement InterfaceiDatalink Maestro KIT-F150
INSTALL GUIDEFORD F150
WITH MYFORD 4INCH SCREEN
2013-2014retains steering wheel controls and more!
NOTICE: Automotive Data Solutions Inc. (ADS) recommends having this installation performed by a certified technician. Logos and trademarks used here in are the properties of their respective owners.

ADS-RR(SR)-FO2-DS maestro.idatalink.com
Ford F150 2013-2014
Automotive Data Solutions Inc. © 2015 2
WELCOME
NEED HELP?
Congratulations on the purchase of your iDatalink Maestro RR Radio replacement solution. You are now a few simple steps away from enjoying your new car radio with enhanced features. Before starting your installation, please ensure that your iDatalink Maestro module is programmed with the correct fi rmware and that you carefully review the Installation Diagram and Vehicle Wire Refer-ence Chart.
Please note that Maestro RR will only retain functionalities that were originally available in the vehicle.
1 866 427-2999
maestro.idatalink.com/supportwww.12voltdata.com/forum
TABLE OF CONTENTS
Installation Instructions 3
Wiring Diagram 5
Radio Wire Reference Chart 6
ADS-RR(SR)-FO2-DS maestro.idatalink.com
Ford F150 2013-2014
Automotive Data Solutions Inc. © 2015 3
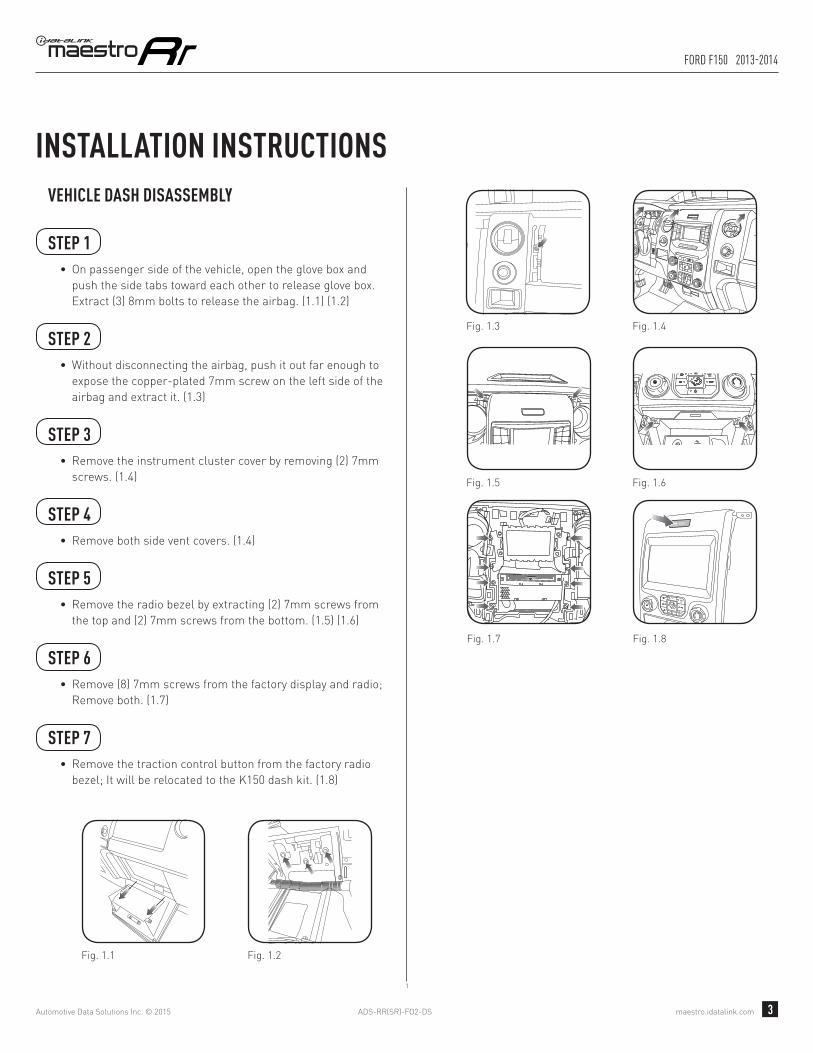
INSTALLATION INSTRUCTIONS VEHICLE DASH DISASSEMBLY
STEP 1• On passenger side of the vehicle, open the glove box and
push the side tabs toward each other to release glove box. Extract (3) 8mm bolts to release the airbag. (1.1) (1.2)
STEP 2• Without disconnecting the airbag, push it out far enough to
expose the copper-plated 7mm screw on the left side of the airbag and extract it. (1.3)
STEP 3• Remove the instrument cluster cover by removing (2) 7mm
screws. (1.4)
STEP 4• Remove both side vent covers. (1.4)
STEP 5• Remove the radio bezel by extracting (2) 7mm screws from
the top and (2) 7mm screws from the bottom. (1.5) (1.6)
STEP 6• Remove (8) 7mm screws from the factory display and radio;
Remove both. (1.7)
STEP 7• Remove the traction control button from the factory radio
bezel; It will be relocated to the K150 dash kit. (1.8)
1
Fig. 1.3
Fig. 1.5
Fig. 1.4
Fig. 1.6
Fig. 1.7 Fig. 1.8
Fig. 1.1 Fig. 1.2
A/CMAXA/C
OFF
PASSAIRBAG
OFF
Fig. 1.3
Fig. 1.5
Fig. 1.4
Fig. 1.6
Fig. 1.7 Fig. 1.8
Fig. 1.1 Fig. 1.2
A/CMAXA/C
OFF
PASSAIRBAG
OFF

ADS-RR(SR)-FO2-DS maestro.idatalink.com
Ford F150 2013-2014
Automotive Data Solutions Inc. © 2015 4
INSTALLATION INSTRUCTIONS DASH KIT ASSEMBLY
STEP 8• Unbox the K150 dash kit.
• Insert the factory traction control button into the K150 dash kit. (2.1)
• Attach the storage pocket to the backside of the K150 dash kit and secure it with the screws included in the kit. (2.2)
• Secure the K150 steel radio brackets to the aftermarket radio using the screws included with the aftermarket radio. (2.3)
CONNECTIONS (REFER TO DIAGRAM)
STEP 9• Unbox the aftermarket radio and locate its main harness.
• Connect the wires from the aftermarket radio’s main harness to the K150 T-harness and match the wire colors (refer to diagram).
STEP 10• Plug the aftermarket radio harnesses into the aftermarket
radio.
• Plug the Data cable to the data port of the aftermarket radio (labeled iDatalink).
• Insert the Audio cable into the iDatalink 3.5 mm audio jack of the aftermarket radio (labeled iDatalink).
NOTE:
In Pioneer radios: plug Audio cable in auxiliary input of the radio.
• Plug the backup camera RCA cable into the aftermarket radio (if applicable).
STEP 11• Plug the aftermarket radio harnesses into the OBDII
connector, located under the driver side dashboard, and run the wires up to the radio cavity.
STEP 12• Connect the K150 T-harness to the factory radio harness.
• Plug the backup camera cable into the factory harness (if applicable).
• Plug the HVAC cable in the factory harness.
STEP 13• Insert the radio into the dash and secure the metal
brackets with the 7mm bolts removed during disassembly.
STEP 14• Connect all the harnesses to the Maestro RR module.
STEP 15• Connect all the harnesses to the K150 dash kit.
• Secure the K150 kit in the dash.
TROUBLESHOOTING TIPS:
• To reset the module back its factory settings, turn the key to the OFF position then disconnect all connectors from the module. Press and hold the module’s programming button and connect all the connectors back to the module. Wait, the module’s LED will fl ash RED rapidly (this may take up to 10 seconds). Release the programming button. Wait, the LED will turn solid GREEN for 2 seconds.
• For technical assistance call 1-866-427-2999 or e-mail “[email protected]”. Visit us at “maestro.idatalink.com/support” and “www.12voltdata.com/forum/”
1
Fig. 2.1
Fig. 2.3
Fig. 2.2
A/CMAXA/C
OFF
PASSAIRBAG
OFF

ADS-RR(SR)-FO2-DS maestro.idatalink.com
Ford F150 2013-2014
Automotive Data Solutions Inc. © 2015 5
Y
X
C
A
H
FG
D
C
A
G
F
H
1
D
BACKUP CAMBACKUP CAM
Y
HVAC CABLE
STEP 15
WHITE - LF SPEAKER (+)WHITE/BLACK - LF SPEAKER (-)GRAY - RF SPEAKER (+)GRAY/BLACK - RF SPEAKER (-)GREEN - LR SPEAKER (+)GREEN/BLACK - LR SPEAKER (-)
PURPLE/BLACK - RR SPEAKER (-)
YELLOW - 12V (+)
BLACK - GROUNDRED - ACCESSORY (+)
ORANGE - ILLUMINATION (+)PURPLE/WHITE - REVERSE LIGHT (+)LTGREEN - E-BRAKE (-)
BLUE/WHITE - AMP. TURN ON (+)
PURPLE - RR SPEAKER (+)
PINK - VEHICLE SPEEDYELLOW/BLACK - FOOT BRAKEBROWN (NOT CONNECTED)
WIRES FROMVEHICLE
MAINHARNESS
CONNECT TOAFTERMARKET RADIO
RCA CABLE
FACTORY RADIO HARNESS
RR-F150 T-HARNESS
WIRING DIAGRAM
STEP 12
STEP 10
STEP 14
STEP 9
SEE RADIOWIRE REFERENCECHART FORRADIO WIRECOLORS
MAESTRO RR MODULE
DATACABLE
AUDIOCABLE
STEP 11 OBDII CONNECTOR

ADS-RR(SR)-FO2-DS maestro.idatalink.com
Ford F150 2013-2014
Automotive Data Solutions Inc. © 2015 6
RADIO WIRE REFERENCE CHART
WireDescription Polarity Wire Color on Maestro
T-Harness Wire Color on Alpine cable Wire Color on Kenwood cable Wire Color on Pioneer cable
Illumination (+) Orange N/A Orange/White Orange/White
Reverse Light (+) Purple/White Orange/White Purple/White Purple/White
E-Brake (-) Lt Green Yellow/Blue Lt Green Lt Green
Foot Brake (+) Yellow/Black Yellow/Black N/A N/A
VSS (vehicle speed sensor) (DATA) Pink Green/White N/A Pink