installation and operating instructions - home appliances nz tubs (ls... · plumbing work must be...
TRANSCRIPT

Installationand OperatingInstructions
As part of Parmco Appliances commitment to improving and updating product ranges,we reserve the right to alter, change and update technical specifications and appearance
attributes of all Parmco Appliances products. E&OE.
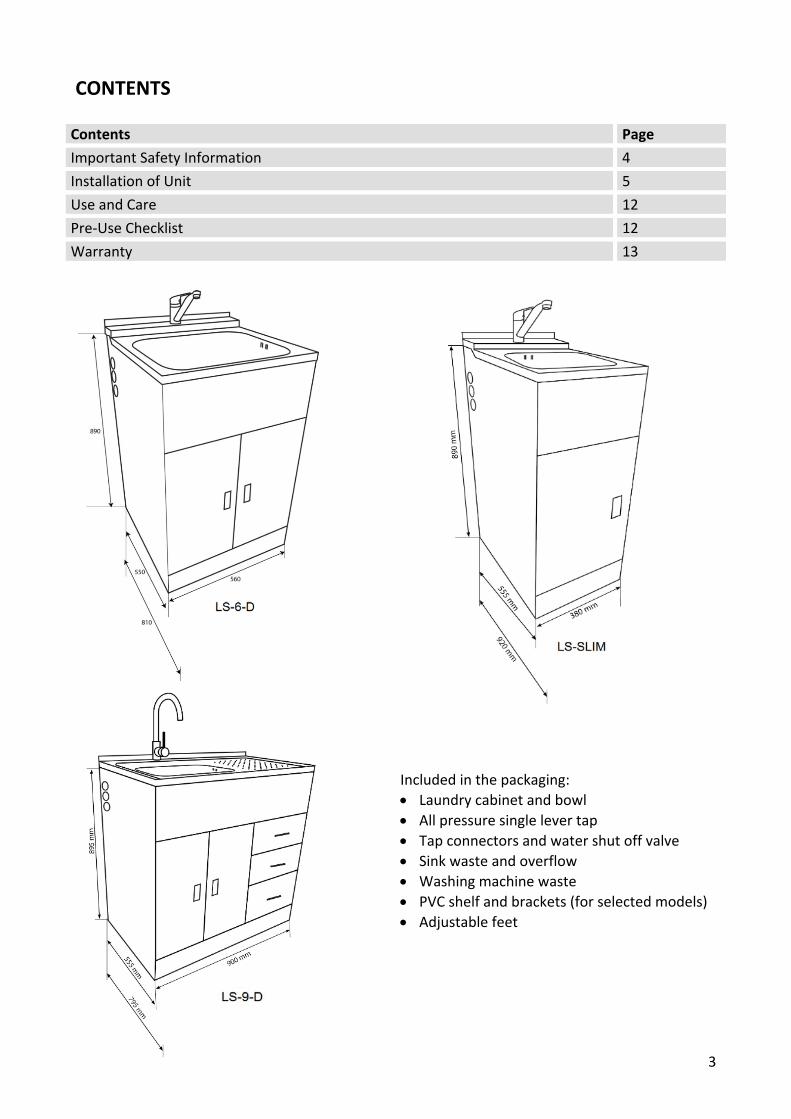
Models: LS-SLIM LS-6-D LS-9-D

Dear Valued Customer,
Thank you and congratulations on purchasing your new Parmco appliance.
All Parmco products are made to the highest quality and design standards. We are sure you will enjoy your new appliance.
As a note, please read through these instructions carefully, as these will assist you in gaining a complete understanding of the functions and features offered by your appliance.
Please take special note of all detailed technical information and installation instructions. It is essential that you only allow a qualified technician to install this appliance to ensure the safety and reliability of this appliance.
Furthermore, not using appropiate personnel to install this appliance may affect any future warranty claims lodged, so please check with Parmco Appliances before any installation is carried out.
We hope you enjoy your new appliance. If you would like to find out more about this product or any other products in Parmco’s extensive range, visit us on the web at www.parmco.co.nz.
Regards,The Parmco Team
3
CONTENTS
Contents Page
Important Safety Information 4
Installation of Unit 5
Use and Care 12
Pre-Use Checklist 12
Warranty 13
Included in the packaging: Laundry cabinet and bowl All pressure single lever tap Tap connectors and water shut off valve Sink waste and overflow Washing machine waste PVC shelf and brackets (for selected models) Adjustable feet

4
IMPORTANT SAFETY INFORMATION For best performance and to extend the life of your laundry tub, we recommend that you read the instructions in this owners manual thoroughly before using your new laundry tub. It will provide you with all the information you need to ensure its safe installation, proper use and maintanence. Retain this owners manual for future reference. BEFORE USING THIS LAUNDRY TUB Read the instructions thoroughly before installing the laundry tub Remove all plastic protective films on the laundry tub before operating the laundry tub. This product is not intended for use by young children or infirmed persons without supervison. Young children must be supervised to ensure that they do not play with this product. It is very important that the water supply pipes to the laundry tub are thoroughly flushed to
remove debris prior to the connection of the laundry tub. Debris and other foreign matter may damage the ceramic cartridge in the mixer tap and is not covered by warranty.
To prevent damage to the ceramic cartridge, it is recommended that an “inline” filter is fitted prior to the the mixer tap. Damage to the cartridge caused by debris/grit is not covered under warranty.
Recommended temperature range for the mixer tap is 5-55°C with a maximum permissible temperature of 80°C.
The maximum operating pressure is 1000kPa and the minimum is 35kPa.
COMPLIANCE Please check with your local authority regarding compliance with the current Plumbing and Drainage regulations. A registered plumber is required to carry out “sanitary” plumbing. All
plumbing work must be carried out in accordance with all relevant New Zealand Standards. All electrical work must be carried out in accordance with all relevant New Zealand Standards. In
some cases this product may need to be earthed.
5
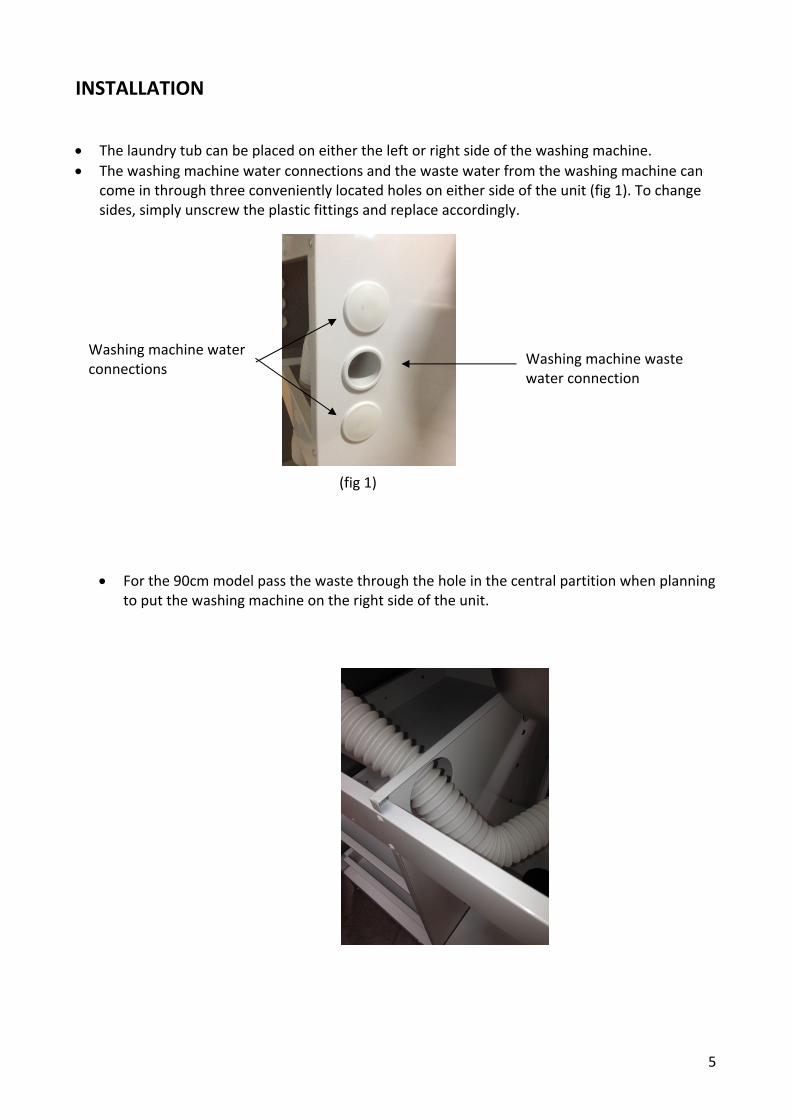
INSTALLATION The laundry tub can be placed on either the left or right side of the washing machine. The washing machine water connections and the waste water from the washing machine can
come in through three conveniently located holes on either side of the unit (fig 1). To change sides, simply unscrew the plastic fittings and replace accordingly.
(fig 1)
For the 90cm model pass the waste through the hole in the central partition when planning to put the washing machine on the right side of the unit.
Washing machine water connections
Washing machine waste water connection
6
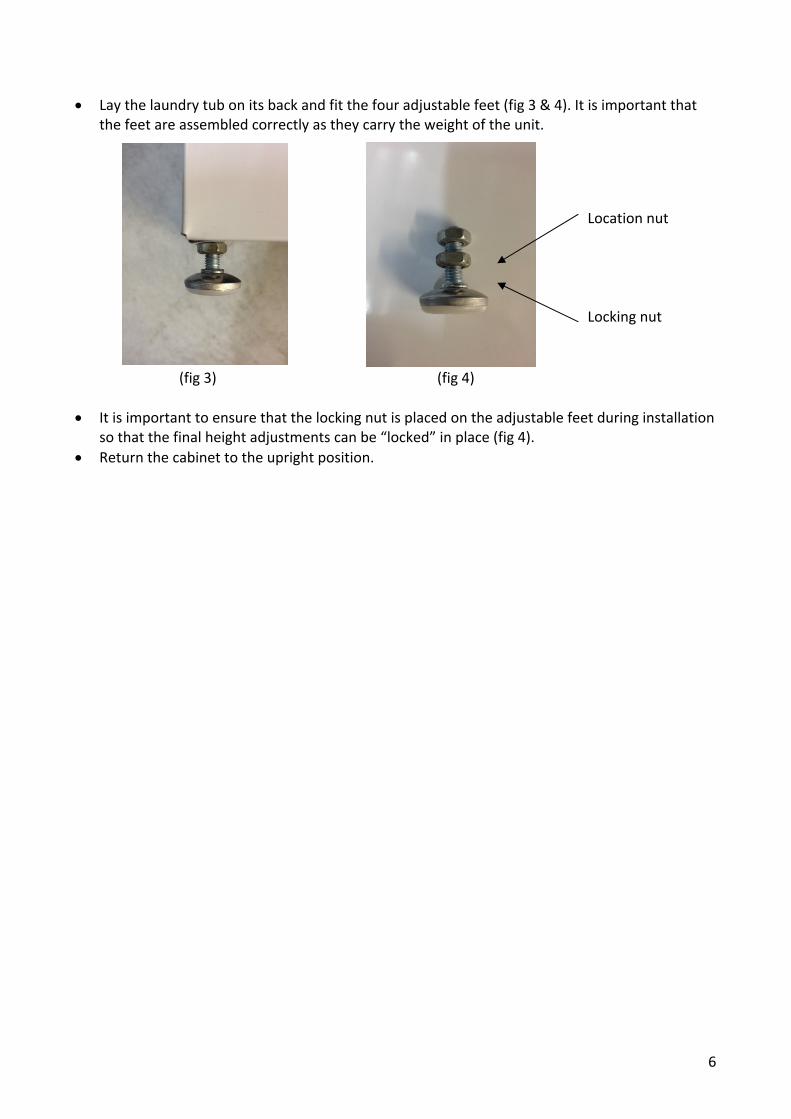
Lay the laundry tub on its back and fit the four adjustable feet (fig 3 & 4). It is important that
the feet are assembled correctly as they carry the weight of the unit. (fig 3) (fig 4) It is important to ensure that the locking nut is placed on the adjustable feet during installation
so that the final height adjustments can be “locked” in place (fig 4). Return the cabinet to the upright position.
Location nut
Locking nut

7
CONNECTING TO THE WATER SUPPLY You will notice that the entire pipe assembly is unassembled. For your convenience, the pipe work has been specifically not assembled to allow you to easily change the pipe assembly to best match your particular installation situation. The directions below show one example of how to connect the cold water connection to the tub mixer tap and the washing machine cold water inlet. The hot water connection for the tub mixer tap is connected directly to the hot water “wingbat” connection at the wall.
Lay the pipe assembly on the floor and become familiar with the component parts.
IMPORTANT Every connection must be tightened and each join correctly connected with suitable
washers/plumbers tape/hemp before allowing water through the pipes before allowing water through the pipes.
IMPORTANT Every connection must be tightened and each join correctly connected with suitable
washers/plumbers tape/hemp before allowing water through the pipes before allowing water through the pipes.
Washing machine cold water inlet
To cold water supply
Mixer tap cold water inlet
Water supply shut off
Water supply shut off ½ inch brass T
½ - ¾ inch adaptor

8
CONNECTING THE TAP TO THE LAUNDRY TUB Lay the entire tap assembly on the floor and become familiar with its components. You will find it easier to install the two water inlet hoses before securing the tap to the sink top. Hot and cold water connection are as per above picture.
Braided hoses 1 x cold 1 x hot
Main tap body
Threaded securing rod
Rubber washer and brass securing bracket
Securing nut
Hot water Cold water

9
When installing the goose neck tap on the 90cm model please make sure the tap is orientated as per below picture with the tap handle facing the front of the unit.
From the top of the laundry station carefully push through one water inlet hose first and then the other. This will ensure you do not scratch the stainless steel top. From the underside of the tub place the rubber washer on the threaded securing rod. Then place the brass securing bracket over the threaded securing rod. Finally screw on the securing nut. Make sure that the securing nut is tightened fully. CONNECTING THE SINK INSERT, OVERFLOW AND WASTE Connect the sink waste insert first.
Grey undersink trap and rubber flange
Rubber gasket and securing screw
Stainless steel drainer
10
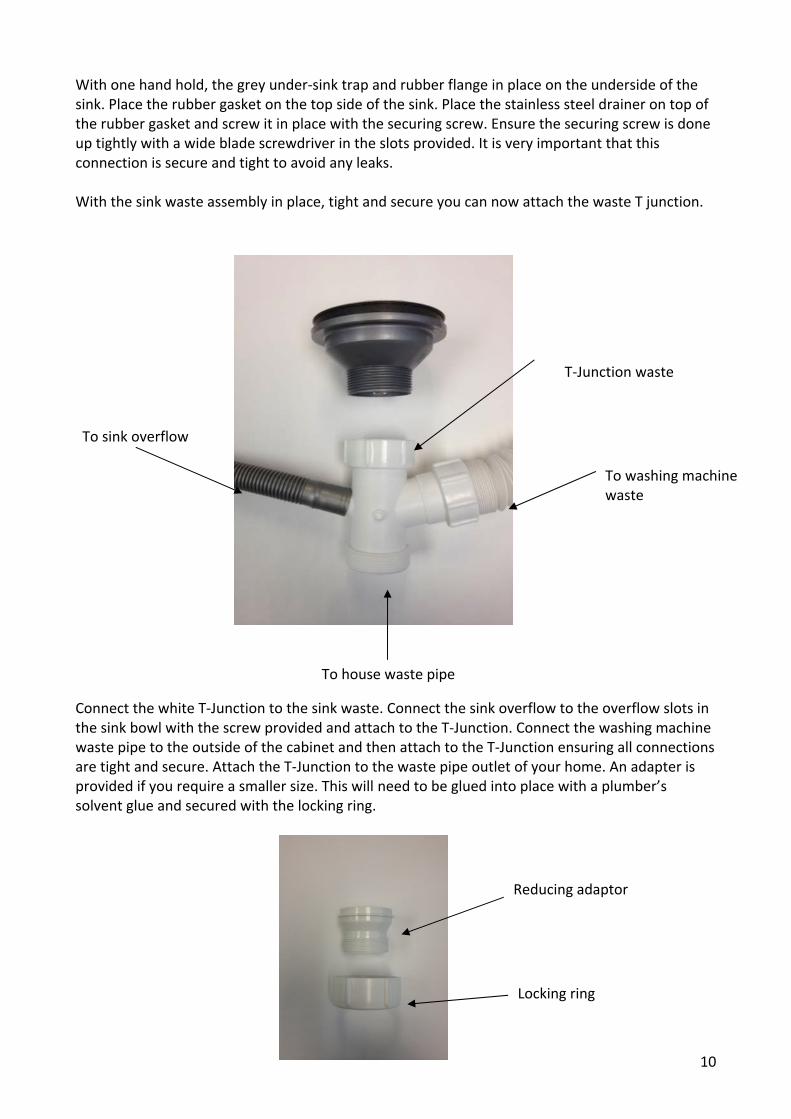
With one hand hold, the grey under-sink trap and rubber flange in place on the underside of the sink. Place the rubber gasket on the top side of the sink. Place the stainless steel drainer on top of the rubber gasket and screw it in place with the securing screw. Ensure the securing screw is done up tightly with a wide blade screwdriver in the slots provided. It is very important that this connection is secure and tight to avoid any leaks. With the sink waste assembly in place, tight and secure you can now attach the waste T junction. Connect the white T-Junction to the sink waste. Connect the sink overflow to the overflow slots in the sink bowl with the screw provided and attach to the T-Junction. Connect the washing machine waste pipe to the outside of the cabinet and then attach to the T-Junction ensuring all connections are tight and secure. Attach the T-Junction to the waste pipe outlet of your home. An adapter is provided if you require a smaller size. This will need to be glued into place with a plumber’s solvent glue and secured with the locking ring.
T-Junction waste
To washing machine waste
To sink overflow
To house waste pipe
Reducing adaptor
Locking ring

11
INSTALLING THE PVC SHELF (selected models only) The shelf is made of rigid, non-rot PVC plastic. First, fix the shelf hanger brackets to the underside of the PVC shelf using the bolts and washers supplied, ensuring that the domed head of the bolt is on the top side of the PVC shelf.
When the shelf hanger brackets are secured tightly to the PVC shelf, offer the right angled ends of the brackets into the middle side rail in the holes provided.
With the two right angle ends of the brackets in place, gently pull up the hanger bracket until the curved ends fit into place in the holes in the upper securing rail
Underside of shelf, bolt assembly
Upper securing rail
Curved end, hanger bracket
Middle side rail

12
USE AND CARE The sink bowl is manufactured from high quality stainless steel. The bowl and top panel can be cleaned using a good quality stainless steel cleaner. The cabinet must not be cleaned using harsh chemical and abrasive type cleaners. Remove dirt using a mild solution of detergent and water and wipe down frequently. The use of harsh and abrasive chemical cleaners such as (but not limited to) bleaches, mentholated spirits, etc, as well as scourers and abrasive type cleaners may damage the finish on the cabinet. If storing poisonous chemicals inside the laundry cabinet, a suitable AS/NZS approved child safety latch (not supplied) should be fitted. On the 90cm model it is important to keep the slide runners well lubricated. Apply lubricant as needed to both slide runners .
PRE-USE CHECKLIST Is the unit level? Have the locking nuts been tightened on all feet? Have the water supply connections been flushed to ensure no grit or debris? Has plumbers thread tape been used on all pipe connections? Are all connections tight and secure? Are the waste connections all tight and secure? Have the hot and cold water inlets been correctly orientated?
Congratulations. Your Parmco laundry tub is now ready to use.
IMPORTANT It is very important that the water supply is flushed before connecting the new pipe assembly to ensure no loose deposits, grit, etc, make their way into the new pipe assembly. A good quality inline filter should be used to ensure grit does not enter the tap cartridge. This can cause serious damage to the ceramic discs in the tap and is not covered by warranty.

Parmco Appliances 2 year warranty
The Warranty:
• Subjecttothetermsandconditionscontainedwithinthiswarranty,iftheproductisnotofAcceptableQuality(asdefinedintheConsumerGuaranteesAct)within2yearsofthedateoforiginalpurchase,thenParmcoSalesundertakestorepairor,atit’ssolediscretion,replacetheproduct.
• Thewarrantydoesnotcoverthecostsoftransport,mileageortravellingtimeiftheproductislocatedbeyond30kmofarecognisedServiceAgent.
• Thiswarrantyisofferedasanextrabenefit,anddoesnotaffectotherlegalrights,whichcannotbemodifiedorexcludedbyagreement.
• ThiswarrantyonlyappliestogoodssuppliedandinstalledintheNorthandSouthIslandsofNewZealand.
• TheprovisionsofthiswarrantyareinadditiontotherightsandremediesavailabletoconsumersundertheConsumer
GuaranteesAct1993.
The Warranty is not valid:
• Iftheproductisnotinstalledandoperatedinaccordancewiththeoperatinginstructions.
• Iftheproductisnotinstalledtocomplywiththeelectrical,gas,plumbingandotherRegulationsandCodesofPracticeinNewZealand.
• IftheproductisoperatedonvoltagesorfrequenciesoutsidethenormalrangefordomesticappliancesinNewZealand.
• Iftheproductisnotusedinnormaldomesticuse,orifitisusedinabusinessasdefinedintheConsumerGuaranteesAct.
• Ifanyserialnumberhasbeenremovedordefaced.• Ifproofofdateofpurchaseisnotsupplied,exceptatthesolediscretionofParmcoSales.Proofofpurchasecanbefortheproductitself,orifinstalledwithakitchenorhousethenproofofpurchasecanbefromaParmcoresellerofproductssuppliedbyParmco.
Liability under this warranty will not be accepted for:• Wearandtearfromnormaldomesticuse.• Damageintransport.• Damagecausedtotheproductbyneglect,abuse,negligence,wilfulactormisuse.
• Anydefectcausedbyaccident,misuse,neglect,tamperingwithorunauthorisedmodificationsoftheapplianceoranyattemptatinternaladjustmentorrepairbyanypersonotherthananAuthorisedServiceAgent.
• Servicecallsthatrelateprincipallytothefollowing:• Instructiononhowtousetheproduct.• Repairorreplacementofhousefuses,electricalwiring,gasfittingorplumbing.
• Wearandtearcausedbynormaluseoftheproduct.• Normalorscheduledmaintenanceincludingblockedfiltersorducting.• Consumableitemssuchaslightbulbs.• Anydamagetoceramicglasshobscausedbyspillswhencooking.• Anybreakageordamageofglassitems.• Anydamagecausedbynonrecommendedproductusedforcleaning,maintaining,lubricatingorsimilar.
• Anyaspectrelatingtotheinstallationoftheproduct,ordamagecausedduringinstallation.
• Anythirdparty(includingreseller)orconsequentiallossordamage(directorindirect)howeverarising.
Product Dateofpurchase
Dealer/RetailersName
PleaseretainthisWarrantycardtogetherwithreceiptorotherproofofpurchasedatewhenseekingserviceduringthewarrantyperiod
p: 09 573 5678 f: 09 573 5699
e: [email protected] w: www.parmco.co.nz
PleasecontactParmcoat095735678ifyourapplianceneedsservicingunderwarranty.Please
haveyourmodelnumberandproofofpurchaseready.WarrantyrepairsmustbeauthorizedbyParmco.