installation and operation guide for at&t …...2018/07/05 · getting started 2 installation...
TRANSCRIPT

Installation and Operation Guide for AT&T Softphone Call Manager for use with TL86103/TL16013/TL87203

Table of contents
Installation and Operation Guide for AT&T Softphone Call Manager for use with TL86103/TL16013/TL87203
Getting startedIntroduction .......................................1Installation ..........................................2
Compatibility .................................2Installation ......................................2
Important settings ........................3Audio settings ..............................3Skype access authorization .. 4
Quick reference guide - Call Connectivity panel .........5
Call status messages .............. 6Quick reference guide -
Settings panel ............................ 8Quick reference guide -
Phonebook ............................ 9Quick reference guide -
Call log ..................................... 10Settings ................................................11
About Settings ............................11Settings - GENERAL .................... 12
Program auto start ................. 12Media Player ................................. 13Voice command ........................ 13On-screen display .................... 14Softphone program ............... 14No line alert display for landline ............................................ 15No connected cell phone alert display for cellular line .................................... 15Not installed/incompatible alert display ................................. 16
Settings - ANSWERING SYSTEM ..................17
Call screening ...............................17Number of rings ........................ 18Remote code ............................... 18Message alert tone ................. 19Recording time per message ................................ 19
Settings - ABOUT .........................20User guide .....................................20Contact ...........................................20Software update .......................20
OperationMaking, answering, and ending calls ............................. 21
Log in Skype/Lync ................... 21Make a call ..................................... 22Answer a call ................................24End a call ........................................ 25
Options while on calls ...............26Hold ...................................................26Landline call waiting ................26Cellular line call waiting ........ 27Conference ................................... 27
PhonebookImport phonebook entries ....28
Create a new phonebook entry .....................28Import phonebook entries from Microsoft Outlook ......29

Import phonebook entries from CSV ......................30
Review and search thephonebook ........................................31
Review and search phonebook entries ..................31
Dial, edit or delete phonebook entries ...................... 32
Dial a phonebook entry ....... 32Edit a phonebook entry ....... 32Delete a phonebook entry ... 33
Caller IDCall log .................................................34
View the call log ........................34Dial a call log entry ..................34Delete a call log entry ...........34Delete all call log entries ..... 35Save a call log entry to the phonebook .......................... 35Edit a call log entry ..................36
Voice command ............................ 37About voice command ......... 37Using voice command .......... 37On-screen display .................... 37General commands ................38Commands to make a call ....38
AppendixTroubleshooting............................ 39
IndexIndex ......................................................42

1
IntroductionThe AT&T Softphone Call Manager helps you to unify your everyday business communication using your AT&T TL86103/TL16013/TL87203. Before using the AT&T Softphone Call Manager, you have to:1. Install your TL86103/TL16013/TL87203 according to its user’s
manual.2. Install the AT&T Softphone Call Manager on your computer
using the CD-ROM provided in the package. -OR- Visit www.telephones.att.com/downloads to download the software. Unzip and install the file after download.
Launch the AT&T Softphone Call Manager, and you will enter the Call Connectivity panel. In that panel, you can view the overall status of your landline, cellular line, Skype, and Lync calls.
Simply connect your telephone base and computer with the USB cable, and you can use this software to manage traditional landline calls, cellular line calls, softphone VoIP calls through Skype® and Microsoft Lync®. This software has a voice command feature, which allows you to make calls by saying the contact name in the PHONEBOOK ( ).
If you want to make landlline, cellular, or softphone calls, you can click the dial pad ( ) in the Call Connectivity ( ) panel. Alternatively, you can make softphone calls with Skype or your telephone base. To answer or end calls, you can use the telephone base, corded handset or cordless handset, Skype or Lync, or the corresponding buttons in the Call Connectivity ( ) panel.
You can build up your phonebook ( ) by adding your contacts' names there. You can also import your phonebook entries from Microsoft Outlook® or CSV files.
If you want to have an overview of all your incoming, outgoing, and missed calls, go to CALL LOG ( ) to learn more information.
You can check for software updates or configure various settings in the Settings ( ) panel to best suit your needs.
Getting started
Microsoft®, Microsoft Lync®, Microsoft Outlook® and Skype® are registered trademarks of Microsoft Corporation.

Getting started
2
InstallationCompatibilityThe AT&T Softphone Call Manager works with:
Operating systems Software programs and versions
Microsoft® Windows XP®, Windows Vista®, Windows 7, Windows 8
Skype® 5.0 or above, Windows Media Player® 10 or above, Microsoft Outlook® 2003 or above, Microsoft Lync® 2010/2013, iTunes® 10 or above, Landline calls controllers
InstallationTo install the AT&T Softphone Call Manager:1. Put the CD-ROM that comes with the package into your computer.
Open My computer, and then double click to open the disk drive. -OR- Visit www.telephones.att.com/downloads to download the
software. Unzip the file after download.2. Double click the installation file to begin the InstallShield Wizard.
f If any security warning window pops up, tick the option check box to authorize the installation of the software. Click Run.
3. Select the language to be displayed during the installation and in the program. Click OK to continue.
4. Click Next>. Read the license agreement, and then accept the terms by pressing the upper check box. Press Next> to continue.
5. The default installation path is: “C:\Program Files\AT&T\AT&T Softphone Call Manager v3”. Click the Browse... button to change the path, if necessary. Click Next>.
6. Select the program to connect to the software. Click Next>.7. Click Install.8. When the installation is complete, press Finish to exit the
installation program. f If you want to launch the AT&T Softphone Call Manager after
installation, tick the option check box before pressing Finish.
Windows®, Windows XP®, Windows Vista® and Windows Media Player® are registered trademarks of Microsoft Corporation.iTunes® is a registered trademark of Apple, Inc.All other trademarks are the properties of their respective owners.

3
Getting started
Important settingsAudio settingsAfter you have installed the AT&T Softphone Call Manager, check to make sure the audio setting is properly configured in your Skype and/or Microsoft Lync.
Audio settings in Skype:1. Launch the Skype program.2. Click Tools, and then Options.3. Click Audio settings.4. Make sure AT&T USB Audio is selected under the speakers and
microphone settings.
Audio settings in Microsoft Lync:1. Launch the Microsoft Lync program.2. Click Options, and then Audio device.3. Make sure AT&T USB Audio is selected under the Audio device
setting.
IMPORTANTPeriodically check for software updates. Go to the ABOUT tab under the
Settings ( ) panel in the AT&T Softphone Call Manager, and then click Check Update. For more details, see the Software update section on page 20.

Getting started
4
Skype access authorizationThe first time you run Skype after you have installed the AT&T Softphone Call Manager, it may ask for your authorization to run the softphone program. Make sure you allow the access.If you have accidentally denied the access, follow the steps to allow the access:
1. Launch Skype.2. Go to Tools > Options > Advanced > Advanced Settings >
Manage other programs’ access to Skype. 3. Locate ATTSCMv3.exe.4. Click Change, and then check Allow this program to use skype.5. Click OK.
Important settings

5
Quick reference guide - Call Connectivity panelGetting started
1. Minimize button -- Click it to minimize the software window.2. Close button -- Click it to close the software.3. Call status -- Displays the status of landline, cellular line, Skype,
and Lync calls.4. Number input box -- Click the box and enter a phone number.5. Options bar -- Click HOLD , CONF , , or to hold a call,
establish a conference call, access the phonebook, or access the call log, respectively.
6. Current line -- Displays the current line in use, or displays IDLE when the telephone base is in idle mode.
7. Current mode -- Displays whether the current call on the telephone base is on speakerphone, corded handset, or is muted.
3
1 2
7 6
4 5

Getting started
6
Quick reference guide - Call Connectivity panelCall status messagesThe following table summarizes all the call status messages in the Call Connectivity ( ) panel.
Call ended You have just ended a call.
Call on hold The call is being put on hold.
Calling You are making an outside call.
Check telephone line No telephone line is connected to the telephone base.
Conference You are in a multi-line conference call.
Idle The telephone line is not in use.
Incoming call There is an incoming call.
Incompatible version The program version you are currently using is not compatible with the software.
Line in use The line is currently in use on devices other than the telephone base.
Logged in You have logged in to Skype or Lync.
Logged out You have logged out from Skype or Lync.
No cell phone connected Bluetooth device is not paired to or is disconnected from the telephone base.
Not available at this time
An error is occurred, or an action is rejected by the telephone base.
Not installed Skype or Lync is not installed on your computer.

7
Getting started
Quick reference guide - Call Connectivity panel
Not selected Please go to settings to choose Skype as softphone
Skype is not set as the softphone program for this software.
Not selected Please go to settings to choose MS Lync as softphone
Lync is not set as the softphone program for this software.
On a call You are on a call.
Please enter number A line is selected without any digits input.
Unable to call Line in use
The line is in use, and you cannot make a call.
X missed calls There are X unread missed calls.

Getting started
8
Quick reference guide - Settings panel
1. GENERAL, ANSWERING SYSTEM, and ABOUT tabs -- Click the tabs to manage your settings (see Settings on pages 11-20).
2. Introduction panel -- Provides an introduction for each item in the SETTINGS panel.
3. RESTORE DEFAULT -- Click it to restore all settings to their default settings.
4. APPLY -- Click it to apply and confirm any setting changes.
3 4
1
2

9
Getting started
Quick reference guide - Phonebook
1. IMPORT -- Click it to import contacts from Microsoft Outlook or CSV files.
2. ADD -- Click it to create a new phonebook entry.3. Search bar -- Enter characters or numbers to search for
phonebook entries.
12
3
In the Call Connectivity ( ) panel, press to access the phonebook.

Getting started
10
Quick reference guide - Call log
1. CLEAR HISTORY -- Click it to delete all records in the call log.2. Search bar -- Enter characters or numbers to search for call
log entries.3. ALL -- Click it to show all landline and celluar line call records. 4. IN -- Click it to show the records of incoming landline and
celluar line calls. 5. OUT -- Click it to show the records of outgoing landline and
celluar line calls.6. MISSED -- Click it to show the records of missed landline and
celluar line calls.
In the Call Connectivity ( ) panel, press to access the call log.
Amanda Hall 800-222-3111
Charlie Johnson 104
Charlie Johnson104
MACDONARD MIKE104
MACDONARD MIKE104
Amanda Hall 800-222-3111
MACDONARD MIKE104
1
4 5 63
2

11
Getting started
SettingsAbout SettingsYou may customize various settings in the Settings ( ) panel before you start using the software. The following is an introduction of what you can set in each tab.
Use the GENERAL tab to choose the softphone program. You can also enable or disable the auto-start feature, action on media player, voice command, on-screen display, no line alert for landline, no connected cell phone alert for cellular line, and not installed/incompatible alert for Lync/Skype.
Use the ANSWERING SYSTEM tab to change the settings of call screening, number of rings, remote code, message alert tone, and recording time per message for line 1 and line 2, independently.
Use the ABOUT tab to download the Installation and Operation Guide of the software, or to obtain customer service information. You can also check the current software and firmware versions, or check if there is an updated software version for download.

Getting started
12
Settings - GENERALProgram auto startThis feature is Disable by default. If you enabled it, it will launch automatically whenever Windows starts up.
To enable or disable program auto start:1. Click the Settings ( ) panel.2. Click the GENERAL tab.3. Click the Auto-start when windows start-up drop-down menu
under Program auto start section.4. Click Enable or Disable. 5. Click the APPLY button to confirm.

13
Getting started
Media PlayerIf there is an incoming call when you are using Windows Media Player or iTunes, the media player pauses. You may choose to enable or disable this action on the media player.
To enable or disable the pause action on the media player:1. Click the Settings ( ) panel.2. Click the GENERAL tab.3. Click the Action on player when calls begin drop-down menu
under Media player section.4. Click Pause or No action.5. Click the APPLY button to confirm.
Voice commandYou can choose to enable or disable the voice command feature on your TL86103/TL16013/TL87203. If this feature is disabled, all system devices cannot initiate a voice command.
To enable or disable the voice command feature:1. Click the Settings ( ) panel.2. Click the GENERAL tab.3. Click the Voice command drop-down menu under Voice
recognition section.4. Click Enable or Disable.5. Click the APPLY button to confirm.
Settings - GENERAL

Getting started
14
On-screen displayIf this feature is enabled, a pop-up window will display and guide you through the voice command process (see page 37).
To enable or disable the on-screen display:1. Click the Settings ( ) panel.2. Click the GENERAL tab.3. Click the On-screen display drop-down menu under
Voice recognition section.4. Click Enable or Disable.5. Click the APPLY button to confirm.
Softphone programYou can choose Skype or Lync as the softphone program to use for softphone calls.
To choose the softphone program:1. Click the Settings ( ) panel.2. Click the GENERAL tab.3. Click the Choose softphone program drop-down menu under
Softphone program section.4. Click Skype or Lync.5. Click the APPLY button to confirm.
Settings - GENERAL

15
Getting started
No line alert display for landlineIf there is no line connected to the telephone base, the Line 1 or Line 2 status bar in the
(Call Connectivity) panel displays Check telephone line. You can enable or disable this alert message.
To enable or disable the alert display:1. Click the Settings ( ) panel.2. Click the GENERAL tab.3. Click the No line alert display drop-down menu under
Landline (Line 1/Line2) section.4. Click Enable or Disable.5. Click the APPLY button to confirm.
No connected cell phone alert display for cellular lineIf there is no cell phone connected to the telephone base, the Cell A or Cell B status bar in the Call Connectivity panel displays No cell phone connected. You can enable or disable this alert message.
To enable or disable the alert display:1. Click the Settings ( ) panel.2. Click the GENERAL tab.3. Click the No connected cell phone alert display
drop-down menu under Cellular line (Cell A/Cell B) section.4. Click Enable or Disable.5. Click the APPLY button to confirm.
Settings - GENERAL

Getting started
16
Not installed/incompatible alert displayIf you did not install Skype or Lync on your computer, or its version is not compatible with this software, the Lync/ Skype status bar in the Call Connectivity ( ) panel displays Not installed or incompatible. You can enable or disable this alert message.
To enable or disable the alert display:1. Click the Settings ( ) panel.2. Click the GENERAL tab.3. Click the Not installed/incompatible alert display drop-down
menu under Lync/Skype section.4. Click Enable or Disable.5. Click the APPLY button to confirm.
Settings - GENERAL

17
Getting started
You can set the answering system settings for line 1 and line 2, independently.
Call screeningThe call screening feature lets you hear the incoming messages at the time they are being recorded. You can turn on or off the call screening feature.
To turn on or off call screening:1. Click the Settings ( ) panel.2. Click the ANSWERING SYSTEM tab.3. Click the Call screening drop-down menu.4. Click On or Off.5. Click the APPLY button to confirm.
Settings - ANSWERING SYSTEM

Getting started
18
Settings - ANSWERING SYSTEMNumber of ringsYou can set the answering system to answer an incoming call after a number of rings. You can also select toll saver to answer a call after two rings when you have new messages, or four rings when you have no new messages. This feature allows you to check for new messages, and avoid paying long distance charges when calling from out of your local area.
To set the number of rings:1. Click the Settings ( ) panel.2. Click the ANSWERING SYSTEM tab.3. Click the Number of rings drop-down menu.4. Click 2, 3, 4, 5, 6, or Toll saver.5. Click the APPLY button to confirm.
Remote codeTo access your answering system remotely from any touch-tone phone, you need to enter a two-digit remote code (00-99). The default remote access code is 19.
To change the remote code:1. Click the Settings ( ) panel.2. Click the ANSWERING
SYSTEM tab.3. Click the Remote code drop-down menu.4. Click a two-digit number from 00 to 99.5. Click the APPLY button to confirm.

19
Getting started
Settings - ANSWERING SYSTEMMessage alert toneThe message alert tone is off by default. If you turn it on, and there is at least one new message in your answering system, the telephone base will beep every ten seconds.
To turn on or off the message alert tone:1. Click the Settings ( ) panel.2. Click the ANSWERING SYSTEM tab.3. Click the Message alert tone drop-down menu.4. Click On or Off.5. Click the APPLY button to confirm.
Recording time per messageYou can set the recording time for incoming messages. The message length is three minutes by default.
To set the recording time:1. Click the Settings ( ) panel.2. Click the ANSWERING
SYSTEM tab.3. Click the Recording time
per message drop-down menu.4. Click 1, 2, or 3 minute.5. Click the APPLY button to confirm.

Getting started
20
User guideYou can download the Installation and Operation Guide from our webpage.
1. Click the Settings ( ) panel.2. Click the ABOUT tab.3. Click User Guide in the Support section.
ContactYou can obtain customer support information from our Product Support webpage.
1. Click the Settings ( ) panel.2. Click the ABOUT tab.3. Click Contact in the Support section.
Software updatePeriodically check for latest software updates to always keep your software up-to-date.
1. Click the Settings ( ) panel.2. Click the ABOUT tab.3. Click Check Update in the
Software update section. 4. If there is any new software
version, click Download to download the new version.
5. When the download is done, click Update Now to install the new version you have just downloaded.
Settings - ABOUT
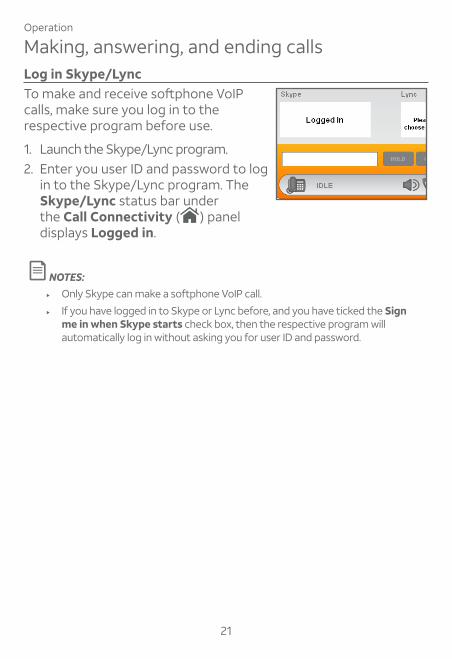
Log in Skype/LyncTo make and receive softphone VoIP calls, make sure you log in to the respective program before use.
1. Launch the Skype/Lync program.2. Enter you user ID and password to log
in to the Skype/Lync program. The Skype/Lync status bar under the Call Connectivity ( ) panel displays Logged in.
NOTES: f Only Skype can make a softphone VoIP call.
f If you have logged in to Skype or Lync before, and you have ticked the Sign me in when Skype starts check box, then the respective program will automatically log in without asking you for user ID and password.
Making, answering, and ending callsOperation
21

Operation
22
Make a callTo make a call on a landline:1. Click the Call Connectivity
( ) panel.2. Click the number input box.
f Use your keyboard to enter the telephone number.
3. Choose one of the following ways to make a call:
f Click on the Line 1 or Line 2 status bar. f Press SPEAKER , 1 Line, or 2 Line on the telephone base. f Lift the corded handset.
To make a call on a cellular line:1. Click the Call Connectivity ( ) panel.2. Click the number input box.
f Use your keyboard to enter the telephone number.
3. Click on the Cell A or Cell B status bar.
Making, answering, and ending calls

Operation
23
To make a Skype call:
NOTES: f Make sure the telephone base is connected to your computer using a
USB cable, and you have logged in to Skype.
f Making an outgoing phone call using Skype will require you to purchase Skype credit. Visit www.skype.com for more information.
Choose one of the following ways to make a Skype call: f Click the
Call Connectivity ( ) panel, and then click the number input box. Use your computer's keyboard to enter the telephone number. Click on the Skype status bar.
f Enter the telephone number on a cordless handset or the telephone base in idle mode, and then press PC CALL .
f Dial the number on your Skype.
Making, answering, and ending calls

Operation
24
Answer a callWhen there is an incoming call on line 1 or line 2:You can choose one of the following ways to answer the call:
f Click on the pop-up window. f Click in the line 1 or line 2 status bar
under the Call Connectivity ( ) panel. f Press 1 LINE, 2 LINE, or SPEAKER on the telephone base. f Press LINE 1/FLASH, LINE 2/FLASH, /SPEAKER, or any
dialing key (0-9 or TONE ) on a cordless handset. f Lift the corded handset.
When there is an incoming call on a cellular line:You can choose one of the following ways to answer the call:
f Click on the pop-up window. f Click in the cell A or cell B line status bar
under the Call Connectivity ( ) panel. f Press SPEAKER , Cell A , or Cell B on the telephone base. f Press /SPEAKER, A Cell, or B Cell on a cordless handset. f Lift the corded handset.
When there is an incoming Skype/Lync call:You can choose one of the following ways to answer the call:
f Click on the Skype/Lync pop-up window. f Click in the Skype/Lync status bar
under the Call Connectivity ( ) panel. f Press SPEAKER on the telephone base or lift the corded handset. f Press /SPEAKER or ANSWER on a cordless handset. f Answer the call on Skype or Lync.
Making, answering, and ending calls

Operation
25
Making, answering, and ending callsEnd a callTo end a call on line 1 or line 2:You can choose one of the following ways to end the call:
f Click in the line 1 or line 2 status bar under the Call Connectivity ( ) panel.
f Press 1 LINE, 2 LINE, or SPEAKER on the telephone base. f Press OFF/CANCEL on the cordless handset in use, or place it into
the charger. f Return the corded handset to the telephone base.
To end a call on a cell A or cell B line:You can choose one of the following ways to end the call:
f Click in the cell A or cell B status bar under the Call Connectivity ( ) panel.
f Press Cell A , Cell B , or SPEAKER on the telephone base. f Press OFF/CANCEL on the cordless handset in use, or place it into
the charger. f Return the corded handset to the telephone base.
To end a Skype/Lync call:You can choose one of the following ways to end the call:
f Click in the Skype/Lync status bar under the Call Connectivity ( ) panel.
f Press SPEAKER on the telephone base, or return the corded handset to the telephone base.
f Press OFF/CANCEL on the cordless handset in use, or place it into the charger.
f End the call on Skype or Lync.

Operation
26
HoldYou can hold a landline, cellular line, Skype, or Lync call, and resume it at any time you want on the Call Connectivity ( ) panel.
To hold a landline line call: f Click HOLD to hold the current call.
To resume a landline line call:Click to resume the call.
To hold a cellular line call: f Click HOLD to hold the current call.
To resume a cellular line call:Click to resume the call.
To hold a Skype/Lync call: f While on a Skype/Lync call, click HOLD to hold the current call. f You can make another Skype/Lync call, if necessary.
To resume a Skype/Lync call: f Click to resume the call.
Landline call waitingIf you subscribe to call waiting service offered by your telephone service provider, and someone calls while you are already on a call, you hear a call waiting alert tone. You can switch back and forth between calls on line 1 and line 2 using the Call Connectivity ( ) panel.
f Click FLASH in the line 1 or line 2 status bar under the Call Connectivity ( ) panel.
f Click FLASH again at any time to switch back and forth between calls.
Options while on calls

Operation
27
Options while on calls
Cellular line call waitingIf you subscribe to call waiting service from your cell phone service provider, and someone calls while you are already on a call, you hear a call waiting alert tone. You can switch back and forth between cellular line calls by using the Call Connectivity ( ) panel.
f Click SWAP in the cell A or cell B line status bar under the Call Connectivity ( ) panel.
f Click SWAP again at any time to switch back and forth between calls.
ConferenceYou can create a 3-way conference when you have calls established on landlines and/or cellular lines using the Call Connectivity ( ) panel.
To create a conference:
f Click CONF to create a conference.
To end a call on an individual landline or cellular line:
f Click in the line 1, line 2, cell A line, or cell B line status bar. The call continues until all people hang up.
To end a conference: f Click CONF again to end the call on all lines.

28
Import phonebook entriesCreate a new phonebook entry1. Click the Call Connectivity
( ) panel.2. Click to access the
phonebook.3. Click ADD.4. Enter the name and
telephone number (Mobile, Office, Home, or Other) in the corresponding field.
5. Click SAVE to store the entry. f Click CANCEL to cancel
without saving the entry.
Phonebook

29
Phonebook
Import phonebook entriesImport phonebook entries from Microsoft Outlook1. Click the Call Connectivity
( ) panel.2. Click to access the
phonebook.3. Click IMPORT.4. Click to select IMPORT FROM
OUTLOOK.5. When Import contacts from
Microsoft Outlook? displays, click the YES button to confirm.
6. When XX contacts imported from Microsoft Outlook displays, click OK to complete.
NOTES: f If Microsoft Outlook is not installed,
Microsoft Outlook is not found displays.
f If Microsoft Outlook is not compatible, Microsoft Outlook is not compatible displays.
f If there are no contacts in Microsoft Outlook, No contact is found in Microsoft Outlook displays.
f If Microsoft Outlook is not available at the moment, Microsoft Outlook is unavailable at the moment. Please check Microsoft Outlook or try import later displays.

30
Phonebook
Import phonebook entriesImport phonebook entries from CSV1. Click the Call Connectivity ( )
panel.2. Click to access the
phonebook.3. Click IMPORT.4. Click to select IMPORT
FROM CSV.5. When Import from CSV displays,
click OPEN TEMPLATE FILE TO EDIT to edit the contact details, and then save it to your computer.
6. Click OPEN CSV FILE FROM COMPUTER, and then choose the CSV file that is saved in step 5.
7. When XX contacts from CSV file has been imported to the phonebook displays, click OK to complete.
NOTES: f If there is an error in the CSV template file, CSV template file error displays.
f If the format of the CSV template file is not compatible with the phonebook, Invalid CSV file displays.

31
Phonebook
Review and search the phonebookReview and search phonebook entries1. Click the Call Connectivity
( ) panel.2. Click to access the
phonebook.3. Use the scroll bar on the
right to scroll through the list of phonebook entries, if necessary. You can also use the search bar to search for entries by entering names or numbers. Matching entries show below the search bar.

32
Phonebook
Dial a phonebook entry1. Click the Call Connectivity ( ) panel.2. Click to access the phonebook.3. Find the entry you wish to dial. See Review and search
phonebook entries on the previous page.4. Double click the phone number you wish to dial.5. Click in the desired line status bar.
Edit a phonebook entry1. Click the Call Connectivity
( ) panel.2. Click to access the
phonebook.3. Click the entry you wish to
edit, and then click EDIT f If you cannot see any
entries, make sure the search bar is blank.
4. Click the field you wish to add or edit for Name, Mobile, Office, Home, or Other telephone numbers.
5. Use your computer's keyboard to edit the entries.
6. Repeat steps 3-4 if you need to edit other fields.
7. Click SAVE to confirm.
Dial, edit or delete phonebook entries

33
Phonebook
Delete a phonebook entry1. Click the Call Connectivity
( ) panel.2. Click to access the
phonebook.3. Click the entry you wish to
delete, and then click EDIT. f If you cannot see any
entries, make sure the search bar is blank.
4. Click DELETE. The screen displays Delete Contact? and the contact name.
5. Click YES to delete. f Click CANCEL if you do
not want to delete the entry.
6. The screen shows Deleted. Click OK to return to the phonebook.
Dial, edit or delete phonebook entries

34
View the call logIn the call log, you can view ALL, IN, OUT, and MISSED calls by clicking on their respective tabs.
To view the call log, click the Call Connectivity ( ) panel, and then click to access the call log. Scroll through the call log with the scroll bar on the right, if necessary. You can also use the search bar to search for a specific name or number, if needed.
Dial a call log entry1. Click the Call Connectivity ( ) panel.2. Click to access the call log.3. Double click the phone number you wish to dial.4. Click in the desired line status bar.
Delete a call log entry1. Click the Call Connectivity ( ) panel.2. Click to access the call log.3. Click the entry you wish to delete, and then click EDIT.
f If you cannot see any entries, make sure the search bar is blank.
4. Click DELETE CALL LOG ENTRY from the options shown. The screen displays Are you sure you want to delete this log entry?.
5. Click YES to confirm. f Click CANCEL to keep the call log entry.
Call logCaller ID
Amanda Hall 800-222-3111
Charlie Johnson 104
Charlie Johnson104
MACDONARD MIKE104

35
Delete all call log entries1. Click the Call Connectivity ( )
panel.2. Click to access the call log.3. Click CLEAR HISTORY beside the
search bar. The screen displays Clear call log history?.
4. Click YES to confirm. f Click CANCEL to keep the call log
entries.
Save a call log entry to the phonebook1. Click the Call Connectivity ( )
panel.2. Click to access the call log.3. Click the entry you wish to save
to the phonebook, and then click EDIT.
f If you cannot see any entries, make sure the search bar is blank.
4. Click CREATE NEW CONTACT from the options.
5. Select the field you wish to add or edit for Name, Mobile, Office, Home, or Other telephone numbers, and then use the keyboard to edit the entries.
6. Click SAVE to confirm.
Call logCaller ID

36
Call log
Edit a call log entry1. Click the Call Connectivity ( ) panel.2. Click to access the call log.3. Select the entry, which is stored in the phonebook, and then
click EDIT. f If you cannot see any entries, make sure the search bar is
blank.4. Click Edit Contact from the options. 5. Select the field you wish to add or edit for Name, Mobile, Office,
Home, or Other telephone numbers.6. Use your computer's keyboard to edit the entries. 7. Repeat steps 5-6 if you need to edit other fields.8. Click SAVE to confirm. The same change is applied to the
phonebook entry.
Call log

37
About voice commandBy saying certain commands to the telephone base, you can make calls.
Using voice commandBefore you make a call using voice command, make sure you have enabled this feature (see page 13).
1. Press MENU on the telephone base or cordless handset in idle mode.
2. On the telephone base, press CID, DIR, /RECORD, or /DELETE to highlight Voice Command. Press SELECT .
-OR- Press CID or DIR on the cordless handset to highlight Voice
Command. Press SELECT . 3. The screen displays Processing Voice command..., and then
you hear “Who would you like to call?” and a confirmation beep.
4. Say the contact name in the phonebook of this software to dial and make the call.
See page 38 for a list of commands.
On-screen displayIf you have enabled the on-screen display feature (see page 14), you will see pop-up messages displayed on your computer to guide you through the voice command process.
Voice commandVoice command

38
General commands
Command Action
“What can I say?” To hear a list of voice commands.
“Cancel.” To return to idle mode.
Commands to make a call
Command Action
First name + last name (from software phonebook)
To call a specific contact number from the software phonebook.
f If there are multiple names recognized, you can
� Say “Call one”, “Call two” or “Call three” of your choice according to the voice prompt to call the desired contact.-OR-
� Double click the desired number on the pop-up screen to call.
f If the contact has more than one number, you can:
� Say "Call mobile", "Call office", "Call home" or "Call other" to call the desired number.-OR-
� Double click the desired number on the pop-up screen to call.
Voice commandVoice command

39
TroubleshootingIf you have difficulty in using this software with your TL86103/TL16013/TL87203, please try the following suggestions. For customer service, visit our website at www.telephones.att.com or call 1 (800) 222-3111. In Canada, dial 1 (866) 288-4268.
I cannot install the software. f Check the operating system of your PC to make sure it is
compatible with this software. See Compatibility on page 2. f Make sure your hard drive has enough space to install the
AT&T Softphone Call Manager. f Make sure the file is not corrupted. You can download the
AT&T Softphone Call Manager from www.telephones.att.com/downloads again.
I cannot run the AT&T Softphone Call Manager. f Try to restart your PC before you run the software again. f Make sure you have set your firewall or any antivirus software to
allow this software to run.
I cannot update my AT&T Softphone Call Manager. f Make sure your PC is connected to the Internet. f Make sure you have set your firewall or any antivirus software to
allow this software to check for updates.
I cannot use my Skype/Lync with the AT&T Softphone Call Manager.
f Make sure you have installed Skype/Lync and logged in to the programs.
Appendix

Appendix
40
TroubleshootingAT&T USB Audio does not appear in the audio devices control panel on my PC.
f Make sure you have powered up the TL86103/TL16013/TL87203 telephone base.
I can’t hear any audio. f Press VOLUME/p to increase the telephone base
speaker volume. f Adjust the volume in the audio settings of your computer. f Make sure you have set the audio settings correctly (see
page 3).
I can’t make calls by using the software. f Make sure the USB cable is connected to your TL86103/TL16013/
TL87203 telephone base and PC.
The other party cannot hear me. f Make sure the sound is not set as muted under the audio control
panel in Skype or Lync.
I cannot import phonebook entries from Microsoft Outlook. f Make sure the contact list in your Microsoft Outlook is not empty. f Make sure you installed Microsoft Outlook 2003 or above.
I cannot import phonebook entries from CSV files. f Make sure you have CSV files ready in your computer (see
page 30). f Make sure the CSV files are valid.
I cannot hear any sound from Windows Media Player/iTunes when there is an incoming call.
f Change the setting in (Settings) > GENERAL > Media Player > Action on player when calls begin to Disable (see page 13).

Appendix
41
TroubleshootingI have already logged in to Skype but the status in the Call Connectivity panel shows Logged out.
f Launch Skype, and then go to Tools > Options > Advanced > Advanced Settings > Manage other programs’ access to Skype > Locate ATTSCMv3.exe > Click Change > Check Allow this program to use skype > Click OK.
My voice is not recognized in a voice command. f Make sure you have phonebook entries added or imported from
Microsoft Outlook or CSV files to the software phonebook (see pages 28-30).
f Make sure you have set the audio settings correctly (see page 3). f Make sure you are speaking towards the microphone on your
TL86103/TL16013/TL87203 telephone base. f When you say the command, say it clearly, in a consistent speed
and louder than the background noise. f When voice command fails, you will hear "I didn't catch that. Please
try again." Repeat your voice command.

Index
42
Index
AAction on player when calls
begin 13Answer a call 24Audio 3
CCaller ID Announce 17Call log 34–36Cellular line call waiting 27Conference 27Compatibility 2Contact 20Create a phonebook entry 27
DDefault mode 12Delete a call log entry 34Delete all call log entries 35Delete a phonebook entry 33Dial a call log entry 34Dial a phonebook entry 32
E Edit a phonebook entry 32End a call 25
HHold calls 27
IImport phonebook entries 29Incompatible version
alert display 20Installation 2
LLandline call waiting 26Log in 21
MMake a call 22Mute 26
OOn-screen display 16
PPhonebook 28–33
QQuick reference guide 5–9
RResume calls 26Review and search
phonebook entries 31
Index

Index
43
SSave a call log entry to
the phonebook 35Settings
audio 3general 12–16answering system 17-19about 20 Skype access 4
TTroubleshooting 39–41
UUpdates 20User guide 20
VView the call log 34Voice command 37–38
Index

www.telephones.att.com
©2013-2018 Advanced American Telephones. All Rights Reserved. AT&T and the AT&T logo are trademarks of AT&T Intellectual Property licensed to
Advanced American Telephones, San Antonio, TX 78219. Issue 8.0 AT&T 07/18.
Microsoft®, Microsoft Lync®, Skype®, Windows®, Windows XP®, Windows Vista®, Windows Media Player® and Microsoft Outlook® are registered trademarks of
Microsoft Corporation. iTunes® is a registered trademark of Apple, Inc.
All other trademarks are the properties of their respective owners.