installation and operation instructions bcm oil moisture
TRANSCRIPT

Fluidcontrol
Installation and Operation Instructions
Original instructions
Oil Moisture Sensor
BCM
BE15010109/2020
Bühler Technologies GmbH, Harkortstr. 29, D-40880 RatingenTel. +49 (0) 21 02 / 49 89-0, Fax: +49 (0) 21 02 / 49 89-20
E-Mail: [email protected]: www.buehler-technologies.com

Bühler Technologies GmbH, Harkortstr. 29, D-40880 RatingenTel. +49 (0) 21 02 / 49 89-0, Fax: +49 (0) 21 02 / 49 89-20Internet: www.buehler-technologies.comE-Mail: [email protected]
Read this instruction carefully prior to installation and/or use. Pay at-tention particularly to all advises and safety instructions to prevent in-juries. Bühler Technologies can not be held responsible for misusingthe product or unreliable function due to unauthorised modifications.
All rights reserved. Bühler Technologies GmbH 2020
Document informationDocument No............................................................BE150101Version........................................................................ 09/2020

BCM
Contents1 Introduction..................................................................................................................................................................................................................... 2
1.1 Intended Use......................................................................................................................................................................................................... 21.2 Functionality......................................................................................................................................................................................................... 2
1.2.1 Humidity monitoring.......................................................................................................................................................................... 21.2.2 Temperature monitor ......................................................................................................................................................................... 21.2.3 IO-Link ...................................................................................................................................................................................................... 2
1.3 Design types.......................................................................................................................................................................................................... 31.4 Model key............................................................................................................................................................................................................... 31.5 Scope of Delivery.................................................................................................................................................................................................. 3
2 Safety instructions......................................................................................................................................................................................................... 42.1 Important advice ................................................................................................................................................................................................. 42.2 General hazard warnings ................................................................................................................................................................................. 5
3 Transport and storage .................................................................................................................................................................................................. 6
4 Setup and connection ................................................................................................................................................................................................... 74.1 Installation ............................................................................................................................................................................................................ 7
4.1.1 Installation recommendation.......................................................................................................................................................... 84.2 Electrical connections ........................................................................................................................................................................................ 8
5 Operation and Control.................................................................................................................................................................................................. 95.1 BCM-WD/BCM-WR.............................................................................................................................................................................................. 9
5.1.1 Start-up procedure.............................................................................................................................................................................. 95.1.2 LED statuses .......................................................................................................................................................................................... 95.1.3 General key functions ....................................................................................................................................................................... 105.1.4 Keylock enabled .................................................................................................................................................................................. 105.1.5 Menu overview..................................................................................................................................................................................... 115.1.6 Changing basic settings ................................................................................................................................................................... 125.1.7 Switching outputs.............................................................................................................................................................................. 155.1.8 Analogue outputs.............................................................................................................................................................................. 205.1.9 Diagnostic options ............................................................................................................................................................................ 22
5.2 BCM-WS................................................................................................................................................................................................................ 255.2.1 Start-up procedure............................................................................................................................................................................. 255.2.2 Parameter configuration ................................................................................................................................................................. 255.2.3 Factory setting..................................................................................................................................................................................... 255.2.4 Switching outputs.............................................................................................................................................................................. 255.2.5 Analogue outputs............................................................................................................................................................................... 25
6 Cleaning and Maintenance....................................................................................................................................................................................... 26
7 Service and repair......................................................................................................................................................................................................... 277.1 Removal information ....................................................................................................................................................................................... 277.2 Troubleshooting ................................................................................................................................................................................................ 277.3 Spare parts and accessories ........................................................................................................................................................................... 28
8 Disposal ........................................................................................................................................................................................................................... 29
9 Appendices..................................................................................................................................................................................................................... 309.1 Technical Data BCM-WS .................................................................................................................................................................................. 309.2 Technical Data BCM-WR/BCM-WD ............................................................................................................................................................... 319.3 Dimensions BCM-WS........................................................................................................................................................................................ 339.4 Outputs BCM-WS .............................................................................................................................................................................................. 339.5 Outputs BCM-WD/BCM-WR........................................................................................................................................................................... 339.6 Pin assignment BCM-WS................................................................................................................................................................................. 349.7 Pin assignment BCM-WR/WD ....................................................................................................................................................................... 349.8 Display ranges .................................................................................................................................................................................................... 359.9 Current settings................................................................................................................................................................................................. 359.10 Menu Sequence Overview .............................................................................................................................................................................. 36
10 Attached documents ................................................................................................................................................................................................... 37
iBühler Technologies GmbHBE150101 09/2020

BCM
1 Introduction
1.1 Intended UseOil moisture sensors are used to monitor the water content in oils and the temperature. Oil moisture sensors must not be usedin highly flammable or corrosive liquids.
Please note the technical data in the appendix for the specific intended use, existing material combinations, as well as temper-ature limits.
WARNING
All device models are solely intended for industrial applications. They are not safety com-ponents. The devices must not be used if failure or malfunction thereof jeopardises thesafety and health of persons.Use in explosive areas is prohibited.
1.2 FunctionalityThe sensor determines the relative humidity in oil through water activity (aW). The relative humidity behaves similar to wateractivity. Here we can also use the term saturation level of oil. The sensor features a measuring chamber where humid air on theinside and humidity in the medium become balanced. This puts the sensor in relation to the maximum saturation. So itprovides a degree of the saturation of the oil. Furthermore, the temperature is determined to allow for correcting the values. Thewater activity is specified as a factor from 0 to 1. When multiplied by 100% this provides the relative humidity or the saturationin percent.
The critical limit for saturation depends on several parameters specific to the system. The main advantage, however, is the con-tinuous monitoring of humidity and temperature. The operating company can therefore make their own determinations onchanges in his system and adjust system parameters where necessary.
1.2.1 Humidity monitoringThe sensor element for determining the humidity is located inside the medium, protected by a tube. The relative humidity canbe continuously output as analog signal or digital signal (IO-Link) or as a switch signal. The threshold is preset and can be con-figured depending on the model. Depending on the version, there are several switching outputs combined with one analog out-put (4 - 20 mA). The display versions can show the relative humidity in the display and output it to the analog output. Thethresholds for the switching outputs can be freely configured. The sensor versions have the option for analogue output of the re-lative humidity. The threshold for the switching point is preset and can only be factory configured or via the digital interface.
1.2.2 Temperature monitorThe temperature is monitored via temperature sensor (Pt100) inside the medium, protected by a tube. Depending on the ver-sion, there are several switching outputs combined with one analog output (4 - 20 mA) or digital output (IO-Link). The displaytypes can display the temperature and output it to the analog output. The sensor types have the option for analogue temperat-ure output.
Please note the technical data in the appendix.
1.2.3 IO-LinkIf the sensor has an IO-Link interface, the identification, process and diagnostics data can be accessed. The sensor parameterssuch as switching points or switch-back points can be set during operation. This requires an IO-Link Master with configurationtool.
When replacing the sensor all previously configured parameters can be transferred to the new sensor.
The sensor has an electronic technical manual, the so-called IODD file. The IODD file contains all information required for systemintegration. The file can be downloaded from https://ioddfinder.io-link.com.
For more information please visit: www.io-link.com
2 Bühler Technologies GmbH BE150101 09/2020

BCM
1.3 Design typesThe BCM is available as three basic models:
Model DescriptionBCM-WS Sensor without displayBCM-WD Sensor with display (display built into the sensor)BCM-WR Combination of sensor and display (display for external installation)
The BCM will have different switching and analogue outputs depending on the configuration. The outputs are freely program-mable.
The sensor versions are available with digital interface. Here the sensor uses the standardised technology IO-Link, an efficientpoint-to-point communication. It uses the previous, proven and tested connection technology. Compatibility with the previoustechnology is guaranteed.
1.4 Model key
Model BCM-WS
W
BCM - W S 1 0 -
Humidity
Type designation
Outputs1S2A 1x switching output / 2x analog1D Version IO-Link
Sensor
BCM Moisture Sensor
SVersion
Process connection
6 Flange (per DIN 24557/T2)
/
0 G3/42 G1/2
Length (only model WS160)
Model BCM-WD/BCM-WR
W Humidity
Type designation Outputs2S2A1D1S4S2A
Display with built-in sensorRemote display with external sensor
BCM Moisture Sensor
DR
VersionProcess connection
G 3/40
BCM - W 1 0 0 -
2 x switching output / 2 x analogue1 x switching output / IO-Link4 x switching output / 2 x analogue
G 1/22
1.5 Scope of Delivery– BCM Oil Moisture Sensor
– Product documentation
– Connection/mounting accessories (optional)
3Bühler Technologies GmbHBE150101 09/2020

BCM
2 Safety instructions
2.1 Important adviceThis device may only be used if:
– The product is being used under the conditions described in the operating- and system instructions, used according to thenameplate and for applications for which it is intended. Any unauthorized modifications to the device will void the warrantyprovided by Bühler Technologies GmbH,
– the specifications and markings in the type plate are observed,
– the limits in the data sheet and the instructions must be observed,
– monitoring equipment / protection devices must be connected correctly,
– the device is protected from mechanical damage and vibration,
– service and repairs not described in these instructions is performed by Bühler Technologies GmbH,
– using genuine replacement parts.
These operating instructions are a part of the equipment. The manufacturer reserves the right to change performance-, specific-ation- or technical data without prior notice. Please keep these instructions for future reference.
Signal words for warnings
DANGERSignal word for an imminent danger with high risk, resulting in severe injuries or death if not avoided.
WARNINGSignal word for a hazardous situation with medium risk, possibly resulting in severe injuries or death if notavoided.
CAUTIONSignal word for a hazardous situation with low risk, resulting in damaged to the device or the property orminor or medium injuries if not avoided.
NOTICESignal word for important information to the product.
Warning signsThese instructions use the following warning signs:
Warns of a general hazard Unplug from mains
Voltage warning Wear respiratory equipment
Warns not to inhale toxic gasses Wear a safety mask
Warns of corrosive liquids Wear gloves
General information
4 Bühler Technologies GmbH BE150101 09/2020

BCM
2.2 General hazard warningsThe equipment must be installed by a professional familiar with the safety requirements and risks.
Be sure to observe the safety regulations and generally applicable rules of technology relevant for the installation site. Preventmalfunctions and avoid personal injuries and property damage.
The operator of the system must ensure:– Safety notices and operating instructions are available and observed,
– The respective national accident prevention regulations are observed,
– The permissible data and operational conditions are maintained,
– Safety guards are used and mandatory maintenance is performed,
– Legal regulations are observed during disposal,
– compliance with national installation regulations.
Maintenance, RepairPlease note during maintenance and repairs:
– Repairs to the unit must be performed by Bühler authorised personnel.
– Only perform conversion-, maintenance or installation work described in these operating and installation instructions.
– Always use genuine spare parts.
– Do not install damaged or defective spare part. If necessary, visually inspect prior to installation to determine any obviousdamage to the spare parts.
Always observe the applicable safety and operating regulations in the respective country of use when performing any type ofmaintenance.
The method for cleaning the devices must be adapted to the IP protection class of the devices. Do not use cleaners which coulddamage the device materials.
DANGER Toxic, acidic gases/liquids
Protect yourself from toxic, corrosive gasses/liquids when performing any type of work.Wear appropriate protective equipment.
5Bühler Technologies GmbHBE150101 09/2020

BCM
3 Transport and storageOnly transport the product inside the original packaging or a suitable alternative.
The equipment must be protected from moisture and heat when not in use. It must be stored in a covered, dry, dust-free roomat room temperature.
6 Bühler Technologies GmbH BE150101 09/2020

BCM
4 Setup and connection
DANGER Electric voltage
Risk of electric shock
a) De-energise the system.
b) The equipment may only be installed, maintained and put into operation by instruc-ted, competent personnel.
c) Always observe the applicable safety regulations for the operating site.
DANGER Toxic, acidic gases/liquids
Protect yourself from toxic, corrosive gasses/liquids when performing any type of work.Wear appropriate protective equipment.
CAUTION Overpressure
Protect the device from static and dynamic overpressures.Use suitable preventive measures!
4.1 InstallationBefore installing the device, ensure the system is depressurised to prevent liquid from escaping. If necessary, use a collectioncontainer.
The BCM comes fully assembled and can be installed in the piping flange connection on a tank housing using the screw-inthread. When doing so, please ensure the sensor part is always fully bathed by medium to ensure the measured values dis-played are correct. For built-in versions, use the flow cell, sold separately.
DANGER Electric voltage
Risk of electric shockWhen connecting devices, please note the maximum voltages and currents (see tech-nical data) and use the correct wire cross-sections and circuit breakers.When selecting the connection lines, also note the maximum operating temperatures ofthe devices.
The flange-mounted display units can be swivelled vertically by approx. 270° so they are easier to read. Please note the built-inswivel stop. You will notice more resistance when reaching the stop. Turning it beyond this stop may damage the display unit.
7Bühler Technologies GmbHBE150101 09/2020

BCM
4.1.1 Installation recommendationProper moisture sensor function requires the entire sensor element to be inside the medium at all times. The sensor version issuitable for installation at the side of the tank. Here the installation position should be below the minimum liquid level. Wheninstalling into a return pipe, be sure not to exceed the maximum flow rate.
With the BCM-WR version the remote display mounts to a top hat rail.
Installation example:
Assembly block dimensions:100
G3/4
M8 - 15 deep
70
G1
1/4
80
G1
1/4
50
4.2 Electrical connectionsElectricity is supplied via plug connectors. Please refer to the appendix for installation dimensions, nominal voltage and plugconfiguration.
The switching outputs are PNP transistors (see illustration):
Supply voltage
Note: When measuring the switching output with high-load measuring device inputs or when used as a frequency output, theload must be set to 10 kΩ between the output and earth (GND) to avoid faulty measurements.
8 Bühler Technologies GmbH BE150101 09/2020

BCM
5 Operation and Control
NOTICE
The device must not be operated beyond its specifications.
5.1 BCM-WD/BCM-WRThis explanation of operation refers to the versions with display unit.
5.1.1 Start-up procedureThe device will automatically switch on when connected to power. It will first briefly display the software version, at which timethe device will also check the built-in components. The display will then switch to displaying measurements.
The following describes the function of the display and control unit:
LEDs
Control keys
Display
If an error message appears in the display during operation, please refer to the Troubleshooting table under chapter “Serviceand Repair”.
5.1.2 LED statusesLEDs above the measurement display indicate the status of the switching outputs. The LEDs are permanently assigned to theswitching outputs.
The following table lists the factory settings for the liquid level and temperature switching output configuration:
2 switching outputs 4 switching outputsLED 1 – yellowStatus switching output 1
Humidity Humidity
LED 2 - red Status switching output 2
Temperature Humidity
LED 3 – yellowStatus switching output 3
--- Temperature
LED 4 – redStatus switching output 4
--- Temperature
The switching characteristics of the LED (on if switching contact closed or open) can be changed.
9Bühler Technologies GmbHBE150101 09/2020

BCM
5.1.3 General key functionsThe keys below the display are used for operation.
The menu controls are detailed in the following chapters.
Key Mode Function– Measurement display: Change measured variables displayed.– In the menu: Move down one menu level.
Move up one menu level.– At the end of the menu:
The display indicates the end of the menu.– Following input/selection: Confirm and save a numerical value entered or a function selection. The dis-
play will flash if a parameter has been changed.– Measurement display: Displays the configuration.– In the menu: Scroll up menu item, numerical value or function selection. Holding the key
will continuously scroll.– Measurement display: Go to main menu.– In the menu: Scroll down menu item, numerical value or function selection. Holding the key
will continuously scroll.
+ – In the menu: Exit the main / sub / drop-down menu and return to displaying the measure-ment without saving changes to the parameters.
+ – In the menu: Move to the next higher menu level.
60 s no action – In the menu: Exit the main / sub/ drop-down menu.
To select a menu item and to enter values:
– Open the main menu with the key.
– Select the submenu with the and keys and open the submenu with the key.
– If necessary, select the next submenu with the and keys and open with the key.
– Select the desired menu item with the and keys and open the list of values with the key.
– Set the value with the and keys and confirm with the key. The new settings will the saved and the device will returnto the submenu.
– Select the menu item EXIT to exit the submenu and confirm with the key. The device will return to the next menu level upor to the measurement display.
5.1.4 Keylock enabled
With the keylock enabled, selecting the menu with the key will display in place of the main menu. The activedigit will be indicated by a dot.
– Use the and keys to enter the code and confirm with the key. The active digit will move one place to the right. Afterentering the 3rd digit the main menu will open.
If the wrong code is entered, the device will return to the measurement display. If you forgot the password you can always entermaster code 287 to access the menu.
You can cancel the keylock under Loc in submenu Basic Settings Advanced Options b.EF and enter 000 to reset the code.
10 Bühler Technologies GmbH BE150101 09/2020

BCM
5.1.5 Menu overviewThe menu structure is based on the VDMA standard sheet 24574-1. The menu structure is hierarchic. The top menu level containsthe main menu items, e.g. HuMi, tEMP, b.EF, diA, E. Each main menu contains further submenu items.
The menu items may vary depending on the device configuration. Not all menu items described below will necessarily apply toyour device. Press the key in display mode to open the configuration. A 4-digit code will appear, e.g.
With the 4 digits tsav meaning:t: Model
s: Number of switching outputsa: Number of analogue outputsv: Device installation type
h = humidity and temperature measurement2 or 40 of the 2i = standard installation (tank installation)r = remote installation
ConfigurationEquipment configuration
H___i
____
HuMi
DisplayMeasurement display
HumidityHumidity main menu
out1
Settings menu OUT1Out 1
out_
Settings menu OUT1Out x
An 1
Settings menu Analog 1Analog Out 1
E
Exit menu levelExit
out_
Settings menu OUTXOut X
out_
Settings menu OUTXOut X
An 2
Settings menu Analog 2Analog Out 2
E
Exit menu levelExit
tEMP
Temperature main menuTemperature
b.EF
Basic Adv. FunctionsBasic EF
If applicable
If applicable
If applicable
If applicable
If applicable
DiA
Diagnostics menuDiagnostic
E
Exit menu levelExit
____
The individual menu items will not be shown if the option does not apply. Example: With a=0 the menu items for configuringthe analogue output does not apply. You can then skip the description for this item.
The structure of the main menus Humidity (HuMi) and Temperature (tEMP) is identical. Here you can configure the switchingoutputs or the analogue outputs (if applicable).
11Bühler Technologies GmbHBE150101 09/2020

BCM
The basic device settings can be changed. General settings can be configured under Basic Settings Advanced Functions (b.EF).These settings should be configured first, as they affect the displays and settings for the individual menus. These settings aree.g. the units used and allocating switching outputs for liquid level and temperature measurement. The allocation of the ana-logue outputs cannot be changed.
The Diagnostic (dia) menu further contains diagnostics options.
For the detailed illustration of the entire menu structure please refer to the original operating instructions at the end of thischapter.
5.1.6 Changing basic settingsThe general basic settings can be changed under menu Basic Settings Extended Functions (bEF). These settings will affect themeasurement display and the configuration options in the various main menus. Here you can also change the switching outputassignment.
– Press the key to open the main menu.
– Select menu item (EF) using the and keys and open the menu with the key.
NOTICE Disabling normal error handling
Disabling normal error handling and analysis could potentially cause dangerous operat-ing states, dangers to the user or machines. Before using this option, review the hazardpotential within the process. With this setting, Bühler Technologies GmbH assumes no li-ability for injuries to health or material damage caused by this setting.
5.1.6.1 Restore factory settings (Reset)Use the Reset function (rES) to restore the factory settings. All changes will be lost. Since this will also reset the limits, you mustcheck the liquid level and temperature settings.
Basic EF b.EF
Basic Adv. FunctionsrES
Factory settingReset ___
no - YES
Confirm
The options are:
Original status:No,keep current settings
Original status:Yes,reset settings to the factory defaults.
The factory settings are:
Definitions:
SP x / rPx Switching point / switch-back point xds x / drx Switch-on delay / switch-back delay for switching output xA x ..Hi / Ax.Lo Maximum and minimum measurement for outputA.ou x Analogue output signal typeou x Switching characteristic for switching output xH.uni / t.uni Humidity / temperature unitr.ou x Switching output x liquid level or temperature monitoring allocationdis Display refresh rateLoc KeylockSJ.ou Switching output loggeddH.MM Delay for recording the minimum / maximum humiditydt.MM Delay for recording the minimum / maximum temperature
Note: For customer-specific specifications the factory preset may vary from those listed here.
12 Bühler Technologies GmbH BE150101 09/2020

BCM
Version with 2 switching outputs:
Switching outputs Basic SettingsSP1 / rP1 80% / 75% Err.h YES
ds1 / dr1 / ou1 0 / 0 / Hno H.uni -I- (%)SP2 / rP2 60 / 55°C t.uni °C
ds2 / dr2 / ou2 0 / 0 / Hno r.ou1 HuMi
r.ou2 tEMP
dis FASt
Loc 000
Version with 4 switching outputs:
Switching outputs Basic SettingsSP1 / rP1 80% / 75% Err.h YES
ds1 / dr1 / ou1 0 / 0 / Hno H.uni -I- (%)SP2 / rP2 60% / 55% t.uni °C
ds2 / dr2 / ou2 0 / 0 / Hno r.ou1 HuMi
SP3 / rP3 70 / 65 °C r.ou2 HuMi
ds3 / dr3 / ou3 0 / 0 / Hno r.ou3 tEMP
SP4 / rP4 80 / 75°C r.ou4 tEMP
ds4 / dr4 / ou4 0 / 0 / Hno dis FASt
Loc 000
Version with analogue outputs:
Analogue outputsA1.Hi / A1.Lo / A.ou1 0 / 100 / i1A2.Hi / A2.Lo / A.ou2 0 / 100 / i1
Diagnostic settings:
DiagnosticsSJ.ou out1
dH.MM 0.0
dt.MM 0.0
5.1.6.2 Disabling normal error handlingHere you can enable/disable normal error handling and analysis.
The function Disable error handling (Err.h) is used to disable normal error handling and analysis. This may pose dangers to theuser or machine.
Basic EF b.EF
Basic ext. functionsErr.h
Disable error handlingSet error handling ___
no - YES
Confirm
The options are:
Disables normal error handling. Enables normal error handling (default)
Important note: When exceeding the measuring range or if sensor errors occur, the measurementwill be frozen and all six LEDs in the status bar will blink. When the measurement returns to thepermissible range the LEDs will stop blinking and the display will refresh again as usual.
13Bühler Technologies GmbHBE150101 09/2020

BCM
5.1.6.3 Set humidity unitThis is where the unit symbol for the humidity is configured:
Basic EF b.EF
Basic Adv. FunctionsH.uni
Humidity UnitSet Unit Humidity ___
-I -
Selection menu
Options:[-1-]
The options are:
Percent
5.1.6.4 Set temperature unitThis is where the unit symbol for the temperature is configured:
Basic EF b.EF
Basic Adv. Functionst.uni
Temperature unitSet Unit Temp ;_
;C - ;F
Selection menu
The options are:
DegreesCelsius
DegreesFahrenheit
Note:
– Values are automatically converted and the measuring range adjusted. However, always checkthe respective switching points and switch-back points.
5.1.6.5 Define switching outputsHere you can define the switching outputs.
Use the “Define switching outputs” function to define the switching outputs (r.ou1 and r.ou2). The switching outputs can alsobe configured as Err, HuMi or tEMP
Basic EF b.EF
Basic Adv. Functionsr.ou1/2
Define switching outputsSET Output ___
HuMi-tEMP-Err
Selection menu
Options:[Err, tEMP, HuMi]
The options are:
Err TEMP HuMi
Note:
– Switching outputs 1 and 2 can alternatively be wired as error indicators. In this case the outputwill be connected as a NC contact which opens when exceeding the range or if an error occurs.The LED assigned to this output will generally not be activated, as all 6 LEDs in the status bar willblink if an error occurs.
– When defining a switching output as an error indicator it will no longer be an option for normalswitching output settings.
14 Bühler Technologies GmbH BE150101 09/2020
BCM
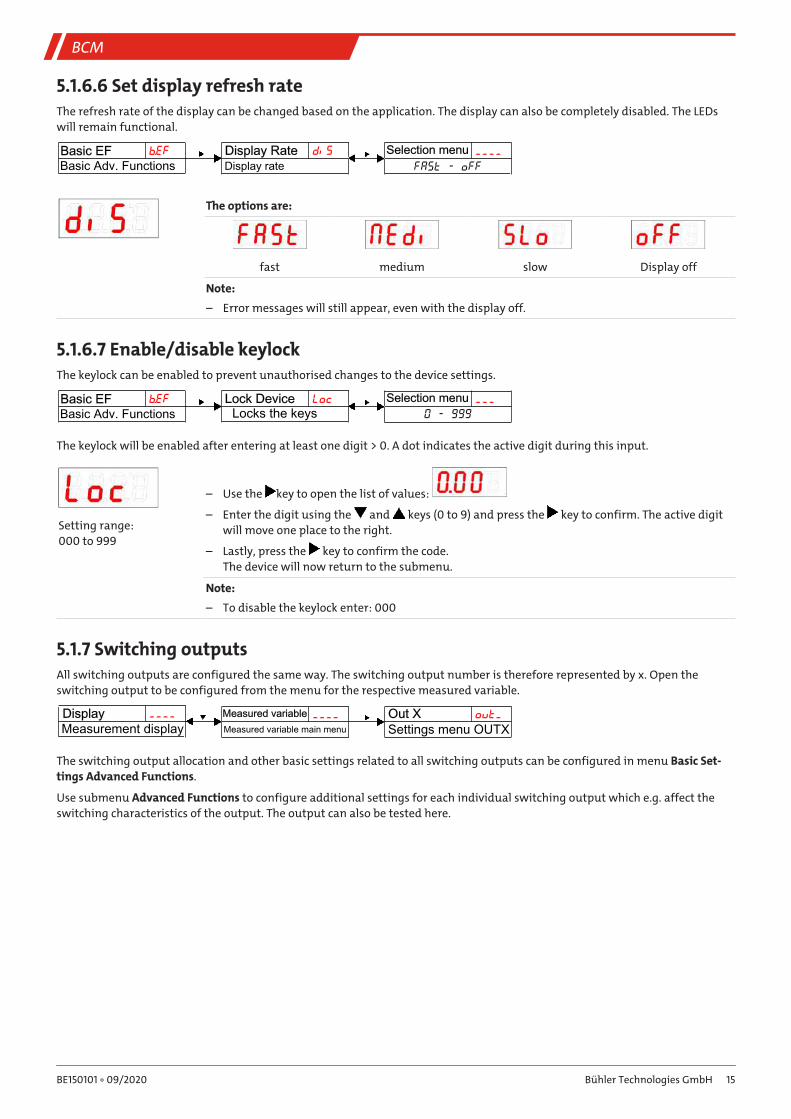
5.1.6.6 Set display refresh rateThe refresh rate of the display can be changed based on the application. The display can also be completely disabled. The LEDswill remain functional.
Basic EF b.EF
Basic Adv. FunctionsDi5
Display rateDisplay Rate ____
FASt - oFF
Selection menu
The options are:
fast medium slow Display off
Note:
– Error messages will still appear, even with the display off.
5.1.6.7 Enable/disable keylockThe keylock can be enabled to prevent unauthorised changes to the device settings.
Basic EF b.EF
Basic Adv. FunctionsLock
Locks the keysLock Device ___
0 - 999
Selection menu
The keylock will be enabled after entering at least one digit > 0. A dot indicates the active digit during this input.
Setting range:000 to 999
– Use the key to open the list of values:
– Enter the digit using the and keys (0 to 9) and press the key to confirm. The active digitwill move one place to the right.
– Lastly, press the key to confirm the code.The device will now return to the submenu.
Note:
– To disable the keylock enter: 000
5.1.7 Switching outputsAll switching outputs are configured the same way. The switching output number is therefore represented by x. Open theswitching output to be configured from the menu for the respective measured variable.
Display ____
Measurement display____
Measured variable main menuMeasured variable out_Out X
Settings menu OUTX
The switching output allocation and other basic settings related to all switching outputs can be configured in menu Basic Set-tings Advanced Functions.
Use submenu Advanced Functions to configure additional settings for each individual switching output which e.g. affect theswitching characteristics of the output. The output can also be tested here.
15Bühler Technologies GmbHBE150101 09/2020

BCM
5.1.7.1 Switching output x: Definition of the switching characteristicThe switching characteristic for the output can be configured under the following menu:
Measured variable ____ out_
Measured variable main menuOut X EF_EF X
Advanced Functionsou_Set Out X
Definition OUTX___Selection menu
Hno - FMSettings menu OUTX
The options are:
Hysteresis Function
Hysteresis function as the NO contact
Hysteresis function as the NC contact
NO contact or NC contact function when the out-put signal is set when exceeding the configuredswitching point. The output signal will be deletedif the value is below the configured switch-backpoint.
Here, NO contact (Hno) means the PNP switchingoutput is closed above switching point SPx andopens below switching point rPx.
Here, NC contact (Hnc) means the PNP switchingoutput is open above switching point SPx andcloses below switching point rPx.
Also see the explanation in the drawing below.
SP
rP
Hno
(NO contact)
Hnc
(NC contact)
HysteresisSP-rP( )
Time t
Time t
Time t
Window function
Window function asNO contact
Window function asNC contact
NO contact or NC contact function defining a sig-nal window. When the measuring window isreached the output signal is set and deleted uponexiting.
Here, NO contact (Fno) means the PNP switchingoutput is closed if the value is within the window.Otherwise the switching output will be open.
Here, NC contact (Fnc) means the PNP switchingoutput is open if the value is within the window.Otherwise the switching output will be closed.
FH
FL
Fno
(NO contact)
Fnc
(NC contact)
Time t
Time t
Time t
Window
Frequency output
Frequency output
If the output is defined as a frequency output, asquare wave signal with a frequency between 1 Hzand 100 Hz proportional to the measurement willbe output.
Note: To increase the slew rate of the square wavesignal, we recommend loading the switching out-put with an load of 10 kΩ.
T ≤corresponds to f = 1 HzTime t
Time t
Time t
T = 47.5 °Ccorresponds to f = 50 Hz
T ≥corresponds to f = 100 Hz
F ILo F IHiExample: = 15 °C, = 80 °Cwith temperature T and frequency f:
F ILo
F IHi
16 Bühler Technologies GmbH BE150101 09/2020

BCM
open(0)
closed(1)
open(0)
closed(1)
rising NO contactfalling NC contactNO (normally open)
rising NC contactfalling NO contactNC (normally closed)
Hno Hnc
Note: The designation of the switching function may vary:
Measured variable
5.1.7.2 Switching output x: Upper switching limit (switching point)The upper switching limit for switching output Out x can be defined with the following submenu:
Measured variable ____ out_
Measured variable main menuOut X ____SPI FHI F I.Hi
Switching point X____Selection menu
[ o.Lo - o.Hi ]Settings menu OUTX
Setting range:[o.Lo]…[o.Hi]
Switching point for OUT x
Note:
– The switching point must be set to within the range limits (see menu Basic Settings AdvancedFunctions).
– If switching output OUT x was assigned the function Window, will appear. Thesetting corresponds with the upper window limit.
– If switching output OUT x was assigned the function Frequency output, will ap-pear. The setting corresponds to the frequency 100 Hz.
5.1.7.3 Switching output x: Lower switching limit (switch-back point)The lower switching limit for switching output Out x can be defined with the following submenu:
Measured variable ____ out_
Measured variable main menuOut X ____rPI FLI F I.Lo
Switch-back point X____Selection menu
[ o.Lo - o.Hi ]Settings menu OUTX
Setting range:[o.Lo]…[o.Hi]
Switch-back point for OUT x
Note:
– The switch-back point must be set to within the range limits.
– If switching output OUT x was assigned the function Window, will appear. Thesetting corresponds with the lower window limit.
– If switching output OUT x was assigned the function Frequency output, will ap-pear. The setting corresponds to the frequency 1 Hz.
17Bühler Technologies GmbHBE150101 09/2020

BCM
5.1.7.4 Switching output x: Switch-on delayThe menu Advanced Functions EFx is used to configure additional settings for switching output x. The submenu is at the secondsubmenu level.
The switching and switch-back delay prevents the alarm being triggered too frequently in unstable conditions. The switchingdelay can be configured with the following menu:
Measured variable ____ out_
Measured variable main menuOut X EF_EF X
Advanced FunctionsdS_Delay SP X
Delay OUTX On___Selection menu
0 - 100Settings menu OUTX
Setting range:0…100 seconds
Time span in seconds during which the signal must be continuously present for the switching out-put to respond.
Note:
– If switching output OUT x was assigned the function Window, the setting corresponds to theswitch-on delay which detects valid reaching of the measuring window.
– If switching output OUT x was assigned the function Frequency output, this value will have noaffect.
5.1.7.5 Switching output x: Switch-back delayThe switch-back delay can be configured with the following menu:
Measured variable ____ out_
Measured variable main menuOut X EF_EF X
Advanced Functionsdr_Delay RP X
Delay OUTX Off___Selection menu
0 - 100Settings menu OUTX
Setting range:0…100 seconds
Switch-back signal delay for OUT x.
Time span in seconds during which the signal must be continuously present for the switching out-put to respond.
Note:
– If switching output OUT x was assigned the function Window, the setting corresponds to theswitch-on delay which detects valid closing of the measuring window.
– If switching output OUT x was assigned the function Frequency output, this value will have noaffect.
5.1.7.6 Switching output x: Testing the switching outputThe switching output test can be started with the following menu:
Measured variable ____ out_
Measured variable main menuOut X EF_EF X
Advanced FunctionsC.ou_Check Out X
Functional test OUTX____Selection menu
n.oP - onSettings menu OUTX
Switching output test option
Options when setting ou1 to Hno / Hnc / Fno / Fnc:
Normal switching output opera-tion
Switching output permanentlyoff disabled
Switching output permanentlyactivated
Options when setting ou1 to FM:
Normal mode as frequency out-put
OutputFrequency 1 Hz
OutputFrequency 100 Hz
Note:
– After completing the test, set the function to normal mode n.oP.
18 Bühler Technologies GmbH BE150101 09/2020

BCM
5.1.7.7 Change status LED display functionThe LEDs in the display indicate the switching status of the output. The following table shows how LEDs are allocated to theswitching output:
Numbering LED
Switching outputx
Allocation for 2 switching outputs Allocation for 4 switching outputs
1 Reserved for IO-Link LED 1 - yellow2 LED 2 - red LED 2 - red3 Reserved LED 3 - yellow4 Reserved LED 4 - red5 Reserved6 Reserved
In the factory setting the LED indicates the physical status of the PNP switching output (switching output closed – LED on).
The logical indicator function may need to be different from the physical signal on the switching output. You can therefore alsoreverse this indication with this menu (switching output open – LED on).
Example:You have 2 switching outputs for the temperature, configured as:
– Switching output 1: Max contact, rising NO contact. The LED lights up when exceeding the maximum temperature and thetemperature is higher than the desired range. So this LED lighting up indicates an “Error” status.
– Switching output 2: Min contact, rising NO contact. So in the factory setting, the LED lights up when exceeding the minimumtemperature. So in this case the LED would light up if the status is okay.
The table shows an example with the factory setting and with inverted status function for LED3. The switching points aredefined as:
SP3 = 70 °C, rP3 = 65 °C SP4 = 80 °C, rP4 = 75 °C
Factory setting Status function LED 3 inverted
State Status
A
LED3 ON LED3 OFF
Temperature rises to > 70 °C
PNP switching output 3 closed
OK
B
LED4 and LED3 ON only LED4 ON
Temperature rises to > 80 °C
PNP switching output 4 closed
Error
C
LED3 ON LED 3 OFF
Temperature falls to < 75 °C
PNP switching output 4 open
OK
D
LED3 OFF LED3 ON
Temperature falls to < 65 °C
PNP switching output 3 open
Error
Here you can reverse the LED status function for a contact: the LED lights up if the contact is open, so below the minimum tem-perature, and the LED lighting up again indicates an “Error” status.
19Bühler Technologies GmbHBE150101 09/2020

BCM
Measured variable ____ out_
Measured variable main menuOut X EF_EF X
Advanced FunctionsLEd_LED Out X
Function status LEDXL=__Selection menu
L= o - L=_oSettings menu OUTX
The options are:
LED = output;the LED lights up when the PNP switching output
is closed.
LED = -output;the LED lights up when the PNP switching output
is open.
NOTICE
The display function of the status LED affects event logging! Please note chapter “Dia-gnostic options”.
5.1.8 Analogue outputs
5.1.8.1 Models with analogue outputIn the factory setting the analogue output signal rises as the humidity increases. The range adjustment and the signal type canbe set in the menu.
5.1.8.2 Analogue output x: Assigning the upper limit
HumidityUsed to configure at which humidity level to output the maximum analogue signal. This is configured in menu:
Measured variable ____ An_
Measured variable main menuAnalog OutX A I.HiAnalog MaxX
Maximum value assignment____Selection menu
[ o.Lo - o.Hi ]Settings menu Analog X
Setting range:0 % to 100 %
Note:
– The output range setting must not be less than 10 % of the measuring range: A I.Hi – A I.Lo >=10% * (0 – 100)
– If the range is set too low, the analogue value output may have grades.
TemperatureUsed to configure at which temperature to output the maximum analogue signal. This is configured in menu:
Measured variable ____ An_
Measured variable main menuAnalog OutX A I.HiAnalog MaxX
Maximum value assignment____Selection menu
[ o.Lo - o.Hi ]Settings menu Analog X
Setting range:-20 °C to 120 °C(-4 °F to 248 °F)
Note:
– The output range setting must not be less than 10 % of the measuring range: A I.Hi – A I.Lo >=10%
– If the range is set too low, the analogue value output may have grades.
20 Bühler Technologies GmbH BE150101 09/2020

BCM
5.1.8.3 Analogue output x: Lower limit assignment
HumidityUsed to configure at which humidity level to output the minimum analogue signal. This is configured in menu:
Measured variable ____ An_
Measured variable main menuAnalog OutX A I.LoAnalog MinX
Minimum value assignment____Selection menu
[ o.Lo - o.Hi ]Settings menu Analog X
Setting range:0 % to 100 %
Note:
– The output range setting must not be less than 10 % of the measuring range: A I.Hi – A I.Lo >=10% * (0 – 100)
– If the range is set too low, the analogue value output may have grades.
TemperatureUsed to configure at which temperature to output the minimum analogue signal. This is configured in menu:
Measured variable ____ An_
Measured variable main menuAnalog OutX A I.LoAnalog MinX
Minimum value assignment____Selection menu
[ o.Lo - o.Hi ]Settings menu Analog X
Setting range:-20 °C to 120 °C(-4 °F to 248 °F)
Note:
– The output range setting must not be less than 10 % of the measuring range: A I.Hi – A I.Lo >=10%
– If the range is set too low, the analogue value output may have grades.
5.1.8.4 Analogue output x: Signal type assignmentThe analogue output can be defined as a voltage or current output with different value ranges. This is configured in menu:
Measured variable ____ An_
Measured variable main menuAnalog OutX A.ou_Set A.OUtX
Output function_ _Selection menu
i I - u 3Settings menu Analog X
The options are:
4 mA to 20 mA 2 V to 10 V 0 V to 10 V 0 V to 5 V
5.1.8.5 Analogue output x: Testing the analogue outputThe analogue output can be tested. The highest, mean and lowest analogue value can be output successively. This is configuredin menu:
Measured variable ____ An_
Measured variable main menuAnalog OutX C.An_Check AnX
Functional test Analog X____Selection menu
n.oP - LoSettings menu Analog X
The options are:
Normal mode Highest analogue value output
Mean analogue value output Lowest analogue value output
Note:
– After completing the test, set the function to normal mode n.oP.
21Bühler Technologies GmbHBE150101 09/2020

BCM
5.1.9 Diagnostic optionsThe device is able to log events for a switching output. The LED lighting up is considered an event. The logging of switching pro-cedures therefore depends on how the LED switching function is configured.
The configuration and analysis can be carried out here.
Display ____
Measurement displaydiA
Diagnostics menuDiagnostic
NOTICE
Only one switching output can be logged. The switching output to be logged is con-figured in menu item Set Journal Out (Sjou).
– Press the key to open the main menu.
– Select menu item diA with the and keys.
From here you will be able to access various diagnostic values and measurement monitoring logs.
– Open the menu with the key.You can now change or view the diagnostic settings.
5.1.9.1 View logbookThe last 6 events for the switching output being logged can be viewed here and all entries deleted:
Diagnostic diA
Diagnostics menuJ.out
Log outputJournal Out ____
Jor I - ---
Selection menu
The journal entries will be displayed as: Example:– Most recent event Jor1 occurred x hours (h) / days (d) ago, Jor1 ⇔ 1.3h, key
Jor2 ⇔ 2.4h, key , Jor3 ⇔ 6.1h, key , Jor4 ⇔ 8.2h, key , Jor5 ⇔ non *, key , Jor6 ⇔ non *, key , ---, key ; = delete
– Events 2 to 5 occurred x hours / days ago,– The oldest event Jor6 occurred x hours / days ago,– Delete function (---)
* not yet populated, only 4 events have occurred
The information displayed will alternate between the index and time for entry x, e.g. Jor1 ⇔ 1.4hfor the most recent event 1.4 hours ago.
Press the key to return to the submenu or use , to select the next journal entry.
Confirming the information with the key will delete the list of events and returnto the submenu.
Note:
– If no events have been logged, the display will alternate between Jorx and non.
22 Bühler Technologies GmbH BE150101 09/2020

BCM
5.1.9.2 View error logbookHere you can open and delete error messages:
Diagnostic diA
Diagnostics menuJ.ErrJournal Error ____
____ - ---
Selection menuLogs errors
To delete the error messages: Example:– Display error number 0, button – Delete function ---, button ; = delete
If an error occurs, this shows the error number (see table in chapter Troubleshooting [> page 27]).
Press the key to return to the submenu or use , to display.
Confirming the display with the key will clear the error messages.
5.1.9.3 Maximum and minimum humidityUsed to view or delete the maximum and minimum humidity:
Diagnostic diA
Diagnostics menuH.MM
Max/Min MemoryMax/Min Humidity ____
____ - ---
Selection menu
The journal entries will be displayed as: Example:– Maximum humidity, 150, key – occurred x hours / days ago, 8.4h, key , – Minimum humidity, 60, key , – occurred x hours / days ago, 2.1h, key , – Delete function ---, key ; = delete
Menu order:Max. value,timemin. valuetimedelete
Press the key to return to the submenu or use , to select the next Journal entry.
Confirming the information with the key will delete the list of events and returnto the submenu.
23Bühler Technologies GmbHBE150101 09/2020

BCM
5.1.9.4 Maximum and minimum temperatureUsed to view or delete the saved maximum and minimum temperature:
Diagnostic diA
Diagnostics menut.MM
Max/Min MemoryMax/Min Temp ____
____ - ---
Selection menu
The journal entries will be displayed as: Example:– Maximum temperature, 72°C, key – occurred x hours / days ago, 8.4h, key , – Minimum temperature, 22°C, key , – occurred x hours / days ago, 2.1h, key , – Delete function ---, key ; = delete
Menu order:Max. value,timemin. valuetimedelete (reset)
Press the key to return to the submenu or use , to select the next Journal entry.
Confirming the information with the key will delete the list of events and returnto the submenu.
5.1.9.5 Define switching output to logUsed to select the switching output to be logged. Only one switching output can be logged.
Diagnostic diA
Diagnostics menuSJ.ou
Output monitoringSet Journal Out out_
Out I - Out_
Selection menu
Options:out1 to outx
Switching output logging.
NOTICE
Values are backed up from volatile to non-volatile memory approx. every three hours.
5.1.9.6 Delay for storing the Min/Max HumidityA delay time for saving the minimum and maximum humidity can be set to record reliable values when input values fluctuate.Here, enter the time span in seconds during which the signal must be continuously present before the humidity is logged.
Diagnostic diA
Diagnostics menudH.MM
Min/Max DelayDelay MM ___
0 - 100
Selection menu
Setting range:0…100 seconds
– Use the key to open the list of values.
– Set the value with the and keys and press to confirm (e.g. 5 (seconds).The unit will return to the submenu.
24 Bühler Technologies GmbH BE150101 09/2020

BCM
5.1.9.7 Delay for storing the Min/Max TemperatureA delay time for saving the minimum and maximum temperature can be set to record reliable values when temperatures fluc-tuate. Here, enter the time span in seconds during which the signal must be continuously present before the temperature islogged.
Diagnostic diA
Diagnostics menudt.MM
Min/Max DelayDelay MM ___
0 - 100
Selection menu
Setting range:0…100 seconds
– Use the key to open the list of values.
– Set the value with the and keys and use the key to confirm (e.g. 5 (seconds).The device will return to the submenu.
5.2 BCM-WSThis explanation of the operation applies to the sensor versions without display.
5.2.1 Start-up procedureThe device will automatically switch on when connected to power.
With IO-Link, the sensor will be in SIO mode if there is no master. In SIO mode the sensor will work the same as a normal PNPswitching output.
5.2.2 Parameter configurationThe IO-Link interface can be used to configure the parameters as switching point, switch-back point or temperature unit.
5.2.3 Factory setting(can only be restored via IO-Link)
Switching outputs Basic SettingsSwitching point/switch-back point 80% / 75% Error message InactiveDelay switching point/switch-back point 0 / 0 Temperature unit °CCharacteristic Hysteresis as
NC contact(Hnc)
Switching output assignment Humidity
5.2.4 Switching outputsThe sensor has one switching output assigned to humidity. The threshold is preset to 80 %. The switching function is a NC con-tact. This switching output can be configured ex works or via the digital interface.
For the functionality please refer to chapter Switching outputs [> page 15].
5.2.5 Analogue outputsThe sensor version features up to two 4-20 mA analogue outputs. The analogue outputs are available for the relative humidityand temperature. The scale is preset and can be factory configured or via the digital interface. By default the analogue outputshows the relative humidity as 0 % to 100 %. The analogue output shows the temperature from -20 °C to 120 °C.
25Bühler Technologies GmbHBE150101 09/2020

BCM
6 Cleaning and MaintenanceRegularly check sealing screw connections for leaks, particularly if vibration may occur. Apart from this the device is mainten-ance-free.
The method for cleaning the devices must be adapted to the IP protection class of the devices. Do not use cleaners which coulddamage the device materials. Isopropyl alcohol is recommended for cleaning the sensor element. The parts of the sensor in con-tact with the medium should be swirled in a container with the specified cleaning agent and then dried in ambient air. Neverclean the sensor with compressed air or a jet of fluid to prevent damaging the sensor elements.
26 Bühler Technologies GmbH BE150101 09/2020

BCM
7 Service and repairThis chapter contains information on troubleshooting and correction should an error occur during operation.
Repairs to the unit must be performed by Bühler authorised personnel.
Please contact our Service Department with any questions:
Tel.: +49-(0)2102-498955 or your agent
If the equipment is not functioning properly after correcting any malfunctions and switching on the power, it must be inspectedby the manufacturer. Please send the equipment inside suitable packaging to:
Bühler Technologies GmbH
- Reparatur/Service -
Harkortstraße 29
40880 Ratingen
Germany
Please also attach the completed and signed RMA decontamination statement to the packaging. We will otherwise be unable toprocess your repair order.
You will find the form in the appendix of these instructions, or simply request it by e-mail:
7.1 Removal informationThe housing temperature depends on the process temperature, therefore remember when working on the device:
Allow the device to cool down before performing maintenance or repairs.
Before remove the device, ensure the system is depressurised to prevent liquid from escaping. If necessary, use a collection con-tainer.
Please observe the safety notices in chapter Setup and connection [> page 7].
7.2 Troubleshooting
Problem/malfunction Possible cause ActionNo display – No supply voltage – Check cable and replace, if necessaryError messages on the display:
Alternating between Err and Exxx: e.g. ⇔ Error 001 – Ambient temperature too low – Maintain limits
Error 002 – Ambient temperature too high – Maintain limits
Error 004 – Pt100 failure (short-circuit) – Send device in for repair
Error 008 – Pt100 failure (cable break) – Send device in for repair
Error 032 – Sensor failure (supply line open) – Send device in for repair
Error 064 – Transmitter (moisture) – Input signal too low
Error 128 – Transmitter (moisture) – Input signal too high
Error 256 – Transmitter (temperature) – Input signal too low
Error 512 – Transmitter (temperature) – Input signal too high
Error 1024 – Internal error – Please contact customer service
27Bühler Technologies GmbHBE150101 09/2020

BCM
Possible errors
Problem / Malfunction Possible cause ActionSwitching output not trigger-ing when exceeding limits
– Switching output configured incorrectly – In submenu Coux: “Test Switching Output“ toensure normal mode
– Switching output defect – In submenu Coux: “Test Switching Output” totest the desired switching output
Switching output constantlyswitching
– Switching output configured incorrectly – In submenu Coux: “Test Switching Output“ toensure normal mode
– Switching output defect – In submenu Coux: “Test Switching Output” totest the desired switching output
The analogue doesn’t receivethe full/correct output current
– Wrong signal type set – In submenu Aoux: Check and if necessary setthe correct signal type (current/voltage out-put)
– Load too high (current output) – Reduce load to permissible valueAnalogue output doesn’tchange the output signalwhen the input signal changes
– Analogue output configured incorrectly – In submenu CAnx: „Test Analogue Output“ toensure normal mode
7.3 Spare parts and accessories
Accessories
Item no. 4-pin Item no. 8-pin Description9144 05 0010 9144 05 0048 Connecting cable M12x1, 1.5 m, angular coupling and straight plug9144 05 0046 9144 05 0049 Connecting cable M12x1, 3.0 m, angular coupling and straight plug9144 05 0047 9144 05 0033 Connecting cable M12x1, 5.0 m, angular coupling and strands
28 Bühler Technologies GmbH BE150101 09/2020

BCM
8 DisposalDispose of parts so as not to endanger the health or environment. Follow the laws in the country of use for disposing of elec-tronic components and devices during disposal.
29Bühler Technologies GmbHBE150101 09/2020

BCM
9 Appendices
9.1 Technical Data BCM-WS
Sensor versions BCM-WS100 BCM-WS120 BCM-WS160Max. operating pressure 50 bar 50 bar 1 barMedium -20 °C to +80 °C * -20 °C to +80 °C * -20 °C to +80 °C *Threaded connection G3/4" pipe thread, EOlastic
sealG1/2" pipe thread, EOlastic seal Flange (DIN 24557/T2), seal FKM
max. torque 20 Nm 20 Nm ---Sensor length from seal face 36 mm 34 mm min. 200 mm to max. 1200 mmmax. flow rate 110 L/min 110 L/min 110 L/minmax. flow rate at sensor 5 m/s 5 m/s 5 m/sChemical resistance Mineral oil based liquids,
synthetic esters and biopetroleums
Mineral oil based liquids, synthetic esters and biopetroleums
Mineral oil based liquids, synthetic esters and biopetroleums
Ambient temperature -20 °C to + 70 °C -20 °C to + 70 °C -20 °C to + 70 °CSupply voltage (UB) 18 - 30 V (nominal voltage
24 VDC)12 V on request for version 1S2ANote load
18 - 30 V (nominal voltage 24 VDC)12 V on request for version 1S2A Note load
18 - 30 V (nominal voltage 24 VDC)12 V on request for version 1S2A Note load
*Medium temperature up to 120 °C, from 90 °C no accurate measurand output possible within the tolerances.
Material/Version BCM-WS100 BCM-WS120 BCM-WS160Housing Stainless steel/aluminium Stainless steel/aluminium Stainless steel/aluminiumMaterial in contact with media 1.4301, 1.4571, 2.4478, FR4,
glass1.4301, 1.4571, 2.4478, FR4, glass 1.4301, 1.4571, 2.4478, FR4, glass
Weight approx. 205 g approx. 170 g approx. 930 g at L = 200 / + 50 g per 100 mm
IP rating IP67* IP67* IP67*
*with plug-in connector screwed on
IO-LinkIO-Link Revision 1.1Baudrate COM2 (38.4 k)SIO Mode Yesmin. time period 20 ms
Moisture measurementMeasuring range 0 - 100 % rel. humidityAccuracy ± 3 % FSAnalog output 4 – 20 mA (0 – 100 % relative humidity)Tolerance ± 0.5 % FSLoad Ω = (UB – 8 V) / 0.02 A
Switching output for humidityPNP switching output 1) 2) Fixed to 80 % relative humidity NC (normally closed)Switching current max. 0.2 A1) others on request2) adjustable via IO-Link
30 Bühler Technologies GmbH BE150101 09/2020

BCM
Temperature measurementMeasuring range -20 °C to +120 °CAccuracy ± 1.5 % FSAnalog output 4 – 20 mA (-20 to +120 °C)Tolerance ± 0.5 % FSLoad Ω = (UB – 8V) / 0.02 A
9.2 Technical Data BCM-WR/BCM-WDSensor with Display and Control Unit
General Technical DataMax. operating pressure 50 bar
1 barMedium -20 °C to + 80 °C *Threaded connection G3/4" pipe thread, EOlastic sealmax. torque 20 NmSensor length from seal face 36 mmmax. flow rate 110 L/minmax. flow rate at sensor 5 m/sChemical resistance Mineral oil based liquids, synthetic esters and biopetroleums
*Medium temperature up to 120 °C, from 90 °C no accurate measurand output possible within the tolerances.
Analysis and Display ElectronicsDisplay 4 character 7 segment LEDDisplay unit 0 – 100 % relative humidityOperation via 3 keysMemory Min./Max. data memoryStarting current input approx. 100 mA for 100 msCurrent input during operation approx. 50 mA (without current- and switching outputs)Supply voltage (UB) 18 – 30 VDC (nominal voltage 24 VDC)Ambient temperature -20 °C to +70°CDisplay resolution 0.5 %, 0.5 °C, °F
Version BCM-WR remote display with sensor DimensionsMounting 35 mm top hat rail mounting/ G3/4 40
105
53
Weight approx. 335 g incl. sensorDisplay housing PAIP rating IP65* (display)/IP67* (sensor)
* with plug-in connector screwed on
31Bühler Technologies GmbHBE150101 09/2020

BCM
Version BCM-WD with attached sensor DimensionsMounting G3/4 / G1/2 40
SW27
Ø16
G 3/4
3616
141
53
15Weight approx. 270 gDisplay housing PAIP rating IP65* (display)
*with plug-in connector screwed on
IO-LinkIO-Link Revision 1.1Baudrate COM3 (230.4 k)SIO Mode Yesmin. time period 10 ms
Moisture measurementMeasuring range 0 - 100 % rel. humidityAccuracy ± 3 % FSAnalog output Parametrisable current or voltage output (4 - 20 mA, 2 - 10 V, 0 - 10 V or 0 - 5 V)Tolerance ± 0.5 % FSLoad Ω (current output) = (UB – 8 V) / 0.02 A
Switching outputsPNP switching output Parametrisable switching function and switching outputSwitching current max. 0.2 A per output
Temperature measurementMeasuring range -20 °C to +120 °CAccuracy ± 1.5 % FSAnalog output Parametrisable current or voltage output (4 - 20 mA, 2 - 10 V, 0 - 10 V or 0 - 5 V)Tolerance ± 0.5 % FSLoad Ω (current output) = (UB – 8 V) / 0.02 A
32 Bühler Technologies GmbH BE150101 09/2020

BCM
9.3 Dimensions BCM-WS
BCM-WS100 BCM-WS120 BCM-WS160M12x1
13
8734
143
Ø16G 1/2
SW 2
7
Ø26.9
M12x1
13
90L
(min
. 100
/max
. 120
0)
Imm
ersi
on d
epth
min
. 35
115
SealFKM
Ø20
Ø6
Ø60
Ø73
Ø90
6x 6
0°
Installation opening
9.4 Outputs BCM-WSVersion 1S2A 1DPlug (base) 1 x M12 – 8-pin 1 x M12 – 4-pinSwitching output (fixed) XIO-Link XHumidity analogue output XTemperature analogue output X
9.5 Outputs BCM-WD/BCM-WRVersion 2S2A 1D1S 4S2APlug (base)Display & remote
1 x M12 – 8-pin 1 x M12 – 4-pin 1 x M12 – 4-pin1 x M12 – 8-pin
Sensor connection jack (bottom)Remote
1 x M12 – 8-pin 1 x M12 – 8-pin 1 x M12 – 8-pin
Switching outputs 2 x 1 x 4 xIO-Link XHumidity analog output X XTemperature analog output X X
33Bühler Technologies GmbHBE150101 09/2020

BCM
9.6 Pin assignment BCM-WS
WS-1S2A WS-1D
Panel plug/jack 8-pin 4-pinStandard IO Link
Pin1 L+ L+2 L-3 S1 humidity L-4 C/Q56 I1 humidity7 I2 temp.8
9.7 Pin assignment BCM-WR/WD
Plug A Plug B Sensor connectionjack
WD/WR-2S2A
WD/WR-1D1S
WD/WR-4S2A
WD/WR-4S2A
WR
Panel plug/jack 8-pin 4-pin 4-pin 8-pin 8-pinStandard IO-Link IO-Link
Pin1 L+ L+ L+ L+2 L- DO/S2 S2 L-3 S1 Humidity L- L- S34 C/Q S15 S2-Temp. S46 I1 humidity I1 humidity I1 humidity7 I2 temp. I2 temp. I2 temp.8
34 Bühler Technologies GmbH BE150101 09/2020

BCM
9.8 Display ranges
Name Menu/Unit Display Range from/with unit
Range to/with unit
Temperature°C ;C ;C -100 °C 999 °C°F ;F ;F -100 °F 999 °F
HumidityPercent -I- - -100 % 999 %
9.9 Current settings
Switching outputs Basic Settings DiagnosticsSP1 / rP1 Err.h SJ.ou
ds1 / dr1 / ou1 H.uni dh.MM
SP2 / rP2 t.uni dh.MM
ds2 / dr2 / ou2 r.ou1
SP3 / rP3 r.ou2
ds3 / dr3 / ou3 r.ou3
SP4 / rP4 r.ou4
ds4 / dr4 / ou4 dis
Analogue outputs Loc
A1.Hi / A1.Lo / A.ou1A2.Hi / A2.Lo / A.ou2
Date: Signature:
35Bühler Technologies GmbHBE150101 09/2020

BCM
9.10 Menu Sequence Overview
ConfigurationEquipment configuration
H__i
____DisplayMeasurement display
Main menu Submenu 1 Submenu 2 Submenu 3 Settings and Display Menu
____
____HumidityHumidity main menu
HuMi ____Out 1Settings menu OUT1
out1 ____SP1
Switching point 1____ ____Selection menu ____
____
Switch-back point 1____ ____Selection menu ____
Amount of time the signal must be present for output OUT1 to trigger.Setting range: 0...100 seconds (for frequency output without function)
____EF 1Extended functions
EF1 ____Delay SP 1Delay OUT1 On
dS1 ____Selection menu
< o.Lo - o.Hi >
___
Amount of time the signal must be present for output OUT1 to switch back.Setting range: 0...100 seconds (for frequency output without function)
____Delay RP 1Delay OUT1 Off
dr1 ____Selection menu ___
Frequency output 1-100 Hz
____Set Out 1Definition OUT1
ou1 ____Selection menuHno - FM
___Definition of switching characteristics for output 1:
FM
____Check Out 1Functional test OUT1
C.ou1 ____Selection menun.op - on
____Normal switching output operationSwitching output Off /Switching output On /
n.oP
oFF
on
F1
F100
Simulation 1 HzSimulation 100 Hz
____ExitExit menu level
E
____LED Out 1Function status LED1
LEd1 ____Selection menuL= o - L=-o
L=__
Sets a value for frequency 1 Hz (only OUT1 and OUT2)rP1
FI.Lo
FL1 Set lower window limitSet switch-back point /
Hno Hnc Hysteresis function NO contact or NC contactFno Fnc Window function NO contact or NC contact /
LED = -output: inverted to switching outputL= o
L=-o
LED = output: follows the switching output
< o.Lo - o.Hi >
0 - 100
FH1 F1.Hi
rP1 FL1 F1.Lo
____ExitExit menu level
E
or 60s no action:Exit main/submenu
Shortcut +
See menu structure Out1Not applicable for version with
analogue output
____Out xSettings menu OUTx
out_
____Analog Max1Set maximum value
A1.Hi ____Selection menu0;C - 100;C
____ Sets the maximum analogue output signal to a defined value.(Note: Max. – Min >= 10 % of the measuring range)
____Analog Min1Set minimum value
A1.Lo ____Selection menu0;C - 100;C
____
i I
____Set A.Out1Output function
A.ou1 ____Selection menui 1 - u 3
_ _
u 14...20 mASelecting the analogue output function:
Output mean analogue value /n.oP
HALF
____Check An1Functional test Analog 1
C.An1 ____Selection menun.oP - Lo
____ Hi Output maximum analogue valueAnalogue output normal mode /
____Analog Out1Settings menu Analog 1
An1
____ExitExit menu level
E
Exit menu levelEExit
Sets the maximum analogue output signal to a defined value.(Note: Max. – Min >= 10 % of the measuring range)
2...10 V u 2 0...10 V u 3 0...5 V
Lo Minimum analogue value output
Alternate menu for version with analogue outputNot applicable when ordered with 2 or more
switching outputs
tEMP
Temperature MenuTemperature
b.EF
Basic Adv. FunctionsBasic EF
Settings menu OUT Xout_Out X
Settings menu OUT Xout_Out X
Settings menu Analog 2An2Analog Out2
Exit menu levelEExit
Factory settingrESReset
See menu structure Out1
See menu structure Out1Not applicable for version with
analogue output
See menu structure Analog Out1
____Confirmno - YES
___ Resets the device to delivery status
Humidity UnitHuniSet Unit Humidity ____
Selection menu
-l- - non
___
Temperature unitt.uniSet Unit Temp ____Selection menu
;C - ;F
;_;C [Celsius],Selecting the temperature unit displayed:
Set 100 %100Set Upper ____Selection menu
-999 - 9999
____ Sets a defined value for the maximum humidity.(Example: maximum humidity at 100 %)
Set 0 %0Set Lower ____Selection menu
-999 - 9999
____ Sets a defined value for the minimum humidity.(Example: minimum humidity at 10 %)
Set Out 1r.ou 1reassign O1 ____Selection menu
HuMi- tEMP - Err
____ Set switching output Out1 to humidity measurement/temperature measurement or as error signal.
Set Out xr.ou_reassign Ox Selection menu
HuMi- tEMP
____
Display ratedi5Display Rate ____Selection menu
FASt - off
____
KeylockLocLock Device ____Selection menu
0 - 999
___
Exit menu levelEExit
-1- [Percent],Selecting the unit displayed: non [no unit (4-digit display)]
;F [Celsius]
Sets switching output OutX to humidity measurement or temperature measurement
Selecting the display refresh rate:FASt [fast], Medi [medium], SLo [slow],
Activating the keylock by entering a numerical code > 0 Master code 287
oFF [Display off]
diA
Diagnostics menuDiagnostic
Log outputJ.outJournal Out ____
Jor I - ---
____ Displays the last 6 alarms + delete function.
Max/Min memoryH.MMMax/Min Humidity ____Selection menu ____
Max/Min memoryt.MMMax/Min Temp ____Selection menu
___;_ - ---
Output monitoringSJ.ouSet Journal Out ____Selection menu
Out1 - Out_
out_ Selecting the alarm output to be logged
Min/Max delayDH.MMDelay MM ____Selection menu
0 - 100
___ Amount of time the signal must be present before saving the maximum / minimum value. Setting range: 0...100 seconds
Min/Max delaydt.MMDelay MM ____Selection menu
0 - 100
___ Amount of time the signal must be present before saving the maximum / minimum value. Setting range: 0...100 seconds
Displays the limits + delete function.
Display: Value – amount of time passed in hours/days; scroll through journal with
Selection menuDisplay: X – amount of time passed in hours/days; scroll through journal with JorX
Displays the limits + delete function.
Display: Value – amount of time passed in hours/days; scroll through journal with ____
___;_ - ---
Exit menu levelEExit
E
Exit menu levelExit
____SwitchSwitch view
____Switches the measurement display level / temperature
Sets a value for frequency 100 Hz (only OUT1 and OUT2)SP1
FI.Hi
FH1 Define maximum window limitSwitching point setting /
0 - 100
Alternate menu for version with analogue outputNot used when ordered with 4 switching outputs
Error handlingErrhSet error handling ____
no - YES
___ Disable/enable normal error handling and analysisSelection menu
Set Out 2r.ou 2reassign O2 ____Selection menu
HuMi- tEMP - Err
____ Set switching output Out2 to humidity measurement/temperature measurement or as error signal.
Selection menu
Logs errorsJ.ErrJournal Error ________ Displays the error codes + delete function.
E___ ; scroll through journal with Display: Error codeSelection menu
36 Bühler Technologies GmbH BE150101 09/2020

BCM
10 Attached documents– Declaration of conformity KX150001
– RMA - Decontamination Statement
37Bühler Technologies GmbHBE150101 09/2020


RMA-Nr./ RMA-No.Die RMA-Nummer bekommen Sie von Ihrem Ansprechpartner im Vertrieb oder Service./ You may obtain the RMAnumber from your sales or service representative.
Firma/ Company
Firma/ CompanyStraße/ StreetPLZ, Ort/ Zip, CityLand/ Country
Zu diesem Rücksendeschein gehört eine Dekontaminierungserklärung. Die gesetzlichen Vorschriften schreiben vor,dass Sie uns diese Dekontaminierungserklärung ausgefüllt und unterschrieben zurücksenden müssen. Bitte füllen Sieauch diese im Sinne der Gesundheit unserer Mitarbeiter vollständig aus./ This return form includes a decontaminationstatement. The law requires you to submit this completed and signed decontamination statement to us. Please com-plete the entire form, also in the interest of our employee health.
Ansprechpartner/ Person in charge
Name/ Name Abt./ Dept. Tel./ Phone E-Mail
Gerät/ DeviceAnzahl/ QuantityAuftragsnr./ Order No.
Serien-Nr./ Serial No.Artikel-Nr./ Item No.
Grund der Rücksendung/ Reason for return
Kalibrierung/ Calibration Modifikation/ ModificationReklamation/ Claim Reparatur/ Repairandere/ other
bitte spezifizieren/ please specify
Ist das Gerät möglicherweise kontaminiert?/ Could the equipment be contaminated?
Nein, da das Gerät nicht mit gesundheitsgefährdenden Stoffen betrieben wurde./ No, because the device was not operated withhazardous substances.
Nein, da das Gerät ordnungsgemäß gereinigt und dekontaminiert wurde./ No, because the device has been properly cleaned anddecontaminated.
Ja, kontaminiert mit:/ Yes, contaminated with:
explosiv/ explosive
entzündlich/ flammable
brandfördernd/ oxidizing
komprimierteGase/
compressedgases
ätzend/ caustic
giftig,Lebensgefahr/poisonous, risk
of death
gesundheitsge-fährdend/ harmful to
health
gesund-heitsschädlich/ health hazard
umweltge-fährdend/
environmentalhazard
Bitte Sicherheitsdatenblatt beilegen!/ Please enclose safety data sheet!
Das Gerät wurde gespült mit:/ The equipment was purged with:
Diese Erklärung wurde korrekt und vollständig ausgefüllt und von einerdazu befugten Person unterschrieben. Der Versand der (dekontaminier-ten) Geräte und Komponenten erfolgt gemäß den gesetzlichen Bestim-mungen.
This declaration has been filled out correctly and completely, and signed byan authorized person. The dispatch of the (decontaminated) devices andcomponents takes place according to the legal regulations.
Datum/ Date
rechtsverbindliche Unterschrift/ Legally binding signature
Falls die Ware nicht gereinigt, also kontaminiert bei uns eintrifft, muss dieFirma Bühler sich vorbehalten, diese durch einen externen Dienstleisterreinigen zu lassen und Ihnen dies in Rechnung zu stellen.
Should the goods not arrive clean, but contaminated, Bühler reserves theright, to comission an external service provider to clean the goods and in-voice it to your account.
Firmenstempel/ Company Sign
DE00001101/2019
RMA-Formular und Erklärung über DekontaminierungRMA-Form and explanation for decontamination
Bühler Technologies GmbH, Harkortstr. 29, D-40880 RatingenTel. +49 (0) 21 02 / 49 89-0, Fax: +49 (0) 21 02 / 49 89-20
E-Mail: [email protected]: www.buehler-technologies.com

Dekontaminierungserklärung
Die Analyse defekter Baugruppen ist ein wesentlicher Bestandteil der Qualitätssicherung der FirmaBühler Technologies.
Um eine aussagekräftige Analyse zu gewährleisten muss die Ware möglichst unverändert untersuchtwerden. Es dürfen keine Veränderungen oder weitere Beschädigungen auftreten, die Ursachen ver-decken oder eine Analyse unmöglich machen.
Bei elektronischen Baugruppen kann es sich um elektrostatisch sensible Baugruppen handeln. Es istdarauf zu achten, diese Baugruppen ESD-gerecht zu behandeln. Nach Möglichkeit sollten die Baugrup-pen an einem ESD-gerechten Arbeitsplatz getauscht werden. Ist dies nicht möglich sollten ESD-gerechte Maßnahmen beim Austausch getroffen werden. Der Transport darf nur in ESD-gerechten Be-hältnissen durchgeführt werden. Die Verpackung der Baugruppen muss ESD-konform sein. VerwendenSie nach Möglichkeit die Verpackung des Ersatzteils oder wählen Sie selber eine ESD-gerechte Ver-packung.
Beachten Sie beim Einbau des Ersatzteils die gleichen Vorgaben wie oben beschrieben. Achten Sie aufdie ordnungsgemäße Montage des Bauteils und aller Komponenten. Versetzen Sie vor der Inbetrieb-nahme die Verkabelung wieder in den ursprünglichen Zustand. Fragen Sie im Zweifel beim Herstellernach weiteren Informationen.
Analysing defective assemblies is an essential part of quality assurance at Bühler Technologies.
To ensure conclusive analysis the goods must be inspected unaltered, if possible. Modifications orother damages which may hide the cause or render it impossible to analyse are prohibited.
Electronic assemblies may be sensitive to static electricity. Be sure to handle these assemblies in anESD-safe manner. Where possible, the assembles should be replaced in an ESD-safe location. If un-able to do so, take ESD-safe precautions when replacing these. Must be transported in ESD-safe con-tainers. The packaging of the assemblies must be ESD-safe. If possible, use the packaging of the sparepart or use ESD-safe packaging.
Observe the above specifications when installing the spare part. Ensure the part and all componentsare properly installed. Return the cables to the original state before putting into service. When in doubt,contact the manufacturer for additional information.
DE00001101/2019
Bühler Technologies GmbH, Harkortstr. 29, D-40880 RatingenTel. +49 (0) 21 02 / 49 89-0, Fax: +49 (0) 21 02 / 49 89-20
E-Mail: [email protected]: www.buehler-technologies.com