installation instructions -...
TRANSCRIPT

SAFETY INSTRUCTIONS
Siemens Energy & Automation, Inc.Bellefontaine, OH 43311 U.S.A.
JD Frame Types: JXD2(-A), JXD6(-A), HJXD6(-A),HHJXD6, & CJD6(-A). LD Frame Types LXD6(-A),HLXD6(-A), HHLXD6, & CLD (-A). LMD Frame TypesLMXD6 & HLMXD6. ETI Motor Circuit Interrupters TypesJXD6(-A) ETI, CJD6(-A) ETI, LXD6(-A) ETI, CLD6(-A)ETI, & LMXD6 ETI. Solid State Molded Case CircuitBreaker Sentron Series III; JD Frame Types SJD6(-A),SHJD6(-A), SCLD6 (-A), & JDFP(-A); LD Frame TypesSLD6(-A), SHLD6(-A), SCLD6(-A), & LDFP(-A). JM/LM Frame Types JM6, JMK, LM6, LMK.NOTE: This instruction outlines the recommendedinstallation procedure of the accessories noted intothe devices listed above.1. Turn power off supplying device before in-
stalling kit.2. Make sure device is in tripped position. For cir-
cuit breakers: depress the red trip button (seefig. 1). For molded case switches: Removing thecover will trip the mechanism.
3. Remove two lug shield screws on load end shield(not shown) and (5 or 9) load end cover screws(A, Fig. 1) and, if device is mounted, also removemounting screws (B, Fig. 1). Remove load endcover only. Remove label from trip unit thatcovers the accessory access opening at theback of trip unit (J, Fig. 2). Accessory units canbe mounted in either right or left poles of the de-vice. Except for types with an "S" prefix or an"FP" suffix, they can ONLY be mounted in theRIGHT POLE. If installed, remove paper labelcovering trip unit interface access port whichstates “remove this label before installing shunttrip U.V. trip or bell alarm accessory”.
Fig. 1COVER SCREW LOCATION
Installation Instructions
Hazardous voltage.Will cause death or seriousinjury.Turn off and lock out all powersupplying this device beforeremoving cover(s) or device andwhile cover(s) are removed.
Replace all covers and shieldsbefore power supplying this deviceis turned on.
LUG SHIELDSHOULD NOTBE REMOVED
LOAD ENDCOVERTRIP
BUTTON
LUG SHIELDREMOVED
Item: Shunt Trip, Undervoltage Trip, &/or AuxiliarySwitch Unit, Low Voltage Switch
For use with: JXD, JM, LXD, LM & LMXD FrameCircuit Breakers, and Molded CaseSwitches, & Motor Circuit Interrupters.(See Types Below).
Page 1 of 4
Pc. No. 77501A05
B
A
A
ACCESSORY MOUNTING INSTRUCTIONS4. Feed leads through opening at bottom of acces-
sory case for right hand or left hand mounting indevice. (Leads should aways exit accessory to-ward outer edge of device.) Feed accessory leadsdown and through 5/16 X 1/2 elongated opening(C, Fig. 2) to bring leads out bottom of device. NOTE:Leads must be brought out in the same order asthey exit wire retainer of accessory case.
5. Accessory is located in the device by groove(E, Fig. 2), bottom side of accessory. Slide ac-cessory down to rest on pad (D, Fig. 2) Trip Unit.When accessory is installed correctly, front ofaccessory (F, Fig.2) will rest on pad (G, Fig. 2)of line cover. Pull gently and evenly on acces-sory wire leads (2 to 6 wires) while lowering ac-cessory into base. Make sure all the slack is re-moved from leads inside device.
Siemens Energy & Automation, Inc.Bellefontaine, OH 43311 U.S.A.Siemens Energy & Automation, Inc.Bellefontaine, OH 43311 U.S.A.
Hazardous voltage.Will cause death or seriousinjury.Turn off and lock out all powersupplying this device beforeremoving cover(s) or device andwhile cover(s) are removed.Replace all covers and shieldsbefore power supplying thisdevice is turned on.
Page 2 of 4Pc. No. 77501A05
Installation Instructions
Fig. 2INSTALLING ACCESSORY
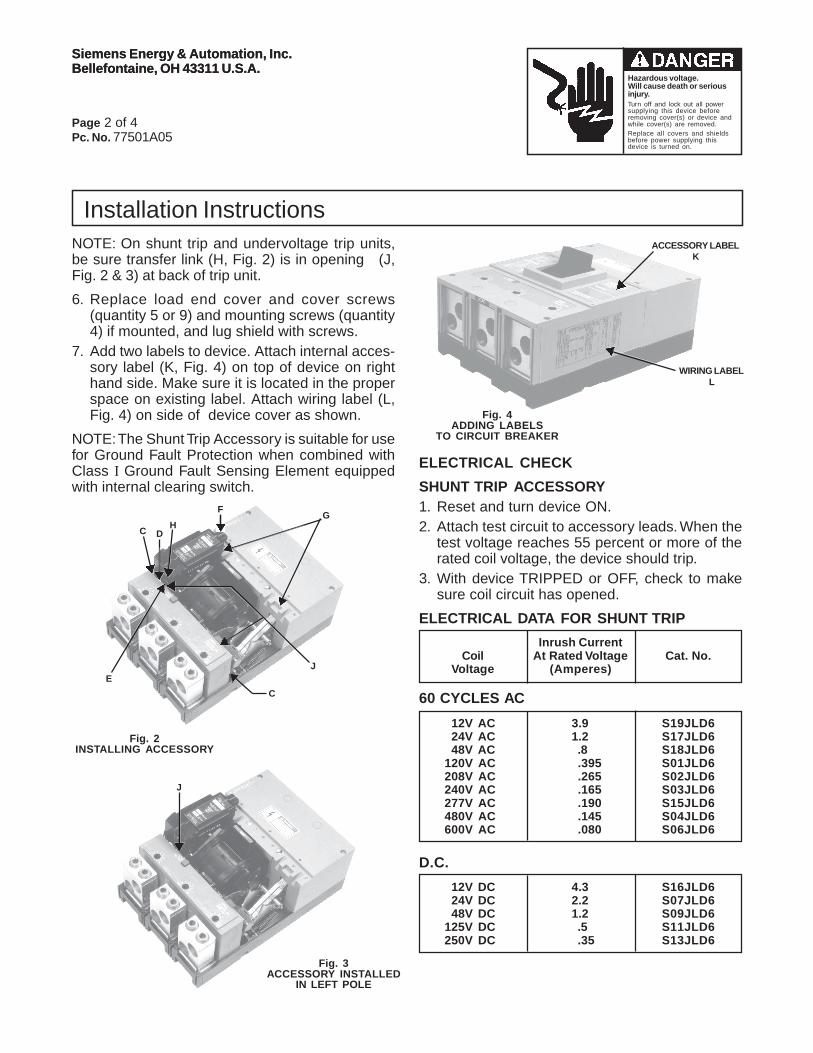
Fig. 4ADDING LABELS
TO CIRCUIT BREAKER
ACCESSORY LABELK
WIRING LABELL
J
C DH
FG
E
C
J
NOTE: On shunt trip and undervoltage trip units,be sure transfer link (H, Fig. 2) is in opening (J,Fig. 2 & 3) at back of trip unit.
6. Replace load end cover and cover screws(quantity 5 or 9) and mounting screws (quantity4) if mounted, and lug shield with screws.
7. Add two labels to device. Attach internal acces-sory label (K, Fig. 4) on top of device on righthand side. Make sure it is located in the properspace on existing label. Attach wiring label (L,Fig. 4) on side of device cover as shown.
NOTE: The Shunt Trip Accessory is suitable for usefor Ground Fault Protection when combined withClass I Ground Fault Sensing Element equippedwith internal clearing switch.
Fig. 3ACCESSORY INSTALLED
IN LEFT POLE
ELECTRICAL CHECK
SHUNT TRIP ACCESSORY1. Reset and turn device ON.2. Attach test circuit to accessory leads. When the
test voltage reaches 55 percent or more of therated coil voltage, the device should trip.
3. With device TRIPPED or OFF, check to makesure coil circuit has opened.
ELECTRICAL DATA FOR SHUNT TRIP
Inrush CurrentCoil At Rated Voltage Cat. No.
Voltage (Amperes)
60 CYCLES AC
D.C.
12V AC 3.9 S19JLD624V AC 1.2 S17JLD648V AC .8 S18JLD6
120V AC .395 S01JLD6208V AC .265 S02JLD6240V AC .165 S03JLD6277V AC .190 S15JLD6480V AC .145 S04JLD6600V AC .080 S06JLD6
12V DC 4.3 S16JLD624V DC 2.2 S07JLD648V DC 1.2 S09JLD6
125V DC .5 S11JLD6250V DC .35 S13JLD6

Siemens Energy & Automation, Inc.Bellefontaine, OH 43311 U.S.A.
Hazardous voltage.Will cause death or seriousinjury.Turn off and lock out all powersupplying this device beforeremoving cover(s) or device andwhile cover(s) are removed.Replace all covers and shieldsbefore power supplying thisdevice is turned on.
UNDERVOLTAGE TRIP ACCESSORY1. With device in TRIPPED position, connect test cir-
cuit to accessory leads. Energize undervoltage tripdevice at 85 percent of the marked rated voltage ofthe coil. Reset and turn device handle ON.
2. Reduce voltage to 35 percent of rated coil volt-age. Device must trip.
ELECTRICAL DATA FOR UNDERVOLTAGE TRIP
Sealed-in CurrentCoil At Rated Voltage Cat. No.
Voltage (Amperes)
60 CYCLES AC
D.C.
120V AC .03 U01JLD6208V AC .018 U02JLD6240V AC .016 U03JLD6277V AC .013 U16JLD6480V AC .008 U06JLD6
*600V AC .008 U08JLD6 120V AC .03 U01JLM6
24V DC .11 U13JLD648V DC .06 U14JLD6
125V DC .027 U10JLD6**250V DC .02 U12JLD6
125V DC .027 U10JLM6
* Kit includes a 30k ohm, 25 watt resistor(Clarostat Cat. No. VP-25-K or equivalent).
** Kit includes a 2.5k ohm, 25 watt resistor(Clarostat Cat. No. VP-25-K or equivalent).
Note: Resistor to be mounted externally of de-vice & connected by installer.
Installation Instructions
Page 3 of 4Pc. No. 77501A05
ACCESORY UNITS
Accessory units employing an auxiliary switch in com-bination with a shunt trip, an undervoltage trip, an alarmswitch, or a second auxiliary switch will utilize the wirecolors and designations for each device as shownbelow. A double auxiliary switch combination will usewiring marking A2, B2, and C2 for the second switch.
• •
••
~ ~
ShuntTrip
Customersupply
• •
•
~ ~
Blk Blk
Blu Blu
Undervoltage
Customersupply
Internal ClearingContacts closed whenbreaker is closed.
VoltageDroppingResistor(Supplied).250 VDC &600 VACOnly
•
•• •
Auxiliary
Switch
Blk Wht Red
A1 C1 B1
A1-C1 Closed when circuit breaker is closed.
B1-C1 Open when circuitbreaker is closed.
Low Voltage
Switch
A-C Closed when circuit breaker is in tripped position.B-C Open when circuit breaker is in tripped position.
•
AlarmSwitch
•• •Yel Wht Brn
A C B

Siemens Energy & Automation, Inc.Bellefontaine, OH 43311 U.S.A.
Installation Instructions
Hazardous voltage.Will cause death or seriousinjury.Turn off and lock out all powersupplying this device beforeremoving cover(s) or device andwhile cover(s) are removed.Replace all covers and shieldsbefore power supplying thisdevice is turned on.
AUXILIARY SWITCH INFORMATION
ALL SWITCHES HAVE THREE LEADS AND ARE IDENTIFIED AS FOLLOWS.
WIRE WIRE SWITCH TERMINALS OR CONTACTS.MARKING COLORS
C1 or C2 WHITE C-COMMON TERMINAL
A1 or A2 BLACK N.O.—NORMALLY OPEN CONTACT (OPEN WHEN DEVICE ISOPEN, CLOSED WHEN DEVICE IS CLOSED).
B1 or B2 RED N.C.—NORMALLY CLOSED CONTACT (CLOSED WHEN DEVICE IS OPEN, OPEN WHEN DEVICE IS CLOSED).
AUXILIARY SWITCH KITSAmpere Rating of Swtich
NumberCat. No. of
Switches A.C. Voltage D.C. Voltage120V. 240V. 480V. 125V. 250V.
A01JLD64 1 10 10 10 .5 .25A02JLD64 2 10 10 10 .5 .25
MAXIMUM ACCESSORY COMBINATIONS THAT CAN BE INSTALLED
ONE SHUNT TRIP* + ONE UNDERVOLTAGE TRIP + THREE AUXILIARY SWITCHESONE SHUNT TRIP* + THREE AUXILIARY SWITCHESONE SHUNT TRIP* + ONE BELL-ALARM + THREE AUXILIARY SWITCHESONE UNDERVOLTAGE TRIP + FOUR AUXILIARY SWITCHESONE UNDERVOLTAGE TRIP + ONE BELL-ALARM + FOUR AUXILIARY SWITCHESONE BELL-ALARM + FOUR AUXILIARY SWITCHESFOUR AUXILIARY SWITCHES
* SHUNT TRIP UNITS INCLUDE A COIL CLEARING SWITCH
Page 4 of 4Pc. No. 77501A05© Siemens Energy & Automation, Inc. 2000
CAT NO. VOLTS AMPS
A01JLDLV 12 - 24A02JLDLV VDC
NOT TO EXCEED 24 VDC .1 AMPS
LOW VOLTAGE SWITCH
.1 A MAX