installation planning guide 11g release 1 (11.1.1.6) · 1 understanding your installation starting...
TRANSCRIPT

Oracle® Fusion MiddlewareInstallation Planning Guide
11g Release 1 (11.1.1.6)
B32474-14
September 2012

Oracle Fusion Middleware Installation Planning Guide, 11g Release 1 (11.1.1.6)
B32474-14
Copyright © 2012, Oracle and/or its affiliates. All rights reserved.
Primary Author: Kevin Hwang
This software and related documentation are provided under a license agreement containing restrictions on use and disclosure and are protected by intellectual property laws. Except as expressly permitted in your license agreement or allowed by law, you may not use, copy, reproduce, translate, broadcast, modify, license, transmit, distribute, exhibit, perform, publish, or display any part, in any form, or by any means. Reverse engineering, disassembly, or decompilation of this software, unless required by law for interoperability, is prohibited.
The information contained herein is subject to change without notice and is not warranted to be error-free. If you find any errors, please report them to us in writing.
If this is software or related documentation that is delivered to the U.S. Government or anyone licensing it on behalf of the U.S. Government, the following notice is applicable:
U.S. GOVERNMENT RIGHTS Programs, software, databases, and related documentation and technical data delivered to U.S. Government customers are "commercial computer software" or "commercial technical data" pursuant to the applicable Federal Acquisition Regulation and agency-specific supplemental regulations. As such, the use, duplication, disclosure, modification, and adaptation shall be subject to the restrictions and license terms set forth in the applicable Government contract, and, to the extent applicable by the terms of the Government contract, the additional rights set forth in FAR 52.227-19, Commercial Computer Software License (December 2007). Oracle America, Inc., 500 Oracle Parkway, Redwood City, CA 94065.
This software or hardware is developed for general use in a variety of information management applications. It is not developed or intended for use in any inherently dangerous applications, including applications that may create a risk of personal injury. If you use this software or hardware in dangerous applications, then you shall be responsible to take all appropriate fail-safe, backup, redundancy, and other measures to ensure its safe use. Oracle Corporation and its affiliates disclaim any liability for any damages caused by use of this software or hardware in dangerous applications.
Oracle and Java are registered trademarks of Oracle and/or its affiliates. Other names may be trademarks of their respective owners.
Intel and Intel Xeon are trademarks or registered trademarks of Intel Corporation. All SPARC trademarks are used under license and are trademarks or registered trademarks of SPARC International, Inc. AMD, Opteron, the AMD logo, and the AMD Opteron logo are trademarks or registered trademarks of Advanced Micro Devices. UNIX is a registered trademark of The Open Group.
This software or hardware and documentation may provide access to or information on content, products, and services from third parties. Oracle Corporation and its affiliates are not responsible for and expressly disclaim all warranties of any kind with respect to third-party content, products, and services. Oracle Corporation and its affiliates will not be responsible for any loss, costs, or damages incurred due to your access to or use of third-party content, products, or services.

iii
Contents
Preface ................................................................................................................................................................ vii
Intended Audience..................................................................................................................................... viiDocumentation Accessibility .................................................................................................................... viiRelated Documents .................................................................................................................................... viiConventions ............................................................................................................................................... viii
1 Understanding Your Installation Starting Point
1.1 Important Information About Product Name Changes........................................................ 1-11.2 Starting as a New Oracle Fusion Middleware User............................................................... 1-11.2.1 Using the Product Installer................................................................................................. 1-21.2.1.1 Creating the Database Schemas.................................................................................. 1-21.2.1.2 Installing an Application Server................................................................................. 1-21.2.1.3 Installing Oracle Fusion Middleware Release 11g (11.1.1.6.0) Products .............. 1-21.2.1.4 Configuring Your Products and Creating the WebLogic Domains ...................... 1-21.2.2 Using the Patch Set Installer............................................................................................... 1-31.2.2.1 Creating the Database Schemas.................................................................................. 1-31.2.2.2 Installing Oracle WebLogic Server ............................................................................ 1-31.2.2.3 Installing Oracle Portal, Forms, Reports and Discoverer Release 11g (11.1.1.2.0) ......
1-31.2.2.4 Updating Oracle Portal, Forms, Reports and Discoverer to the Latest Version . 1-41.2.2.5 Configuring Your Products and Creating Your WebLogic Domains................... 1-41.2.2.6 Installing Oracle Forms and Reports 11g Release 2 (11.1.2) ................................... 1-41.3 Starting with Oracle Application Server 10g .......................................................................... 1-51.4 Starting with Oracle Fusion Middleware 11g (11.1.1.1.0) ..................................................... 1-51.4.1 Updating Oracle WebLogic Server to Version 10.3.2 ..................................................... 1-61.4.2 Installing Oracle Fusion Middleware 11g Release 1 (11.1.1.2.0) Products .................. 1-61.4.3 Migrating Your 11g Release 1 (11.1.1.1.0) Configuration Data to 11g Release 1
(11.1.1.2.0) 1-71.4.4 Updating to 11g Release 1 (11.1.1.6.0)............................................................................... 1-71.5 Starting with Oracle Fusion Middleware 11g (11.1.1.2.0), 11g (11.1.1.3.0), 11g (11.1.1.4.0), or
11g (11.1.1.5.0) 1-71.5.1 Updating WebLogic Server ................................................................................................ 1-71.5.2 Updating Your Existing Software ..................................................................................... 1-71.5.3 Updating Your Database Schemas.................................................................................... 1-8

iv
2 Understanding Oracle Fusion Middleware Concepts and Directory Structure
2.1 Oracle Fusion Middleware Concepts....................................................................................... 2-12.2 Oracle Fusion Middleware Directory Structure ..................................................................... 2-12.2.1 Middleware Home and WebLogic Server Home Directories ....................................... 2-12.2.2 Oracle Home and Oracle Common Home Directories .................................................. 2-22.2.2.1 Creating the Product Oracle Home............................................................................ 2-32.2.2.2 Creating the Oracle Common Home ......................................................................... 2-32.2.2.3 Checking Port Numbers Across Multiple Oracle Homes....................................... 2-32.2.3 WebLogic Server Domain................................................................................................... 2-32.2.4 Multiple Products with Multiple WebLogic Server Domains ...................................... 2-42.2.4.1 Notes for Creating Multiple Domains....................................................................... 2-52.2.4.2 Additional Information for Multiple Products and Multiple Domains ............... 2-52.2.5 Extending an Existing Domain .......................................................................................... 2-52.2.6 Oracle Instance and WebLogic Server Domain............................................................... 2-6
3 Common Installation Planning Tasks
3.1 Before You Begin......................................................................................................................... 3-13.1.1 Read and Understand Oracle Fusion Middleware Concepts........................................ 3-13.1.2 Plan Your Architecture and Review the Appropriate Documentation ....................... 3-23.1.3 Review System Requirements and Specifications .......................................................... 3-33.1.4 Review Certification Information...................................................................................... 3-33.1.5 Review Interoperability and Compatibility..................................................................... 3-33.1.6 Obtain the Oracle Fusion Middleware Software ............................................................ 3-33.1.7 Install an Application Server.............................................................................................. 3-33.1.8 Install and Configure a Database and Schemas .............................................................. 3-43.1.9 Create Operating System Users for IBM DB2 Databases............................................... 3-43.2 Installing Oracle Configuration Manager ............................................................................... 3-53.3 Understanding Installation and Configuration Privileges and Users................................. 3-53.3.1 Installation and Configuration Privileges ........................................................................ 3-53.3.2 Installing as a Non-Default User on UNIX Operating Systems.................................... 3-53.4 Recovering From a Partial or Interrupted Installation or Configuration ........................... 3-63.4.1 Recovering From an Installation Phase Failure or Interruption ................................... 3-73.4.2 Recovering From a Configuration Phase Failure or Interruption ................................ 3-73.5 Creating and Starting Managed Servers on a Remote Machine .......................................... 3-7
4 Silent Oracle Fusion Middleware Installation and Deinstallation
4.1 What is a Silent Installation? ..................................................................................................... 4-14.2 Response Files ............................................................................................................................. 4-24.2.1 Creating a Response File..................................................................................................... 4-24.2.2 Sample Response Files ........................................................................................................ 4-24.2.3 Securing Your Response Files for Silent Installation...................................................... 4-24.3 Pre-Installation Tasks ................................................................................................................. 4-24.3.1 UNIX Users: Creating the oraInst.loc File ................................................................ 4-34.3.2 Windows Users: Creating the Registry Key .................................................................... 4-34.4 Silent Database Schema Creation ............................................................................................. 4-34.5 Silent Oracle WebLogic Server Installation............................................................................. 4-3

v
4.6 Silent Product Installation ......................................................................................................... 4-44.6.1 Sample Silent Install Commands....................................................................................... 4-64.6.2 Sample Silent Install Output .............................................................................................. 4-64.7 Silent Product Configuration .................................................................................................... 4-74.7.1 System Components............................................................................................................ 4-74.7.2 Java Components ................................................................................................................. 4-84.8 Silent Product Deinstallation..................................................................................................... 4-84.8.1 Command Line Parameters for Silent Deinstallation..................................................... 4-84.8.2 Sample Silent Deinstall Output ...................................................................................... 4-10
Index

vi

vii
Preface
The Oracle Fusion Middleware Installation Planning Guide covers common Oracle Fusion Middleware concepts that affect installation, installation procedures, and troubleshooting.
Intended AudienceThis guide is intended for users who are installing Oracle Fusion Middleware products for the first time and are comfortable running some system administration operations, such as creating users and groups, adding users to groups, and installing operating system patches on the computer where the products are going to be installed. Users on UNIX systems who are installing Oracle Fusion Middleware need root access to run some scripts.
Documentation AccessibilityFor information about Oracle's commitment to accessibility, visit the Oracle Accessibility Program website at http://www.oracle.com/pls/topic/lookup?ctx=acc&id=docacc.
Access to Oracle SupportOracle customers have access to electronic support through My Oracle Support. For information, visit http://www.oracle.com/pls/topic/lookup?ctx=acc&id=info or visit http://www.oracle.com/pls/topic/lookup?ctx=acc&id=trs if you are hearing impaired.
Related DocumentsFor additional information, see the following manuals:
■ Oracle Fusion Middleware Concepts. This book introduces the common terms and concepts in an Oracle Fusion Middleware environment.
■ Oracle Fusion Middleware Administrator's Guide. This book contains information for managing your Oracle Fusion Middleware environment after installation and configuration is complete.
■ Oracle Fusion Middleware High Availability Guide. This book contains information for installing Oracle Fusion Middleware in high availability environments.

viii
ConventionsThe following text conventions are used in this document:
Convention Meaning
boldface Boldface type indicates graphical user interface elements associated with an action, or terms defined in text or the glossary.
italic Italic type indicates book titles, emphasis, or placeholder variables for which you supply particular values.
monospace Monospace type indicates commands within a paragraph, URLs, code in examples, text that appears on the screen, or text that you enter.

Understanding Your Installation Starting Point 1-1
1Understanding Your Installation Starting
Point
Oracle Fusion Middleware is a collection of standards-based software products that spans a range of tools and services from J2EE and developer tools, to integration services, business intelligence, collaboration, and content management. Oracle Fusion Middleware offers complete support for development, deployment, and management.
This guide provides important information about preparing your system and instructions for obtaining the latest version of Oracle Fusion Middleware, which is 11g Release 1 (11.1.1.6.0). The procedures you will need to follow will vary depending on the configuration of your existing system.
Find the starting point that best describes your current environment and go to that section for more information:
■ Section 1.1, "Important Information About Product Name Changes"
■ Section 1.2, "Starting as a New Oracle Fusion Middleware User"
■ Section 1.3, "Starting with Oracle Application Server 10g"
■ Section 1.4, "Starting with Oracle Fusion Middleware 11g (11.1.1.1.0)"
■ Section 1.5, "Starting with Oracle Fusion Middleware 11g (11.1.1.2.0), 11g (11.1.1.3.0), 11g (11.1.1.4.0), or 11g (11.1.1.5.0)"
1.1 Important Information About Product Name ChangesSome Oracle Fusion Middleware products have new names as of 11g Release 1 (11.1.1.6.0). Table 1–1 illustrates these changes. Please note that the new product names are used throughout the remainder of this document.
1.2 Starting as a New Oracle Fusion Middleware UserIf you are a new Oracle Fusion Middleware user, there are two methods for installing 11g Release 1 (11.1.1.6.0), depending on the product:
Table 1–1 Oracle Fusion Middleware Product Name Changes
Previous Name Name in 11g Release 1 (11.1.1.6.0
Oracle WebCenter Oracle WebCenter Portal
Oracle Enterprise Content Management Suite
Oracle WebCenter Content

Starting as a New Oracle Fusion Middleware User
1-2 Oracle Fusion Middleware Installation Planning Guide
■ If you are installing any Oracle Fusion Middleware product except for Oracle Portal, Forms, Reports and Discoverer, go to Section 1.2.1, "Using the Product Installer".
■ If you are installing Oracle Portal, Forms, Reports and Discoverer, go to Section 1.2.2, "Using the Patch Set Installer".
1.2.1 Using the Product InstallerInstalling a Release 11.1.1.6.0 Oracle Fusion Middleware product using the product installer involves the following:
■ Creating the Database Schemas
■ Installing an Application Server
■ Installing Oracle Fusion Middleware Release 11g (11.1.1.6.0) Products
■ Configuring Your Products and Creating the WebLogic Domains
Figure 1–1 illustrates the overall installation and configuration flow.
Figure 1–1 Installing Release 11.1.1.6.0 Using the Product Installer
1.2.1.1 Creating the Database SchemasSee Section 3.1.8, "Install and Configure a Database and Schemas".
If you are using an IBM DB2 database, make sure you also read Section 3.1.9, "Create Operating System Users for IBM DB2 Databases".
1.2.1.2 Installing an Application ServerSee Section 3.1.7, "Install an Application Server".
1.2.1.3 Installing Oracle Fusion Middleware Release 11g (11.1.1.6.0) ProductsTable 3–1, " Oracle Fusion Middleware Products and Corresponding Install Guides" lists each Oracle Fusion Middleware product along with its corresponding installation guide. Follow the instructions in the installation guide to install your products.
1.2.1.4 Configuring Your Products and Creating the WebLogic DomainsAfter your products are installed, you must configure them for use. To do so, run the Fusion Middleware Configuration Wizard to create your WebLogic Domain, Administration Server, and various Managed Servers.
Information about creating domains and Managed Servers with the Configuration Wizard can be found in Oracle Fusion Middleware Creating Domains Using the Configuration Wizard. For Oracle WebCenter Content, this information can also be found in Oracle WebCenter Content Installation Guide.
If you are installing multiple products, be sure to read the Oracle Fusion Middleware Interoperability and Compatibility Guide as described in Section 3.1.5, "Review Interoperability and Compatibility".

Starting as a New Oracle Fusion Middleware User
Understanding Your Installation Starting Point 1-3
1.2.2 Using the Patch Set InstallerIf you are installing Oracle Portal, Forms, Reports and Discoverer for the first time, you cannot install the latest release directly, as the patch set installer for this product is designed only to patch an existing installation. Therefore, you must install the latest full versions of the product, which is available in 11g Release 1 (11.1.1.2.0). Then you must patch your installation to update your software to the latest version. This process involves the following:
■ Creating the Database Schemas
■ Installing Oracle WebLogic Server
■ Installing Oracle Portal, Forms, Reports and Discoverer Release 11g (11.1.1.2.0)
■ Updating Oracle Portal, Forms, Reports and Discoverer to the Latest Version
■ Configuring Your Products and Creating Your WebLogic Domains
Figure 1–2 illustrates the overall installation and configuration flow.
Figure 1–2 Installing Release 11.1.1.6.0 Using the Patch Set Installer
1.2.2.1 Creating the Database SchemasSee Section 3.1.8, "Install and Configure a Database and Schemas".
1.2.2.2 Installing Oracle WebLogic ServerSee Section 3.1.7, "Install an Application Server".
1.2.2.3 Installing Oracle Portal, Forms, Reports and Discoverer Release 11g (11.1.1.2.0)After the schemas and Oracle WebLogic Server are installed, you are ready to install Oracle Portal, Forms, Reports and Discoverer.
Note: Oracle WebLogic Server is not included in this list of products as it has its own installer for new installations or upgrade installers for patching existing installations.

Starting as a New Oracle Fusion Middleware User
1-4 Oracle Fusion Middleware Installation Planning Guide
Follow the instructions in Oracle Fusion Middleware Installation Guide for Oracle Portal, Forms, Reports and Discoverer to install Oracle Portal, Forms, Reports and Discoverer.
1.2.2.4 Updating Oracle Portal, Forms, Reports and Discoverer to the Latest VersionRun the Patch Set Installer to update your software to the latest version. For instructions, see "Applying the Latest Oracle Fusion Middleware Patch Set" in Oracle Fusion Middleware Patching Guide.
1.2.2.5 Configuring Your Products and Creating Your WebLogic DomainsAfter Oracle Portal, Forms, Reports and Discoverer is installed, you must configure the components for use. To do so, run the OUI-based configuration tool from bin directory inside your product’s Oracle home directory to create a WebLogic Domain, Oracle instances and Managed Servers.
Please note that this configuration tool is not the same as the Configuration Wizard that is available with Oracle Application Developer, Oracle WebCenter Portal, Oracle SOA Suite and Business Process Management Suite, or Oracle Service Bus. Instructions for running the configuration tool for system components can be found in Oracle Fusion Middleware Installation Guide for Oracle Portal, Forms, Reports and Discoverer.
1.2.2.6 Installing Oracle Forms and Reports 11g Release 2 (11.1.2)In addition to the current release, Oracle Forms and Reports is also available in 11g Release 2 (11.1.2). This version of Oracle Forms and Reports allows for greater flexibility in configuration options and also supports Oracle Access Manager 11g for
Note: You must install but do not configure the 11g Release 1 (11.1.1.2.0) version of your product. You should only configure your products after you have run the Patch Set Installer and updated your software to the latest version.
When you run the installer, you should select the Install Software - Do Not Configure installation type on the Select Installation Type screen.
If you happen to configure your products before you upgrade your software to the latest version, you must follow the instructions in Section 1.5, "Starting with Oracle Fusion Middleware 11g (11.1.1.2.0), 11g (11.1.1.3.0), 11g (11.1.1.4.0), or 11g (11.1.1.5.0)" in order to properly upgrade and configure your software.
Note: If you are a new Oracle Fusion Middleware user, you should only read the following sections in this chapter:
■ "Summary of the Patch Set Installation Process"
■ "Perform General Pre-Patching Tasks"
■ "Download and Start the Product Installer or Patch Set Installer"
■ "Patch Set Installer Instructions"
After completing these sections, you should skip to Section 1.2.2.5, "Configuring Your Products and Creating Your WebLogic Domains".

Starting with Oracle Fusion Middleware 11g (11.1.1.1.0)
Understanding Your Installation Starting Point 1-5
increased security features. If interested, visit the Oracle Forms and Reports Download, Installation, and Configuration ReadMe for 11g Release 2 (11.1.2.0.0).
1.3 Starting with Oracle Application Server 10gFor information on upgrading from Oracle Application Server 10g to Oracle Fusion Middleware 11g Release 1 (11.1.1.6.0), refer to the Oracle Fusion Middleware Upgrade Planning Guide, as well as the other upgrade guides in the Oracle Fusion Middleware 11g documentation library:
■ Oracle Fusion Middleware Upgrade Guide for Java EE
■ Oracle Fusion Middleware Upgrade Guide for Oracle Portal, Forms, Reports, and Discoverer
■ Oracle Fusion Middleware Upgrade Guide for Oracle Identity Management
■ Oracle Fusion Middleware Upgrade Guide for Oracle SOA Suite, WebCenter Portal, and ADF
■ Oracle Fusion Middleware Upgrade Guide for Oracle WebCenter Suite
1.4 Starting with Oracle Fusion Middleware 11g (11.1.1.1.0)If your existing Oracle Fusion Middleware software is 11g Release 1 (11.1.1.1.0), you must first migrate your existing software and configuration data to 11g Release 1 (11.1.1.2.0), and then update the software to the latest version.
Updating to 11g Release 1 (11.1.1.2.0) involves the following:
■ Updating Oracle WebLogic Server to Version 10.3.2
■ Installing Oracle Fusion Middleware 11g Release 1 (11.1.1.2.0) Products
■ Migrating Your 11g Release 1 (11.1.1.1.0) Configuration Data to 11g Release 1 (11.1.1.2.0)
After this is complete, you should follow the instructions in Section 1.5, "Starting with Oracle Fusion Middleware 11g (11.1.1.2.0), 11g (11.1.1.3.0), 11g (11.1.1.4.0), or 11g (11.1.1.5.0)" to complete updating your software to the latest version.
Figure 1–3 illustrates the overall installation and configuration flow.
Figure 1–3 Install Flow for Existing 11g (11.1.1.1.0) Users

Starting with Oracle Fusion Middleware 11g (11.1.1.1.0)
1-6 Oracle Fusion Middleware Installation Planning Guide
1.4.1 Updating Oracle WebLogic Server to Version 10.3.2You must first update the version of Oracle WebLogic Server on your system to 10.3.2. In order to update your WebLogic Server, you must have a My Oracle Support account.
To update your existing Oracle WebLogic Server version 10.3.0 or 10.3.1 to version 10.3.2, use the upgrade installers. For more information, see "Downloading an Upgrade Installer From My Oracle Support" in Oracle Fusion Middleware Installation Guide for Oracle WebLogic Server.
If you have Oracle WebLogic Server version 10.2.x or earlier, then you must refer to the upgrade instructions in Oracle Fusion Middleware Upgrade Guide for Oracle WebLogic Server.
1.4.2 Installing Oracle Fusion Middleware 11g Release 1 (11.1.1.2.0) ProductsBefore you can patch your software to 11g Release 1 (11.1.1.4.0), you must first install the latest full versions of your product, which are available in 11g Release 1 (11.1.1.2.0).
Make sure that you do not configure your products. The following products offer installers which are separate from the configuration tool, meaning you should install the software only, and do not run the configuration tool:
■ Oracle SOA Suite and Oracle Business Process Management Suite
■ Oracle WebCenter Portal
■ Oracle Application Developer
■ Oracle Service Bus
■ Oracle WebCenter Content
The following products offer two installation types: Install and Configure and Install Software - Do Not Configure:
■ Oracle Identity Management
■ Oracle Web Tier
■ Oracle Portal, Forms, Reports and Discoverer
■ Oracle Data Integrator
■ Oracle Business Intelligence
For these products, make sure you select the Install Software - Do Not Configure installation type.
Find the installation guide for your particular product in the Release 11.1.1.2.0 Documentation Library. Follow the instructions in the installation guide to install Release 11.1.1.2.0 of your product.
Note: This link will take you to a document in the Release 11.1.1.3.0 documentation library. The instructions, however, are applicable for updating your Oracle WebLogic Server to 10.3.2, which is the version supported in Release 11.1.1.2.0.

Starting with Oracle Fusion Middleware 11g (11.1.1.2.0), 11g (11.1.1.3.0), 11g (11.1.1.4.0), or 11g (11.1.1.5.0)
Understanding Your Installation Starting Point 1-7
1.4.3 Migrating Your 11g Release 1 (11.1.1.1.0) Configuration Data to 11g Release 1 (11.1.1.2.0)
After you have upgraded your software, you must run the Patch Assistant tool to migrate your data to the updated version. For instructions, refer to "Using Patch Assistant to Migrate from Oracle Fusion Middleware 11g Release 1 (11.1.1.1.0) to Release 1 (11.1.1.2.0)" in Oracle Fusion Middleware Patching Guide.
1.4.4 Updating to 11g Release 1 (11.1.1.6.0)Now that your software is updated to Release 1 (11.1.1.2.0), follow the instructions in Section 1.5, "Starting with Oracle Fusion Middleware 11g (11.1.1.2.0), 11g (11.1.1.3.0), 11g (11.1.1.4.0), or 11g (11.1.1.5.0)" to update your software to the latest version.
1.5 Starting with Oracle Fusion Middleware 11g (11.1.1.2.0), 11g (11.1.1.3.0), 11g (11.1.1.4.0), or 11g (11.1.1.5.0)
Figure 1–4 illustrates the overall installation and configuration flow.
Figure 1–4 Install Flow for Existing 11g (11.1.1.2.0), 11g (11.1.1.3.0), 11g (11.1.1.4.0), or 11g (11.1.1.5.0) Users
1.5.1 Updating WebLogic ServerYou must first update the version of Oracle WebLogic Server on your system to 10.3.6. In order to update your WebLogic Server, you must have a My Oracle Support account.
If you have Oracle WebLogic Server version 10.3.0, 10.3.1, 10.3.2, 10.3.3, 10.3.4, or 10.3.5, use the upgrade installers to upgrade your WebLogic Server to 10.3.6. For more information, see "Downloading an Upgrade Installer From My Oracle Support" in Oracle Fusion Middleware Installation Guide for Oracle WebLogic Server.
If you have Oracle WebLogic Server version 10.2.x or earlier, then you must refer to the upgrade instructions in Oracle Fusion Middleware Upgrade Guide for Oracle WebLogic Server.
1.5.2 Updating Your Existing SoftwareIf you are updating Oracle Portal, Forms, Reports and Discoverer, download and use the Patch Set Installer to update your existing software to the latest version. For all other Oracle Fusion Middleware products, download and use the latest product installer to update your existing software to the latest version.
Refer to "Applying the Latest Oracle Fusion Middleware Patch Set" in Oracle Fusion Middleware Patching Guide for instructions.
Oracle WebCenter Portal and Oracle Identity and Access Management have special patching instructions. For more information, see "Patching Oracle WebCenter Portal" and "Patching Oracle Identity and Access Management 11.1.1.3.0 to 11.1.1.6.0" in Oracle Fusion Middleware Patching Guide.

Starting with Oracle Fusion Middleware 11g (11.1.1.2.0), 11g (11.1.1.3.0), 11g (11.1.1.4.0), or 11g (11.1.1.5.0)
1-8 Oracle Fusion Middleware Installation Planning Guide
1.5.3 Updating Your Database SchemasRun the Patch Set Assistant to upgrade the existing schemas in your database to the latest version. To see which schemas need to be upgraded, refer to "Which Schemas Need to be Updated with Patch Set Assistant?" in Oracle Fusion Middleware Patching Guide.
For instructions on how to run the Patch Set Assistant, refer to "Updating Your Schemas with Patch Set Assistant" in Oracle Fusion Middleware Patching Guide.

Understanding Oracle Fusion Middleware Concepts and Directory Structure 2-1
2Understanding Oracle Fusion Middleware
Concepts and Directory Structure
During the installation process, you will be asked for a variety of directory locations. This section defines each of these directories and explains the contents of each directory.
This chapter contains the following content:
■ Section 2.1, "Oracle Fusion Middleware Concepts"
■ Section 2.2, "Oracle Fusion Middleware Directory Structure"
2.1 Oracle Fusion Middleware ConceptsFor more information about important Oracle Fusion Middleware concepts for all users, refer to Oracle Fusion Middleware Concepts.
2.2 Oracle Fusion Middleware Directory StructureThis section describes the various directories that are created when you install Oracle Fusion Middleware products.
2.2.1 Middleware Home and WebLogic Server Home DirectoriesAll Oracle Fusion Middleware products (except for Oracle Web Tier and Oracle Identity Management with Oracle Internet Directory only) require the presence of an application server on your system. All Oracle Fusion Middleware products support Oracle WebLogic Server as the application server. Beginning with 11g Release 1 (11.1.1.4.0), Oracle Application Developer and Oracle SOA Suite and Oracle Business Process Management Suite also support IBM WebSphere as the application server.
The top-level directory for all Oracle Fusion Middleware products is called the Middleware home; this directory serves as a container for the Oracle WebLogic Server home, Oracle Common home, and one or more product Oracle homes. The Middleware home directory is created when Oracle WebLogic Server is installed as the application server. The WebLogic Server home directory is inside the Middleware home and is created when Oracle WebLogic Server is installed. Figure 2–1 shows the directory structure after a typical Oracle WebLogic Server installation:
Oracle Fusion Middleware Directory Structure
2-2 Oracle Fusion Middleware Installation Planning Guide
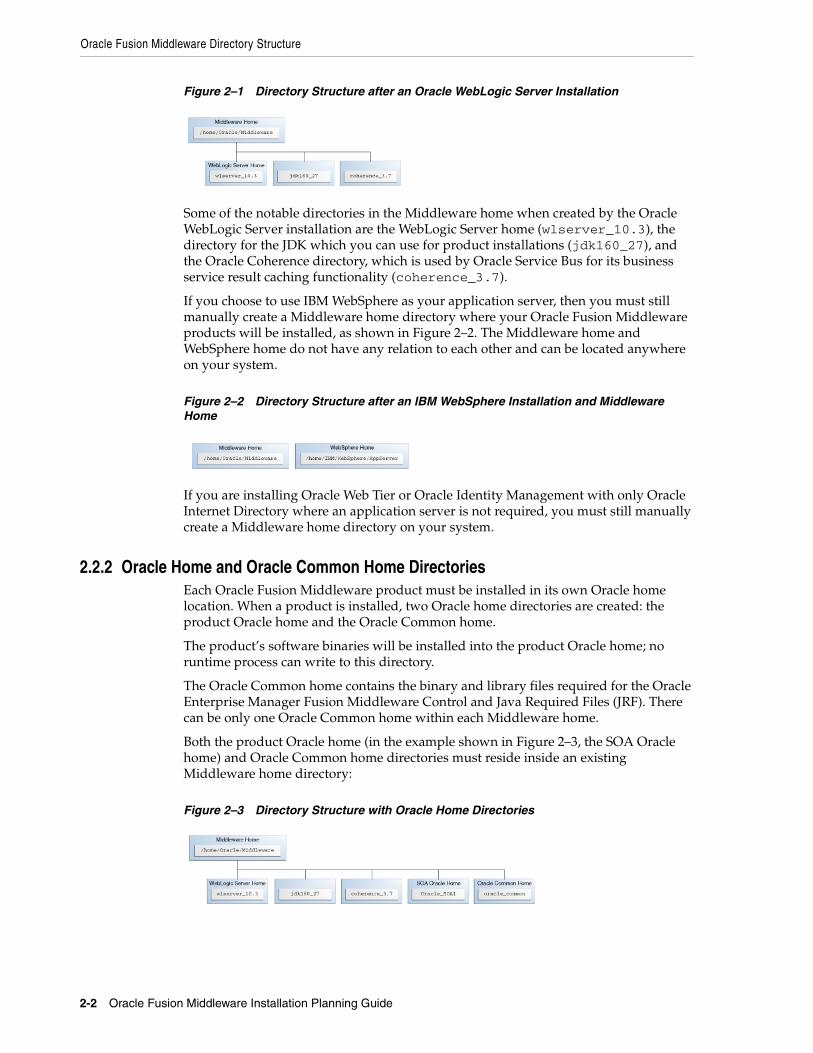
Figure 2–1 Directory Structure after an Oracle WebLogic Server Installation
Some of the notable directories in the Middleware home when created by the Oracle WebLogic Server installation are the WebLogic Server home (wlserver_10.3), the directory for the JDK which you can use for product installations (jdk160_27), and the Oracle Coherence directory, which is used by Oracle Service Bus for its business service result caching functionality (coherence_3.7).
If you choose to use IBM WebSphere as your application server, then you must still manually create a Middleware home directory where your Oracle Fusion Middleware products will be installed, as shown in Figure 2–2. The Middleware home and WebSphere home do not have any relation to each other and can be located anywhere on your system.
Figure 2–2 Directory Structure after an IBM WebSphere Installation and Middleware Home
If you are installing Oracle Web Tier or Oracle Identity Management with only Oracle Internet Directory where an application server is not required, you must still manually create a Middleware home directory on your system.
2.2.2 Oracle Home and Oracle Common Home DirectoriesEach Oracle Fusion Middleware product must be installed in its own Oracle home location. When a product is installed, two Oracle home directories are created: the product Oracle home and the Oracle Common home.
The product’s software binaries will be installed into the product Oracle home; no runtime process can write to this directory.
The Oracle Common home contains the binary and library files required for the Oracle Enterprise Manager Fusion Middleware Control and Java Required Files (JRF). There can be only one Oracle Common home within each Middleware home.
Both the product Oracle home (in the example shown in Figure 2–3, the SOA Oracle home) and Oracle Common home directories must reside inside an existing Middleware home directory:
Figure 2–3 Directory Structure with Oracle Home Directories

Oracle Fusion Middleware Directory Structure
Understanding Oracle Fusion Middleware Concepts and Directory Structure 2-3
2.2.2.1 Creating the Product Oracle HomeThe product Oracle home directory can be created in the following ways:
■ Before running the installation, you can create your Oracle home directory on your system. Remember that the Oracle home must reside inside the Middleware home directory, and it must also be an empty directory. Then, when you run the installer and are asked to provide the location of your Oracle home, you can specify the directory you have created.
■ While running the installer, you can specify the name of a new directory. This directory will automatically be created for you by the installer and will be located inside the Middleware home directory.
2.2.2.2 Creating the Oracle Common HomeThe Oracle Common home directory is created in the following ways:
■ Installing Oracle Application Developer. For more information, see the Oracle Fusion Middleware Installation Guide for Application Developer.
■ Installing any Oracle Fusion Middleware product. The directory oracle_common is automatically created inside the Middleware home directory.
2.2.2.3 Checking Port Numbers Across Multiple Oracle HomesEach product requires its own Oracle home directory. If you are creating an environment where you will have multiple products (and therefore, multiple Oracle home directories), Oracle recommends that you use the staticports.ini file, so that you will have a record of all the ports that are in use on your system to help avoid conflicts.
To use the staticports.ini file, select Specify Ports using Configuration file on the Configure Ports screen during installation.
2.2.3 WebLogic Server DomainAfter a product is installed, it can be configured into a WebLogic Server domain. See Oracle Fusion Middleware Concepts for more information about WebLogic Server domains.
During configuration, on the "Specify Domain Name and Location" screen, you will be asked for the location where you want to store data for your domains and applications. Specifically, you will be asked for:
■ Domain name
■ Domain location
■ Application location
The domain location and domain name together are referred to as the domain home. For example, on a UNIX operating system, if you specified /home/Oracle/Middleware/domains as your domain location and soa_domain as your domain name, the domain home would be /home/Oracle/Middleware/domains/soa_domain.
The application location and domain name together are referred to as the application home. For example, on a Windows operating system, if you specified C:\Oracle\Middleware\applications as your application location, then the application home would be C:\Oracle\Middleware\applications\soa_domain.

Oracle Fusion Middleware Directory Structure
2-4 Oracle Fusion Middleware Installation Planning Guide
Note that a directory with the specified domain name is created in both the specified domain location and application location.
The domain home and application home can be created anywhere on your system. When you run the Configuration Wizard, the default location for the domain home is user_projects/domains under the Middleware home. The default location for the application home is user_projects/applications, also under the Middleware home. It is recommended that you create your domain home and application home outside of both the Middleware home and Oracle home directories, so that in the event you need to patch either the Middleware home or Oracle home, your domain and application information would remain untouched.
For more information about domain configuration, see the Installation Guide for your product. For recommendations about configuring a domain in an enterprise production environment, see the Enterprise Deployment Guide for your product.
Figure 2–4 Directory Structure after a WebLogic Server Domain is Created
2.2.4 Multiple Products with Multiple WebLogic Server DomainsIf you install multiple products and choose to create a separate domain for each product, then your directory structure would look something like the one shown in Figure 2–5:
Figure 2–5 Directory Structure with Multiple Oracle Fusion Middleware Products
Notice that each product has its own Oracle home directory. To differentiate among all the product Oracle home directories, the install guides typically refer to each Oracle home by product name; for example, the Oracle home for Oracle SOA Suite is referred to as the SOA Oracle home, while the Oracle home for Oracle WebCenter Suite is referred to as the WebCenter Oracle home.

Oracle Fusion Middleware Directory Structure
Understanding Oracle Fusion Middleware Concepts and Directory Structure 2-5
2.2.4.1 Notes for Creating Multiple DomainsIf you choose to create multiple domains on a single machine, make sure that each domain has a unique name. When you are running the Configuration Wizard to create and configure your domains, be sure to specify a unique domain name on the "Specify Domain Name and Location" screen. For example, in Figure 2–5, the WebCenter domain might have the name wc_domain, while the SOA domain could be called soa_domain. Refer to the product installation guides for more information.
When you are configuring multiple domains, you must also make sure that the Administration Server and Managed Servers in each domain use a unique port number. There is no provision for checking port numbers across multiple domains, so you will have to keep track of this manually.
To customize the Administration Server port number, select Administration Server on the "Select Optional Configuration" screen in the Configuration Wizard. This will cause the Configure the Administration Server screen to appear, on which you can specify the Administration Server port number.
To customize the Managed Server port numbers, select Managed Servers, Clusters and Machines on the "Select Optional Configuration" screen in the Configuration Wizard. This will cause the Configure Manager Servers screen to appear, on which you can specify the port numbers for your managed servers.
2.2.4.2 Additional Information for Multiple Products and Multiple DomainsFor more information about multiple products and multiple domains, refer to the documentation listed in Table 3–2, " Oracle Fusion Middleware High Availability and Enterprise Deployment Guides".
2.2.5 Extending an Existing DomainDuring installation and configuration, you may chose to extend an existing domain rather than creating a new domain. Extending a domain means that you add products and funtionality to an existing domain. If, for example, you first install Oracle SOA Suite to create a new domain, then install Oracle WebCenter while choosing to extend the existing Oracle SOA Suite domain, then your topology would look like the one shown in Figure 2–6:
Figure 2–6 Directory Structure with Multiple Oracle Fusion Middleware Products in a Single Domain
In essence, you are adding the products and functionality of Oracle WebCenter Suite to the existing Oracle SOA Suite domain.
Oracle Fusion Middleware Directory Structure
2-6 Oracle Fusion Middleware Installation Planning Guide
Not all Oracle Fusion Middleware products can be configured or used in conjunction with other Oracle Fusion Middleware products. If you intend to configure multiple products in your domain, make sure you have read "Domain Extension Interoperability" in Oracle Fusion Middleware Interoperability and Compatibility Guide.
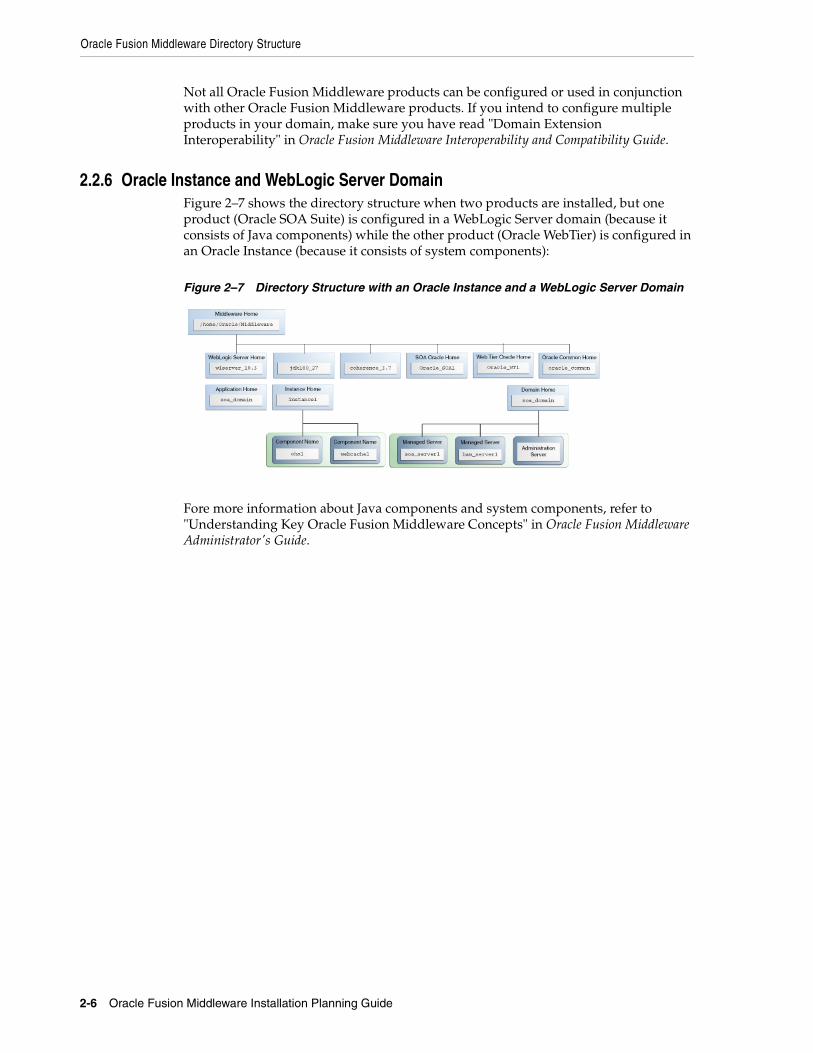
2.2.6 Oracle Instance and WebLogic Server DomainFigure 2–7 shows the directory structure when two products are installed, but one product (Oracle SOA Suite) is configured in a WebLogic Server domain (because it consists of Java components) while the other product (Oracle WebTier) is configured in an Oracle Instance (because it consists of system components):
Figure 2–7 Directory Structure with an Oracle Instance and a WebLogic Server Domain
Fore more information about Java components and system components, refer to "Understanding Key Oracle Fusion Middleware Concepts" in Oracle Fusion Middleware Administrator's Guide.

Common Installation Planning Tasks 3-1
3Common Installation Planning Tasks
This chapter describes some common tasks that should be performed prior to beginning any Oracle Fusion Middleware installation.
The following topics are covered:
■ Section 3.1, "Before You Begin"
■ Section 3.2, "Installing Oracle Configuration Manager"
■ Section 3.3, "Understanding Installation and Configuration Privileges and Users"
■ Section 3.4, "Recovering From a Partial or Interrupted Installation or Configuration"
■ Section 3.5, "Creating and Starting Managed Servers on a Remote Machine"
3.1 Before You BeginThis section contains important information that you should read before you begin to install or upgrade your system:
■ Section 3.1.1, "Read and Understand Oracle Fusion Middleware Concepts"
■ Section 3.1.2, "Plan Your Architecture and Review the Appropriate Documentation"
■ Section 3.1.3, "Review System Requirements and Specifications"
■ Section 3.1.4, "Review Certification Information"
■ Section 3.1.5, "Review Interoperability and Compatibility"
■ Section 3.1.6, "Obtain the Oracle Fusion Middleware Software"
■ Section 3.1.7, "Install an Application Server"
■ Section 3.1.8, "Install and Configure a Database and Schemas"
■ Section 3.1.9, "Create Operating System Users for IBM DB2 Databases"
3.1.1 Read and Understand Oracle Fusion Middleware ConceptsIf you are new to Oracle Fusion Middleware, you should read Oracle Fusion Middleware Concepts before proceeding with an installation or upgrade. Chapter 2, "Understanding Oracle Fusion Middleware Concepts and Directory Structure", contains important information about the directory structure of Oracle Fusion Middleware installations that you should be familiar with before you install any product.
Before You Begin
3-2 Oracle Fusion Middleware Installation Planning Guide
3.1.2 Plan Your Architecture and Review the Appropriate DocumentationDepending on the environment you want to create with your Oracle Fusion Middleware document, the documentation you access will vary.
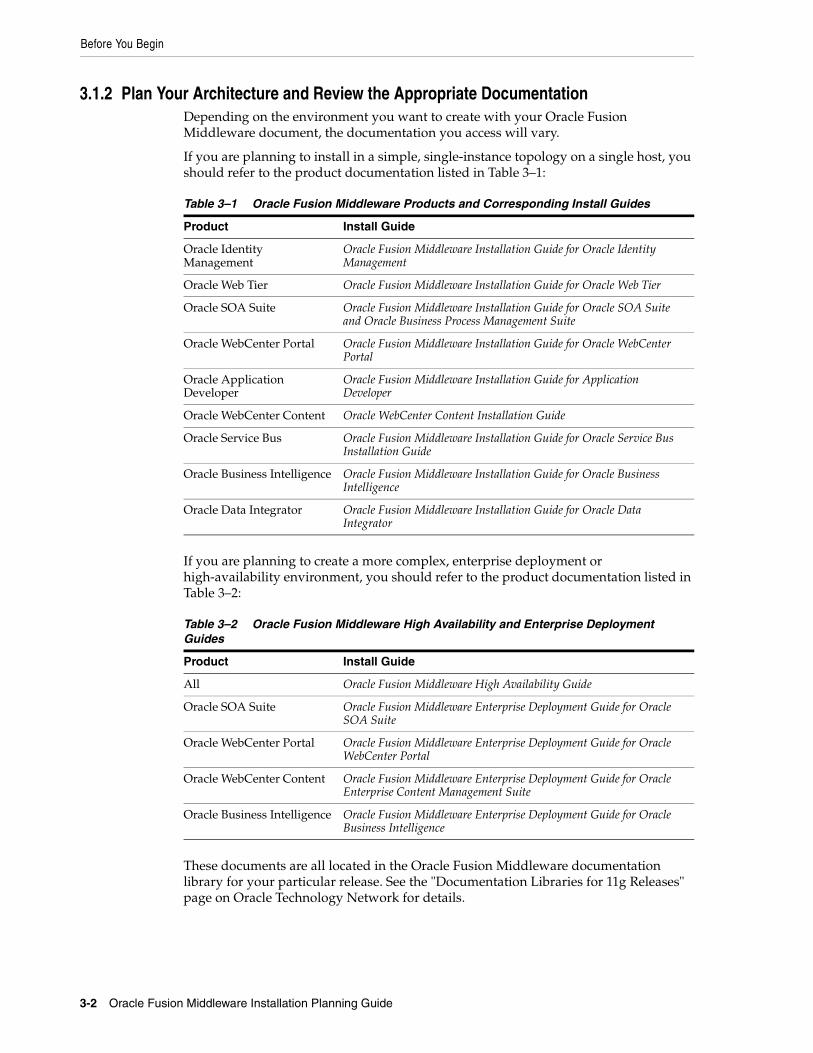
If you are planning to install in a simple, single-instance topology on a single host, you should refer to the product documentation listed in Table 3–1:
If you are planning to create a more complex, enterprise deployment or high-availability environment, you should refer to the product documentation listed in Table 3–2:
These documents are all located in the Oracle Fusion Middleware documentation library for your particular release. See the "Documentation Libraries for 11g Releases" page on Oracle Technology Network for details.
Table 3–1 Oracle Fusion Middleware Products and Corresponding Install Guides
Product Install Guide
Oracle Identity Management
Oracle Fusion Middleware Installation Guide for Oracle Identity Management
Oracle Web Tier Oracle Fusion Middleware Installation Guide for Oracle Web Tier
Oracle SOA Suite Oracle Fusion Middleware Installation Guide for Oracle SOA Suite and Oracle Business Process Management Suite
Oracle WebCenter Portal Oracle Fusion Middleware Installation Guide for Oracle WebCenter Portal
Oracle Application Developer
Oracle Fusion Middleware Installation Guide for Application Developer
Oracle WebCenter Content Oracle WebCenter Content Installation Guide
Oracle Service Bus Oracle Fusion Middleware Installation Guide for Oracle Service Bus Installation Guide
Oracle Business Intelligence Oracle Fusion Middleware Installation Guide for Oracle Business Intelligence
Oracle Data Integrator Oracle Fusion Middleware Installation Guide for Oracle Data Integrator
Table 3–2 Oracle Fusion Middleware High Availability and Enterprise Deployment Guides
Product Install Guide
All Oracle Fusion Middleware High Availability Guide
Oracle SOA Suite Oracle Fusion Middleware Enterprise Deployment Guide for Oracle SOA Suite
Oracle WebCenter Portal Oracle Fusion Middleware Enterprise Deployment Guide for Oracle WebCenter Portal
Oracle WebCenter Content Oracle Fusion Middleware Enterprise Deployment Guide for Oracle Enterprise Content Management Suite
Oracle Business Intelligence Oracle Fusion Middleware Enterprise Deployment Guide for Oracle Business Intelligence

Before You Begin
Common Installation Planning Tasks 3-3
3.1.3 Review System Requirements and SpecificationsBefore performing any upgrade or installation you should read the Oracle Fusion Middleware System Requirements and Specifications document to ensure that your environment meets the minimum installation requirements for the products you are installing.
This document contains information related to hardware and software requirements, minimum disk space and memory requirements, database schema requirements, and required system libraries, packages, or patches.
If you are installing on a DHCP server, non-networked computer, or multihomed computer, there are additional configuration steps that are required. These steps are also available in the system requirements document in the "Oracle Fusion Middleware System Configuration Requirements" section.
If you are installing on a Windows operating system and want to install and configure Java Access Bridge for Section 508 Accessibility, read the "Installing and Configuring Java Access Bridge" section in this document.
If you are installing on a UNIX operating system, Oracle recommends that you configure your system to enable Unicode support. For more information, read the "Enabling Unicode Support" section in this document.
3.1.4 Review Certification InformationBefore performing any upgrade or installation you should read the System Requirements and Supported Platforms for Oracle Fusion Middleware 11gR1 document. This document contains certification information related to supported 32-bit and 64-bit operating systems, databases, web servers, LDAP servers, adapters, IPv6, JDKs, and third-party products. It is located on the Oracle Fusion Middleware Supported System Configurations page.
3.1.5 Review Interoperability and CompatibilityBefore performing any upgrade or installation you should read Oracle Fusion Middleware Interoperability and Compatibility Guide. This document contains important information regarding the ability of Oracle Fusion Middleware products to function with previous versions of other Oracle Fusion Middleware, Oracle, or third-party products. This information is applicable to both new Oracle Fusion Middleware users and existing users who are upgrading their existing environment.
3.1.6 Obtain the Oracle Fusion Middleware SoftwareDepending on your specific needs, there are multiple places where you can obtain Oracle Fusion Middleware software. For details, refer to the Oracle Fusion Middleware Download, Installation, and Configuration ReadMe Files page, where you can find the ReadMe file for your specific release.
3.1.7 Install an Application ServerAll Oracle Fusion Middleware products (except for Oracle Web Tier and Oracle Identity Management with Oracle Internet Directory only) require an application server on your system. For Oracle Application Developer or Oracle SOA Suite and Business Process Management Suite you can choose to install Oracle WebLogic Server or IBM WebSphere as the application server. Refer to the System Requirements and Supported Platforms for Oracle Fusion Middleware 11gR1 document to determine the certified versions of these application servers for installation on your system. This

Before You Begin
3-4 Oracle Fusion Middleware Installation Planning Guide
document is located on the "Oracle Fusion Middleware Supported System Configurations" page.
All Oracle Fusion Middleware products must be installed in the Oracle Middleware home directory, which can be created by installing Oracle WebLogic Server as the application server on your system. If you choose to use IBM WebSphere as your application server, you must manually create a Middleware home directory in which you can install your Oracle Fusion Middleware products.
For more information about the installation directory structure, see Section 2.2, "Oracle Fusion Middleware Directory Structure".
For instructions on how to install Oracle WebLogic Server, see "Running the Installation Program in Graphical Mode" in Oracle Fusion Middleware Installation Guide for Oracle WebLogic Server.
For instructions on how to install IBM WebSphere, see Oracle Fusion Middleware Third-Party Application Server Guide.
3.1.8 Install and Configure a Database and SchemasInstallation of most Oracle Fusion Middleware products requires the availability of a database (only Oracle Web Tier and Oracle Forms and Reports without Oracle Identity Management protection do not require a database). This database must be up and running, and does not have to be on the same system where you are installing the components. The database must also be compatible with Repository Creation Utility (RCU), which is used to create the schemas necessary for your Oracle Fusion Middleware components.
For information about which databases are certified for use with Oracle Fusion Middleware and RCU, and important database configuration information, see "RCU System and Database Requirements" in Oracle Fusion Middleware Repository Creation Utility User's Guide.
After your database is installed and configured, run the latest version of RCU to create your schemas. For instructions, see "Creating Schemas" in Oracle Fusion Middleware Repository Creation Utility User's Guide.
For more information about managing metadata repositories, refer to "Managing the Oracle Metadata Repository" in the Oracle Fusion Middleware System Requirements and Specifications document.
3.1.9 Create Operating System Users for IBM DB2 DatabasesIf you are not using an IBM DB2 database, you can skip this section.
IBM DB2 databases authenticates its database users using equivalent operating system users. Therefore, prior to running RCU, one operating system user must be created on the database host for each schema. The operating system user name must match the schema owner name and must contain only lowercase letters; no all-uppercase or mixed-case names are allowed. For example, if you plan to create a schema named DEV_MDS using RCU, then the operating system user must be named dev_mds (all lowercase letters).
Note: It is recommended that all metadata repositories reside on a database at the same site as the products to minimize network latency issues.

Understanding Installation and Configuration Privileges and Users
Common Installation Planning Tasks 3-5
You can create the operating system user with the following command (this example creates the operating system user dev_mds and assigns the password welcome1):
/usr/sbin/useradd dev_mds -p welcome1 -d /scratch/dev_mds
Refer to your system documentation for more information.
3.2 Installing Oracle Configuration ManagerDuring installation, you will be asked whether or not you want to configure your system to automatically check for security (Specify Security Updates screen) and software (Install Software Updates screen) updates. Electing to do so installs Oracle Configuration Manager on your system.
Oracle Configuration Manager continuously tracks key Oracle and system details, providing essential data to help you manage and service your configurations. Collected data is sent via HTTPS to Oracle Support, which maintains a secure view of each configuration. My Oracle Support then provides system health checks, patch advice, and other valuable information about your Oracle products. Configuration manager does NOT collect application data, such as user passwords.
For more information, log into or create a My Oracle Support account at https://support.oracle.com/, then click on the Collector tab.
3.3 Understanding Installation and Configuration Privileges and UsersThis section contains the following:
■ Section 3.3.1, "Installation and Configuration Privileges"
■ Section 3.3.2, "Installing as a Non-Default User on UNIX Operating Systems"
3.3.1 Installation and Configuration PrivilegesThe user who installs a Fusion Middleware product owns and has read, write, and execute privileges on the binary files installed in the Oracle home. Other users in the operating system group have only read and execute privileges (no write privileges). This means they cannot write to the files, but they can use the installed binaries in the Oracle home to configure a domain or set of Fusion Middleware products.
During configuration, the files generated by the configuration process are owned by the user who ran the Configuration Wizard. The user who ran the Configuration Wizard has read, write, and execute privilege on those files. Other users in the operating system group can read and execute the files, but they do not have write privileges.
To ensure the proper permissions and privileges for all files, the same owner must perform both tasks - install the Oracle Fusion Middleware product and configure the WebLogic Server domain using the Configuration Wizard.
3.3.2 Installing as a Non-Default User on UNIX Operating SystemsOn UNIX operating systems, the installation of Fusion Middleware products is owned and controlled as a known user (for example, "oracle"). The file permissions associated with this installation are configured to ensure the highest level of security possible, which by default are 700 (meaning all files are owned and accessible by the owner only).

Recovering From a Partial or Interrupted Installation or Configuration
3-6 Oracle Fusion Middleware Installation Planning Guide
Changing the default permissions settings will reduce the security of the installation and possibly your system. Therefore, making such a change is not recommended. If access to particular files or executables is required by other users, the UNIX sudo command (or other similar command) should be considered in lieu of changing file permissions.
Refer to your UNIX operating system Administrator’s Guide or contact your operating system vendor if you need further assistance.
3.4 Recovering From a Partial or Interrupted Installation or ConfigurationThe installation of an Oracle Fusion Middleware 11g product consists of two phases:
1. Installation Phase
During this phase, the installer lays down the binaries in an Oracle home directory. The Oracle home directory must be located inside the Middleware home directory (see Section 2.2.1, "Middleware Home and WebLogic Server Home Directories") and no runtime processes can write to this directory.
2. Configuration Phase
During this phase, the configuration of instances for system components and/or the configuration of a WebLogic Server domain for Java components occurs (see "Understanding Key Oracle Fusion Middleware Concepts" in Oracle Fusion Middleware Administrator's Guide for more information about Java components and system components).
The Oracle Instance home (for Oracle instances) and WebLogic Server domains (for the Managed Servers that host the Java components) contain no binaries; they hold files such as configuration files, log files, and temporary files that can be updated.
The installers for Oracle SOA Suite and Oracle Business Process Management Suite, Oracle WebCenter Portal, Oracle WebCenter Content, Oracle Application Developer, and Oracle Service Bus create only Java components in a WebLogic Server domain. For these products, the installation and configuration phases are completely separate - you must run the Configuration Wizard separately after the software installation to configure your Java components.
The installer for Oracle Identity Management and Oracle Portal, Forms, Reports and Discoverer will create both system components and Java components in a WebLogic Server domain. The installer for Oracle Web Tier will create only system components, and you will have the option of associating these components with an existing WebLogic Server domain. For these products, the installer gives you the option to "Install and Configure"; if you choose this option, the installer runs and performs both the installation and configuration phase. If you do not choose to "Install and Configure" then you can install the binaries first and then run the configuration tool separately to configure your components.
The actions required to recover from a partial installation or configuration are described in the following sections:
■ Section 3.4.1, "Recovering From an Installation Phase Failure or Interruption"
■ Section 3.4.2, "Recovering From a Configuration Phase Failure or Interruption"
Additional information can be found in the Troubleshooting appendix in each product installation guide.

Creating and Starting Managed Servers on a Remote Machine
Common Installation Planning Tasks 3-7
3.4.1 Recovering From an Installation Phase Failure or InterruptionIf the product installation is interrupted during the installation phase, the recommended approach is to deinstall the product and remove the Oracle home, then start the installation again.
3.4.2 Recovering From a Configuration Phase Failure or InterruptionIf the installation phase is completed successfully but the configuration phase is interrupted and cannot be restarted, the recommended approach is to:
1. Address and fix the cause of the failure or interruption.
2. Perform one of the following:
a. Retry the configuration by selecting the Retry button in the graphical user interface.
b. Exit the installer (for system components) or Configuration Wizard (for Java components) session, deinstall and remove the failed instance or domain, then restart your configuration tool.
For product-specific deinstallation information, refer to the deinstallation chapter in your product installation guide.
3.5 Creating and Starting Managed Servers on a Remote MachineTo create and start a Managed Server in a WebLogic domain on a remote machine, complete the following steps:
■ Use the pack command located in the WebLogic_Home/common/bin (on UNIX operating systems) or WebLogic_Home\common\bin (on Microsoft Windows operating systems) directory to create a Managed Server template that contains a subset of the files in a domain that are required to create a Managed Server domain directory hierarchy on a remote machine.
The -managed={true|false} parameter of the pack command specifies whether the template is to be used to create Managed Servers on remote machines.
■ Use the unpack command located in the WebLogic_Home/common/bin (on UNIX operating systems) or WebLogic_Home\common\bin (on Windows operating systems) directory to create the Managed Server domain directory on the remote machine.
For more information, see the "Creating and Starting a Managed Server on a Remote Machine" in Oracle Fusion Middleware Creating Templates and Domains Using the Pack and Unpack Commands.

Creating and Starting Managed Servers on a Remote Machine
3-8 Oracle Fusion Middleware Installation Planning Guide
Silent Oracle Fusion Middleware Installation and Deinstallation 4-1
4Silent Oracle Fusion Middleware Installation
and Deinstallation
This chapter describes how to install and deinstall your Oracle Fusion Middleware environment from the command line in silent mode.
This chapter contains the following content:
■ Section 4.1, "What is a Silent Installation?"
■ Section 4.2, "Response Files"
■ Section 4.3, "Pre-Installation Tasks"
■ Section 4.4, "Silent Database Schema Creation"
■ Section 4.5, "Silent Oracle WebLogic Server Installation"
■ Section 4.6, "Silent Product Installation"
■ Section 4.7, "Silent Product Configuration"
■ Section 4.8, "Silent Product Deinstallation"
4.1 What is a Silent Installation?Silent installation eliminates the need to monitor your product installation because no graphical output is displayed and no input by the user is required.
Silent installation of your Oracle Fusion Middleware product is accomplished by using the -silent flag on the command line when you start the installer. In most cases, you will need to supply the location and name of a file containing certain variable and parameter values (for example, installation location). These are the values that would be asked for during a typical installation using the graphical user interface.
For Oracle Fusion Middleware products, this file is typically called a response file. For more information, see Section 4.2, "Response Files".
Note: For UNIX users, if this is a first time installation of any Oracle product, you must create the oraInst.loc file before starting. Please refer to Section 4.3.1, "UNIX Users: Creating the oraInst.loc File" for more information.
Following installation of your product, you need to run the root.sh script as the root user. The root.sh script detects settings of environment variables and enables you to enter the full path of the local bin directory.

Response Files
4-2 Oracle Fusion Middleware Installation Planning Guide
4.2 Response FilesBefore doing a silent installation, you must provide information specific to your installation in a response file. The installer will fail if you attempt an installation using a response file that is not configured correctly. Response files are text files that you can create or edit in a text editor.
4.2.1 Creating a Response FileOracle recommends creating a response file in the following manner:
1. Run your product’s graphical installer, as described in your product installation guide.
2. On the Installation Summary screen, click Save to save your installation parameters to a response file.
You will be prompted for a name and location where you want to create this response file. After it is created, you can use it exactly as-is to replicate the installation on other systems, or modify it as needed.
4.2.2 Sample Response FilesPre-existing sample response files are provided in the Disk1/stage/Response (on UNIX operating systems) or Disk1\stage\Response (on Windows operating systems) directory in the location where you unzipped your downloaded archive files for installation.
Refer to your product installation guide for more detailed descriptions of the sample installation and deinstallation response files that are provided for each product.
4.2.3 Securing Your Response Files for Silent InstallationYour response files contain certain passwords required by the installer. To minimize security issues regarding these passwords in the response file, follow these guidelines:
■ Set the permissions on the response files so that they are readable only by the operating system user who will be performing the silent installation.
■ If possible, remove the response files from the system after the silent installation is completed.
4.3 Pre-Installation TasksThis section covers the pre-installation tasks that may be required before you are able to perform a silent installation.
The following topics are covered:
■ Section 4.3.1, "UNIX Users: Creating the oraInst.loc File"
■ Section 4.3.2, "Windows Users: Creating the Registry Key"
Note: For Windows users, if this is a first time installation of any Oracle product, you must create the registry keys before starting. Registry key creation is described in Section 4.3.2, "Windows Users: Creating the Registry Key"

Silent Oracle WebLogic Server Installation
Silent Oracle Fusion Middleware Installation and Deinstallation 4-3
4.3.1 UNIX Users: Creating the oraInst.loc FileThe Oracle inventory directory is used by the installer to keep track of all Oracle products installed on the computer. The inventory directory is stored in a file called oraInst.loc. If this file does not already exist on your system, you must create it before starting a silent installation. This file is used by the installer.
1. Log in as the root user.
prompt> su
2. Using a text editor such as vi or emacs, create the oraInst.loc file in the directory of your choice. The contents of the file consist of the following two lines:
inventory_loc=oui_inventory_directoryinst_group=oui_install_group
Replace oui_inventory_directory with the full path to the directory where you want the installer to create the inventory directory. Then, replace oui_install_group with the name of the group whose members have write permissions to this directory.
3. Exit from the root user.
# exit
4.3.2 Windows Users: Creating the Registry KeyIf you have not installed Oracle SOA Suite on your computer, then you need to create the following Registry key and value:
HKEY_LOCAL_MACHINE / SOFTWARE / Oracle / inst_loc = [inventory_directory]
Replace Inventory_Directory with the full path to your installer files. For example:
C:\Program Files\Oracle\Inventory
4.4 Silent Database Schema CreationIf your Oracle Fusion Middleware product requires database schemas, you must first create the schemas in your database before installing and configuring your product.
For instructions on how to create the schemas in silent mode, refer to "Running Repository Creation Utility (RCU) from the Command Line" in Oracle Fusion Middleware Repository Creation Utility User's Guide.
4.5 Silent Oracle WebLogic Server InstallationInstallation of all Oracle Fusion Middleware products requires the presence of an Oracle Middleware home directory, which can be created by installing Oracle WebLogic Server.
To install Oracle WebLogic Server in silent mode, refer to "Running the Installation Program in Silent Mode" in Oracle Fusion Middleware Installation Guide for Oracle WebLogic Server.

Silent Product Installation
4-4 Oracle Fusion Middleware Installation Planning Guide
4.6 Silent Product InstallationTo install your Oracle Fusion Middleware product in silent mode, use the -silent mode from the command line. The full syntax for running the installer from the command line on UNIX operating systems is shown below:
runInstaller [-mode] [-options] [(<CommandLinevariable=Value>)*]
On Windows operating systems:
setup.exe [-mode] [-options] [(<CommandLinevariable=Value>)*]Table 4–1 lists the valid command line parameters for silent installation.
Table 4–1 Installer Command Line Parameters
Parameter Description
Installation Modes - Only One Mode Can be Specified
-i
-install
Launches the installer in GUI mode. This is the default mode and is used if no mode is specified on the command line.
-silent Install in silent mode. The installer must be passed either a response file or command line variable value pairs.
-d
-deinstall
Launches the installer in GUI mode for deinstallation.
NOTE - this option is only available when you start the deinstaller from the ORACLE_HOME/oui/bin (on UNIX operating systems) or ORACLE_HOME\oui\bin (on Windows operating systems) directory.
-p
-prerequisite
Launches the installer in GUI mode but only checks the prerequisites. No software is installed.
-v
-validate
Launches the installer in GUI mode and performs all prerequisite and validation checking, but does not install any software.
-sv
-silentvalidate
Performs all prerequisite and validation checking in silent mode. You must pass the installer either a response file or a series of command line variable value pairs.
Installation Options
-help
--help
--usage
Displays the usage parameters for the runInstaller command.
-invPtrLoc file Pointer to the inventory location file. Replace file with the full path and name of the oraInst.loc file.
-response file
-responseFile file
Pointer to the response file. Replace file with the full path and name of the response file.
See Section 4.2, "Response Files" for information about creating the response files.
-jreLoc location Pointer to the location where Java Runtime Environment (JRE) is installed. Replace location with the full path to the jre directory where your JRE is installed.

Silent Product Installation
Silent Oracle Fusion Middleware Installation and Deinstallation 4-5
-logLevel level Specify the level of logging performed by the installer; all messages with a lower priority than the specified level will be recorded. Valid levels are:
■ severe
■ warning
■ info
■ config
■ fine
■ finer
■ finest
-debug Obtain debug information from the installer.
-force Allow the silent installation to proceed in a non-empty directory.
-printdiskusage Log debugging information pertaining to disk usage.
-printmemory Log debugging information pertaining to memory usage.
-printtime Log debugging information pertaining to time usage. This command causes the timeTakentimestamp.log file to be created.
-waitforcompletion Windows only - the installer will wait for completion instead of spawning the Java engine and exiting.
-noconsole Messages will not be displayed to the console window.
-ignoreSysPrereqs Ignore the results of the system prerequisite checks and continue with the installation.
-executeSysPrereqs Execute the system prerequisite checks only, then exit.
-paramFile file Specify the full path to the oraparam.ini file. This file is the initialization file for the installer. The default location of this file is Disk1/install/platform (on UNIX operation systems) or Disk1\install\platform (on Windows operation systems).
-novalidation Disables all validation checking performed by the installer.
-nodefaultinput For the GUI install, several screens have information or default values pre-populated. Specifying this option disables this behavior so that no information or values are pre-populated.
Command Line Variables
Installer Variables Installer variables are specified using varName=value. For example, on a UNIX operating system:
ORACLE_HOME=/home/Oracle/Middleware/as_1
On a Windows operating system:
ORACLE_HOME=C:\products\Oracle\Middleware\as_1
Session Variables Session variables are specified using session:varName=value.
Component Variables Component variables are specified using session:compInternalName:[Version:]varName=value.
Table 4–1 (Cont.) Installer Command Line Parameters
Parameter Description

Silent Product Installation
4-6 Oracle Fusion Middleware Installation Planning Guide
4.6.1 Sample Silent Install CommandsIf this is the first time you are installing on your system (meaning there is no pre-existing Oracle Inventory location), use the following command to perform a silent installation on UNIX systems:
./runInstaller -silent -response file -invPtrLoc file
On Windows systems:
setup.exe -silent -response file -invPtrLoc file
Below is a full example of this command for UNIX systems:
./runInstaller -silent -response /home/Oracle/response/devSOA.rsp -invPtrLoc /home/jdoe/oraInst.loc
On Windows operating systems:
setup.exe -silent -response C:\home\Oracle\response\devSOA.rsp -invPtrLoc c:\home\Oracle\oraInst.loc
If you have already installed an Oracle product on your system and do not need to specify an inventory location, then you can use a command similar to the following on UNIX systems:
./runInstaller -silent -response file
On Windows systems:
setup.exe -silent -response file
Below is a full example of this command on a UNIX system:
./runInstaller -silent -response /home/Oracle/response/devSOA.rsp
On Windows operating systems:
setup.exe -silent -response c:\home\Oracle\response\devSOA.rsp
4.6.2 Sample Silent Install OutputBelow is a sample output from a silent Oracle SOA Suite installation using the sampleResponse_wls.rsp template:
$ ./runInstaller -jreLoc /home/Oracle/Middleware/jdk160_21/ -silent -response /home/Oracle/response/sampleResponse_wls.rspPlatform is Linux X86 32 bitStarting Oracle Universal Installer... Checking if CPU speed is above 300 MHz. Actual 2999 MHz PassedChecking Temp space: must be greater than 150 MB. Actual 69669 MB PassedChecking swap space: must be greater than 512 MB. Actual 1395 MB PassedPreparing to launch Oracle Universal Installer from /tmp/OraInstall2009-04-03_10-49-20PM. Please wait ...[jdoe@examplehost Disk1]$ Log: /home/Oracle/oraInventory/logs/install2009-04-03_10-49-20PM.logCopyright © 1999, 2011, Oracle and/or its affiliates. All rights reserved.Reading response file..Expected result: One of enterprise-4,enterprise-5,redhat-4,redhat-5,SuSE-10Actual Result: enterprise-4Check complete. The overall result of this check is: PassedCertifiedVersions Check: Success.Checking for gcc-3.4.3-22.1; found gcc-3.4.6-10.0.1-i386. Passed

Silent Product Configuration
Silent Oracle Fusion Middleware Installation and Deinstallation 4-7
Checking for gcc-c++-3.4.3-22.1; found gcc-c++-3.4.6-10.0.1-i386. PassedChecking for openmotif21-2.1.30-11.RHEL4.4 ; found openmotif21-2.1.30-11.0.1.RHEL4.6-i386. PassedChecking for setarch-1.6-1; found setarch-1.6-1-i386. PassedChecking for pdksh-5.2.14-30; found pdksh-5.2.14-30.6-i386. PassedChecking for sysstat-5.0.5-1; found sysstat-5.0.5-19.el4-i386. PassedChecking for gnome-libs-1:1.4.1.2.90-44.1; found gnome-libs-1:1.4.1.2.90-44.2-i386. PassedChecking for libstdc++-3.4.3-22.1 ; found libstdc++-3.4.6-10.0.1-i386. PassedChecking for libstdc++-devel-3.4.3-22.1; found libstdc++-devel-3.4.6-10.0.1-i386. PassedChecking for compat-libstdc++-296-2.96-132.7.2; found compat-libstdc++-296-2.96-132.7.2-i386. PassedChecking for compat-db-4.1.25-9; found compat-db-4.1.25-9-i386. PassedChecking for control-center-2.8.0-12; found control-center-1:2.8.0-12.rhel4.5-i386. PassedChecking for glibc-common-2.3.4-2.9; found glibc-common-2.3.4-2.41-i386. PassedChecking for binutils-2.15.92.0.2-13; found binutils-2.15.92.0.2-25-i386. PassedChecking for make-1:3.80-5; found make-1:3.80-7.EL4-i386. PassedChecking for xscreensaver-4.18-5.rhel4.2; found xscreensaver-1:4.18-5.rhel4.14.0.1-i386. PassedCheck complete. The overall result of this check is: PassedPackages Check: Success.Checking for VERSION=2.6.9; found VERSION=2.6.9-78.0.0.0.1.ELxenU. PassedChecking for hardnofiles=4096; found hardnofiles=4096. PassedChecking for softnofiles=4096; found softnofiles=4096. PassedCheck complete. The overall result of this check is: PassedKernel Check: Success.Expected result: ATLEAST=2.3.4-2.19 Actual Result: 2.3.4-2.41Check complete. The overall result of this check is: PassedGLIBC Check: Success.Expected result: 922MBActual Result: 4000MBCheck complete. The overall result of this check is: PassedTotalMemory Check: Success.Verifying data......Copying Files...-----------20%----------40%----------60%----------80%--------100%
The installation of Oracle SOA Suite 11g completed successfully.
4.7 Silent Product ConfigurationThe way in which you can configure your Oracle Fusion Middleware product from the command line varies depending on the type of product.
4.7.1 System ComponentsIf your product contains system components (for example, Oracle Web Tier, Oracle Portal, Forms, Reports and Discoverer, or Oracle Identity Management), you can use the same commands as described in Section 4.6, "Silent Product Installation".
These products use the same engine for both installation and configuration, so the contents of the response file determine whether you are only installing the software, only configuring existing software, or installing and configuring at the same time.

Silent Product Deinstallation
4-8 Oracle Fusion Middleware Installation Planning Guide
As mentioned in Section 4.2, "Response Files", the recommended way to create these response files is to run the graphical installer once and save the configuration to a response file. Each product also comes with sample response files that you can use. Refer to the product installation guides for more information.
Below are some example silent configuration commands, assuming you have previously performed a software-only installation (did not run the configuration tool).
On UNIX operating systems:
./config.sh -silent -response response_file
For example:
./config.sh -silent -response /home/Oracle/response/devSOA.rsp
On Windows operating systems:
config.bat -silent -response response_file
For example:
config.bat -silent -response C:\home\Oracle\response\devSOA.rsp
4.7.2 Java ComponentsIf your product contains Java components (for example, Oracle SOA Suite, or Oracle WebCenter), the installer and the Configuration Wizard are essentially different products and therefore you cannot configure your products silently using the same silent installation commands.
Instead, silent configuration for Java components must be done using WebLogic Scripting Tool (WLST) commands.
For more information, refer to:
■ Oracle Fusion Middleware WebLogic Scripting Tool Command Reference
■ Oracle Fusion Middleware Oracle WebLogic Scripting Tool
4.8 Silent Product DeinstallationTo deinstall the Oracle Fusion Middleware product software on your system (both system and java components), use the -d or -deinstall parameter from the command line. You must start the deinstaller from the ORACLE_HOME/oui/bin (on UNIX operating systems) or ORACLE_HOME\oui\bin (on Windows operating systems) directory; this is the only directory where the -d or -deinstall parameters are accepted.
On UNIX operating systems:
./runInstaller -silent -deinstall -response file
On Windows operating systems:
setup.exe -silent -deinstall -response file
4.8.1 Command Line Parameters for Silent DeinstallationTable 4–2 lists the valid command line parameters for silent deinstallation.

Silent Product Deinstallation
Silent Oracle Fusion Middleware Installation and Deinstallation 4-9
Table 4–2 Deinstaller Command Line Parameters
Parameter Description
Installation Modes - Only One Mode Can be Specified
-d
-deinstall
Launches the installer in GUI mode for deinstallation.
Installation Options
-help
--help
--usage
Displays the usage parameters for the runInstaller (on UNIX operating systems) or setup.exe (on Windows operating systems) command.
-invPtrLoc file Pointer to the inventory location file. Replace file with the full path and name of the oraInst.loc file.
-response file
-responseFile file
Pointer to the response file. Replace file with the full path and name of the response file.
-jreLoc location Pointer to the location where Java Runtime Environment (JRE) is installed. Replace location with the full path to the jre directory where your JRE is installed.
-logLevel level Specify the level of logging performed by the installer; all messages with a lower priority than the specified level will be recorded. Valid levels are:
■ severe
■ warning
■ info
■ config
■ fine
■ finer
■ finest
-debug Obtain debug information from the installer.
-force Allow the silent installation to proceed in a non-empty directory.
-printdiskusage Log debugging information pertaining to disk usage.
-printmemory Log debugging information pertaining to memory usage.
-printtime Log debugging information pertaining to time usage. This command causes the timeTakentimestamp.log file to be created.
-waitforcompletion Windows only - the installer will wait for completion instead of spawning the Java engine and exiting.
-noconsole Messages will not be displayed to the console window.
-ignoreSysPrereqs Ignore the results of the system prerequisite checks and continue with the installation.
-executeSysPrereqs Execute the system prerequisite checks only, then exit.
-paramFile file Specify the full path to the oraparam.ini file. This file is the initialization file for the installer. The default location of this file is Disk1/install/platform (on UNIX operation systems) or Disk1\install\platform (on Windows operation systems).
-novalidation Disables all validation checking performed by the installer.

Silent Product Deinstallation
4-10 Oracle Fusion Middleware Installation Planning Guide
4.8.2 Sample Silent Deinstall OutputBelow is a sample output from a silent deinstall using the deinstall_oh.rsp template:
$ ./runInstaller -silent -deinstall -jreLoc /home/Oracle/Middleware/jdk160_21/ -response /home/Oracle/Response/deinstall_oh.rsp Starting Oracle Universal Installer... Checking swap space: must be greater than 500 MB. Actual 4047 MB PassedPreparing to launch Oracle Universal Installer from /tmp/OraInstall2010-03-26_10-01-21AM. Please wait ...[]$ Log: /home/oraInventory/logs/deinstall2010-03-26_10-01-21AM.logReading response file..Starting silent deinstallation...Starting Oracle Home deinstallation...Completed deinstallation of Oracle Home.
-nodefaultinput For the GUI install, several screens have information or default values pre-populated. Specifying this option disables this behavior so that no information or values are pre-populated.
Command Line Variables
Installer Variables Installer variables are specified using varName=value. For example, on a UNIX operating system:
ORACLE_HOME=/home/Oracle/Middleware/as_1
On a Windows operating system:
ORACLE_HOME=C:\products\Oracle\Middleware\as_1
Session Variables Session variables are specified using session:varName=value.
Component Variables Component variables are specified using session:compInternalName:[Version:]varName=value.
Table 4–2 (Cont.) Deinstaller Command Line Parameters
Parameter Description

Index-1
Index
Aaccessibility, viiapplication server
installing, 3-3
Ccertification for Oracle Fusion Middleware, 3-3common installation tasks, 3-1conventions
for documentation, viiicreating database schemas, 3-4creating operating system users for IBM DB2
databases, 3-4creating response files for silent installation and
deinstallation, 4-2creating the Middleware home directory, 2-1creating the Oracle Common home directory, 2-2creating the Oracle product home directory, 2-3creating the registry keys, 4-2creating the WebLogic home directory, 2-1
Ddocumentation accessibility, viidocumentation conventions, viii
Eextending a domain, 2-5
IIBM DB2 databases
creating operating system users, 3-4
MMiddleware home directory
creating, 2-1multiple domains
notes, 2-5
OOracle Common home directory
creating, 2-2, 2-3Oracle Fusion Middleware, vii
certification, 3-3concepts, 3-1directory structure concepts, 2-1installing the latest version, 1-1overview, 1-1starting as a new user, 1-1starting with Oracle Application Server 10g, 1-5starting with Oracle Fusion Middleware Release
11.1.1.1.0, 1-5starting with Oracle Fusion Middleware Release
11.1.1.2.0, 1-7Oracle home directory
creating, 2-3Oracle Instance in a WebLogic Domain, 2-6Oracle WebLogic Server
updating, 1-6, 1-7upgrade installers, 1-6, 1-7
oracle_common directory, 2-3oraInst.loc file, 4-1overview of Oracle Fusion Middleware, 1-1
PPatch Set Assistant, 1-8Patch Set Installers, 1-4port numbers
across multiple Oracle homes, 2-3
RRCU, 3-4registry keys
creating, 4-2related documents, viiRepository Creation Utility (RCU), 3-4response files, 4-1
creating, 4-2samples, 4-2securing, 4-2
root access, viiroot.sh script, 4-1

Index-2
Ssample output for silent deinstallation, 4-10sample output for silent installation, 4-6sample response files, 4-2sample silent installation commands, 4-6schemas
creating, 3-4securing your silent installation, 4-2silent deinstallation
instructions, 4-8sample output, 4-10
silent installationinstructions, 4-4sample comments, 4-6sample output, 4-6securing, 4-2
silent installation and deinstallation, 4-1response files, 4-2
starting as a new Oracle Fusion Middleware user, 1-1
starting with Oracle Application Server 10g, 1-5starting with Oracle Fusion Middleware Release
11.1.1.1.0, 1-5starting with Oracle Fusion Middleware Release
11.1.1.2.0, 1-7staticports.ini file, 2-3
Uupdating Oracle WebLogic Server, 1-6, 1-7updating Oracle WebLogic Server with the upgrade
installers, 1-6, 1-7updating your database schemas
Patch Set Assistant, 1-8updating your Oracle Application Server 10g to the
latest software version, 1-5updating your Oracle Fusion Middleware Release
11.1.1.1.0 to the latest software version, 1-5updating your Oracle Fusion Middleware Release
11.1.1.2.0 to the latest software version, 1-7upgrade installers, 1-6, 1-7
WWebLogic Domain, 2-3
directory structure for multiple products, 2-4extending, 2-5notes for creating multiple domains, 2-5with Oracle Instance, 2-6
WebLogic home directorycreating, 2-1