installing polyurethane lower control arm … polyurethane lower control arm bushings/sway bar...
TRANSCRIPT

Installing Polyurethane Lower Control Arm Bushings/Sway Bar Bushings on a MKIII
This "how to" assumes you have some basic tools, and safety gear. Safety glasses should be worn at all times when working with tools and automotive fluids. Always use a hydraulic jack and safety stands when lifting or getting under a vehicle. If you are unsure on where to
safety lift your vehicle, refer to its owners guide. The writer of this how to assumes zero liability in how to use this guide, or any damages that may come from it to you, your property, or others and others property. If you are uncertain at any point, refer to a qualified automotive technician.
Why do this?
Simple. VW decided that a simple idea was a good way to go about making a lower control arm. They used good quality materials, that last for quite some time. However as time, miles, heat, age, and wear march on, the bushings breakdown, get cracked, and your lower control arms can flex more then they were designed to. So the fix is to remove the arms, and replace the bushings. At 120K miles, and 10 years of road service on a lowered car that gets cornered hard, I could tell that it was time. I also had a nice clunk going over bumps while turning.
I hear this is hard to do, and takes a long time.
Its not hard to do, but you will need to take your time, not be in a rush, an have the right tools for the job to make it go smooth. Total time, from the time the car came into the garage, to the time I pulled out was three hours. Keep in mind, after this service it is absolutely critical that you get the car aligned when your finished! Now may also be a good time to replaced other components such as tie rods or struts if you car needs them. I took this time to replace my ball joints, it takes seconds since the arm is out of the car for the bushing install. It may help (a lot) to have a friend with you to muscle some parts around with.
I hear that I should use "brand "X" bushings over "brand "Y".
I went with a company (Prothane) that has been making bushings for a long time. Some people say that the Audi TT bushings are a direct drop in, and have a nicer ride quality. I found that so far (after two days) I do not feel that the Prothane bushings are too hard at all. Ride is firm, but not harsh at all. I got a good deal on the "kit" for the entire car from E-bay. I do not plan to install all the bushings that came with the kit (Such as the rear axle beam bushings). Given the money I spent, I am very happy wit the kit and quality of the install. The car handles extremely well now, and all of my front end turn in noises are gone! Note: Prothane shows the same kit for the MKII and III. This is correct. The parts all are the same.
Parts you need: (Shown)
Page 1 of 23Installing Polyurethane Lower Control Arm Bushings/Sway Bar Bushings on a MKIII
9/12/2006http://faculty.ccp.edu/faculty/dreed/Campingart/jettatech/polybushings/index.htm

Ball Joints (x2) Ball Joint Lock Plates/bolts(x2) Prothane Poly Lower Control Arm Bushing Kit Prothane Poly Front Sway Bar Kit Some new washers for sway bar
How Long does this take?
Two to Three Hours, plus a front end alignment
Tools needed:
Ball Joint Press Ball Peen Hammer 1/2" Cold Chisel 13, 15, 17, 18mm 1/2" drive deep sockets 1/2" Ratchet 10" 1/2" drive extension Large Pry Bar Small Pry Bar 1/2" Drive Torque Wrench (50-250 Ft/Lbs) 3/8" Drive Torque Wrench (10~90 Ft/Lbs) Large Bench Mounted Vice Jack Stands/Lift/Floor Jack
Page 2 of 23Installing Polyurethane Lower Control Arm Bushings/Sway Bar Bushings on a MKIII
9/12/2006http://faculty.ccp.edu/faculty/dreed/Campingart/jettatech/polybushings/index.htm

Step 1 -
Lift the front of the vehicle, it may help to make note of the paint/rust marks where the sub frame meets the body. This is important as it adjusts the steering toe adjustment and vehicle thrust centerline. Getting these marks back to the original position will make the alignment go MUCH smoother.
Loosen the front rear arm bolt, Remove the Sway arm bushing bolt, and the sub frame connector bolt.
Page 3 of 23Installing Polyurethane Lower Control Arm Bushings/Sway Bar Bushings on a MKIII
9/12/2006http://faculty.ccp.edu/faculty/dreed/Campingart/jettatech/polybushings/index.htm

Step 2 - Remove the sway arm 13mm end link nut. And remove the sway bar end links by sliding them off the ends of the sway bar.
Page 4 of 23Installing Polyurethane Lower Control Arm Bushings/Sway Bar Bushings on a MKIII
9/12/2006http://faculty.ccp.edu/faculty/dreed/Campingart/jettatech/polybushings/index.htm

Also remove the Ball joint nut and pinch bolt.
And then pry down on the lower control arm to separate it from the ball joint pinch point.
Page 5 of 23Installing Polyurethane Lower Control Arm Bushings/Sway Bar Bushings on a MKIII
9/12/2006http://faculty.ccp.edu/faculty/dreed/Campingart/jettatech/polybushings/index.htm

As the picture shows, you may wish to flip the ball joint pinch bolt around (not as its shown here, its wrong) so its easier to remove and install the bolt and ball joint. The joint is held into the pinch bolt by a small "C" shaped notch on the ball joint (as shown on the shiny part of the ball joint). In order to flip that bolt, you'll have to remove the 17mm (90 Ft/Lbs) lower caliper carrier bolt. Easy fix that will make this job go a lot smoother when it goes back together.
Step 3 - Point and laugh at your well worn and crappy sway bar links...
Page 6 of 23Installing Polyurethane Lower Control Arm Bushings/Sway Bar Bushings on a MKIII
9/12/2006http://faculty.ccp.edu/faculty/dreed/Campingart/jettatech/polybushings/index.htm

Step 4 - Now comes the fun part. - Stuff comes out of the car.
Remove the Front arm bolt, and Rear arm Bolt, and the arm should come out. You'll have to pull the arm out on an angle, removing the front part of the arm first, and then the rear will slide out.
Page 7 of 23Installing Polyurethane Lower Control Arm Bushings/Sway Bar Bushings on a MKIII
9/12/2006http://faculty.ccp.edu/faculty/dreed/Campingart/jettatech/polybushings/index.htm

This is what you should have out so far. Keep track of which bolt goes where!!
Inspect the area in the back of the sub frame where the rear bushing sits. You'll see a lip on the top and bottom of the where the bushing sits. The lips are designed to "Center" the rear part of the arm and hold the bushing in place as the arm flexes as you drive. However, the new Prothane bushings do *not sit well* in these slots, go ahead and try it, they won't seem to fit..
Page 8 of 23Installing Polyurethane Lower Control Arm Bushings/Sway Bar Bushings on a MKIII
9/12/2006http://faculty.ccp.edu/faculty/dreed/Campingart/jettatech/polybushings/index.htm

In order to get out the sway bar bushings off the sway bar (and remove the sway bar, as well as the little locking clips that bolt the bushings into place, you'll have to support the sub frame with a jack, or stands, or a carton, or something that's going to support the weight of the engine and trans. If not, its going to rock backwards and stress the hell out of everything under the hood - yes, I mean the engine could fall out and hit the floor!. There are two other longer bolts that hold the sub frame to the body, once the weight is supported by the jacks, remove the bolts, and the sway bar will be easier to get out. (Note, if you are not doing the sway bar bushings, you can skip this part)
Some folks choose to grind down the lips and be done with it. I left mine in, while it leads to more "hammer" and less "slide" when it come to installing the arms with the new bushings installed, I feel that the bushing still needs to be centered into its housing and, well, that's what the lips are for, so I left them. Yes, this does mean than the new bushings are going to get a little "roughed up" when they are installed, but they are such overkill when it comes to thickness, its not an issue.
Page 9 of 23Installing Polyurethane Lower Control Arm Bushings/Sway Bar Bushings on a MKIII
9/12/2006http://faculty.ccp.edu/faculty/dreed/Campingart/jettatech/polybushings/index.htm

And then; Remove this bolt;
Page 10 of 23Installing Polyurethane Lower Control Arm Bushings/Sway Bar Bushings on a MKIII
9/12/2006http://faculty.ccp.edu/faculty/dreed/Campingart/jettatech/polybushings/index.htm
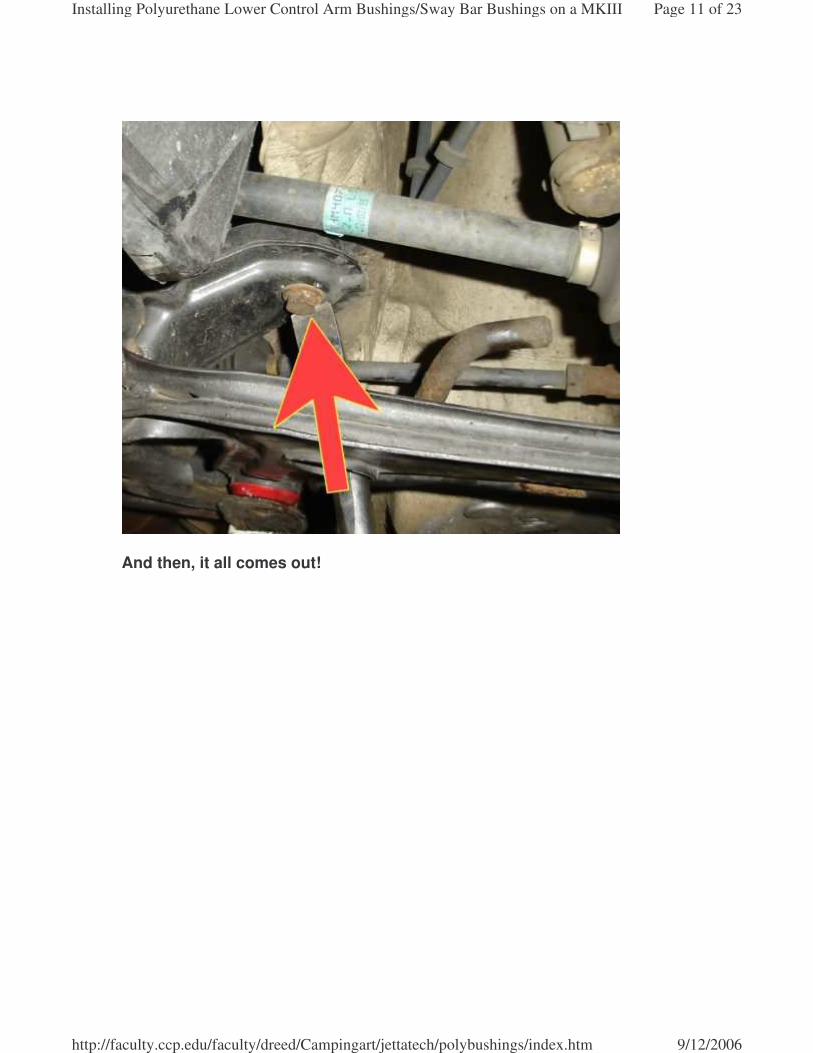
And then, it all comes out!
Page 11 of 23Installing Polyurethane Lower Control Arm Bushings/Sway Bar Bushings on a MKIII
9/12/2006http://faculty.ccp.edu/faculty/dreed/Campingart/jettatech/polybushings/index.htm

Arms, and sway bar/bushings out of the car!
Step 5 - Bushing Removal
Page 12 of 23Installing Polyurethane Lower Control Arm Bushings/Sway Bar Bushings on a MKIII
9/12/2006http://faculty.ccp.edu/faculty/dreed/Campingart/jettatech/polybushings/index.htm

Here we see up close the rear arm bushing. As you can see, it has small tears and cracks in it.
Page 13 of 23Installing Polyurethane Lower Control Arm Bushings/Sway Bar Bushings on a MKIII
9/12/2006http://faculty.ccp.edu/faculty/dreed/Campingart/jettatech/polybushings/index.htm

After mounting it in a vice, using a small pry bar I was able, with ease to rip out the center of the bushing. Yes, its shot!
Page 14 of 23Installing Polyurethane Lower Control Arm Bushings/Sway Bar Bushings on a MKIII
9/12/2006http://faculty.ccp.edu/faculty/dreed/Campingart/jettatech/polybushings/index.htm

Hit the lip of the outer bushing ring (its soft metal) with your cold chisel and a nice ball peen hammer. Don't be shy, but try not to beat up the arm. Some folks use a hack saw to cut the ring out.
Page 15 of 23Installing Polyurethane Lower Control Arm Bushings/Sway Bar Bushings on a MKIII
9/12/2006http://faculty.ccp.edu/faculty/dreed/Campingart/jettatech/polybushings/index.htm

Out. Do the same for the other arm.
For the front arm bushings, There are three methods.
1 - Burn them out. Yes, using a torch, set them on fire. While its fun, it makes a lot (A LOT) of smoke and stinks up the place, and can change the temper of the metal. (Fair)
2 - Cut/Grind off the lips of the bushings and then drive them out. (Good)
3 - Use an Ball Joint Press (Best). Its portable, uses hand tools (or impact) and can help with about 10000x other jobs. OTC makes one for $100 that is a professional model, you can find cheaper ones for as low as $20. I used the OTC, its what I have, and its the best. (Shown at left). Best of all you'll use this same tool to press in the new rear bushings!
Page 16 of 23Installing Polyurethane Lower Control Arm Bushings/Sway Bar Bushings on a MKIII
9/12/2006http://faculty.ccp.edu/faculty/dreed/Campingart/jettatech/polybushings/index.htm

Here it is, pressing out the front arm bushings, I did not bother to cut the lips off... screw that, this tool kicks the ass of all other tools. I've used this tool for ball joints on Ford trucks, and U-Joints on Toyota trucks. Its a very handy tool to have, and is easier and more portable then a shop arbor press.
Step 6 - Installing Bushings.
Press the new bushings in using the ball-joint press. The Prothane kit comes with a "special grease" - yea whatever., use it.. Use ALL of it. The grease helps let the bushings slide into place, as well as keep them lubed. Poly bushings are much harder then the rubber units they replace. They can and will make some noise in the cold, so don't freak out if you hear a few grunts and groans when it gets colder out. The grease is silicone dielectric grease. Use extra if you have to. Just wipe off the excess, dirt, rust, and grime will tear apart the new bushings, so try to keep the work area clean, and clean up the areas where the bushings are going to get pressed into. (AutoCad > MS Paint!)
Page 17 of 23Installing Polyurethane Lower Control Arm Bushings/Sway Bar Bushings on a MKIII
9/12/2006http://faculty.ccp.edu/faculty/dreed/Campingart/jettatech/polybushings/index.htm

I only had to use the OTC press for the rear arm bushings. Remember the arms are the same for left and right, so don't freak out about which end of the bushing goes in first. Just press it in on the side with the slight radius (top), rather than the sharp square end (bottom), if not, you'll slice the bushing up as its pressed it, and that's bad.
The new front arm bushings are split, so they slide right in. I pressed in the sway bar link bushings just using a vice and a block of wood. If any bushing contact points are rust-tastic, clean them up and them lube them with a little grease.
Page 18 of 23Installing Polyurethane Lower Control Arm Bushings/Sway Bar Bushings on a MKIII
9/12/2006http://faculty.ccp.edu/faculty/dreed/Campingart/jettatech/polybushings/index.htm

Page 19 of 23Installing Polyurethane Lower Control Arm Bushings/Sway Bar Bushings on a MKIII
9/12/2006http://faculty.ccp.edu/faculty/dreed/Campingart/jettatech/polybushings/index.htm

I also replaced the ball joints, 3 bolts each, they slide right in and out. No hassles here. Torque the ball joint bolts to 26 Ft/Lbs
All pressed in, new ball joints on, and ready to go!
Step 7 - Put the sway bar and arms back in
Page 20 of 23Installing Polyurethane Lower Control Arm Bushings/Sway Bar Bushings on a MKIII
9/12/2006http://faculty.ccp.edu/faculty/dreed/Campingart/jettatech/polybushings/index.htm

Get the rear sway bar bushings in place, and the sway bar, and then raise the sub frame back into place and snug down the foreword bolt before you try to install the arms. Otherwise the whole unit flops around under the car. I found that once that bolt was snugged down it made a great pry point for getting the arms back in place. Remember the little lip I talked about that centers the rear arm bushing? Well, now is when you fight it. I used a pry bar, dead blow hammer, and a friend to get the arm back into place. Get the rear started 1st, then the front mount, and then the ball joint.
Once you get the arm in place, bolt everything back together and go for a test drive. Remember, if your steering wheel is now cocked, crooked or off center don't freak out. You didn't break anything, but your sub frame is off center. You can leave it for the alignment shop, or try to shift the sub frame around and get it closer to center (better idea).
Note: NEVER use an impact gun to "run" the sub frame bolts back into place. INSPECT the alignment of the sub frame, arm, and body to ensure that everything will line up when the bolt is reinstalled! If you cross thread the nut/cap in side of the body that the bolts thread in to YOU ARE SCREWED! START ALL BOLTS BY HAND!!
Page 21 of 23Installing Polyurethane Lower Control Arm Bushings/Sway Bar Bushings on a MKIII
9/12/2006http://faculty.ccp.edu/faculty/dreed/Campingart/jettatech/polybushings/index.htm

(Sway bar bushings installed)
Page 22 of 23Installing Polyurethane Lower Control Arm Bushings/Sway Bar Bushings on a MKIII
9/12/2006http://faculty.ccp.edu/faculty/dreed/Campingart/jettatech/polybushings/index.htm

Bottom of arm, all bolted back up.
Follow these torque values;
1 - Front arm bushing bolt (82mm long)- 37 Ft/Lbs PLUS a 90 degree turn 2 - Sway bar link bushing nut - 18 Ft/Lbs 3 - Rear arm bushing and (78mm long) sub frame bolt - 52 Ft/Lbs PLUS a 90 degree turn 4 - Sway bar bushing bracket - 18 Ft/Lbs (Note, this is a guess, no real spec is given) 5 - Rear sub frame connector bolt - 48 Ft/Lbs 6 - Front sub frame connector bolt (65 mm long) - 52 Ft/Lbs PLUS a 90 degree turn
Not shown, Ball joint to steering knuckle pinch bolt - 35 Ft/Lbs Wheel Lug Bolts - 81 Ft/Lbs
Home
Page 23 of 23Installing Polyurethane Lower Control Arm Bushings/Sway Bar Bushings on a MKIII
9/12/2006http://faculty.ccp.edu/faculty/dreed/Campingart/jettatech/polybushings/index.htm