instruction manual - metalúrgica siemsen ltda. manual centrifugal juicer ... indicated on the data...
TRANSCRIPT

INSTRUCTION MANUAL
CENTRIFUGAL JUICER MODELS CS / CSE
40561.2-March/2011
METALÚRGICA SIEMSEN LTDA.


SUMMARY
1. Introduction1.1 Main Precautions1.2 Main Components1.3 Technical Characteristics2. Installation and Pre-Operation2.1 Installation2.2 Pre-Operation3. Operation3.1 Starting 3.2 How to feed the Centrifugal Juicer 3.3 How to clog the Sieve 3.4 Production 3.5 Cleaning 4. General Warnings 4.1 Basic Operation Procedures 4.2 Cares to be taken before to start the Juicer 4.3 Routine Inspection 4.4 Operation 4.5 After the work ends 4.6 Maintenance 4.7 Advices 5. Problems Analysis and Solutions 5.1 Problems Causes and Solution 5.2 Electrical Diagram
112233344455577899101010101213

1
1. Introduction
1.1 Main PrecautionsThe Centrifugal Juicers Mod. CS/CSE are machines simple to operate and to clean They are useful to extract fruit and vegetable juices used by Restaurants , and Fast Food professionals . To avoid accidents read the following instructions :1.1.1Before cleaning or maintenance unplug the machine from electric source .1.1.2Never use tools not belonging to the machine to help operation , principally use only the stump ( no.01 Pic 1 ) to introduce the product into the feeding throat ( no.02 Pic 1 ) .1.1.3Before switching ON the machine be sure the Sieve ( no.07 Pic 2 ) is perfectly fitted on the Central Shaft ( no.08 Pic 3 ) , the Central Shaft Clogging Pin ( no.11 Pic 01 ) does not clog the Shaft and the bowl Lid ( no.03 Pic 1 ) is surely fastened by the two handles ( no 04 Pic 1 ) .1.1.4 Never throw or spill water directly on the machine .1.1.5 Never put hand or any object inside the product Residuals Exit Nº 15 ( Pic 7) or inside the Feeding Throat , with the machine switched ON , because hand may be hurt when in contact with the sieve , or the machine may be damaged 1.1.6Never use the Central Shaft Clogging Pin ( no.11 Pic 1 ) with the machine switched ON , the machine may be damaged .1.1.7Before lifting the Lid from the Bowl , be assured the motor has come to a complete stop stopped.1.1.8Never switch ON the machine with wet clothes or wet feet .1.1.9When installing the machine provide proper grounding .
IMPORTANT
To increase the safety of the machine the centrifugal juicer Model CSE has an electronic system , to avoid the machine to be switched ON with its Lid ( no. 03 Pic1) lifted off the Bowl (no.9 Pic 1 ) .
IMPORTANTAlwais check the sieve before use. If you detect any cracks or damage, do not
use the equipment and call techical assistance.
Picture 9
Picture 7 Picture 8
Picture 10
Picture 11
07
15
03
02
14

1.2 Main Components All components are made with carefully selected materials for their function, in accordance with the Siemsen standard testing procedures and experience .
Among the principal components , are :1-Stump2-Feeding throat3-Bowl Cover4-Handle5-Magnet Support ( mod. CSE ) 6-Guide 7-Sieve (Pic. 2 -Page 15)8-Central Shaft (Pic. 3 -Page 16)9- Bowl10-Motor Support11-Central Shaft Clogging Pin12-Cabinet13-ON/OF Switch14-Non Skid Pads (Pic. 7)15-Residuals Exit (Page 15)16-Cup17-Residuals Collecting Vessel18-Clogging Pin Safety Plate(Pic5 -Page 15)19-Central Shaft Clogging Pin Plate (Pic. 5 - Page 15)
1.3 Technical Characteristics Characteristic unit CS/CSEVoltage V 110 or 220Frequency Hz 60 or 50 (*)Power Rating Hp 0.5Height mm 570Width mm 600Length mm 350Net weight kg 13.7Gross weight kg 20Consumption Kw/h 0.36Speed RPM 3.500
(*) Observation : Frequency a voltage will be the one indicated on Data Plate .label
2
01
04
11
02
06
17
14
13
03
12
10
16
Picture 1
Picture 3Picture 2
Picture 5
Picture 6
Picture 4
08
19
09
18
10
07
05
04
03
Ressaltos
13

2 Installation and Pre-Operation
2.1 Installation To achieve a good performance the Centrifugal Juicer shall be installed on a steady and flat surface about 850 mm above floor .Check the voltage , be sure the network electric voltage is the same as the voltage indicated on the data plate label . Grounding is mandatory , do it in accordance with the local rules .
2.2 Pre-operationBefore using the machine wash it with running water all the Centrifugal Juicer parts which might get into contact with the product .
AssemblyPlace the Bowl (no. 03 Pic 1 ) on the Motor Support (no. 8 Pic 3 ) with the nose placed between the two Support Lips( Pic. 04 ) . Turn the Clogging Pin Safety Plate ( no.18 Pic 5 ) upward and press the Central Shaft Clogging Pin (no. 19 Pic 5 ) against the Central Shaft . Keep the Central Shaft Clogging Pin Pressured, fit the Sieve (no.07 Pic 2 ) on the Central Shaft and turn it clockwise until a snap is heard . Release the Central Shaft Clogging Pin. Fit the Lid on the Bowl ( no.03 Pic 6 ) turning it counterclockwise grabbing the liquid discharge nose until the two lid slits touch the Handle beams ( no. 4 Pic 6 ) and then tight the handles .Place the Cup ( no 16 Pic 1 ) below the Bowl nose( no.03 Pic 1 ) and install the Residual Exit (no 15 Pic 7) on the Lid residuals exit throat ( no.03 Pic 7 ), or place the Residual Collecting Vessel ( no. 17 Pic 1 ) below the exit throat ( see Pic 1 ) .
3
Ligação em 110V 60Hz
Saída
Entrada
Reed Switch
NF
Contatora
M
1
5
3
48
2
2 4 146A2
A15 1331
Chave Liga/Desliga
Chave Liga/Desliga
M
Chave Seletora 110/220 Volts
1 3 135A1
A26 1442
1
5
4
8
3
2
M
Contatora
F N
Reed Switch
Entrada
Saída
Ligação em 220V 50/60Hz
5.2 Electric Diagram
220V 50/60Hz (Mod. CSE)
110/220V 60Hz (Mod. CS)
110V 60Hz (Mod. CSE)
12
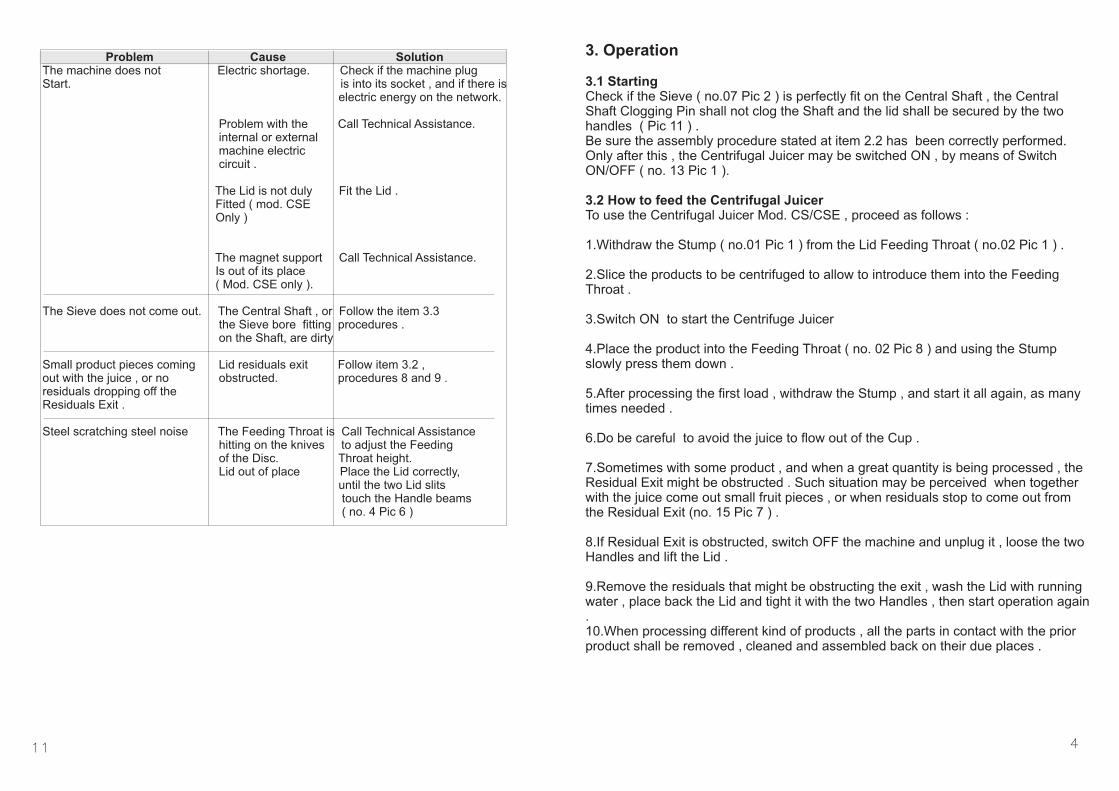
3. Operation
3.1 StartingCheck if the Sieve ( no.07 Pic 2 ) is perfectly fit on the Central Shaft , the Central Shaft Clogging Pin shall not clog the Shaft and the lid shall be secured by the two handles ( Pic 11 ) . Be sure the assembly procedure stated at item 2.2 has been correctly performed. Only after this , the Centrifugal Juicer may be switched ON , by means of Switch ON/OFF ( no. 13 Pic 1 ).
3.2 How to feed the Centrifugal Juicer To use the Centrifugal Juicer Mod. CS/CSE , proceed as follows :
1.Withdraw the Stump ( no.01 Pic 1 ) from the Lid Feeding Throat ( no.02 Pic 1 ) .
2.Slice the products to be centrifuged to allow to introduce them into the Feeding Throat .
3.Switch ON to start the Centrifuge Juicer
4.Place the product into the Feeding Throat ( no. 02 Pic 8 ) and using the Stump slowly press them down .
5.After processing the first load , withdraw the Stump , and start it all again, as many times needed .
6.Do be careful to avoid the juice to flow out of the Cup .
7.Sometimes with some product , and when a great quantity is being processed , the Residual Exit might be obstructed . Such situation may be perceived when together with the juice come out small fruit pieces , or when residuals stop to come out from the Residual Exit (no. 15 Pic 7 ) .
8.If Residual Exit is obstructed, switch OFF the machine and unplug it , loose the two Handles and lift the Lid .
9.Remove the residuals that might be obstructing the exit , wash the Lid with running water , place back the Lid and tight it with the two Handles , then start operation again .10.When processing different kind of products , all the parts in contact with the prior product shall be removed , cleaned and assembled back on their due places .
4
Problem Cause Solution The machine does not Electric shortage. Check if the machine plugStart. is into its socket , and if there is electric energy on the network.
Problem with the Call Technical Assistance. internal or external machine electric circuit .
The Lid is not duly Fit the Lid . Fitted ( mod. CSE Only )
The magnet support Call Technical Assistance. Is out of its place ( Mod. CSE only ).
The Sieve does not come out. The Central Shaft , or Follow the item 3.3 the Sieve bore fitting procedures . on the Shaft, are dirty
Small product pieces coming Lid residuals exit Follow item 3.2 , out with the juice , or no obstructed. procedures 8 and 9 .residuals dropping off the Residuals Exit .
Steel scratching steel noise The Feeding Throat is Call Technical Assistance hitting on the knives to adjust the Feeding of the Disc. Throat height. Lid out of place Place the Lid correctly, until the two Lid slits touch the Handle beams ( no. 4 Pic 6 )
11

3.3 How to clog the Sieve
The Sieve may be clogged using the Central Shaft Clogging Pin ( no.19 Pic 5 ) .The consequence of the day to day Centrifugal Juicer use , will be after some time , a natural wear of some components . Such wearing will produce a residual accumulation , and may cause the Sieve to stick to the Central Shaft .To allow to remove the Sieve , a system has been developed to clog the Central Shaft .Below we outline the procedure to follow if such problem arises :
1.Switch OFF the machine and unplug it.2.Turn the Clogging Pin Safety Plate ( no.18 Pic 5 ) upward and press the Central Shaft Clogging Pin( no.19 Pic 5 ) against the Central Shaft ultil it feels that clogging pin has entered central shaft hole.3.Keep the Central Shaft Clogging Pin Plate under pressure , turn the Sieve ( no. 07 Pic 9 ) counterclockwise until it gets blocked. release central shaft clogging pin an a lift the sieve with your two hands and lift it . 4.Loose the Central Shaft Clogging Pin Plate ( no.19 Pic 5 ) and lower the Clogging Pin Safety Plate ( no.18 Pic 5 )
IMPORTANTTo keep the centrifugal juicer working for as long time as possible without having to use the central shaft clogging pin we recommend to keep the central shaft and the sieve always clean (see Pic.10 Page 16)
3.4 ProductionThe output in quarts will mainly depend on the kind of product to be processed and on the operator performance .
3.5 Cleaning
All the moving parts that have been in contact with the product shall be removed and cleaned .Below follows the procedure on removing the moving parts :1.Switch OFF the machine and unplug it .2.Lose the two Handles , grab the Bowl by the nose and remove the Lid turning it clockwise .3.Grab the Sieve with both hands and lift it . If the Sieve does not come out , turn it counterclockwise and try to lift it again (Pic 2 ) . If no result is obtained , then proceed as written at item 3.3 " How to clog the Sieve ".4.Remove the Bowl .5.Wash with running water all the removed parts .
5
There are some situations in which dropping one glass of water in the feeding throat with the machine on is enough to clean the sieve, the bowl cover and the bowl.
If that is not enough, we suggest you to follow the cleaning procedures above.
4.6 Maintenance
4.6.1Dangers
With the machine switched ON any maintenance operation is dangerous . UNPLUG THE MACHINE FROM ITS SOCKET DURING THE WHOLE MAINTENANCE OPERATION TIME .
IMPORTANTAlways unplug the machine during emergencies .
4.7 Advices
Electrical or mechanical maintenance shall be made by qualified persons .The maintenance responsible shall be sure the machine is working in TOTAL SAFETY conditions .
5 Problem Analysis and Solutions
5.1 Problems Causes and Solutions
The Centrifugal Juicer has been designed to need a minimum maintenance . However some problems may arise due to normal wear during the machine life .If some problem arises, check table 2 , where some possible solutions are recommended .
10

4.3 Routine Inspection
Watch out any abnormal noises coming from the motor or any moving parts .Check the safety devices to be normally operating .
4.4 Operation
4.4.1 Warnings
Long hair, that could touch the machine , could cause serious accidents . Tie them or cover them with a head scarf .Only skilled operators shall use the machine .NEVER use the machine without any of its safety devices normally operating .
4.5 After the work ends
4.5.1 Cares
Always clean the machine . Before cleaning it ALWAYS UNPLUG IT FROM THE WALL SOCKET .Never start to clean before the motor is COMPLETELY STILL .Be sure all the machine components are in their due places before to start it again .
96
6. Assemble the parts back, following the description given by item 2.2 Pre-Operation ( Assembly ) .
ImportantNever clean the machine if plugged to the electric network . Before cleaning unplug it . Before removing the Bowl , be sure the motor is completely still .
3.3.2 Cautions with Stainless Steel:
The Stainless Steel may present rust signs, which ARE ALWAYS CAUSED BY EXTERNAL AGENTS, especially when the cleaning or sanitization is not constant and appropriate.
The Stainless Steel resistance towards corrosion is mainly due to the presence of chrome, which in contact with oxygen allows the formation of a very thin protective coat. This protective coat is formed through the whole surface of the steel, blocking the action of external corrosive agents.
When the protective coat is broken, the corrosion process begins, being possible to avoid it by means of constant and adequate cleaning.
Cleaning must always be done immediately after using the equipment. For such end, use water, neutral soap or detergent, and clean the equipment with a soft cloth or a nylon sponge. Then rinse it with plain running water, and dry immediately with a soft cloth, this way avoiding humidity on surfaces and especially on gaps.
The rinsing and drying processes are extremely important to prevent stains and corrosion from arising.
IMPORTANTAcid solutions, salty solutions, disinfectants and some sterilizing solutions (hypochlorites, tetravalent ammonia salts, iodine compounds, nitric acid and others), must be AVOIDED, once it cannot remain for long in contact with the stainless steel:
These substances attack the stainless steel due to the CHLORINE on its composition, causing corrosion spots (pitting).
Even detergents used in domestic cleaning must not remain in contact with the stainless steel longer than the necessary, being mandatory to remove it with plain water and then dry the surface completely.
Use of abrasives:Sponges or steel wool and carbon steel brushes, besides scratching the
surface and compromising the stainless steel protection, leave particles that rust and react contaminating the stainless steel.
8
4.1.3 Advices
Be sure this Manual INSTRUCTION has been fully understood . Each function or operation procedure has to be perfectly clear .Any manual command ( button , pulses , electric switch , lever, etc ) shall be given only after to be sure the correct command is given .If an electric supply failure happens , the machine shall immediately be switched OFF .Avoid any strikes on the machine , since they could produce failures or a bad performance .Avoid water, dust or dirt to get inside the electrical or mechanical components of the machine .DO NOT CHANGE the machine original characteristics .DO NOT TEAR, WITHDRAW OR GET DIRTY , ANY SAFETY OR IDENTIFICATION LABEL . If a Label is lost or unreadable ask for a new one to your Dealer .
4.2 Cares to be taken before to starting the Juicer
IMPORTANT Read carefully this INSTRUCTION before to starting the machine . Be sure they have been correctly understood . Any doubt contact the department Chief or the Dealer .
4.2.1 Danger
Electric wires must have a perfect insulation, any damage may cause an electric shock .Before to using them be sure they are in good conditions .
4.2.2 Cares
The electric cord , used to feed electricity to the machine has to have the right section to be able to support the machine motor power rating . Any electric wiring running over the floor near the machine shall be fully protected to avoid short circuits .
4. General Warnings
The General Warnings were prepared to properly instruct the operators and the maintenance team .The machine shall only be given to the operators in good working conditions and they shall be properly oriented about how to use it safely , by the Dealer .The operator shall only use the machine after a complete knowledge of the cares to be taken when operating the machine , carefully reading all this Instruction Manual .
4.1 Basic Operation Procedures
4.1.1 Dangers
Some parts of the machine electrical commands have high voltage points or terminals . These when touched , may produce high electric shocks , and even DEATH .Never touch a manual command ( bottom , electric switch etc ) with wet hands , shoes or clothes. If this warning is not understood electric shocks and even DEATH , may occur .
4.1.2 Warnings
The Switch ON/OFF position must be well known , to allow it to be used without to look for it . Before proceeding to any maintenance , unplug the machine from the electric network .Provide enough space around the machine to avoid falls .Water and oil may produce a dangerous and slippery floor . To avoid accidents the floor shall be dry and clean .Never use a manual command ( button , switch , lever , etc ) unadvisedly .If any work has to be done by more than one person , coordination signs shall be accorded , for each step of the work . Next step shall not be started without the sign is given and acknowledged .
7
IMPORTANT
If any item from the GENERAL SAFETY NOTIONS section is not applicable to your product, please disregard it.
That is why such products must not be used for cleaning and sanitization. Scrapings made with sharp instruments or similar must also be avoided.
Main substances that cause stainless steel corrosion:Dust, grease, acid solutions such as vinegar, fruit juices, etc., saltern
solutions (brine), blood, detergents (except for the neutral ones), common steel particles, residue of sponges or common steel wool, and also other abrasives.