instructions for new transit pe users
DESCRIPTION
INSTRUCTIONS FOR NEW TRANSIT PE USERSThese instructions are written with the intention to make it possible to embark inmediately on your first Transit job without having to do much more than installing the software, launching it, and start working.TRANSCRIPT
INSTRUCTIONS FOR NEW TRANSIT PE USERS
by Felix van Heck
April 21, 2023Table of Contents
1. INTRODUCTION.....................................................................................................................12. DOWNLOADING THE TRANSIT SATELLITE PE SOFTWARE...................................13. DOWNLOADING THE TRANSLATION PROJECT..........................................................14. RECEIVING THE PROJECT IN TRANSIT PE...................................................................25. OPENING THE LANGUAGE PAIR......................................................................................46. ORGANIZING THE TRANSIT WINDOWS.........................................................................57. 68. TEXT ORIENTED ENVIRONMENT....................................................................................69. MOST IMPORTANT KEY STROKES..................................................................................610. HOW TO PASTE ITEMS FROM THE DICTIONARY INTO TRANSIT.........................711. HOW TO DEAL WITH BOLDFACE, ITALICS AND UNDERSCORE............................712. HOW TO DEAL WITH TABLES...........................................................................................713. NOTEPAD FOR REMARKS...................................................................................................814. IF YOU WISH TO DO A FINAL REVISION IN WORD....................................................815. SENDING BACK THE TRANSLATION...............................................................................816. ADVANCED DETAILS: WHERE IS MY TRANSLATION STORED?............................917. INDEX......................................................................................................................................10

1. INTRODUCTION
These instructions are written with the intention to make it possible to embark inmediately on your first Transit job without having to do much more than installing the software, launching it, and start working.
I wish you good luck, and in case you should have any problems, don’t lose time trying to resolve them, but just call or e-mail me. I do not remember any problem which I have not been able to resolve. The only thing I recommend you to do regularly while translating is Pressing Cntrl-S, which means saving your work !
2. DOWNLOADING THE TRANSIT SATELLITE PE SOFTWARE
To download the Transit Satellite PE Software, go to
http://www.star-solutions.net/html/eng/support/Transit-SAT-PE.html
Fig. 1 Star's web site where you can download Transit PE
You only need to download the software itself (on top of the list)Any other downloadable files (especially the training audiovisual) are nice but ABSOLUTELY NOT necessary. Install the software and accept all default values.
3. DOWNLOADING THE TRANSLATION PROJECT
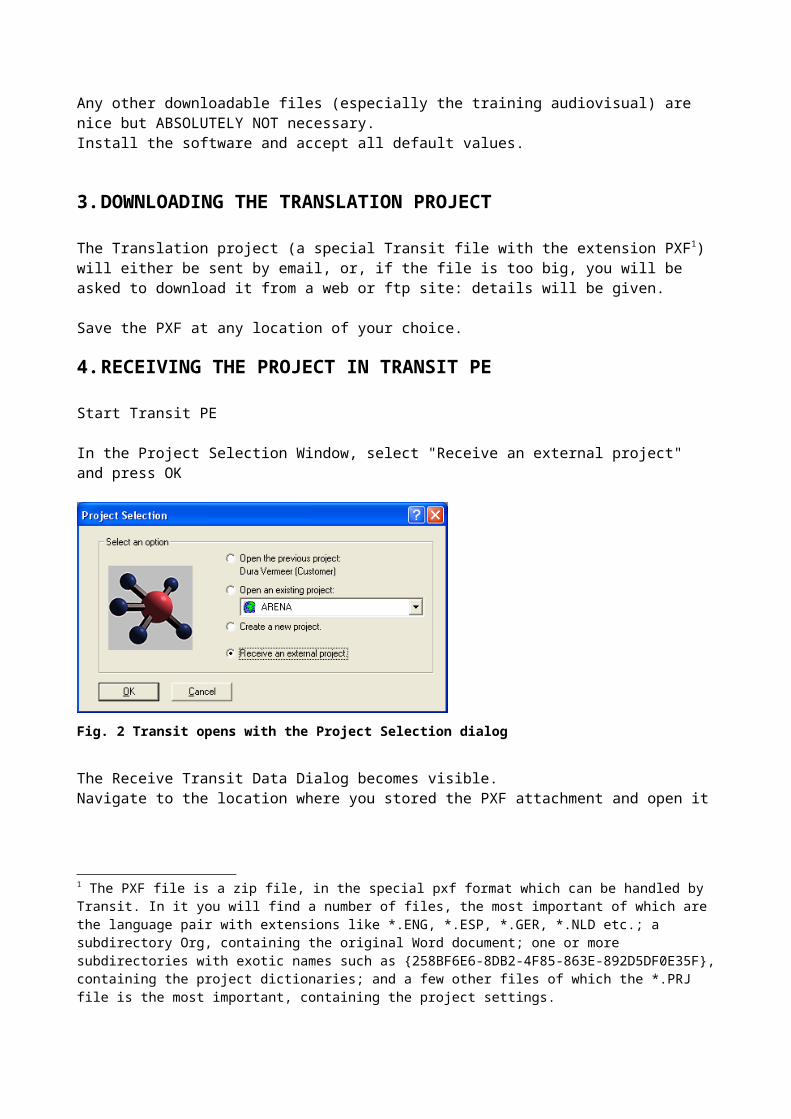
The Translation project (a special Transit file with the extension PXF1) will either be sent by email, or, if the file is too big, you will be asked to download it from a web or ftp site: details will be given.
Save the PXF at any location of your choice.
4. RECEIVING THE PROJECT IN TRANSIT PE
Start Transit PE
In the Project Selection Window, select "Receive an external project" and press OK
Fig. 2 Transit opens with the Project Selection dialog
The Receive Transit Data Dialog becomes visible.Navigate to the location where you stored the PXF attachment and open it
1 The PXF file is a zip file, in the special pxf format which can be handled by Transit. In it you will find a number of files, the most important of which are the language pair with extensions like *.ENG, *.ESP, *.GER, *.NLD etc.; a subdirectory Org, containing the original Word document; one or more subdirectories with exotic names such as {258BF6E6-8DB2-4F85-863E-892D5DF0E35F}, containing the project dictionaries; and a few other files of which the *.PRJ file is the most important, containing the project settings.
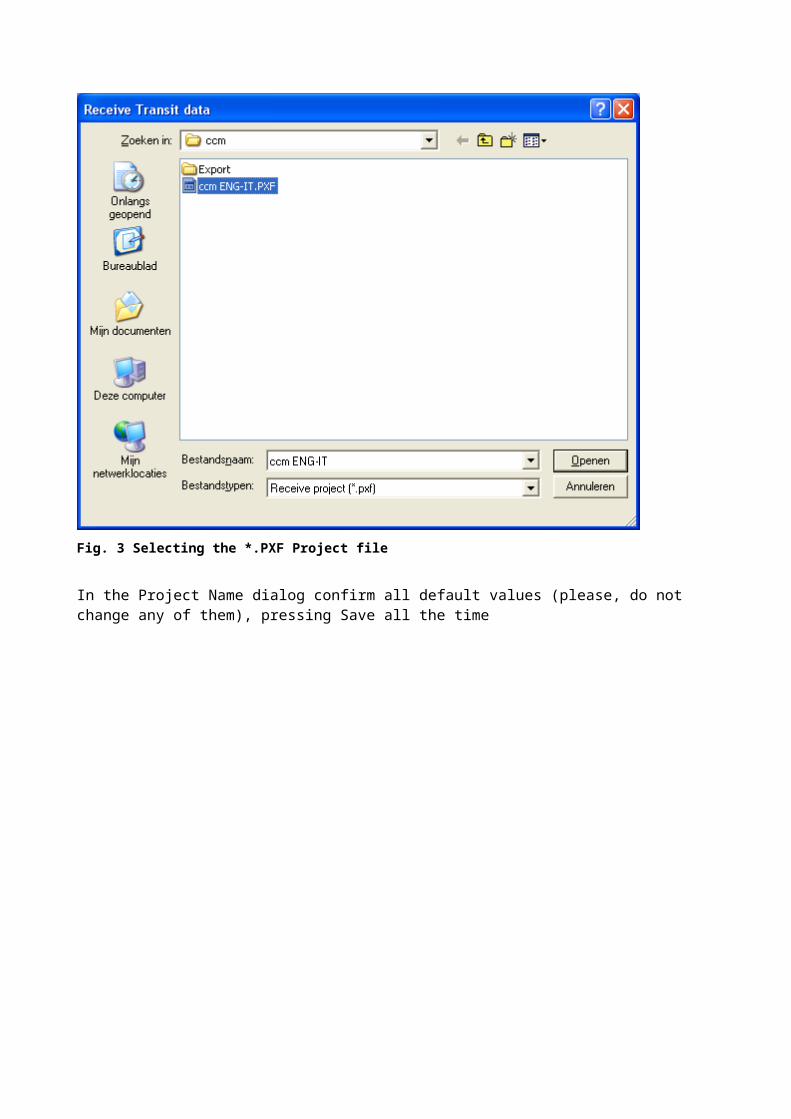
Fig. 3 Selecting the *.PXF Project file
In the Project Name dialog confirm all default values (please, do not change any of them), pressing Save all the time
Fig. 4 All default values must be confirmed
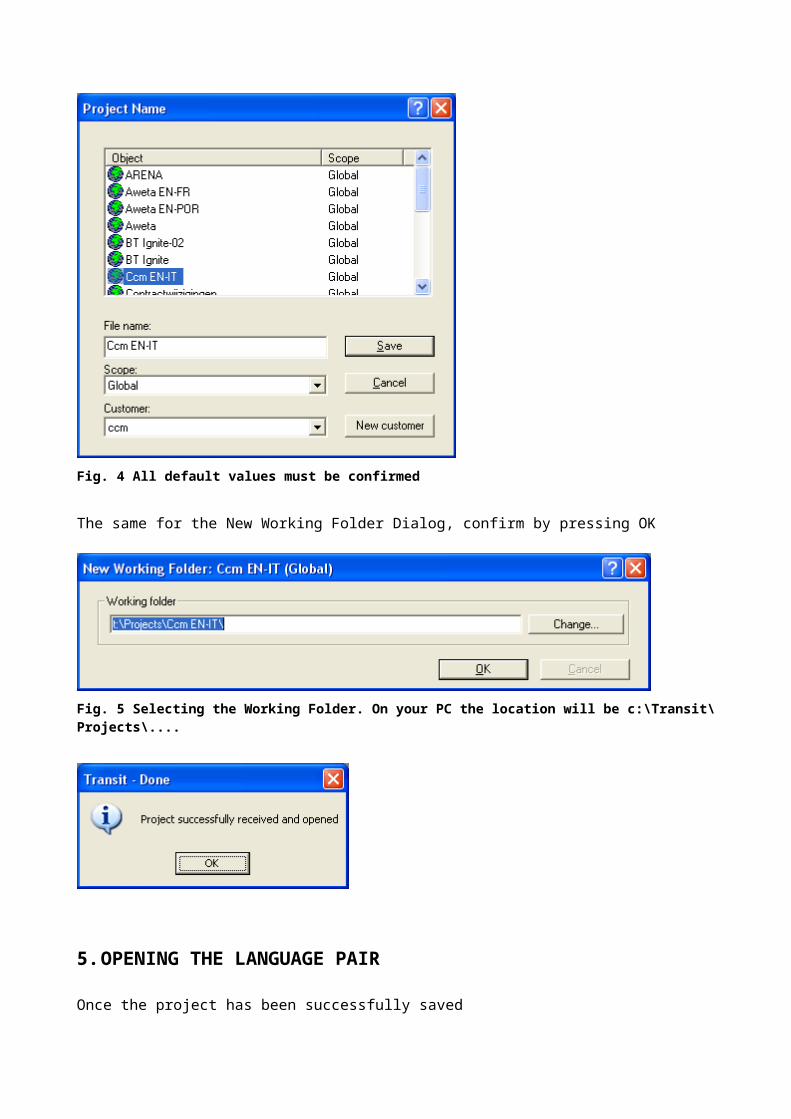
The same for the New Working Folder Dialog, confirm by pressing OK
Fig. 5 Selecting the Working Folder. On your PC the location will be c:\Transit\Projects\....
5. OPENING THE LANGUAGE PAIR
Once the project has been successfully savedSelect File -> Open Language Pair
Fig. 6 Opening a Language Pair

a. select the language pair and open it by pressing OK b. in case a project includes more than 1 language pairs, select all language pairs simultaneously
and open them in a global view. In this way you can, for example, perform functions like search&replace in all documents at a time.
Fig. 7 Opening Language Pairs in a global view
The original Word, Power Point, Excel etc. documents can be found in c:\transit\projects\[project folder]\org you can print them out for easier reference.
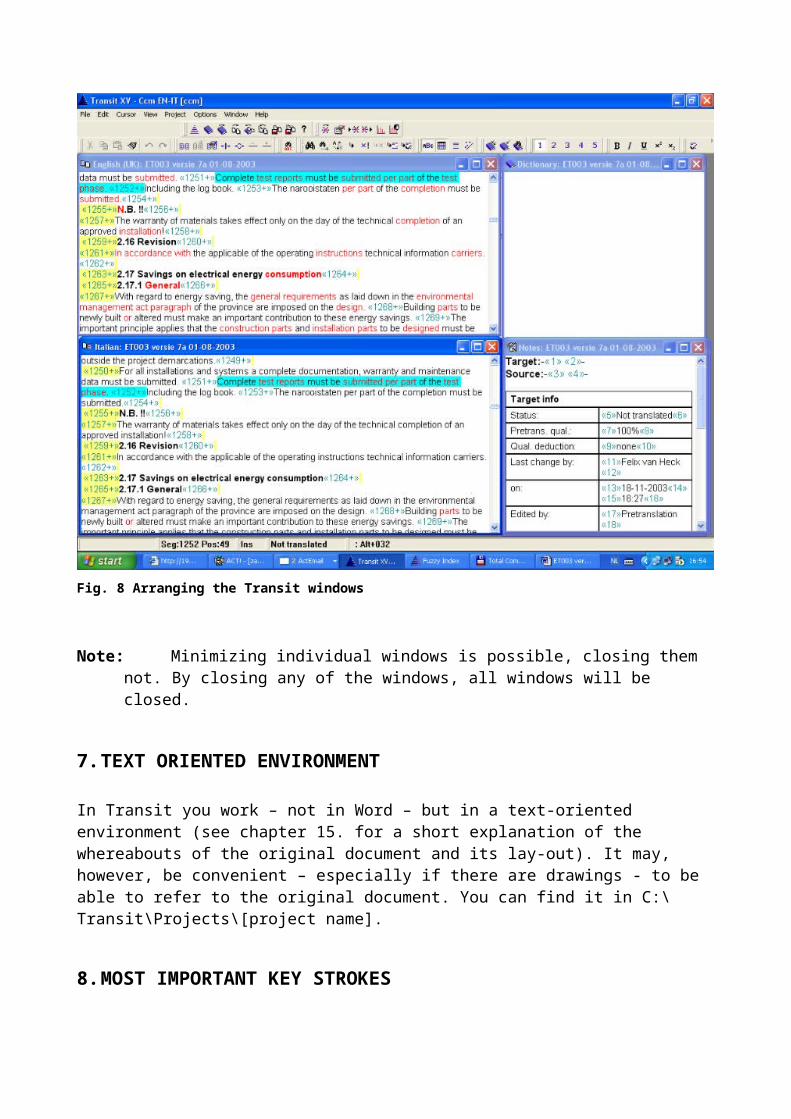
6. ORGANIZING THE TRANSIT WINDOWS
By opening a language pair, Transit opens 5 windows, to be accessed by pressing Alt + 1 through 5,
Alt-1 = source languageAlt-2 = target languageAlt-3 = online dictionary Alt-4 = Note PadAlt-5 = Fuzzy Match windows
The best thing to do, if you have a 17 inch display or larger, is to arrange the windows horizontally as 2/3 (left) + 1/3 (right-hand side)Left up 2/3 = source (can not be changed)Left down 2/3 = target (here you can type the translation)Right up 1/3 = dictionaryRight down 1/3 = Notepad and Fuzzy match (overlapping)

Fig. 8 Arranging the Transit windows
Note: Minimizing individual windows is possible, closing them not. By closing any of the windows, all windows will be closed.
7. TEXT ORIENTED ENVIRONMENT
In Transit you work – not in Word – but in a text-oriented environment (see chapter 15 for a short explanation of the whereabouts of the original document and its lay-out). It may, however, be convenient – especially if there are drawings - to be able to refer to the original document. You can find it in C:\Transit\Projects\[project name].
8. MOST IMPORTANT KEY STROKES
Translating in Transit goes by segments.
+/- By pressing + or - you jump forward/backward from segment to segment.
Alt+Ins Each translation can be confirmed, if you wish, by pressing Alt+Ins.
Confirmed translations are highlighted with a colour. If not: in the Toolbar select View and check "Colors for segment type"
By pressing Alt+Ins the Fuzzy Match screen is activated. 100% matches are translated automatically. 70% matches are given as suggestions in the Fuzzy Match screen.
Alt-Enter After editing the Fuzzy Match, press Alt-Enter to paste the translation into the text, press, Alt-Ins and further.
Even if there are no fuzzy matches to be expected, using Alt-Ins to confirm segments of which You are sure, may be handy at the moment of revising the translation, because you know you can skip the colored segments.
Ctrl-Alt-Bksp Restores the current segment to its original, untranslated, state.
9. HOW TO PASTE ITEMS FROM THE DICTIONARY INTO TRANSIT
ALT-T The cursor is on first letter of highlighted word: pressing Alt-T replaces the source term with the target term.
ALT-G + Letter Pressing ALT-G followed by the letter that corresponds with the translation will paste the translation at any cursor position.
Useful when there are various translations of the term, or when the position of the term is different from the source language.
10. HOW TO DEAL WITH BOLDFACE, ITALICS AND UNDERSCORE
Translating in Transit can be done either by Overtyping or by Inserting the translation. Most users prefer inserting text. But text inserted before boldface text is not boldfaced. To overcome this problem you can de-activate Character formatting for the target window by pressing the AbC button in the Toolbar.
11. HOW TO DEAL WITH TABLES
When text displayed in Transit’s table emulation is hard to read, de-activate the tables button in the Toolbar for the target window only.
Also, when segments are very short, displaying each segment on a new line – using the de-activate tables button - may improve readability.

12. NOTEPAD FOR REMARKS
Alt-4 Brings you to the Notepad window. Any questions or remarks entered there will stay coupled to the corresponding segment. The Notepad runs synchronized with the Target language window. In the Notepad
Control- + / - will bring you to the next / previous note.
13. IF YOU WISH TO DO A FINAL REVISION IN WORD
With the free satellite version you can not restore your transit translation to Word. If you wish to revise from Word, you have two options:
1. Copying the translation from the target window and pasting it into Word; or2. Send me the target file (*.eng, or *.ita, or *.spa etc) which you can find in C:\
Transit\Projects\[project name]and I will send you the word document.
14. SENDING BACK THE TRANSLATION
Just go to Project, Send; Send file...You will be asked to give a name and a location for a file (this time with the extension *.txf).Then you just have to send it by e-mail to the agency.
15. ADVANCED DETAILS: WHERE IS MY TRANSLATION STORED?
The PXF file in which Transit projects come contains a number of files created during the so-called “Import process”. Importing is done by the Project Manager using Transit Professional. By importing the Word file, the Project manager prepares it for processing with Transit.
Essentially, importing means: Stripping the Word file from its specific lay-out codes, and storing them temporarily in a file
with the extension *.COD. The *.COD file is needed to be able to restore the translated Transit file to its original Word layout. This inverse process is called Exporting.Importing and Exorting can not be done with Transit Satellite PE. Therefore the *.COD file is not sent to the translator;
Duplicating the resulting text file in order to create the so-called Language Pair, and giving them distinctive extensions, e.g. *.ENG and *.FRA, depending on the languages concerned; The two files of the language Pair are always sent to the translator.
Creating a file which contains the project settings, with relevant information about the job, such as source and target languages, dictionaries to be used in the translation project, etc. This is the *.PRJ file which is also sent to the translator.
Pretranslating on the basis of any earlier translations and extracting from these earlier translations any fuzzy matches and storing them in files to be sent to the translator as _aextr_1.eng and _aextr_1.fra
After import, the Project Manager “Sends” the entire project to the translator. Transit wraps all relevant files:
- language pair- prj file with the project settings- any reference material- plus the relevant Dictionaries (with exotic names like {E17697C0-55CD-
11D5-8926-0050DA47E859}
in one single compressed PXF file.
By “Receiving” the Transit project, you instruct Transit to store all project files in: C:\Program Files\Transit\Projects\<folder defined by the Project Manager>
INDEX
K
Keystrokes+/- (Jumping between segments.....................................................................................................6Alt+Ins (Confirming translation)....................................................................................................6Alt-1 (Source window)...................................................................................................................5Alt-2 (Target window)....................................................................................................................5Alt-3 (Online Dictionary)...............................................................................................................5Alt-4.................................................................................................................................................8Alt-4 (Note Pad)..............................................................................................................................5Alt-5 (Fuzzy Match window............................................................................................................5Alt-Enter..........................................................................................................................................7Alt-G + Letter (Pasting term).......................................................................................................7Alt-T (Replacing term...................................................................................................................7Control- +/-......................................................................................................................................8Ctrl-Alt-Bksp...................................................................................................................................7