instructions for use - stryker · .com 1 ... • refer to the instructions for use ... stryker...
TRANSCRIPT

www.stryker.com 1
US and Corresponding Foreign Patents Pending
Instructions for Use
Navigation System II-CartREF 7700-100-000
2008-05-05 7700-100-700 Rev. E www.stryker.com
c1275

2 www.stryker.com
• This equipment is not suitable for use in the presence of fl ammable anesthetic mixture with air, oxygen, or nitrous oxide.
• To avoid operating room staff injury and/or product damage, ensure that the Navigation System II-Cart is in parking position when transported and stored.
• When unlocking the camera articulated arm and the movable monitor, pay attention not to bruise your fi ngers or hand. Follow the instruc-tions contained in this manual.
• DO NOT service this device. It contains no parts the user can service. If service is re-quired, contact your Stryker Navigation sales representative.
• Do not place the Navigation System II-Cart near equipment that generates a magnetic fi eld as stored patient data can be erased.
• To prevent overheating, do not place the Navigation System II-Cart in proximity of heat sources such as radiators or air ducts.
• To prevent product damage or personal injury when opening the rear door or the key-
board/mouse cover, carefully follow the instruc-tions contained in this manual.
• Refer to the Instructions for Use for the Naviga-tion System II-Camera for user/patient safety information related to the camera.
• Take special precautions regarding electro-magnetic compatibility (EMC) when using this medical electronic equipment. Install and put the equipment into service according to the EMC information in the EMC Specifi ca-tions Manual REF 6000-005-770. This medi-cal equipment meets all requirements in the IEC 60601-1-2 standard and can be installed in a normal environment. The equipment must not be placed or installed close to strong elec-tromagnetic sources which may infl uence the function of this equipment.
• Excessive infrared radiation from external sources can infl uence localization of the instru-ments by the Navigation System. Refer to the Navigation System II-Camera Instructions for Use.
CAUTIONS:• Do not use any part of the Navigation Sys-
tem II-Cart for loading, transport or storage unless otherwise specifi ed. Failure to comply may lead to product damage and malfunction.
• To avoid product failure, protect the Navigation System II-Cart from fl uid leakage into the hous-ing or any opening.
User/Patient Safety WARNINGS:• Read and understand this information. Famil-
iarization with the Stryker® Navigation Sys-tem II prior to its use is important. Only trained personnel are to use this system. Contact your Stryker Navigation sales representative for more detailed information.
• Before using any component compatible with the Navigation System II-Cart, read and un-derstand the instructions. Pay special attention to the user/patient safety information provided in the instructions for use supplied with the individual components. Failure to comply may result in patient and/or operating room staff injury or damage to the system components.
• Use only IEC 60601-1 and IEC 60601-2 ap-proved components and accessories unless otherwise specifi ed. Other componentes and accessories may not properly interface with the Navigation System II-Cart or may result in increased electromagnetic emissions or decreased electromagnetic immunity of the system. Contact your Stryker Navigation sales representative for more detailed information.DO NOT modify any component or accessory. Failure to comply may result in patient and/or health care staff injury.
• Prior to each use, the Navigation System II-Cart should be checked for loose components and damage. DO NOT use if these conditions exist. If service is required, contact your Stryker Navigation sales representative immediately.
• Prior to surgery, the Navigation System II-Cart should be checked together with the navigated instruments to ensure the equipment functions properly.
• Clean and inspect the Navigation System II-Cart before fi rst and every use. Refer to the cleaning, inspection and maintenance instruc-tions contained in this manual.
• Performing procedures with the Navigation System II-Cart other than those specifi ed in these instructions or outside of its intended use will compromise the navigation accuracy.
• Spilling liquids on any electrical device at-tached to the Navigation System II-Cart should warrant inspection by an authorized Stryker service technician. To avoid product damage, do not place bottles with liquids on the control interface.
• Lock the articulated arms before transport, storage, or monitor/camera removal. Follow the instructions contained in this manual.
• To avoid product damage, do not hang weights on the articulated arms.

www.stryker.com 3
Function and Features - FrontNavigation System II-Camera• REF 7700-500-000• Communicates the coordinate location of the navigated instruments to the system. It
identifi es the location and orientation of one or more instruments in three-dimensional space.
For further information refer to the Instructions for Use for the Navigation System II-Camera.
Monitors• Display patient images for surgeon and operat-
ing room staff during the surgical procedure.
Magneto-optical Drive Interface • Is optional and serves for magneto-optical data
transfer.
Wheel Locks• Press each wheel lock lever on the foremost
wheels to lock the Navigation System II-Cart.
Power Switch• Press to turn the Navigation System II-Cart on.
Camera Handle• Use to position the camera in the surgical fi eld
for optimal alignment towards patient/instru-ments.
Basket• Maximum loading capacity (each): 2 kg (lb 4.5) • Load for storage or detach for installation of the
Printer Tray REF 7700-109-001. For further details, refer to the Important Infor-
mation supplied with the Printer Tray.
Figure 1: Navigation System II-Cart (Front View)
Power Switch
Navigation System II-Camera
Monitor
Movable Monitor
Wheel Lock (two total)
Camera Handle
Magneto-optical Drive Interface
Basket(two total)
Intended Use of the Navigation System II-CartThe Navigation System II-Cart is intended to be used as a component of the Navigation System II. The Stryker Navigation System II-Cart contains a computer workstation with the Navigation System II software and various components necessary to run the system. The Cart is equipped with articulated arms for camera and monitor to be positioned independently for optimal system fl exibility.

4 www.stryker.com
Keyboard• User interface to the navigation software
Mouse Box • Used for mouse storage. The optical mouse
enables operating room staff to interface with the navigation software.
Mouse Pad• Flat surface for mouse rolling
Keyboard/Mouse Cover• Push forward to access keyboard and mouse.• Slide down during transport, cleaning and storage.
Quick Guide Retaining Cover• Open to access or insert the Navigation System II-Cart Quick Guide.
Figure 2: Navigation System II-Cart Control Interface(Top View)
Function and Features - Control Interface
Mouse Box
Keyboard/Mouse Cover
Mouse Pad
Keyboard
Quick GuideRetaining Cover

www.stryker.com 5
Figure 3: Navigation System II-Cart Parking Position(Back View)
DVD Drive
Monitor Lock
Monitor Lock• Engage whenever the Navigation System II-
Cart is transported or stored.
Function and Features - BackRear Door• Open to access or store the power cable. Refer
to the Navigation System II-Cart Quick Guide.
Camera Articulated Arm Lock• Pull down whenever the Navigation System II-
Cart is transported or stored.
DVD Drive • Use for data transfer on digital versatile discs.
Camera Articulated Arm Lock
Rear Door

6 www.stryker.com
Function and Features - I/O PanelI/O Panel • Use to connect the following IEC 60601-1 and
IEC 60601-2 approved accessories: - Second camera - Universal fi rewire A/B devices - USB 2.0 devices - Fluoro C-Arm - Video SVHS - Monitor beamer (VGA/DVI) - Network/ethernet
Figure 4: Navigation System II-Cart I/O Panel

www.stryker.com 7
Instructions
1 Unlock Wheels and Transport1.1 Unlock foremost wheels. See fi gure 5.
1.2 Ensure the Navigation System II-Cart is in parking position for transport into the ope-rating room. Lock camera and monitor.
See fi gure 3. 2 Initialize 2.1 Open the rear door.
2.2 Plug the power cable into the appropriate outlet.
2.3 Turn on the Navigation System II-Cart by pressing the power switch. See fi gure 1.
2.4 Log in.
2.5 Start the application.
2.6 Load or enter patient data.
3 Operating Room Setup 3.1 Position the Navigation System II-Cart
with the rear door oriented towards the operating room table.
3.2 Unlock the camera articulated arm. See fi gure 6.
3.3 Use the grip to unlock and position the movable monitor as required. See fi gure 8.
3.4 Orient the camera and the monitor towards
the operating room table as shown in the operating room setup. See fi gure 9.
3.5 Lock the wheels.
Figure 5: Unlock Wheel
Figure 8: Unlock Monitor
Figure 6: Unlock Camera Articulated Arm
Grip
Figure 7: Camera Repositioning

8 www.stryker.com
4 Intraoperative Use 4.1 Disinfect the camera handle before using
it to reposition the camera within the sterile surgical fi eld.
4.2 The control interface/respective monitor
can be used for data input outside the sterile surgical fi eld.
Figure 9: Operating Room Setup
5 System Shutdown5.1 Turn the Navigation System II-Cart off.
5.2 Unplug the power cable.
5.3 Open the rear door and wind up the power cable for storage.
5.4 Lock the monitor and the camera articulated arms.
5.5 Slide down the keyboard/mouse cover.

www.stryker.com 9
Cleaning and Inspection Instructions
We recommend manual cleaning method.
CAUTIONS:
• DO NOT allow moisture in any opening or on the power cable. Fluids/moisture may damage the electrical components.
• DO NOT use solvents, lubricants, or other chemicals unless otherwise specifi ed.
See table 1.
Supplier Agent Dilution
Ecolab Incidin® 2%None Isopropyl alcohol 70%
Table 1: Succesfully Tested Cleaning Agents
Cleaning Instructions
1. Clean the whole surface of the Navigation Sys-tem II-Cart only if required.
2. For the camera, refer to the cleaning recom-mendations included in the Instructions for Use supplied with the Navigation System II-Cam-era.
3. Carefully wipe the surface using a lint-free soft cloth dampened with a non-abrasive and mild detergent.
Inspection InstructionsAfter cleaning, visually inspect the Navigation System II-Cart under good light conditions for remaining debris. Repeat cleaning procedure again if required. Refer to the Instructions for Use for the Navigation System II-Camera for inspection recom-mendations related to the camera.
Handling and StorageTo ensure the longevity, performance and safety of this equipment, package in the original packaging materials.
Figure 10: Navigation System II-Cart in Storage Position
10 www.stryker.com
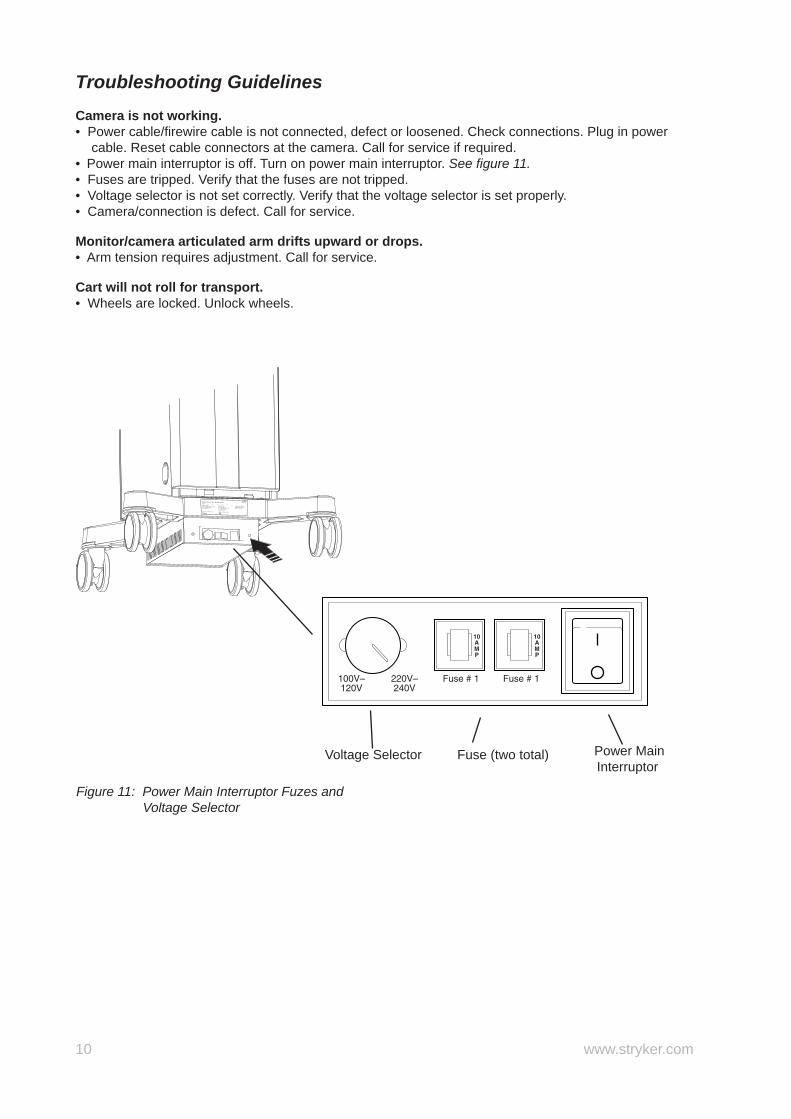
Troubleshooting GuidelinesCamera is not working.• Power cable/fi rewire cable is not connected, defect or loosened. Check connections. Plug in power
cable. Reset cable connectors at the camera. Call for service if required.• Power main interruptor is off. Turn on power main interruptor. See fi gure 11.• Fuses are tripped. Verify that the fuses are not tripped.• Voltage selector is not set correctly. Verify that the voltage selector is set properly.• Camera/connection is defect. Call for service.
Monitor/camera articulated arm drifts upward or drops.• Arm tension requires adjustment. Call for service.
Cart will not roll for transport.• Wheels are locked. Unlock wheels.
Figure 11: Power Main Interruptor Fuzes and Voltage Selector
Power Main Interruptor
Fuse (two total) Voltage Selector

www.stryker.com 11
Symbol Defi nitions
Precautionary Information
In accordance with the European Directive 2002/96/EC on Waste Electrical and Electronic Equipment, this symbol indicates that the product must not be disposed of as unsorted municipal waste. The product should be collected separately. Refer to your local distributor for return and/or collection systems available in your country.
c CE conformity: Essential Require-ments of Medical Device Directive 93/42/EEC.
Labeling
Precautionary Information When applied to the monitor/camera articulated arm, caution: arm drifts up if monitor/camera is demounted during service.
Prevent tilt by moving the Cart slowly.
Prevent operating room staff injury/product damage during transport by locking the articulated arms.
Lock camera articulated arm.
Lock movable monitor.
Rotate to wrap up power cable.
Do not exceed the maximum loading capacity of each basket.
This label is placed on the inner compartment of the Navigation System II-Cart.
Camera handle is not sterile.
These labels are placed on the Navigation System II-Cart.

12 www.stryker.com
Specifi cations*Model: REF 7700-100-000 Navigation System II-Cart Size: 191,3 cm (75.31 in.) height (parking position) 249,2 cm (98.11 in.) height (max) 68,0 cm (26.77 in.) width 81,1 cm (31.92 in.) length Weight: 222 kg (490 Ib) Approvals: CSA International CAN/CSA-C22.2 No. 601.1-M90 IEC 60601-1 EN 60601-1 IEC 60601-1-2 EN 60601-1-2 US UL 60601-1 04
Material: Plastic parts: SMC Lonza Hup 17/28 RN-1090 (UL94VO) Duroplast U 242-2 component polyurethane paintingSheet metal parts: Stainless steel Duroplast U 242-2 component polyurethane paintingBase: Spherulitic graphite iron Powder coating, polyester resin based
Electrical Characteristics:
Equipment Type: Class 1 Power Supply: 100 V -120 V ~ 50-60 Hz 9.5 A 220 V - 240V ~ 50-60 Hz 4.3 A Operation:
Storage and Transportation:
Conformity: The Stryker RFID Reader Module of Navigation System II Cart, Model Number 7700-101-035, is conform in accordance with „Article 46-2.1.1 of Dempa-hou Shikou Kisoku“.
Manufactured and Distributed by:Stryker Leibinger GmbH & Co. KGBötzinger Straße 4179111 Freiburg, Germanyt: +49 761 4512-0
Distributed by:Stryker Navigation4100 East Milham AvenueKalamazoo, MI 49001 USAt: +1 269 323 7700
Tran
slat
ed E
quiv
alen
t: 77
00-1
00-7
13
–10°C
10°C
30°C
55°C
25%
85%
10%
95%
1060 hPa
700
*Specifi cations listed are approximate and may vary slightly from unit to unit. Standards listed are valid unless a transition period may be applicable.