instructions for use · main oven function selector mini oven rotary knob main oven rotary knob...
TRANSCRIPT
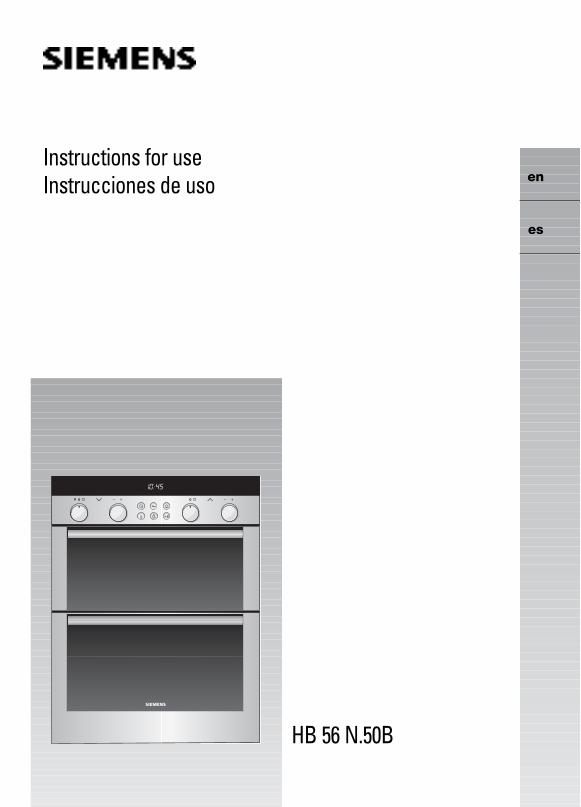
HB 56 N.50B
Instructions for useInstrucciones de uso en
es
2
en page 2 – 64 es página 65 – 127
Making cooking as much fun as eating
Please read this instruction manual. This will ensure that youmake use of all the technical benefits the cooker has to offer.
It will provide you with important safety information. You willthen be familiarised with the individual components of yournew cooker. And we will show you how to make settingsstep by step. It is quite simple.
The tables list the settings and shelf positions for numerouswell-known dishes. All these dishes are tested in our cookingstudio.
In the unlikely event of a fault, look here for information onhow to rectify minor faults yourself.
A detailed table of contents will help you to find your wayaround quickly.
Enjoy your meal!
3
Table of contents
Important information . . . . . . . . . . . . . . . . . . . . . . 6
Before installation . . . . . . . . . . . . . . . . . . . . . . . . . . 6
Safety information . . . . . . . . . . . . . . . . . . . . . . . . . . 6
Reasons for damage . . . . . . . . . . . . . . . . . . . . . . . . 7
Your new cooker . . . . . . . . . . . . . . . . . . . . . . . . . . 8
The control panel . . . . . . . . . . . . . . . . . . . . . . . . . . 8
Function selector – Main oven . . . . . . . . . . . . . . . . 9
Rotary knob – Main oven . . . . . . . . . . . . . . . . . . . . 9
Function selector – Mini oven . . . . . . . . . . . . . . . . . 10
Rotary knob – Mini oven . . . . . . . . . . . . . . . . . . . . . 10
Control buttons and display panel . . . . . . . . . . . . . . 11
Push-in control knobs . . . . . . . . . . . . . . . . . . . . . . . 11
Types of heating – Main oven . . . . . . . . . . . . . . . . . 12
Types of heating – Mini oven . . . . . . . . . . . . . . . . . . 14
Oven and shelving accessories . . . . . . . . . . . . . . . . 15
Cooling fan . . . . . . . . . . . . . . . . . . . . . . . . . . . . . . . 19
Before using for the first time . . . . . . . . . . . . . . . 19
Heating up the oven . . . . . . . . . . . . . . . . . . . . . . . . 19
Pre-cleaning the accessories . . . . . . . . . . . . . . . . . 19
Setting the oven . . . . . . . . . . . . . . . . . . . . . . . . . . 20
Setting procedure . . . . . . . . . . . . . . . . . . . . . . . . . . 20
If the oven is to switch off automatically – Main oven . . . . . . . . . . . . . . . . . . . . . . . . . . . . . . . . 21
If the oven is to switch on and off automatically – Main oven . . . . . . . . . . . . . . . . . . . . . . . . . . . . . . 22
Residual heat indicator – Main and Mini oven . . . . . 23
Rapid heating – Main oven . . . . . . . . . . . . . . . . . . 24
Setting procedure . . . . . . . . . . . . . . . . . . . . . . . . . . 24
4
Table of contents
Automatic roasting – Main oven . . . . . . . . . . . . . 25
Ovenware . . . . . . . . . . . . . . . . . . . . . . . . . . . . . . . . 25
Preparing food . . . . . . . . . . . . . . . . . . . . . . . . . . . . 26
Programs . . . . . . . . . . . . . . . . . . . . . . . . . . . . . . . . 27
How long will the meal take to cook? . . . . . . . . . . . 28
Setting procedure . . . . . . . . . . . . . . . . . . . . . . . . . . 28
The oven should switch on and off automatically . . . 30
Tips for automatic roasting . . . . . . . . . . . . . . . . . . . 31
Sabbath setting – Main oven . . . . . . . . . . . . . . . . 32
Setting procedure . . . . . . . . . . . . . . . . . . . . . . . . . . 32
Time . . . . . . . . . . . . . . . . . . . . . . . . . . . . . . . . . . . . 33
Setting procedure . . . . . . . . . . . . . . . . . . . . . . . . . . 33
Timer . . . . . . . . . . . . . . . . . . . . . . . . . . . . . . . . . . . 34
Setting procedure . . . . . . . . . . . . . . . . . . . . . . . . . . 34
Basic settings – Main oven . . . . . . . . . . . . . . . . . 35
Changing the basic settings . . . . . . . . . . . . . . . . . . 36
Childproof lock . . . . . . . . . . . . . . . . . . . . . . . . . . . 37
Automatic time limiter . . . . . . . . . . . . . . . . . . . . . . 37
Care and cleaning . . . . . . . . . . . . . . . . . . . . . . . . . 38
Oven exterior . . . . . . . . . . . . . . . . . . . . . . . . . . . . . 38
Oven . . . . . . . . . . . . . . . . . . . . . . . . . . . . . . . . . . . . 38
Clean function – Main and Mini oven . . . . . . . . . . . 40
Cleaning the glass panels – Main and Mini oven . . . 41
Cleaning the rails . . . . . . . . . . . . . . . . . . . . . . . . . . . 43
Seal . . . . . . . . . . . . . . . . . . . . . . . . . . . . . . . . . . . . 44
Accessories . . . . . . . . . . . . . . . . . . . . . . . . . . . . . . 44
Troubleshooting . . . . . . . . . . . . . . . . . . . . . . . . . . 44
5
Table of contents
Replacing the oven light . . . . . . . . . . . . . . . . . . . . . 45
After-sales service . . . . . . . . . . . . . . . . . . . . . . . . 46
Packaging and old appliances . . . . . . . . . . . . . . . 47
Tables and tips . . . . . . . . . . . . . . . . . . . . . . . . . . . 48
Cakes and pastries . . . . . . . . . . . . . . . . . . . . . . . . . 48
Baking tips . . . . . . . . . . . . . . . . . . . . . . . . . . . . . . . 51
Meat, poultry, fish . . . . . . . . . . . . . . . . . . . . . . . . . . 52
Tips for roasting and grilling . . . . . . . . . . . . . . . . . . 56
Frozen foods – Main oven . . . . . . . . . . . . . . . . . . . . 57
Defrosting – Main oven . . . . . . . . . . . . . . . . . . . . . . 58
Drying – Main oven . . . . . . . . . . . . . . . . . . . . . . . . . 59
Preserving – Main oven . . . . . . . . . . . . . . . . . . . . . . 60
Energy saving tips . . . . . . . . . . . . . . . . . . . . . . . . . . 62
Acrylamide in food . . . . . . . . . . . . . . . . . . . . . . . . 62
What can you do? . . . . . . . . . . . . . . . . . . . . . . . . . 63
Test dishes – Main oven . . . . . . . . . . . . . . . . . . . . 64
6
Important informationRead this instruction manual carefully. Only then will you be able to operate your cooker safely and correctly.
Please keep the instruction and installation manual in a safe place. Please pass on the instruction manual to the new owner if you sell the appliance.
Before installationTransport damage Check the appliance after unpacking it.
Do not connect the appliance if it has been damaged in transport.
Electrical connection The cooker may only be connected by an approved specialist. Losses resulting from damage caused by incorrect connection will invalidate warranty claims.
Safety informationThis appliance is intended for domestic use only.Only use the cooker for food preparation.
Hot oven Open the oven door carefully. Hot steam may � escape.Never touch the internal surfaces of the oven or the heating elements. There is a risk of burning. Children must be kept at a safe distance from the appliance.
Never store combustible items in the oven. Risk of fire.
Never clamp leads of electrical appliances in the hot oven door. The insulation on the leads could melt. There is a risk of short-circuiting.
7
Repairs Incorrectly done repairs are dangerous.� There is a risk of electrocution.Repairs may only be carried out by after-sales service technicians who have been fully trained by BSH.
If there is a fault, switch off the oven fuse at the fuse box. Call the after-sales service.
Reasons for damage
Baking tray, aluminium foil Do not place the baking tray on the oven floor. or dishes on the oven floor Do not cover it with aluminium foil.
Do not place dishes on the oven floor.This will cause heat accumulation. The baking and roasting times will no longer be correct and the enamel will be damaged.
Slide-in accessories To avoid damage, insert slide-in accessories carefully.
Baking paper If using 3D-hot air ˜, do not place greaseproof paper loosely in the oven (e.g. when heating the oven).The hot-air fan could draw in the paper which maydamage the heater and fan.
Water in the oven Never pour water directly into a hot oven. This could damage the enamel.
Fruit juice When baking very moist fruit cakes, do not put too much on the baking sheet. Fruit juice dripping from the baking sheet leaves stains that cannot be removed. It is recommended that you use the deeper universal pan.
Cooling with the oven door Only leave the oven to cool with the door closed. Do open not allow anything to become trapped in the oven
door. Even if you only leave the oven door open slightly, the fronts of adjacent units may become damaged over time.
8
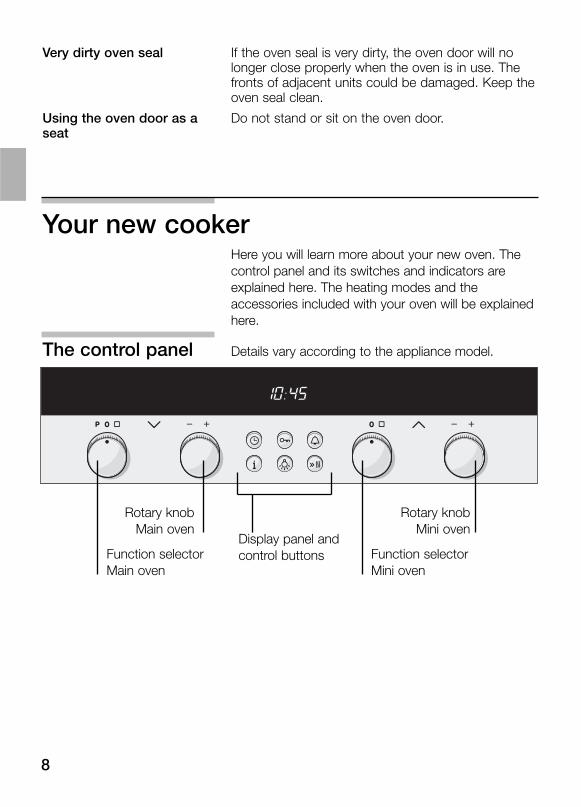
Your new cookerHere you will learn more about your new oven. The control panel and its switches and indicators are explained here. The heating modes and the accessories included with your oven will be explained here.
The control panel Details vary according to the appliance model.
Function selectorMain oven
Function selectorMini oven
Rotary knobMain oven
Rotary knobMini oven
Display panel andcontrol buttons
Very dirty oven seal If the oven seal is very dirty, the oven door will no longer close properly when the oven is in use. The fronts of adjacent units could be damaged. Keep the oven seal clean.
Using the oven door as a Do not stand or sit on the oven door.seat
9
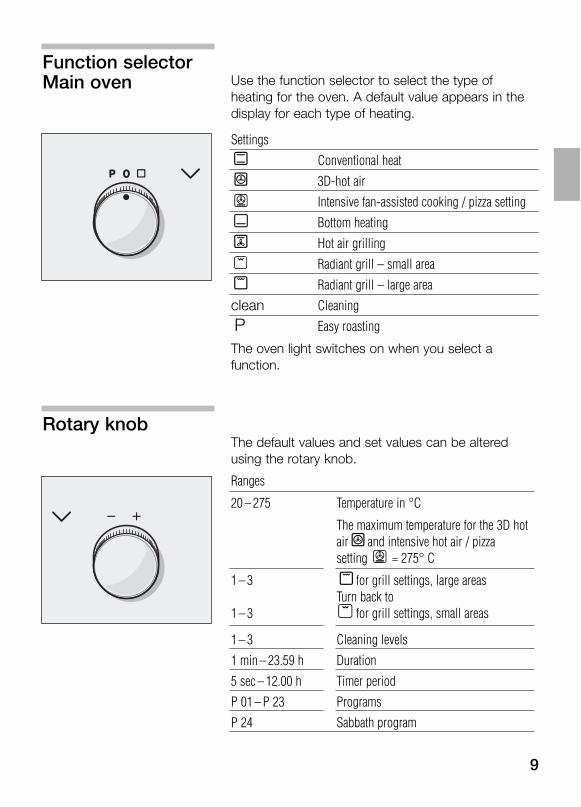
Rotary knobThe default values and set values can be altered using the rotary knob.
Ranges
20 – 275 Temperature in °C
The maximum temperature for the 3D hot air ˜ and intensive hot air / pizza setting T = 275° C
1 – 3 )for grill settings, large areasTurn back to
1 – 3 V for grill settings, small areas
1 – 3 Cleaning levels
1 min – 23.59 h Duration
5 sec – 12.00 h Timer period
P 01 – P 23 Programs
P 24 Sabbath program
Function selectorMain oven Use the function selector to select the type of
heating for the oven. A default value appears in the display for each type of heating.
Settings
/ Conventional heat
˜ 3D-hot air
T Intensive fan-assisted cooking / pizza setting
. Bottom heating
, Hot air grilling
V Radiant grill – small area
) Radiant grill – large area
clean Cleaning
P Easy roasting
The oven light switches on when you select a function.

10
Function selectorMini oven Use the function selector to select the type of
heating for the oven. A default value appears in the display for each type of heating.
Settings
0 Oven light
/ Conventional heat
. Bottom heating
V Radiant grill – small area
) Radiant grill – large area
clean Cleaning
The oven light switches on when you select a function.
Rotary knobThe default values and set values can be altered using the rotary knob.
Range
50-275 Temperature in °C
1 – 3 )for grill settings, large areasTurn back to
1 – 3 V for grill settings, small areas
1 – 3 Cleaning levels

11
Control buttons anddisplay panel
Clock button 6 Use this button to set the time of day, the cooking time * andthe completion time +
Key button E Use this button to switch the childproof lock on and off
Timer button 8 Use this button to set the timer
Info button i Use this button to call up information
Oven light button 0 Use this button to switch the main oven light on and off
Rapid heating button D Use this button to heat up the oven quickly.
The values you have set are shown in the display panel.The rise in temperature or the residual heat in the oven is shown in the preheating indicator below the temperature display.
Push-in controlknobs The control knobs can be pushed in. Simply press
the control knob to release or lock it.
You can turn the control knobs to the left or to the right.
12
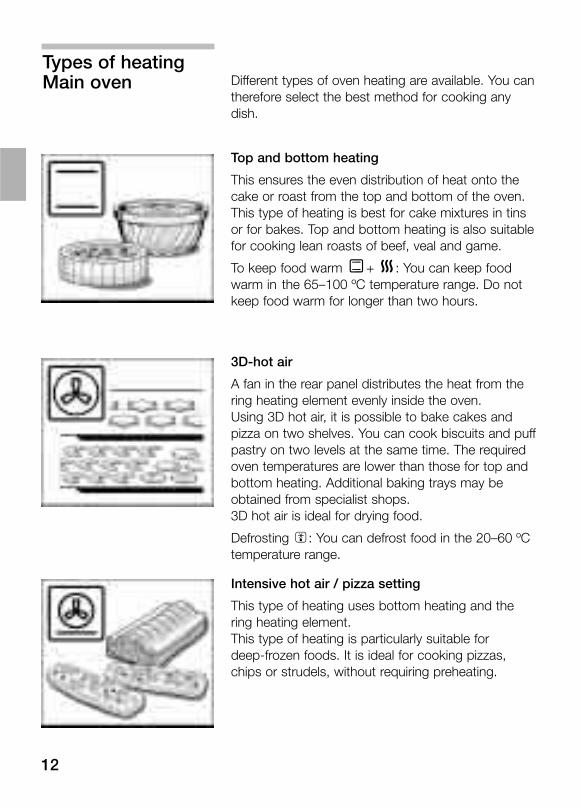
Types of heatingMain oven Different types of oven heating are available. You can
therefore select the best method for cooking any dish.
Top and bottom heating
This ensures the even distribution of heat onto the cake or roast from the top and bottom of the oven.This type of heating is best for cake mixtures in tins or for bakes. Top and bottom heating is also suitable for cooking lean roasts of beef, veal and game.
To keep food warm /+ s: You can keep food warm in the 65–100 ºC temperature range. Do not keep food warm for longer than two hours.
3D-hot air
A fan in the rear panel distributes the heat from the ring heating element evenly inside the oven.Using 3D hot air, it is possible to bake cakes and pizza on two shelves. You can cook biscuits and puff pastry on two levels at the same time. The required oven temperatures are lower than those for top and bottom heating. Additional baking trays may be obtained from specialist shops.3D hot air is ideal for drying food.
Defrosting e: You can defrost food in the 20–60 ºC temperature range.
Intensive hot air / pizza setting
This type of heating uses bottom heating and the ring heating element.This type of heating is particularly suitable for deep-frozen foods. It is ideal for cooking pizzas, chips or strudels, without requiring preheating.
13
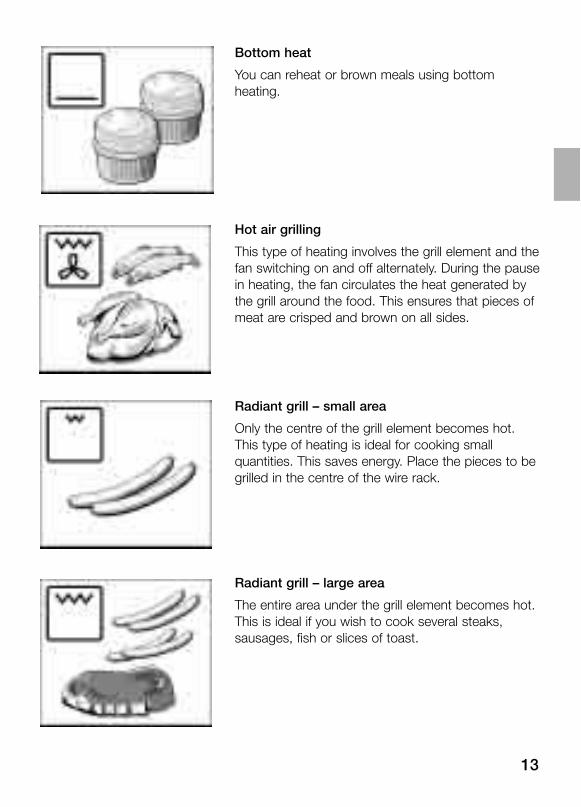
Bottom heat
You can reheat or brown meals using bottom heating.
Hot air grilling
This type of heating involves the grill element and the fan switching on and off alternately. During the pause in heating, the fan circulates the heat generated by the grill around the food. This ensures that pieces of meat are crisped and brown on all sides.
Radiant grill – small area
Only the centre of the grill element becomes hot. This type of heating is ideal for cooking small quantities. This saves energy. Place the pieces to be grilled in the centre of the wire rack.
Radiant grill – large area
The entire area under the grill element becomes hot. This is ideal if you wish to cook several steaks, sausages, fish or slices of toast.

14
Types of heating Different types of oven heating are available. You can
Mini oven therefore select the best method for cooking any dish.
Top and bottom heating
This ensures the even distribution of heat onto the cake or roast from the top and bottom of the oven.This type of heating is best for cake mixtures in tins or for bakes. Top and bottom heating is also suitable for cooking lean roasts of beef, veal and game.
Bottom heat
You can reheat or brown meals using bottom heating.
Radiant grill – small area
Only the centre of the grill element becomes hot. This type of heating is ideal for cooking small quantities. This saves energy. Place the pieces to be grilled in the centre of the wire rack.
Radiant grill – large area
The entire area under the grill element becomes hot. This is ideal if you wish to cook several steaks, sausages, fish or slices of toast.
Notes Heating is interrupted if you open the oven door while the oven is in operation.
To ensure that the heat is well distributed, the fan switches on for a short time during preheating for types of heating with top and bottom heating.
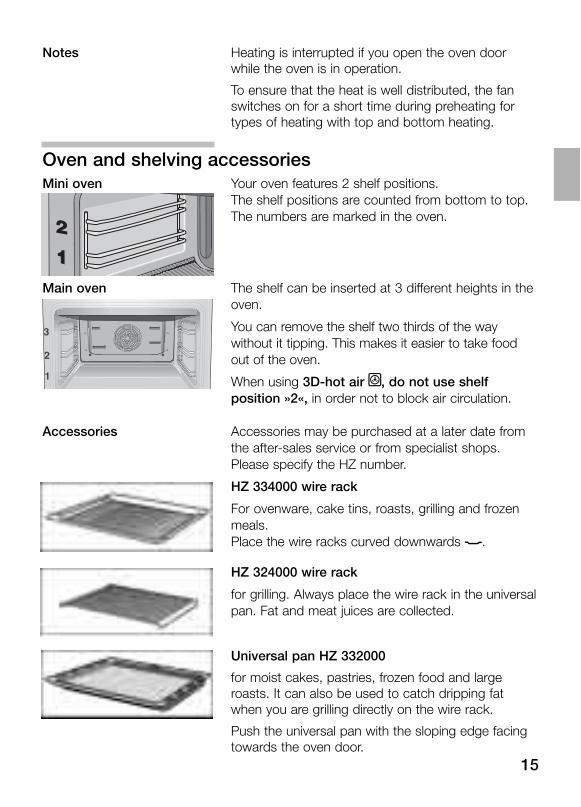
Oven and shelving accessoriesMini oven Your oven features 2 shelf positions.
The shelf positions are counted from bottom to top. The numbers are marked in the oven.
Main oven The shelf can be inserted at 3 different heights in the oven.
You can remove the shelf two thirds of the way without it tipping. This makes it easier to take food out of the oven.
When using 3D-hot air ˜, do not use shelf position »2«, in order not to block air circulation.
Accessories Accessories may be purchased at a later date from the after-sales service or from specialist shops. Please specify the HZ number.
HZ 334000 wire rack
For ovenware, cake tins, roasts, grilling and frozen meals.Place the wire racks curved downwards (.
HZ 324000 wire rack
for grilling. Always place the wire rack in the universal pan. Fat and meat juices are collected.
Universal pan HZ 332000
for moist cakes, pastries, frozen food and large roasts. It can also be used to catch dripping fat when you are grilling directly on the wire rack.
Push the universal pan with the sloping edge facing towards the oven door.
15
16
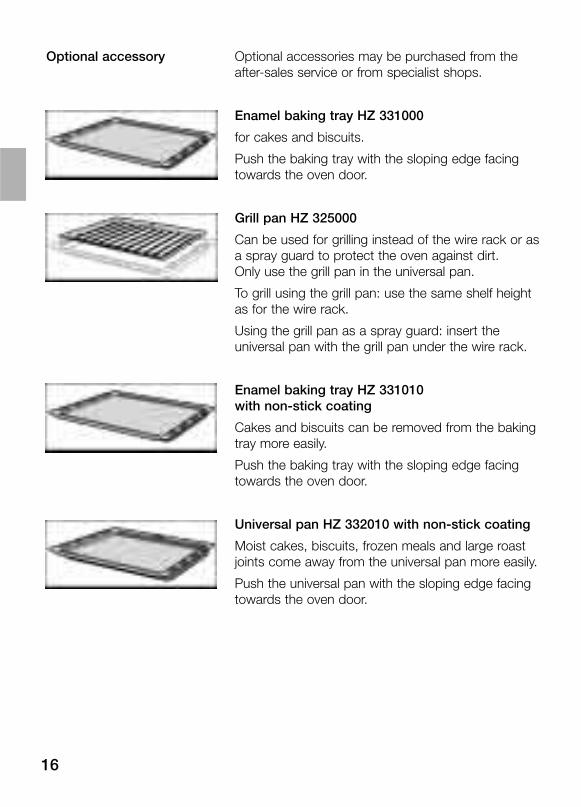
Optional accessory Optional accessories may be purchased from the after-sales service or from specialist shops.
Enamel baking tray HZ 331000
for cakes and biscuits.
Push the baking tray with the sloping edge facing towards the oven door.
Grill pan HZ 325000
Can be used for grilling instead of the wire rack or as a spray guard to protect the oven against dirt. Only use the grill pan in the universal pan.
To grill using the grill pan: use the same shelf height as for the wire rack.
Using the grill pan as a spray guard: insert the universal pan with the grill pan under the wire rack.
Enamel baking tray HZ 331010 with non-stick coating
Cakes and biscuits can be removed from the baking tray more easily.
Push the baking tray with the sloping edge facing towards the oven door.
Universal pan HZ 332010 with non-stick coating
Moist cakes, biscuits, frozen meals and large roast joints come away from the universal pan more easily.
Push the universal pan with the sloping edge facing towards the oven door.
17
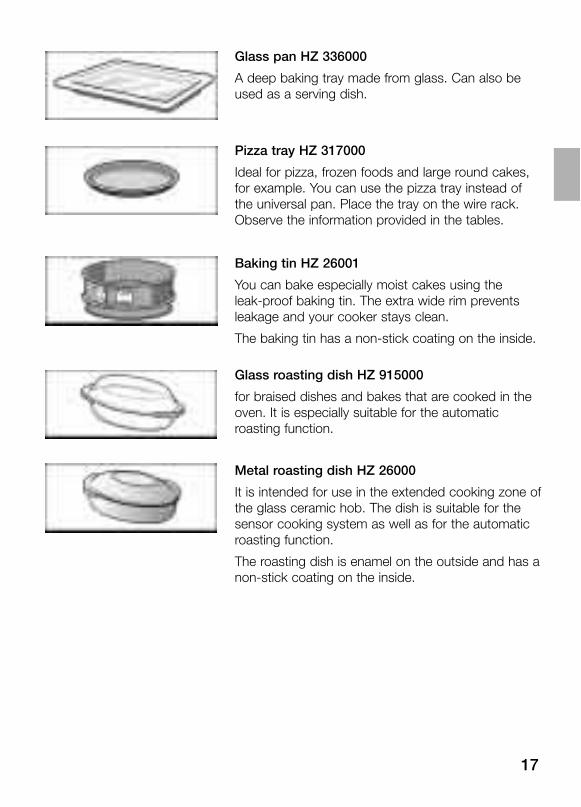
Glass pan HZ 336000
A deep baking tray made from glass. Can also be used as a serving dish.
Pizza tray HZ 317000
Ideal for pizza, frozen foods and large round cakes, for example. You can use the pizza tray instead of the universal pan. Place the tray on the wire rack. Observe the information provided in the tables.
Baking tin HZ 26001
You can bake especially moist cakes using the leak-proof baking tin. The extra wide rim prevents leakage and your cooker stays clean.
The baking tin has a non-stick coating on the inside.
Glass roasting dish HZ 915000
for braised dishes and bakes that are cooked in the oven. It is especially suitable for the automatic roasting function.
Metal roasting dish HZ 26000
It is intended for use in the extended cooking zone of the glass ceramic hob. The dish is suitable for the sensor cooking system as well as for the automatic roasting function.
The roasting dish is enamel on the outside and has a non-stick coating on the inside.
18
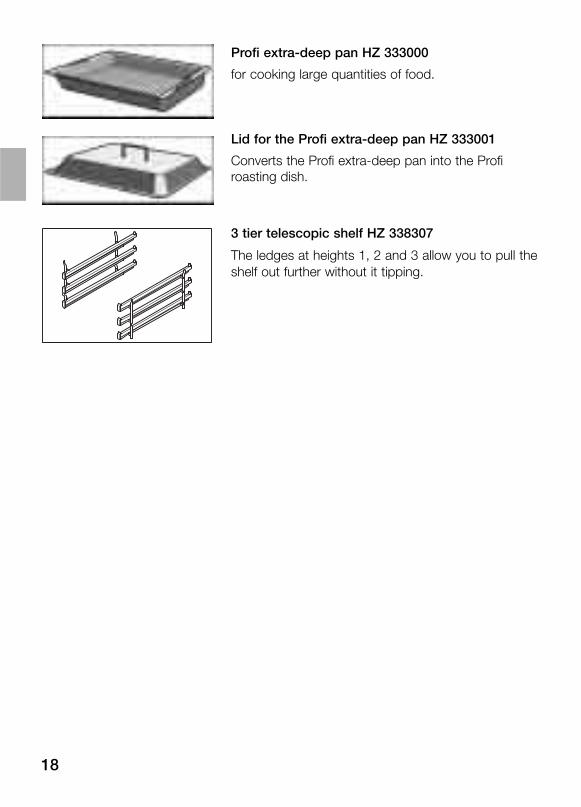
Profi extra-deep pan HZ 333000
for cooking large quantities of food.
Lid for the Profi extra-deep pan HZ 333001
Converts the Profi extra-deep pan into the Profi roasting dish.
3 tier telescopic shelf HZ 338307
The ledges at heights 1, 2 and 3 allow you to pull the shelf out further without it tipping.
19
Cooling fanThe oven is fitted with a cooling fan. It switches itself on and off as necessary. The warm air escapes above the door
Before using for the first timeThis section will tell you everything you need to do before using the cooker for the first time.
Heat the oven and clean the accessories. Read the safety instructions in the „Important information“ section.
Firstly, check to see if the 6 symbol and three zeros are flashing in the display.
If the 6 symbol and three Set the time.zeros are flashing 1. Press the 6 clock button.
12:00 appears and the 6 clock symbol flashes.
2. Set the time using the rotary knob(for the main oven).
The time selected is adopted after a few seconds. The cooker is now ready for use.
Heating up the ovenHeat the empty oven with the door closed to remove the new oven smell.
Method 1. Set the function selector to top/bottom heating t.A suggested temperature appears in the display.
2. Use the rotary knob to set the temperature to 240 ºC.
Switch off the function selector after 60 minutes.
Pre-cleaning theaccessories Please wash the accessories thoroughly with soapy
water and a cleaning cloth before using them.
20
Setting the ovenYou have various options for setting the oven.
Switching off the oven When your meal is ready, switch off the oven manually yourself.
The main oven switches off You can leave the kitchen for a long period.automatically
The main oven switches on You can put your meal in the oven in the morning, and off automatically for example, and set the oven so that your meal is
ready at midday.
Tables and tips The correct settings for many dishes can be found in the Tables and tips section.
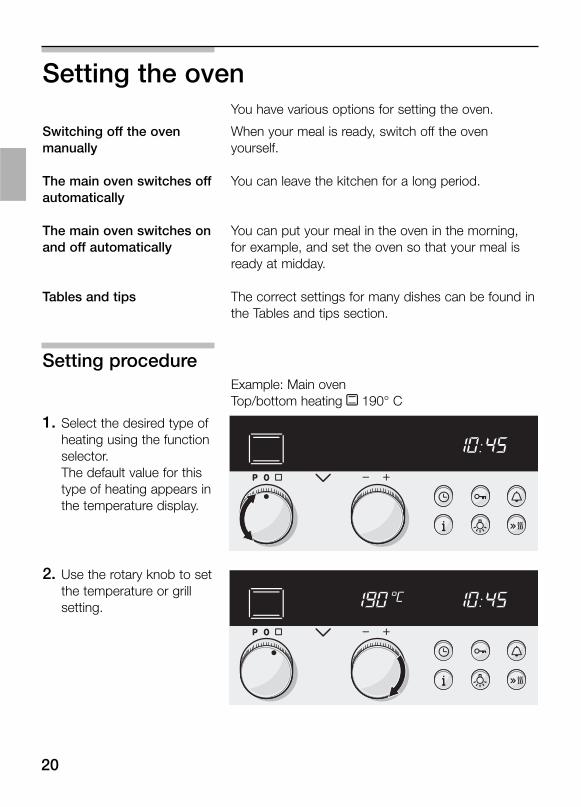
Setting procedureExample: Main ovenTop/bottom heating t 190° C
1. Select the desired type ofheating using the functionselector.The default value for thistype of heating appears inthe temperature display.
2. Use the rotary knob to setthe temperature or grillsetting.
21
Switching off Switch off the function selector when the meal is ready.
Changing the setting You may change the temperature or grill setting at any time.
Preheating indicator The preheating indicator provides a visual display of the oven temperature increase. It is best to insert the dish in the oven when all segments are lit.The preheating indicator does not appear if you are grilling.
You can call up the approximate preheating temperature with the Info i button.
The thermal inertia of the oven means that a temperature may be displayed during the heating up phase which differs from the actual oven temperature.
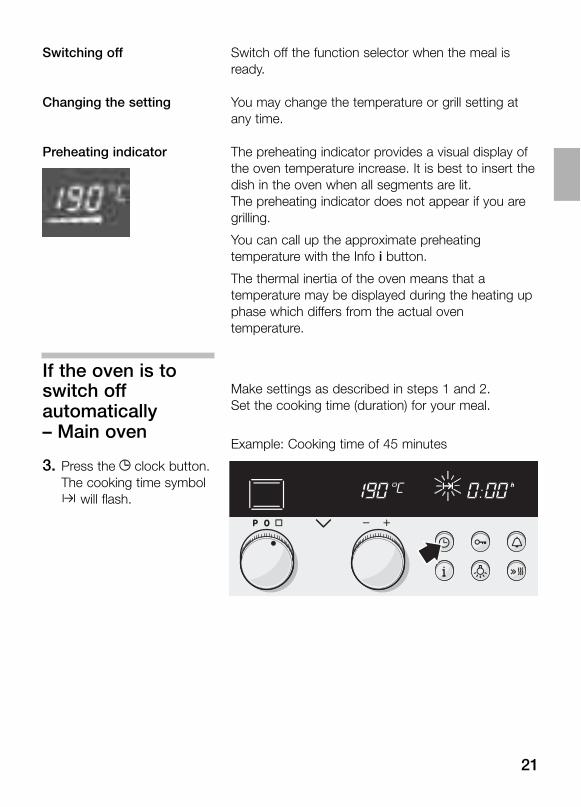
If the oven is to switch off Make settings as described in steps 1 and 2.
automatically Set the cooking time (duration) for your meal.
– Main ovenExample: Cooking time of 45 minutes
3. Press the 6 clock button.The cooking time symbol* will flash.
22
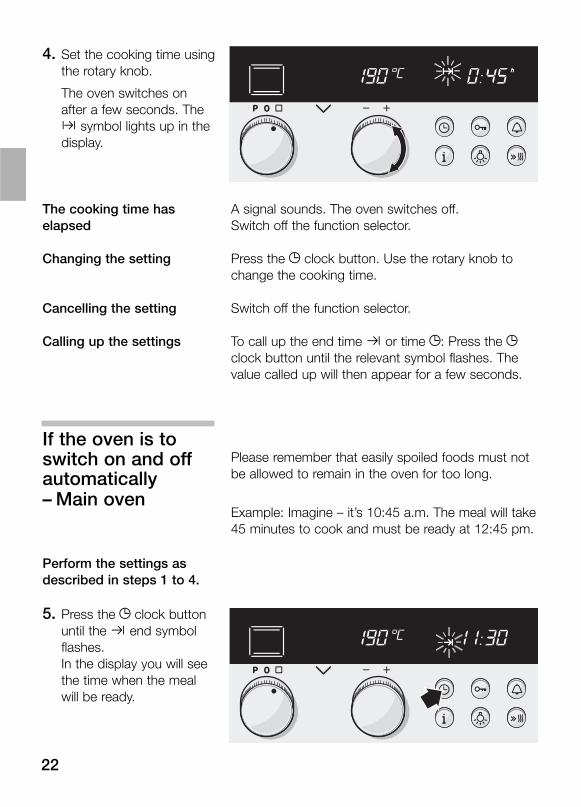
4. Set the cooking time usingthe rotary knob.
The oven switches onafter a few seconds. The* symbol lights up in thedisplay.
The cooking time has A signal sounds. The oven switches off.elapsed Switch off the function selector.
Changing the setting Press the 6 clock button. Use the rotary knob to change the cooking time.
Cancelling the setting Switch off the function selector.
Calling up the settings To call up the end time + or time 6: Press the 6clock button until the relevant symbol flashes. The value called up will then appear for a few seconds.
If the oven is toswitch on and off Please remember that easily spoiled foods must not
automatically be allowed to remain in the oven for too long.
– Main ovenExample: Imagine – it’s 10:45 a.m. The meal will take 45 minutes to cook and must be ready at 12:45 pm.
Perform the settings asdescribed in steps 1 to 4.
5. Press the 6 clock buttonuntil the + end symbolflashes.In the display you will seethe time when the mealwill be ready.
23
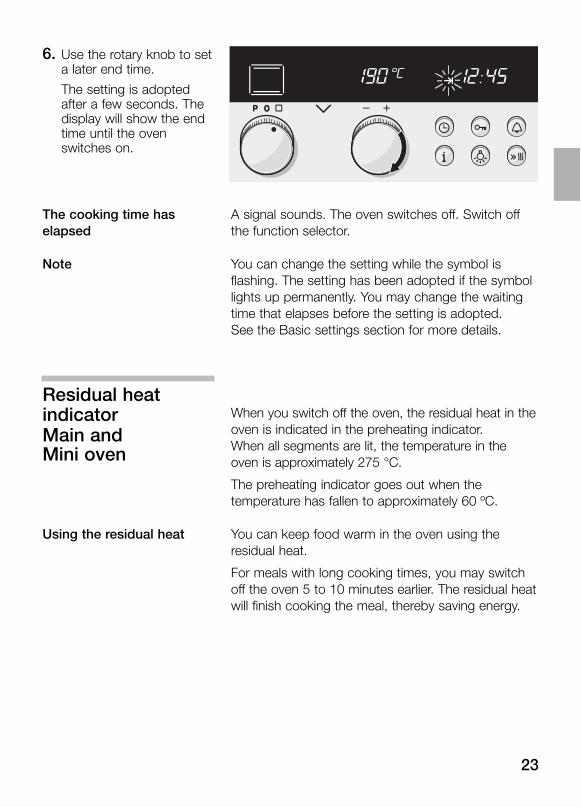
6. Use the rotary knob to seta later end time.
The setting is adoptedafter a few seconds. Thedisplay will show the endtime until the ovenswitches on.
The cooking time has A signal sounds. The oven switches off. Switch off elapsed the function selector.
Note You can change the setting while the symbol is flashing. The setting has been adopted if the symbol lights up permanently. You may change the waiting time that elapses before the setting is adopted. See the Basic settings section for more details.
Residual heatindicator When you switch off the oven, the residual heat in the
Main and oven is indicated in the preheating indicator.
Mini oven When all segments are lit, the temperature in theoven is approximately 275 °C.
The preheating indicator goes out when the temperature has fallen to approximately 60 ºC.
Using the residual heat You can keep food warm in the oven using the residual heat.
For meals with long cooking times, you may switch off the oven 5 to 10 minutes earlier. The residual heat will finish cooking the meal, thereby saving energy.
24
Rapid heatingMain oven This allows you to heat up the oven particularly
quickly.
Suitable types of heating ˜ = 3D-hot air
Setting procedureFirst set the oven.
Then press the rapid heating button D drücken.The D symbol lights up in the display.The oven will heat up. The segments of the preheating indicator will light up.
The rapid heating process You will hear a short signal. The D symbol will go is complete out. Put your dish in the oven.
Cancelling the rapid Press the rapid heating button. The symbol will go heating function out. The rapid heating process is cancelled.
Notes The rapid heating function is interrupted if you change the type of heating.
The rapid heating function will not work if the temperature set is below 100 ºC.If the temperature in the oven is only slightly below the temperature set, the rapid heating function is not necessary. It will not switch on.
During the rapid heating phase, you can call up the current preheating temperature with the “Info i“ button.
25
Automatic roastingfor the main oven Using automatic roasting, you will be able to produce
delicious braised meals, juicy roasts and tasty stews without the need for turning or basting the meat which, in turn, keeps your oven clean.
OvenwareThe automatic roasting function is only suitable for roasting in a covered dish. Only use a roasting dish with a suitable lid.
Suitable dishes Suitable dishes are heat-resistant (up to 300 ºC), glass or glass ceramic dishes.Add more fluid when roasting in enamalled steel, cast-iron or pressed aluminium dishes. The food will brown more.Please observe the instructions of the dish manufacturers.
High-grade steel dishes are only suitable in some cases. The food will not brown as much and the meat will not cook as well.
Unsuitable dishes Dishes made of shiny aluminium, unglazed clay or dishes with plastic handles are not suitable.
Dish size The meat should cover around two thirds of the base of the dish. This ensures that the meat juices turn out well.
There should be at least 3 cm between the meat and the lid. The meat may expand while roasting.
26
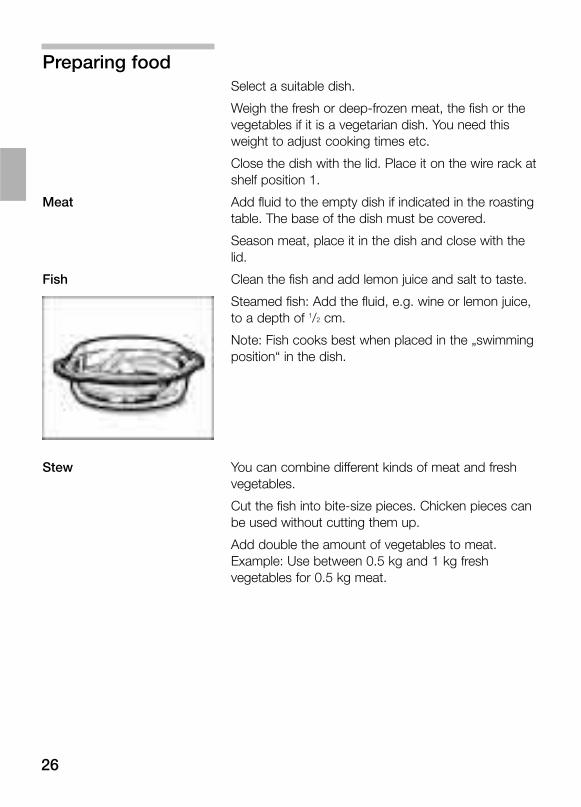
Preparing foodSelect a suitable dish.
Weigh the fresh or deep-frozen meat, the fish or the vegetables if it is a vegetarian dish. You need this weight to adjust cooking times etc.
Close the dish with the lid. Place it on the wire rack at shelf position 1.
Meat Add fluid to the empty dish if indicated in the roasting table. The base of the dish must be covered.
Season meat, place it in the dish and close with the lid.
Fish Clean the fish and add lemon juice and salt to taste.
Steamed fish: Add the fluid, e.g. wine or lemon juice, to a depth of 1/2 cm.
Note: Fish cooks best when placed in the „swimming position“ in the dish.
Stew You can combine different kinds of meat and fresh vegetables.
Cut the fish into bite-size pieces. Chicken pieces can be used without cutting them up.
Add double the amount of vegetables to meat. Example: Use between 0.5 kg and 1 kg fresh vegetables for 0.5 kg meat.
27
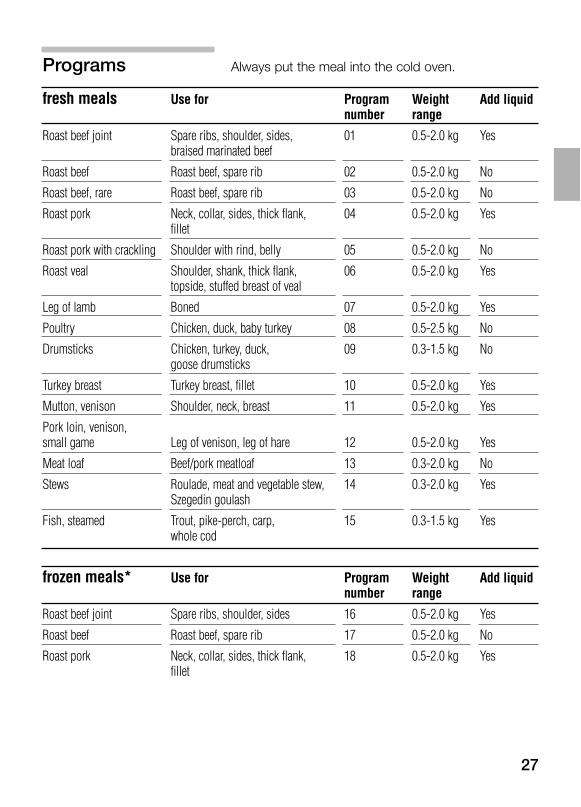
Programs Always put the meal into the cold oven.
fresh meals Use for Program Weight Add liquidnumber range
Roast beef joint Spare ribs, shoulder, sides, 01 0.5-2.0 kg Yesbraised marinated beef
Roast beef Roast beef, spare rib 02 0.5-2.0 kg No
Roast beef, rare Roast beef, spare rib 03 0.5-2.0 kg No
Roast pork Neck, collar, sides, thick flank, 04 0.5-2.0 kg Yesfillet
Roast pork with crackling Shoulder with rind, belly 05 0.5-2.0 kg No
Roast veal Shoulder, shank, thick flank, 06 0.5-2.0 kg Yestopside, stuffed breast of veal
Leg of lamb Boned 07 0.5-2.0 kg Yes
Poultry Chicken, duck, baby turkey 08 0.5-2.5 kg No
Drumsticks Chicken, turkey, duck, 09 0.3-1.5 kg Nogoose drumsticks
Turkey breast Turkey breast, fillet 10 0.5-2.0 kg Yes
Mutton, venison Shoulder, neck, breast 11 0.5-2.0 kg Yes
Pork loin, venison, small game Leg of venison, leg of hare 12 0.5-2.0 kg Yes
Meat loaf Beef/pork meatloaf 13 0.3-2.0 kg No
Stews Roulade, meat and vegetable stew, 14 0.3-2.0 kg YesSzegedin goulash
Fish, steamed Trout, pike-perch, carp, 15 0.3-1.5 kg Yeswhole cod
frozen meals* Use for Program Weight Add liquidnumber range
Roast beef joint Spare ribs, shoulder, sides 16 0.5-2.0 kg Yes
Roast beef Roast beef, spare rib 17 0.5-2.0 kg No
Roast pork Neck, collar, sides, thick flank, 18 0.5-2.0 kg Yesfillet
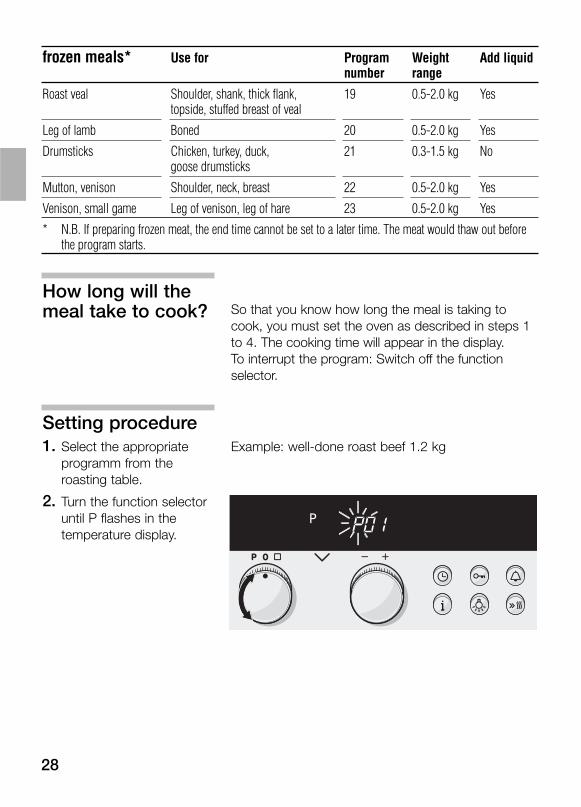
28
frozen meals* Use for Program Weight Add liquidnumber range
Roast veal Shoulder, shank, thick flank, 19 0.5-2.0 kg Yestopside, stuffed breast of veal
Leg of lamb Boned 20 0.5-2.0 kg Yes
Drumsticks Chicken, turkey, duck, 21 0.3-1.5 kg Nogoose drumsticks
Mutton, venison Shoulder, neck, breast 22 0.5-2.0 kg Yes
Venison, small game Leg of venison, leg of hare 23 0.5-2.0 kg Yes
* N.B. If preparing frozen meat, the end time cannot be set to a later time. The meat would thaw out before the program starts.
How long will themeal take to cook? So that you know how long the meal is taking to
cook, you must set the oven as described in steps 1 to 4. The cooking time will appear in the display.To interrupt the program: Switch off the function selector.
Setting procedure1. Select the appropriate Example: well-done roast beef 1.2 kg
programm from the roasting table.
2. Turn the function selectoruntil P flashes in thetemperature display.
29
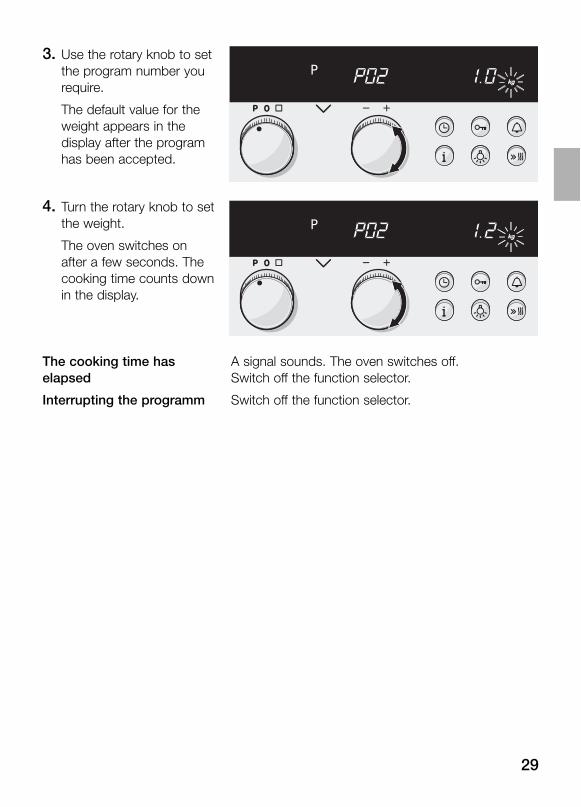
3. Use the rotary knob to setthe program number yourequire.
The default value for theweight appears in thedisplay after the programhas been accepted.
4. Turn the rotary knob to setthe weight.
The oven switches onafter a few seconds. Thecooking time counts downin the display.
The cooking time has A signal sounds. The oven switches off.elapsed Switch off the function selector.
Interrupting the programm Switch off the function selector.

30
The oven shouldswitch on and offautomatically Only use fresh meat or fresh fish.
for the main oven Do not leave the food to stand in the oven for toolong. Unchilled meat and fish will spoil easily.
Example: Program 02, the meal will be ready at 12:15 pm.
Perform the settings asdescribed in steps 1 to 4.
5. Press the 6 clock buttonuntil the ! end symbolflashes.In the display you will seethe time when the mealwill be ready.
6. Use the rotary knob to seta later end time.
The setting is adoptedafter a few seconds. Theend time appears in thedisplay. The ! symbol lights up. The oven startsat the appropriate time.
The cooking time has A signal sounds. The oven switches off. Switch off elapsed the function selector.
Note The set time counts down in the display.To call up remaining cooking time ?, end time ! or time 6 Press the 6 clock button until the appropriate symbol flashes.To call up the weight: Press the i information button.
31
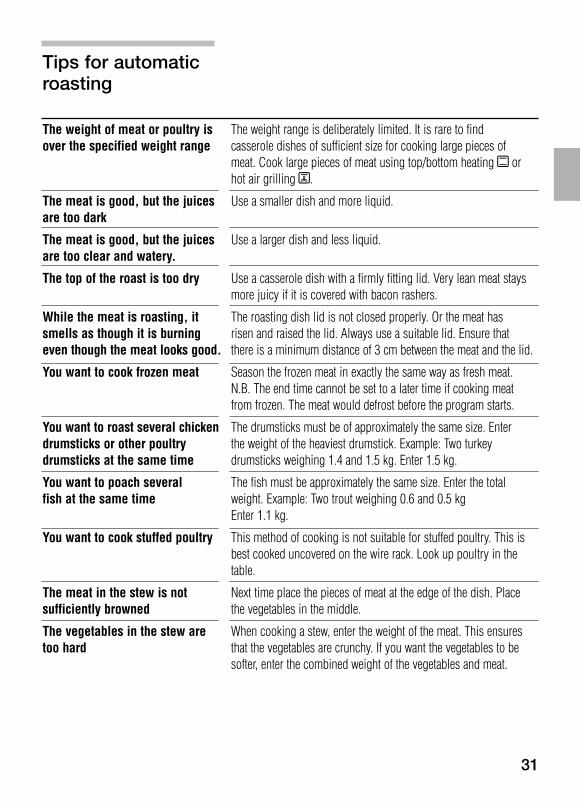
Tips for automaticroasting
The weight of meat or poultry is The weight range is deliberately limited. It is rare to find over the specified weight range casserole dishes of sufficient size for cooking large pieces of
meat. Cook large pieces of meat using top/bottom heating t orhot air grilling ˆ.
The meat is good, but the juices Use a smaller dish and more liquid.are too dark
The meat is good, but the juices Use a larger dish and less liquid.are too clear and watery.
The top of the roast is too dry Use a casserole dish with a firmly fitting lid. Very lean meat stays more juicy if it is covered with bacon rashers.
While the meat is roasting, it The roasting dish lid is not closed properly. Or the meat has smells as though it is burning risen and raised the lid. Always use a suitable lid. Ensure that even though the meat looks good. there is a minimum distance of 3 cm between the meat and the lid.
You want to cook frozen meat Season the frozen meat in exactly the same way as fresh meat. N.B. The end time cannot be set to a later time if cooking meat from frozen. The meat would defrost before the program starts.
You want to roast several chicken The drumsticks must be of approximately the same size. Enter drumsticks or other poultry the weight of the heaviest drumstick. Example: Two turkey drumsticks at the same time drumsticks weighing 1.4 and 1.5 kg. Enter 1.5 kg.
You want to poach several The fish must be approximately the same size. Enter the total fish at the same time weight. Example: Two trout weighing 0.6 and 0.5 kg
Enter 1.1 kg.
You want to cook stuffed poultry This method of cooking is not suitable for stuffed poultry. This is best cooked uncovered on the wire rack. Look up poultry in the table.
The meat in the stew is not Next time place the pieces of meat at the edge of the dish. Place sufficiently browned the vegetables in the middle.
The vegetables in the stew are When cooking a stew, enter the weight of the meat. This ensures too hard that the vegetables are crunchy. If you want the vegetables to be
softer, enter the combined weight of the vegetables and meat.
32
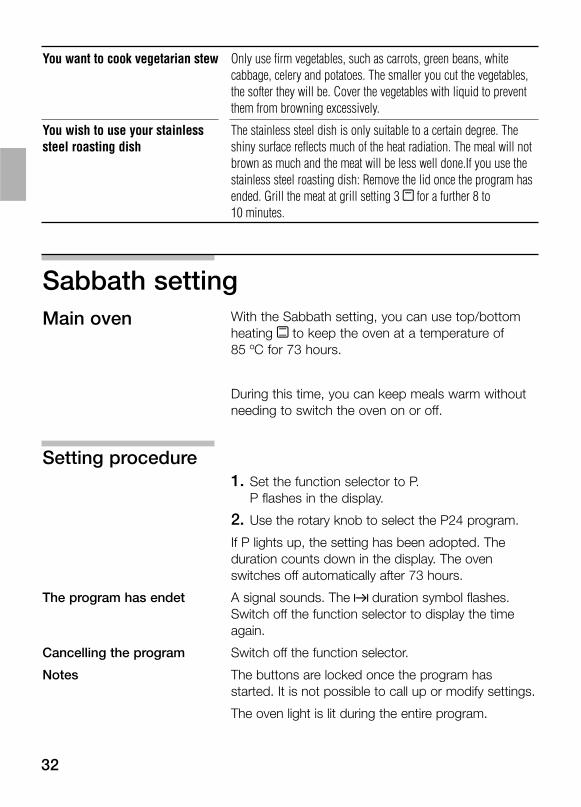
Sabbath settingMain oven With the Sabbath setting, you can use top/bottom
heating t to keep the oven at a temperature of 85 ºC for 73 hours.
During this time, you can keep meals warm without needing to switch the oven on or off.
Setting procedure1. Set the function selector to P.
P flashes in the display.
2. Use the rotary knob to select the P24 program.
If P lights up, the setting has been adopted. The duration counts down in the display. The oven switches off automatically after 73 hours.
The program has endet A signal sounds. The ? duration symbol flashes. Switch off the function selector to display the time again.
Cancelling the program Switch off the function selector.
Notes The buttons are locked once the program has started. It is not possible to call up or modify settings.
The oven light is lit during the entire program.
You want to cook vegetarian stew Only use firm vegetables, such as carrots, green beans, white cabbage, celery and potatoes. The smaller you cut the vegetables, the softer they will be. Cover the vegetables with liquid to prevent them from browning excessively.
You wish to use your stainless The stainless steel dish is only suitable to a certain degree. The steel roasting dish shiny surface reflects much of the heat radiation. The meal will not
brown as much and the meat will be less well done.If you use the stainless steel roasting dish: Remove the lid once the program has ended. Grill the meat at grill setting 3 x for a further 8 to 10 minutes.
33
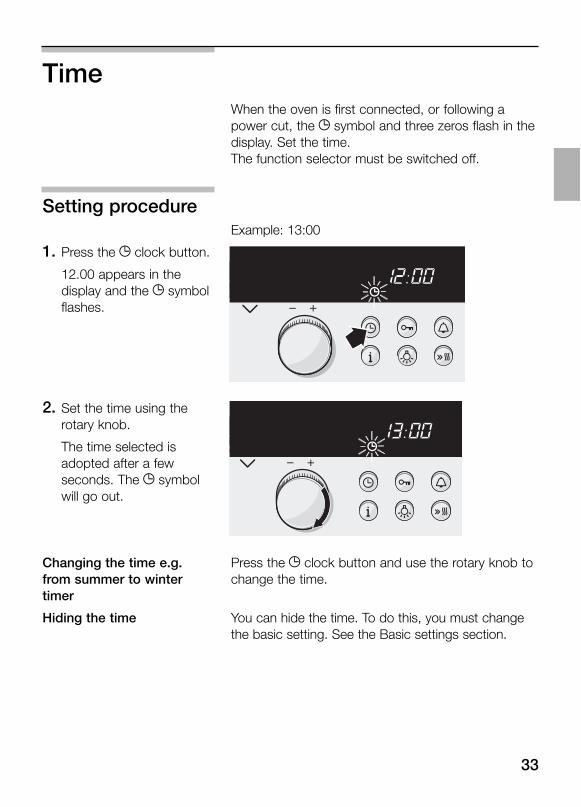
TimeWhen the oven is first connected, or following a power cut, the 6 symbol and three zeros flash in the display. Set the time.The function selector must be switched off.
Setting procedureExample: 13:00
1. Press the 6 clock button.
12.00 appears in thedisplay and the 6 symbolflashes.
2. Set the time using therotary knob.
The time selected isadopted after a fewseconds. The 6 symbolwill go out.
Changing the time e.g. Press the 6 clock button and use the rotary knob to from summer to winter change the time.timer
Hiding the time You can hide the time. To do this, you must change the basic setting. See the Basic settings section.
34
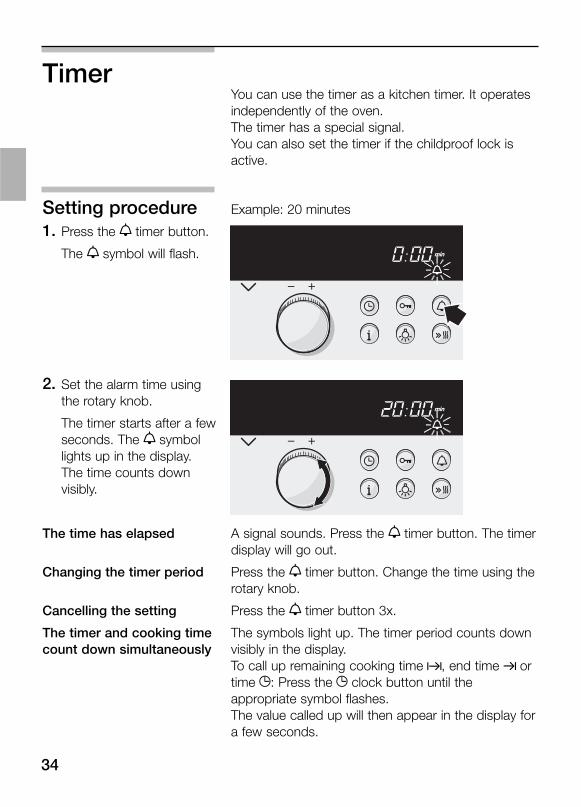
TimerYou can use the timer as a kitchen timer. It operates independently of the oven.The timer has a special signal.You can also set the timer if the childproof lock is active.
Setting procedure Example: 20 minutes
1. Press the 8 timer button.
The 8 symbol will flash.
2. Set the alarm time usingthe rotary knob.
The timer starts after a fewseconds. The 8 symbollights up in the display.The time counts downvisibly.
The time has elapsed A signal sounds. Press the 8 timer button. The timerdisplay will go out.
Changing the timer period Press the 8 timer button. Change the time using the rotary knob.
Cancelling the setting Press the 8 timer button 3x.
The timer and cooking time The symbols light up. The timer period counts down count down simultaneously visibly in the display.
To call up remaining cooking time ?, end time ! or time 6: Press the 6 clock button until the appropriate symbol flashes.The value called up will then appear in the display for a few seconds.
35
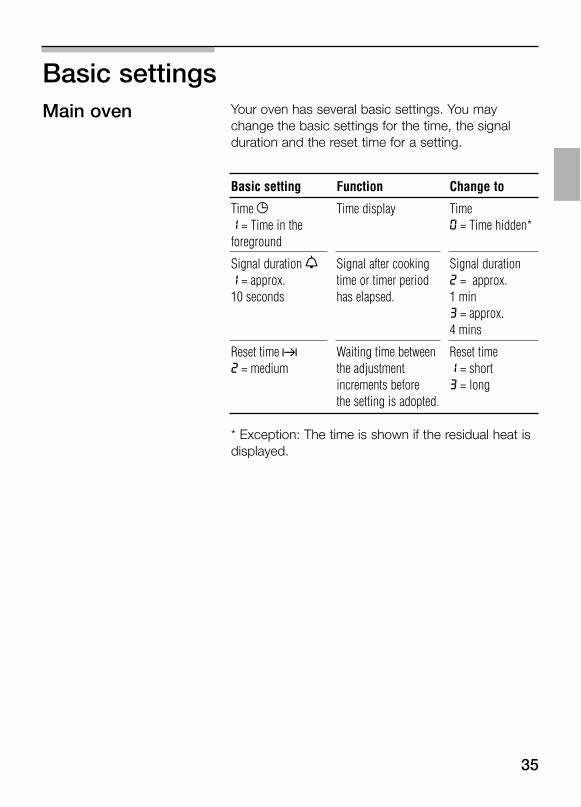
Basic settingsMain oven Your oven has several basic settings. You may
change the basic settings for the time, the signal duration and the reset time for a setting.
Basic setting Function Change to
Time 6 Time display Time1 = Time in the 0 = Time hidden* foreground
Signal duration 8 Signal after cooking Signal duration1 = approx. time or timer period 2 = approx.10 seconds has elapsed. 1 min
3 = approx. 4 mins
Reset time ? Waiting time between Reset time2 = medium the adjustment 1 = short
increments before 3 = longthe setting is adopted.
* Exception: The time is shown if the residual heat is displayed.
36
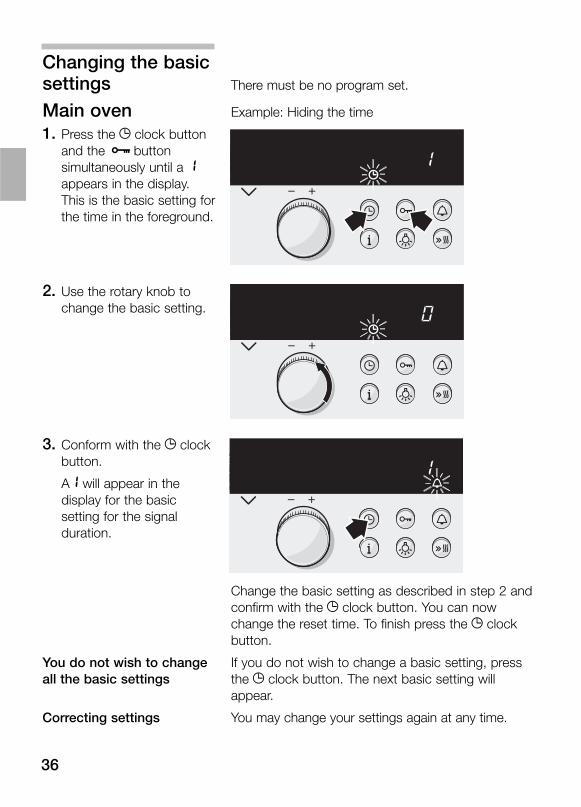
Changing the basicsettings There must be no program set.
Main oven Example: Hiding the time
1. Press the 6 clock buttonand the Ebuttonsimultaneously until a 1appears in the display.This is the basic setting forthe time in the foreground.
2. Use the rotary knob tochange the basic setting.
3. Conform with the 6 clockbutton.
A1 will appear in thedisplay for the basicsetting for the signalduration.
Change the basic setting as described in step 2 and confirm with the 6 clock button. You can now change the reset time. To finish press the 6 clock button.
You do not wish to change If you do not wish to change a basic setting, press all the basic settings the 6 clock button. The next basic setting will
appear.
Correcting settings You may change your settings again at any time.
37
Childproof lock for the main ovenThe oven has a childproof lock to prevent children switching it on accidentally.
Locking the oven The function selector must be switched off.Press the E key button until the E symbol appears in the display. This will take approximately 4 seconds.
Unlocking Press the E key button until the Esymbol goes out.
Notes You can set the timer and the clock even when the oven is locked.
Automatic time limiterIf you have forgotten to switch off the oven, the automatic time limiter will be activated. Oven operation will be interrupted. The time when this happens depends on the selected temperature or grill setting.
A 5 appears in the display when the oven is no longer heating up
The heating function is interrupted until you switch off the function selector. The 5 will go out.You can now reset the oven.
Cancelling the automatic If you enter a cooking time, the oven will then switch time limiter off automatically.
The time limiter is cancelled.
38
Care and cleaningDo not use high-pressure cleaners or steam jets.
Oven exteriorWipe the oven with water and a little washing-up liquid. Dry it with a soft cloth.
Caustic or abrasive substances are not suitable. If any such substances come into contact with the frontage, wipe it off immediately with water.
Notes Slight differences in the colours on the appliance front are caused by the use of different materials, such as glass, plastic and metal.
Shadows on the door panel which resemble smears are reflections from the oven light.
Appliances with stainless Always remove any flecks of limescale, grease, steel fronts cornflour and egg white immediately. Corrosion can
form under such flecks.
Use stainless steel care products. Follow the manufacturer’s instructions. Try out the product on a small area first, before using on the whole surface.
Appliances with aluminium Use a mild window-cleaning detergent. Wipe the fronts area with a soft window cloth or a fluff-free
micro-fibre cloth, using a horizontal action without applying pressure.
Aggressive cleaning products, scratchy sponges and rough cleaning cloths are not suitable.
OvenNever use coarse scouring pads or cleaning sponges. Oven cleaner may only be used on enamelled oven surfaces
For ease of cleaningthe oven door can be detached.
39
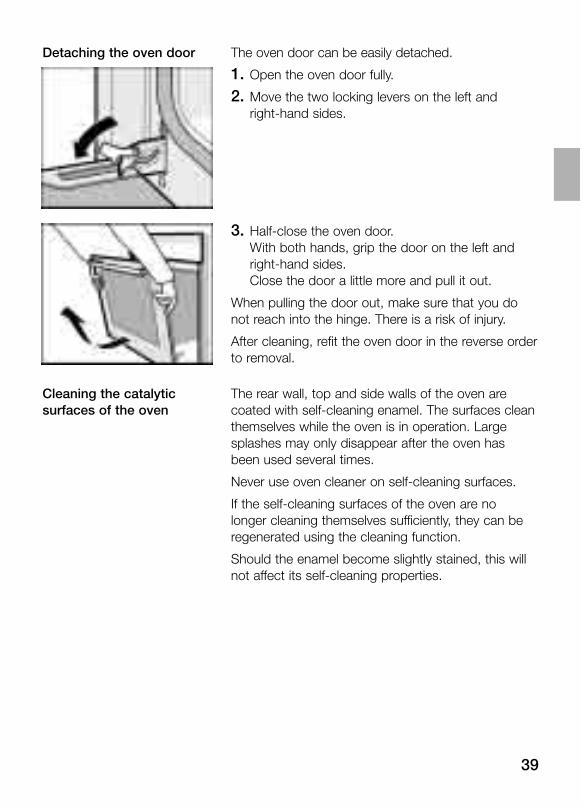
Detaching the oven door The oven door can be easily detached.
1. Open the oven door fully.
2. Move the two locking levers on the left and right-hand sides.
3. Half-close the oven door.With both hands, grip the door on the left and right-hand sides. Close the door a little more and pull it out.
When pulling the door out, make sure that you do not reach into the hinge. There is a risk of injury.
After cleaning, refit the oven door in the reverse order to removal.
Cleaning the catalytic The rear wall, top and side walls of the oven are surfaces of the oven coated with self-cleaning enamel. The surfaces clean
themselves while the oven is in operation. Large splashes may only disappear after the oven has been used several times.
Never use oven cleaner on self-cleaning surfaces.
If the self-cleaning surfaces of the oven are no longer cleaning themselves sufficiently, they can be regenerated using the cleaning function.
Should the enamel become slightly stained, this will not affect its self-cleaning properties.
40
Cleaning the oven floor Use hot soapy water or a vinegar solution.
It is best to use oven cleaner if the oven is very dirty. Only use oven cleaner in a cold oven.Never use oven cleaner on the self-cleaning surfaces of the oven.
Note:Enamel is baked on at very high temperatures. This can cause some slight colour variation. This is normal and does not affect the function. Do not use coarse scouring pads or strong cleaning agents to remove such discolorations.
The edges of thin trays cannot be completely enamelled. As a result, these edges can be rough. Anti-corrosion protection is guaranteed.
Cleaning the glass cover It is best to clean the glass cover with washing-up for the oven light liquid.
Cleaning functionThe cleaning function is a regeneration program. If the self-cleaning components of the oven are no longer cleaning themselves sufficiently, they can be regenerated using this function. They are then fully operational again.
Remove accessories and ovenware from the oven.
Caution Firstly, you must clean the oven surfaces which are not self-cleaning. Otherwise stains may appear that cannot be removed.
Cleaning levels You can set various cleaning levels, depending on how dirty the self-cleaning components are.Cleaning levels:3 = 1 hour 15 minutes2 = 1 hour1 = 45 minutes.
41
Setting procedure Set the function selector to clean.Level 2 appears in the display.
The level can be altered using the rotary knob.
The oven switches off automatically at the end. You will hear a short signal.
Switch off the function selector.
Extending the end time The end time can be extended as long as the clean for the main oven symbol is flashing. Press the 6 clock button and set
the end time. The ! end symbol flashes until the time is adopted. The oven starts automatically.
When the oven has cooled Wipe away salt residues from the self-cleaning components using a moist cloth.
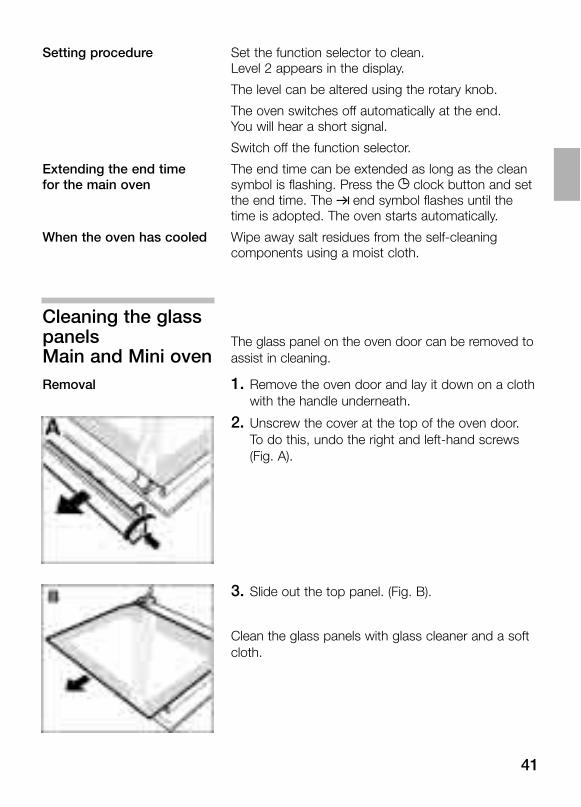
Cleaning the glasspanels The glass panel on the oven door can be removed to Main and Mini oven assist in cleaning.
Removal 1. Remove the oven door and lay it down on a cloth with the handle underneath.
2. Unscrew the cover at the top of the oven door. To do this, undo the right and left-hand screws(Fig. A).
3. Slide out the top panel. (Fig. B).
Clean the glass panels with glass cleaner and a soft cloth.
42
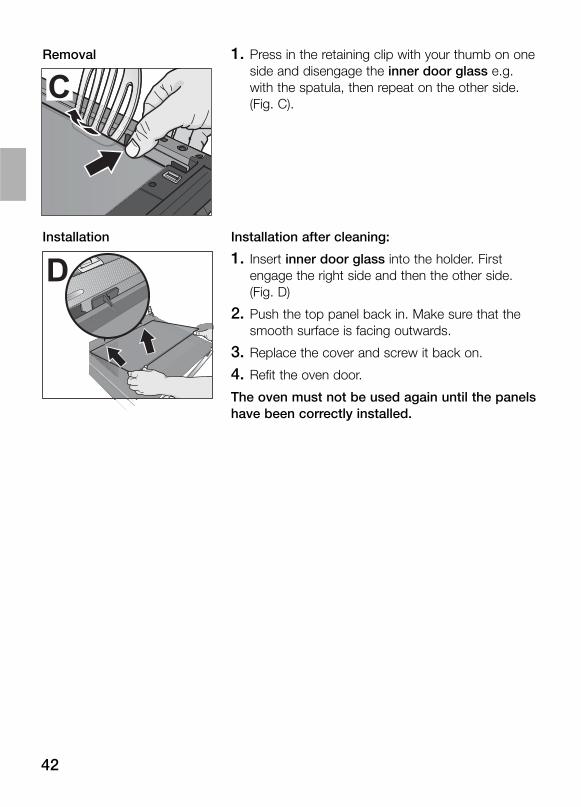
Removal 1. Press in the retaining clip with your thumb on oneside and disengage the inner door glass e.g.with the spatula, then repeat on the other side.(Fig. C).
Installation Installation after cleaning:
1. Insert inner door glass into the holder. Firstengage the right side and then the other side.(Fig. D)
2. Push the top panel back in. Make sure that the smooth surface is facing outwards.
3. Replace the cover and screw it back on.
4. Refit the oven door.
The oven must not be used again until the panels have been correctly installed.
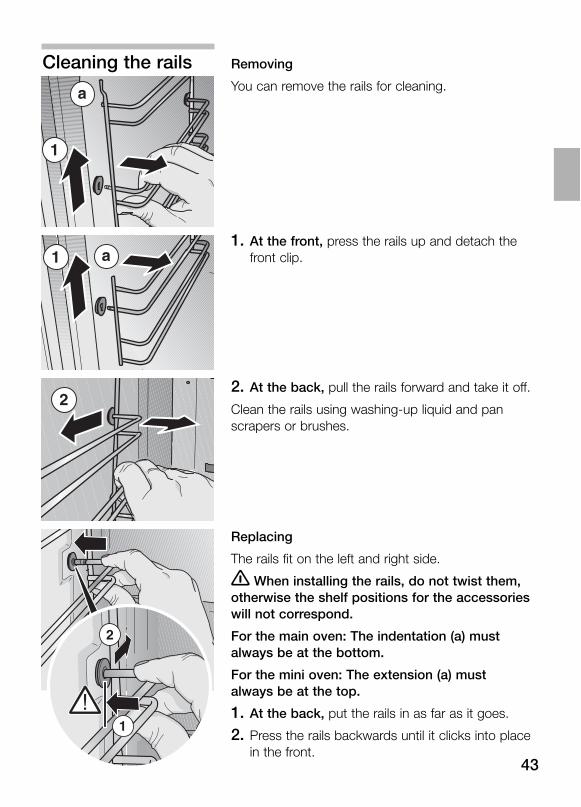
Cleaning the rails Removing
You can remove the rails for cleaning.
1. At the front, press the rails up and detach thefront clip.
2. At the back, pull the rails forward and take it off.
Clean the rails using washing-up liquid and pan scrapers or brushes.
Replacing
The rails fit on the left and right side.
� When installing the rails, do not twist them, otherwise the shelf positions for the accessories will not correspond.
For the main oven: The indentation (a) must always be at the bottom.
For the mini oven: The extension (a) must always be at the top.
1. At the back, put the rails in as far as it goes.
2. Press the rails backwards until it clicks into place in the front.
43

44
Seal Clean the seal on the oven with washing-up liquid. Never use caustic or abrasive detergents.
Accessories Immediately after use, soak the accessories in washing-up liquid. Food residues can then be easily removed with a brush or sponge.
TroubleshootingShould a malfunction occur, it is often only due to a minor fault. Please read the following instructions before calling the after-sales service:
Problem Possible cause Comments/remedy
The oven does not work. Blown fuse Look in the fuse box and check that the fuse is in working order.
The clock display flashes. Power cut Reset the time.
A „5” appears in the The automatic time limiter Switch off the function selector.display. was activated.
The „Er 1“ or „Er 4“ error The temperature sensor Contact the after-sales service.message appears in the clock has failed.display.
The „Er 11“ error message A button has been Press all buttons separately. If the errorappears in the clock display. pressed for too long or message remains, please contact the
a button has jammed. after-sales service.
Repairs may only be carried out by fully trained after-sales service technicians.
Improper repairs may constitute serious hazards to the user.
45
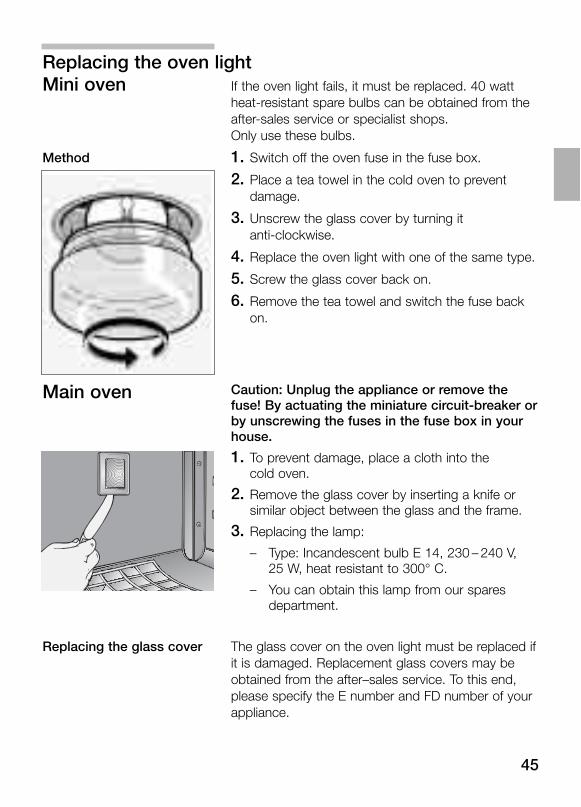
Replacing the oven lightMini oven If the oven light fails, it must be replaced. 40 watt
heat-resistant spare bulbs can be obtained from the after-sales service or specialist shops.Only use these bulbs.
Method 1. Switch off the oven fuse in the fuse box.
2. Place a tea towel in the cold oven to prevent damage.
3. Unscrew the glass cover by turning it anti-clockwise.
4. Replace the oven light with one of the same type.
5. Screw the glass cover back on.
6. Remove the tea towel and switch the fuse back on.
Main oven Caution: Unplug the appliance or remove the fuse! By actuating the miniature circuit-breaker or by unscrewing the fuses in the fuse box in your house.
1. To prevent damage, place a cloth into the cold oven.
2. Remove the glass cover by inserting a knife or similar object between the glass and the frame.
3. Replacing the lamp:
– Type: Incandescent bulb E 14, 230 – 240 V, 25 W, heat resistant to 300° C.
– You can obtain this lamp from our spares department.
Replacing the glass cover The glass cover on the oven light must be replaced ifit is damaged. Replacement glass covers may beobtained from the after–sales service. To this end, please specify the E number and FD number of your appliance.
46
E no. FD no.
After-sales service �
After-sales serviceOur after-sales service is there for you if your oven needs repairing.You will find the address and telephone number of your nearest after-sales service centre in the phone book. The after-sales service centres listed will also be happy to advise you of a service point in your local area.
E number and FD number Please quote the E number (product number) and the FD number (production number) of your appliance when contacting the after-sales service. The rating plate containing these numbers is found on the right, on the side of the oven door. You can make a note of these numbers in the space below to save time in the event of your appliance malfunctioning.
47
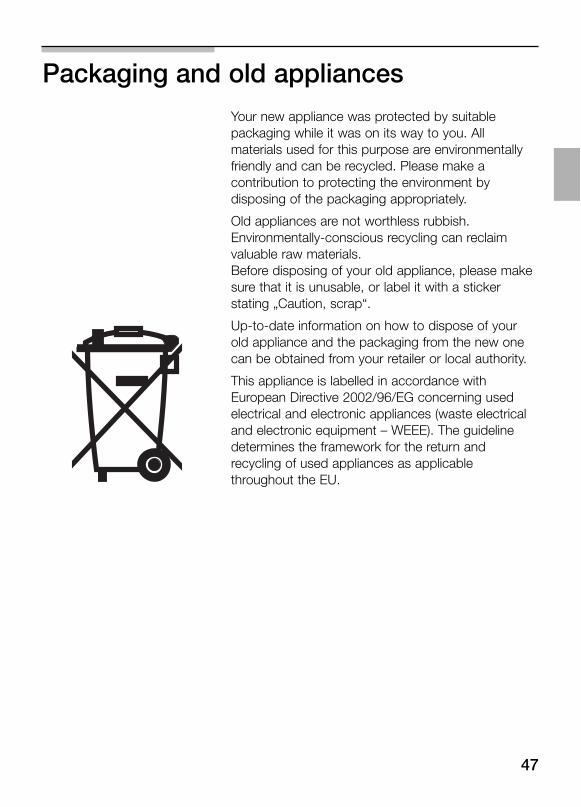
Packaging and old appliancesYour new appliance was protected by suitable packaging while it was on its way to you. All materials used for this purpose are environmentally friendly and can be recycled. Please make a contribution to protecting the environment by disposing of the packaging appropriately.
Old appliances are not worthless rubbish. Environmentally-conscious recycling can reclaim valuable raw materials.Before disposing of your old appliance, please make sure that it is unusable, or label it with a sticker stating „Caution, scrap“.
Up-to-date information on how to dispose of your old appliance and the packaging from the new one can be obtained from your retailer or local authority.
This appliance is labelled in accordance with European Directive 2002/96/EG concerning usedelectrical and electronic appliances (waste electricaland electronic equipment – WEEE). The guidelinedetermines the framework for the return andrecycling of used appliances as applicablethroughout the EU.
48
Tables and tipsThis table contains a selection of dishes and the optimum settings at which to cook them. You can find out which type of heating and temperature is best for your dish, which accessories to use, and at which oven level the dish should be inserted. You will find a variety of tips about ovenware and preparation, and a small troubleshooting section in case anything should go wrong.
Cakes and pastries
Baking tins It is best to use dark baking tins. You should use 3D-hot air when using thin baking tins, or glass containers. This means, however, that the baking time is increased and the cake does not brown so evenly.
Always place the cake tin on the wire rack.
Tables The values in the table apply to dishes placed in a cold oven. This saves energy. Shorten the baking times indicated by 5 to 10 minutes if you have preheated the oven.
The tables show which type of heating is best for different cakes and bakes.
49
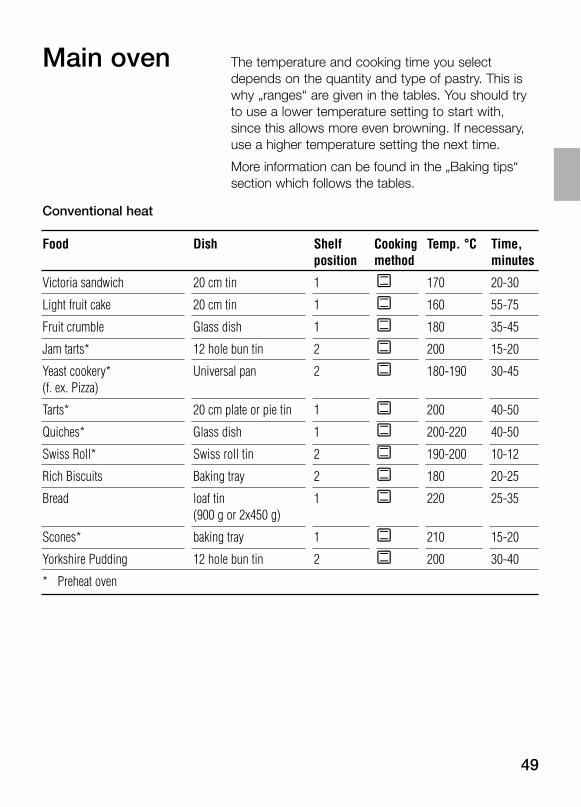
Conventional heat
Food Dish Shelf Cooking Temp. °C Time,position method minutes
Victoria sandwich 20 cm tin 1 / 170 20-30
Light fruit cake 20 cm tin 1 / 160 55-75
Fruit crumble Glass dish 1 / 180 35-45
Jam tarts* 12 hole bun tin 2 / 200 15-20
Yeast cookery* Universal pan 2 / 180-190 30-45(f. ex. Pizza)
Tarts* 20 cm plate or pie tin 1 / 200 40-50
Quiches* Glass dish 1 / 200-220 40-50
Swiss Roll* Swiss roll tin 2 / 190-200 10-12
Rich Biscuits Baking tray 2 / 180 20-25
Bread loaf tin 1 / 220 25-35(900 g or 2x450 g)
Scones* baking tray 1 / 210 15-20
Yorkshire Pudding 12 hole bun tin 2 / 200 30-40
* Preheat oven
Main oven The temperature and cooking time you select depends on the quantity and type of pastry. This is why „ranges“ are given in the tables. You should try to use a lower temperature setting to start with, since this allows more even browning. If necessary, use a higher temperature setting the next time.
More information can be found in the „Baking tips“ section which follows the tables.

50
3D-hot air
Food Dish Shelf Cooking Temp. °C Time,position method minutes
Rich fruit cake 23 cm round tin or 1 ˜ 140 140-17020 cm square cake tin
Meringues Universal pan 1 ˜ 80-90 130-160
Pavlova Universal pan 1 ˜ 150*+100 65-95
Jacket Potatoes Universal pan 1 ˜ 160 55-65
* Preheat oven
3D-hot air: Baking on 2 levels
Food Dish Shelf Cooking Temp. °C Time,position method minutes
Victoria sandwich 23 cm tin 1+3 ˜ 160 30-40
Scones* baking trays 1+3 ˜ 180 20-30
Jacket potatoes wire racks 1+3 ˜ 160 65-75
Biscuits baking trays 1+3 ˜ 150 20-30
Small Cakes* baking trays 1+3 ˜ 150 30-40
Meringues baking trays 1+3 ˜ 80 125-155
* Preheat oven
51
Baking tips
You wish to cook to your own Refer to the instructions in the tables for similar types of food.recipe.
How to check that a sponge Approximately 10 minutes before the end of the baking time given cake is cooked properly. in the recipe, pierce the tallest point of the cake with a cocktail
stick. The cake is done if the cocktail stick comes out clean.
The cake collapses. Next time, use less liquid or decrease the oven temperature by 10 degrees. Observe the cooking times in the recipe.
The cake has risen in the centre Do not grease the sides of the springform cake tin. As soon as the but is lower at the edges. cake is done, carefully loosen the cake around the edges using a
knife.
The cake is too dark at the top. Insert it at a lower level in the oven, select a lower temperature and cook the cake a little while longer.
The cake is too dry. Use a toothpick to make small holes in the finished cake. Then drizzle fruit juice or alcohol over the top. Next time you should decrease the temperature by around 10 degrees and reduce the baking times.
The bread or cake (e.g. Next time you should add a little less liquid and cook for a little cheesecake) looks fine, but is longer at a lower temperature. Cakes with fruit topping: Precook the soggy on the inside (soft, with base first of all. Sprinkle with almonds or breadcrumbs and then watery areas). place the topping over this. Please observe the recipe and the
baking times.
The pastry is unevenly browned. Select a slightly lower temperature to ensure that the pastry is baked more evenly. Check the shelf position and the rails (seesection ”Cleaning the rails”). Baking paper that protrudes over the food can affect the air circulation. For this reason, always cut the baking paper to fit the baking tray.
The fruit cake is too light at the Use the deeper universal pan next time.bottom. The fruit juice flows over.
You were baking on several Always use 3D hot air ˜ when baking on several levels. Baking levels. The food on the top trays that are placed in the oven at the same time will not baking tray is darker than that necessarily be ready at the same time.on the bottom baking tray.
Condensation is formed when Baking may result in the formation of water vapour. It escapes baking cakes containing fresh above the door handle. The steam may settle and form water fruit. droplets on the control panel or on the fronts of adjacent units.
This is a normal physical process.
52
Meat, poultry, fishOvenware You may use any heat-resistant dishes. The universal
pan is also suitable for larger roasts.
Always place the dishes in the centre of the wire rack.
Hot glass dishes should be placed on a dry kitchen towel after being removed from the oven. The glass could crack if placed on a cold or wet surface.
Advice on roasting The roasting result depends on the type and quality of meat.
Add 2 to 3 soup spoons of liquid to lean meat, and 8 to 10 soup spoons of liquid to pot roasts, depending on the size.
Baste the meat if desired.
Some meats should be prepared in liquid in a covered casserole. This type of cooking is suitable for less tender cuts of meat.
Place in a cold oven to save energy or pre-heat if desired.
Meat should be turned half way through the cooking time.
When the roast is ready, switch off the oven and leave the roast to stand for 10 minutes with the oven door closed. This allows the meat juices to distribute more favourably.
Advice on hot air grilling Use the wire rack and the universal pan.
When grilling with hot air on the wire rack, the oven may become very dirty depending on the food which is being grilled. Therefore, always clean the oven after use to prevent dirt from burning in.
For particularly crispy poultry or joints (pork joint with skin).
Turn large joints after approx. half the grilling time.
Turn the whole bird after approx. two thirds of the grilling time. Prick the skin under the wings of duck and goose so that the fat can roast right through.
53
Advice on radiant grilling Used for smaller dishes having little height/thickness.
Mini oven If possible, use pieces of meat which are of the same thickness. They should be at least 2 to 3 cm thick. Such pieces will be browned evenly and stay juicy and soft in the middle. Only salt the steaks after they have been grilled.
Turn the pieces of meat after two thirds of the cooking time indicated.
At your discretion, lightly baste the grill and the food with oil.
� Exercise CAUTION when grilling.Always keep children at a safe distance.
Notes on grilling Always close the oven door when grilling.
The grilling temperatures are variable.
Always place food to be grilled in the centre of thewire rack.
If the grill element (heating element) switches OFFautomatically, the overheating protection wasactivated.The radiator will be reactivated after a short periodof time.
54
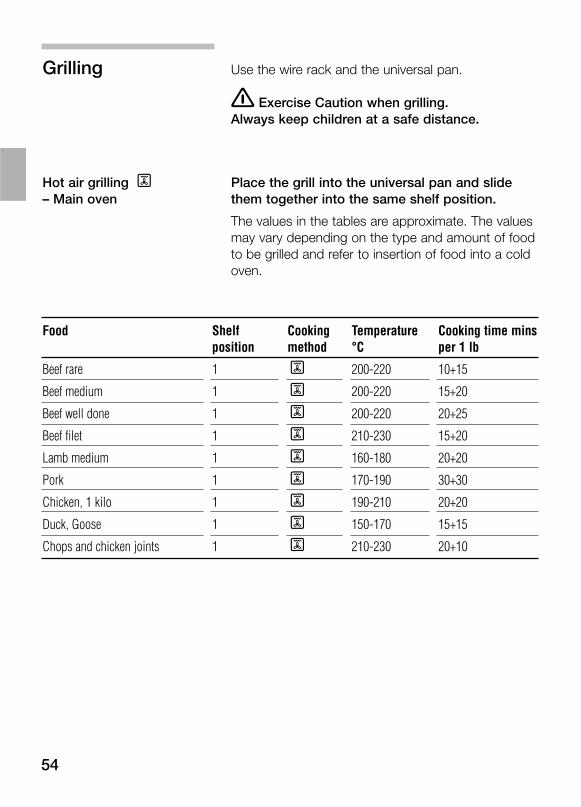
Grilling Use the wire rack and the universal pan.
� Exercise Caution when grilling.Always keep children at a safe distance.
Hot air grilling , Place the grill into the universal pan and slide– Main oven them together into the same shelf position.
The values in the tables are approximate. The values may vary depending on the type and amount of food to be grilled and refer to insertion of food into a cold oven.
Food Shelf Cooking Temperature Cooking time minsposition method °C per 1 lb
Beef rare 1 , 200-220 10+15
Beef medium 1 , 200-220 15+20
Beef well done 1 , 200-220 20+25
Beef filet 1 , 210-230 15+20
Lamb medium 1 , 160-180 20+20
Pork 1 , 170-190 30+30
Chicken, 1 kilo 1 , 190-210 20+20
Duck, Goose 1 , 150-170 15+15
Chops and chicken joints 1 , 210-230 20+10
55
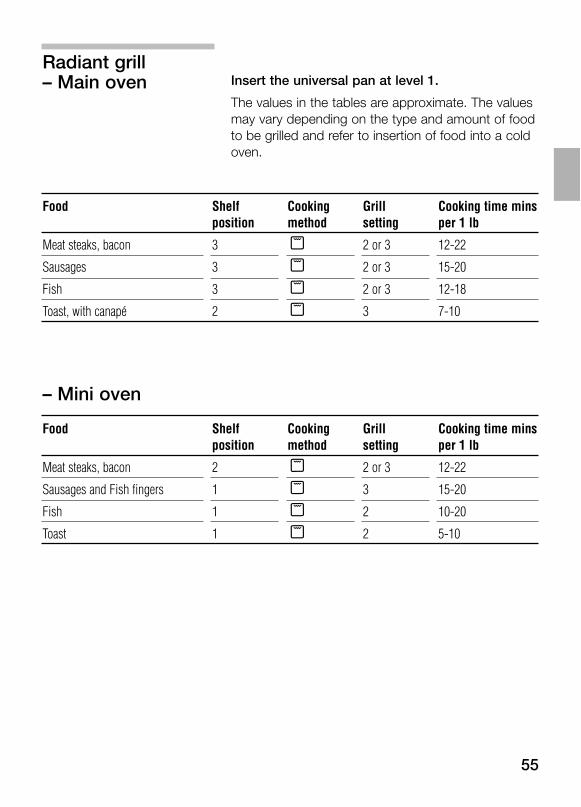
Radiant grill– Main oven Insert the universal pan at level 1.
The values in the tables are approximate. The values may vary depending on the type and amount of food to be grilled and refer to insertion of food into a cold oven.
Food Shelf Cooking Grill Cooking time minsposition method setting per 1 lb
Meat steaks, bacon 3 ) 2 or 3 12-22
Sausages 3 ) 2 or 3 15-20
Fish 3 ) 2 or 3 12-18
Toast, with canapé 2 ) 3 7-10
– Mini oven
Food Shelf Cooking Grill Cooking time minsposition method setting per 1 lb
Meat steaks, bacon 2 ) 2 or 3 12-22
Sausages and Fish fingers 1 ) 3 15-20
Fish 1 ) 2 10-20
Toast 1 ) 2 5-10
56
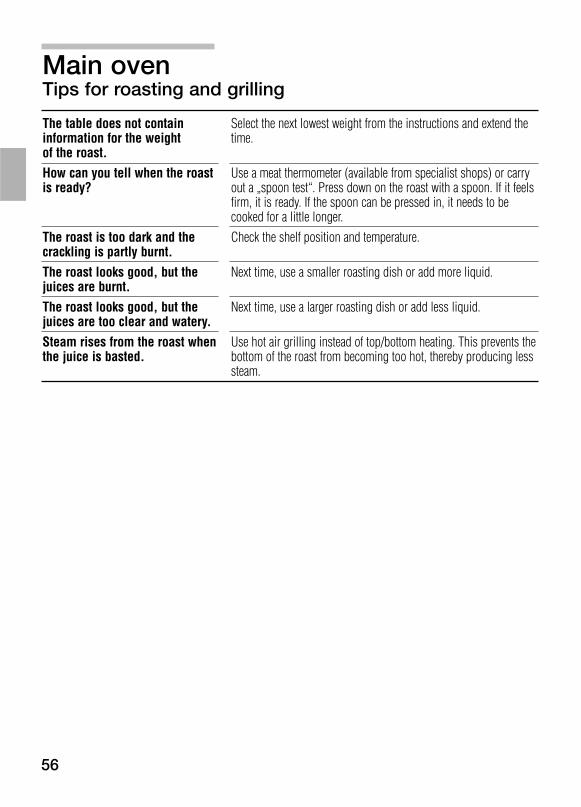
Main ovenTips for roasting and grilling
The table does not contain Select the next lowest weight from the instructions and extend the information for the weight time.of the roast.How can you tell when the roast Use a meat thermometer (available from specialist shops) or carry is ready? out a „spoon test“. Press down on the roast with a spoon. If it feels
firm, it is ready. If the spoon can be pressed in, it needs to be cooked for a little longer.
The roast is too dark and the Check the shelf position and temperature.crackling is partly burnt.The roast looks good, but the Next time, use a smaller roasting dish or add more liquid.juices are burnt.The roast looks good, but the Next time, use a larger roasting dish or add less liquid.juices are too clear and watery.Steam rises from the roast when Use hot air grilling instead of top/bottom heating. This prevents the the juice is basted. bottom of the roast from becoming too hot, thereby producing less
steam.
57
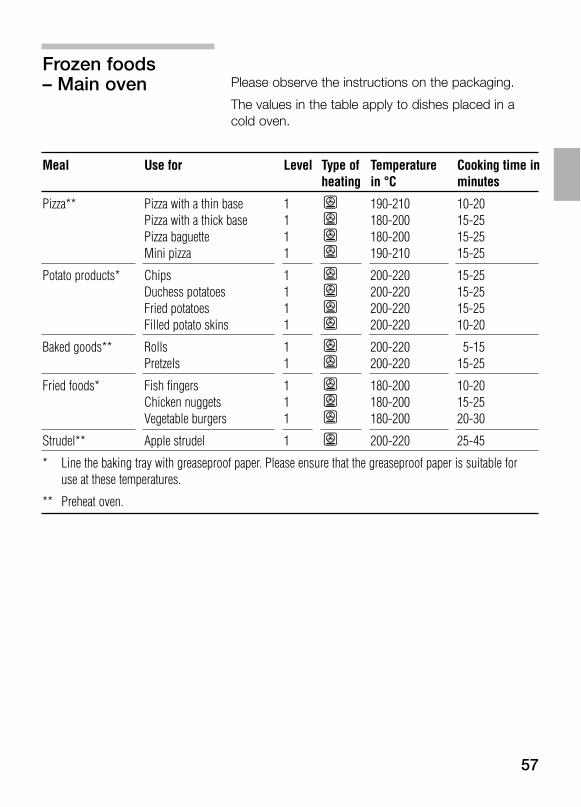
Frozen foods– Main oven Please observe the instructions on the packaging.
The values in the table apply to dishes placed in a cold oven.
Meal Use for Level Type of Temperature Cooking time inheating in °C minutes
Pizza** Pizza with a thin base 1 T 190-210 10-20Pizza with a thick base 1 T 180-200 15-25Pizza baguette 1 T 180-200 15-25Mini pizza 1 T 190-210 15-25
Potato products* Chips 1 T 200-220 15-25Duchess potatoes 1 T 200-220 15-25Fried potatoes 1 T 200-220 15-25Filled potato skins 1 T 200-220 10-20
Baked goods** Rolls 1 T 200-220 05-15Pretzels 1 T 200-220 15-25
Fried foods* Fish fingers 1 T 180-200 10-20Chicken nuggets 1 T 180-200 15-25Vegetable burgers 1 T 180-200 20-30
Strudel** Apple strudel 1 T 200-220 25-45
* Line the baking tray with greaseproof paper. Please ensure that the greaseproof paper is suitable for use at these temperatures.
** Preheat oven.
58
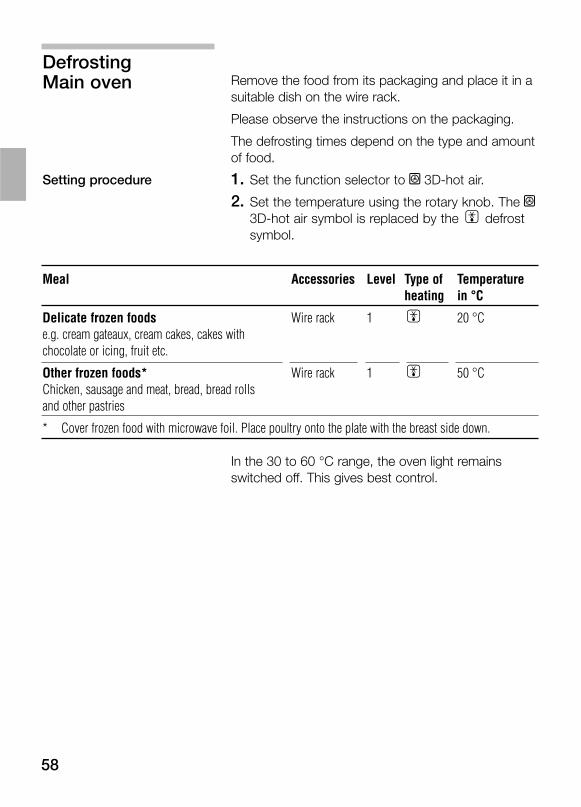
DefrostingMain oven Remove the food from its packaging and place it in a
suitable dish on the wire rack.
Please observe the instructions on the packaging.
The defrosting times depend on the type and amount of food.
Setting procedure 1. Set the function selector to ˜ 3D-hot air.
2. Set the temperature using the rotary knob. The ˜3D-hot air symbol is replaced by the e defrost symbol.
Meal Accessories Level Type of Temperatureheating in °C
Delicate frozen foods Wire rack 1 e 20 °Ce.g. cream gateaux, cream cakes, cakes with chocolate or icing, fruit etc.
Other frozen foods* Wire rack 1 e 50 °CChicken, sausage and meat, bread, bread rollsand other pastries
* Cover frozen food with microwave foil. Place poultry onto the plate with the breast side down.
In the 30 to 60 °C range, the oven light remains switched off. This gives best control.
59
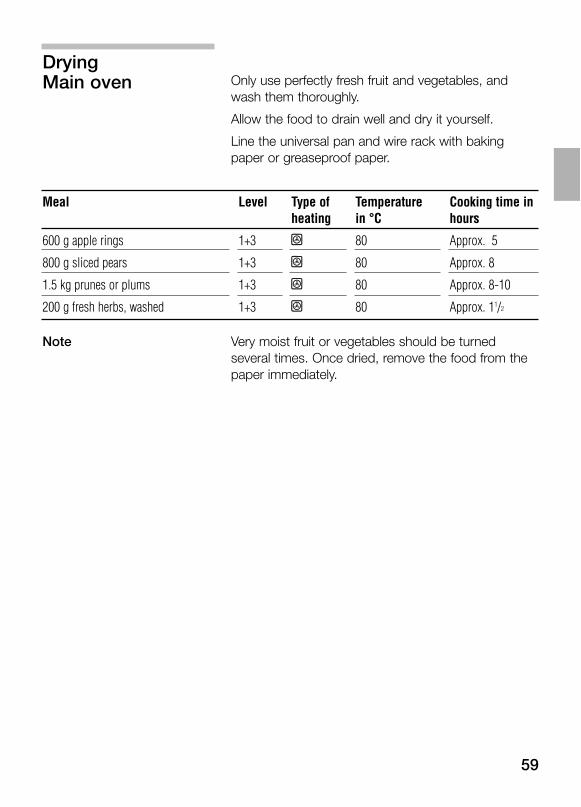
DryingMain oven Only use perfectly fresh fruit and vegetables, and
wash them thoroughly.
Allow the food to drain well and dry it yourself.
Line the universal pan and wire rack with baking paper or greaseproof paper.
Meal Level Type of Temperature Cooking time in heating in °C hours
600 g apple rings 1+3 ˜ 80 Approx. 5
800 g sliced pears 1+3 ˜ 80 Approx. 8
1.5 kg prunes or plums 1+3 ˜ 80 Approx. 8-10
200 g fresh herbs, washed 1+3 ˜ 80 Approx. 11/2
Note Very moist fruit or vegetables should be turned several times. Once dried, remove the food from the paper immediately.

60
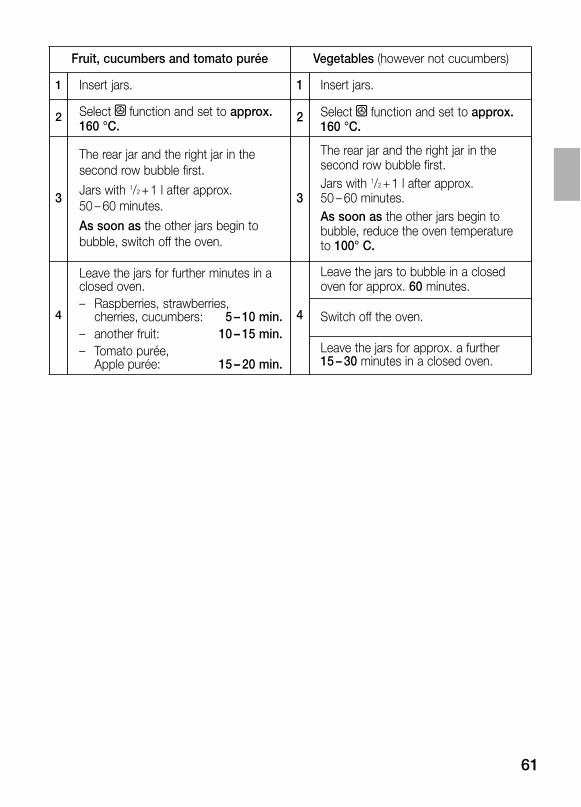
PreservingMain ovenPreparation The jars and rubber sealing rings must be clean and
intact. Use jars of the same size if possible. The instructions in the table refer to round 1-litre jars. Caution Do not use larger or taller jars. The lid could crack.
Only use perfectly fresh fruit and vegetables. Wash them thoroughly.
Pour the fruit or vegetables into the jars. Wipe clean the tops of the jars again if necessary. They must be clean. Place a wet rubber sealing ring and lid on each jar and lock the jars using clamps.
Place the preserving jars in a triangle (see fig.), ensuring that they are approx. 5 cm from the rear of the oven.
The times specified in the tables are guidelines only. They can be influenced by the room temperature, the number of jars and the amount and temperature of the jar contents. Before you change settings or switch off the appliance, make sure that the contents of the jars are actually bubbling.
Setting procedure 1. Place the universal pan on level 1. Place the jars inside the pan so that they do not come into contact with each other.
2. Pour 1/2 litre of hot water (approx. 80 °C) into the universal pan.
3. Close the oven door.
4. Switch the function selector to ˜.
5. Set the rotary knob to approx. 160 °C.
61
Fruit, cucumbers and tomato purée Vegetables (however not cucumbers)
1 Insert jars. 1 Insert jars.
2 Select ˜ function and set to approx.160 °C.
2 Select ˜ function and set to approx.160 °C.
3
The rear jar and the right jar in thesecond row bubble first.
Jars with 1/2 +1 l after approx. 50 – 60 minutes.
As soon as the other jars begin tobubble, switch off the oven.
4 4
Leave the jars for further minutes in aclosed oven.– Raspberries, strawberries,
cherries, cucumbers: 05 – 10 min.– another fruit: 10 – 15 min.– Tomato purée,
Apple purée: 15 – 20 min.
Leave the jars to bubble in a closedoven for approx. 60 minutes.
Switch off the oven.
Leave the jars for approx. a further 15 – 30 minutes in a closed oven.
3
The rear jar and the right jar in thesecond row bubble first.Jars with 1/2 +1 l after approx. 50 – 60 minutes.As soon as the other jars begin tobubble, reduce the oven temperatureto 100° C.
62
Energy saving tipsOnly preheat the oven if it specifies in the recipe or in the table in the instruction manual that you should do so.
Use non-stick, black painted or enamelled tins. They absorb the heat especially well.
If you have several cakes to bake it is best to bake them one after the other. The oven is still warm. This shortens the baking time for the second cake. You can also put two baking tins in one after the other.
For long cooking times, the oven can be switched off 10 minutes before the end of the cooking time and the remaining heat can be used to finish the cooking.
Acrylamide in foodExperts are currently discussing how dangerous acrylamide in food can be. We have compiled this information sheet for you on the basis of current research.
Where does acrylamide Acrylamide in food does not come from external come from? contamination. It is formed in the food itself during
preparation – provided that the food contains carbohydrate and protein. Exactly how this happens has not yet been completely explained. However, it appears that the acrylamide content is strongly influenced by
high temperaturesa low water content in foodintensive browning of the food.
63
What sort of foods are Acrylamide forms mostly in grain and potato afected? products that are prepared at high temperatures,
e.g.:
crisps, chips,toast, rolls, bread, baked goods made from shortcrust pastry (speciality biscuits and cakes).
What can you do? You can avoid high levels of acrylamide when baking, frying and grilling. The following recommendations were published by AID1 and BMVEL2 to help you minimise acrylamide levels:
In general Keep cooking times as short as possible.
„Brown rather than burn“ – cook food only until it is golden brown.
The larger and thicker the food is, the less acrylamide it contains.
Baking Set the temperature to a maximum of 180 ºC for the 3D-hot air setting.
Cookies: Set the temperature to a maximum of 170 ºC for the 3D-hot air setting. The presence of egg or egg yolk in a recipe reduces the formation of acrylamide.
Spread oven chips evenly over the baking sheet in one layer where possible. To prevent the food from drying out quickly, place at least 400 g on each baking sheet.1 AID “Acrylamide“ information leaflet, published by AID (German Evaluation and Information Service for Nutrition, Agriculture and Forestry) and BMVEL (German Federal Ministry for Consumer Protection, Food and Agriculture), as at 12/02, Internet: http://www.aid.de.2 BMVEL press release 365, as at 4.12.2002, Internet: http://www.verbraucherministerium.de

64
Test dishes for the main ovenFollow the preheating instruction.Values in the table apply without rapid heating up.
According to standard 44547 and EN 60350
Baking
Food Dish and notes Shelf Cooking Tempera- Time inposition method ture °C minutes
Shortbread (preheat) Baking tray 2 t 150-170 15-25
Baking tray 1 ˜ 140-160 20-302 baking trays 1+3 ˜ 140-160 20-35
Small Cakes Baking tray 2 t 160-170 25-35Baking tray 1 ˜ 150-160 25-35
Fatless sponge Spring form cake tin 1 t 160-170 30-40cake Spring form cake tin 1 ˜ 160-170 30-40
Yeast pasty Baking tray 2 t 170-180 45-55Baking tray 1 ˜ 160-170 50-602 baking trays 1+3 ˜ 160-170 60-75
Apple pie* Wire racks 1 T 170-180 70-80Spring form cake tin l 20 cm
* Preheat oven.
Grilling
Food Dish and Shelf Cooking Grill Time innotes position method setting minutes
Toast Wire rack* 3 ) 3 0,5-1,5(preheat for 10 min.)
Beef steak, Wire rack* + 3 ) 2 1st side 10-1512 pieces** universal pan 2nd side 07-12
* Wire grills may be obtained as optional accessories from specialist shops.** Turn after 2/3 of the time has elapsed. Always insert the universal pan at level 1.
65
Para que el cocinar sea tan placentero como el comer
Leer estas instrucciones de uso. Entonces podrán aprovecharse todas las ventajas técnicas de la cocina.
Se obtendrá información importante sobre la seguridad.Conocerá cada una de las partes de su nueva cocina. Y nosotros le enseñaremos paso a paso cómo programarla.Es muy sencillo.
En las tablas se pueden encontrar los valores de ajuste y lasalturas de inserción para muchos platos útiles. Todos los platos han sido probados en nuestro estudio de cocina.
Y si aparece alguna avería, aquí podrá encontrarse información sobre cómo subsanar usted mismo estas pequeñas averías.
Un índice detallado le ayudará a orientarse rápidamente.
Y ¡buen provecho!
66
Contenido
Qué hay que tener en cuerta . . . . . . . . . . . . . . . . 69
Antes del montaje . . . . . . . . . . . . . . . . . . . . . . . . . . 69
Indicaciones de seguridad . . . . . . . . . . . . . . . . . . . 69
Causas de los daños . . . . . . . . . . . . . . . . . . . . . . . 70
Su nuevo horno . . . . . . . . . . . . . . . . . . . . . . . . . . . 71
El panel de mandos . . . . . . . . . . . . . . . . . . . . . . . . 71
Selector de funciones – horno grande . . . . . . . . . . 72
Mando giratorio – horno grande . . . . . . . . . . . . . . . 72
Selector de funciones – horno pequeño . . . . . . . . . 73
Mando giratorio – horno pequeño . . . . . . . . . . . . . . 73
Teclas de manejo y panel indicador . . . . . . . . . . . . 74
Mandos giratorios escamoteables . . . . . . . . . . . . . . 74
Tipos de calentamiento – horno grande . . . . . . . . . 75
Tipos de calentamiento – horno pequeño . . . . . . . . 77
El carrito del horno y sus accesorios . . . . . . . . . . . . 78
Ventilador . . . . . . . . . . . . . . . . . . . . . . . . . . . . . . . . 82
Antes del primer uso . . . . . . . . . . . . . . . . . . . . . . 82
Calentar el horno . . . . . . . . . . . . . . . . . . . . . . . . . . 82
Limpieza previa de los accesorios . . . . . . . . . . . . . . 82
Programar el horno . . . . . . . . . . . . . . . . . . . . . . . . 83
Así se programa . . . . . . . . . . . . . . . . . . . . . . . . . . . 83
El horno se desconecta automáticamente – horno grande . . . . . . . . . . . . . . . . . . . . . . . . . . . . . 84
El horno se conecta y se desconecta automáticamente – horno grande . . . . . . . . . . . . . . 85
Indicador de calor residual – de los hornos grande y pequeños . . . . . . . . . . . . . 86
67
Contenido
Calentamiento rápido – horno grande . . . . . . . . . 87
Así se programa . . . . . . . . . . . . . . . . . . . . . . . . . . . 87
Función automática de asado – horno grande . . 88
Recipientes . . . . . . . . . . . . . . . . . . . . . . . . . . . . . . . 88
Elaboración del plato . . . . . . . . . . . . . . . . . . . . . . . 89
Programas . . . . . . . . . . . . . . . . . . . . . . . . . . . . . . . 90
Cuánto tiempo se requiere para cocinar el plato? . . 91
Así se programa . . . . . . . . . . . . . . . . . . . . . . . . . . . 91
El horno se conecta y se desconectaautomáticamente – horno grande . . . . . . . . . . . . . . . 93
Sugerencias para el asado automático . . . . . . . . . . 94
Conmutador Sabbat – horno grande . . . . . . . . . . 95
Así se programa . . . . . . . . . . . . . . . . . . . . . . . . . . . 95
Hora . . . . . . . . . . . . . . . . . . . . . . . . . . . . . . . . . . . . 96
Así se programa . . . . . . . . . . . . . . . . . . . . . . . . . . . 96
Reloj avisador . . . . . . . . . . . . . . . . . . . . . . . . . . . . 97
Así se programa . . . . . . . . . . . . . . . . . . . . . . . . . . . 97
Ajustes básicos – horno grande . . . . . . . . . . . . . 98
Modificar los ajustes básicos . . . . . . . . . . . . . . . . . 99
Seguro para niõs . . . . . . . . . . . . . . . . . . . . . . . . . . 100
Limitación automática del tiempo . . . . . . . . . . . . . 100
Cuidados y limpieza . . . . . . . . . . . . . . . . . . . . . . . 101
Parte externa del aparato . . . . . . . . . . . . . . . . . . . . 101
Horno . . . . . . . . . . . . . . . . . . . . . . . . . . . . . . . . . . . 101
Función Clean – de los hornos grande y pequeño . 103
Limpieza de los vidrios – de los hornos grande y pequeño . . . . . . . . . . . . . . 104
68
Contenido
Limpieza de las rejillas . . . . . . . . . . . . . . . . . . . . . . . 106
Junta . . . . . . . . . . . . . . . . . . . . . . . . . . . . . . . . . . . . 107
Accesorios . . . . . . . . . . . . . . . . . . . . . . . . . . . . . . . 107
¿Qué hacer en caso de avería? . . . . . . . . . . . . . . 107
Cambiar la lámpara de iluminación del horno . . . . . 108
Servicio de Asistencia Técnica . . . . . . . . . . . . . . 109
Embalaje y aparatos usados . . . . . . . . . . . . . . . . 110
Tablas y sugerencias . . . . . . . . . . . . . . . . . . . . . . 111
Pasteles y repostería . . . . . . . . . . . . . . . . . . . . . . . . 111
Sugerencias y consejos prácticos para el horneado 114
Carne, aves, pescado . . . . . . . . . . . . . . . . . . . . . . . 115
Consejos prácticos para el asado convencionaly el asado al grill . . . . . . . . . . . . . . . . . . . . . . . . . . . 119
Alimentos precocinados congelados . . . . . . . . . . . . 120
Descongelación – horno grande . . . . . . . . . . . . . . . 121
Desecar – horno grande . . . . . . . . . . . . . . . . . . . . . 122
Cocción de mermeladas – horno grande . . . . . . . . 123
Consejos prácticos para el ahorro de energía . . . . . 125
Acrilamida en los alimentos . . . . . . . . . . . . . . . . . 125
¿Qué se puede hacer? . . . . . . . . . . . . . . . . . . . . . . 126
Comidas normalizadas – horno grande . . . . . . . . 128
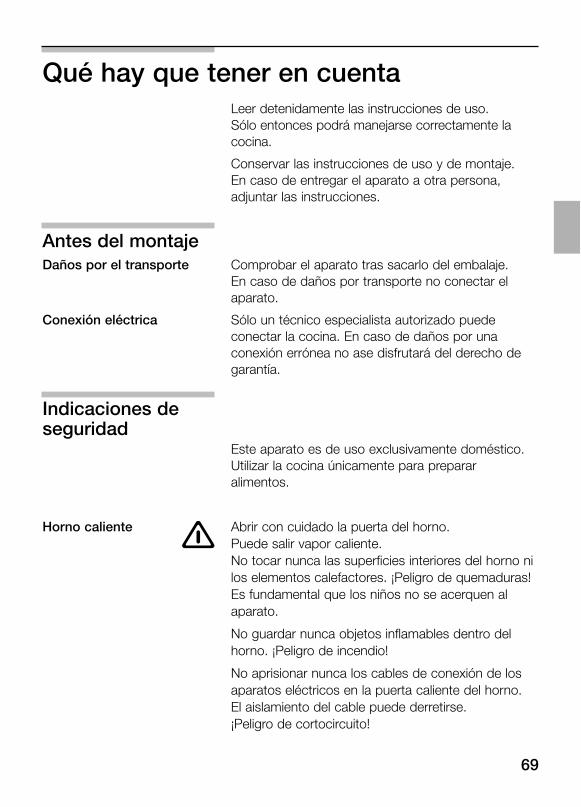
69
Qué hay que tener en cuentaLeer detenidamente las instrucciones de uso. Sólo entonces podrá manejarse correctamente la cocina.
Conservar las instrucciones de uso y de montaje. En caso de entregar el aparato a otra persona, adjuntar las instrucciones.
Antes del montajeDaños por el transporte Comprobar el aparato tras sacarlo del embalaje.
En caso de daños por transporte no conectar el aparato.
Conexión eléctrica Sólo un técnico especialista autorizado puede conectar la cocina. En caso de daños por una conexión errónea no ase disfrutará del derecho de garantía.
Indicaciones deseguridad
Este aparato es de uso exclusivamente doméstico.Utilizar la cocina únicamente para preparar alimentos.
Horno caliente Abrir con cuidado la puerta del horno. � Puede salir vapor caliente. No tocar nunca las superficies interiores del horno ni los elementos calefactores. ¡Peligro de quemaduras! Es fundamental que los niños no se acerquen al aparato.
No guardar nunca objetos inflamables dentro del horno. ¡Peligro de incendio!
No aprisionar nunca los cables de conexión de los aparatos eléctricos en la puerta caliente del horno. El aislamiento del cable puede derretirse. ¡Peligro de cortocircuito!
70
Reparaciones Las reparaciones inadecuadas son peligrosas.� ¡Peligro de descarga eléctrica! Sólo un técnico instruido por nosotros está autorizado a realizar las reparaciones.
Si el aparato se ha averiado, desconectar el fusible de la cocina en la caja de fusibles.Llamar al Servicio de Asistencia Técnica.
Causas de los daños
Bandeja de horno, papel No introduzca ninguna bandeja de horno en la de aluminio o recipientes solera, no la cubra con papel de aluminio, ni coloque en la solera ningún recipiente sobre ella, ya que se origina una
acumulación térmica, los tiempos de cocción dejan de ser correctos y se daña el esmalte.
Piezas replegables Replegar las piezas con sumo cuidado a fin de evitar daños.
Papel especial para hornear En caso de seleccionar la modalidad de calentamiento «Aire caliente 3D forzado» ˜, no forrar el horno o las bandejas de horneado con papel especial para hornear suelto, dado que éste podría resultar aspirado por el ventilador durante la fase de calentamiento, dando lugar a importantes daños en el ventilador y el circuito de calentamiento del horno.
Agua en el horno No verter nunca agua en el horno caliente. Se puede dañar el esmalte.
Zumo de fruta No llenar demasiado la bandeja para preparar un pastel de frutas jugoso. El zumo de fruta que gotea de la bandeja produce manchas que no se pueden eliminar. Es mejor utilizar la bandeja universal honda.
Enfriamiento con la puerta Dejar enfriar el horno sólo cuando esté cerrado. No del horno abierta aprisionar nada en la puerta del horno. Incluso si
sólo se abre un poquito la puerta del horno, podrían dañarse con el tiempo los frontales de los muebles limítrofes.
71
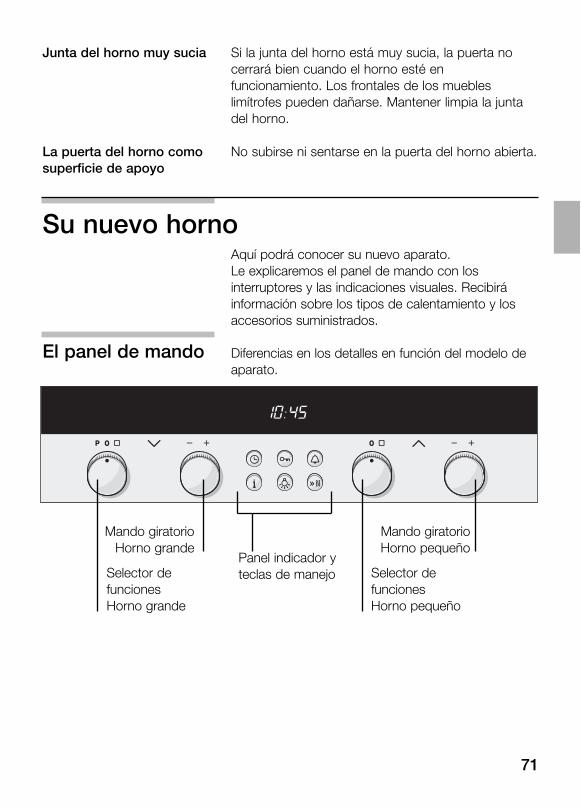
Su nuevo horno Aquí podrá conocer su nuevo aparato. Le explicaremos el panel de mando con los interruptores y las indicaciones visuales. Recibirá información sobre los tipos de calentamiento y los accesorios suministrados.
El panel de mando Diferencias en los detalles en función del modelo de aparato.
Selector de funcionesHorno grande
Selector de funcionesHorno pequeño
Mando giratorioHorno grande
Mando giratorioHorno pequeño
Panel indicador yteclas de manejo
Junta del horno muy sucia Si la junta del horno está muy sucia, la puerta no cerrará bien cuando el horno esté en funcionamiento. Los frontales de los muebles limítrofes pueden dañarse. Mantener limpia la junta del horno.
La puerta del horno como No subirse ni sentarse en la puerta del horno abierta. superficie de apoyo
72
Mando giratorioTodos los valores propuestos y de ajuste se puedenmodificar con el mando giratorio.
Márgenes
20 – 300 Temperatura en °C
la temperatura máx. para aire caliente 3D ˜ y aire caliente intensivo / escalón para pizza T es de 275° C
1 – 3 Escalones del grill, superficie amplia )girar a posición inicial
1 – 3 Escalones del grill, superficie reducida V
1 – 3 Niveles de limpieza
1 min – 23.59 h Duración
5 sec – 12.00 h Reloj avisador
P 01 – P 23 Programas
P 24 Conmutador Sabbat
Selector de funcioneshorno grande A través del selector de funciones puede ajustarse el
tipo de calentamiento del horno. En la indicación visual aparece un valor recomendado para cada tipode calentamiento.
Ajustes
/ Calor superior e inferior
˜ Aire caliente 3D
T Aire caliente intensivo / escalón para pizza
. Calor inferior
, Grill de infrarrojos con aire caliente
V Grill variable de superficie reducida
) Grill variable de superficie amplia
clean Limpieza
P Asado automático
Al ajustar el selector de funciones, la lámpara interior del horno se enciende.
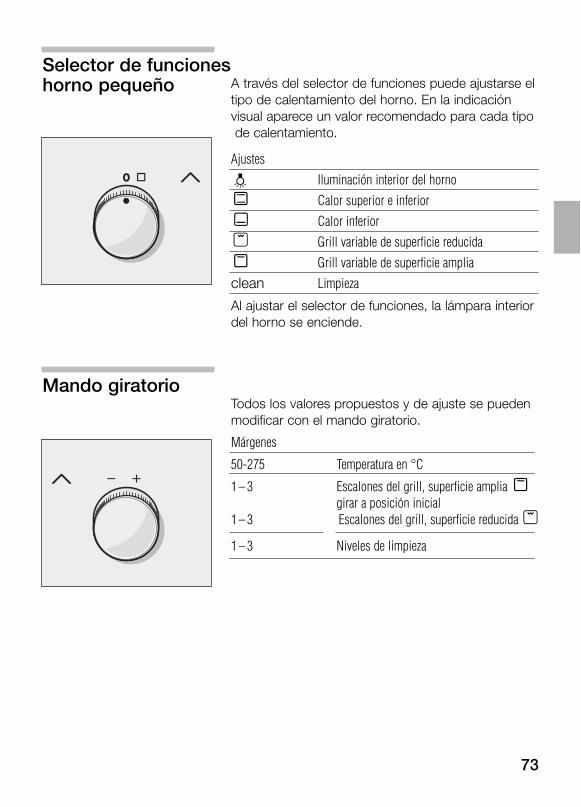
73
Selector de funcioneshorno pequeño A través del selector de funciones puede ajustarse el
tipo de calentamiento del horno. En la indicación visual aparece un valor recomendado para cada tipode calentamiento.
Ajustes
0 Iluminación interior del horno
/ Calor superior e inferior
. Calor inferior
V Grill variable de superficie reducida
) Grill variable de superficie amplia
clean Limpieza
Al ajustar el selector de funciones, la lámpara interior del horno se enciende.
Mando giratorioTodos los valores propuestos y de ajuste se puedenmodificar con el mando giratorio.
Márgenes
50-275 Temperatura en °C
1 – 3 Escalones del grill, superficie amplia )girar a posición inicial
1 – 3 Escalones del grill, superficie reducida V
1 – 3 Niveles de limpieza
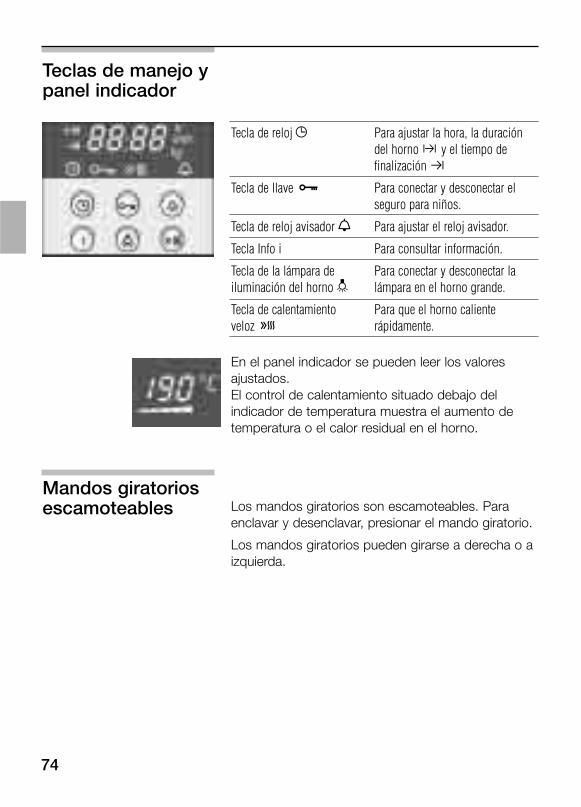
74
Teclas de manejo ypanel indicador
Tecla de reloj 6 Para ajustar la hora, la duración del horno * y el tiempo de finalización +
Tecla de llave E Para conectar y desconectar el seguro para niños.
Tecla de reloj avisador 8 Para ajustar el reloj avisador.
Tecla Info i Para consultar información.
Tecla de la lámpara de Para conectar y desconectar la iluminación del horno 0 lámpara en el horno grande.
Tecla de calentamiento Para que el horno caliente veloz D rápidamente.
En el panel indicador se pueden leer los valores ajustados.El control de calentamiento situado debajo del indicador de temperatura muestra el aumento de temperatura o el calor residual en el horno.
Mandos giratoriosescamoteables Los mandos giratorios son escamoteables. Para
enclavar y desenclavar, presionar el mando giratorio.
Los mandos giratorios pueden girarse a derecha o a izquierda.

75
Tipos de calentamientodel horno grande El horno dispone de diferentes tipos de
calentamiento. De este modo se puede seleccionar en cada momento la forma de preparación más idónea para el alimento.
Calor superior e inferior
El calor llega de arriba y de abajo tanto si se trata de un pastel como un asado. Con este tipo de calentamiento, se obtiene un mejor resultado al cocinar pasteles de masa batida en moldes y gratinados. También para piezas de asado de menor tamaño de carne de vaca, ternera y caza resulta apropiado el calor superior e inferior.
Conservar en caliente /+s: En el margen de temperatura de 65–100 ºC se pueden conservar calientes los alimentos. No conservar los alimentos en caliente durante más de dos horas.
Aire caliente 3D
Un ventilador en la pared posterior distribuye el calor del calentador circular de forma uniforme por el horno. Con el aire caliente 3D se pueden hornear al mismo tiempo pasteles y pizzas a dos niveles. Se pueden hornear pastas y hojaldres en dos niveles a la vez. Las temperaturas de horno requeridas son inferiores a las de calor superior e inferior. Puede adquirir bandejas adicionales en un comercio especializado.
Descongelación e: El margen de temperatura de 20–60 ºC es apropiado para la descongelación de los platos.
Aire caliente intensivo / escalón para pizza
Esta opción pone en funcionamiento el calor inferior y el calentador circular. Este tipo de calentamiento es el más adecuado para alimentos ultracongelados. Se consigue un mejor resultado de cocción de la pizza congelada, las patatas fritas o el pastel de hojaldre dulce sin necesidad de precalentar el horno.
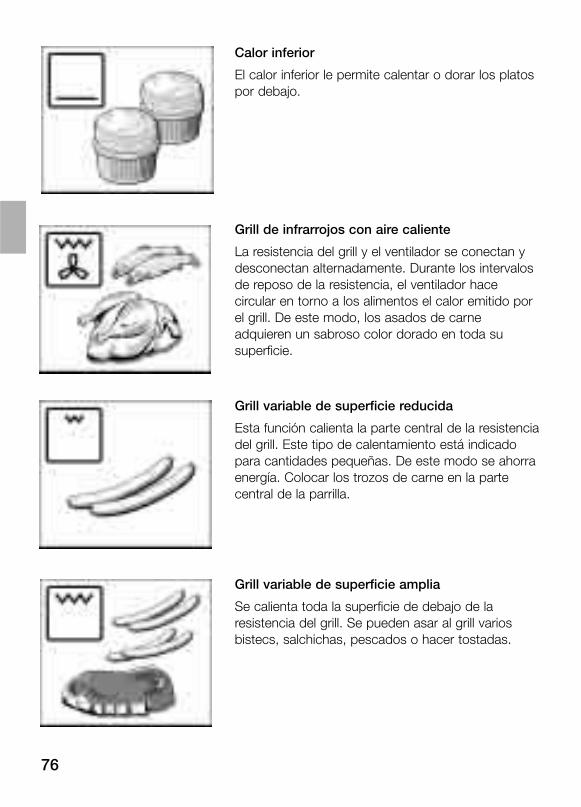
76
Calor inferior
El calor inferior le permite calentar o dorar los platos por debajo.
Grill de infrarrojos con aire caliente
La resistencia del grill y el ventilador se conectan y desconectan alternadamente. Durante los intervalos de reposo de la resistencia, el ventilador hace circular en torno a los alimentos el calor emitido por el grill. De este modo, los asados de carne adquieren un sabroso color dorado en toda su superficie.
Grill variable de superficie reducida
Esta función calienta la parte central de la resistenciadel grill. Este tipo de calentamiento está indicado para cantidades pequeñas. De este modo se ahorra energía. Colocar los trozos de carne en la parte central de la parrilla.
Grill variable de superficie amplia
Se calienta toda la superficie de debajo de la resistencia del grill. Se pueden asar al grill varios bistecs, salchichas, pescados o hacer tostadas.
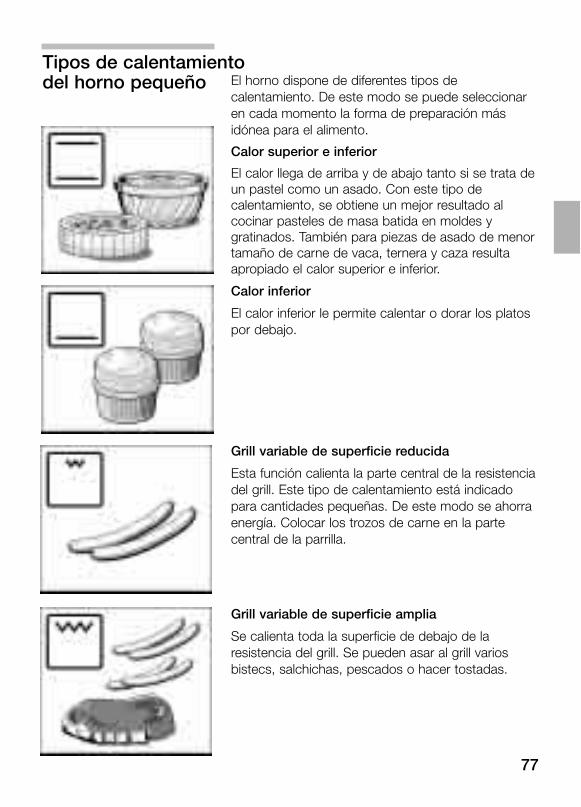
77
Tipos de calentamientodel horno pequeño El horno dispone de diferentes tipos de
calentamiento. De este modo se puede seleccionar en cada momento la forma de preparación más idónea para el alimento.
Calor superior e inferior
El calor llega de arriba y de abajo tanto si se trata de un pastel como un asado. Con este tipo de calentamiento, se obtiene un mejor resultado al cocinar pasteles de masa batida en moldes y gratinados. También para piezas de asado de menor tamaño de carne de vaca, ternera y caza resulta apropiado el calor superior e inferior.
Calor inferior
El calor inferior le permite calentar o dorar los platos por debajo.
Grill variable de superficie reducida
Esta función calienta la parte central de la resistenciadel grill. Este tipo de calentamiento está indicado para cantidades pequeñas. De este modo se ahorra energía. Colocar los trozos de carne en la parte central de la parrilla.
Grill variable de superficie amplia
Se calienta toda la superficie de debajo de la resistencia del grill. Se pueden asar al grill varios bistecs, salchichas, pescados o hacer tostadas.
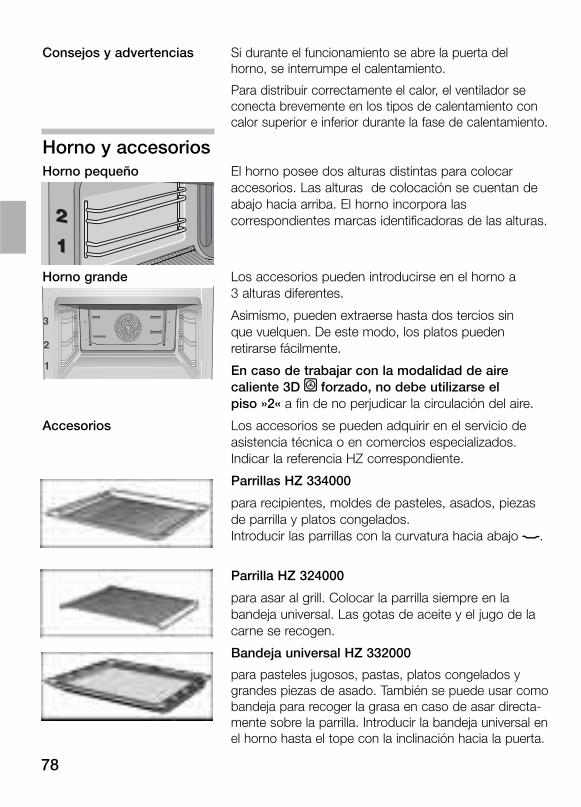
78
Consejos y advertencias Si durante el funcionamiento se abre la puerta del horno, se interrumpe el calentamiento.
Para distribuir correctamente el calor, el ventilador se conecta brevemente en los tipos de calentamiento con calor superior e inferior durante la fase de calentamiento.
Horno y accesoriosHorno pequeño El horno posee dos alturas distintas para colocar
accesorios. Las alturas de colocación se cuentan de abajo hacia arriba. El horno incorpora las correspondientes marcas identificadoras de las alturas.
Horno grande Los accesorios pueden introducirse en el horno a 3 alturas diferentes.
Asimismo, pueden extraerse hasta dos tercios sin que vuelquen. De este modo, los platos pueden retirarse fácilmente.
En caso de trabajar con la modalidad de aire caliente 3D ˜ forzado, no debe utilizarse el piso »2« a fin de no perjudicar la circulación del aire.
Accesorios Los accesorios se pueden adquirir en el servicio de asistencia técnica o en comercios especializados. Indicar la referencia HZ correspondiente.
Parrillas HZ 334000
para recipientes, moldes de pasteles, asados, piezas de parrilla y platos congelados.Introducir las parrillas con la curvatura hacia abajo (.
Parrilla HZ 324000
para asar al grill. Colocar la parrilla siempre en la bandeja universal. Las gotas de aceite y el jugo de la carne se recogen.
Bandeja universal HZ 332000
para pasteles jugosos, pastas, platos congelados y grandes piezas de asado. También se puede usar comobandeja para recoger la grasa en caso de asar directa-mente sobre la parrilla. Introducir la bandeja universal en el horno hasta el tope con la inclinación hacia la puerta.
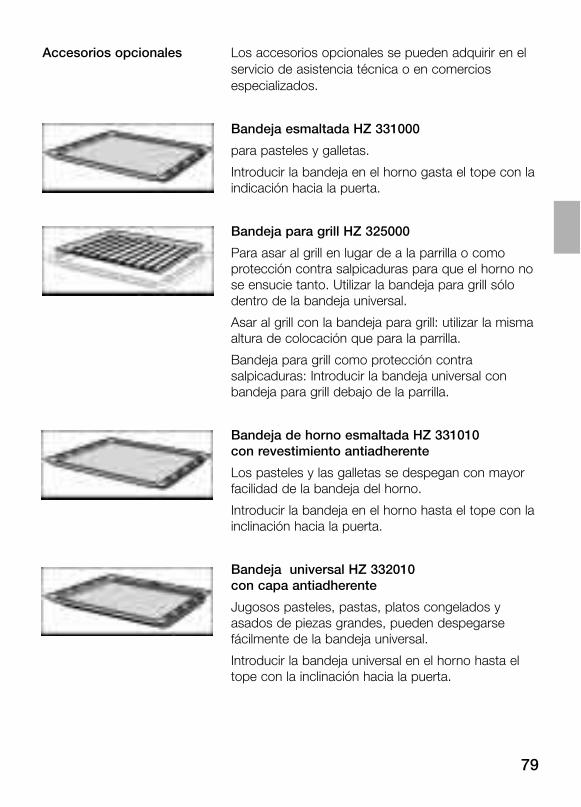
79
Accesorios opcionales Los accesorios opcionales se pueden adquirir en el servicio de asistencia técnica o en comercios especializados.
Bandeja esmaltada HZ 331000
para pasteles y galletas.
Introducir la bandeja en el horno gasta el tope con laindicación hacia la puerta.
Bandeja para grill HZ 325000
Para asar al grill en lugar de a la parrilla o como protección contra salpicaduras para que el horno no se ensucie tanto. Utilizar la bandeja para grill sólo dentro de la bandeja universal.
Asar al grill con la bandeja para grill: utilizar la misma altura de colocación que para la parrilla.
Bandeja para grill como protección contra salpicaduras: Introducir la bandeja universal con bandeja para grill debajo de la parrilla.
Bandeja de horno esmaltada HZ 331010 con revestimiento antiadherente
Los pasteles y las galletas se despegan con mayor facilidad de la bandeja del horno.
Introducir la bandeja en el horno hasta el tope con la inclinación hacia la puerta.
Bandeja universal HZ 332010 con capa antiadherente
Jugosos pasteles, pastas, platos congelados y asados de piezas grandes, pueden despegarse fácilmente de la bandeja universal.
Introducir la bandeja universal en el horno hasta el tope con la inclinación hacia la puerta.
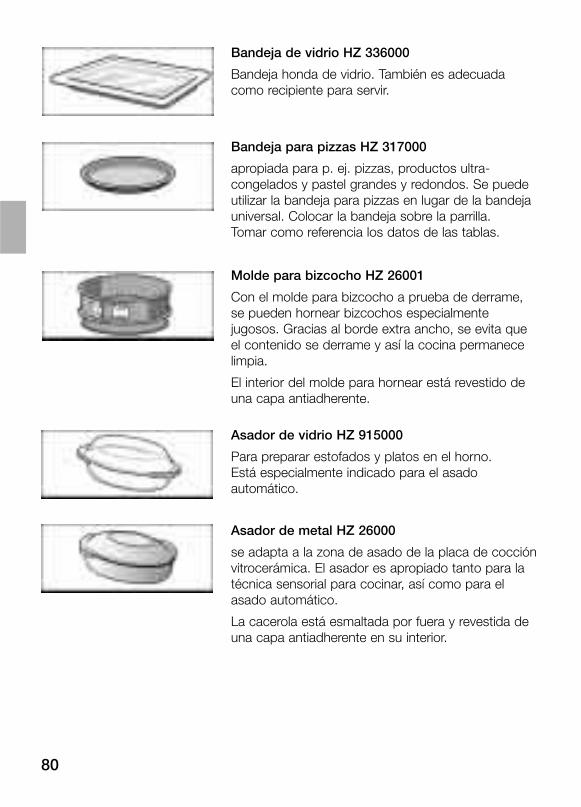
80
Bandeja de vidrio HZ 336000
Bandeja honda de vidrio. También es adecuada como recipiente para servir.
Bandeja para pizzas HZ 317000
apropiada para p. ej. pizzas, productos ultra-congelados y pastel grandes y redondos. Se puede utilizar la bandeja para pizzas en lugar de la bandeja universal. Colocar la bandeja sobre la parrilla. Tomar como referencia los datos de las tablas.
Molde para bizcocho HZ 26001
Con el molde para bizcocho a prueba de derrame, se pueden hornear bizcochos especialmente jugosos. Gracias al borde extra ancho, se evita que el contenido se derrame y así la cocina permanece limpia.
El interior del molde para hornear está revestido de una capa antiadherente.
Asador de vidrio HZ 915000
Para preparar estofados y platos en el horno. Está especialmente indicado para el asado automático.
Asador de metal HZ 26000
se adapta a la zona de asado de la placa de cocción vitrocerámica. El asador es apropiado tanto para la técnica sensorial para cocinar, así como para el asado automático.
La cacerola está esmaltada por fuera y revestida de una capa antiadherente en su interior.
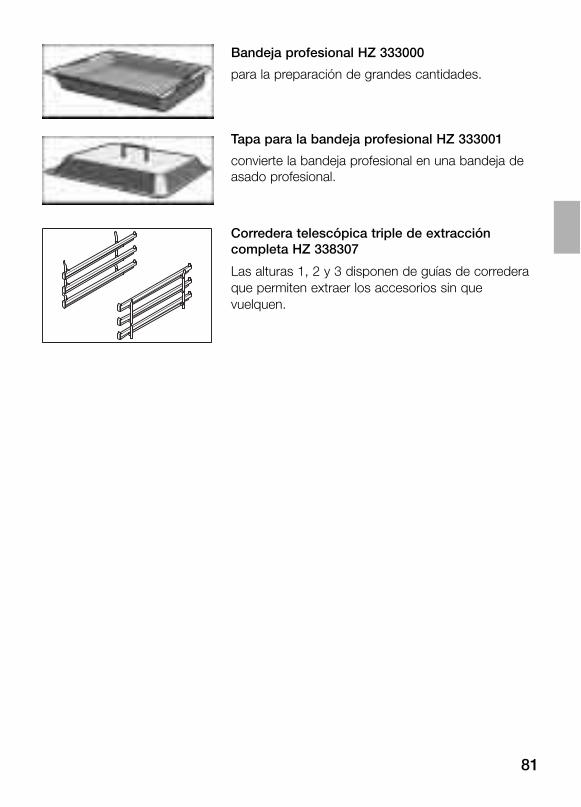
81
Bandeja profesional HZ 333000
para la preparación de grandes cantidades.
Tapa para la bandeja profesional HZ 333001
convierte la bandeja profesional en una bandeja de asado profesional.
Corredera telescópica triple de extracción completa HZ 338307
Las alturas 1, 2 y 3 disponen de guías de corredera que permiten extraer los accesorios sin que vuelquen.
82
Ventilador El horno está dotado de un ventilador de enfriamiento. Éste se conecta y desconecta en caso de necesidad. El aire caliente se escapa por la puerta.
Antes del primer usoEn este capítulo hay información sobre todo lo que hay que hacer antes de cocinar por primera vez.
Calentar el horno y limpiar los accesorios. Leer las indicaciones de seguridad en el capítulo “Qué hay que tener en cuenta”.
En primer lugar comprobar si en la indicación visual en el horno parpadean el símbolo 6 y tres ceros.
Si parpadean el símbolo 6 Poner el reloj en hora.y tres ceros 1. Pulsar la tecla de reloj 6.
Aparecerá 12:00 y el símbolo reloj 6 parpadeará.
2. Programar la hora con el botón giratorio(del horno grande).
Tras unos segundos se aplica la hora. El horno está ahora listo para funcionar.
Calentar el horno Para eliminar el olor a nuevo, calentar el horno vacío y cerrado.
Proceder de la siguiente 1. Colocar el selector de funciones en calor superior forma e inferior t.
En la indicación visual se propone una temperatura.
2. Programar 240 ºC con el botón giratorio.
Tras 60 minutos, desconectar el selector de funciones.
Limpieza previa delos accesorios Antes de utilizar los accesorios, limpiarlos con agua,
un poco de jabón y una bayeta.
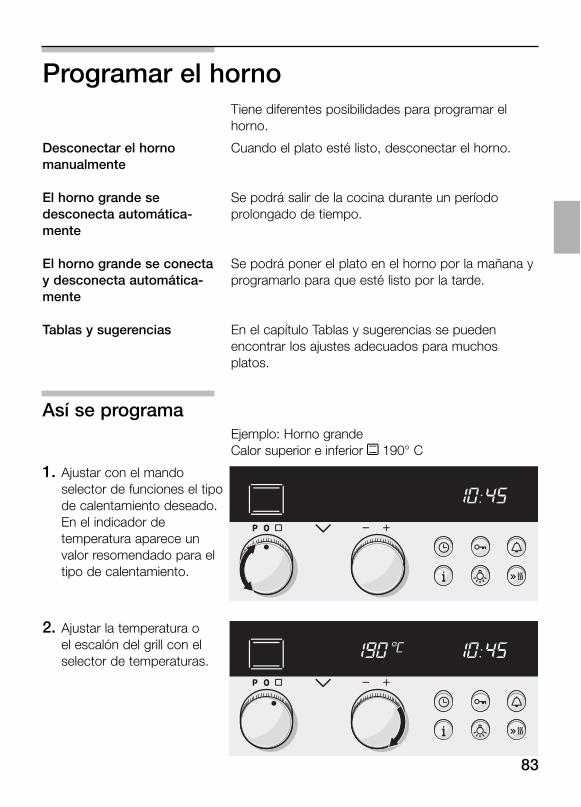
83
Programar el hornoTiene diferentes posibilidades para programar el horno.
Desconectar el horno Cuando el plato esté listo, desconectar el horno.manualmente
El horno grande se Se podrá salir de la cocina durante un período desconecta automática- prolongado de tiempo.mente
El horno grande se conecta Se podrá poner el plato en el horno por la mañana y y desconecta automática- programarlo para que esté listo por la tarde.mente
Tablas y sugerencias En el capítulo Tablas y sugerencias se pueden encontrar los ajustes adecuados para muchos platos.
Así se programaEjemplo: Horno grandeCalor superior e inferior t 190° C
1. Ajustar con el mandoselector de funciones el tipode calentamiento deseado.En el indicador detemperatura aparece unvalor resomendado para eltipo de calentamiento.
2. Ajustar la temperatura oel escalón del grill con elselector de temperaturas.
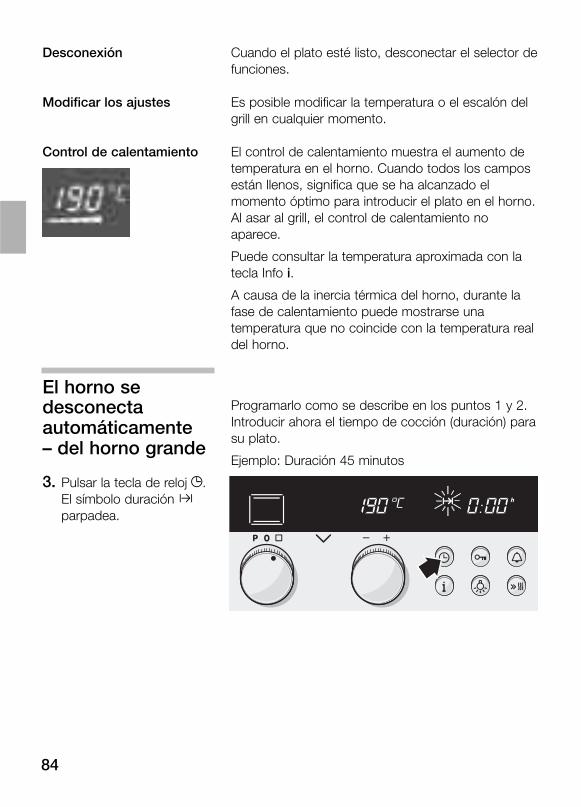
84
Desconexión Cuando el plato esté listo, desconectar el selector de funciones.
Modificar los ajustes Es posible modificar la temperatura o el escalón del grill en cualquier momento.
Control de calentamiento El control de calentamiento muestra el aumento de temperatura en el horno. Cuando todos los campos están llenos, significa que se ha alcanzado el momento óptimo para introducir el plato en el horno.Al asar al grill, el control de calentamiento no aparece.
Puede consultar la temperatura aproximada con la tecla Info i.
A causa de la inercia térmica del horno, durante la fase de calentamiento puede mostrarse una temperatura que no coincide con la temperatura real del horno.
El horno se desconecta Programarlo como se describe en los puntos 1 y 2.
automáticamente Introducir ahora el tiempo de cocción (duración) para
– del horno grandesu plato.
Ejemplo: Duración 45 minutos
3. Pulsar la tecla de reloj 6.El símbolo duración *parpadea.
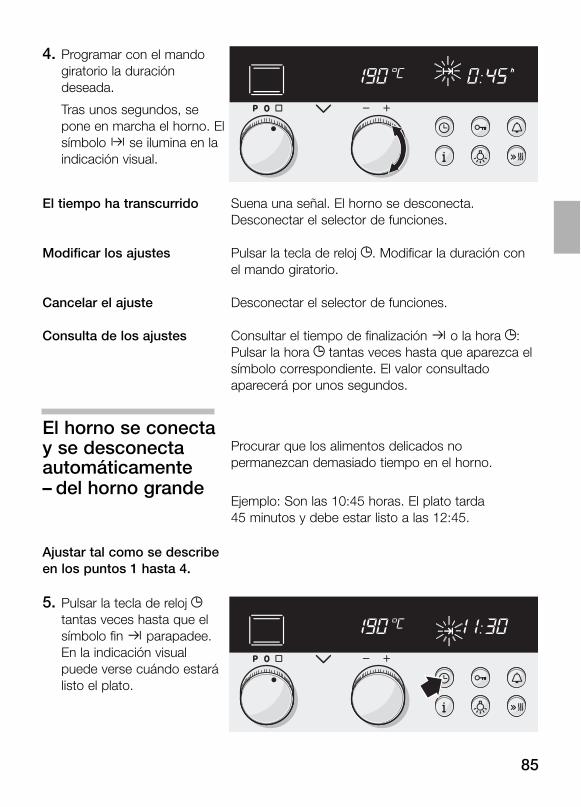
85
4. Programar con el mandogiratorio la duracióndeseada.
Tras unos segundos, sepone en marcha el horno. Elsímbolo * se ilumina en laindicación visual.
El tiempo ha transcurrido Suena una señal. El horno se desconecta.Desconectar el selector de funciones.
Modificar los ajustes Pulsar la tecla de reloj 6. Modificar la duración con el mando giratorio.
Cancelar el ajuste Desconectar el selector de funciones.
Consulta de los ajustes Consultar el tiempo de finalización + o la hora 6: Pulsar la hora 6 tantas veces hasta que aparezca el símbolo correspondiente. El valor consultado aparecerá por unos segundos.
El horno se conectay se desconecta Procurar que los alimentos delicados no
automáticamente permanezcan demasiado tiempo en el horno.
– del horno grandeEjemplo: Son las 10:45 horas. El plato tarda 45 minutos y debe estar listo a las 12:45.
Ajustar tal como se describeen los puntos 1 hasta 4.
5. Pulsar la tecla de reloj 6tantas veces hasta que elsímbolo fin + parapadee.En la indicación visualpuede verse cuándo estarálisto el plato.
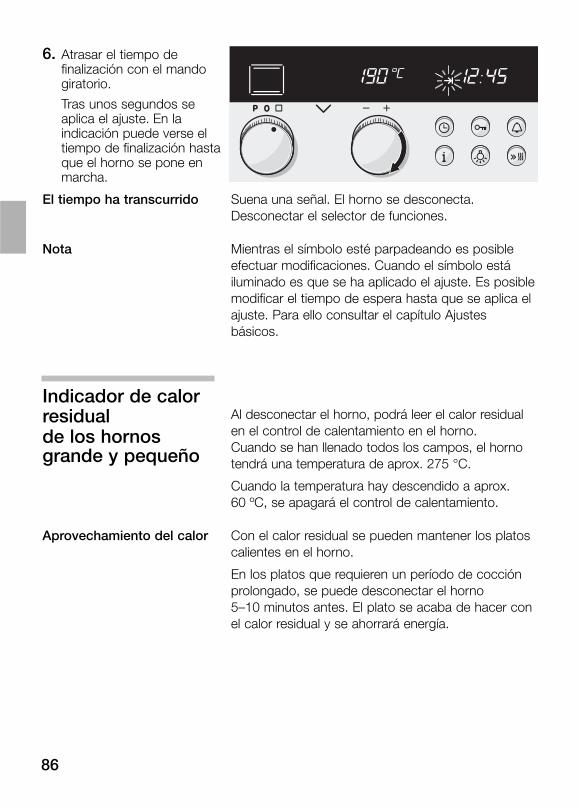
86
6. Atrasar el tiempo definalización con el mandogiratorio.
Tras unos segundos seaplica el ajuste. En laindicación puede verse eltiempo de finalización hastaque el horno se pone enmarcha.
El tiempo ha transcurrido Suena una señal. El horno se desconecta. Desconectar el selector de funciones.
Nota Mientras el símbolo esté parpadeando es posible efectuar modificaciones. Cuando el símbolo está iluminado es que se ha aplicado el ajuste. Es posible modificar el tiempo de espera hasta que se aplica el ajuste. Para ello consultar el capítulo Ajustes básicos.
Indicador de calorresidual Al desconectar el horno, podrá leer el calor residual
de los hornos en el control de calentamiento en el horno.
grande y pequeño Cuando se han llenado todos los campos, el horno tendrá una temperatura de aprox. 275 °C.
Cuando la temperatura hay descendido a aprox. 60 ºC, se apagará el control de calentamiento.
Aprovechamiento del calor Con el calor residual se pueden mantener los platos calientes en el horno.
En los platos que requieren un período de cocción prolongado, se puede desconectar el horno 5–10 minutos antes. El plato se acaba de hacer conel calor residual y se ahorrará energía.
87
Calentamiento rápidoHorno grande Así se puede calentar el horno con gran rapidez.
Tipos de calentamiento ˜ = Aire caliente 3D
Así se programaConectar primero el horno.
A continuación, pulsar la tecla de calentamiento rápido D.En la indicación visual se ilumina el símbolo D.El horno calienta. Los campos del control de calentamiento se rellenan.
El calentamiento rápido ha Se oirá una señal breve. El símbolo D se apaga. finalizado Introducir el plato en el horno.
Cancelar el calentamiento Pulsar la tecla de calentamiento rápido. El símbolo se rápido apaga. Se ha cancelado el calentamiento rápido.
Consejos y advertencias Si se modifica el tipo de calentamiento, se interrumpe el calentamiento rápido.
El calentamiento rápido no funciona cuando la temperatura ajustada se halla por debajo de los 100 ºC.Si la temperatura en el horno es sólo un poco más baja que la temperatura programada, no es necesario el calentamiento rápido. No se conecta.
Durante el calentamiento rápido, se puede consultar la temperatura actual pulsando la tecla Info i.
88
Función automática de asadodel horno pequeño Con la función automática de asado, los platos
guisados, los asados sabrosos y los cocidos deliciosos son muy fáciles de preparar. No habrá que girar ni rociar y el horno permanecerá limpio.
RecipientesEl asado automático sólo es apropiado para asar en recipientes cerrados. Utilizar únicamente recipientes con las tapaderas correspondientes.
Recipientes adecuados Recipientes resistentes al calor (hasta 300 ºC), recipientes de vidrio o vitrocerámica.Si se utilizan cacerolas de acero esmaltado, hierro fundido o de aluminio colado a presión, añadir más líquido. El plato se dora con más intensidad.Observar los consejos y advertencias del fabricante del recipiente.
Las cacerolas de acero inoxidable son sólo adecuadas para casos concretos. El plato no se dora con tanta intensidad y la carne no queda en su punto.
Recipientes inadecuados Recipientes de aluminio brillante y claro, de arcilla sin esmaltar y batería de cocina con asas de plástico.
Tamaño de los recipientes La carne debe cubrir aprox. dos tercios de la base del recipiente. Así se obtiene un jugo de asado de aspecto sabroso.
La distancia entre la carne y la tapa debe ser de por lo menos 3 cm. La carne puede aumentar de tamaño durante el asado.
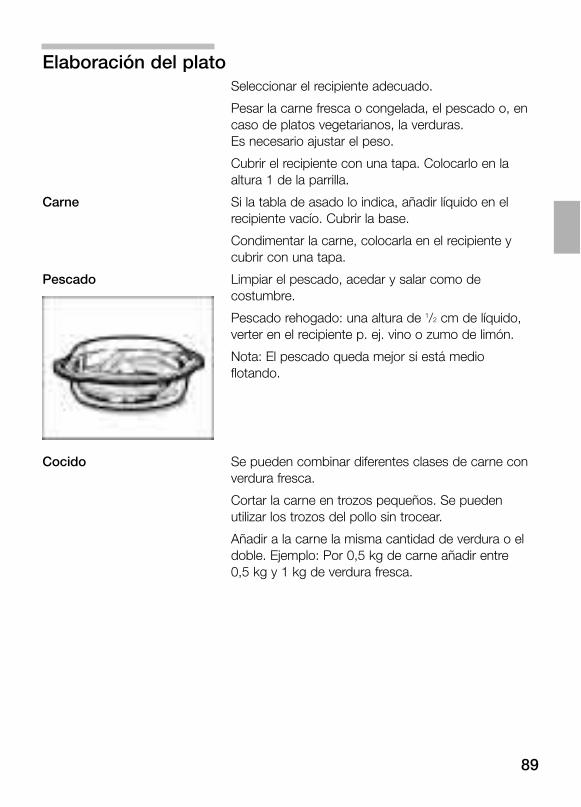
89
Elaboración del platoSeleccionar el recipiente adecuado.
Pesar la carne fresca o congelada, el pescado o, en caso de platos vegetarianos, la verduras. Es necesario ajustar el peso.
Cubrir el recipiente con una tapa. Colocarlo en la altura 1 de la parrilla.
Carne Si la tabla de asado lo indica, añadir líquido en el recipiente vacío. Cubrir la base.
Condimentar la carne, colocarla en el recipiente y cubrir con una tapa.
Pescado Limpiar el pescado, acedar y salar como de costumbre.
Pescado rehogado: una altura de 1/2 cm de líquido, verter en el recipiente p. ej. vino o zumo de limón.
Nota: El pescado queda mejor si está medio flotando.
Cocido Se pueden combinar diferentes clases de carne con verdura fresca.
Cortar la carne en trozos pequeños. Se pueden utilizar los trozos del pollo sin trocear.
Añadir a la carne la misma cantidad de verdura o el doble. Ejemplo: Por 0,5 kg de carne añadir entre 0,5 kg y 1 kg de verdura fresca.
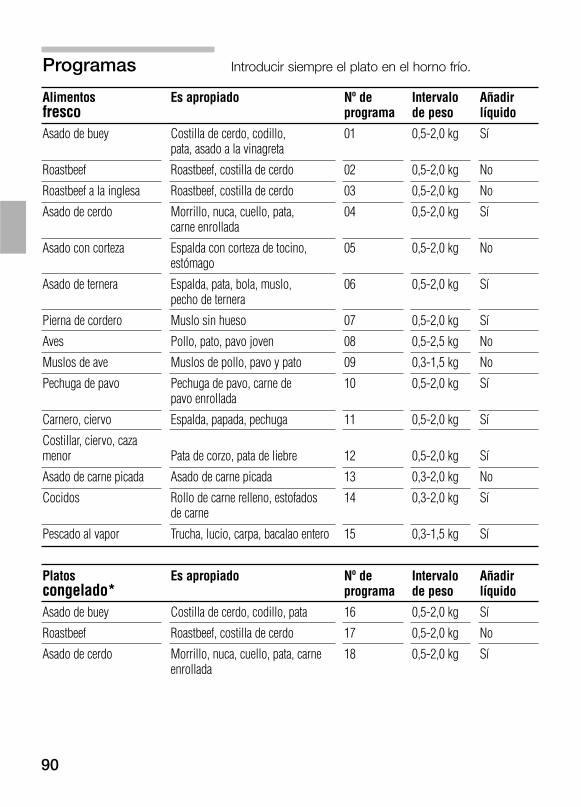
90
Programas Introducir siempre el plato en el horno frío.
Alimentos Es apropiado Nº de Intervalo Añadirfresco programa de peso líquido
Asado de buey Costilla de cerdo, codillo, 01 0,5-2,0 kg Sípata, asado a la vinagreta
Roastbeef Roastbeef, costilla de cerdo 02 0,5-2,0 kg No
Roastbeef a la inglesa Roastbeef, costilla de cerdo 03 0,5-2,0 kg No
Asado de cerdo Morrillo, nuca, cuello, pata, 04 0,5-2,0 kg Sícarne enrollada
Asado con corteza Espalda con corteza de tocino, 05 0,5-2,0 kg Noestómago
Asado de ternera Espalda, pata, bola, muslo, 06 0,5-2,0 kg Sípecho de ternera
Pierna de cordero Muslo sin hueso 07 0,5-2,0 kg Sí
Aves Pollo, pato, pavo joven 08 0,5-2,5 kg No
Muslos de ave Muslos de pollo, pavo y pato 09 0,3-1,5 kg No
Pechuga de pavo Pechuga de pavo, carne de 10 0,5-2,0 kg Sípavo enrollada
Carnero, ciervo Espalda, papada, pechuga 11 0,5-2,0 kg Sí
Costillar, ciervo, caza menor Pata de corzo, pata de liebre 12 0,5-2,0 kg Sí
Asado de carne picada Asado de carne picada 13 0,3-2,0 kg No
Cocidos Rollo de carne relleno, estofados 14 0,3-2,0 kg Síde carne
Pescado al vapor Trucha, lucio, carpa, bacalao entero 15 0,3-1,5 kg Sí
Platos Es apropiado Nº de Intervalo Añadircongelado* programa de peso líquido
Asado de buey Costilla de cerdo, codillo, pata 16 0,5-2,0 kg Sí
Roastbeef Roastbeef, costilla de cerdo 17 0,5-2,0 kg No
Asado de cerdo Morrillo, nuca, cuello, pata, carne 18 0,5-2,0 kg Síenrollada
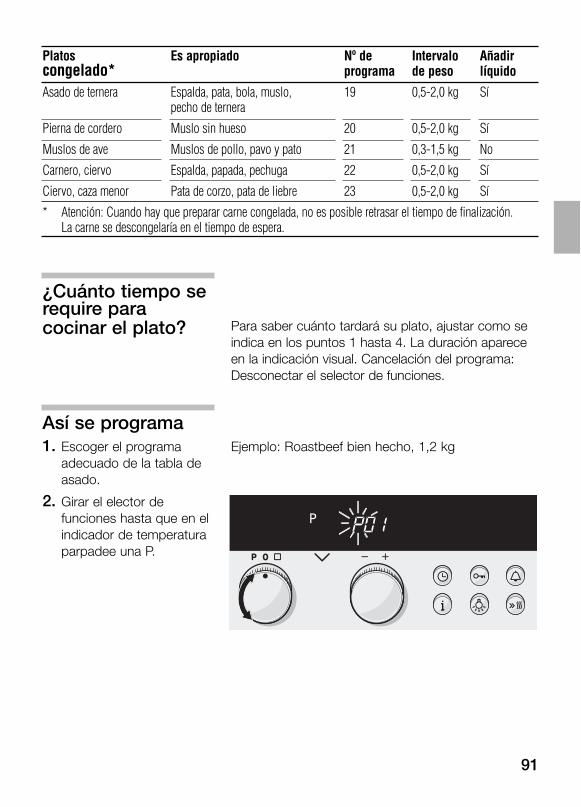
91
Platos Es apropiado Nº de Intervalo Añadircongelado* programa de peso líquido
Asado de ternera Espalda, pata, bola, muslo, 19 0,5-2,0 kg Sípecho de ternera
Pierna de cordero Muslo sin hueso 20 0,5-2,0 kg Sí
Muslos de ave Muslos de pollo, pavo y pato 21 0,3-1,5 kg No
Carnero, ciervo Espalda, papada, pechuga 22 0,5-2,0 kg Sí
Ciervo, caza menor Pata de corzo, pata de liebre 23 0,5-2,0 kg Sí
* Atención: Cuando hay que preparar carne congelada, no es posible retrasar el tiempo de finalización. La carne se descongelaría en el tiempo de espera.
¿Cuánto tiempo serequire paracocinar el plato? Para saber cuánto tardará su plato, ajustar como se
indica en los puntos 1 hasta 4. La duración aparece en la indicación visual. Cancelación del programa: Desconectar el selector de funciones.
Así se programa1. Escoger el programa Ejemplo: Roastbeef bien hecho, 1,2 kg
adecuado de la tabla deasado.
2. Girar el elector defunciones hasta que en elindicador de temperaturaparpadee una P.

92
3. Ajustar el número deprograma deseado con elmando giratorio.
Una vez se ha aplicado elprograma, aparecerá el valorrecomendado para el peso.
4. Ajustar el peso con elmando giratorio.Tras unos segundos, sepone en marcha el horno.En la indicación visual sepuede ver cómo transcurredicha duración.
El tiempo ha transcurrido Suena una señal. El horno se desconecta.Desconectar el selector de funciones.
Cancelación del programa Desconectar el selector de funciones.
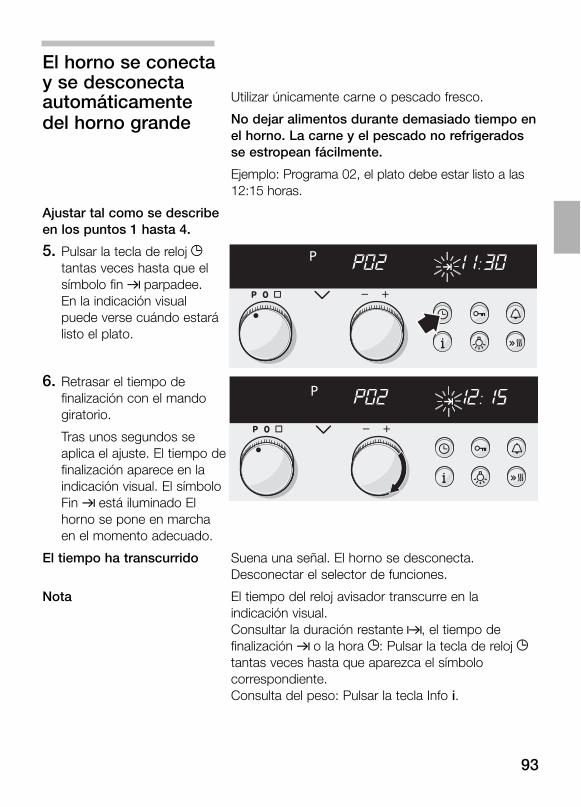
93
El horno se conectay se desconectaautomáticamente Utilizar únicamente carne o pescado fresco.
del horno grande No dejar alimentos durante demasiado tiempo en el horno. La carne y el pescado no refrigerados se estropean fácilmente.
Ejemplo: Programa 02, el plato debe estar listo a las 12:15 horas.
Ajustar tal como se describeen los puntos 1 hasta 4.
5. Pulsar la tecla de reloj 6tantas veces hasta que elsímbolo fin ! parpadee.En la indicación visualpuede verse cuándo estarálisto el plato.
6. Retrasar el tiempo definalización con el mandogiratorio.
Tras unos segundos seaplica el ajuste. El tiempo definalización aparece en laindicación visual. El símboloFin ! está iluminado El horno se pone en marchaen el momento adecuado.
El tiempo ha transcurrido Suena una señal. El horno se desconecta. Desconectar el selector de funciones.
Nota El tiempo del reloj avisador transcurre en la indicación visual.Consultar la duración restante ?, el tiempo de finalización ! o la hora 6: Pulsar la tecla de reloj 6tantas veces hasta que aparezca el símbolo correspondiente.Consulta del peso: Pulsar la tecla Info i.
94
Sugerencias para elasado automático
El peso del asado o del ave El rango de peso se ha limitado conscientemente. Con frecuencia, supera el rango de peso si el asado es muy grande no puede conseguirse una cacerola indicado. suficientemente grande. Preparar las piezas grandes con calor
superior e inferior t o grill de infrarrojos con aire caliente ˆ.
El asado es bueno, pero la salsa Seleccionar un recipiente más pequeño y usar más líquido.el demasiado oscura.
El asado es bueno, pero la salsa Seleccionar un recipiente más grande y usar menos líquido.es demasiado clara y líquida.
El asado está demasiado seco Usar un recipiente con una tapa que cierre bien. La carne muy por arriba. magra se conserva jugosa añadiendo unas tiras de tocino.
Mientras se está asando huele a La tapa de la cacerola no cierra bien. O la carne se ha hinchado y quemado, pero el asado tiene ha levantado la tapa. Usar siempre una tapa que encaje. Asegurarse buen aspecto. de que entre la carne y la tapa haya una distancia mínima de 3 cm.
Si se desea preparar carne Condimentar la carne congelada igual que la carne fresca. congelada. Atención: No se puede retrasar el tiempo de finalización para la
carne congelada. La carne se descongelaría en el tiempo de espera.
Si se desea asar varios muslos Los muslos deben ser del mismo tamaño, más o menos. Indicar el de pollo o de ave a la vez. peso del muslo que más pese. Ejemplo: Dos muslos de pavo con
1,4 y 1,5 kg. Indicar 1,5 kg.
Si se desea rehogar o asar Los pescados deben ser del mismo tamaño, más o menos. Indicar varios pescados. el peso total. Ejemplo: Dos truchas con 0,6 y 0,5 kg. Indicar
1,1 kg.
Si se desea preparar aves El ave rellena no es apropiada. La mejor forma es abierta sobre la rellenas. parrilla. Consultar para ello la tabla para aves.
La carne del cocido está muy La próxima vez, amontonar los trozos de carne en el borde del poco dorada. recipiente. Colocar las verduras en el centro.
Las verduras del cocido están Para el cocido, indicar el peso de la carne. Las verduras quedarán demasiado duras. en su punto. Si es necesario que queden más tiernas, indicar
juntos el peso de las verduras y de la carne.
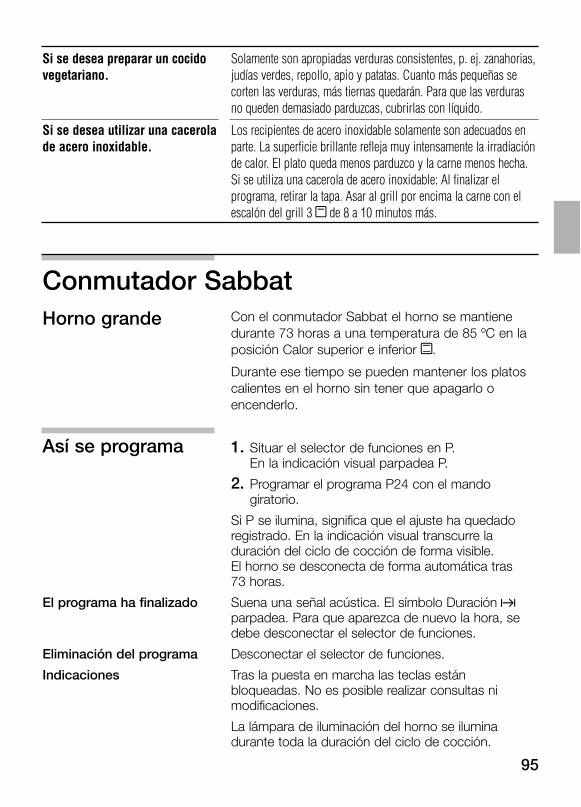
95
Conmutador SabbatHorno grande Con el conmutador Sabbat el horno se mantiene
durante 73 horas a una temperatura de 85 ºC en la posición Calor superior e inferior t.
Durante ese tiempo se pueden mantener los platos calientes en el horno sin tener que apagarlo o encenderlo.
Así se programa 1. Situar el selector de funciones en P.En la indicación visual parpadea P.
2. Programar el programa P24 con el mando giratorio.
Si P se ilumina, significa que el ajuste ha quedado registrado. En la indicación visual transcurre la duración del ciclo de cocción de forma visible. El horno se desconecta de forma automática tras 73 horas.
El programa ha finalizado Suena una señal acústica. El símbolo Duración ?parpadea. Para que aparezca de nuevo la hora, se debe desconectar el selector de funciones.
Eliminación del programa Desconectar el selector de funciones.
Indicaciones Tras la puesta en marcha las teclas están bloqueadas. No es posible realizar consultas ni modificaciones.
La lámpara de iluminación del horno se ilumina durante toda la duración del ciclo de cocción.
Si se desea preparar un cocido Solamente son apropiadas verduras consistentes, p. ej. zanahorias, vegetariano. judías verdes, repollo, apio y patatas. Cuanto más pequeñas se
corten las verduras, más tiernas quedarán. Para que las verduras no queden demasiado parduzcas, cubrirlas con líquido.
Si se desea utilizar una cacerola Los recipientes de acero inoxidable solamente son adecuados en de acero inoxidable. parte. La superficie brillante refleja muy intensamente la irradiación
de calor. El plato queda menos parduzco y la carne menos hecha.Si se utiliza una cacerola de acero inoxidable: Al finalizar el programa, retirar la tapa. Asar al grill por encima la carne con el escalón del grill 3 x de 8 a 10 minutos más.
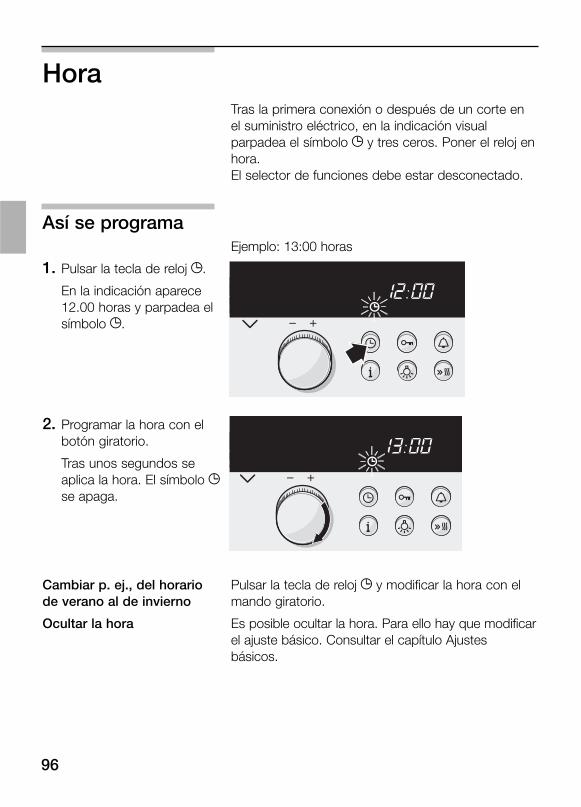
96
HoraTras la primera conexión o después de un corte en el suministro eléctrico, en la indicación visual parpadea el símbolo 6 y tres ceros. Poner el reloj en hora.El selector de funciones debe estar desconectado.
Así se programaEjemplo: 13:00 horas
1. Pulsar la tecla de reloj 6.
En la indicación aparece12.00 horas y parpadea elsímbolo 6.
2. Programar la hora con elbotón giratorio.
Tras unos segundos seaplica la hora. El símbolo 6se apaga.
Cambiar p. ej., del horario Pulsar la tecla de reloj 6 y modificar la hora con el de verano al de invierno mando giratorio.
Ocultar la hora Es posible ocultar la hora. Para ello hay que modificar el ajuste básico. Consultar el capítulo Ajustes básicos.

97
Reloj avisadorSe puede utilizar el reloj del horno como un reloj avisador de cocina. Funciona de manera independiente del horno.El reloj avisador tiene una señal especial.También es posible ajustar el reloj avisador cuando el seguro para niños está activo.
Así se programa Ejemplo: 20 minutos
1. Pulsar la tecla de relojavisador 8.
El símbolo 8 parpadea.
2. Programar la hora del relojavisador con el mandogiratorio.
Tras unos segundos, seponeen marcha el relojavisador. El símbolo 8 seilumina en la indicaciónvisual. El tiempo transcurrede manera visible.
El tiempo ha transcurrido Suena una señal. Pulsar la tecla de reloj avisador 8. La indicación visual del reloj avisador se apaga.
Modificar el tiempo del Pulsar la tecla de reloj avisador 8. reloj avisador Modificar el tiempo con el mando giratorio.
Borrar el ajuste Pulsar la tecla de reloj avisador 8 3x.
El reloj avisador y la Los símbolos se iluminan. El tiempo del reloj avisador duración transcurren transcurre de manera visible en la indicación visual.simultáneamente Consulta de la duración restante ?, el tiempo de
finalización ! o la hora 6: Pulsar la hora 6 tantas veces hasta que aparezca el símbolo correspon-diente.El valor consultado aparecerá por unos segundos en la indicación visual.
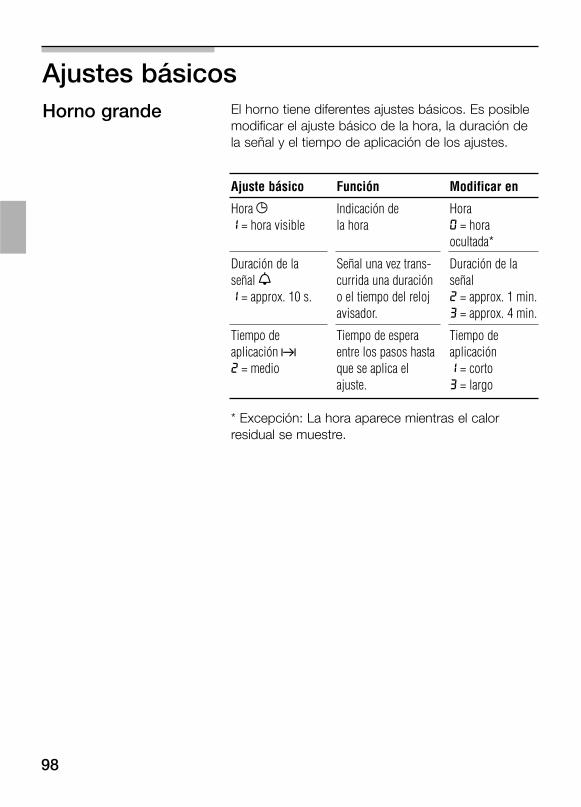
98
Ajustes básicosHorno grande El horno tiene diferentes ajustes básicos. Es posible
modificar el ajuste básico de la hora, la duración de la señal y el tiempo de aplicación de los ajustes.
Ajuste básico Función Modificar en
Hora 6 Indicación de Hora1 = hora visible la hora 0 = hora
ocultada*
Duración de la Señal una vez trans- Duración de la señal 8 currida una duración señal1 = approx. 10 s. o el tiempo del reloj 2 = approx. 1 min.
avisador. 3 = approx. 4 min.
Tiempo de Tiempo de espera Tiempo de aplicación ? entre los pasos hasta aplicación2 = medio que se aplica el 1 = corto
ajuste. 3 = largo
* Excepción: La hora aparece mientras el calor residual se muestre.
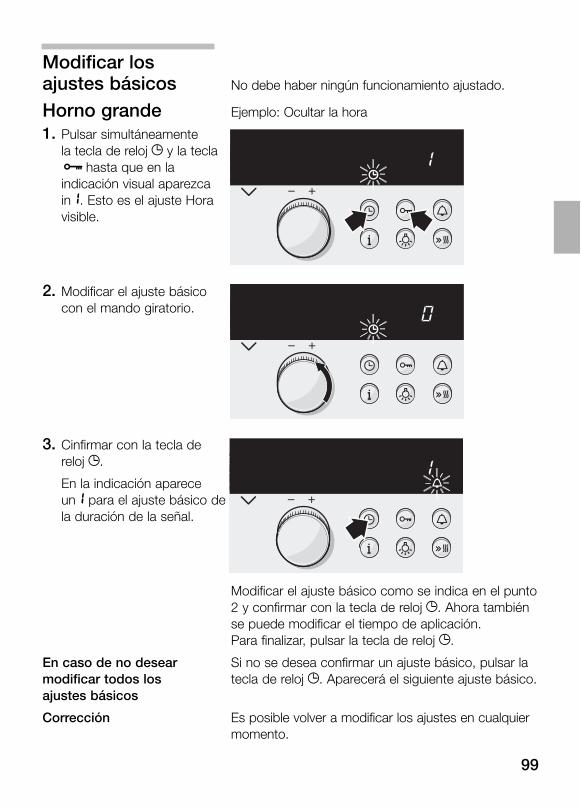
99
Modificar losajustes básicos No debe haber ningún funcionamiento ajustado.
Horno grande Ejemplo: Ocultar la hora
1. Pulsar simultáneamentela tecla de reloj 6 y la teclaEhasta que en la indicación visual aparezcain1. Esto es el ajuste Horavisible.
2. Modificar el ajuste básicocon el mando giratorio.
3. Cinfirmar con la tecla dereloj 6.
En la indicación aparece un1 para el ajuste básico dela duración de la señal.
Modificar el ajuste básico como se indica en el punto 2 y confirmar con la tecla de reloj 6. Ahora también se puede modificar el tiempo de aplicación. Para finalizar, pulsar la tecla de reloj 6.
En caso de no desear Si no se desea confirmar un ajuste básico, pulsar la modificar todos los tecla de reloj 6. Aparecerá el siguiente ajuste básico.ajustes básicos
Corrección Es posible volver a modificar los ajustes en cualquier momento.
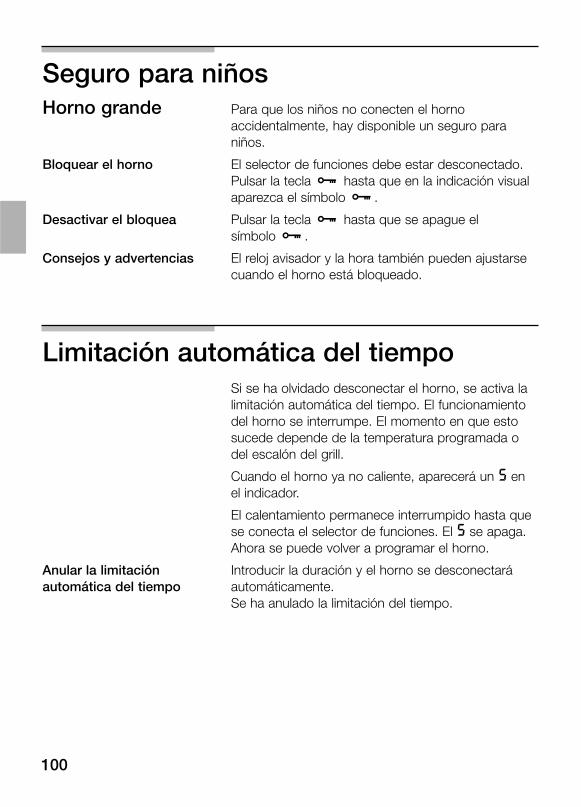
100
Seguro para niñosHorno grande Para que los niños no conecten el horno
accidentalmente, hay disponible un seguro para niños.
Bloquear el horno El selector de funciones debe estar desconectado.Pulsar la tecla E hasta que en la indicación visual aparezca el símbolo E.
Desactivar el bloquea Pulsar la tecla E hasta que se apague el símbolo E.
Consejos y advertencias El reloj avisador y la hora también pueden ajustarse cuando el horno está bloqueado.
Limitación automática del tiempoSi se ha olvidado desconectar el horno, se activa la limitación automática del tiempo. El funcionamiento del horno se interrumpe. El momento en que esto sucede depende de la temperatura programada o del escalón del grill.
Cuando el horno ya no caliente, aparecerá un 5 en el indicador.
El calentamiento permanece interrumpido hasta que se conecta el selector de funciones. El 5 se apaga. Ahora se puede volver a programar el horno.
Anular la limitación Introducir la duración y el horno se desconectará automática del tiempo automáticamente.
Se ha anulado la limitación del tiempo.
101
Cuidados y limpiezaNo utilizar limpiadores de alta presión ni máquinas de limpieza a vapor.
Parte externe delaparato Limpiar el aparato con agua y un poco de
lavavajillas. Secarlo con una paño suave.
Los productos corrosivos y abrasivos no son apropiados. Cuando un producto de este tipo entra en contacto con el frontal, limpiarlo inmediatamente con agua.
Indicación Es posible que aparezcan diferentes tonalidades en el frontal del aparato debido a diferentes materiales como vidrio, plástico o metal.
Las sombras con forma de estrías apreciables en el vidrio de la puerta son los reflejos luminosos de la lámpara del horno.
Aparatos con frontal de Eliminar siempre de manera inmediata las manchas acero inoxidable de cal, grasa, almidón y clara de huevo. Debajo de
estas manchas puede formarse corrosión.
Utilizar agentes conservantes para acero inoxidable. Observar las indicaciones del fabricante. Probar el producto en áreas pequeñas antes de aplicarlo a toda la superficie.
Aparatos con frontal de Utilizar un detergente suave para ventanas. Limpiar aluminio la superficie con una paño suave para ventanas o un
paño de fibras microscópicas sin pelusa sin ejercer excesiva presión.
Los detergentes agresivos, las esponjas que rayan y los paños de limpieza ásperos no son apropiados.
Horno No utilizar estropajos ni esponjas duras. El limpia-hornos sólo debe utilizarse en las superficies del horno esmaltadas.
Para facilitar la limpieza del hornoes posible descolgar la puerta.
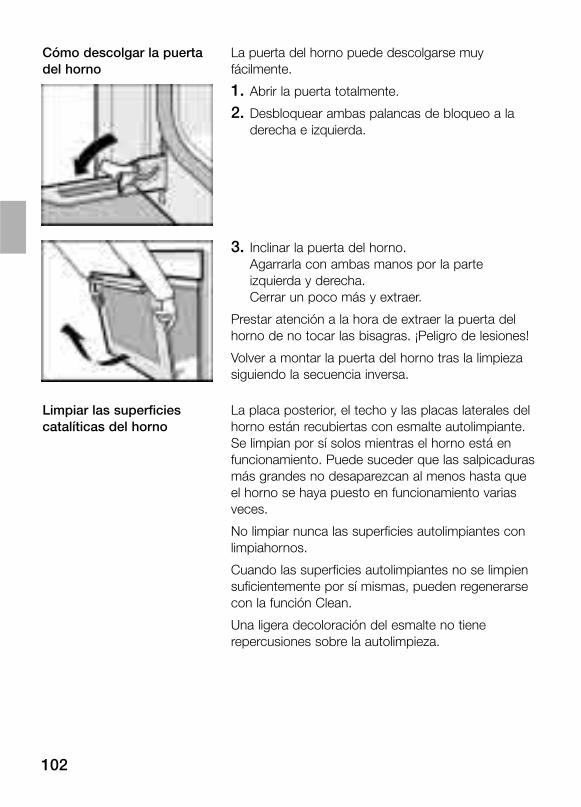
102
Cómo descolgar la puerta La puerta del horno puede descolgarse muy del horno fácilmente.
1. Abrir la puerta totalmente.
2. Desbloquear ambas palancas de bloqueo a la derecha e izquierda.
3. Inclinar la puerta del horno.Agarrarla con ambas manos por la parte izquierda y derecha.Cerrar un poco más y extraer.
Prestar atención a la hora de extraer la puerta delhorno de no tocar las bisagras. ¡Peligro de lesiones!
Volver a montar la puerta del horno tras la limpieza siguiendo la secuencia inversa.
Limpiar las superficies La placa posterior, el techo y las placas laterales del catalíticas del horno horno están recubiertas con esmalte autolimpiante.
Se limpian por sí solos mientras el horno está en funcionamiento. Puede suceder que las salpicaduras más grandes no desaparezcan al menos hasta que el horno se haya puesto en funcionamiento varias veces.
No limpiar nunca las superficies autolimpiantes con limpiahornos.
Cuando las superficies autolimpiantes no se limpien suficientemente por sí mismas, pueden regenerarse con la función Clean.
Una ligera decoloración del esmalte no tiene repercusiones sobre la autolimpieza.
103
Limpieza de la base del Utilizar agua caliente con un poco de jabón o una horno solución de agua y vinagre.
Para una limpieza a fondo, se recomienda el uso de limpiadores específicos para hornos. Utilizar los limpiadores específicos para hornos sólo con el horno frío. No aplicar nunca el producto sobre las superficies autolimpiantes.
Por cierto:El esmalte se cuece a una temperatura muy elevada. Por eso pueden aparecer pequeñas diferencias de color. Este fenómeno es normal y no tiene ninguna repercusión en el funcionamiento del horno. Estas alteraciones en el color no deben tratarse con estropajos o agentes abrasivos.
Los bordes de las bandejas finas no pueden esmaltarse por completo. Por está razón pueden resultar bastos al tacto. La protección anticorrosión está garantizada.
Limpieza del tapa de vidrio Limpie el vidrio protector preferiblemente con protector de la lámpara del lavavajillas.horno
Función CleanLa función Clean es un programa de regeneración. Cuando los elementos autolimpiantes en el horno no se limpien suficientemente por sí mismos, se regenerarán con esta función. Luego volverán a ser completamente funcionales.
Retirar los accesorios y los recipientes del horno.
Atención Las superficies en el horno que no se limpian solas deberán limpiarse a fondo antes. De lo contrario aparecerán manchas que no podrán eliminarse.
Niveles de limpieza Según el grado de suciedad que presenten las partes autolimpiantes, es posible ajustar diferentes niveles:3 = 1 hora 15 minutos2 = 1 hora1 = 45 minutos.
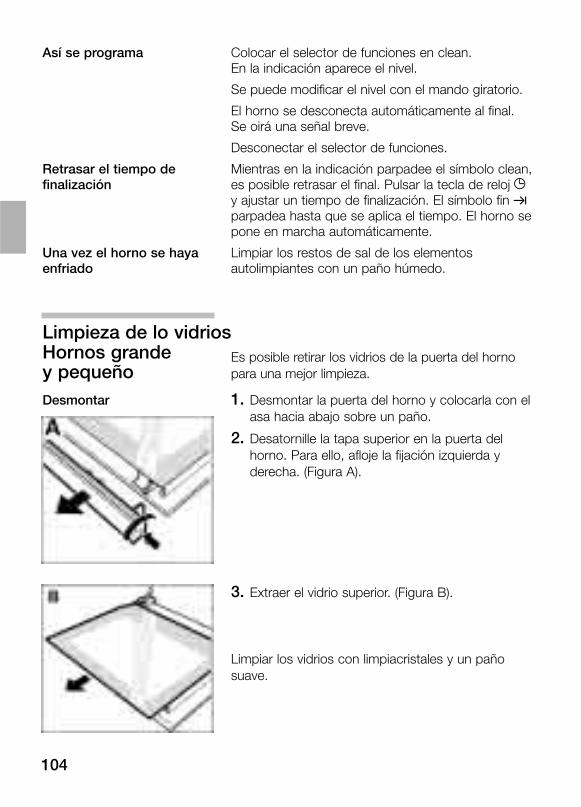
104
Así se programa Colocar el selector de funciones en clean. En la indicación aparece el nivel.
Se puede modificar el nivel con el mando giratorio.
El horno se desconecta automáticamente al final. Se oirá una señal breve.
Desconectar el selector de funciones.
Retrasar el tiempo de Mientras en la indicación parpadee el símbolo clean, finalización es posible retrasar el final. Pulsar la tecla de reloj 6
y ajustar un tiempo de finalización. El símbolo fin !parpadea hasta que se aplica el tiempo. El horno se pone en marcha automáticamente.
Una vez el horno se haya Limpiar los restos de sal de los elementos enfriado autolimpiantes con un paño húmedo.
Limpieza de lo vidriosHornos grande Es posible retirar los vidrios de la puerta del horno y pequeño para una mejor limpieza.
Desmontar 1. Desmontar la puerta del horno y colocarla con el asa hacia abajo sobre un paño.
2. Desatornille la tapa superior en la puerta del horno. Para ello, afloje la fijación izquierda y derecha. (Figura A).
3. Extraer el vidrio superior. (Figura B).
Limpiar los vidrios con limpiacristales y un paño suave.
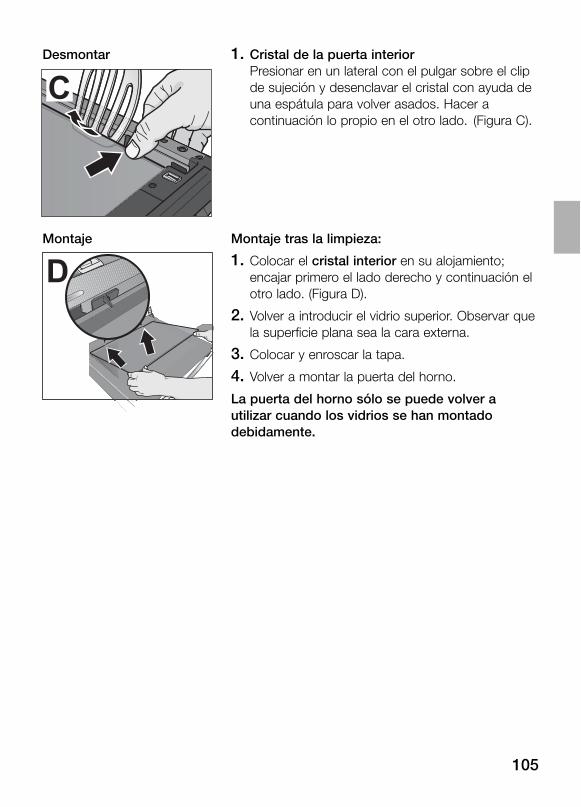
105
Desmontar 1. Cristal de la puerta interiorPresionar en un lateral con el pulgar sobre el clip de sujeción y desenclavar el cristal con ayuda de una espátula para volver asados. Hacer acontinuación lo propio en el otro lado. (Figura C).
Montaje Montaje tras la limpieza:
1. Colocar el cristal interior en su alojamiento; encajar primero el lado derecho y continuación el otro lado. (Figura D).
2. Volver a introducir el vidrio superior. Observar que la superficie plana sea la cara externa.
3. Colocar y enroscar la tapa.
4. Volver a montar la puerta del horno.
La puerta del horno sólo se puede volver a utilizar cuando los vidrios se han montado debidamente.
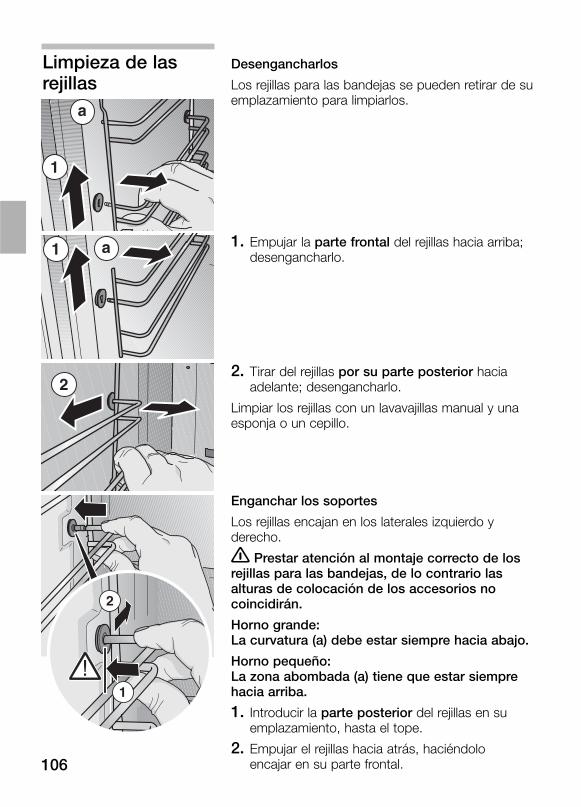
Limpieza de las Desengancharlos
rejillas Los rejillas para las bandejas se pueden retirar de su emplazamiento para limpiarlos.
1. Empujar la parte frontal del rejillas hacia arriba; desengancharlo.
2. Tirar del rejillas por su parte posterior hacia adelante; desengancharlo.
Limpiar los rejillas con un lavavajillas manual y una esponja o un cepillo.
Enganchar los soportes
Los rejillas encajan en los laterales izquierdo y derecho.
� Prestar atención al montaje correcto de los rejillas para las bandejas, de lo contrario las alturas de colocación de los accesorios no coincidirán.
Horno grande:La curvatura (a) debe estar siempre hacia abajo.
Horno pequeño:La zona abombada (a) tiene que estar siempre hacia arriba.
1. Introducir la parte posterior del rejillas en su emplazamiento, hasta el tope.
2. Empujar el rejillas hacia atrás, haciéndolo encajar en su parte frontal.106
107
¿Qué hacer en caso de avería?Con frecuencia, cuando se produce una avería, suele tratarse de una pequeña anomalía fácil de subsanar. Antes de llamar al servicio de asistencia técnica, deben tenerse en cuenta las siguientes advertencias:
Avería Posible causa Consejos/Forma de subsanarla
El aparato no funciona. El fusible está defectuoso. Comprobar en la caja de fusibles si el fusible funciona correctamente.
La pantalla de visualización Corte en el suministro Volver a poner el reloj en hora.del reloj parpadea. eléctrico.
En el indicador aparece Se ha activado la limitación Desconectar el selector de funciones.un „5”. automática del tiempo.
En el indicador de hora La sonda térmica no Avisar al servicio de asistencia técnica.aparece el mensaje de error funciona.“Er 1” o “Er 4”.
En el indicador de hora Se ha pulsado demasiado Pulsar todas las teclas por separado. aparece el mensaje de error tiempo una tecla o ésta se Si el mensaje de error persiste, llamar “Er 11”. ha atascado. al servicio de asistencia técnica.
Las reparaciones deben ser efectuadas sólo por personal del servicio de asistencia técnica debidamente instruido.
Cuando un aparato no ha sido reparado correctamente, puede suponer un peligro considerable.
Junta Limpiar la junta en el horno con lavavajillas. No utilizar nunca productos de limpieza abrasivos.
Accesorios Poner los accesorios en remojo con lavavajillas inmediatamente después de su uso. Así, los restos de comida pueden eliminarse fácilmente con un cepillo o una esponja.
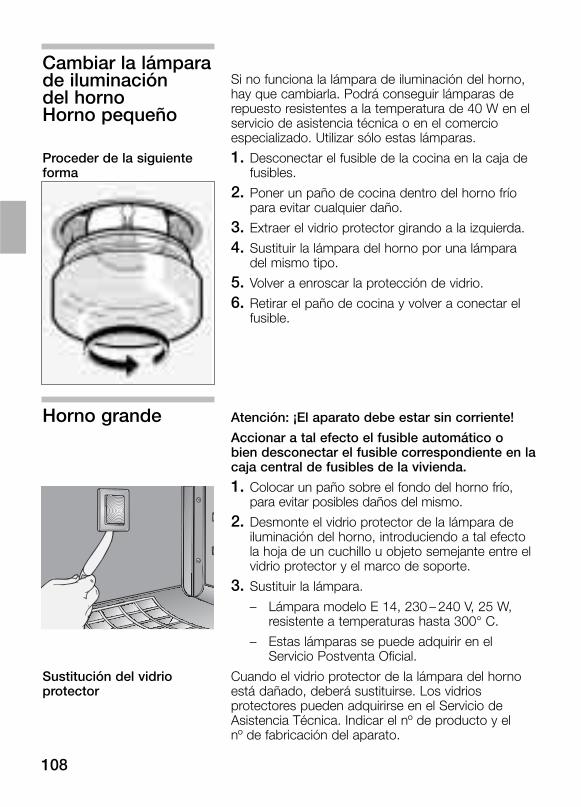
108
Cambiar la lámparade iluminación Si no funciona la lámpara de iluminación del horno,
del horno hay que cambiarla. Podrá conseguir lámparas de
Horno pequeño repuesto resistentes a la temperatura de 40 W en el servicio de asistencia técnica o en el comercio especializado. Utilizar sólo estas lámparas.
Proceder de la siguiente 1. Desconectar el fusible de la cocina en la caja de forma fusibles.
2. Poner un paño de cocina dentro del horno frío para evitar cualquier daño.
3. Extraer el vidrio protector girando a la izquierda.
4. Sustituir la lámpara del horno por una lámpara del mismo tipo.
5. Volver a enroscar la protección de vidrio.
6. Retirar el paño de cocina y volver a conectar el fusible.
Horno grande Atención: ¡El aparato debe estar sin corriente!
Accionar a tal efecto el fusible automático o bien desconectar el fusible correspondiente en lacaja central de fusibles de la vivienda.
1. Colocar un paño sobre el fondo del horno frío, para evitar posibles daños del mismo.
2. Desmonte el vidrio protector de la lámpara de iluminación del horno, introduciendo a tal efecto la hoja de un cuchillo u objeto semejante entre el vidrio protector y el marco de soporte.
3. Sustituir la lámpara.
– Lámpara modelo E 14, 230 – 240 V, 25 W, resistente a temperaturas hasta 300° C.
– Estas lámparas se puede adquirir en el Servicio Postventa Oficial.
Sustitución del vidrio Cuando el vidrio protector de la lámpara del horno protector está dañado, deberá sustituirse. Los vidrios
protectores pueden adquirirse en el Servicio de Asistencia Técnica. Indicar el nº de producto y el nº de fabricación del aparato.
109
Nº de producto FD
Servicio de Asistencia Técnica �
Servicio de Asistencia TécnicaNuestro servicio de asistencia técnica está disponible si el aparato debe repararse. La dirección y el número de teléfono del punto de atención al cliente más próximo se encuentran en la guía telefónica. Los centros de atención al cliente señalados también le indicarán con gusto el punto más cercano.
Nº de producto y nº de Si se solicita nuestro servicio de asistencia técnica, se fabricacción debe facilitar el número de producto (E-Nº) y el
número de fabricación (FD-Nº) del aparato. La placa de características con los números se halla en la parte lateral de la puerta del horno. Para que en caso de avería no haya que esperar mucho tiempo, es posible introducir los datos del aparato directamente aquí.
110
Embalaje y aparatos usadosUn embalaje protector protege a su nuevo aparato durante el transporte hasta su hogar. Todos los materiales de embalaje utilizados son respetuosos con el medio ambiente y pueden ser reciclados o reutilizados. Hay que intentar contribuir activamente a la protección del medio ambiente insistiendo en unos métodos de eliminación y recuperación de los materiales de embalaje respetuosos con el medio ambiente.
Los aparatos usados incorporan materiales valiosos que se pueden recuperar al final de su uso, entregando el aparato a dicho efecto en un centro oficial de recogida o recuperación de materiales reciclables. Antes de deshacerse de su aparato usado y sustituirlo por una unidad nueva, hay que inutilizarlo e identificarlo con un adhesivo: ”¡Atención!”
Su distribuidor o administración local le informará gustosamente sobre las vías y posibilidades más eficaces y actuales para la eliminación respetuosa con el medio ambiente de estos materiales.
Este aparato cumple con la Directiva europea 2002/96/CE sobre aparatos eléctricos y electrónicos identificada como (Residuos de aparatos eléctricos y electrónicos). La directiva proporciona el marco general válido en todo el ámbito de la Unión Europea para la retirada y la reutilización de los residuos de los aparatos eléctricos y electrónicos.
111
Tablas y sugerenciasAquí se encuentra una selección de platos y los ajustes óptimos para ellos. Se puede consultar qué tipo de calentamiento y temperatura es la más adecuada para cada plato, qué accesorios se deben utilizar y a qué altura se deben colocar. Además se encuentran sugerencias sobre los recipientes y la preparación, y una pequeña ayuda por si alguna vez algo sale mal.
Pasteles y repostería
Moldes para hornear Los moldes más idóneos son los metálicos de color oscuro. Para moldes de color claro y material de poco grosor o para moldes de cristal debería utilizarse aire caliente 3D. Aún así, el tiempo de cocción se alarga y el pastel no se dora por igual.
Colocar el molde siempre en la parrilla.
Tablas El cuadro de cocción siguiente ha sido elaborado exclusivamente a partir de la colocación de los alimentos con el horno frío. Así se ahorra energía. Si se precalienta el horno, los tiempos de horneado indicados se acortan de 5 a 10 minutos.
En las tablas se puede consultar el tipo de calentamiento que mejor se ajusta al tipo de pastel o pastas.
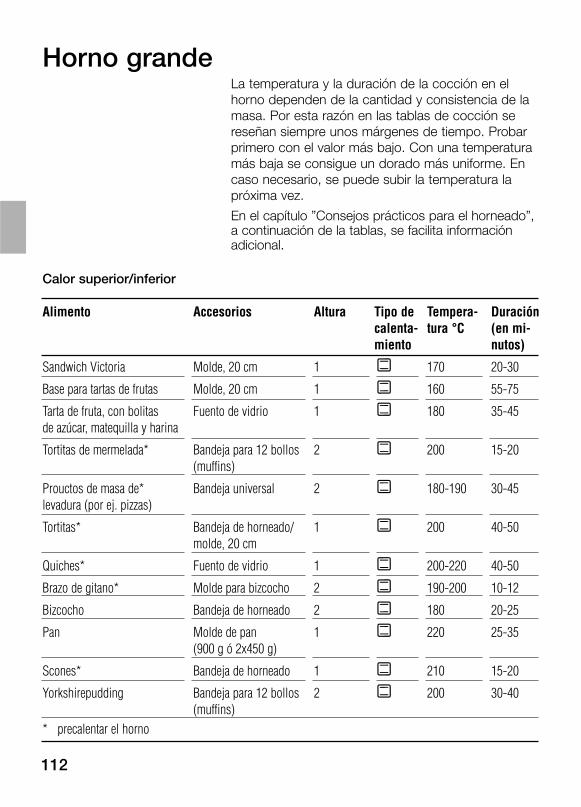
112
Horno grandeLa temperatura y la duración de la cocción en el horno dependen de la cantidad y consistencia de la masa. Por esta razón en las tablas de cocción se reseñan siempre unos márgenes de tiempo. Probar primero con el valor más bajo. Con una temperatura más baja se consigue un dorado más uniforme. En caso necesario, se puede subir la temperatura la próxima vez.
En el capítulo ”Consejos prácticos para el horneado”, a continuación de la tablas, se facilita información adicional.
Calor superior/inferior
Alimento Accesorios Altura Tipo de Tempera- Duracióncalenta- tura °C (en mi-miento nutos)
Sandwich Victoria Molde, 20 cm 1 / 170 20-30
Base para tartas de frutas Molde, 20 cm 1 / 160 55-75
Tarta de fruta, con bolitas Fuento de vidrio 1 / 180 35-45de azúcar, matequilla y harina
Tortitas de mermelada* Bandeja para 12 bollos 2 / 200 15-20(muffins)
Prouctos de masa de* Bandeja universal 2 / 180-190 30-45levadura (por ej. pizzas)
Tortitas* Bandeja de horneado/ 1 / 200 40-50molde, 20 cm
Quiches* Fuento de vidrio 1 / 200-220 40-50
Brazo de gitano* Molde para bizcocho 2 / 190-200 10-12
Bizcocho Bandeja de horneado 2 / 180 20-25
Pan Molde de pan 1 / 220 25-35(900 g ó 2x450 g)
Scones* Bandeja de horneado 1 / 210 15-20
Yorkshirepudding Bandeja para 12 bollos 2 / 200 30-40(muffins)
* precalentar el horno
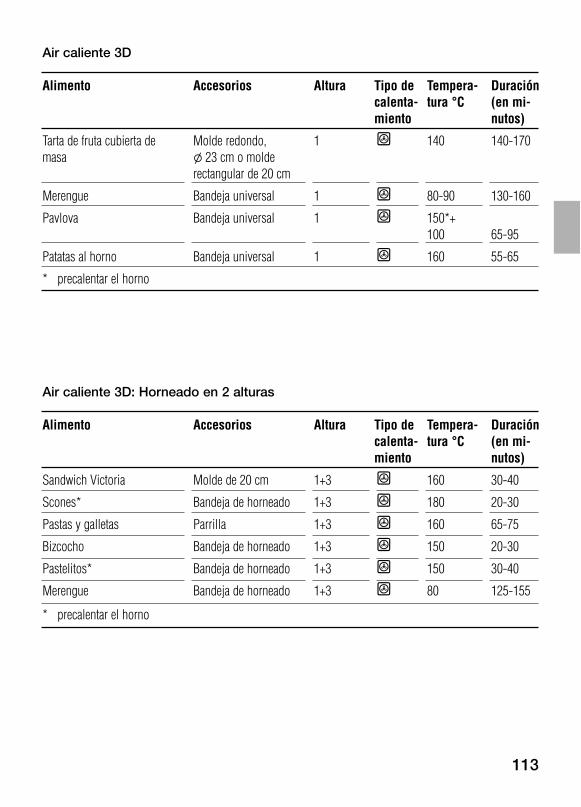
113
Air caliente 3D
Alimento Accesorios Altura Tipo de Tempera- Duracióncalenta- tura °C (en mi-miento nutos)
Tarta de fruta cubierta de Molde redondo, 1 ˜ 140 140-170masa l 23 cm o molde
rectangular de 20 cm
Merengue Bandeja universal 1 ˜ 80-90 130-160
Pavlova Bandeja universal 1 ˜ 150*+100 65-95
Patatas al horno Bandeja universal 1 ˜ 160 55-65
* precalentar el horno
Air caliente 3D: Horneado en 2 alturas
Alimento Accesorios Altura Tipo de Tempera- Duracióncalenta- tura °C (en mi-miento nutos)
Sandwich Victoria Molde de 20 cm 1+3 ˜ 160 30-40
Scones* Bandeja de horneado 1+3 ˜ 180 20-30
Pastas y galletas Parrilla 1+3 ˜ 160 65-75
Bizcocho Bandeja de horneado 1+3 ˜ 150 20-30
Pastelitos* Bandeja de horneado 1+3 ˜ 150 30-40
Merengue Bandeja de horneado 1+3 ˜ 80 125-155
* precalentar el horno

114
Sugerencias y consejos prácticos para el horneado
Si se quiere utilizar una receta Se puede orientar por un producto semejante que figure en la tabla propia. de cocción.Manera de comprobar si el Unos 10 minutos antes de que finalice el tiempo de horneado pastel de masa batida ya está señalado en la receta, pinchar el pastel en su punto más alto con en su punto. un palillo de madera fino. Si el palillo sale limpio sin restos de
masa, el pastel está listo.La tarta quedó aplastada. La próxima vez, emplear menos líquido o seleccionar una
temperatura de horneado 10 grados inferior. Observar los períodos de tiempo reseñados en la receta para batir la masa.
La tarta se ha hinchado bien en No engrasar el molde. Una vez terminado el pastel, desprenderlo el centro, pero hacia los bordes con cuidado del molde, con ayuda de un cuchillo.tiene menos altura.El pastel sale demasiado dorado Colocar el pastel a más profundidad en el horno, seleccionar una por arriba. temperatura de horneado más baja y dejarlo cocer durante más
tiempo.El pastel sale demasiado seco. Pinchar varias veces con un palillo el pastel ya terminado. Verter
sobre éste unas gotas de zumo de fruta o de alguna bebida alcohó-lica. La próxima vez, seleccionar una temperatura de horneado 10 grados superior y reducir el tiempo de horneado.
El pan o la repostería (por La próxima vez, emplear menos líquido y dejar el producto durante ejemplo, tarta de requesón) un poco de más tiempo en el horno, a una temperatura inferior. tienen una buena apariencia por En los pasteles con revestimiento jugoso, hornear primero la base. fuera, pero por dentro están A continuación, esparcir sobre la base del pastel almendras picadas pastosos (húmedos, con zonas o pan rallado, antes de poner la guarnición. Observar las mojadas). indicaciones de la receta y los tiempos de cocción.Las pastas se han dorado de Seleccionar una temperatura inferior; las pastas quedarán más forma irregular. uniformes. Coloque el pastel la próxima vez en una altura inferior y
rejillas (véase limpieza de las rejillas). El papel de hornear que sobresale puede influir también en la circulación del aire. Cortarlo siempre a la medida de la bandeja.
El pastel de frutas queda Utilizar la próxima vez la bandeja universal más honda.demasiado claro por debajo. El zumo rebosa.Se ha horneado a diferentes ni- Para hornear a diferentes niveles, utilizar siempre el aire caliente veles. En la bandeja superior las 3D ˜. Aunque se coloquen varias bandejas para su horneado pastas han quedado de un color simultáneo, ello no significa que deban estar listas al mismo más oscuro que en la inferior. tiempo.Al hornear pasteles jugosos se Al hornear se puede generar vapor de agua. Una parte de este produce agua de condensación. vapor se evacua por la manilla de la puerta del horno, pudiéndose
condensar en el panel de mandos o en los frontales de los muebles adyacentes en forma de gotas de agua. Viene condicionado físicamente.
115
Carne, aves, prescadoRecipiente Se puede utilizar cualquier recipiente resistente al
calor. La bandeja universal también es apropiada para cocinar grandes asados.
Colocar los recipientes siempre en el centro de la parrilla.
Los recipientes de vidrio calientes deben ponerse sobre un paño de cocina seco. El cristal puede estallar si la base de apoyo está húmeda o fría.
Consejos prácticos para El resultado de un asado depende de la clase y asar calidad de la carne empleada.
En caso de preparar asados de carne magra, agregar 2 o 3 cucharadas soperas de líquido. En caso de preparar un estofado de carne, agregar de 8 a 10 cucharadas soperas de líquido, según el tamaño de la pieza de carne.
Rocie la carne si está deseado.
Algunas carnes se deben preparar en líquido en unacazuela cubierta. Este tipo de cocinar es convientepara los cortes menos blandos de la carne.
Coloque en un horno frio para a horrar energia o para precalentarla si está deseado.
A las piezas de carne se les debería dar la vuelta una vez transcurrida la mitad del tiempo de cocción.
Una vez que el asado esté listo debe dejarse reposar unos 10 minutos en el horno desconectado con la puerta cerrada. De esta manera se puede repartir mejor el jugo de la carne.
Consejos prácticos para asar Utilizar la parrilla y la bandeja universal.al grill variable de superficie Al realizar el asado con grill variable de superficie amplia amplia (grill de infrarrojos con aire caliente) puede
originarse un mayor grado de suciedad en el horno. Por ello deberá limpiarse el horno tras cada ciclo de trabajo, a fin de evitar que puedan quemarse e incrustarse los restos de alimentos en el mismo.
Para obtener aves o asados (asado de cerdo con corteza) paricularmente crujientes.
Volver las piezas grandes una vez transcurrida aprox. la mitad del tiempo de asado prescrito.
Dar la vuelta a las aves enteras una vez transcurridas las dos terceras partes de su tiempo de asado. En los asados de pato y ganso, pinchar la piel debajo de las alas a fin de permitir la salida de la grasa.
Consejos prácticos paraasar al grill Para platos pequeños y planos.
Horno pequeño Los trozos de carne para asar en el grill deberán ser en lo posible igual de gruesos. Deben tener como mínimo un grosor de entre 2 y 3 cm, a fin de que queden doradas de modo uniforme y conserven todo su jugo. Sazonar los bistecs sólo después de asarlos.
Dar la vuelta a las piezas una vez transcurridas las dos terceras partes del tiempo señalado.
Untar ligeramente la parrilla y el alimento de aceite.
� Prestar atención al asar al grill.Mantener alejados los niños de la cocina durantelas operaciones.
Notas sobre el asado Preparar los platos al grill siempre con el horno a la prilla cerrado.
Las temperaturas del asado al grill pueden regularse.
Colocar siempre la carne en el centro del parrilla.
Si el cuerpo de calefacción del grill se desconectara, ello es debido a la activación del circuito protector contra sobrecalentamiento.
El cuerpo de calefacción volverá a conectarse al cabo de breves instantes.
116
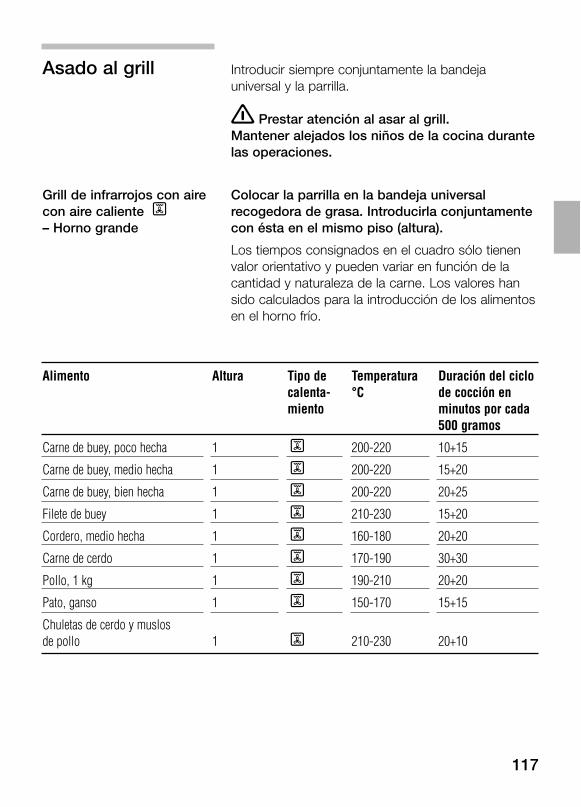
117
Asado al grill Introducir siempre conjuntamente la bandejauniversal y la parrilla.
� Prestar atención al asar al grill.Mantener alejados los niños de la cocina durantelas operaciones.
Grill de infrarrojos con aire Colocar la parrilla en la bandeja universalcon aire caliente , recogedora de grasa. Introducirla conjuntamente– Horno grande con ésta en el mismo piso (altura).
Los tiempos consignados en el cuadro sólo tienen valor orientativo y pueden variar en función de la cantidad y naturaleza de la carne. Los valores han sido calculados para la introducción de los alimentos en el horno frío.
Alimento Altura Tipo de Temperatura Duración del ciclocalenta- °C de cocción enmiento minutos por cada
500 gramos
Carne de buey, poco hecha 1 , 200-220 10+15
Carne de buey, medio hecha 1 , 200-220 15+20
Carne de buey, bien hecha 1 , 200-220 20+25
Filete de buey 1 , 210-230 15+20
Cordero, medio hecha 1 , 160-180 20+20
Carne de cerdo 1 , 170-190 30+30
Pollo, 1 kg 1 , 190-210 20+20
Pato, ganso 1 , 150-170 15+15
Chuletas de cerdo y muslos de pollo 1 , 210-230 20+10
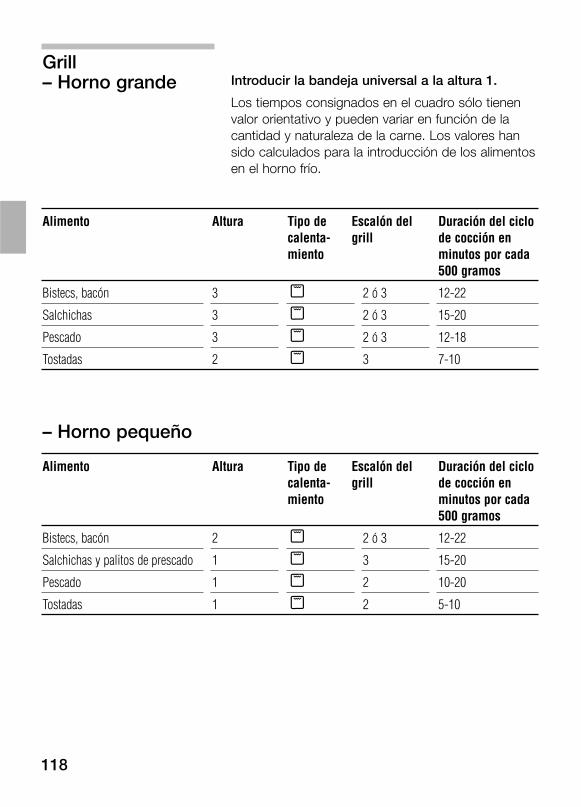
118
Grill– Horno grande Introducir la bandeja universal a la altura 1.
Los tiempos consignados en el cuadro sólo tienen valor orientativo y pueden variar en función de la cantidad y naturaleza de la carne. Los valores han sido calculados para la introducción de los alimentos en el horno frío.
Alimento Altura Tipo de Escalón del Duración del ciclocalenta- grill de cocción enmiento minutos por cada
500 gramos
Bistecs, bacón 3 ) 2 ó 3 12-22
Salchichas 3 ) 2 ó 3 15-20
Pescado 3 ) 2 ó 3 12-18
Tostadas 2 ) 3 7-10
– Horno pequeño
Alimento Altura Tipo de Escalón del Duración del ciclocalenta- grill de cocción enmiento minutos por cada
500 gramos
Bistecs, bacón 2 ) 2 ó 3 12-22
Salchichas y palitos de prescado 1 ) 3 15-20
Pescado 1 ) 2 10-20
Tostadas 1 ) 2 5-10
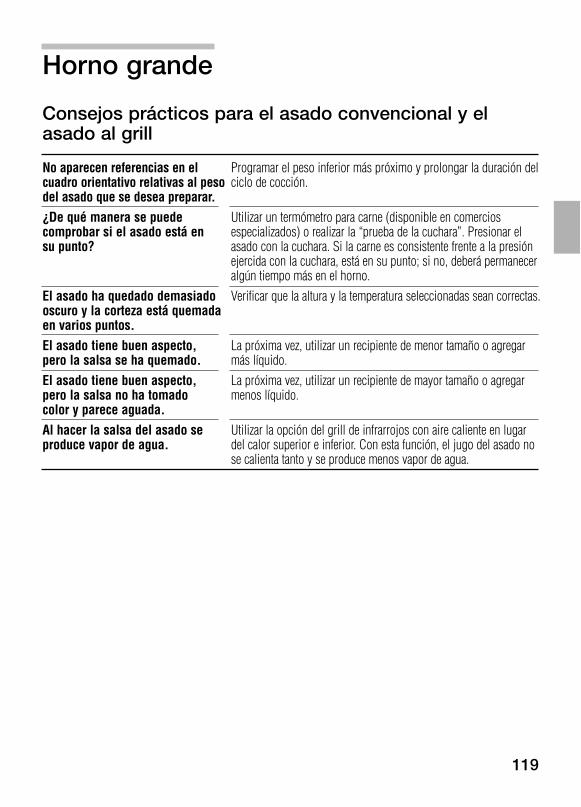
119
Horno grande
Consejos prácticos para el asado convencional y elasado al grill
No aparecen referencias en el Programar el peso inferior más próximo y prolongar la duración del cuadro orientativo relativas al peso ciclo de cocción.del asado que se desea preparar.¿De qué manera se puede Utilizar un termómetro para carne (disponible en comercios comprobar si el asado está en especializados) o realizar la “prueba de la cuchara”. Presionar el su punto? asado con la cuchara. Si la carne es consistente frente a la presión
ejercida con la cuchara, está en su punto; si no, deberá permanecer algún tiempo más en el horno.
El asado ha quedado demasiado Verificar que la altura y la temperatura seleccionadas sean correctas.oscuro y la corteza está quemada en varios puntos.El asado tiene buen aspecto, La próxima vez, utilizar un recipiente de menor tamaño o agregar pero la salsa se ha quemado. más líquido.El asado tiene buen aspecto, La próxima vez, utilizar un recipiente de mayor tamaño o agregar pero la salsa no ha tomado menos líquido.color y parece aguada.Al hacer la salsa del asado se Utilizar la opción del grill de infrarrojos con aire caliente en lugar produce vapor de agua. del calor superior e inferior. Con esta función, el jugo del asado no
se calienta tanto y se produce menos vapor de agua.
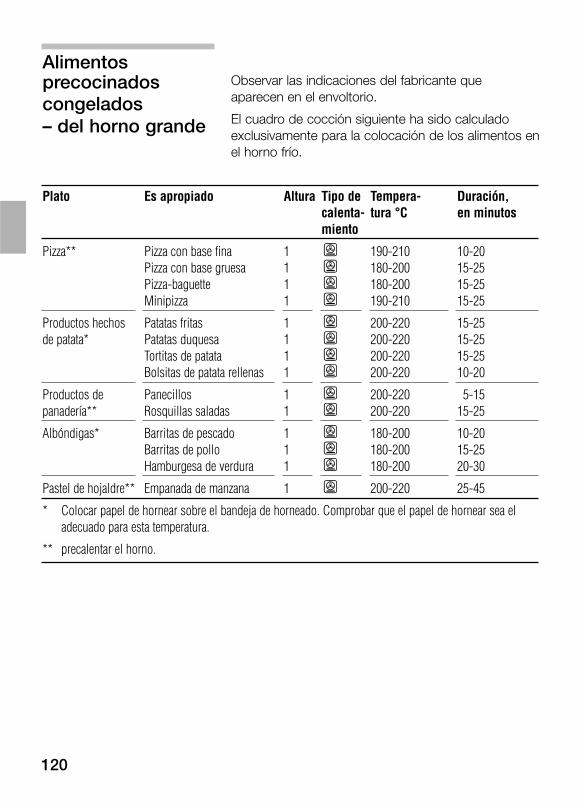
120
Alimentosprecocinados Observar las indicaciones del fabricante que
congelados aparecen en el envoltorio.
– del horno grande El cuadro de cocción siguiente ha sido calculado exclusivamente para la colocación de los alimentos en el horno frío.
Plato Es apropiado Altura Tipo de Tempera- Duración,calenta- tura °C en minutosmiento
Pizza** Pizza con base fina 1 T 190-210 10-20Pizza con base gruesa 1 T 180-200 15-25Pizza-baguette 1 T 180-200 15-25Minipizza 1 T 190-210 15-25
Productos hechos Patatas fritas 1 T 200-220 15-25de patata* Patatas duquesa 1 T 200-220 15-25
Tortitas de patata 1 T 200-220 15-25Bolsitas de patata rellenas 1 T 200-220 10-20
Productos de Panecillos 1 T 200-220 15-15panadería** Rosquillas saladas 1 T 200-220 15-25
Albóndigas* Barritas de pescado 1 T 180-200 10-20Barritas de pollo 1 T 180-200 15-25Hamburgesa de verdura 1 T 180-200 20-30
Pastel de hojaldre** Empanada de manzana 1 T 200-220 25-45
* Colocar papel de hornear sobre el bandeja de horneado. Comprobar que el papel de hornear sea el adecuado para esta temperatura.
** precalentar el horno.
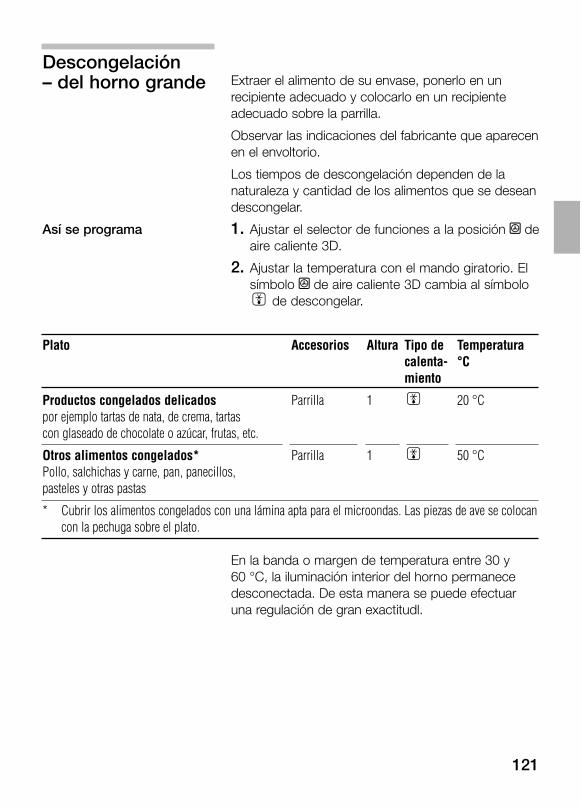
121
Descongelación– del horno grande Extraer el alimento de su envase, ponerlo en un
recipiente adecuado y colocarlo en un recipiente adecuado sobre la parrilla.
Observar las indicaciones del fabricante que aparecen en el envoltorio.
Los tiempos de descongelación dependen de la naturaleza y cantidad de los alimentos que se desean descongelar.
Así se programa 1. Ajustar el selector de funciones a la posición ˜ deaire caliente 3D.
2. Ajustar la temperatura con el mando giratorio. El símbolo ˜ de aire caliente 3D cambia al símbolo e de descongelar.
Plato Accesorios Altura Tipo de Temperaturacalenta- °Cmiento
Productos congelados delicados Parrilla 1 e 20 °Cpor ejemplo tartas de nata, de crema, tartas con glaseado de chocolate o azúcar, frutas, etc.
Otros alimentos congelados* Parrilla 1 e 50 °CPollo, salchichas y carne, pan, panecillos, pasteles y otras pastas
* Cubrir los alimentos congelados con una lámina apta para el microondas. Las piezas de ave se colocancon la pechuga sobre el plato.
En la banda o margen de temperatura entre 30 y 60 °C, la iluminación interior del horno permanece desconectada. De esta manera se puede efectuar una regulación de gran exactitudl.
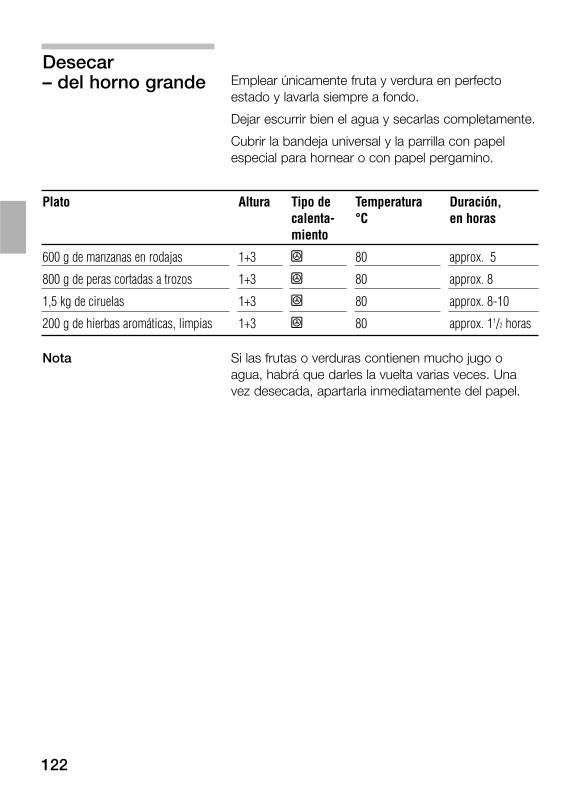
122
Desecar– del horno grande Emplear únicamente fruta y verdura en perfecto
estado y lavarla siempre a fondo.
Dejar escurrir bien el agua y secarlas completamente.
Cubrir la bandeja universal y la parrilla con papel especial para hornear o con papel pergamino.
Plato Altura Tipo de Temperatura Duración, calenta- °C en horasmiento
600 g de manzanas en rodajas 1+3 ˜ 80 approx. 5
800 g de peras cortadas a trozos 1+3 ˜ 80 approx. 8
1,5 kg de ciruelas 1+3 ˜ 80 approx. 8-10
200 g de hierbas aromáticas, limpias 1+3 ˜ 80 approx. 11/2 horas
Nota Si las frutas o verduras contienen mucho jugo o agua, habrá que darles la vuelta varias veces. Una vez desecada, apartarla inmediatamente del papel.

123
Cocción demermeladesPreparativos Utilizar tarros y anillos de goma limpios y en perfecto
estado. Los tarros deberán ser, en lo posible, del mismo tamaño. Los valores de la tabla se refieren a tarros redondos con una capacidad de 1 litro. ¡Atención! No utilizar tarros de mayor tamaño o altura. Las tapas podrían estallar.
Emplear únicamente fruta y verdura en perfecto estado. Lavarlas siempre a fondo.
Verter la fruta o la verdura en los tarros. Volver a limpiar, si es necesario, los bordes del tarro. Tienen que estar limpios. Colocar el anillo de goma y la tapa, estando mojados, sobre el tarro lleno. Cerrar los tarros con una abrazadera.
Poner los frascos sobre la bandeja en forma triangular, guardando una distancia de 5 cm respecto a la pared de fondo del horno.
Los tiempos indicados son valores orientativos. La temperatura ambiente, el número de tarros y la temperatura del contenido del tarro pueden influir sobre dichos valores, haciéndolos divergir. Antes de conmutar o desconectar el horno, cerciorarse de que el contenido de los tarros esté burbujeando realmentet.
Así se programa 1. Colocar la bandeja universal en la altura 1. Poner los frascos sobre la bandeja de modo que no entren en contacto uno con otro.
2. Verter medio litro de agua caliente (aprox. 80 ºC) en la bandeja universal.
3. Cerrar la puerta del horno.
4. Colocar el mando selector de funciones en ˜.
5. Ajustar el selector de temperaturas en el escalón de aprox. 160 °C.
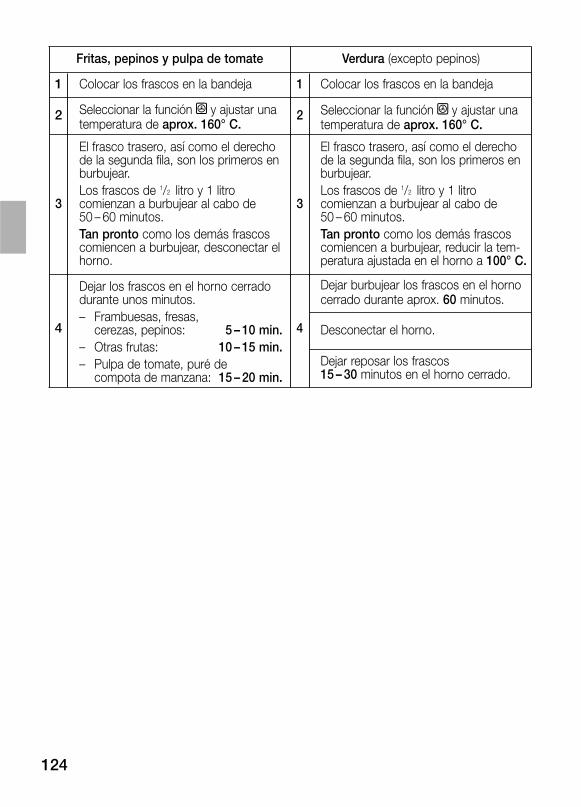
124
Fritas, pepinos y pulpa de tomate Verdura (excepto pepinos)
1 Colocar los frascos en la bandeja 1 Colocar los frascos en la bandeja
2 Seleccionar la función ˜ y ajustar unatemperatura de aprox. 160° C.
2 Seleccionar la función ˜ y ajustar unatemperatura de aprox. 160° C.
3
El frasco trasero, así como el derechode la segunda fila, son los primeros enburbujear.Los frascos de 1/2 litro y 1 litro comienzan a burbujear al cabo de 50 – 60 minutos.Tan pronto como los demás frascoscomiencen a burbujear, desconectar elhorno.
4 4
Dejar los frascos en el horno cerradodurante unos minutos.– Frambuesas, fresas,
cerezas, pepinos: 05 – 10 min.– Otras frutas: 10 – 15 min.– Pulpa de tomate, puré de
compota de manzana: 15 – 20 min.
Dejar burbujear los frascos en el hornocerrado durante aprox. 60 minutos.
Desconectar el horno.
Dejar reposar los frascos 15 – 30 minutos en el horno cerrado.
3
El frasco trasero, así como el derechode la segunda fila, son los primeros enburbujear.Los frascos de 1/2 litro y 1 litro comienzan a burbujear al cabo de 50 – 60 minutos.Tan pronto como los demás frascoscomiencen a burbujear, reducir la tem-peratura ajustada en el horno a 100° C.
125
Acrilamida en los alimentosLos especialistas están discutiendo actualmente hasta qué punto puede ser dañina la acrilamida. En base a los resultados obtenidos en las investigaciones actuales hemos confeccionado esta hoja informativa para usted.
¿Cómo se forma la La acrilamida no se forma en los alimentos a partir acrilamida? de agentes contaminantes externos. La acrilamida
se forma mayormente al preparar alimentos que contienen un alto contenido en almidón y componentes proteicos. Cómo ocurre exactamente esto, todavía no se ha aclarado del todo. No obstante, se hace saber que el contenido de acrilamida se ve influido notablemente por
altas temperaturasun contenido de agua reducido en los alimentosproductos demasiado dorados.
Consejos prácticospara el ahorro deenergía Precalentar el horno sólo en caso de que se indique
en la receta o en la tabla de cocción del plato a cocinar.
Utilizar moldes de repostería de color oscuro, lacadoso esmaltados de negro. Son los que mejor absorben el calor.
En caso de querer preparar varios pasteles, se aconseja hacerlo de forma sucesiva. Al estar el hornocaliente, se reducen los tiempos de horneado del segundo pastel. También se pueden colocar simultáneamente dos moldes rectangulares uno junto al otro.
En caso de largos períodos de horneado, se puede desconectar el horno 10 minutos antes de transcurrir el tiempo de horneado previsto aprovechando, de este modo, el calor residual para terminar la cocción del alimento o plato.
126
¿Qué se puedehacer? Se pueden evitar valores elevados de acrilamida al
hornear, asar y asar al grill. Las siguientes recomendaciones han sido publicadas por aid1 y BMVEL2:
Generalidades Establecer tiempos de cocción lo más cortos posible.
„Dorar en lugar de carbonizar“, evite dorar en exceso los alimentos.
Cuanto mayor y más grueso es el alimento, menor es la cantidad de acrilamida que contiene.
Hornear Ajustar el calor superior e inferior a una temperatura de 200 ºC máx. y el aire caliente 3D a 180 ºC máx.
Galletas: Ajustar el calor superior e inferior a una temperatura de 190 ºC como máx., el aire caliente 3D a 170 ºC como máx. Si la receta contiene huevo o yema de huevo, se reduce la formación de acrilamida.
Las patatas al horno deben distribuirse de manera uniforme y si es posible en una sola capa sobre la bandeja. Para evitar un desecado rápido, hornear como mínimo 400 g por bandeja.1 Folleto informativo „Acrilamida“, publicado por aid y BMVEL, fecha 12/02, Internet: http://www.aid.de.2 Comunicado de prensa 365 de BMVEL del 4 de diciembre de 2002, Internet: http://www.verbraucherministerium.de
¿Qué alimentos están La acrilamida se origina al sobrecalentar productos afectados? preparados a base de cereales y patata como p. ej.
Patatas chips, patatas fritas,tostadas, panecillos, pan,productos de pastelería (galletas y bizcochos).
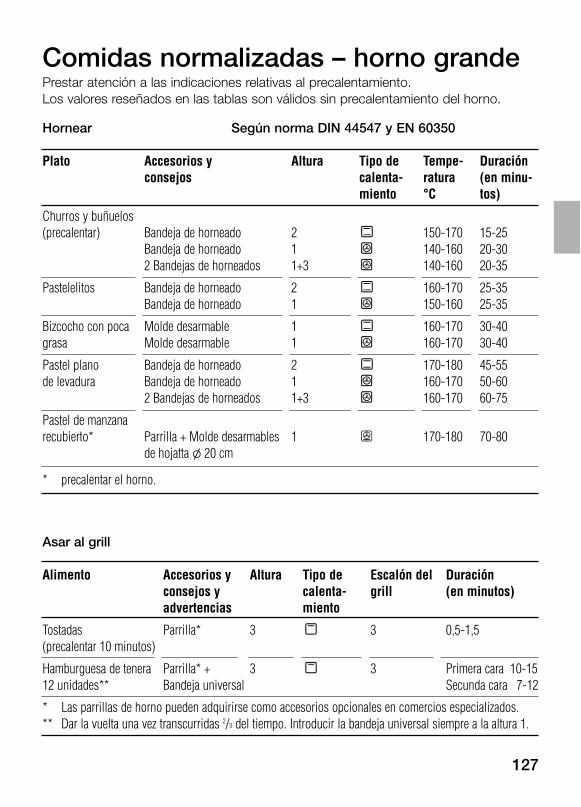
127
Comidas normalizadas – horno grandePrestar atención a las indicaciones relativas al precalentamiento.Los valores reseñados en las tablas son válidos sin precalentamiento del horno.
Hornear Según norma DIN 44547 y EN 60350
Plato Accesorios y Altura Tipo de Tempe- Duraciónconsejos calenta- ratura (en minu-
miento °C tos)
Churros y buñuelos (precalentar) Bandeja de horneado 2 t 150-170 15-25
Bandeja de horneado 1 ˜ 140-160 20-302 Bandejas de horneados 1+3 ˜ 140-160 20-35
Pastelelitos Bandeja de horneado 2 t 160-170 25-35Bandeja de horneado 1 ˜ 150-160 25-35
Bizcocho con poca Molde desarmable 1 t 160-170 30-40grasa Molde desarmable 1 ˜ 160-170 30-40
Pastel plano Bandeja de horneado 2 t 170-180 45-55de levadura Bandeja de horneado 1 ˜ 160-170 50-60
2 Bandejas de horneados 1+3 ˜ 160-170 60-75
Pastel de manzana recubierto* Parrilla + Molde desarmables 1 T 170-180 70-80
de hojatta l 20 cm
* precalentar el horno.
Asar al grill
Alimento Accesorios y Altura Tipo de Escalón del Duraciónconsejos y calenta- grill (en minutos)advertencias miento
Tostadas Parrilla* 3 ) 3 0,5-1,5(precalentar 10 minutos)
Hamburguesa de tenera Parrilla* + 3 ) 3 Primera cara 10-1512 unidades** Bandeja universal Secunda cara 07-12
* Las parrillas de horno pueden adquirirse como accesorios opcionales en comercios especializados.** Dar la vuelta una vez transcurridas 2/3 del tiempo. Introducir la bandeja universal siempre a la altura 1.

128
Note

129
Note
130164 848
Noticias

9000 164 848Printed in Germany 0306 Es.Siemens-Electrogeräte GmbH
Family Line01805-22233 0,12/min. DTAGSiemens-Hausgeräte
Besuchen Sie uns im Internet:http://www.siemens.de/hausgeraete