instructions for use of frontair 2 suit
TRANSCRIPT

Instructions for use of
Frontair 2 Suit

TABLE OF CONTENTS
General Information ···························································PG 1
Limitations & Warnings························································PG 2
Pre-Checks ······································································PG 3
Maximum and minimum airflow ··············································PG 4
High/Low flow control valve ·················································PG 4
Donning Procedure·····························································PG 5
Doffing Procedure······························································PG 6
Tear-Off Doffing/Evacuation Strip (optional) ······························PG 7
Inspection Of Component Parts ··············································PG 7
Instructions For Use Of Fall Arrest Harness ································PG 8
Use Of Optional Welding Face Screen ·······································PG 9
Fitting Face screen······························································PG 9
Care & Maintenance of Visors/Face Screens ································PG 10
Storage ···········································································PG 11
Inside Label ·····································································PG 11
Sizing·············································································PG 12

General InformationThe Respirex Frontair 2 suit is designed for use within certain contaminatedenvironments only. You must carefully read and follow these operating instructionsclosely.
The suit is designed as a single use garment and should not be re-used.
The suit must be supplied with breathable air from an external compressed air sourceproviding positive pressure. The quality of breathing air flowing into the suit unit mustcomply with EN12021:1999.
All Respiratory Protective Clothing is CE marked to indicate compliance with Europeandirectives on personal protective equipment (PPE). The Frontair 2 suit complies withEN 1073-1:1998 (ventilated protective clothing against particulate radioactivecontamination); this specifies the performance requirements for the suit and itsmaterials of construction. Physical performance results for the main material ofconstruction are detailed on a separate data sheet supplied with the suit.
Air flowing into the suit is divided into two streams, 50% flows to the hood for breathingpurposes and 50% is fed to the arms and legs via a network of internal tubes to provideventilation. The internal air system is permanently fitted and cannot be removed fromthe suit.
The suit provides a class 5 (50,000) nominal protection factor according to EN1073-1:1998.
1

Limitations & Warnings
� At high work rates the pressure in the suit may become negative at peak inhalationflow or during bending or squatting.
� Adequate protection may not be provided by the suit in atmospheres that are imme-diately dangerous to life or health (IDLH).
� The suit must NOT be used with oxygen only or oxygen enriched air.
� The internal air system features a silencer which cannot be removed. If the silencerbecomes blocked there will be a reduced air flow to the suit. To prevent thepossibility of the silencer becoming blocked, breathing air must be adequatelyfiltered at all times.
� Care must be taken to ensure that the suit is being used from the correct length andbore of air supply hose as a low airflow may cause a less efficient protection.
� The suit is manufactured from non-breathable materials. Persons who show anysigns of excessive stress such as fever, nausea, dizziness, eye irritation, difficulty inbreathing, becoming fatigued or any unusual order or taste should leave the workarea immediately and remove themselves from the suit.
� Suit designed for single use only. Do NOT re-use
� The garment must only be used in the hazardous area for which it is intended. Al-ways follow the instructions carefully otherwise the protection offered by the gar-ment may be drastically affected.
� Always use compatible PPE, e.g. gloves and safety boots advised by Respirex.
For any enquiries please contact the Respirex customer services department onTel : +44 (0)1737 778600, Fax : +44 (0)1737 779441 or Email : [email protected]
2
Pre-ChecksUnder the Control of Substances Hazardous to Health (COSHH) regulations 1988 andthe Personal Protective Equipment (EC Directive) regulations 1992, a thoroughexamination of respiratory protection equipment (RPE) is required to be undertaken in aclean area at least once per month if the garment has not been used. When in useRespirex recommend that the RPE is always checked before the start of each shift cycle.These inspections are required to ensure that the RPE will perform as intended and isfree from defects.Each inspection must be recorded and the following noted : date, serial number, name ofexaminer, condition of the equipment and details of any defect found. The inspectionrecords will be kept by relevant Health & Safety departments for a period of at least fiveyears.
1. Visually inspect the suit for any damage that may impair correct operation.
2. Ensure that the breathing air pack is securely attached and is not damaged.
3. The suit is free from contamination both internally and externally.
4. The suit is free from tears and holes; paying particular attention to the seam areas.
5. Vision through the visor is not obscured by large scratches or scuff marks.
6. Respirex recommend that the exhalation valves are part of the visual pre-check. Ifthe valve diaphragm is distorted or damaged in any way it must be replaced.
Inspection of the compressed air supply tube (medium pressure connecting hose) whichsupplies breathing quality air to the operator must be carried out at least once per monthand before each shift cycle and the results recorded.
During the inspection the following should be checked:
1. Lines are clean externally.
2. Lines are free from damage (holes, splits, etc).
3. Air line coupling connections are in good working order.
Submerge in water to locate any leaks if any sign of external damage is evident.
Report any defects to the supervisor and record them. The compressed air supply tubemust NOT be used until the defect has been rectified.
3

Maximum and minimum airflowThe airflow to the suit must be within the range.
Maximum 600 litres/min (21.2 CFM).
Minimum 265 litres/min (9.4 CFM).
The suit is approved for use with the following combinations of hose length andpressure range to achieve the flow rates above:
Pressure range of 3.2 bar - 4.6 bar at supply (46 psi - 67 psi).
The suit must be connected with a minimum hose length of 10m and a maximum hoselength of 60m. A maximum of one joint is permissible in any intermediate hose lengthbetween 10m and 60m, e.g 2 x 15m, 2 x 20m or 2 x 30m.
Notes:
� Bore size of hose must be 9.5mm.
� Hose lengths of 10m must have no joints.
If the end-user’s pressure range falls outside that detailed above, or hoselengths/bore sizes are different to those specified, contact RespirexInternational Ltd for further information.
High/Low flow control valveA control valve is fitted which can vary the airflow into the suit. By turning the valvebetween maximum (+) and minimum (-) the airflow will be vary by approximately onethird. Note: the suit must be connected with the hose lengths specified to achieve thisrange.
4
Air In Air In
To suit To suit
Increase
flow
decrease
flow

Donning ProcedureIt is strongly recommended that before anybody attempts to wear or use a Frontair 2suit, full training is given on wearing and decontamination by a competent person andthe details of the training recorded. For safety purposes it is best to have an assistant tohelp you don and doff the suit. This makes the process easier and quicker and you willavoid stumbling or tripping which may result in personal injury or damage to the suit.
Note: The suit is designed to have footwear worn internally.
Follow these steps in putting on the suit:
1. Fully open the outer and inner zippers. These can be fitted either vertically orhorizontally at the rear of the suit or horizontally across the chest. Fig.1 shows a suitwith a vertically fitted rear zipper arrangement.
2. With the aid of an assistant step into the lower half of the suit and slide your feetdown the legs into the integral feet (Fig. 1). Fasten the ankle ties securely in a bow(Fig. 2).
3. Raise the suit to waist level, arrange the waist beltcomfortably and fasten firmly. For method orrepositioning waist belt from interior of suit toexterior see page .
4. Connect the suit to an air source supplying aircompliant with EN12021:1999 (Fig. 3). Ensure thatthe air supply hose is fed through the supportattached to the suit.
5. With the help of the dressing assistant lift the suit uponto the shoulders and place your arms into thesleeves.
5
Fig.1
Fig.2
Fig.3

6
6. Pull the hood of the suit over your head (air supply MUST be connected).
7. The dressing assistant should close the inner and outer zippers, (Fig. 4),the suit willnow inflate fully.
On completion of the donning procedure the wearer is now ready to enter the workenvironment.
Doffing ProcedureNote: The person assisting in the doffing procedure should be wearing appropriatePPE selected by qualified safety personnel.
1. The assistant should unfasten the outer and inner zippers.
2. With the aid of the assistant pull the hood of the suit forwards over the head andremove arms from the sleeves.
3. Lower the suit to the waist and disconnect from the compressed air supply.
4. Lower the suit to ground level, unfasten ankle ties and step out suit.
After use decontaminate or dispose according to your company procedures.
Fig.4 Fig.5
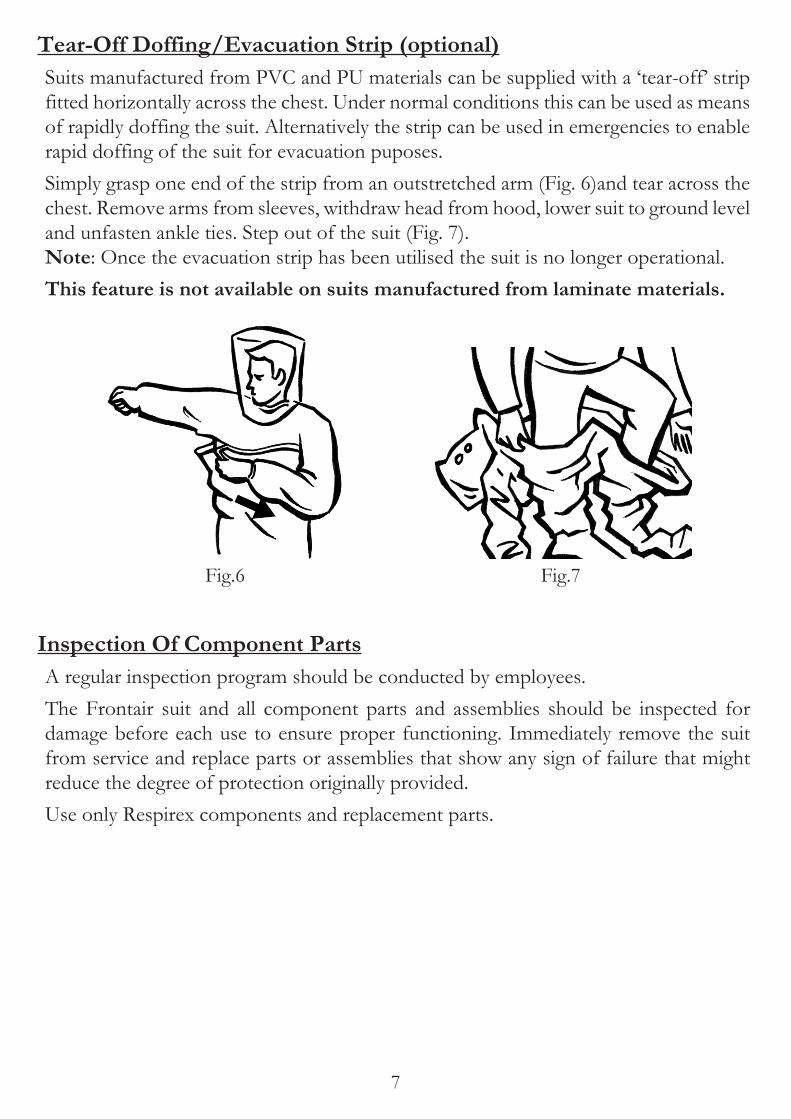
Tear-Off Doffing/Evacuation Strip (optional)Suits manufactured from PVC and PU materials can be supplied with a ‘tear-off’ stripfitted horizontally across the chest. Under normal conditions this can be used as meansof rapidly doffing the suit. Alternatively the strip can be used in emergencies to enablerapid doffing of the suit for evacuation puposes.
Simply grasp one end of the strip from an outstretched arm (Fig. 6)and tear across thechest. Remove arms from sleeves, withdraw head from hood, lower suit to ground leveland unfasten ankle ties. Step out of the suit (Fig. 7).Note: Once the evacuation strip has been utilised the suit is no longer operational.
This feature is not available on suits manufactured from laminate materials.
Inspection Of Component PartsA regular inspection program should be conducted by employees.
The Frontair suit and all component parts and assemblies should be inspected fordamage before each use to ensure proper functioning. Immediately remove the suitfrom service and replace parts or assemblies that show any sign of failure that mightreduce the degree of protection originally provided.
Use only Respirex components and replacement parts.
7
Fig.6 Fig.7

Instructions For Use Of Fall Arrest HarnessNote: Option only available on suits manufactured from 300 micron PVC withhorizontally fitted zippers.WARNING : This facility must only be used inconjunction with a fall arrest harness approved to EN361:1992 with a back ‘D’ ring fixing and a portableRespirex retractable airline hose reel. Always follow themanufacturer’s recommendations for use, inspection andcleaning of safety belts and harnesses.
1. Don the fall arrest harness according to manufacturer’sinstructions ensuring that the back ‘D’ ring fixing pointis between the wearer’s shoulder blades. See Fig 8.
2. Don the suit as outlined on page 5 as far as stage 5.3. Pull the harness trunk on the suit inside out and down
towards the ‘D’ ring fixing point of the fall arrestharness. Connect the ‘D’ ring on the fall arrestharness to the internal harness link using a connectorapproved to EN 362:1992. See Fig 9.
4. Complete the donning procedure for the suit asdescribed on page 6.
5. Attach the exterior harness link on the suit to aninertia block fall arrest device approved to EN360:1992
NOTE : When an suit is being worn in conjunction witha fall arrest harness the trunk at the rear of the hood mustconcertina flat towards the wearer’s neck. This is toensure that in the event of a fall the movement of theharness is taken up by the trunk. This prevents damageoccurring to the suit. See Fig 10.At no time must the operator work at greater than 1mhorizontal distance from the attachment point on theinertia block fall arrest device.At all times the operator must maintain a quantity ofslack airline at their working location, thus avoiding anypotential for the airline hose to become stress loaded in the event of a fall. At least 5m ofcoiled hose must remain wound onto the portable Respirex retractable hose reel, whichwill then be carried by the operator and attached to a point immediately adjacent to theworking location.
8
Fig.8
Fig.9
Fig.10

Use Of Optional Welding Face ScreenThese instructions refer to Frontair 2 suits designed for use with face screens to protectagainst non-ionising radiation arising from welding and similar operations. To be used inaccordance with current Eye Protection Regulations and must be worn when theprocess or job for which it is provided is being carried out. Ensure you understand whenit should be worn and if there are any queries consult your supervisor.
The face screen must ONLY be fitted with the following combination of lenses:
4.25” (10.8cm) x 2” (5.1cm) Clear Cover Glass AND a4.25” (10.8cm) x 2” (5.1cm) Green lens conforming to EN169:1992.
Note: The Clear cover glass is worn outermost from the eye.
Fitting Face screenDon the suit as detailed in the user instructions with the following additional stage foruse of the welding face screen.
Proceed to the work area. Before commencing work secure the outer glare shield fittedwith flip-up welding lens holder to the visor using the velcro attachment pointsprovided, see Fig 11 (to achieve the best grip try to ensure that the attachment points onthe glare shield line up with those on the visor).
Ensure that the filter lenses are at eye level.
Note: A heat resistant over-suit and hood is available which helps to prevent damagefrom welding splash, please contact Respirex for further information.
9
Fig.11
Care & Maintenance of Visors/Face ScreensCan be cleaned using a mild solution of soap and warm water. Wipe with a soft cloth ortissue and allow to dry. Under no circumstances use an external heat source for drying.Periodic disinfecting with a dilute solution of a proprietary disinfectant will enhancewearer comfort. Pitted or scratched lenses reduce vision and seriously reduceprotection - replace immediately.
Regardless of the above recommendations visors and face screens should be examinedfor damage such as scratches, abrasions, cracks etc. before use, and should also beexamined for deterioration. Damaged face screens and visors should be replaced.Lenses subjected to chemical splashes or significant impact should also be replaced.
WarningThe materials from which the welders face screen are manufactured are not known tobe harmful although it may be possible for an allergic reaction to occur in susceptibleindividuals.
10

StorageIf the suit is to be stored in a box or container it should be folded so that the breathing airpack and visor is not distorted.
ALWAYS STORE THE SUIT IN A DRY CONDITION.
Inside Label1.Manufacturer of garment;Respirex International Ltd.
2.Manufacturer’s Model No.
3.Material of Manufacture.
4.Manufacturer’s Order No.
5.Customer Name.
6.Date of manufacture; Day/Month/Year.
7.CE Mark and notified Body code.
8.Pictogram defining protection types:Particulate Radiation Pictogram
9.Inward leakage class
10.Garment Size
SizeSMLXLXXL
Chest cms (ins)88-96 (35"-38")96-104 (38"-41")104-112 (41"-44")112-124 (44"-49")124-136 (49"-53½")
Height m (ft ins)1.64-1.70 (5'4½"- 5'7")1.70-1.76 (5'7"- 5'9")1.76-1.82 (5'9" - 5'11½")1.82-1.88 (5'11½"- 6'2")1.88-1.94 (6'2"- 6'4½")
11."Open Book Pictogram"; wearer must refer to the "Instructions for use" for furtherinformation.
12.Five care pictograms indicating whether clothing is suitable for cleaning and reuse.
� Pictogram 1 Light Mechanical Washing or Do not wash (shown)
� Pictogram 2 Do not bleach
� Pictogram 3 Do not iron
� Pictogram 4 Do not machine dry
� Pictogram 5 Do not dry clean
11
1
2
3456
7
8
9
11
12
10

Sizing
The following pictograms designate the range of height & chest sizes suitable forspecific sizes of Frontair 2 suit, check your body measurements and select the correctsize of suit. Body measurements in cm (inch).
Size Body Height Chest Girth
S 164-170 (5’4½“-5’7") 88-96(35"-38")
M 170-176 (5’7"-5’9") 96-104(38"-41")
L 176-182 (5’9"-5’11½“) 104-112(41"-44")
XL 182-188 (5’11½“-6’2") 112-124(44"-49")
XXL 188-194 (6’2"-6’4½“) 124-136(49"-53½”)
12
88-96
164-170
112-124 124-136
182-188 188-194
96-104 104-112
170-176 176-182
SMALL
X-LARGE XX-LARGE
MEDIUM LARGE

RESPIREX INTERNATIONAL LTD,Unit F Kingsfield Business Centre,Philanthropic Road,Redhill,Surrey. RH1 4DP
ENGLAND.
Tel.+44 (0) 1737 778600
Fax. +44(0) 1737 779441
Email : [email protected]
Type Examination By : SGS United Kingdom Ltd,Weston-super-Mare,Somerset BS22 6WAENGLAND
Notified Body No. 0120
BS\076\B\2008
Cert No. Q4521