instructor manual student user manual technical · pdf filedxr clinician is a complete...
TRANSCRIPT

DxR™ clinicianI N S T R U C T O R M A N U A L
S T U D E N T U S E R M A N U A L
T E C H N I C A L A P P E N D I X

DxR Clinician is a complete computer patient simulation package consisting of
prepared patient cases, management tools (for setting the evaluation criteria,
analyzing student records, and enriching the program with learning resources
and content questions), and authoring tools (for developing new cases of your
own).
DxR was developed because healthcare professionals face the difficult task of
determining the clinical reasoning skills of individual students. The current proce-
dure of observing and mentoring students during preclinical patient encounters
and clinical clerkships provides considerable insights into the clinical reasoning
process but does not provide any means of quantifying the specific skills.
DxR Clinician software, on the other hand, does have the ability to monitor each
action of the student during the “patient” encounter and to provide feedback
about the level of clinical reasoning he or she has demonstrated.
This manual provides detailed instructions for how to use the management tools.
The instructions explain how to set the evaluation criteria for any DxR Clinician
case. There are also instructions for how to collect individual student data into
the Record Utility, which can not only analyze an individual student’s record but
can also provide summary performance data for a group of students who com-
pleted the same case.
Because each clinical problem brings with it a set of learning issues that may
stimulate a student’s need to know basic content, we have designed the software
so that users can access Web sites containing learning resources, such as basic
knowledge and clinically relevant content. This feature permits the student to
access a learning resource from within the patient case and review the relevant
learning issue in the context of the problem-solving task. And finally, another
important feature of the DxR software is the Query function, which allows you to
attach content-related questions to a given case. This feature lets you test the stu-
dent’s content knowledge, again in the context of the problem-solving task.
The intent of the software is to give you, the instructor, control over the contents
of the case and the way in which the evaluation criteria are set so that you can
provide the best educational experience for your students.
J. Hurley Myers, Ph. D.
Professor Emeritus of Physiology and Internal Medicine
Southern Illinois University School of Medicine
President, DxR Development Group, Inc.
DxR Clinician
1
Introduction
DxRCInstrv2.51_0505

Introduction...................................................................................................................1Getting Started.........................................................................................................................5
Preparing to Work Through a DxR Case Yourself.......................................................................................6Accessing the DxR Management Utility..................................................................................................................7Creating Directories and Installing Cases...........................................................................................................8Adding Cases to an Existing Directory...............................................................................................................9Hiding/Showing directories and cases....................................................................................................................9User Names and Passwords.................................................................................................................................10-11
Working Through a Case: Quick Reference.......................................................................................12-13Editing Case Data – Changing Evaluation Criteria.............................................................14-19
Editing Patient Data.......................................................................................................................................14Web Links (Learning Resources)..............................................................................................................................14Adding Media.........................................................................................................................................................15Patient Intro..............................................................................................................................................................16Patient Appearance..............................................................................................................................................16Case Editors.................................................................................................................................................................16HPI Button................................................................................................................................................................16Interview Button............................................................................................................................................................16Exam Button.............................................................................................................................................................17Lab Button....................................................................................................................................................................18Management Button.........................................................................................................................................19Evaluate Button: Editing Evaluation Criteria........................................................................................................19
How DxR Clinician Evaluates Students’ Performance .....................................................20-26How Criteria Work in Evaluating Student Performance......................................................................21
Expected Outcome Node.................................................................................................................................22Dx Considered Node......................................................................................................................................23Needed to Consider Node....................................................................................................................................23Justify Node.........................................................................................................................................................24Competing Node..................................................................................................................................................25Thorough Node................................................................................................................................................25Efficiency Node................................................................................................................................................26
Editing Case Data -- Changing Evaluation Criteria............................................................27-30Paradigm Values...............................................................................................................................................27
Edit Case Data – Presentation Options...............................................................................31-33Case Delivery Options Button.......................................................................................................................31
Access Preferences..................................................................................................................................................31Hypothesis Preference...........................................................................................................................................31Other Preferences ........................................................................................................................................................31Query and Management Query Buttons.....................................................................................................32
Analyzing Student Records in the Record Utility...............................................................34-47Export Records........................................................................................................................................................34Download the Record Utility.....................................................................................................................................34Importing Student Activity Records.....................................................................................................................35
Adjust Evaluation Criteria Screen......................................................................................36-38Index Screen......................................................................................................................................................38Student Record Screen.............................................................................................................................39-43Record Statistics Screen..................................................................................................................43-46
Overview Statistics..........................................................................................................................................44Interview, Exam, Lab, and Management Statistics.............................................................................................45
Performance Ranking Screen.......................................................................................................................46Printing...............................................................................................................................................................47
Browser Requirements..........................................................................................................................................48Screen Size and Monitor Resolution.......................................................................................................................48Changing QuickTime Connection Settings.........................................................................................................48Sound..........................................................................................................................................................49Uploading Your Media Files......................................................................................................................................50Index............................................................................................................................................................................52-53
DxR Clinician
2
Contents

DxR Clinician
3
© 2005 DxR Development Group, Inc.,150 East Pleasant Hill Road, Carbondale, Illinois 62903-6158, for soft-
ware template and icons. All rights reserved.No part of this software program, including artwork and text, may be utilized, reproduced, stored, or trans-mitted in any form by any means, electronic or mechanical, or by any information storage or retrieval sys-tem, without permission in writing from the copyright holder.Address inquiries to DxR Development Group, Inc., 150 East Pleasant Hill Road, Carbondale, Illinois 62903-
6158.Licensee of the software does have permission to duplicate the printed manuals, and to print and duplicatemanuals from the PDF files contained on the CD-ROM.Macintosh is a registered mark of Apple Computer, Inc.
Windows is a registered mark of Microsoft Corporation.
QuickTime is a trademark of Apple Computer, Inc.DxR Development Group, Inc., is a licensed distributor of QuickTime.
QuickTime and the QuickTime logo are trademarks used under license.Portable Document Format (PDF) and Acrobat are trademarks of Adobe, Inc.Brands and product references noted are the trademarks of their respective companies.

DxR Clinician
4

DxR Clinician
5
DxR Clinician consists of a powerful set of tools designed to make the classroom
experience a valuable and pleasant one for both faculty and students.
The DxR Clinician package includes three basic components.
• The DxR Management tools enable you to control who gains access to aDxR case or cases and what the users see when they enter a DxR case. Youcan edit patient data, edit evaluation criteria, or decide to proceed withoutchanging the data and/or evaluation criteria that the case author created.The criteria set by the instructor and/or case author form the basis for eval-uating student performance in investigating the case and reaching a diag-nosis. DxR Management also includes tools for maintaining files for stu-dents who are assigned to work through a DxR case.
• The DxR cases consist of data collected by our case authors based on realpatient encounters. Rather than conducting an in-person investigation, stu-dents will open a DxR case and will begin a simulated clinical investigationusing the tools available in the DxR case. Students will have access to thesame basic clinical investigative techniques that are available to a health-care professional dealing with an actual patient. Using the DxR case infor-mation, students will be able to question the patient, conduct a simulatedphysical exam, and order lab tests. The student will also be able to see andreview the results or responses before making a diagnosis and manage-ment choices. At the end of the case, the student will be able to access aninitial assessment of his or her performance compared to the instructor’sexpected responses.
• The DxR Record Utility — the only component of the DxR package whichisn’t Web-based— is where the instructor can review and evaluate studentand group performance on a DxR case. The Record Utility also allowsinstructors to change the evaluation criteria set earlier in DxR Managementor override the computer’s evaluation. The Record Utility is also the onlyplace that instructors can evaluate the student’s management plan. Datafrom the Record Utility can be printed for student or faculty use.
DxR Clinician is a Web-based application that can be hosted either on a Web site
at your institution or by DxR Development Group. If your institution is hosting the
Web site, the first step in using the DxR Clinician tool is to make sure your
Webmaster and/or technical support personnel know how you intend to use the
program (i.e. coursework, exams) and are aware of any special technical needs
you may have. For those hosting DxR Clinician on a Web site at their institutions,
technical requirements are listed in the Technical Appendix manual.
We recommend that you start using DxR Clinician (DxR) by working through a
patient case just as you would ask students to do. This will help you become
familiar with the structure and presentation of DxR cases.
Getting Started

DxR Clinician
6
Before you assign a case for your students to complete, it’s important that you
work through the case just as students would. This process will allow you insight
into the difficulty of the case, the key findings in the case, and the criteria that
you might want to change or add.
Before you can start working through a case, you must select a case or cases from
the catalog and install the case(s) into a directory that’s specific to you. This is
accomplished through using the DxR Clinician Management Utility.You should be
provided a user ID and password to access the DxR Management Utility by either
your Webmaster or by DxR Technical Support, depending on where your site is
hosted. Once the case is installed, you may use the Management Utility to make
a “student” login for yourself in one of the cases. After you have allowed yourself
access to a DxR Clinician case you will be ready to work through the case just as a
student would. Follow the steps in the Quick Help on pages 12 and 13 of this
manual.
As you move through a selected case, be careful to note case data that you want
to change. Most text data can be edited. You should also take careful note of the
Initial Assessment that appears at the end of the DxR Clinician case (when you
click the Evaluate button). The Initial Assessment provides a first look at how stu-
dent performance is assessed. It may provide you with the first indications of how
you would like to change evaluation criteria before administering a DxR Clinician
case to your students. Keep in mind the educational level of your students and
any specific teaching objectives as you complete the DxR case. After your case
review, you will know whether or not you would like to edit patient data and/or
evaluation criteria.
Preparing to Work Through a DxR Case Yourself

DxR Clinician
7
Accessing the DxR Management Utility
If your school is hosting your site, your Webmaster or system administrator will
provide a user ID and password, as well as the address of the site. The DxR
Management Utility is installed at a location that will look like the example
below. Please note that this address is case sensitive.
http://your_site/DxR/DxRManag
If your site is hosted by the DxR Development Group, we will have given you a
user name and password to allow you to access the DxR Management Utility at
the address listed below. Please note that this address is case sensitive.
http://yourschool.dxronline.com/DxR/DxRManag
The log-in window for the DxR Management Utility will ask for your user ID or
user name and password. When you are successfully logged in, you will see the
DxR Management Index screen.
Fig. 1: The DxR Management Utility Index screen.

DxR Clinician
8
Creating Directories and Installing Cases
DxR cases are installed into direc-
tories. If you are teaching a partic-
ular set of diagnostic skills or are
covering specific subject matter
you may choose to name your
directories after the skill or subject
matter. If you teach more than one
class or students at varying levels
of education, you may choose to
name your directories after the
classes. You can install the same
case in multiple directories and set
different grading criteria for each
instance.
You can provide students with
access to the entire set of cases, or
you can provide HTML links from
your own Web pages directly to specific cases.
You may begin creating directories and installing cases within them any time
after your site is placed on the server and the server is prop-
erly configured.
1. Open the DxR Management Utility and click Install,Show, or Hide Cases. A screen will appear, displayingany directories that have already been created on yoursite.
2. Type the name of the directory you would like to cre-ate into the space labeled “Directory.” Click Createwhen you are done. A screen will appear, displayingthe list of cases that are available for installation.
3. If you want to install only some of the cases in the list,click inside the box preceding the names of all casesyou would like to install into this directory, and thenclick Install Selected Cases. Click Continue to verifyyour choices.
4. If you want to install all the cases in the list, click Install All Cases. All thecases in the list will be installed into your directory.
Note: Each DxR directory can contain only 12 cases. If you install more than 12 cases into a sin-
gle directory, the program will divide the cases into groups of 12 for display.
• If you choose to have a technical support person install your cases intodirectories, you will need to provide that person with the names of thedirectories you would like to create and the cases that should be containedin each directory.
Directory names may be chosen by case subject, course number, or almost any
other cue that will help you remember the directory and its contents.
Fig. 2: Cases displayed inDxR’s Waiting Room.
YOUR SCHOOL’S DxR CLINICIAN
SITE
DIRECTORY NAMED
DOE_RESPIRATORY
DIRECTORY NAMED
DOE_CARDIO
DIRECTORY NAMED
SMITH_CLINPRAC
DOMBKOSKI CASE
HANSONCASE
DOMBKOSKI CASE
DONNERCASE
BLUMENTHALCASE
BRENNANCASE
COHENCASE
You should not use
“DxR”as the complete
name of any of the
directories, although
you can include “DxR”
as part of the directory
name.
A L E R T
Fig. 3: DxR Patient casesinstalled in directories.

DxR Clinician
9
Adding Cases to an Existing Directory
After you’ve installed your initial cases into a directory, you may decide later that
you would like to add another case to the same directory. To do this, follow these
steps.
1. Click the Install, Show, or Hide Cases link on the Management Utility Indexscreen. On the Directories screen, scroll down to see the list of directoriesand cases installed on your site. Find the directory to which you want to addcases.
2. Click the Add Cases button at the bottom of the case list.
3. Select the cases you’d like to add and then click Install Selected Cases.
Hiding/Showing directories and cases
After you create a directory or directories on your DxR Clinician site, you can also
determine whether the directories or the cases within them are visible to those
who gain access to the site. For example, using the Hide/Show features, you can
install all the cases you plan to use during a semester with your class and then
make those cases visible only when you are ready for students to enter and
access them. To hide or show a directory on your DxR Clinician site, follow the
steps listed below.
1. From the DxR Management Utility Index screen, click the Install, Show, orHide Cases link. When the directories screen appears, you will see a list of allthe directories that exist on your site and a list of the cases installed withinthem. A checkmark in the box preceding the directory or case name meansthat directory or case is visible to students on your DxR Clinician site.
2. To change whether a directory or a case is visible on your site, click insidethe box. Next, click Save Changes. If your directory or case was previouslyvisible, it will now be invisible to those who access your DxR Clinician site. Ifthe case or directory was previously invisible, it will now be visible.

DxR Clinician
10
User Names and Passwords
To allow yourself and/or your students access to a DxR case, you should first click
the User Names/Passwords link to enter approved user names and, optionally,
passwords.
Using care in how you enter the names and passwords will ease the process of
logging on to a case. User names are NOT case sensitive, but passwords ARE
case sensitive. Each time a user (either you or a student) accesses a case, he/she
must type in a user name/password that is among those entered for that case.
Users who deviate by including extra spaces or by changing letter in the pass-
word case won’t be able to access the patient case, so it’s important that you
make students aware of the format for their user names and passwords.
Step 1. Creating an access list for users
When giving a group of students access to a case or group of cases, we recom-
mend that you create your lists of user names and passwords using a plain text
editor such as Word Pad® or SimpleText® following the format specified below.
Save the file as plain text. If you use a word processor such as Microsoft® Word® or
AppleWorks®, enable the feature that allows you to see spacing and other format-
ting marks that would otherwise be invisible. (See Helpful Hint) You can then sim-
ply copy and paste your list into the Add Users to Case field.
Step 2. Formatting User Names & Passwords
The format for entering user names and passwords is as follows:
Jennifer Johnson/456-abc
• Any letter, uppercase or lowercase, or any number may be used. Hyphenssuch as in an ID number are permitted, but slashes may only be used toseparate the user’s name from his/her password. A forward slash (/) mustseparate the user name from the password in your list.
• Press Enter (Return) after each user name/password combination since eachcombination must be on its own line.
• Names should use only regular letters and/or numbers. A space between thefirst and last name is OK.
• Names must be unique.
• Passwords can contain letters, numbers and hyphens but no other non-alphanumeric character.
• Passwords do not need to be unique, though this is preferable.
• A password can be the student’s ID number, complete with dashes. Out ofconcern for the user’s privacy, however, some instructors may choose to useonly the last four digits of the student’s ID number.
Most word processingapplications include afunction that allowsyou to see markings,such as spaces, that arenot otherwise visible.(This function may beaccessed under thepreferences settingsfor the wordprocessingapplication.) Choosethis option to helpdetermine if you’veincluded extra spacesin your User namesand Passwords format.We also recommendthat you keep yourformatting as simple aspossible. Avoid anytabs or extra spaceswithin the password.
H E L P F U L H I N T
DxR Clinician cases
are shipped with
the Require
Passwords prefer-
ence in the Case
Delivery Options
section turned ON.
If you don’t want to
force students to
enter a password in
order to enter the
case, you can turn
this preference OFF
in setting Case
Delivery Options.
N OT E

DxR Clinician
11
Step 3. Entering your user names/passwords
Navigate to the Index screen of the DxR Management Utility and click User
Names/Passwords to go to that screen.
A. To enter new user names for either a single case or for all cases in aparticular directory, follow these steps:
• Select the directory containing that case(s) for which you want to addusers.
• Select the individual case or click ALL CASES (to add your user list to allcases in that directory) . A list of existing users will appear in the fieldlabeled Current Users InCase.
• If you are adding a list ofuser names, go to yourtext editor, copy the listyou’ve created, andpaste it into the fieldlabeled Add Users toCase (shown in Figure5). If you are adding asingle user, type theuser name and pass-word into the fieldlabeled Add Users toCase.
• Click Create Users to cre-ate the user name(s)and password(s) youjust entered.
B. To change an individualuser name/password that isalready entered for a case,select the directory name andthen select the case name.Select the name you want toedit from the Current Usersfield and then click Edit User.Type in your changes and click OK.
C. To permanently delete a user name/password, select the directory andthen the case. In the Current Users field, select the user name you want todelete and click Delete User. Caution: Deleting a user name/password is apermanent action that discards both the user name/password and the stu-dent record associated with it.
Note: You can select multiple user names/passwords for deletion.
PC users: Hold down the control key while clicking on the names you wantto select and then delete, or press the shift key to select a string user names.
Mac users: Hold down the Command key while clicking on the names youwant to select and then delete, or press the shift key to select a string usernames.
Fig. 4: The DxRManagement Utility’s UserNames and Passwordsscreen.

DxR Clinician
1. STARTING a. Follow the URL or Link provided by your instructor to the desired case.You will access the patient case either directly by clicking theDxR Clinician opening screen, or through a waiting room.
b. Enter your assigned name and password. After name/password are verified, click Start.
c. Review the information on the patient's Presenting Situation. Answer the question “What would you like to do next?”Click Interview,Physical Exam or Lab to begin your investigation.
2. INTERVIEW PATIENT
a. Click Interview . Initially you may be able to see only the Present Illness category or to review a summary of the History of the
Present Illness (HPI). Select any questions appropriate for that category as directed below (2c).
b. Follow the on-screen instructions to enter a Diagnostic Hypothesis and access other categories.
1. After you enter your Diagnostic Hypothesis, you will need to select the hypothesis you are investigating from your list at the top ofthe screen before you can ask a question. If you aren't investigating a particular hypothesis, select Scanning.
2. To associate a question with more than one Hypothesis, hold down the CTRL (Command) key while clicking the appropriatehypotheses.
3. To associate multiple questions with the same hypothesis, hold down ALT (Option) while highlighting the questions.c. Click the category for the question you want to ask. Questions are listed in the box in the upper half of your screen. Highlight thequestion and click Ask.The response appears in the box below.
d.To find a question among the various categories, click Search at the end of the category list and enter a keyword or phrase in the boxthat appears.
3. STATEMENT OF PROBLEM AND DIFFERENTIAL DIAGNOSIS a. At some point in your investigation of the patient case, you will be asked to frame the patient's problem and form a list of diagnostichypotheses in order of importance.When you have completed your initial list, click DONE to return to the patient. If you would like togather more data from the patient before entering this information, close the DDx window. Depending on your instructor's prefer-ences, you may not be able to investigate areas other than the Present Illness without entering your hypotheses.
b. If you would like to change or rearrange your list of diagnostic hypotheses, click the DIFFERENTIAL DIAGNOSIS (DDx) button.
1.To edit your statement of the patient’s main problem, type changes in the text field at the top of the message box.2.To add a diagnostic hypothesis, type it in the middle text box, then click ADD.3.To delete a diagnostic hypothesis, select it and click DELETE.4.To change the order of the diagnostic hypotheses, select the one you want to move and click UP or DOWN. It will move one posi-
tion in the list.5.When finished, click DONE.
4. Perform A Physical Exam (When you first enter the Exam screen, you will see a description of the patient’s appearance.)
a. Click EXAM button. If you are prompted with the Hypothesis Screen, make any changes you wish and click Done when you
are satisfied with your entries.
b. Specify the diagnostic hypothesis you are investigating.
c. Select the appropriate tool, then click the body part you want to examine.
d. Click the button for the Body View you wish to examine (i.e., head, chest, abdomen).The name of the tool and the body part thatyour cursor is positioned to select will be displayed above the patient picture. Click Other Exams to access Observations, Maneuvers, orMental Status exams. Click Vital Signs to see a list of the patient's vital signs.
e. Some exams will yield audio, graphic, or text data that you must interpret before you can enter a diagnosis. (Heart sounds are soft,you may need to use headphones to hear the clearly. QuickTime is required to play sounds. ) Enter your interpretation in the text fieldprovided, then click Enter. Click the CONSULTANT button to view any available information from a professional consultant.
5. Order Laboratory Tests Depending on your instructor’s choices, you will be able to order labs either individually or as a group.
a. Click the LAB button. If you are prompted with the Hypothesis screen, edit as you wish and click Done.
b. Each time before selecting a lab test, specify the diagnostic hypothesis you are investigating.
NOTE: Some lab tests results are delayed. If you select a lab test with delayed lab results, your order can be submitted with a group oflab tests, but you won’t be able to see its results until after you submit your final management plan and click the Continue arrow. If youneed to change your diagnosis and treatment after viewing delayed lab results, you will have that opportunity.
c.To get additional information about a lab test before ordering, click the TEST INFO button, then select the test. To search the data-base for a specific test, enter the test name or related keyword, and click the SEARCH button. Search results appear in list form. Select alab from the search results to order it immediately or to place it in your Proposed Lab Orders list.
d.To order a test from the group of 32 common tests click the name of the desired test.
e.To order tests not listed in the common group, select a category of tests, then select the test from the list of available tests for thatcategory.
f. When ordering lab tests as a group, make sure you are satisfied with the selections in your Proposed Lab Orders list, thenclick Submit to order those lab tests. Once your orders have been submitted, click a specific lab test and click View Results.
g.View and interpret all available consultant information as described above (4e).
Working Through a Case: Quick Reference

DxR Clinician
6. Enter DIAGNOSIS
Click DIAGNOSIS button to enter your final diagnosis. Click the diagnostic hypothesis that most closely matches your final
diagnosis and click SELECT. In the next text field, edit this hypothesis to express your final diagnosis in pathophysiologic terms.
Justify your diagnosis and select your confidence level. When you are satisfied, click ENTER FINAL DIAGNOSIS. (Click CONTINUE.)
After you commit to a final diagnosis, you will not be able to return to the case.7. MANAGEMENT AND PROBLEM LISTYou may be prompted to type in, prioritize, and save a patient problem list. Select where treatment should take place (in hospitalor outpatient). Select the aspects of management you wish to prescribe by clicking the specific buttons and detailing thetreatment you desire. After you have entered your final management plan, results for delayed labs will be available for review.When finished, click EVALUATE to have your performance evaluated. Answer the Management Confidence questions and clickDone.8. INITIAL SELF-ASSESSMENT The initial self-assessment provides information about your investigation of the case. Click one of the categories at the top. A starnext to the category indicates you completed the task successfully. On each screen, items you requested during your workup ofthe patient are marked with a star. Click an item to review the patient results.
NOTES You may use two methods to record text to your personal NOTES.a. To record data while interviewing a patient, conducting a physical exam or ordering lab tests, highlight the text to be saved, thenclick the ADD portion of the NOTES button. (Some browsers do not support this feature. In this case you will need to select the textyou want, copy it to the computer's clipboard, open the Notes window, and paste in the text.)
b.To review, edit or delete existing notes, and/or add new information to your notes manually, click the VIEW portion of the NOTES button.
c. You must click the Save button in the Notes screen to preserve your changes.
d. To print your notes, click the PRINT button on your Notes window. When the new browser window appears, click Print on thebrowser’s button bar.
LEARNING ISSUES SOAP NOTES and Learning Resources If you wish to make note of learning issues encounteredwithin the program or make SOAP notes, click the appropriate button. You must click the Save button to preserve your changes.Learning Resources accesses a list of Web links.EFFICIENCY WARNING: You will see a warning when you are within 3 of the total number of questions, exams or lab tests deemed necessaryto complete this case efficiently.You will be warned again when you are within 1 of that number.You may continue collecting patient dataafter the warning, but if you do, you will not be able to reach the highest level of performance.
Oth
er
Tip
s
Case Investigation Examination Tools Patient Management
HINT:To measure temperature sensation on variousparts of the body, such as the foot, ankle, hand,etc., use the tuning fork. This measures responseto a cold tuning fork.
Observations, Maneuvers, Mental Status
SELECT BODY VIEW:HeadChestAbdomenBody
Speculum, Tuning Fork
Position Sense, Cotton
Stopwatch, pin
Sphygmomanometer, Hammer
Thermometer, Stethoscope
Tongue Blade, Percussion
Otoscope, Motion/Strength
Ophthalmoscope, Feel
Flashlight, view
Vital SignsInterview
Physical Exam
Laboratory
Differential Diagnosis
Diagnosis
Patient Management
Interpretation
Consultant
Notes
Learning Issues
SOAP Notes
Online Help
Learning Resources
Nursing Care
Activity
Diet
Procedure
Collaboration
Medications
Education
Counseling
Community Resources
Follow-up
Evaluate Performance

DxR Clinician
14
After going through a case, you may decide to change the evaluation criteria or
perhaps replace patient responses within the case. DxR Clinician cases allow you,
the instructor, to modify the cases to better fit your teaching needs. The Edit Case
Data link on the DxR Management Utility Index screen allows you to customize
DxR patient cases by editing patient data, altering student evaluation criteria,
selecting case delivery options, and questioning students on-line as they com-
plete the DxR case.
To begin editing case data:
1. Click Edit Case Data on the DxR Management Utility Index screen.
2. Select the directory containing the case you want to edit, and then selectthe name of a case from those listed. Click Edit Case.
3. Choose the type of information you would like to edit. The Patient Intro,Patient Appearance, HPI, Interview, Exam, Lab, and Management buttonsallow you to edit patient information within the case.The Case Editorsallows you to type in information about yourself or others who collaboratedon editing the case information. The Evaluate button allows you to edit thecriteria used to evaluate student performance. The Case Delivery Options,Query, and Management Query buttons allow you to manipulate how thecase content is delivered to the student. The Web Links button allows you tomake Web-based learning resources available to students as they workthrough a case.
Editing Patient Data
Almost all text data within the cases can be edited. Each time you select a ques-
tion, lab, or exam, you will have the opportunity to change the text response or
result.
Web Links (Learning Resources)
You can add links to Web-based learning resources to provide your students with
more information while they work through a DxR Clinician case. These electronic
learning resources (such as Web sites, etc.) can be made available in the
Interview, Exam, Lab, and Management sections of the case. Students will be able
to click the link to access these resources directly from within the program. You
can choose to link a resource to a particular item within the case, or you can
make the electronic learning resource available from anywhere within the case.
For example, if the patient is experiencing shortness of breath, you could type in
the Web address link for a Web site that provides the student more information
on that problem.
To link a Learning Resource to a particular item in a DxR Clinician case, fol-
low these steps:
1. Choose the item from the Interview, Exam, or Lab categories to which youwould like to link a resource. Scroll down to the Learning Resources fields.
2. In the first field , type a word or a phrase that will appear to the studentsafter the patient results/response which can be clicked to directly accessthe learning resource. In the second field, type in the URL (this is theInternet address) of the learning resource you want to make available. ClickSave Changes in the window.
Editing Case Data – Changing Evaluation Criteria
Case data exists on the
Web server. Changes
you make to case data
will overwrite existing
data on the Web server,
so it may be helpful to
maintain a record of
your changes in a
separate text file.
Some results may
contain formatting for
tables. It’s important
that you do not remove
formatting or markers,
since they are required
to access graphics, links,
and tables associated
with a response or
result.
N OT E

DxR Clinician
15
To link a learning resource that students will be able to access from any-
where within a DxR Clinician case:
1. Click Web Links. In the space provided, typein the URL (this is the Internet address) ofthe learning resource you want to makeavailable.
2. Also type in a word or phrase that willappear to the students which can beclicked to directly access the learningresource and click Add. You can add multi-ple links using this same method. Each linkwill be listed on a separate line.
3. When you are finished adding LearningResources, the link(s) will be created. Clickthe link to open the new location(s) in anew window.
To remove a Learning Resource shown in the
Existing Links field, select the link(s) to be removed by clicking inside the check-
box and then click Remove Selected Links.
Adding Media
You can add your own properly-formatted graphics, sounds, or movies to a DxR
Clinician case. These would include such things as X-rays, CT scans, and photo-
graphs. Audio files can be used to allow a student to hear a patient’s heart and
breath sounds. In some cases, there might also be value in using audio files to
present some portion of the Interview (such as to demonstrate slurred speech)
that supports a certain diagnosis. Navigate to the client data item to which you
want to add media and click the Add New Media button. A dialog box will
appear.1.Make certain that any file you wish to upload conforms to the specifications listed in
the back of this manual.
2.Click the "Browse..." button below and navigate to the media file on your computeryou wish to upload.
3.Click the "Upload File" button.
Once the file is successfully uploaded it will appear in your "Available Media List".
Note: Once a file has been successfully uploaded it cannot be removed by any-
one but your system administrator, and even then it is not recommended.
Note: See the back section of this manual to access guidelines for media.
To add a graphic, a movie, or a sound:
1. Order the question, exam, or lab to which you would like to add media.
2. Scroll down to the Insert/Change Media items, then select the graphic,movie, or sound file from the Available Media list that appears (see MediaFiles Note). Click Preview Media if you want to see/hear the media as stu-dents who select this item will. Click Add to attach the media file to theinterview question, exam, or lab test that you’re editing. The name of yourgraphic, movie, or sound will automatically appear in the Media field.
3. Click Save Changes to preserve this link.
To remove the link to a graphic, simply highlight the media file name from the
Media field and delete it. Click Save Changes.
• If you are looking for
a movie, the file name
will end with
.mov
• If you are looking for
a graphic, the file
name will end with
.jpg .png or .gif
• If you are looking for
a sound, the file name
will end with
.mp3
M E D I A F I L E SN OT E
If you give studentsaccess to the
Consultant text by acti-vating this function in
the Case DeliveryOptions, any mediaaccompanying theitem result will also
accompany theConsultant Text.
H e l p f u l H i n t
Fig. 5: Adding Web Links.

DxR Clinician
16
Patient Intro Button
This function allows you to change the text of the Presenting Data
displayed when the students first enter the case. We recommend
you do not change the patient name since any changes wouldn’t be reflected on
graphics of the patient. Click Save Changes when you are done editing this infor-
mation.
Patient Appearance Button
This feature allows you to type in and save a text description of the
patient. The information would appear to the student as he/she enters the exam
portion of the case.
Case Editors Button
This feature allows you to type in and save the name, title, and affili-
ation of yourself and the collaborators who helped to edit the patient case data.
HPI Button
This button displays a field where you can edit the text that
describes the history of the present illness. This information will appear to stu-
dents only if you’ve marked History of Present Illness in the case delivery options.
Interview Button
In this section, you may change the patient’s responses to questions.
You may also require students to justify certain requests for informa-
tion or to interpret the patient’s response. You may provide students with an
expert opinion in the form of Consult Text after they make the interpretation or
attach a learning resource to an item.
1. Select a category, and when the list of questions appears, select a question.
2. Click Ask to see the existing response.
3. Change the patient response in the Result Text field as desired.
• Determine whether this question should be one of the criteria items toevaluate student performance in either the Diagnostic Process evaluationor the Management Plan.
• Check the box marked Ask User to JustifyRequest to explain why they requestedthis information. If the “justify request” boxis already marked, click inside the box ifyou want to remove the prompt to justifythe selected item.
• Add Media as the patient result and addLearning Resources to supplement the stu-dent’s learning as desired. (See pp. 14-15.)
• Click inside the Interpret box to requirethe student to type in an interpretation forthe patient’s response.
• Optional: Type the text of an expert opin-ion in the field marked Consultant Text.Students will be allowed to access theinformation from this text field only afterthey enter an interpretation of the inter-view response associated with the text.
4. Click Save Changes to write your modifica-tions into the patient database.
Fig. 6: Editing data forthe interview section.
You may ask students tojustify interview, exam orlab items, or you mayremove a request tojustify that is alreadyincluded for those items.You may check the Justifybox to gain insight into astudent’s clinicalreasoning. The caseauthor may haveincluded a request tojustify certain items.
If you disagree with thisrequest, click thecheckmark in the Justifybox to remove therequest.
H E L P F U L H I N T
Criteria NoteClick the See Other CriteriaItems button below eachof the evaluation points tosee a list of the itemsalready selected as criteriafor that node. You can alsouse this button to makethe item you are editingequivalent with a criteriaitem already in the list.

DxR Clinician
17
Exam Button
In the exam section, you may change the patient’s physical exam
results as well as ask the students to justify their exam choices. You
may also require the students to interpret the patient’s exam results and provide
them with an expert opinion in the form of Consult Text.
To edit exams, follow these steps.
1. Click the body view (using the small patient icons) that includes the bodypart you want to examine.
2. Click the exam tool you want to use.
3. Select the body part from the list that appears.
4. When the exam results appear, make changes in the field labeled Result Text.
5. Click Other Exams, select an item from the three lists (Observations,Maneuvers, and Mental Status) then change the results as desired for thechosen exam in the field labeled “Result Text”. Also under Other Exams,select Vital Signs from the list to edit the patient’s vital signs. Change theresults for these values in the Result Text field as desired and click SaveChanges. Please note that making changes under Vital Signs will not changepatient data for other exams displaying the same information. Edit themseparately.
• Determine whether this exam should be one of the criteria items to evalu-ate student performance in either the Diagnostic Process evaluation or theManagement Plan.
• Check the box marked Ask User to Justify Request to explain why theyrequested this information. If the “justify request” box is already marked,click inside the box if you want to remove the prompt to justify the select-ed item.
• Add Media as the patient result and add Learning Resources to supplementthe student’s learning as desired. (See pp. 14-15.)
• Click inside the Interpret box to require the student to type in an interpre-tation for the patient’s response.
• Optional: Type the text of an expert opinion in the field marked ConsultantText. Students will be allowed to access the information from this text fieldonly after they enter an interpretation of the exam result associated withthe text.
6. Click Save Changes when you are done making changes to this exam.
If you edit results thatwould show up in morethan one exam, (i.e. vitalsigns), you must edit thesame values in allapplicable exams.Example: Heart ratewould show up undervital signs and in severalindividual exams. Suchresults should be editedin all exams where theywould appear.
N OT E
Fig. 7: Editing patientExam results.
Criteria NoteClick the See Other CriteriaItems button below eachof the evaluation points tosee a list of the itemsalready selected as criteriafor that node. You can alsouse this button to makethe item you are editingequivalent with a criteriaitem already in the list.

DxR Clinician
18
Lab Button
Here you may
change the
patient’s lab results. Follow the
steps below.
1. Select a lab category.
2. When the list of labsappears, select the labyou want to view/edit.
3. Click Order to go directlyto the patient’s results.
4. Edit the text results in thefield labeled Result Textas desired and click SaveChanges. You may alsochange other parts of thisresult (see below).
• Determine whether theresult of this lab testshould be delayed untilafter the student entersa final diagnosis andmanagement plan. If youdecide to delay the labresults, you must alsoactivate this function in the Case Delivery Options portion of editing thiscase.
• Determine whether this lab test should be one of the criteria items toevaluate student performance in either the Diagnostic Process evalua-tion or the Management Plan.
• Check the box marked Justify to ask students to justify their request forthis lab test. If the “justify request” box is already checked, click on thecheckmark if you want to remove the prompt to justify the selected item(see Justify note).
• Determine whether to include media or Web-based learning resources toappear when students order this test. See pages 14 & 15.
• Determine if the student must type in an interpretation of this resultwhen it becomes available.
• Optional, when an interpretation is required: Type the text of anexpert opinion in the field marked Consult. A student will be allowed toview the information from this text field only after he/she enters aninterpretation of the lab item associated with the text/media result.
• Edit as needed the text displayed in the Normal Result field. This text willbe displayed to students when they click the Test Info button or theNormal button when selecting lab tests.
• If you want to change Lab Cost, edit that information in the field labeledLab Cost.The editable text in the Lab definition field includes a descrip-tion the lab test and what it is used for, followed by what an abnormalresult might indicate. The text that appears in the Definition field willhave a pipe symbol “|”following the description of the lab. To change theTest Description, edit the text before the pipe symbol. Edit the informa-tion after the pipe symbol “|”to change what a lab result of AbnormalIndicates. Please do not remove the “|” symbols.
5. Click Save Changes after you’ve made all the desired changes.
Most requests to justify aparticular item will occur inthe lab category, often toprompt the students toweigh the potential benefitof ordering a lab test. If youwant students to justifyrequesting a lab, you mustselect the lab test, and thenclick inside the Ask User toJustify box. When thecheckmark appears, theJustify prompt has beenactivated.
J U S T I F Y N OT E
Fig. 8: The Lab Categoryscreen for editing patient data.
Criteria NoteClick the See Other CriteriaItems button below each ofthe evaluation points to see alist of the items alreadyselected as criteria for thatnode. You can also use thisbutton to make the item youare editing equivalent with acriteria item already in the list.

DxR Clinician
19
Management Button
The Management button allows you to enter questions that will
appear when the student makes certain management selections.
Please note that this button doesn’t allow you to edit the management plans.
To edit the management plan, use the evaluate button and then locate the item
you would like to edit.
The Management Section contains no responses/results to edit, but does allow
you to enter questions that will appear when the student makes certain selec-
tions.
1. Select the category from the list on the left. A list of available managementoptions within that category will appear.
2. Highlight the option that you are interested in and click Edit. You will nowsee a list of Question Options.
3. If you select No Question, the student will not be prompted with any ques-tion when selecting this item. If you leave the Default Question marked,then the question “What would be the purpose of this?” will appear if thestudent chooses this item. The cases are preset with the Default Questionselected unless the case author has entered a Custom Question in its place.You may select Custom Question to enter your own question. If you makechanges, click Save.
4. Determine whether the management item that you’ve selected should be acriteria item for the management plan. To make the item a Required item,click the Required box. To make the item a Recommended managementitem, click the Recommended box. .
(Optional) To make the item equivalent to one of th existing management cri-teria items, click the Required or Recommended menu and select the man-agement item that your new item equates to. Make sure the appropriateRequired or Recommended box is also checked.
After you are satisfied with your changes to patient information in a DxR case,
you may select another type of information to edit or return to the DxR
Management Index screen.
Evaluate Button: Editing Evaluation Criteria
Before you edit the criteria for evaluating student performance,
it’s best to understand what is being assessed at each evaluation
point, how it’s being assessed, and how your changes may affect student scores.
The pages that follow first deal with how student performance is evaluated
(pages 20-26) and then with editing the criteria that provide the basis for the
evaluation (pages 27–33).
DxR Clinician
20
DxR Clinician provides you with both qualitative and quantitative evaluations of a
student’s performance in working through a simulated patient case. For example,
the student’s Level of Diagnostic Reasoning performance is expressed as a quali-
tative description as well as a numeric value. Additionally, DxR Clinician renders
numeric scores for Clinical Reasoning, Management, and Content Knowledge.
These four scores are weighted and then combined to produce the Overall
Performance Evaluation Score. (See the Record Utility section of this manual for
more information.)
For the Clinical Reasoning Score (CRS), students will receive points for achieve-
ments in the clinical investigation, including considering the correct diagnosis as
part of their listed diagnostic hypotheses, arriving at the correct diagnosis, and
selecting the investigative items from the patient information needed to justify
the correct diagnosis and rule out competing hypotheses.
The Level of Diagnostic Performance is a descriptive, qualitative measure based
on the items the student includes in his/her investigative inquiry. The Diagnostic
Performance Level evaluation is governed by a paradigm that eventually classi-
fies a student’s performance by one of ten descriptions. Each of these descrip-
tions is assigned a value between zero and 100.
Please note the student’s performance in selecting Management items for the
patient case is scored separately on a numerical basis in four subcategories. Later
in the Record Utility, you may assign a numeric value to the subcategories of
Required, Recommended, Related H&P, and Related Lab, based on the relative
importance of each category.
The student’s performance in the Content Knowledge score is based on the
instructor’s assessment of performance in five areas: statement of problem, Dx
justification, interpretations, rationales, and the case questions. This quantitative
and qualitative evaluation allows the instructor to grade student responses in
these areas and then weight them to produce a Content Knowledge Score. These
four scores — Clinical Reasoning Score, Diagnostic Performance, Management,
and Content Knowledge — are weighted and then combined to form the
Overall Performance Score.
How DxR Clinician Evaluates Students’ Performance

DxR Clinician
21
How Criteria Work in Evaluating Student Performance
The Scoring Paradigm represents a decision tree used to evaluate student per-
formance. The evaluation of student performance begins at the diagnosis
(Expected Outcome).
To arrive at a Level of Diagnostic Performance students will move through a
yes/no decision tree. In each branch of the tree, a student will move up only if
he/she selected all the items designated as criteria for success at that node. The
student will move “down” if he/she failed to enter/select all items designated as
criteria for success at that node. Depending on their entries at the Expected
Outcome (correct diagnosis) node, students move either “up” the paradigm
toward the highest performance level (IMPRESSIVE), or “down” the paradigm
toward the lowest performance level (INADEQUATE).
The criteria for each node are set initially by the case author, but can be changed
using the DxR Management Utility, or the Record Utility.
The Clinical Reasoning Score is derived from points assessed for achievements
at five different nodes. They include listing the correct diagnosis among the stu-
dent’s hypotheses, arriving at the correct diagnosis, justifying the diagnosis, rul-
ing in and out competing hypotheses, and doing a thorough workup. The case
author and/or instructor select the items the student must include at each node
to receive full credit. At each of the first two nodes (Expected Outcome and
Diagnosis Considered), the student will receive either all the possible points for
that node or none of the possible points. At the Justify, Competing, and Thorough
nodes, students who include some but not all criteria items will receive partial
credit. This scoring method allows the possibility of a reasonable score for stu-
dents who reach the incorrect diagnosis, but are otherwise thorough.
Impressive
Very Good
Acceptable
ShotgunPrematureLucky
Anchored
PrematureOmissions
Inadequate
Expected Outcome (Diagnosis)Node
DiagnosisConsideredNode
Justify DiagnosisNode
CompetingHypothesesNode
ThoroughWorkupNode
Within Limits (Efficiency)Node
Within Limits (Efficiency)Node
Justify DiagnosisNode
Needed toConsiderNode
A node represents a point
of assessment for an area or
level of diagnostic proficiency.
D E F I N I T I O N : N o d e
Definition:
Criteria items are
responses that the case
author and/or instructor
designate as key items
in evaluating the stu-
dent’s performance on
the DxR Clinician case.
Criteria are patient
items the student must
list to receive full credit
for that node of the
scoring paradigm.
Definition: Criteria Items
Fig. 9: The ScoringParadigm

DxR Clinician
22
In describing each node, we’ve outlined how the student’s Level of Diagnostic
Performance and the Clinical Reasoning Score would be affected.
Expected Outcome Node (Diagnosis)
At this node, the question is “Did the student include all the required Parts of the cor-
rect diagnosis?”
Within the DxR program, students enter their expected outcomes (diagnoses) as
free-entered text. The software searches the text of the students’ entries for key
words and phrases that match the case author’s/instructor’s standards. Since
some diagnoses are complex or multifaceted, the software allows the case author
or instructor to enter up to five sets of synonyms (key words or phrases) to define
the expected outcome (diagnosis). All are considered “Parts” of the expected out-
come, but some may be considered more significant
than others in describing the diagnosis. One of the
parts of the correct diagnosis must be marked as
Required for success at the Expected Outcome node.
A student must include one of the synonyms for all
required parts of the correct diagnosis to move up
the evaluation paradigm. (Parts which aren’t marked
as required are evaluated in the Thorough node.)
Depending on the educational level of students, you
may choose to require only certain Parts at this point
in the evaluation process.
For the Level of Diagnostic Performance: To move up the paradigm
students must include in their diagnosis at least one synonym from all
required Parts of the correct diagnosis. If so, the student will move up the
evaluation paradigm to the Justified Diagnosis node.
If the student failed to list at least one synonym from each required Part
of the correct diagnosis, he/she will move down the evaluation paradigm
to the Diagnosis Considered node.
Student's Diagnosis Program's Evaluation Explanation
"The patient seems to havechronic obstructive pulmonarydisease."
Accepted This diagnosis is accepted because it matches one ofthe equivalents entered by the case author orinstructor.
"This patient has chronicasthmatic bronchitis leadingto pulmonary hypertension,causing right atrialenlargement, and rightventricular hypertrophy."
Rejected Rejected because there is no reference to chronicasthmatic bronchitis in the equivalents entered by thecase author or instructor. Chronic bronchitis is listedas an equivalent, however, chronic asthmaticbronchitis is not. Instructors can use the Record Utilityto correct a student's score to account for alternatewording.
"The patient has aemphasema."
Rejected The diagnosis is correct, but it is rejected because of amisspelling. Instructors may use the Record Utility tocorrect a student’s score to account for spellingerrors.
Fig. 11: An example of how the DxR Clinician program evaluates the diagnosis.
Fig. 10: A required part ofthe diagnosis.

DxR Clinician
23
For the Clinical Reasoning Score: Students who enter all required Parts
of the correct diagnosis from their hypothesis lists will receive the points
assigned for both expected outcome (default total points possible = 10)
and for the Diagnosis Considered node (default total points possible =
40), since the student both considered and chose the correct Expected
Outcome.
A student who fails to enter all required Parts of the correct diagnosis
won’t receive any of the points assigned to the Expected Outcome node,
but would move down the decision tree to the Diagnosis Considered
node for examination of his/her hypothesis list.
Dx Considered Node
At this node, the question is “Did the student list ALL required Parts of the Expected
Outcome in his/her list of diagnostic hypotheses?”
Here the student’s complete hypothesis list is examined to see if the student con-
sidered all required parts of the Expected Outcome in his/her hypothesis list.
For the Level of Diagnostic Performance: If the student considered all
required Parts of the Expected Outcome, he/she will next move to the
Justify Diagnosis node.
If the student failed to do so, he/she will move down the decision tree to
the Needed to Consider node.
For the Clinical Reasoning Score: Students who included ALL required
Parts of the Expected Outcome in their hypothesis lists will receive all
points assigned to the Considered node (default total points possible =
40).
Students who omitted any of the required Parts of the Expected
Outcome won’t receive any points for the Diagnosis Considered node.
Needed to Consider Node
At this node, the question is “Were there sufficient clues to enable the student to con-
sider the correct diagnosis?”
If the student neither chose nor considered the correct diagnosis in his/her
hypothesis list, the student’s record is examined at the Needed to Consider node
for key elements that should have led the student to at least consider the
Expected Outcome. Information used to answer this question comes from the
student selections for history, physical, and lab which should clearly lead an
investigator to consider the correct diagnosis as a diagnostic hypothesis. This list
of clues should not be exhaustive. It should, however, contain the fundamental
items that together point to the correct diagnosis.
For the Level of Diagnostic Performance: If the student didn’t select
the items that would have provided sufficient clues to consider the
Expected Outcome (Diagnosis), the student’s performance may result
from an inability to frame the problem, usually associated with a cogni-
tive knowledge deficit. His or her Level of Diagnostic Performance would
be labeled “Inadequate.”

DxR Clinician
24
If the student did include items that would have provided sufficient clues
to consider the expected outcome but still failed to consider the correct
diagnosis, his/her Level of Diagnostic Performance would be described as
having Omissions. The failure to consider the correct diagnosis could
point to a misinterpretation of the available clues. Such misinterpreta-
tions may point to a cognitive knowledge deficit and/or a lack of compe-
tence with specific performance objectives (e.g. interpreting heart
sounds).
If the student correctly interpreted the available clues but still didn’t con-
sider the correct diagnosis, then his/her error probably results from igno-
rance of the disease process and/or a processing error (omission, inade-
quate synthesis, wrong synthesis). The student’s free text responses to key
items may provide insight in pinpointing the cause of the error.
For the Clinical Reasoning Score: There are no points assigned to this
node for the Clinical Reasoning Score.
Justify Node
At this node, the question is “Did the student include all questions, physical exams,
and lab data necessary to justifiably arrive at the correct diagnosis?”
The Justify node appears at two points on the evaluation paradigm. The ques-
tions, physical exams, and lab data listed as criteria at this node should represent
the basic information necessary to justify the Expected Outcome. The data
assessed here do not represent the ideal workup.
For the Level of Diagnostic Performance: If the student’s choices are
sufficient to justify the correct diagnosis, but if the student failed to reach
that diagnosis, his/her Level of Diagnostic Performance would be
“Anchored.”
If the student choices aren’t sufficient to justify the correct diagnosis and
if the student failed to arrive at the correct outcome, his/her Level of
Diagnostic Performance would be “Premature.”
Students who reached the correct diagnosis but whose investigative
choices didn’t justify those conclusions would see their Level of
Diagnostic Performance described as “Lucky,” meaning he/she arrived at
the Expected Outcome by a lucky guess.
Students whose investigative choices provided a sound basis to justify
their selection of the correct diagnosis move “up” the Scoring Paradigm to
the Competing node.
For the Clinical Reasoning Score: Students will receive credit based on
the number of the designated criteria items for this node that he/she
included. For example, if the student included two of the four criteria
items listed for the Justify node, he/she would get half the possible points
for the Justify node (default total points possible = 20).

DxR Clinician
25
Competing Node
At this node, the question is “Did the student include all criteria items needed to rule
out competing hypotheses?”
The paradigm works best if the criteria set for this node evaluate a student’s
choices in investigating the most important or most likely other hypotheses or
diagnoses. Clearly, if students are expected to consider or rule out all possibilities
in a complete differential diagnosis, virtually no student would successfully pass
through this filter.
Example: In the case of a boy with knee arthritis, the Expected Outcome might
have been juvenile rheumatoid arthritis. Other diagnoses for consideration might
have been Lyme disease and rheumatic fever. Criteria entered at this point could
reasonably include questions about exposure to insects, a question about the
presence of a rash, an ASO titer, a Lyme titer, questions about fever and taking the
boy’s temperature as part of the physical exam.
For the Level of Diagnostic Performance: If the student included all cri-
teria items in ruling out competing hypotheses , the student moves “up”
the paradigm to the “Thorough” node.
If the student failed to include all the criteria items in ruling out compet-
ing hypotheses, the student will attain a rating of Premature for his/her
Level of Diagnostic Performance.
For the Clinical Reasoning Score: Students will receive credit based on
the number of the designated criteria items for this node that he/she
included. For example, if the student includes half the criteria items,
he/she would receive half the points possible for the Competing node
(default total possible = 15 points).
Thorough Node
The question at this node is,“Did the student’s selections include all other criteria
items that haven’t been evaluated elsewhere, but which are deemed essential for a
thorough workup?”
The evaluation standards set for a thorough workup are usually what would be
expected of a resident completing a primary care residency. The information eval-
uated at this node assesses the questions, physical exams, laboratory tests, and
ancillary diagnoses considered essential for a thorough workup. Items evaluated
here should include questions, exams, labs, treatment, and diagnoses that are
expected, but which haven’t been previously selected at other nodes. This
includes one synonym from all other parts of the diagnosis that weren’t marked
as “required” for the Expected Outcome.
For the Level of Diagnostic Performance: If the student entered all the
criteria items for this node and all the parts of the diagnosis (required and
non-required), the student will have the opportunity to move “up” the
paradigm to the highest performance level, depending on his/her rating
at the Efficiency Node.

DxR Clinician
26
If the student failed to include all the criteria items for this node all the
parts of the diagnosis (required and non-required), he/she won’t be able
to attain the highest level of performance on this particular DxR case. In
this case, the student’s Level of Diagnostic Performance also depends on
how he/she is rated at the Efficiency Node.
For the Clinical Reasoning Score: Students will receive credit for the
number of the designated criteria items for this node that he/she includ-
ed. For example, if the student includes half the criteria items, he/she
would receive half the points possible for the Thorough node (default
total possible = 15 points).
Efficiency Node (Within Limits)
At this node, the question is “Did the student stay within the efficiency limits set by the
case author and/or instructor?”
One characteristic of an expert clinician is the ability to arrive at a correct diagno-
sis efficiently. To discourage an unfocused approach to the clinical investigation
process, you may place limits on the numbers of questions that should be asked,
exams that may be performed, and lab tests that may be given in a particular
case.
For the Level of Diagnostic Performance: If the student stayed within
the set efficiency limit and still conducted a thorough workup, he/she will
achieve the highest Level of Diagnostic Performance, which is Impressive.
If the student exceeded limits but conducted a thorough workup, his/her
Level of Diagnostic Performance will be Very Good.
If the student stayed within the efficiency limits but didn’t achieve a thor-
ough workup, his/her Level of Diagnostic Performance will be Acceptable.
If the student exceeded limits and failed to conduct a thorough workup,
his/her Level of Diagnostic Performance will be described as Shotgun,
denoting a “shotgun” approach to the clinical investigation.
For the Clinical Reasoning Score: If students exceed efficiency limits,
points will be deducted from their Clinical Reasoning Scores. See the
chart below. Deductions are proportional to the extent to which students
exceed limits.
Now that you understand how the students’ performance is evaluated, you can
manipulate the criteria as you wish.
Fig. 12: Details of scoring at the Efficiency node.

DxR Clinician
27
Evaluate Button: Editing Evaluation Criteria
You can change the evaluation criteria for a case on-line just as you can edit
Patient Data. The following pages explain the process of changing the online
evaluation criteria for a DxR case. (You can also change evaluation criteria in the
Record Utility while analyzing student records. See the Adjust Criteria section of
this manual for more information.) On the DxR Management Utility Index screen,
click Edit Case Data. Select and enter the case you would like to edit. Click
Evaluate. You will see a row of buttons, corresponding to each part of a DxR
Clinician case. On the next few pages we explain how to edit criteria for each sec-
tion.
Paradigm Values: DxR Clinician provides different forms
of evaluation, but paradigm values affect only the Clinical
Reasoning score (these scores should total 100 points).
Preset point values for the nodes included in the student’s Clinical Reasoning
Score are shown (see Detail Note). You may change the numbers here or in the
Record Utility. Click Save Changes when you are satisfied with your entries.
See the Adjusting Evaluation Criteria section of this manual for information on
changing paradigm values in the Record Utility. (See p. 36)
Diagnosis Button
Click Diagnosis to set the criteria for the Expected Outcome.
The Expected Outcome should include the diagnosis, but may also include other
information the case author deemed important.
1. Edit as need the concise diagnosis, which includes all components of thediagnosis. This information is displayed to the student during the Initial Self-Assessment at the end of the case.
2 List each component of the Expected Outcome (Diagnosis) separately in thefields marked Part 1, Part 2, etc. (5 or fewer parts). Most cases will have onlyone or two parts to the correct diagnosis, but space is provided for up tofive.
3. Add any acceptable synonyms to each Part, listing each synonym on a sepa-rate line. Include as many synonyms or equivalents as possible. This will givethe student greater latitude in having a diagnosis scored correctly. For scor-ing purposes, each synonym is considered equivalent to all other items inthat Part. The student’s diagnosis must contain one of the synonyms listedfor that Part to receive credit.
4. To edit any part of the Expected Outcome, highlight the text you want tochange, delete it, and type in the new text. Click Save Changes.
5. Indicate each Part of the diagnosis that will be Required. The Parts checkedas Required will be used in evaluating the first node, the ExpectedOutcome. The others become part of the criteria for the Thorough level. Youmust check Required for at least one Part of the Diagnosis. If you do notcheck at least one component of the diagnosis as Required, then any diag-nosis entered by the student will be scored as correct.
Optional: You can provide immediate feedback to the student in the form of a brief discussion of thediagnosis if you wish. You may edit the existing text or simply add your discussion text in the fieldlabeled “Expected Outcome.” Students can access this information by clicking the Expected Outcomebutton on the Initial Self-Assessment screen which appears after they have completed the case.
Editing Case Data – Changing Evaluation Criteria
Diagnosis Considered =
40 points
Expected Outcome =
10 points
Justify Diagnosis =
20 points
Competing Hypotheses
= 15 points
Thorough Workup =
15 points.
D E TA I L N OT E
You can click the Print
Dx Criteria button to
print all criteria associ-
ated with the
Diagnoses, including
your edits.
Click Print Rx Criteria to
print all criteria associ-
ated with treating the
patient (management),
including any changes
that you’ve made.
P R I N T C R I T E R I A

DxR Clinician
28
Consider, Justify, Competing, and Thorough Buttons
To review the existing node criteria, click the button for
the node you want to review. A screen will appear, dis-
playing the evaluation criteria as provided by the case
author. Decide whether you want to modify any of these
criteria.
To select items to add, follow these steps.
1. Click the appropriate Interview, Exam Tools, or Lab Category (top of thescreen) to see the pull-down menu for each.
2. From these menus, select the proper category (e.g., from Interview youcould select the category of questions you want to view. From Examinationyou could select the exam tool that you want the students to use).
3. Click Get Questions or Get Lab List for the Interview and Lab sections.Choose the specific question, body part, or laboratory test you want to add.Click Retrieve...from Case. You will see the patient response or the test resultspecific to that case.
4. You have two options in adding material to the node criteria. By clickingAdd you add material as a new, separate item; by clicking ‘Or’ Add you addmaterial as an equivalent. (See Helpful Hint.) If you enter many items asequivalents, the text will wrap to the next line, but all items are consideredto be synonymous.
• Option 1: Type your discussion text in the field labeled “Why this item isimportant.” Students will see this text, along with the patient data whenthey view detail of this criteria item in the Initial Assessment at the end ofthe case.
• Option 2: You can provide comments to your students explaining the eval-uation criteria for a node in the “Category Discussion Text.”To edit anyexisting text, highlight and delete the text you want to change and thentype in the new information.
5. After editing the criteria for each node, click Save Changes. The evaluationinformation for the node will be written to the evaluation database on theserver.
Efficiency Button
One characteristic of an expert clinician is the
ability to arrive at a correct diagnosis efficiently. To discourage the stu-
dent from an unfocused approach to the clinical investigation, a limit is
set regarding the number of interview questions, exams, and lab tests
that may be ordered before an “efficiency warning” is given. Cases
include default limits for all these items. The limit should be broad
enough to allow for a reasonable, thorough investigation, but confined
enough so that a student merely going down the list of available choic-
es would encounter dialog boxes warning,“You have __ more questions
(exams, labs) before your overall efficiency will be affected.” Students
will be allowed to request additional questions, exams, and lab tests
beyond the efficiency limit. However, it will affect a student’s efficiency
scores if he/she exceeds the limits. Efficiency scores may affect the Level
of Diagnostic Performance that the student achieves, as well as the
Clinical Reasoning Score.
How do you decide
whether items should be
listed as equivalents? We
suggest the following rule
of thumb. If the student
can gather the same
information from several
different items in the case,
each item should be listed
on the same line,
separated by commas. For
example,“Blood A-G|20,”
“Blood A-G|46,” and
“Blood A-G|54” all refer to
blood sugar or glucose. If
you felt that a measure of
blood sugar were
required you could list all
three measurement
methods as equivalents. If
the student includes any
one of these equivalents
he/she would receive
credit for having gathered
the required information.
H E L P F U L H I N T
Fig. 13: Editing Efficiency limits for a DxRClinician case.

DxR Clinician
29
Criteria Count: If you have added or deleted any criteria items from the various
nodes (Consider, Justify, Competing, and Thorough), change the criteria count of
interview questions, exams, and lab tests to reflect your changes, making sure to
exclude duplicates. Click Save Changes when you are finished editing.
Note: The information entered in the Criteria Count at the time the student
completes the case will determine the information displayed to the student in
the Initial Self-Assessment at the end of the case, so it’s a good idea to make
these adjustments before you make the case available to students. (These values
are rechecked and automatically set by the Record Utility when records are
imported.)
Student Maximum: Preset counts are shown but may be edited.
1. Enter the total number of interview questions, exams, lab tests, and man-agement options that students will be allowed to request before exceedingthe efficiency limits.
2. Click Save Changes when you are finished editing.
Item Count: The Item Count entries show the total number of items available in
the DxR Clinician database. Do not change these numbers.
Lab Cost Allowance: This is the total dollar amount allowed for lab tests ordered
by a student. The preset amount is shown and can be edited. Remember that all
lab tests count as individual items. There are no “panels” of lab tests that can be
ordered in the DxR Clinician database. The information on whether students
exceed the lab cost allowance will be reported to you in the Record Utility.
If you have added labs or changed the costs of lab tests, you may want to adjust the Lab Cost
Allowance.
Click Save Changes when you are satisfied with your entries.
Management
In this section, you may set the criteria that will be used
to evaluate the student’s patient management plan.
Patient management items are divided into four cate-
gories. They are Required, Recommended, Related H & P,
and Related Lab. Students will be evaluated based on
entries that match the criteria you set for each category.
Later, in the Record Utility, you will set point values for
each of the four categories of the management plan. The
preset point values total 100. Below is a discussion of the types of items that you
should list for each of the four areas. (For instructions on editing the point values
assigned to the four management areas, see the instructions for Adjusting
Evaluation Criteria on p. 36)
Management Discussion Text
In the Management Discussion Text field that appears below the criteria for
Required, Recommended, Related H&P, and Related Lab, you can type in text that
explains the issues in managing this patient’s problems. This discussion text may
explain why certain management choices are appropriate or inappropriate for
this patient.
Click Print Rx Criteria to
print all criteria associ-
ated with treating the
patient (management),
including any changes
that you’ve made.
You can click the Print
Dx Criteria button to
print all criteria associ-
ated with the
Diagnoses, including
your edits.
P R I N T C R I T E R I A

DxR Clinician
30
Required Button
This area should contain only the treatment criteria items that you would consid-
er necessary for a student to receive a satisfactory score on his/her treatment
plan. Select only items from the Management pull-down menu.
Recommended Button
This area should contain additional
treatment criteria items that would
be included in a more complete
treatment plan. Select only items
from the Management pull-down
menu.
Related H&P Button
The criteria listed here should
include Interview and Exam items
that the student needs to investi-
gate in relation to the manage-
ment items selected. For example,
if the student were prescribing
medication for the patient, he/she
would need to ask about allergies,
current prescriptions, and over the
counter medications currently
used. These items may or may not be considered when the student is making
his/her diagnosis.
Related Lab Button
The criteria items listed here should include all items from the lab section that
the student needs to investigate in relation to the management items selected.
For example, you may think it’s important to order an EKG or CXR before consult-
ing with a cardiologist. These items may or may not be considered when the stu-
dent is making his/her diagnosis.
Deleting Management Criteria
To delete a management criteria item, click the appropriate Required,
Recommended, Related H&P, or Related Labs button. In the field labeled
Evaluation Codes, highlight the code of the item that you want to delete, and
click Save Changes.
When you are satisfied with your changes to each section of the evaluation crite-
ria, click Save Changes. You can return to the DxR Management Utility Index
screen (click Home) or continue the process of editing case data by changing
how the case is presented to students.
Fig.14: Editing criteriafor the Management sec-tion of a DxR ClinicianCase.

DxR Clinician
31
You can use the Case Delivery Options Query, and Management Query buttons
to determine how the case is presented to the student. From the DxR
Management Utility Index screen, click Edit Case Data and then click one of the
three buttons .
Case Delivery Options Button
Access Preferences
Interview: Check to allow access to the interview section of the case.
History of Present Illness: Check this box to allow users to review the HPI infor-
mation, replacing the Present Illness category in the Interview.
Exam: Check to allow access to the exam section of the case.
Lab: Check to allow access to the lab section of the case.
Show Normal: Check this box to automatically display the normal valuesalong with the result of each lab ordered. If you don’t check this box, stu-dents will still have access to normal results byclicking the Normal button.
Delayed Labs: Check the Delayed Labs box if youwould like the results of some lab tests to bedelayed, simulating what happens in a real clini-cal setting. The results of these tests will be givento students once they make their final diagnosis.They are then given the opportunity to changetheir diagnosis and management based on theresults of the delayed tests.
Lab List: Click Lab List to allow students to groupa series of lab tests together and order them asa group.
Management: Check to allow access to the manage-
ment section of the case.
Treatment Categories: Check this option to allowaccess to the ten treatment categories used to develop a managementplan. Users must select a treatment mode (In Hospital or Out Patient) beforetreatment categories are available.
Evaluation: Check to allow access to the initial assessment at the end of each case.
Consultants: Check to allow access to consultant information contained within the case.
Hypotheses Preferences
Associate Hypotheses: Check Associate Hypotheses if you want the students to
specify the hypothesis they are pursuing each time they request an interview, physical
exam, and lab item.The ability to force the students to associate each inquiry item with
a specific hypothesis may provide insight into the student’s clinical reasoning.
Review at...: For each Review At box you check, students must enter or review
their diagnostic hypotheses and problem statement before beginning that area
of the investigation.
If you check the Review at Interview box, students will be allowed access to ques-
tions in the first Interview category (“Present Illness” or the summary of the
History of the Present Illness). However, they must enter their diagnostic hypothe-
ses before accessing other categories in the Interview section.
Edit Case Data – Presentation Options
Fig. 15: Editing case deliveryoptions.

DxR Clinician
32
Other…
Require Passwords: Check Require Password if you want students to enter an
assigned Password instead of a name to be able to enter a DxR Clinician case.
What Was Studied: Check to ask students to list any resources or references con-
ducted while he or she was away from the patient case.
Problem List: Check this preference to require students to make a list of all
issues that are pertinent to the holistic care of the patient , other than the chief
complaint. If you check this option, students will be able to enter their problem
list at any time while working through the case, but they will not be prompted to
enter their problem list until they are preparing to enter a final management plan
for the patient.
As always, if you make any changes, click Save Changes to preserve your changes.
Query and Management Query Buttons
You may wish to ask students questions at various points in their investigation to
enrich their experience in working with a DxR Clinician case and to
stimulate their diagnostic thinking. You can link your questions to
specific investigation items using the online query utility. When the
student selects an item linked to your question, the patient’s
response (or test result) will be displayed first and then the student
will be alerted that your question will appear. If the student does not select the
investigation item to which your question is linked, the question will still be
asked, but it will appear immediately before the student enters a diagnosis.
If the student is required to make an interpretation of the data, the prompt to
answer your question will precede the student’s interpretation.
Query allows you to link questions to the interview, lab, or exam sections of the
case.
Management Query allows you to link questions to the items in the management
section of the DxR Clinician cases, to the Management section in general, or to
one of the two treatment modes (In
Hospital or Outpatient).
Follow the steps on the next page
after clicking either the Query or
Management Query button.
Fig. 16: Query list display-ing questions for a DxRClinician case.
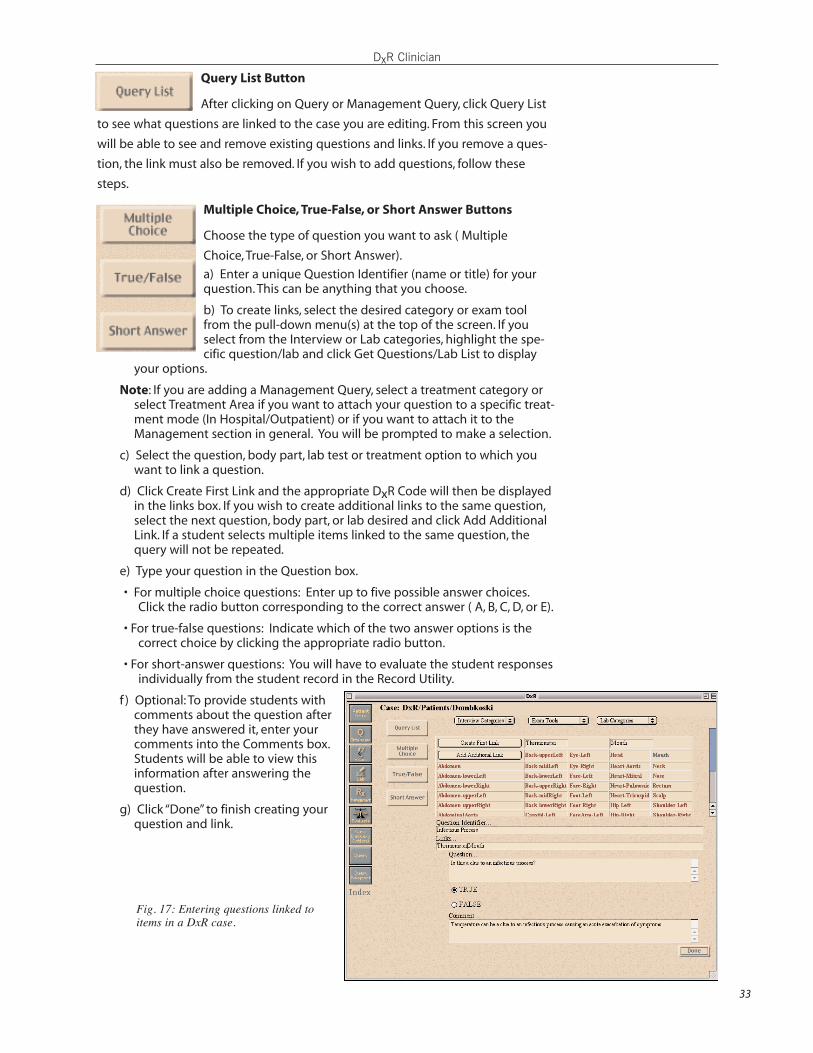
DxR Clinician
33
Query List Button
After clicking on Query or Management Query, click Query List
to see what questions are linked to the case you are editing. From this screen you
will be able to see and remove existing questions and links. If you remove a ques-
tion, the link must also be removed. If you wish to add questions, follow these
steps.
Multiple Choice, True-False, or Short Answer Buttons
Choose the type of question you want to ask ( Multiple
Choice, True-False, or Short Answer).
a) Enter a unique Question Identifier (name or title) for yourquestion. This can be anything that you choose.
b) To create links, select the desired category or exam toolfrom the pull-down menu(s) at the top of the screen. If youselect from the Interview or Lab categories, highlight the spe-cific question/lab and click Get Questions/Lab List to display
your options.
Note: If you are adding a Management Query, select a treatment category orselect Treatment Area if you want to attach your question to a specific treat-ment mode (In Hospital/Outpatient) or if you want to attach it to theManagement section in general. You will be prompted to make a selection.
c) Select the question, body part, lab test or treatment option to which youwant to link a question.
d) Click Create First Link and the appropriate DxR Code will then be displayedin the links box. If you wish to create additional links to the same question,select the next question, body part, or lab desired and click Add AdditionalLink. If a student selects multiple items linked to the same question, thequery will not be repeated.
e) Type your question in the Question box.
• For multiple choice questions: Enter up to five possible answer choices.Click the radio button corresponding to the correct answer ( A, B, C, D, or E).
• For true-false questions: Indicate which of the two answer options is thecorrect choice by clicking the appropriate radio button.
• For short-answer questions: You will have to evaluate the student responsesindividually from the student record in the Record Utility.
f ) Optional: To provide students withcomments about the question afterthey have answered it, enter yourcomments into the Comments box.Students will be able to view thisinformation after answering thequestion.
g) Click “Done” to finish creating yourquestion and link.
Fig. 17: Entering questions linked toitems in a DxR case.

DxR Clinician
34
DxR Clinician’s Record Utility provides you with a detailed analysis of your stu-
dents’ performance and investigative process. Each Student Activity Record
includes data on the student’s selections in the various parts of a DxR Clinician
case. We encourage you to review the student responses, as well as the comput-
er’s analysis of the student’s diagnosis and diagnostic hypotheses list. The review
will help you gauge the degree of conformity between your evaluation and the
computer’s initial evaluation based on the case author standards. A careful review
will enable you to give students more meaningful feedback on their perform-
ance. You can change the evaluation criteria and then reevaluate student per-
formance using the revised criteria. You can also print reports for your review and
for students. In addition, the Record Utility can generate statistical information
regarding items in the DxR Clinician database.
Export Records
Since student records are created on the Web server but evaluated in the Record
Utility which is not a Web-based application, you must export records to your
local computer for evaluation. Go to the DxR Management Utility at
http://webSite/DxR/DxRManag/index.html
• Click Student Record Files. Select the directoryand the case within it from which you wish toretrieve records.
• In the middle of the screen, you will see anarea labeled Record Status where you canselect an individual record in your chosendirectory and case.
To view the status of a specific record,select it in the Select User field, then clickView Record.
• To delete a specific record, select the username in the Select User field, and then clickDelete Record. This deletes only the recordand not the user name and password associ-ated with it. You might use this feature if youare allowing students to use the case as apractice case and want to allow them to re-enter the case after they’ve completed itonce.
• Click Export Records and then right click (Mac users: click and hold) the linkin the middle of the screen to download student records. Records will besaved by the case name. You can also use the Windows Version andMacintosh Version links to download the Record Utility.
Download the Record Utility
When you select a directory and a case and click Export Records, you can download
a copy of th Record Utility for grading your student records. Select either the
Macintosh® or Windows® version of this utility.This will download, decode, and
unstuff the utility on the Macintosh® version. For the Windows® version, a setup will
be copied to your hard drive. Follow the directions in the setup to install the Record
Utility on the computer. Now you are ready to use the Record Utility.
Analyzing Student Records in the Record Utility
Fig. 18: Converting RecordFiles for import into theDxR Record Utility.
If you want to save and
review student records
which have previously
been edited in the
Record Utility, you
should download a
new copy of the record
utility for each new
group of student
records that you
intend to review.
H E L P F U L H I N T
System RequirementsSee page 48 for the minimumsystem requirements to runthe DxR Clinician RecordUtility.

DxR Clinician
35
Importing Student Activity Records1. Open the Record Utility and click Import SAR. The Import screen allows you
to control how you import student records into the Record Utility for reviewand evaluation. The steps you follow will differ depending on whether youare importing records for an initial review or whether you are opening theutility to review records that you have already imported.
2. Click the File menu at the top of your screen and select one of the optionslisted below.
• Import studentnames list. Use thisoption to importyour properly-for-matted student ros-ter (formatted asshown on pages 10-11). The list willappear in the topfield on the rightside of your screen.Select ClearStudent Names Listto remove your stu-dent roster from theRecord Utility.
• Clear Records. Thisoption allows you toremove from theRecord Utilityrecords that werepreviously imported.Use this function ifyou have previously imported SARs for a group or a case and want to startanew in reviewing records from a different group or a different case.
• Import Records (Web). Use this function to import student activityrecords that were captured using the Web-based version of the DxRClinician software.
• Add Records. Do not use this option if you are importing records from theCD version. This function works only with records captured with the Webversion of DxR Clinician. Select this import option when you want to addstudent records from a DxR Clinician case to those already imported intothe Record Utility from the same case. Any SARs you add must come fromthe same case and must be captured from the same version of the pro-gram. For example, if the records already imported are from the Dombkoskicase captured from the Web version, any records you add must also befrom the Web version of the Dombkoski case.
• Save Scored Records. Create a folder on your computer where you wantto save your records after you’ve scored them. Then, select this option tonavigate to this folder and save your records.
• Open Scored Records. Select this option to navigate to and reopenrecords that you’ve previously scored and saved.
• Export Scores to Tab Delimited File. This option allows you to export thescoring data for all records in the Record Utility to an application thataccepts tab-delimited formatting. This option may be useful in makingspreadsheets for displaying student scores that can be used in a grade-book application.
• Export Data to tab-delimited file. This option allows you to export everypiece of data from a DxR Clinician case into an application that acceptstab-delimited formatting.
Fig. 19: The Record UtilityImport screen with the SARFiles menu.

DxR Clinician
36
3. When you have imported a student list and then selected Import SARs, adialog box will appear, prompting you to review the evaluation criteria forthe case. Click OK to go to the Scoring Paradigm screen in the AdjustCriteria section.
Adjust Evaluation Criteria Screen
The Adjust Evaluation Criteria screen gives you control over each of the types of
student performance evaluation (Diagnostic Performance, Clinical Reasoning,
Management, and Content Knowledge). It also allows you to control how those
component scores figure into the Overall Performance Score.
Changing Paradigm Values: Click Adjust Criteria at the bottom of any screen in
the Record Utility to go to the Scoring Paradigm. On this screen, you can type in
values that will
• change the point values assigned to the various nodal points in the para-digm (these values should total 100) (See note)
• customize the values assigned to each of the ten Levels of DiagnosticPerformance (Inadequate through Impressive – highest individual valueno greater than 100)
• set the Minimum Pass Level for each type of score (Overall Performance,Diagnostic Performance, Clinical Reasoning, Management, and ContentQuestions). This number represents the minimum score the student needs toreceive a satisfactory performance rating for that component of the evaluation.
• set values for the four management score components (Required,Recommended, Related H&P, and Related Lab) to total 100 (see Note).
• designate point values (scores) for the four qualitative descriptions of thestudent’s hypothesis list (no preset values are included – highest valuepossible is 100) to include this rating in the Clinical Reasoning Score.
• designate point values (scores) for the four qualitative descriptions of thestudent’s problem list (no preset values are included – highest value possi-ble is 100) to include this rating in the Management Score (see Note).
• designate point values (scores) for the four qualitative descriptions of thestudent’s Content Knowledge (highest value possible is 100)
• set the weights (between zero and 100%, with all five weights totalling100) to be applied to the five components of the Content Knowledge score(Statement of Problem, Dx Justification, Interpretations, Rationales, andQuestions).
• determine the relative weights (between zero and 100%) for each of thefour component scores that resultin the Overall Performance score.(Diagnostic Performance, ClinicalReasoning Score, ManagementScore, and the Content KnowledgeScore. The four weights must total100%.)
Example: To emphasize Diagnostic andClinical Reasoning skills and exclude themanagement component from scoring, youmight set your weights as follows:
Diagnostic Performance 55%Clinical Reasoning 40%Management Score 0%Content Knowledge 5%Total 100%
If you choose to assess theHypothesis List and theProblem List, you mustdetermine how they willapply to the ClinicalReasoning andManagement Scores --either incorporating themin as part of the scores oras a potential “bonus”beyond the score’s normal100% possible.
Example: If you want toincorporate the ProblemList assessment into theManagement Score, youwill need to adjust thescores assigned to theother Managementcomponents (Required,Recommended, RelatedH&P and Related Labs) sothat their values, plus thehighest rating for theProblem List, total 100.
However, if the ProblemList assessment is a ‘bonus’you don’t need to makeany adjustments to theother Managementcomponents. Your rating ofthe student’s problem listwould be applied aboveand beyond the 100%possible from the otherManagement Scorecomponents.
N OT E
Fig. 20: The ScoringParadigm.

DxR Clinician
37
Adjusting Evaluation Criteria: Click a button
from the top of the Scoring Paradigm screen to
see the criteria items listed for the corresponding
category or node. (You can also use the buttons
within the Paradigm to navigate to the corre-
sponding category or node.)
• Click Diagnosis to see and/or edit the textof the expected outcome and itsComponents. If you edit this listing, it willalter the criteria used to evaluate all stu-dent records for this case. If you choose,you can mark additional parts of theDiagnosis as “Required” or remove the“Required” designation from those youpreviously marked as required. You canalso add synonyms to any parts of thediagnosis.
• Click Consider, Justify, Competing, Thorough, or Limits from the top of theConsider Paradigm screen to see the criteria for the corresponding catego-ry or node. Change the evaluation criteria as necessary. You may alter anyof the criteria, but you must be careful to use the correct form. Choose oneof the two methods shown below for adding criteria items.
Click the Select Items from Database but-
ton, then select a pull-down menu from
the top of your screen. A list of the items in the database for that category and/or
tool will appear. Select the appropriate item from the pull-down menu. The item
will be preceded by its item code. Click New to list the item as a separate new
entry, or Equivalent to list the item as an equivalent of an item already listed. Click
Save Changes to permanently save your edits.
Click the Edit DxR Codes Directly button to
add items by free text entry. Use this
option only if you are familiar with the appropriate DxR item code. Most Exam
codes are the name of the exam tool followed by the appropriate body part.
However, other codes are a bit less predictable. Make sure you have entered the
proper code before you save changes. Each criteria item should be listed on a
separate line. You should list Equivalents on the same line, separated by commas.
Click Save Changes to permanently preserve your edits.
You may move items between nodal points by cutting and pasting them. Delete
items by selecting them and clicking Delete Selected Item.
Management: Click Required, Recommended, Related H & P, or Related Labs to
change criteria items within each of those categories of the Management section
by the two methods explained above (Select Item from Database or Edit DxR
Codes Directly). Remember, Required and Recommended categories should con-
tain only management items from the patient case. Related H & P may contain
Interview and Exam items, while Related Lab should contain only Lab items.
Limits: Click Limits on the Adjust Evaluation Criteria screen to see the Criteria
Counts for each node. You can also change the lab cost allowance by typing in a
Fig. 21: Review/edit evalua-tion criteria on the AdjustEvaluation Criteria screens.
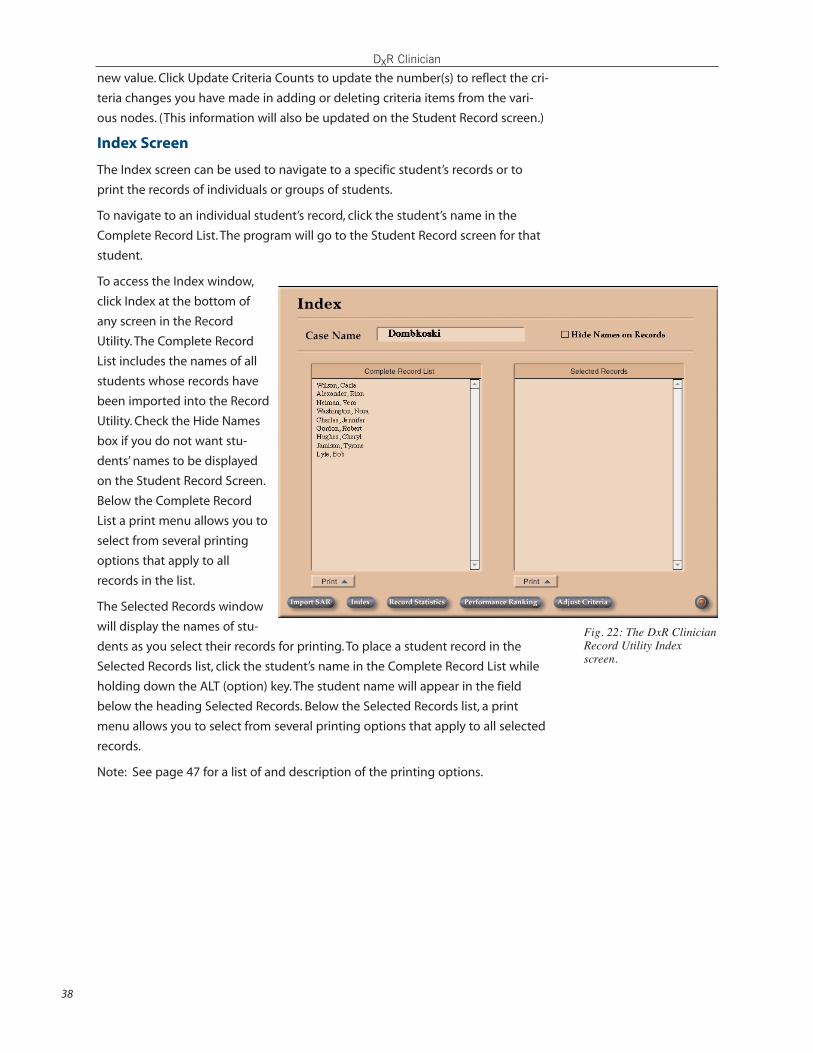
DxR Clinician
38
new value. Click Update Criteria Counts to update the number(s) to reflect the cri-
teria changes you have made in adding or deleting criteria items from the vari-
ous nodes. (This information will also be updated on the Student Record screen.)
Index Screen
The Index screen can be used to navigate to a specific student’s records or to
print the records of individuals or groups of students.
To navigate to an individual student’s record, click the student’s name in the
Complete Record List. The program will go to the Student Record screen for that
student.
To access the Index window,
click Index at the bottom of
any screen in the Record
Utility. The Complete Record
List includes the names of all
students whose records have
been imported into the Record
Utility. Check the Hide Names
box if you do not want stu-
dents’ names to be displayed
on the Student Record Screen.
Below the Complete Record
List a print menu allows you to
select from several printing
options that apply to all
records in the list.
The Selected Records window
will display the names of stu-
dents as you select their records for printing. To place a student record in the
Selected Records list, click the student’s name in the Complete Record List while
holding down the ALT (option) key. The student name will appear in the field
below the heading Selected Records. Below the Selected Records list, a print
menu allows you to select from several printing options that apply to all selected
records.
Note: See page 47 for a list of and description of the printing options.
Fig. 22: The DxR ClinicianRecord Utility Indexscreen.

DxR Clinician
39
Examining an Individual Student’s Record (Student RecordScreen)
Each Student Activity Record (SAR) contains a complete record of that student’s
patient investigation as well as the computer’s evaluation of that record. To navi-
gate to an individual Student Record Screen click the Index button at the bottom
of any screen in the Record Utility. You will see a list of the student records cur-
rently in the utility.
Click the name of the student whose record you want to see. Use the arrow keys
on the keyboard or the arrow buttons at the bottom of the screen to move from
one record to another.
Sections of the Student Record Screen (descriptions through page 43)
Student Record Information and Summaries
Use the buttons at the top of the screen to display the following information:
Complete Record: A complete item-by-item list of the student’s investi-
gation, including the time of each selection or entry.
Items RE: Diagnosis: Items linked to the Diagnostic Hypothesis and
eventually chosen as the basis of the diagnosis.
Items RE: Hypotheses: All inquiry items listed according to the
Diagnostic Hypotheses the student associated with that hypothesis.
Missing Items: The evaluation criteria that the student did not
request/select. Click the specific category to see the specific criteria items
within that category that the student omitted.
Follow-up: The issues recorded by the student on the management con-
fidence screen.
Notes: The student’s personal notes and SOAP notes.
Print: Click Print to see/select your printing options. See page 47.
Delete Record: Click Delete Record to remove the student record from
the Record Utility. You can download the record again from the DxR
Management if you
choose.STUDENT RECORD INFORMATI
ON AND SUMMARIES
STUDENTANDGROUPPERFORMANCE
BUTTONSTO
REVIEW
STUDENTRECORD
EVALUA
TION OF
STUDEN
T
PERFOR
MANCE
Fig. 23: Sections of theStudent Record Screen in theDxR Record Utility.

DxR Clinician
40
Buttons to Review Student Records
Diagnostic Buttons
Click Diagnosis to see the student’s final diagnosis and the
correct diagnosis.
This screen will display both required components and
non-required components. The Components (parts) of the
correct diagnosis which are matched in the student’s diagnosis are displayed in
bold text. If the student fails to arrive at the correct diagnosis, his/her Diagnostic
Performance Ranking will fall below “Lucky.”
To override the computer evaluation, click
the appropriate Satisfactory/Unsatisfactory
button to change the computer’s evaluation.
The words “Instructor Override” will appear.
This will automatically change the scoring for
the individual student’s record. (See Helpful
Hint.)
Click Hypothesis to see a list of the diagnostic
hypotheses the student considered and the
correct diagnosis. Click Yes or No to indicate
whether the student included the required
items. This selection offers the instructor the
opportunity to override the computer’s evalu-
ation (see Helpful Hint). Optional: You may click
one of the four radio buttons to make a quali-
tative judgement (ranging from Thorough to
Vague) about the student’s hypothesis list. If you mark one of these qualitative
ratings, it will be reported to the student in your printouts of his/her evaluation.
However, to include it in the scoring process, you must click the Adjust Criteria
button (to go to the Scoring Paradigm) and assign positive or negative point val-
ues for each of the qualitative descriptions. If you assigned point values to the
Hypothesis List ratings on the Adjust Criteria screen, they will be applied to the
Clinical Reasoning Score when you select a rating.
Click the appropriate button (Consider, Justify, Competing, and Thorough) to
reveal the criteria items necessary to receive a satisfactory evaluation for that
node. The items in bold were selected by the student. Note that all the items
must be bold (selected by the student) to result in a satisfactory evaluation for
that node.
Optional: You may make changes to the computer evaluation for these paradigm
categories (nodes) by changing the criteria. (See instructions for the Adjust
Criteria screen, pg 37.) Any changes in criteria you previously made in DxR
Clinician online will automatically be reflected in the Record Utility.
Fig. 24: Evaluating thestudent’s final diagnosis.
If you want to give a
student credit for a
diagnosis or hypothesis
despite a misspelling or
alternate wording, you
can override the com-
puter’s evaluation.
H E L P F U L H I N T

DxR Clinician
41
Management Items Buttons
The Problem List button allows you to select a subjective rat-
ing for the user’s problem list. You may then mark your selec-
tion as Satisfactory or Unsatisfactory. If you assigned points to
the Problem List on the Adjust Criteria screen, they will be
applied to the Management Score after you select a rating.
The other buttons (Required, Recommended, Related H&P, Related Lab) reveal the
instructor’s criteria for that part of the Management section. The items in bold
were selected by the student. Note that all the items must be bold (selected by
the student) to result in a satisfactory evaluation for that part of the
Management section. You may enter your evaluation of the student’s entries in
the Required and Recommended categories, using the Satisfactory and
Unsatisfactory buttons. In other categories, you may make changes to the com-
puter evaluation by changing the criteria. (See information on the Adjust Criteria
screen, pg. 36-38.)
Content Knowledge Buttons
Statement of Problem: This button reveals the state-
ment of the problem(s) as listed by the student. The state-
ment of problems is not graded by the computer, so it will
be designated as Not Assessed. You may wish to grade
this information by clicking one of the radio buttons. If
you entered point values for the various ratings (outstanding, acceptable, incom-
plete, and not acceptable), the points will be applied to the Content Knowledge
score when you select a rating.
Dx Justification: This button reveals the student’s justification for the chosen
diagnosis. You may wish to grade this information by clicking one of the radio
buttons.
Interpretations: All interpretations the student made for items within the case
can be viewed by clicking this button. These interpretations are not assessed by
the computer but are available for your review and assessment. Click the words
Not Assessed preceding each item once to assess that interpretation as satisfac-
tory, or twice for an unsatisfactory assessment. If any of the items for interpreta-
tion are included in the case criteria, you will see a breakdown of which criteria
items were interpreted by the student and which weren’t.
Rationales: Click this button to see, review, and if you choose, assess the stu-
dent’s stated reasons for ordering certain items: lab tests, interview questions,
exams, or management items. These Rationales are not assessed by the comput-
er, but they are available for your review and assessment. Click the words Not
Assessed preceding each item once to assess that rationale as satisfactory, or
twice for an unsatisfactory assessment.
Questions: Answers to any questions that you included in the case can be
viewed here. If the student’s answer isn’t assessed by the computer (example:
short answer questions) or if you want to change the computer assessment, click
the assessment description (Not Assessed, Correct, Incorrect) preceding each
item until the desired assessment appears.

DxR Clinician
42
Student and Group Performance
This area of the student record screen displays basic information about the stu-
dent’s investigation and how it compares to the performance of the group or
class as a whole.
The rows marked Questions Asked, Exams
Performed, and Labs Ordered show the num-
ber of items the student requested in each
category, the percent of the criteria items the
student included in each category, and the
class averages. Click the specific criteria but-
ton (e.g. Questions Asked) to see a complete
list of the items the student requested for
that section.
The hypothesis row shows the number of hypotheses entered by the student as
well as the class average. If you made a qualitative evaluation of the student’s
hypothesis list (thorough through vague), that evaluation will also be displayed.
• The screen also shows the relative cost of the labs ordered and the timespent in investigating the case.
• Data on whether the student has seen or read about a problem like thisbefore are also shown, compared with percentages for the class.
• The student’s confidence in his/her diagnosis and management are report-ed.
Notes to Student button: Click this button to open a screen for writing comments
to the student.
Evaluation of Student Performance
Diagnostic Performance: This displays both a qualitative rating of the student’s
diagnostic performance and also the numeric value assigned to that rating. Click
Adjust Criteria to see how Diagnostic Performance was determined using the
Scoring Paradigm.
Clinical Reasoning Score (CRS): This is the computer’s assessment based on
how the student performed at the expected outcome, diagnosis considered, justi-
fy diagnosis, competing hypotheses, and thorough workup nodes. You also have
the option of including the evaluation of the student’s hypothesis list. The point
values the student achieves for most nodes is based on the percentage of criteria
items the student included for that node (except in the Expected Outcome and
Diagnosis Considered node, where students are scored on an all-or-nothing
basis.) For example, at the Justify node, where 20 of the 100 points have been
Fig. 26: The Evaluation ofStudent Performance sec-tion of the Student Recordscreen.
To learn how toinclude yourassessment of thestudent’s hypothesislist in the ClinicalReasoning Score, seethe Adjust Criteriasection.
N OT E
Fig. 25: Reviewing studentand group performance.

DxR Clinician
43
assigned, a student who entered 50% of the “Justify” items would get 10 points.
Management Score: The management score is based on the number of criteria
items the student included in his/her management plan and the points assigned
to the management section. You can also include your assessment of the stu-
dent’s Problem List in this score, or add the points assigned to the problem list
assessment as a “bonus” added on to the Management Score. See the Adjust
Criteria section for an explanation.
Content Knowledge Score: The Content Knowledge Score is based on your
assessment of the student’s performance on the following task: Statement of
Problem, Dx Justification, Interpretations, Rationales, and Questions.
MPLs
In DxR Clinician cases, there are four component scores that make up the Overall
Performance score for the case..
For each score in a DxR Clinician case, you can set a Minimum Pass Level.
This score represents the minimum score the student needs to be rated as satis-
factory on that scoring component. You can change the Minimum Pass Level
scores on the Adjust Evaluation Criteria screen.
Weights
The Weights assigned to the Diagnostic Performance, Clinical Reasoning,
Management and Content Knowledge scores represent that score’s importance
in arriving at the Overall Performance Score. These values, expressed as a percent-
age, total 100%. They are set on the Adjust Criteria screen.
Overall Performance
The Overall Performance score is a numeric value derived from the Diagnostic
Performance Score, the Clinical Reasoning Score, Content Knowledge, and the
Management Score. When you weight each of the component scores, you deter-
mine each component’s percentage of the Overall Performance score.
Collecting Statistical Data (Record Statistics Screen)
You may want to collect several types of statistical data that can be gleaned from
the student records of a DxR Clinician case. The Record Statistics screen provides
detail on how the students in a group performed in the various evaluation nodes.
The data from this screen can be useful in determining if a particular criteria item
proved problematic for a large number or a small number of students. The screen
will also display the number and percentage of students who were evaluated as
“satisfactory” in that category or node. The “Statistics” buttons at the bottom of
the screen allow you to see an overview and spreadsheets detailing group per-
formance on each interview, exam, lab, and management item within a DxR
Clinician case.

DxR Clinician
44
• Click Record Statistics at the bottom of any screen in the Record Utility. Thecriteria categories are listed on the left.
• Click the category for which you want to review statistics (Consider, Justify,Competing and Thorough, or the Management categories of Required,Recommended, Related H & P or Related Lab). The screen will display all cri-teria items listed for that node/category and the number of students whoincluded each item.
• Click a criteria item in the list to displaythe names of the students who did anddid not request the item. Click Continueto return to the Record Statistics screen.(See Fig. 27.)
• Click Print in the lower right of the screenif you want to print information in thesefields. To see a print preview, hold downthe option (alt) key while clicking Print.
• Click Return to Last Record if you want tosee the student record you last viewed.
• The Statistics buttons in the lower left ofthe Record Statistics screen provide yougreater visual detail of student perform-ance in the various categories and onspecific items in a DxR Clinician case.
Overview Statistics
The Overview Statistics screen allows you to detect patterns in your students’
clinical problem-solving processes, determine the most likely approach to the
clinical problem, and identify students who may need additional instruction in a
particular area.
Click Overview Statistics to see a color-coded timeline of each student’s actions
as he/she worked through a DxR Clinician case. At the top of the screen, the leg-
end displays the colors representing each of the interview question categories,
along with gray and white color bars representing the physical exams and labora-
tory tests, respectively. As you review the color bars corresponding to each stu-
dent name, you will notice that the relative length of each colored section
reflects the number of items the student included from that part of the program
at that particular point in the investigation. For example, a short bright red bar
indicates that the student asked very few questions about the patient’s lifestyle,
while a relatively long white bar would indicate that the student ordered many
lab tests at that point in the clinical investigation. By comparing the color bars for
the students in a group, you may be able detect patterns in your students’ prob-
lem-solving processes. For example, if all or most students arrived at the correct
diagnosis and followed a similar pattern in arriving at that diagnosis, you may
determine this is the most likely approach to the clinical problem. However, if a
student’s problem-solving pattern appears atypical, you may determine there’s a
need for a closer review of the student’s performance in selecting the criteria
items and of the student’s diagnostic and clinical performance.
Depending on thenumber of students inyour group and thespeed of yourcomputer, it may takeseveral minutes for theOverview Statisticsscreen to appear.
N OT E
Fig. 27: The RecordStatistics screen in theDxR Record Utility.

DxR Clinician
45
The Overview Statistics screen can also provide detail on the specific items the
student included in each step of his/her inquiry. Find a student whose record you
would like to inspect more closely, and then click a section of the color-bar to dis-
play a list of the specific items the stu-
dent included from that category (inter-
view, exam, lab) at that particular point in
the clinical investigation. A scoring sum-
mary and the total number of items the
student selected in that part of the pro-
gram will appear above the list. The
items displayed in bold type were desig-
nated by the case author/instructor as
criteria items. You will see a scoring sum-
mary for that student at the top of the
window.
Because the Overview Statistics screen is
a color-coded chronological display of
each student’s actions in a case, you can learn whether the student followed a
logical problem-solving process. For example, if you notice that a particular stu-
dent ordered lab tests (represented by white on the color bar) early in the clinical
investigation and then ordered more labs later on, you can see detail of what
labs the student ordered initially compared to the labs ordered later in the inves-
tigation. A review of the student’s investigation leading up to each lab session
may indicate whether the student was engaged in a focused inquiry or merely
scanning in hopes of arriving at the correct diagnosis.
Interview, Exam, Lab, and Management Statistics
These statistics screens — accessed from the Record Statistics screen — allow
you to explore in greater detail the questions, exams, lab tests, and management
options the students in the group included and omitted from the clinical inquiry.
Examination of this screen may alert you to specific areas in which the group
needs additional instruction or it may help you identify individual students who
are having difficulty. Click one of these buttons (Interview Statistics, Exam
Statistics, Lab Statistics, or Management Statistics) to see a spreadsheet view of
student performance in the selected part of the DxR Clinician case. The spread-
sheet view uses color bars to provide detail on how students performed on each
item in the database. Above each color bar, the number on the left represents the
DxR Code for the item, while the number on the right is the number of students
in the group who included that item in their investigation. Click any color bar to
reveal the numbers and the names of the students in the group who did and did
not include that item. Click Instructions to return to the color bar screen.
Fig. 28: Overview statistics.
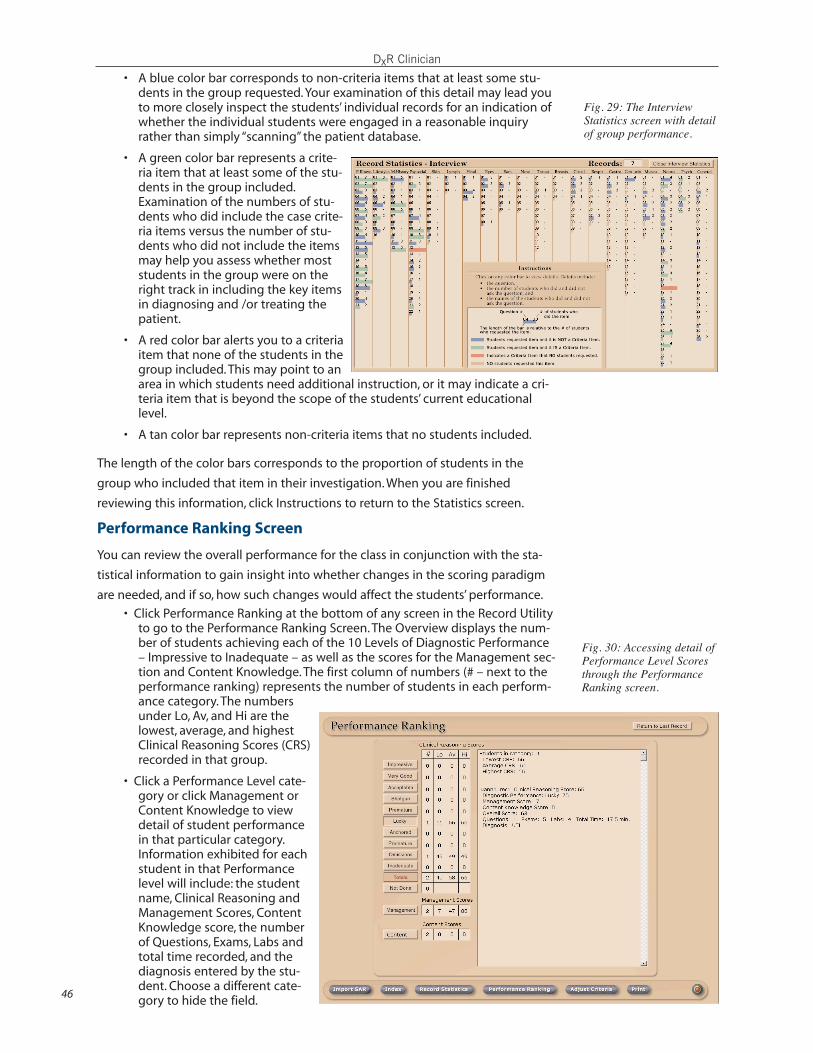
DxR Clinician
46
• A blue color bar corresponds to non-criteria items that at least some stu-dents in the group requested. Your examination of this detail may lead youto more closely inspect the students’ individual records for an indication ofwhether the individual students were engaged in a reasonable inquiryrather than simply “scanning” the patient database.
• A green color bar represents a crite-ria item that at least some of the stu-dents in the group included.Examination of the numbers of stu-dents who did include the case crite-ria items versus the number of stu-dents who did not include the itemsmay help you assess whether moststudents in the group were on theright track in including the key itemsin diagnosing and /or treating thepatient.
• A red color bar alerts you to a criteriaitem that none of the students in thegroup included. This may point to anarea in which students need additional instruction, or it may indicate a cri-teria item that is beyond the scope of the students’ current educationallevel.
• A tan color bar represents non-criteria items that no students included.
The length of the color bars corresponds to the proportion of students in the
group who included that item in their investigation. When you are finished
reviewing this information, click Instructions to return to the Statistics screen.
Performance Ranking Screen
You can review the overall performance for the class in conjunction with the sta-
tistical information to gain insight into whether changes in the scoring paradigm
are needed, and if so, how such changes would affect the students’ performance.
• Click Performance Ranking at the bottom of any screen in the Record Utilityto go to the Performance Ranking Screen. The Overview displays the num-ber of students achieving each of the 10 Levels of Diagnostic Performance– Impressive to Inadequate – as well as the scores for the Management sec-tion and Content Knowledge. The first column of numbers (# – next to theperformance ranking) represents the number of students in each perform-ance category. The numbersunder Lo, Av, and Hi are thelowest, average, and highestClinical Reasoning Scores (CRS)recorded in that group.
• Click a Performance Level cate-gory or click Management orContent Knowledge to viewdetail of student performancein that particular category.Information exhibited for eachstudent in that Performancelevel will include: the studentname, Clinical Reasoning andManagement Scores, ContentKnowledge score, the numberof Questions, Exams, Labs andtotal time recorded, and thediagnosis entered by the stu-dent. Choose a different cate-gory to hide the field.
Fig. 30: Accessing detail ofPerformance Level Scoresthrough the PerformanceRanking screen.
Fig. 29: The InterviewStatistics screen with detailof group performance.

DxR Clinician
47
Click Print at the lower right of the Performance Ranking screen if you want toprint the information shown in these fields. To see a print preview holddown the option (alt) key while clicking Print.
Printing
This function allows you print various types of reports on student performance.
The Complete Student Records list will include the names of all students for
whom you have records in the Record Utility. The Selected Records list will be
empty until you add student names to the list. You can direct the Record Utility to
print different data for students in each of these two lists.
Click Index to go to the Index screen. Click the Print pull-down menu to see your
print options. Select the type of data you would like to print for each of the lists.
To enter student names into the field marked Selected Records, click the stu-
dent’s name in the Record List field while holding down the Option (Alt) key. To
remove a name, click the name in the Selected Records field.
On the Student Record Screen clicking Print and then selecting SAR screen in the
menu produces a printed picture of the Student Record screen as you are seeing
it.
Fig. 31: Reports that can be printed from the Record Utility.
On the Record Utility’sImport screen you can alsoexport student performancedata to a data analysis pro-gram. In the SAR Files pull-down menu (top right of thescreen) select Export to atab-delimited file.This func-tion allows you to exportdata in two files: a Key Listfile that contains a list of allthe items in the DxR data-bases that were applicableto your case; and a case datafile that contains your stu-dent list and data on stu-dent performance. Toexport data, you must usedata analysis software thatimports data in tab-delim-ited format.
H E L P F U L H I N T
Common Information
• Student Name/ID •Performance Rating • Case Name
• Clinical Reasoning Score • Management Score • Computer Evaluation
• Faculty notes to student (if any) • Content Knowledge Score
Basic Student • All common info • Student DDx List • Labs ordered • Scoring Explanation
Complete Report• All common info • Start/stop times • Student notes • Chronological log of all student activity
Items by Hypothesis Report• All common info • Student hypothesis list and all items associated with it
Items for Diagnosis • All common info • Student Dx and all items associated with it
List of Labs Ordered• All common info • All student-ordered labs
Content Knowledge Report• All common info • Student Dx Justification • Student Rationales
Notes • All common info • All student SOAP notes, general notes, and learning issues
SAR Screen• Prints a picture of the student record screen
Management Plan• Prints a list of the Management items that the student ordered

DxR Clinician
48
Cookies and Javascript must be enabled. Your browser must also have Apple
Computer’s QuickTime 5.0.2 or greater plug-in installed. Make sure you select a
full install of QuickTime. Also make sure your browser preferences are set to allow
the page to specify the colors and fonts. The following browsers are compatible
with this program. Using a browser and/or browser version other than one of the
following may cause browser crashes and other unpredictable results when
using this program.
To run the Record Utility, you need a computer meeting the following requirements:
Windows® 98, Pentium II, 64 MB; Windows® 2000, Pentium III, 128 MB: or Windows®XP, Pentium III, 128 MB
Power Macintosh® G3 running OS 10.1.5, 10.2.6, or 10.3, 128 MB
DxR Clinician requires a minimum monitor resolution of 1024x768 pixels. If your
monitor is not set for 1024x768 pixels or higher resolution, portions of your
screen may be cut off and a warning message will appear when you try to log in
to the case.
Your monitor must also be set display at least 16 bit color (thousands of colors). If
your monitor is not set to display 16 bit or higher color, images and movies may
appear distorted, pixellated, or washed out on your screen.
DxR Clinician cases can include various media, including QuickTime™ movies.With slower dial-up Internet connections, you may experience adegradation in the viewing quality of the movies. By manually over-riding the connection speed setting for QuickTime, it is possible toimprove the viewing quality of the QuickTime™ movies. However, youshould expect it to take substantially more time to download movieswhen set at a higher connection speed setting.
To manually override the Connection Speed settings in QuickTime™,follow these steps.
1. Open your computer’s control panel.
2. Open the QuickTime™ settings (see Fig A1).
3. Use the pull-down menu at the top of the QuickTime™ settingswindow to select Connection Speed.
4. When the Connection Speed settings appear, select a connec-tion that is faster than the one you are using to access theInternet. However, keep in mind, the faster the connection speed you select,the longer the download time for the QuickTime™ movies in the case.
5. Close the window.
Browser Requirements and System Requirements
Screen Size and Monitor Resolution
Windows®• Microsoft® Internet Explorerversion 6.0 or higher • Netscape® 7.2 or higher• Firefox version 1.x or higher
Macintosh®• Microsoft® Internet Explorerversion 5.0 or higher• Netscape® 7.2 or newer browsers • Firefox version 1.x or higher
Changing QuickTime Connection Settings
Fig. A1: Quicktime Settingswindow.

DxR Clinician
49
Heart and breath sounds will sound best when heard through headphones.
Problems hearing sounds?
1. Make sure QuickTime is installed. When QuickTime is installed, you should see
this controller when you select an item that has a sound as a result.
2. If you are using Windows® and see the controller shown below, Quicktime’s
ability to play embedded mp3 files has been disabled. You must enable it. For
instructions, see below or use the Help button on the DxR Clinician case screen.
Re-enabling QuickTime's mp3 Player in Windows
If QuickTime's ability to play mp3's has been disabled in Windows®, the following
directions will help you restore it.
1. Locate the Start Menu icon in the menu bar across the bot-tom of your screen.
2. Click the Start Menu icon to open it.
3. Select the Settings menu item, and open it.
4. Click the Control Panel menu item. A Control Panel windowshould appear on your screen.
5. Locate and open the QuickTime control panel. A QuickTimeSettings window should appear on your screen.
6. On the QuickTime Settings window, click the menu and selectBrowser Plug-in. A set of Browser Plug-in choices will appearin the window.
7. Click the MIME Settings button at the bottom of the QuickTime Settingswindow. The MIME Settings window will open.
8. Scroll to the bottom of the list. You should find two entries for mp3s.
Both entries should have a "+" beside them. If they don't,double click on them to produce the "+". Once the "+"appears they are enabled.
9. QuickTime has now been re-enabled to play mp3s. Click OK toclose the window.
Sound
Fig. A2: MIME settings withQuickTime .mp3 settings dis-abled.
Fig. A3: MIME settings withQuickTime .mp3 settingsenabled.
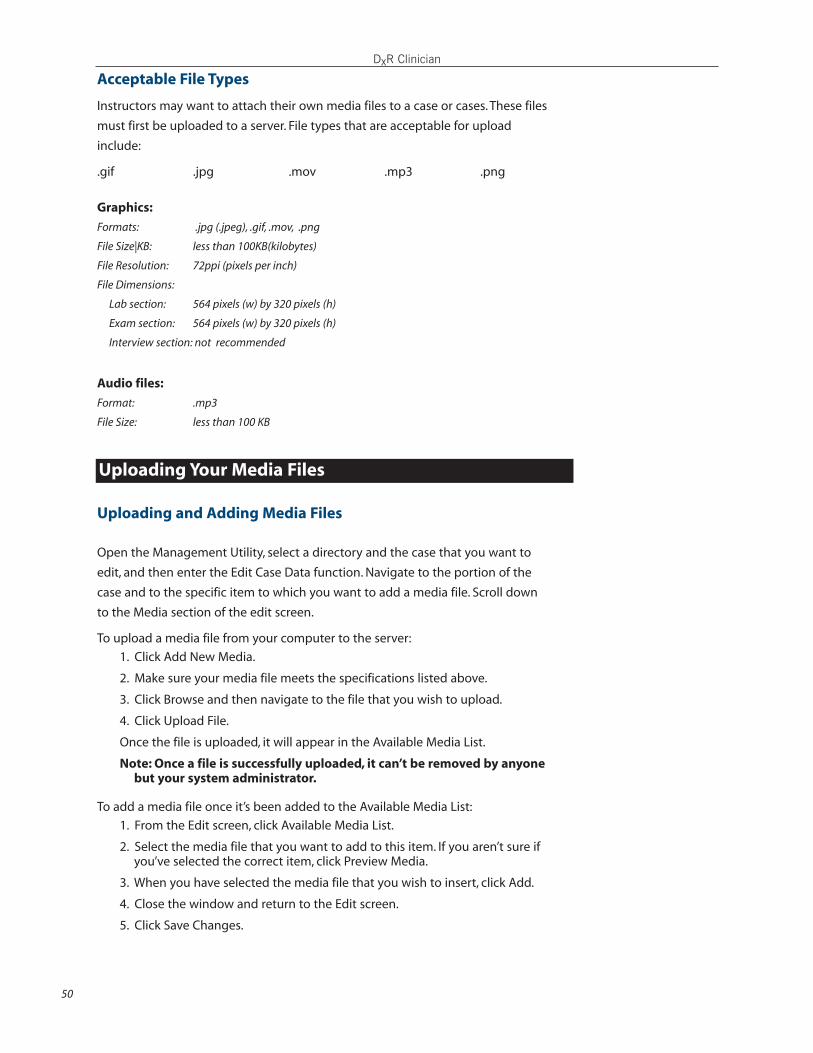
DxR Clinician
50
Acceptable File Types
Instructors may want to attach their own media files to a case or cases. These files
must first be uploaded to a server. File types that are acceptable for upload
include:
.gif .jpg .mov .mp3 .png
Graphics:
Formats: .jpg (.jpeg), .gif, .mov, .png
File Size|KB: less than 100KB(kilobytes)
File Resolution: 72ppi (pixels per inch)
File Dimensions:
Lab section: 564 pixels (w) by 320 pixels (h)
Exam section: 564 pixels (w) by 320 pixels (h)
Interview section: not recommended
Audio files:
Format: .mp3
File Size: less than 100 KB
Uploading and Adding Media Files
Open the Management Utility, select a directory and the case that you want to
edit, and then enter the Edit Case Data function. Navigate to the portion of the
case and to the specific item to which you want to add a media file. Scroll down
to the Media section of the edit screen.
To upload a media file from your computer to the server:
1. Click Add New Media.
2. Make sure your media file meets the specifications listed above.
3. Click Browse and then navigate to the file that you wish to upload.
4. Click Upload File.
Once the file is uploaded, it will appear in the Available Media List.
Note: Once a file is successfully uploaded, it can’t be removed by anyonebut your system administrator.
To add a media file once it’s been added to the Available Media List:
1. From the Edit screen, click Available Media List.
2. Select the media file that you want to add to this item. If you aren’t sure ifyou’ve selected the correct item, click Preview Media.
3. When you have selected the media file that you wish to insert, click Add.
4. Close the window and return to the Edit screen.
5. Click Save Changes.
Uploading Your Media Files

DxR Clinician
51

DxR Clinician
52
AAccess Preferences 31Associate. See Hypothesis,Associate with
BBody View 12, 17
CCase Delivery Options 10, 31Cases 5, 6
Adding to an Existing Directory 9
Editors 16
Hide 9
Installing 8
All Cases 8
Selected Cases 9
Show 9
Clinical Reasoning Score 20, 21,27, 28, 36, 42Consultant 12, 13, 15, 16, 17, 31Content knowledge questions 1
Score for 20, 36, 43
Criteria Items 21
DDiagnosis 5, 13, 22
Diagnosis Considered 42. See Node, Dx
Considered
Expected Outcome 21, 27, 42
Setting criteria for 27
Final 13
Required 37
Diagnostic Hypothesis. SeeHypothesisDifferential Diagnosis. SeeHypothesisDirectories 6, 9
Creating 8
Naming 8
Discussion Text 28
EEdit Case Data 14Edit DxR Codes Directly 37Efficiency 25, 28
Criteria Count 29
Item Count 29
Lab Cost Allowance 29
Limits 38
Student Maximum 29
Equivalent 28, 37Evaluate button 6, 13, 19, 27Evaluation criteria 1, 5, 14
Adjust, in the Record Utility 36, 37
Editing 27
Management 29
Exam 12, 13, 17Exam Statistics. See Record Statistics,
Exam
Examination Tools 13, 17
Other Exams 13, 17
Expected Outcome. See DiagnosisExporting Scores 35
GGraphics, adding. See MediaGroup Performance 42, 46
HHide/Show 9History of the Present Illness (HPI)Summary 12, 16Hypothesis 12, 40, 42
Associate 12, 31
Preferences 31
IIndex screen. See ManagementUtility Index Screen. See alsoRecord Utility, Index screen Initial Assessment 5, 6, 13, 27, 28
Access to 31
Interpretation 13, 16, 17, 18, 41Interview 12, 13, 16
Interview Statistics. See Record
Statistics, Interview
Items RE: Diagnosis 39Items RE: Hypotheses 39
JJustify 16, 17, 18
Diagnosis Justification 41
LLab 5, 12, 13, 18
Cost allowance 29
Definition 18
Delayed 31
Lab Statistics. See Record Statistics, Lab
List 31
Learning Issues 13Learning resources 1, 13, 14, 15, 18Level of Diagnostic Reasoning
performance 20, 21, 28, 36, 42Limits. See Efficiency
MManagement plan 5, 13, 18, 19
Discussion 29
Recommended 30
Related H&P 30
Related Lab 30
Required 30
Setting criteria for 30
Statistics for. See Record Statistics,
Management
Management Query 31, 32Management tools. SeeManagement UtilityManagement Utility 5, 7
Accessing 7
Index screen 7, 9, 14
Media 15, 18, 50Acceptable File Types 50
Adding a graphic, a movie, or a sound 15
Uploading 50
Microsoft® Internet Explorer 48Movies, adding. See See MediaMPL 43
NNode 21, 40-41
Competing 25, 27
Dx Considered 23, 27
Efficiency 26, 28
Expected Outcome 22, 27
Justify 24, 27. See Node, Justify
Needed to Consider 23
Setting Criteria for, 28
Thorough 25, 27
Notes 13, 39
OOverall Performance EvaluationScore 20Override 40Overview Statistics 44
PParadigm 21, 36, 37, 40
Values 27, 36
Passwords 6, 7, 10Entering 11
Formatting 10
Requiring 32
Patient Appearance 16Patient data 6
Editing 14
Patient Intro 16
Index

DxR Clinician
53
Patient Management. SeeManagement PlanPerformance Ranking Screen 46Physical exam. See ExamPresent Illness 31Printing 38, 44, 47Problem List 13, 32
QQuery 1, 31, 32
List 33
Multiple Choice, True-False, or Short
Answer 33
Questions 41Quick Help 6, 12QuickTime 48, 49
RRationales 41Record Statistics Screen 43, 44
Exam Statistics 45
Interview statistics 45
Lab Statistics 45
Management Statistics 45
Overview Statistics 45
Record Utility 1, 5, 34, 44Adjust Criteria 36, 37, 42
Import screen 47
Index screen 38, 47
Student Record Screen 38, 39
Result Text 16, 17, 18Review Hypothesis 31
SSAR. See Student Activity RecordScanning 12, 46Scoring 36
Weights 36
Select Items from Database 37SOAP Notes 13Sound 49
Adding. See Media
Student Activity Record (SAR) 34,39
Complete Record List 38, 47
Exporting 34, 47
Importing 35
Selected Records 38, 47
Synonyms 22, 27
UUser Names/IDs 6, 7, 10
Entering 11
Formatting 10
V
Vital Signs 17
WWeb Links. See Learning ResourcesWeights 36What Was Studied 32