intacct training manual - summer release 2015 - finalmaster
TRANSCRIPT

IntacctTrainingManual AccountsPayable–Add/EditVendor
420
ADD/EDIT VENDOR 1. To add a new vendor to the system from within the Accounts Payable module, navigate to: Accounts Payable
Vendors.
Vendors can also be added from within the Purchasing module. Regardless of the creation point of the vendor, the record is accessible from either module.
2. On the Vendors screen, click either the Add button to add a new vendor, or the Edit link to edit an existing vendor.
Be default, the SHOW HIERARCHY checkbox in the View: section of the Vendors screen is checked, which allows the user to view the relationship between parent and child vendors easily by showing the child vendors indented below the parent with a line connecting them. When filtering the vendor list, child vendors whose parents are not visible

IntacctTrainingManual AccountsPayable–Add/EditVendor
421
in the list appear with an “X” in front of their color‐coded box to indicate that the vendor is, in fact, a child of another vendor.
The Import button on the Vendors screen allows the user to upload a CSV file in order to add or update vendors. This functionality is especially useful when needing to perform a mass addition or update of vendors. The Vendor*
templates (Custom or Standard) from the Company Setup Checklist should be used in this process. If you do not have access to these templates, please contact your administrator.
3. The Vendor Information screen will open. On the Vendor tab, you can enter basic contact information about the vendor.

IntacctTrainingManual AccountsPayable–Add/EditVendor
422
4. In the Vendor section of this tab, enter the information relating to how the vendor is stored and used in the system.
Item Type Note
ID Auto‐fill / Text Enter a unique identifier for the vendor. Most systems are configured to automatically
create the ID for you. If this is true for your company, this field will automatically
populate with “‐‐New ‐‐”and will not be editable.
NAME Text The name of the vendor company as it will appear on checks and statements.
ONE‐TIME Checkbox Selecting this field designates the vendor as a one‐time use vendor that will not
automatically show up in vendor look‐up lists. To see one‐time vendors, you will need
to check the SHOW ONE‐TIME checkbox on the Vendors list screen.
Unless the vendor will truly not be used again this field should generally not be checked.
STATUS Drop‐down list Set the vendor as either “Active” or “Inactive”. By default, this field is set to “Active”
which means that the vendor can have bills entered and payments issued against it.
“Inactive” vendors cannot have these actions performed.

IntacctTrainingManual AccountsPayable–Add/EditVendor
423
5. In the Primary Contact section of this tab, enter the main contact information for the vendor.
Item Type Note
LAST NAME Text The last name of the main contact for the vendor.
FIRST NAME Text The first name of the main contact for the company.
MIDDLE NAME Text The middle name or initial of the main contact for the company.
PRINT AS Auto‐fill /
Text
The name of the company as it should appear in notices and correspondence. This
field will be automatically populated with the text entered in the VENDOR NAME field.
ADDRESS LINE 1 Text The first address line where payments and statements should be sent.
If checks will be mailed to vendors, all available mailing address information should be entered.
ADDRESS LINE 2 Text The second address line where payments and statements should be sent.
If checks will be mailed to vendors, all available mailing address information should be entered.
CITY Text The city where payments and statements should be sent.
STATE/PROVINCE Text The state or province where payments and statements should be sent.
ZIP/POSTAL CODE Text The zip or postal code for location where payments and statements should be sent.
COUNTRY Text The country where payments and statements should be sent.
PHONE NUMBER Text The phone number for the vendor.
No template is applied. Brackets, hyphens, and other symbols will only be shown where you place them.

IntacctTrainingManual AccountsPayable–Add/EditVendor
424
Item Type Note
MOBILE NUMBER Text The cell phone number for the vendor.
PAGER Text The pager number for the vendor.
FAX Text The fax number for the vendor.
EMAIL ADDRESS Text An e‐mail address for main company contact. The system only accepts a valid e‐mail
format, which includes the "@" symbol and domain.
SECONDARY EMAIL
ADDRESS Text An e‐mail address for a secondary company contact. The system only accepts a valid e‐
mail format, which includes the "@" symbol and domain.
URL Text The URL for the company's web site. This information is for your reference and is not
used within standard Intacct applications. The system does not validate this field as a
URL.
EXCLUDE FROM THE
COMPANY CONTACT
LIST
Checkbox Select if the contact listed on this page should not be included in the company contact
list. By default, this field is Unchecked, which means that the system will include the
vendor as a contact record in the company’s contact list.
This box should generally NOT be selected. If it is selected, the contact record for the vendor will not be visible in contact drop‐down lists or in the company’s list of contacts.
6. Click on the Additional Information tab to see additional, less‐commonly used vendor fields. Review the fields and enter data
for the vendor as needed.

IntacctTrainingManual AccountsPayable–Add/EditVendor
425
7. In the Vendor details section of this tab, enter additional information relating to the vendor including the vendor’s PARENT company, TAX ID, 1099 NAME, etc.
Field Type Notes
TYPE ID Drop‐down list You may designate this vendor as a specific Vendor Type.
Vendor Types can be used to categorize vendors for reporting purposes.
PARENT Drop‐down list You may select a vendor to create a vendor hierarchy by designating the Parent
Vendor.
GL GROUP Drop‐down list You may designate a GL Group to be associated with this vendor.
A Vendor GL Group can be used by the Purchasing module to track revenue into different accounts payable accounts. A common usage of this might be to track purchases to related parties into a “Due from Related Parties” account by adding all related party vendors into a GL Group.
TAX ID Text The federal tax ID for the vendor.
1099 ELIGIBLE Checkbox If the vendor is 1099 eligible, check this checkbox. When saving a new vendor, if this
field is checked, the system will direct you to enter the applicable 1099 information.
1099 NAME Text Official name of the company used on a 1099 form.
FORM 1099 Link Launches a screen where you can maintain details for this vendor's 1099 form. This
field is not visible until you have already completed the vendor set up and entered the
vendor’s 1099 information.
ATTACHMENT Drop‐down list You may attach a multiple electronic files of any file type to the vendor record. See
the Attachment section for more details.
8. In the Billing details section of this tab, enter additional information relating to how the system should handle the vendor’s bills.

IntacctTrainingManual AccountsPayable–Add/EditVendor
426
Field Type Notes
DISCOUNT (%) Number If the vendor has offered you a discount on all purchases, you may enter that discount
amount in this field. This can sometimes occur if you are a preferred customer for the
vendor. This field accepts any number from 1‐100, with up to 2 decimal places. The
number entered represents the percent value. For instance, to set the value to ten
percent, type “10” (not 0.10).
Do not type the percent sign (“%”) into the field when entering the percentage.
VENDOR PRICE LIST Drop‐down list You may select a Price List to be associated with this vendor.
PRICE SCHEDULE Drop‐down list You may select a Price Schedule to be associated with this vendor.
GL ACCOUNT Drop‐down list You can designate a specific GL Account to be used by default for purchases from the
vendor. The GL account specified here will be the default offset account to Accounts
Payable when creating a new AP Bill; however, this setting has no impact on invoices
entered via the Purchasing module.
ACCOUNT LABEL Drop‐down list You can designate a specific Account Label to be used by default for purchases from
the vendor. The Account Label specified here will control the default offset account
to Accounts Payable when creating a new AP Bill; however, this setting has no impact
on invoices entered via the Purchasing module.
TAXABLE Checkbox Check this box if regular purchases from this vendor are, or could be, taxable. By
default, this field is Checked.

IntacctTrainingManual AccountsPayable–Add/EditVendor
427
Field Type Notes
CONTACT TAX GROUP
Drop‐down list You may select a contact tax group for the vendor. The contact tax group impacts the
tax rate used when advanced tax functionality is enabled.
For example, a contact might be placed in the “Texas” tax group which could be set up for Texas sales tax.
CREDIT LIMIT Number The amount of credit extended by the vendor. The system can be configured to warn
or disallow the user if you have exceeded the vendor’s credit limit.
ON HOLD Checkbox When on hold no one can enter bills into the system for the vendor. By default, this
field is Unchecked, which means that the vendor is available for bill entry.
DO NOT CUT CHECK
Checkbox When selected no payments can be made to the vendor from the system. By default,
the field is left Unchecked.
COMMENTS Text Notes regarding the vendor.
DEFAULT
CURRENCY Drop‐down list Sets the currency to be used for transactions with this vendor.
This field is visible only when multiple currencies are enabled.
9. If the vendor has additional contact addresses that need to be captured in the system, such as multiple office addresses, click on
the Contact List tab to define additional contacts for the vendor.
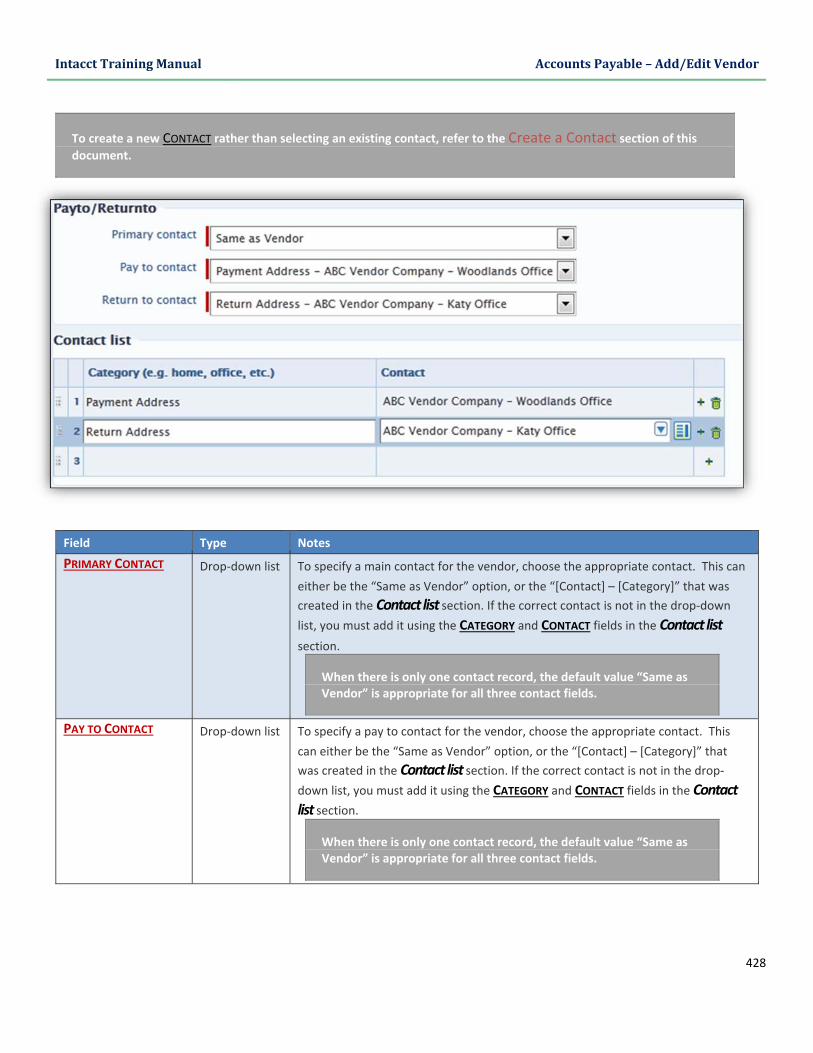
10. In the Payto/Returnto section, the PRIMARY CONTACT, PAY TO CONTACT, and RETURN TO CONTACT are set by default to “Same
as Vendor”, which means that they will use the contact information that is created based on the information provided in the
Primary contact section of the Vendor tab. If the contact for any of these should be different, the appropriate contact can be designated by creating a new contact in the Contact list section. Simply assign a CATEGORY name, and then select or add a
contact record using the drop‐down list in the CONTACT field. Once completed, the contact will appear in drop‐down lists for
the PRIMARY CONTACT, PAY TO CONTACT, and RETURN TO CONTACT fields. If there are no additional contact records needed for the vendor, this step can be skipped entirely.
IntacctTrainingManual AccountsPayable–Add/EditVendor
428
To create a new CONTACT rather than selecting an existing contact, refer to the Create a Contact section of this document.
Field Type Notes
PRIMARY CONTACT Drop‐down list To specify a main contact for the vendor, choose the appropriate contact. This can
either be the “Same as Vendor” option, or the “[Contact] – [Category]” that was
created in the Contact list section. If the correct contact is not in the drop‐down list, you must add it using the CATEGORY and CONTACT fields in the Contact list
section.
When there is only one contact record, the default value “Same as Vendor” is appropriate for all three contact fields.
PAY TO CONTACT Drop‐down list To specify a pay to contact for the vendor, choose the appropriate contact. This
can either be the “Same as Vendor” option, or the “[Contact] – [Category]” that
was created in the Contact list section. If the correct contact is not in the drop‐down list, you must add it using the CATEGORY and CONTACT fields in the Contact list section.
When there is only one contact record, the default value “Same as Vendor” is appropriate for all three contact fields.

IntacctTrainingManual AccountsPayable–Add/EditVendor
429
Field Type Notes
RETURN TO CONTACT Drop‐down list To specify a return to contact for the vendor, choose the appropriate contact. This
can either be the “Same as Vendor” option, or the “[Contact] – [Category]” that
was created in the Contact list section. If the correct contact is not in the drop‐down list, you must add it using the CATEGORY and CONTACT fields in the Contact list section.
When there is only one contact record, the default value “Same as Vendor” is appropriate for all three contact fields.
CATEGORY Text Category is a user defined field that allows you to more easily group and sort
contacts. The category might be a specific office or specific location, a department,
or an individual.
CONTACT Drop‐down list Associate the category with a contact record using this field. If you need to add a
new contact, please refer to the Create a Contact section of this document.
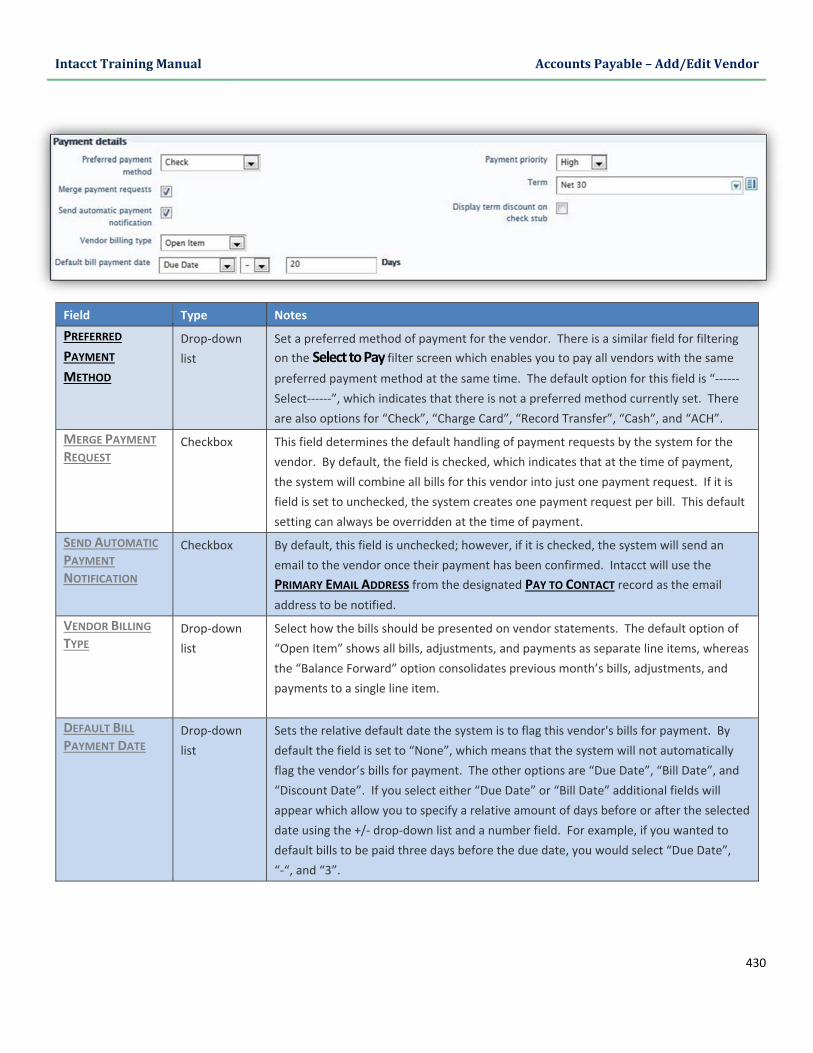
11. Click on the Payment Information tab to enter payment specific information for the vendor such as the payment method, ACH
bank information, and account number.
12. In the Payment details section, enter payment information such as the PREFERRED PAYMENT METHOD, DEFAULT BILL PAYMENT
DATE, PAYMENT PRIORITY, and TERM, along with other vendor‐specific payment settings.
IntacctTrainingManual AccountsPayable–Add/EditVendor
430
Field Type Notes
PREFERRED
PAYMENT
METHOD
Drop‐down
list
Set a preferred method of payment for the vendor. There is a similar field for filtering
on the Select to Pay filter screen which enables you to pay all vendors with the same
preferred payment method at the same time. The default option for this field is “‐‐‐‐‐‐
Select‐‐‐‐‐‐”, which indicates that there is not a preferred method currently set. There
are also options for “Check”, “Charge Card”, “Record Transfer”, “Cash”, and “ACH”.
MERGE PAYMENT
REQUEST Checkbox This field determines the default handling of payment requests by the system for the
vendor. By default, the field is checked, which indicates that at the time of payment,
the system will combine all bills for this vendor into just one payment request. If it is
field is set to unchecked, the system creates one payment request per bill. This default
setting can always be overridden at the time of payment.
SEND AUTOMATIC
PAYMENT
NOTIFICATION
Checkbox By default, this field is unchecked; however, if it is checked, the system will send an
email to the vendor once their payment has been confirmed. Intacct will use the
PRIMARY EMAIL ADDRESS from the designated PAY TO CONTACT record as the email
address to be notified.
VENDOR BILLING TYPE
Drop‐down
list
Select how the bills should be presented on vendor statements. The default option of
“Open Item” shows all bills, adjustments, and payments as separate line items, whereas
the “Balance Forward” option consolidates previous month’s bills, adjustments, and
payments to a single line item.
DEFAULT BILL PAYMENT DATE
Drop‐down
list
Sets the relative default date the system is to flag this vendor's bills for payment. By
default the field is set to “None”, which means that the system will not automatically
flag the vendor’s bills for payment. The other options are “Due Date”, “Bill Date”, and
“Discount Date”. If you select either “Due Date” or “Bill Date” additional fields will
appear which allow you to specify a relative amount of days before or after the selected
date using the +/‐ drop‐down list and a number field. For example, if you wanted to
default bills to be paid three days before the due date, you would select “Due Date”,
“‐“, and “3”.

IntacctTrainingManual AccountsPayable–Add/EditVendor
431
Field Type Notes
PAYMENT
PRIORITY Drop‐down
list
Payment priorities help you to internally organize your payment process. The selection
you make here will be the default for bills entered for this vendor; however, you can
change the priority of an individual bill at the time you enter it. The options available
are “Urgent”, “High”, “Normal” (default), and “Low”.
TERM Drop‐down
list
The term designates the credit terms extended by the vendor. Intacct uses terms to
calculate due dates, discounts and penalties regarding bills for this vendor.
DISPLAY TERM
DISCOUNT ON CHECK STUB
Radio button Selecting “Yes” in this field sets the system to automatically notify the vendor via the
check stub that you have elected to take your term discount. The default selection is
“No”, which means that the term discount will not automatically appear on the check
stub.
13. In the ACH configuration details section, you must check the ENABLE ACH checkbox to enter the vendor’s ACH bank information in order to allow the vendor to be paid via ACH. The fields that become available after selecting to enable ACH for the vendor are described in the following table.
Field Type Notes
ENABLE ACH Checkbox Check this checkbox if you the vendor wants to be paid via ACH and had provided you
with their bank information.
ACH BANK
ROUTING NUMBER Number Enter the Routing Number for the vendor’s bank account.
ACCOUNT NUMBER Number Enter the vendor’s bank account number.
ACCOUNT TYPE Drop‐down list Select whether the vendor’s bank account is a “Checking Account” or a “Savings
Account”. By default, this field is set to “Checking Account”, which is the most
common.

IntacctTrainingManual AccountsPayable–Add/EditVendor
432
Field Type Notes
ACCOUNT
CLASSIFICATION Drop‐down list Select whether the vendor’s bank account is a personal or business account. If the
vendor is a contractor using a personal bank account, select the “Personal (PPD)”
option. If the account is a business bank account, you will need to contact your bank
to determine whether the account is classified as a “Business (CTX)” or “Business
(CCD)” bank account.
14. In the Vendor Account Number section, enter the account number(s) that the vendor uses to identify your company. If the
vendor has different account numbers for your company’s locations, you can use the table at the bottom of this section to define the account numbers for each location.
Field Type Notes
VENDOR ACCOUNT NO.
Text The number the vendor uses to refer to your company’s account.
DISPLAY VENDOR ACCOUNT NUMBER
FOR SPECIFIC
LOCATION(S) ON VENDOR CHECK STUB
Checkbox By default, this field is unchecked, which causes the VENDOR ACCOUNT NO. designated for
the company or entity to print in the check’s Memo field. If you check this field, the system
will display the appropriate ACCOUNT NO. based on the bill’s location coding on the vendor
check stub.
15. Click on the Restrictions tab to further control the visibility of the vendor based on location and/or department.

IntacctTrainingManual AccountsPayable–Add/EditVendor
433
Field Type Note
UNRESTRICTED VENDOR Radio button Visible by users in the top‐level entity as well as all the subordinate entities.
RESTRICTED TO TOP‐LEVEL ONLY
Radio button Visible only to users in the top‐level entity.
RESTRICTED VENDOR Radio button Visible only to specified Locations and/or Departments as designated in the
LOCATION/LOCATION GROUPS and DEPARTMENT/DEPARTMENT GROUPS fields.
LOCATION/LOCATION GROUPS Selection list Only Location or Location Groups in right‐hand box have visibility rights to
this vendor when the RESTRICTED VENDOR field has been selected.
DEPARTMENT/DEPARTMENT
GROUPS
Selection list Only Department or Department Groups in right‐hand box have visibility
rights to this vendor when the RESTRICTED VENDOR field has been selected.
16. When all applicable information about the vendor has been entered, click the Save button.

IntacctTrainingManual AccountsPayable–Add/EditVendor
434
17. If the vendor was checked as 1099 ELIGIBLE, the system will direct you to the Form 1099 Information with Default Box screen.
18. Enter the appropriate 1099 information using the fields available on the Form 1099 Information with Default Box screen. As you make selections in the FORM NAME, DEFAULT 1099 BOX, and ENTITY fields, the screen will reload to provide the applicable options and fields.

IntacctTrainingManual AccountsPayable–Add/EditVendor
435
Field Type Note
FORM NAME Drop‐down list Select the appropriate 1099 form for the vendor. This will generally be
“Miscellaneous Income (Form 1099‐MISC)”.
DEFAULT 1099 BOX Drop‐down list Select the appropriate box on the 1099 form you selected for the vendor
payment. This will generally be “7 ‐ Nonemployee compensation”.
ENTITY
Drop‐down list This field only appears if your company is set up to issue separate 1099 forms
for each entity, and you are creating the vendor at the root level. You may
select an entity for which you want to enter initial values using this field. Once
selected, a section for vendor initial values for the entity will appear.

IntacctTrainingManual AccountsPayable–Add/EditVendor
436
Field Type Note
INITIAL VALUES FOR YEAR
Drop‐down list If you intend to run all 1099 information for the vendor from Intacct, but initial
values for the year reside in another system, you can enter the initial value by
first selecting the appropriate year.
[INITIAL VALUES FIELDS] Number Depending on which 1099 Form was selected, the appropriate boxes will
display after the INITIAL VALUES FOR YEAR field. The initial value may be
entered into Intacct at this time for each box as appropriate.
19. When all applicable Form 1099 information has been entered, click the Save button to complete the vendor set up.