integrating thinkvantage update retriever and thininstaller
TRANSCRIPT

June 21, 2012
A Quick Solution Guide
Integrating ThinkVantage Update Retriever and Integrating ThinkVantage Update Retriever and Integrating ThinkVantage Update Retriever and Integrating ThinkVantage Update Retriever and ThinInstaller with Microsoft Deployment Toolkit ThinInstaller with Microsoft Deployment Toolkit ThinInstaller with Microsoft Deployment Toolkit ThinInstaller with Microsoft Deployment Toolkit
(MDT 2010)(MDT 2010)(MDT 2010)(MDT 2010)
By Joe Parker, Customer Enabler
v2.0

Second Edition (June 2012) © Copyright Lenovo 2012. LENOVO products, data, computer software, and services have been developed exclusively at private expense and are sold to governmental entities as commercial items as defined by 48 C.F.R. 2.101 with limited and restricted rights to use, reproduction and disclosure. LIMITED AND RESTRICTED RIGHTS NOTICE: If products, data, computer software, or services are delivered pursuant a General Services Administration “GSA” contract, use, reproduction, or disclosure is subject to restrictions set forth in Contract No. GS-35F-05925.

Contents
Introduction ........................................................................................................................................................................... 4
Problem Statement ............................................................................................................................................................... 4
Previous Options .................................................................................................................................................................. 4
Lenovo Solution .................................................................................................................................................................... 4
Benefit 1 ............................................................................................................................................ 4
Benefit 2 ............................................................................................................................................ 4
Benefit 3 ............................................................................................................................................ 4
Implementation ...................................................................................................................................................................... 5
Getting Started .................................................................................................................................. 5
Driver Repository Creation ................................................................................................................ 6
Exporting Drivers from Repository ..................................................................................................... 9
Using ThinkPad Driver Packs for SCCM ......................................................................................... 11
Deployment Point Creation .............................................................................................................. 12
Creating our task sequence ............................................................................................................. 16
Creating a Task Sequence .............................................................................................................. 24
Adding Drivers to the Task Sequence ............................................................................................. 31
Working with ThinInstaller ............................................................................................................... 33
Before you start deploying ............................................................................................................... 36
Creating bootable Media ................................................................................................................. 41

Introduction
This paper is intended to be a brief overview of using Lenovo’s Update Retriever and ThinInstaller applications with Microsoft’s Deployment Toolkit [MDT] for a simpler approach to operating system deployments. Although the contents of this paper are focused on working with MDT, these same principles also apply to Microsoft’s System Center Configuration Manager 2007 and 2012 products.
Problem Statement
When building an image, it is often difficult to find all the correct hardware device drivers, installation command line parameters, and model applicability. Once the correct set of installation packages have been collected, additional manual steps are still required per package to get the packages into a usable state for operating system deployments.
Previous Options
Historically one would download each driver individually, extract them from their web package and then install manually or perform additional manual steps to integrate the driver into an operating system deployment. These methods require the IT administrator to know exactly which device drivers are applicable to which systems.
Lenovo Solution
With Lenovo’s Update Retriever and ThinInstaller, one can create a centralized database of device drivers and utilities as well as automate the installation and updates of Lenovo content.
Benefit 1
Driver content is prepackaged for direct use by ThinInstaller and is packaged to be installed in the supported method from Lenovo.
Benefit 2
The driver database functions as an update server as well, providing the ability to manage the latest driver content and deploy to clients in the field.
Benefit 3
Drivers and updates can be centrally managed via a simple console.

Implementation
Getting Started
Microsoft’s Deployment Toolkit provides a robust framework for the creation and deployment of Windows images. This process uses a modular, “task sequence” oriented approach to install and configure the operating system, drivers and applications. Lenovo’s ThinkVantage ThinInstaller and Update Retriever will allow you to augment the driver installation process to include prepackaged content from Lenovo. To get started we will need the following available to us:
• A dedicated PC, Server, or VM with Server 2003 or Server 2008/R2 running
• 4GB of RAM
• 2.0Ghz processor or faster
• GB Network Adapter
• Source media for any Windows OS you want to install (XP sp2/3, Vista, Win7)
We will also need the following downloads:
• ThinkVantage Update Retriever (requires .net 3.0 to be installed)
• ThinkVantage ThinInstaller
• Microsoft Deployment Toolkit (latest version for your processor architecture): http://technet.microsoft.com/en-us/solutionaccelerators/dd407791.aspx
Once the server is up and running, install the Microsoft Deployment Toolkit. Then go to the Start menu and launch “Deployment Workbench”. You should then be presented with an MMC window that looks similar to the following:

When you expand the “Information Center” you will see a few options: Getting Started, Documentation, News, and Components. For now we will select Components. As you can see there are a number of items we can download. These are the other components that will be required to be able to create our WinPE image as well as automate many of the operating system installation components. For the scope of this project we will need to download “MSXML 6.0” and “Windows Automated Installation Kit (x64)” [WAIK]. Be sure to select the appropriate Architecture version (X86 vs. X64) of the WAIK to match the architecture of the host OS running MDT. The WAIK is a pretty large file (over 1GB in size) so take a coffee break while you wait for the downloads to finish. Once downloaded you can then install these components, reboot and start building the deployment point and driver repository.
Driver Repository Creation
Now that we have installed the Deployment Workbench let’s install Update Retriever and get our driver repository in place. Once Update Retriever has been installed, you need to configure the repository settings.

In this case we have simply set the root of the repository as a shared directory on the same server as the DeploymentWorkbench. The following changes are also suggested on the “Update’s default status” tab:
This will “activate” the updates so that the default configuration of ThinInstaller will be able to “see” the updates (more on the Status option later). Once these are set, go back to the “Repository” tab and select “Continue”. You will now be able to download updates by selecting the “Get new updates” option in the top left of Update Retriever.
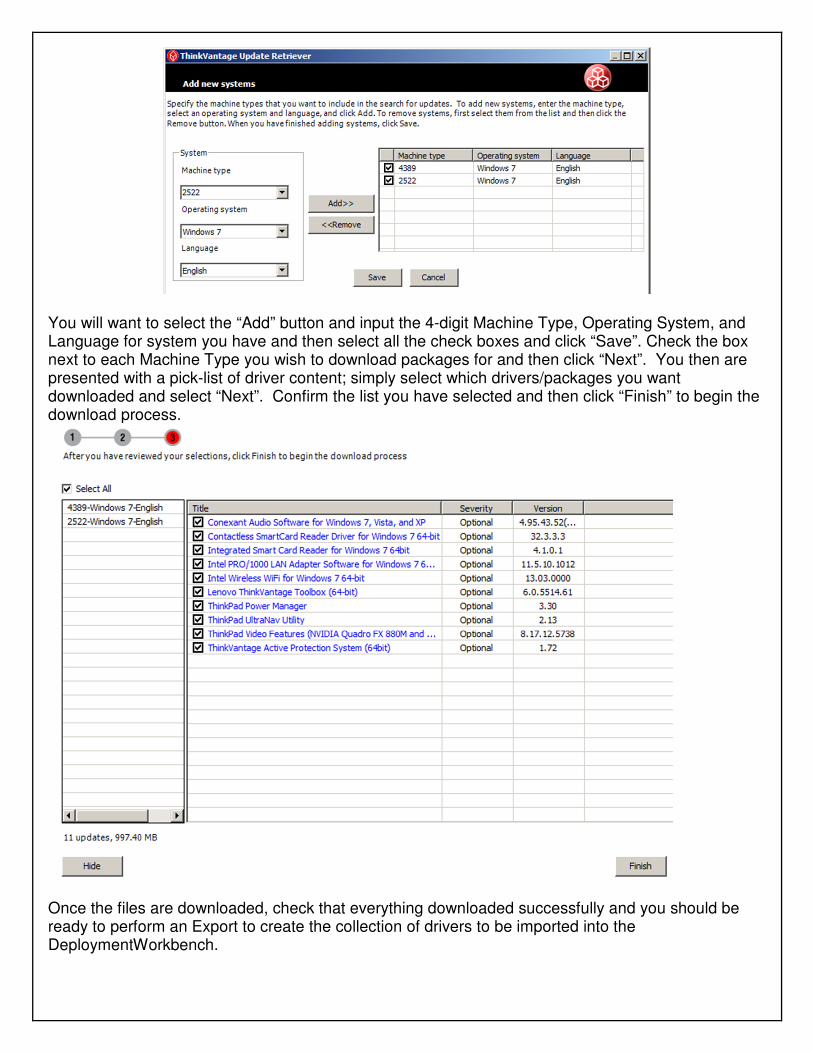
You will want to select the “Add” button and input the 4-digit Machine Type, Operating System, and Language for system you have and then select all the check boxes and click “Save”. Check the box next to each Machine Type you wish to download packages for and then click “Next”. You then are presented with a pick-list of driver content; simply select which drivers/packages you want downloaded and select “Next”. Confirm the list you have selected and then click “Finish” to begin the download process.
Once the files are downloaded, check that everything downloaded successfully and you should be ready to perform an Export to create the collection of drivers to be imported into the DeploymentWorkbench.

Exporting Drivers from Repository
In Update Retriever, expand the Manage repository option. Select the Export updates option and the following screen will appear.
Specify the folder in which you would like to store the exported updates. In this example we will save the exported updates in a folder on the host machine. To simplify management of drivers when multiple machines will be deployed it may be beneficial to have a separate folder for each machine type to export updates into. Click “Next” and a list of updates available in the repository will appear. You may filter the list of updates displayed by selecting the Machine Type – OS – Language combination. Place check marks in the boxes next to the hardware device drivers you wish to export. Click “Finish” to export each of the packages to the folder previously specified.

During the export process, if a package is encountered that has already been exported previously; the following dialog will be presented.
You may choose to replace, overwrite, or skip the flagged package. You also have the option of applying your choice to all packages found to be in conflict. Once all packages have been processed, a results screen will be displayed with the option to view more details about the current results or link to the folder the packages were exported to.
We will make use of the exported updates later in the OS Deployment Task Sequence definition.

Using ThinkPad Driver Packs for SCCM
Starting in July 2012, Lenovo will begin to make available ThinkPad Driver Packs for SCCM to support the newest releases of the ThinkPad Classic series of systems (T, X, W, and L). ThinkPad Driver Packs are self-extracting executable files which contain the hardware device drivers for specific ThinkPads and specific operating systems. There will initially be Windows 7 32bit and 64bit packages available with Windows 8 packages coming in the future. Windows XP packages will not be made available as that operating system is approaching end of life. The result of extracting the files will be a folder structure which organizes the driver installation source files for each component under a top-level parent folder. The Driver Import Wizard of MDT or SCCM can then be used to import these drivers directly into the console so they can be referenced in an OS Deployment task sequence.
In most cases the driver installation source files will only include the INF-installable content. The intent is to ensure the base functionality of the hardware component is enabled once the OS deployed. This means that enhanced features (such as Dolby Digital for the audio device) may not be supported. To obtain all enhanced features for a given hardware component it is recommended to use the full setup process through ThinInstaller instead of relying on the INF installation capabilities. The ThinkPad Driver Packs will be available for download from the Lenovo Support web site on the Driver and Software page for each particular system. Driver packs will be released at or near a product’s release. Driver packs will be updated whenever Lenovo updates our factory images for the systems which is approximately quarterly. For driver updates that occur between updates of the driver packs, it is recommended to use Update Retriever and its Export function to manage the individual drivers.

Deployment Point Creation Now that our driver repository is ready to go we can set up and configure the deployment share to be used. Once the DeploymentWorkbench is open, right click “Deployment Shares” and select “New Deployment Share”.
You will then be prompted to create a new directory that will contain the components for our deployment solution.

You will then need to create a network share name.
Specify a Deployment share description. This will be the name that shows up in the DeploymentWorkbench.
Click “Next” and review the Summary page. When you click “Next” again, the process will begin with progress being displayed in the dialog. When complete, click “Finish”.
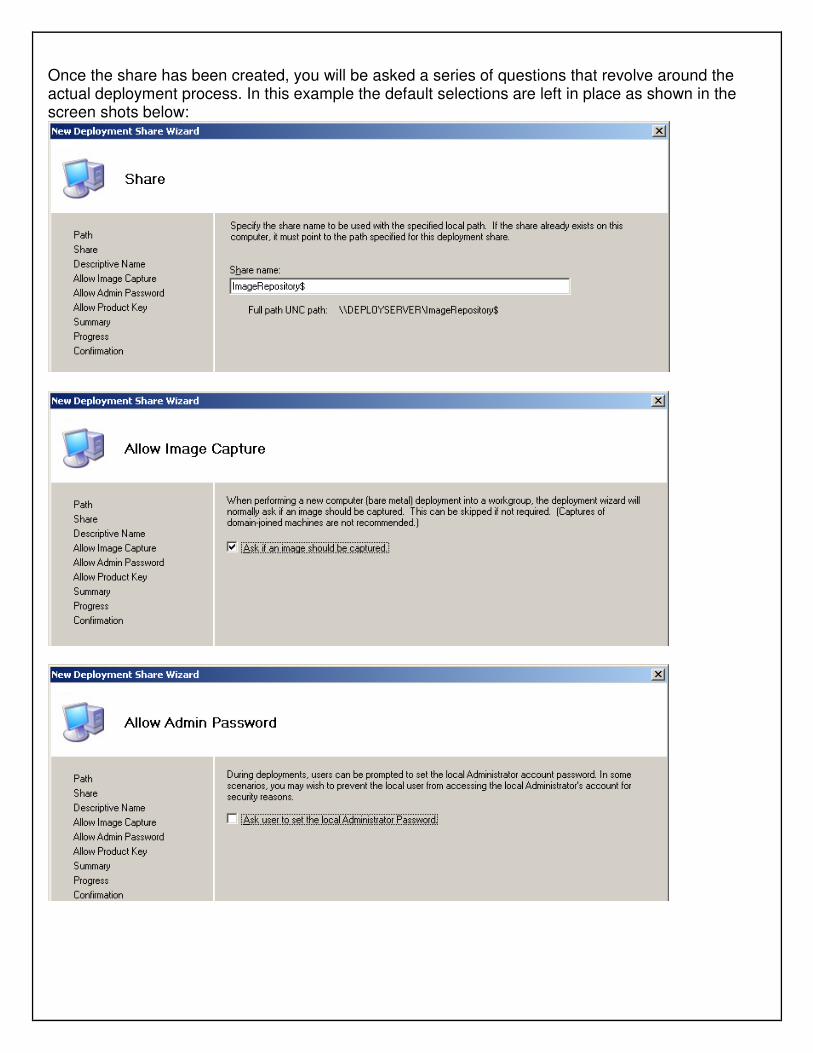
Once the share has been created, you will be asked a series of questions that revolve around the actual deployment process. In this example the default selections are left in place as shown in the screen shots below:


Creating our task sequence
Now that our deployment share has been created we can proceed with adding our OS, Drivers, Applications and other components necessary for the deployment. We will first want to import our Operating System. Expand the Deployment Shares item and then expand the deployment share we just created. Right-click “Operating Systems” and choose “Import Operating System” from the menu.

We want to select the “Full set of source files”
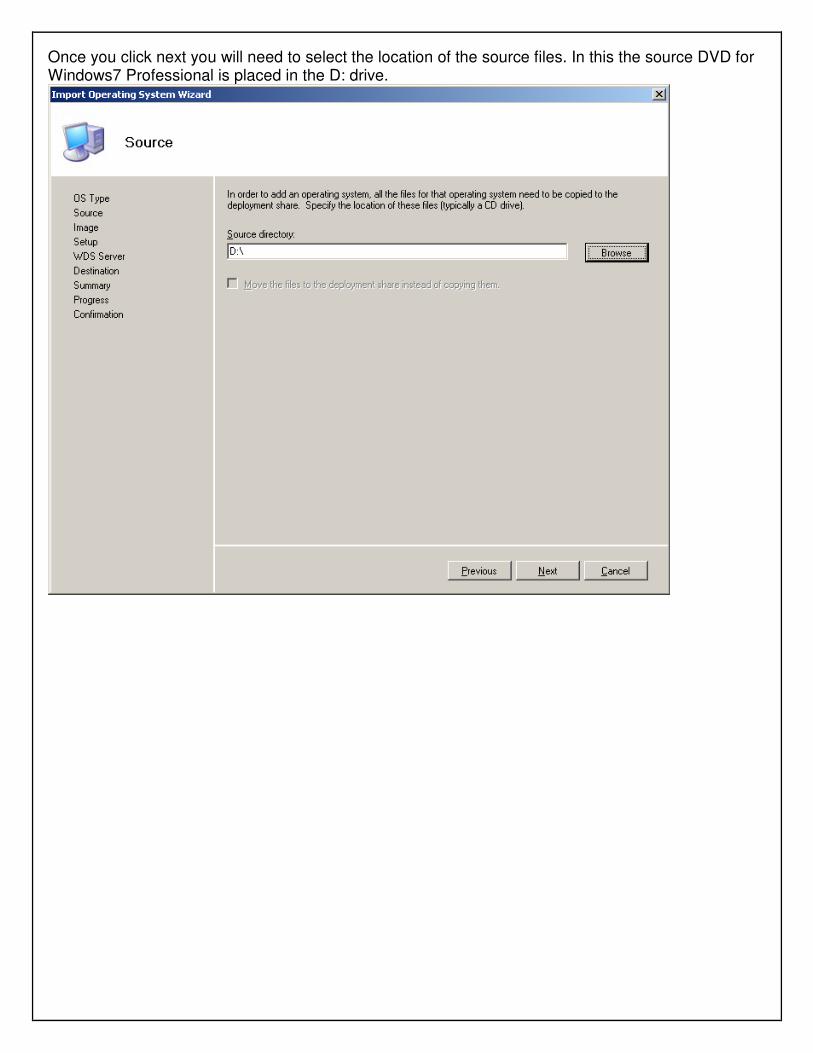
Once you click next you will need to select the location of the source files. In this the source DVD for Windows7 Professional is placed in the D: drive.
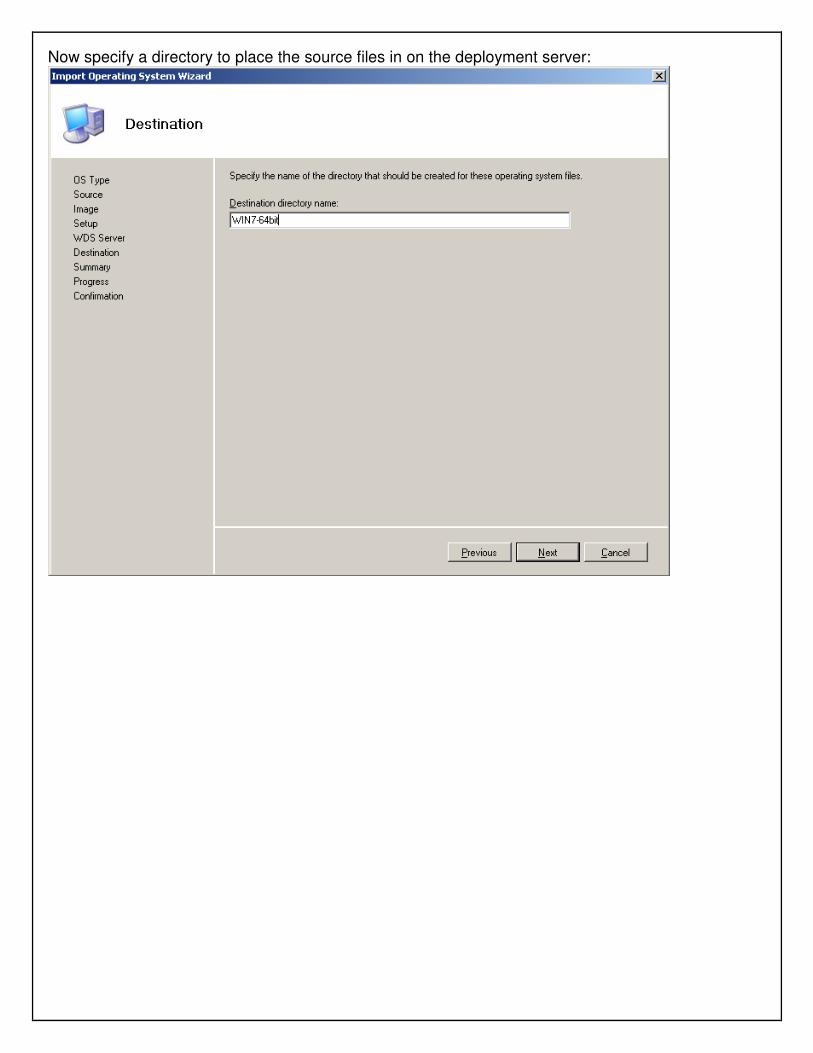
Now specify a directory to place the source files in on the deployment server:

Click “Next”, verify the settings and then click “Next” again to begin importing the operating system. This process can take some time.

Once imported you will now see the operating system populated in the “Operating Systems” folder in the Deployment Workbench. Now that we have an operating system imported we can import the hardware device drivers.

Importing Device Drivers When importing device drivers into MDT, there are several ways the drivers can be organized. In this example, the drivers for a specific Machine Type will be grouped together in its own folder. In the DeploymentWorkbench, expand the deployment share and right-click on Out-of-Box Drivers. Select New Folder and enter the four-digit Machine Type for the system and a description for this folder.
Once the folder has been created, right-click on it and choose Import Drivers. Specify the folder used in Update Retriever to export the packages for this machine type. Click “Next” and confirm the summary.

Click “Next” again and progress for the process will be displayed. Click “Finish” when the process is complete. In the DeploymentWorkbench, the imported drivers imported to this folder will be listed.

Creating a Task Sequence To create a task sequence, select “Task Sequences” in the left-hand menu and then select “New Task Sequence” from the right-hand menu. You will then be presented with the New Task Sequence Wizard. Enter a Task sequence ID, name and comments. Use simple and straightforward values. The Task Sequence ID is for the workbench to reference while the name is for your reference.

You will then be prompted to select which type of “task sequence” you want to use. Leave the default selection of “Standard Client Task Sequence” and click “Next”.

You then need to select the operating system you want to deploy. This list is generated from the operating systems you imported earlier.

The next option will prompt you to input the Product Key for the operating system:
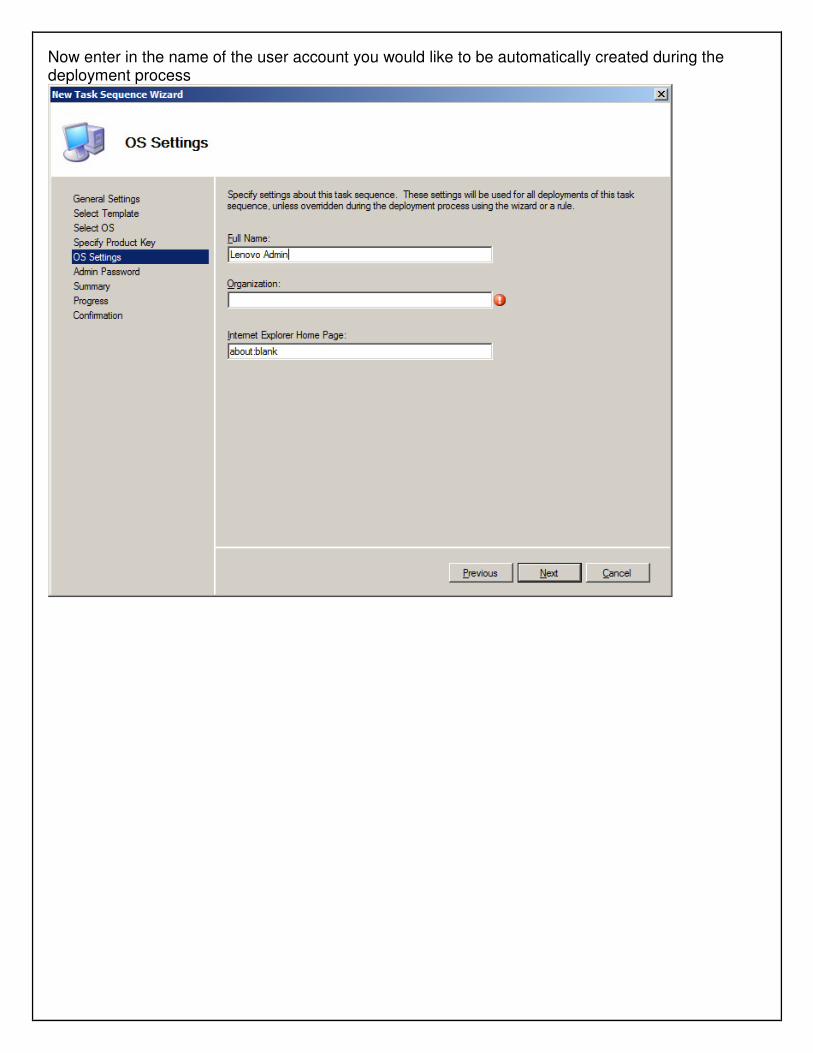
Now enter in the name of the user account you would like to be automatically created during the deployment process

You will also be able to create a default password for the Administrator account created previously.

Finally, you can review your selections and click “Next” to create the task sequence. A confirmation page will be displayed when complete. Click “Finish” to close the wizard.

Adding Drivers to the Task Sequence
Now that we have created our task sequence, we can proceed with adding our drivers. First we will need to create a Selection Profile to identify the drivers to use in this task sequence. In the DeploymentWorkbench, expand “Advanced Configuration” and right-click “Selection Profiles”. Click “New Selection Profile” and enter a descriptive name and comments.
Click “Next”. Specify the folder containing the drivers by expanding the “Out-of-Box Drivers” category and placing a check in the checkbox next to the folder name.

Confirm the summary page by clicking “Next” and then click “Finish” when the process is complete. Open the task sequence for editing by double clicking the task sequence in the DeploymentWorkbench to bring up the properties dialog. Click on the “Task Sequence” tab to view the detailed list of tasks. Select the “Inject Drivers” task. Under the “Properties” tab, choose the selection profile that was just created and then click “Apply”.
Working with ThinInstaller
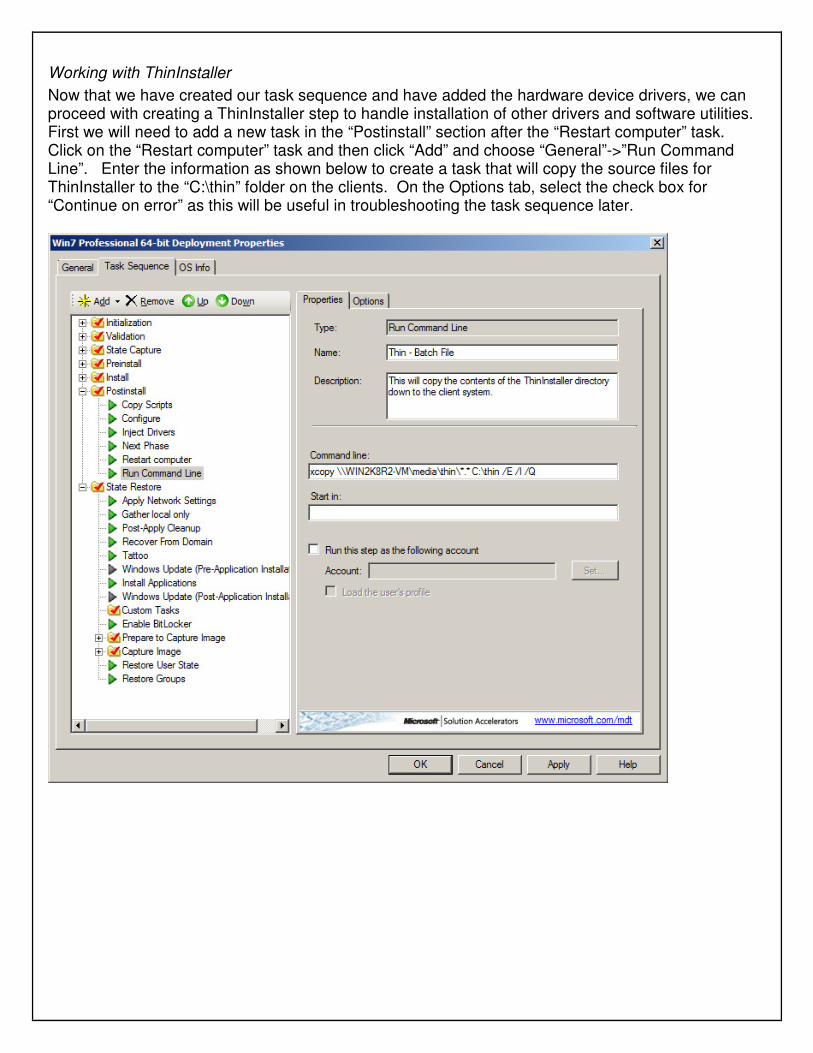
Now that we have created our task sequence and have added the hardware device drivers, we can proceed with creating a ThinInstaller step to handle installation of other drivers and software utilities. First we will need to add a new task in the “Postinstall” section after the “Restart computer” task. Click on the “Restart computer” task and then click “Add” and choose “General”->”Run Command Line”. Enter the information as shown below to create a task that will copy the source files for ThinInstaller to the “C:\thin” folder on the clients. On the Options tab, select the check box for “Continue on error” as this will be useful in troubleshooting the task sequence later.
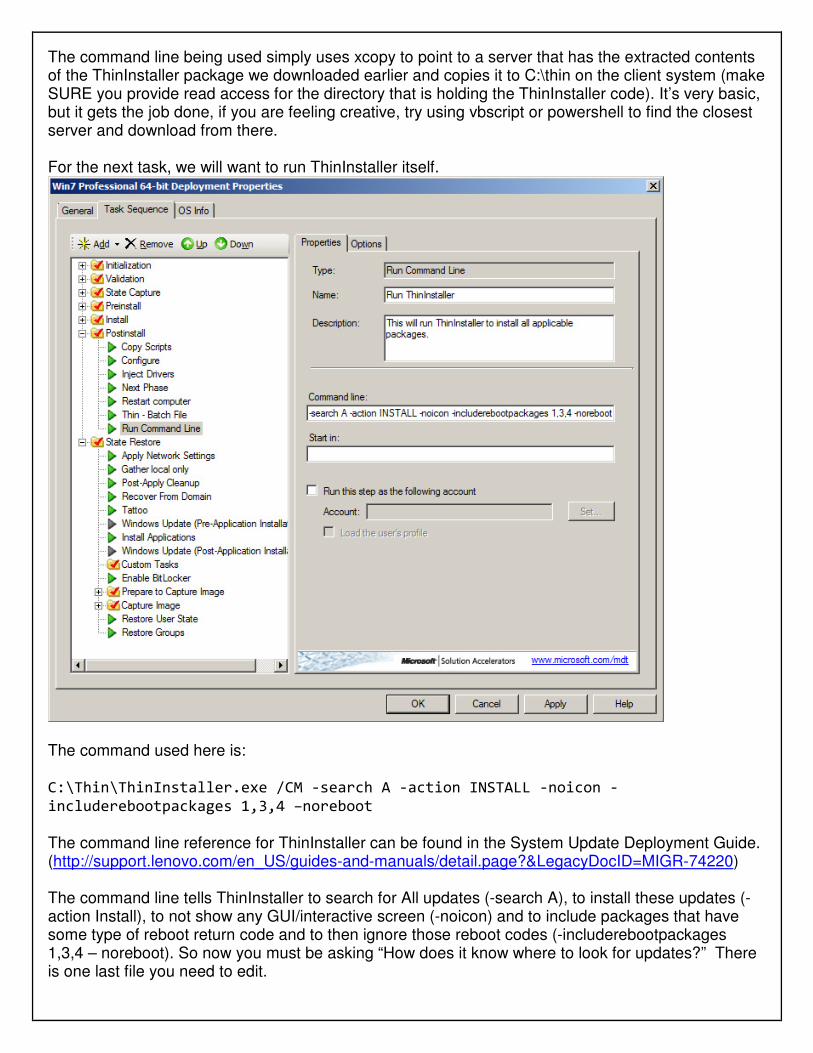
The command line being used simply uses xcopy to point to a server that has the extracted contents of the ThinInstaller package we downloaded earlier and copies it to C:\thin on the client system (make SURE you provide read access for the directory that is holding the ThinInstaller code). It’s very basic, but it gets the job done, if you are feeling creative, try using vbscript or powershell to find the closest server and download from there. For the next task, we will want to run ThinInstaller itself.
The command used here is: C:\Thin\ThinInstaller.exe /CM -search A -action INSTALL -noicon -
includerebootpackages 1,3,4 –noreboot
The command line reference for ThinInstaller can be found in the System Update Deployment Guide. (http://support.lenovo.com/en_US/guides-and-manuals/detail.page?&LegacyDocID=MIGR-74220) The command line tells ThinInstaller to search for All updates (-search A), to install these updates (-action Install), to not show any GUI/interactive screen (-noicon) and to include packages that have some type of reboot return code and to then ignore those reboot codes (-includerebootpackages 1,3,4 – noreboot). So now you must be asking “How does it know where to look for updates?” There is one last file you need to edit.

In the folder from which the ThinInstaller files are being shared, there is a file named ThinInstaller.exe.configuration. Open this file in Notepad to edit. The contents should look something like the following:
The contents of this file tell ThinInstaller a few items, the most important of which is where the Update Retriever repository is. In the example above, you may remember earlier; we created the repository as a share on the MDT server and here we simply provide the UNC path to it. A log path is also specified for debugging any issues; the logs will be saved to the client on C:\Thin\extralogs (this can be anything you want). It is also very important to make sure the “ContentMode” is the same as the “ContentMode” set for UpdateRetriever (either both to ACTIVE or both to TEST). The other items should be set like the example above (“IgnoreLocalLicense”, “DebugEnable”, etc).

Before you start deploying
There are a few items left before we can start testing the deployment. Since the drivers are going to be delivered via the network we need to add the network drivers into the “Out-of-Box Drivers” folder in MDT. We will want the Windows 7 NIC driver for the WinPE and OS Installation phase and if you intend to install XP, you will also need the XP NIC driver (which will install during the OS Installation phase as well). Once the drivers are downloaded from the Lenovo support site, go to the “Out-of-Box Drivers” folder and select the “Import Drivers” item on the right-hand menu.

Click “Browse” to locate the path where the INF files are located and click “Next”. On the next screen click “Next” to verify your selections and begin the import process.
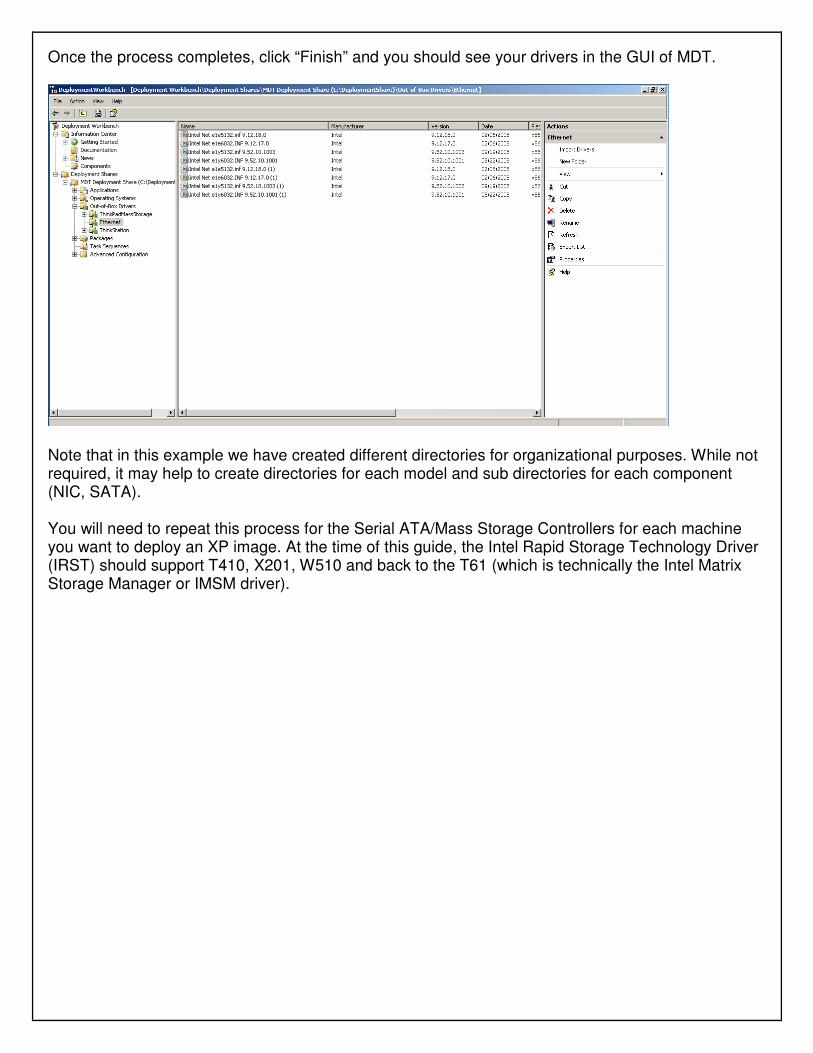
Once the process completes, click “Finish” and you should see your drivers in the GUI of MDT.
Note that in this example we have created different directories for organizational purposes. While not required, it may help to create directories for each model and sub directories for each component (NIC, SATA). You will need to repeat this process for the Serial ATA/Mass Storage Controllers for each machine you want to deploy an XP image. At the time of this guide, the Intel Rapid Storage Technology Driver (IRST) should support T410, X201, W510 and back to the T61 (which is technically the Intel Matrix Storage Manager or IMSM driver).

Now that we have finished defining our task sequence we can proceed with updating the deployment share by going to the left-hand menu, right clicking the root of the name of our deployment share and selecting “Update Deployment Share”:
On the next screen you can choose to optimize the boot image or completely regenerate the boot image. In this case we will simply choose the “optimize” option.

Click “Next” on both this and the next screen and it will process the boot WIM file to inject drivers and update any selections that pertain to the preboot environment. Make sure to review any error messages if they come up and address per the documentation. The screenshot below shows what WIM is being modified as well as displays what drivers are being injected.
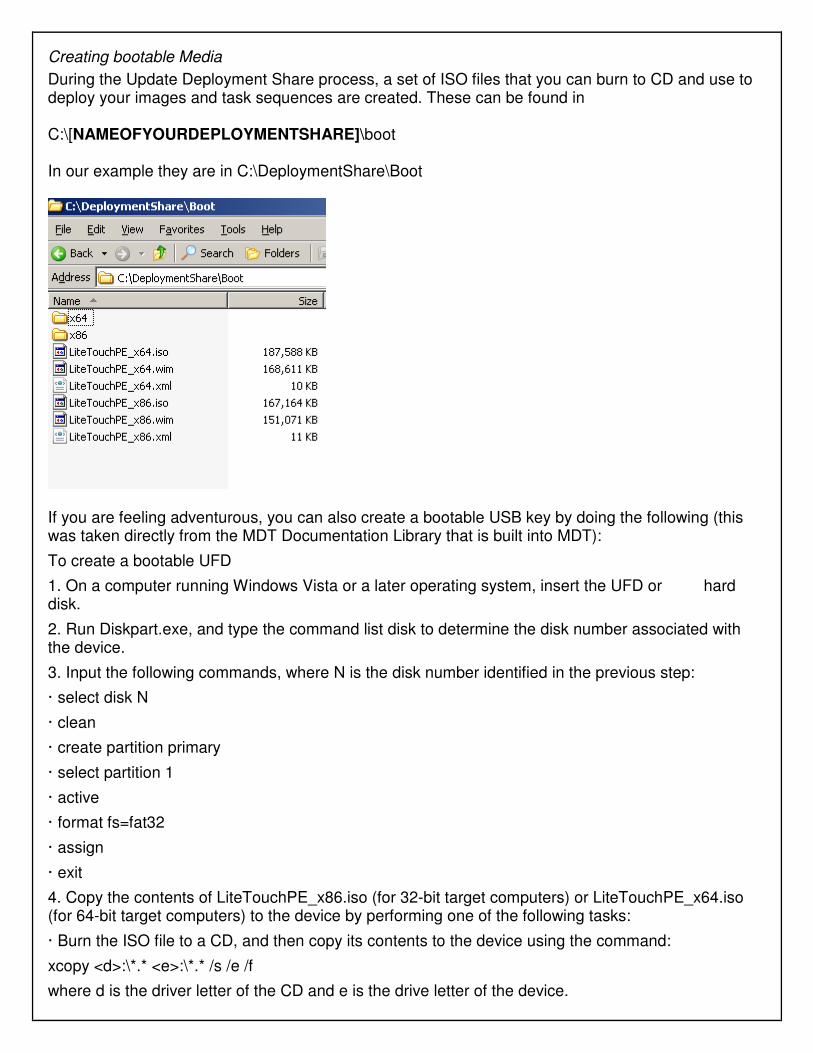
Creating bootable Media
During the Update Deployment Share process, a set of ISO files that you can burn to CD and use to deploy your images and task sequences are created. These can be found in C:\[NAMEOFYOURDEPLOYMENTSHARE]\boot In our example they are in C:\DeploymentShare\Boot
If you are feeling adventurous, you can also create a bootable USB key by doing the following (this was taken directly from the MDT Documentation Library that is built into MDT):
To create a bootable UFD
1. On a computer running Windows Vista or a later operating system, insert the UFD or USB hard disk.
2. Run Diskpart.exe, and type the command list disk to determine the disk number associated with the device.
3. Input the following commands, where N is the disk number identified in the previous step:
· select disk N
· clean
· create partition primary
· select partition 1
· active
· format fs=fat32
· assign
· exit
4. Copy the contents of LiteTouchPE_x86.iso (for 32-bit target computers) or LiteTouchPE_x64.iso (for 64-bit target computers) to the device by performing one of the following tasks:
· Burn the ISO file to a CD, and then copy its contents to the device using the command:
xcopy <d>:\*.* <e>:\*.* /s /e /f
where d is the driver letter of the CD and e is the drive letter of the device.

· Alternatively, mount the ISO file using a virtual CD program, and then copy its contents to the device using the command:
xcopy <d>:\*.* <e>:\*.* /s /e /f
where d is the driver letter of the CD and e is the drive letter of the device.