interface commands description ijet, x1jet, x2jet plus touch … · 2019-05-17 · page 4 of 119...
TRANSCRIPT

Art.-Nr.: 72801003
Interface
Commands Description
iJET, X1JET, X2JET plus Touch
X4JET / X4JET plus Touch
XB4JET, XB8JET
Software Version > iJET V2.016
X2JET / X4JET / plus V2.016
X1JET V2.016
As at: 05.Mai 2015
Version 1.0.34
Weber Marking Systems GmbH
Maarweg 33
D-53619 Rheinbreitbach
Tel.: +49 (0) 2224 7708-0
Fax: +49 (0) 2224 7708-20
E-Mail: [email protected]
Internet: www.webermarking.de
Read the operating manual before starting any work!

Page 2 of 119
Table of contents: Revisionen .................................................................................................................................. 4
Overview of commands ............................................................................................................. 6
ANSI Table .................................................................................................................................. 8
Control character description: <x> ........................................................................................... 10
Interface EIA-232 (RS232) ........................................................................................................ 11
Description Interface USB ........................................................................................................ 12
Description Interface Ethernet ................................................................................................. 13
XML Data communication *4 ................................................................................................... 14
General ..................................................................................................................................... 15
USB-stick communication *1 .................................................................................................... 16
Fault code Erra<CR> ............................................................................................................ 19
Command: <ESC>* Handshake .............................................................................................. 20
Command: <ESC>RST System Restart ................................................................................... 21
Command: <ESC>K Select head *2 ........................................................................................ 22
Command: <ESC>C Delete print memory ............................................................................. 23
Command: <ESC>C0 Print pause/stop .................................................................................. 24
Command: <ESC>C1 Continue printing after pause .............................................................. 25
Command: <ESC>CR Reset ink level ...................................................................................... 26
Command: <ESC>R Spit ......................................................................................................... 27
Command: <ESC>F Start printing without photocell ............................................................ 28
Command: <ESC>SU Update program version ..................................................................... 29
Command: <ESC>SUS Get the last update status ................................................................. 30
Command: <ESC>SCL Set lenght of cable .............................................................................. 31
Command: <ESC>HC Number of heads for X1JET networking .............................................. 32
Command: <ESC>HC Head configuration for 8head systems ............................................... 33
Command: <ESC>Psr Text field as graphic ............................................................................ 35
Graphic command description ......................................................................................... 36
Command: <ESC>B Barcode field .......................................................................................... 38
Special features of the data matrix code ................................................................................. 40
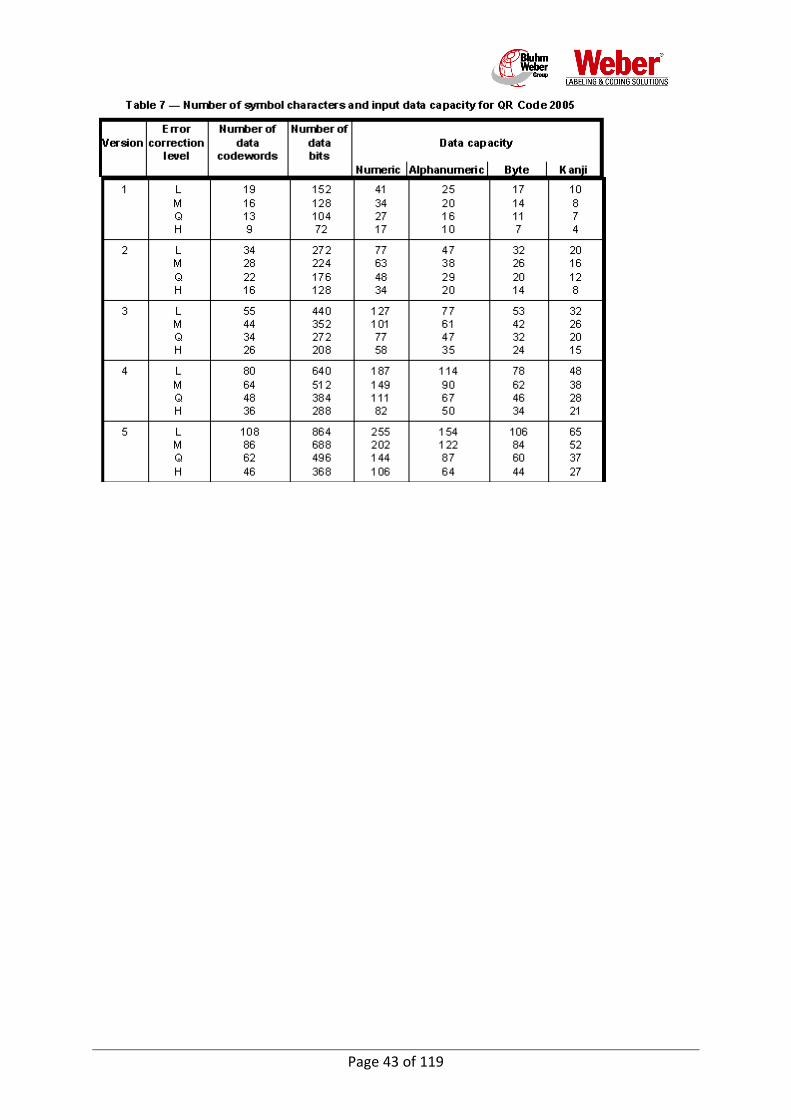
Special features of the QR-Code .............................................................................................. 42
Command: <ESC>L Logo ........................................................................................................ 46
Command: <ESC>L + STR$LGO Logo/Graphic embedded into print message ........................ 47
Command: <ESC>X Action field – remote field ..................................................................... 48
Action field functions: .............................................................................................................. 51
Extension of the field of action function "o":........................................................................... 52
Special functions for date field: ............................................................................................... 53
Internal action field commands: .............................................................................................. 54
Command: <ESC>P Extra line in the iDesign print image ...................................................... 55
Command: <ESC>I Internal info field..................................................................................... 56
Command: <ESC>P Width of the print image ....................................................................... 57
Command: <STX>TZ Call print image and start printing ....................................................... 58
Command: <ESC>EW Send print image data to memory .................................................... 59
Command: <ESC>EX End of transfer .................................................................................... 59
Command: <ESC>EL Receive print image data from system ................................................ 60
Command: <ESC>ED Receive directory ................................................................................ 61
Command: <ESC>EQ Delete print image from directory .................................................... 62
Page 3 of 119
Command: <ESC>*LF Receive Font directory ....................................................................... 63
Command: <ESC>*CF Delete Font in directory ................................................................... 64
Command: <ESC>*LL Receive Logo directory ...................................................................... 65
Command: <ESC>*CL Delete logo in directory .................................................................... 66
Command: <ESC>*STD Send date and time ......................................................................... 67
Command: <ESC>*GSTD Receive date and time .................................................................. 68
Command: <ESC>M* Send list of all parameter ................................................................... 69
Command: <ESC>MG* Receive list of all parameter ............................................................ 78
Command: <ESC>N Store parameter into print image ......................................................... 79
Command: <ESC>MI Send table of all IP-addresses, display status information.................. 80
Command: <ESC>MGI Receive table of all IP-addresses ....................................................... 82
Command: <ESC>MP Send passwords .................................................................................. 83
Command: <ESC>MGP Get passwords. ................................................................................... 87
Command: <ESC>MPC Send firmware upgrade level ............................................................. 88
Command: <ESC>MGPC Get MAC and firmware upgrade level ............................................. 89
Command: <ESC>MS Send shift code. .................................................................................. 91
Command: <ESC>MGS Get shift code. ..................................................................................... 92
Command: <ESC>MW Data connection ............................................................................... 93
Command: <ESC>MGW Fetch data connection parameter..................................................... 96
Command: <ESC>MW Data link. .......................................................................................... 97
Command: <ESC>MGW Get Data link parameter .................................................................... 99
Command: <ESC>SV Status ................................................................................................. 100
Command: <ESC>S1 Status 1 .............................................................................................. 102
Command: <ESC>S2 Status 2 .............................................................................................. 104
Command: <ESC>SLX Readout LX memory ........................................................................ 105
Command: <ESC>SHP HP Readout HP memory ................................................................ 107
Command: <ESC>SL Read back variable data ................................................................... 108
Command: <ESC>EI Read back ink list .............................................................................. 109
Command: <ESC>SOP Set output-ports direct ................................................................... 110
Command: <ESC>EG Transfer logo ...................................................................................... 111
Command: <STX>TZ Fill in action fields .............................................................................. 112
Command: <STX><BNR>TZ Fill in action fields with ........................................................... 115
Command: <STX><BNR>n TZ Fill in action fields without ................................................... 117
Command: <STX>CLR Clear buffer ..................................................................................... 118
Example: Send and call up print image for printing. .............................................................. 119
Example: Send print image to the memory. .......................................................................... 119

Page 4 of 119
Revisionen Version Date Chapter Change Reason 1.0.1 15.02.09 All none First edition 1.0.2 15.04.09 All diverse commands First functions 1.0.3 30.05.09 All diverse commands all basic functions ready 1.0.4 30.06.09 <ESC>EL Receive Print image files new command 1.0.5 15.07.09 All none Release V1.001 1.0.6 29.10.09 S1, S2 New creation add new command 1.0.7 19.04.10 M*, MG* Advanced New Parameter MP, MGP Advanced New commands 1.0.8 22.07.10 Call Print image TZ Changed from ET Wrong command 1.0.9 27.08.10 Action field ~y~ New function 1.0.10 11.12.10 TZ-Command Expand New parameter M* revised bug fix MI, MGI Expand New command M* Expand New parameter SOP New New command 1.0.11 21.02.11 Password Description Description 1.0.12 12.04.11 M* Par 56, 57, Upgrading SL New command Upgrading M* Start parameter Upgrading 1.0.13 16.08.11 P New command Upgrading I New command Upgrading STD Time offset Upgrading M* Parameter 46 Rs232 MGP Parameter 16r Upgrading MS New command Upgrading MGS New command Upgrading 1.0.14 27.12.11 All Combination X1JET new with X4JET, X1JET 1.0.15 30.12.11 All Combination Revision 1.0.16 12.01.12 XML Interface Description New function 1.0.17 20.01.12 LL, LF command description USB Stick description Upgrading 1.0.18 18.04.12 Databar new barcode New function DUN14 new barcode New function Variable Logos, New function No barcode print without data Upgrading Month as characters New parameter 1.0.19 20.07.12 STD Roll-over time in minutes M* Day of the year offset +400 SCL, M* Lenght of cable New command /
parameter

Page 5 of 119
1.0.23 14.08.14 MW Data link New 2.011 1.0.28 01.04.14 HC 8-head New command 8-head mode 1.0.33 30.04.15 Graphic format description additions

Page 6 of 119
Overview of commands
Command Description Response
General
<ESC>* Handshake OK<CR>
<ESC>RST System Neustart Ok<CR>
<ESC>K Select print head None
<ESC>C Clear print memory None
<ESC>C0 Printing pause OK<CR>
<ESC>C1 Continue printing after pause OK<CR>
<ESC>CR Reset ink level OK<CR>
<ESC>R Rinse/spit OK<CR>
<ESC>F Start printing without sensor OK<CR>
<ESC>SU Programmversion update Ok<CR>
<ESC>SCL Cable lenght LX / MX Value<CR>
<ESC>MW Data connection Ok<CR>
<ESC>HC headconfiguration Configuration<CR>
Fields
<ESC>P Text field None
<ESC>B Barcode field None
<ESC>L Logo None
<ESC>X Action field None
<ESC>P Additional line None
<ESC>I Infofield None
Print image management
<STX>TZ………<ETX> Call print image and start printing
<ACK><STX>1OK<ETX>
<ESC>EW Send print image data in memory
<ESC>EX End of transmission OK<CR>
<ESC>EL Receive print image data Print image data OK<CR>
<ESC>ED Directory Name<CR> EX<CR>
<ESC>EQ Delete print image OK<CR>
Parameters
<ESC>*STD Send time and date OK<CR>
<ESC>*GSTD Read time and date Data<CR>
<ESC>MI Send IP Address Ok<CR>
<ESC>MGI Read IP Address Data<CR>
<ESC>M* List of all parameter OK<CR>
<ESC>MG* Read list of all parameter Data<CR>
<ESC>MP Send Password Ok<CR>
<ESC>MGP Read Password Data<CR>
<ESC>MS Send Shiftcode Ok<CR>
<ESC>MGS Read Shiftcode Data<CR>
<ESC>EI Read ink list Daten<CR>

Page 7 of 119
Status
<ESC>SV<CR Version K<version><CR>
<ESC>S1<CR> Status 1 Data<CR>
<ESC>S2<CR> OK, warning, alarm Data<CR>
<ESC>SOP Set output direct Ok<CR>
Memory
<ESC>*WF Sent fonts OK<CR>
<ESC>*CF Clear fonts OK<CR>
<ESC>*LF Query font names Data<CR> EX<CR>
<ESC>EG Sent Logo None
<ESC>*CL Clear logos OK<CR>
<ESC>*LL Query logo names Data<CR> EX<CR>
Action fields
<STX>TZ………<ETX> Fill in action fields <ACK>, <STX>….<ETX>
<STX>CLR<ETX> Clear buffer

Page 8 of 119
ANSI Table
4.4 ANSI- Table
DEC HEX Chr. Name DEC HEX Chr. DEC HEX Chr. DEC HEX Chr.
0 00 ^@ 32 20 Leer 64 40 @ 96 60 '
1 01 ^A SOH 33 21 ! 65 41 A 97 61 a
2 02 ^B STX 34 22 " 66 42 B 98 62 b
3 03 ^C ETX 35 23 # 67 43 C 99 63 c
4 04 ^D EOT 36 24 $ 68 44 D 100 64 d
5 05 ^E 37 25 % 69 45 E 101 65 e
6 06 ^F ACK 38 26 & 70 46 F 102 66 f
7 07 ^G 39 27 ' 71 47 G 103 67 g
8 08 ^H BS 40 28 ( 72 48 H 104 68 h
9 09 ^I TAB 41 29 ) 73 49 I 105 69 i
10 0A ^J LF 42 2A * 74 4A J 106 6A j
11 0B ^K 43 2B + 75 4B K 107 6B k
12 0C ^L 44 2C , 76 4C L 108 6C l
13 0D ^M CR 45 2D - 77 4D M 109 6D m
14 0E ^N 46 2E . 78 4E N 110 6E n
15 0F ^O 47 2F / 79 4F O 111 6F o
DEC HEX Chr. Name DEC HEX Chr. DEC HEX Chr. DEC HEX Chr.
16 10 ^P 48 30 0 80 50 P 112 70 p
17 11 ^Q 49 31 1 81 51 Q 113 71 q
18 12 ^R 50 32 2 82 52 R 114 72 r
19 13 ^S 51 33 3 83 53 S 115 73 s
20 14 ^T 52 34 4 84 54 T 116 74 t
21 15 ^U NAK 53 35 5 85 55 U 117 75 u
22 16 ^V 54 36 6 86 56 V 118 76 v
23 17 ^W 55 37 7 87 57 W 119 77 w
24 18 ^X 56 38 8 88 58 X 120 78 x
25 19 ^Y 57 39 9 89 59 Y 121 79 y
26 1A ^Z 58 3A : 90 5A Z 122 7A z
27 1B ^[ ESC 59 3B ; 91 5B [ 123 7B {
28 1C ^\ 60 3C < 92 5C \ 124 7C |
29 1D ^] 61 3D = 93 5D ] 125 7D }
30 1E ^^ 62 3E > 94 5E ^ 126 7E ~
31 1F ^_ 63 3F ? 95 5F _ 127 7F

Page 9 of 119
DEC HEX Chr. Name DEC HEX Chr. DEC HEX Chr. DEC HEX Chr.
128 80 € 160 A0 Leer 192 C0 À 224 E0 à
129 81 • 161 A1 ¡ 193 C1 Á 225 E1 á
130 82 ‚ 162 A2 ¢ 194 C2 Â 226 E2 â
131 83 ƒ 163 A3 £ 195 C3 Ã 227 E3 ã
132 84 „ 164 A4 ¤ 196 C4 Ä 228 E4 ä
133 85 … 165 A5 ¥ 197 C5 Å 229 E5 å
134 86 † 166 A6 ¦ 198 C6 Æ 230 E6 æ
135 87 ‡ 167 A7 § 199 C7 Ç 231 E7 ç
136 88 ˆ 168 A8 ¨ 200 C8 È 232 E8 è
137 89 ‰ 169 A9 © 201 C9 É 233 E9 é
138 8A Š 170 AA ª 202 CA Ê 234 EA ê
139 8B ‹ 171 AB « 203 CB Ë 235 EB ë
140 8C Œ 172 AC ¬ 204 CC Ì 236 EC ì
141 8D • 173 AD 205 CD Í 237 ED í
142 8E Ž 174 AE ® 206 CE Î 238 EE î
143 8F • 175 AF ¯ 207 CF Ï 239 EF ï
DEC HEX Chr. Name DEC HEX Chr. DEC HEX Chr. DEC HEX Chr.
144 90 • 176 B0 ° 208 D0 Ð 240 F0 ð
145 91 ‘ 177 B1 ± 209 D1 Ñ 241 F1 ñ
146 92 ’ 178 B2 ² 210 D2 Ò 242 F2 ò
147 93 “ 179 B3 ³ 211 D3 Ó 243 F3 ó
148 94 ” 180 B4 ´ 212 D4 Ô 244 F4 ô
149 95 • 181 B5 µ 213 D5 Õ 245 F5 õ
150 96 – 182 B6 ¶ 214 D6 Ö 246 F6 ö
151 97 — 183 B7 · 215 D7 × 247 F7 ÷
152 98 ˜ 184 B8 ¸ 216 D8 Ø 248 F8 ø
153 99 ™ 185 B9 ¹ 217 D9 Ù 249 F9 ù
154 9A š 186 BA º 218 DA Ú 250 FA ú
155 9B › 187 BB » 219 DB Û 251 FB û
156 9C œ 188 BC ¼ 220 DC Ü 252 FC ü
157 9D • 189 BD ½ 221 DD Ý 253 FD ý
158 9E ž 190 BE ¾ 222 DE Þ 254 FE þ
159 9F Ÿ 191 BF ¿ 223 DF ß 255 FF ÿ
DEC Decimal HEX Hexadecimal Chr. Character

Page 10 of 119
Creation of the character 128-255 in the text processing:
Switch on "Num-Lock", push and hold the "ALT"- key. For the ‰- character (Code 137) you must type "0137" in ten-Block and loose the „ALT“-key. The character code must be wrote in decimal diction with 4 character.
Control character description: <x> Control characters are displayed in this document as Characters in „<> The following control characters are used: Control character Hexadecimal Decimal <SOH> 01 1 <STX> 02 2 <ETX> 03 3 <EOT> 04 4 <ACK> 06 6 <TAB> 09 9 <CR> 0D 13 <NAK> 15 21 <ESC> 1B 27

Page 11 of 119
Interface EIA-232 (RS232)
iJET No EIA 232 existent
X1JET HP / X1JET LX / X1JET MX / X1JET XR Serial Interface cable, socket 9-pole, to connector 15-pole (Art.No.: 72800006)
Configuration: PC EIA232 X1JET 9-pole socket 15-pole connector PIN 2 ------------------------------------- PIN 7 PIN 3 ------------------------------------- PIN 14 PIN 5 ------------------------------------- PIN 1
X2JET plus Touch
Serial cable, socket 9-pole, to plug 25-pole
Configuration: PC EIA232 X2JET plus 9-pole socket 25-pole plug PIN 2 ------------------------------------- PIN 3 PIN 3 ------------------------------------- PIN 2 PIN 5 ------------------------------------- PIN 7
X4JET / X4JET plus Touch
Serial null modem cable, socket 9-pole, to socket 9-pole
Configuration: PC EIA232 X4JET / plus 9-pole socket 9-pole socket PIN 2 ------------------------------------- PIN 3 PIN 3 ------------------------------------- PIN 2 PIN 5 ------------------------------------- PIN 5
Settings: Baud rate 1200 – 115000 default: 115000 Equality none, even, odd default: none Stopbits 1,2 default: 1 Databits 7,8 default: 8 Handshake Xon – Xoff

Page 12 of 119
Description Interface USB iJET USB-A for Data stick mini-USB-B for PC communication
X1JET USB-A for Data stick USB for PC communication by USB – EIA232 Converter (Art.No.: 72800007)
X2JET plus Touch X4JET / X4JET plus Touch USB-A for Data stick USB-B for PC communication

Page 13 of 119
Description Interface Ethernet
RJ45 connection socket Plug connection: Pin1 - Transmit+; Pin2 - Transmit-; Pin3 - Receive+; Pin6 - Receive- Connection via Standard TCP/IP settings Set the IP address on the system or via interface. Port 10200 for <ESC> sequences – can be changed via interface command. Port 10300 for I/O-Server (online feedbacks) – The Port by iDesign will be rise for each further system by 1. Port 10400 for XML-data transfer - fix

Page 14 of 119
XML Data communication *4 A data set can send for a print image switch and filling of variable fields on port 10400 via Ethernet. The data set is like a TZ-command to head 1 with single print mode. A print image switch may take place if all variable data sets of the previous print image are print.
Command description: <content Proceed of a command </content> Command end <GTIN>01234567890128</GTIN> Variable Data GTIN Field <PPN>111234567842</PPN> Variable Data PPN Field <LOT>1A234B5</LOT> Variable Data LOT Field <EXP>151231</EXP> Variable Data EXP Field <SN>1234567890123456</SN> Variable Data SN Field
Example: <content dfi="GS1"> <GTIN>01234567890128</GTIN> <LOT>1A234B5</LOT> <EXP>151231</EXP> <SN>1234567890123456</SN> </content>
Print image example: X;#=1;g=1:P1-0-00000-016;A2,5mm;GTIN ~xxxxxxxxxxxxx~ X;#=2;g=1:P1-0-000000064;A2,5mm;LOT ~xxxxxxx~~ X;#=3;g=1:P1-0-000000140;A2,5mm;EXP ~(3)5xx~.~(3)3xx~.~(3)1xx~ X;#=4;g=1:P1-0-000000220;A2,5mm;S-N ~xxxxxxxxxxxxxxxx~ X;#=5;g=1:BF0l0300009600020;Auto;(01)~(1)xxxxxxxxxxxx~(10)~(2)xxxxxxx~(17)~(3)xxxxxx~(21)~(4)xxxxxxxxxxxxxxxx~
Response: <RES>1</RES>
Explanation: <RES>0 = Transfer failure <RES>1 = Transfer Ok <RES>2:1 = Print ready head 1 <RES>3:1E1 = Failure
<Failure code> 1- 9 1 = Photo sensor activation without data 2 = unknown command 3 = not existing Print image name 4 = not existing print head 6 = System not ready

Page 15 of 119
General
Text with star: Some functions are not available in all systems. These are signed with a star and a number. *1 = only for X1JET *2 = only for multi head system (X2JET / X4JET) *3 = only for a group or channel (X4JET) *4 = only for iJET *5 = not for iJET
Print image name name.xyz name: Long names like under “Windows”, max.25 character. Max. 25 characters for print
images, which will send by interface. 1.00I to 9.00I for the 9 Images for X1JET, which can call up with the keys. xy: 00 (fixed) the actual selected print head is used. z: I HP and LX J MX R XR H CL 2.5 M Maxiline
Example:
Milk.00I

Page 16 of 119
USB-stick communication *1 Load print images incl. fonts, logos and parameters automatically with an USB-stick. The 9 print images of the X1JET can be selected by successive press of “123”
button. Example 3 press select print image 3.00I Interface commands can automatically be done using the USB-stick. After the connection of a USB stick an automatic run of commands will be made to query the system status. At the same time a directory „Markoprint“ and a subdirectory with the name of the serial number of the system, i.e. „L12003-x1“ will be created in the main directory of the USB stick. There will be saved all system specific data. The stick must be connected once on the system to post this information, so that the iDesign software can work with the system after that
Command sequence: <Esc>SV<CR> <Esc>S1<CR> <Esc>S2<CR> <Esc>MG*<CR> <Esc>MGI<CR> <Esc>MGP-<CR> <Esc>MGPC<CR> <Esc>MGS-<CR> <ESC>ED----;<CR> <Esc>*LL<CR> <Esc>*LF<CR> <Esc>*GSTD<CR> <ESC>EI----;<CR> The command sequence is in the „Command.ast“ file in the HMI directory of the system and will be transfer with the program update. Afterwards a „Status.ast“ file will be written on the USB-stick in the subdirectory of the system. Also a Log.txt file, in which all successful data transfers and failures are logged.

Page 17 of 119
Example Content of the Status.ast file: S: <Esc>SV<CR> R: 0001:11(X1Jet)Version 0.001c<CR> S: <Esc>S1<CR> R: 0:0000:099:0:0:1.00I:0:0:1:000001:0<CR> S: <Esc>S2<CR> R: 01000000;00000000<CR> S: <Esc>MG*<CR> R: 0000;0100;0003;0000;0000;0000;0010;0010;0000;0300;0100;0000;0110;0190;0190;0000;0005;0000;0005;0010;0010;0010;0000;0000;0000;0045;0020;0000;0000;0001;0001;0000;0000;0000;0000;0000;0000;0000;0000;0000;0100;0100;0000;0000;3001;0000;0000;0000;0000;0000;1020;3000;0000;0000;0000;0000;0000;0000<CR> S: <Esc>MGI<CR> R: 192.168.8.224;255.255.255.0;0.0.0.0;0.0.0.0<CR> S: <Esc>MGP-<CR> R: Free:8E40D951F9330E49BAD2CBFF7C5F670E:09; user:70AC589DFE08CC12D0692374430F8B9D:09<CR> S: <Esc>MGPC<CR> R: 2122201100000002:0050C2A65392:L12003-x1<CR> S: <Esc>MGS-<CR> R: <CR> S: <ESC>ED----;<CR> R: 1.00I<CR><ESC>EX<CR> S: <Esc>*LL<CR> R: 03438:Cow<CR>08966:hp<CR>13102:PostOfficeLogo<CR>31562:BLWG296<CR> 09089:Cow300<CR>20853:fmb293<CR>06510:Compliments4<CR><ESC>EX<CR> S: <Esc>*LF<CR> R: :A1,5mm<CR>:A1,5mmB<CR>:A10mm<CR>:A10mmB<CR>:A12mm<CR>:A12mmB<CR>:A1mm<CR>:A1mmB<CR>:A2,5mm<CR>:A2,5mmB<CR>:A2mm<CR>:A2mmB<CR>:A3mm<CR>:A3mmB<CR>:A4mm<CR>:A4mmB<CR>:A5mm<CR>:A5mmB<CR>:A6mm<CR>:A6mmB<CR>:A7mm<CR>:A7mmB<CR>:A8mm<CR>:A8mmB<CR>:A9mm<CR>:A9mmB<CR>:dummy<CR><ESC>EX<CR> S: <Esc>*GSTD<CR> R: 1235062001125<CR> S:<ESC>EI----;<CR> R:STABL<SOH>004<EOT>DIBL<SOH>005<EOT>SCRD<SOH>008<EOT>SCGN<SOH>009<EOT>SCBLU<SOH>010<EOT>WEBL<SOH>011<EOT>UVINV<SOH>012<EOT>IRINV<SOH>013<EOT>MIBL2<SOH>014<EOT>G1BL<SOH>015<EOT>CMBLK<SOH>025<EOT>RCBLU<SOH>026<EOT>RCRD<SOH>027<EOT>UVC1<SOH>028<EOT>BEABL<SOH>030<EOT>UltraBlack<SOH>031<EOT>FastSolid<SOH>033<EOT>CMBLK2<SOH>034<EOT>NPBLK<SOH>035<EOT>FSBLK<SOH>036<EOT>PTBLK<SOH>037<EOT>Bulk400<SOH>099<EOT><CR> Example content of the LOG.txt file: B:\Markoprint\L12003-x1\Label\*.00I -> Dir not found B:\Markoprint\L12003-x1\Fonts\*.ft3 -> Dir not found B:\Markoprint\L12003-x1\Logos\*.bmp -> Dir not found
Page 18 of 119
Directory structure: Markoprint L12003-x1 Status.ast L12004-x1 Status.ast Command.ast Result.ast Label 1.00I 2.00I Fonts A4mm.ft3 A6mm.ft3 Logos Cow.bmp HP.bmp - Global.ast is only proceed if no Command.ast file is available for the system. - Result.ast Result of Global.ast The 5 print images for X1JET, which can call up with the keys: 1.00I to 5.00I Interface commands can proceed automatically with the USB-stick.
Instruction execution: A file “Command.ast” must exist in the sub folder Markoprint/ and there in the sub folder with the serial number of the USB-stick to execute interface commands on a selected system. If the “Command.ast” file is in the main folder of the stick it will be executed on any system if there is no “Command.ast” in the folder with the serial number.
Command.ast Executed interface commands The commands will be inserted as described in the interface description The control character will be written in angle brackets. I.e.: Carriage Return: <CR>
The file is a text file and can also create with the iDesign software in the terminal.
Content i.e.: <Esc>*<CR> <Esc>SV<CR> Result.ast Result file of the instruction execution
After the command.ast file is processed, a result protocol will be written in the result.ast file.
The existing result.ast file will be overwritten. Content i.e.: S: <Esc>*<CR> R: Ok<CR> S: <Esc>SV<CR> R: 0001:11(X1Jet)Version 0.001c<CR> The transfer of the data and commands happen by the X1JET directly after the connection of the stick. After this the „Status.ast“ file is created.
Operation: After the connection and identification of the stick, the data will be read from the stick and the Status LED flashes quickly meanwhile (4x/second) Thereafter, data will be written on the stick, during that time the Status LED flashes slowly (2x/second). If the LED lights constant, the stick can be removed after 2 seconds.
Page 19 of 119
Fault code Erra<CR> When an error message appears after a data transfer, the error can be specified more precisely by a fault code.
Response:
Erra<CR>
Parameter: Value:
a = <fault code> 1 = Photocell triggered without data 2 = Unknown command 3 = Print image name not present 4 = Head not present 6 = System not ready
Example:
Err2<CR> 2 = Unknown command Command was not recognised and cannot be executed

Page 20 of 119
Command: <ESC>* Handshake Handshake is to test communication with printer.
Syntax:
<Esc>*<CR>
Parameter: Value:
None
Response:
Ok<CR>
Example: send: <ESC>*<CR> read: Ok<CR>

Page 21 of 119
Command: <ESC>RST System Restart After sending this command the controller will restart. This is used after changing the configuration or after software update.
Syntax:
<Esc>RST<CR>
Parameter: Value:
Keine
Response:
Ok<CR>
Example: send: <ESC>*<CR> read: Ok<CR> The system restarts in the same way as it was switched off.

Page 22 of 119
Command: <ESC>K Select head *2 The corresponding head must be selected before each print assignment or head specified command. This is only for multi-head systems necessary. For multi-head print images the first head of the head group will be specified. i.e.: for 2x Twin head: K1 for the first Twin head and K3 for the second Twin head For the X2JET the second head must be selected as K3 (Cartridge3) For the XB8JET (CL 3.0 8head) the second board is named as head 5-8. The head selection with connected commands has to take place once only.
Syntax:
<Esc>Kx<CR>
Parameter: Value X4JET: Value X2JET:
x = <headnumber> 1 = head 1 1 = head 1 2 = head 2 2 = not used 3 = head 3 3 = head2 4 = head 4 4 = not used
Value XB4JET: Value XB8JET:
x = <Kopfnummer> 1 = head 1 5 = head 1 - 2.board 2 = head 2 6 = head 2 - 2.board 3 = head 3 7 = head 3 - 2.board 4 = head 4 8 = head 4 - 2.board
Response:
No reply
Example: send: <ESC>K2<CR> send: <ESC>CR<CR> read: Ok<CR>

Page 23 of 119
Command: <ESC>C Delete print memory The print memory will be deleted. The status of the system is switched to warning (no print image) after sending this command. Attention! Please use the command for continuous printing only, not for single print.
Syntax:
<Esc>C<CR>
Parameter: None
Response:
No

Page 24 of 119
Command: <ESC>C0 Print pause/stop Printing will be stopped without clearing the print memory. With <ESC>C1<CR> the Print image will continue to be printed with the variables entered and with the current count. After the command is sent the status will switch to warning. Attention! Please use the command for continuous printing only, not for single print.
Syntax:
<Esc>C0<CR>
Parameter: None
Response:
None
Example:
send: <ESC>C0<CR> read: Ok<CR>
Page 25 of 119
Command: <ESC>C1 Continue printing after pause The stopped print image in the print memory will be restarted. The last variables/counts will continue to be printed. Attention! Please use the command for continuous printing only, not for single print.
Syntax:
<Esc>C1<CR>
Parameter: None
Response:
Ok<CR>
Example: send: <ESC>C1<CR> read: Ok<CR>

Page 26 of 119
Command: <ESC>CR Reset ink level The ink level of the head selected will be reset to 100%. The print head must be selected using <ESC>K1<CR> (or K2).
Syntax:
<Esc>CR<CR>
Parameter: None
Response:
Ok<CR>
Example: send: <ESC>K2<CR> send: <ESC>CR<CR> read: Ok<CR>
Page 27 of 119
Command: <ESC>R Spit Rinses/spits all nozzles once. Start purging cycle for X1JET MX Spitting will be carried out as soon as the command is received, regardless of the photocell.
Syntax:
<Esc>R----;aaaa<CR>
Parameter: Value:
aaaa = Number of drop rows 0001 – 2000 >0000 bei X1JET MX for cleaning cycles
Response:
Ok<CR>
Example: send: <ESC>R----;0025<CR> read: Ok<CR>

Page 28 of 119
Command: <ESC>F Start printing without photocell Printing will be started as soon as the command is received, regardless of the photocell.
Syntax:
<Esc>F<CR>
Response:
Ok<CR>
Example: send: <ESC>F<CR> read: Ok<CR>
Print will start after set print delay. If the <ESC> F command is sent before the print build-up is complete, the realization of the command will be delayed and is realized after the print build-up immediately.
Page 29 of 119
Command: <ESC>SU Update program version A version, which is pre-loaded via FTP server will be activate. The file of the version has the extension .IMG. i.e.: StickV1004k_x4Jet.IMG The controller restarts after sending the command and it can’t communicate. Don’t cut off the power supply during the program update.
Syntax:
<Esc>SU----;x.xxxy<CR>
Parameter: Wert:
x.xxx = Program version 1.004 y= Test version k (a-z)
Response:
Ok<CR> Erra<CR> a = 9 : False instruction format a = 11 : Update-file not found a = 12 : Unknown file content a = 13 : Updatefile not for iJet / X1JET / X4JET a = 14 : Checksum not correct

Page 30 of 119
Command: <ESC>SUS Get the last update status Shows the status of the last update.
Syntax:
<Esc>SUS---;<CR>
Parameter: Value:
No
Response: Ok<CR> : Update Ok No Status<CR> : No status available Init Update<CR> : Update prepared Bad File<CR> : Unknown file content Update Error<CR> : Update failure

Page 31 of 119
Command: <ESC>SCL Set lenght of cable If the lenght of a printhead cable for LX or MX is longer than 13m the lenght must be set. The lenght can be set only per channel. The maximum lenght for HP is 13m, for LX and MX and XR 50m After sending the command without value, the value which is set will be responsed, the set value will not be changed.
Syntax:
<Esc>SCL----;[Len]<CR>
Parameter: Value:
Len Lenght of cable in m 1 - 50
Response:
Len<CR>

Page 32 of 119
Command: <ESC>HC Number of heads for X1JET networking The HC command defines the number of print heads with the networking of multiple X1JET Stitch to one print image. Up to 16 heads can be linked. For the networking the X1Jet must have a version >2.012j. Via the IP address of the first X1JET activate the multiple head. The IP address of the next X1JET must set with the <ESC>MI command in the first X1JET. Each additional X1JET receives an own address and the address of the following X1JET. The last one receives his own address only. The HC command may sent only when the systems are linked with the MI command.
Syntax:
<Esc>HC----;[Head number]<CR>
Parameter: Value:
Head number. 02 to 16 01 – Reset to single head Without – query the configuration
Response:
Head conf<CR> Each head reports a 4-digit number back. The first two digits represent the number of heads before this head, the next two digits for the number of heads behind the head incl himself. The first 4 digits reflect the total number of the linked heads. Err<CR> Err returns when no connection can be made to one head.
Examples: 07.06.2014 08:20:49 618 | send: <ESC>K1<CR> 07.06.2014 08:20:49 624 | send: <ESC>HC----;04<CR> 07.06.2014 08:20:49 633 | read: 0004;0103;0202;0301<CR> 07.06.2014 08:20:49 618 | send: <ESC>K1<CR> 07.06.2014 08:20:49 624 | send: <ESC>HC----;<CR> 07.06.2014 08:20:49 633 | read: 0004;0103;0202;0301<CR>
Attention! If the system should controled as single system, the parameter must be set to „01“. The IP address in the MI command must set to 0.0.0.0. Response of the TZ command: 07.06.2014 08:18:26 326 | send: <ESC>K1<CR> 07.06.2014 08:18:26 331 | send: <STX>TZ1.00I;11<CR><ETX> 07.06.2014 08:18:26 340 | read: <ACK> 07.06.2014 08:18:26 358 | read: <STX>3OK<ETX><STX>2OK<ETX> 07.06.2014 08:18:26 364 | read: <STX>1OK<ETX>
Page 33 of 119
Command: <ESC>HC Head configuration for 8head systems The <ESC>HC command can use for an application up to 4 heads alternative to par30 of the <ESC>M* command. The 8-head operation works analog with 8 numbers. An operation without 8-head connection uses the 4 usual numbers for the head configuration. If the command is sent without a value, the value returns in the response without a change of the set value. Both boards must have a firmware >2.012b for a 8-head configuration. The head configuration is set for both boards with the <ESC>HC command automatically. The IP address of the second board must set with the <ESC>MI command in the first board.
Syntax:
<Esc>HC----;[Head conf]<CR>
Parameter: Value:
Head conf. 4 or 8 numbers See also <ESC>M* command par30
Response:
Head conf<CR> Err<CR>
Examples: 1111 = 4 Single heads 11111111 = 8 Single heads 4000 = 1 Quad head print image (4-cartridges) from head#1 80000000 = 1 8-fold head print image (8-cartridges) from head#1 2020 = 2 Twin head print images (2-cartridges) from head#1 and from head#3 20202020 = 4 Twin head print images (2-cartridges) from head#1, from head#3, from head#5 and from head#7

Page 34 of 119
Command: <ESC>P Text field Sends text field with fixed text. In the case of text fields with several lines, the lines will be separated by tabs (HEX 09).
Syntax:
<Esc>Ps-w-xxxxxyyyy;fontname;...<CR>
Parameter: Value: s = <Zoom> 1 fixed value
w = angle 0 = 0°, 1 = 90° 2 = 180°, 3 = 270° xxxxx = <X-Position> 00000 – 99999
yyyy = <Y_Position> 0000 – 9999 fontname = <font name> max. 15 digits … = <text information> all ANSI characters (32 – 256)
Response: No response
Example 1:
<Esc> P1-0-000000000;4mm;Apricots, Erdbeer<Tab>Waldbeeren<CR>
Example 2:
<Esc>P1-0-000000000;A10mm;2555645<CR>

Page 35 of 119
Command: <ESC>Psr Text field as graphic Send text field with fixed text. The text files will be passed graphically. This command allows using any “Widows” fonts in a text field. <SOH> separates the fixe text command from the graphic command.
The "+" indicates a new command.
"Arial_96_0_0" – „Windows“ font information - Name_Height_Characterset_Style
"13254324 يسبلسيبسليبليسبليسب イスカイスカイスカイス" - Text information Unicode
" EG----;18828;;1494;288;36; - The known Logoheader – Logo name is blank.
Syntax:
P1+0-000000000;Bradley Hand ITC_-76_0_0;0041,0042,0043,0031,0032,0033,>1:1<SOH>EG----;02127;;273;96;12;0S1C,0S38,0S7,0SC,0R18,0R3,…
Parameter: Value: s = <Zoom> 1 fixed value
+ = Graphic command 1 = Transfer graphic w = angle 0 = 0°, 2 = 180° 1 = 90°, 3 = 270° xxxxx = <X-Position> 00000 – 99999
yyyy = <Y_Position> 0000 – 9999 fontname = <Fontname> max.15-digits … = <Text information> all ANSI characters (32 – 256)
Response: No response
Example1: <ESC>P1+0-000000000;Arial_-123_0_0;0031,0033,0032,0035,0034,0033,0032,0034,0020,0020,0020,064A,0633,0628,0644,0633,064A,0628,0633,0644,064A,0628,0644,064A,0633,0628,0644,064A,0633,0628,0020,0020,0020,0020,0020,0020,FF72,FF7D,FF76,FF72,FF7D,FF76,FF72,FF7D,FF76,FF72,FF7D,0022,>1:1�EG----;18268;;2465;144;18;,,,,,,,,,,,,,0OFFC,….<CR>

Page 36 of 119
Graphic command description The monochrome graphics - array columns compressed. The coordinate origin is the upper left. Counting from 0 to column width in pixels - 1. The column is numbered from 0 to height in pixels. The height in pixels must be a multiple of 8. The first to be encoded byte is top left and is divided into 2 x 4 bits. (Nibble) sample 1
orientation of bytes sample X=black / 0=white
[3] [X] [2] [0] [1] [X] [0] [X] Nibble 1 = 1101 = dec. 11 = hex B
[3] [0] [2] [0] [1] [X] [0] [0] Nibble 2 = 0100 = dec. 2 = hex 2 first byte = B2 Each column is separated by a comma. <CR> = dez. 13 <ESC> = dez. 27 <ESC>EG----;00044;logo;16;24;3;B2,,,,,,,,,,,,,,,<CR>

Page 37 of 119
Sample2
Two identical nibble be written next to each: FF If number of nibble >1 and <22 is numbered G-Z: FG 2 repeats equals G. 22 repeats equals Z From more than 32 repeats a new byte is written and again the same FF to FZ. EG----;00260;logo;50;56;7;FF,,FG,,,,,,,,,,,,,,,,,0I1FIC,0I1FIC,0I1FIC,0I1FIC,0I1FIC,0I1F0G7C,0I1F0G7C,0I1F0G7C,0I1F0G7C,0I1F0G7C,0I1F0G7C,0I1F0G7C,0I1F0G7C,0I1F0G7C,0I1F0G7C,0I1F0G7C,0I1F0G7C,0I1F0G7C,0I1F0G7C,0I1F0G7C,0I1FIC,0I1FIC,0I1FIC,0I1FIC,0I1FIC,,,,,, From number 22 is re-numbered. The green areas are empty column. In this case is nothing between the commas. The red areas are the rest of the column. This will be also ignored.

Page 38 of 119
Command: <ESC>B Barcode field
Syntax:
<Esc>Bswchhhhxxxxxyyyy;fontname;...<CR <Esc>Bswchhhhxxxxxyyyy:i1=v1:i2=v2:...:in=vn;fontname;...<CR
Parameter: Value: s = <Zoom> 1 – 9 or (A-Z for 2D code and barcode)
w = <angle> 0 = 0°, 1 = 90°, 2 = 180°, 3 = 270° turning with 2D codes not possible! c = <code> A: EAN -13 12 digits
B: EAN -8 7 digits C: Code 2 of 5 40 digits even number of digits D: Code 39 25 digits E: Code 128 40 digits F: EAN 128 40 digits with (00) <18 digits G: DUN 14 14 digits with 13 digits automatic
calculation of check sum Modulo10, Ratio 1:2 H: UPC-A 11 digits I: 2 of 5 with Chk 39 digits odd number of digits J: UPC-E 6 digits
K: Data matrix code ECC200 L: EAN data matrix M QR-Code
N: DUN 14 14 digits with 13 digits automatic calculation of check sum Modulo10, Ratio 1:3
O: PPN-Code P: Databar omnidirectional Q: Databar Expanded
hhhh = <height> 0000 – 9999 xxxxx = <X-Position> 00000 – 99999
yyyy = <Y_Position> 0000 – 9999 optional: i1..in = Field-ID (description) m = plain writing grouping: group length
n = plain writing grouping: Number of space character between the groups
v1..vn = content 0-9 fontname = <Fontname> max. 15 digits no font name no plain text For 2 D codes enter the size (see next page) … = <code information> Depending on the code, all ANSI characters (32 – 256) for Datamatrix and QR-Code control characters can be send as HEX values.Not for GS1 Datamatrix! The HEX value must be written in angle brackets. For example: <0D> for CR. The angle brackets must be set. If no <font name> is given, no plain text will be output.

Page 39 of 119
Response: No response
Example 1:
<Esc>B30A0300000000000;2;623457245724<CR>
Example 2:
<Esc> B30E0300000000000:m=4:n=2;A2mm;012345678912<CR>

Page 40 of 119
Special features of the data matrix code In the data matrix code, instead of font names, the size is indicated: e.g. B10J0060000000000;16x16;012345678901
If 'auto' is indicated, the size will be determined automatically. e.g. B10J0060000000000;Auto;854784578474917835938649561345913459098165002560560456
Auto – the optimum size will be determined automatically By the zoom it’s also possible to enter A-Z also instead of 1-9 in order to get finer tunings. Zoom 1: A black square consists of 4x4 pixel at 600x600dpi Zoom 2: A black square consists of 8x8 pixel at 600x600dpi … Zoom A: A black square consists of 2x2 pixel at 600x600dpi Zoom B: A black square consists of 4x4 pixel at 600x600dpi Zoom C: A black square consists of 6x6 pixel at 600x600dpi Zoom D: A black square consists of 8x8 pixel at 600x600dpi ... Half of pixel will be print at 300x300dpi. Zoom A: A black square consists of 1x1 pixel at 300x300dpi The datamatrix can contain control characters. These are added as HEX value in brackets. For example: <OD> for CR oder <1B> for ESC. Attention: not allowed for GS1 Datamatrix.

Page 41 of 119
Square sizes: Data Content Numeric Alphanumeric Byte 10x10 6 3 1 12x12 10 6 3 14x14 16 10 6 16x16 24 16 10 18x18 36 25 16 20x20 44 31 20 22x22 60 43 28 24x24 72 52 34 26x26 88 64 42 32x32 124 91 60 36x36 172 127 84 40x40 228 169 112 44x44 288 214 142 48x48 348 259 172 52x52 408 304 202 64x64 560 418 278 72x72 736 550 366 80x80 912 682 454 88x88 1152 862 574 96x96 1392 1042 694 104x104 1632 1222 814 120x120 2100 1573 1048 132x132 2608 1954 1302 144x144 3116 2335 1556 Rectangular sizes: 8x18 10 6 3 8x32 20 13 8 12x26 32 22 14 12x36 44 31 20 16x36 64 46 30 16x48 98 72 47
Page 42 of 119
Special features of the QR-Code In the QR code, instead of font names, the size and redundancy is used: Font name format: xyy.zz
Parameter: Value:
x = Error Correction Level L,M,Q oder H
L = 7% M=15% (Standard) Q=25% H=30%
y = Code Version 01..28 oder Auto see table (If the code size isn’t enough for the given data, the next suitable code is used.
.zz = Mask (Optional) 01..08 (Pattern Mask Specification)
Example <Esc>B20M0060000000000;H01;01234567890<CR> If 'Auto' is used, the size will be determined automatically.
Example <Esc>B10M0060000000000;Auto;8547845784749178359386495613459134590981650025605<CR> Auto – the optimum size will be determined automatically, M will be set as standard.
Example QR-Code as actionfield: <Esc>X;#=0;g=6:B30M0300003400020;Auto;123456789A~abcdefgh~BC~zzzzzz~D123456789<CR> The QR code can contain control characters. These are added as HEX value in brackets. For example: <OD> for CR oder <1B> for ESC.
Page 43 of 119

Page 44 of 119

Page 45 of 119

Page 46 of 119
Command: <ESC>L Logo Insert logo.
Syntax:
<Esc>Lsmw-xxxxxyyyy;name<CR>
Parameter: Value: s = <Zoom> 1 fixed value
m = memory - Flash, Logo stored in the logo memory 1 RAM, one logo can be overwritten (temp.). w = angle 0 = 0°, 1 = 90°
2 = 180°, 3 = 270° xxxxx = <X-Position> 00000 – 99999
yyyy = <Y_Position> 0000 – 9999 name = <logo name> max. 15 digits
Response:
No response
Example:
<Esc>L1-0-000000044;MOP<CR>

Page 47 of 119
Command: <ESC>L + STR$LGO Logo/Graphic embedded into print message DoubleClick on the logo field in order to see the follow menu:
If Size and aspect ratio is selected it is possible to change this with the mouse. The result graphic will be stored into the L command of the print message. A reference to the original graphic file still exists for further adjustments without loss quality.
P1+0-000000000;Arial_-128_0_0;STR$LGO>2.bmp>1:1�EG----;06938;;256;256;32;,,,,,,,,,,,03FZZTC,03FZZTC, … ,,,,
P1+0-000000000;Arial_-128_0_0; : see chapter „Text fiel das graphic“ STR$LGO : Identifier for an embedded graphic field 1:1 : aspect ratio to original graphic <SOH> : separator tot he graphic command EG----;… : graphic command, see chapter „“

Page 48 of 119
Command: <ESC>X Action field – remote field Action fields are special text or barcode fields in a print image that can be filled with data and called for printing over an interface. For a manual print image assignment the action fields are queried in the display. (As variable fields) An action field includes a tilde ('~'). This character appears by pressing the "Alt Gr" and the "+" keys. If an action field is entered, but a link with other fields shouldn’t be print, This field can entered with a „Dummy“ font. The field will be shown in the iDesign software, but will not print.
Syntax:
<Esc>X;#=1;i1=v1;i2=v2;...;in=vn:P...<CR> <Esc>X;#=1;i1=v1;i2=v2;...;in=vn:B...<CR> <Esc>X;#=1;i1=v1;i2=v2;...;in=vn:L...<CR>
Parameter: Value:
i1..in = field ID v1..vn = content
ID Description # Field number 1-25 = Consecutive numbering of the fields, query in this order
Field number >50 are reserved for variable, date and counter field.
a Counter starting value up to 12 digit b Counter repeat c Counter increment d Counter ending value up to 12cdigit e Date offset YYMMDDD f Info text variable field g Flags 0: variable field 1: counter 2: date for combination the value will be added. h Variable field specification i actual counter value
info = info text is displayed when the variable field is queried. An info text is recommended when there are several variables in a print image.
P.. = <text field> as text command B.. = <Barcodefield> as barcode command L.. = <Logofeld> as Logo command <Esc>X;#=1;f=Logo;h=3:L1-0-000000000;logo~y~
Barcode plain writing lines grouping k Number of signs per group l Number of spaces between the groups

Page 49 of 119
Response:
No response
Example: iDesign software entry: A remote field is entered with ~xxxx~. The number of “x” shows how many characters can be used in the remote field. Alternative ~y~ can be used for variable length of an remote field.
Page 50 of 119
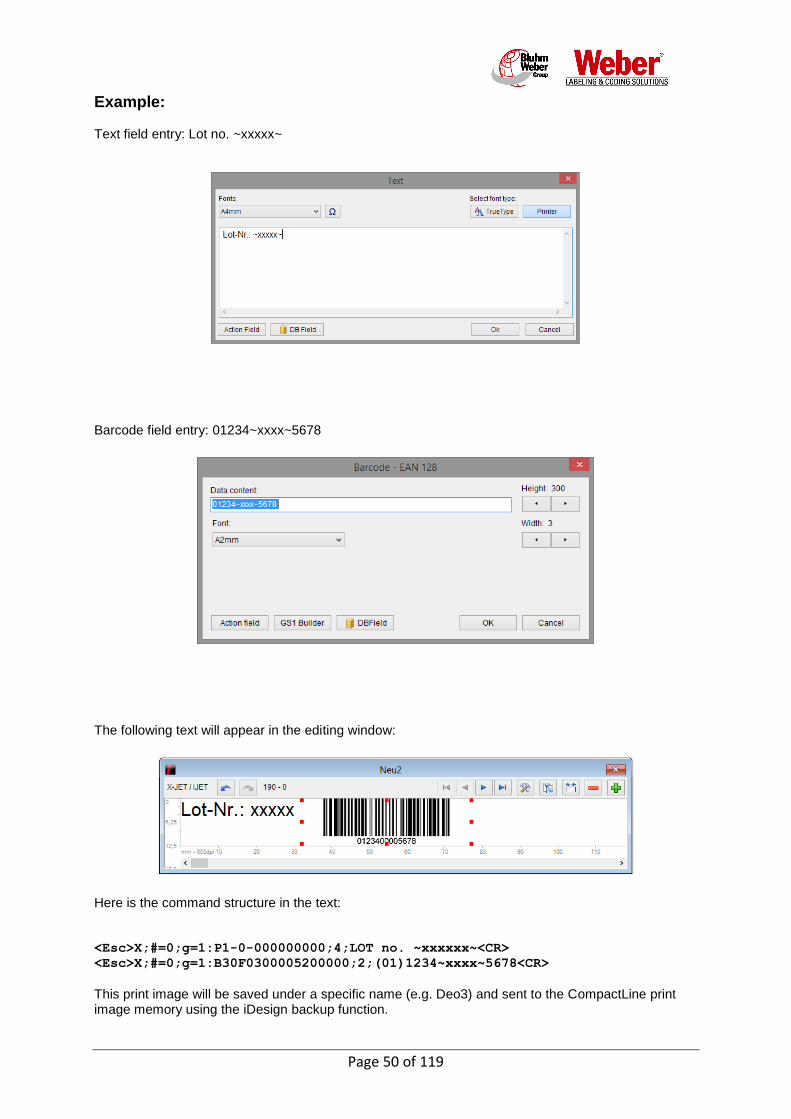
Example:
Text field entry: Lot no. ~xxxxx~
Barcode field entry: 01234~xxxx~5678
The following text will appear in the editing window:
Here is the command structure in the text: <Esc>X;#=0;g=1:P1-0-000000000;4;LOT no. ~xxxxxx~<CR>
<Esc>X;#=0;g=1:B30F0300005200000;2;(01)1234~xxxx~5678<CR>
This print image will be saved under a specific name (e.g. Deo3) and sent to the CompactLine print image memory using the iDesign backup function.
Page 51 of 119
Action field functions:
Placeholders, which are defined as follows and used to enter the information:
a -tens place day b -ones place day c -tens place month d -ones place month e -thousands place year f -hundreds place year g -tens place year h -ones place year i -tens place hour j -ones place hour k -tens place minute l -ones place minute m -tens place second n -ones place second ooo -Month in Characters (APR,MAY) ppp -Day of the year q -Day of the week rr -Calendar week s -Hour as character (e.g. letters 0=A, 1=B, …, 23=Z) t -Shift code (max. 4 characters) u -Hundreds place day of the year v -Tens place day of the year w -Ones place day of the year x -Data transfer from interface y - dynamic datalenght transferring from interface ~y~ z -Counter function zzzz – 4-digit counter (max.8-digit) +++z – 4-digit counter without leading zeros (right aligned) ----z – 4-digit counter without leading zeros (left aligned)
A -Tens place day with zeros hidden B -Day as character (e.g. Letters 1-9 =A, 10-19=B, 20-29=C, 30,31=D) C -Tens place month with zeros hidden D -Month as character (e.g. letters 1=A, 2=B, …, 12=M) G -Tens place year with zeros hidden H -Year ones place as character (e.g. 0=C, 1=M, 2=E, 3=A, 4=D, 5=J, 6=O, 7=H, 8=N, 9=S) I -Tens place hour with zeros hidden K -Tens place minute with zeros hidden L -Minutes as character (e.g. letters 0=A, 1=B, …, 5=F) M -Tens place seconds with zeros hidden Q -Weekday as character (e.g. letters 1=A, 2=B, …, 7=G)
X - Y -Print ready signal Z -Counter as character max.6 characters

Page 52 of 119
Extension of the field of action function "o": In the software system tables can be saved for individual month abbreviation for each language. The table is in the USB stick version of the HMI folder and then to the respective language directory, e.g. "EN" The table is UserPar.dat and can be edited with a text editor. Specify up to 10 monthly tables and symbol lengths of 1 to 10 characters ('_' as a space). Example: : TextMonth0 3JANFEBMRZAPRMAIJUNJULAUGSEPOKTNOVDEZ : TextMonth1 3JANFEBMARAPRMAYJUNJULAUGSEPOCTNOVDEC : TextMonth2 9Januar___Februar__März_____April____Mai______Juni_____Juli_____August___SeptemberOktober__November_Dezember_ - Call table with 0 ~ ooo ~, Table 1 ~ ~ 1ooo, Table 2, etc. ~ ~ 2ooooooooo

Page 53 of 119
Special functions for date field: The date field has to be entered as an action field in the text field or bar code field. To call the function "#" with the special function number "1, 2, ..." is inserted in the action field behind the tilde character. #1: The expiration date will always show the last day of the month. Example: ~ #1ab.cd.gh~ Date is now: 17.05.09 Offset 5 months Expiry date: 31.10.2009 # 2: The expiration date will always show the last day of the month. The leap year is also 28.02. displayed and not the 29.02. Example: ~ #2ab.cd.gh~ Date is now: 23.03.11 Offset 11 months Expiry date: 28.02.12 # 3: The month of the shelf life always changes, 15 and not by the 1
st of the month.
Example: ~ #3cd.gh~ Date is now: 14.05.09 Offset five months expiry date: 10.09 Date is now: 15.05.09 Offset five months expiry date: 11.09 #5: In the day of the year, an offset of 400 days is added without that over 365 the year is added.
Example:
~#5ppp~ Date is now:12.07.12, Day of the year:194 Print day of the year 594
#5;xxx: In the day of the year, a variable offset 1-633 days is added without that over 365 the year is added.
Example:
~#5;123ppp~ Date is now:12.07.12, Day of the year:194 Print day of the year 317

Page 54 of 119
Internal action field commands:
(The command <ESC>X doesn’t exist no longer directly, but will translate internal in following commands) <Esc>PXs-w-xxxxxyyyy;fontname;...<CR> - Print action fields, otherwise like the P-command - Access to action fields can be made by ~x~ or ~y~ in the text area - 'x' stands for a character of the field. - 'y' stands for the total character string of the field. The number of the character for 'y' is the field length. - Example Field1:~(1)xxxx~ Field2:~(2)xxxxx~ Field3:~(3)3xx1xx~ Field4:~(4)y~ <Esc>BXswchhhhxxxxxyyyy;fontname;...<CR> - Barcode action fields, otherwise like the B-command <Esc>LXs-w-xxxxxyyyy;{attributstring}<CR> - Logo action fields, otherwise like the L-command <Esc>ZA;#={fieldno};a={Start value};b={Repeat};c={Step width}; ;d={End value}:{Attribute series}<CR> {Start value} = 0. {Repeat} = 0. {Step width} = 0. {End value} = 0. {Attribute series} (z.B.: SN~zz-zz~) - Generates a counter field, that can be accessed with PX or BX <Esc>DA;#={fieldno}:e={date offset}:{Attribute series}<CR> {fieldno} = 1..999 {date offset} = JJMMTTT {Attribute series} (i.e.: ~abcdefgh~) - Generates a date field, that can be accessed with PX or BX <Esc>VA;#={fieldno};f={Infotext};h={Vorgabetext}:<CR> - Generates a variable field, that can be accessed with PX or BX

Page 55 of 119
Command: <ESC>P Extra line in the iDesign print image During the creation of a print image with iDesign a comment line is add on the print image to size the print image (number of needed print heads). The comment can expand anytime.
Syntax:
<Esc>P1-0-000000000: h=x<CR>
Parameter: x= <Print head size> 0 no definition 1 Maxi50 2 Maxi100 3 Maxi150 4 Maxi200, 13 Cl25Single 15 Cl25Twin 24 iJET / X1JET / X4JET Single 25 X4JET Twin - - 31 X4Jet-8head 36 X1JET XR 54 41 MX50 42 X4JET MX100 43 X4JET MX150 44 X4JET MX200 45 X4JET MX250 46 X4JET MX300 47 X4JET MX350 48 X4JET MX400
Response:
No response
Example:
<Esc>P1-0-000000000: h=27<CR>
The print image will be created for a X4JET Quad head.

Page 56 of 119
Command: <ESC>I Internal info field An info field can be inserted in the print image, which is ignored during printing. Any ASCII-signs can stand between <ESC>I and <CR>, except control character (< ASC 32).
Syntax:
<Esc>Ixxx<CR>
Parameter: xxx= <Info text> any text
Response:
No response
Example:
<Esc>I“This is an info text“<CR> <Esc>I C:\Article dates\Article.xml;Arial10Bold;21-JUN-2011<CR>

Page 57 of 119
Command: <ESC>P Width of the print image Define print image width in pixel
Syntax:
<Esc>Psrw-xxxxx0000;;<CR>
Parameter: Value: s = <Zoom> 1 fester Wert r = right border r
w = angle 0 xxxxx = <Width of the print image in pixel> 00000 – 99999
Response:
No response
Example:
<Esc> P1r0-023450000;; <CR>

Page 58 of 119
Command: <STX>TZ Call print image and start printing With each ET command a print image will be called from the memory for printing.
Syntax:
<STX>TZname.xxy;kd<CR><ETX>
Parameter: Value:
name = <print image name> Name of the print image in the memory xx = <System> 00 Fix y = Technologie I HP or LX see page 14 .xxy must not be send. k = <Head number> 1-2 if no info given, head group 1 d = <Printing mode> 0 for single print 1 continuous printing if no info given, continuous
printing 3 continuous printing with storage of the last print
after switch off.
Example:
<STX>TZ126.00I;11<CR><ETX> or <STX>TZ126;11<CR><ETX>
Response:
<ACK><STX>1OK<ETX>
Error message: <STX><head number> E<fault code><ETX>
Explanations:
<Fault code> 1- 9 1 = Photocell triggered without data 2 = Unknown command 3 = Print image name not present 4 = Head not present 5 = not used 6 = System not ready 7 = Wrong checksum / can’t open the port (2.011c) 8 = double block number / no response (2.011c) 9 = not next block number / logo not loaded
Example: send: <STX>TZ1.00I;11<CR><ETX> read: <ACK> read: <STX>1OK<ETX>
See also Fill Action Fields <STX>TZ

Page 59 of 119
Command: <ESC>EW Send print image data to memory
Command: <ESC>EX End of transfer With the EW command the transfer of the print image data will be initiated. With the EX command the transfer will be terminated.
Syntax:
<Esc>EW----;name.xxy<CR>
Parameter: Value:
name = <print image name> Name of the print image in the memory xx = Head 00 = Standard y = Head type I = General
Syntax:
<Esc>EX----;<CR>
Sequence:
<Esc>EW----;name.00I<CR> Print image commands
<Esc>EX----;<CR>
Response:
OK<CR>
Example: send: <ESC>EW----;126.00I<CR> send: <ESC>P1-0-000000020;8;WEBER<TAB>Testprint<CR> send: <ESC>P1-0-006200000;7;EXP:31.12.2008<CR> send: <ESC>D1-0-006800288;10;0000000;ij:kl:mn<CR> send: <ESC>B70A0600014600000;5;401234567890<CR> send: <ESC>EX----;<CR>
read: Ok<CR>
Page 60 of 119
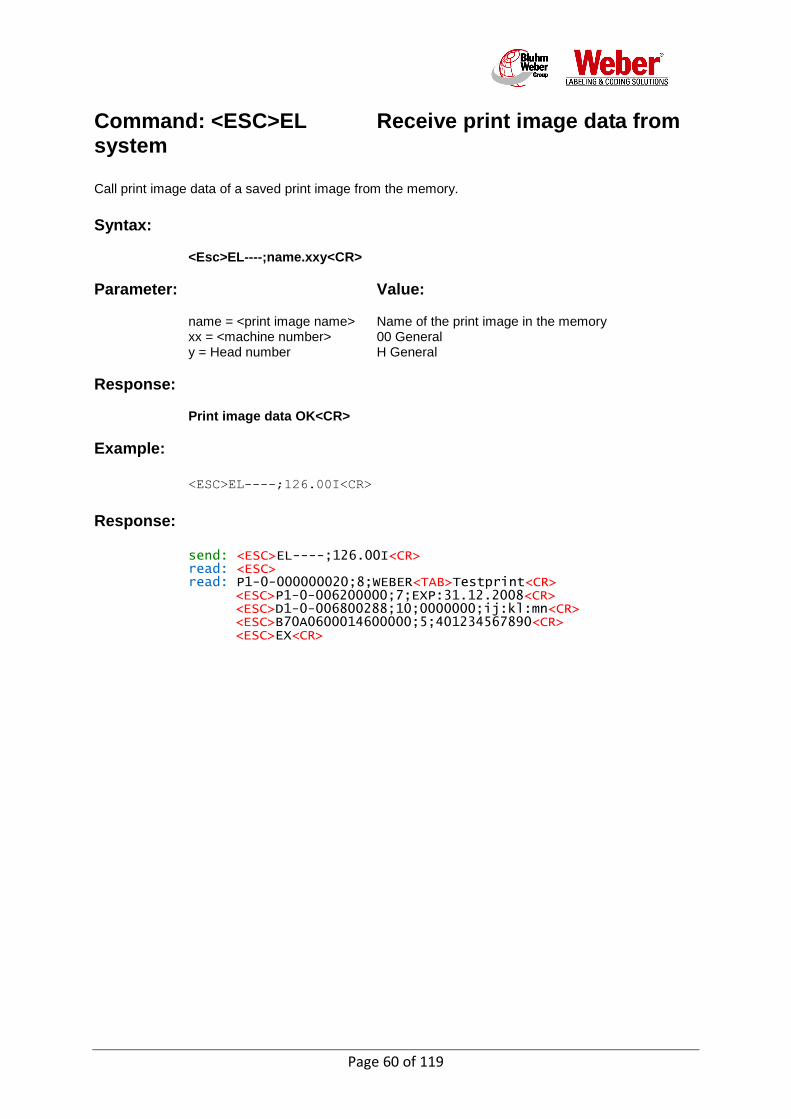
Command: <ESC>EL Receive print image data from system Call print image data of a saved print image from the memory.
Syntax:
<Esc>EL----;name.xxy<CR>
Parameter: Value:
name = <print image name> Name of the print image in the memory xx = <machine number> 00 General y = Head number H General
Response:
Print image data OK<CR>
Example:
<ESC>EL----;126.00I<CR>
Response:
send: <ESC>EL----;126.00I<CR> read: <ESC> read: P1-0-000000020;8;WEBER<TAB>Testprint<CR> <ESC>P1-0-006200000;7;EXP:31.12.2008<CR> <ESC>D1-0-006800288;10;0000000;ij:kl:mn<CR> <ESC>B70A0600014600000;5;401234567890<CR> <ESC>EX<CR>
Page 61 of 119
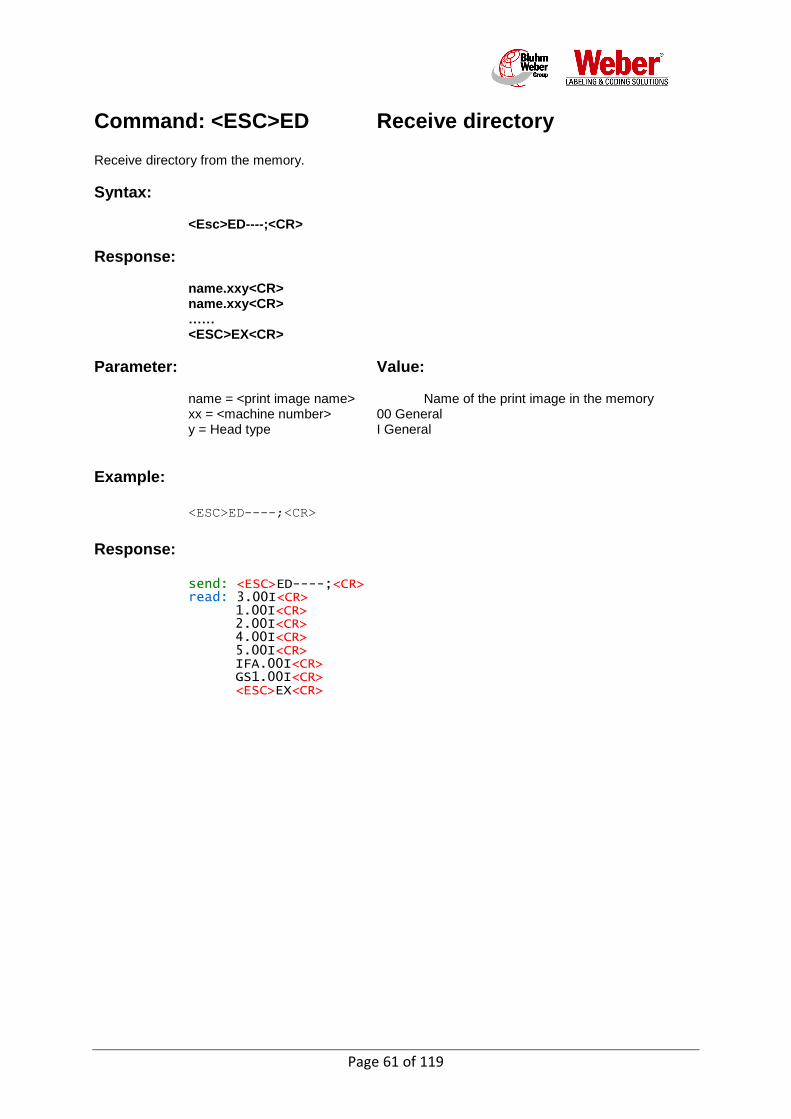
Command: <ESC>ED Receive directory Receive directory from the memory.
Syntax:
<Esc>ED----;<CR>
Response:
name.xxy<CR> name.xxy<CR> …… <ESC>EX<CR>
Parameter: Value:
name = <print image name> Name of the print image in the memory xx = <machine number> 00 General y = Head type I General
Example:
<ESC>ED----;<CR>
Response:
send: <ESC>ED----;<CR> read: 3.00I<CR> 1.00I<CR> 2.00I<CR> 4.00I<CR> 5.00I<CR> IFA.00I<CR> GS1.00I<CR> <ESC>EX<CR>

Page 62 of 119
Command: <ESC>EQ Delete print image from directory Syntax:
<Esc>EQ----;name.xxy<CR>
Parameter: Value:
name = <print image name> Name of the print image in the memory xx = <machine number> 00 General y = Head number H General *.*= <Wildcard> delete all
Response:
OK<CR> Err<CR>
Example: send: <ESC>EQ----;temp1.00I<CR> read: Ok<CR>
Example:
send: <ESC>EQ----;*.*<CR> read: Ok <CR>

Page 63 of 119
Command: <ESC>*LF Receive Font directory Call up the font directory from the memory.
Syntax:
<Esc>*LF<CR>
Response:
:name<CR> :name<CR> …… <ESC>EX<CR>
Parameter: Value:
name = <Fontname> Name of the font in the memory
Example:
<ESC>*LF<CR>
Response:
send: <ESC>*LF<CR> read: :A12mm<CR>:A2,5mmB<CR>:A2,5mm<CR>:A4mm<CR>:A12mmB<CR> read: :A6mmB<CR>:A5mmB<CR>:A3mm<CR>:A9mmB<CR> read: :A6mm<CR>:A5mm<CR>:A2mm<CR> read: <ESC>EX<CR>

Page 64 of 119
Command: <ESC>*CF Delete Font in directory Syntax:
<Esc>*CF;name<CR> <Esc>*CF;*.*<CR>
Parameter: Value:
name = <Fontname> Name of the font in the memory *.* Delete all fonts
Response:
OK<CR> Err<CR>
Example: send: <ESC>*CF;A4mm<CR> read: Ok<CR>

Page 65 of 119
Command: <ESC>*LL Receive Logo directory Call up logo directory from the memory.
Syntax:
<Esc>*LL<CR>
Response:
xxxxx:name<CR> xxxxx:name <CR> …… <ESC>EX<CR>
Parameter: Value:
xxxxx = <?> ? name = <Logoname> Name of the logo in the memory
Example:
<ESC>*LL<CR>
Response:
send: <ESC>*LL<CR> read: 14707:TAILLE<CR>00252:s5<CR>25916:s10<CR> read: 11741:LOGO GERFLOR<CR>11738:LOGOGERFLORBMP BMP<CR> read: <ESC>EX<CR>
Page 66 of 119
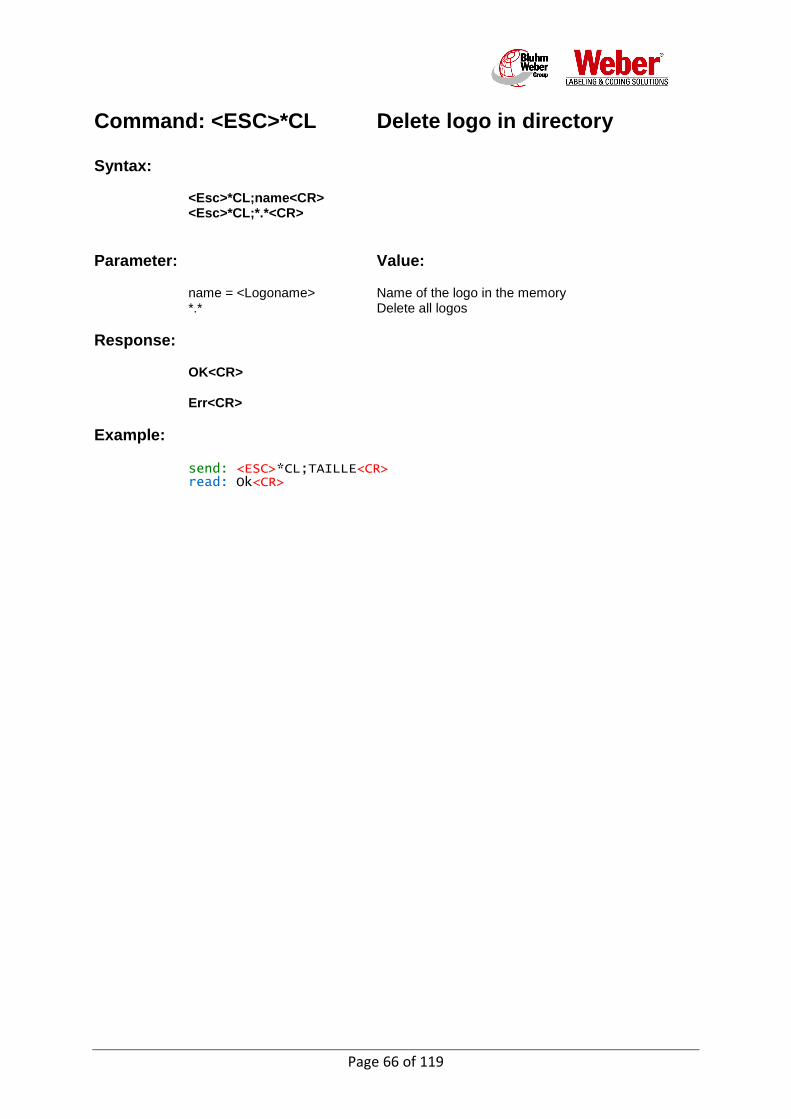
Command: <ESC>*CL Delete logo in directory Syntax:
<Esc>*CL;name<CR> <Esc>*CL;*.*<CR>
Parameter: Value:
name = <Logoname> Name of the logo in the memory *.* Delete all logos
Response:
OK<CR> Err<CR>
Example: send: <ESC>*CL;TAILLE<CR> read: Ok<CR>

Page 67 of 119
Command: <ESC>*STD Send date and time Send date and time for setting the system clock.
Syntax:
<Esc>*STDhhmmssTTMMJJW<CR> <Esc>*STDhhmmssTTMMJJW[;ooooo]<CR>
Parameter: Value
hh = <Hour> 01 - 24 mm = <Minute> 01 - 60 ss = <Second> 01 - 60 TT = <Day> 01 - 31 MM = <Month> 01 - 12 JJ = <Year 2digits> 01 - 99 W = <Day of the week> 1 – 7 ooooo = <timeoffset> (Optional) -2359 - +2359 (in hour and minutes)
Response:
Ok<CR> Err<CR>
Example: send: <ESC>*STD1500592812113;+03<CR> read: Ok<CR>

Page 68 of 119
Command: <ESC>*GSTD Receive date and time Receive date and time of the system clock.
Syntax:
<Esc>*GSTD<CR>
Response:
hhmmssTTMMJJW<CR>
Parameter: Value
hh = <Hour> 01 - 24 mm = <Minute> 01 - 60 ss = <Second> 01 - 60 TT = <Day> 01 - 31 MM = <Month> 01 - 12 JJ = <Year 2digits> 01 - 99 W = <Day of the week> 1 - 7 ooooo = <timeoffset> (Optional) -2359 - +2359 (in hour and minutes)
Example: send: <ESC>*GSTD<CR> read: 1504172812113<CR>

Page 69 of 119
Command: <ESC>M* Send list of all parameter Send all parameter as a list. Each parameter has 4 digits. Example: Pulse 0001 = Extern Some of the parameters can have a + or – character as prefix. Each Parameter can be a Number between -9999 to 9999. Characters and more numbers behind a Parameter will be ignored. If there is no value for a parameter, this parameter will be ignored and will stay at the old value. The table is open to the end and can be expanded in the future.
Syntax:
<Esc>M*;<par1>;<par2>;….;<par n><CR> The first parameter number can be send as an option.
<Esc>M*[p<StartPar>];<par1>;<par2>;….;<par n><CR>
Response:
Ok<CR>
Parameter: Value Comment Star
par1 Pulse internal / external 0 = Internal (3) *3 1 = External Encoder 1 headgroup1 *2 or Encoder 2 on head group 2 *2 2 = Group 2 get the pulse of group 1 *2
and group 1 get the pulse of the master board (only by slave)
Par2 Speed for internal pulse in 1/10 m/min 0010 – 4000 (2) *3 Par3 Divider Encoder for external pulse Encoder dpi / par3 (2) *3 Par4 Print direction 0=L<-R (1) 1=L->R Par5 Upside down 0=No (1) 1=Yes Par6 Mirror (Not used) (1) Par7 Start delay in mm (1) Par8 Print repeat distance in mm (1) Par9 Number of repeats 0=Off 0000 – 0999 (1) 999=Endless

Page 70 of 119
Parameter: Value Comment Star par10 Intensity DPI in Dots per Inch 0000 – 0999 (2) *3 par11 Zoom in % 0010 – 0900 (1) par12 Nozzle Rows 0=A~B (1) 1=A+B 2=A 3=B par13 Head voltage in 1/10 V 0040 - 0112 (4) *3 par14 Fire-Time in 10ns 0050 - 0300 (4) *3 Fire Time LX in 10ns 0020 - 0080 *3 par15 Fire-Pause in 10ns 0100 – 0300 (4) *3 Pre-Pulse LX in 10ns 0005 – 0033 *3 Par16 Barcode correction in Pixel -0005 – 0005 (1) *3 Par17 Ink warning in % (0) Par18 Spit-Mode 0=Off (4) *3 1=Before 2=Interval Par19 Number of Spittrows in Rows 0000 – 0100 (4) Par20 Spit delay in s 0000 – 0999 (4) Par21 Spit interval in s 0000 – 0999 (4) Par22 Auto-Off in min 0000 – 0999 (4) Par23 Twin head-Offset in Pixel 0000 – 1000 (0) *5 Par24 Offset Bidirekt. print with Twin head in Pixel 0000 – 1000 (0) *5 Par25 Warming function 0=No (4) *3 1=Yes par26 Warming-temperatur in °C (4) par27 Warming-Timer in s (4) par28 Language 0=German (9) 1=English 2=French 3=Spain 4 Japanese 5=Schwedish 6=Finnish 7=Türkisch 8=Italienisch 9=Russisch

Page 71 of 119
Parameter: Value Comment Star par29 Counter start value 0 = as set in print image (1) How to handle the counter start value 1 = user prompt for start value During the print start. 2 = last value (“i” section of command)
3 = user prompt for start value, last value will be displayed.
par30 head type 3=Single iJET, X1JET (9) *2 par30 head type abcd (9) *2 - 'a': digit '1' to '4': specifies how many print heads generate a multihead print image together from head#1. . 1=Single, 2=Twin, 3=Triple, 4= Quad - 'b' digit '0' to '3': specifies how many print heads generate a multihead print image together from head#2. '0' specifies that this head already among to a multihead print image. - 'c' digit '0' to '2': specifies how many print heads generate a multihead print image together from head #3. '0' specifies that this head already among to a multihead print image. - 'd' digit '0' to '1': specifies with '1' that head#4 is a single head.
'0' specifies that this head already among to a multihead print image. Example: 1111 = 4 Single heads 4000 = 1 Quad head print image (4-heads) from head#1 2020 = 2 Twin head print image (2-heads) from head#1 and from head#3 2011 = 1 Twin head print image (2-heads) from head#1 and 2 Single heads (head#3, head#4) 3001 = 1 Triple head print image (3-heads) from head#1 and 1 Single head (head#4) 1201 = 1 Twin head print image (2-heads) from head#2 and 2 Single heads (head#1, head#4) The head type can be set alternative with the command <ESC>HC. The counting is 8 for networked maste-slave system (XB8JET, Compactline 3.0 8-head). For 8 head systems the HC command must be used. The first 4 heads will be shown with this command. par31 ink type HP LX MX (4) 0=STABL ??? SC II 1=DIBL LX GP+ Versa 2=MIBL2 LX CS1 A5000 3=SCRD LX SD1 4=SCGN LX RD1 5=SCBLU 6=WEBL 7=UVC1 8=BEABL 9=UVINV 10=IRINV 11=G1BL 12=CMBLK 13=RCBLU 14=RCRD 15=UltraBlack 16=FastSolid as BEABL in CSV Table 17=CMBLK2 18=NPBLK 19=Bulk400 Can be expanded See ink table in the HMI folder.

Page 72 of 119
Parameter: Value Comment Star Par32 User1 (Not used) (9) Par33 Print delay for reverse printing 0 = deactivate (1) 1 to 9999 = in mm Par34 Store parameter into print image 0 = deactivated (9) 1 = read only 2 = Read and write Par35 Print-Mode (Not used) Par36 stor variable fields 0=No (1) 1=Yes Par37 Sensor Ext/Int 0=Intern (1) 1=Extern 0 – 3 Sensor connection X4JET (1) *2 0 = Sensor 1 1 = Sensor 2 (plug 1+2) 2 = Sensor 3 3 = Sensor 4 (plug 3+4) 4 = Start of master boards
(via Link cable, only slave boards)
Par38 turn Display 180° 0=No (9) *4 1=Yes Par39 Setup Sensor I/O 0=Off (9) *4 1=(I) Cartridge heating 2=(I) Spit-Start not active 3=(I) Print direction 4=(I) Upside down 5=(I) Print Stop not active 6=(I) Print image selection (!EXT01.00I Name to !EXT04.00I) 7=(O) Ok 8=(O) Warning 9=(O) Alarm 10=(O) Ink low 11=(O) Ink empty 12=(O) Print ready was in the iJET inverted up to version V2.006e 13=(O) Print trigger not active
Par40 Setup Encoder I/O wie Par39 (9) *4 Par41 Delay output print trigger in mm (not used) (9) Par42 lenght print trigger output in mm (not used) (9) Par43 High-Speed 0=No (2) *3 1=Yes Par44 Optimized zoom 0=No (1) 1=Yes

Page 73 of 119
Parameter: Value Comment Star Par45 RS232 Interface abcd Only X4JET and X1JET (9) a =baudrate 0 = 1200, 1 = 2400, 2 = 4800, 3 = 9600, 4 = 19200, 5 = 38400, 6 = 115200 b =parity 0 = none, 1 = even, 2 = odd c =stoppbit 0 = 1, 1 = 2 d =bits 0 = 7bit, 1 = 8bit
par 46 Define polarity abcd only X4JET (9) a : 0 = Start 1-4 NPN – 1 = PNP b : 0 = Input 1-4 NPN – 1 = PNP c : 0 = Input 5-8 NPN – 1 = PNP d : 0 = Relay outputs closer, 1 = inverted par 47 – 54 not in the iJET par 47 Input 1,2 like par 50, par 47-50 head-related (K1 - K4) (0) par 48 Input 3,4 like par 50, per input 2-digit (0) par 49 Input 5,6 like par 50 (0) par 50 Input 7,8 00 = Off (0) 01 = head heating Not active 02 = Spit-Start Not active 03 = Print direction 04 = Upside down 05 = Print pause as long as the input is active 06 = External print image selection (!EXT01.00I to !EXT99.00I) 07 = ZTV only by par47 for head1 = 0707 ! 08 = Shutter printhead 09 = Reset ink counter 10 = Start purge procedure only X1JET MX

Page 74 of 119
par 51 output 1,2 like par 54, 3020 Standard (9) par 52 output 3,4 like par 54, 1000 Standard (9) par 53 output 5,6 like par 54, 1020 Standard (9) par 54 output 7,8 3000 Standard (9)
00 = Off 01 = On
02 = Warning+Alarm (all heads) 03 = TZ Buffer empty 04 = Shutter open 10 = OK (all heads)
11 = OK (Group 1) 12 = OK (Group 2) 13 = OK (head 1) 14 = OK (head 2) 15 = OK (head 3) 16 = OK (head 4) 20 = Warning (all heads) 21 = Warning (Group 1) 22 = Warning (Group 2) 23 = Warning (head 1) 24 = Warning (head 2) 25 = Warning (head 3) 26 = Warning (head 4) 30 = Alarm (all heads) 31 = Alarm (Group 1) 32 = Alarm (Group 2) 33 = Alarm (head 1) 34 = Alarm (head 2) 35 = Alarm (head 3) 36 = Alarm (head 4) 40 = Low ink (all heads) 41 = Low ink (Group 1) 42 = Low ink (Group 2) 43 = Low ink (head 1) 44 = Low ink (head 2) 45 = Low ink (head 3) 46 = Low ink (head 4) 50 = Ink empty (all heads) 51 = Ink empty (Group 1) 52 = Ink empty (Group 2) 53 = Ink empty (head 1) 54 = Ink empty (head 2) 55 = Ink empty (head 3) 56 = Ink empty (head 4)
60 = Print ready (all heads) (so long as Busy is on) 61 = Print ready (Group 1) 62 = Print ready (Group 2) 63 = Print ready (head 1) 64 = Print ready (head 2) 65 = Print ready (head 3) 66 = Print ready (head 4)

Page 75 of 119
Parameter: Value Comment Star Par55 Rev. Delay 0=Delay for reverse print from left side (1) 1=Delay for reverse print from right side Par56 Head type 0=100er Trident (0) 1= 50er Trident Par57 Head type 0=must be „0“ by Master or single system (9)
By slave head configuration of the upstream head. Installation like Par30.
Par58 Encoder dpi basic setting 0 = 600dpi Standard value (2) 1 = 636dpi 200mm Measuring wheel Par59 Length of cable for LX and MX printhead in m 1 to 50 (4) *3 3 = 3m Standard Par60 MX-Head distance in mm 0 = Standard 150mm (0) 1 - 200 = head distance in mm Par61 Set head configuration 0 = No configuration set / no change (9) 1 = Query after next restart 11 - 33 = set configuration direct – 23 = MX/LX after restart Attentin: Wait 5 seconds for a restart! Par62 System settings 0 = No Option used (9) 1 = EAN-Datamatrix with FNC1 character instead GS1. 2 = Print ready (see TZ-command) 4 = send head number back at S1 8 = Standby possible 16 = one pulse for print repeat 32 = Print Busy as print ready signal ^ 64 = FIFO print start delay *5 Max. 250mm delay at Pro Version Max. 500mm delay at X1JET 128 = Logo Buffer, max.100kB each logo*2 256 = Fix counter for print repeat Par63 NonStopPrinting 0 = Off – no NonStopPrinting (9) 1 = NonStopPrinting only channel 1 2 = NonStopPrinting only channel 2 3 = NonStopPrinting channel 1+2 3 = NonStopPrinting X2JET „ON“ Par64 Datamatrix pixel shaving number of pixel 0 – 0010 (0)

Page 76 of 119
Response:
Ok<CR> Err<CR>
Example1: send: <ESC>K1<CR> send: <ESC>M*;1;;3;;;;123<CR> read: Ok<CR>
External pulse Divider 3 Print start delay 123mm
Example2: send: <ESC>M*p38;1<CR> read: Ok<CR>
Turn display of the iJET 180°
Startext: Some functions are not available in all systems. These are marked with a star and number. *1 = Only for X1JET *2 = Only for multi-head systems (X2/X4JET) *3 = Only for groups per channel by X2/X4JET *4 = Only for iJET *5 = Not available for iJET
Parameter characteristics:
For some parameters the physical head must select before sending the parameter. (0): Head-based: Always information of the physical head. (1): Print image-based: Information of the 1. Physical head of the print image (2): Pulse-based: K1 or K3. By intergroup head config. only K1. By pulse-chain (Pulse Group#2 of Group#1) only K1. (3): Pulse group : K1 or K3. By intergroup head config. only K1. (4): Pulse group : K1 or K3. Always pulse-group, independent of the head config. (9): System: System parameter

Page 77 of 119
For follow parameter is a reboot of the printer necessary: 28 System language 30 Head type 43 High Speed 57 Head type Master/Slave 61 Head configuration 62 Special settings 63 NonStop Printing The restart is performed with the following command:
send: <ESC>RST<CR> read: Ok<CR>
see also chapter: Command: <ESC>RST System Restart
Page 78 of 119
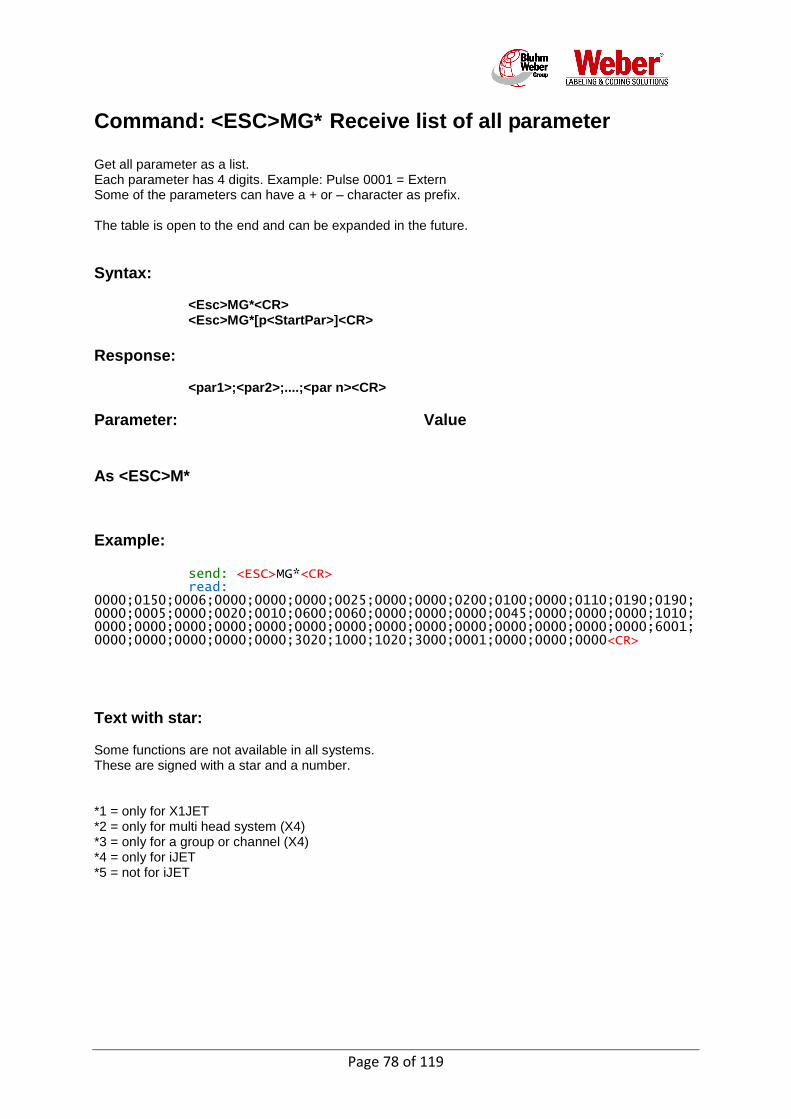
Command: <ESC>MG* Receive list of all parameter Get all parameter as a list. Each parameter has 4 digits. Example: Pulse 0001 = Extern Some of the parameters can have a + or – character as prefix. The table is open to the end and can be expanded in the future.
Syntax:
<Esc>MG*<CR> <Esc>MG*[p<StartPar>]<CR>
Response:
<par1>;<par2>;....;<par n><CR>
Parameter: Value
As <ESC>M*
Example: send: <ESC>MG*<CR> read: 0000;0150;0006;0000;0000;0000;0025;0000;0000;0200;0100;0000;0110;0190;0190;0000;0005;0000;0020;0010;0600;0060;0000;0000;0000;0045;0000;0000;0000;1010;0000;0000;0000;0000;0000;0000;0000;0000;0000;0000;0000;0000;0000;0000;6001;0000;0000;0000;0000;0000;3020;1000;1020;3000;0001;0000;0000;0000<CR>
Text with star: Some functions are not available in all systems. These are signed with a star and a number. *1 = only for X1JET *2 = only for multi head system (X4) *3 = only for a group or channel (X4) *4 = only for iJET *5 = not for iJET

Page 79 of 119
Command: <ESC>N Store parameter into print image Store a set of parameter into the print image.. Each parameter has 4 digits. Example: Pulse 0001 = External Some of the parameters can have a + or – character as prefix. Each Parameter can be a Number between -9999 to 9999. Characters and more numbers behind a Parameter will be ignored. If there is no value for a parameter, this parameter will be ignored and will stay at the old value. The parameter number and parameter values corresspond to the M* command. The table is open to the end and can be expanded in the future.
Syntax:
<Esc>N----;<par1>;<par2>;….;<par n><CR> The first parameter number can be send as an option.
<Esc>N----[p<StartPar>];<par1>;<par2>;….;<par n><CR>
Parameter: Value Star 1 Par2 Speed *3 2 Par3 Divider encoder *3 3 Par4 Print direction 4 Par5 Upside down 5 Par6 Mirror (not activ) 6 Par7 Start delay 7 Par8 Print repeat distance 8 Par9 Print repeat number 9 par10 Intensity DPI 10 par11 Zoom in % 11 par12 Nozzle row 12 par16 Barcode correction *3 13 par17 ink warning level in % 14 par18 Spit-mode *3 15 par19 No of spit rows 16 par20 Spit delay 17 par25 Warming-Function *3 18 par26 Warming-Temp. 19 par27 Warming-Timer 20 par31 Inktype *3 *3 this parameter is used for the whole channel. With the assignment of 2 parameter sets to head 1 and 2 of a channel, the last one is valid. That means head 1 prints with the parameter of head 2 maybe. The parameter will be stored into the Print image with the „N“ command:
Example: N----;;;0001;;;0050 Print direction and print delay

Page 80 of 119
Command: <ESC>MI Send table of all IP-addresses, display status information Send all IP-addresses as table.
Each IP address is shown as standard notation (xxx.xxx.xxx.xxx). Belongs a port to the IP-
address, it will added with a colon (xxx.xxx.xxx.xxx:yyyy). The individual addresses separated
by semicolons. If the addresses are not specified, the corresponding address will be retained. The table can be extended.
Syntax:
<Esc>MI; <adr1>;<adr2>;....;<adr n><CR>
Response:
Ok<CR> Err<CR>
Address: Value
adr1 Own IP-address adr2 Own SubNet-mask adr3 Gateway address adr4 IP and Port for status-output adr5 IP and Port for <ESC>U adr6 IP address for the next board for multi system connection
Example: send: <ESC>MI;192.168.1.1;;;192.168.1.10:10300<CR> read: Ok<CR>
(Standard values for CUBE MK2)
Status output: If the IP address is unequal 0.0.0.0 and port unequal 0, a status connection is build up to the specified IP address with port. A status will be displayed with each status change or after 10 seconds. Max. 10 values will be displayed per second. If there are more values within this time, the highest value will be displayed. I.e.: the information a = 0, 2, 0 will be identified. The value 2 will be send. If an IP address 0.0.0.0:0 is specified by adr4, the status display will be stopped.

Page 81 of 119
Structure of the staus information: <ESC>abcd;efgh;ij;klmnopqrstuv<CR> xxxxxxxx<CR>
a = Status head 1 (0=Ok, 1=Warning, 2=Alarm) b = Status head 2 (0=Ok, 1=Warning, 2=Alarm) c = Status head 3 (0=Ok, 1=Warning, 2=Alarm) d = Status head 4 (0=Ok, 1=Warning, 2=Alarm) e = Print activation head 1 (0=Standby, 1=active print) f = Print activation head 2 (0=Standby, 1= active print) g = Print activation head 3 (0=Standby, 1= active print) h = Print activation head 4 (0=Standby, 1= active print) i = Missing encoder signal head group 1 (0=Ok, 1=missing signal) j = Missing encoder signal head group 2 (0=Ok, 1=missing signal) k = Input 1 15pol PIN11 (0=Off, 1=On) l = Input 2 15pol PIN12 (0=Off, 1=On) m = Input 3 Alarm 3+4 PIN5 (0=Off, 1=On) n = Input 4 not used o = Input 5 15pol PIN13 (0=Off, 1=On) p = Input 6 15pol PIN14 (0=Off, 1=On) q = Input 7 Alarm 3+4 PIN6 (0=Off, 1=On) r = Input 8 not used s = Input 9 Sensor 1 (0=Off, 1=On) t = Input 10 Sensor 2 (0=Off, 1=On) u = Input 11 Sensor 3 (0=Off, 1=On) v = Input 12 Sensor 4 (0=Off, 1=On)
xxxxxxxx = output 1 to 8 (0=Off, 1=On)

Page 82 of 119
Command: <ESC>MGI Receive table of all IP-addresses Receive all IP-addresses as table.
Each IP address is shown as standard notation (xxx.xxx.xxx.xxx). Belongs a port to the IP-
address, it will added with a colon (xxx.xxx.xxx.xxx:yyyy). The individual addresses separated
by semicolons. The table can be extended.
Syntax:
<Esc>MGI<CR>
Response:
<adr1>;<adr2>;....;<adr n><CR>
Address: Value
adr1 Own IP-address adr2 Own SubNet-mask adr3 Gateway address adr4 IP and Port for status-output adr5 IP and Port for <ESC>U adr6 IP of the next board for multi system connection
Example: send: <ESC>MGI<CR> read: 192.168.8.221;255.255.255.0;0.0.0.0;0.0.0.0<CR>

Page 83 of 119
Command: <ESC>MP Send passwords Maximum 15 passwords.
Syntax:
<Esc>MP<mode>;<user 1>:<passw 1>:<level 1>;….;<user n>:<passw n>:<level n><CR>
Parameter: Value Description
<mode> = Mode - (minus sign) Retransmit passwords A Add passwords
<user> = User name (text) User name <passw> = Password (MD5 Hexvalue) Password (Hex 32-digit) <level> = Pass-Level (Level 1-9) Password-Level
Response:
Ok<CR> Err<CR>
Passwords are generated with the commands <ESC>MP or <ESC>MGP as follows: - Passwords are transmitted as 32-digit hexadecimal value (16Byte or rather 128Bit) - The Hex-value relates to the MD5-Hash-value of the original password with 'MOP123'-appendix
Example: Password : '1234' Message for MD5 : '1234MOP123' MD5 Hash-value : '70AC589DFE08CC12D0692374430F8B9D' There is a small program to calculate the MD5 Hash value „MD5_Calculator.exe“. Free password-level will be generated by a special password. User-Name : 'Free' Password : '989898' equates with 'MOP123'-appendix MD5 Hash-value : '8E40D951F9330E49BAD2CBFF7C5F670E' Example MP-command: Level 1-5 should be free, Level 6-9 should be unlocked by User 'admin' with password '1234'. send: <ESC>MP-;Free:8E40D951F9330E49BAD2CBFF7C5F670E:5;admin:70AC589DFE08CC12D0692374430F8B9D:9<CR> read: Ok<CR>
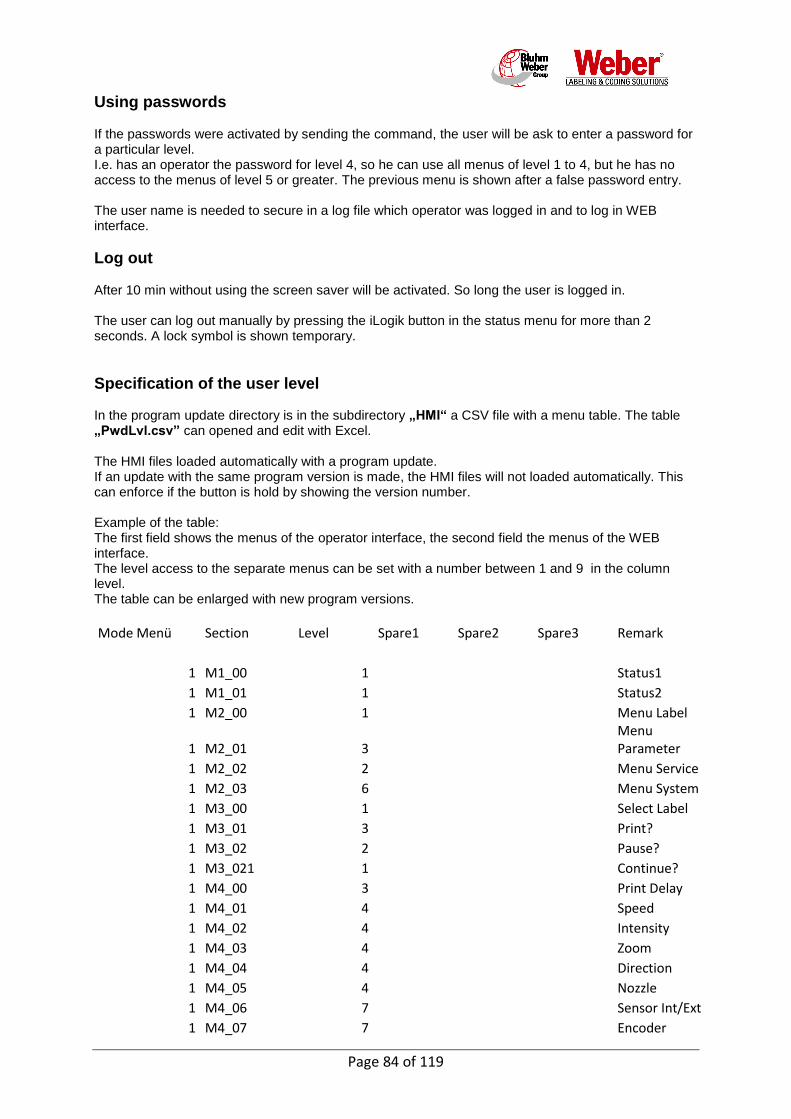
Page 84 of 119
Using passwords If the passwords were activated by sending the command, the user will be ask to enter a password for a particular level. I.e. has an operator the password for level 4, so he can use all menus of level 1 to 4, but he has no access to the menus of level 5 or greater. The previous menu is shown after a false password entry. The user name is needed to secure in a log file which operator was logged in and to log in WEB interface.
Log out After 10 min without using the screen saver will be activated. So long the user is logged in. The user can log out manually by pressing the iLogik button in the status menu for more than 2 seconds. A lock symbol is shown temporary.
Specification of the user level In the program update directory is in the subdirectory „HMI“ a CSV file with a menu table. The table „PwdLvl.csv” can opened and edit with Excel. The HMI files loaded automatically with a program update. If an update with the same program version is made, the HMI files will not loaded automatically. This can enforce if the button is hold by showing the version number. Example of the table: The first field shows the menus of the operator interface, the second field the menus of the WEB interface. The level access to the separate menus can be set with a number between 1 and 9 in the column level. The table can be enlarged with new program versions.
Mode Menü Section Level Spare1 Spare2 Spare3 Remark
1 M1_00 1 Status1
1 M1_01 1 Status2
1 M2_00 1 Menu Label
1 M2_01 3 Menu Parameter
1 M2_02 2 Menu Service
1 M2_03 6 Menu System
1 M3_00 1 Select Label
1 M3_01 3 Print?
1 M3_02 2 Pause?
1 M3_021 1 Continue?
1 M4_00 3 Print Delay
1 M4_01 4 Speed
1 M4_02 4 Intensity
1 M4_03 4 Zoom
1 M4_04 4 Direction
1 M4_05 4 Nozzle
1 M4_06 7 Sensor Int/Ext
1 M4_07 7 Encoder
Page 85 of 119
1 M4_08 4 Divider Encoder
1 M4_09 4 Upside down
1 M5_00 6 Time / Date
1 M5_01 8 IP-Address
1 M5_02 8 Gate-Way
1 M5_03 7 Change Ink Type
1 M5_04 7 Select Ink
1 M5_05 8 Bluetooth
1 M6_00 2 Purge
1 M6_01 3 Reset Ink Counter
1 M6_02 3 Head Temperatur
1 M6_03 6 USB-Stick
Mode WebParam Par Name Level Spare1 Spare2 Spare3 Remark
2 PrtSensor 7
Sensor Int/Ext
2 PrtDelay 3
Print Delay
2 PrtEncoder 7
Encoder
2 PrtSpeed 4
Speed
2 PrtDivider 4
Divider Encoder
2 PrtDensity 4
Intensity
2 PrtZoom 4
Zoom
2 PrtDir 4
Direction
2 PrtNozzle 4
Nozzle
2 PrtUpSiDo 4
Upside down
2 PrtRSpace 5
Repeat Delay
2 PrtRCount 5
Repeat No
2 PrtSpitMode 7
Spit Mode
2 PrtSpitRows 7
Spit Rows
2 PrtSpitDly 7
Spit Delay
2 PrtSpitCyc 7
Spit Interval
2 PrtAutoOff 7
Spit Auto Off
2 PrtWarmFnk 7
Warming Mode
2 PrtWarmVal 7
Warming Temp.
2 PrtWarmTime 7
Warming Timeout
2 PrtInkType 7
Ink Type
2 SysDisplRot 6
Display Rotation
2 SysLanguage 6
Language
2 PrtInkWarn 7
Ink Warning Level
2 PrtVolt 9
Head Voltage
2 PrtSpitTime 9
Fire Time
2 PrtSpitPause 9
Fire Pause
2 PrtBCodeCorr 7
Barcode Corr.

Page 86 of 119
2 SysUser1Md 9
Alarm Output
2 PrtHighSpeed 7
High Speed
2 SysSenIO 9
Sensor Opt. IO
2 SysEncIO 9
Encoder Opt. IO
2 SysOutDly 9
Print Pulse Delay
2 SysOutPls 9
Puls Length
2 PrtFixZoom 4
Fixed Zoom

Page 87 of 119
Command: <ESC>MGP Get passwords. Maximum 15 passwords
Syntax:
<Esc>MGP<mode><CR>
Parameter: Value Description
<mode> = Mode - (minus sign) Get passwords
Response:
<user 1>:<passw 1>:<level 1>;….;<user n>:<passw n>:<level n><CR>
Err<CR> <user> = User name (text) User name <passw> = Password (MD5 HexWert) Password (Hex 32digits) <level> = Pass-Level (Level 1-9) Password-Level
Example: send: <ESC>MGP-<CR> read: Free:8E40D951F9330E49BAD2CBFF7C5F670E:09;user:70AC589DFE08CC12D0692374430F8B9D:09

Page 88 of 119
Command: <ESC>MPC Send firmware upgrade level To change the firmware upgrade level , an activation key must be sent to the system. The activation key is created in a Kryptobox.
Syntax:
<Esc>MP<mode><CR>
Parameter: Value Description
<mode> = Mode C Get firmware upgrade level
Response:
Ok<CR>
Err<CR>
Example: send: <ESC>MPC;WLP0NVMW3HN2PL03YTH1<CR> read: Ok<CR>
Creation of the code in the Kryptobox: Example: send: <ESC>MPC;1:21222111110010030000000:0050C2A65392<CR> read: <ACK>WLP0NVMW3HN2PL03YTH1<CR>
Reset of the demo mode is described in the program code.

Page 89 of 119
Command: <ESC>MGPC Get MAC and firmware upgrade level The table can be extended up.
Syntax:
<Esc>MGP<mode><CR>
Parameter: Value Description
<mode> = Mode C Get upgrade level
Response:
<par1><par2>....<par n>:<mac><CR>
Err<CR>
<par1> Max. speed 0 = 30m/min 1 = 60m/min 2 = 90m/min 3=180m/min <par2> Counter 0 = No 1 = Yes <par3> Time/Date 0 = No 1 = Yes 2 = Best before date-Offset <par4> Variable text 0 = No 1 = By TZ-command 2 = By HMI <par5> Barcode 0 = No 1 = 1D Barcodes 2 = 2D Barcodes <par6> Password 0 = No 1 = Yes <par7> USB-Stick 0 = No 1 = Yes <par8> Interface (not used) 0 = No 1 = Yes <par9> Bluetooth 0 = No Only iJET 1 = Yes <par10> 24V Digital I/O 0 = No Only iJET 1 = Yes

Page 90 of 119
<par11> Demo 0 = No 1 = Yes 2 = Demo not possible, not any longer “Print” 3 = Demo expired <par12> Head-coding 0 = No 1 = Yes <par13> Print length at 300dpi 0 = 2m 1 = 4m 2 = 6m <par14> Head type group 1 0 = HP Not used from 2.016 1 = MX Headtype stays as it is 2= LX 3= XR 4= HP MK2 <par15> Head type group 2 0 = HP Not used from 2.016 1 = MX Headtype stays as it is 2= LX 3= XR 4= HP MK2 <par16> Configuration-Preset 0 = Undefined 1 = BASIC 2 = ADVANCED 3 = PRO 4 = PRINT 5 = Labelfirmware ADVANCED 6 = Labelfirmware PRO <par17> Vertikal DPI 0-3 0 = 600 dpi 1 = 300 dpi <par18> HP MK2 Kart.Freigabe 0-3 0 = Frei für Kartuschen ohne SmartCard 1 = Nur SmartCard Kartuschen frei from MAC address 40:D8:55:14:52:00 <par19> OEM Kartuschen Freigabe 0-3 0 = Weber 1 = OEM 1 2 = OEM 2 3 = OEM 3 <par20> Reserve 0-3 0 = … 1 = … <par21> Reserve 0-3 0 = … 1 = … <par22> Reserve 0-3 0 = … 1 = … <par23> Reserve 0-3 0 = … 1 = … <mac> MAC-address 12-digit Hex-value serNr MOP-serial number
Example: send: <ESC>MGPC<CR> read: 2122201100000002:0050C2A65027:J06037-iM<CR>

Page 91 of 119
Command: <ESC>MS Send shift code. Send shift code settings to the print system. Maximum 6 shift codes can be generated with maximal 8 character. Only the start time is transmitted, the end time will be calculated automatically. The shift code is called with „t“ in the date field.
Syntax:
<Esc>MS<mode>;<code 1>:<Zeit 1>;….;<code n>:<Zeit n><CR>
Parameter: Value Description
<mode> = Mode - (minus sign) New tranmission of shift code A Add shift code
<code> = Shift code (text) Shift code (max 8-digit)) <time> = Starttime (SSMMss) Time hours,min,sec
Response:
Ok<CR> Err<CR>
Example MS-command: Shift 1: 6 o‘clock, code: FGA Shift 2: 14 o‘clock, code: MGB Shift 3: 22 o‘clock, code: NGC send: <ESC>MS-;FGA:060000;MGB:140000;NGC:220000<CR> read: Ok<CR>
Page 92 of 119
Command: <ESC>MGS Get shift code. Read the shift code settings out from the print system.
Syntax:
<Esc>MGS<mode><CR>
Parameter: Value Description
<mode> = Mode - (minus sign) Get shift codes
Response:
<code 1>:<time 1>;….;<code n>:<time n><CR>
Err<CR> <code> = Shift code (text) Shift code (max 8-digit) <time> = Start time (SSMMss) Time hour,min,sec
Example:
send: <ESC>MGS-<CR> read: FGA:060000;MGB:140000;NGC:220000<CR>

Page 93 of 119
Command: <ESC>MW Data connection
Mode1: Send scales data Use the TZ command to send data to a print image. If a scale or a scanner aren’t programmable and show the data in a fixed format, the print system can be set to this case. Select the print image at the system manually. The print image must contain an action field, which is to be filled with data. An action field number is specified in the command MW. This “virtual” action field (i.e. 30) is used for the data transfer only. The action field in the print image must have a different number (1). In this action field (and other) is referenced to the virtual field. So the sent information can be used in any various fields (plain text and datamatrix).
Syntax:
<Esc>MW<mode>;<port>;<startseq>;<endseq>;<feldnr>;<timeout><CR>
Parameter: Value Description
<mode> = Mode - (minus) Switch off 1 Activate data connection
2 Fill variable fields by scanner 3 Fill text allocation and variable fields by scanner <port> = TCP-Port 2048 - 30000 TCP-Portnumber
0 Serial interface <startseq>= Start-Sequence 8digit HEX-value 1 to 4digit Startseq. <endseq> = Ende-Sequence 8digit HEX-value 1 to 4digit Endseq. <feldnr> = Field number 1 - 0050 Field number Action field. <timeout> = Time 1 - 999 Time to Blank 0 Continuous printing until new data
Response:
Ok<CR> Err<CR>
Example MW-command: TCP-Port: 11000 StartSeq: <ESC> EndSeq: <CR>
FieldNo: 30 Timeout: 5s
send: <ESC>MW1;11000;1B;0D;30;5<CR> read: Ok<CR>

Page 94 of 119
Mode 2: Fill variable fields by scanner Field number and time aren’t necessary. Field number:0, time:0. Interrogate variable fields with start/stop, select print image and OK. This can be entered by a scanner or by a keyboard. After a scan of all fields, the print image assignment take place and the fields are visible on the display. The old data are print with Stop / Start and F5 Start. The sensor LED of the X1JET blinks yellow until the data are scanned. Every data set is confirmed with a short green flash. The print is assigned when all data are read.
Example: Send MW command, switch off the system, switch on send: <ESC>MW2;0;1B;0D;0;0<CR> read: Ok<CR>
Attention! The system must switch off and on after sending the command. The layout must have one or more action fields, which must filled with data. The action field is referenced to the specified field (here 30). The layout must be assigned on the system. Don’t use this field (here 30), this will be referenced only. Mode 3: Print image selection and fill variable fields
New function for X2JET plus Touch / X4JET plus Touch only. Special software print image selection and fill variable fields by scanner Task: On a order form of a customer are 3 barcodes for the part number, charge number and best before date. An operator should scan the part number of the order form with a scanner. The corresponding print image is call up with the help of the part number. The names of the print image correspond to the part numbers. The print image has two variables for the charge number and the best before date. If the values are interrogate from the print system, those can scan with scanner or can insert manually.

Page 95 of 119
Description: To enable this function, the MW command must send once. i.e.: send: <ESC>MW3;0;1B;0D;0;0<CR> Please find detailed description of the command above. The system must switch on and off after sending. The system must stand in the main menu or in the print image selection menu for the print image selection. The active print head can select in the main menu. For safety: Only barcodes, which have exactly the same length like the print image name, are accepted. The print images must save in the controller. The length of the read in variable fields must accord with the length of the barcodes. A formatting is possible: i.e.: In field 2 is scanned: 2016-11, to be printed: best before date: 11.2016. Text field: „MHD: ~(2)6xx.1xxxx~. The field 2 must create with a DummyFont if it should not print. The print image can include one or more action fields, which should be filled with data. The fields must create as text field with action field content. The fields must numbered serially from 1. The scanner connection takes place via Ethernet (IP and Port free selectable) or RS232. It’s possible to fix a up to 4 digits start and end sequence. Minimum is one sign for start and end identification. Enter this in Hex format. The scanner send i.e.: <ESC>10100739<CR> for the print image names and the data. Function set up Sending i.e.: <ESC>MW3;0;1B;0D;0;0<CR> at which 1B is the Hex value for <ESC> and 0D is the Hex value for <CR>. After sending the command the serial interface doesn’t react to other interface commands. The Ethernet interface still react to interface commands on port 10200. The mode can switch off with <ESC>MW-<CR>. Attention! The system must switch off and on after sending the command. Version note: The print image selection is available from version 2.015n in the X2JET plus Touch and X4JET plus Touch. send: <ESC>MW3;0;1B;0D;0;0<CR> 05.05.2015 12:21:46 898 | read: Ok<CR>

Page 96 of 119
Command: <ESC>MGW Fetch data connection parameter
Syntax:
<Esc>MGW<CR>
Parameter: Value Description
Response:
<mode>;<port>;<startseq>;<endseq>;<feldnr>;<timeout><CR>
Err<CR> : Syntax Error -<CR : deaktiviert
Parameter see <ESC>MW<CR>
Example: send: <ESC>MGW<CR> read: 1;11000;1B;0D;0030;0005<CR>
Attention! The system must switch off and on after sending the command.
The mode can switch off with send: <ESC>MW-<CR>. send: <ESC>MW-<CR>
read: Ok<CR>
Page 97 of 119
Command: <ESC>MW Data link. Use the TZ command to send data in a print image. If a scale or scanner isn’t programmable and the data are shown in a fixed format, it is now possible to select the printer to this. The print image is selected on the system manually. The print image must include an action field, which should be filled with data. The command MW indicates an action field number. This „virtual“ action field (30) is used for the data transfer only. The action field in the print image must have another number (1). In this action field (and further) is referred to the virtual field. So the transmitted information can be arbitrarily used in different fields (plain text and datamatrix).
Syntax:
<Esc>MW<mode>;<port>;<startseq>;<endseq>;<feldnr>;<timeout><CR>
Parameter: Value Description
<mode> = Mode - (Minus sign) Switch off 1 Activate 2 Fill variable fields with
scanner <port> = TCP-Port 2048 - 30000 TCP-Port number
0 Serial interface <startseq>= Start-Sequence 8digit HEX-value 1 to 4-digit Start seq. <endseq> = End-Sequence 8digit HEX-value 1 bis 4-digit End seq. <feldnr> = Field number 1 - 5000 Field number Action field. <timeout> = Time 1 - 999 Time to blank 0 Endless print until new data
Response:
Ok<CR> Err<CR>
Example MW command: TCP-Port: 11000 StartSeq: <ESC> EndSeq: <CR>
FieldNo: 30 Timeout: 5s
send: <ESC>MW1;11000;1B;0D;30;5<CR> read: Ok<CR>

Page 98 of 119
Mode 2: Fill variable fields with scanner Field number and time not used, field number:0, Time:0. With Start / Stop choose a print image and confirm with ok.the variable can be filled with scanner or manual. After filling all fields the print image will be printed. With Start / Stop and F5 the old data will be print. At the X1 the sensor LED blinks yellow until data are scanned. Each set of data will be confirmed with a short green light. After reading all data the print will start.
Example: Send MW command, switch the system off and on send: <ESC>MW2;0;1B;0D;0;0<CR> read: Ok<CR>
Attention! The system must switch off and on again after sending the command. The print image must have one or more action fields which should be filled with data. The action fields have a reference to the selected field number (here 30) The print image must be selected at the controller. The selected field (30) is only used for the reference.

Page 99 of 119
Command: <ESC>MGW Get Data link parameter
Syntax:
<Esc>MGW<CR>
Parameter: Value Description
Response:
<mode>;<port>;<startseq>;<endseq>;<feldnr>;<timeout><CR>
Err<CR>
See parameter <ESC>MW<CR>
Example: send: <ESC>MGW<CR> read: 1;00000;1B;0D;0006;0005<CR>
Attention! The system must switch off and on again after sending the command. The data link can carried over ethernet (IP and Port free selectable) or RS232. It can be set a 1- to 4-digit start and end sequence. This must be entered in Hex format. The scale send i.e. <ESC>kg12854LG7fe<CR> and 12845 for the eight in g. There must be at least a start and end character. In order that false information will be print, the print memory will be automatically deleted after a adjusted time. I.e. 5sec. when a product is weighted all 10 sec. Must be sent: <ESC>MW1;11000;1B;0D;30;5<CR> in which 1B is the Hex value for <ESC> and 0D is the Hex value for <CR>. After sending this command, the serial interface isn’t responding to other interface commands. The ethernet interface reacts on interface commands on the port 10200. The mode can be switched off with <Esc>MW-<CR>.
Page 100 of 119
Command: <ESC>SV Status Query head type and version
Syntax:
<Esc>SV<CR>
Response:
k(iJet)Version <version><CR> kkkk:xy(X4Jet)Version <version><CR>
Parameter: Value
kkkk = <Head configuration> abcd - 'a': digit '1' to '4': specifies how many print heads generate a multihead print image together from head#1. . 1=Single, 2=Twin, 3=Triple, 4= Quad - 'b' digit '0' to '3': specifies how many print heads generate a multihead print image together from head#2. '0' specifies that this head already among to a multihead print image. - 'c' digit '0' to '2': specifies how many print heads generate a multihead print image together from head #3.
'0' specifies that this head already among to a multihead print image. - 'd' digit '0' to '1': specifies with '1' that head#4 is a single head. '0' specifies that this head already among to a multihead print image. Examples: <ESC>MK----;1111<CR> : 4 Single heads <ESC>MK----;4000<CR> : 1 Quad head print image (4-heads) from head#1 <ESC>MK----;2020<CR> : 2 Twin head print image (2-heads) from head#1 and from head#3 <ESC>MK----;2011<CR> : 1 Twin head print image (2-heads) from head#1 and 2 Single heads (head#3, head#4) <ESC>MK----;3001<CR> : 1 Triple head print image (3-heads) from head#1 and 1 Single head (head#4) <ESC>MK----;1201<CR> : Twin head print image (2-heads) from head#2 and 2 Single heads (head#1, head#4)
x = <Head type channel1 (1 and 2)> 1: HP head 2: MX head 3: LX head 4: XR head 5: HP MK2 head y = <Head type channel 2 (3 and 4)> 1: HP head 2: MX head 3: LX head 4: XR head 5: HP MK2 head
(X4Jet) system type
version = <Version number> actual Version number V1.002

Page 101 of 119
Example: send: <ESC>SV<CR> read: 1(iJet)Version 2.006d<CR> send: <ESC>SV<CR> read: 0001:11(X1Jet)Version 0.001c<CR> send: <ESC>SV<CR> read: 1010:22(X4Jet)Version 1.004k<CR> send: <ESC>SV<CR> read: 1010:32(X4Jet+)Version 1.004k<CR>

Page 102 of 119
Command: <ESC>S1 Status 1 Query status messages The head must be selected using <ESC>K1<CR> (or K2). Or the last head selected will be displayed.
Syntax: <Esc>S1<CR>
Response: ink:htmr:iuse:xclk:bat:txt:pause:headOk:headTyp:labelCnt:ztv:cp:LX:exInk:scStat <CR> The “K<headnumber>:” is prefixed by the head number response. (M* Par62 = 4)
Parameter: Value
ink = <ink status> 0: OK 1: Cartridge almost empty (5%) 2: Cartridge empty
htmr = <Warming temperature> in °C if warming on. HP/LX: -001= no head, 0=not calibrated, 26=standard value MX: -001= no head, 0=failure, 20=heat, 40=Temp ok
iuse = <ink level> >=0: Ink level in % xclk = <no pulses> 0: OK
1: No encoder pulses bat = <battery status> 0: OK
1: empty txt = <name of the active print image> pause 0: Active print
1: Pause 2: Stopp headOk 0: Head Ok
1: Head not existent headTyp 1: HP 2: Trident 100er 3: Trident 50er 4: LexMark labelCnt Print image counter 6-digit ztv 0: Not used 1: ZTV Ok 2: ZTV Warning 3: ZTV empty (print stop) 4: ZTV Failure cp 0: Ok 1: Prozessor ID? 2: ExtChip? 3: 1 + 2? LX 0: no voltage setting 1: LX with voltage setting exInk ink consumption in % after ink empty scStat Status SmartCard The values are added in the case 1: Blocked ink selection of multiple messages 2: Exceed best before date 4: Exceed User best before date

Page 103 of 119
Example: send: <ESC>S1<CR> read: 0:0000:100:1:0:12810_25x75.00J:0:0:3:000032:0<CR>

Page 104 of 119
Command: <ESC>S2 Status 2 Query inputs and outputs
Syntax:
<Esc>S2<CR>
Response:
aaaaaaaa;bbbbbbbb<CR>
Parameter: Value
aaaaaaaa = <outputs> 0: Contact OFF 1: Contact ON
a1 = <Signal light1> Alarm a2 = <Signal light1> OK a3 = <Signal light1> Warning a4 = <Signal light1> Reserve a5 = <Signal light2, Relay1> a6 = <Signal light2, Relay2> a7 = <Signal light2, Relay3> a8 = <Signal light2, Relay4>
bbbbbbbb = <inputs> 0: Input OFF
1: Input ON b1 = <USER 1> b2 = <USER 2> b3 = <START 1> b4 = <START 2> b5 = <reserve 1> b6 = <reserve 2> b7 = <reserve 3> b8 = <reserve 4> c9 = < reserve > c9 bis c12 Only X4JET c10 = <reserve> c11 = <reserve> c12 = <reserve>
Example:
send: <ESC>S2<CR> read: 01000000;01000000<CR>
Output 2 in on (OK) Input 2 is on.

Page 105 of 119
Command: <ESC>SLX Readout LX memory Read the memory of the Lexmark cartridge. X2/4JET with the version > 1.008b
Syntax:
<Esc>SLX<CR>
Response:
aa,bb,cc,dd,ee,ff,gg,hh,ii,kk,ll,mm,nn,oo,pp,rr<CR>
Parameter: Value
aa = Byte0 bb = Byte1 cc = Byte2 dd = Byte3 ee = Byte4 Temp sensor ff = Byte5 Ink type gg = Byte6 Ink type hh = Byte7 OEM ID ii = Byte8 kk = Byte9 ll = Byte10 mm = Byte11 nn = Byte12 oo = Byte13 Ink level pp = Byte14 Ink level rr = Byte15
Example: send: <ESC>SLX<CR> read: 9C,0B,0B,BC,63,2C,2F,66,37,37,FF,FF,00,00,1F,FF<CR>
Byte 5 and 6 are the ink ID: In Collins 33-64 decimal for the top 6 bits.
Ink Ink ID InkID
Byte6 Byte5
LX CS1 0010 1111 (2F) 0010 1100 (2C)
LX GP+ 0000 1111 (0F) 0000 1100 (0C)
LX SD1 1000 0100 (84) 1000 0100 (84) 21 h - 33dec
LX RD1 1010 0000 (A0) 1010 0000 (A0) 28 h – 40 dec
Byte 7 is the Company ID. For Weber = 66
The Bytes 13 and 14 are used for the ink level. In 7% steps. 100% / 98% / 91% / ….

Page 106 of 119
BYTE BIT(S) YSP RUSHMORE BULK TANK PROG BY COMMENTS
0 6 0 = MONO CHIP 0 = MONO CHIP NOT USED LXK mfg
02 3-1 AVAILABLE AVAILABLE NOT USED
03 6-4 AVAILABLE AVAILABLE NOT USED
04 7-0 TEMP SENSE TEMP SENSE NOT USED LXK mfg
05 7-2 INK TYPE INK TYPE INK TYPE LXK mfg 64 INKS (primary)
05 1 REDUNDANT YSP = 0 REDUNDANT RUSH = 1 NOT USED LXK mfg
06 7-2 REDUNDANT INK TYPE REDUNDANT INK TYPE REDUNDANT INK TYPE LXK mfg 64 INKS; must match primary
07 7-0 SECONDARY OEM ID SECONDARY OEM ID SECONDARY OEM ID LXK mfg
08 7-0 BAR CODE BAR CODE MUSTANG PROG S/N LXK/i-button mfg (printhead) last three characters of 7-character barcode 09 7-0 BAR CODE BAR CODE MUSTANG PROG S/N LXK/i-button mfg
11 7-4 AVAILABLE AVAILABLE NOT USED
13 7-0 INK LEVEL INK LEVEL INK LEVEL printer gas gauge
14 7-0 INK LEVEL INK LEVEL INK LEVEL printer gas gauge
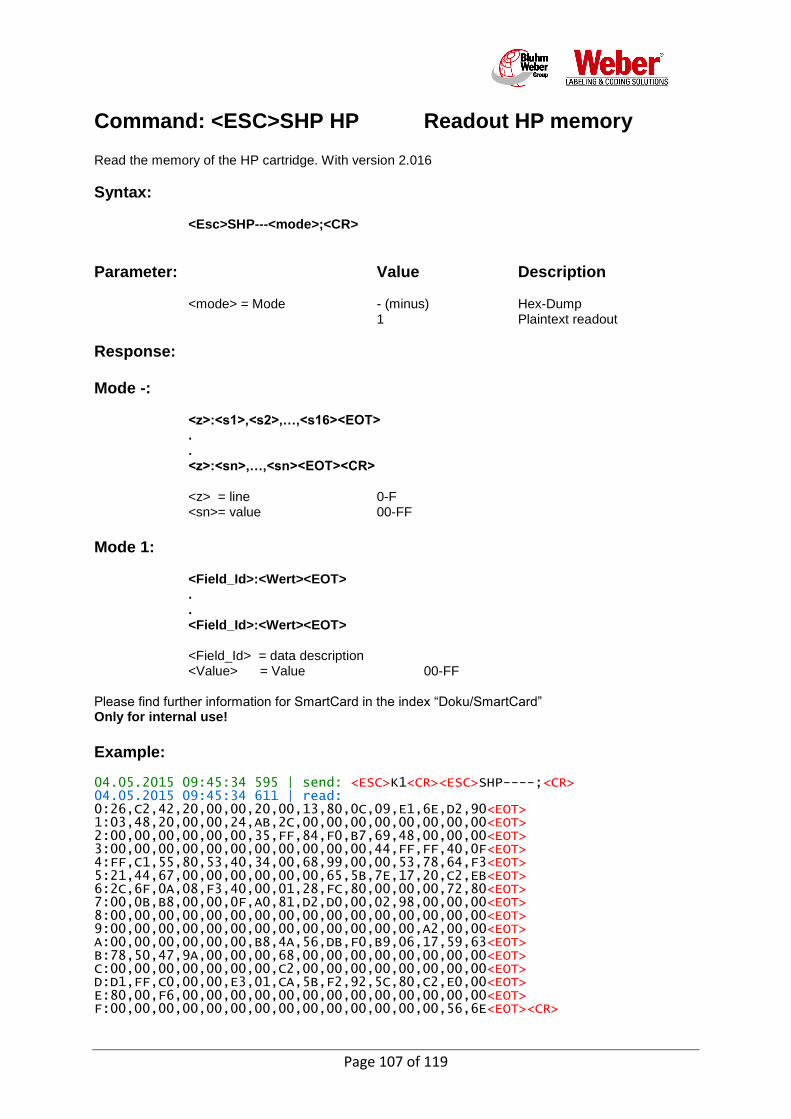
Page 107 of 119
Command: <ESC>SHP HP Readout HP memory Read the memory of the HP cartridge. With version 2.016
Syntax:
<Esc>SHP---<mode>;<CR>
Parameter: Value Description
<mode> = Mode - (minus) Hex-Dump 1 Plaintext readout
Response: Mode -:
<z>:<s1>,<s2>,…,<s16><EOT> . . <z>:<sn>,…,<sn><EOT><CR> <z> = line 0-F <sn>= value 00-FF
Mode 1:
<Field_Id>:<Wert><EOT> . . <Field_Id>:<Wert><EOT> <Field_Id> = data description <Value> = Value 00-FF
Please find further information for SmartCard in the index “Doku/SmartCard” Only for internal use!
Example:
04.05.2015 09:45:34 595 | send: <ESC>K1<CR><ESC>SHP----;<CR> 04.05.2015 09:45:34 611 | read: 0:26,C2,42,20,00,00,20,00,13,80,0C,09,E1,6E,D2,90<EOT> 1:03,48,20,00,00,24,AB,2C,00,00,00,00,00,00,00,00<EOT> 2:00,00,00,00,00,00,35,FF,84,F0,B7,69,48,00,00,00<EOT> 3:00,00,00,00,00,00,00,00,00,00,00,44,FF,FF,40,0F<EOT> 4:FF,C1,55,80,53,40,34,00,68,99,00,00,53,78,64,F3<EOT> 5:21,44,67,00,00,00,00,00,00,65,5B,7E,17,20,C2,EB<EOT> 6:2C,6F,0A,08,F3,40,00,01,28,FC,80,00,00,00,72,80<EOT> 7:00,0B,B8,00,00,0F,A0,81,D2,D0,00,02,98,00,00,00<EOT> 8:00,00,00,00,00,00,00,00,00,00,00,00,00,00,00,00<EOT> 9:00,00,00,00,00,00,00,00,00,00,00,00,00,A2,00,00<EOT> A:00,00,00,00,00,00,B8,4A,56,DB,F0,B9,06,17,59,63<EOT> B:78,50,47,9A,00,00,00,68,00,00,00,00,00,00,00,00<EOT> C:00,00,00,00,00,00,00,C2,00,00,00,00,00,00,00,00<EOT> D:D1,FF,C0,00,00,E3,01,CA,5B,F2,92,5C,80,C2,E0,00<EOT> E:80,00,F6,00,00,00,00,00,00,00,00,00,00,00,00,00<EOT> F:00,00,00,00,00,00,00,00,00,00,00,00,00,00,56,6E<EOT><CR>

Page 108 of 119
Command: <ESC>SL Read back variable data Read back variable data of a print image.
Syntax:
<Esc>Kx<CR> <Esc>SL<CR>
Response:
<Field type 1>(SOH)<Field no 1>(SOH)<Field content 1>(EOT) <Field type 2>(SOH)<Field no 2>(SOH)<Field content 2>(EOT) . . . <Field type N>(SOH)<Field no N>(SOH)<Field content N>(EOT) (CR)
Parameter: Value
<Field type> D : Date field C : Counter field V : Variable text field X : Action field <Field no> Field number* <Field content> Text content
The field number refers to the advanced iJET commands: <ESC>VA, <ESC>ZA, <ESC>DA, <ESC>PX, <ESC>BX The field number will be automatically generated by the <ESC>X command as follows: (FN stands for the field number in the <ESC>X command) Date field number: FN + 1000 Counter field number: FN + 1100 Field number Var.text: FN Field number X-command: FN + 1200
Example:
Print command: <ESC>X;#=1;a=0001;d=9999;P1-0-003200060;A4mm;Z=~zzzz~D=~ijkl~<CR>
This command will be translate into three commands (counter, date and print). Response: D<SOH>1001<SOH>0406<EOT> C<SOH>1101<SOH>0001<EOT> X<SOH>1201<SOH>Z=0001 D=0406<EOT><CR>
Example: send: <ESC>K3<CR> send: <ESC>SL<CR> read: X<SOH>1252<SOH>0014<EOT>C<SOH>1152<SOH>0014<EOT>X<SOH>1251<SOH>30.01.13<EOT>D<SOH>1051<SOH>300113<EOT><CR>

Page 109 of 119
Command: <ESC>EI Read back ink list Read back the list of used inks
Syntax:
<Esc>Kx<CR> <Esc>EI----;<CR>
Response:
<Name 1>(SOH)<Index 1>(EOT) <Name 2>(SOH)<Index 2>(EOT) . . . <Name N>(SOH)<Index N>(EOT) (CR)
Parameter: Value
<Name> Ink description <Index> Set-Number
Example: send: <ESC>K1<CR> send: <ESC>EI----;<CR> read: STABL<SOH>004<EOT>DIBL<SOH>005<EOT>MIBL2<SOH>014<EOT> SCRD<SOH>008<EOT>SCGN<SOH>009<EOT>SCBLU<SOH>010<EOT> WEBL<SOH>011<EOT>UVC1<SOH>028<EOT>BEABL<SOH>030<EOT> UVINV<SOH>012<EOT>IRINV<SOH>013<EOT>G1BL<SOH>015<EOT> CMBLK<SOH>025<EOT>RCBLU<SOH>026<EOT>RCRD<SOH>027<EOT> UltraBlack<SOH>031<EOT>FastSolid<SOH>033<EOT> CMBLK2<SOH>034<EOT>NPBLK<SOH>035<EOT>Bulk400<SOH>099<EOT> FSBLK<SOH>036<EOT>PTBLK<SOH>037<EOT><CR>

Page 110 of 119
Command: <ESC>SOP Set output-ports direct Outputs can be switched fast and direct. They can be switched on or off or set to the function like in System settings presetted. (<ESC>M*). The outputs can change for a while. Minimum time 100ms.
Syntax:
<ESC>SOP----;aa******[;b]<CR>
Response:
Ok<CR> Err<CR>
Parameter: Value a = <status> 0=off 1=on 2=as preset with <ESC>M* * = position will be ignored Optional: b = <Pulse time> 100...99999 ms Output change for the selected time, the
outputs will be set as originally after lapse of time.
Minimal time 100ms
Example: send: <ESC>SOP----;01******;500<CR> read: Ok<CR>
Output 1 will be switched off for 500ms, output 2 will be switched on for 500ms, all further outputs will be not changed (X4JET)
Attention! Before using this command the outputs must be defined with the command <ESC>M* Not possible in all versions. The digital signals in the systems are only updated every 40 seconds. Signals, that are smaller than this time, are not recorded and cannot be displayed.
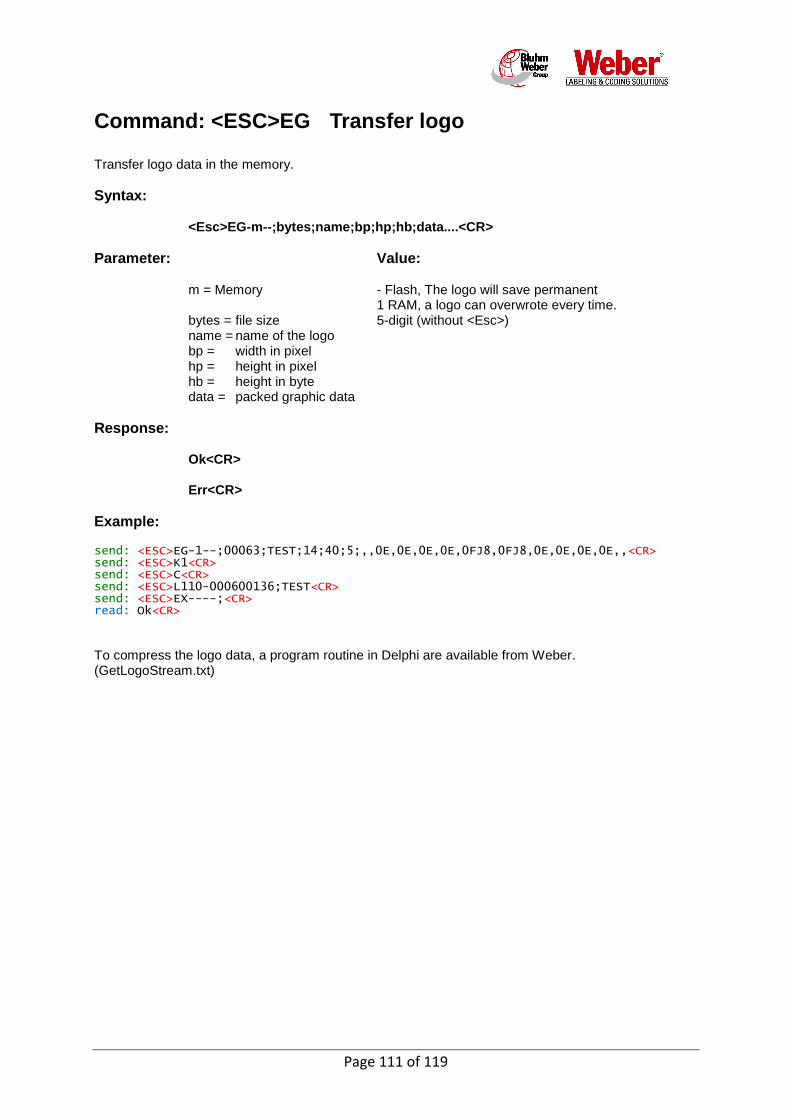
Page 111 of 119
Command: <ESC>EG Transfer logo Transfer logo data in the memory.
Syntax:
<Esc>EG-m--;bytes;name;bp;hp;hb;data....<CR>
Parameter: Value:
m = Memory - Flash, The logo will save permanent 1 RAM, a logo can overwrote every time. bytes = file size 5-digit (without <Esc>) name = name of the logo bp = width in pixel hp = height in pixel hb = height in byte data = packed graphic data
Response:
Ok<CR> Err<CR>
Example: send: <ESC>EG-1--;00063;TEST;14;40;5;,,0E,0E,0E,0E,0FJ8,0FJ8,0E,0E,0E,0E,,<CR> send: <ESC>K1<CR> send: <ESC>C<CR> send: <ESC>L110-000600136;TEST<CR> send: <ESC>EX----;<CR> read: Ok<CR>
To compress the logo data, a program routine in Delphi are available from Weber. (GetLogoStream.txt)

Page 112 of 119
Command: <STX>TZ Fill in action fields Fill in action fields in a print image externally or internally. Transfer protocol for direct head assignment using a serial interface
Syntax: <STX>TZ<imagename.00I>;< head no><printing mode>[;<queue size>][;<print delay>]<CR> <Field content 1><CR> <Field content 2><CR> -
<Field content n><CR> [<counter start value>] <ETX>
Parameter: Value <STX> Print image start Dec. 2
<imagename.00I> max. 8 character name <Head number> 1-2 if no info given, head group 1 <Printing mode> 0 for single print 1 continuous printing if no info given, continuous printing
3 continuous printing with storage of the last print after switch off.
optional: < queue no> 1 maximum 1 set of TZ commandos in the queue buffer No value = the queue will be filled up to 1 kB optional: <Delay> 1-1000 print delay in mm No Value = the global value will be taken. optional: <counter start value> 1-999999999999 the start value of the first counter in the print image. Only for continuous printing <ETX> Print image end dec. 3 <ACK> pos. acknowledgement Dec. 6 <NAK> negative acknowledgement Dec. 21
Response: <STX><head number>OK<ETX>

Page 113 of 119
Example: send: <STX>TZAT1227.00I;10<CR>MHD.: 06/97<CR><ETX> read: <ACK> Transfer print image 'AT1227.00I' to head 1 with single print and fill in variable field 1 with 'MHD.: 06/97'.
Example 2: send: <STX>TZAT1227.00I;20;1;<CR>MHD.: 06/97<CR> LOT: L6389<CR><ETX> read: <ACK> Commit print image ‘AT1227.00I’ to head 2 with a single print, CUE number 1, no print image-related print start delay and fill in the variable field 1 with ‘MHD.: 06/97’ and the variable field 2 with ‘LOT: L6389’. Response: After a print image has been printed the following sentence will be returned: <STX><head number>OK<ETX> With print ready message: (M* Par62 = 6) <STX><Head number>END<ETX>
Error message: <STX><head number> E<fault code><ETX> read: <STX>1E3<ETX>
Explanations:
<Fault code> 1- 9 1 = Photocell triggered without data 2 = Unknown command 3 = Print image name not present 4 = Head not present 5 = not used 6 = System not ready 7 = Wrong checksum / can’t open the port (2.011c) 8 = double block number / no response (2.011c) 9 = not next block number / logo not loaded

Page 114 of 119
Example: send: <STX>TZDeo3.00I;10<CR>02354<CR>A17C<CR><ETX> read: <ACK>
Transfer print image ' Deo3.00I ' to head 1 with single print.
Printed image:
Each data block to be transferred will be prefixed with STX. The data block ends with ETX. A successful reception will be acknowledged with ACK. When data blocks are received in error, a negative acknowledge, NAK, will be sent. If no acknowledgement is given, the data block will be repeated. If a counter is present in a print image, the starting value of the counter can be included in the transmission. The content of the last data block indicates the starting value. If no data block is transferred, the counter will start with the programmed starting value. This function is possible only in the case of continuous printing.
Example: send: <STX>TZDeo3.00I;11<CR>02354<CR>A17C<CR>333<ETX> read: <ACK> read: <STX>1OK<ETX> A counter in the print image Deo3.00I starts with a value of 333 In the case of continuous printing the printed print image will be set up in print buffer 1 and updated in print buffer 2 if necessary. The date and time are always updated. After the next print image is sent, the first print image will be overwritten. In the case of a single print, the first print print image is set up in print memory 1, the second print image in print memory 2. The third print image will be stored in the buffer. If further print images are sent <NAK> will be returned. Date/time fields will not be updated in the case of a single print!!! The used fonts, which are used for the creation of the first print image, are load to a cache memory to change the data faster. Therefore the first creation of a print image may take longer, especially for large fonts. If a font 4 print wasn’t needed, it is deleted from the cache memory.

Page 115 of 119
Command: <STX><BNR>TZ Fill in action fields with
Checksum Fill in action fields in a print image externally or internally. Transfer protocol for direct head assignment using a serial interface
Syntax: <STX><BNR>TZ<imagename.00I>;< head no><printing mode>[;<queue size>][;<print delay>]<CR> <Field content 1><CR> <Field content 2><CR> -
<Field content n><CR> <ETX><BCC>
Parameter: Value <STX> Print image start Dec. 2 <BNR> Block number if no info, no block check will be made
<image name.00I> max. 8 character name <Head number> 1-2 if no info given, head group 1 <Printing mode> 0 for single print 1 continuous printing if no info given, continuous printing
3 continuous printing with storage of the last print after switch off.
optional: < queue size > 1 maximum 1 set of TZ commandos in the queue buffer optional: <Delay> 1-1000 print delay in mm <ETX> Print image end dec. 3 <BCC> Block check XOR logical operation of all sent characters <ACK> pos. acknowledgement Dec. 6 <NAK> negative acknowledgement Dec. 21
Response: <STX><head number>OK<BNR><ETX>
Example: <STX>1TZAT1227.00I;10<CR>MHD.: 06/97<CR><ETX> Transfer print image 'AT1227.00I' to head 1 with single print and fill in variable field 1 with 'MHD.: 06/97'.
Response: After a print image has been printed the following sentence will be returned: <STX><head number>OK1<ETX>
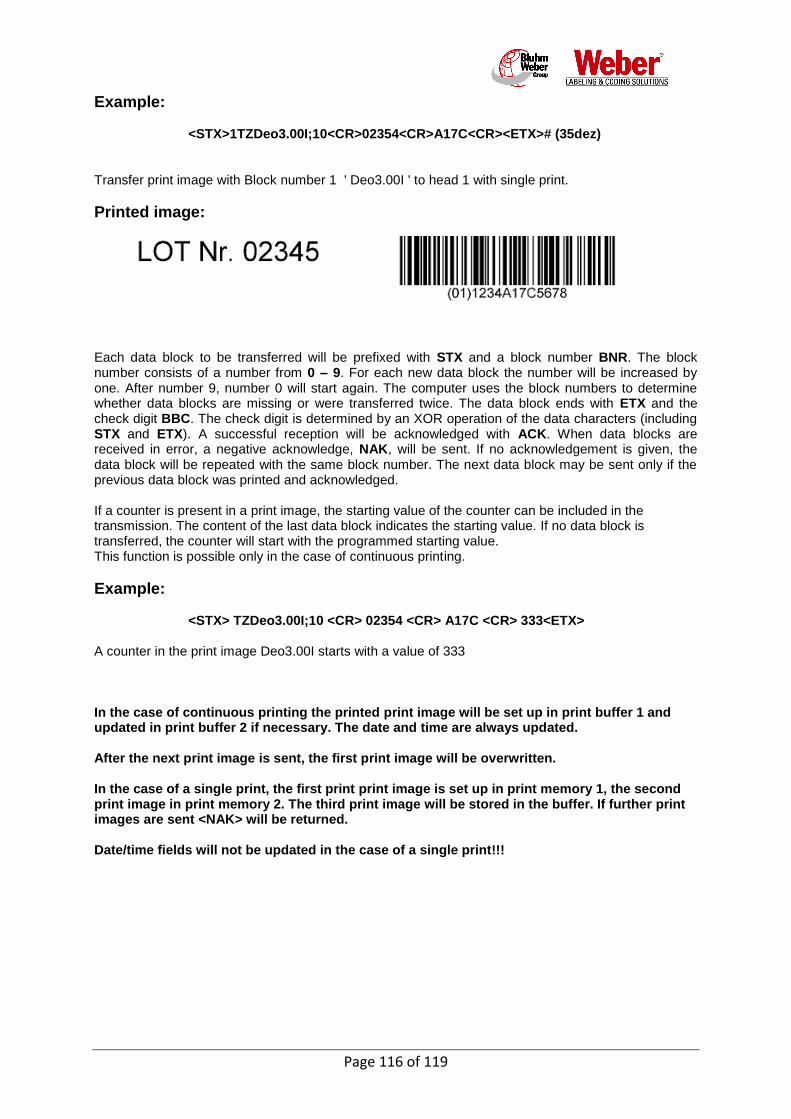
Page 116 of 119
Example:
<STX>1TZDeo3.00I;10<CR>02354<CR>A17C<CR><ETX># (35dez)
Transfer print image with Block number 1 ' Deo3.00I ' to head 1 with single print.
Printed image:
Each data block to be transferred will be prefixed with STX and a block number BNR. The block number consists of a number from 0 – 9. For each new data block the number will be increased by one. After number 9, number 0 will start again. The computer uses the block numbers to determine whether data blocks are missing or were transferred twice. The data block ends with ETX and the check digit BBC. The check digit is determined by an XOR operation of the data characters (including STX and ETX). A successful reception will be acknowledged with ACK. When data blocks are received in error, a negative acknowledge, NAK, will be sent. If no acknowledgement is given, the data block will be repeated with the same block number. The next data block may be sent only if the previous data block was printed and acknowledged. If a counter is present in a print image, the starting value of the counter can be included in the transmission. The content of the last data block indicates the starting value. If no data block is transferred, the counter will start with the programmed starting value. This function is possible only in the case of continuous printing.
Example:
<STX> TZDeo3.00I;10 <CR> 02354 <CR> A17C <CR> 333<ETX> A counter in the print image Deo3.00I starts with a value of 333 In the case of continuous printing the printed print image will be set up in print buffer 1 and updated in print buffer 2 if necessary. The date and time are always updated. After the next print image is sent, the first print image will be overwritten. In the case of a single print, the first print print image is set up in print memory 1, the second print image in print memory 2. The third print image will be stored in the buffer. If further print images are sent <NAK> will be returned. Date/time fields will not be updated in the case of a single print!!!

Page 117 of 119
Command: <STX><BNR>n TZ Fill in action fields without
Checksum Fill in action fields in a print image externally or internally. Transfer protocol for direct head assignment using a serial interface
Syntax: <STX><BNR>nTZ<imagename.00I>;< head no><printing mode>[;<queue size>][;<print delay>]<CR> <Field content 1><CR> <Field content 2><CR> -
<Field content n><CR> <ETX>
Parameter: Value <STX> Print image start Dec. 2 <BNR> Block number if no info, no block check will be made
<imagename.00I> max. 8 character name <Head number> 1-2 if no info given, head group 1 <Printing mode> 0 for single print 1 continuous printing if no info given, continuous printing
3 continuous printing with storage of the last print after switch off.
optional: < queue size > 1 maximum 1 set of TZ commandos in the queue buffer optional: <print delay> 1-1000 print delay in mm <ETX> Print image end dec. 3
<ACK> pos. acknowledgement Dec. 6 <NAK> negative acknowledgement Dec. 21
Response: <STX><head number>OK<BNR><ETX>

Page 118 of 119
Command: <STX>CLR Clear buffer In the case of an action field protocol the filled buffer will be cleared. Applies only for single print. In the case of continuous printing <Esc>C<CR> can be entered to stop the printing or enter <Esc>C0<CR> to stop the printing. With <Esc>C1<CR> the print can be started again.
Syntax:
<STX>CLR[a]<ETX>
Response:
<ACK>
Parameter: Value a = <head number> 1 – 8 without number head 1
Example: send: <STX>CLR<ETX> read: <ACK>
<STX>CLR<ETX> clear all buffer Only for head 1
send: <STX>CLR3<ETX> read: <ACK>
<STX>CLR3<ETX> clear all buffer head 3

Page 119 of 119
Example: Send and call up print image for printing. send: <ESC>EW----;temp.00I<CR> send: <ESC>X;#=0;g=4:P1-0-000000140;A4mm;~ab.cd.gh~<CR> send: <ESC>X;#=0;g=2;a=0001;d=9999;c=1;b=0:P1-0-006200140;A4mm;~zzzz~<CR> send: <ESC>P1-0-005400000;A4mm;L12345<CR> send: <ESC>P1-0-000000000;A4mm;Testtext<CR> send: <ESC>B30A0300009800000;A2mm;012345678901<CR> send: <ESC>EX----;<CR> read: Ok<CR> send: <STX>TZtemp.00I;13<CR><ETX> read: <ACK> read: <STX>1OK<ETX>
Example: Send print image to the memory. send: <ESC>EW----;Sample.00I<CR> send: <ESC>P1-0-000000000;A4mm;Testtext<CR> send: <ESC>X;#=0;g=4:P1-0-000000140;A4mm;~ab.cd.gh~<CR> send: <ESC>X;#=0;g=2;a=0001;d=9999;c=1;b=0:P1-0-006200140;A4mm;~zzzz~<CR> send: <ESC>B30A0300009800000;A2mm;012345678901<CR> send: <ESC>X;#=0;g=1;f=Lot Nummer;h=L12345:P1-0-005400000;A4mm;~xxxxxxxxxxxxxxxxxxxxxxxxxxxxxxxxxxxxxxxxxxxxxxxx~<CR> send: <ESC>EX----;<CR> read: Ok<CR>