interior rear view mirr or
TRANSCRIPT

11/4/2020 Interior Rear View Mirror (Mirrors) - ALLDATA Repair
https://my.alldata.com/repair/#/repair/article/54382/component/754/itype/401/nonstandard/10006/selfRefLink/true 1/15
2015 Ford Fusion FWD L4-2.5LVehicle > Body and Frame > Mirrors > Service and Repair > Removal and Replacement
INTERIOR REAR VIEW MIRROR
501-09 sRear View Mirror 2015 FusionRemoval and Installation
Interior Rear View MirrorSpecial Tool(s) / General Equipment
501-025 Installer, Rear View Mirror
501-190 Remover, Auto Dimming Rear View Mirror
501-191 Installer, Rear View Mirror
501-D118A (501-D118) Mirror Remover
Removal
NOTE: Removal steps in this procedure may contain installation details.
Refer to: (100-00 General Information, Description and Operation) .
1. WARNING: Before beginning any service procedure in this section, refer to Safety Warnings in section100-00 General Information. Failure to follow this instruction may result in serious personal injury.
Health and Safety Precautions
2. Mirror Types

11/4/2020 Interior Rear View Mirror (Mirrors) - ALLDATA Repair
https://my.alldata.com/repair/#/repair/article/54382/component/754/itype/401/nonstandard/10006/selfRefLink/true 2/15
Mirror type 1
4. If equipped, disconnect the interior mirror electrical connector.

11/4/2020 Interior Rear View Mirror (Mirrors) - ALLDATA Repair
https://my.alldata.com/repair/#/repair/article/54382/component/754/itype/401/nonstandard/10006/selfRefLink/true 3/15
5. Adjust the jaws on the interior mirror remover. Use Special Service Tool: 501-190 Remover, Auto Dimming Rear View Mirror .
Using the interior mirror remover, release the locking tab.
6. NOTICE: Make sure the interior mirror remover is fully inserted into the rear view mirror mount access hole.Otherwise, damage to the windshield glass may occur.
Open In New TabZoom/Print
11/4/2020 Interior Rear View Mirror (Mirrors) - ALLDATA Repair
https://my.alldata.com/repair/#/repair/article/54382/component/754/itype/401/nonstandard/10006/selfRefLink/true 4/15
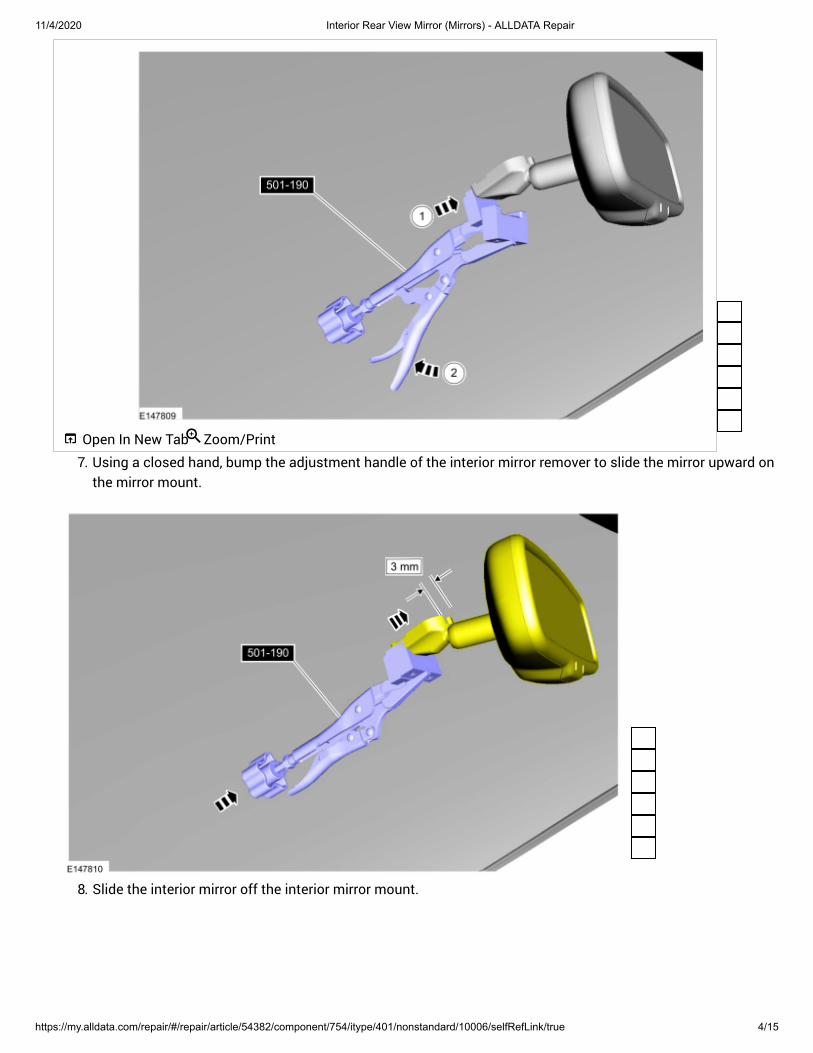
7. Using a closed hand, bump the adjustment handle of the interior mirror remover to slide the mirror upward onthe mirror mount.
8. Slide the interior mirror off the interior mirror mount.
Open In New TabZoom/Print
11/4/2020 Interior Rear View Mirror (Mirrors) - ALLDATA Repair
https://my.alldata.com/repair/#/repair/article/54382/component/754/itype/401/nonstandard/10006/selfRefLink/true 5/15
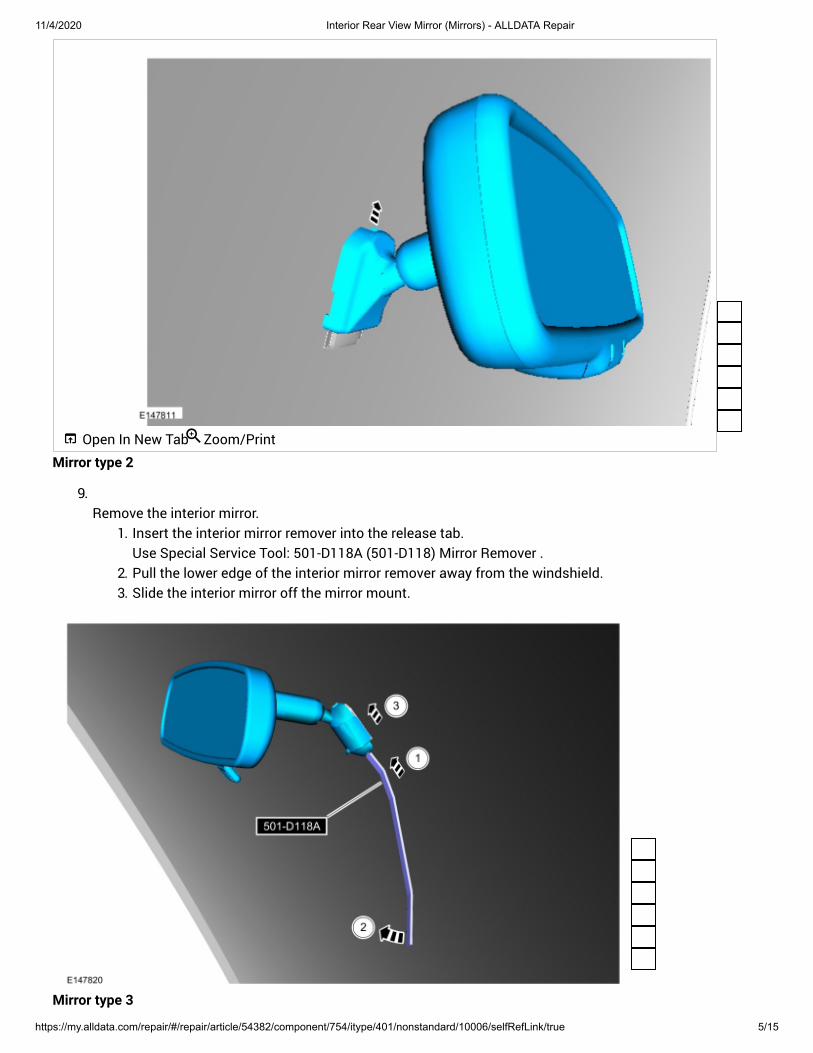
Mirror type 2
9. Remove the interior mirror.
1. Insert the interior mirror remover into the release tab. Use Special Service Tool: 501-D118A (501-D118) Mirror Remover .
2. Pull the lower edge of the interior mirror remover away from the windshield. 3. Slide the interior mirror off the mirror mount.
Mirror type 3
Open In New TabZoom/Print

11/4/2020 Interior Rear View Mirror (Mirrors) - ALLDATA Repair
https://my.alldata.com/repair/#/repair/article/54382/component/754/itype/401/nonstandard/10006/selfRefLink/true 6/15
10. Remove the rain sensor covers.
11. Disconnect the interior mirror electrical connector.
12. Remove the interior mirror.
1. Position the interior mirror assembly to release the indexing tab. 2. Inspect the indexing tab and turn the interior mirror slightly counter clock-wise. 3. Turn the interior mirror 45 degrees counter clock-wise. 4. Pull the interior mirror off the mirror mount.
Open In New TabZoom/Print

11/4/2020 Interior Rear View Mirror (Mirrors) - ALLDATA Repair
https://my.alldata.com/repair/#/repair/article/54382/component/754/itype/401/nonstandard/10006/selfRefLink/true 7/15
Mirror type 4
13. If a new mirror is being installed, use a diagnostic scan tool, begin the PMI process for the IPMA following theon-screen instructions.
14. Remove the rain sensor covers.
Open In New TabZoom/Print

11/4/2020 Interior Rear View Mirror (Mirrors) - ALLDATA Repair
https://my.alldata.com/repair/#/repair/article/54382/component/754/itype/401/nonstandard/10006/selfRefLink/true 8/15
15. Disconnect the interior mirror electrical connector.
16. Remove the interior mirror.
1. Turn the interior mirror assembly counter clock-wise. 2. Remove the interior mirror off the mirror mount.
Open In New TabZoom/Print

11/4/2020 Interior Rear View Mirror (Mirrors) - ALLDATA Repair
https://my.alldata.com/repair/#/repair/article/54382/component/754/itype/401/nonstandard/10006/selfRefLink/true 9/15
Mirror type 5
17. Remove the interior mirror.
1. Release the locking tab. 2. Slide the interior mirror off the mirror mount.

11/4/2020 Interior Rear View Mirror (Mirrors) - ALLDATA Repair
https://my.alldata.com/repair/#/repair/article/54382/component/754/itype/401/nonstandard/10006/selfRefLink/true 10/15
Mirror type 6
18. Disconnect the electrical connector and unclip the wiring harness.
Open In New TabZoom/Print

11/4/2020 Interior Rear View Mirror (Mirrors) - ALLDATA Repair
https://my.alldata.com/repair/#/repair/article/54382/component/754/itype/401/nonstandard/10006/selfRefLink/true 11/15
19. Remove the interior mirror.
1. Loosen the set screw. : 16 lb.in (1.8 Nm)Torque
2. Slide the interior mirror upward.
Installation
Mirror type 1
Open In New TabZoom/Print

11/4/2020 Interior Rear View Mirror (Mirrors) - ALLDATA Repair
https://my.alldata.com/repair/#/repair/article/54382/component/754/itype/401/nonstandard/10006/selfRefLink/true 12/15
2. Slide the interior rear view mirror over the windshield bracket from the top.
Using the interior mirror installer, fully seat the interior mirror. Use Special Service Tool: 501-191 Installer, Rear View Mirror .
3. NOTE: An audible click will be heard as the mirror fully seats.

11/4/2020 Interior Rear View Mirror (Mirrors) - ALLDATA Repair
https://my.alldata.com/repair/#/repair/article/54382/component/754/itype/401/nonstandard/10006/selfRefLink/true 13/15
4. If equipped, connect the electrical connector.
Open In New TabZoom/Print

11/4/2020 Interior Rear View Mirror (Mirrors) - ALLDATA Repair
https://my.alldata.com/repair/#/repair/article/54382/component/754/itype/401/nonstandard/10006/selfRefLink/true 14/15
5. If equipped with a compass module which requires calibration, check the compass zone and calibration.
Mirror type 2
6. Using the interior mirror installer, fully seat the interior mirror. Use Special Service Tool: 501-025 Installer, Rear View Mirror .
7. If equipped with a compass module which requires calibration, check the compass zone and calibration.
Mirror type 3
Open In New TabZoom/Print

11/4/2020 Interior Rear View Mirror (Mirrors) - ALLDATA Repair
https://my.alldata.com/repair/#/repair/article/54382/component/754/itype/401/nonstandard/10006/selfRefLink/true 15/15
8. To install, reverse the removal procedure.
Mirror type 4
9. To install, reverse the removal procedure.
10. If a new mirror has been installed, use diagnostic scan tool, complete the PMI process for the IPMAfollowing the on-screen instructions. If a new mirror has been installed, carry out the camera alignment using a scan tool.
Mirror type 5
11. Slide the interior mirror onto the mirror mount until the locking tab is engaged.
Mirror type 6
12. To install, reverse the removal procedure.