introduction system manual oxford instruments...
TRANSCRIPT

Introduction System Manual
Issue 01
Page 1 VRM software TW2
draft15.docSystem Manual
November 2010. ©2010. Oxford Instruments NanoScience. All rights reserved.
Oxford Instruments NanoScience
Issue 01 / May 2012
Control Software for Vector Rotation Magnets

Introduction
Issue 01 Page 2 VRM Software Manual May 2012 ©2012. Oxford Instruments NanoScience. All rights reserved.
Copyright © Copyright 2012 Oxford Instruments NanoScience, a trading name of Oxford Instruments Nanotechnology Tools Ltd. All rights reserved. You may make hard copies of this manual for your organisation’s internal use in connection with the system with which it was supplied, provided that the integrity of the manual is maintained and this copyright notice is reproduced. Other than as permitted above, you may not reproduce or transmit any part of this document, electronically or mechanically without the prior written permission of Oxford Instruments NanoScience. Disclaimer
Oxford Instruments’ policy is one of continued improvement. The Company reserves the right to alter without notice the specification, design or conditions of supply of any of its products or services. Although every effort has been made to ensure that the information in this manual is accurate and up to date, errors may occur. Oxford Instruments NanoScience shall have no liability arising from the use of or reliance by any party on the contents of this manual and, to the fullest extent permitted by law, excludes all liability for loss or damages howsoever caused. Trademarks
The Oxford Instruments Logo and Oxford Instruments Direct are trademarks or registered trademarks of Oxford Instruments plc or its subsidiaries. The use of our trademarks is strictly controlled and monitored and any unauthorised use is forbidden.
LabVIEW is a registered trademark of the National Instruments Corporation in the United States and other countries. Technical and Customer Support
Contact details for Technical and Customer Support can be found on page 40. Oxford Instruments NanoScience Tubney Woods, Abingdon, Oxon, OX13 5QX, England Tel: +44 (0)1865 393 200 Fax: +44 (0)1865 393 333 E-mail: [email protected] www.oxford-instruments.com

Introduction
Issue 01 Page 3 VRM Software Manual May 2012 ©2012. Oxford Instruments NanoScience. All rights reserved.
Contents
1. Introduction ..........................................................................................................................................................................6
2. Safety Issues ......................................................................................................................................................................8
3. Installing the software ................................................................................................................................................10
4. Starting up the software.............................................................................................................................................11
5. Configuring the hardware ........................................................................................................................................15
6. Operating the software ..............................................................................................................................................31
7. ConstantField ...................................................................................................................................................................37
8. Customer Support........................................................................................................................................................ 40
Appendix A. Software Release Notes ............................................................................................................................... 42
Appendix B. Coordinate systems ......................................................................................................................................... 43
Appendix C. ISOBUS .................................................................................................................................................................... 46
Appendix D. SCPI command reference and VRMClient ......................................................................................47
Figures
Figure 1 VRM software dialog ........................................................................................................... 11 Figure 2 PSU settings dialog showing simulation option........................................................................ 15 Figure 3 Table showing VISA Resources available .............................................................................. 17 Figure 4 Ethernet dialog for Mercury iPS ............................................................................................ 18 Figure 5 GPIB dialog for Mercury iPS ................................................................................................ 20 Figure 6 ISOBUS dialog for IPS120................................................................................................... 21 Figure 7 GPIB dialog for IPS120 ....................................................................................................... 23 Figure 8 Limits settings dialog (limits file read-only).............................................................................. 24 Figure 9 Limits settings dialog (limits file can be edited) ........................................................................ 25 Figure 10 Limits settings dialog (6T cylinder) ...................................................................................... 26 Figure 11 Limits settings for 6Tesla cylinder with 9.46°°°° tilt ..................................................................... 28 Figure 12 Limits settings for 4Tesla cylinder with 2.5°°°° tilt....................................................................... 29 Figure 13 Limits settings for 1Tesla sphere......................................................................................... 29 Figure 14 VRM software main dialog (sweep in progress) ..................................................................... 31 Figure 15 VRM envelope schematic .................................................................................................. 33 Figure 16 Cartesian coordinate system .............................................................................................. 43 Figure 17 Spherical coordinate system .............................................................................................. 44 Figure 18 Cylindrical coordinate system ............................................................................................. 45 Figure 19 Example showing 3 power supplies connected using an ISOBUS cable .................................... 46

Introduction
Issue 01 Page 4 VRM Software Manual May 2012 ©2012. Oxford Instruments NanoScience. All rights reserved.

Introduction
Issue 01 Page 5 VRM Software Manual May 2012 ©2012. Oxford Instruments NanoScience. All rights reserved.
Welcome Thank you for choosing your equipment from Oxford Instruments, a company dedicated to providing world-class products and customer support. Our highly trained teams are available to help you with all your queries relating to your order, delivery or technical issues. As an Oxford Instruments customer, you have access to a worldwide service and support package providing telephone and on-site technical and repair services. In the unlikely event that your product should require repair, our technicians will initiate service under the terms of your Oxford Instruments warranty. At Oxford Instruments we know that your expectations are at the highest level. We aim to meet and exceed those expectations in the service that we provide, and in the quality you will see when you use Oxford Instruments equipment. We are delighted you selected Oxford Instruments as your supplier and wish you success with your new equipment. Jim Hutchins, Managing Director, Oxford Instruments NanoScience
Introduction
Issue 01 Page 6 VRM Software Manual May 2012 ©2012. Oxford Instruments NanoScience. All rights reserved.
1. Introduction Scope of this Manual
This manual describes how to install, configure and operate the Vector Rotate Magnet field control software. It also contains reference information and includes details of key contacts at Oxford Instruments who are available for help. Please keep all the manuals supplied with your system and make sure that you incorporate any amendments that might be sent to you. If you sell or give away the product to someone else, please give them the manuals too.
The VRM software is designed to • Control the magnitude and direction of the magnetic field vector. • Prevent operation beyond the safe limits of the magnet design. • Make it easier to integrate a VRM system with the user’s experiment. The VRM software includes two subsidiary programs that can be run alongside VRM. • VRMClient is a simple dialog application for the VRM SCPI commands. • ConstantField is an application that allows the user to sweep a field vector of constant
magnitude through an arc. It is provided an as example.
Documents supplied with the system The VRM Software is supplied either as a download or CD together with the following documents: • Control Software for Vector Rotate Magnets (this document)
This release of the VRM control software replaces the “Magnetic Field Control” software.
Please note that the software was developed within a PC Windows/LabVIEW environment and is unsupported if run on a Macintosh/LabVIEW environment. If additional support is required for the general operation or programming of LabVIEW, please contact National Instruments at www.ni.com/labview/.

Introduction
Issue 01 Page 7 VRM Software Manual May 2012 ©2012. Oxford Instruments NanoScience. All rights reserved.
Revision history
This is issue 01 of the VRM Software Manual, as shown in the footer at the bottom of each page.
The changes made to this document and a summary of previous issues are listed in the table below.
Always use the latest issue of the manual.
Issue Affected page(s) Summary of changes
01
All pages First edition of VRM Software Manual
Communication with instruments
This software supports serial (ISOBUS) and GPIB communication protocols for the IPS120 power supply and, in addition, Ethernet communication for the Mercury iPS.
• The Oxford Instruments ISOBUS system allows many OI instruments to be connected to a single RS232 serial port, with each instrument having a unique ISOBUS address (the address is simply a number between 0 and 9). Further details are given in Appendix C. ISOBUS.
• For GPIB communication it is important that the GPIB card is compatible with LabVIEW and your operating system. Ideally, your GPIB card and driver will be supplied by National Instruments.
• Standard Ethernet 10/100 Mbits/s IEE802.3 TCP/IP

Safety Issues
Issue 01 Page 8 VRM Software Manual May 2012 ©2012. Oxford Instruments NanoScience. All rights reserved.
2. Safety Issues Safety procedures are vital to prevent
• Serious injury or death • Serious damage to the equipment.
Before you attempt to install or operate the VRM software, please make sure that you are aware of all safety precautions listed in this document together with the warnings and cautions set out in other documents supplied with the system. All cryogenic systems are potentially hazardous and you must take precautions to ensure your own safety. The general safety precautions required when working with cryogenic systems and superconducting magnets are given in the Safety Matters booklet. Safety symbols used in this manual Symbols are used in this manual to draw your attention to safety procedures that you must follow to protect yourself or the equipment. There are two types of hazard symbol used in this manual:
Warning: The warning triangle highlights dangers which may cause injury or, in extreme circumstances, death. Warnings and cautions must be followed to ensure your own safety.
Caution: The general caution symbol highlights actions that you must take to prevent damage to the equipment. The action is explained in the text.
Disclaimer Oxford Instruments cannot accept responsibility for damage to the system caused by failure to observe the correct procedures laid down in this manual and the other manuals supplied with the system. The warranty may be affected if the system is misused, or the recommendations in the manuals are not followed. Warnings Warnings and cautions must be followed to ensure your own safety.

Safety Issues
Issue 01 Page 9 VRM Software Manual May 2012 ©2012. Oxford Instruments NanoScience. All rights reserved.
This manual does not contain safety information for the instruments or systems that this software can be used to control. For this information, please refer to individual instrument manuals and system documentation.
Installing the software
Issue 01 Page 10 VRM Software Manual May 2012 ©2012. Oxford Instruments NanoScience. All rights reserved.
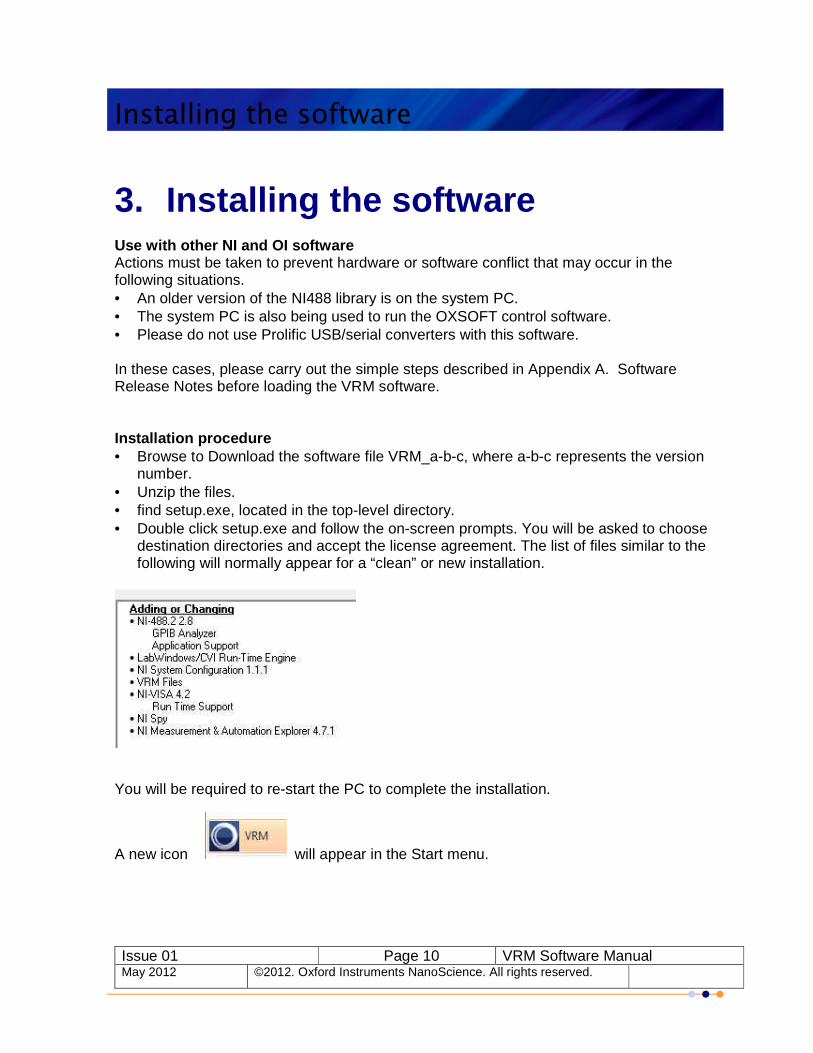
3. Installing the software Use with other NI and OI software Actions must be taken to prevent hardware or software conflict that may occur in the following situations. • An older version of the NI488 library is on the system PC. • The system PC is also being used to run the OXSOFT control software. • Please do not use Prolific USB/serial converters with this software. In these cases, please carry out the simple steps described in Appendix A. Software Release Notes before loading the VRM software. Installation procedure • Browse to Download the software file VRM_a-b-c, where a-b-c represents the version
number. • Unzip the files. • find setup.exe, located in the top-level directory. • Double click setup.exe and follow the on-screen prompts. You will be asked to choose
destination directories and accept the license agreement. The list of files similar to the following will normally appear for a “clean” or new installation.
You will be required to re-start the PC to complete the installation.
A new icon will appear in the Start menu.

Starting up the software
Issue 01 Page 11 VRM Software Manual May 2012 ©2012. Oxford Instruments NanoScience. All rights reserved.
4. Starting up the software
Click the icon to run the VRM software. This gives the screen shown in Figure 1. By default, the software is initially configured to run in simulation mode, as shown.
Figure 1 VRM software dialog

Starting up the software
Issue 01 Page 12 VRM Software Manual May 2012 ©2012. Oxford Instruments NanoScience. All rights reserved.
Brief tour of the main VRM software dialog
Coordinate systems for power supply, magnet and setpoint (or target vector).
Choose the desired coordinate system using one of the 3 tabs.
The display is continuously updated.
The coordinate systems are defined and described in Appendix B. Coordinate systems.
This provides sweep rate options for driving the magnet from one field vector to another.
Sweep target and persistence options.
Check if you wish the magnets to be automatically placed in persistent mode at the end of a “To setpoint” or “To zero” sweep. Switch heater timings will be controlled using the heater delay and end of sweep settling time parameters. The next chapter shows how to set these.
This is a message box describing what the software is doing.

Starting up the software
Issue 01 Page 13 VRM Software Manual May 2012 ©2012. Oxford Instruments NanoScience. All rights reserved.
A second message box reports errors. Clear the message using the
button.
Use these to configure the software, as described fully in Chapter 5.
This graphical display shows the Cartesian axis system and separate arrowheads for the magnetic field vector (pink), target field vector (grey) and PSU vector (yellow).
The display is continually updated.
Use the zoom control to scale the field and PSU vectors on the graph. When the vectors fill the graph, further increase of scale has no effect.
Tick to log PSU data to a file, as follows.
The logging period gives the interval between data points (ms). When the log file exceeds MaxFileSize a new log file is opened. Log files are saved to /VRM/logfiles/ with filenames of the form VRMyyyymmdd-hhmmss.log.
Starting up the software
Issue 01 Page 14 VRM Software Manual May 2012 ©2012. Oxford Instruments NanoScience. All rights reserved.
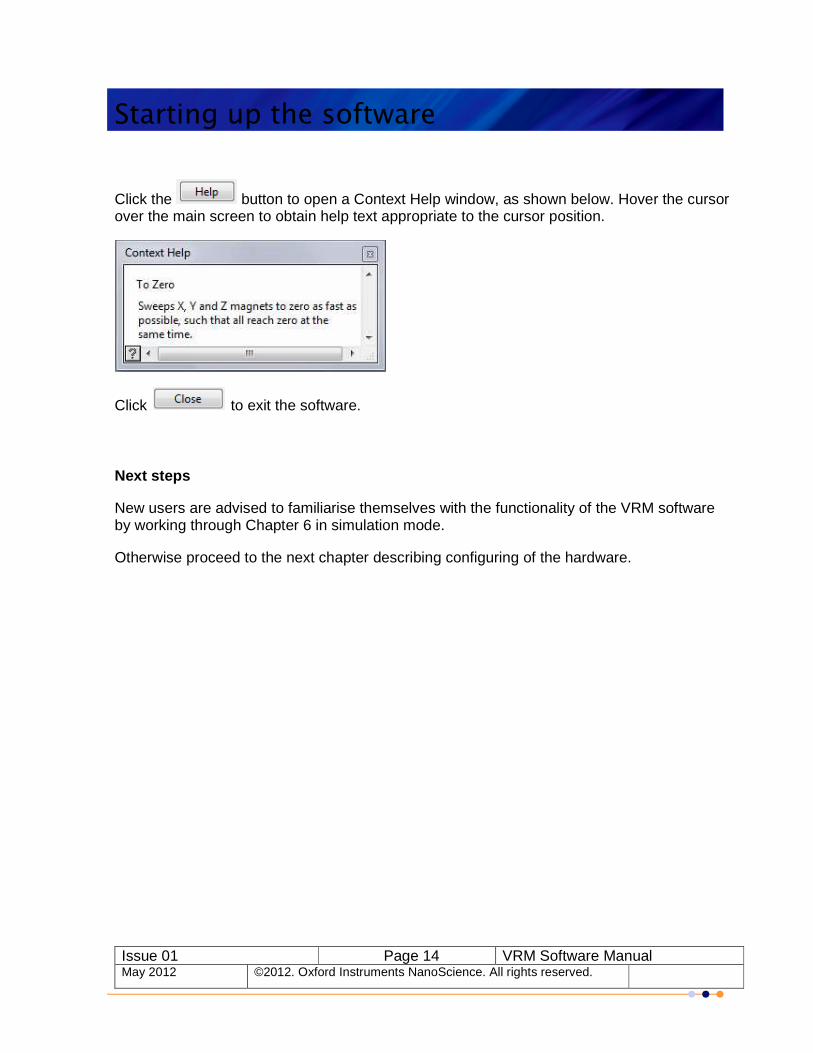
Click the button to open a Context Help window, as shown below. Hover the cursor over the main screen to obtain help text appropriate to the cursor position.
Click to exit the software. Next steps
New users are advised to familiarise themselves with the functionality of the VRM software by working through Chapter 6 in simulation mode.
Otherwise proceed to the next chapter describing configuring of the hardware.

Configuring the hardware
Issue 01 Page 15 VRM Software Manual May 2012 ©2012. Oxford Instruments NanoScience. All rights reserved.
5. Configuring the hardware This consists of 2 parts:
• Setting up communication with the magnet power supplies
• Setting up safe limits of operation for the VRM magnet. Configuration steps common to both IPS and Mercury power supplies
• Click to give the new window shown in Figure 2.
Figure 2 PSU settings dialog showing simulation option

Configuring the hardware
Issue 01 Page 16 VRM Software Manual May 2012 ©2012. Oxford Instruments NanoScience. All rights reserved.
• Click the X-axis, Y-axis and Z-axis tabs and uncheck the tick box for any absent magnet/PSU.
• Check if you wish to reverse the polarity of the chosen magnet. This can also be achieved by swapping the magnet power supply current leads.
• Choose power supply type (or simulation mode) from the drop-down list
It is important to ensure that the X magnet power supply drives the X magnet and likewise Y and Z.
• Set heater delay (seconds). This heater drives the magnet persistent switch (if fitted) to its normal state. Only when the heater is ON (switch open) can the current in the magnet be controlled by the power supply. The delay gives the heater enough time to guarantee that the switch is open. The same value for the delay ensures that the instruction to turn the heater OFF gives it time to cool and close the switch. If a current is flowing, the magnet will then be in “persistent mode”.
Instructions that follow should be applied to the X, Y and Z magnets of your VRM system by selecting the appropriate tab.
There are a number of compromises to be made regarding the choice of switch heater current (set up in the magnet power supply) and heater delay. Advice will be provided in your magnet system manual.
Further background information on superconducting switches will be found in Practical Cryogenics chapter 6 and your magnet system manual.
Configuring the hardware
Issue 01 Page 17 VRM Software Manual May 2012 ©2012. Oxford Instruments NanoScience. All rights reserved.
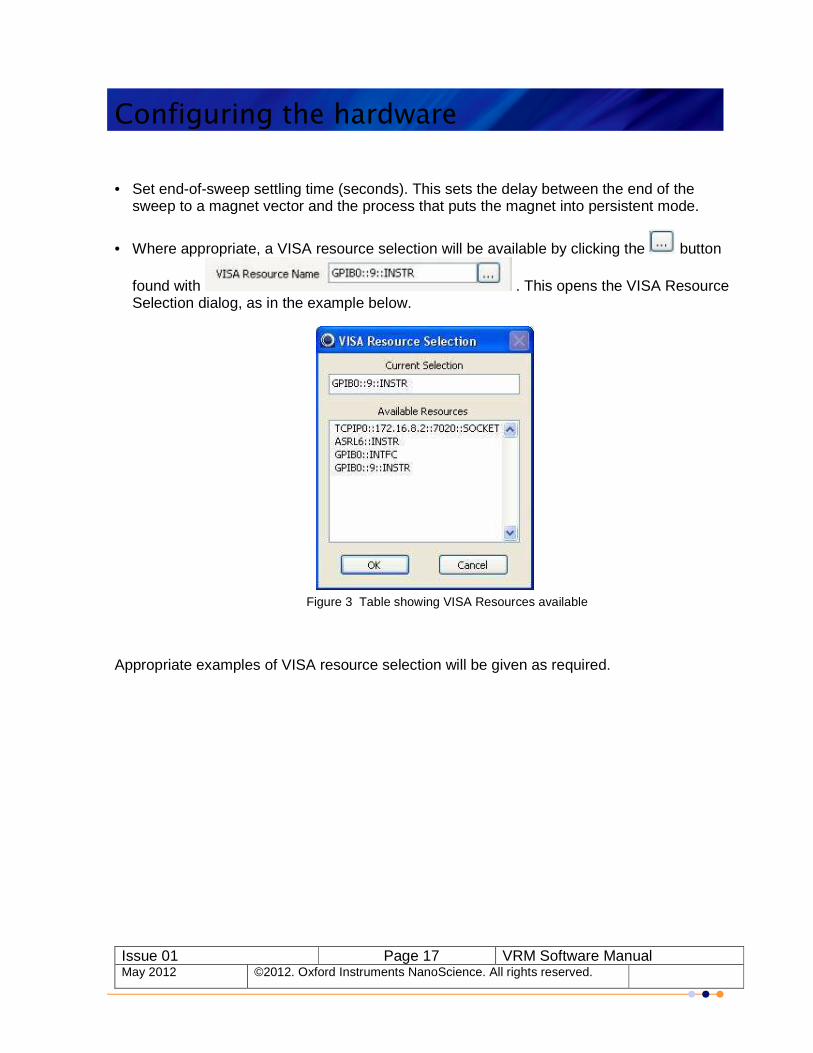
• Set end-of-sweep settling time (seconds). This sets the delay between the end of the sweep to a magnet vector and the process that puts the magnet into persistent mode.
• Where appropriate, a VISA resource selection will be available by clicking the button
found with . This opens the VISA Resource Selection dialog, as in the example below.
Figure 3 Table showing VISA Resources available
Appropriate examples of VISA resource selection will be given as required.

Configuring the hardware
Issue 01 Page 18 VRM Software Manual May 2012 ©2012. Oxford Instruments NanoScience. All rights reserved.
Set up communication with Mercury iPS magnet power supplies
It is necessary to first choose and set up communication protocols in the power supply itself. Information on the use of the Mercury iPS will be found in the Mercury iPS manual. This can be downloaded from www.mymercurysupport.com.
• Select Oxford Instruments Mercury iPS from the drop down list if your magnet is driven by a single Mercury iPS master + slave iPSs. The simulation mode label then disappears from the software main window.
• Click to open the new dialog box shown in Figure 4.
Figure 4 Ethernet dialog for Mercury iPS
Configuring the hardware
Issue 01 Page 19 VRM Software Manual May 2012 ©2012. Oxford Instruments NanoScience. All rights reserved.
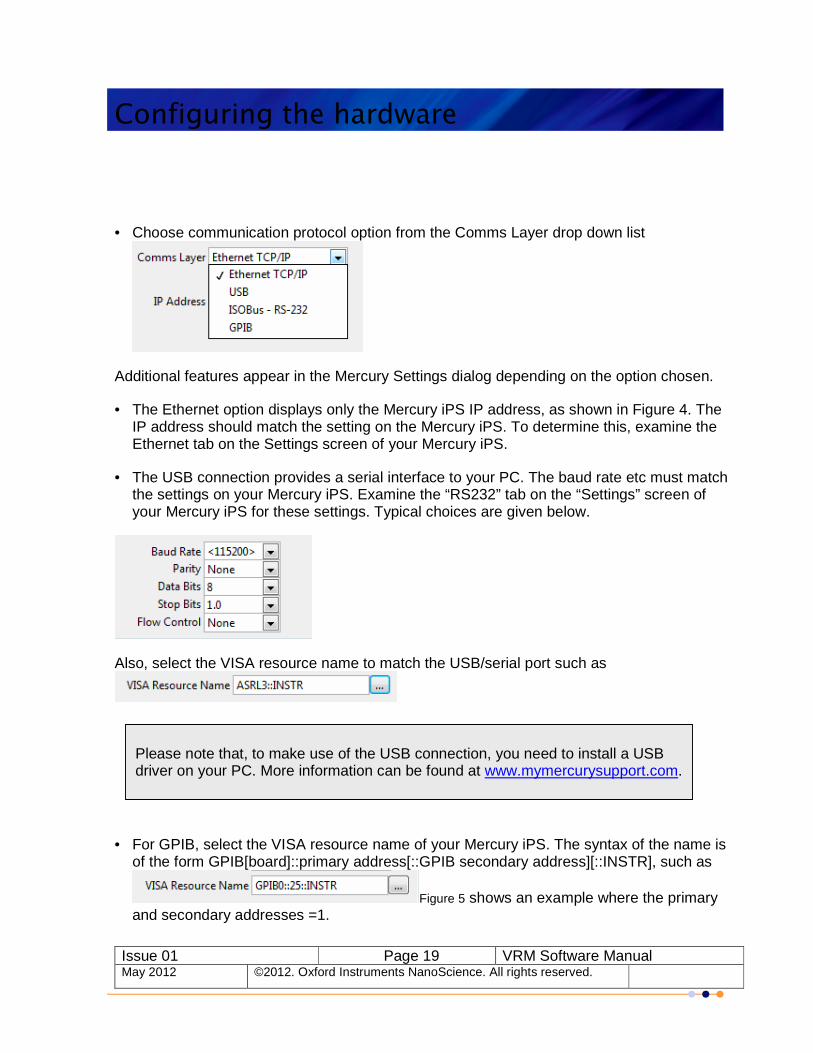
• Choose communication protocol option from the Comms Layer drop down list
Additional features appear in the Mercury Settings dialog depending on the option chosen.
• The Ethernet option displays only the Mercury iPS IP address, as shown in Figure 4. The IP address should match the setting on the Mercury iPS. To determine this, examine the Ethernet tab on the Settings screen of your Mercury iPS.
• The USB connection provides a serial interface to your PC. The baud rate etc must match the settings on your Mercury iPS. Examine the “RS232” tab on the “Settings” screen of your Mercury iPS for these settings. Typical choices are given below.
Also, select the VISA resource name to match the USB/serial port such as
• For GPIB, select the VISA resource name of your Mercury iPS. The syntax of the name is of the form GPIB[board]::primary address[::GPIB secondary address][::INSTR], such as
Figure 5 shows an example where the primary and secondary addresses =1.
Please note that, to make use of the USB connection, you need to install a USB driver on your PC. More information can be found at www.mymercurysupport.com.

Configuring the hardware
Issue 01 Page 20 VRM Software Manual May 2012 ©2012. Oxford Instruments NanoScience. All rights reserved.
.. Figure 5 GPIB dialog for Mercury iPS
• ISOBUS – RS232 communication requires selection of Baud rate etc. Examine the RS232 tab on the Mercury iPS Settings screen for these values. If using ISOBUS then you must also set the ISOBUS address of each PSU as given by the ISOBUS tab on the Settings screen.
Also, select the VISA resource name of your Mercury iPS, such as
as the name for port 3.
For more information on ISOBUS protocol, refer to Appendix C. ISOBUS.
• Finally, test the connection by clicking .
The standard ISOBUS addresses X=1, Y=2, Z=3 are chosen for convenience only. It is simply necessary for each magnet power supply to have a different ISOBUS address.

Configuring the hardware
Issue 01 Page 21 VRM Software Manual May 2012 ©2012. Oxford Instruments NanoScience. All rights reserved.
Set up communication with IPS120 magnet power supplies
• Select Oxford Instruments IPS-120 from the drop down list to give Figure 6. The simulation mode label then disappears from the software main window.
Figure 6 ISOBUS dialog for IPS120
• Choose communication protocol type from the drop down list
Configuring the hardware
Issue 01 Page 22 VRM Software Manual May 2012 ©2012. Oxford Instruments NanoScience. All rights reserved.
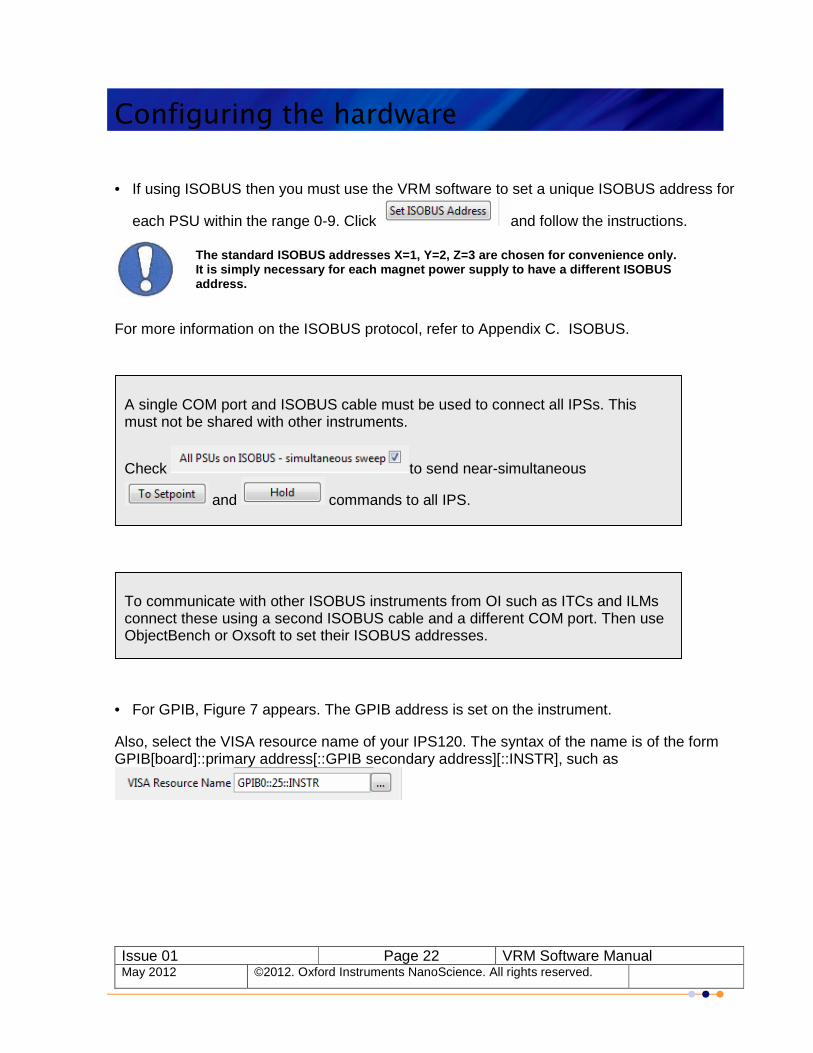
• If using ISOBUS then you must use the VRM software to set a unique ISOBUS address for
each PSU within the range 0-9. Click and follow the instructions.
The standard ISOBUS addresses X=1, Y=2, Z=3 are chosen for convenience only. It is simply necessary for each magnet power supply to have a different ISOBUS address.
For more information on the ISOBUS protocol, refer to Appendix C. ISOBUS.
• For GPIB, Figure 7 appears. The GPIB address is set on the instrument.
Also, select the VISA resource name of your IPS120. The syntax of the name is of the form GPIB[board]::primary address[::GPIB secondary address][::INSTR], such as
To communicate with other ISOBUS instruments from OI such as ITCs and ILMs connect these using a second ISOBUS cable and a different COM port. Then use ObjectBench or Oxsoft to set their ISOBUS addresses.
A single COM port and ISOBUS cable must be used to connect all IPSs. This must not be shared with other instruments.
Check to send near-simultaneous
and commands to all IPS.
Configuring the hardware
Issue 01 Page 23 VRM Software Manual May 2012 ©2012. Oxford Instruments NanoScience. All rights reserved.
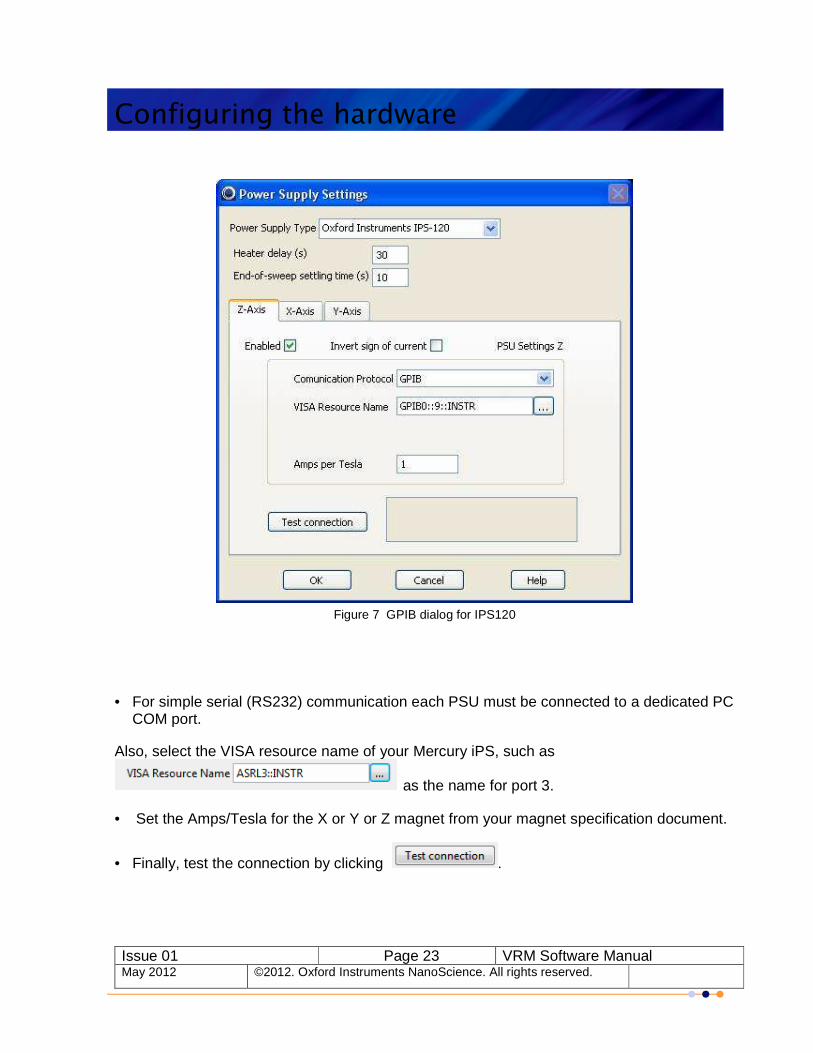
Figure 7 GPIB dialog for IPS120
• For simple serial (RS232) communication each PSU must be connected to a dedicated PC COM port.
Also, select the VISA resource name of your Mercury iPS, such as
as the name for port 3.
• Set the Amps/Tesla for the X or Y or Z magnet from your magnet specification document.
• Finally, test the connection by clicking .

Configuring the hardware
Issue 01 Page 24 VRM Software Manual May 2012 ©2012. Oxford Instruments NanoScience. All rights reserved.
Set up magnet limits
A description of the working limits of your magnet is contained in the file VRMdatalimits.xml.
• Click to give the dialog box shown in Figure 8.
Figure 8 Limits settings dialog (limits file read-only)
To view the contents of the limits file, left click the envelope name.
• In order to edit the limits file, click to give the Limits dialog that allows editing of the Limits file, as shown in Figure 9.
The software is supplied with a limits file that can be edited. After editing you are advised to make the file read-only. If the file is read-only and you have the appropriate login privileges, navigate to the file, right click and select Properties. Uncheck the read-only attribute.

Configuring the hardware
Issue 01 Page 25 VRM Software Manual May 2012 ©2012. Oxford Instruments NanoScience. All rights reserved.
Figure 9 Limits settings dialog (limits file can be edited)
• Right click any limits file to edit or delete the selected file, or create a new limits file.
• Edit the magnet sweep rates, as necessary.
The VRM software is supplied with default values for the magnet Sweep Rates. These must be edited to correspond with values advised in your Magnet System Operator manual. Values for X, Y and Z need not be equal.
In the first example, the Specifications, wiring and test results section of the System Assembly and User Manual gives 3 tables, for the X, Y and Z magnets similar to:
Energisation Current (A) From
To Energisation Rate (amps/minute)
(tesla/minute) Temperature
0 105.45 17.573 1 ≤ 4.2 K
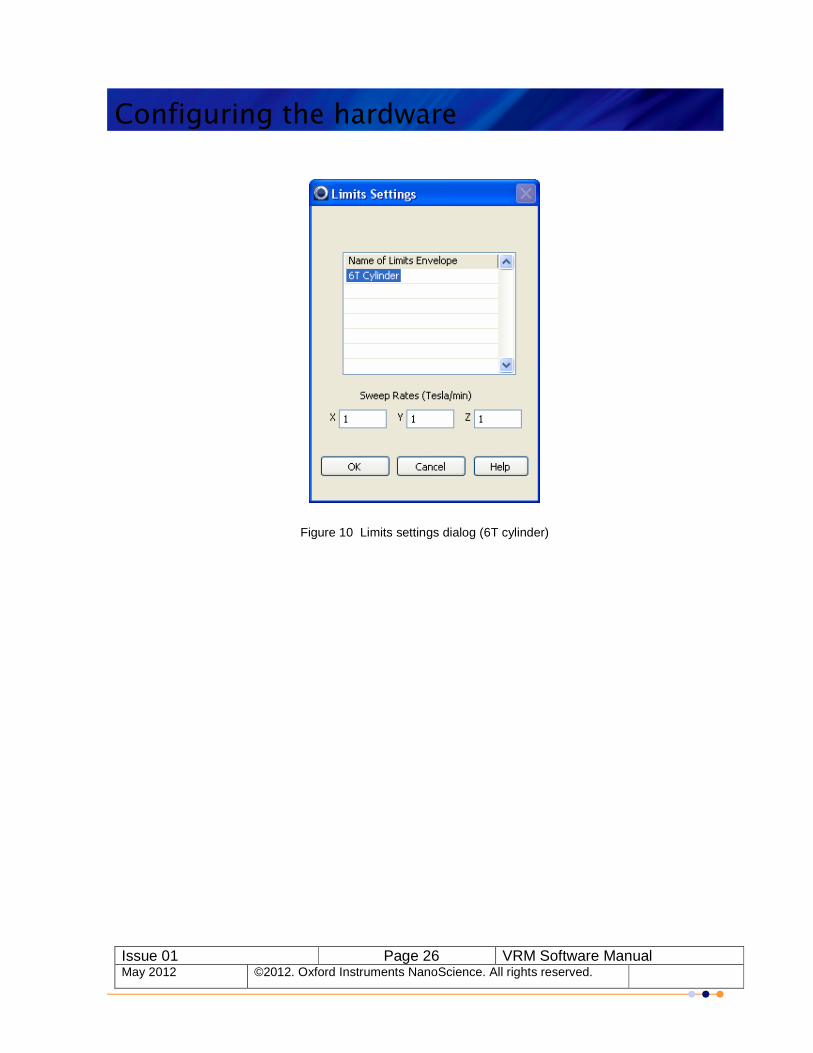
If the X, Y and Z magnets can all be swept at 1 Tesla/minute (which is typical), the limits setting dialog becomes
Configuring the hardware
Issue 01 Page 26 VRM Software Manual May 2012 ©2012. Oxford Instruments NanoScience. All rights reserved.
Figure 10 Limits settings dialog (6T cylinder)

Configuring the hardware
Issue 01 Page 27 VRM Software Manual May 2012 ©2012. Oxford Instruments NanoScience. All rights reserved.
In the second example (below) you will find the field sweep rates given in the magnet summary sheet for Z (line 7), X (line 11) and Y (line 15).
Each magnet can be swept at 0.25 Tesla/minute so the limits dialog resembles that given in Figure 9.
Whatever values are entered, the magnet will not sweep faster than safe limits set in the PSUs.

Configuring the hardware
Issue 01 Page 28 VRM Software Manual May 2012 ©2012. Oxford Instruments NanoScience. All rights reserved.
• To create a new limits file, give it a name and enter the values advised in your Magnet System Operator manual.
The first example shows the table from the Specifications, wiring and test results section of the System Assembly and User Manual.
Guaranteed maximum central magnetic field at 4.2 K in :-
6 Tesla vector operation
360 degree three axis operation
Up to 6Tesla BMOD with an angle up to 9.46° in any orientation around the Z –axis
e.g.
Z=6T
X=0.707T
Y=0.707T
BMOD = 6.0
Angle in XY plane 45 degrees
Angle from Z axis = 9.46°
Up to 1.0 Tesla BMOD by combination of X, Y & Z axis coils
This vector rotate system can operate in 2 modes. As a 6 Tesla (Z) vector magnet with a maximum tilt angle of 9.46° , the maximum field value in the XY plane is 1 Tesla (0.7072 + 0.7072 = 1.000). This represents a cylinder of height 6 (Tesla) and radius 1 (Tesla).
In addition, the system can operate as a 1 Tesla sphere. As this sphere fits inside the cylinder, only the cylinder limits envelope needs to be set, as shown in Figure 11.
Figure 11 Limits settings for 6Tesla cylinder with 9.46° tilt

Configuring the hardware
Issue 01 Page 29 VRM Software Manual May 2012 ©2012. Oxford Instruments NanoScience. All rights reserved.
The second example requires 2 limits envelopes. When the Z magnet is at 4 Tesla, the permitted tilt of 2.5° translates to a field modulus of (4 x sin(2.5°)) = 0.1745 Tesla in the XY plane. This is a cylinder 4 (Tesla) long with radius 0.1745 (Tesla), as shown in Figure 12.
Figure 12 Limits settings for 4Tesla cylinder with 2.5° tilt
However, for full 360° operation, the limits describe a 1 Tesla sphere, as shown in Figure 13.
Figure 13 Limits settings for 1Tesla sphere

Configuring the hardware
Issue 01 Page 30 VRM Software Manual May 2012 ©2012. Oxford Instruments NanoScience. All rights reserved.
Finally, click OK.
Limits may be subsequently edited or deleted by clicking or , as shown in Figure 9.
Field values in the limits settings dialogs should be increased by a nominal 0.001 Tesla to allow for rounding and digitising effects.
After editing, you are advised to make the file read-only. If you have the appropriate login privileges, navigate to the file, right click and select Properties. Check the read-only attribute. To edit the file at a later date, uncheck the read-only attribute in the same way.
Operating the software
Issue 01 Page 31 VRM Software Manual May 2012 ©2012. Oxford Instruments NanoScience. All rights reserved.
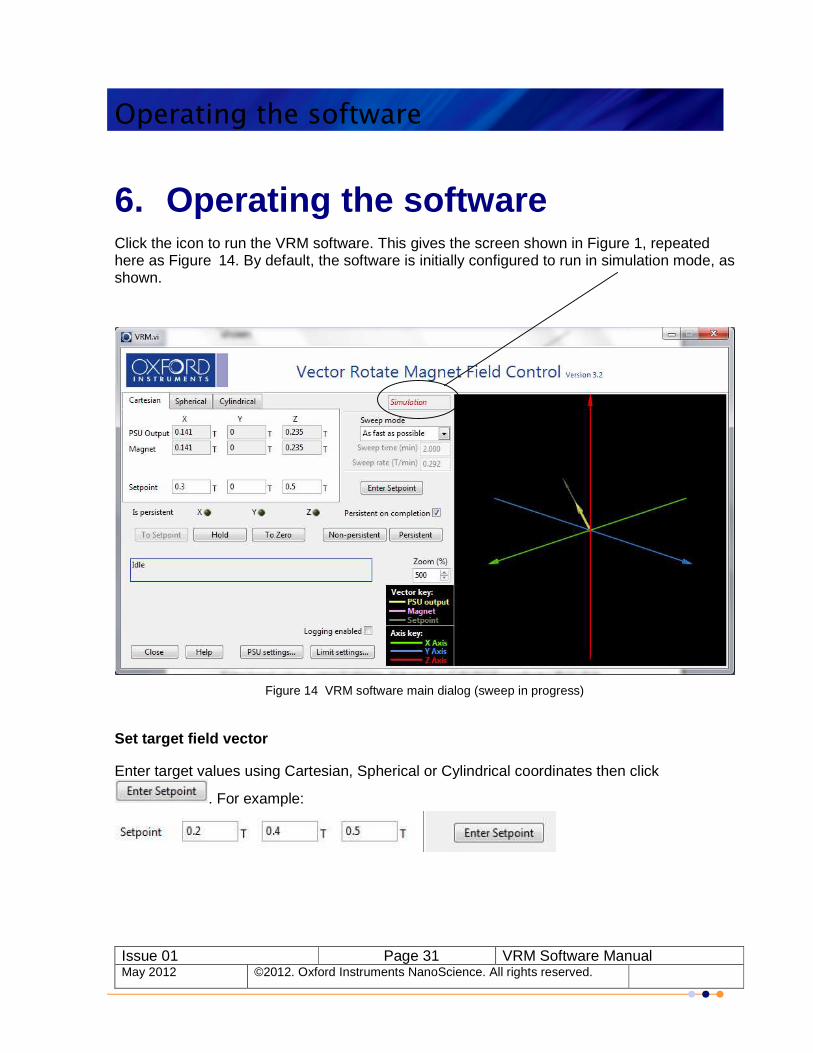
6. Operating the software Click the icon to run the VRM software. This gives the screen shown in Figure 1, repeated here as Figure 14. By default, the software is initially configured to run in simulation mode, as shown.
Figure 14 VRM software main dialog (sweep in progress)
Set target field vector
Enter target values using Cartesian, Spherical or Cylindrical coordinates then click
. For example:

Operating the software
Issue 01 Page 32 VRM Software Manual May 2012 ©2012. Oxford Instruments NanoScience. All rights reserved.
The display panel now shows a graphical representation of the target field vector in grey.
The equivalent values of the field target vector in the other coordinate systems are available by clicking the appropriate tab.
in Spherical coordinates.
in Cylindrical coordinates.
Radio buttons permit angles to be set and displayed in or . If the target field vector is outside the system limit, an error message will appear
Operating the software
Issue 01 Page 33 VRM Software Manual May 2012 ©2012. Oxford Instruments NanoScience. All rights reserved.
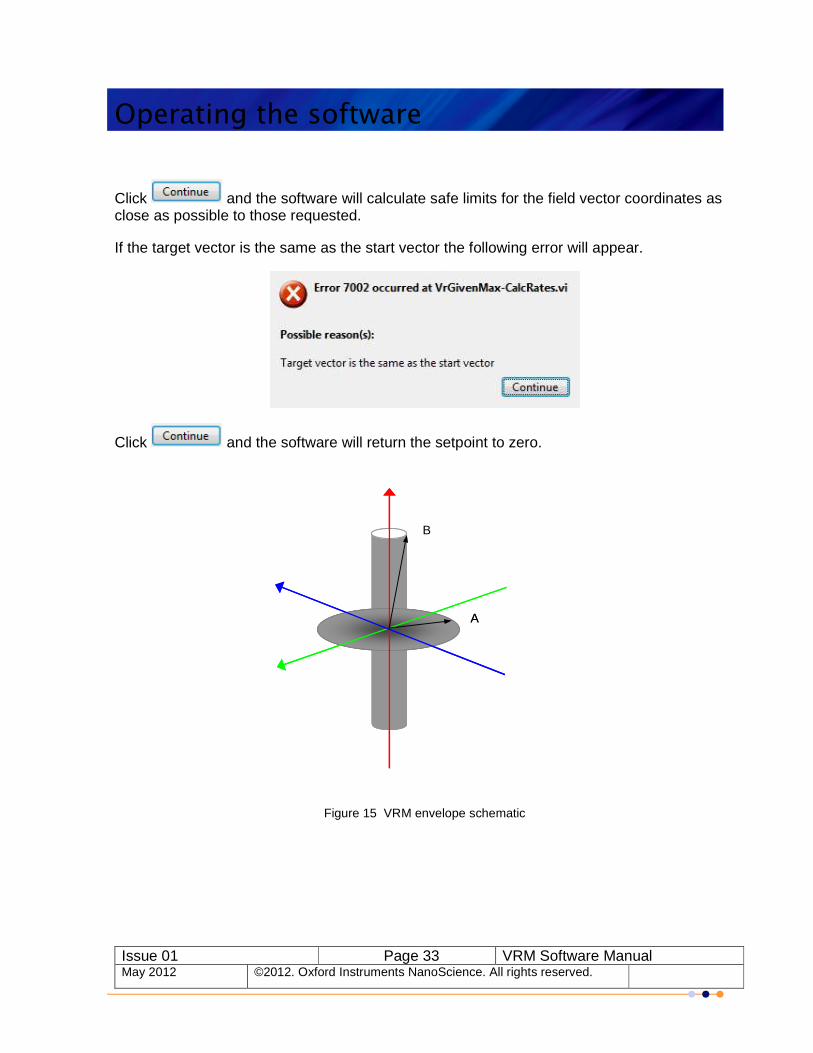
Click and the software will calculate safe limits for the field vector coordinates as close as possible to those requested.
If the target vector is the same as the start vector the following error will appear.
Click and the software will return the setpoint to zero.
Figure 15 VRM envelope schematic
A
B
A
Operating the software
Issue 01 Page 34 VRM Software Manual May 2012 ©2012. Oxford Instruments NanoScience. All rights reserved.
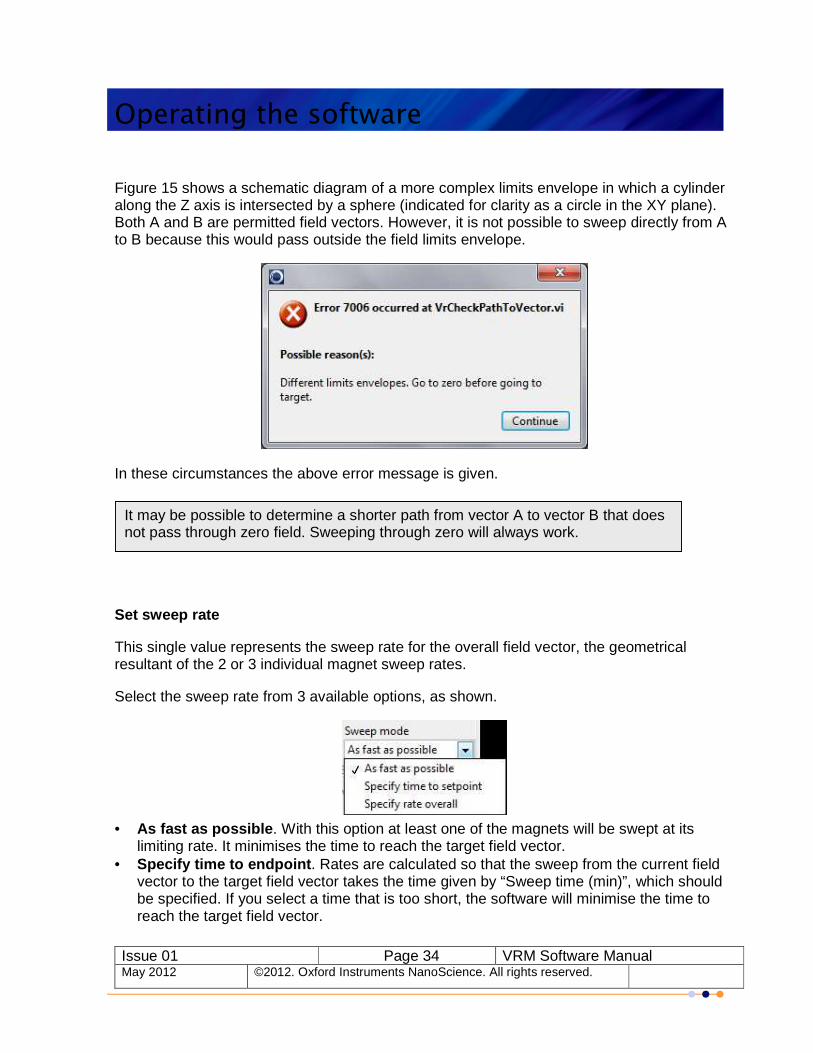
Figure 15 shows a schematic diagram of a more complex limits envelope in which a cylinder along the Z axis is intersected by a sphere (indicated for clarity as a circle in the XY plane). Both A and B are permitted field vectors. However, it is not possible to sweep directly from A to B because this would pass outside the field limits envelope.
In these circumstances the above error message is given.
Set sweep rate
This single value represents the sweep rate for the overall field vector, the geometrical resultant of the 2 or 3 individual magnet sweep rates.
Select the sweep rate from 3 available options, as shown.
• As fast as possible. With this option at least one of the magnets will be swept at its
limiting rate. It minimises the time to reach the target field vector. • Specify time to endpoint. Rates are calculated so that the sweep from the current field
vector to the target field vector takes the time given by “Sweep time (min)”, which should be specified. If you select a time that is too short, the software will minimise the time to reach the target field vector.
It may be possible to determine a shorter path from vector A to vector B that does not pass through zero field. Sweeping through zero will always work.

Operating the software
Issue 01 Page 35 VRM Software Manual May 2012 ©2012. Oxford Instruments NanoScience. All rights reserved.
• Specify rate overall. Rates are calculated so that the sweep from the current field vector to the target field vector is the rate given by “Sweep rate (T/min)”, which should be specified. If you select a rate that is too high, the software will maximise the rate to the target field vector.
If the target field vector has been set and has been selected, the software calculates and displays the Sweep time and Sweep rate. If the sweep rate is too high, an error will occur, as shown below.
If you the maximum possible sweep rate will be used. Set persistent/non-persistent mode Magnets with switch heaters may be set “persistent”, that is, with zero current in the PSUs.
shows that all magnets are persistent. There is zero current in the switch heaters.
shows that no magnet is persistent. The currents for the switch heaters are on. Further information on persistent operation of superconducting magnets will be found in your Magnet System Operator manual.

Operating the software
Issue 01 Page 36 VRM Software Manual May 2012 ©2012. Oxford Instruments NanoScience. All rights reserved.
Clicking runs the PSUs to currents equal to the persistent currents in the VRM magnet and energises the switch heater.
Clicking turns off the switch heater, waits for the switch to close then runs the PSUs to zero current.

ConstantField
Issue 01 Page 37 VRM Software Manual May 2012 ©2012. Oxford Instruments NanoScience. All rights reserved.
7. ConstantField
The VRM software suite is supplied with the example program ConstantField. This sweeps the VRM at constant magnitude through a defined arc
• Start the VRM software in simulation mode.
• Navigate to the VRM software main directory and run the application ConstantField
• In the ConstantField window select Start (A) and End (B) orientations, the sweep rate and the number of straight sections desired to simulate the rotation arc.
• Click the button.
• On first use you will be prompted to confirm communication between ConstantField and VRM.
• You must click and ensure there is a correct response, as shown, before proceeding.
The software will then calculate a series of target field vectors. Commands are sent to and executed by the main VRM software.

ConstantField
Issue 01 Page 38 VRM Software Manual May 2012 ©2012. Oxford Instruments NanoScience. All rights reserved.
The next 2 images show the graphical part of the ConstantField window performing a 10 section sweep.

ConstantField
Issue 01 Page 39 VRM Software Manual May 2012 ©2012. Oxford Instruments NanoScience. All rights reserved.
Graphical display options
Field magnitude key

Customer Support
Issue 01 Page 40 VRM Software Manual May 2012 ©2012. Oxford Instruments NanoScience. All rights reserved.
8. Customer Support Warranty The Oxford Instruments customer support warranty is available to all our customers during the first 12 months of ownership from date of delivery. This warranty provides:
• Repair to faults that are a result of manufacturing defects at Oxford Instruments. Technical support To obtain technical support you will need to quote your Oxford Instruments order number. Please contact your nearest Customer Support centre as follows:
Europe, RoW, Main Office Tel: +44 (0)1865 393 311 E-mail: [email protected] Web: www.oxford-instruments.com USA Office Tel: +1 800 447 4717 E-mail: [email protected] Web: www.oxford-instruments.com Japan Office Tel: +81 03 5245 3871 E-mail: [email protected] Web: www.oxford-instruments.com http://oijapan.com China Office Tel: +86 21 63608530/1/2/3 E-mail: [email protected] Web: www.oxford-instruments.com
Additional services available from Oxford Instruments Oxford Instruments Direct – provides one-stop shopping for cryogenics, magnetic, vacuum and associated laboratory products as well as hard to find reference for low temperature physics, optics, thermometry and laboratory safety practices. You can also visit on-line at www.oxinstdirect.com. Ordering parts is easy via phone, fax or email. Online ordering is available in North America.

Customer Support
Issue 01 Page 41 VRM Software Manual May 2012 ©2012. Oxford Instruments NanoScience. All rights reserved.
About Oxford Instruments Oxford Instruments specialises in the design, manufacture and support of high-technology tools and systems for industry, research, education, space, energy, defence and healthcare. We combine core technologies in areas such as low temperature and high magnetic field environments; X-ray, electron and optical based metrology; nuclear magnetic resonance, advanced growth, deposition and etching. Our aim is to be the leading provider of tools and systems for the emerging nanotechnology and bioscience markets. Oxford Instruments NanoScience Limited
Oxford Instruments NanoScience creates high performance environments for low temperature and high magnetic field applications in physical science research and process development down to the atomic scale.
The business has a strong capability in advanced cryogenics and applied superconductivity. Through the application of these technologies we deliver solutions that meet the exacting needs of scientists working at the forefront of fundamental physics, applied physics, materials science and next generation device development. With an extensive customer network, a strong reputation for performance and quality, we value the support we have provided to world leading research scientists in their pursuit of excellence.

Appendix A. Software Release Notes
Issue 01 Page 42 VRM Software Manual May 2012 ©2012. Oxford Instruments NanoScience. All rights reserved.
Appendix A. Software Release Notes
• If an older version of LabVIEW is already installed on the system PC, the pre-existing NI488 library may prevent correct software installation. If you plan to run the LabVIEW development environment, you are advised to upgrade to a newer version.
• If you wish to run VRM and OXSOFT control software on the same PC, using ISOBUS communication protocol, use one COM port for instruments controlled by OXSOFT and another COM port for the IPSs controlled by VRM.
• We recommend that USB-serial converters are obtained from National Instruments for full compatibility with this software.
There is also a file Release Notes.txt in the main VRM folder. This includes revision history.
Appendix B. Coordinate systems
Issue 01 Page 43 VRM Software Manual May 2012 ©2012. Oxford Instruments NanoScience. All rights reserved.
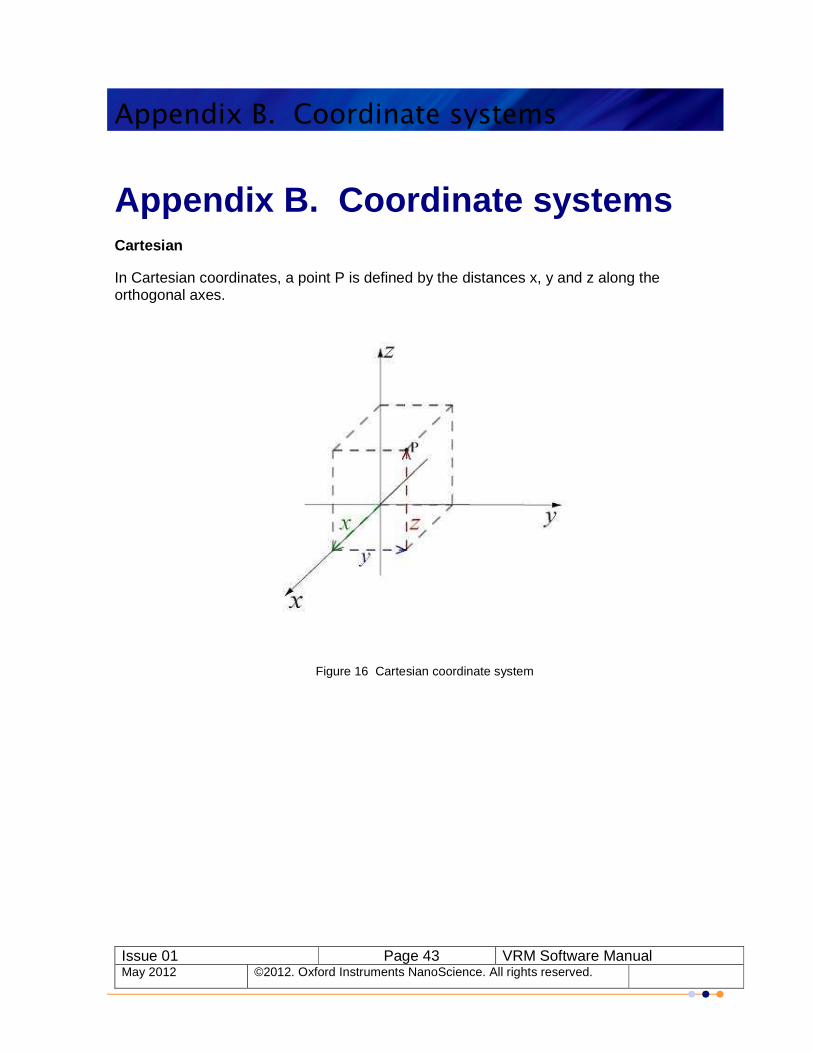
Appendix B. Coordinate systems Cartesian
In Cartesian coordinates, a point P is defined by the distances x, y and z along the orthogonal axes.
Figure 16 Cartesian coordinate system

Appendix B. Coordinate systems
Issue 01 Page 44 VRM Software Manual May 2012 ©2012. Oxford Instruments NanoScience. All rights reserved.
Spherical
In spherical (or spherical polar) coordinates, a point P is specified by a vector of magnitude ρ (rho) and two angles.
θ (theta) is defined as the angle from the x-axis, as viewed in the positive xy plane.
φ (phi) is defined as the angle from the positive z-axis towards the point P.
Figure 17 Spherical coordinate system
Valid θ range: 0 ≤ θ ≤ 2π (radians); 0 ≤ θ ≤ 360 (degrees)
Valid φ range: 0 ≤ θ ≤ π (radians); 0 ≤ φ ≤ 180 (degrees)

Appendix B. Coordinate systems
Issue 01 Page 45 VRM Software Manual May 2012 ©2012. Oxford Instruments NanoScience. All rights reserved.
Cylindrical
In cylindrical coordinates, a point P is specified as being on a cylinder of radius ρ (rho). The projection of P on the xy plane makes an angle θ with the reference direction (x). The final coordinate is the distance z along the vertical (z) axis.
Figure 18 Cylindrical coordinate system
Valid θ range: -π ≤ θ ≤ π (radians); -179 ≤ θ ≤ 180 (degrees)

Appendix C. ISOBUS
Issue 01 Page 46 VRM Software Manual May 2012 ©2012. Oxford Instruments NanoScience. All rights reserved.
Appendix C. ISOBUS ISOBUS is similar to conventional RS232 (serial) communication but with the following additional features.
• It allows up to 10 Oxford Instruments devices to be connected to a single computer serial port.
• There is a special cable manufactured by OINS with 1 master connector (plug) and up to 10 slave connectors.
• The master connector is plugged into the computer serial port. • Slave connector plug into each instrument. • Each instrument is given a unique ISOBUS address (0-9) that is stored in the instrument
memory. • Communication with the chosen instrument is achieved by knowing the computer serial
port identification and the ISOBUS address of the instrument.
Figure 19 Example showing 3 power supplies connected using an ISOBUS cable
Computer RS232 serial port
ISOBUS cable
master
PSU with ISOBUS address 1
slave
PSU with ISOBUS address 2
slave
PSU with ISOBUS address 3
slave
Appendix D. SCPI command reference and
Issue 01 Page 47 VRM Software Manual May 2012 ©2012. Oxford Instruments NanoScience. All rights reserved.
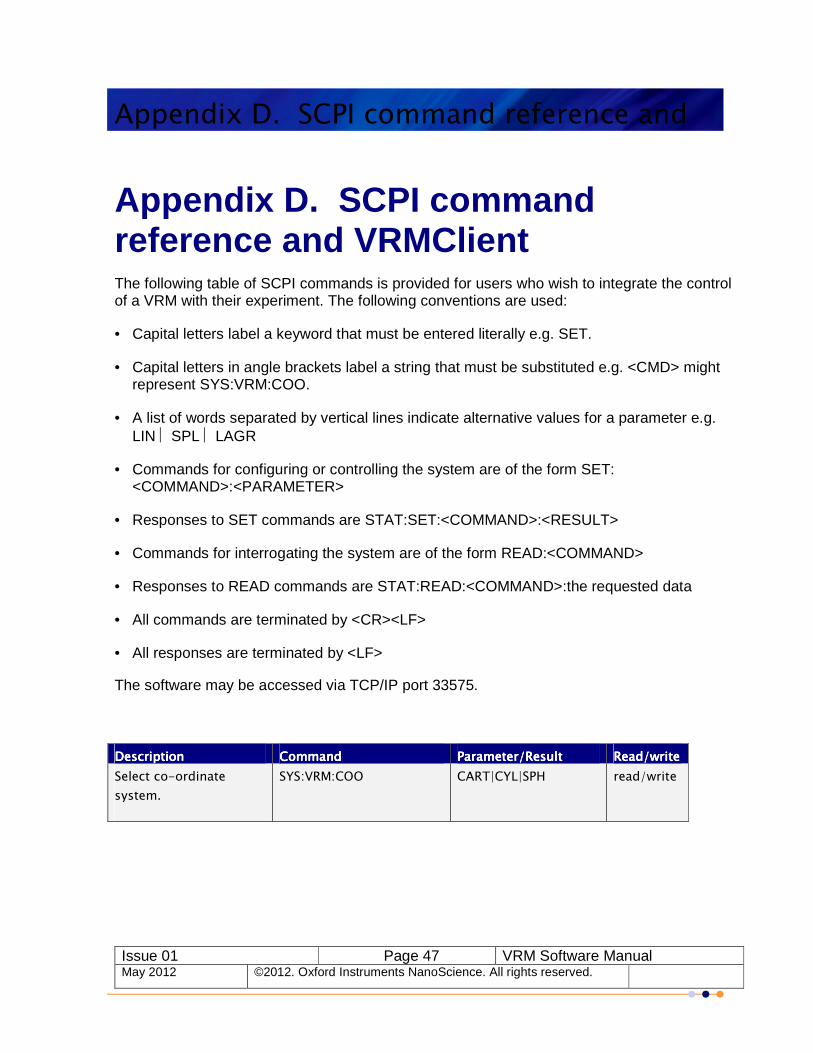
Appendix D. SCPI command reference and VRMClient The following table of SCPI commands is provided for users who wish to integrate the control of a VRM with their experiment. The following conventions are used:
• Capital letters label a keyword that must be entered literally e.g. SET.
• Capital letters in angle brackets label a string that must be substituted e.g. <CMD> might represent SYS:VRM:COO.
• A list of words separated by vertical lines indicate alternative values for a parameter e.g. LIN SPL LAGR
• Commands for configuring or controlling the system are of the form SET: <COMMAND>:<PARAMETER>
• Responses to SET commands are STAT:SET:<COMMAND>:<RESULT>
• Commands for interrogating the system are of the form READ:<COMMAND>
• Responses to READ commands are STAT:READ:<COMMAND>:the requested data
• All commands are terminated by <CR><LF>
• All responses are terminated by <LF>
The software may be accessed via TCP/IP port 33575.
DescriptionDescriptionDescriptionDescription CommandCommandCommandCommand PPPParameterarameterarameterarameter/Result/Result/Result/Result Read/writeRead/writeRead/writeRead/write
Select co-ordinate
system.
SYS:VRM:COO CART|CYL|SPH read/write

Appendix D. SCPI command reference and
Issue 01 Page 48 VRM Software Manual May 2012 ©2012. Oxford Instruments NanoScience. All rights reserved.
DescriptionDescriptionDescriptionDescription CommandCommandCommandCommand PPPParameterarameterarameterarameter/Result/Result/Result/Result Read/writeRead/writeRead/writeRead/write
Magnet field (PSU
persistent field or, if
switch heater is on (ie
magnet is non-
persistent), PSU output
field)
SYS:VRM:VECT If COO is:
CART then [x y z]
CYL then [rho theta z]
SPH then [r theta phi]
magnitudes are in
Tesla.
Angles are in radians.
readonly
PSU output field (will be
same as Magnet field if
magnet is non-
persistent)
SYS:VRM:OVEC If COO is:
CART then [x y z]
CYL then [rho theta z]
SPH then [r theta phi]
readonly
Target field (from PSU
setpoints)
SYS:VRM:TVEC If COO is:
CART then [x y z]
CYL then [rho theta z]
SPH then [r theta phi]
readonly
Magnet currents (PSU
persistent current or, if
switch heater is on, PSU
output current)
SYS:VRM:MCUR [x y z]
x, y and z are in Amps.
readonly
PSU output currents (will
be same as Magnet
currents if magnet is
non-persistent)
SYS:VRM:CURR [x y z]
x, y and z are in Amps.
readonly
Get status of switch
heaters (OFF means
magnet is persistent)
SYS:VRM:SWHT Response is a triple
[<X> <Y> <Z>] of
OFF|ON|NOSW|FLT
readonly
Persistent on completion
of sweep
SYS:VRM:POC ON|OFF read/write
Field sweep rate limits SYS:VRM:RFMX [x y z]
x, y and z in
Tesla/minute
readonly
Get field sweep rates SYS:VRM:RFST [x y z]
x, y and z in
Tesla/minute
readonly

Appendix D. SCPI command reference and
Issue 01 Page 49 VRM Software Manual May 2012 ©2012. Oxford Instruments NanoScience. All rights reserved.
DescriptionDescriptionDescriptionDescription CommandCommandCommandCommand PPPParameterarameterarameterarameter/Result/Result/Result/Result Read/writeRead/writeRead/writeRead/write
Sweep mode from
present vector to
setpoint (as fast as
possible, in a specified
time, or at a specified
overall rate)
SYS:VRM:RVST:MODE
(SET:SYS:VRM:MODE:<P>
will be ignored unless sent
at the same time as VSET)
ASAP|TIME|RATE read/write
Sweep time to vector
setpoint
SYS:VRM:RVST:TIME
(SET:SYS:VRM:TIME:<min>
will be ignored unless sent
at the same time as MODE
and VSET)
Float value (minutes) read/write
Sweep rate to vector
setpoint
SYS:VRM:RVST:RATE
(SET:SYS:VRM:RATE:<rate>
will be ignored unless sent
at the same time as MODE
and VSET)
Float value
(Tesla/minute)
read/write
Vector setpoint
(magnitudes in Tesla,
angles in radians)
SYS:VRM:VSET
(SET:SYS:VRM:VSET: etc
will be ignored unless sent
at the same time as RVST
parameters)
If COO is:
CART then [x y z]
CYL then [rho theta z]
SPH then [r theta phi]
magnitudes are in
Tesla.
Angles are in radians.
read/write
System status SYS:VRM:ACTN RTOS|RTOZ|HOLD|PERS
:NPERS:SAFE:IDLE
read
Sweep to the given
vector, as specified by
the mode, and if
requested set persistent
on completion
SYS:VRM:ACTN RTOS write
Sweep to zero as fast as
possible and, if
requested, set persistent
on completion
SYS:VRM:ACTN RTOZ write
Hold SYS:VRM:ACTN HOLD write

Appendix D. SCPI command reference and
Issue 01 Page 50 VRM Software Manual May 2012 ©2012. Oxford Instruments NanoScience. All rights reserved.
DescriptionDescriptionDescriptionDescription CommandCommandCommandCommand PPPParameterarameterarameterarameter/Result/Result/Result/Result Read/writeRead/writeRead/writeRead/write
HOLD any sweep that is
in progress and put
magnet in persistent
mode.
(No interruption by
Hold)
SYS:VRM:ACTN SAFE write
Make persistent SYS:VRM:ACTN PERS write
Make non-persistent SYS:VRM:ACTN NPERS write

Appendix D. SCPI command reference and
Issue 01 Page 51 VRM Software Manual May 2012 ©2012. Oxford Instruments NanoScience. All rights reserved.
The simple dialog application VRMClient is supplied to explore commands and responses.
• Navigate to the VRM software main directory and run the application VRMClient.
• Use the standard LabVIEW buttons to run, run continuously or stop the
application. When the application is running continuously use to send a command. Two examples are given below.