introduction to project reviews using navisworks -...
TRANSCRIPT

Introduction to Project Reviews Using Navisworks Michael Boyd – BIM Manager, WSP UK
CO5945
Autodesk Navisworks does not coordinate construction projects, people do. This class will help attendees understand how Navisworks and BIM 360 Glue can be used as tools to effectively manage teams and review projects. Template setup, effective clash detective use, coordination reporting, meeting prep, follow-up actions and methods for trending coordination will be covered amongst many other tips and tricks to keep the team engaged in the process.
Learning Objectives At the end of this class, you will be able to:
Understand how to set up clash tests and rules
Discover effective clash grouping and filtering techniques
Discover effective model-review meeting management
Discover tips and tricks for effective project management
About the Speaker
Michael Boyd works within the WSP UK Project Technology Team, a group set up to provide the Information Manager and Building Information Modeling (BIM) coordination role on construction projects. He also has an internally focused role and is responsible for the implementation and management of BIM within WSP UK. Software implementation, team mentoring on live projects, and staff training are key parts of his role, and he leads BIM teams on some of the largest projects in the United Kingdom. A long-time user of Autodesk, Inc. products, Michael is a beta tester and Gunslinger for the Revit software platform. Michael is also the co-founder of the Edinburgh Revit User Group, and he is a frequent speaker at other user groups and BIM-related conferences in the United Kingdom and abroad.
@_michaelboyd
uk.linkedin.com/in/michaelwboyd/
CO5945 - Introduction to Project Reviews Using Navisworks
2
Contents
Learning Objectives ......................................................................................................................................... 1
About the Speaker ........................................................................................................................................... 1
1. Introduction ...................................................................................................................................................... 4
1.1 What is Navisworks? ................................................................................................................................. 4
1.2 Navisworks Product Line .......................................................................................................................... 4
1.3 Navisworks User Interface ........................................................................................................................ 5
1.4 Useful windows to open ............................................................................................................................ 6
2. Planning ........................................................................................................................................................... 7
2.1 Employers Information Requirements (EIR) ............................................................................................ 7
2.2 BIM Execution Plan (BEP) ........................................................................................................................ 8
2.3 Model Element Ownership Matrix (MEOM) ............................................................................................. 8
2.4 Attributes .................................................................................................................................................... 9
2.5 Meeting Planning ..................................................................................................................................... 10
3 Process ........................................................................................................................................................... 11
3.1 Project Setup – Viewpoints ..................................................................................................................... 11
3.2 How to Save a Viewpoint ........................................................................................................................ 12
3.3 Search Sets and Selection Sets ............................................................................................................. 13
3.4 Why are sets important? ......................................................................................................................... 14
3.5 The Clash Detective – an Overview ....................................................................................................... 15
3.6 Creating a Test ........................................................................................................................................ 16
3.7 Clash Rules .............................................................................................................................................. 17
3.8 Running a test .......................................................................................................................................... 18
3.9 Clash Results ........................................................................................................................................... 19
3.10 Grouping Clashes .................................................................................................................................. 20
3.11 Other uses for the Clash Detective ...................................................................................................... 22
3.12 Walkthrough Design Issues .................................................................................................................. 23
3.13 Clash Avoidance using BIM 360 Glue ................................................................................................. 24
3.14 Mobile working ....................................................................................................................................... 25
3.15 Clash Detection & Clash Avoidance Workflow .................................................................................... 26
CO5945 - Introduction to Project Reviews Using Navisworks
3
4 Reporting ......................................................................................................................................................... 27
4.1 Clash Reporting - an Overview............................................................................................................... 27
4.2 Report Management ................................................................................................................................ 28
4.3 Trending Coordination ............................................................................................................................. 29
5 Meetings .......................................................................................................................................................... 31
5.1 Suggested Meeting Agenda ................................................................................................................... 31
5.2 In Person v Virtual ................................................................................................................................... 32
5.3 Meeting Planning ..................................................................................................................................... 32
5.4 Follow Up ..................................................................................................................................................... 32
6 Tips and Tricks ............................................................................................................................................... 33
6.1 Keyboard shortcuts.................................................................................................................................. 33
6.2 Speed Walking ......................................................................................................................................... 33
6.3 Sectioning ................................................................................................................................................ 34
6.4 Split Windows .......................................................................................................................................... 35
6.5 Spacebar selection .................................................................................................................................. 35
6.6 Compare Models ..................................................................................................................................... 36
6.7 Hidden Elements ..................................................................................................................................... 38
6.8 Missing Attributes Tip .............................................................................................................................. 38
6.9 Right click options .................................................................................................................................... 39
6.10 Working with Native Revit Files ............................................................................................................ 39
6.11 Using Third Person for Space Checking.............................................................................................. 40
6.12 Presentation Level Graphics ................................................................................................................ 41
CO5945 - Introduction to Project Reviews Using Navisworks
4
1. Introduction This handout and associated presentation is aimed at beginners, or users who have used Navisworks but are struggling to get to grips with its features. If you have used Navisworks in anger for over six months then you likely know most of its contents but I sincerely hope you might pick up one or two tips that help you in your projects.
Enjoy and please feel free to get in touch.
Michael
1.1 What is Navisworks? Navisworks is project review software that provides the opportunity to federate and analyse models, improving the coordination and communication of a design. It is mainly used to analyse models for construction planning, logistic planning and cost surety. It can link the 3D Geometric models with databases, providing a starting point for asset management.
It is not a model authoring tool.
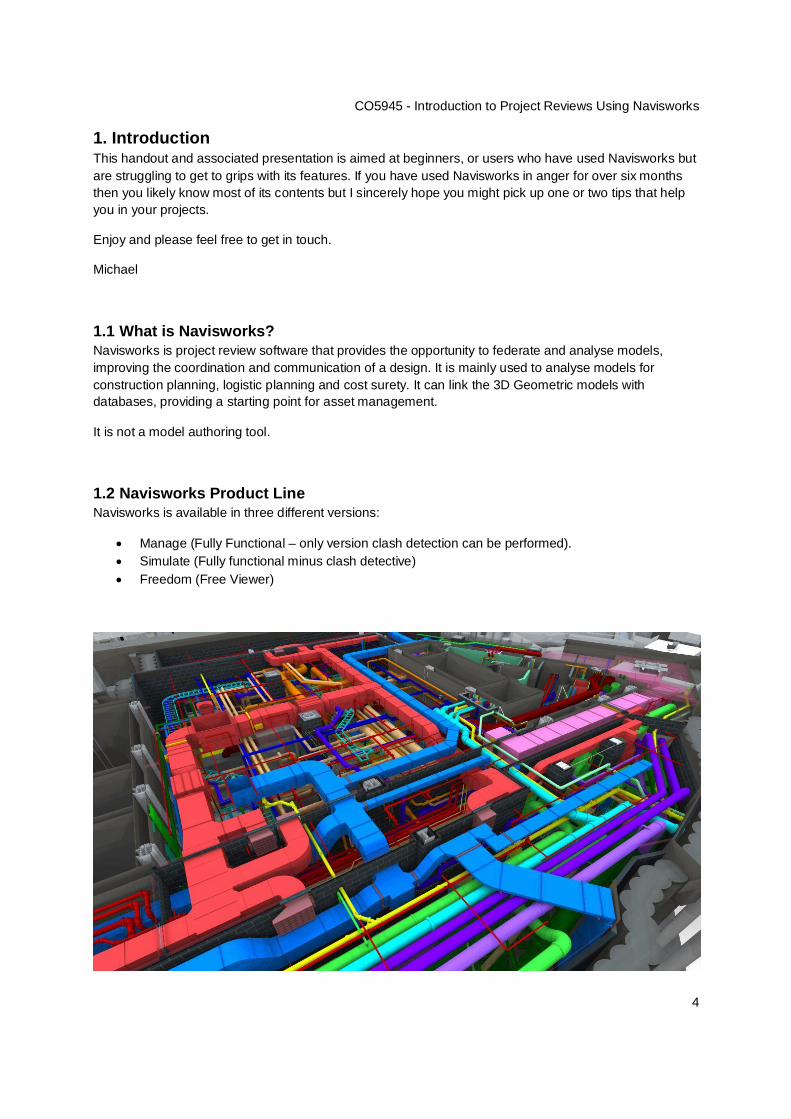
1.2 Navisworks Product Line Navisworks is available in three different versions:
Manage (Fully Functional – only version clash detection can be performed). Simulate (Fully functional minus clash detective) Freedom (Free Viewer)
CO5945 - Introduction to Project Reviews Using Navisworks
5
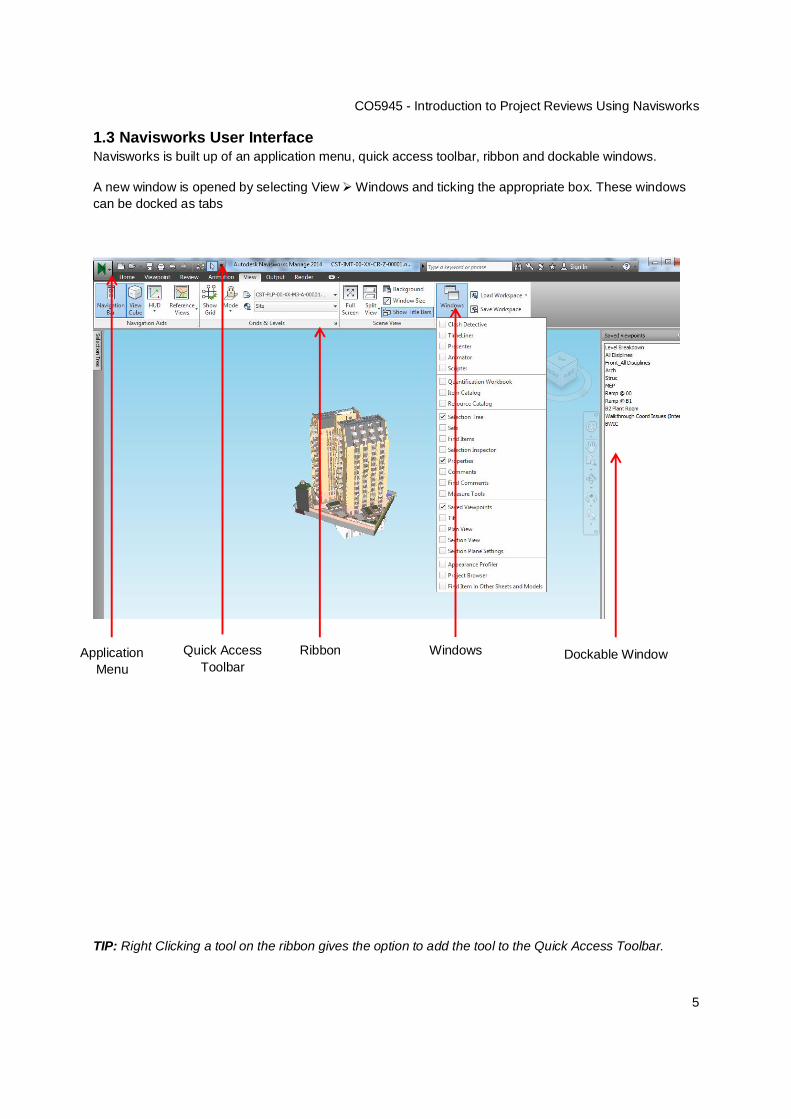
1.3 Navisworks User Interface Navisworks is built up of an application menu, quick access toolbar, ribbon and dockable windows.
A new window is opened by selecting View Windows and ticking the appropriate box. These windows can be docked as tabs
TIP: Right Clicking a tool on the ribbon gives the option to add the tool to the Quick Access Toolbar.
Application Menu
Quick Access Toolbar
Ribbon Dockable Window Windows
CO5945 - Introduction to Project Reviews Using Navisworks
6
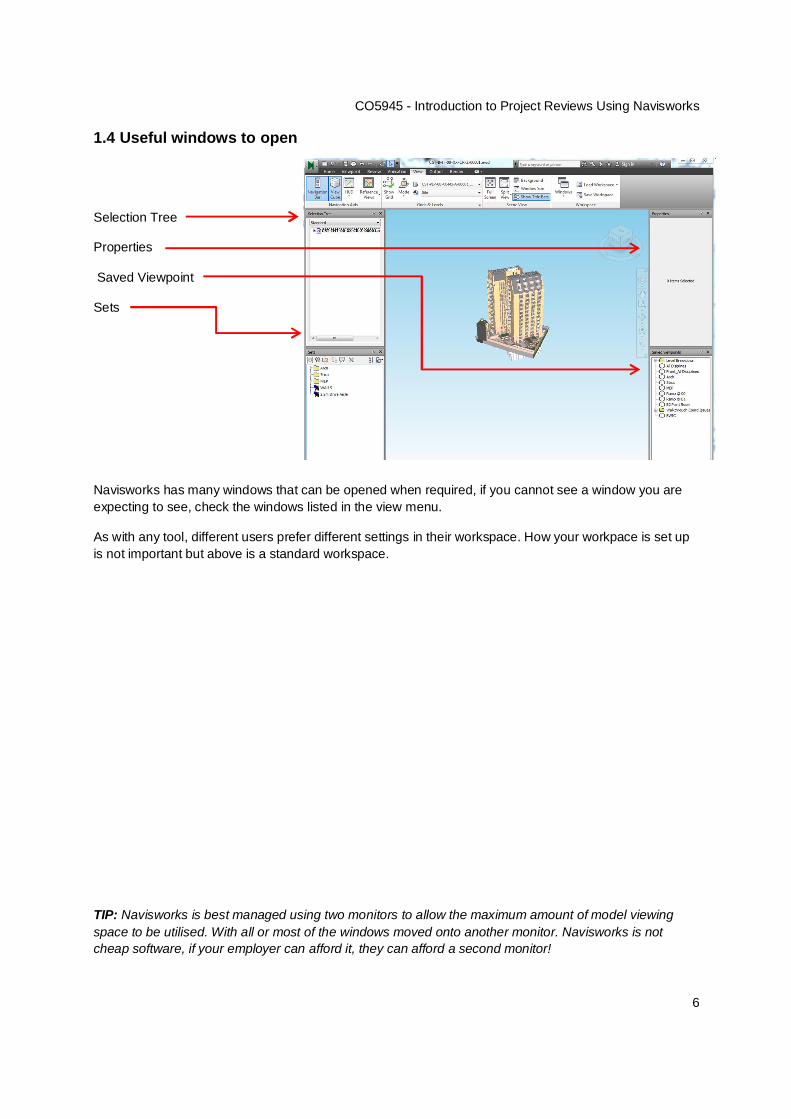
1.4 Useful windows to open
Selection Tree
Properties
Saved Viewpoint
Sets
Navisworks has many windows that can be opened when required, if you cannot see a window you are expecting to see, check the windows listed in the view menu.
As with any tool, different users prefer different settings in their workspace. How your workpace is set up is not important but above is a standard workspace.
TIP: Navisworks is best managed using two monitors to allow the maximum amount of model viewing space to be utilised. With all or most of the windows moved onto another monitor. Navisworks is not cheap software, if your employer can afford it, they can afford a second monitor!
CO5945 - Introduction to Project Reviews Using Navisworks
7
2. Planning The focus of this class is based around project reviews but it is important that planning takes place prior to any coordination workshops to ensure the process is a success. Below are several documents that if implemented effectively can greatly impact the success of BIM and design coordination on construction projects.
2.1 Employers Information Requirements (EIR) On any project it is essential to establish exactly what information is required. The EIR is a document created by a client (or representative) or contractor and is used to communicate WHAT information is required. This document should be included in the request for proposal documentation to communicate to the tenderers what information is required to be delivered and any additional tasks that must be undertaken such as attendance at model coordination workshops.
The EIR is a high level document, below is an example of the sections within WSPs EIR that we supply to clients.
Introduction
EIR Purpose Goals Objectives Terms and Definitions
Technical
Software Data Exchange Formats Coordinates Model maturity Management Training
Management
Standards Roles and Responsibilities Planning the Work and Data Segregation Security Collaboration Process Coordination and Clash detection process Systems Performance
Commercial
Data Exchange and Project Deliverables Model Ownership and Use Delivery Strategy for Asset Information
CO5945 - Introduction to Project Reviews Using Navisworks
8
2.2 BIM Execution Plan (BEP) In response to the EIR, the BIM Execution Plan outlines HOW and WHO is going to deliver the requirements described in the EIR. The contents of this document must be agreed by the design/construction team.
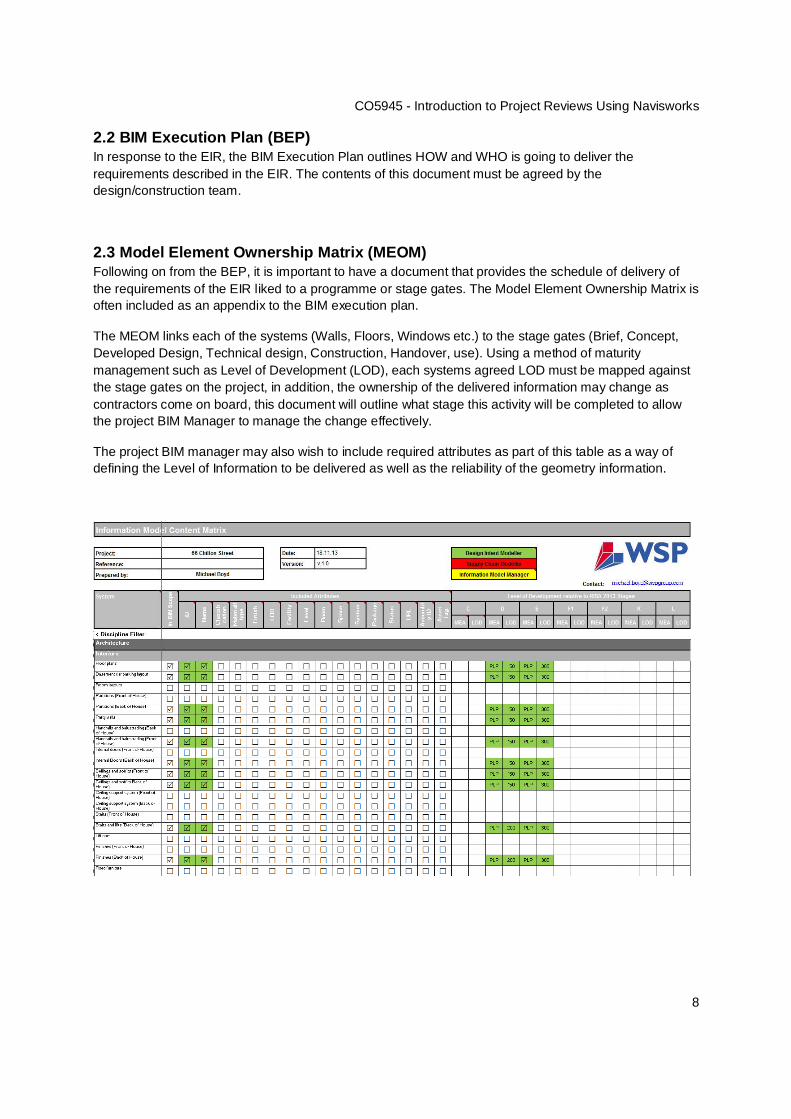
2.3 Model Element Ownership Matrix (MEOM) Following on from the BEP, it is important to have a document that provides the schedule of delivery of the requirements of the EIR liked to a programme or stage gates. The Model Element Ownership Matrix is often included as an appendix to the BIM execution plan.
The MEOM links each of the systems (Walls, Floors, Windows etc.) to the stage gates (Brief, Concept, Developed Design, Technical design, Construction, Handover, use). Using a method of maturity management such as Level of Development (LOD), each systems agreed LOD must be mapped against the stage gates on the project, in addition, the ownership of the delivered information may change as contractors come on board, this document will outline what stage this activity will be completed to allow the project BIM Manager to manage the change effectively.
The project BIM manager may also wish to include required attributes as part of this table as a way of defining the Level of Information to be delivered as well as the reliability of the geometry information.
CO5945 - Introduction to Project Reviews Using Navisworks
9
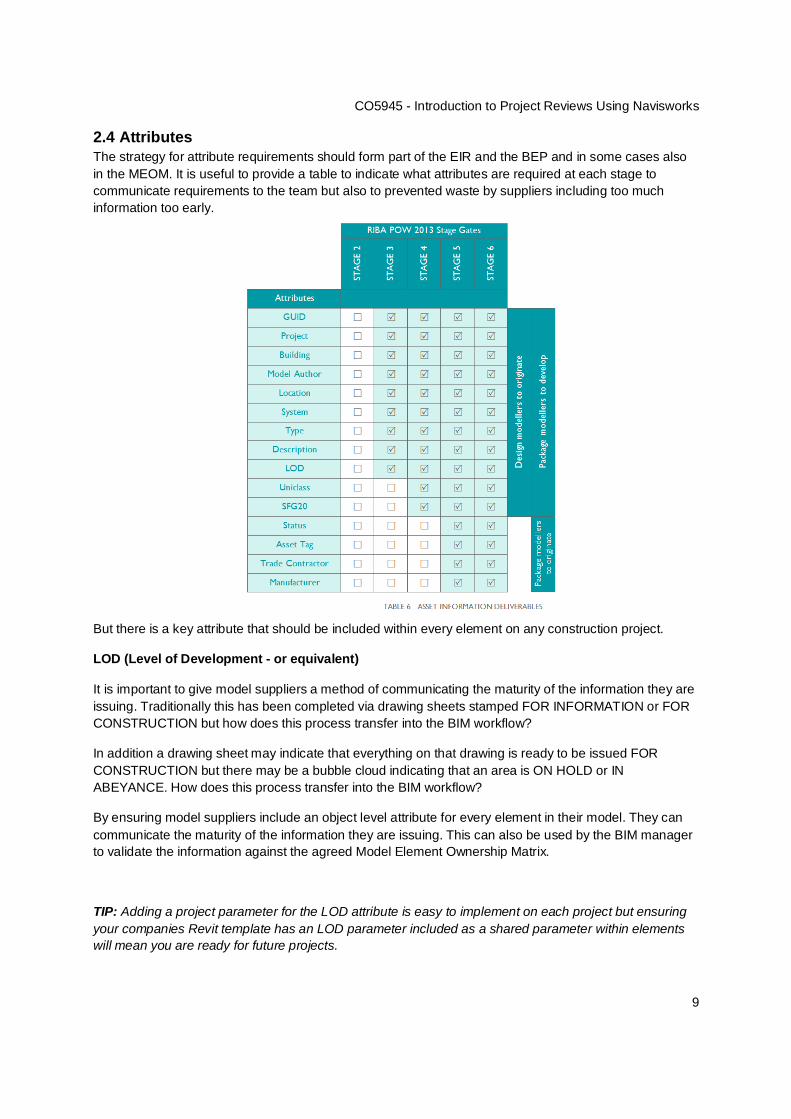
2.4 Attributes The strategy for attribute requirements should form part of the EIR and the BEP and in some cases also in the MEOM. It is useful to provide a table to indicate what attributes are required at each stage to communicate requirements to the team but also to prevented waste by suppliers including too much information too early.
But there is a key attribute that should be included within every element on any construction project.
LOD (Level of Development - or equivalent)
It is important to give model suppliers a method of communicating the maturity of the information they are issuing. Traditionally this has been completed via drawing sheets stamped FOR INFORMATION or FOR CONSTRUCTION but how does this process transfer into the BIM workflow?
In addition a drawing sheet may indicate that everything on that drawing is ready to be issued FOR CONSTRUCTION but there may be a bubble cloud indicating that an area is ON HOLD or IN ABEYANCE. How does this process transfer into the BIM workflow?
By ensuring model suppliers include an object level attribute for every element in their model. They can communicate the maturity of the information they are issuing. This can also be used by the BIM manager to validate the information against the agreed Model Element Ownership Matrix.
TIP: Adding a project parameter for the LOD attribute is easy to implement on each project but ensuring your companies Revit template has an LOD parameter included as a shared parameter within elements will mean you are ready for future projects.
CO5945 - Introduction to Project Reviews Using Navisworks
10
2.5 Meeting Planning For successful model coordination meeting throughout the design process, meetings should be diarised in advance. There are several types of meetings related to BIM on projects
Kickoff meetings
At the start of the project it is essential to host a BIM kick-off meeting, the project BIM Manager will introduce himself and his team to the rest of the project team members, discuss the BEP and outline the BIM Strategy on the project. This meeting can also be used to highlight any concerns team members may have with the protocols highlighted in the BEP.
BIM Strategy Meetings
At various stages, the senior project stakeholders will be invited to BIM strategy meetings to assess if the project is on track for achieving its goals outlined in the EIR and BEP. The frequency of these meetings is entirely dependent on the project program.
Model Coordination Meetings
There is also a requirement to hold regular BIM Coordination meetings. Prior to the BIM Coordination meetings the BIM Manager/Coordinator will have prepared a report of the clash instances and model errors found in the federated model, the team will discuss and resolve these issues as a team. The frequency of these meetings will depend on the stage of the project but it is expected that by the time the project is into late design development the project team members will be meeting on a fortnightly basis.
TIP: It is important to get the dates into the diary early, send outlook calendar invites to remind attendees not only of their required attendance but also to upload their model files. If the model coordination meeting is on a Wednesday, set an appointment in their outlook calendar to upload their model files the previous Friday, little things like this make all the difference.
CO5945 - Introduction to Project Reviews Using Navisworks
11
3 Process
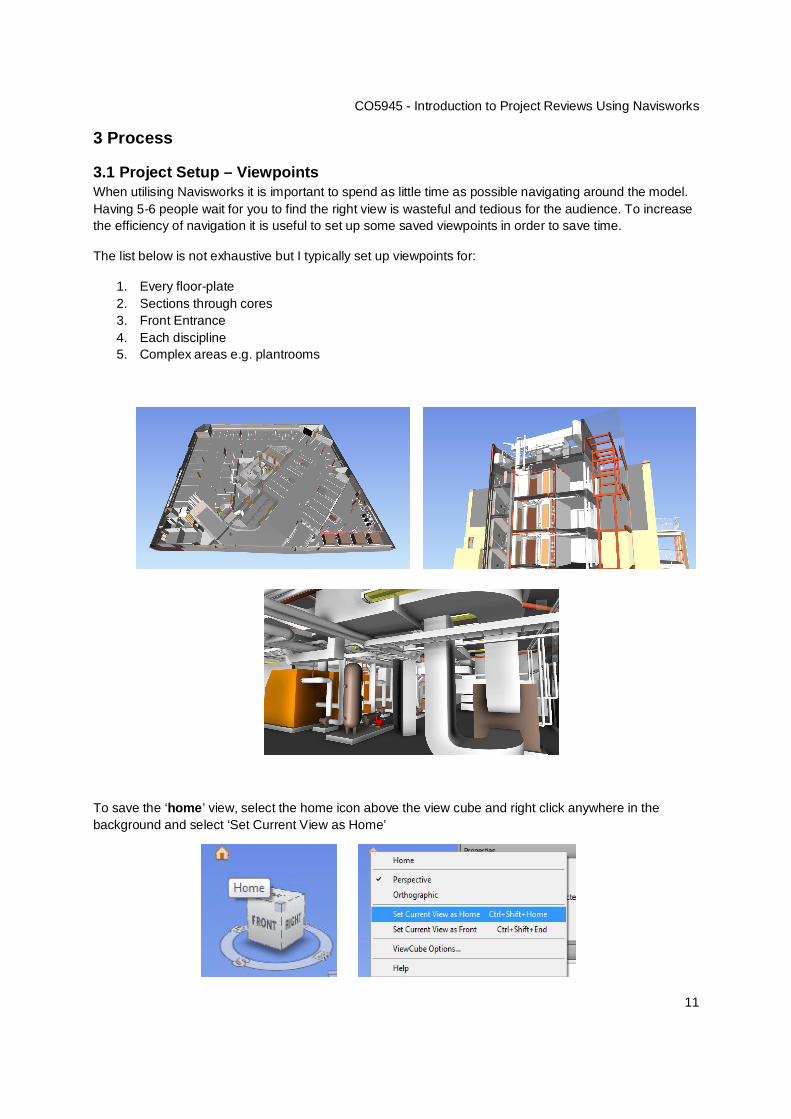
3.1 Project Setup – Viewpoints When utilising Navisworks it is important to spend as little time as possible navigating around the model. Having 5-6 people wait for you to find the right view is wasteful and tedious for the audience. To increase the efficiency of navigation it is useful to set up some saved viewpoints in order to save time.
The list below is not exhaustive but I typically set up viewpoints for:
1. Every floor-plate 2. Sections through cores 3. Front Entrance 4. Each discipline 5. Complex areas e.g. plantrooms
To save the ‘home’ view, select the home icon above the view cube and right click anywhere in the background and select ‘Set Current View as Home’
CO5945 - Introduction to Project Reviews Using Navisworks
12
3.2 How to Save a Viewpoint
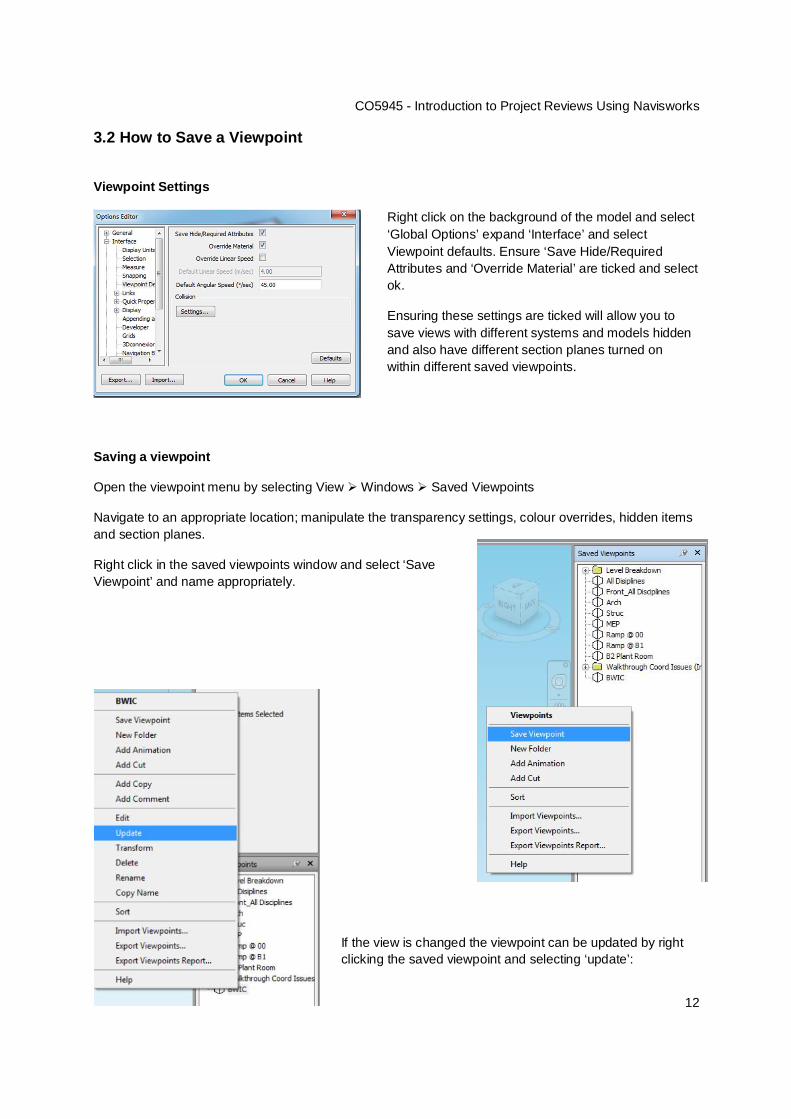
Viewpoint Settings
Right click on the background of the model and select ‘Global Options’ expand ‘Interface’ and select Viewpoint defaults. Ensure ‘Save Hide/Required Attributes and ‘Override Material’ are ticked and select ok.
Ensuring these settings are ticked will allow you to save views with different systems and models hidden and also have different section planes turned on within different saved viewpoints.
Saving a viewpoint
Open the viewpoint menu by selecting View Windows Saved Viewpoints
Navigate to an appropriate location; manipulate the transparency settings, colour overrides, hidden items and section planes.
Right click in the saved viewpoints window and select ‘Save Viewpoint’ and name appropriately.
If the view is changed the viewpoint can be updated by right clicking the saved viewpoint and selecting ‘update’:
CO5945 - Introduction to Project Reviews Using Navisworks
13
3.3 Search Sets and Selection Sets
Open the set menu by selecting View Windows Sets
Sets can be used to create groups that share common properties, which can make it easier to review and analyse information throughout the design process. There are two types of sets in Navisworks.
1. A search set is a group of items created by a saved search criteria. They are dynamic, and will respond to change and update the set when revisions are added.
2. A selection sets are one time selection groups, they are static and will need to be updated manually if any changes are made.
NOTE: The indicative symbol differs between search and selection sets.
Selection Sets
Once the desired items have been selected, click on the ‘Save Selection’ icon in the set menu. A selection set is then created and can be named as appropriate.
It should be noted that selection sets will not be updated with new revisions of model files, e.g. if you select all the walls within a model and create a selection set, when this model is updated the selection set will not include the added walls as the selection is static.
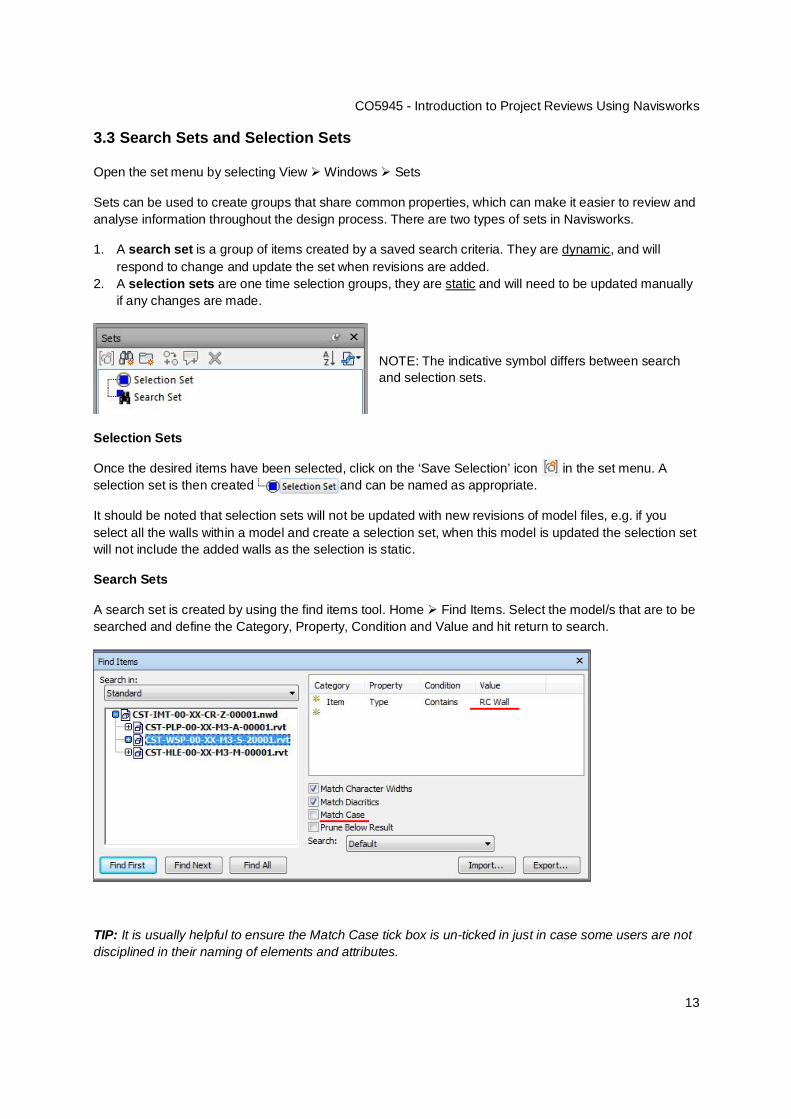
Search Sets
A search set is created by using the find items tool. Home Find Items. Select the model/s that are to be searched and define the Category, Property, Condition and Value and hit return to search.
TIP: It is usually helpful to ensure the Match Case tick box is un-ticked in just in case some users are not disciplined in their naming of elements and attributes.
CO5945 - Introduction to Project Reviews Using Navisworks
14
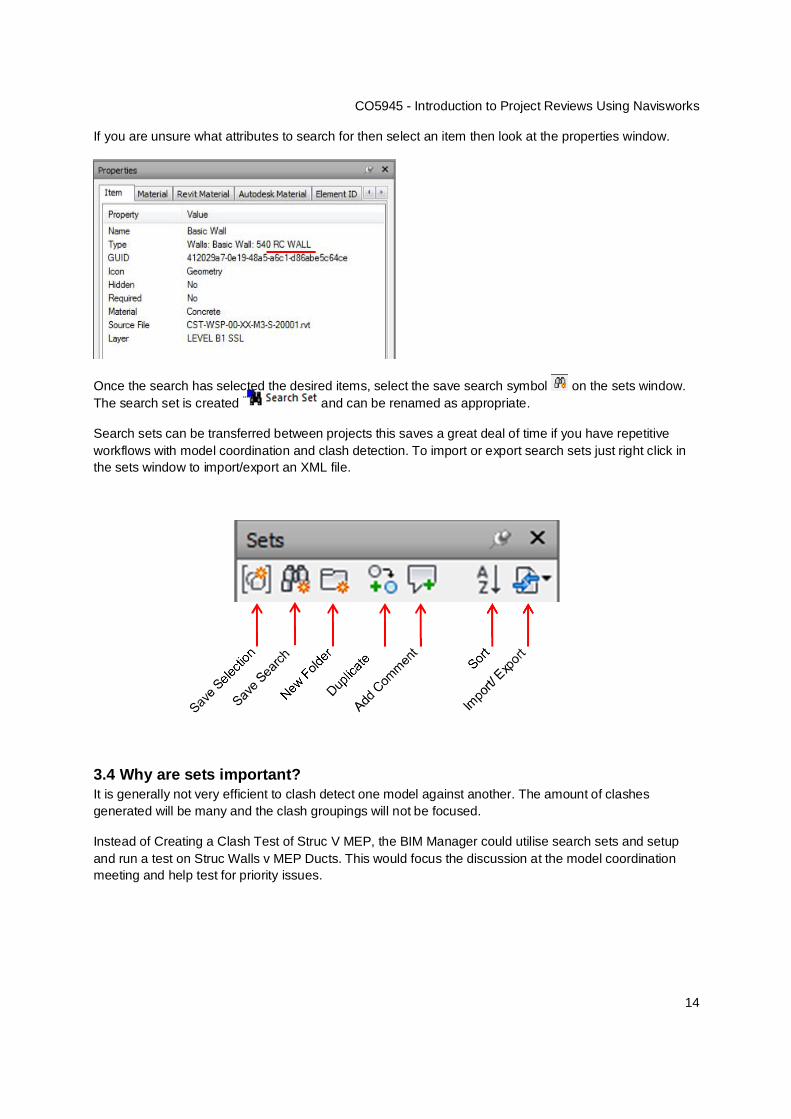
If you are unsure what attributes to search for then select an item then look at the properties window.
Once the search has selected the desired items, select the save search symbol on the sets window. The search set is created and can be renamed as appropriate.
Search sets can be transferred between projects this saves a great deal of time if you have repetitive workflows with model coordination and clash detection. To import or export search sets just right click in the sets window to import/export an XML file.
3.4 Why are sets important? It is generally not very efficient to clash detect one model against another. The amount of clashes generated will be many and the clash groupings will not be focused.
Instead of Creating a Clash Test of Struc V MEP, the BIM Manager could utilise search sets and setup and run a test on Struc Walls v MEP Ducts. This would focus the discussion at the model coordination meeting and help test for priority issues.
CO5945 - Introduction to Project Reviews Using Navisworks
15
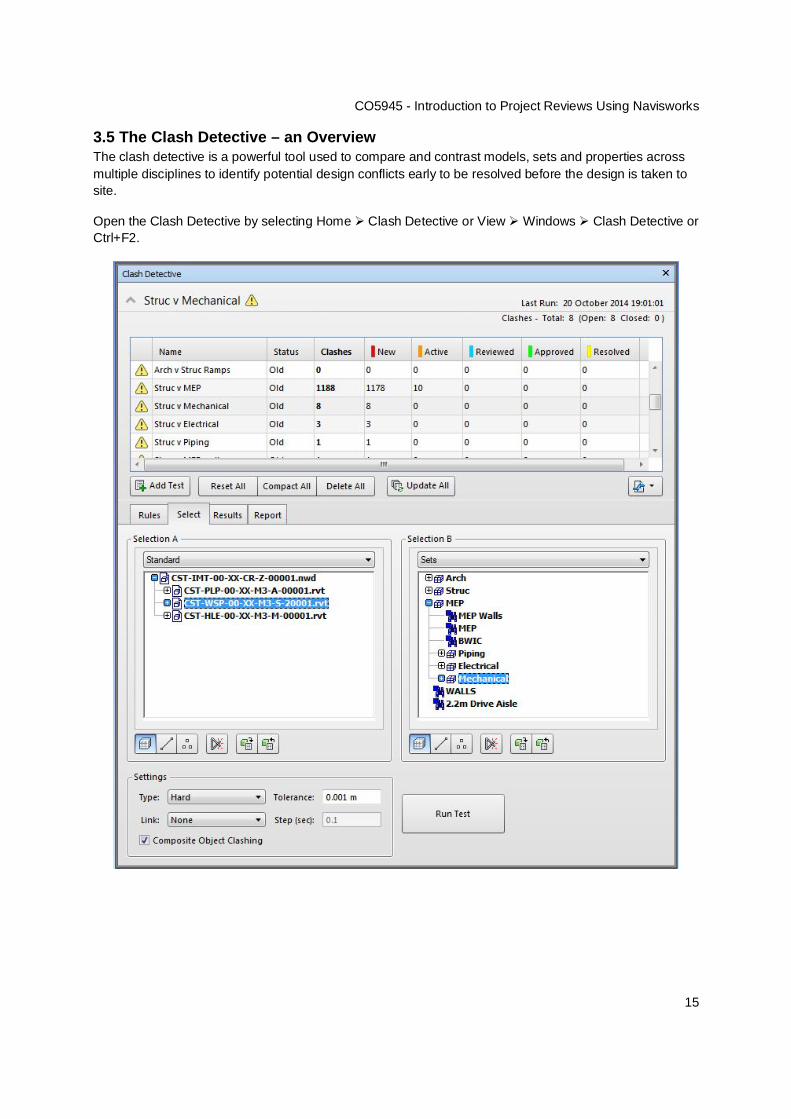
3.5 The Clash Detective – an Overview The clash detective is a powerful tool used to compare and contrast models, sets and properties across multiple disciplines to identify potential design conflicts early to be resolved before the design is taken to site.
Open the Clash Detective by selecting Home Clash Detective or View Windows Clash Detective or Ctrl+F2.

CO5945 - Introduction to Project Reviews Using Navisworks
16
3.6 Creating a Test Within the clash detective window, click ‘Add Test’
In the select tab of the Clash Detective, a clash test is defined by selecting model, sets or properties in Selection A against the chosen models, sets or properties in Selection B.
The content of the test is determined in the drop down menu below Section A / Section B. Models are categorized as ‘Standard’ or ‘Compact. Properties and sets can also be selected to run clash tests against. These categories can also be clashed against one another, for example the Whole MEP model vs Structural Framing (as above)
CO5945 - Introduction to Project Reviews Using Navisworks
17
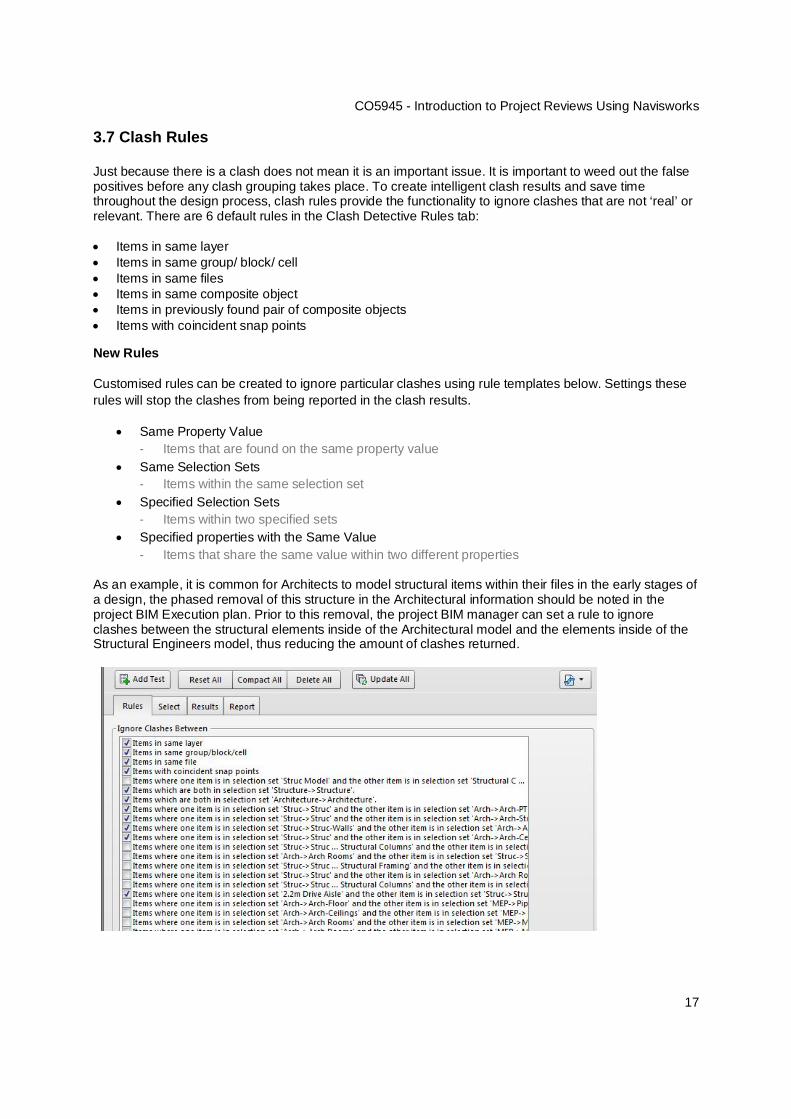
3.7 Clash Rules Just because there is a clash does not mean it is an important issue. It is important to weed out the false positives before any clash grouping takes place. To create intelligent clash results and save time throughout the design process, clash rules provide the functionality to ignore clashes that are not ‘real’ or relevant. There are 6 default rules in the Clash Detective Rules tab: Items in same layer Items in same group/ block/ cell Items in same files Items in same composite object Items in previously found pair of composite objects Items with coincident snap points
New Rules
Customised rules can be created to ignore particular clashes using rule templates below. Settings these rules will stop the clashes from being reported in the clash results.
Same Property Value - Items that are found on the same property value
Same Selection Sets - Items within the same selection set
Specified Selection Sets - Items within two specified sets
Specified properties with the Same Value - Items that share the same value within two different properties
As an example, it is common for Architects to model structural items within their files in the early stages of a design, the phased removal of this structure in the Architectural information should be noted in the project BIM Execution plan. Prior to this removal, the project BIM manager can set a rule to ignore clashes between the structural elements inside of the Architectural model and the elements inside of the Structural Engineers model, thus reducing the amount of clashes returned.
CO5945 - Introduction to Project Reviews Using Navisworks
18
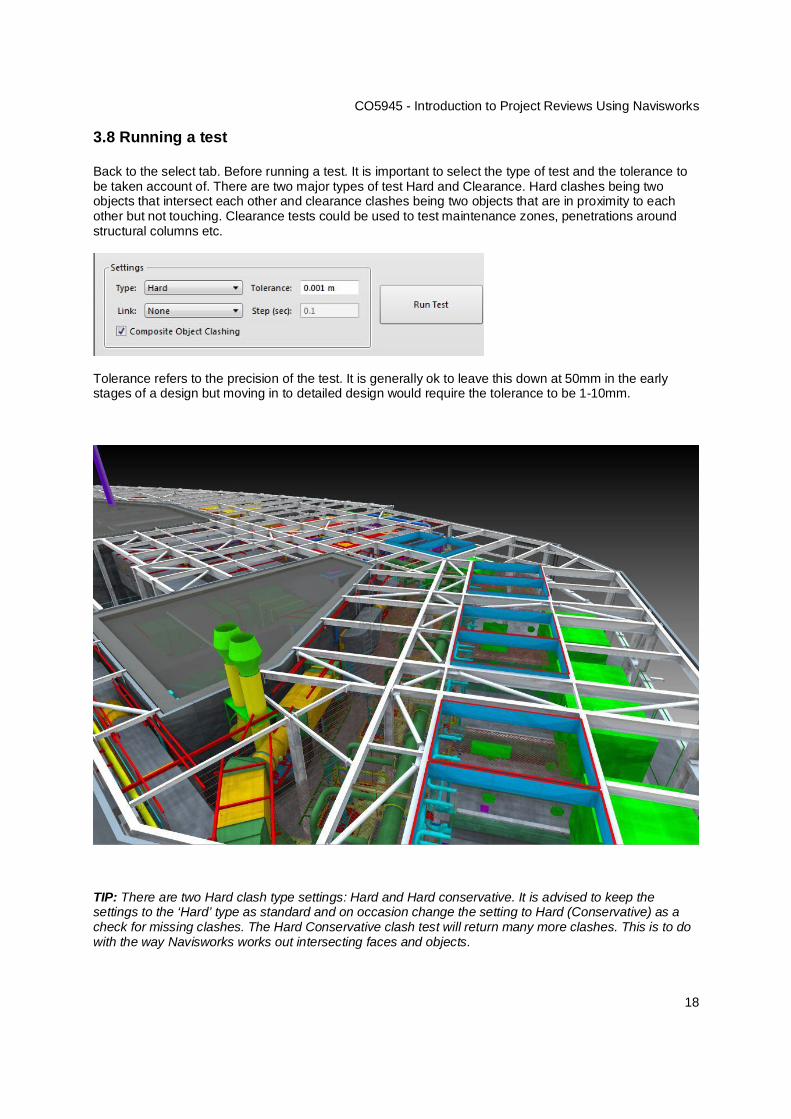
3.8 Running a test Back to the select tab. Before running a test. It is important to select the type of test and the tolerance to be taken account of. There are two major types of test Hard and Clearance. Hard clashes being two objects that intersect each other and clearance clashes being two objects that are in proximity to each other but not touching. Clearance tests could be used to test maintenance zones, penetrations around structural columns etc.
Tolerance refers to the precision of the test. It is generally ok to leave this down at 50mm in the early stages of a design but moving in to detailed design would require the tolerance to be 1-10mm.
TIP: There are two Hard clash type settings: Hard and Hard conservative. It is advised to keep the settings to the ‘Hard’ type as standard and on occasion change the setting to Hard (Conservative) as a check for missing clashes. The Hard Conservative clash test will return many more clashes. This is to do with the way Navisworks works out intersecting faces and objects.
CO5945 - Introduction to Project Reviews Using Navisworks
19
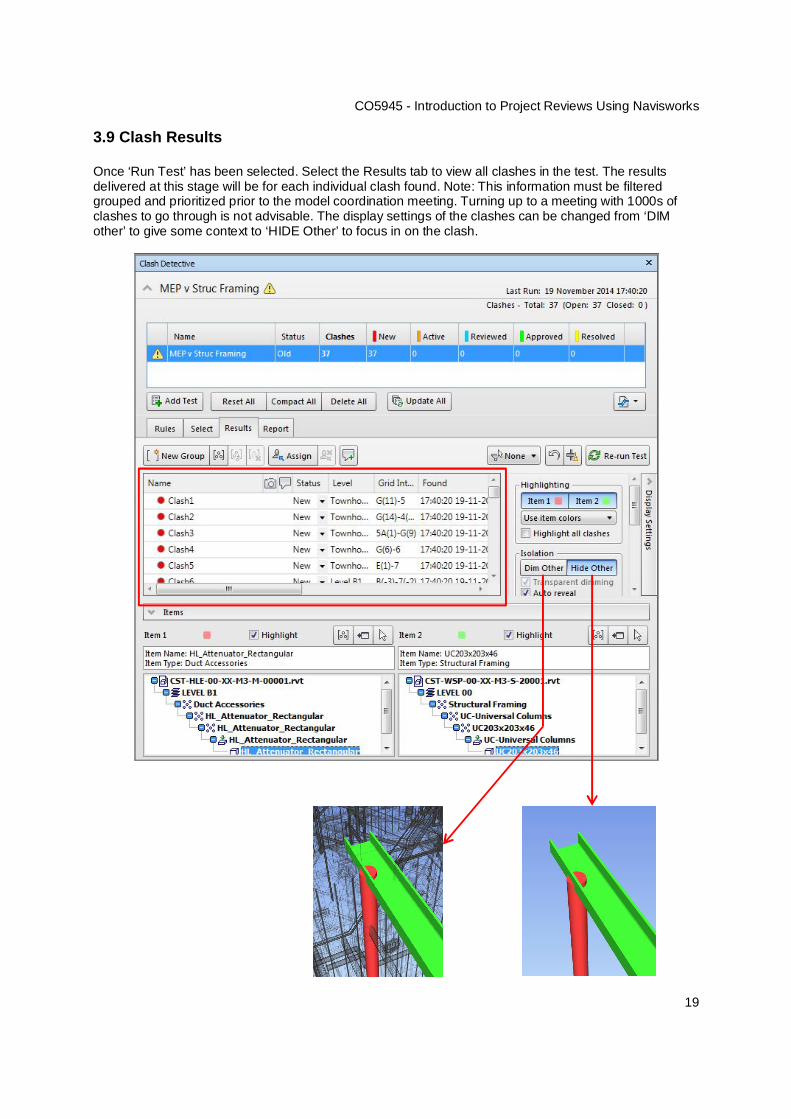
3.9 Clash Results Once ‘Run Test’ has been selected. Select the Results tab to view all clashes in the test. The results delivered at this stage will be for each individual clash found. Note: This information must be filtered grouped and prioritized prior to the model coordination meeting. Turning up to a meeting with 1000s of clashes to go through is not advisable. The display settings of the clashes can be changed from ‘DIM other’ to give some context to ‘HIDE Other’ to focus in on the clash.
CO5945 - Introduction to Project Reviews Using Navisworks
20
3.10 Grouping Clashes So we have learned how to create some clash tests and we have found some issues, now we can take them to a coordination meeting right? WRONG!
Do not under any circumstances bring 100s and 1000s of clashes to a coordination meeting or worse still send out a clash report indicating these clashes to a team. You will lose credibility and also find that you are completely ignored. Grouping clash results by area, group or similarity assists in highlighting issues that affect certain stakeholders and specific project priorities, which will assist in creating efficient coordination meetings by turning clashes into coordination issues.
NOTE: There are several methods of grouping clashes; the method I note below is the method WSP has evolved into using as we find it far more efficient than other methods.
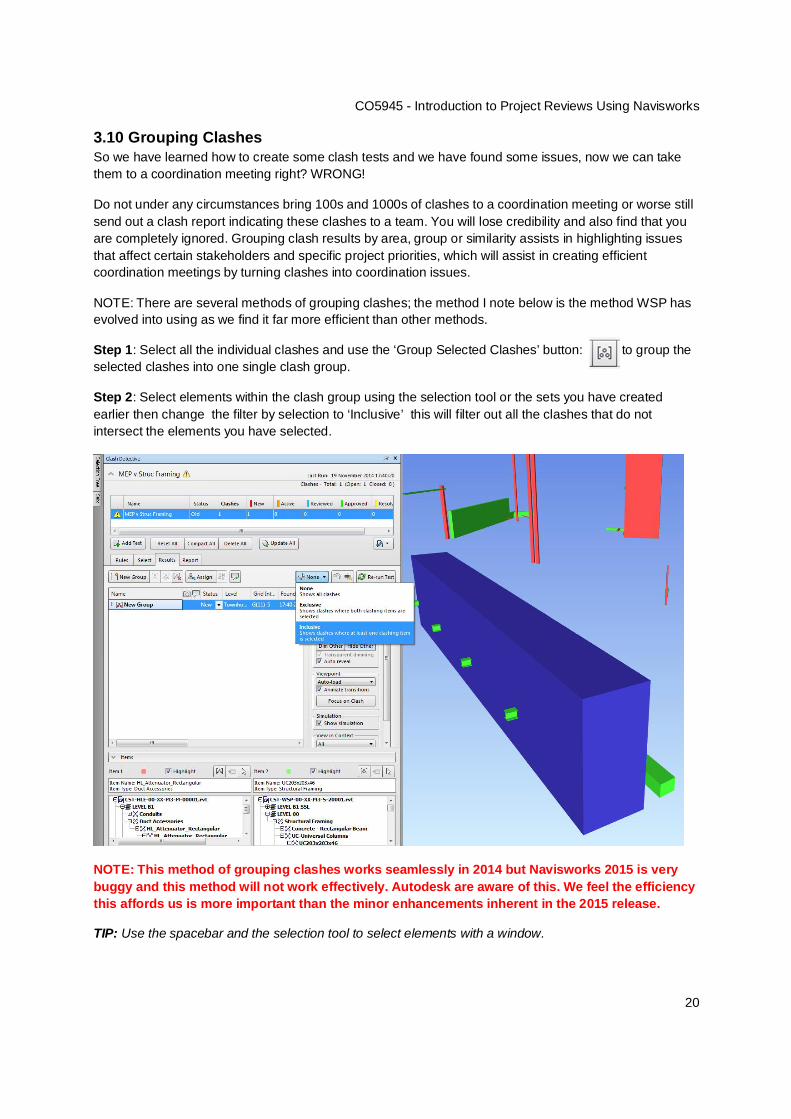
Step 1: Select all the individual clashes and use the ‘Group Selected Clashes’ button: to group the selected clashes into one single clash group.
Step 2: Select elements within the clash group using the selection tool or the sets you have created earlier then change the filter by selection to ‘Inclusive’ this will filter out all the clashes that do not intersect the elements you have selected.
NOTE: This method of grouping clashes works seamlessly in 2014 but Navisworks 2015 is very buggy and this method will not work effectively. Autodesk are aware of this. We feel the efficiency this affords us is more important than the minor enhancements inherent in the 2015 release.
TIP: Use the spacebar and the selection tool to select elements with a window.
CO5945 - Introduction to Project Reviews Using Navisworks
21
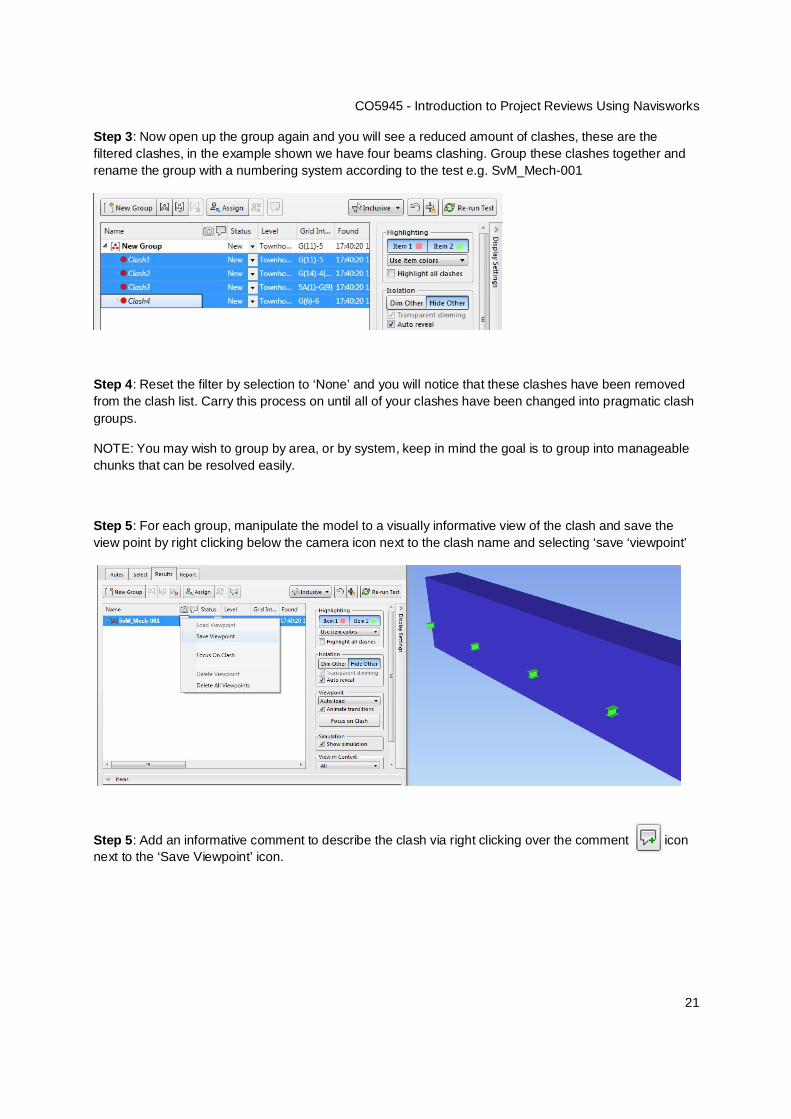
Step 3: Now open up the group again and you will see a reduced amount of clashes, these are the filtered clashes, in the example shown we have four beams clashing. Group these clashes together and rename the group with a numbering system according to the test e.g. SvM_Mech-001
Step 4: Reset the filter by selection to ‘None’ and you will notice that these clashes have been removed from the clash list. Carry this process on until all of your clashes have been changed into pragmatic clash groups.
NOTE: You may wish to group by area, or by system, keep in mind the goal is to group into manageable chunks that can be resolved easily.
Step 5: For each group, manipulate the model to a visually informative view of the clash and save the view point by right clicking below the camera icon next to the clash name and selecting ‘save ‘viewpoint’
Step 5: Add an informative comment to describe the clash via right clicking over the comment icon next to the ‘Save Viewpoint’ icon.
CO5945 - Introduction to Project Reviews Using Navisworks
22
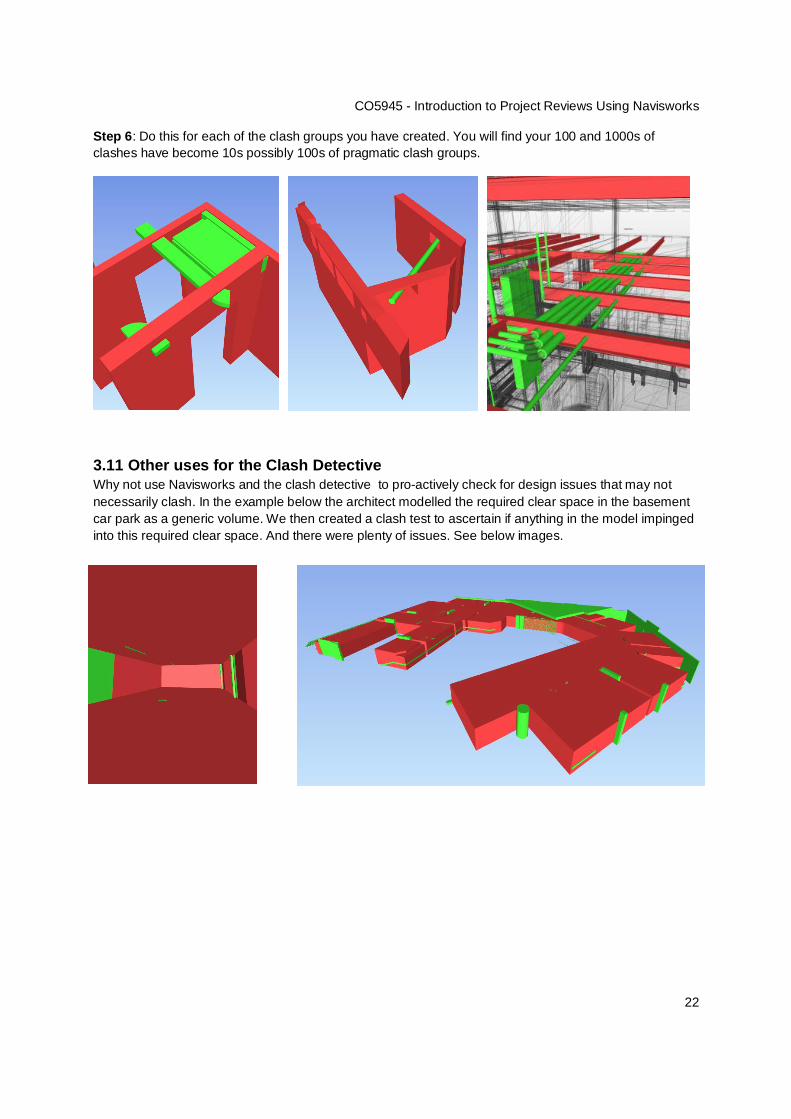
Step 6: Do this for each of the clash groups you have created. You will find your 100 and 1000s of clashes have become 10s possibly 100s of pragmatic clash groups.
3.11 Other uses for the Clash Detective Why not use Navisworks and the clash detective to pro-actively check for design issues that may not necessarily clash. In the example below the architect modelled the required clear space in the basement car park as a generic volume. We then created a clash test to ascertain if anything in the model impinged into this required clear space. And there were plenty of issues. See below images.
CO5945 - Introduction to Project Reviews Using Navisworks
23
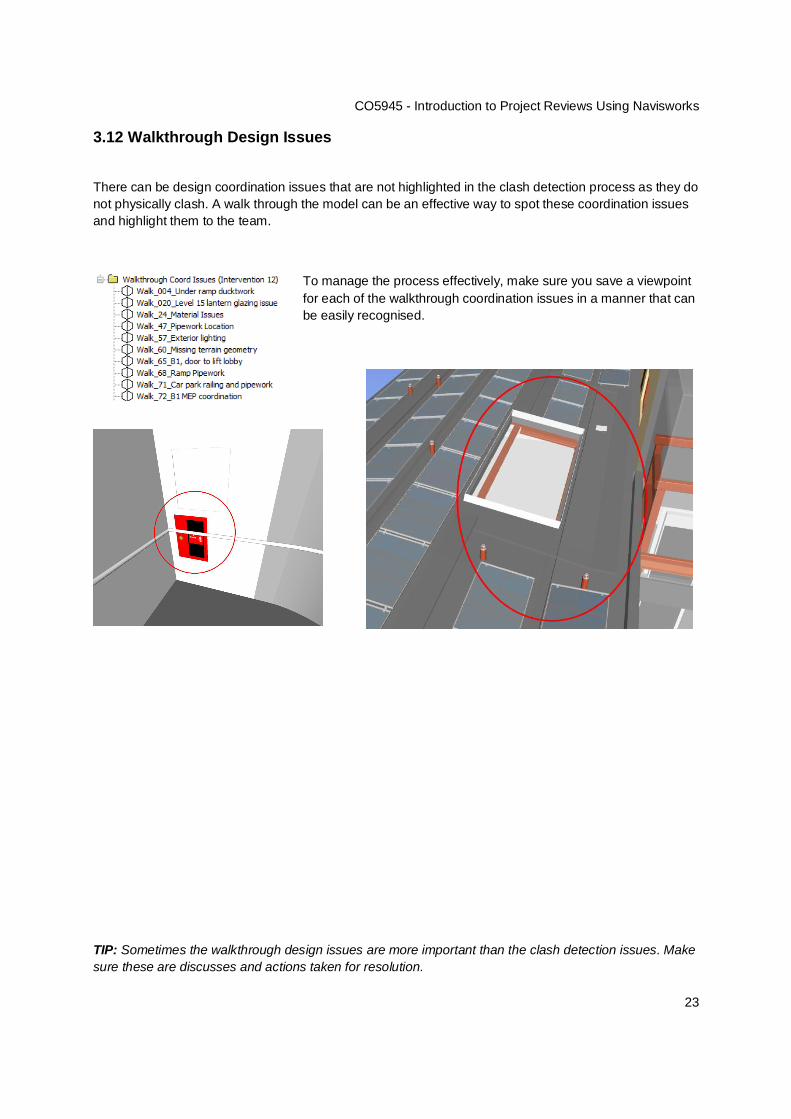
3.12 Walkthrough Design Issues
There can be design coordination issues that are not highlighted in the clash detection process as they do not physically clash. A walk through the model can be an effective way to spot these coordination issues and highlight them to the team.
To manage the process effectively, make sure you save a viewpoint for each of the walkthrough coordination issues in a manner that can be easily recognised.
TIP: Sometimes the walkthrough design issues are more important than the clash detection issues. Make sure these are discusses and actions taken for resolution.
CO5945 - Introduction to Project Reviews Using Navisworks
24
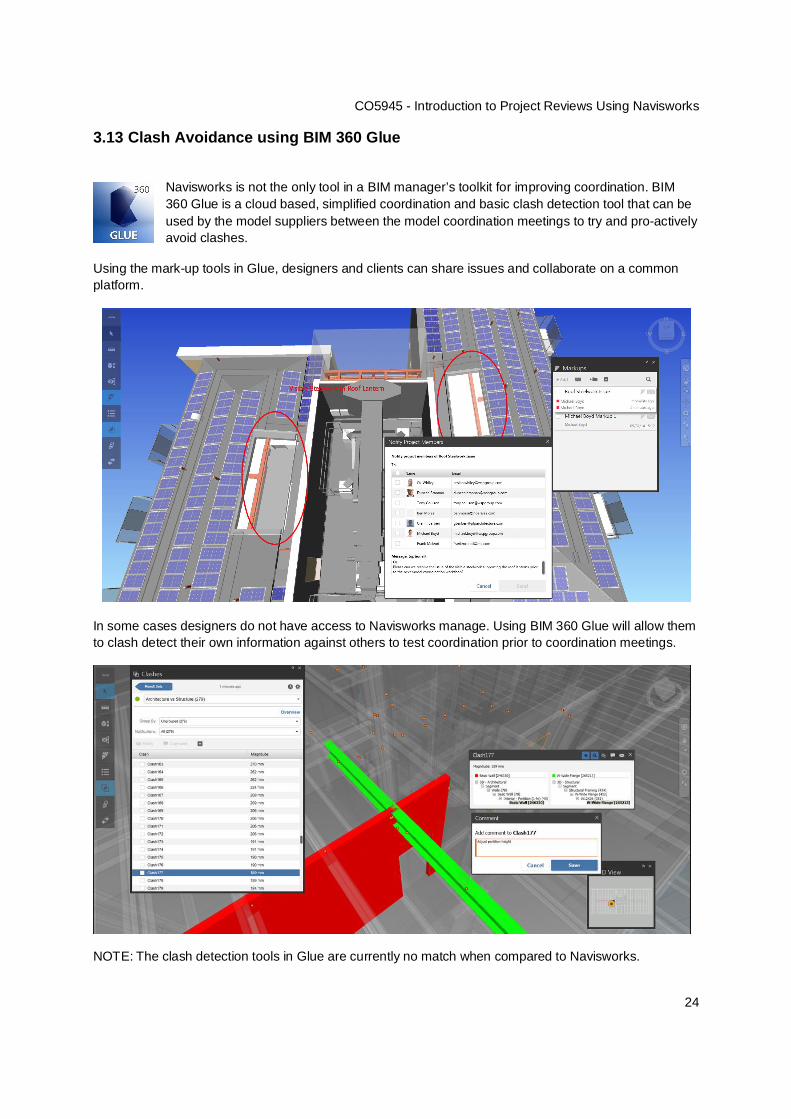
3.13 Clash Avoidance using BIM 360 Glue
Navisworks is not the only tool in a BIM manager’s toolkit for improving coordination. BIM 360 Glue is a cloud based, simplified coordination and basic clash detection tool that can be used by the model suppliers between the model coordination meetings to try and pro-actively avoid clashes.
Using the mark-up tools in Glue, designers and clients can share issues and collaborate on a common platform.
In some cases designers do not have access to Navisworks manage. Using BIM 360 Glue will allow them to clash detect their own information against others to test coordination prior to coordination meetings.
NOTE: The clash detection tools in Glue are currently no match when compared to Navisworks.
CO5945 - Introduction to Project Reviews Using Navisworks
25
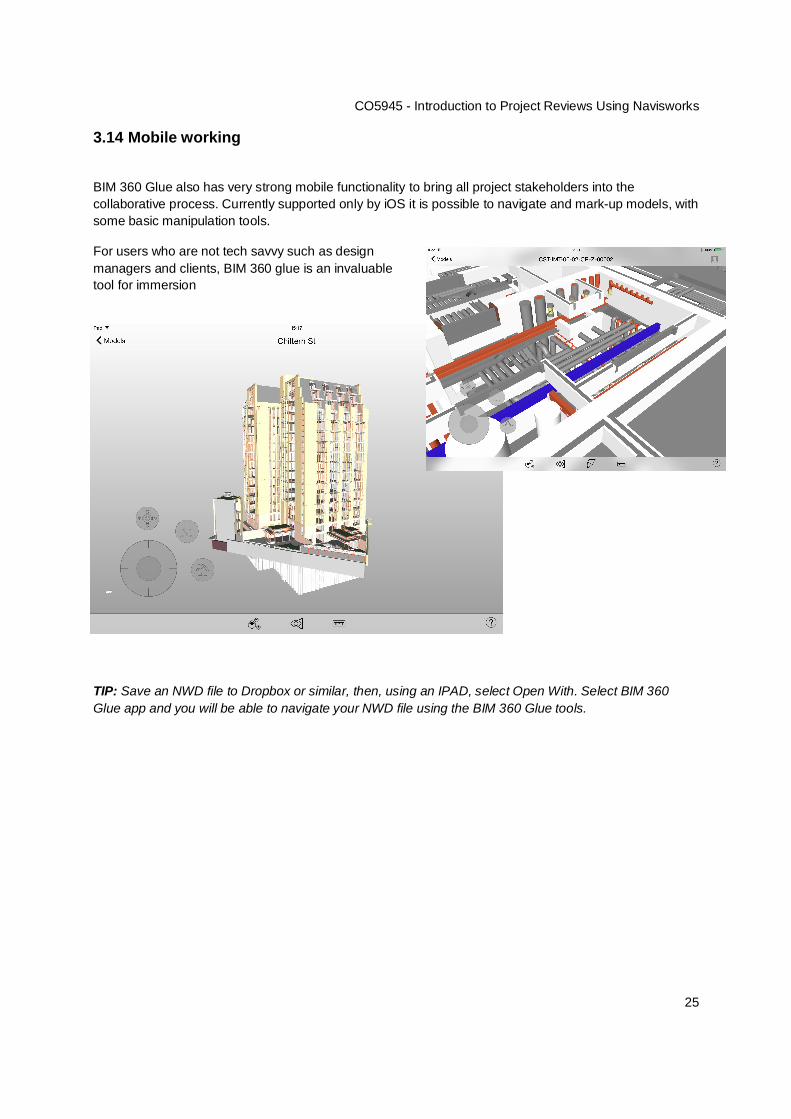
3.14 Mobile working
BIM 360 Glue also has very strong mobile functionality to bring all project stakeholders into the collaborative process. Currently supported only by iOS it is possible to navigate and mark-up models, with some basic manipulation tools.
For users who are not tech savvy such as design managers and clients, BIM 360 glue is an invaluable tool for immersion
TIP: Save an NWD file to Dropbox or similar, then, using an IPAD, select Open With. Select BIM 360 Glue app and you will be able to navigate your NWD file using the BIM 360 Glue tools.
CO5945 - Introduction to Project Reviews Using Navisworks
26
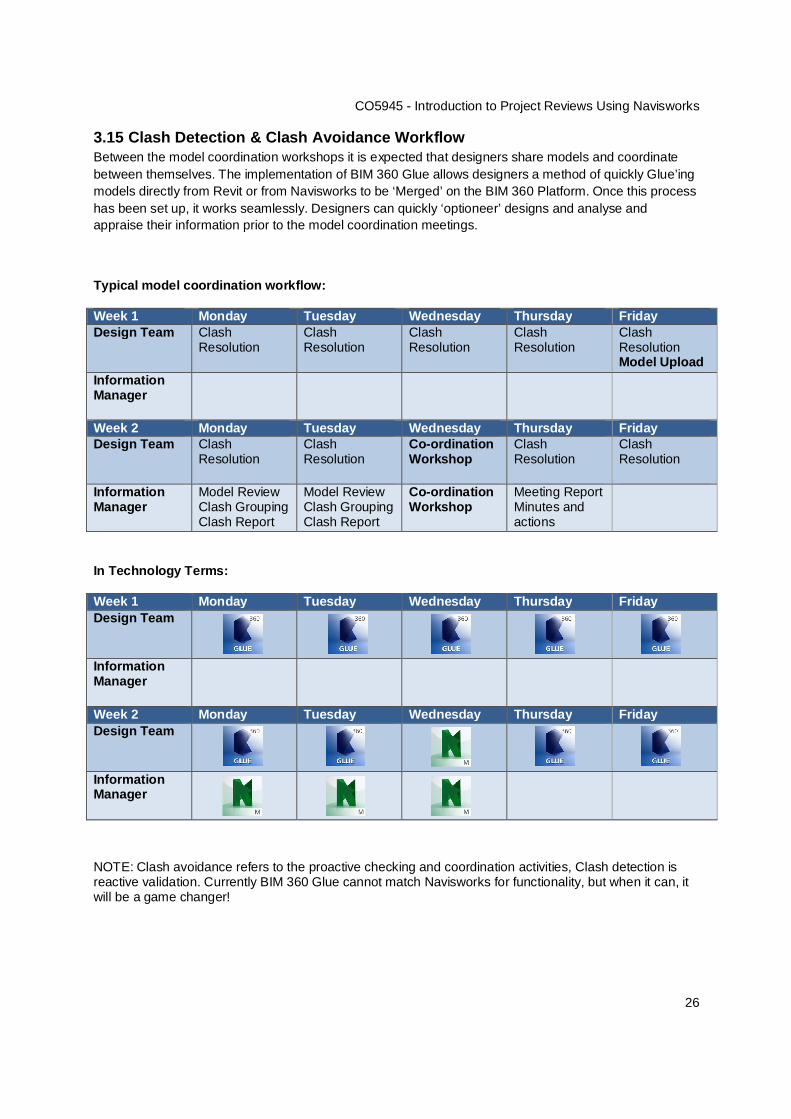
3.15 Clash Detection & Clash Avoidance Workflow Between the model coordination workshops it is expected that designers share models and coordinate between themselves. The implementation of BIM 360 Glue allows designers a method of quickly Glue’ing models directly from Revit or from Navisworks to be ‘Merged’ on the BIM 360 Platform. Once this process has been set up, it works seamlessly. Designers can quickly ‘optioneer’ designs and analyse and appraise their information prior to the model coordination meetings.
Typical model coordination workflow:
Week 1 Monday Tuesday Wednesday Thursday Friday Design Team Clash
Resolution
Clash Resolution
Clash Resolution
Clash Resolution
Clash Resolution Model Upload
Information Manager
Week 2 Monday Tuesday Wednesday Thursday Friday Design Team Clash
Resolution
Clash Resolution
Co-ordination Workshop
Clash Resolution
Clash Resolution Information
Manager Model Review Clash Grouping Clash Report
Model Review Clash Grouping Clash Report
Co-ordination Workshop
Meeting Report Minutes and actions
In Technology Terms:
Week 1 Monday Tuesday Wednesday Thursday Friday Design Team
Information Manager
Week 2 Monday Tuesday Wednesday Thursday Friday Design Team
Information Manager
NOTE: Clash avoidance refers to the proactive checking and coordination activities, Clash detection is reactive validation. Currently BIM 360 Glue cannot match Navisworks for functionality, but when it can, it will be a game changer!
CO5945 - Introduction to Project Reviews Using Navisworks
27
4 Reporting So we have created our clash tests, grouped the clashes into pragmatic coordination issues and saved viewpoints and appended comments. Now we need to communicate what we have found to the team.
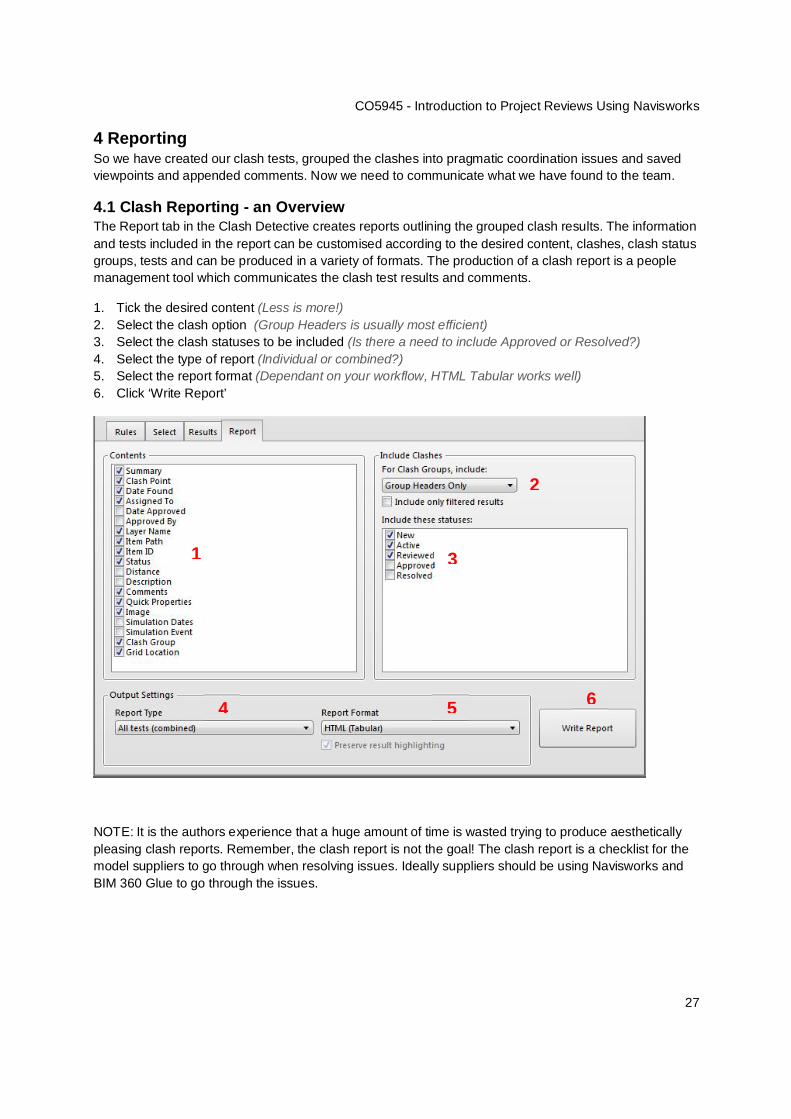
4.1 Clash Reporting - an Overview The Report tab in the Clash Detective creates reports outlining the grouped clash results. The information and tests included in the report can be customised according to the desired content, clashes, clash status groups, tests and can be produced in a variety of formats. The production of a clash report is a people management tool which communicates the clash test results and comments.
1. Tick the desired content (Less is more!) 2. Select the clash option (Group Headers is usually most efficient) 3. Select the clash statuses to be included (Is there a need to include Approved or Resolved?) 4. Select the type of report (Individual or combined?) 5. Select the report format (Dependant on your workflow, HTML Tabular works well) 6. Click ‘Write Report’
NOTE: It is the authors experience that a huge amount of time is wasted trying to produce aesthetically pleasing clash reports. Remember, the clash report is not the goal! The clash report is a checklist for the model suppliers to go through when resolving issues. Ideally suppliers should be using Navisworks and BIM 360 Glue to go through the issues.
1
2
3
4 5 6
CO5945 - Introduction to Project Reviews Using Navisworks
28
4.2 Report Management For the purposes of this presentation, we will cover the two types of report that WSP implement in our workflow. The ‘HTML Tabular’ and the ‘As Viewpoints’ report. Using both these reporting methods allow stakeholders to use the Tabular report as a resolution checklist and use the Viewpoints to highlight the clashes inside of Navisworks should they only have access to Navisworks Simulate or Freedom.
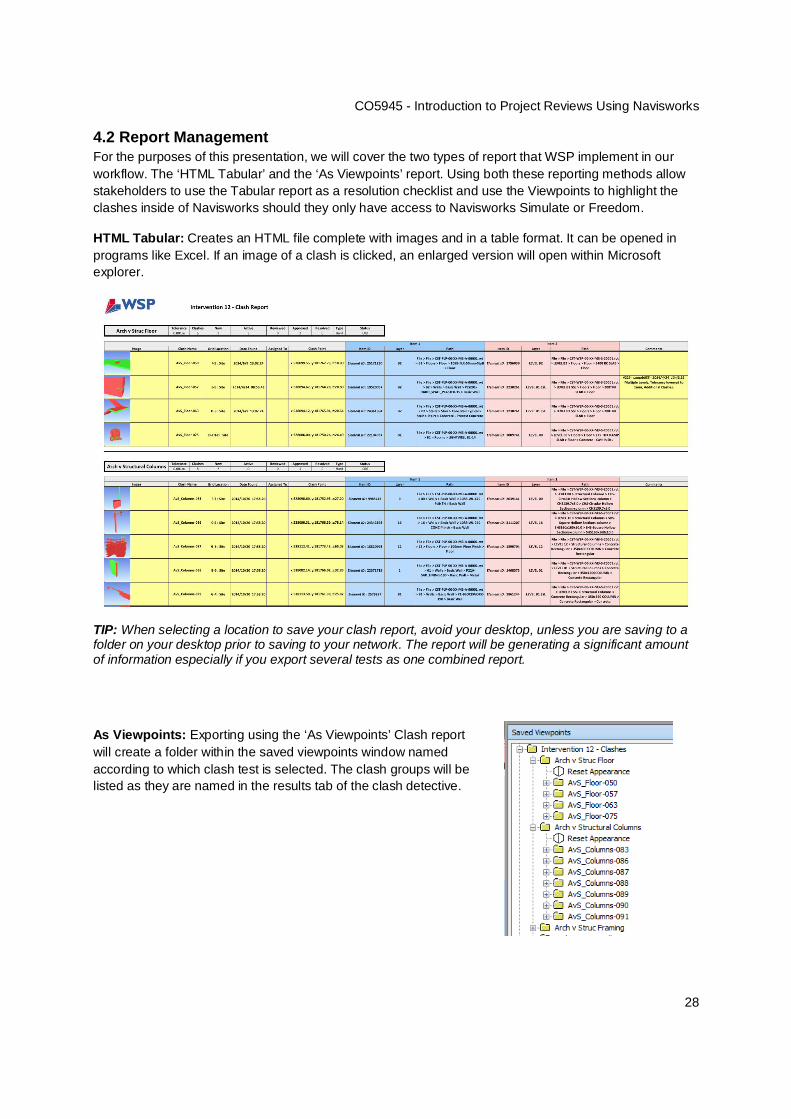
HTML Tabular: Creates an HTML file complete with images and in a table format. It can be opened in programs like Excel. If an image of a clash is clicked, an enlarged version will open within Microsoft explorer.
TIP: When selecting a location to save your clash report, avoid your desktop, unless you are saving to a folder on your desktop prior to saving to your network. The report will be generating a significant amount of information especially if you export several tests as one combined report.
As Viewpoints: Exporting using the ‘As Viewpoints’ Clash report will create a folder within the saved viewpoints window named according to which clash test is selected. The clash groups will be listed as they are named in the results tab of the clash detective.
CO5945 - Introduction to Project Reviews Using Navisworks
29
4.3 Trending Coordination The saying goes: “If it cannot be measured, then it cannot be improved”. How can we check or trend coordination on a project? By trending the amount of entities within a federated model against the total clashes found we are able to generate a clash trending overview. See below:
Total Entities within Model V Clash Amount
Generating the total entities:
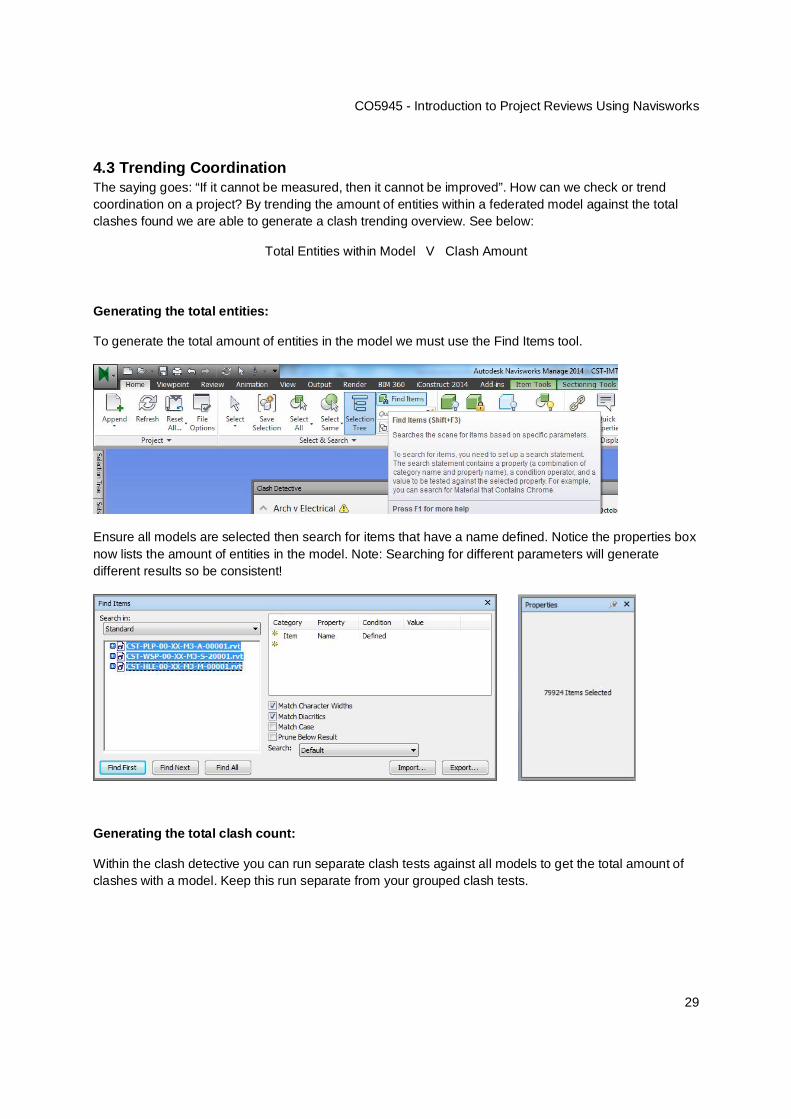
To generate the total amount of entities in the model we must use the Find Items tool.
Ensure all models are selected then search for items that have a name defined. Notice the properties box now lists the amount of entities in the model. Note: Searching for different parameters will generate different results so be consistent!
Generating the total clash count:
Within the clash detective you can run separate clash tests against all models to get the total amount of clashes with a model. Keep this run separate from your grouped clash tests.
CO5945 - Introduction to Project Reviews Using Navisworks
30
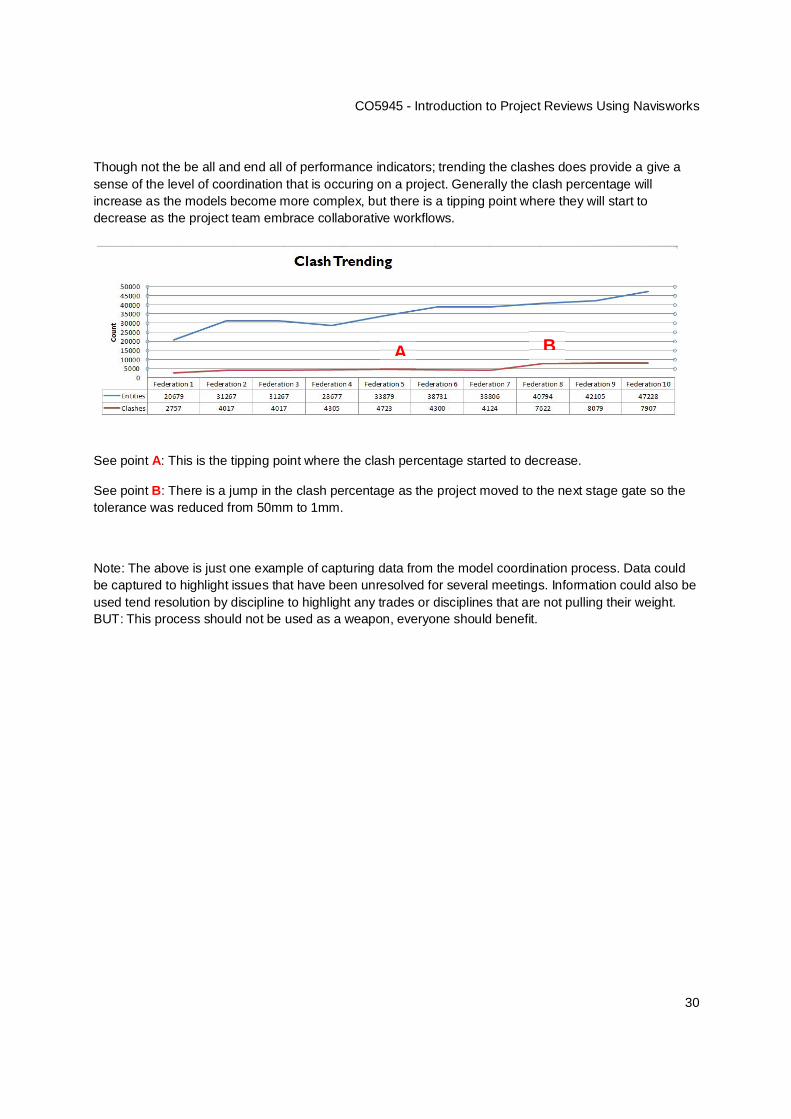
Though not the be all and end all of performance indicators; trending the clashes does provide a give a sense of the level of coordination that is occuring on a project. Generally the clash percentage will increase as the models become more complex, but there is a tipping point where they will start to decrease as the project team embrace collaborative workflows.
See point A: This is the tipping point where the clash percentage started to decrease.
See point B: There is a jump in the clash percentage as the project moved to the next stage gate so the tolerance was reduced from 50mm to 1mm.
Note: The above is just one example of capturing data from the model coordination process. Data could be captured to highlight issues that have been unresolved for several meetings. Information could also be used tend resolution by discipline to highlight any trades or disciplines that are not pulling their weight. BUT: This process should not be used as a weapon, everyone should benefit.
A B
CO5945 - Introduction to Project Reviews Using Navisworks
31
5 Meetings
Model coordination meetings are an integral part of the collaborative process but if not managed correctly participants can become disengaged with the process and see the meetings as a hardship they must endure. With some planning and management this does not have to be the case.
There is no ‘correct’ way to manage meetings. This paper is in no way trying to dictate the exact methodology to run the perfect meeting, feel free to pick up a self-help book at your local book store for that. But there are some considerations and lessons learned that may be of use to the reader to keep the team engaged in the process.
Golden Rules:
1. Meetings should NEVER be longer than 2 hours 2. Everyone should benefit from attending 3. Attendees must have authority to make decisions on the spot
5.1 Suggested Meeting Agenda
1. Previous actions Cover any actions (not clash related) taken at the previous meeting.
2. Overview of model, stats Stats of model entities and clash percentage Outstanding issues such as a discipline not uploading a model
3. Walkthrough Coordination Issues Run through the non-clash issues, most of the time these are more important that the
physical clashes. 4. Discipline issues
Allow the disciplines 5-10 mins each to bring up any issues that is a priority to them. Remember golden rule No. 2.
5. Clash coordination In an ideal world the clash report and NWD file would be issued and everyone would
coordinate their own information. BUT, that is currently not the case. Use this time to cover the priority issues.
6. AOB If you manage to get through all the clash coordination issues then well done. In a
two hour meeting you are likely to be able to run through 40-50 issues depending on the complexity.

CO5945 - Introduction to Project Reviews Using Navisworks
32
5.2 In Person v Virtual In person meetings are very helpful, especially at the start of a project. They allow a team to build rapport and get to know each other. It is recommended that the first couple of meetings are managed in person. The negative side of in person meetings is that they tend to take longer due to attendees catching up and striking conversation so this makes them harder to manage.
Virtual meetings on the other hand can be a very effective time management tool. Attendees do not have to travel to the meeting. If 4 people are travelling 15 minutes each way, this equates to two hours lost time each meeting, in addition to attendees being unsettled from their desk environment.
Also, virtual meetings can pack in more than in-person meetings. People are less likely to converse and keep their answers concise and to the point. It is estimated that the content covered in a two hour virtual meeting would need an in-person meeting lasting 3-4 hours.
5.3 Meeting Planning As discussed earlier, planning meetings in advance will keep the design process on track and all disciplines aligned. In addition to the clash grouping and report generation noted in previous section the below checklist is a useful guide.
1. Have dates in the diary and outlook invites sent for meetings and model upload dates. 2. Have a set of the latest drawings to hand. 3. Catch-up with the disciplines beforehand, a quick phone call to help focus the meeting. 4. Collate stats on the model, Growth in entities, change in clash percentage. 5. Undertake a Model Review or Health Check on each disciplines model beforehand (See more in this
in the tips and tricks section)
TIP: There is absolutely nothing more useful than having the client involved in this process and attending the meeting. It removes 90% of the petty issues between disciplines and focuses the process.
TIP: If you utilise virtual meetings, always remember to restart your machine 30 minutes prior to the meeting. On occasion virtual meetings do crash. Restarting your PC cleans out the memory and prevents this. NOTE: This tip also applies to presentations (I am speaking from experience)
5.4 Follow Up We have had the meeting, so we are finished now right? WRONG
Remember it is people we are managing through the process, they need a reminder. There are a few final steps to the process that if followed will improve results.
1. Send out minutes from the meeting with actions highlighted 2. Send out clash report and a published NWD of the federated model 3. Update attendees outlook invite to the next meeting with the action list
CO5945 - Introduction to Project Reviews Using Navisworks
33
6 Tips and Tricks
6.1 Keyboard shortcuts Much of the Navisworks workflow is repetitive, knowing keyboard shortcuts makes navigation easier and improves efficiency in your workflow.
The below list is not exhaustive but these are the shortcuts I use consistently.
CTRL + 1 - Turns on Select mode. CTRL + 2 - Turns on Walk mode. CTRL + 3 - Turns on Look Around mode. CTRL + 7 - Turns on Orbit mode. CTRL + A - Displays the Append dialog box. CTRL + D - Toggles Collision mode. CTRL + F - Displays the Quick Find dialog box CTRL + H - Toggles Hidden mode for selected items. CTRL + F2 - Launch Clash Detective
See the below link for more shortcuts.
http://beyonddesign.typepad.com/posts/2012/05/keyboard-shortcuts-for-autodesk-navisworks.html
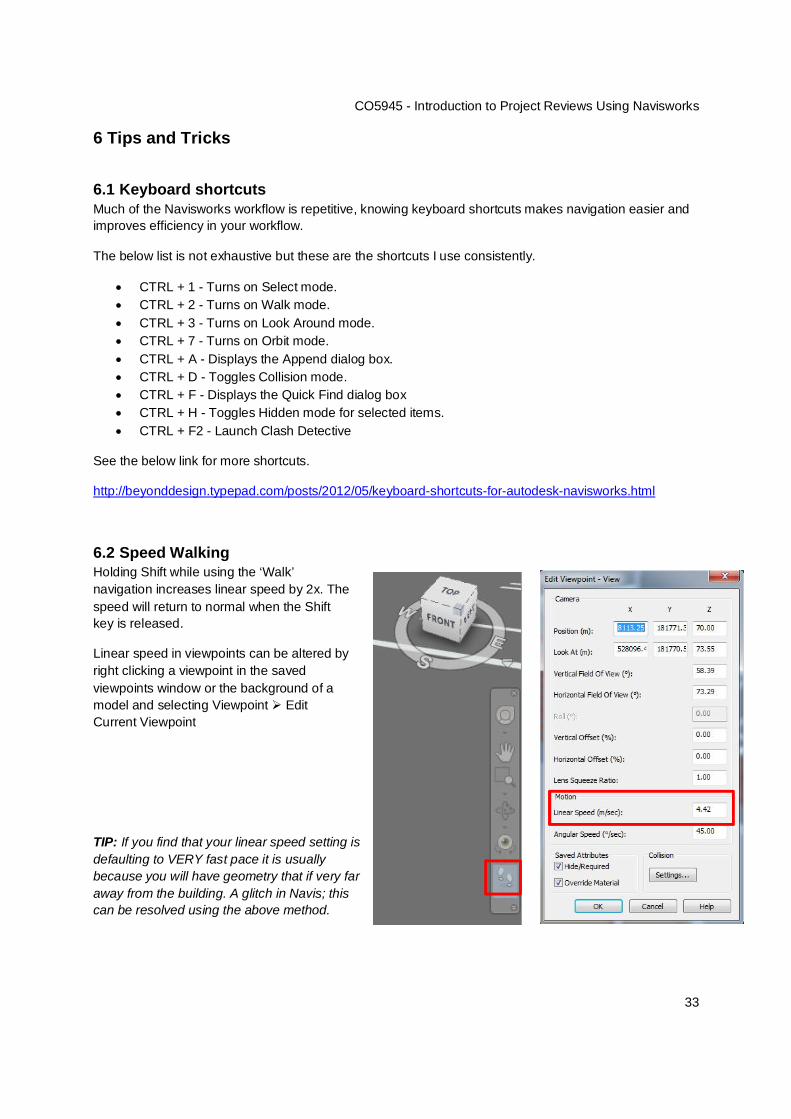
6.2 Speed Walking Holding Shift while using the ‘Walk’ navigation increases linear speed by 2x. The speed will return to normal when the Shift key is released.
Linear speed in viewpoints can be altered by right clicking a viewpoint in the saved viewpoints window or the background of a model and selecting Viewpoint Edit Current Viewpoint
TIP: If you find that your linear speed setting is defaulting to VERY fast pace it is usually because you will have geometry that if very far away from the building. A glitch in Navis; this can be resolved using the above method.
CO5945 - Introduction to Project Reviews Using Navisworks
34
6.3 Sectioning Navisworks provides the ability to create cross sections of a model in a 3D workspace.
Cross sections create a ‘cut view’ which provides visibility of the interior of a model. These cut views can be saved as viewpoints (as discussed in section 3.2).
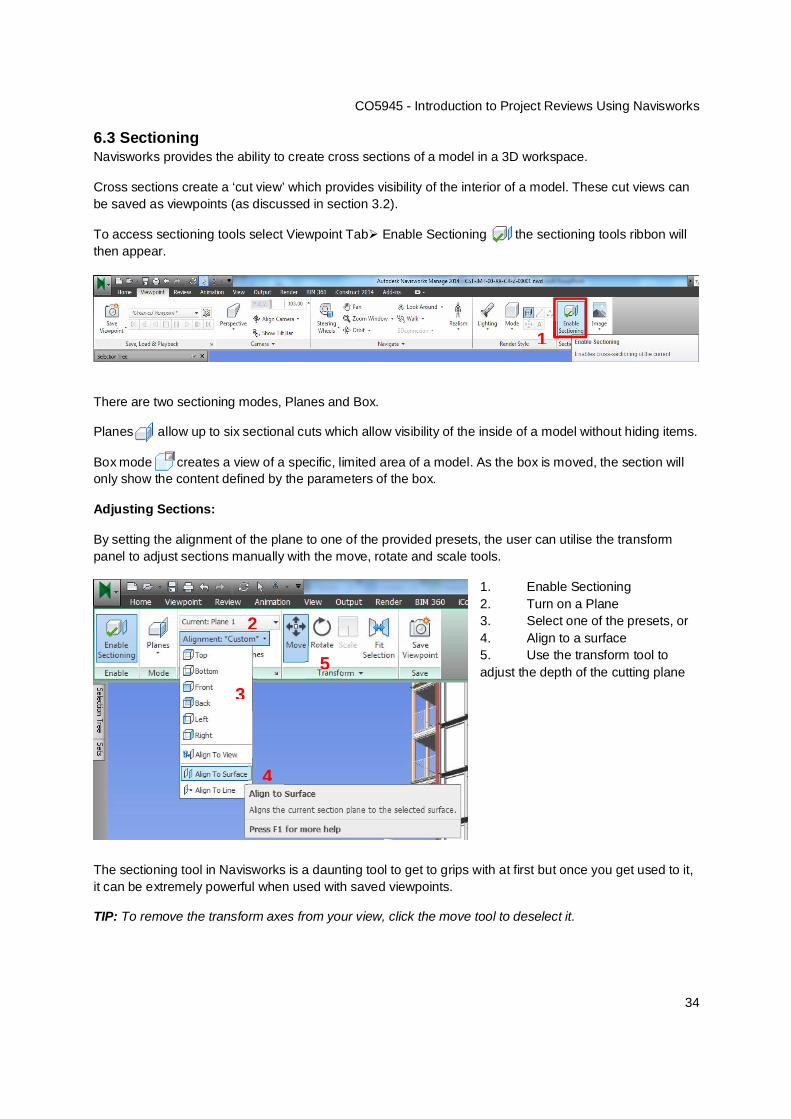
To access sectioning tools select Viewpoint Tab Enable Sectioning the sectioning tools ribbon will then appear.
There are two sectioning modes, Planes and Box.
Planes allow up to six sectional cuts which allow visibility of the inside of a model without hiding items.
Box mode creates a view of a specific, limited area of a model. As the box is moved, the section will only show the content defined by the parameters of the box.
Adjusting Sections:
By setting the alignment of the plane to one of the provided presets, the user can utilise the transform panel to adjust sections manually with the move, rotate and scale tools.
1. Enable Sectioning 2. Turn on a Plane 3. Select one of the presets, or 4. Align to a surface 5. Use the transform tool to adjust the depth of the cutting plane
The sectioning tool in Navisworks is a daunting tool to get to grips with at first but once you get used to it, it can be extremely powerful when used with saved viewpoints.
TIP: To remove the transform axes from your view, click the move tool to deselect it.
1
2
3
4
5
CO5945 - Introduction to Project Reviews Using Navisworks
35
6.4 Split Windows
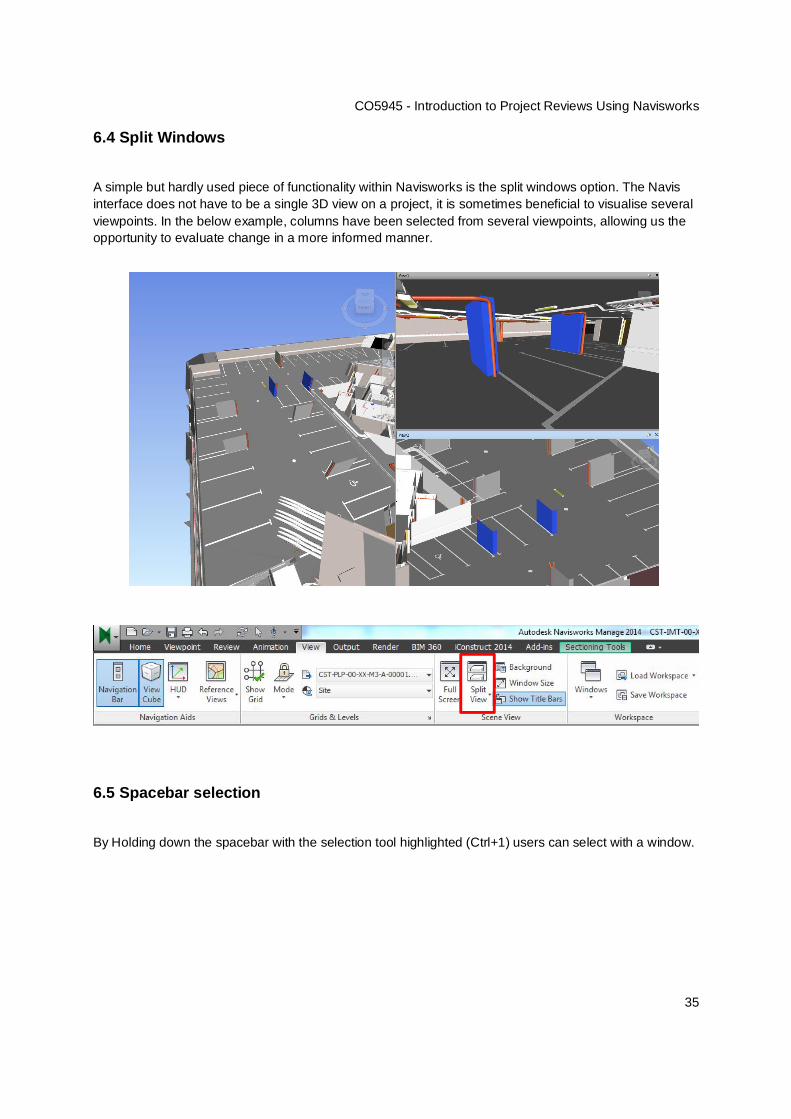
A simple but hardly used piece of functionality within Navisworks is the split windows option. The Navis interface does not have to be a single 3D view on a project, it is sometimes beneficial to visualise several viewpoints. In the below example, columns have been selected from several viewpoints, allowing us the opportunity to evaluate change in a more informed manner.
6.5 Spacebar selection
By Holding down the spacebar with the selection tool highlighted (Ctrl+1) users can select with a window.
CO5945 - Introduction to Project Reviews Using Navisworks
36
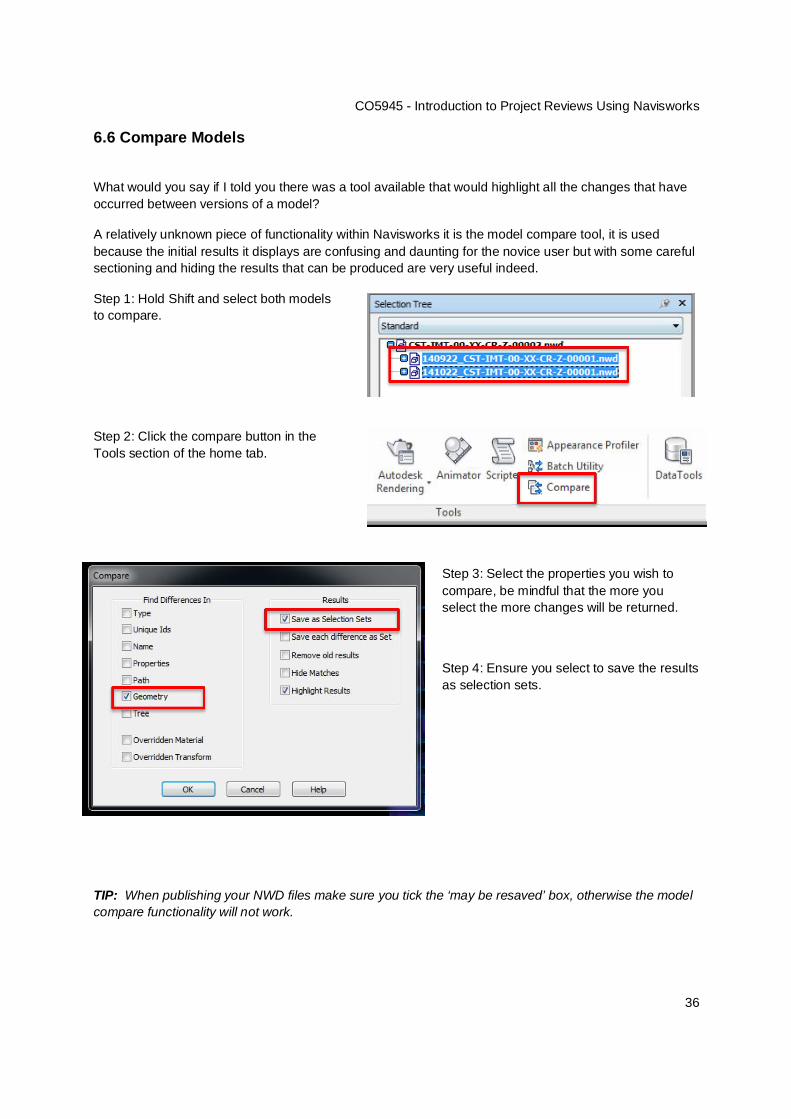
6.6 Compare Models
What would you say if I told you there was a tool available that would highlight all the changes that have occurred between versions of a model?
A relatively unknown piece of functionality within Navisworks it is the model compare tool, it is used because the initial results it displays are confusing and daunting for the novice user but with some careful sectioning and hiding the results that can be produced are very useful indeed.
Step 1: Hold Shift and select both models to compare.
Step 2: Click the compare button in the Tools section of the home tab.
Step 3: Select the properties you wish to compare, be mindful that the more you select the more changes will be returned.
Step 4: Ensure you select to save the results as selection sets.
TIP: When publishing your NWD files make sure you tick the ‘may be resaved’ box, otherwise the model compare functionality will not work.
CO5945 - Introduction to Project Reviews Using Navisworks
37
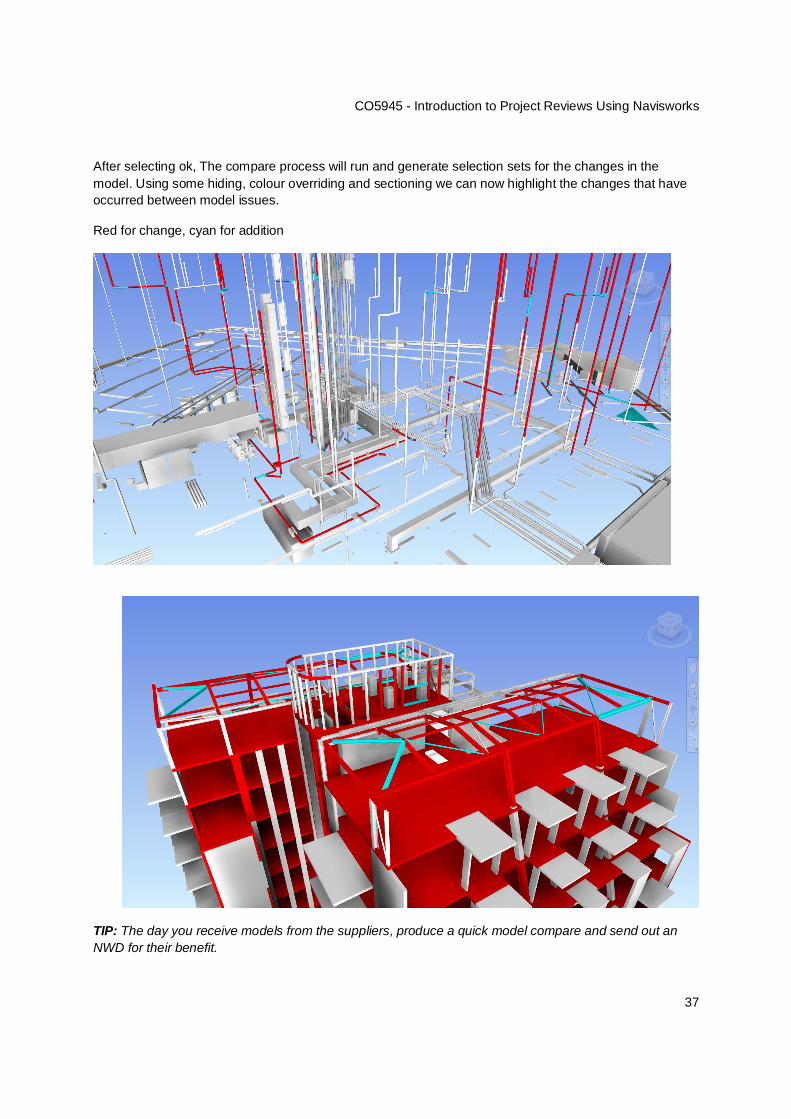
After selecting ok, The compare process will run and generate selection sets for the changes in the model. Using some hiding, colour overriding and sectioning we can now highlight the changes that have occurred between model issues.
Red for change, cyan for addition
TIP: The day you receive models from the suppliers, produce a quick model compare and send out an NWD for their benefit.

CO5945 - Introduction to Project Reviews Using Navisworks
38
6.7 Hidden Elements
It is not always possible to work with teams using Autodesk software, which usually interfaces cleanly with Navisworks. When working on projects with Bentley, ArchiCAD, PDMS or other software, it Is a frequent occurrence to receive useless line work with the model files.
Obviously, the best way to manage this is to use search sets to ‘Hide’ this geometry in views but it can also be beneficial to save these sets in a Hidden Elements folder. By clicking the folder you can now Hide and Unhide (if you wish) all of this geometry in one action.
6.8 Missing Attributes Tip
There is a known bug within Navisworks that will not allow all attributes to be visible if the bottom of the selection tree items are highlighted. If you can’t see the attributes you are looking for try moving up the tree and you may be surprised.
CO5945 - Introduction to Project Reviews Using Navisworks
39
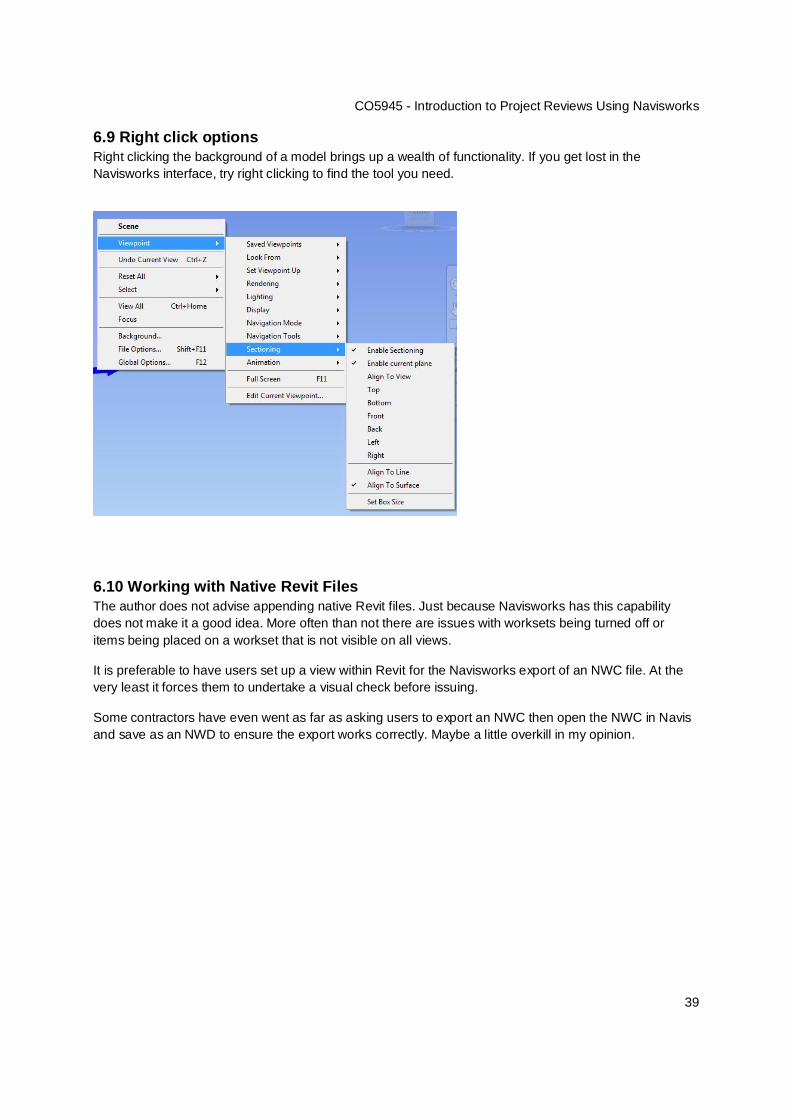
6.9 Right click options Right clicking the background of a model brings up a wealth of functionality. If you get lost in the Navisworks interface, try right clicking to find the tool you need.
6.10 Working with Native Revit Files The author does not advise appending native Revit files. Just because Navisworks has this capability does not make it a good idea. More often than not there are issues with worksets being turned off or items being placed on a workset that is not visible on all views.
It is preferable to have users set up a view within Revit for the Navisworks export of an NWC file. At the very least it forces them to undertake a visual check before issuing.
Some contractors have even went as far as asking users to export an NWC then open the NWC in Navis and save as an NWD to ensure the export works correctly. Maybe a little overkill in my opinion.

CO5945 - Introduction to Project Reviews Using Navisworks
40
6.11 Using Third Person for Space Checking A very quick check for space requirements is to use the Third Person Avatar for space checking. Firstly turn on the third person Viewpoint > Realism > Third person or click Ctrl-T.
1. Edit the viewpoint 2. Select the collision settings 3. Change the height and radius settings to suit your checks 4. To formalise this process you could change the avatar, for example, when the space
requirements are not met the avatar could change to red.
Note: In the example to the right the height is under 1.8m so the avatar changes to a crouching construction worker
1
3
2
4

CO5945 - Introduction to Project Reviews Using Navisworks
41
6.12 Presentation Level Graphics Navisworks is a functional tool not a photorealistic renderer (the rendering tools are getting better). Sometimes you just want a tidy view, you don’t need a render. There are some settings you can change to improve the aesthetics of your view. Application menu > Options > Display
Examples of Standard Settings against new settings. It is not to everyone’s taste and I must admit I leave it on the standard settings 90% of the time but when I need images from presentations or reports, this quality is usually good enough.
Credit for tip: http://beyonddesign.typepad.com/posts/2012/12/tip-autodesk-graphics-in-navisworks.html
1
2

CO5945 - Introduction to Project Reviews Using Navisworks
42
Thanks for reading, I hope you enjoy the class. Feel free to get in touch.
Michael
@_michaelboyd
uk.linkedin.com/in/michaelwboyd/