inventory and ordering strategy guide - epicor1).pdfinventory and ordering strategy guide triad r....
TRANSCRIPT

HHHH ▼ aaaa ▼ rrrr ▼ dddd ▼ gggg ▼ oooo ▼ oooo ▼ dddd ▼ ssss
Inventory and Ordering Strategy Guide
TRIADR

Foreword
This manual contains reference information about Triad’s hardgoods retail software products. The software described in this manual, as well as the manual itself, are furnished under the terms and conditions of a license agreement. The software consists of software options which are separately licensed. It is against the law to copy the software on any medium, or to enable any software options, except as specifically permitted under the license agreement. In addition, no part of this manual may be copied or transmitted in any form or by any means without the prior written permission of Triad.
From time to time, Triad makes changes to its software products. Therefore, information in this manual is subject to change and the illustrations and screens which appear in the manual may differ somewhat from the version of the software provided to you.
Created byLearning Products Development
Copyright © 1994 by Triad Systems Corporation. All rights reserved.
Printed in the United States of America.
Hardgoods Division3055 Triad DriveLivermore, CA 94550-9559
Publication No. 1075154
Revision No. 4614

Contents
Using This Strategy Guide .....1-1
Overview ........................................1-1
The Purpose of This Strategy Guide ...........................................1-2
Who Should Use This Strategy Guide ...........................................1-2
How This Strategy Guide is Organized ....................................1-2
Conventions Used in This Strategy Guide ............................1-3
Using the Training Mode .............1-3
Entering the Training Mode ..............1-4Exiting the Training Mode ...............1-5
Where to Get Help ........................1-6
Setting Up Inventory ...............2-1
Overview ........................................2-1
Introduction ..................................2-2
Adding System-Wide Constants ....................................2-2
Adding the Date Table .................2-4
Adding the Unit of Measure Table ............................................2-5
Adding the Unit of Weight Table ............................................2-6
Adding the Price Rounding Table ........................................... 2-7
Developing a Coding Scheme ..... 2-9
Adding Departments ................. 2-12
Printing a Department List ............ 2-13
Adding Classes ............................ 2-14
Printing a Class List ...................... 2-15
Adding Finelines ........................ 2-15
Printing a Fineline List .................. 2-16
Adding Vendors ......................... 2-17
Printing a List of Vendors .............. 2-20
What You Should Do Now ........ 2-21
Loading Inventory .................... 3-1
Overview ....................................... 3-1
Introduction ................................. 3-2
Determining Location Codes ...... 3-2
Gathering Source Documents ..... 3-5
Using Inventory Load Sheets ...... 3-5
Loading Items ............................... 3-8
Looking at Function IMU .......... 3-13
Checking Your Work ................. 3-16
Changing Item Information ..... 3-17
i

Contents
Loading Non-Merchandise Items ..........................................3-18
Loading Alternate Part Numbers ....................................3-18
Loading Message SKUs ...............3-19
Loading Kit Items .......................3-19
Loading Lumber Items ...............3-20
Suggested Methods for Lumber SKU Numbering ..........................3-20
Conventional Method ....................3-21Advanced Method .........................3-22Suggested Grades ...........................3-22Suggested Finishes and
Treatments .................................3-24
Loading Tally 2 Items .................3-24
What You Should Do Now .........3-25
Managing Inventory ................4-1
Overview ........................................4-1
Introduction ..................................4-2
Special Pricing Structures ............4-2
Quantity Break Pricing .....................4-2Matrix Pricing .................................4-3
Price Changes ................................4-6
Methods of Changing Prices .............4-6Electronic Price Changes ..................4-7Price Books .....................................4-8Inventory Labels .............................4-8
Inventory Flex Reports ................ 4-8
End-of-Month and End-of-Year Procedures .................................. 4-9
What You Should Do Now .......... 4-9
Basic Replenishment Ordering .................................... 5-1
Overview ....................................... 5-1
Introduction ................................. 5-2
Adding Purchasing Constants .... 5-2
Basic Replenishment Ordering ..................................... 5-3
Creating the PO with Report ROR ..... 5-4Modifying the PO ........................... 5-4Printing the PO and Getting It to
the Vendor ................................. 5-5Purging the Purchase Order ............. 5-5
What You Should Do Now .......... 5-6
Classic Replenishment Ordering .................................... 6-1
Overview ....................................... 6-1
Introduction ................................. 6-2
Adding Purchasing Constants .... 6-2
ii
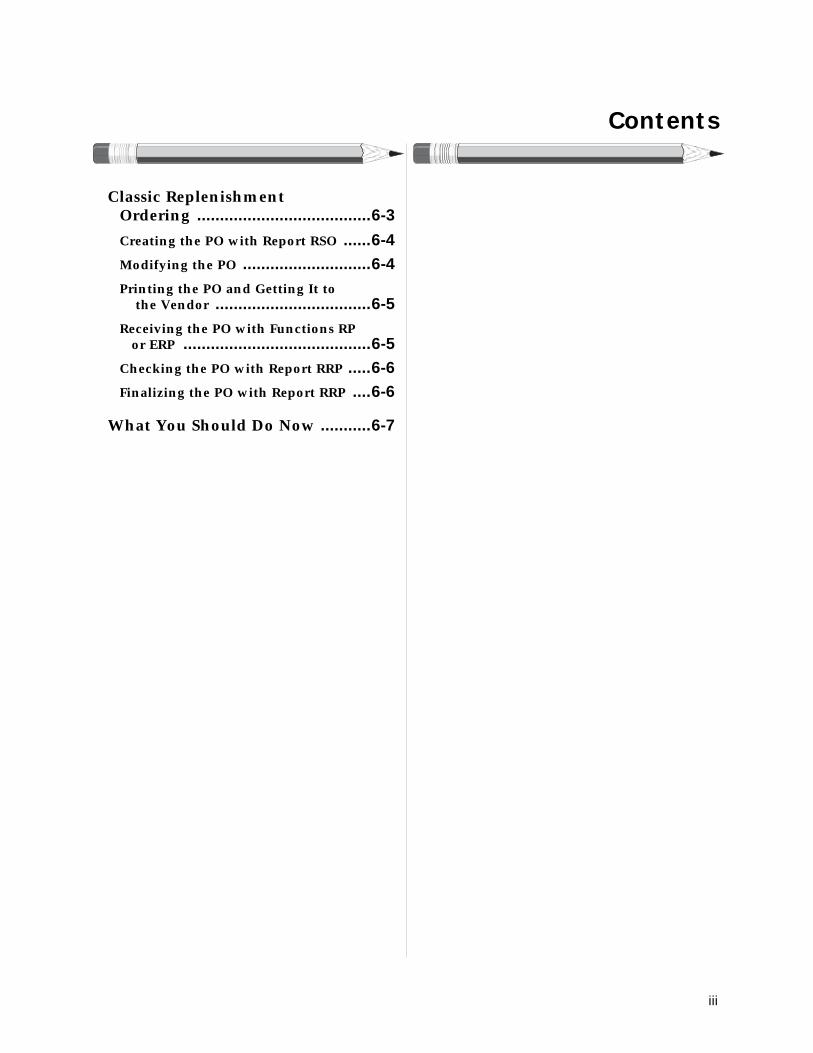
Contents
Classic Replenishment Ordering ......................................6-3
Creating the PO with Report RSO ......6-4Modifying the PO ............................6-4Printing the PO and Getting It to
the Vendor ..................................6-5Receiving the PO with Functions RP
or ERP .........................................6-5Checking the PO with Report RRP .....6-6Finalizing the PO with Report RRP ....6-6
What You Should Do Now ...........6-7
iii

1111
Using This Strategy GuideOverviewThis chapter presents the following information.
The purpose of this guide—page 1-2
Who should use this guide—page 1-2
How this guide is organized—page 1-2
Conventions used in this guide—page 1-3
Using the Training Mode—page 1-3
Where to get help—page 1-6
Overview 1-1

1111
The Purpose of This Strategy GuideThe purpose of the strategy guide is to provide information about the inventory and ordering applications of your Triad system. The strategy guide is designed to be used in conjunction with the Inventory and Ordering Workbook.
The strategy guide does not contain all the information about each function and report and therefore does not replace the other manuals you received.
When you have completed this strategy guide and the workbook, you will have the basic information you need to use your Triad inventory and ordering applications. The strategy guide is purposely short on detail to get you up and running faster.
Who Should Use This Strategy GuideThis guide should be read by anyone with decision-making authority and involved in the areas of setting up and maintaining inventory items, and ordering items.
How This Strategy Guide is OrganizedThis guide includes the following chapters:
➥ 1—Using This Strategy Guide—describes the strategy guide, its structure, and the conventions that help you find the information you need.
➥ 2—Setting Up Inventory—presents information about setting up inventory constants and supporting information before loading inventory.
➥ 3—Loading Inventory—presents information about loading different types of inventory items and running reports.
➥ 4—Managing Inventory—presents information about how to manage pricing, inventory reports, and end-of-month procedures.
➥ 5—Basic Replenishment Ordering—presents information about creating, modifying, and receiving purchase orders for systems with the basic inventory software package.
➥ 6—Classic Replenishment Ordering—presents information about creating, modifying, and receiving purchase orders for systems with the classic inventory software package.
1-2 The Purpose of This Strategy Guide

1111
Conventions Used in This Strategy GuideThe following style conventions help you use the strategy guide and the inventory and purchasing applications more effectively.
Using the Training ModeYou do not need to have access to your Triad system to complete the strategy guide, but it can make the concepts easier to understand. If you are looking at function and report screens while reading the strategy guide, be sure you are in the Training Mode.
It is important that you work in the Training Mode when you are using the workbook, or practicing with this guide. If you are not, you risk changing or losing permanent information that may be set up in the Live Mode.
Live Mode data is the real information on your Triad system, such as your customer names, customer balances, inventory numbers, sales histories, and purchase orders.
Convention Description
Entries Actual entries you type at the ter-minal keyboard appear in bold-face type. For example, type IMU.
Keys The keys you press to perform a function at the terminal appear in boldface type inside angle brack-ets. For example, <Enter>.
Messages The messages and prompts you receive from the Triad system are presented in special type. For example: THIS RECORD HAS BEEN ADDED.
Actions Actions you need to take begin with this symbol: ❖.
Footer At the bottom of every page is a footer. Use this as a guide when looking up information. Look at the bottom of this page to see an example of a footer.
Conventions Used in This Strategy Guide 1-3

1111
Entering the Training ModePrior to entering the Training Mode for the first time you must do the following in Live Mode:
1. Set up a user record in Function MUR.
2. Add bit #125 to the user record in Function MSE.
✹ Only user records with bit #125 can access the Training Mode.
If you need more information about how to use Functions MUR and MSE, refer to your Manager’s POS Workbook, Functions Manual, and Security Guide.
To enter the Training Mode do the following:
1. At the login prompt, type TRAIN.
2. Press <Enter>.
3. Enter your name and password on the Signon Screen.
Your screen will display the message, WOULD YOU LIKE TO INITIALIZE ALL TRAINING FILES?
You have two options:
➥ Type YES to initialize.
or
➥ Press <Enter> to ignore.
Type YES if you want to initialize the Training Mode training files. Initializing will erase any work that you may have done previously in the Training Mode. It will refresh the information in the Training Mode back to the original data needed to complete the workbook.
For example, you would type YES if you have completed the workbook and now one of your co-workers is about to start the workbook exercises.
Press <Enter> to ignore if you do not want to initialize the Training Mode. Ignore initialization if you do not want to erase any of the work you may have done in the Training Mode.
For example, you would ignore initialization if you were in the middle of a chapter and had to exit the Training Mode to go to the Live Mode. When you enter the Training Mode later you do not want to erase any work you have done so far, so you would ignore initialization.
1-4 Using the Training Mode

1111
Your screen will look like this after you typed YES to initialize or pressed <Enter> to ignore:You should see the banner at the top of the screen—APPLICATION TRAINING MODE.
If you do not see that banner, follow the preceding steps for entering the Training Mode.
Exiting the Training Mode
To exit the Training Mode and return to the Live Mode, do the following:
1. At the Main Menu, type Quit.
2. Press <Enter>.
3. At the login prompt, type M.
4. Press <Enter>.
You are now back in Live Mode.
Using the Training Mode 1-5

1111
Where to Get HelpUse the following chart to help you turn to the right source when you have questions.
For questions about Do the following
Inventory Check the Inventory Item Manual, Functions Manual, or Reports Manual.
Pricing Check the Pricing and Promotions Man-ual, Functions Manual, or Reports Manual.
Purchasing Check the Purchasing and Receiving Manual, Functions Manual, or Reports Manual.
Troubleshooting Call Hardgoods Central Support at 1-800-67-TRIAD.
Hardware Call your Field Engineer at 1-800-67-TRIAD.
Installation and training Call your Marketing Representative at 1-800-67-TRIAD.
1-6 Where to Get Help

2222
Setting Up InventoryOverviewYou will learn about the following procedures in this chapter.
Adding system-wide constants—page 2-2
Adding the date table—page 2-4
Adding the unit of measure table—page 2-5
Adding the unit of weight table—page 2-6
Adding the price rounding table—page 2-7
Developing a coding scheme—page 2-9
Adding departments—page 2-12
Adding classes—page 2-14
Adding finelines—page 2-15
What you should do now—page 2-21
Overview 2-1

2222
IntroductionThis chapter presents information about the setup procedures that must be done before you can start loading inventory items into your Triad system.
Adding System-Wide ConstantsUse Function MIC to enter and maintain system-wide constants. The way you fill in the fields on this screen determines the default information the system uses when you add inventory items. For example, if you enter Y at Keep Sales Prices?, the Keep Prices field in the inventory screen (Function IMU) will default to Y.
As you add inventory items (in Functions LOD or IMU), you can change the fields on an item-by-item basis. Answer the fields on this screen as they apply to the majority of your inventory items. This will save you time later when you are loading individual items because the fields will already be filled in for you with the correct information.
This is the Modify Inventory Constants (MIC) Screen.
Before you add the system-wide constants, ask yourself the questions that follow. Then look for your answer. Based on your answers, add your system-wide constants.
2-2 Introduction

2222
❖ Do you value your inventory at replacement or average cost?
The Function MIC field–Cost Used In Calculation.
❖ When you order items, do you include promotion sales?
The Function MIC field–Count Promotional Sales In Sales History.
If your answer is Then
Replacement The system will use replacement cost on the end-of-day reports. The system cal-culates all gross profit figures based on replacement cost.
Average The system will use average cost on the end-of-day reports. The system calcu-lates all gross profit figures based on average cost. The system always updates this cost during receiving. Until you begin purchasing and receiving, average cost and replacement cost will be the same.
You’re not sure Ask your accountant how you should answer this question.
If your answer is Then
Yes The system adds the regular and promo-tion sales together. This means you reor-der based on all sales of the item.
Then you might want to enter Y in the Keep Expanded Promo Data? field. Then you will have an option when calculat-ing reorder information to exclude pro-motion sales. The expanded information is kept and can be viewed in Function ISH.
No The system keeps the regular and pro-motion sales separate. This means you reorder based on regular sales.
Adding System-Wide Constants 2-3

2222
❖ Do you need more than 13 months of sales history for any of your items?
The Function MIC field–Keep Expanded Sales History.
If you have questions about Function MIC, refer to your Functions Manual, and Inventory Item Information Manual, the tabbed section, “Setting Up Inventory Constants.”
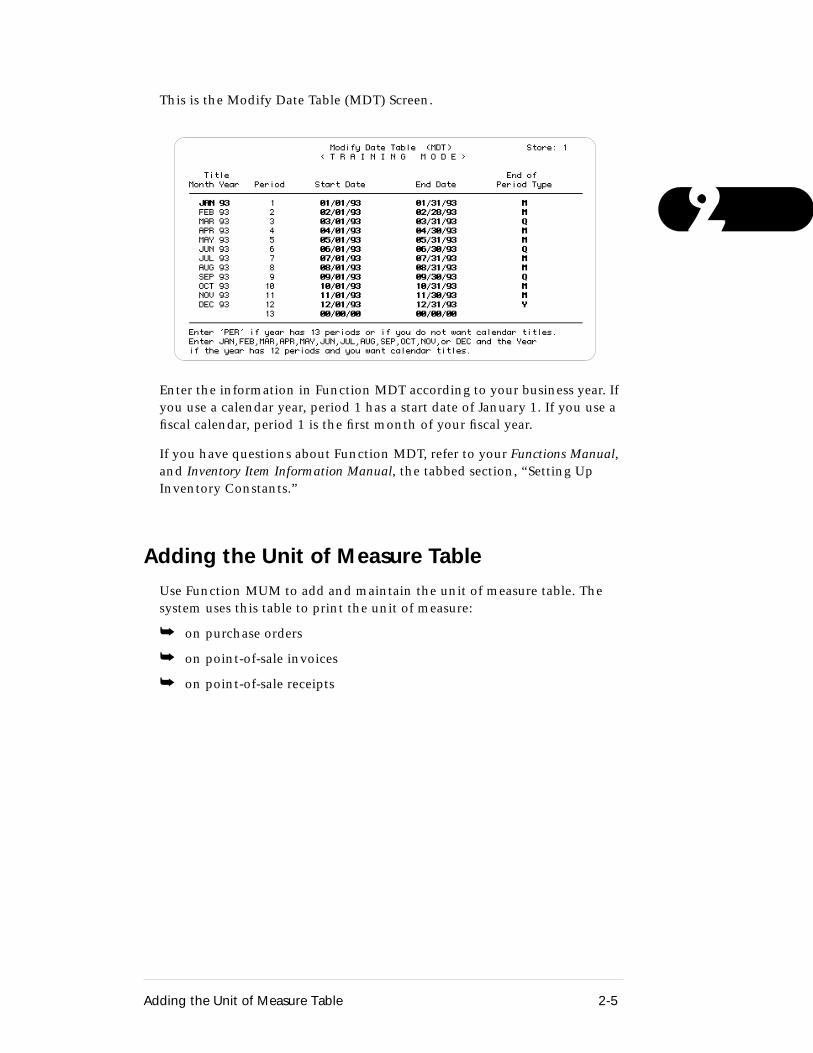
Adding the Date TableUse Function MDT to enter and maintain your date table. The system uses the date table to:
➥ determine if the last day of the month is month-end, quarter-end, or year-end
➥ calculate annualized (projected) sales
➥ calculate order points for purchasing
Once you set up Function MDT, you will only change this screen once a year, after you close out your year-end.
If your answer is Then
Yes But not for the majority of your items, then leave the default of N in this field. For the items that you want to keep additional sales history on, answer this field with a Y in the item record in Function IMU.The system will then keep an additional 13 months of sales history for the item. You can view the information in Func-tion ISH.
No Then leave the default of N in this field.
2-4 Adding the Date Table
2222
This is the Modify Date Table (MDT) Screen.
Enter the information in Function MDT according to your business year. If you use a calendar year, period 1 has a start date of January 1. If you use a fiscal calendar, period 1 is the first month of your fiscal year.
If you have questions about Function MDT, refer to your Functions Manual, and Inventory Item Information Manual, the tabbed section, “Setting Up Inventory Constants.”
Adding the Unit of Measure TableUse Function MUM to add and maintain the unit of measure table. The system uses this table to print the unit of measure:
➥ on purchase orders
➥ on point-of-sale invoices
➥ on point-of-sale receipts
Adding the Unit of Measure Table 2-5

2222
This is the Unit of Measure Table Maintenance (MUM) Screen.
Review the table, and add other units of measure appropriate for your business.
The first code of the table (in this case EA), is the system default. As you add items to your Triad system, EA will be the unit of measure default for each item. You can change this on an item-by-item basis.
When adding items, your Triad system will verify that the unit of measure you add to an item is set up in Function MUM. Therefore, a record of every unit of measure you use in your business must be set up in Function MUM before you try to add it to an item in Functions LOD or IMU.
If you have questions about Function MUM, refer to your Functions Manual, and Inventory Item Information Manual, the tabbed section, “Setting Up Inventory Constants.”
Adding the Unit of Weight TableUse Function MUW to add and maintain the unit of weight table. The system uses this table to print the unit of weight on purchase orders.
2-6 Adding the Unit of Weight Table

2222
This is the Unit of Weight Table Maintenance (MUW) Screen.
If your vendors offer discounted freight costs for orders weighing a certain amount, you may want to fill in the weight and unit of weight when you add inventory items.
Some FastStart™ tapes contain the weight and unit of weight for each item.
The units of weight that you will use in your business are probably represented in the table. You can add other units of weight if needed.
If you have questions about Function MUW, refer to your Functions Manual, and Inventory Item Information Manual, the tabbed section, “Setting Up Inventory Constants.”
Adding the Price Rounding TableUse Function PRO to increase your margins. If you let the system calculate the retail price, it rounds the retail up to the next price point.
Adding the Price Rounding Table 2-7

2222
This is the Price Rounding (PRO) Screen.
Here is an example of how you can increase your margins by using the price rounding table.
You have an item that costs $5.27, and you want to make a gross profit of 50%. The retail (without using price rounding) is $10.54. Using the price rounding table, the retail is $10.69—a difference of 15 cents.
The following table provides more examples of how price rounding can help you increase your margins.
In the previous examples, the gross profit of all the items increase just by letting the system calculate the retail price and round the pennies according to your price rounding table.
After you add a price rounding table, ask yourself the questions that follow. Then look for your answer. Use your answers to help you enter price rounding information for items.
Cost Desired GP% Retail PRO Retail Actual GP%
.20 50 .40 .45 55.56
2.50 50 5.00 5.19 51.83
10.45 50 20.90 20.99 50.21
2-8 Adding the Price Rounding Table

2222
❖ Does the vendor print price stickers for you?
You can override price rounding for an item by:
➥ typing in the retail for an item in Functions LOD or IMU—instead of letting the system calculate it
➥ changing the Function IMU field, Price Rounding (found on the Codes Screen), from a value of 1 (use price rounding) to a value of 2 (calculate the pennies to two decimal places and do not use price rounding)
You can use Function RICU to change the price rounding field.
If you have questions about Function PRO, refer to your Functions Manual, and Inventory Item Information Manual, the tabbed section, “Setting Up Inventory Constants.”
Developing a Coding SchemeBefore you can begin adding your inventory items into your system, you must:
➥ develop a department, class, and fineline coding scheme
➥ add the departments, classes, and finelines into your system
If you will use a FastStart tape to add your primary vendor’s inventory items, the department, class, and fineline scheme may be on the tape. However, you should read this section in case you want to change your primary vendor’s scheme.
Before you develop your scheme, you must have a basic understanding of departments, classes, and finelines. A department is the broadest or most general way of grouping items together. A class is a breakdown of a given department. A fineline is a breakdown of a given class.
If your answer is Then
Yes If you use your vendor’s variable pricing scheme, the retail price in the system may not match the price on the stickers if the items use price rounding.
For the vendors items turn off price rounding in Function IMU.
No You can print your own price stickers on your system with price rounded prices.
Developing a Coding Scheme 2-9

2222
The following illustration provides an example of this concept.
In the example, paint is the department, exterior and interior are the classes, and latex, enamel, and semi-gloss are the finelines.
Before you develop your scheme, ask yourself the following key questions. Then look for your answer. Your answers will help you develop a scheme for your business.
❖ How do you want to see your sales information?
Once you start using point-of-sale, the system will provide a daily sales breakdown by department.
If your answer is Then
By broad groups (for example, paint, tools, plumbing)
Make sure you break your inventory down into enough departments so you can review sales of these groups on a daily and monthly basis.
By specific groups (for example, interior paint and exterior paint)
Make sure you break your inventory down into enough departments so you can review sales for these groups on a daily and monthly basis.
Paint
Exterior Interior
Latex Enam el
Dept
Class Class
Fineline Fineline Fineline
Semi-gloss
2-10 Developing a Coding Scheme

2222
❖ Do you currently have a department, class, and/or fineline scheme?
Notice that the department, class, and fineline numbering scheme stayed consistent throughout the previous examples. To do this:
➥ determine the departments
➥ add a zero to the department number for the first class
➥ add a zero to the class number for the first fineline
If you need more than 10 classes per department, but will have only nine numerical departments (1,2,...,8,9) use the following scheme:
If your answer is Then
Yes Make sure your scheme will give you the information you want. You may want to expand it so you can gather more detailed information.
No You may want to use the following scheme.
Department Class Fineline
1 10-19 100-199
2 20-29 200-299
3 30-39 300-399
11 110-119 1100-1199
37 370-379 3700-3799
FR (Freight)
LA (Labor)
Department Class Fineline
1 100-199 1000-1999
2 200-299 2000-2999
3 300-399 3000-3999
FR (Freight)
LA (Labor)
Developing a Coding Scheme 2-11

2222
Notice that the department, class, and fineline numbering scheme stayed consistent throughout the previous examples. To do this:
➥ determine the departments
➥ add two zeros to the department number for the first class
➥ add a zero to the class number for the first fineline
You can use numbers or letters for departments, classes, and finelines. Keep in mind there are some pre-built queues (series of reports) that rank your inventory by department. They use numeric departments. If you want to use the pre-built queues, use the numeric department scheme.
Every item must be in a department. However, it does not have to be in a class or fineline. If you choose not to have classes or finelines, make sure you break your inventory down into enough departments so you can review sales for these groups on a daily and monthly basis.
If you have questions about Functions MDE, MCL, and MFI, refer to your Functions Manual, and Inventory Item Information Manual, the tabbed section, “Setting Up Inventory Constants.”
Adding DepartmentsUse Function MDE to add and maintain your departments. If you use a FastStart tape, it may include your primary vendor’s departments. Loading the tape will add the departments to your system.
Function MDE has two screens. Screen C (current year) keeps the first year of sales and purchase history.
This is the Modify Department File (MDE) Current Year Screen.
2-12 Adding Departments

2222
When adding departments, if you do not fill in the Standard Gross Profit % field, it will default (fill in for you) to the value of the Minimum Gross Profit % field in Function MIC.
Point-of-Sale updates the ***Sales*** columns. A finalized receiving report (Report RRP, Option F) updates the ***Purchases*** columns.
Optionally, you can use the Sales Forecast column to enter a sales forecast figure at the beginning of the month and track actual sales against it.
Screen L (last year) keeps last year’s sales and purchase history.
This is the Modify Department File (MDE) Last Year Screen.
At the end of each month, the system shifts the sales and purchase history. For example, the current period data shifts to period 2, period 2 data shifts to period 3, and so on. You can run reports that compare your current month’s sales or purchases with any other month- or year-to-date sales or purchase history.
Printing a Department List
Use Report RDE to print a list of your departments.
Adding Departments 2-13

2222
This is the Department Report (RDE) Screen.
Run Report RDE with Report Format N (for no history) after you have entered your departments. Review the report to be sure all the departments you need for loading inventory are entered.
Keep a copy or two of this report to refer to when you are loading inventory items.
Adding ClassesUse Function MCL to add and maintain your classes. If you use a FastStart tape, it may include your primary vendor’s classes. Loading the tape will add the classes to your system.
This is the Modify Class Record (MCL) Screen.
2-14 Adding Classes

2222
When adding classes, entering a value in the Gross Profit % field is not required.
The Sales and Purchases columns are updated by point-of-sale and purchasing in the same way as Function MDE.
Your Triad system keeps up to one year of sales and purchase history for classes.
You do not have to assign a class to every inventory item.
Printing a Class List
Use Report RCL to print a list of your classes.
This is the Class Report (RCL) Screen.
Run Report RCL with Report Format N (for no history) after you have entered your classes. Review the report to be sure all the classes you want for loading inventory are entered.
Keep handy a copy or two of this report to refer to when you are loading inventory items.
Adding FinelinesUse Function MFI to add and maintain your finelines. If you use a FastStart tape, it may include your primary vendor’s finelines. Loading the tape will add the finelines to your system.
Adding Finelines 2-15

2222
This is the Modify Fineline Record (MFI) Screen.
The Sales and Purchases columns are updated by point-of-sale and purchasing in the same way as Function MDE.
Your Triad system keeps up to one year of sales and purchase history for finelines.
Notice that there is no GP% field in Function MFI, so there is no gross profit control for finelines like there is with departments and classes.
You do not have to assign a fineline to every inventory item.
Printing a Fineline List
Use Report RFI to print a list of your finelines.
2-16 Adding Finelines

2222
This is the Fineline Report (RFI) Screen.
If you are using finelines, run Report RFI with Report Format N (for no history) after you have entered your finelines. Review the report to be sure all the finelines you want for loading inventory are entered.
Keep a copy or two of this report to refer to when you are loading inventory items.
Adding VendorsUse Function MVR to add and maintain your vendors. If you use a FastStart tape to add the inventory items of your primary vendor, the vendor record information may be on the tape. If it is, it will contain vendor information for all of the manufacturers your primary vendor stocks in the warehouse.
You must enter a record for your primary vendor along with records for any other vendors you purchase from.
The system uses the vendor records when you:
➥ add inventory items
➥ order and receive items
➥ use the Accounts Payable application
Function MVR has two screens. Screen S (Standard) is the basic information about the vendor, such as name, address, and lead time.
Adding Vendors 2-17

2222
This is the Vendor File Maintenance (MVR) Standard Screen.
Screen H is the History Screen.
This is the Vendor File Maintenance (MVR) History Screen.
The information in the top section of the History Screen comes from Screen S. The Accounts Payable application updates the Accounts Payable History section. A finalized receiving report (Report RRP, Option F) updates the Purchasing History section.
Before you add your vendors, ask yourself the following key questions. Then look for your answer. Use your answers to help you add your vendors.
2-18 Adding Vendors

2222
❖ Will you use numbers or letters to identify your vendors?
The Function MVR field—Vendor Code.
❖ Will you use the Accounts Payable program?
The Function MVR fields—Address and Terms Code.
❖ Does the vendor have specific amounts that you must purchase with each order?
The Function MVR fields—Minimum Dollars, Minimum Weight, Minimum PO Line Amt, Minimum Units, Minimum Bill Amt $.
If your answer is Then
Numbers You will need to keep a vendor list handy, so you can identify the vendor that corresponds to each number.
Letters Letters can be easier to remember. For example, if Georgia Pacific is one of your vendors, a code of GP may be eas-ier to remember than a number.
If your answer is Then
Yes Use the Remit To address on the ven-dor’s invoice to fill in the Address fields. The system prints this address on your Accounts Payable checks.
No Fill in the address information for your reference.
If your answer is Then
Yes Then fill in the minimum field(s) that apply.
No Leave these fields blank.
Adding Vendors 2-19

2222
❖ Will you transmit (use phone lines to send information) your purchase orders to your vendor(s)?
If you have questions about Function MVR refer to your Functions Manual, and Inventory Item Information Manual, the tabbed section, “Setting Up Inventory Constants.”
Printing a List of Vendors
Use Report RVE to print a list of your vendors.
This is the Vendor Report (RVE) Screen.
Run Report RVE after you have entered your vendors. Review the report to be sure all the vendors you need for loading inventory have been entered. Keep a copy or two of this report handy to refer to when you load items.
If you have questions about Report RVE refer to your Reports Manual, and Inventory Item Information Manual, the tabbed section, “Setting Up Inventory Constants.”
If your answer is Then
Yes Enter your customer number for this vendor in the Assigned Customer Num-ber field.
No This field is optional. You can still fill in your customer number for this vendor for your reference.
2-20 Adding Vendors

2222
What You Should Do NowNow that you have completed this chapter, you are ready to complete the setup procedures described in this chapter. Make sure you and the person responsible for setting up inventory on your Triad system complete the Inventory and Ordering Workbook, chapter 2, Setting Up Inventory.
What You Should Do Now 2-21

2222
2-22 What You Should Do Now

3333
Loading Inventory
OverviewYou will learn about the following procedures in this chapter.
Gathering source documents—page 3-5
Using inventory load sheets—page 3-5
Loading items—page 3-8
Checking your work—page 3-16
Changing item information—page 3-17
Loading non-merchandise items—page 3-18
Loading alternate part numbers—page 3-18
Loading message SKUs—page 3-19
Loading kit items—page 3-19
Loading lumber items—page 3-20
Determining location codes—page 3-2
Loading Tally 2 items—page 3-24
What you should do now—page 3-25
Overview 3-1

3333
IntroductionThis chapter presents information to help you load inventory.
The inventory that you load can be grouped as follows:
➥ General items–hardware items such as tools, paint, and plumbing
➥ Bulk items–such as nuts, bolts, wire, rope, and chain
➥ Special items–such as Freight or Labor
➥ Message items–SKUs that may require consumer information at point-of-sale such as paint, toxic products, and wallpaper
➥ Kit items–a collection of merchandise sold as one item, such as a paint kit that includes brushes, roller, and tray
➥ Tally 1 items–an SKU for an item that you stock and sell in different lengths, such as molding, and do not track the quantity on hand for each individual length
➥ Lumber items–such as dimensional lumber, boards, and timbers
➥ Tally 2 items–an SKU for an item that you stock and sell in different lengths, such as lumber, and do track the quantity on hand for each individual length
➥ Departmental items–a generic item number for a department, used to sell items that do not have their own individual SKU number
Determining Location CodesOne of the features of your Triad system is that you can assign a location code to an inventory item. Location codes become important when you run reports to analyze inventory, to create purchase orders, and to take physical inventories. For example, you can run a suggested order report that lists the items in location code order. Then you can walk the floor and easily check the items on the order against the merchandise on the shelf.
Before you begin entering inventory, develop a location code scheme based on a layout of your store plan.
3-2 Introduction

3333
❖ How to determine location codes
1. Sketch out the floor plan of your store.
2. On the floor plan, evenly section out all areas of your store such as aisles and walls (a 4’ section is usually a good length).
3. Assign a code to each section.
4. Keep the codes the same number of digits—you have up to five digits available, but you do not have to use all five.
5. Keep the codes the same mix of alpha, numeric, or alpha- numeric—in other words, keep all your location codes numeric (such as 1234), or alpha (ABCD), or alpha-numeric (A123)—but do not have a mix where some codes are alpha and some are numeric.
On the next page you will find an example you can use when sketching out a floor plan and determining location codes for your store. Make copies of your final floor plan with location codes for the people who will be entering inventory into your Triad system.
Determining Location Codes 3-3

3333
Sample Location Code Floor Plan
OFFICES
STORAGEAREA
RECEIVINGAREA
Check Out
W07 W08
W06
W05
W04
W09
W03 W02
W01
D01 C01 B01 A01
A04B04C04D04
A02
A03
A05
A06
B02
B03
B05
B06
C02
C03
C05
C06
D02
D03
D05
D06
E01 E04
F01 F04
G01 G04
H01 H04
E02 E03
E06 E05
F02 F03
F06 F05
G02 G03
G06 G05
H02 H03
H06 H05
I01
I02
I03
I04
I05
I06
J01
J02
J03
J04
J05
J06
K01
K02
K03
K04
K05
K06
L01
L02
L03
L04
L05
L06
3-4 Determining Location Codes

3333
Gathering Source DocumentsThe first step in loading inventory is to gather “documents” that will give you source information for inventory items. Source information includes the following:
➥ SKU number
➥ item description
➥ pricing information
➥ stocking information
There are many sources from which you can gather the information that you will need to load your inventory into your Triad System.
These sources include:
➥ Triad FastStart™ tape
➥ vendor catalogs
➥ vendor invoices
➥ actual inventory items
FastStart tapes are the quickest way to load a large amount of inventory from your primary vendor. Check with your Triad Representative to see if a FastStart tape is available for your vendor. If you use a FastStart tape find out exactly what is included on the tape. Ask the following questions:
➥ Does it include all the items from the vendor, or just the ones you have purchased?
➥ Does it include other information besides items, such as departments, classes, finelines, or vendors?
➥ Is it a Lumber FastStart tape?
Using Inventory Load SheetsYou can use the source documents that you gather in two ways:
➥ transfer the needed information to Inventory Load sheets
or
➥ load the information from them directly into your Triad system
Inventory Load sheets are useful when the person loading the inventory into your Triad system does not have the authority or the knowledge to make decisions about the information being loaded. You can fill out the load sheets with the correct information, then pass them on to the person who will be keying in the information.
Gathering Source Documents 3-5

3333
Blank Inventory Load sheets can be found on the following pages. These blank sheets are your masters. Use them to make copies that you can use when loading items.
3-6 Using Inventory Load Sheets

3333
d
Ord
er
Mu
ltSt
kU
MP
ur
UM
Ret
ail
Co
stG
P%
Inv
ento
ry L
oa
d S
hee
t
Dep
tC
lass
Loc
Des
crip
tio
nP
rim
e V
end
Mfg
V
end
Sec
Ven
dM
fg
Par
t#St P
k
Using Inventory Load Sheets 3-7
SKU

3333
Loading ItemsUse Function LOD (Inventory Item Load) to quickly enter and access basic information about an inventory item. For each item, you get immediate access to vital information such as quantity on hand, replacement cost, retail price, order multiple, and location.
This is the Inventory Item Load (LOD) Screen.
❖ Looking At Function LOD Fields
Before you add inventory items you need to understand the fields in Function LOD. Use the table that follows to review most of the fields found in Function LOD.
The table shows the exact name of the field as found in Function LOD and then information about the field such as:
➥ the complete field name–sequence number for Seq #
➥ if the field is required when adding an item
➥ the size and type of the field–14 a/n means up to 14 characters, alphabetic or numeric
➥ any prerequisites for the field–if it needs to be set up first in another function
3-8 Loading Items

3333
The field Information about the field
SKU Stock Keeping Unit, required, 14 a/n. Use your primary vendor’s item num-ber.If your primary vendor does not stock the item, use the manufacturer’s num-ber, the UPC code, or make up your own number. Do not use the same number of digits as your primary ven-dor’s items. If a SKU number conflicts with a primary vendor SKU number, consider changing it by adding a single alpha character to the beginning of the SKU.The SKU number is what you will key in at point-of-sale to sell the item. Keep the number as short and as simple as possible.
Dept Department, required, 2 a/n.Code must first be set up in MDE.
Class 3 a/n.Code must first be set up in MCL.
Fineline 6 a/n.Code must first be set up in MFI.
Loc Location, 5 a/n.Extremely useful field.
Descript Description, 32 a/n.Prints on reports and on point-of-sale invoices and receipts.
Seq # Sequence number, 14 a/n.Required, but you do not have to fill it in—it will default to SKU.Used on reports to place items in a dif-ferent order.Use Seq # when you want a group of items (whose SKUs are not consecutive) to print together on a report. You can use the same sequence number on more than one SKU.
Rec Type Record Type, required, H/L.Defaults to H, which is used for all items except for lumber items. Change Rec Type to an L when loading lumber SKUs.
Loading Items 3-9
3333
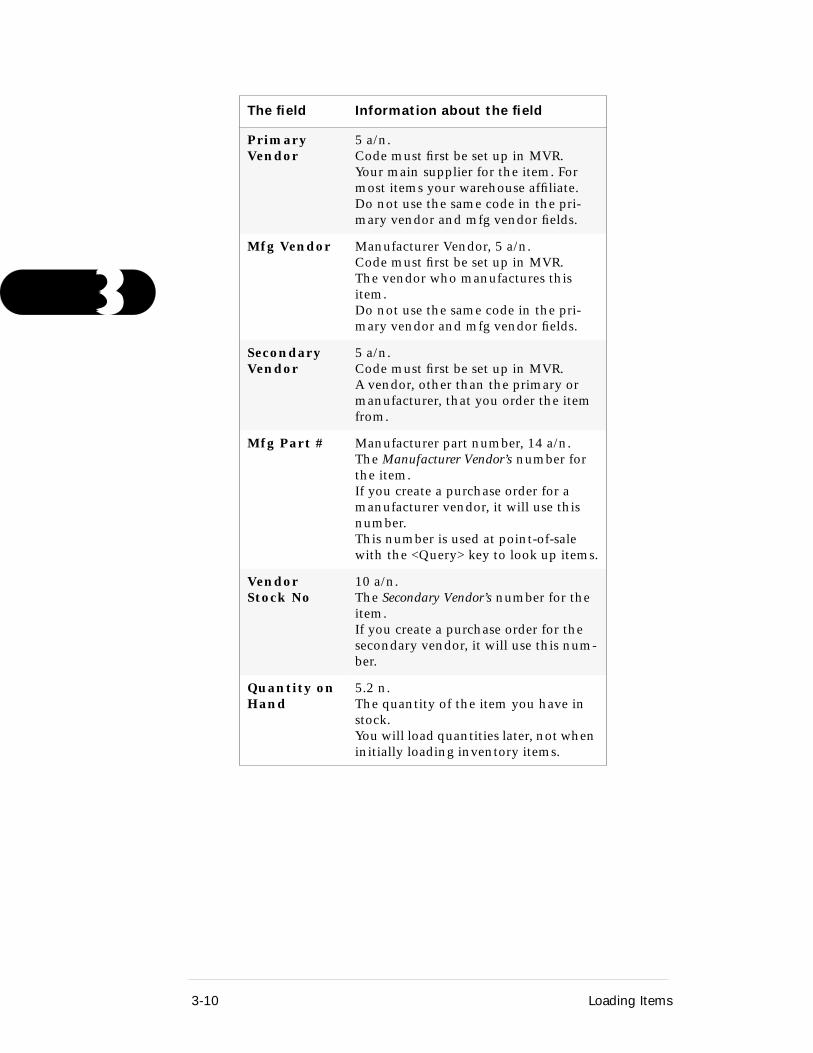
Primary Vendor
5 a/n.Code must first be set up in MVR.Your main supplier for the item. For most items your warehouse affiliate.Do not use the same code in the pri-mary vendor and mfg vendor fields.
Mfg Vendor Manufacturer Vendor, 5 a/n.Code must first be set up in MVR.The vendor who manufactures this item. Do not use the same code in the pri-mary vendor and mfg vendor fields.
Secondary Vendor
5 a/n.Code must first be set up in MVR.A vendor, other than the primary or manufacturer, that you order the item from.
Mfg Part # Manufacturer part number, 14 a/n.The Manufacturer Vendor’s number for the item.If you create a purchase order for a manufacturer vendor, it will use this number.This number is used at point-of-sale with the <Query> key to look up items.
Vendor Stock No
10 a/n. The Secondary Vendor’s number for the item.If you create a purchase order for the secondary vendor, it will use this num-ber.
Quantity on Hand
5.2 n.The quantity of the item you have in stock. You will load quantities later, not when initially loading inventory items.
The field Information about the field
3-10 Loading Items

3333
Order Point 5 n.Used in purchasing. Can be set by Report ROP, or manually entered.Report ROR uses this field as a reorder indicator—how many must be sold at point-of-sale before the item should be reordered.Report RSO uses this field as the mini-mum number you want to have on hand. The quantity on hand must fall below this number before the RSO will suggest an order. Check with your Triad Representative about how you should interpret this field.
Maximum Stk Level
This is an advanced purchasing field. You can ignore it for now.
Standard Package
5 n, defaults to 1.Used in purchasing.This is the quantity of the item that you buy from the Manufacturer Vendor. The quantity is in terms of stocking units. So, if you stock this item by the piece, and you must order 1 case of 24 from the manufacturer vendor, then enter 24 in this field.
Min # of Std Pkgs
Minimum number of standard pack-ages, 5 n, defaults to 1.Used in purchasing.The minimum number of purchasing units you must buy from the Manufac-turer Vendor.So, if you purchase this item by the case, and you must order a minimum of 5 cases from the manufacturer ven-dor, then enter 5 in this field.
Order Multi-ple
5 n, defaults to 1.Used in purchasing.This is the quantity of the item that you buy from the Primary Vendor. The quantity is in terms of stocking units. So, if you stock this item by the piece, and you order this item by the piece, enter 1 here.
Stocking Unit
2 a, defaults to EA.Code must first be set up in MUM.This is how the item is stocked in your store.
The field Information about the field
Loading Items 3-11

3333
Purchase Unit
2 a, defaults to EA.Code must first be set up in MUM.This is how you buy this item.
Weight 5 n, 2 a, defaults to LB.Code must first be set up in MUW.Used in purchasing.This is a two-part field. First you indi-cate the weight per stocking unit, then the weight code. For example, 9 OZ.
Retail Price 4.3 nThe price you normally sell this item for in terms of pricing units. It is the default price used at point-of-sale.
Cost 4.3 nThe latest replacement cost per stocking unit.
Pricing Unit 2 aCode must first be set up in MUM.The unit of measure that corresponds to the retail price.
Desired Gross Profit
2.2 nThe gross profit you would like to make on the sale of the item.If you do not fill in this field, the sys-tem calculates it based on retail and cost. If retail or cost are left blank, then the system uses the Desired GP to cal-culate the missing field.
User Codes Use this field to specially tag items based on a criteria you define. You can then run reports to include or exclude user codes.Each space in the field is unique. So a field of _A__, is different from a field of ___A.
Discount-able
Y/N, default is Y.Set this field to No if you do not want additional discounts given on the item.
The field Information about the field
3-12 Loading Items

3333
Keep in mind the information about the fields in Function LOD as you enter items. Every item will not require every field to be filled in, but it is important to understand each field and how it is used. This way, you will not have to go back and change information after items have been loaded.
If you have questions about Function LOD, refer to your Functions Manual, and Inventory Item Information Manual, the tabbed section, “Loading Inventory.”
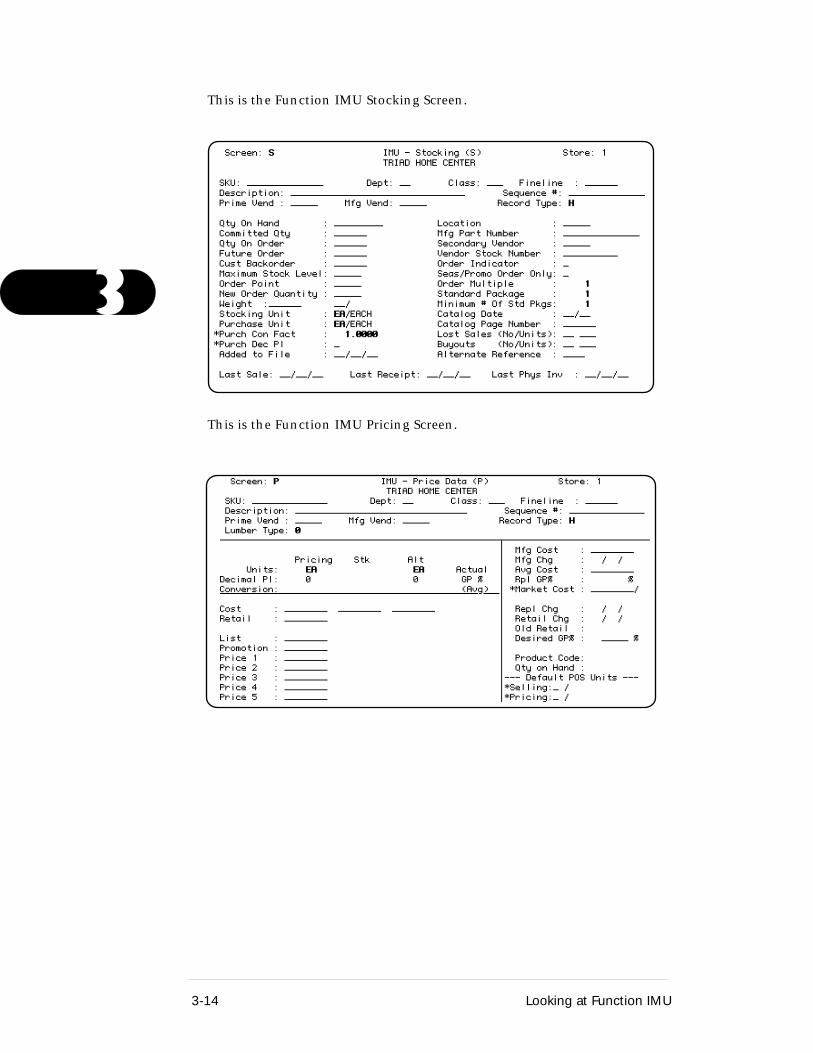
Looking at Function IMUFunction IMU (Item Master Update) contains the complete information about each inventory item.
Unlike Function LOD, Function IMU has multiple screens: Stocking, Pricing, Codes, History, and Vendor. Use the <Next Screen> key to move to the different screens, or you can press the <Home> key and type in the first letter of the screen you want to go to.
Print Price Labels
1/B/N/P/Q/Y/Z, default is Y.Indicates the type, number, and infor-mation that prints on a label for the item. 1—1 item label with priceB—bin label onlyN—no labelsP—item labels with purchase unit price and bin labelsQ—item labels with purchase unit without price and bin labels.Y—item labels with stocking unit price and bin labelsZ—item labels with stocking unit with-out price and bin labels
Special Record
F/L/M, default is blank.Used to code SKUs into special catego-ries: F–Freight, L–Labor, M–Miscella-neous. Total sales for SKUs coded in each category will print on your end-of-day Report RDJ.
Taxable Y/N/A, default is Y.Indicates tax status of the item:Y–Yes, N–No, A–Always taxable.
The field Information about the field
Looking at Function IMU 3-13
3333
This is the Function IMU Stocking Screen.
This is the Function IMU Pricing Screen.
3-14 Looking at Function IMU

3333
This is the Function IMU Codes Screen.
This is the Function IMU History Screen.
Looking at Function IMU 3-15

3333
This is the Function IMU Vendor Screen.
You will use Function IMU to:
➥ load items into inventory that require more information than can be accessed through Function LOD, such as lumber items
➥ add more information to an item you already loaded in Function LOD
➥ change information for an item that was previously added in Functions LOD or IMU
If you have questions about Function IMU, refer to your Functions Manual, and Inventory Item Information Manual, the tabbed section, “Maintaining Inventory.”
Checking Your WorkFunctions LOD and IMU allow you to easily view inventory items, but sometimes you will need to get a printed list of items for checking prices, stock levels, sales trends, or any other type of item information. You will use a report to do this most effectively.
Report RIS (Item Status Report) prints a list of items in a variety of ways. Use a combination of report types, select options, print options, and from/to values, to report exactly the type of information you need. Your Triad system comes with some predefined reports such as LOADEDIT for checking your work as you load items into inventory.
3-16 Checking Your Work

3333
Changing Item InformationAs you enter inventory items and check the information you loaded, you will probably need to make some changes. There are three ways to make changes to item information:
➥ directly to an item in Function IMU.
➥ to a range of items with Function RICU.
➥ to item SKU numbers with Function RCIN.
Before you make changes to inventory, ask yourself the following questions to determine which function will work best for you.
❖ Which function is best for the changes you need to make?
✹ Use extreme caution when making changes with Function RICU. If you make a mistake on the first or second screen, you can make changes to your entire Inventory File that you did not intend to make. It can be difficult to recover from a mistake made in Function RICU.
The first time you use Function RICU, if you are the slightest bit unsure about how to go about making the changes you want, talk to your Triad Representative first.
If you have questions about Functions RCIN, RICU, or IMU, refer to your Reports Manual, Functions Manual, and Inventory Item Information Manual, the tabbed section, “Maintaining Inventory.”
Ask yourself this question Then do the following
Do you need to change the SKU number? For example, an item was entered in Function LOD as SKU number 12557, and it should have been 12577
Use Function RCIN to change item SKU numbers.
Do you need to change one field for a range of SKUs? For example, all the items in department 3 should have the Function LOD/IMU field Print Labels set to No.
Use Function RICU to make changes for a range of items.
You need to make a change that does not fit RCIN, or RICU. For example, you want to change one price sensitive item so the Dis-countable field is No.
Use Function IMU to make the changes directly for each item.
Changing Item Information 3-17
3333
Loading Non-Merchandise ItemsIn addition to loading SKUs for inventory merchandise, you will also load SKUs for non-merchandise records. Examples of these are Departmental and Special SKUs.
Departmental SKUs are used at point-of-sale to sell items that do not have their own inventory SKUs set up. Special SKUs are set up for non-merchandise items like freight and labor charges.
Do the following when loading inventory:
➥ Using your department report list, enter a departmental SKU for each department code.
➥ Enter SKUs for any non-merchandise items you sell at point-of-sale.
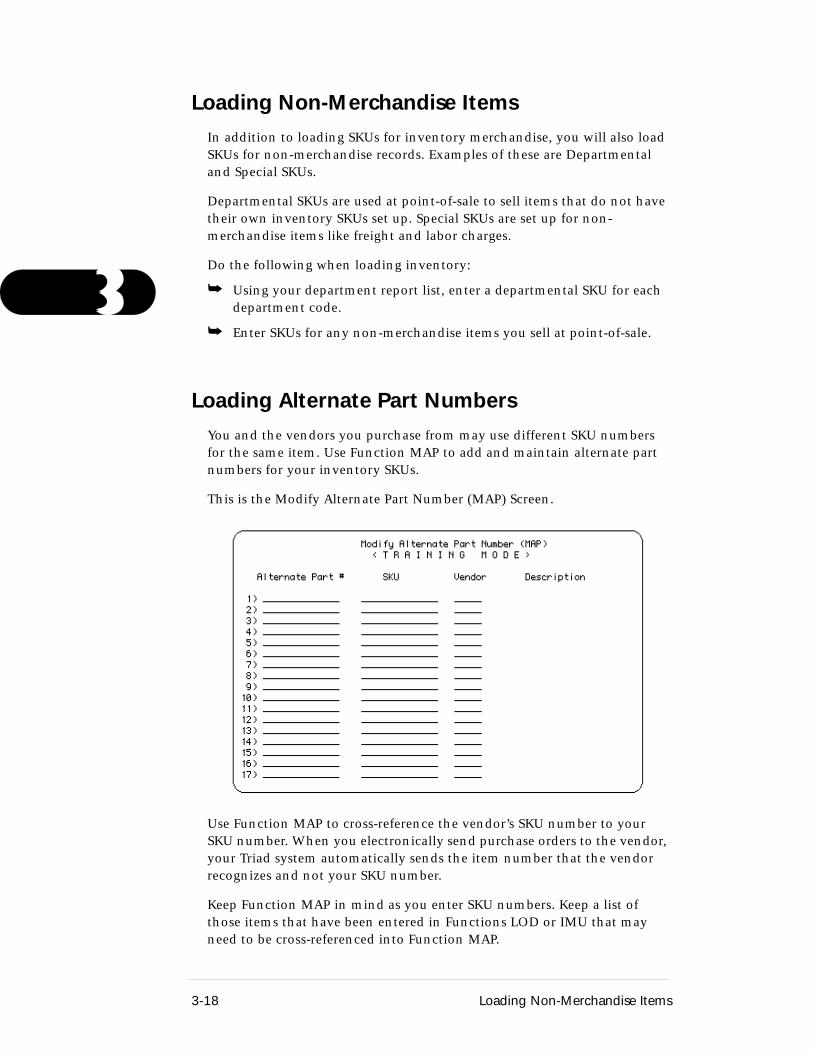
Loading Alternate Part NumbersYou and the vendors you purchase from may use different SKU numbers for the same item. Use Function MAP to add and maintain alternate part numbers for your inventory SKUs.
This is the Modify Alternate Part Number (MAP) Screen.
Use Function MAP to cross-reference the vendor’s SKU number to your SKU number. When you electronically send purchase orders to the vendor, your Triad system automatically sends the item number that the vendor recognizes and not your SKU number.
Keep Function MAP in mind as you enter SKU numbers. Keep a list of those items that have been entered in Functions LOD or IMU that may need to be cross-referenced into Function MAP.
3-18 Loading Non-Merchandise Items

3333
If you have questions about Function MAP, refer to your Functions Manual, and Purchasing and Receiving Manual, the tabbed section, “Vendors.”
Loading Message SKUsWhen setting up an SKU, you can code it so that it will prompt a clerk at point-of-sale to enter a message about the SKU. Paint, toxic products, and wallpaper items can be coded as message SKUs.
The *Tally field in Function IMU is used to code an SKU so that it prompts for the message at point-of-sale. Here are the codes and messages:
Loading Kit ItemsKits are groups of items that you have packaged together and then sell at point-of-sale with one SKU number. Examples of kits are swing-sets, deck kits, a tool box kit, and a painter kit.
If the *Tally field is Then, at point-of-sale
P The clerk will be prompted to enter a pat-tern number for the item.
S The clerk will be prompted to enter a serial number for the item.
T The clerk will be prompted to enter a tint formula for the item.
X The clerk will be prompted to enter a toxic warning message for the item.
A The clerk will be prompted to enter addi-tional information for the item. This is a generic code, use it when none of the others apply.
Loading Message SKUs 3-19

3333
Follow these steps to set up kits on your Triad system:
1. Check to be sure all the items in the kit are entered in Function IMU.
2. Set up the kit header SKU in Function IMU—this is the number you sell the kit by at point-of-sale.
3. Link the kit items to the kit header SKU through Function MKR.
4. Use Report RKR to check which kits have been loaded.
If you plan to use kit records, read the Kits Manual. If you have further questions about Functions IMU, MKR, and Report RKR, refer to your Functions Manual and Reports Manual.
Loading Lumber ItemsLumber SKUs require special consideration. In most cases, you will use different units of measure for the stocking, purchasing, pricing, and alternate units of measure. The way you add and maintain these SKUs affects the accuracy of your inventory and your efficiency at point-of-sale.
The first priority of loading lumber items is determining a numbering scheme for the SKUs.
The scheme should be simple and easy to use. You will be typing in the SKUs at point-of-sale, so you want to keep extra characters to a minimum. For example, you might set up a SKU for a 2x4x8 douglas fir kiln dried with SKU number 20408DFKD or DF20408KD.
If you will be loading lumber SKUs, read the information about Function IMU in your Inventory Item Information Manual, the tabbed section, “Setting Up Different Units of Measure.” If you have additional questions about Function IMU, refer to your Functions Manual.
The quickest way to load lumber items is with a Lumber FastStart Tape. Check with your Triad Representative about the availability of a tape for your business.
If you will not be using a FastStart tape, use the following information to help you determine a numbering scheme.
Suggested Methods for Lumber SKU Numbering
There are two approaches to lumber numbering methods—Conventional and Advanced.
3-20 Loading Lumber Items

3333
With each method, an SKU may contain as many as five different components:
➥ dimension
➥ species
➥ treatment
➥ finish
➥ grade
The Conventional and Advanced numbering methods allow SKUs to be grouped in two basic formats. The Conventional method will group and sort by dimension, regardless of the species and grade. The Advanced method will sort by species, with dimensions sorted within species in ascending order.
Conventional Method
Conventional method SKU numbers have their components arranged like this:
dimension / species / treatment / finish / grade
For example, 4414YPKDF, represents a 4x4x14 (dimension) Yellow Pine (species) S4S Kiln Dried (finish) Flat Grain (grade) dimensional lumber.
Other examples are presented in the table that follows.
Notice that with the previous examples, all the 1x12x10s would be grouped together, regardless of species.
SKU Description
11210DFN1 1x12x10 Douglas Fir, S4S resawn, #1 grade
11210RWRCO 1x12x10 Redwood, Rough, Construction Heart
11210KPKD 1x12x10 Knotty Pine, S4S Kiln Dried
11210RWKDCH 1x12x10 Redwood, Kiln Dried, Clear Heart
Loading Lumber Items 3-21

3333
Advanced Method
Advanced method SKU numbers have their components arranged like this:
species / dimension / treatment / finish / grade
Advanced method SKUs always have the wood species as the first component of the number. In addition, leading zeros are used in the width and length portions of the dimension.
For example, RW11210RCO, represents Redwood (species), 1x12x10 (dimension), Rough (treatment), Construction Heart (grade).
Other examples are presented in the table that follows:
Notice that with the previous examples, all the Douglas Firs would be grouped together by size.
Suggested Grades
The lumber industry has grouped dimensional lumber into grades reflecting the quality and characteristics of a given species. A variety of grades often exist for any one species, and certain kinds of wood, such as cedar and redwood, have their own grading system.
Twenty-two lumber grades are suggested in the table that follows. Grade designations in SKUs contain one or two characters and may be either letters or numbers. The grade is always at the end of the SKU, no matter which numbering method is used.
For example, an SKU representing a piece of 1x2x6 Kiln dried, Sanded four sides, Knotty cedar, would have the designation of K for grade as the last component of the SKU.
If a number appears as the last character of a SKU (and is not part of the dimension) that number represents a grade. Numbers are used to designate grades, #1, #2 & BTR, and #3 Utility, and are not used in redwood or cedar gradings.
SKU Description
DF20408 Douglas Fir, 2x4x8, S4S, #2 Standard and Better
DF20408KD Douglas Fir, 2x4x8, Kiln Dried
DF20408KDV Douglas Fir, 2x4x8, Kiln Dried, Vertical Grain
3-22 Loading Lumber Items

3333
Use the table that follows for grade designations.
Grade Description
blank Standard & Better
1 #1 Const or equivalent
2 #2 & Better
3 #3 Utility
F Flat Grain
L Select
S Select Structural
V Vertical Grain
X Stud
Cedar Grades
CL Clear
S Select
K Knotty
Redwood Grades
CH Clear Heart
CL Clear
F Foundation (#1/#2)
SH Select Heart
AF All Heart Facia
B B Grade
CO Construction Heart
CC Construction Common
M March
E Economy
Loading Lumber Items 3-23

3333
Suggested Finishes and Treatments
Dimensional lumber is available in many kinds of finishes and treatments. A wood’s finish reflects how the four sides of any piece are dressed. For instance, the designation S4S means that all four sides are sanded, or dressed. A ROUGH designation means none of the sides have been dressed.
Lumber can also be treated. This often means additional drying time or treatment with a chemical preservative, such as creosote. Wood that is kiln dried has most of its inherent moisture removed, as opposed to a piece of green wood, which is moisture rich.
Use the table that follows for finish and treatment designations:
Loading Tally 2 ItemsA Tally 2 item is a SKU that you use to sell different lengths of the same item. For example, you could use the same SKU number to sell different lengths of 2 x 4 douglas fir. To sell some 8’ pieces and some 10’ pieces at point-of-sale, you would type in just one SKU for 2 x 4 douglas fir, then you would type lengths and quantities. You set up Tally 2 items when you need to keep track of both sales and stocking information for every length of the tally item.
Finish and Treatment Description
blank Sanded four sides (S4S)
N Resawn
R Rough
KD Kiln dried, S4S
PT Pressure treated, S4S
PTN Pressure treated, resawn
KDN Kiln dried, resawn
PTR Pressure treated, rough
KDR Kiln dried, rough
3-24 Loading Tally 2 Items

3333
Follow these steps to set up a Tally 2 item on your Triad system:
1. Verify that all the individual lengths of the item are entered in Function IMU.
2. Set up the Tally 2 SKU in Function IMU—this is the number you sell the items by at point-of-sale.
3. Link the SKUs for the individual lengths to the tally 2 SKU through Function MTL.
4. Use Report RTL to check which Tally 2s have been loaded.
If you plan to use Tally 2 records, read the Tally Items Manual. If you have further questions about Functions IMU and MTL, and Report RTL, refer to your Functions Manual and Reports Manual.
What You Should Do NowNow that you have read this chapter, you are ready to start loading inventory items. Make sure you and the person(s) responsible for loading inventory on your Triad system complete the Inventory and Ordering Workbook, chapter 3, Loading Inventory.
What You Should Do Now 3-25

4444
Managing Inventory
Overview You will learn about the following procedures in this chapter.
Special pricing structures—page 4-2
Price changes—page 4-6
Inventory Flex Reports—page 4-8
End-of-Month and End-of-Year—page 4-9
What you should do now—page 4-9
Overview 4-1

4444
IntroductionThis chapter presents information to help you in managing your inventory, once you have loaded it into your Triad system.
The information is organized into three areas:
➥ Special pricing structures—including quantity breaks and matrix pricing
➥ Price changes—including price books and labels
➥ Inventory Flex reports
Special Pricing StructuresIn addition to the retail price you usually charge for an item, you can set up two other pricing structures on your Triad system. These are:
➥ Quantity Breaks—discounts to the retail price of the item if certain quantities are purchased
➥ Matrix Pricing—special pricing for items if the customer is part of a certain group, such as contractors
The benefit, once you have set up quantity breaks or matrix pricing, is that the Triad System automatically at point-of-sale:
➥ checks to see if the customer is part of a certain group
➥ checks if the item(s) being purchased are eligible for a quantity break or matrix price
➥ determines if the quantity being purchased is enough for a quantity break discount
➥ calculates the correct price
Quantity Break Pricing
Use Function MQB to set up quantity break discount rates for inventory items. For example, you discount certain nails 3% off retail if the customer buys between 4 and up to 10 pounds, and 7% if a customer buys 10 pounds or more.
4-2 Introduction

4444
This is the Modify Quantity Break (MQB) Screen.
❖ Setting Up a Quantity Break
There are always two steps to implementing a quantity break:
1. Set up the discount structure in Function MQB.
2. Code the item in Function IMU on the Codes Screen in the Qty Break Code field.
If you have questions about Function MQB, refer to your Functions Manual, and Pricing and Promotions Manual, the tabbed section, “Using Quantity Breaks.”
Matrix Pricing
In your business, you may offer certain customers special prices on different groups of items. For example, you have a group of customers that you call do-it-yourselfers and you give them a special price of 10% off retail on certain items. You also have a another group of contractors whose special price is 20% off retail on certain items.
On your Triad system, this type of special pricing is called matrix pricing. And like quantity break pricing, you set up a table that defines the discount structure and then you code the items to which you want the special pricing to apply. Next you activate the pricing structure to calculate the special prices for the item. And then you tell the Triad system which customers receive the special pricing by giving them a code.
❖ Setting Up Matrix Pricing
There are four steps to setting up matrix pricing:
Special Pricing Structures 4-3

4444
1. Use Function MPM to define the discount structure.
2. Code the items in Function IMU (you can use RICU to do this).
3. Activate the prices with Report RPC.
4. Code the customers in Function MCR.
The first step in setting up matrix pricing is Function MPM.
This is the Modify Price Matrix (MPM) Screen.
❖ Define Your Customer Groups
To fill in this screen, you must first decide on your customer groups. You have up to five customer groups available, as represented by the numbers 1 through 5 in parentheses at the top of the screen.
You probably have some customer groups in mind. Examples might be contractors, do-it-yourselfers, and employees. Just remember that you define the groups (1) through (5). You do not have to use all five groups.
4-4 Special Pricing Structures

4444
Once you define them, jot down your definitions for each group:
1. ____________________________________________________________
2. ____________________________________________________________
3. ____________________________________________________________
4. ____________________________________________________________
5. ____________________________________________________________
❖ Define Your Item Product Groups
The next step in Function MPM is to define the item product groups that are represented by the numbers in the Code column on the far left of the Function MPM Screen. This is probably the most difficult task in setting up the matrix.
Think about how you discount your items now. Are there:
➥ groups of like items with the same discount percent per customer group—for example, all contractors receive 10% off of paint department items
➥ a wide range of items with the same discount percentage— for example, all contractors receive 10% off all (or almost all) items in the store
There are quite a few combinations of item/discount/customer groupings that could be set up, and your Triad system has room for up to 999 product codes.
Like the customer groups, you get to define each code that you use. It is a good idea to list on a piece of paper each product code you use, and what items it applies to. For example, your list might look like this:
Code(1)–Contractors
(2)–Do-it-yourselfers
(3)–Employees
1-Paint, Dept 1
-15% -10% +30%
2–Power Tools, Ven-dor Makita, Class 22
-5% -3% +40%
3–House-wares, Dept 3 except Class 31
-10% -5% +35%
Special Pricing Structures 4-5

4444
Once you have determined your customer groups and item product groups, you are ready to fill in Function MPM.
You would then complete the steps for setting up the price matrix:
1. Code the items in Function IMU (you can use RICU to do this).
2. Activate the prices with Report RPC.
3. Code the customers in Function MCR.
If you have questions about setting up a price matrix, refer to your Functions Manual, and Pricing and Promotions Manual, the tabbed section, “Using Matrix Prices.”
Price ChangesYour inventory pricing greatly determines the success of your business. An item with a price that is too high does not sell. An item with a price too low does not generate adequate profit.
Changes may need to be made on a daily basis to meet a competitor’s price, weekly for items from your primary vendor, and once a month or once a year for other vendors.
Methods of Changing Prices
The three methods for changing prices are:
➥ Direct Price Changes—using Function IMU
➥ Group Price Changes—using Functions IPC and Report RPC
➥ Range Price Changes—using Report RPC
Use the table that follows to determine when to use which method.
If you need toUse this method
Change prices for a few items, and need to do it immediately
Direct
Change prices for more than a few items which are not in a range (such as not all the items in a department or not all the items for a certain vendor), and the price changes are based on exact prices and not a percentage of the current price or gross margin.
Group
4-6 Price Changes

4444
The benefit of the Group and Range methods of changing prices is that you can preview the changes before they become effective. In this way you can check the accuracy and the new gross margins of the items. If there are a few items that you do not want to change, you can delete the changes in Function IPC before you finalize the rest of the changes.
Another use of the Range method is to “try out” price changes for a group of items. Use Option B (Print Only Range of Price Changes) of Report RPC to do this. Option B will not add the price changes to the Price Change File, only print out the current prices and what they would be if you implemented the price change.
For practice in the Range method of price changes, refer to your Pricing and Promotions Manual, the tabbed section, “Report RPC Tutorial.” That section of your manual explains in greater detail the Report RPC screens and provides exercises that you can practice.
If you have questions about any of the price change methods, refer to your Functions Manual, Reports Manual, and Pricing and Promotions Manual, the tabbed section, “Changing Prices.”
Electronic Price Changes
Electronic Price Changes are another area of price changes that you can work with on your Triad system. With Electronic Price Changes, your vendor transmits price changes from the vendor’s system to your Triad system over the phone lines.
So instead of mailing you a list of price changes that you manually enter in Function IPC, the price changes are electronically sent and entered in Function IPC for you. Just make corrections if needed in Function IPC Screen M, and run Report RPC Option F to move the price changes to the Function IMU Pricing Screen. This method can save you time and reduce errors.
Check with your Triad Representative to see if any of your vendors have this capability.
If you have questions about Electronic Price Changes, refer to your Talking Computers Manual (or your Cotter True Value User’s Guide, if you are a Cotter member).
Change prices for a range of items and the price changes are based on a percentage of the current price or gross margin
Range
If you need toUse this method
Price Changes 4-7

4444
Price Books
Use Report RPB (Price Book Report) to print a list of prices that you can use when you need a paper reference for prices.
A handy feature of this report is in the Prices to Print option field. If you leave spaces between the option letters, the report will have spaces between the columns of prices.
Use the from and to fields to select only the items you want in a particular price book.
If you have questions about Report RPB, refer to your Reports Manual, and Pricing and Promotions Manual, the tabbed section, “Looking Up Prices.”
Inventory Labels
Your Triad system is capable of printing two types of inventory labels:
➥ price labels, using Report RLA (Price Label Printing Report)
➥ bin labels, using Report RBL (Bin Label Printing Report)
The benefits to printing your own labels are:
➥ print only the amount of labels you need
➥ print labels prior to receiving an order
➥ change the labels of what is on the shelf as soon as you know that prices have changed
If you have questions about inventory labels, refer to your Reports Manual, and Purchasing and Receiving Manual, the tabbed section, “Appendixes.” Appendix A is about printing price labels and Appendix B is about printing bin/shelf labels.
Inventory Flex ReportsYou can use your Triad system to design inventory reports that are specific to your needs. You create the report to show only inventory fields you want to see and thus include only the detail that you need. These inventory reports are called Flex Reports.
Some Flex Reports are already built into the Triad system (both in the Training Mode and in the Live Mode). Use Report RIS (Item Status Report) to print Inventory Flex Reports.
Here are the steps to creating and printing a flex report:
4-8 Inventory Flex Reports

4444
1. Print a field list with Report RST—save this report to use each time you create a Flex Report.
2. Decide which fields you want to print on the Flex Report—sketch the report on paper to list the fields and the order to print.
3. Define the Flex Report to your system—use Function DEF.
4. Print a sample format of your Flex Report—use Report RDF.
5. Print your Flex Report—use Report RIS.
If none of the print sequences are what you need, use print sequence 5–User Defined. This print sequence allows you to determine the order that information will print, where it will subtotal, and when to start a new page. Before you use the User Defined print sequence for the first time, read about it in your Reports Manual, the tabbed section, “Introduction to Reporting.”
If you have questions about Flex Reports, refer to your Functions Manual, Reports Manual, and Inventory Item Information Manual, the tabbed section, “Using Flex Reports.”
End-of-Month and End-of-Year ProceduresIn addition to the daily inventory procedures, you also have end-of-month and end-of-year procedures. For inventory, most of the work involves shifting history information.
Function MDE has 25 periods (months) of history. At the end of each month Report RDE runs with certain options to shift history information and open up a new period for the start of the new month.
The processing that the Triad system does at the end of every month is handled automatically through Functions MEQ, SEQ, and MQS. Be sure that you and your Triad Representative have reviewed these functions to ensure that all is set up correctly for your business.
What You Should Do NowNow that you have read this chapter, you are ready to start managing your inventory items. Make sure you and the person responsible for inventory on your Triad system complete the Inventory and Ordering Workbook, chapter 4, Managing Inventory.
End-of-Month and End-of-Year Procedures 4-9

5555
Basic Replenishment Ordering
OverviewYou will learn about the following procedures in this chapter.
Adding purchasing constants—page 5-2
Basic replenishment ordering—page 5-3
What you should do now—page 5-6
Overview 5-1

5555
IntroductionThis chapter presents information for replenishment ordering procedures for the Basic Inventory software package.
You only want to read this chapter if you have the Basic Inventory software package. To see if you have this software package do the following on one of your terminals:
1. Type RSO at the Main Menu.
2. Press <Enter>.
➥ If you get a FUNCTION NOT FOUND message at the bottom of the screen, you have the Basic Inventory software package. Continue reading this chapter.
➥ If the Suggested Order Report (RSO) Screen displays, then you have the Classic Inventory software package. Do not read this chapter. Read the next chapter, Classic Replenishment Ordering.
Adding Purchasing ConstantsUse Function MPC to set up information that determines the ordering process in your business.
This is the Modify Purchase Order Constants (MPC) Screen.
Before you answer the fields in Function MPC, ask yourself the following key questions. Then look for your answer. Based on your answers, add your purchasing constants in Function MPC.
5-2 Introduction

5555
❖ At how many days before a future order is due in, do you want the system to consider it current?
The Function MPC field–# Days Before Future PO Quantity Becomes Current.
A future order is an order that you have placed with a vendor that will not be shipped for a while, such as a show or market order. Your Triad system will not consider future orders when determining what to order, until a certain number of days before the due date of the future order. The number of days is what you fill in here in Function MPC.
A typical answer is 7 or 14 days. For example, you fill in this field with a value of 7. The system will look at future orders, and if it is due within seven days, it will consider it a current order and not suggest that you order this merchandise.
❖ Do you use landed cost in receiving?
This field determines if you want the Triad system to automatically calculate the value of freight and other charges in the prices of items on the purchase order. You have the following options:
➥ N–do not use landed cost
➥ W–use landed cost based on weight and do not recalculate retail
➥ X–use landed cost based on weight and recalculate retail
➥ Y–use landed cost based on units and recalculate retail
➥ Z–use landed cost based on units and do not recalculate retail
If you have questions about Function MPC, refer to your Functions Manual, and Purchasing and Receiving Manual, the tabbed section, “Introduction.”
Basic Replenishment OrderingReplenishment Ordering is the most basic type of ordering you can do with your Triad system. It is based on ordering what you have sold, thereby replenishing your stock. As you begin to accumulate more sales history from point-of-sale, you will move on to more advanced purchasing methods.
You can begin ordering with your Triad system as soon as you start point-of-sale. Here are the steps for ordering:
Basic Replenishment Ordering 5-3

5555
1. Create the PO with Report ROR, Option F.
2. Modify the PO with Function MPO.
3. Print a copy of the PO with Report ROF.
4. Get the PO to your vendor.
5. Purge the PO with Report ROF, Option F.
Creating the PO with Report ROR
Use Report ROR to:
➥ print a report that shows what has sold since the last time you created an order for a particular vendor
➥ create a PO in the Triad system with all the items on the report, so you can easily modify quantities, delete items, and add items
➥ reset to zero the To Date field in Function IMU for each item on the report
The To Date field is found in Function IMU on the History Screen. It is updated each time an item is sold or returned. When you create a PO with Report ROR it clears this field. Then sales information from point-of-sale again begins to update this field for the next time you create a PO.
You can print Report ROR in department or location code order. The advantage to location code order is that you can take the report, walk the aisles, and check the suggested quantity to order against the stock level on the shelf.
If you use a FastStart™ tape to load inventory, prior to starting point-of-sale, check the To Date Sales field in Function IMU, Screen H. You want to be sure it is blank. FastStart tapes for some vendors load information into this field. If your tape did this, you want to run Report RIH with Options CT to clear this field.
If you have questions about Report ROR, refer to your Reports Manual, and Purchasing and Receiving Manual, the tabbed section, “Replenishment Ordering.”
Modifying the PO
Use Function MPO (Modify Purchase Order) to modify the PO you just created with Report ROR. With Function MPO you can:
➥ add a new item to the PO
➥ change the quantity to be ordered for an item
➥ delete an item from the PO so it is not ordered
5-4 Basic Replenishment Ordering

5555
➥ order an item that you do not stock in your inventory
If you have questions about Function MPO, refer to your Functions Manual, and Purchasing and Receiving Manual, the tabbed section, “Replenishment Ordering.”
Printing the PO and Getting It to the Vendor
Use Report ROF to print a copy of the PO after you have modified it in Function MPO. Use the options to determine what detail prints on the report. Use any option except Option F. Option F would purge the PO and you do not want to do that until after you receive the merchandise.
If you have questions about Report ROF, refer to your Reports Manual, and Purchasing and Receiving Manual, the tabbed section, “Replenishment Ordering.”
The next step in the ordering process is to get a copy of the PO to the vendor. In addition to the methods you currently use to send the PO to your vendor (such as phone, fax, or mail), some vendors may allow you to transmit your PO electronically from your Triad system directly to their computer via the telephone lines. Use Function BTC (Bisync Transmission Controller) to accomplish this task. It takes the PO information from Function MPO and sends it to the vendor.
Check with your Triad Representative if electronic transmission of purchase orders is available for any of your vendors.
If you have questions about Function BTC, refer to your Functions Manual, and Talking Computers Manual (or The Cotter True Value User’s Guide, if you are a Cotter member).
Purging the Purchase Order
Once you have sent the PO to your vendor and the merchandise is received at your store, you no longer need the PO in your Triad system. Use Report ROF with Option F to remove (purge) the PO from Function MPO.
If you have questions about Report ROF, refer to your Reports Manual, and Purchasing and Receiving Manual, the tabbed section, “Replenishment Ordering.”
Basic Replenishment Ordering 5-5

5555
What You Should Do NowNow that you have read this chapter, you are ready to start managing your inventory items. Make sure you and the person responsible for ordering on your Triad system complete the Inventory and Ordering Workbook, chapter 5, Basic Replenishment Ordering.
5-6 What You Should Do Now

6666
Classic Replenishment Ordering
OverviewYou will learn about the following procedures in this chapter.
Adding purchasing constants—page 6-2
Classic replenishment ordering—page 6-3
What you should do now—page 6-7
Overview 6-1

6666
IntroductionThis chapter presents information for replenishment ordering procedures for the Classic Inventory software package.
You will only want to read this chapter if you have the Classic Inventory software package. To see if you have this software package, do the following on one of your terminals:
1. Type RSO at the Main Menu.
2. Press <Enter>.
➥ If the Suggested Order Report (RSO) Screen displays, you have the Classic Inventory software package. Continue reading this chapter.
➥ If you get a FUNCTION NOT FOUND message at the bottom of the screen, you do not have the Classic Inventory software package. Do not read this chapter. Read the previous chapter, Basic Replenishment Ordering.
Adding Purchasing ConstantsUse Function MPC to set up information that determines how purchasing will work in your business.
This is the Modify Purchase Order Constants (MPC) Screen.
Before you answer the fields in Function MPC, ask yourself the following key questions. Then look for your answer. Based on your answers, add your purchasing constants in Function MPC.
6-2 Introduction
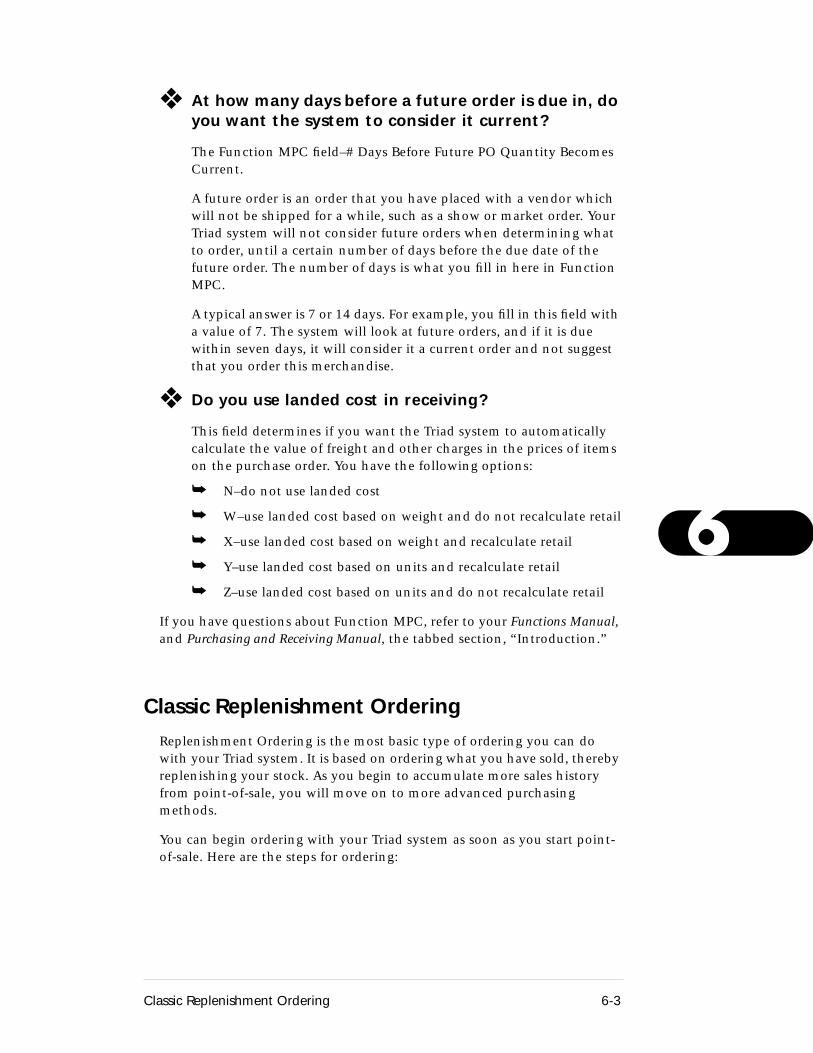
6666
❖ At how many days before a future order is due in, do you want the system to consider it current?
The Function MPC field–# Days Before Future PO Quantity Becomes Current.
A future order is an order that you have placed with a vendor which will not be shipped for a while, such as a show or market order. Your Triad system will not consider future orders when determining what to order, until a certain number of days before the due date of the future order. The number of days is what you fill in here in Function MPC.
A typical answer is 7 or 14 days. For example, you fill in this field with a value of 7. The system will look at future orders, and if it is due within seven days, it will consider it a current order and not suggest that you order this merchandise.
❖ Do you use landed cost in receiving?
This field determines if you want the Triad system to automatically calculate the value of freight and other charges in the prices of items on the purchase order. You have the following options:
➥ N–do not use landed cost
➥ W–use landed cost based on weight and do not recalculate retail
➥ X–use landed cost based on weight and recalculate retail
➥ Y–use landed cost based on units and recalculate retail
➥ Z–use landed cost based on units and do not recalculate retail
If you have questions about Function MPC, refer to your Functions Manual, and Purchasing and Receiving Manual, the tabbed section, “Introduction.”
Classic Replenishment OrderingReplenishment Ordering is the most basic type of ordering you can do with your Triad system. It is based on ordering what you have sold, thereby replenishing your stock. As you begin to accumulate more sales history from point-of-sale, you will move on to more advanced purchasing methods.
You can begin ordering with your Triad system as soon as you start point-of-sale. Here are the steps for ordering:
Classic Replenishment Ordering 6-3

6666
1. Create the PO with Report RSO—use Order Calc Options T and Other Options F.
2. Modify the PO with Function MPO.
3. Print a copy of the PO with Report RPO.
4. Get the PO to your vendor.
5. Receive the PO with Functions RP or ERP.
6. Check the PO with Report RRP.
7. Finalize the PO with Report RRP, Option F.
Creating the PO with Report RSO
Use Report RSO to:
➥ print a report that shows what has sold since the last time you created an order for a particular vendor
➥ create a PO in the Triad system with all the items on the report, so you can easily modify quantities, delete items, and add items
➥ reset to zero the To Date field in Function IMU for each item on the report
The To Date field is found in Function IMU on the History Screen. It is updated each time an item is sold or returned. When you create a PO with Report RSO with Order Calc Option T, it clears this field. Then sales information from point-of-sale again begins to update this field for the next time you create a PO.
You can use different printing sequences with the Report RSO. Printing sequence 7 uses location codes. The advantage to location code order is that you can take the report, walk the aisles, and check the suggested quantity to order against the stock level on the shelf.
If you use a FastStart™ tape to load inventory, prior to starting point-of-sale, check the To Date Sales field in Function IMU, Screen H. You want to be sure it is blank. FastStart tapes for some vendors load information into this field. If your tape did this, you want to run Report RIH with Options CT to clear this field.
If you have questions about Report RSO, refer to your Reports Manual.
Modifying the PO
Use Function MPO to modify the PO you just created with Report RSO. With Function MPO you can:
➥ add a new item to the PO
➥ change the quantity to be ordered for an item
6-4 Classic Replenishment Ordering

6666
➥ delete an item from the PO so it is not ordered
➥ order an item that you do not stock in your inventory
If you have questions about Function MPO, refer to your Functions Manual, and Purchasing and Receiving Manual, the tabbed section, “Order Point Purchasing,” the small tab section, “Changing a Purchase Order.”
Printing the PO and Getting It to the Vendor
Use Report RPO to print a copy of the PO after you have modified it in Function MPO. Use the options, such as DIMRSZ, to determine what detail prints on the report.
If you have questions about Report RPO, refer to your Reports Manual, and Purchasing and Receiving Manual, the tabbed section, “Order Point Purchasing,” the small tab section, “What’s on Order?”
The next step in the ordering process is to get a copy of the PO to the vendor. In addition to the methods you currently use to send the PO to your vendor (such as phone, fax, or mail), some vendors may allow you to transmit your PO electronically from your Triad system directly to their computer via the telephone lines. Use Function BTC (Bisync Transmission Controller) to accomplish this task. It takes the PO information from Function MPO and sends it to the vendor.
Check with your Triad Representative if electronic transmission of purchase orders is available for any of your vendors.
If you have questions about Function BTC, refer to your Functions Manual, and Talking Computers Manual (or The Cotter True Value User’s Guide, if you are a Cotter member).
Receiving the PO with Functions RP or ERP
When the merchandise arrives at your store, use Function RP (Receipt Posting) to:
➥ indicate which items were received
➥ indicate what quantities were received
➥ add items to the PO
➥ reject items that were received but you are not going to add to stock
➥ indicate price changes for items
➥ indicate which items were not shipped by the vendor
If you have questions about Function RP, refer to your Functions Manual, and Purchasing and Receiving Manual, the tabbed section, “Order Point Purchasing,” the small tab section, “Receiving.”
Classic Replenishment Ordering 6-5

6666
For some vendors it is possible to automate the Function RP process using Function ERP (Electronic Receipt Posting). With Function ERP, a vendor sends PO receipt information to your Triad system over the phone lines.
Your Triad system then uses this information to reconcile what is ordered on the PO compared to what was shipped. This automates the Function RP process. The benefit of Function ERP is the time savings; you do not have to spend time manually posting the items you receive against the purchase order.
Check with your Triad Representative to see if Function ERP is available for any of your vendors.
If you have questions about Electronic Receipt Posting refer to your Talking Computers Manual (or The Cotter True Value User’s Guide if you are a Cotter member).
Checking the PO with Report RRP
Use Report RRP (Receiving Report) after Function RP to print a receiving report to check you work.
Use the report to check what items, quantities, and prices the Triad system believes you will be receiving for this PO.
Check the report and mark any mistakes. There are two lines of information for each item. The top line lists the current values (such as current quantity on hand and prices). The bottom line lists the new values that will be updated to the system when you finalize the PO.
If you find any mistakes, you should go back to Function RP and post just those items that need to be corrected. You can then run another Report RRP if you need to check your corrections.
If you have questions about Report RRP, refer to your Reports Manual, and Purchasing and Receiving Manual, the tabbed section, “Order Point Purchasing,” the small tab section, “Receiving.”
Finalizing the PO with Report RRP
After you have:
➥ posted in Function RP
➥ checked your work with Report RRP
➥ corrected any mistakes in Function RP
➥ ran Report RRP again to check corrections (optional)
you finalize the PO. Use Report RRP with update Option F to do this also.
6-6 Classic Replenishment Ordering

6666
Use Option F only when you have completed and checked your posting for the PO. Option F will update Function IMU item information. You will no longer be able to access this PO in Functions RP or MPO.
If you have questions about Report RRP, refer to your Reports Manual, and Purchasing and Receiving Manual, the tabbed section, “Order Point Purchasing,” the small tab section, “Receiving.”
What You Should Do NowNow that you have read this chapter, you are ready to start managing your inventory items. Make sure you and the person responsible for ordering on your Triad system complete the Inventory and Ordering Workbook, chapter 6, Classic Replenishment Ordering.
What You Should Do Now 6-7