iof/tso installation guide, release 8a
TRANSCRIPT

IOF (Interactive Output Facility)
TSO Installation Guide Release 8A

Copyrights and Trademarks
Triangle Systems, Inc. P. O. Box 12752 Research Triangle Park, NC 27709 Tech Support Email Address: [email protected] Page: http://www.triangle-systems.com Copyright © 1991-2006, Triangle Systems, Inc. All rights reserved. IOF is a trademark of Triangle Systems, Inc. All other product and company names mentioned herein are for identification purposes only and are the property of, and may be trademarks of, their respective holders. January 2006

Table of Contents
Table of Contents ............................................................................................................... i
1. Initial Generation of the Product...................................................................................1 Load Product Distribution Libraries .......................................................................1 Updating System Libraries ....................................................................................1 IOF Options ...........................................................................................................1 Set the "C" Options................................................................................................2 Review the "D" Options .........................................................................................2 Generate the Install Library ...................................................................................2 Set the "A" Options................................................................................................3 Convert SDSF Parms............................................................................................3 Review SDSF Compatibility Options .....................................................................3 Review the "B" Options .........................................................................................3 Assemble and Link the Product.............................................................................4 Testing and Installing the Generated Product........................................................4
2. Testing and Installing the Initial Generation...................................................................5 Copy SVC Module to Link Pack ............................................................................5 Copy ESR Module to Link Pack ............................................................................5 IPL to Activate the SVC or ESR Module................................................................5 Copy Product Load Modules to System Library ....................................................6 Create a Logon Proc for Testing............................................................................6 Add IOF as ISPF Option........................................................................................6 Perform Initial Testing ............................................................................................6 Changing "A" or "B" Options During Testing..........................................................7 Changing "C", "D", or "K" Options During Testing .................................................8 Installing ISPF, HELP and CLIST Libraries for Production ....................................8 Installing IOF System Log Access and Management (IOF/SLAM)........................8 Activating IOF Sysplex Features ...........................................................................8
3. Options Changes Requiring Full Generation ................................................................9 Make Desired Options Changes ...........................................................................9 Generate the New Load Modules..........................................................................9 Install Test Versions of Load Modules ...................................................................9
i Table of Contents

Install New Modules as Production ..................................................................... 10
4. Options Changes Requiring Abbreviated Generation ................................................ 11 Make Desired Options Changes ......................................................................... 11 Create Test Version of Options Module............................................................... 11 Test the New Options Module ............................................................................. 11 Directly Replace Production Options Module...................................................... 12
5. Installing a New Release of IOF ................................................................................ 13
6. Testing a New Version in Parallel with Production ..................................................... 15 Test Environment for Product Load Modules ...................................................... 15 Test Using the IOF8A REXX Exec ...................................................................... 15 Create a Logon Proc for Testing.......................................................................... 16 Testing the New Version...................................................................................... 16 Changing "A" or "B" Options During Testing ....................................................... 16 Changing "C", "D", or "K" Options During Testing ............................................... 17 Installing the New Load Modules as Production ................................................. 17 Installing ISPF, HELP, and CLIST Libraries for Production ................................. 17
7. JES2 Maintenance Considerations............................................................................ 19 When You Apply JES2 Maintenance................................................................... 19 When You Install a New Version of JES2............................................................ 19 If a Higher Level Release is Available ................................................................. 19 If You are Currently Running the Latest Level..................................................... 19
8. System Log Access and Management (IOF/SLAM) .................................................. 21 The Log Index ..................................................................................................... 21 The Log Indexing Task ........................................................................................ 21 Indexing the System Log (SYSLOG) .................................................................. 21 Indexing the Operlog (OLOG) ............................................................................. 22 Using the Log Index ............................................................................................ 23 Controlling the Indexing Task .............................................................................. 26 Indexing Your Own Selected Log Records.......................................................... 26 Options for the Indexing Task.............................................................................. 27 Indexing Yesterday's System Log ....................................................................... 27 Capturing Log Data ............................................................................................. 28 Capturing Log Data to Tape or Other User Managed Media............................... 30
9. Access Control Overview ........................................................................................... 31 SDSF Considerations.......................................................................................... 31 Adding New Access Control Rules...................................................................... 32
ii 1. Initial Generation of the Product

Deleting Access Control Rules ............................................................................32 Using RACF, Top Secret, or ACF2 to Control IOF Access...................................32 Access Control Trace ..........................................................................................33
10. Attributes and Options for User Groups ...................................................................35
11. Controlling Display Formats .....................................................................................37
12. Installing and Maintaining Source Mods....................................................................39 Create Source Updates.......................................................................................39 Add a Control Statement for each Update Member.............................................40 Create the Job to Update the Source Library......................................................40 Update the Source Library ..................................................................................40 Assemble Affected Source Modules....................................................................40 Test the New Product Load Modules...................................................................41
13. Generating an Installation Version of the Product ....................................................43 Select an Installation Level Identifier ...................................................................43 Create the Job to Generate the New Libraries ....................................................44 Carefully Review the Generated M50DISK Job ..................................................44 Create the New Libraries.....................................................................................44 New Versions of JES2.........................................................................................44 New Target System .............................................................................................44 Generate the New Install Library .........................................................................44
14. Holding Job Printout for IOF.....................................................................................47
15. IOF Diagnostic Aids..................................................................................................49 Installation and Generation Problems .................................................................49 Execution Errors and Abends..............................................................................49 Batch TSO Clist Problems...................................................................................50 Generation Parameters Including User Access Control ......................................50 IOF Server and AT Command .............................................................................51 Diagnostic Solutions............................................................................................51 Determining the IOF Version ...............................................................................56 IOF Trace Facility ................................................................................................56
TSITRACE Command ...................................................................................56 TRACE Command.........................................................................................57
Displaying IOF Options and Variables.................................................................58 Determining Where IOF Modules Reside............................................................59 Display JES2 Remote Definition Table (RDT) Listing..........................................59 File Concatenation Utilities..................................................................................59
iii Table of Contents

IOFLISTF Command ..................................................................................... 60 IOFFINDM Command ................................................................................... 60 IOFADDC Command..................................................................................... 61 IOFREMC Command .................................................................................... 61
16. Dumping the JES2 Control Blocks........................................................................... 63
17. Performance Considerations ................................................................................... 65
18. CD and Tape Contents............................................................................................. 67
19. Product Load Module Naming Conventions ............................................................. 69
20. Entering MVS and JES2 Commands....................................................................... 71
21. The IOF External Writer ........................................................................................... 73
22. Local Data Set Name Prefixing................................................................................ 75
23. Sample IOF Modifications........................................................................................ 77
24. ISPF Command Table Entry for IOF ........................................................................ 79
25. Managing Output on the Spool ................................................................................ 81
26. IOF Job Archival and Retrieval (IOF/JOBARC) ....................................................... 83 IOF/JOBARC Data Sets ...................................................................................... 83 IOF/JOBARC Installation Considerations............................................................ 83 IOF/JOBARC Cataloged ..................................................................................... 84 Using the OFFLOAD Command to Archive Jobs ................................................ 84 Simulating an Archival (Offload) Run .................................................................. 84 Periodic Offloads................................................................................................. 85 Emergency Offloads............................................................................................ 86 Archiving Special Applications............................................................................. 86 Combining Offload Directories ............................................................................ 87 Deleting Old Directories and Offload Data Sets .................................................. 88 Uploading Offloaded Jobs................................................................................... 88 Upload Server Task............................................................................................. 89 Uploading Jobs ................................................................................................... 90 IOF/JOBARC Command Syntax ......................................................................... 92
JARCLOSE Command.................................................................................. 92 JARDEL Command ....................................................................................... 93 JARDJOIN Command ................................................................................... 93 JAROFFLD Command .................................................................................. 94
iv 1. Initial Generation of the Product

JAROPEN Command ....................................................................................95 JARUPLOD Command..................................................................................96
Automatic Offload When Spool is Full .................................................................96
27. Access Control Reference........................................................................................98 Introduction..........................................................................................................98 Access Control Options Members .......................................................................98 Defining Default Job Ownership..........................................................................99 Defining IOF User Groups ...................................................................................99 IOF Group Features ..........................................................................................101 IOF Resources ..................................................................................................102 IOF Resource Attributes ....................................................................................102 Session Attributes..............................................................................................104 IOF Access Levels.............................................................................................104 Granting Access to IOF Functions.....................................................................106 ALLOW Macro Description................................................................................108 ALLOW Macro Examples .................................................................................. 110 Limiting Access with LIMIT Macros ................................................................... 112 Defining Multiple Attributes with the ATTRCHK Macro ...................................... 112 Special "CONTROL" Limit Attribute ................................................................... 113 Building ALLOW and LIMIT Macros Using the ALLOW Command ................... 113 STRLIST and ADRLIST Macros ........................................................................ 114 Access to Sysout Data Sets .............................................................................. 114 Using Your Security System to Control IOF Access .......................................... 115 Defining Your Security System to IOF ............................................................... 116 ALLOW Macros to Activate Security System Checks........................................ 116 Adding Security System Resource Names........................................................ 117 Granting Access to IOF Resources ................................................................... 119 Security System Access Control Examples.......................................................121
28. Using IOF to Manage a Sysplex Environment .......................................................125 Introduction........................................................................................................125 Controlling Access to Sysplex Functions...........................................................125 Configuring Your Communications Protocol to Support the AT Command........126 Testing the AT Command ..................................................................................126 IOF SERVER Command ...................................................................................127
29. Configuring APPC to Support the AT Command ....................................................129 APPC Programming Terms ...............................................................................129 Defining IOF APPC to MVS and VTAM .............................................................129 Initializing APPC ................................................................................................133
v Table of Contents

vi 1. Initial Generation of the Product

1. Initial Generation of the Product
This chapter describes the process for the initial installation of IOF/TSO. If you have previously installed IOF/TSO at Release 7 or higher, see Chapter 5 for instruction on installing the new version.
Load Product Distribution Libraries
IOF can be downloaded from the Triangle Systems web site. The entire product is downloaded as a single compressed Mainframe Product Install (MPI) file. To download, install, and test the latest release from our web site, see the instructions at:
• http://www.triangle-systems.com • Click on "IOF Technical Support" • Click on "Order or Download the Latest Release"
To load IOF from a CD or tape, see the instructions in the IOF 8A Release Guide which is shipped with the product.
Updating System Libraries
None of the tasks described in this chapter update any of your system libraries. The tasks described in Chapter 2 update your system libraries only with specific copy jobs whose sole purpose is to copy IOF components to system libraries.
The documentation clearly warns you when a given task causes system libraries to be updated. Therefore, you can insure that your system updates satisfy the change control requirements for your installation.
IOF Options
Each IOF option is stored as a separate member of the product options library which was loaded from the tape or MPI file. Each options member contains comments describing the format and purpose of that option.
Although this approach may require more effort during the installation process, the options library can be reused for subsequent maintenance releases. Therefore, you will need to set each option only once.
1. Initial Generation of the Product 1

Initial values for the "C" and "A" options must be set during your initial generation. Most options related to the operation of the product ("A" and "B" options) also can be changed later during product testing.
Note that the comments in these members are in upper and lower case to make them easier to read. This will cause ISPF edit to treat all input as upper and lower case. Therefore, you must enter all of your changes to the options members in upper case only.
Set the "C" Options
Each member of the options library whose name begins with the letter "C" contains an option that must be set before proceeding. The member C00INDEX contains an index of these members.
You should now review and edit all members of the options library whose names begin with the letter "C". Be particularly careful with member C75ASMJS since this is the options member that is most likely to cause you trouble later.
Review the "D" Options
Each member of the options library beginning with the letter "D" contains an option that you may wish to review before proceeding. These options all have default values, so you don't need to change any "D" options if you are satisfied with the default values. The member D00INDEX contains an index of these members.
Generate the Install Library
Edit the M10INIT job in the install library. Complete the JOB statement and fill in the correct prefix for the install and options libraries in the SYSPROC DD statements. Save the edited M10INIT job back into the install library and then submit the job.
It is important that you first save the job since the M10INIT job will update the install library with DISP=SHR. You might damage the library if you save back into the install library after the M10INIT job has begun execution.
The M10INIT job will generate a collection of jobs in the install library that you can use to install and maintain the product. If the job executes correctly, the last record in the printed output of the job should be:
****** JOB 'M70ASM#' CREATED SUCCESSFULLY ******
2 1. Initial Generation of the Product

Set the "A" Options
Each member of the options library whose name begins with the letter "A" contains an option that must be set before the product is generated. The member A00INDEX contains an index to these options.
You should now review and edit all members of the options library whose names begin with the letter "A".
Convert SDSF Parms
By default IOF will allow users with operator authority to do all functions but allow end users access to only their own jobs. If you have IBM's SDSF product you can install IOF with the same user groups and access rules as your current SDSF system
Follow the steps below to convert your current ISFPARMS data set into comparable rules for IOF access control.
• Review the IOF install job M86ISFCV. This job is generated based on the option C67SDSF and should point to your current SDSF ISFPARMS data set.
• Submit job M86ISFCV to convert your ISFPARMS data set into a new B23ALLOW options member for IOF. The original B23ALLOW member is renamed to B23ACOLD.
See Chapter 9 for more information about IOF access control.
Review SDSF Compatibility Options
If you have IBM's SDSF, you can choose several options that makes IOF more compatible with SDSF. See options member B49CMPAT for a description of these options.
Review the "B" Options
Each member of the options library whose name begins with the letter "B" contains a "run" option that you may wish to review before generating the product. The member B00INDEX contains an index of these members.
Since you easily can change most of these options after the initial generation, you may wish to skip these options when first installing the product.
3 1. Initial Generation of the Product

Assemble and Link the Product
Submit the M13GEN job to do the required assemblies and link the product load modules. If there are assembly errors, you will normally need to correct an "A" or "B" option and then rerun the M13GEN job.
The M13GEN job does not modify any system library. It builds the IOF load modules into the distribution load module library. The IOF modules are copied to system libraries later in the install process.
If there is a problem with a "K" options member (K20ASM, etc.) or the C75ASMJS member, you should correct the member and rerun the M10INIT job to regenerate the install library before rerunning the M13GEN job. Again, you should avoid editing the M13GEN job directly, since other jobs in the install library probably have the same problems and will not be corrected unless you change the appropriate options members and run M10INIT to regenerate the library.
If you do decide to edit the M13GEN job directly, be sure to make careful notes so that you can correct the appropriate options members and regenerate the install library later.
Testing and Installing the Generated Product
If this is the very first time that IOF has been installed at your installation, see Chapter 2 for information about how to test and install the newly generated product. Otherwise, see Chapter 6 to test the new version in parallel with your production IOF.
4 1. Initial Generation of the Product

2. Testing and Installing the Initial Generation
This is a description of the steps necessary to install and test the load modules that were generated by the M13GEN job. This chapter is only applicable to the very first time that you install IOF. See Chapter 5 for information about installing and testing subsequent maintenance releases.
Copy SVC Module to Link Pack
If you specified SVC=nnn in option member A10AUTH, follow the instructions in this section to copy the SVC load module to your link pack area and install it as an SVC.
Copy the IGC00XXX member of the product load module library to a system LPA or MLPA library and name it IOFrrSVC (where rr is the IOF release). Then, update the appropriate IEASVCxx member of SYS1.PARMLIB.
For example, if you specified SVC=235 in A10AUTH and this is release 8A of IOF, copy load module IGC00XXX and rename it IOF8ASVC. Then, add the following statement to your IEASVCxx member of SYS1.PARMLIB:
SVCPARM 235,REPLACE,TYPE(3),EPNAME(IOF8ASVC)
Copy ESR Module to Link Pack
If you specified ESR=nnn in option member A10AUTH, follow the instructions in this section to copy the ESR load module to your link pack area and install it as an ESR. ESR numbers between 200 and 255 can be used.
To make sure that the ESR number you selected is not already in use, scan your system LPA and MLPA libraries for the module IGX00nnn (from ESR=nnn in A10AUTH).
Copy the IGX00XXX load module to a system LPA or MLPA library, and name it IGX00nnn (from ESR=nnn in A10AUTH). For example, if you specified ESR=241 in A10AUTH, the module name would be IGX00241.
IPL to Activate the SVC or ESR Module
If you copied the SVC or ESR module to an MLPA library you must modify the appropriate IEALPAxx member of SYS1.PARMLIB to include the new module name.
2. Testing and Installing the Initial Generation 5

IPL your system to activate the SVC or ESR module copied above. If you copied the module to an LPA library, you must specify "CLPA" when you IPL.
Copy Product Load Modules to System Library
Submit job M14COPY to copy the product load modules to the authorized system link list or LPA library specified in your C64LINK options member. Note that the IOFTvvvM, IOFTvvvA, IOFTvvvU, and IOFTvvvP modules will not execute from a STEPLIB. See Chapter 17 for recommendations about module placement to improve system performance.
Create a Logon Proc for Testing
Create a TSO logon procedure to test the product. Concatenate the following IOF libraries to the indicated DD names:
ISPPLIB IOF ISPPLIB Library
ISPMLIB IOF ISPMLIB Library
ISPTLIB IOF ISPTLIB Library
SYSPROC IOF CLIST Library
SYSHELP IOF HELP Library
Add IOF as ISPF Option
On your ISPF Primary Options Menu add the following menu option:
% I +IOF - Interactive Output Facility
and the corresponding select option:
I,'PGM(IOFSPF) PARM(&ZCMD) NEWAPPL(IOF) NOCHECK'
Perform Initial Testing
Logon with the test procedure created above. Enter "I" on the ISPF Primary Options Menu (or IOF with no operands from TSO READY) to display the IOF Option Menu. From this menu you can select displays for jobs, output groups, or devices.
As a simple test, position to the JOBNAME field of the IOF Option Menu and enter a generic job name that you know will match more than one job in your system (for example, entering PROD* will display all jobs beginning with "PROD").
6 2. Testing and Installing the Initial Generation

You should see a list of all jobs matching the generic job name. Place an S beside one of the jobs and press ENTER. You should see a display of the return codes for the job followed by a menu of the sysout data sets for the job. Place an S beside one of the data sets, and you should enter browse for that data set.
Enter END (PF3) to return to the sysout data set menu. Enter END again to return to the list of jobs. END again will take you back to the IOF Option Menu. From there you can select another option or enter END again to return to ISPF (or TSO READY).
At most sites any option on the IOF Option Menu can be entered anywhere in IOF to jump directly to that option. At all sites you can select a new IOF option from anywhere within IOF by preceding the desired option with a "/". For example, you can enter /M anywhere in IOF to get immediately to the IOF System Monitor Display. The IOF Quick Reference Summary card provides information to assist you in further testing of IOF features designed for systems operators and support personnel. Chapter 2 of the IOF User Guide contains a detailed sample session.
To see the jobs that belong to you, press ENTER on the IOF Option Menu without entering any other parms. See options member A40SCOPE for a description of the jobs that are considered by IOF to belong to you. You can also go directly to your jobs from outside IOF by entering “I.” on the ISPF Primary Options Menu or “IOF *” from TSO READY. See Chapter 9 for more discussion of job ownership options for IOF.
You can reverse the meaning of “I” and “I.” under ISPF using option A70FLOW. You also can reverse their meanings for selected user groups using the INITCMD= parm on GROUP macros in options member B23ALLOW. This might be desirable for many end users since they may wish to look at only their own jobs. IOF is structured with all jobs on a single menu, so end users normally will not need to use the IOF Option Menu.
Changing "A" or "B" Options During Testing
If you discover during testing that you want to change one or more "A" or "B" options, modify the associated options members and regenerate the load modules. The type of generation needed depends on the options that you change.
Each "A" and "B" option is labeled as requiring either a "full generation" or an "abbreviated generation". If you change any option designated as requiring a full generation, you should run the M13GEN job to rebuild the load modules and then run M14COPY to copy the new load modules into your system library.
If all of the options that you change are "abbreviated generation" options, then run job M18NEWOP to perform the abbreviated generation and copy the options load module into your system library. Comments in the options
7 2. Testing and Installing the Initial Generation

members clearly indicate whether they are "full generation" or "abbreviated generation" options.
Changing "C", "D", or "K" Options During Testing
If you discover during testing that you need to change one or more "C", "D", or "K" options, you should modify the associated options members, run the M10INIT job to recreate the install library, run M13GEN to rebuild the load modules, and then run M14COPY to copy the new load modules to your system library.
Installing ISPF, HELP and CLIST Libraries for Production
If you want to install the ISPPLIB, ISPMLIB, ISPTLIB, HELP, and CLIST libraries by copying them into your production libraries, submit the M15COPY job. This will copy the distribution libraries into the production libraries that you specified in the options members C60PLIB, C61MLIB, C62TLIB, C63HELP, and C65CLIST.
Installing IOF System Log Access and Management (IOF/SLAM)
See Chapter 8 for a description of the installation process for the IOF system log index.
Activating IOF Sysplex Features
If you are running a sysplex, see Chapter 28 for a description of IOF features that can help you manage your sysplex environment. Some of these features have additional installation requirements.
8 2. Testing and Installing the Initial Generation

3. Options Changes Requiring Full Generation
Follow the steps below if you want to change a "full generation" run option after the product has been installed in production. The run options have member names beginning with "A" or "B". The comments in the run options members clearly indicate whether they are "full generation" or "abbreviated generation" options. If you want to change only "abbreviated generation" options, see Chapter 4 for these procedures.
Since the procedures for the abbreviated generation options are completely contained in the full generation process, you only need to follow the full generation procedures when changing both.
Make Desired Options Changes
Edit the "A" and/or "B" options members that contain the desired options. Members A00INDEX and B00INDEX can be browsed to help determine which members need to be changed.
Generate the New Load Modules
Submit job M13GEN to perform the necessary assemblies and produce the product load modules.
Install Test Versions of Load Modules
Submit job M56TEST to copy the new load modules to the system library (specified in C64LINK) with new names that will not conflict with your production module names. Note that these modules will not run from STEPLIB. To test the new modules, create an ISPF panel to select IOF as follows:
PGM(IOFSPF#) instead of PGM(IOFSPF)
When you select "I" from this panel, you will invoke the new test version of the product. To test the new version under TSO READY enter the IOF# command instead of the IOF command.
3. Options Changes Requiring Full Generation 9

Install New Modules as Production
After testing is completed, submit job M14COPY to copy the new load modules to your system library as the production versions. If you want to preserve the previous production versions of the load modules, you can rename them before running the M14COPY job.
10 3. Options Changes Requiring Full Generation

4. Options Changes Requiring Abbreviated Generation
You can follow the steps below if you want to change only "abbreviated generation" run options after the product has been installed in production. The run options have member names beginning with "A" or "B". The comments in the run options members clearly indicate whether they are "full generation" or "abbreviated generation" options.
If you want to change a full generation or a combination of full and abbreviated generation options, follow the full generation procedure described in Chapter 3.
Make Desired Options Changes
Edit the "A" and/or "B" options members that contain the desired options. Members A00INDEX and B00INDEX can be browsed to help determine which members need to be changed.
Skip to Directly Replace Production Options Module below to install your options changes directly to your production IOF, or follow the instructions below to create a test module and test it in parallel with your production IOF.
Create Test Version of Options Module
Submit job M17TRYOP to rebuild just the options load module and install it with a new name in a systems library for testing. You must refresh LLA after running M17TRYOP. This will not effect your production IOF. Note that the options module will not run from a STEPLIB.
Test the New Options Module
To test the new options module, invoke IOF from ISPF by entering:
I.$ALTMOD(U #)
From TSO READY, you can test by entering:
IOF $ALTMOD(U #)
In either case you will be running your production base load module with your new options module.
4. Options Changes Abbreviated Generation 11

Directly Replace Production Options Module
Submit job M18NEWOP to install the new options load module (IOFTvvvU) into your system library. Since this will replace your current production options module, you might want to rename it before running M18NEWOP. You must refresh LLA after running M18NEWOP
12 4. Options Changes Abbreviated Generation

5. Installing a New Release of IOF
This chapter describes how to install a new release of IOF after the product has previously been installed. The new release can be installed and tested in parallel with your production version, and can be made the production version after testing is complete.
To install the new release from our web site, see the instructions at:
• http://www.triangle-systems.com • Click on "IOF Technical Support" • Click on "Order or Download the Latest Release"
To load IOF from a CD or tape, see the instructions in the IOF 8A Release Guide which is shipped with the product.
5. Installing a New Release of IOF 13


6. Testing a New Version in Parallel with Production
This is a description of the steps necessary to install a new version of the product for testing in parallel with your existing production version. This procedure assumes that the product load modules have already been generated by the M13GEN job.
Test Environment for Product Load Modules
Submit the M32COPY job to copy the product load modules that must reside in a system link list library into the library specified in your C64LINK options member. These module names will not conflict with the current production module names since these load module names contain the version and level id for this new release of the product.
The IOF and IOFSPF load modules are not copied by the M32COPY job above. If you copied them into a link list library, they would become your current production versions of those modules. Since the IOF and IOFSPF load modules are internally programmed to invoke a specific version and level of IOF, any user who requested IOF from the ISPF Primary Options Menu would invoke the new IOFSPF. This would in turn invoke the new load modules copied above with the M32COPY job. In effect you would have installed the new version as your production IOF.
To avoid this conflict you can test the IOF and IOFSPF load modules from a STEPLIB in your TSO session. The logon procedure described below has a STEPLIB DD statement pointing to the new product load module library. When you logon with this procedure, you will invoke the new versions of IOF and IOFSPF which will invoke the new load modules copied by M32COPY above.
It is important to point out that this test procedure will not work if the M32COPY job above is not executed. The load modules copied by M32COPY will not execute from a STEPLIB and must be run from a system link list or LPA library.
Test Using the IOF8A REXX Exec
IOF8A REXX exec resides in the IOF CLIST library. This exec sets up the proper IOF environment of release 8A and initiates a release 8A IOF session. To execute the exec:
6. Testing a New Version in Parallel with Production 15

• Copy IOF8A to a system SYSPROC or SYSEXEC library and enter from any ISPF panel:
"TSO IOF8A"
• From ISPF Option 6, enter:
"ex 'ppp.IOFT8A0.CLIST(IOF8A)'
Specify the fully qualified name of the IOF release 8A CLIST library.
Create a Logon Proc for Testing
Create a TSO logon procedure to test the product. Add the following IOF libraries to the front of the concatenation for the indicated DD names:
STEPLIB New IOF LOAD Library ISPPLIB New IOF ISPPLIB Library ISPMLIB New IOF ISPMLIB Library ISPTLIB New IOF ISPTLIB Library SYSPROC New IOF CLIST Library SYSHELP New IOF HELP Library
Testing the New Version
To test the new version of the product, logon with the logon procedure created above. When you enter "I" on the ISPF panel that invokes your production IOF, the IOFSPF load module will be loaded from the STEPLIB and will in turn invoke the new version of the product.
When you enter "IOF" at the TSO READY level (or under Option 6), the IOF command load module will be loaded from the STEPLIB and will, in turn, invoke the new version of the product.
Changing "A" or "B" Options During Testing
If you discover during testing that you need to change one or more "A" or "B" options, you can modify the associated options members and regenerate the load modules. The type of generation needed depends on the options that you changed.
Each "A" and "B" option is labeled as requiring either a "full generation" or an "abbreviated generation". If you have changed any option designated as requiring a full generation, run the M13GEN job to rebuild the load modules. Then, run M32COPY and M57NEW to copy the load modules into your
16 6. Testing a New Version in Parallel with Production

system and CICS libraries. See Chapter 3 for more information about "full generation" options.
If all the options that you changed are "abbreviated generation" options, run job M18NEWOP to perform the abbreviated generation and copy the options load module into your system library. Comments in the options members clearly indicate whether they are "full generation" or "abbreviated generation" options. See Chapter 4 for more information about "abbreviated generation" options.
Changing "C", "D", or "K" Options During Testing
If you discover during testing that you need to change one or more "C", "D", or "K" options, you should modify the associated options members, run the M10INIT job to recreate the install library, and run M13GEN to rebuild the load modules. Then, run M32COPY to copy the new modules into your system library.
Installing the New Load Modules as Production
Submit the M33COPY job to copy the IOF and IOFSPF load modules into your product system link list library. At this time they will replace your previous production versions of those modules and the new modules will become the production versions.
If you want to preserve the old IOF and IOFSPF load modules, you can rename them in your system library before submitting the M33COPY job.
Installing ISPF, HELP, and CLIST Libraries for Production
If you want to install the ISPPLIB, ISPMLIB, ISPTLIB, HELP, and CLIST libraries by copying them into your production libraries, submit the M15COPY job. This job will copy the libraries into the production libraries that you specified in the options members C60PLIB, C61MLIB, C62TLIB, C63HELP, and C65CLIST.
17 6. Testing a New Version in Parallel with Production


7. JES2 Maintenance Considerations
When You Apply JES2 Maintenance
In most cases JES2 maintenance does not affect the operation of IOF. If you do notice problems after applying JES2 maintenance, run the M13GEN job to pick up the maintenance. Then, run the M32COPY job to copy the updated load modules to your system library.
When You Install a New Version of JES2
If you are installing a new version of JES2 (with a new FMID), you will need to re-install the IOF load modules. First, call IOF Technical Support or check the IOF Technical Support section of our website to determine if a new product version is available that is at a higher level than your current production version. You can download MPI files or maintenance required for new JES2 versions directly from the web site. The IOF Technical Support web address is: http://www.triangle-systems.com.
If a Higher Level Release is Available
If a higher level IOF release is available, order or download the new version and follow the instructions in Chapter 5.
After loading the new distribution libraries, update options member C75ASMJS to reference the source libraries for your new version of JES2 before running the M10INIT job. See Chapter 5 for a more information about this procedure. If you are creating a new target MVS system, you also will need to update options member C64LINK before running M10INIT.
If You are Currently Running the Latest Level
If you are currently running the latest maintenance level of the product, follow the instructions in Chapter 13 to create a new set of libraries that can be used as a base for generating the new IOF load modules.
After completing the procedures described in Chapter 13, submit job M13GEN in the new install library to do the necessary assemblies and generate the product load modules.
7. JES2 Maintenance Considerations 19

If you are creating a new target MVS system, you can copy the product load modules to the target link list by submitting job M14COPY. When you logon to the new target MVS system, you will be using the new version of IOF.
If you are installing a new JES2 on your current production MVS system, you should refer to Chapter 6 for information about testing the new version of IOF in parallel with your production version.
20 7. JES2 Maintenance Considerations

8. System Log Access and Management (IOF/SLAM)
IOF can be used to quickly and easily review the system log and sysplex operlog. In addition to being able to go immediately to the bottom (or to any specific time of day), IOF provides an index to important system events, so you can review an entire day's significant log events in a few seconds. In addition, you can easily add your own significant events to be indexed.
You can also retain an index for yesterday's (or any number of previous days') log. This gives you the same convenient access to previous logs that you have for today's current log.
IOF also provides the optional capability to archive old log data and manage the archived copies. It is easy to test this option in parallel with your current capture if you wish. Optionally, IOF can capture the log data to a data set or leave it on the spool for your normal capture process.
The Log Index
IOF allows you immediate access to the log by maintaining a dynamic index that describes the current contents of the log. This index contains information that allows you to quickly position within the log. It also contains an index of important log events that you can request while reviewing the log.
The Log Indexing Task
The IOF log index is a data set that is periodically updated by the IOF log indexing task. This task is a continuously running batch job (or started task) that wakes up every two minutes and updates the IOF log index to include the log records written since the last update. IOF provides procedures to index both the system log (SYSLOG) and the sysplex operlog (OPERLOG).
Indexing the System Log (SYSLOG)
The procedure below can be used to start the system log indexing task as a started task or to execute it as a batch job:
8. System Log Access and Management (IOF/SLAM) 21

//SLAMRUN PROC CLASS=X,OPT= <=== Class //SLAM EXEC PGM=IKJEFT1B,PARM='SLAMRUN &OPT' //SYSPROC DD DISP=SHR,DSN=clist.library.name <=== Clist //SYSTSPRT DD SYSOUT=&CLASS Library //SYSTSIN DD DUMMY
Indexing the Operlog (OLOG)
The procedure below can be used to start the operlog indexing task as a started task or to execute it as a batch job:
//SLAMOPER PROC CLASS=X,OPT= <=== Class //SLAM EXEC PGM=IKJEFT1B,PARM='SLAMOPER &OPT' //SYSPROC DD DISP=SHR,DSN=clist.library.name <=== Clist //SYSTSPRT DD SYSOUT=&CLASS Library //SYSTSIN DD DUMMY
Change the SYSPROC DD statement in both the sample procedures above to point to your distribution IOF CLIST library and select a sysout class for the SYSTSPRT DD statement. After installing the procedure(s) above, the sample job(s) below can be submitted to test the log indexing tasks.
To index SYSLOG:
//SLAMLOG JOB acct,user-name,TIME=5, // USERID=authid <=== Userid // PASSWORD=password <=== Password //ACTIVE EXEC SLAMRUN
To index Operlog:
//SLAMOPER JOB acct,user-name,TIME=5, // USERID=authid, <=== Userid // PASSWORD=password <=== Password //ACTIVE EXEC SLAMOPER
The userid for the jobs must have the authority to browse the system log or operlog. SLAMRUN and SLAMOPER can also be run as started tasks. Started tasks are normally permitted full access to all IOF functions.
If your site runs a parallel sysplex operlog facility, we recommend that you also run SYSLOG on each system in the sysplex. IBM seems to agree with this recommendation. In addition to the SLAMOPER task to index the common log, you should run the SLAMRUN task on each system in the sysplex. Indexing all system logs and the common operlog provides the ability to browse the common log or the logs of individual systems.
If your site runs the sysplex operlog but does not run the system log, you may want the ability to browse operlog records segmented by system. To do this, you must build a filtered operlog index for each system. In addition to the common SLAMOPER task shown above, you must run a SLAMOPER task as shown below for each system. Specify the system id for each system in the OPT parm.
//SLAMOPR1 JOB acct,user-name,TIME=5, // USERID=authid, <=== Userid // PASSWORD=password <=== Password
22 8. System Log Access and Management (IOF/SLAM)

//ACTIVE EXEC SLAMOPER,OPT='SYSID(sid1)' <=== Sysid
The name of the system log index data set is:
prefix.logname.$syid.suffix
prefix PREFIX = value from options member B32INDEX logname LOGNAME = value from options member B30SLAM
(normally SYSLOG) $syid SYSID=YES in options member B30SLAM, this is a "$"
followed by the system id for the system being indexed. Suffix SUFFIX = value from options member B32INDEX
The name of the combined operlog index data set is:
prefix.OPERLOG.suffix
prefix PREFIX = value from options member B32INDEX OPERLOG Constant Suffix SUFFIX = value from options member B32INDEX
The name of the individual system operlog index data sets are:
prefix.OPERLOG.$syid.suffix
prefix PREFIX = value from options member B32INDEX OPERLOG Constant $syid "$" followed by the system id for the system being
indexed. Suffix SUFFIX = value from options member B32INDEX
If you start the SLAM task late in the day, it may take several minutes for it to scan and index all of the system log data already written for the day. You should wait for it to finish its initial scan of the log data before trying to use the index. After the initial scan, it will pause for about two minutes, wake up and perform a minor update of the index, and then pause again. This cycle will continue until you stop the indexing task. (See the section below, Controlling the Indexing Task.)
After you see the SLAM job swap out, the index will be ready to use.
Using the Log Index
Enter "LOG" on the IOF Option Menu (or "/LOG" from anywhere in IOF) to browse the system log and/or operlog. The LOGTYPE parm on the GROUP macro in the B23ALLOW IOF option member defines which type of log is to be displayed by default.
LOGTYPE has three acceptable parms. LOGTYPE=SYSLOG is the default and sets system log as the default log type. LOGTYPE=OPERLOG sets operlog as the default. LOGTYPE=OPERACT sets operlog as default, if it is active, but reverts to the system log if the operlog is not active.
23 8. System Log Access and Management (IOF/SLAM)

Users can override the default log type by using the LOGTYPE command from any IOF panel. Enter LOGTYPE SYSLOG, LOGTYPE OPERLOG, or LOGTYPE OPERACT to specify the desired default log type. The default log type specified is saved in the user's profile.
The default log type and/or system id can be overridden with a parm on the LOG command.
Syntax
LOG [S /SYSLOG /O / OPER/ OLD/ ARCH/ sysid] [sysid]
S or SYSLOG. System log
O or OPER. Operlog
OLD. Old logs as described below
ARCH. Archived logs as described below
sysid. System id of operlog or system log
Examples:
LOG S. Displays SYSLOG
LOG S A997. Displays SYSLOG for sysid A997
LOG O. Displays OPERLOG
LOG. Displays OPERLOG or SYSLOG as defined by the LOGTYPE parm
LOG OLD. Displays menu of old system logs if LOGTYPE=SYSLOG. Under ISPF only, if LOGTYPE=OPERLOG displays a table of available old operlogs
LOG -1. If LOGTYPE=OPERLOG, displays the operlog for yesterday (-1 days ago)
LOG O -2. Displays day-before-yesterdays operlog
LOG O 321. Displays operlog for day-of-year number 321 if available
Entering the LOG command for either the system log or the operlog will go directly to the bottom of browse for the selected log. Enter "LOC 1539" to position to 15:39 in the log. Enter "LOC 0715" to position to 7:15.
24 8. System Log Access and Management (IOF/SLAM)

Enter "INDEX" to display the IOF Data Indices menu. A sample indices menu for the system log is shown below. The operlog index is similar.
Each item on this menu describes an index that has been built by the indexing task. The count field is the number of log records pointed to by that index. The description field shows the type of log record pointed to by that index.
The first index ( # ) contains pointers to the first and last records in the current system log. The description field for this index shows the node name, system id, starting date, and starting time for the current log. If you selected this index from the menu (by placing "S" beside it), you would see the first and last indexed records in the current log.
The second index above ( DEVICE ) contains pointers to three log records that describe device I/O errors. If you select that index (by placing an "S" beside it), you would see:
------------------------------ IOF DATA INDICES ------------------------------- COMMAND ===> SCROLL ===> CURSOR ---------NAME------COUNT--DESCRIPTION------------------------------------------ _ 1 # 2 Node MIAMI Sysid ESA7 on 97248 _ 2 DEVICE 3 Device I/O errors _ 3 ENQ 104 Jobs delayed by enqueued MVS data sets _ 4 ERROR 2 System errors _ 5 JES2 45 JES2 errors and minor events _ 6 MISC 3 Miscellaneous events of interest _ 7 97248 789 Friday in one minute intervals
------------------------------- IOF DATA INDEX -------------------------------- COMMAND ===> SCROLL ===> CURSOR ------------------------------------------------------------------------------- _ 1 97248 03:17 Disk 37D had IOS000 error 01,DCK _ 2 97248 10:09 Disk 584 had IOS000 error 01,ICC _ 3 97248 10:35 Disk D75 had IOS000 error 01,EQC
This index is easy to read and understand. If you select one of these items from the menu, you will enter browse of the system log at that specific record. Once in browse you can use all IOF browse services. "END" will return you to the IOF Data Index for device errors. "END" again will return you to the IOF Data Indices menu.
As illustrated, you can jump into an index and then directly into the system log for a particular index entry. This makes it easy for you to quickly review important system events by simply checking the index.
25 8. System Log Access and Management (IOF/SLAM)

Controlling the Indexing Task
The indexing task can be controlled with the MVS STOP and MODIFY commands. If your active indexing task is SLAMRUN:
P SLAMRUN Causes the indexing task to terminate F SLAMRUN,RESET Tells the indexing task that the current log
has been captured and that a new index for the new log data should be started. This is the default action when the log is captured; normally this command will not need to be entered.
F SLAMRUN,REFRESH Tells the indexing task that you changed one or more index definitions and that it should incorporate the new index definitions before continuing to index the log.
The SLAMOPER task accepts the same modify commands as SLAMRUN. Also, SLAMOPER accepts one additional modify command:
F SLAMOPER,NEWINDEX Tells the indexing task to spin off an index for yesterday.
This command normally does not need to be entered. By default SLAMOPER automatically spins off an index for the previous day and resets the current index at midnight. This allows the "LOG -1", "LOG 321", and "LOG OLD" commands described above to function as designed.
Indexing Your Own Selected Log Records
You can expand the log index for both the system log and the operlog to include index pointers to log records for events that are of special interest to your installation. Modify the SLAMINST clist to add your own index or to add additional events to an existing index. See clist SLAMDEF for examples of defining indices and adding entries to indices.
The HCFORMAT(CENTURY) parm on the HARDCOPY statement in the CONSOLxx member of SYS1.PARMLIB specifies that a 4-digit year should be used in system log date stamps. SLAMRUN automatically detects the number of digits being stored in the log and sets variable YEARSIZE to a value of 2 or 4. YEARSIZE affects the columns where data is saved in the log. The value can be used in SLAMINST and SLAMDEF to define IOF fields to the proper columns.
IOF formats a 2-digit or 4-digit year when displaying operlog data based upon the HCFORMAT specification in the CONSOLExx member of the system parmlib. This causes the IOF operlog format to be the same as the syslog format.
26 8. System Log Access and Management (IOF/SLAM)

The indexing task can be told to dynamically include changes to SLAMINST by entering the MVS command "F SLAMRUN,REFRESH" (as described in the previous section).
See the IOF User's Guide for information about the commands used in the SLAMINST clist.
Options for the Indexing Task
There are several options that can be specified in the OPT= parameter when the SLAMRUN or SLAMOPER procedure is invoked. See the SLAMRUN and SLAMOPER clists in the IOF clist library for a complete description of the available options. To specify your desired options, enter them in the OPT= parameter when invoking the SLAMRUN or SLAMOPER procedure. For example:
//SLAM EXEC SLAMRUN,OPT='USERID(SMITHJ)'
Indexing Yesterday's System Log
IOF provides a way for you to save yesterday's system log and index it just as your active log is indexed. To save yesterday's log, run the SLAMMEMO job after you write the log (WRITE LOG command) but before you run your capture.
This job will copy the day's system log data to a sysout data set and then index it as it was indexed when it was the active log. It will not affect your production system log data in any way. After SLAMMEMO completes, you can run your normal log capture procedure.
You can then enter "LOG?" on the IOF Option Menu to display the IOF System Log Option Menu. That menu shows how to select and review old system logs. You can also enter "/LOG OLD" from any IOF display to go directly to the display of old system logs. Enter the "V" line command to browse one of the old logs.
You can keep as many SLAMMEMO jobs as you wish. Each SLAMMEMO job represents one day's system log, and the IOF System Log Menu will let you display all of the existing old logs. You may want to keep only yesterday's log, or you may want to keep the logs for the previous week. The MEMODAYS parameter defines the number of old logs you want to keep.
Remember that this process does not affect your normal log capture in any way.
The following procedure can be used to invoke SLAMMEMO:
27 8. System Log Access and Management (IOF/SLAM)

//SLAMMEMO PROC CLASS=X,OPT= <=== Class //SLAM EXEC PGM=IKJEFT1B,PARM='SLAMMEMO &OPT' //SYSPROC DD DISP=SHR,DSN=clist.library.name <=== Clist //SYSTSPRT DD SYSOUT=&CLASS Library //SYSTSIN DD DUMMY
To save the previous week's system log data for easy review, run the following job after your WRITE LOG command but before you run your normal log capture:
//SLAMMEMO JOB acct,name,TIME=5, // USERID=authid, <=== Authorized userid // PASSWORD=password <=== Password //COPYLOG EXEC SLAMMEMO, // OPT='LOGCLASS(x),MEMOCLAS(y),MEMODAYS(7)' //
The userid above must be authorized to browse the system log. LOGCLASS is the sysout class where your log is written with the WRITE LOG command. MEMOCLAS is the sysout class to be used by the SLAMMEMO job for the copy of the log data. "MEMODAYS(7)" says that you want to keep indices for the previous seven days' log.
The MEMOJOB= parm in options member B30SLAM must match the job name that you use for this job. If you want to name it something other than SLAMMEMO, you must update the B30SLAM options member.
There are several options to the SLAMMEMO procedure that can be specified in the OPT= parameter. These options are documented in the SLAMMEMO clist. To specify options, append them to the values in the OPT= parameter when invoking the SLAMMEMO procedure. For example:
//COPYLOG EXEC SLAMMEMO, // OPT='LOGCLASS(L),MEMOCLAS(A),MEMODAYS(7),SYSID(IPO1)'
You can start the SLAMMEMO procedure as a started task.
There is no need to write memo copies of the OPERLOG. The NEWINDEX feature of SLAMOPER accomplishes this objective of providing browse access to old operlog data.
Capturing Log Data
You can use IOF to capture the previous day's log data. IOF will allocate and manage the captured data. If you are interested in using this facility, you should consider running it in parallel with your current capture procedure for a while before converting your production capture to use IOF.
This is easy with IOF because you can capture the data and request that it be left on the spool. The following procedure can be used to archive system log data:
//SLAMARCH PROC CLASS=A,OPT=
28 8. System Log Access and Management (IOF/SLAM)

//SLAM EXEC PGM=IKJEFT1B,PARM='SLAMARCH &OPT' //SYSPROC DD DISP=SHR,DSN=clist.library.name //SYSTSPRT DD SYSOUT=&CLASS //SYSTSIN DD DUMMY
SLAMARCH allocates an output data set to which SYSLOG will be copied. The data set name prefix is defined in the B30SLAM member of the IOF OPTIONS data set. The system id and date/time range contained in the captured log is also included in the generated data set name. UNIT, VOLSER, and SMS specifications of the output data set can be specified in the OPT parm. See the clist PROC statement for a detailed description of all the available parms.
The following job will use the SLAMARCH procedure above to capture class "L" system log data without disturbing it on the spool.
//LOGARCH JOB acct,name,TIME=5, // USERID=authid, <=== Authorized user // PASSWORD=password <=== Password //SLAMARCH EXEC SLAMARCH, // OPT='LOGCLASS(L) LOGDISP(KEEP) VOLSER(AR1911) PACK'
The userid above must be authorized to browse the system log. The data will be packed using the ISPF edit/browse pack technique. LOGCLASS is the sysout class where your log is written by the WRITE LOG command. The archive data set will be allocated on the AR1911 volume.
This job will copy the log data for you but leave the data on the spool so that your normal capture process, such as the SLAMWTR command can dispose of it. To cause the job above to copy the log and then delete the spool data, change "LOGDISP(KEEP)" to "LOGDISP(CANCEL)". The job will then function much like an MVS External Writer. The system log data will be copied and then deleted from the spool.
SLAMARCH has several additional options. These options are described in detail in the SLAMARCH clist PROC statement. Options can be specified in the OPT= parm. For example:
//CAPTURE EXEC SLAMARCH, // OPT='LOGCLASS(L) LOGDISP(KEEP) SYSID(IPO1) DATACLAS(ARCH)'
Procedures to archive the operlog are currently being developed. The code to perform these functions is written as clists and/or Rexx execs. Once completed, the clists and/or execs will be available on our web site for downloading. The web site address is:
http://www.triangle-systems.com
If you are running operlog and are interested in making archive copies of the operlog data, check the web site to determine what is available. If you don't have access to the web, email [email protected] for assistance.
29 8. System Log Access and Management (IOF/SLAM)

Capturing Log Data to Tape or Other User Managed Media
You can also use IOF to capture the previous day's system log data to a data set of your choice. The SLAMWTR procedure can copy log data to tape or other target media. SLAMWTR does not manage the output data for you, however. The following procedure can be used to capture system log data.
//SLAMWTR PROC CLASS=x,OPT= <=== Sysout //SLAM EXEC PGM=IKJEFT1B,PARM='SLAMWTR &OPT' class //SYSPROC DD DISP=SHR,DSN=clist.library.name <=== Clist //SYSTSPRT DD SYSOUT=&CLASS library //SYSTSIN DD DUMMY
The following job will use the SLAMWTR procedure above to capture your system log data:
//CAPTURE JOB acct,name,TIME=5, // USERID=authid, <=== Authorized user // PASSWORD=password <=== Password //CAPTURE EXEC SLAMWTR, // OPT='LOGCLASS(x),LOGDISP(CANCEL)' <=== Write Log //CAPTURE DD target.data.set.specs class
The userid above must be authorized to browse the system log. LOGCLASS is the sysout class where your log is written by the WRITE LOG command. The CAPTURE DD statement specifies the target data set for capturing the system log data.
There are several options that can be requested in the OPT= parameter of the SLAMWTR procedure. These options are described in the SLAMWTR clist.
30 8. System Log Access and Management (IOF/SLAM)

9. Access Control Overview
By default IOF allows most users to control only their own jobs, while a user with OPERATOR authority is allowed to control all jobs in the system. You have the ability to change the default rules to match the requirements of your installation.
This section describes some simple procedures that can be used to maintain the access rules for IOF. See Chapter 27 for more detailed information about IOF access control.
SDSF Considerations
This topic should be skipped unless you previously used IBM's SDSF product to view output under TSO. The initial install process, described in Chapter 1, includes the ability to convert your current SDSF ISFPARMS data set to comparable IOF access control rules. If you chose that option, a new B23ALLOW options member was created for you that contains the GROUP, ALLOW, and LIMIT macros necessary to simulate your current SDSF access control environment.
You may wish to review the new B23ALLOW options member:
• One IOF GROUP macro is generated for each ISFGRP macro. Permissions are granted by ALLOW macros that point back to the GROUP macros.
• The default IOF options menu for end users is OPTUS1. This menu is used instead of the system programmer default (OPTOPT) if the SDSF group does not specify either PR, DA, INIT, or LOG in the AUTH= parameter. You can change this by changing the PANEL= parm on the GROUP macro.
• All users are allowed to control the jobs they submitted. To change this, modify the ALLOW macros labeled MY1, MY2, MY3, MY4, and MY5.
If you are using the IBM defined SAF classes JESSPOOL, OPERCMDS, WRITER and SDSF to control access to SDSF resources, IOF can honor your existing SAF rules. Access to IOF functions, commands and displays will be virtually identical to the SDSF access to the same features. To cause IOF to honor the IBM-defined SAF rules, specify "IBMSAF=YES" in the A60ACF option. Note that IOF LIMIT macros will always be strictly enforced, even if IBM SAF rules are being used.
9. Access Control Overview 31

Important note: If you enable the JESSPOOL, OPERCMDS, WRITER and/or SDSF SAF classes without proper rules and profiles in place, you may inadvertently permit access to IOF resources.
Adding New Access Control Rules
If you have only the CICS version of IOF, you must add new access control rules by directly editing the ALLOW and LIMIT macros in options member B23ALLOW. However, IOF/TSO provides a simple ISPF dialogue interface to assist you in building new ALLOW and LIMIT macros. If you have both versions of IOF, you can copy your IOF/TSO access control options into IOF/CICS.
Enter the ALLOW command from any IOF panel under ISPF to invoke the dialogue. You will be prompted by a series of ISPF panels for the information necessary to build ALLOW and LIMIT macros. You optionally then can have the new ALLOW/LIMIT macros appended to your production B23ALLOW options member.
Even if you do not use this mechanism to update your B23ALLOW member, it is still a very good way to learn how ALLOW and LIMIT macros are used.
Deleting Access Control Rules
Edit options member B23ALLOW to delete access control rules. You will normally be deleting or modifying an ALLOW or LIMIT macro.
Using RACF, Top Secret, or ACF2 to Control IOF Access
IOF allows you to control access with your external security system:
• Use options member A60ACF to specify which security system you have and whether operators and started tasks should be given access without requiring rules in the security system.
• Use options member B24ACFDF to select the types of access you want to control with your security system.
• If your security system is RACF, enter the ACF command from any IOF panel under ISPF to maintain your security system rules for IOF access. This function is not available in IOF/CICS.
• IOF/CICS users should review Chapter 26, CICS External Security Considerations, of the IOF/CICS Install Guide for important information about IOF security in a CICS environment.
IOF checks the IBM defined JESJOBS class before canceling jobs. If you enable the JESJOBS class, you should also add rules or profiles to control access to cancel jobs.
32 9. Access Control Overview

Access Control Trace
To see exactly how IOF validates access to IOF functions, see the section, IOF Trace Facility, in Chapter 15.
33 9. Access Control Overview


10. Attributes and Options for User Groups
Each IOF user is assigned to a group at the start of each IOF session. Options member B23ALLOW defines which users belong to each IOF group. In addition to indicating which jobs, output groups, devices, etc. that the users are allowed to access, group membership also has certain other implications.
You can specify the following attributes for groups of users using GROUP macros in the B23ALLOW options member:
• What jobs are displayed on their default IOF Job List Menu. • Whether the user's TSO session is to be included on their default Job List
Menu. • A limit to the number of sysout records that can be scanned in a single
FIND command. • A minimum time delay between times that the user can hit ENTER to
refresh their IOF Job List Menu. • Whether the user is allowed to use the EXTEND command for the IOF
Job List Menu. • A minimum pause interval for the EVERY and PAUSE commands. Or,
you can disable these commands. • The WTOR route codes for action messages to be displayed at the
bottom of the system log browse. • Default options for the IOF Monitor Display, including the ability to prevent
access to the display. • The default system id for system log browse. • Alternate display formats, described in Chapter 11, for certain display
panels. • Whether the user is to enter the IOF Job List Menu or the IOF Option
Menu when they invoke IOF with no parms. • An alternate options menu to display options and accept session parms. • A special subset of the global commands table that applies only to users
in the group. • Whether the user is allowed to use the DR command. • Whether the user is allowed to use the INPUT command on the IOF Job
Summary. • The specific options that will be displayed on the IOF Option Menu for
members of the group.
10. Attributes and Options for User Groups 35


11. Controlling Display Formats
Users can tailor most IOF display formats to fit their personal needs and preferences using the CUT, PASTE and ARRANGE commands. Panel modifications are saved in the user's profile until deleted. Enter "HELP ARRANGE" for a description of CUT, PASTE and ARRANGE, or see Chapter 6, Customizing IOF Panels, of the IOF User's Guide.
If you need to globally change the default formats on one or more IOF panels, options member B68FORMT tells you how. By changing B68FORMT you can alter the default display formats for all users. By creating new SECTION macros and pointing to them with the FORMATS= operand of GROUP macros, you can select different display formats for different groups of users.
You can also change the default sort order for specific sections with SECTSORT macros.
See options member B68FORMT for a description of the SECTION macro and its relationship to the GROUP macro. Modifying the B68FORMT options member requires an abbreviated generation as detailed in Chapter 4 of this guide.
11. Controlling Display Formats 37


12. Installing and Maintaining Source Mods
Before deciding to make a change to one of the product source modules, you should carefully investigate the possibility that your requirement can be met by using some combination of product options. Each release of IOF contains new options that can be used to eliminate user modifications. Please contact [email protected] if you are considering source changes. We will be happy to help you find a way to accomplish your objectives without source modifications.
This is a description of a procedure for modifying the product that makes it possible to carry forward your source modifications to new releases. This procedure is not necessary if you are only changing options in the options library. In that case, you should refer to Chapter 3 or Chapter 4 for instructions.
Before making any source modifications to the product, you should create a new set of libraries. This will enable you to create, test and maintain your modifications independently from the base libraries. See Chapter 13 for the procedure to generate a new set of libraries.
Do not proceed to the steps below until you have followed the instructions in Chapter 13 to generate a new set of libraries. You must follow this procedure in order to receive technical assistance with your modifications. If you choose to skip this step and update the source directly, we can not assume the responsibility for helping you carry forward your changes to the next release level of IOF. We will not be able to help you because it will be impossible to identify and extract the source changes from the old release in order to apply the same changes to the new release.
Please contact technical support if you have any questions about this policy. We will try to help you understand the problems created when modifications are developed that cannot be easily identified and applied to subsequent releases. We will be glad to answer any technical questions about the update procedure itself.
Create Source Updates
Each source update should be created as an IEBUPDTE input data set and stored in the newly created version of the product updates library. The member names in the updates library will be referenced in control statements described below.
12. Installing and Maintaining Source Mods 39

Each member of the updates library should only contain source updates for a single source module, and each update member should include exactly one "./ ADD" or "./ CHANGE" statement. However, multiple update members may contain updates to the same source module.
Add a Control Statement for each Update Member
Edit the options library member D55UPSRC to add a %VUPDATE or %VADD statement for each update member that you have added to the updated library. The comments in member D55UPSRC describe the %VUPDATE and %VADD control statements.
Create the Job to Update the Source Library
Submit the M52UPSR# job to generate job M52UPSRC which can be used to apply all of the source updates that were described in options member D55UPSRC. If you need to add other members to the updates library, you should update options member D55UPSRC and rerun M52UPSR# to recreate the M52UPSRC job.
It is not necessary to rerun the M52UPSR# job if you only are changing an existing member of the updates library. You need to rerun M52UPSR# if you have added, deleted, or renamed members in the updates library. Remember that options member D55UPSRC must accurately reflect the contents of the updates library or job M52UPSR# will not generate the correct update steps.
Update the Source Library
Submit job M52UPSRC to apply your updates to the source library. The updates will begin with the source members from the original distribution library and update them into your current source library.
Thus, you can rerun the M52UPSRC job at any time and it will go back to your original distribution source, apply all of your updates, and store the updated modules into your current source library.
Assemble Affected Source Modules
If only the JESCTL or OPTIONS source members are affected, you can submit the M13GEN job to assemble the modified source modules and produce the product load modules. In that case proceed directly to the section below, Test the New Product Load Modules.
If you have made source changes that affect source modules other than JESCTL and OPTIONS, you should submit job M70ASM# to generate an assembly job for each source module in the source library. Refer to install
40 12. Installing and Maintaining Source Mods

library member M00INDEX for a list of the names of assembly jobs for the various source members. The member names start with M71JESCA.
Submit the generated assembly jobs for the source members (other than JESCTL and OPTIONS) that you need to assemble. Then, submit job M13GEN to assemble JESCTL, OPTIONS, and generate the product load modules.
Test the New Product Load Modules
See Chapter 6 for information about testing a new version of the product in parallel with your production version.
41 12. Installing and Maintaining Source Mods


13. Generating an Installation Version of the Product
This is a description of how to create a new set of product libraries that can be used to apply installation modifications to the product.
Each set of product libraries has a three character version and level identification. The first two characters represent the base tape version and match the last two characters of the volume serial of the tape from which the libraries were loaded. The third character is the level identifier and is always "0" for the libraries that are initially loaded from a tape or MPI file.
For example for Release 8A, the base version identifier would be "8A" and the last character would be "0". So, the complete version and level identifier would be "8A0".
The third character, or level identifier, can be used by the installation to indicate local levels of the product that are based on a particular tape release. Using the above example, an installation could create a set of libraries with a level identifier of "1". In this case the complete version and level identifier would be "8A1".
If you already have the product installed in production with a certain set of changes applied (say at level "8A1") and you want to make some additional changes, you can create another installation level (say "8A2") to begin your new changes.
This mechanism allows you to proceed with modifications in an orderly fashion without impacting your current production product or the libraries from which it was generated.
The steps below describe how to create a new installation level of the product libraries.
Select an Installation Level Identifier
Select the one-character installation level identifier. If this is the first installation level since this version of IOF was installed, it would normally be designated as "1." You can use any alphanumeric character that you wish as long as you have not already used it for this version of IOF.
13. Generating an Installation Version of the Product 43

Create the Job to Generate the New Libraries
Edit job M50DISK# to specify your selected installation level identifier in the LEVEL operand of the %VGENJOB statement (the last record in the job). Save the new M50DISK# job; then, submit it to create the M50DISK job.
Carefully Review the Generated M50DISK Job
Review the M50DISK job just created to make sure the data set names of the new libraries to be created match the level identifier you selected. Be very careful here. If you run the M50DISK job with data set names that actually match an existing version of product libraries, it will delete all of the existing libraries.
The M50DISK job first deletes the new library names to make it easy for you to rerun the job if for some reason it fails after partial completion. But, this means it can delete a complete set of existing libraries if you make a mistake here.
Create the New Libraries
Submit the M50DISK job to allocate a new set of libraries with the new installation version identifier and copy the current libraries to the new libraries. When this job completes successfully, you will have a new set of product libraries that match the new installation version identifier.
New Versions of JES2
If the new version of IOF is being generated for a new version of JES2, update options member C75ASMJS in the new options library to reference the macro library for your new version of JES2 (SYS1.SHASMAC).
New Target System
If the new version of IOF is being generated for a new MVS target system, update options member C64LINK in the new options library to point to the linklist library for the new target system.
Generate the New Install Library
Submit job M10INIT from the new install library to build the installation jobs in that library. These jobs will be set up so that you can generate and install the product from the new set of product libraries.
44 13. Generating an Installation Version of the Product

Since all of your previous options will be preserved, you will not need to modify the new options library unless you wish to change an option you had specified previously.
Your new set of product libraries is now allocated and initialized. These libraries can be used to generate a new version of the product without disturbing any previous versions of the product libraries.
Note that a small change has been made to M50DISK beginning with release 7F. Now, M50DISK always copies all IOF data sets from the current level to the new level. In older IOF releases, the SOURCE and OBJ data sets were always copied from level 0. The effect of this change is that IOF maintenance and user mods applied at any level will always be carried forward to new levels.
45 13. Generating an Installation Version of the Product

14. Holding Job Printout for IOF
To review the results of a job with IOF, its output must be prevented from printing before the user has a chance to review it. There are two basic approaches that can be used to accomplish this.
The first approach is to simply hold the sysout data sets for a job. In this case, after reviewing the job with IOF, the user can cancel or release it for print.
As an alternate approach, your installation can add a dummy symbolic destination name (such as "TSO", "FETCH", etc.) to the JES2 initialization parms. This symbolic name can be associated with an unused remote number (Rnn) or with an unused local device (Unn). Users can then route their jobs to this destination (with /*ROUTE statements) to prevent them from being printed.
After reviewing such a job with IOF, users can request that IOF route the job's output to a real JES2 print destination (LOCAL, etc.) with the IOF "PRINT" function. IOF provides a profile option that allows users to supply their default real print destination, eliminating the need to supply the destination each time that they ask IOF to print a job. To set a default print destination, the user enters "P.1" on the IOF Option Menu.
If you use this approach to holding jobs, you may need a way to eliminate old jobs from your queue. See Chapter 25 for information about canceling old output from your spool.
14. Holding Job Printout for IOF 47


15. IOF Diagnostic Aids
IOF Technical support is available to assist you if you have trouble installing, tailoring, or running IOF. Additional help can be obtained from the Technical Support Home Page on the Internet at http://www.triangle-systems.com. Many common problems can be quickly and easily solved without assistance using the information in this chapter.
Installation and Generation Problems
# Symptom Solutions
01 M13GEN job assembly errors. a b
02 JESCTL assembly errors (JESCTL step of M13GEN). b a
03 Generation options do not seem to function as described. u v af
04 An IOF superzap fix has no effect. w e f ab
05 The IOF expiration date patch does not extend the expiration date.
x w e f ab ac af
Execution Errors and Abends
# Symptom Solutions
11 Abend 16D, ESR# not found. c
12 Abend Fxx, SVC not found (xx is the hex SVC number specified in A10AUTH options member). d
13 SYSTEM error (Status not returned due to incorrect JESCTL assembly). b a e f ab
14 INIT error - yyyy i
15 System abend 0Cx n
16 "L" option gets "INDEX" error. y ag
15. IOF Diagnostic Aids 49
Batch TSO Clist Problems
Many IOF clists are designed to be run in batch TSO. The SYSTSPRT batch TSO output file contains output that would have been displayed on the terminal if the session were run interactively. Error messages will normally be displayed in SYSTSPRT for batch TSO sessions.
# Symptom Solutions
21 Clist terminates with an error message. (SLAMRUN, SLAMMEMO, SLAMARCH, OUTQUE, IOFWTR, CLEANNDX).
g h q r t
22
Clist gets a REFUSED error. The batch TSO session is not authorized to perform a specified IOF function. (SLAMRUN, SLAMMEMO, SLAMARCH, OUTQUE, IOFWTR, CLEANNDX).
j k q t
23 "FIELD" error (invalid variable name) o g p q s
Generation Parameters Including User Access Control
IOF has several options to allow control of exactly which users can access specific IOF functions. You may want to restrict certain IOF functions for some users, or permit other users to control specific jobs or devices.
# Symptom Solutions
31 Some users get REFUSED error when they use the "LOG" option to review the system log l aa ad
32 Users with operator authority can browse the payroll jobs (or some other type of job that management does not want them to see.)
m aa ae
33 The EXTEND command does not work. s ae
34 End users use the EVERY command to create terminal activity and thus prevent auto-logoff procedures from logging them off.
t ae
35 The print check command (PC) is "REFUSED" z aa
36 Users are "REFUSED" access to functions they are authorized to do. aa v ad ae
37 Users have too much access to IOF functions. aa v ad ae
50 15. IOF Diagnostic Aids

IOF Server and AT Command
An IOF server must be active on a remote CPU in order to use the AT command. The TSO user must be permitted access on the local machine to use the AT command, but the IOF server controls access to what the user can do on the remote machine.
# Symptom Solutions
41 AT or SERVER command is refused. ah 42 Invalid VTAM LU name in B67SERV option. ai
43 Invalid APPC TP name in B67SERV option. aj
44 Commands or functions refused on server. ak
Diagnostic Solutions
a. Check IOF Options library members that you modified. The statement causing the error may be in one of these members. If so, re-read the option description and correct the statement in error.
b. Check the C75ASMJS options member to insure that the proper macro libraries are defined for the version of JES2 that you are running. The SMP MTS data set may need to be included in the library concatenation if you applied but did not accept JES2 maintenance. If C75ASMJS is wrong: (1) correct C75ASMJS (2) rerun M10INIT (3) rerun M13GEN. Then, copy the modules to linklist or LPA via M32COPY, M56TEST, etc.
c. The IOF ESR module is not installed in LPA. "AUTH ESR=" was specified in the A10AUTH option, but IGX000XX was not renamed properly and copied to LPA. Also, insure that another module by this name does not already exist (for some other product) in LPA. See Chapter 2 for more information.
d. The IOF SVC module is not installed. "AUTH SVC=" was specified in the A10AUTH option, but the SVC was not installed properly in the system. Install the SVC as a type 3 SVC. See Chapter 2 for more information.
e. The IOF and IOFSPF load modules are the only IOF load modules that will run from a STEPLIB. Insure that the main module (IOFpvvxM), auxiliary module (IOFpvvxA), user options module (IOFpvvxU), and panel module (IOFpvvxP) reside in a link list or LPA library. These four modules will not run from a STEPLIB.
f. The IOFpvvxM, IOFpvvxA, IOFpvvxU, and/or IOFpvvxP modules are being loaded from the wrong link list library. Perhaps an older copy of the same module exists in a link list or LPA library that is higher in the link list or LPA concatenation than the library currently being tested.
51 15. IOF Diagnostic Aids

g. The TSO batch clist may be running the wrong version of IOF. If you are currently testing Release 8A by using a STEPLIB to the IOF command, you also need a STEPLIB in your batch TSO procedure. The Release 8A versions of SLAMRUN, SLAMMEMO, SLAMWTR, OUTQUE, IOFWTR, IOFPRTSU, and CLEANNDX clists are all designed to be run primarily from batch TSO. Each of these clists issues IOF commands, and requires IOF Release 8A to function properly.
h. If you have more than one started task named SYSLOG running on the sysid that SLAMRUN is trying to index, SLAMRUN will have to be modified slightly to be able to select the SYSLOG that is the real system log. Email [email protected] for assistance in making this modification.
i. Check the region size and the LSQA available to the user. IOF gets most of its memory above the line so memory restriction problems are rare. Under CICS, LSQA shortage can cause this error message.
j. The batch TSO session must be authorized to perform the required function. SLAMRUN and SLAMMEMO browse SYSLOG. SLAMWTR browses and cancels a SYSLOG data set. OUTQUE browses the specified jobs and performs the requested action (cancel, route, etc.). IOFWTR selects and modifies or cancels specified output groups. In most sites, a batch job assumes the same characteristics as the submitter of the job. If the TSO user who submits the job has access to a function, the batch job should have the same access. If the submitter's userid is not automatically given to the batch job, USER and PASSWORD job statement parameters may be required.
k. The distributed B23ALLOW options member defines a started task group, STCGROUP, which is authorized to perform all IOF functions. If you have removed or modified the group macro for STCGROUP, or if you have modified any of the ALLOW macros it references to restrict the access permitted to started tasks, you may have removed the authority for the clist to perform the function it is designed to do. You must grant the task permission to perform the function.
l. Users must be granted permission to browse the SYSLOG job to use the "L" option. The easiest way to build ALLOW macros to grant access to the system log is via the "ALLOW" option. You can also see the B23EX02 member of the IOF SAMPMOD data set for specific information on how to allow all users, or specific users, access to SYSLOG, and thus permission to use the "L" IOF option.
m. The LIMIT macro in the B23ALLOW option can be used to restrict access. The easiest way to build LIMIT macros is to use the "ALLOW" option from the IOF Option Menu and follow the prompts to build the specific restrictions you need. Limits are applied even when a user has generic access to all IOF functions.
n. You may have to contact IOF technical support if you experience an abend situation. IOF normally produces a seven to twelve line diagnostic area whenever it abends. This diagnostic information
52 15. IOF Diagnostic Aids

displays at the terminal and also in SYSLOG. The diagnostic information displayed is often all that is required by IOF Technical Support to diagnose a problem. If you are making modifications to IOF exits or source code, knowledge of the diagnostic area format will also be useful to you.
IOF 8A0 ABEND DIAGNOSTIC AREA 99200.1423 1 0000 840C1000 001107E2 001D050C 000CFFFF *d......S........* <--- abend, coded PSW/R14 2 0010 05985DDC D01407FE 000090EC D00C0700 *.q) :.......:...* <--- PSW addr, 12 PSW bytes 3 0020 071C0000 85985DE2 00020001 00054F00 *....eq)S......|.* <--- PSW, lng, intcode, xadr 4 0030 00000000 05A6FE66 05A6FE28 05A6FE28 *.....w...w...w..* <--- R0 R3 Regs at time 5 0040 00000001 00000000 05A98250 05A982BC *.........zb&.zb.* <--- R4 R7 of abend. 6 0050 0598586C 8598BEFC 8598BDCE 05A6EE80 *.q.%eq..eq...w..* <--- R8 R11 7 0060 0598BD08 05A6F50C 8598C214 05985DE0 *.q...w5.eqB..q):* <--- R12 R15
Line 1 contains the abend code, the coded PSW and coded R14 at the time of the abend. The PSW and R14 are coded so that they can be used to determine where the abend occurred in IOF without the need of a link edit map. In the first example above, line 1 col 1 contains 840C1000 indicating an S0C1 abend occurred. The coded PSW is 001107E2 which indicates that the PSW was in the csect GLOBCMND at displacement 7E2 at the time of the abend. The coded R14 is 001D050C which indicates that the contents of R14 is an address that points into the csect EASYINP at displacement 50C.
Line 2 contains the twelve bytes of data surrounding the PSW. Lines 3 through 7 contain the PSW, instruction length, interrupt code, translation exception address, and the 16 registers in effect at the time of the abend. If the abend occurs inside an SVC, there will be 5 additional lines containing another set of PSW and register that look like lines 3 through 7.
The following list provides some of the more common csect codes for user modifiable code:
JOBACESS 0704xxxx JESCTL 0411xxxx SELSETUP 0420xxxx
where xxxx is the displacement inside the csect.
o. In a TSICOPY statement the valid field names for the section currently being processed must be used. Field information can be obtained by accessing IOF HELP for the panel.
p. To determine the clist statement in error, the clist can be traced with clist CONTROL statements. Add the following statement to the top of the clist to be traced: CONTROL LIST CONLIST SYMLIST
q. The distributed IOF clists can be traced by specifying the TEST parameter when the clist is invoked.
r. An IOF command was not issued on the correct panel. For some reason, IOF is not currently positioned to the panel that was intended.
s. The EXTEND function is controlled by the EXTEND parameter on the GROUP macro in the B23ALLOW option. EXTEND=YES or EXTEND=DEFAULT must be specified for a group in order for
53 15. IOF Diagnostic Aids

EXTEND to function. The OUTQUE and IOFWTR clists require EXTEND to function properly.
t. The MINPAUS parameter on the GROUP macro in the B23ALLOW option controls the EVERY and PAUSE commands. MINPAUS=NONE disables the EVERY and PAUSE commands. Note that PAUSE is used by SLAMRUN, SLAMPROC and IOFWTR clists.
u. Carefully check options members. Check for parameters specified in lower case characters, missing commas, and missing equals (=) after a keyword parameter.
v. Users are assigned to the first GROUP description they fit, so GROUP macros are position dependent. ALLOW macros are also position dependent except that all normal ALLOW and LIMIT macros are checked before any ACF ALLOW macros. All LIMIT macros will be applied without regard to the order.
w. IOF maintenance patches are distributed to patch the distributed base module(s). Patching the base module insures that the maintenance will be included in any future IOF generations. To become effective on your current production IOF, the maintenance must also be applied to the applicable linklist or LPA module. This can be done by running M13GEN and M14COPY, or by applying the patch directly to the linklist or LPA module.
The corresponding load module names are:
Distributed Module Link/LPA Module Description
BASpvv0M IOFpvvxM Main IOF Module
BASpvv0A IOFpvvxA Auxiliary Module
BASpvv0U IOFpvvxU User Options Module
BASpvv0P IOFpvvxP Panel Module
BASTvv0T IOF IOF TSO Command Processor (TSO only)
BASTvv0S IOFSPF IOF ISPF Command Processor (TSO only)
BASCvv0C IOFCIC IOF CICS Transaction (CICS only)
BASCvv0D IOFCMT IOMT Master Terminal CICS Transaction
"p" is the IOF product code ("T" for the TSO product, and "C" for the CICS product).
"vv" is the IOF version ("7A", "8A", "6B", etc.).
"x" is your local level (normally "0").
54 15. IOF Diagnostic Aids
If the modules are resident in LPA or MLPA, an IPL will be required to make the patch effective.
x. The expiration date patch should be stored in the A50EXPIR options member and applied using the M40EXPIR install library job. If this procedure is used, the expiration date patch is automatically applied whenever IOF maintenance is applied. The User Options Module (IOFpvvxU) should be resident in a link list library, and not in LPA, so that it is easy to make options changes and apply maintenance such as the expiration date patch.
y. The SLAMRUN task is not running. See Chapter 8 of the Installation Guide for detailed information on how to run IOF/SLAMRUN.
z. Users must be authorized to display all printers and punches on the IOF Device List Menu to use the PC command. The following ALLOW macro will grant display access to all printers and punches to all users in the system. Add this macro to your B23ALLOW option member:
ALLOW 1,0,DEVICES,*,ID=*
aa. ALLOW macros in the B23ALLOW option either do not permit the access, or permit too much access. LIMIT macros in the B23ALLOW option can explicitly restrict access to the function. The system security system could be permitting access to the function. The easiest way to determine exactly which ALLOW macro, LIMIT macro, or ACF rule is granting or refusing the access is to run the IOF trace facility described in the below section, IOF Trace Facility.
ab. From TSO READY or from ISPF Option 6, enter the IOFWHERE command to determine from which libraries the various IOF load modules are loaded. ac. From TSO READY, enter the IOFWHEN command. Follow the prompts to specify library name of the "U" module to display the expiration date patch for the active system. ad. Enter the WHO command from the session that has the problem. ae. Enter the DVAR command from the session that has the problem. Page through all the screens to determine the variables that apply to this session.
af. Ener the VERSION command to display the current IOF version. Then, enter HELP to display the long message which will include the link edit date and time.
ag. The index format changed in Release 7C and is not compatible with the index for previous versions of IOF. The index must be written and used by compatible versions of IOF. ah. The AT and SERVER commands require access to the “SYSTEM" resource. See ALLOW Macro Examples in Chapter 27, Example 10. ai. Check the LU name in the SERVER macro in the B67SERV option. The LU name must be defined in both the APPCPMxx member of SYS1.PARMLIB and to VTAM. See Chapter 29 for more information.
55 15. IOF Diagnostic Aids

aj. The TP name specified in the B67SERV option for this system has not been defined properly by the M21APPC job.
ak. Access to IOF functions and commands on a server are controlled by the server's access control. The IOF running on the server does not grant the desired access.
Determining the IOF Version
The VERSION command can be entered from any IOF panel to display the version of IOF that is currently being executed in the short error message area at the top of the screen. The HELP command will then display a long message which includes the date and time the user options module was link edited.
IOF Trace Facility
IOF has extensive trace facilities to help you determine why specific users are allowed (or not allowed) to perform specific IOF functions. IOF group assignment, function validation, and links to the system security system are examples of important functions that may need to be traced in a specific situation.
IOF trace information is written to an output file with a DD name of $IOFLOG$. This file must be allocated before the trace can be started. The TSITRACE command is used to activate tracing and select tracing options.
The TRACE command provides a simple way to trace IOF functions. It invokes a clist that automatically allocates a sysout trace data set and then issues a TSITRACE command to activate tracing. It also automatically browses the trace data set when you turn off tracing.
The TSITRACE and TRACE commands are described below. By comparing the examples you can see that TRACE is much easier to use.
TSITRACE Command
The TSITRACE command is used to start or stop tracing and allows you to select specific types of trace entries:
TSITRACE[GROUP/INIT/VALIDATE/ALLOW/ACF] [/OFF]
Specifying one or more of the GROUP, INIT, VALIDATE, ALLOW, and ACF parms activates IOF tracing and selects the type of tracing desired:
GROUP Traces the assignment of a user to an IOF group. See the below examples.
56 15. IOF Diagnostic Aids

INIT Traces global permissions assigned based on session start parms. (JOBNAME, DEVICE, etc.)
VALIDATE Traces requests to permit specific IOF functions. ALLOW Traces evaluation of individual ALLOW macros. ACF Traces all calls to external security system (RACF, etc.)
Specifying "OFF" turns off tracing and closes the trace data set.
All examples below assume that a trace data set has been allocated to DD name $IOFLOG$.
Example 1. Trace the assignment of a user to an IOF group.
From any IOF panel enter:
TSITRACE GROUP
IOFNEST
END
TSITRACE OFF
Example 2. Determine why a user can (or cannot) specify a particular job name.
From the IOF Option Menu enter:
TSITRACE INIT ALLOW
Key the desired job name in the JOBNAME field and press enter.
TSITRACE OFF
Example 3. Determine why a user can (or cannot) select a particular job for review.
From the IOF Job List Menu enter:
TSITRACE VALIDATE ALLOW ACF
Select the job in question
TSITRACE OFF
TRACE Command
The TRACE command provides a simplified way to do tracing under IOF. It invokes a clist to automatically allocate a sysout trace data set and activate tracing. The TRACE command is not available under CICS.
The TRACE command with no parms automatically turns on tracing for GROUP, INIT, VALIDATE, ALLOW, and ACF. It also has a SYSOUT(c) parm to allow you to specify the sysout class for the trace data set (the default is SYSOUT(A)).
57 15. IOF Diagnostic Aids

When the TRACE command is used to turn off tracing, it will automatically browse the trace data set.
The examples below assume that no trace data set has been allocated. In each case the last TRACE command will place you in browse for the trace data set.
Example 1. Trace the assignment of a user to an IOF group.
From any IOF panel enter:
TRACE GROUP
IOFNEST
END
TRACE
Example 2. Determine why a user can (or cannot) specify a particular job name.
From the IOF Option Menu enter:
TRACE
Key the desired job name in the JOBNAME field and press ENTER.
TRACE
Example 3. Determine why a user can (or cannot) select a particular job for review.
From the IOF Job List Menu enter:
TRACE
Select the job in question.
TRACE
Displaying IOF Options and Variables
IOF has many displayable options and variables. The DVAR command lists many of the options that have been selected, and documents the IOF option library member name in which the option is set. It will be instructive to enter DVAR to see the options that have been selected for a user.
Syntax
DVAR /iof-var-name/
iof-var-name. Any IOF variable name, including variable names that are defined by the user with SETPVAR and SETLVAR commands. If no parm is specified, several menus of IOF variables will be displayed.
58 15. IOF Diagnostic Aids

DVAR displays several columns of information for each variable:
NAME The IOF variable name VALUE The current value of the variable FROM The pool from which the variable is fetched OPTION The IOF OPTION member in which the variable is set Description The description of the variable
Determining Where IOF Modules Reside
For IOF/TSO, the IOF and IOFSPF load modules can reside in a STEPLIB, LINKLIB, or LPALIB. For IOF/CICS, the IOFCIC module must reside in a CICS load library that is part of the CICS DFHRPL concatenation. All other IOF modules must reside in a LINKLIB or LPALIB. IOF modules can sometimes exist in multiple libraries which can be confusing when applying maintenance or updating the product.
The IOFWHERE command can be issued from TSO READY or from ISPF Option 6 to list the libraries where all the active IOF load modules reside. From TSO READY or ISPF Option 6 enter:
%IOFWHERE
IOF/CICS users must invoke IOF with the FINDMOD parameter. From CICS enter:
IOF /FINDMOD or IOF /FINDMOD(M) to locate the "main" module IOF /FINDMOD(A) to locate the "auxiliary" module. IOF /FINDMOD(U) to locate the "user options" module. IOF /FINDMOD(P) to locate the "panel" module.
Display JES2 Remote Definition Table (RDT) Listing
The LRDT command will display the JES2 Remote Definition Table (RDT). This information may be useful when diagnosing problems concerning route codes. LRDT is not available under CICS.
File Concatenation Utilities
IOF provides several file utilities for use in displaying and changing the data sets and members concatenated to a DDNAME. These utilities are written in Rexx and can be invoked from TSO READY, from ISPF Option 6, or by using the TSO command.
These utilities can be used to list and update ddname concatentations for SYSPROC, SYSEXEC, ISPLLIB, ISPPLIB, and other ddnames dynamically. When updating ISPF libraries, you must restart ISPF to make the changes effective.
59 15. IOF Diagnostic Aids

IOFLISTF Command
TSO users often do not know what data sets are currently allocated to a file name (DDNAME) for their TSO sessions. This information may be essential when debugging TSO commands or ISPF dialogs.
IOFLISTF will list all the data sets currently concatenated to a DDNAME in the order of concatenation.
Syntax
IOFLISTF ddname
ddname. The DDNAME to be listed.
Examples
From Option 6 or TSO Ready:
IOFLISTF SYSPROC
IOFLISTF (you will be prompted to enter a ddname)
From IOF or another ISPF application:
TSO IOFLISTF ISPMLIB
IOFFINDM Command
When debugging a TSO command or ISPF dialog, it is often necessary to find the data set where a member resides. IOFFINDM will check all the data sets concatenated to a ddname and list the names of the data sets that contain the member in question.
Syntax
IOFFINDM ddname member /FIRST/
ddname. The DDNAME to be checked.
member. The PDS member name to be found.
FIRST. List only the first data set containing the member.
Examples
From Option 6 or TSO Ready:
IOFFIND ISPPLIB ISR@PRIM
IOFFIND SYSEXEC (you will be prompted to enter a member)
60 15. IOF Diagnostic Aids

From IOF or another ISPF application:
TSO IOFFIND SYSPROC IOFLISTF
TSO IOFFIND (you will be prompted for ddname and member)
IOFADDC Command
IOFADDC will add a data set to either the front of the concatenation or to the end. If the data set is already in the concatenation, it will be moved either to the first or last.
Syntax
IOFADDC ddname dsname /HEAD/TAIL/DUPLICATES/NL/
ddname. The DDNAME to be changed.
Dsname. The data set name to be added. Multiple dsnames can be specified if enclosed within parenthesis.
HEAD. The default; concatenate to the front.
TAIL. Concatenate to the end.
DUPLICATE. Concatenate data set even if already in the list.
NL. Do not list the new concatenation.
Examples
From Option 6 or TSO Ready:
IOFADDC SYSPROC 'SYS2.IOFT7J0.CLIST'
IOFADDC ISPLLIB MY.LOADLIB TAIL NL
IOFREMC Command
Data sets can be removed from a DDNAME concatenation with the IOFREMC command. Either the first data set, last data set, or specific data set name can be removed.
Syntax
IOFREMC ddname /HEAD/TAIL/DA(dsname)/NL/
ddname. The DDNAME to be changed.
HEAD. The default; remove the first data set from the concatenation.
TAIL. Remove the last data set from the concatenation.
61 15. IOF Diagnostic Aids

DA(dsname). The explicit data set name(s) to be removed.
NL. Do not list the new concatenation.
Examples
From Option 6 or TSO Ready:
IOFREMC SYSPROC (remove first SYSPROC data set) IOFREMC ISPLLIB DA(MY.LOADLIST) NL
62 15. IOF Diagnostic Aids

16. Dumping the JES2 Control Blocks
The DUMPCB line command can be used on the IOF Job List Menu to dump the control blocks for a job. You will be placed in IOF browse with the JES2 control blocks displayed. You can use any of the normal IOF browse features to scroll, find character strings, or SNAP information to a printer or external data set.
The following operands are supported on the DUMPCB command:
• DATA(JES2-data-set-number). Specifies the internal JES2 sysout (or sysin) data set number for a spool data set whose data blocks are to be displayed in dump format.
• MTTR(JES2-mttr). Specifies the JES2 "MTTR" of a spool block to be dumped. The full eight character JES2 MTTR must be specified.
• WIDE. Specifies that wide dump format should be used if IOF is running on a narrow (80 column) terminal. This option is useful if you want to SNAP the data to a wide printer while using a narrow terminal.
For example, to dump the data block at disk MTTR address 01023F07:
3 DUMPCB MTTR(01023F07)
The DUMPCB line command on the IOF Job Summary displays the appropriate control blocks for the selected sysout data set. DUMPCB cannot be used from the Job Summary in a CICS environment.
16. Dumping the JES2 Control Blocks 63


17. Performance Considerations
The suggestions below are optional but are recommended for running IOF in a production environment.
The module IOFTvvvM (where vvv is the version identifier) should be placed in the pageable link pack area.
The modules IOFTvvvU and IOF should not be placed in the link pack area. IOFTvvvU contains most of the product options (including the expiration date). The IOF module will not load properly from the link pack area.
The remaining load modules optionally can be placed in the link pack area. Note that the IOFvvvA module operates in a 24-bit addressing mode and must load below the line.
17. Performance Considerations 65


18. CD and Tape Contents
The product CD contains the IOF documentation in Adobe Acrobat PDF format, and both the IOF/TSO and IOF/CICS products in the PRODUCTS directory.
The product distribution tape is a standard label tape with a volume serial of the form "IOFTvv", where vv is the base version identifier for the tape. The tape contains one file, T.IOFTvv0.MPI. DCB characteristics are RECFM(FB) LRECL(80) BLKSIZE(23440).
18. CD and Tape Contents 67


19. Product Load Module Naming Conventions
There are two categories of load modules used in the IOF product. In the first category are IOF and IOFSPF, load modules whose names must be known by end users. The users must know the name IOF because it is the name of the command that is entered from TSO READY.
The name IOFSPF is exposed to the users because it is the module name that is selected from an ISPF panel to invoke IOF under ISPF. Since these modules represent the user interface to the product, their names should always be IOF and IOFSPF for the current production version of the product.
The IOF load module can be executed from a link list library or from a STEPLIB library in your TSO logon procedure. The IOFSPF load module can be executed from a link list library, from a STEPLIB library in your TSO logon procedure, or from an ISPLLIB library in your TSO logon procedure.
In the second category of modules are IOFTvvvM, IOFTvvvA, IOFTvvvU, and IOFTvvvP, load modules that must be invoked from a link list library (or the link pack area). The "vvv" in the module names represents the version identifier for the modules. End users do not need to know the names of these modules as their names change with each new version of the product.
When a particular version of the product is generated, the IOF and IOFSPF load modules for that version are initialized to invoke the correct IOFTvvvM, IOFTvvvA, IOFTvvvU, and IOFTvvvP modules for that version. This means that even though the load module names will always be IOF and IOFSPF, each of these modules is internally associated with a specific version identifier of the product.
For example, the IOFSPF load module that is generated for version "7J0" will always invoke modules IOFT7J0M, IOFT7J0A, IOFT7J0U, and IOFT7J0P.
This naming convention allows a simple testing procedure for new versions of the product. The IOFTvvvM, IOFTvvvA, IOFTvvvU,and IOFTvvvP modules can safely be copied into the link list, since their names are guaranteed not to conflict with the product load module names for previous versions.
Then, by using a STEPLIB for your new IOF and IOFSPF modules, you can completely test the new version. The install library contains jobs that are specifically designed to install new releases for test in this manner. (See Chapter 6 for more details.)
19. Product Load Module Naming Conventions 69


20. Entering MVS and JES2 Commands
For a user with OPERATOR privileges, to enter a JES2 command from any IOF screen, enter "$" followed by the command:
$DA
To enter an MVS command, enter "#" followed by the command:
#D T
Entering an MVS or JES2 command under IOF will automatically take you to the IOF Extended MCS console. See Chapter 13 of the IOF User's Guide for more information about IOF Extended MCS console support. Each user can enter the AUTOCON OFF command to disable automatic console. AUTOCON ON re-enables automatic console.
You can enter a command and then position automatically to the command in the system log by using the "<" command. For example:
<$DA
or
<D T
The “<” command will issue the desired command and find the command in the system log so you can easily see its output.
To enter a command (with "<") that includes single quotes (apostrophes), you must specify two apostrophes for each apostrophe desired in the command:
<$D''PAYROLL''
20. Entering MVS and JES2 Commands 71


21. The IOF External Writer
There are a number of applications that require data from the JES2 spool to be read and stored in a non-spool data set. The IBM External Writer provides a primitive ability to copy spool data to a data set. The IOF External Writer overcomes many restrictions imposed by the IBM writer.
You can select data to be copied based on many JES2 sysout data set characteristics (CLASS, FORMS, UCS, FCB, age, generic job name, etc.). You also have the option to copy the spool data without deleting it from the spool. You can leave it on the spool with a different sysout attribute (class, etc.) to prevent it from being re-selected by the writer.
Also, the IOF External Writer produces a complete report of all the data that was copied. This can be useful in tracking the flow of reports through your system.
The following procedure can be used to invoke the IOF Writer:
//IOFWTR PROC CLASS=x,OPT= <=== Sysout //IOFWTR EXEC PGM=IKJEFT1B,PARM='IOFWTR &OPT' class //SYSPROC DD DISP=SHR,DSN=clist.library.name <=== Clist //SYSTSPRT DD SYSOUT=&CLASS library //SYSTSIN DD DUMMY
The job below will copy all sysout class X output groups to the data set named by DD OUTPUT and then cancel them:
//CLASXWTR JOB acct,name,TIME=5, // USERID=authid, <=== Authorized userid // PASSWORD=password, //WTR EXEC IOFWTR, // OPT='CLASS(X),DDNAME(OUTPUT),DISP(CANCEL),PAUSE(0)' //OUTPUT DD output.data.set.specs
The PAUSE(0) above will copy the groups that are on the spool, cancel them, and then terminate. If you request a non-zero PAUSE value, the writer will pause the designated number of seconds and then repeat the process. It will continue its pause/process loop until you cancel it.
The IOFWTR procedure has a number of other options that also can be included in the OPT= parameter. The IOF clist IOFWTR describes these options. IOFWTR can be used by end users to process output of jobs that they own. IOFWTR is subject to the same IOF access control as terminal IOF users.
21. The IOF External Writer 73


22. Local Data Set Name Prefixing
If a data set name is specified in the SD command (or on the SD interface panel) without enclosing it in apostrophes, IOF will prefix the name with the user's current profile prefix character string. This prefixing is done in the source module DSNQUAL, which is included in the IOF source library.
Options member B54SNPDS describes other options that can be used to control snap data set names.
22. Local Data Set Name Prefixing 75


23. Sample IOF Modifications
The sample modifications in the IOF sample modifications library were contributed by IOF customers and have not been installed or tested by our technical support staff. They are provided as potentially useful indications of how you might approach the job of modifying IOF to accomplish certain installation objectives.
The member $INDEX contains a list and brief description of the modifications contained in the library.
If you have an IOF modification that you would like to contribute to the sample library, send us a tape with an unloaded PDS library containing the modification. One member of the library should contain a brief abstract of the modification. The only material that will be placed on our tape will be the abstract and the mod itself. If you wish to receive credit for the mod, be sure to include it in either the comments for the mod or its abstract.
23. Sample IOF Modifications 77


24. ISPF Command Table Entry for IOF
If you would like your ISPF users to be able to invoke IOF as a nested dialogue under EDIT, BROWSE, or other ISPF applications, you can add the following command table entry to your ISPCMDS command table:
VERB : IOF ACTION : SELECT PGM(IOFSPF) PARM('&ZPARM') NEWAPPL(IOF) NOCHECK
24. ISPF command Table Entry for IOF 79


25. Managing Output on the Spool
IOF provides a flexible mechanism for analyzing your spool and purging old output. The procedure below can be used to analyze your spool and optionally purge old output jobs:
//OUTQUE PROC CLASS=x,OPT= <=== Sysout //OUTQUE EXEC PGM=IKJEFT1B,PARM='OUTQUE &OPT' class //SYSPROC DD DISP=SHR,DSN=clist.library.name <=== Clist //SYSTSPRT DD SYSOUT=&CLASS library //SYSTSIN DD DUMMY
The job below will find all the jobs matching the requested criteria and produce a report of all the matching jobs:
//SCAN JOB acct,name,TIME=5, // USERID=authid, <=== Authorized userid // PASSWORD=password //SCAN EXEC OUTQUE, // OPT='AGE(10),DEST(LOCAL),JOBNAME(PROD*)'
This job will produce a report of all jobs that are 10 days old, have a dest of LOCAL, and whose names begin with "PROD". An output listing produced by OUTQUE for all jobnames beginning "PROD" sorted by destination is shown below.
Output Job Queue Utility Listing Run at 15:40:17 on 07/29/93 PAGE 1 Run parameters are SYSOUT(X) ACTION(LIST) JOBNAME(PROD*) SORT(DESTDEV) CTLBRK Jobname Jobid Acct Dest User name Time run Date Notify Helds Inputdev Alloc PRODNIT J01970 ISIS FETCH SCHUBERT 10:36 7/29/93 ISOFVS INTRDR 2 PRODEN J01975 ISIS FETCH SCHUBERT 10:41 7/29/93 ISOFVS INTRDR 43 PROD3245 J01984 ISIS FETCH SCHUBERT 10:49 7/29/93 ISOFVS INTRDR 7 *** 3 Jobs for DESTDEV FETCH ****** 52 PRODNIT J05672 JFW LOCAL WALKER 17:16 7/03/92 ISIJFW 4 INTRDR 2 PRODEN J05731 JFW LOCAL WALKER 15:31 7/06/92 ISIJFW 16 INTRDR 17 PROD7666 J07230 JFW LOCAL WALKER 16:11 7/06/92 ISIJFW 4 INTRDR 2 PRODAN J07272 JFW LOCAL WALKER 16:42 7/06/92 ISIJFW 16 INTRDR 17 *** 4 Jobs for DESTDEV LOCAL ****** 38 *** 7 Grand Total Jobs *** ***** 126
To purge these jobs, add CANCEL to the OPT= parm in the above JCL and re-submit the SCAN job.
The OUTQUE procedure has a number of other options that also can be included in the OPT= parameter. The IOF clist OUTQUE describes these options.
The OUTQUE function displays or cancels entire jobs. The IOFLISTG clist allows you to display or cancel individual output groups. See the comments
25. Managing Output on the Spool 81

in the IOFLISTG clist for more information. The example below cancels all output groups that are more than 4 days old.
//CANOLDTS PROC //LISTG EXEC PGM=IKJEFT1B, // PARM='IOFLISTG AGE(4) HELD(YES) CANCEL' //SYSPROC DD DISP=SHR,DSN=clist.library.name <=== Clist //SYSTSPRT DD SYSOUT=A library //SYSTSIN DD DUMMY
82 25. Managing Output on the Spool

26. IOF Job Archival and Retrieval (IOF/JOBARC)
IOF job offload and archival facilities (IOF/JOBARC) provide an easy and inexpensive method of offloading output jobs from the system. Jobs can be selected for offloading based on any job identification or characteristic, including jobname, username, ownerid, age and destination. IOF/JOBARC maintains a detailed catalog of offloaded jobs that can be used for selecting jobs for uploading.
IOF/JOBARC uses the IOF programmable interface to JES2 to drive and control the JES2 offloader devices. JES2 offloader sysout transmitters and sysout receivers execute the physical offload and upload functions. Jobs are offloaded in NJE format, thus all job and sysout characteristics of the data are kept.
The job archival function of IOF/JOBARC runs as a batch job or started task. It can be run on a periodic basis and/or on an emergency basis when the JES2 spool system approaches saturation. The job retrieval function is initiated from a full screen ISPF display that makes it easy to select jobs to be uploaded.
IOF/JOBARC Data Sets
Two types of data sets are maintained by IOF/JOBARC. Each offload run produces one directory and one offload data set.
• Directory Data Sets contain one line of detailed information about each offloaded job. The information includes jobname, owner, notify, username, date/time the job was run, date/time the job was offloaded, number of steps, number of lines of output, the highest completion or abend code, and the name of the offload data set.
• Offload Data Sets contain the offloaded jobs. They are written by a JES2 offloader in NJE format. Each offload data set usually contains many offloaded jobs.
IOF/JOBARC Installation Considerations
• B34OFFLD Option. The major IOF/JOBARC options are defined to the system in the B34OFFLD member of the IOF options library. All options are shipped with default values. An abbreviated IOF generation as defined in Chapter 4 is required to change B34OFFLD options.
26. IOF Job Archival and Retrieval (IOF/JOBARC) 83

• Clist Library. IOF/JOBARC commands are implemented as TSO clists. All IOF/JOBARC clist names begin with the characters "JAR".
• Panel Library. The job retrieval function of IOF/JOBARC uses 11 ISPF panels with panel names all beginning "VIOFUP".
IOF/JOBARC Cataloged
The JOBARC cataloged procedure shown below can be used by all IOF/JOBARC functions to run as a batch job or started task. You must add this procedure to the proclib data set that will be used to run IOF/JOBARC jobs. Change the SYSPROC statement to point to your IOF clist library.
//JOBARC PROC CLASS=X //BATCHTSO EXEC PGM=IKJEFT1B,DYNAMNBR=50 //SYSPROC DD DISP=SHR,DSN=iof.clist.library <===clist //SYSTSPRT DD SYSOUT=&CLASS
Using the OFFLOAD Command to Archive Jobs
The OFFLOAD command on the Job List Menu causes all the jobs currently listed on the menu to be offloaded. Jobs which have been excluded from the menu with the EXCL command will not be offloaded. The OFFLOAD command is a good way to initiate special purpose offloading.
Simulating an Archival (Offload) Run
The following JCL will make a report of all jobs with jobnames beginning "TS" that are more than five days old. The offloader is not invoked because the SIMULATE parm is specified.
//OFFCHK JOB .... //SIMULATE EXEC JOBARC //SYSTSIN DD * JAROPEN SIMULATE SYSOUT(A) JAROFFLD JOBNAME(TS*) AGE(5) JARCLOSE /*
The JAROPEN statement specifies that this is a simulated run and allocates the report to sysout class A. The JAROFFLD statement specifies the jobname and age parms. The JARCLOSE statement closes the report and does general cleanup. The full list of IOF/JOBARC commands and parms are described in detail in the section below, IOF/JOBARC Command Syntax.
You might want to make several simulated runs with parms that make sense at your installation at this point before proceeding to do an actual offload run.
84 26. IOF Job Archival and Retrieval (IOF/JOBARC)

Periodic Offloads
IOF/JOBARC can be used to periodically cleanup the spool by offloading old jobs from the system. Periodic offload automatically can be scheduled daily, several times a week, weekly, or at other regular intervals as required.
The following job will offload jobs that are at least 7 days old unless the jobname begins with "PR". The jobs will be offloaded to a 3480 cartridge. The offloader number and data set name prefix to be used are specified in the B34OFFLD IOF options member but could have been overridden on the JAROPEN statement. This job can be automatically submitted on a periodic basis to offload jobs meeting the specified criteria. The offload report is written to the default sysout class defined in the B34OFFLD option.
//JOBARC JOB .... //DUMPJOBS EXEC JOBARC //SYSTSIN DD * JAROPEN OFFUNIT(CART) JAROFFLD AGE(7) + EXCL1('JOBNAME BG PR') JARCLOSE /*
We suggest that you dedicate an offloader to IOF/JOBARC. JES2 will offload a job only once on a single offload device. Confusion can result if IOF/JOBARC competes with other offload procedures for a single offloader.
Detailed descriptions of the JAROPEN, JAROFFLD, and JARCLOSE commands are provided in the below section, IOF/JOBARC Command Syntax.
The date and time the job is run are included in the directory and offload data set names that are automatically generated by JAROPEN. For example, if the job above were run at 1:30 on September 23, 1993, it would generate the following data set names:
Directory data set 'SYSIOF.OFFDIR.D93267.T0130.SEP23.OFFRUN'
Offload data set 'SYSIOF.OFFLOAD.D93267.T0130.OFFRUN'
A second example demonstrates offloading all started tasks except the SYSLOG task that are at least one day old.
//STCARC JOB .... //DUMPSTC EXEC JOBARC //SYSTSIN DD * JAROPEN UNIT(CART) JAROFFLD ASIDTYP(STC) AGE(1) EXCL1('JOBNAME EQ SYSLOG') JARCLOSE /*
An archival example with two JAROFFLD commands is shown next. The first command offloads all jobs that are routed to "BLDG7A", are ten days old and use at least twelve track groups of spool space. Jobs that contain the
85 26. IOF Job Archival and Retrieval (IOF/JOBARC)

characters "PAYROLL" or "BUDGET" in the username field, and jobs with ownerid's beginning "PD" are excluded from this offload run.
In addition, a second command is used in this example to offload all jobs that are at least three days old and also have "TST" in positions 5-7 of the jobname . The two JAROFFLD commands use the same directory and offload data sets.
//JOBARC2 JOB .... //DUMPJOBS EXEC JOBARC //SYSTSIN DD * JAROPEN JAROFFLD AGE(10) DEST(BLDG7A) SIZE(12) + EXCL1('USERNAME CT PAYROLL') + EXCL2('USERNAME CT BUDGET') + EXCL3('OWNER BG PD') JAROFFLD AGE(3) JOBNAME(++++TST*) JARCLOSE /*
Emergency Offloads
IOF/JOBARC can also be used to relieve spool saturation conditions. In emergency situations, jobs may have to be offloaded that would not normally be offloaded by the periodic offload job. The specific offload parms for emergency situations usually depend on the severity of the spool saturation.
The SPOOLPC parm allows conditional execution of a JAROFFLD command based on the current spool saturation. The JAROFFLD command on which a SPOOLPC parm is coded is executed only if the current spool usage percent is higher than the number specified for the SPOOLPC parm.
The following emergency offload job demonstrates use of the SPOOLPC parm. It offloads jobs that are at least five days old and have jobnames beginning "TES" or having "98" or "99" in the 7th and 8th positions of the jobname. Then if the spool percent is still 85% or higher, all jobs that are ten days old and use ten or more track groups are offloaded. If the spool percent is still not below 85%, all jobs that are eight days old are offloaded.
//SPOOLFUL JOB .... //DUMPJOBS EXEC JOBARC //SYSTSIN DD * JAROPEN OFFUNIT(CART) JAROFFLD AGE(5) JOBNAME('TES* ++++++98 ++++++99') JAROFFLD AGE(10) SIZE(10) SPOOLPC(85) JAROFFLD AGE(8) SPOOLPC(85) JARCLOSE /*
Archiving Special Applications
There are many requirements for special application offload runs. Copies of jobs from critical applications may need to be archived after printing. Application jobs that do not produce major end-user reports may not need to
86 26. IOF Job Archival and Retrieval (IOF/JOBARC)

be printed at all except for historical purposes. Development teams may need to offload a series of development jobs.
Archiving a copy of all the IOF installation jobs will be used as an example of a special offload. All IOF install jobnames begin with the character "M". The ownerid of the job submitter is maintained independently of the jobname and can be specified in the SCOPE parm. This allows job selection based on both jobname and ownerid. Therefore, the following job can be used to make an archival copy of all the IOF installation jobs submitted by userid "ISIJVR". The suffix "IOFINSTL" is used to clearly distinguish this as a special archival run under the standard prefix.
//IOFINST JOB .... //DUMPJOBS EXEC JOBARC //SYSTSIN DD * JAROPEN PREFIX(SYSIOF) SUFFIX(IOFINSTL) JAROFFLD JOBNAME(M*) SCOPE(ISIJVR) JARCLOSE /*
An alternate way to run this same offload is to specify PREFIX(ISIJVR) and take the default suffix. This method requires that user ISIJVR have the authority to control the offloader devices, or that the user who submits the IOFINST job have the authority to create data sets under the level "ISIJVR".
Combining Offload Directories
The directory data sets generated by JAROFFLD are clearly named to indicate when the offload run was made. This makes directories easy to identify and use on the IOF/JOBARC Directory List panel shown below in the section, Uploading Jobs.
The default suffix for all offload directories and offload data sets is OFFRUN. There can be several OFFRUN directories for a single day; it may be preferable to combine them all into a single daily directory.
The JARDJOIN command copies all the offload directory data sets with a specified data set name suffix (last data set name level) to a new suffix. For example, all directories with the default suffix of OFFRUN can be combined into one directory with a suffix of DAILY. Or, all DAILY directories can be combined into a WEEKLY directory. JARDJOIN deletes the old directories after they have been successfully copied.
The following job will combine all the directories with a suffix of OFFRUN into one directory with a suffix of DAILY. The combined directory will contain entries that point to several offload data sets. The format of the combined directory data set name is identical to the original data set name format except that the date and time of the JARDJOIN run is used.
//DIRJOIN JOB ... //COMBINE EXEC JOBARC //SYSTSIN DD * JARDJOIN OPREFIX(SYSIOF) OSUFFIX(OFFRUN) +
87 26. IOF Job Archival and Retrieval (IOF/JOBARC)

CPREFIX(SYSIOF) CSUFFIX(DAILY)
Deleting Old Directories and Offload Data Sets
The JARDEL command deletes old directories and all the offload data sets they reference. Each IOF/JOBARC offload job builds one offload data set and one directory data set. But, JARDJOIN commands can combine several directories into one so that combined directories can reference multiple offload data sets. JARDEL reads each directory it is deleting in order to also delete all the offload data sets it references.
The sample delete job below keeps 10 weekly directories and deletes older directories and their associated offload data sets.
//DIRDEL JOB ... //COMBINE EXEC JOBARC //SYSTSIN DD * JARDEL PREFIX(SYSIOF) SUFFIX(WEEKLY) CYCLES(10)
Note that directories can also be deleted manually on the IOF/JOBARC Directories List panel shown below in the section, Uploading Jobs. However, this method requires manual intervention and confirmation of each deleted data set.
Uploading Offloaded Jobs
The UPLOAD command can be entered on any IOF panel (under ISPF) to invoke a display of offloaded jobs.
Users can select specific jobs for upload from this display. The actual uploading is performed by a batch job, or optionally by a started task. The upload method is specified in the B34OFFLD IOF option. The two methods are:
SERVER=NO. A batch job is automatically submitted by the upload dialogue to upload one or more offloaded jobs.
SERVER=YES. Upload transactions are queued to an upload server task. The server task can be started periodically to process all queued transactions. Or, it can be a non-terminating started task that continuously monitors the transaction queue for upload transactions.
The specific method chosen will depend on several factors, including the number of upload transactions that are being processed. It may be best initially to use the batch submit method of uploading and convert to the server as upload activity increases.
Note that the submitted job is run under the userid of the user who executes the UPLOAD command. This userid is required to have full update access to
88 26. IOF Job Archival and Retrieval (IOF/JOBARC)

the JES2 offloader devices. For this reason, a systems programmer or other authorized person is usually required to upload jobs using the SERVER=NO method.
Upload Server Task
If you select the server option by specifying SERVER=YES in B34OFFLD, you must run the JARSERVR task to process the upload transaction. You can override JARSERVR parms to set your parameters. The JARSERVR clist PROC statement with default parms is shown below.
PROC 0 /* --------Parm Description --------------------*/+ PAUSE(0) /* Pause seconds when done. 0 means terminate. */+ OFFNBR() /* Offloader number. Which offloader to use. */+ WTR() /* WTRID of transactions. */+ DISP(CANCEL) /* Disposition of processed transactions. */+ TEST /* Trace clist execution. */+ /*-----------------------------------------------*/
The PAUSE parm value of zero means that JARSERVR will terminate after it has processed all queued upload transactions. A non-zero PAUSE value causes JARSERVR to run continuously. It pauses the specified number of seconds after processing all queued transactions, then searches for new transactions to process. For example, if you specify PAUSE(120), JARSERVR will wait 2 minutes between upload batches.
Parm values for OFFNBR and WTR are not normally required. The values specified for the OFFNBR and WTR parms in B34OFFLD will be used if these clist parms are null.
DISP(CANCEL) causes upload transactions to be deleted after they have been processed. If any value other than CANCEL is specified for DISP, the WTRID of processed transactions will be changed to the DISP value after the transaction has been processed.
When PAUSE(0) is specified, the server task can be started periodically by the JES2 automatic operator commands. The non-terminating task can be started by system fireup procedures. The following JCL can be used to run a non-terminating server started task. Note that the PAUSE value is specified in the EXEC statement PARM.
//JARSERVR PROC //BATCHTSO EXEC PGM=IKJEFT1B,PARM='JARSERVR PAUSE(120)' //SYSPROC DD DISP=SHR,DSN=iof.clist.library //SYSTSPRT DD SYSOUT=A //SYSTSIN DD DUMMY
End users are not required to have access to the JES2 offloader devices in order to be able to upload jobs using the server. For this reason this method may be required if no operations personnel are available to perform this type of service, or if many upload operations are required.
89 26. IOF Job Archival and Retrieval (IOF/JOBARC)

Uploading Jobs
Job retrieval is initiated by entering the UPLOAD command on any IOF panel. Note that IOF must be running under ISPF for this command to work because it utilizes ISPF table services.
------------------------- IOF/JOBARC Upload Utility --------------------------- COMMAND ===> Enter the IOF/JOBARC Directory Data Set Name level below. A list of all data sets beginning with this level will be displayed. Normally the second level of the dsname level should be "OFFDIR". DSNAME LEVEL ===> SYSIOF.OFFDIR If a fully qualified data set name is specified in the dsname level above, the list of directories will be skipped and the list of jobs stored in the directory will be displayed directly. Jobname ===> Owner ===> Enter level and optionally prefixes above and press ENTER
The UPLOAD command causes the panel above to be displayed. You must enter the data set name prefix for the offload directory data sets you wish to display in the "DSNAME LEVEL" parm field. Since we have been using SYSIOF as the data set name prefix in our examples and the second level of directory data set names is OFFDIR, we enter "SYSIOF.OFFDIR" in this field. Pressing ENTER causes the data set names that begin "SYSIOF.OFFDIR" to be displayed.
------------------------ IOF/JOBARC Directory List --------------- Row 1 of 11 COMMAND ===> Scroll ===> PAGE Line Commands: I - Include directory in offloaded jobs list. D - Delete directory and all offload data sets it references. U - Upload all jobs listed in the directory. -----Action---Offload Date----Day of Week--Day-Month------Time----Type-------- _ 1996/10/10 Thursday 10 October 12:24 OFFRUN _ 1996/08/02 Friday 2 August 13:50 OFFRUN _ 1996/04/12 Friday 12 April 14:36 OFFRUN _ 1995/12/28 Thursday 28 December 16:58 OFFRUN _ 1995/10/12 Thursday 12 October 11:55 OFFRUN _ 1995/09/06 Wednesday 6 September 10:44 OFFRUN _ 1995/06/01 Thursday 1 June 15:50 OFFRUN _ 1995/05/01 Monday 1 May 15:57 OFFRUN _ 1995/03/10 Friday 10 March 15:49 OFFRUN _ 1995/01/25 Wednesday 25 January 14:13 OFFRUN ******************************* Bottom of data *******************************
The directory data sets are displayed in inverse chronological order so that the most recent directory is displayed first. Each directory contains a list of jobs that have been offloaded. To display the jobs in a directory enter "I" in its line action area. Enter "I" in multiple action areas to see a display of jobs from several directories.
90 26. IOF Job Archival and Retrieval (IOF/JOBARC)

Normally, you would periodically run the JARDEL command to clean up old directories. You also can manually delete a directory and all the offload data sets it references by using the "D" line command on this panel. All manual deletes require confirmation.
To continue our example, enter "I" in the line action area of the AUG23 directory above to cause the panel below to be displayed.
------------------- IOF/JOBARC Offloaded Job List --------------- ROW 1 OF 55 COMMAND ===> Scroll ===> CSR Specify generic selection field parms below to limit the jobs displayed. Line Commands: S (Select for upload) U (Upload with no confirmation) JOBNAME ===> DATE ===> SORT ===> DATE OWNER ===> DATEOFF ===> SORTSEQ ===> D (A or D) Act Jobname Jobid Notify Owner Username Run-Date Retn Code Off-Date _ SLOGSOME J09966 _ ISIJFP J.PRESTWO 930803 0 930823 _ SLOGALL J09967 _ ISIJFP J.PRESTWO 930802 0 930823 _ DUMPT J08146 ISIJFP ISIJFP J.PRESTWO 930802 0 930823 _ CICSDMPA J07167 _ ISIJFP1 PRESTWOOD 930801 0 930823 _ XTESTA J05990 ISINRM ISINRM WALKER 930801 12 930823 _ MODID7B J05624 _ ISIJFP PRESTWOOD 930725 8 930823 _ XSIDRACF J04874 _ ISIJFP J.PRESTWO 930720 0 930823 _ XIT1DFLT J04875 _ ISIJFP J.PRESTWO 930719 1 930823 _ TESTDEV J02837 ISIJFP ISIJFP J.PRESTWO 930719 0 930823 _ DEVICE J02869 ISIJFP ISIJFP J.PRESTWO 930718 0 930823 _ COMPJ2I J06268 ISIJFP ISIJFP J.PRESTWO 930714 28 930823 _ COMPJ2I J02216 _ ISIJFP1 J.PRESTWO 930713 28 930823 _ $TEST2 J02235 _ ISIJER L.ROBBINS 930713 0 930823 _ ASMJES J01061 _ ISIJFP PGMRNAME 930710 0 930823
This panel can be scrolled up and down to search for a specific job. The list of jobs can be refined by specifying generic values in the JOBNAME, OWNER, DATE, and DATEOFF fields. For example, entering "S*" in the JOBNAME field causes only jobnames beginning with the character "S" to be displayed. Entering "ISIJER" in the OWNER field causes only jobs owned by userid ISIJER to be displayed. Entering "9308*" in the DATE field causes only jobs that ran during August 1993 to be displayed. Additional directories can be included on the display by pressing END to return to the previous panel. Then, select one or more directories to be added to the display.
The list of jobs can be sorted on any field on the extended display by entering the field name in the SORT field. Some valid sort names are JOBNAME, JOBID, OWNER, NOTIFY, USERNAME, DATERUN, DATEOFF and MRC (maximum return code).
The "S" and "U" line commands can be entered for one or more jobs. The "S" command causes the IOF/JOBARC Job Upload Confirmation panel to be displayed. It displays additional information about the job and requests confirmation that the job should be uploaded. The "U" command causes the job to be selected for upload without going through the confirmation panel.
91 26. IOF Job Archival and Retrieval (IOF/JOBARC)
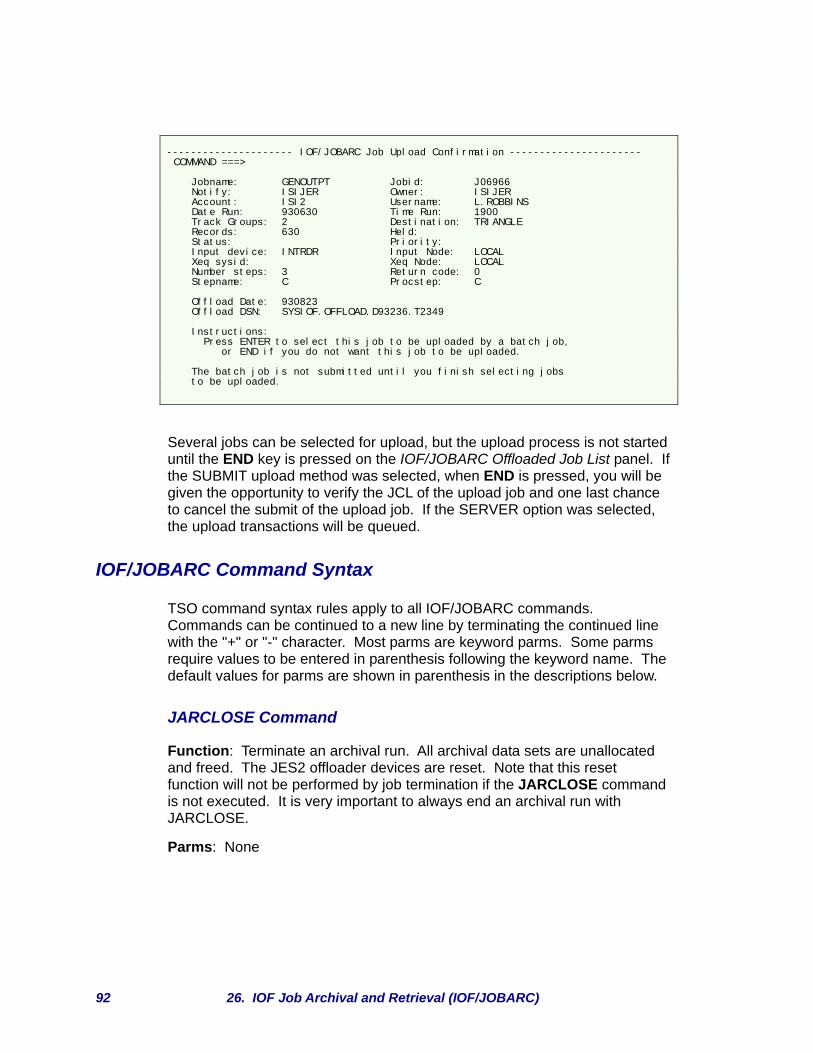
--------------------- IOF/JOBARC Job Upload Confirmation ---------------------- COMMAND ===> Jobname: GENOUTPT Jobid: J06966 Notify: ISIJER Owner: ISIJER Account: ISI2 Username: L.ROBBINS Date Run: 930630 Time Run: 1900 Track Groups: 2 Destination: TRIANGLE Records: 630 Held: Status: Priority: Input device: INTRDR Input Node: LOCAL Xeq sysid: Xeq Node: LOCAL Number steps: 3 Return code: 0 Stepname: C Procstep: C Offload Date: 930823 Offload DSN: SYSIOF.OFFLOAD.D93236.T2349 Instructions: Press ENTER to select this job to be uploaded by a batch job, or END if you do not want this job to be uploaded. The batch job is not submitted until you finish selecting jobs to be uploaded.
Several jobs can be selected for upload, but the upload process is not started until the END key is pressed on the IOF/JOBARC Offloaded Job List panel. If the SUBMIT upload method was selected, when END is pressed, you will be given the opportunity to verify the JCL of the upload job and one last chance to cancel the submit of the upload job. If the SERVER option was selected, the upload transactions will be queued.
IOF/JOBARC Command Syntax
TSO command syntax rules apply to all IOF/JOBARC commands. Commands can be continued to a new line by terminating the continued line with the "+" or "-" character. Most parms are keyword parms. Some parms require values to be entered in parenthesis following the keyword name. The default values for parms are shown in parenthesis in the descriptions below.
JARCLOSE Command
Function: Terminate an archival run. All archival data sets are unallocated and freed. The JES2 offloader devices are reset. Note that this reset function will not be performed by job termination if the JARCLOSE command is not executed. It is very important to always end an archival run with JARCLOSE.
Parms: None
92 26. IOF Job Archival and Retrieval (IOF/JOBARC)
JARDEL Command
Function: Delete IOF/JOBARC directories and all the offload data sets referenced based on the directory prefix, suffix, create date and/or on the number of cycles to keep.
Parms:
CYCLES( ). Number of cycles to keep. If specified, that number of directories will be kept. Older directories at the specified level will be deleted. Either CYCLES or DELDATE should be specified but not both.
DELDATE( ). Delete date. If specified, data sets that were created before the specified date in yyyy.ddd format will be deleted. For example, DELDATE(1993.262) deletes all directories created before September 18, 1993. DELDATE should not be specified if CYCLES is specified.
PREFIX( ). High level of the offload directory data set names to be deleted. This parm is required.
SIMULATE. If specified, data set deletion is simulated by a message and no data sets are actually deleted.
SUFFIX( ). Bottom level of the directory data set names to be deleted. This parm is required.
JARDJOIN Command
Function: Combine all IOF/JOBARC directories with a specific suffix into a single offload directory with a new suffix.
Parms:
CPREFIX( ). High level of the combined directory data set name. If this parm is not specified, the value specified in the OPREFIX parm will be used.
CSUFFIX(DAILY). Bottom level of the combined directory data set name.
OPREFIX( ). High level of the old offload directory data set names. This parm is required.
OSUFFIX(OFFRUN). Bottom level of the old directory data set names.
SYSOUT(X). Sysout class of SYSPRINT sysout data set.
93 26. IOF Job Archival and Retrieval (IOF/JOBARC)

JAROFFLD Command
Function: Select jobs to be offloaded. A JAROPEN command must have been issued before using a JAROFFLD command in a job step.
Parms:
AGE( ). Job age in days. If an age is specified, only jobs at least that many days old are processed.
ASIDTYP(JOB/STC/TSU). Type of address space. If not specified, all types of address spaces are offloaded. Valid values are JOB, STC, and TSU. If a value is specified, only that type of address space will be offloaded.
DEST( ). Destination. If specified, only jobs with a matching job print route code will be processed. A list of up to 8 destinations can be specified. The list must be enclosed in quotes and the dests must be separated by spaces or commas.
EXCL1( ). Exclude statement 1. If specified, the operands are used in an IOF exclude statement to exclude jobs with the matching characteristics from processing. EXCL2, EXCL3 and EXCL4 are executed in the same way.
Example: EXCL1('INPUTDEV EQ INTRDR')
EXCL2( ). Exclude statement 2.
Example: EXCL2('JOBNAME BG PROD')
EXCL3( ). Exclude statement 3.
Example: EXCL3('USERNAME EQ BOSS')
EXCL4( ). Exclude statement 4. Any field name in the extended IOF Job List can be used in the exclude statements.
Example: EXCL4('ACCOUNT GT 970')
JOBNAME( ). Jobname. Any value that can be entered in the IOF jobname selection field, including generic jobnames with "+" and "*" wildcard characters. A maximum of 8 jobnames can be specified. If multiple jobnames are specified, they must be separated by spaces or commas and enclosed in quotes.
Example: JOBNAME('++99* PAYR* BUDSTAT')
94 26. IOF Job Archival and Retrieval (IOF/JOBARC)

SCOPE(ALL). IOF scope. Any value that can be specified on the IOF scope parameter, including generic userids, groupids, "GROUP" and "ALL".
SIZE( ). Job size in spool track groups. If a value is specified for size, only jobs that have allocated at least this number of spool track groups will be selected.
SPOOLPC(0). Spool usage percent. The JAROFFLD command is conditional on the current JES2 spool usage percent. It will not offload any jobs if the JES2 spool utilization is less than the specified per cent.
JAROPEN Command
Function: Initialize an archival run. The report data set is allocated. The directory and offload data sets are allocated and initialized. The selected JES2 offloader is initialized. A JAROPEN command must be used prior to using a JAROFFLD command in a job step.
Parms:
DISP(DELETE/KEEP/HOLD). Offloader disposition. DELETE means that offloaded jobs are deleted after being dumped. KEEP and HOLD are also valid options.
LNEPGE(55). Print lines per page for report data set.
OFFLABEL(SL). Offload label type.
OFFNBR(1). Offloader number. Which offloader to use.
OFFPROT(N). Offload SAF protection (Y or N).
OFFRETPD(999). Offloader retention period.
OFFTRKS( ). Number of primary and secondary tracks to allocate for DASD offload data sets. This parm must be left as null for tape offload data sets because specification of a value causes a dasd data set to be allocated.
OFFUNIT(CART). Offload unit type.
OFFVOL( ). Offload volume serial number.
PREFIX( ). Override the high level of the directory and offload data set names that was specified in the B34OFFLD option. This parm is not used if SIMULATE is specified. The value specified in B34OFFLD is used if SIMULATE is not specified and no prefix is specified.
95 26. IOF Job Archival and Retrieval (IOF/JOBARC)

SIMULATE. If specified, a simulated offload run is made. Simulated runs produce the offload report but do not offload any jobs. Note that the PREFIX, SUFFIX, DIRDSN, OFFDSN, OFFUNIT, OFFVOL, OFFTRKS, OFFLABEL, OFFRETPD, OFFPROT, OFFNBR and DISP parms are ignored for simulated runs.
SUFFIX( ). Override the bottom level of the offload directory data set name that was specified in B34OFFLD. Suffixes can be chosen to meet local requirements. It is suggested that the default of OFFRUN be used for both periodic and emergency offload runs. The following additional suffixes are suggested: DAILY (daily JARDJOIN consolidation of offload directories), WEEKLY (weekly consolidation of daily directories), MONTHLY (monthly consolidation of directories), or any 1 to 8 character application name to define special offload runs.
SYSOUT( ). Sysout class for the report data set. The default value is specified in B34OFFLD.
JARUPLOD Command
Function: Upload one job from an offload data set. This command is issued by the UPLOAD dialogue and is normally not issued directly by users.
Parms: The first two parms are positional.
OFFDSN. The offload data set name. This parm is required and is the first positional parm.
JOBID. The job id of the job to be retrieved. This is required and is the second positional parm.
NOTIFY( ). The notify id of the user to be notified when the job has successfully been uploaded. If this parm is not specified, the notify id from the upload job will be used.
OFFNBR( ). Offloader number. The JES2 offloader to use. If not specified, the value specified in B34OFFLD is used.
Automatic Offload When Spool is Full
The SLAMRUN system log indexing task searches the log for errors and exception conditions. It easily can be modified to detect the HASP050 error message that signals spool saturation and to automatically initiate an emergency IOF/JOBARC offload procedure. The SLAMINST clist is used to define local conditions and can be modified for this purpose.
First, generate an emergency job offload catalogued procedure that can be started with an MVS start command. This procedure is identical to the
96 26. IOF Job Archival and Retrieval (IOF/JOBARC)

JOBARC cataloged procedure except that the SYSTSIN DD statement must point to a real online data set. An example is shown below:
//EMERGOFF PROC CLASS=X //BATCHTSO EXEC PGM=IKJEFT1B //SYSPROC DD DISP=SHR,DSN=iof.clist.library <=== clist //SYSTSPRT DD SYSOUT=&CLASS //SYSTSIN DD DISP=SHR,DSN=jaroff.cmds <=== offload parms
Add the following statements before the EXIT statement in the SLAMINST clist. Either restart SLAMRUN or enter "F SLAMRUN,REFRESH" to enable the new condition.
DEFCON JESTGS JESMSG EQ 'HASP050' + AND COLS(92 94) EQ 'TGS' + AND COLS(99 101) GT ' 90' <=== your percent ONCOND * SETCOND JESTGS INACTIVE ONCOND * SETCOND JESTGON ACTIVE ONCOND * # S EMERGOFF DEFCON JESTGON COLS(1 31) EQ 'O IOF/JOBARC JARCLOSE COMPLETED' ONCOND * SETCOND JESTGS ACTIVE
This will cause SLAMRUN to scan for the HASP050 track groups excession message. When an excession message is found, a start command for the EMERGOFF procedure above is issued. SLAMRUN will not look for the HASP050 message again until the emergency offload has completed.
97 26. IOF Job Archival and Retrieval (IOF/JOBARC)

27. Access Control Reference
Introduction
Chapter 9, Access Control Overview, describes how to use IOF facilities to control access to IOF resources. This chapter contains a more detailed look at the underlying structure of IOF access control.
By default IOF allows most users to control only their own jobs. End users cannot control devices, browse the system log, or use the IOF System Monitor unless specifically authorized. Users with TSO operator authority are allowed to browse and control all jobs and devices in the system and to use all IOF facilities.
IOF access control facilities let you change these default rules to meet the requirements of your installation. End users easily can be permitted to browse and control jobs they don't own or to manage specific devices. Operator users can be prevented from browsing sensitive jobs such as the payroll. These changes can be made by parameter changes or by interfacing IOF to your host security system.
IOF allows you to control access to jobs, output groups, sysout data sets, JES2 devices, system commands, and other systems in a sysplex. Access rules are defined through several IOF options which are members of the IOF options library. The detailed description of these options is contained in the options library. This chapter explains how the various options fit together and gives specific access control examples.
Access Control Options Members
The following members of the IOF Options Library are used to define the access control rules for your installation:
• A35USRID. For IOF under CICS only, this option allows you to specify the association between CICS users and IOF user ids.
• A40SCOPE. This member defines the default job ownership rule for your system.
• A60ACF. Specifies which security system you have (RACF, ACF2, or Top Secret) and whether operators and started tasks should be allowed access without requiring rules in the security system.
• B21$DOC. This member contains the documentation for the B21ACESS member.
27. Access Control Reference 98

• B21ACESS. This member describes the level of IOF access required to perform each of the functions defined by IOF.
• B23$DOC. This member contains the documentation for the B23ALLOW member.
• B23ALLOW. This member allows you to assign IOF users to access control groups. It also allows you to control which users (or groups) are allowed to do which IOF functions.
• B24ACFDF. Use this member to select the types of access that you want to protect with your security system. You also specify the high level prefix for all IOF security system resource names.
• B25DVGRP. This member groups JES2 device functions and parms together into smaller units that can be referenced more easily in B21ACESS.
Defining Default Job Ownership
The A40SCOPE option defines the default job ownership rule for your site. The selection that you make in this options member will heavily affect all other access control options for IOF.
In A40SCOPE you indicate which jobs are to be associated with an individual user. Jobs can be associated based on job name or based on job owner.
Job owner is much more attractive, since it removes all restrictions on the names that users can assign to their jobs. But, it does require that an owning userid be assigned to each job by JES2 and stored in the JES2 JQE control block for the job.
If you want job ownership to be based on the owning userid, specify:
USSCOPE OWNER,'/U'
Otherwise, you would specify A40SCOPE as:
USSCOPE JOBNAME,'/U*'
which will cause IOF to assume that a job is associated with a user if the job's name begins with the user's userid.
Read the A40SCOPE options member and be sure you understand the choices you can make. Select your USSCOPE option, and keep it in mind as you continue.
Defining IOF User Groups
IOF is shipped with three groups defined:
99 27. Access Control Reference

• OPERATOR. All users with the operator attribute. (UADS=OPE ) • STCGROUP. All started tasks. (ASIDTYP=STC) • ENDUSER. All other users. (No qualification parms)
Options member A60ACF controls the functions that are available to members of the default operator and started task groups. End users are allowed to review and control only the jobs they submitted. You easily can change the authority that the default groups have and can define as many IOF groups as you need.
If you have converted the ISFPARMS data set for IBM's SDSF product, you will have one IOF group for each ISFGRP macro in the ISFPARMS data set.
Use GROUP macros in options member B23ALLOW to define your IOF groups. See options member B23$DOC for a complete description of the GROUP macro.
Each user is assigned to the first group for which they qualify, so the order of GROUP macros in B23ALLOW is important. The most restrictive group macros should appear first in B23ALLOW and the least restrictive ones later. Users who do not qualify for any IOF group will not be allowed to use IOF.
One or more of the qualification parms described in the table below can be included on the GROUP macro to define the users that qualify for the group. If there is no qualification parm on a GROUP macro, all users qualify for that group. Qualify User
Qualify STRLIST
Exclude User
Exclude STRLIST
Description
ID IDLST XID XIDLST One or more explicit user ids
PROC PROCLST XPROC XPROCLS One or more TSO logon procedure names
TERM TERMLST XTERM XTERMLS One or more terminal names
ACCT ACCTLST XACCT XACCTLS One or more account numbers
ACFGP ACFGLST XACFGP XACFGLS One or more RACF group names
ACFLG ACFLGLS XACFLG XACFLGL One or more RACF connect groups
AC2UID AC2UIDL XAC2UID XAC2UIL One or more ACF2 userid strings
SES1 SES2
SES1LST SES2LST
XSES1 XSES2
XSES1LS XSES2LA
One or more session attributes named in source member ATTRBASE. Specify the parm as shown: SESn=(attrname,(attrval,..))
UADS UADS attr: OPERATOR, MOUNT, ACCOUNT, JCL
ASIDTYP
Address space type: JOB, TSU, STC
User Qualification Parms
For example, the parm "ID=(HR097A,HR177B,HR9*)" on a GROUP macro qualifies userids "HR097A", "HR177B", and all ids beginning "HR9" for the group. The parm "IDLST=PAYLIST" qualifies all ids listed in the STRLIST
100 27. Access Control Reference

macro at label "PAYLIST". The parms "UADS=OPER,XID=OPNEW" qualify all users with operator authority except "OPNEW".
IOF Group Features
Several IOF features are controlled by parameters on the GROUP macro. The table below lists the parm names and describes the group feature each parm controls.
Parm Name Values Description
FINDLIM (max,default) Maximum allowable and default FINDLIM
EXCLTSO YES/NO YES means exclude the active TSO session from display unless it has output. NO means always display active session.
MINPAUS seconds/NONE Minimum pause or refresh time allowed in seconds
EXTEND YES/NO/DEFAULT EXTEND command is allowed, not allowed, or used by default
INITCMD INITCMD/INITMENU Job List Menu or IOF Option Menu on initial IOF entry
ACTION route1,route2,ALL/ NONE
WTOR route codes that will be displayed by default at the bottom of the system log display
MONITOR opt1,opt2.../NONE System monitor default options or NONE
SYSID systemid Default syslog system id
FORMATS (sect1,sect2...) Alternate display section format names
CMDTYPE (type1,type2...) Global command types
PANEL OPTOPT/OPTUS1/OPTUS2/OPTUS3/OPTSDS
IOF Option Menu name
ALLOW (alow1,alow2...) ALLOW macro names that apply to this group
DFSCOPE USER/GROUP/ALL Default scope
MXSCOPE USER/GROUP/ALL Maximum allowable scope
USSCOPE (JOBNAME,str1...str8) (OWNER,str1...str8)
User scope definition. Defaults to the value set in the A40SCOPE option.
GRSCOPE (JOBNAME,str1...str8) (OWNER,str1...str8) Group scope definition
INPCMD YES/NO Allow use of the Input command to display input data sets on Job Summary Menu
QOPT YES/NO "Q" option allowed
DISPLAY (refresh,display) .01 seconds minimum display refresh/status interval
CONSOLE YES/NO CONSOLE command allowed
DRCMD YES/NO Display replies (DR) command allowed
STR1,STR2,STR3,STR4
string (string,beg,length)
String 1 through string 4 definitions. "/U" means users userid. "*" is wild card terminator. "+" wild card position.
AUTH (one or more options) Specific options to be displayed on the IOF Option Menu
101 27. Access Control Reference

Parm Name Values Description
AUTHADD (one or more options) Specific options to be added to the default options displayed on the IOF Option Menu
AUTHREM (one or more options) Specific options to be removed from the default options displayed on the IOF Option Menu
GROUP Macro Feature Parms
The default GROUP macros in options member B23ALLOW are surrounded by comments that describe the functions being defined for each group.
IOF Resources
IOF controls access to jobs, output groups, sysout data sets, commands, systems and devices. Specific users or groups of users can be allowed to look at or modify any of these five basic resource types. The names of these resource types are:
• JOBS • GROUPS • SYSOUTS • DEVICES • COMMANDS • SYSTEMS • PROCESS • THREADS • ENCLAVES
You will use these resource names when permitting users access to IOF resources.
IOF Resource Attributes
Each type of IOF resource has a set of attributes or characteristics. Access to a resource can be granted based on any one of these attributes. For example, each job has a name and a print destination, and may have an owner, a notify id, and other characteristics.
IOF resource attributes are defined in source member ATTRBASE. You can define your own resource attributes by modifying options member B63ATTR. The following table lists many of the attributes that have already been defined. It shows both primitive and combined attributes. Combined attributes are simply a combination of two or more primitive attributes.
102 27. Access Control Reference

Resource Type
Attribute Name
Attribute Type Description
JOBCOMBO Combined OWNER.JOBNAME
JOBNAME Primitive Name of the job
OWNER Primitive Userid of the job owner
NOTIFY Primitive Notify userid
DEST Primitive Job level destination
CLASS Primitive Job class
JOBID Primitive Job id
ACFGROUP Primitive RACF group of owner
ACF2UID Primitive ACF2 userid string
SUBUSER Primitive Submitter’s userid
SUBGROUP Primitive Submitter’s group
A19JBTYP Primitive Job type (BAT, STC, TSU)
JOBS
ACCT Primitive Account number
DEST Primitive Destination of group
CLASS Primitive Class of group
FORMS Primitive Forms of group
WTRID Primitive External writer name of group
MAILED Primitive Mail id of the group
GROUPS
USC, FCB, … Primitive Other group parms
DEST Primitive Destination of the data set
CLASS Primitive Sysout class of the data set
FORMS Primitive Forms of the data set
WTRID, FCB,USC, …
Primitive Other sysout characteristics
PDVDSKEY Primitive Data set key
SYSOUTS
PDVDDNAM Primitive DDNAME
DEVCOMBO Combined DEVTYPE.DEVNAME
DEVNAME Primitive Device name
DEVTYPE Primitive Generic device type
DEVICES
DEST Primitive Devices associated with the destination
CMDCOMBO Combined CMDTYPE.CMDNAME.CMDPARM1
CMDTYPE Primitive Command type (MVS or JES)
COMMANDS
CMDNAME Primitive Command name
103 27. Access Control Reference

Resource Type
Attribute Name
Attribute Type Description
CMDPARM1 Primitive First positional parm
COMMAND Primitive (for compatibility with prior releases)
SYSTEMS SYSID Primitive System id (SYSID or Service name)
JOBNAME Primitive Process Jobname
OWNER Primitive Process OWNER
PROCESS
TYPE Primitive TSU, STC, BAT
THREADS Currently none
SSTYPE Primitive Subsystem type
SUBSYS Primitive Subsystem name ENCLAVES
OWNERJOB Primitive Enclave owner jobname
Resource Attributes by Resource Type
Session Attributes
The current IOF user's session has certain attributes that can be used for access control. When the user tries to access a job, these session attributes can be matched against the same (or different) attributes of job.
Attributes Description
USERID User's userid
ASCBTYP Type of address space, JOB, STC or TSU
ACCT User's account number
XEQSYSID Execution system id of the JES2 system
ACFGROUP RACF group name
ACF2UID ACF2 UID String
Session Attributes
Session attributes can be specified in the STR1, ..., STR8 parms of ALLOW macros to set up comparisons between an attribute of a job and the same attribute of the IOF user's session. See examples 7 and 8 in the Allow Macro Examples section below for more details.
IOF Access Levels
IOF defines four levels of display access and four independent levels of update access for each of the six resource types. Display access is required to see, browse or copy an IOF resource. Update access is required to modify an IOF resource.
104 27. Access Control Reference

Because display access is completely independent of update access, it is possible to permit users to "look but not touch". For example, you may wish to let users browse certain jobs without granting permission to cancel or modify the jobs. Conversely, you may want to let some operators route and cancel certain jobs under their control without granting them permission to browse the output. Both these requirements are easy to implement because IOF provides independent display and update access.
Options member B21ACESS defines which IOF functions are available at each level of access. Options member B21$DOC describes the macros that are used in B21ACESS. The table below shows the major IOF functions associated with each of the levels of IOF access in the default B21ACESS options member, and is somewhat easier to read than the B21ACESS member.
Resource Type Level Display Functions Update Functions
1 Display job on Job List Menu
2 Select job for review
Cancel, route, release held ds, modify dest/class/sysid
3 Hold/release/restart job, modify class/priority
Jobs
4 Dump job control blocks
Set independent mods, modify performance group
1 Display on Menu
2 Select group for review
Cancel, modify class/dest/forms/ pagedef/address…
3 Hold/release group, modify wtrid/ priority/prmode
Groups
4
1 Display on IOF Job Summary
2 Cancel, modify class/dest/forms/ pagedef/address/wtrid/linect/prmode/ notify/usrlib …
3 Browse and snap all data sets
Sysouts
4
1 Display on Device List Menu
Start/drain/interrupt/restart/ backspace/set forms/ucs/fcb …
2 Cancel, set class/flash/spacing/xeq node/sysid … Set offload dsname, unit, volser and type …
3 Set dest/prmode/command authority, trace, disc intvl …
Devices
4 Set wtrid/work select, initiator class, FSS name, autologon …
2 Issue DR command Commands
4 Issue JES2 and MVS commands
1 Display MAS on menu
Invoke server (functions on server are controlled by the server CPU's IOF)
2 Select detail MAS display
Systems
3 Display Operlog
105 27. Access Control Reference

Resource Type Level Display Functions Update Functions
4 Start, stop, restart, reset, modify MAS parms Delete Operlog data
1 Display Enclaves on the menu
Enclaves
4 Quiese, resume, reset, set Service Class
1 Display Process on the menu
Process
4 Kill Process
Standard Access Control Table
Granting a particular level of access will allow all functions with level numbers less than or equal to the granted level. So, granting level 3 display access also allows the display functions defined at level 1 and level 2.
A missing level number in the table above means that no new functions are introduced at that level. For example, no level 1 update functions are defined for jobs.
You can move functions and/or operands from one level of access to another by modifying options member B21ACESS. Member B21EX01 in the sample mods (SAMPMOD) data set shows an example of moving the input class and priority operands from level 3 update access to level 2. It is also possible to define additional access control tables if four levels of access are not sufficient.
Granting Access to IOF Functions
ALLOW macros in options member B23ALLOW define exactly which level of access is permitted to which type of resource under what conditions. No IOF function can be done unless it is permitted by an ALLOW macro.
Each ALLOW macro can apply to one or more specific users or groups of users. There are several ways of defining who is granted access by an ALLOW macro. The ALLOW and ALOWLST parameters on a GROUP macro point to ALLOW macros that are to apply to the group. Any of the user qualification parms described below can be specified on ALLOW macros to indicate which users are being permitted access. The ACF parameter on an ALLOW macro specifies that access is being granted through your security system. Qualify User
Qualify STRLIST
Exclude User
Exclude STRLIST
Description
ID IDLST XID XIDLST One or more explicit user ids
GROUP GRPLST XGROUP XGRLST One or more IOF group names
PROC PROCLST XPROC XPROCLS One or more TSO logon procedure names
TERM TERMLST XTERM XTERMLS One or more terminal names
106 27. Access Control Reference
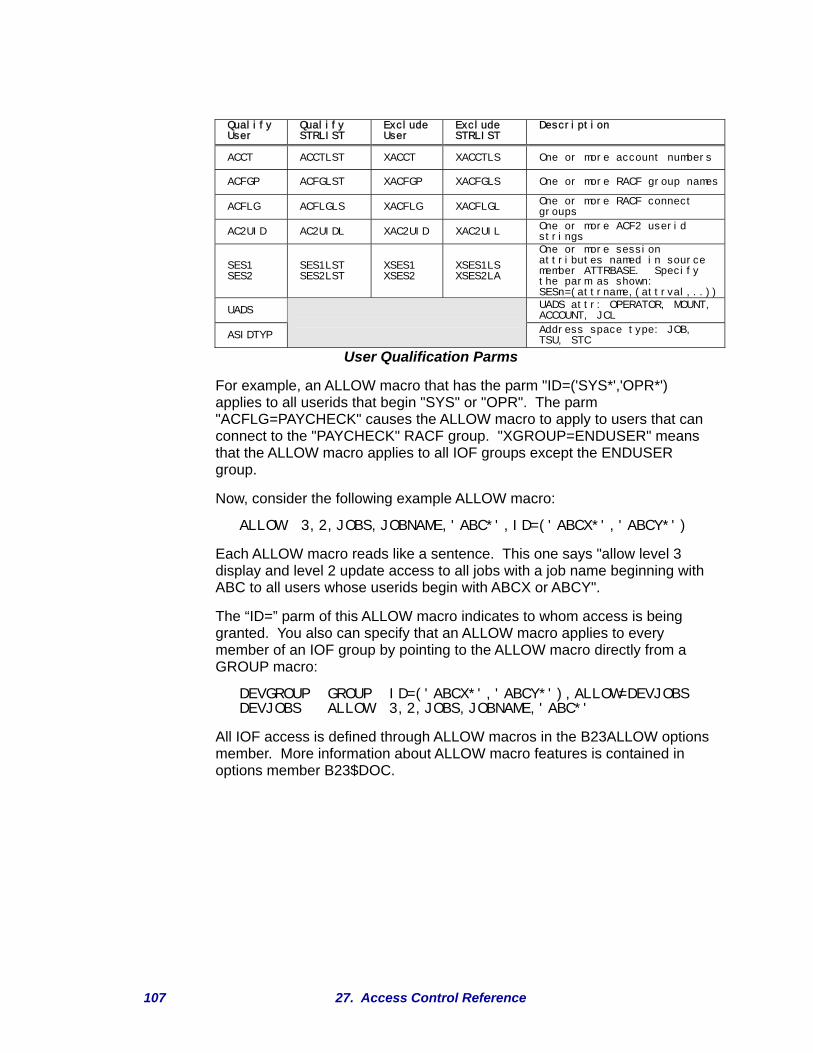
Qualify User
Qualify STRLIST
Exclude User
Exclude STRLIST
Description
ACCT ACCTLST XACCT XACCTLS One or more account numbers
ACFGP ACFGLST XACFGP XACFGLS One or more RACF group names
ACFLG ACFLGLS XACFLG XACFLGL One or more RACF connect groups
AC2UID AC2UIDL XAC2UID XAC2UIL One or more ACF2 userid strings
SES1 SES2
SES1LST SES2LST
XSES1 XSES2
XSES1LS XSES2LA
One or more session attributes named in source member ATTRBASE. Specify the parm as shown: SESn=(attrname,(attrval,..))
UADS UADS attr: OPERATOR, MOUNT, ACCOUNT, JCL
ASIDTYP
Address space type: JOB, TSU, STC
User Qualification Parms
For example, an ALLOW macro that has the parm "ID=('SYS*','OPR*') applies to all userids that begin "SYS" or "OPR". The parm "ACFLG=PAYCHECK" causes the ALLOW macro to apply to users that can connect to the "PAYCHECK" RACF group. "XGROUP=ENDUSER" means that the ALLOW macro applies to all IOF groups except the ENDUSER group.
Now, consider the following example ALLOW macro:
ALLOW 3,2,JOBS,JOBNAME,'ABC*',ID=('ABCX*','ABCY*')
Each ALLOW macro reads like a sentence. This one says "allow level 3 display and level 2 update access to all jobs with a job name beginning with ABC to all users whose userids begin with ABCX or ABCY".
The “ID=” parm of this ALLOW macro indicates to whom access is being granted. You also can specify that an ALLOW macro applies to every member of an IOF group by pointing to the ALLOW macro directly from a GROUP macro:
DEVGROUP GROUP ID=('ABCX*','ABCY*'),ALLOW=DEVJOBS DEVJOBS ALLOW 3,2,JOBS,JOBNAME,'ABC*'
All IOF access is defined through ALLOW macros in the B23ALLOW options member. More information about ALLOW macro features is contained in options member B23$DOC.
107 27. Access Control Reference

ALLOW Macro Description
Syntax
label ALLOW
dlev display level ,ulev update level ,res-type resource type ,res-attr[(col,len)] resource attribute
,| match-str | match strings
| STRLST=listname | lists of strings
| NOT=match-str | match strings
| NOTLST=listname | lists of strings
,| [user-qual] | user qualifier
| [ACF=| GLOBAL |] | security system
| | USER | | global/user levels
[,TABLE=access-tbl] access table name
[,STR1,...,STR8=(session-attr[,(col,len)])]
[,IFALSO=(atrc-nam#1,...,atrc-nam#n)]
label. The name of the ALLOW macro. This name can be used in the ALLOW operand of a GROUP macro to associate this ALLOW macro with the group. A label is useful for tracing purposes even if you do not reference it.
dlev. The level of display access being allowed, with a value from 0 to 4. If the ACF parameter is specified, this is the maximum display level that can be granted by your security system.
ulev. The level of update access being allowed, with a value of 0 to 4. If the ACF parameter is specified, this is the maximum update level that can be granted by your security system.
res-type. The type of resource to which access is being allowed. Valid resource types are JOBS, GROUPS, SYSOUTS, DEVICES, COMMANDS, SYSTEMS, PROCESS, THREADS, AND ENCLAVES.
res-attr. The resource attribute name. This specifies the characteristic of the resource that is to be compared against the match-strings to determine if this ALLOW macro is applicable. For example, if res-type were JOBS, res-attr might be JOBNAME or
108 27. Access Control Reference

OWNER. For valid resource attributes for each resource type, see the table in the above section, IOF Access Levels.
Note that a value of an asterisk ( * ) can be specified for the resource attribute name to indicate that this ALLOW macro is applicable to all resources of the type named in res-type. When this form is used, the res-attr and match-str parameters are not used.
res-attr(col,len). Specifies a substring of the resource attribute. This would normally only be used in conjunction with the STR1, ..., STR8 parms. See Example 8 in the section below, ALLOW Macro Examples.
match-str. The set of pattern match strings that are to be compared against the resource characteristic named in res-attr above to determine if this ALLOW macro is applicable. If an asterisk ( * ) is specified for res-attr, this parameter should be omitted. Generic names can be specified using the plus ( + ) as a one character wild card, and the asterisk ( * ) as a wild card terminator. More than one name can be specified if enclosed within parentheses.
STRLST=listname. An alternate way to specify the match-strings. "listname" is the name of a STRLIST macro that describes a list of match strings.
NOT=match-str. A set of pattern match strings that must not match the resource attribute in order for the ALLOW macro to be applicable.
NOTLST=listname. An alternate way to specify the NOT= strings. "listname" is the name of a STRLIST macro that describes a list of match strings.
user-qual. Specifies which users this ALLOW macro applies to. See the table in the above section, Granting Access to IOF Functions, for a description of all the user qualification parms that can be used on an ALLOW macro.
ACF=GLOBAL. Specifies that this is a pattern ALLOW macro that describes a profile (rule) defined to your security system that should be checked to determine if this user should be allowed to perform the function they are attempting. GLOBAL implies that the rule is defined at the system level and has the prefix specified in the B24ACFDF options member. System level rules are controlled by the system security administrator and not by individual users. See the below section, Using Your Security System to Control IOF Access, for more information about defining security system rules that correspond to IOF ALLOW macros.
ACF=USER. Specifies that this is a pattern ALLOW macro that describes a profile (rule) defined to your security system that should
109 27. Access Control Reference

be checked to determine if this user should be allowed to perform the function they are attempting. USER implies that the rule is defined at the user level and has a user's userid as a prefix. User level rules are controlled by individual users. See the below section, Using Your Security System to Control IOF Access, for more information about defining security system rules that correspond to IOF ALLOW macros.
TABLE=access-table. Specifies the name of an access table in options member B21ACESS. This would never need to be specified unless you have defined additional access tables in B21ACESS. The name of the default access table is STANDARD.
STR1=session-attr. Defines the /1 insertion string to be the value of the named session attribute. See Example 7 in the section below, ALLOW Macro Examples..
STR1=(session-attr,col,len). Defines the /1 insertion string to be a substring of the named session attribute. See Example 8 in the section below, ALLOW Macro Examples..
STR2=, ..., STR8=. Define the /2, ..., /8 insertion strings.
IFALSO=(atrc-nam#1, ..., atrc-nam#n). Names one or more ATTRCHK macros that define additional conditions that must be met in order for the ALLOW (or LIMIT) macro to be honored.
ALLOW Macro Examples
Example 1. Let all users browse the system log by granting level 3 display access to jobname "SYSLOG" to all userids.
ALLOW 3,0,JOBS,JOBNAME,'SYSLOG',ID=*
Example 2. Let userids that begin "OPER" have "SYS" in positions 3 through 5, or begin "PR" and have "CL" in positions 4 and 5 browse the log, jcl and messages data sets of all jobs in the system based on any selection criteria. Also, let them cancel all jobs and modify all job attributes. Do not permit browsing the regular sysout data sets of the jobs.
ALLOW 2,4,JOBS,*,ID=('OPER*','++SYS*','PR+CL*')
This can also be accomplished by:
ALLOW 2,4,JOBS,*,IDLST=LN1
LN1 STRLIST 'OPER*','++SYS*','PR+CL*'
Example 3. Define userid "RSAM" as the operator of remote 18. Do not allow RSAM to modify the destination, work select, and other systems type parameters of the printer.
ALLOW 2,2,DEVICES,DEVNAME,'R18.*',ID='RSAM'
110 27. Access Control Reference

Example 4. Allow everyone in the 'OPERATOR' and 'SYSPGMR' groups to fully control all devices.
ALLOW 4,4,DEVICES,*,GROUP=(OPERATOR,SYSPGMR)
Example 5. Allow all users connected to the MSTRCTL RACF group to browse and modify most characteristics of all jobs with a notify id of 'SYSCTL'.
ALLOW 3,2,JOBS,NOTIFY,'SYSCTL',ACFGP=MSTRCTL
Example 6. Allow all users who are connected to the "LOCOPER" RACF group to control all sysout groups and devices that are routed to or associated with the "LOCAL" destination.
ALLOW 4,4,GROUPS,DEST,'LOCAL',ACFLG=LOCOPER
ALLOW 4,4,DEVICES,DEST,'LOCAL',ACFLG=LOCOPER
Example 7. Allow all users to control jobs in their own RACF group.
ALLOW 3,2,JOBS,ACFGROUP,'/1',ID=*,STR1=ACFGROUP
Example 8. Allow all users to control a job if the seventh and eighth characters of the job's ACF UID string match the seventh and eighth characters of the IOF user's ACF2 UID string.
ALLOW 3,2,JOBS,ACF2UID(7,2),'/1',ID=*,STR1=
(ACF2UID,7,2)
Example 9. Allow everyone except the IOF ENDUSER group to display the MAS and invoke the AT command on all systems.
ALLOW 2,1,SYSTEMS,SYSID,*,XGROUP=ENDUSER
Example 10. Allow ENDUSER group members to invoke the AT command for sysid IPO2. Functions available during the server session are controlled by the IOF on the server CPU.
ALLOW 0,1,SYSTEM,SYSID,IPO2,GROUP=ENDUSER
Example 11. Allow all users to browse all sysout data sets with a ddname of SYSPRINT and sysout class of "J".
ALLOW 2,0,JOBS,*,ID=*
ALLOW 3,0,SYSOUTS,DDNAME,SYSPRINT,ID=*,
IFALSO=SOCLASSJ SOCLASSJ ATTRCHK SYSOUTS,CLASS,J
Example 12. Prevent all access to sysout classes "C" and "R" for jobnames beginning "HR" to everyone except userids beginning "HRM".
LIMIT 1,0,SYSOUTS,JOBNAME,HR*,XID=HRM*,IFALSO=
PAYCLASS PAYCLAS ATTRCHK SYSOUTS,CLASS,(C,R)
See SAMPMOD library members B23EX02 and B23EXSES for additional examples of ALLOW macros.
111 27. Access Control Reference

Limiting Access with LIMIT Macros
The LIMIT macro has exactly the same parms as the ALLOW macro but limits access rather than allowing access. The level numbers on a LIMIT macro indicate the highest possible access that will be granted to the resource. For example:
LIMIT 2,2,JOBS,JOBNAME,'PAY*',ID=*
This macro sets a limit on the level of IOF access that can be allowed to any job whose name begins with "PAY". Since ID=* is specified, this limitation applies to all IOF users. This macro prevents all users from browsing any sysouts other than the log, JCL, and messages for all jobs with jobnames beginning "PAY".
A LIMIT macro that absolutely applies to all users is somewhat unusual in practical situations. Normally there are a few users for whom the limit should not be applied. The following LIMIT macro is an example:
LIMIT 1,0,SYSOUTS,CLASS,'P',XACFLG=PAYROLL
This macro prevents browse or modify of class "P" sysout data sets except by users who are connected to the PAYROLL RACF group. Class "P" data sets are only allowed to be displayed on the Job Summary display for all other users.
See SAMPMOD library member B23EXLIM for several additional examples of LIMIT macros.
Defining Multiple Attributes with the ATTRCHK Macro
The ATTRCHK macro is used to define additional criteria that must be satisfied in order for an ALLOW or LIMIT macro to be honored. ALLOW and LIMIT macros can point to one or more ATTRCHK macros with the IFALSO parm.
When the IFALSO parm is specified, the ALLOW/LIMIT macro will be used only if all of the specified ATTRCHK macros are satisfied.
Syntax
name ATTRCHK res-type
,res-attr
,|match-str |
|STRLST=listname|
|NOT=match-str |
|NOTLST=listname|
112 27. Access Control Reference

name. The name specified in the IFALSO parm of an ALLOW or LIMIT macro.
res-type, res-attr, match-str and listname. These have the same meanings as on the ALLOW and LIMIT macros. These parms define additional conditions that must be met. Note that the res-type for the ATTRCHK macro must match the res-type parm on the ALLOW or LIMIT macro that points to the ATTRCHK.
Special "CONTROL" Limit Attribute
A special "CONTROL" attribute for "JOBS", "GROUPS" and "SYSOUTS" combines several key attributes of these resources. The "CONTROL" attribute is built by combining the following attributes separated by a period ( . ).
Attribute Length Description
JOBID 8 characters Jobid of the job
OWNER 1 to 7 characters Owner of the job
JOBNAME 1 to 8 characters Jobname of the job
JOBSTATE 5 to 7 characters Job state: INPUT, RUNNING, OUTPUT
FUNCTION 4 to 7 characters IOF validation function: MENU, SELECT, CANCEL, MODIFY, ROUTE, JRELEASE, DRELEASE, HOLD, DUMPCB, PRINT, RESTART, SNAP
The "CONTROL" attribute is especially useful in the LIMIT macro. For example, the following LIMIT macro prevents anyone except userids beginning "CO" from canceling any running started task with a jobname beginning "CICS":
LIMIT 0,0,JOBS,CONTROL,'S*.*.CICS*.RUNNING.CANCEL',XID=CO*
The LIMIT macro above only applies to running CICS jobs. It does not restrict cancel of CICS jobs on the output queue.
Building ALLOW and LIMIT Macros Using the ALLOW Command
The easiest way to build ALLOW and LIMIT macros is to use the IOF ALLOW command. From any IOF panel when running under ISPF, enter the ALLOW command to initiate a dialogue that takes you step-by-step through the process of building specific ALLOW and LIMIT macros.
You can save the new ALLOW and LIMIT macros if you wish, or you can simply review the macros that the dialogue builds in order to get a better understanding of how the generated macros work. No IOF options members are ever updated by the dialogue unless you explicitly specify the member name and verify the update.
113 27. Access Control Reference

If you have only the CICS version of IOF, you will have to edit the B23ALLOW options member to specify your ALLOW and LIMIT macros.
If you have both the TSO and CICS versions of IOF and you want to use the same access rules for both products, you can copy your IOF/TSO access control options members to your IOF/CICS options library. Make sure that both products are at the same release level, and then review options members A40SCOPE, A60ACF, B21ACESS, B23ALLOW, B24ACFDF, and B25DVGRP in your IOF/TSO options library. Copy the desired options members to your IOF/CICS options library and make whatever changes, if any, are required.
STRLIST and ADRLIST Macros
Both the GROUP and ALLOW macros have parms for which you may wish to specify lists of names, ids, or addresses. Sometimes, the same list needs to be specified several times.
The STRLIST macro allows you to define a list of match strings that can be referenced by ALLOW and GROUP macros.
Syntax
label STRLIST 'str1','str2',...
label. The name used to point to this STRLIST macro.
'str1','str2',... The list of generic match strings.
The ADRLIST macro allows you to define a list of address pointers that can be referenced by GROUP and ALLOW macros.
Syntax
label ADRLIST addr1,addr2,...
label. The name used to point to this ADRLIST macro.
addr1,addr2,... The list of address pointers.
Access to Sysout Data Sets
You will notice that the default B23ALLOW options member does not contain any ALLOW macros for the SYSOUTS resource type. This is because granting access to a job or output group also grants the same level of access to any sysouts in the job or output group.
You will need ALLOW macros for the SYSOUTS resource type only if you need to grant a higher level of access to some sysout data sets of a job than
114 27. Access Control Reference

you grant to the job as a whole. For example, consider the following ALLOW macros:
ALLOW 2,2,JOBS,JOBNAME,'PAY*',ID='HR*' ALLOW 3,0,SYSOUTS,CLASS,'P',ID='HR*'
The first ALLOW macro permits userids beginning "HR*" to select jobnames beginning "PAY" and browse the log, messages, and JCL data sets. Level 3 display access is required to browse other data sets of the job.
The second ALLOW macro says that any "HR*" user can browse but not modify any sysout data set with sysout class "P" for any job that they are able to select. This SYSOUTS ALLOW macro is required because it grants a higher level of display access to some data sets than the JOBS macro granted.
It is important to point out that granting access with a SYSOUTS ALLOW macro only affects jobs or groups that the user is able to select. Sysout functions are never attempted until after a job or group has been selected.
Using Your Security System to Control IOF Access
You can see that IOF ALLOW macros provide very powerful features for controlling access to IOF resources. However, these macros must be regenerated each time that you need to make a change. This problem can be avoided by using your host security system to control some IOF access decisions. IOF provides interfaces to RACF, Top Secret, and ACF2 for this purpose.
See Chapter 9 for a description of how to control access to IOF resources with your security system. The discussion which follows is a description of the basic IOF facilities that are involved with providing this support.
You specify which types of resources are to be controlled by your security system by coding ALLOW macros with the ACF parameter. For example, you can request that access to jobs be controlled by your security system but not access to JES2 devices.
For most installations, some reasonable combination of IOF access table control and security system control seems to work best. For example, it usually makes sense to allow users to look at and control their own jobs without checking with the security system. But for looking at other users' jobs, it is often easier to let the security system contain the rules.
To use your security system to control IOF access:
• Define your security system to IOF in options member A60ACF. • Select the resources to be controlled by modifying options member
B24ACFDF.
115 27. Access Control Reference

• Use the ACF command under IOF (while under ISPF) to manage resource names in your security system that correspond to IOF resources that you wish to control.
Each of these topics will be discussed in some detail below.
Defining Your Security System to IOF
To use a security system interface for IOF you must first designate your security system to IOF in the A60ACF options member.
ALLOW Macros to Activate Security System Checks
The ALLOW macros to activate security system checks are automatically generated by choices that you make in options member B24ACFDF. The description below explains how those ALLOW macros relate to your security system.
No security system check will be made unless specifically requested by an ALLOW macro in options member B23ALLOW. Coding the ACF parameter on an ALLOW macro means that the ALLOW macro is actually just a pattern for a rule (profile) that is defined to your security system. The corresponding rule in your security system will be checked to determine if the function requested by the user should be allowed.
For example, consider the following ALLOW macro:
ALLOW 3,2,JOBS,JOBNAME,*,ACF=GLOBAL
This macro tells IOF to check your security system for rules that control access to jobs based on job name. If a user attempts a job function (like CANCEL or PRINT) and no non-ACF ALLOW macros in B23ALLOW permit the function, a security system check will be made to see if a rule grants the level of access necessary to perform the requested function.
The display and update access levels ("3,2" in our example above) for an ACF ALLOW macro have completely different meanings than for non-ACF ALLOW macros. For ACF ALLOW macros the access levels specify the maximum level of access that can be granted through the security system. Using our example macro above, IOF would never grant more than level 3 display or level 2 update access to a job based on job name rules stored in the security system.
The third parameter of an ACF ALLOW macro ("JOBS" in our example above) must specify a valid IOF resource type (JOBS, GROUPS, DEVICES, SYSOUTS, COMMANDS, or SYSTEMS).
The fourth parameter ("JOBNAME" in our example above) must specify the name of an IOF resource attribute. See the table in the section above, IOF Resource Attributes, for a list of valid resource attributes.
116 27. Access Control Reference

The fifth parameter (the asterisk, *, in our example above) allows you to restrict security system checks to certain job names. In the example we specified the generic asterisk which means that the security system should be checked for all job names. You could specify instead a list of generic job names and the security system would be checked only if the name of the job being accessed matched one of the generic job names.
ACF=GLOBAL in our example above means that only rules controlled by the system security administrator should be checked. ACF=USER means that rules that can be controlled by individual users should be checked.
The ID, IDLST, GROUP, GRPLST, and other user qualification parms can be specified on an ACF ALLOW macro to limit ACF control to specific groups of users. An ACF ALLOW macro should never be pointed to by the ALLOW or ALOWLST parameters of a GROUP macro.
ALLOW macros with the ACF parameter are checked last, so most common types of access can be granted without a security system call. The default B23ALLOW option contains several ALLOW macros that permit all users to access the jobs they submitted. For efficiency these macros normally should not be removed even when some access control decisions will be made by the security system.
Adding Security System Resource Names
To grant access to an IOF resource you must first add a resource name to your security system that corresponds to the IOF resource. Each ACF ALLOW macro indicates that there are security system resource names that correspond to the resources described in that ALLOW macro.
For the TSO version of IOF you would normally use the ACF command from any IOF panel (while under ISPF) to add security system resource names. If you have both the TSO and the CICS versions of IOF and your A60ACF and B24ACFDF options members are compatible, you can define your IOF/CICS resource names using IOF/TSO. If you have only the CICS version, you will have to use your security system to manually add resource names. The description below explains the structure of these resource names.
Syntax
prefix.table.D/U.resource.attribute.value
prefix. The PREFIX= value from options member B24ACFDF. The default value is IOFACF.
table. Specifies the first 3 characters of the access table name from options member B21ACESS that will be used to control this access attempt. The default table name is STANDARD, so this level will normally be "STA".
117 27. Access Control Reference

D/U. "D" means that this resource name will be used to control only display access to the resource. "U" means that this resource name will be used to control only update access to the resource. If a display function (like browse or snap) is being attempted by the user, the resource name that is checked will have "D" in this position. For update functions (like cancel of modify) this level will be "U".
resource. Specifies the first 4 characters of an IOF resource type (JOBS, GROU, DEVI, SYSO, COMM, SYST). This is the type of IOF resource that this security system resource name can be used to control.
attribute. Specifies the first 4 characters of an IOF resource attribute name from the table in "IOF Resource Attributes". Access will be granted based on this attribute (JOBNAME, DEST, etc.).
value. Specifies a specific value for the attribute above. For example, if attribute were "JOBN", this would be a specific (or generic) job name to which permissions are to be granted.
The resource class for IOF resource names is defined by the CLASS= parameter in the A60ACF options member. The default class is DATASET.
The table below describes a few examples of GLOBAL resource names that could be used to grant access to IOF resources.
Resource Name Access Controlled
IOFACF.STA.D.JOBS.JOBN.PROD* Display functions for jobs with job name beginning PROD
IOFACF.STA.D.JOBS.JOBC.PAYCL.P* Display functions for all jobs owned by "PAYCL" with jobnames beginning "P"
IOFACF.STA.U.JOBS.JOBC.PAYCL.* Update functions for all jobs owned by "PAYCL"
IOFACF.STA.*.JOBS.* Display and update functions for all jobs in the system
IOFACF.STA.*.GROU.DEST.ATLANTA Display and update functions for output groups routed to ATLANTA
IOFACF.STA.U.COMM.CMDC.* Issuing all MVS and JES2 commands from IOF
IOFACF.STA.U.COMM.CMDC.MVS.C.CICS* Issuing the MVS Cancel command for all jobnames beginning "CICS"
IOFACF.STA.U.COMM.CMDC.JES.*.* Issuing all JES2 commands and all operands
IOFACF.STA.*.DEVI.DEVN.PRINTER3 Display and update functions for the device named PRINTER3
IOFACF.STA.D.DEVI.* Display functions for all JES2 devices
IOFACF.STA.*.SYST.SYSI.PROD Sysplex display and update for system PROD
Global Resource Names Examples
Remember that an ALLOW macro in the B23ALLOW options member is required to activate each of the resource name checks described above.
118 27. Access Control Reference

Now, look at the resource name for output groups above and notice how the resource name reads like a sentence. You would use this resource name to grant "standard display and update functions to all groups with a dest of ATLANTA".
See the table in the section above, IOF Resource Attributes, for a description of all the possible combinations of resources and attributes that can be used in IOF ALLOW macros and security system resource names. In practice, most installations use only a small subset of these combinations. But, it is clear from the table that IOF is extremely flexible in allowing you to define the access rules for your users.
The access control system rule to be checked is completely controlled by the ALLOW macro. For example, assume that the following ALLOW macro is present in B23ALLOW:
ALLOW 3,2,JOBS,JOBNAME,'*',ACF=GLOBAL
Now, assume that a user attempts to cancel job PAYEDIT. Assume further that no non-ACF ALLOW macros in B23ALLOW permit the user to perform the cancel function, and that no LIMIT macros absolutely prevent the access. IOF will request access from the security system to the following GLOBAL resource name to determine if the user is permitted to cancel PAYEDIT:
IOFACF.STA.U.JOBS.JOBN.PAYEDIT
The level of access to be checked is discussed in the next section, Granting Access to IOF Resources. If access is allowed, PAYEDIT will be canceled. You completely control which types of resources are checked by selecting options on the activating ALLOW macros.
If the user had attempted to select job PAYEDIT for display, the resource name checked would be exactly like the one above, with the exception that the "U" level would be "D". We will see below that this allows you four levels of display access and four independent levels of update access to each type of IOF resource.
Granting Access to IOF Resources
For the TSO version of IOF you would normally use the ACF command from any IOF panel (while under ISPF) to grant access to IOF resources. If you have both the TSO and the CICS versions of IOF and your A60ACF and B24ACFDF options members are compatible, you can grant access using IOF/TSO. If you have only the CICS version, you will have to use your security system to manually grant access to IOF resources. The description below provides more detailed information about how access is granted to IOF resource names.
To grant a user access to an IOF resource you permit them access to the security system resource name that corresponds to that IOF resource. The level of IOF access granted is determined by the level of security system
119 27. Access Control Reference

access that is granted. For each security system there is a direct correlation between the four levels of IOF access and specific levels of security system access. This correlation is described in the table below.
IOF Level RACF Access Type TSS Access Type ACF Access Type
1 Read Read Execute
2 Update Update Read
3 Control Update, Control Write
4 After All Allocate
ACF Access Levels Table
It is important to remember that an IOF access level has no meaning without also indicating whether it is display or update access. For example, the term "level 2 IOF access" has no meaning. You need to say "level 2 display access" or "level 2 update access". This is because there are four independent levels of IOF display and update access, each numbered 1 to 4. For more information, see the table in the section above, IOF Access Levels.
This means that the IOF access levels in the table above do not indicate whether they are for display or update access. From the previous section you will remember that if a user is attempting a display function, a level of ".D." will be included in the security system resource name to be checked. For an update function a level of ".U." will be included.
The presence of the ".D." or ".U." level in the resource name is what controls whether display or update access is being granted. To grant a particular level of display access to a user, you grant him the corresponding security system access level to a resource name with the ".D." level included.
For example, assume that a user attempts to select job PAYEDIT for review and that no non-ACF macros in B23ALLOW permit the access. From the table in the section above, IOF Access Levels, you can see that IOF level 2 display access to job PAYEDIT is required to select it for review. Since a display function is being attempted, the security system resource name to be checked would be:
IOFACF.STA.D.JOBS.JOBN.PAYEDIT
To check for level 2 access to this resource name, we go to the ACF Access Levels Table above and find that level 2 IOF access corresponds to RACF update (or ACF2 read) access. So, IOF would check to see if the current user has RACF update (or ACF2 read) access to the resource above. If so, the user would be allowed to select PAYEDIT for review.
Notice that the normal interpretations of the RACF and ACF2 access level names have no meaning at all for IOF. RACF update access is simply used to correspond to IOF level 2 access. The resource name itself actually indicates whether display or update access is being granted. Another example will help to demonstrate this.
120 27. Access Control Reference

Assume that a user attempts to modify the input class of job PAYEDIT. From the table in the section above, IOF Access Levels, you can see that level 3 IOF update access to PAYEDIT is required to modify its input class. Since an update function is being attempted, the security system resource name to be checked would be:
IOFACF.STA.U.JOBS.JOBN.PAYEDIT
To check for level 3 update to this resource name, we go to ACF Access Levels Table above and find that level 3 IOF access corresponds to RACF control (or ACF2 write) access. So, IOF would check to see if the current user has RACF control (or ACF2 write) access to the resource. If so, the user would be allowed to change the input class of PAYEDIT.
Security System Access Control Examples
Each example assumes that the user has not been granted access through non-ACF ALLOW macros. The standard B21ACESS option is assumed. It is also assumed that the A60ACF option specifies RACF and the B24ACFDF option specifies a PREFIX=IOFACF and CLASS=DATASET.
Example 1. Let the system security administrator use the security system to control access to all jobs in the system based on job name. The following ALLOW macro will cause the security system to be called when an attempt is made to access a job by job name and access has not been granted by another ALLOW macro:
ALLOW 4,4,JOBS,JOBNAME,*,ACF=GLOBAL
Assume that a job with a job name of WEEKLY is selected for review. Job select requires IOF level 2 display access. To get IOF level 2 display access, RACF "update" access is required to the resource name:
IOFACF.STA.D.JOBS.JOBN.WEEKLY
The user attempting to select WEEKLY for review needs at least "update" RACF access to this resource name or to a generic RACF resource name that includes this name.
If the user wanted to cancel the WEEKLY job, IOF level 2 update access is required. To get IOF level 2 update access, RACF "update" access is required to the resource name:
IOFACF.STA.U.JOBS.JOBN.WEEKLY
To change the performance group of WEEKLY, IOF level 4 update access is required. Therefore, RACF "alter" access is required to the resource name shown above.
Note how the third level of the resource name changed from "D" to "U" in the examples above to indicate the change from "display" to "update" access.
121 27. Access Control Reference

Both examples above required "update" access to the resource name, because IOF level 2 access was needed in both cases.
Now, let's examine the flexibility the ALLOW macro above gives to the security administrator.
• Resource name 'IOFACF.STA.D.JOBS.JOBN.*' can be used to control display access to all jobs. • Users permitted RACF "update" access to this resource have level 2
IOF display access to all jobs in the system. They can select any job for review and browse the log, JCL and messages data sets.
• Users permitted RACF "control" access to this resource have level 3 display access to all jobs. They can browse all data sets of all jobs.
• No update access to jobs can be granted using this resource name. • Resource name 'IOFACF.STA.U.JOBS.JOBN.PAY*' can be used to
control update access to all jobnames beginning 'PAY'. • Users permitted RACF "update" access to this resource have IOF
level 2 update access. They can cancel jobs, route them, or release their held data sets. They can also modify several job and data set characteristics. See B21ACESS for a complete description of all functions and parameters allowed with level 2 update access.
• Users permitted RACF "control" access to this resource have IOF level 3 update access. They can hold jobs, release jobs, restart jobs, and change their input class and priority.
• Users permitted RACF "alter" access to this resource have IOF level 4 update access. They can set independent mode and performance group.
• No display access can be granted using this resource name. • Resource name 'IOFACF.STA.*.JOBS.JOBN.PROD*' can be used to
control both display and update access to all jobnames beginning 'PROD'. • Users permitted RACF "update" access to this resource have IOF
level 2 display and update access. They can browse the log, jcl and messages data sets of jobs, cancel jobs, route jobs, and release their held data sets.
• Users permitted RACF "alter" access to this resource have IOF level 4 display and update access. They can do anything to 'PROD' jobs.
Example 2. Let all users permit access to their own jobs.
ALLOW 3,2,JOBS,JOBNAME,*,ACF=USER
This macro lets individual users define security system rules that grant access to their own jobs. Note, however, that users are not permitted to grant display access higher than level 3, nor update access higher than level 2. This restriction prevents end users from permitting themselves to modify priority, class, and performance group of their own jobs.
122 27. Access Control Reference

A user can allow all users to browse the log, JCL, and messages data sets of all his jobs by entering the following RACF command:
ADDDSD IOFACF.STA.D.JOBS.JOBN.* UACC(UPDATE)
The user's userid becomes the prefix because the resource name is not enclosed in quotes.
The user can then allow specific users to browse all the sysouts of his jobs by entering the following RACF command:
PERMIT IOFACF.STA.D.JOBS.JOBN.*
ACC(CONTROL) ID(......)
The user can also control access to specific jobs he owns by defining and controlling resource names for the specific names of the jobs to be controlled.
Example 3. Let the system security administrator define operators of all devices by device name.
ALLOW 4,4,DEVICES,DEVNAME,*,ACF=GLOBAL
This ALLOW macro allows the system security administrator to define resource names that can be used to control all devices by device name. Users can be permitted to display all devices and initiators by permitting RACF read (IOF level 1) access to the resource name below. No device control commands or modifications can be permitted by this resource name:
IOFACF.STA.D.DEVI.DEVN.*
Operators can be allowed to display and update all attributes of all devices and initiators by permitting RACF alter (IOF level 4) access to the resource name below. Note that the third level of the resource name is generic, meaning that both display and update access are being granted.
IOFACF.STA.*.DEVI.DEVN.*
The remote 35 operator can be permitted to display all attributes of remote 35 devices, to issue most device commands and to alter many device attributes by permitting RACF read (IOF level 1) access to the resource:
IOFACF.STA.*.DEVI.DEVN.R35.*
The main console operator can be permitted to control all initiators by permitting RACF alter (IOF level 4) access to the resource:
IOFACF.STA.*.DEVI.DEVN.INIT*
123 27. Access Control Reference


28. Using IOF to Manage a Sysplex Environment
Introduction
IOF provides several functions that allow you to control all your JES2 systems from a single IOF session:
• MAS Command. Display basic JES2 information about all systems and easily start or stop any JES2 in the sysplex.
• AT Command. Activate an IOF server session on any system in your VTAM network. Access to IOF functions on the server session is carefully controlled. Some of the more useful functions are to: • Control JES2 devices defined on another CPU • Display CPU and I/O time for jobs running on another CPU • Browse sysout data not yet written to spool for jobs running on
another CPU
Controlling Access to Sysplex Functions
You have complete control over which users are allowed to use the MAS and AT commands. By default, all users with TSO operator authority and all started tasks have the authority to use these commands. To change this, remove "SYSTEMS" from the STC= and/or OPER= parms of the SETACF macro in options member A60ACF.
Giving a user access to an IOF server on another machine in the sysplex (with the AT command) does not grant the user any privileges on that system. The user will only be allowed to do the IOF functions specifically permitted by the IOF on that system.
The examples below show how to selectively allow specific users to use these commands by adding ALLOW macros to options member B23ALLOW.
Example 1. Allow all users to use the AT command for any system in the sysplex, but do not allow them to use the MAS command:
ALLOW 0,1,SYSTEMS,SYSID,*,ID=*
Example 2. Allow selected users to use the AT command for the IPO3 system:
ALLOW 0,1,SYSTEMS,SYSID,IPO3,ID=(ABC*,XYZ*)
28. Using IOF to Manage a Sysplex Environment 125

Example 3. Absolutely prevent any user except MSTROPER from using the AT command or displaying the JES2 system for system IPO2:
LIMIT 0,0,SYSTEMS,SYSID,IPO2,XID=MSTROPER
Example 4. Allow users with operator authority to use the MAS command but not overtype any display fields:
ALLOW 4,0,SYSTEMS,SYSID,*,UADS=OPERATOR
Example 5. Allow the same access as the macro above, but add permission to use the AT command:
ALLOW 4,1,SYSTEMS,SYSID,*,UADS=OPERATOR
Configuring Your Communications Protocol to Support the AT Command
See Chapter 29 for information about configuring APPC to support the IOF AT command. The IOF AT command may support additional protocols in the future.
Testing the AT Command
From the IOF Option Menu, enter "AT?" to view a menu containing these options:
Option 1. Displays the names and aliases from the B67SERV Option member. If no names are displayed or if changes need to be made, update B67SERV and run an abbreviated IOF generation as described in Chapter 4.
Option 2. Displays the names of systems that have printers and lines attached.
Option 3. HELP for the AT command. Command syntax and examples are given.
Option 4. HELP for the AT line command (Job List Menu for running jobs, MAS display).
Assuming you are running on system "1" and system "2" has an IOF server defined, enter:
AT 2
This will start an IOF server session and display the IOF Option Menu on system "2". The top left corner of the display will show that the display was built with data from system "2". Note that the first time IOF is initialized on a server from a client IOF session, a server "logon" must be done so a noticeable delay will be seen. The server session is kept active as long as
126 28. Using IOF to Manage a Sysplex Environment

the client IOF session is active so that subsequent AT commands can be executed immediately.
From the server IOF Option Menu, you can issue any IOF options for which you are authorized. For example, entering the "PR" option will display the IOF printer panel for printers attached to system "2".
Terminate the remote IOF session exactly like you would terminate any IOF session, by successive END commands, X on the IOF Option Menu, etc. When the remote session terminates, the original IOF panel from which the AT command was issued will be redisplayed.
Optionally, you can enter IOF options on the AT command. For example, if you enter:
AT 2 M
the system monitor will be displayed on system "2". See Chapter 21 of the IOF User's Guide,or enter "AT?" for a more complete description of using the AT command.
IOF SERVER Command
The IOF SERVER command is the base command used for establishing a server connection. The higher level AT command uses SERVER. When writing REXX execs or clists, it may be necessary to use the base SERVER function. In addition, the SERVER command can be used to establish communications with a server that has not been defined in the B67SERV option.
Syntax
SERVER [protocol ADDR(net-address)] /[servname]
[USER(userid password)]
[CMD(initcmd)]
[CLIST/Rexx]
protocol. The protocol to be used. APPC is currently the only supported protocol.
net-address. The network address. See the SERVER macro in Chapter 29 for a description of APPC network addresses.
servname. A server name or alias defined in the B67SERV option. Either a protocol and net-address, or a servname must be specified, but not both.
userid. The optional userid for the server session. The client's userid will be used if this parm is not specified.
127 28. Using IOF to Manage a Sysplex Environment

password. The password associated with the userid above.
initcmd. The optional input parms that are passed to the server application when it starts. See the IOF command syntax for a description of the parms that can be specified. Any parm that can be specified on the IOF command can be passed.
CLIST/REXX. Specifies that this SERVER command came from a running client clist or REXX exec and that the server session should continue to fetch its input commands from the client clist. TSICOPY commands on the server automatically operate against the client clist unless there is also a nested clist started on the server. In this case TSICOPY will work by default against the local clist. You can specify TO(CLIENT) on TSICOPY commands to set clist variables back on the client from a local clist on the server.
128 28. Using IOF to Manage a Sysplex Environment

29. Configuring APPC to Support the AT Command
APPC Programming Terms
Programming terms that apply to the IOF APPC server implementation include:
• Transaction Program (TP). An application program that uses APPC communications is a transaction program (TP). IOF becomes a client TP when it communicates with an IOF server TP on a remote machine. The client IOF session and the remote server IOF session are considered to be a single cooperative processing application that resides on two different systems.
• Conversation. The communication between the client IOF session and the remote IOF server is called a conversation. The client TSO or CICS IOF session initiates the conversation by "calling" the remote IOF server. Several MVS and VTAM parms are required on both the local and remote system to provide sufficient information to permit the conversation to be started.
• Logical Unit Type 6.2. Logical unit type 6.2 is the SNA addressable unit that manages the exchange of data between the client IOF session and the remote server IOF session. Logical units are defined to VTAM by APPL statements in SYS1.VTAMLST. LUs managed by MVS/APPC must also be defined by a LUADD statement in the APPCPMxx member of SYS1.PARMLIB.
Defining IOF APPC to MVS and VTAM
Several steps are required to define the IOF transaction processor to MVS and VTAM. This section describes each requirement and specifies the action that you should take for the requirement.
SYS1.PARMLIB(ASCHPMxx). The ASCHPMxx member of SYS1.PARMLIB defines scheduling characteristics of the APPC/MVS transaction scheduler. Section 4.1 of IBM Manual GC28-1807 (GC28-1503 pre-OS/390) provides a detailed description of this member. No default member is provided with MVS, but the IOF SAMPMOD data set includes sample ASCHPM00 which can be used to run the IOF APPC server.
29. Configuring APPC to Support the AT Command 129

ACTION: If you currently do not have any APPC running, copy ASCHPM00 from the IOF SAMPMOD data set to SYS1.PARMLIB. If you are currently running APPC, append ASCHPM00 from the IOF SAMPMOD data set to your existing ASCHPMxx member to add the IOFCLASS. CLASSADD CLASSNAME(IOFCLASS) MAX(99) /* maximum number of IOF servers */ MIN(1) RESPGOAL(1) MSGLIMIT(500)
SYS1.PARMLIB(APPCPMxx). The APPCPMxx member of SYS1.PARMLIB describes the VTAM LU names that APPC will use for communications between TPs. These names also must be defined to VTAM. (See Defining APPC Logical Units (LU) to VTAM below.)
No default member is shipped with MVS. Section 9.1 of IBM Manual GC28-1807 provides a detailed description of APPCPM00. IOF SAMPMOD data set member APPCPM00 defines a sample logical unit named IOFLU01.
You will need a unique VTAM LU name for each system where an IOF server is to execute. We recommend that these LU names contain (or imply) the name of the system that they represent.
ACTION: Use member APPCPM00 of the IOF SAMPMOD data set as a model to create member APPCM00 of SYS1.PARMLIB (or update your existing APPCPMxx member). Create one LUADD statement for each system where you will run an IOF server. LUADD ACBNAME(IOFLU01) /* unique name for each system */ SCHED(ASCH) BASE TPDATA(SYS1.APPCTP) TPLEVEL(SYSTEM)
Transaction Program Definition. Transaction programs (TP) are defined as TP profiles which are stored in a KSDS VSAM data set. The name of the data set is specified in the TPDATA parm of member APPCPMxx of SYS1.PARMLIB. The default data set name is SYS1.APPCTP. Secion 5.2.2.2 of IBM Manual GC28-1907 describes how to define SYS1.APPCTP.
130 29. Configuring APPC to Support the AT Command

Action: Define SYS1.APPCTP if you do not already have a TP Profile KSDS data set defined.
ATBSDFMU Utility. Utility program ATBSDFMU is used to add and maintain TP profiles. TP profiles contain the transaction scheduling characteristics and the JCL to initiate the transaction. ATBSDFMU has several major commands:
• TPADD. Add a new TP • TPALIAS. Create an alias for a TP name • TPDELETE. Delete a TP or alias • TPKEYS. List names of existing TPs (that the user is
permitted to use). • TPMODIFY. Modify an existing TP • TPRETRIEVE. Retrieve existing TP definition
The M21APPC member in the IOF INSTALL library contains a sample job to run ATBSDFMU to add the IOF transaction program definition. This job assumes that SYS1.APPCTP is specified in the TPDATA parm of your APPCPMxx member of SYS1.PARMLIB. It adds the IOFAPPC transaction program (TP) to the system. You may want to define multiple transaction programs on some systems. Each TP can have unique JCL to provide special production and testing environments.
ACTION: Run the M21APPC job from the IOF INSTALL library on each machine that will support an IOF server. Check the JCL to insure that the SYSSDLIB DD statement points to the system APPCTP library for that system. Define one or more IOF transaction programs on each system in the complex.
Defining a Logon Mode (LOGMODE) to VTAM. A VTAM logon mode contains the parameters and protocols that determine the communication characteristics of a session. The compiled version of logmode tables are in SYS1.VTAMLIB. APPC Logical Units (LU) require a LOGMODE entry in SYS1.VTAMLIB. ISTINCLM is the default LOGMODE table supplied with VTAM. It normally contains the #INTER logmode which is suitable for use with the IOF APPC transaction. See Section 8.4.1 of IBM Manual GC28-1807 (GC28-1503 pre-OS/390) for more information.
131 29. Configuring APPC to Support the AT Command

ACTION: If your installation is using the default VTAM log mode table, you already have the #INTER log mode defined and can use it in the SERVER macro below. Otherwise, define and install a suitable LU 6.2 log mode and specify its name instead. You can use the #INTER member of the IOF SAMPMOD data set as a guide. Add the definition to your SYS1.VTAMLST and assemble into SYS1.VTAMLIB.
Defining APPC Logical Units (LU) to VTAM. You must define a logical unit to VTAM for each LUADD statement that was added to member APPCPMxx of the above SYS1.PARMLIB. Member ATBAPPL of the IOF SAMPMOD data set defines a sample VTAM logical unit named IOFLU01.
ACTION: Using the ATBAPPL member of the IOF SAMPMOD data set as a model, add an APPL statement to member ATBAPPL of SYS1.VTAMLST for each LUADD statement added to the above member APPCPMxx. The names of the APPL statements must match the ACBNAME parms of the LUADD statements.
IOF B67SERV Option. Servers are defined to IOF in the B67SERV member of the IOF options library. One SERVER macro is included for each local and remote system that will have the ability to run an IOF server. SERVER macro syntax is defined in B67SERV.
The first positional parm of the SERVER macro must specify "APPC" to indicate the APPC protocol is to be used. Currently, APPC is the only supported protocol.
The second positional parm of the SERVER macro defines the network address for that server. The network address contains the APPC LU name, IOF transaction program name and logmode of the IOF server. The APPC LU name optionally can be prefixed by the VTAM network name when this is required to define a unique LU name.
Examples:
IPO1 SERVER APPC,'IOFLU01 IOFAPPC #INTER', + ALIAS=(1,BATCH),PRINTERS=YES,LINES=YES, + DESC='BATCH' IPO2 SERVER APPC,'LOCNET.IOFLUO2 IOFAPPC #INTER', + ALIAS=(2,TSO), + DESC='LOCAL TSO' IPO3 SERVER APPC,'RMNET.IOFLUO2 IOFAPPC #INTER', + ALIAS=(3,CICS),DESC='RMT CICS'
132 29. Configuring APPC to Support the AT Command

ACTION: Add one SERVER macro to B67SERV for each system that will run an IOF server. It is suggested that you use simple alias names to make IOF servers easier to use. Run an abbreviated IOF generation (see Chapter 4) to install the new B67SERV.
Initializing APPC
The following commands are required to initialize APPC on each system:
S ASCH,SUB=MSTR (start scheduler) S APPC,SUB=MSTR (start APPC) V NET,ACT,ID=ATBAPPL (activate LU)
The AT command then can be used to access IOF APPC servers. See Chapter 28 for information on testing the AT command.
133 29. Configuring APPC to Support the AT Command


29. Configuring APPC to Support the AT Command 135