ipcloudnetworkcamera - cd.ipcamdata.comcd.ipcamdata.com/en/download/x/user manual for android... ·...
TRANSCRIPT

IPIP CloudCloud NetworkNetwork CameraCameraEverythingEverything inin youryour eyeseyes
iSmartViewPro(For Android)
User Manual
2018-01 VER 5.0

1. iSmartViewPro Summary
iSmartViewPro (Android Version) is developed application software based on Android system, it is suitablefor Android mobile phone and Tablet, support Android 4.0 and above.
iSmartViewPro features: Support Android 4.0 OS and above; Support quickly WiFi configuration via mobile phone sound wave; Support SmartP2P plug and play device ; Support multi-windows viewing (Max.4 windows at the same time); Support to playback SD card recording via mobile phone; Support functions of Live-video Watching, Live-video parameters setting , Audio monitoring,
Two-Way Intercom, PTZ controlling and snapshotting; Support to search camera in LAN to add the camera; Support to edit and manage the camera (WiFi/E-mail/Alarming/FTP, etc. Advanced Settings).
Camera indicating light InstructionThe devices are equipped with two status indicators, the Red is working status indicator, and the Blue isWi-Fi status indicator. Kindly note some outdoor camera models are the exception.
Red status indicator light:1) When device is plugged with power adapters and the power supply is normal, the red indicator light ison2) Device booted and if the system starts operate normally, the red indicator light would flash slowly3) If the device is connected with the Internet, the red indicator is always on4) Hold & press the reset button for 10 seconds, the red indicator light flash quickly, which indicates thedevice would go back to factory defaults status. When upgrading the firmware of device the redindicator light would also flash quickly.
Blue status indicator light:1) Device boot and the blue light flashes at intervals, which indicates that you can start Wi-Ficonfiguration now (kindly note Wi-Fi configuration must be finished within 5 minutes after device booted)2) When the blue light flashes quickly, it indicates that the internet router is being connected3) When the blue indicator is always light, it indicates that the connection has been established with theinternet router (Wi-Fi Connected)4) When the blue light is off, it indicates Wi-Fi Disconnected or you didn’t finish the Wi-Fi configurationwithin 5 minutes.
2. APP Software
Download iSmartViewPro APPs from the software website http://cd.ipcamdata.com Search and download iSmartViewPro from Google Play Store. Scan below QR code to download it directly to mobile phone
Scan it to download ismartViewPro

3. Installing APPs software
Download iSmartViewPro App to mobile phone and install it.It shows the following icon after finishing installation:
iSmartViewProTips: Please be sure that you have finished network configuration of the camera according to The User Manualand can visit the camera via LAN or WAN before using iSmartViewPro software.
4. Application interface introduction
4.1 Introducing InterfaceCamera: camera listing and functions settings of the cameraAlarm: checking alarm event of the cameraPictures: checking snapshots taken from live-video and saved on mobile phoneVideos: checking recordings of live-video which saved on mobile phone, and normal recordings in storage cardinside of the remote cameraMore: One-key Wi-Fi configuration (via sound wave), checking APP version,etc.

4.2 Sharing PicturesClick the “Pictures” on interface to access local picture file-->>Select the camera you want to view-->>Select thepicture -->>click and hold pressed the picture you want to share -->>Choose the icon to share the selected picture.
5. Add the Camera
1、 Launch the iSmartViewPro software2、 Add new camera

There are three ways to add the camera:1. Add camera via wired method2. Add camera via WiFi mode3. Add already connected network camera
☆Please follow below Graphic instructions to add the new cameraa) Add camera via wired methodb) Add camera via WiFi modec) Add already connected network camerac.1 input camera ID manuallyc.2 Scan QR code on CameraC.3 search in LAN
Search in LAN to Add Scan ID to Add Manually to Add
6. Wi-Fi Configuration via sound wave
Tips:
Before configuration, please unplug the power adapter to reboot the camera, kindly note you need finish Wi-Fi
configuration within 5 minutes after reboot(The Blue indicator is flashing slowly), otherwise the camera cannot be
configured and it needs to unplug the power adapter again;
Put smartphone loudspeaker nearby camera microphone outlet before clicking “configure”(please confirm the
camera is with built-in microphone, otherwise you cannot use this function)。
After configuration is succeed, the blue WiFi indicator will be flashing quickly. After connect with Internet router
automatically, the blue indicator will be always ON. If configuration is failed, the blue status light would OFF and
please click “Configure” button again more times.
For KC series devices, the voice monitor is abnormal when the blue indicator starts flashing (Note it would be normal
after 5 minutes when the camera system operate normally). If the WIFI information is configured, the blue light will
not flash and the sound will be normal.
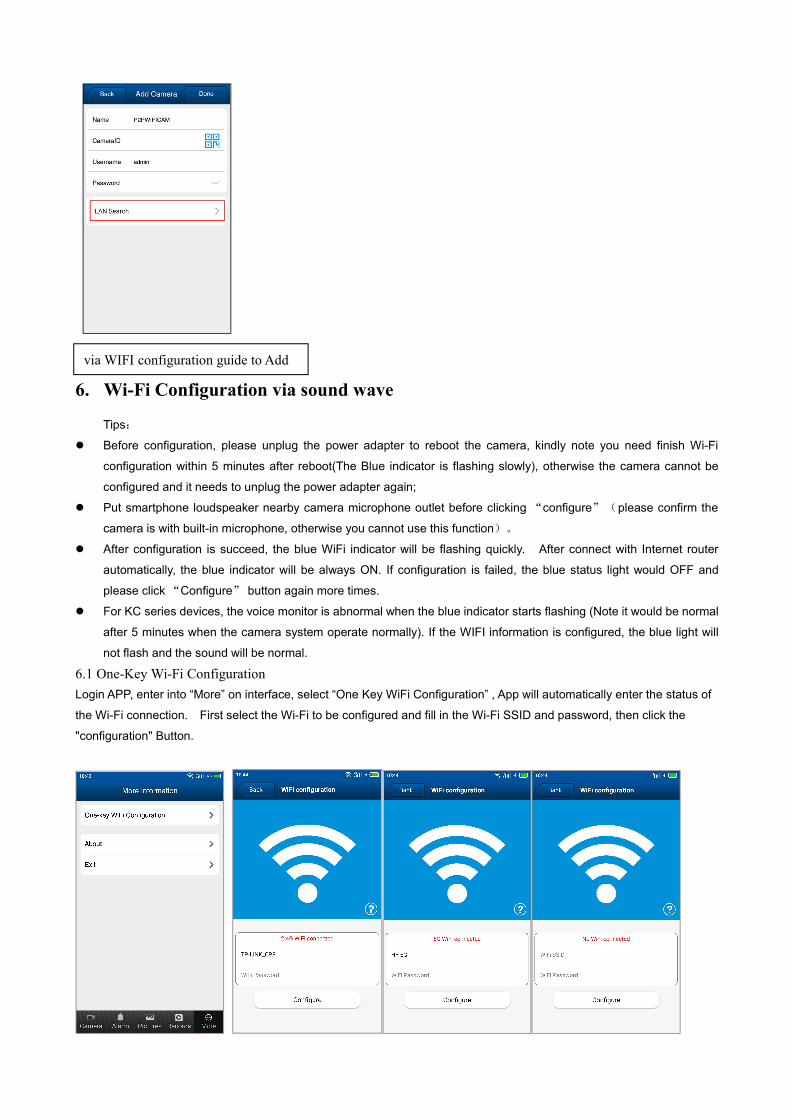
6.1 One-Key Wi-Fi ConfigurationLogin APP, enter into “More” on interface, select “One Key WiFi Configuration” , App will automatically enter the status of
the Wi-Fi connection. First select the Wi-Fi to be configured and fill in the Wi-Fi SSID and password, then click the
"configuration" Button.
via WIFI configuration guide to Add

6.2 Add camera via wired methodNote:1. The configuration guide only can configure one device every time. It will specify the DID before configuration.2. The device firmware version only supports 2.4GHz network connection.
Scan the unique QR code on each camera and name the camera before click “Next”
With wired connection succeed there is a prompt box to confirm if you also want to set up Wi-Fi connection at thesame time, you can click ‘Yes” to automatically search Wi-Fi SSID nearby and select the Wi-Fi to connect, thenenter the Wi-Fi password before click “Next”

When succeed the prompt box appears. Click “Yes” it will jump to Interface page:
6.3. Add cameras via WiFi Configuration Guide.1) Add camera via WiFi mode(Set up WiFi without connecting ethernet cable)
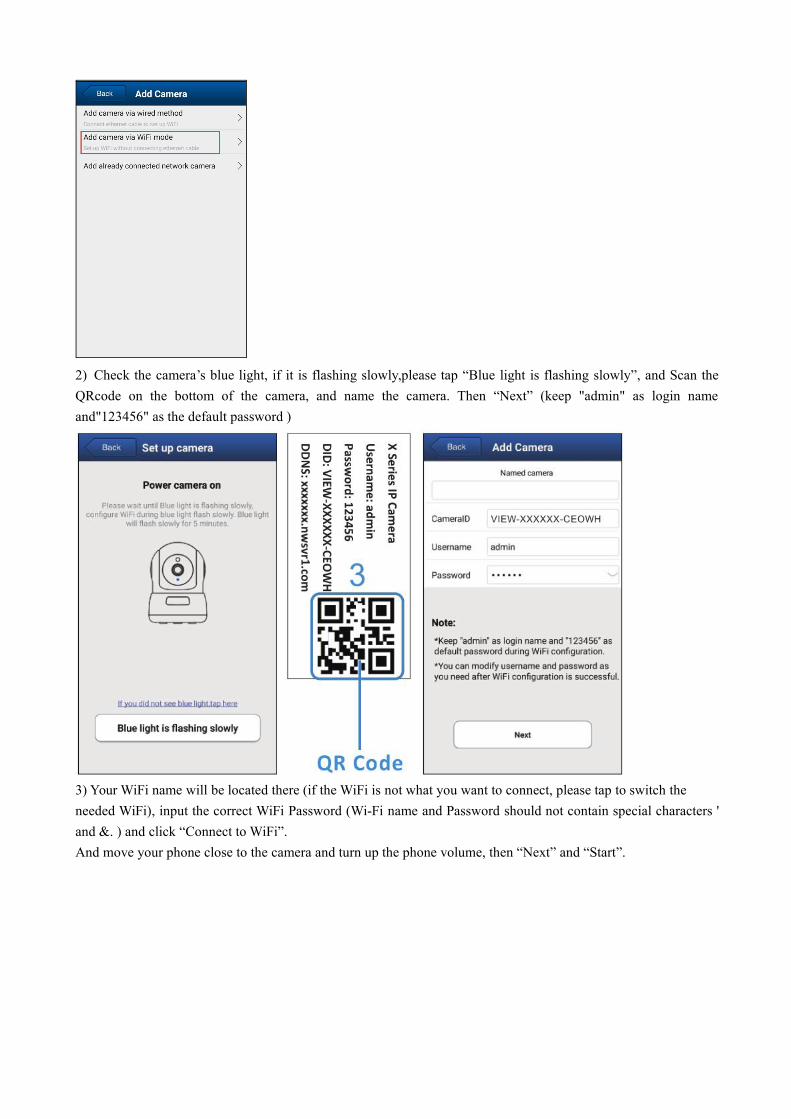
2) Check the camera’s blue light, if it is flashing slowly,please tap “Blue light is flashing slowly”, and Scan theQRcode on the bottom of the camera, and name the camera. Then “Next” (keep "admin" as login nameand"123456" as the default password )
3) Your WiFi name will be located there (if the WiFi is not what you want to connect, please tap to switch theneeded WiFi), input the correct WiFi Password (Wi-Fi name and Password should not contain special characters 'and &. ) and click “Connect to WiFi”.And move your phone close to the camera and turn up the phone volume, then “Next” and “Start”.

4) The phone will send a sequence of beeps to the camera and try to connect WiFi,If WiFi set up succeed, the appwill go back to Camerapage and show ”Configuration Succeed” and the camera will be “online”.
6.4 . Add already connected network camera .1.Add already connected network camera(camera network connection)

7. View Live-Video and relative operation instruction
7.1. View Live-video at single screena) Select the online camera
b) Click on monitoring screen, it shows video operation bar, you can control PTZ(Pan/Tilt of camera),taking snapshot & recording, monitoring and two-way intercom, etc.

c) Other settings
7.2. View Live-video at multi-screen
Click Multi-screen Button on interface, you can access to Multi-screen mode.
Preset
Quit, Preset, Mirror, Flip, PTZ cruise vertically, PTZ cruise horizontally
OFF/ON
On or Off landscape screen, On or Off monitoring/talk, monitor/talkTips: Must to click on “OFF/ON” to launch monitor/talk function when using
monitor or talk.
Snapshot, record, resolution setting, brightness, contrast, restore default parameters.
Click on “Preset” toaccess preset settingmenu, you can set andrecall preset positionof Pan/Tilt camera
Click on “VGA” to accessResolution setting menu, youcan alter the video resolutionof the camera.

a)
b) Click to Hide device list, and click to Exit from Multi-Screen Mode.
8. Playback SD card recording remotely
Click the "Record" on interface, Choose “SD card” to check all recordings. You can also click “search” on theright top corner to check different recording type-plan record & alarm record as below:

9. Advanced Setting
9.1. Wi-Fi SettingClick on WiFi Setting, this function can search the usable Wi-Fi SSID automatically.
9.2. User SettingClick “User Management”, you can set up username and password of the camera.

9.3. Time SettingClick “Time Setting”, you can calibrate local timezone of the camera, then it will work at correct timezone.
9.4. Alarm SettingClick “Alarm Setting”, you can set Motion Detect Armed, Alarm input Armed, IO Linkage on Alarm and AlarmedMail Notification, etc.
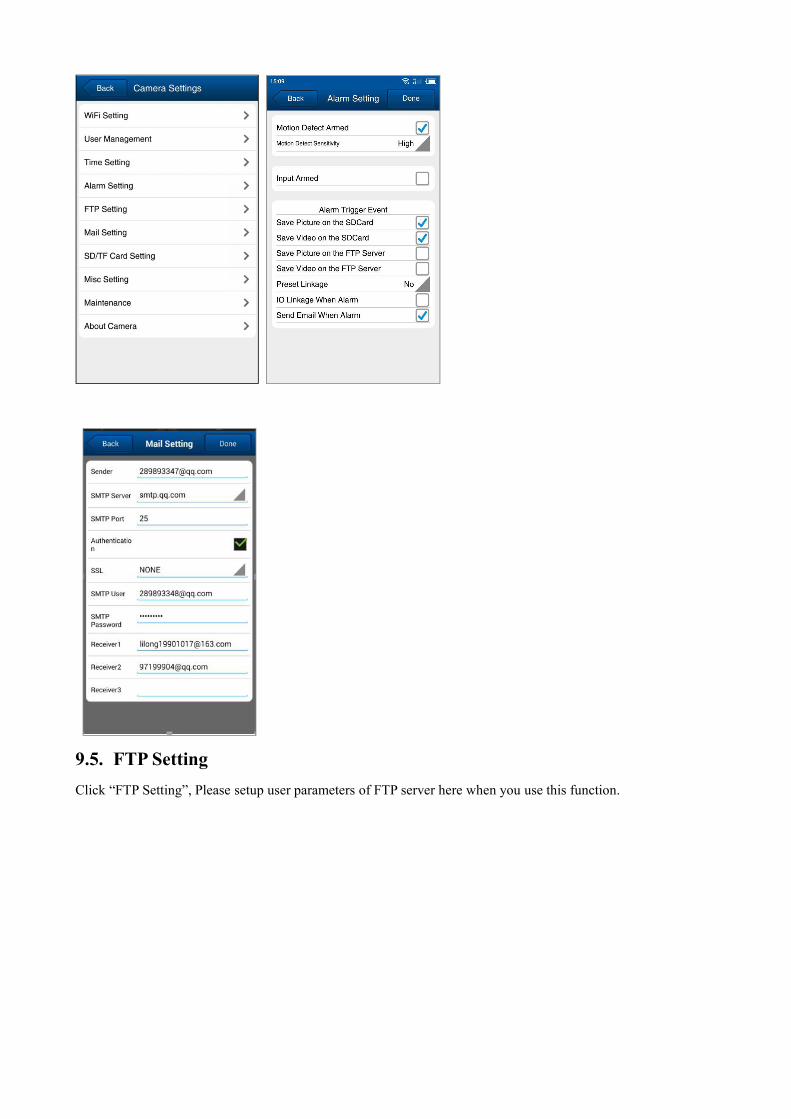
9.5. FTP SettingClick “FTP Setting”, Please setup user parameters of FTP server here when you use this function.

9.6. Mail SettingClick “ Mail Setting”, Please setup the Email parameters of sender and receiver here when you use this function.
9.7. SD SettingClick “SD/TF card Setting”, it can get storage card information if you put a SD card inside the camera here andset up the recording Bitrate. Kindly note please format the SD card before setting recordings, and when storagecard is full it would rewrite automatically.
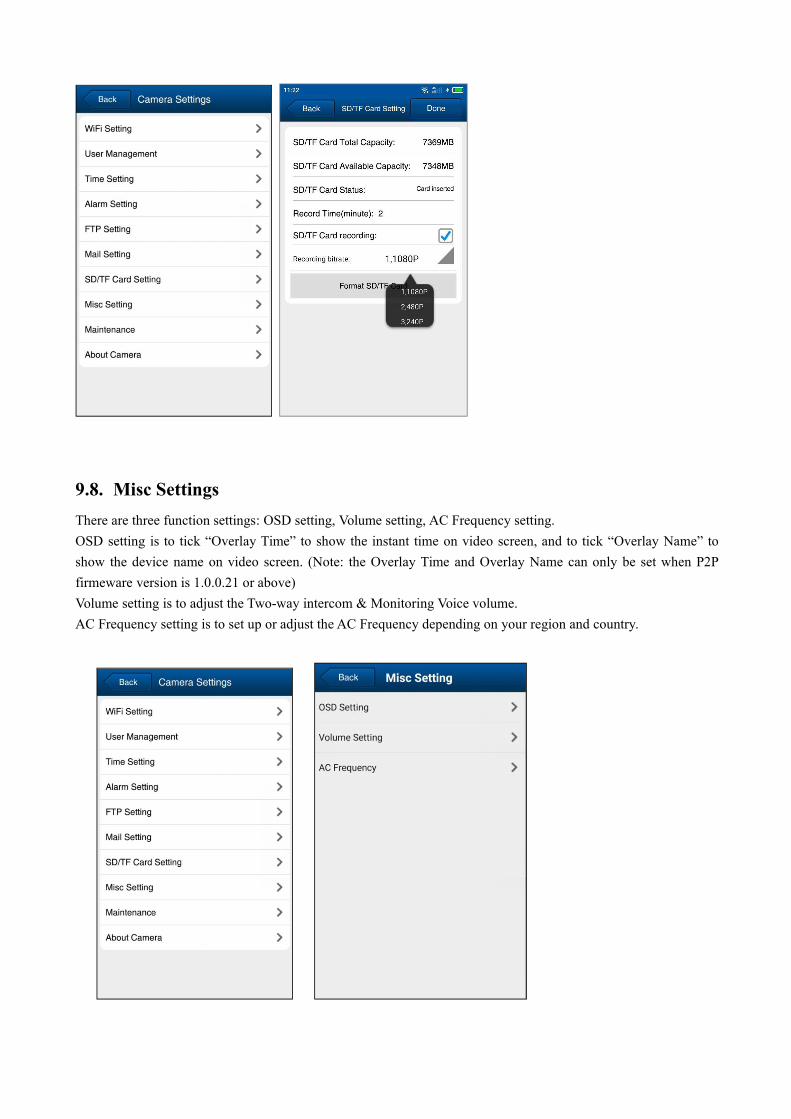
9.8. Misc SettingsThere are three function settings: OSD setting, Volume setting, AC Frequency setting.OSD setting is to tick “Overlay Time” to show the instant time on video screen, and to tick “Overlay Name” toshow the device name on video screen. (Note: the Overlay Time and Overlay Name can only be set when P2Pfirmeware version is 1.0.0.21 or above)Volume setting is to adjust the Two-way intercom & Monitoring Voice volume.AC Frequency setting is to set up or adjust the AC Frequency depending on your region and country.

9.9. MaintenanceClick “FTP Setting”, you can reboot device and restore to Factory default setting.
9.10. About CameraClick “About camera”, you can check detailed camera information- Firmware, P2P version, API version, etc.