istr bike guardian 118x118 - tradeinn
TRANSCRIPT

Prodotto o importato da: CTE INTERNATIONAL srl Via. R.Sevardi 7 42124 Reggio Emilia - Italia.
Prima dell’uso leggere attentamente le istruzioni.Produced or imported by: CTE INTERNATIONAL srl
Via. R.Sevardi 7 42124 Reggio Emilia - Italy. Read the instructions carefully before installation and use.
Vertrieb durch: ALAN ELECTRONICS GmbH Daimlerstraße 1K - D-63303 Dreieich Deutschland.
Vor Benutzung Bedienungsanleitung beachten. Importado por: MIDLAND IBERIA, SA
C/Cobalt, 48 - 08940 Cornellà de Llobregat, Barcelona - España. Antes de utilizar, lea atentamente el manual de uso.
Importé par: ALAN FRANCE S.A.R.L. 5, Rue Ferrie, Zac les Portes du Vexin 95300 Ennery - France
Avant l’utilisation, lire les instructions.
BIKE GUARDIANBIKE GUARDIANBIKE DVR
ACTION CAM
Scopri molto di più su/See more onmidlandeurope.com

• INFORMAZIONE AGLI UTENTI: Ai sensi dell’art. 13 del decreto legislativo 25 luglio 2005, n.151 “At-tuazione delle Direttive 2002/95/CE, 2002/96/CE e 2003/108/CE, relative alla riduzione dell’uso di sostanze pericolose nelle apparecchiature elettriche ed elettroniche, nonché allo smaltimento dei rifiu-ti”. Il simbolo del cassonetto barrato riportato sull’apparecchiatura indica che il prodotto alla fine della propria vita utile deve essere raccolto separatamente dagli altri rifiuti. L’utente dovrà, pertanto, conferire l’apparecchiatura giunta a fine vita agli idonei centri di raccolta differenziata dei rifiuti elettronici ed elet-trotecnici, oppure riconsegnarla al rivenditore al momento dell’acquisto di una nuova apparecchiatura di tipo equivalente, in ragione di uno a uno. L’adeguata raccolta differenziata per l’avvio successivo dell’ap-parecchiatura dismessa al riciclaggio, al trattamento e allo smaltimento ambientalmente compatibile con-tribuisce ad evitare possibili effetti negativi sull’ambiente e sulla salute e favorisce il riciclo dei materiali di cui è composta l’apparecchiatura. Lo smaltimento abusivo del prodotto da parte dell’utente compor-ta l’applicazione delle sanzioni amministrative di cui al dlgs. n.22/1997 (articolo 50 e seguenti del dlgs. n.22/1997).
• All articles displaying this symbol on the body, packaging or instruction manual of same, must not be thrown away into normal disposal bins but brought to specialised waste disposal centres. Here, the various materials will be divided by characteristics and recycles, thus making an important contribution to envi-ronmental protection.
• Alle Artikel, die auf der Verpackung oder der Gebrauchanweisung dieses Symbol tragen, dürfen nicht in den normalen Mülltonnen entsorgt werden, sondern müssen an gesonderten Sammelstellen abgegeben werden. Dort werden die Materialien entsprechend ihrer Eigenschaften getrennt und, um einen Beitrag zum Umweltschutz zu liefern, wiederverwertet.
• Todos los artículos que exhiban este símbolo en el cuerpo del producto, en el embalaje o en el manual de instrucciones del mismo, no deben ser desechados junto a los residuos urbanos normales sino que deben ser depositados en los centros de recogida especializados. En estos centros, los materiales se dividirán en base a sus características y serán reciclados, para así poder contribuir de manera importante a la protec-ción y conservación del medio ambiente.
• Tous les articles présentant ce symbole sur le corps, l’emballage ou le manuel d’utilisation de celui-ci ne doivent pas être jetés dans des poubelles normales mais être amenés dans des centres de traitement spé-cialisés. Là, les différents matériaux seront séparés par caractéristiques et recyclés, permettant ainsi de contribuer à la protection de l’environnement.
All trademarks and registered trademarks are the property of their respective owners. Tutti i marchi di fabbrica registrati sono di proprietà dei rispettivi titolari

1IT
ALIA
NOInformazioni su questa guida
Il contenuto del presente documento viene divulgato solo a scopo informativo ed è soggetto a mo-difiche senza preavviso. Abbiamo fatto il possibile per garantire che il presente manuale sia preciso e completo. Tuttavia, non ci assumiamo alcuna responsabilità per eventuali errori e omissioni che potrebbero essere stati commessi e fatti. Il produttore si riserva il diritto di modificare le specifiche tecniche senza preavviso.
Principali funzioni:• Videocamera da auto e Action cam Full HD• Risoluzione: FullHD 1080p / HD 720p • Protezione IP65• Registrazione ciclica
• Foto: 2MP
• Video: 1080p 27fps
• Grandangolo 120°
AvvertenzeIl manuale d’uso contiene dettagli su utilizzo, funzionamento, specifiche tecniche e precauzioni. Si consiglia di leggere attentamente l’intero manuale prima di utilizzare il prodotto e conservare il ma-nuale anche in seguito. Ci auguriamo che i nostri prodotti siano di vostra soddisfazione e possano esservi utili per molto tempo!L’installazione e l’uso in modo scorretto possono causare gravi infortuni all’utilizzatore, al mezzo ed a terzi. Si prega di prestare massima attenzione e cautela nell’installazione e di verificare periodicamente che i supporti siano integri, fissati saldamente ed in modo corretto.
• Non provare ad aprire la videocamera né tentare riparazioni in proprio, questo farà decadere automaticamente la garanzia. In caso di problemi ai componenti della videocamera, rivolgersi ad un centro assistenza per la riparazione
• Per la pulizia non utilizzare sostanze chimiche, solventi o detergenti , ma unicamente un panno morbido inumidito.
• Alla fine del suo ciclo di vita non smaltire la videocamera in modo casuale e non gettarla nel fuo-co: potrebbe esplodere.
• Per mantenere la qualità del video, pulire accuratamente la superficie della lente, utilizzando un panno morbido inumidito.
• La società NON è responsabile per la perdita di dati/contenuto durante il funzionamento del dispositivo.
2
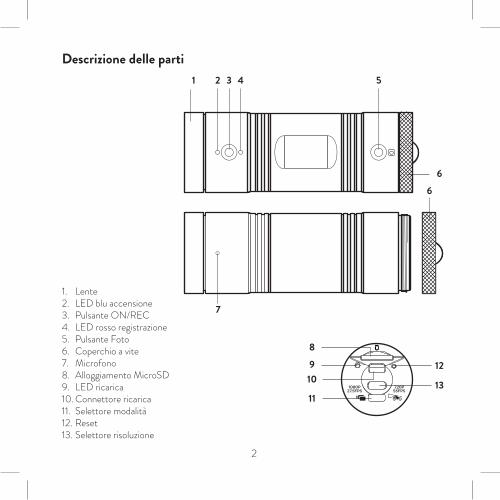
Descrizione delle parti
1. Lente 2. LED blu accensione3. Pulsante ON/REC4. LED rosso registrazione5. Pulsante Foto6. Coperchio a vite7. Microfono8. Alloggiamento MicroSD9. LED ricarica10. Connettore ricarica11. Selettore modalità12. Reset13. Selettore risoluzione
1 2 3 4 5
6
7
6
8910
11
12
13

3IT
ALIA
NOContenuto della confezione
1. Supporto telecamera2. Supporto manubrio3. Supporto adesivo (piatto e curvo) con attacco Go-Pro4. Supporto a fascia con strap5. Cavo alimentazione Waterproof6. Cavo connessione PC7. Laccetto
1 2 3 4
6 75
4
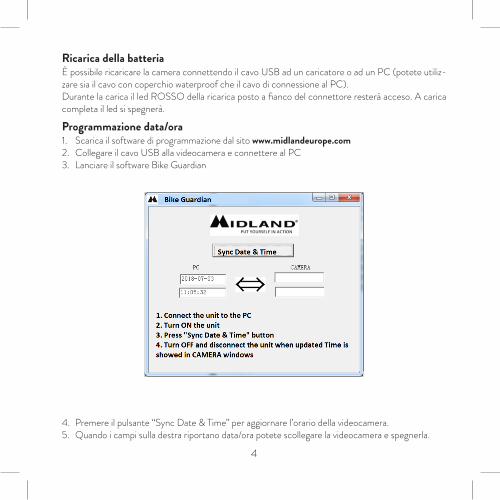
Ricarica della batteriaÈ possibile ricaricare la camera connettendo il cavo USB ad un caricatore o ad un PC (potete utiliz-zare sia il cavo con coperchio waterproof che il cavo di connessione al PC).Durante la carica il led ROSSO della ricarica posto a fianco del connettore resterà acceso. A carica completa il led si spegnerà.
Programmazione data/ora1. Scarica il software di programmazione dal sito www.midlandeurope.com2. Collegare il cavo USB alla videocamera e connettere al PC3. Lanciare il software Bike Guardian
4. Premere il pulsante “Sync Date & Time” per aggiornare l’orario della videocamera. 5. Quando i campi sulla destra riportano data/ora potete scollegare la videocamera e spegnerla.

5IT
ALIA
NOFissaggio della videocamera sul manubrio
1. Fissare BIKE GUARDIAN al supporto, facendo attenzione a far coincidere la parte piatta supe-riore della videocamera con l’incavo nel supporto, quindi chiudere la leva laterale.
2. Fissare il supporto da manubrio 3. Avvitare BIKE GUARDIAN sul supporto
4. Avvitare il cavo waterproof a BIKE GUARDIAN e collegarlo ad una fonte di alimentazione.Fare attenzione poiché la tenuta waterproof è garantita solo sul connettore della videocamera.Il connettore USB posto all’altra estremità deve essere posizionato in modo tale da essere protetto dall’acqua.

6
Fissaggio adesivo1. Fissare il supporto adesivo, avendo cura di pulire e
sgrassare la superficie prima dell’applicazione dell’a-desivo.
2. Procedere al fissaggio della camera sull’apposito sup-porto adesivo (piatto o curvo in funzione della super-ficie)
Registrazione/modalita’ di funzionamentoNel retro della videocamera sono presenti due selettori con i quali è possibile impostare la modalità di funziona-mento e la risoluzione.
La video camera ha 2 modalità di funzionamento: modalità DVR e modalità Actioncam
Modalità DVR: la camera inizia a registrare auto-maticamente all’alimentazione e interrompe la re-gistrazione quando l’alimentazione viene tolta, can-cellando automaticamente i file più vecchi quando la scheda microSD è piena.
Modalità Actioncam: la registrazione deve essere avviata e fermata manualmente, inoltre al riempimento della scheda microSD la BIKE GUARDIAN smetterà di registrare.
La tabella sotto riassume il funzionamento nelle 2 modalità:
Start/Stop Registrazione
Modalità DVRStart/Stop registrazione all’avvio/
spegnimento della motoRegistrazione continua: cancellando i file più vecchi quando la memoria
è piena
Modalità ActioncamStart/stop registrazione
manualeLa registrazione si interrompe quan-
do la memoria è piena

7IT
ALIA
NOIn entrambe le modalità la videocamera spezzerà le registrazioni in file della durata di 5 minuti.
Con il secondo selettore è possibile selezionare la risoluzione:• FullHD 1080p@27fps• HD 720p@55fpsNella tabella sotto sono riportate le durate indicative delle memorie in funzione della risoluzione sele-zionata e della capacità della memoria.
Capacità Risoluzione 1080p Risoluzione 720p
8GB 70 min 90 min16GB 140 min 180 min32GB 280 min 360 min64GB 560 min 720 min128GB 1120 min 1440 min
Consigliamo di formattare la micro SD card ogni 2 settimane di utilizzo.
Micro SD1. Formattare la micro SD prima di utilizzarla nel dispositivo. Utilizzare una scheda di memoria non
formattata può portare alla perdita di dati o registrazioni non corrette.2. Inserire la scheda nella camera mentre BIKE GUARDIAN è spenta. 3. Premere 3 secondi il pulsante ON/REC per accendere la videocamera. Si accenderà il led BLU e
la videocamera vibrerà brevemente per 3 volte.4. Tenere premuto il pulsante Foto per circa 15 secondi per formattare la SD all’interno della video-
camera. Il led ROSSO lampeggerà durante la formattazione e la videocamera vibrerà brevemente all’inizio ed alla fine.
Supporta SD da 8 a 128 GBSi raccomanda di utilizzare SD classe 10 o velocità superioreSi raccomanda di cancellare il contenuto della Scheda di memoria regolarmente

8
FotoPremendo il pulsante Foto è possibile scattare foto (mentre la videocamera è accesa ed in stand by) e catturare fotogrammi durante la registrazione.
ResetIn caso di malfunzionamenti o comportamento anomalo, si consiglia di seguire questi passi:1. premere il pulsante “reset” posto sul retro della videocamera (a fianco del connettore d’alimen-
tazione)2. estrarre la microSD e formattarla da un PC3. inserire la microSD e riformattarla dalla videocamera (accendere la videocamera quindi premere
e tenere premuto per 15 secondi il pulsante “foto”)
Specifiche tecnicheRisoluzione FullHD 1080p / HD 720p
Frame rate 1080p@27fps / 720p@55fps
Sensore Sony IMX323 sensor 2M
Angolo visuale 120°
Formato video Mov
Waterproof IP65
Alimentazione USB 5V DC
MicroSD Da8 a 128GB (4GB o inferiori non supportate)
Batteria 680 mAh (fino a 120min)
Per scaricare eventuali aggiornamenti firmware e per informazioni sulla garanzia visitate il sito www.midlandeurope.com

9EN
GLI
SH
About this GuideThe content of this document is for information purpose and is subject to change without prior no-tice. We made every effort to ensure that this User Guide is accurate and complete. However, no liability is assumed for any errors and omissions that may have occurred. The manufacturer reserves the right to change the technical specifications without prior notice.
Main features:• FULL HD camera • DVR and action cam• Resolution: FullHD 1080p / HD 720p • IP65 rating• Cycle recording• Photo: 2MP• Video: 1080p 27fps• Wide angle 120°
Warnings This manual includes details on how to use the device, its working, technical specifications and pre-cautions. We recommend to carefully read it before using the camera and keep it for the future. We trust that this DVR will meet your needs for a long time!An improper installation and an incorrect use of the camera could cause personal injuries to the user and damages to the vehicle. For this reason we recommend to pay the utmost attention while installing the device and to periodically check the mounting supports are intact and properly fixed.
• Do not try to open the shell and repair it: this will void the warranty. If you experience problems, go to the professional service centre for repairing.
• For the best quality of videos, the lens must be clean. To clean the camera and its lens do not use thrill chemical substances or clean solvents, but only a moist soft cloth.
• At the end of its life, do not discard the camera randomly and do not throw it into the fire, it may explode.
• The company is NOT responsible for the loss of any data/content during operation.

10
Description of the controls
1. Lens2. Blue LED: power on3. ON/REC button4. Red LED: recording5. Photo control6. Screw cap7. Microphone8. MicroSD Slot9. Recharge LED10. Recharge connector11. Operating mode selector12. Reset13. Resolution selector
1 2 3 4 5
6
7
6
8910
11
12
13

11EN
GLI
SH
What’s in the box
1. Lock mount2. Handlebar mount3. Adhesive support (flat and curved) with Go-Pro adaptor4. Strap mount5. Waterproof power cable6. Cable for the connection to PC7. Wrist belt
1 2 3
6 75
4

12
Battery rechargeBIKE GUARDIAN can be recharged by connecting the USB cable to a proper charger or to a PC (you can use both cables supplied in the package: the waterproof cable or the one suitable for the connection PC)While the camera is being charged the RED led next to the recharge connector will light up and will turn off once the charge is full.
Setting date and time1. To download the programming software please visit www.midlandeurope.com2. Connect the USB cable to the camera and to the PC.3. Open the software “Bike Guardian”.
4. Press on “Sync Date & Time” to update the camera time. 5. When data and time appear on the right blanks, the camera can be disconnected and turned off.
13EN
GLI
SH
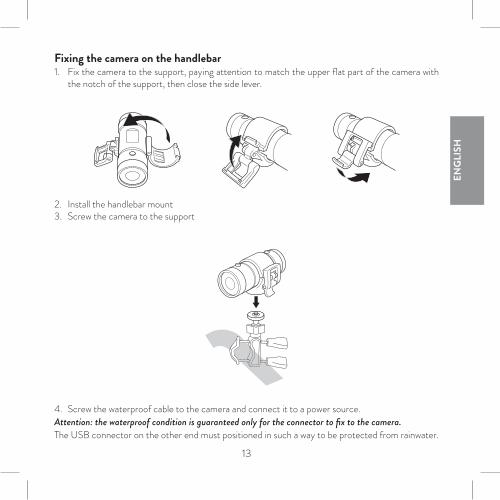
Fixing the camera on the handlebar 1. Fix the camera to the support, paying attention to match the upper flat part of the camera with
the notch of the support, then close the side lever.
2. Install the handlebar mount 3. Screw the camera to the support
4. Screw the waterproof cable to the camera and connect it to a power source. Attention: the waterproof condition is guaranteed only for the connector to fix to the camera. The USB connector on the other end must positioned in such a way to be protected from rainwater.

14
Adhesive support 1. Before attaching the adhesive support, carefully clean
the surface where it will be applied. 1. Fix the camera to the adhesive support (flat or curved,
depending on the surface).
Recording / operating modesOn the rear side of the camera there are two selectors suitable to set the resolution and the operating mode.
BIKE GUARDIAN can work either as a DVR or as an action cam.
DVR mode: the camera automatically starts re-cording when it’s powered and stops recording when the power is switched off. When the mi-croSD card is full, BIKE GUARDIAN continues recording by deleting the older files.
Actioncam mode: the camera manually starts and stops recording. When the microSD card is full, BIKE GUARDIAN will stop recording.
The chart here below summarises the two different modes:
Start/Stop Recording
DVR modeStart/Stop recording at the tur-
ning on/off of the motorbikeLoop recording: when the me-
mory is full the oldest files will be overwritten
Actioncam modeRecording will start/stop ma-
nuallyRecording will stop when the
memory is full
In both modes, the camera will split the recordings in 5-minute files.

15EN
GLI
SH
With the other selector it is possible to select the resolution: • FullHD 1080p@27fps• HD 720p@55fps
The chart shows the memory life depending on the resolution selected and on the memory capacity.
Capacity 1080p Resolution 720p Resolution
8GB 70 min 90 min
16GB 140 min 180 min
32GB 280 min 360 min
64GB 560 min 720 min
128GB 1120 min 1440 min
We suggest that you format the micro SD card every 2 weeks.
Micro SD1. It is recommended to format the micro SD card before the initial use, otherwise data may be lost. 2. Insert the SD card when the camera is OFF.3. To turn on the camera push the ON/REC button for 3 seconds. The blue led will light up and BIKE
GUARDIAN will vibrate for 3 times. 4. To format the SD card keep pressed the Photo control for about 15 seconds. The red led will blink
while formatting and the camera will vibrate at the beginning and at the end of the process. BIKE GUARDIAN supports micro SD cards from 8 up to 128 GB.Note1: We recommend to use SD cards class 10 high speed or higher. Note2: We suggest regularly deleting the data from the memory card.
PhotosBy pressing the Photo button, you will take pictures while the camera is in stand-by mode and cap-ture frames while it is recording.

16
ResetWhen the camera does not work properly or is jammed, we suggest that you follow these steps: 1. Press the “reset” button on the rear of the camera2. Pull out the micro SD card from the camera and format it with a PC 3. Insert the micro SD card into the camera again and format it from the camera (turn on BIKE
GUARDIAN and keep pressed the Photo button for about 15 seconds)
Technical specifications Resolution FullHD 1080p / HD 720p
Frame rate 1080p@27fps / 720p@55fps
Sensors Sony IMX323 sensor 2M
Wide angle 120°
Video format Mov
Waterproof IP65
Power supply USB 5V DC
MicroSD From 8 up to 128GB (4GB or lower are not supported)
Battery 680 mAh (up to 120min)
To download further firmware updatings and for information about the warranty please go to www.midlandeurope.com

17D
EUTS
CH
EinleitungDer Inhalt dieses Dokuments dient zu Informationszwecken und kann ohne vorherige Ankündigung geändert werden. Wir haben uns bemüht sicherzustellen, dass dieses Benutzerhandbuch genau und vollständig ist. Es wird jedoch keine Haftung für eventuelle Fehler und Auslassungen übernommen. Der Hersteller behält sich das Recht vor, die technischen Spezifikationen ohne vorherige Ankünd-igung zu ändern.
Haupteigenschaften:• FULL HD Kamera • Als Dashcam oder Action Kamera nutzbar• Auflösung: Full HD 1080p / HD 720p • IP65 wassergeschützt• Zyklische Videoaufnahmen (Dashcam
Modus)• Fotoqualität: 2MP• Video: 1080p / 27fps• Aufnahmewinkel 120°
Warnung Dieses Handbuch enthält Details zur Verwendung des Geräts, über seine Funktionsweise sowie technische Daten und Vorsichtsmaßnahmen. Wir empfehlen, dieses Handbuch vor Gebrauch der Kamera sorgfältig zu lesen und für die Zukunft aufzubewahren. Wir vertrauen darauf, dass diese Kamera Ihre Anforderungen lange erfüllt!
Eine unsachgemäße Installation und ein falscher Gebrauch der Kamera können zu Verletzungen des Benutzers und zu Schäden am Motorrad/Fahrzeug führen. Aus diesem Grund empfehlen wir, bei der Installation des Geräts äußerste Sorgfalt anzuwenden und regelmäßig zu überprüfen, ob die Montagehalterungen intakt und ordnungsgemäß befestigt sind.
Versuchen Sie nicht, das Gehäuse der Kamera zu öffnen und sie zu reparieren. Dadurch erlischt die Garan-tie. Wenn Probleme auftreten, wenden Sie sich an ein professionelles Servicecenter, um sie zu reparieren.Für die beste Videoqualität muss das Objektiv sauber sein. Verwenden Sie zum Reinigen der Kamera und des Objektivs keine chemischen Substanzen oder Lösungsmittel, sondern ein feuchtes, weiches Tuch.Entsorgen Sie die Kamera am Ende ihrer Lebensdauer ordnungsgemäß. Werfen Sie sie nicht ins Feuer, sie kann explodieren.Das Unternehmen haftet NICHT für den Verlust von Daten / Inhalten während des Betriebs.

18
Tasten und Funktionen
1. Linse2. Blaue LED: eingeschaltet3. Ein/Aus/Aufnahme4. Rote LED: Aufnahme5. Foto Auslöser (FOTO)6. Abdeckung7. Mikrofon8. MicroSD Buchse9. LED Ladeanzeige10. Ladebuchse11. Modus Auswahl12. Reset13. Auflösung
1 2 3 4 5
6
7
6
8910
11
12
13
19D
EUTS
CH
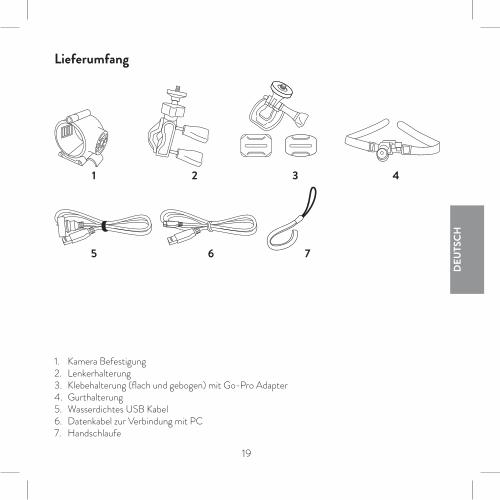
Lieferumfang
1. Kamera Befestigung2. Lenkerhalterung3. Klebehalterung (flach und gebogen) mit Go-Pro Adapter4. Gurthalterung5. Wasserdichtes USB Kabel6. Datenkabel zur Verbindung mit PC7. Handschlaufe
1 2 3
6 75
4

20
AufladenDie BIKE GUARDIAN Kamera kann mit beiden Kabeln im Lieferumfang (wasserdichtes Kabel und Datenkabel) an einer geeigneten Stromversorgung oder am PC aufgeladen werden. Während des Ladevorgangs leuchtet die Ladeanzeige rot und erlischt, sobald die Kamera vollständig aufgeladen ist.
Einstellung Datum und Uhrzeit1. Bitte laden Sie die Programmiersoftware von www.midlandeurope.com runter2. Verbinden Sie das USB Kabel mit der Kamera und Ihrem PC3. Öffnen Sie die Software “Bike Guardian”4. Drücken Sie auf “Sync Date & Time”, um das Datum und die Uhrzeit zu aktualisieren

21D
EUTS
CH
Befestigung der Kamera am Lenker 1. Legen Sie die Kamera in die Befestigung (1). Achten Sie darauf, dass die flache Oberseite der
Kamera an der passenden Stelle Befestigung liegt. Fixieren Sie nun die Kamera, indem Sie den Verschluß einhaken und nach unten ziehen.
2. Befestigen Sie die Lenkerhalterung (2) an Ihrem Lenker 3. Schrauben Sie nun die Kamera auf die Lenkerhalterung
4. Verwenden Sie das wasserdichte USB Kabel und verbinden Sie es mit einer Stromquelle (Power-Bank, USB Steckdose, etc.).
Achtung: das Kabel ist nur an dem Ende, das an der Kamera installiert wird, wasserdicht! Der USB An-schluss an der anderen Seite muss so positioniert werden, dass er vor Regenwasser geschützt ist.

22
Klebehalterung 1. Bitte reinigen Sie zuerst die Oberfläche sorgfältig, auf
der Sie die Klebehalterung anbringen möchten2. Verwenden Sie je nach Oberfläche die flache oder
die gebogene Klebehalterung und bringen dann die Kamera an
Auflösung / BetriebsartenAuf der Rückseite der Kamera befinden sich 2 Auswahl-schalter, mit denen Sie die Auflösung und die Betriebsart wählen können. BIKE GUARDIAN kann als Dashcam oder Action Ka-mera verwendet werden.
Dashcam Modus: die Aufnahme beginnt/endet automatisch mit dem Ein-/Ausschalten der Ka-mera. Wenn die Micro SD Speicherkarte voll ist, werden die ältesten Dateien zuerst überspielt.
Action Cam Modus: die Kamera muss manuell ein- und ausgeschaltet werden. Wenn die Micro SD Speicherkarte voll ist, endet die Aufnahme auto-matisch.
Eine Übersicht der beiden Modi finden Sie in dieser Tabelle:
Start/Stop Aufnahme
Dashcam ModusStart/Stop Aufnahme, wenn Sie
das Motorrad einschaltetAufnahmeschleife: älteste Da-
teien werden zuerst überschrieben.
Action Cam ModusAufnahme manuell
starten/stoppenAufnahme stoppt, wenn der
Speicher voll ist In beiden Modi werden die aufgenommenen Dateien in Videos mit 5 Minuten Länge unterteilt.

23D
EUTS
CH
Auflösung - wählen Sie eine der folgenden Einstellungen: • FullHD 1080p@27fps• HD 720p@55fps
Die folgende Tabelle zeigt die geschätzte Aufnahmedauer je nach Auflösung und Speicherkarte:
Speicher 1080p Auflösung 720p Auflösung
8GB 70 min 90 min
16GB 140 min 180 min
32GB 280 min 360 min
64GB 560 min 720 min
128GB 1120 min 1440 min
Micro SD Karte1. Wir empfehlen die Micro SD Karte vor der ersten Verwendung zu formatieren. 2. Schalten Sie die Kamera zuerst aus, bevor Sie die SD Karte einlegen.3. Drücken Sie EIN/AUS für 3 Sekunden, um die Kamera einzuschalten. Die blaue LED erleuchtet
und die Kamera vibriert 3 mal.4. Drücken und halten Sie die FOTO Taste für ca. 15 Sekunden, um eine SD Karte zu formatieren.
Während der Formatierung blinkt die LED Anzeige rot und die Kamera vibriert einmal am Anfang und am Ende.
Es werden Micro SD Karten von 8 bis 128 GB unterstützt.Note1: Wir empfehlen eine Speicherkarte “Class 10 High Speed” oder besser zu verwenden. Note2: Wir empfehlen Ihnen, die Micro SD Karte alle 2 Wochen zu formatieren.
FotosUm im Stand-By Modus ein Foto aufzunehmen, drücken Sie die Foto Auslöser Taste (5). Während der Videoaufnahme wird mit der Taste ein Standbild aufgenommen.

24
ResetFalls die Kamera mal nicht mehr reagieren sollte und abgestürzt ist, gehen Sie bitte wie folgt vor:1. Drücken Sie die “Reset” Taste auf der Rückseite der Kamera. 2. Entnehmen Sie die MicroSD Karte und formatieren Sie diese am PC.3. Stecken Sie die SD Karte wieder in die Kamera und formatieren Sie diese erneut (Kamera ein-
schalten und dann die FOTO Taste für ca. 15 Sekunden gedrückt halten).
Technische Spezifikationen Auflösung FullHD 1080p / HD 720p
Bildrate 1080p@27fps / 720p@55fps
Sensor Sony IMX323 Sensor 2M
Aufnahmewinkel 120°
Video Format Mov
Wasserdichtigkeit IP65
Stromversorgung USB 5V DC
MicroSD Von 8GB bis zu 128GB (4GB oder weniger wird nicht unterstützt)
Batterie 680 mAh (bis zu 120min)
Gehen Sie auf www.midlandeurope.com, um Updates runterzuladen oder weitere Informationen über die Garantiebestimmungen zu erhalten.

25ES
PAÑ
OL
Acerca de esta guíaEl contenido de este documento tiene fines informativos y está sujeto a cambios sin previo aviso. Hicimos todos los esfuerzos posibles para garantizar que esta Guía del usuario sea precisa y completa. Sin embargo, no se asume ninguna responsabilidad por cualquier error u omisión que pueda haber ocurrido. El fabricante se reserva el derecho de cambiar las especificaciones técnicas sin previo aviso.
Funciones principales:• Cámara FULL HD • DVR y cámara de acción• Resolución: FullHD 1080p / HD 720p • Certificación IP65• Grabación cíclica• Foto: 2MP• Vídeo: 1080p 27fps• Gran Angular 120°
Advertencias Este manual incluye detalles sobre cómo usar el dispositivo, su funcionamiento, especificaciones téc-nicas y precauciones. Recomendamos leerlo detenidamente antes de usar la cámara y guardarla para el futuro. ¡Confiamos en que este DVR satisfaga sus necesidades durante mucho tiempo!Una instalación incorrecta y un mal uso de la cámara podrían causar lesiones personales al usuario y daños al vehículo. Por este motivo, recomendamos prestar la máxima atención al instalar el dispositivo y verificar periódicamente que los soportes de montaje estén intactos y correctamente sujetos.
• No intente abrir la carcasa y repararla: esto anulará la garantía. Si tiene algún problema, diríjase a un servicio técnico profesional.
• Para la mejor calidad de vídeos, la lente debe estar limpia. Para limpiar la cámara y su lente, no utilice sustancias químicas abrasivas ni disolventes, solo use un paño suave y húmedo.
• Al final de su vida útil, no tire la cámara a la basura y no la arroje al fuego, podría explotar. • La compañía NO es responsable por la pérdida de ningún dato / contenido durante el uso.

26
Descripción de los controles
1. Lente2. LED azul: encendida3. Botón ON/REC4. LED rojo: grabando5. Foto6. Tapón de rosca7. Micrófono8. Ranura MicroSD9. LED de carga10. Conector de carga11. Selector de modo operativo12. Reset13. Selector de resolución
1 2 3 4 5
6
7
6
8910
11
12
13

27ES
PAÑ
OL
Qué hay en la caja
1. Soporte de fijación2. Soporte de manillar3. Soporte adhesivo (plano y curvo) con adaptador Go-Pro4. Soporte de correa5. Cable de alimentación waterproof6. Cable para conexión al PC7. Correa de muñeca
1 2 3
6 75
4

28
Carga de la bateríaBIKE GUARDIAN puede cargarse conectando el cable USB a un cargador adecuado o al PC (puede usar los dos cables suministrados: el cable waterproof o el cable para PC)Durante la carga, el RED rojo junto al conector de cargase encenderá y se apagará cuando la carga esté completa.
Ajustar la fecha y la hora1. Para descargar el software de programación visite www.midland.es2. Conecte el cable USB a la cámara y al PC.3. Abra el software “Bike Guardian”.
4. Pulse en “Sync Date & Time” para actualizar la hora de la cámara. 5. Cuando la fecha y la hora aparezcan en los espacios correctos, la cámara puede desconectarse
y apagarse.

29ES
PAÑ
OL
Montar la cámara en el manillar 1. Fije la cámara al soporte, prestando atención para hacer coincidir la parte plana superior de la
cámara con la muesca del soporte. Después cierre la palanca lateral.
2. Instale el soporte de manillar 3. Fije la cámara al soporte con el tornillo
4. Atornille el cable waterproof a la cámara y conéctelo a una fuente de alimentación. Atención la condición de impermeabilidad está garantizada solo para que el conector se fije a la cáma-ra. El conector USB en el otro extremo debe colocarse de tal manera que se proteja del agua de la lluvia.
30
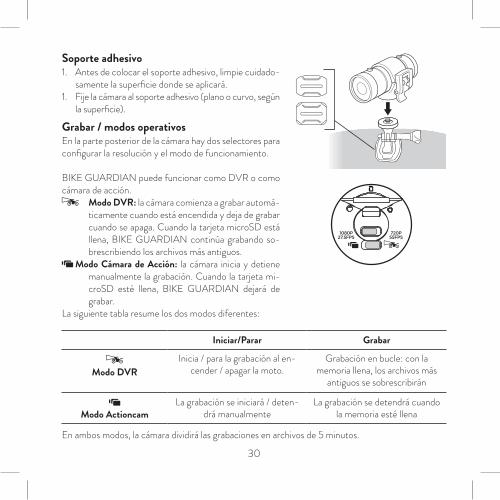
Soporte adhesivo 1. Antes de colocar el soporte adhesivo, limpie cuidado-
samente la superficie donde se aplicará. 1. Fije la cámara al soporte adhesivo (plano o curvo, según
la superficie).
Grabar / modos operativosEn la parte posterior de la cámara hay dos selectores para configurar la resolución y el modo de funcionamiento.
BIKE GUARDIAN puede funcionar como DVR o como cámara de acción.
Modo DVR: la cámara comienza a grabar automá-ticamente cuando está encendida y deja de grabar cuando se apaga. Cuando la tarjeta microSD está llena, BIKE GUARDIAN continúa grabando so-brescribiendo los archivos más antiguos.
Modo Cámara de Acción: la cámara inicia y detiene manualmente la grabación. Cuando la tarjeta mi-croSD esté llena, BIKE GUARDIAN dejará de grabar.
La siguiente tabla resume los dos modos diferentes:
Iniciar/Parar Grabar
Modo DVRInicia / para la grabación al en-
cender / apagar la moto.Grabación en bucle: con la
memoria llena, los archivos más antiguos se sobrescribirán
Modo ActioncamLa grabación se iniciará / deten-
drá manualmenteLa grabación se detendrá cuando
la memoria esté llena
En ambos modos, la cámara dividirá las grabaciones en archivos de 5 minutos.

31ES
PAÑ
OL
Con el otro selector es posible seleccionar la resolución: • FullHD 1080p@27fps• HD 720p@55fps
La tabla muestra la vida útil de la memoria dependiendo de la resolución seleccionada y de la capa-cidad de la memoria.
Capacidad Resolución 1080p Resolución 720p
8GB 70 min 90 min
16GB 140 min 180 min
32GB 280 min 360 min
64GB 560 min 720 min
128GB 1120 min 1440 min
Sugerimos que formatee la tarjeta micro SD cada 2 semanas.
Micro SD1. Se recomienda formatear la tarjeta micro SD antes del primer uso, de lo contrario se podrían
perder datos. 2. Inserte la tarjeta SD cuando la cámara esté apagada.3. Para encender la cámara pulse ON/REC durante 3 segundos. El led azul se iluminará y BIKE
GUARDIAN vibrará 3 veces. 4. Para formatear la tarjeta SD, mantenga presionado Foto durante aproximadamente 15 segundos.
El led rojo parpadeará mientras se formatea y la cámara vibrará al principio y al final del proceso. BIKE GUARDIAN soporta tarjetas micro SD desde 8 hasta 128 GB.Nota1: recomendamos usar tarjetas SD de Clase 10 alta velocidad, o superiores. Nota2: sugerimos eliminar regularmente los datos de la tarjeta de memoria.

32
FotosAl presionar el botón Foto, tomará fotos mientras la cámara está en stand-by y capturará fotogramas mientras está grabando.
ResetCuando la cámara no funcione correctamente o esté atascada, le sugerimos que siga estos pasos: 1. Pulse el botón “reset” en la parte trasera de la cámara2. Extraiga la tarjeta micro SD y formatéela con un PC 3. Inserte de nuevo la tarjeta micro SD y formatéela desde la cámara (encienda BIKE GUARDIAN
y mantenga pulsado el botón Foto durante unos 15 segundos)
Especificaciones técnicas Resolución FullHD 1080p / HD 720p
Fotogramas por segundo 1080p@27fps / 720p@55fps
Sensores Sony IMX323 sensor 2M
Gran Angular 120°
Formato de vídeo Mov
Waterproof IP65
Alimentación USB 5V DC
MicroSD Desde 8 hasta 128GB (no soporta 4GB o inferiores)
Batería 680 mAh (hasta 120min)
Para descargar más actualizaciones de firmware y obtener información sobre la garantía visite www.midland.es

REDIT / RSM
Cte International Srl dichiara che il prodotto è conforme ai requisiti essenziali e alle disposizioni della Direttiva 2014/53/UE. La Dichiarazione di conformità si può scar-icare dal sito http://www.midlandeurope.com/it/pagi-
na/10090-certificationsGB / CY / MT
Hereby Cte International Srl declares that this product is in compliance with the essential requirements and other relevant provisions of Directive 2014/53/UE. The dec-laration of conformity is available on the web site http://www.midlandeurope.com/it/pagina/10090-certifica-
tions AT / DE / CH / LI
Hiermit erklärt Cte International Srl, dass das Produkt die grundlegenden Anforderungen und anderen relevanten Bestimmungen der Richtlinie 2014/53/UE. Die Kon-formitätserklärung ist unter folgendem Link verfügbar: http://www.midlandeurope.com/it/pagina/10090-cer-
tificationsES
CTE International SRL. declara, bajo su responsabilidad, que este aparato cumple con lo dispuesto en la Directiva 2014/53/UE, del Parlamento Europeo. La Declaración de Conformidad está disponible en http://www.midlan-
deurope.com/it/pagina/10090-certificationsFR / LU / CH
Par la présente Cte International Srl déclare que le modèle est conforme aux exigences essentielles et au-tres dispositions pertinentes de la directive 2014/53/UE. La déclaration de conformité est disponible sur le site internet http://www.midlandeurope.com/it/pagi-
na/10090-certifications
PTA CTE INTERNATIONAL declara que este aparelho cumpre com o disposto na Directiva 2014/53/UE do Parlamento Europeu. A Declaração de Conformidade está disponível no sitio na Internet em http://www.mid-
landeurope.com/it/pagina/10090-certificationsGR
Με το παρών, η Cte International Srl δηλώνει οτι το όνομα του μοντέλου συμμορφώνεται ως προς τις βασικές απαιτήσεις και άλλες σχετικές διατάξεις του Κανονισμού 2014/53/UE. Η δήλωση συμμόρφωσης είναι διαθέσιμη στην ιστοσελίδα http://www.midlandeurope.com/it/pagina/10090-certifications
NLHierbij verklaard CTE International Srl dat dit mod-el voldoet aan de essentiële eisen en andere relevante bepalingen van richtlijn 2014/53/UE. De verklaring van conformiteit is beschikbaar op de website http://www.
midlandeurope.com/it/pagina/10090-certificationsBE
CTE INTERNATIONAL Srl verklaart dat het product overeenstemt met de voorschriften en andere bepalingen van de richtlijn 2014/53/UE. De conformiteitsverklaring is voorhanden op de website http://www.midlandeurope.
com/it/pagina/10090-certificationsPL
CTE International Srl deklaruje, że ten model jest zgodny z wymaganiami zasadniczymi i innymi istotnymi postanow-ieniami Dyrektywy 2014/53/UE. Deklaracja Zgodności jest dostepna na stronie http://www.midlandeurope.
com/it/pagina/10090-certifications RO
Cte International Srl declara ca acest model este in conformitate cu cerintele esentiale si alte prevederi ale Directivei 2014/53/UE. Declaratia de confomitate este disponibila si pe site-ul http://www.midlandeurope.com/
it/pagina/10090-certifications.

BGС настоящото CTE international Srl декларира, че продукта е в съответствие с основните изисквания и съответните модификации на Директива 2014/53/UE. Декларацията за съвместимост е налична на сайта: http://www.midlandeurope.com/it/pagina/10090-cer-
tificationsNO
CTE INTERNATIONAL Srl erklærer at produktet er i overensstemmelse med de viktigste kravene og andre relevante betingelser i Direktivet 2014/53/UE. Sams-varserklæringen finnes tilg jengelig på nettstedet http://www.midlandeurope.com/it/pagina/10090-certifica-
tionsDK
Hermed erklærer Cte International Srl , at dette apperat er i overensstemmelse med kravene og andre relevante bestemmelser i direktiv 2014/53/UE. Overensstem-melseserklæringen findes på webstedet http://www.mid-
landeurope.com/it/pagina/10090-certificationsSE
CTE INTERNATIONAL Srl förkunnar att produkten överensstämmer med de väsentliga kraven och övriga bestämmelser i direktiv 2014/53/EU. Denna försäkran om överensstämmelse finns på webbplatsen http://www.
midlandeurope.com/it/pagina/10090-certificationsFI
CTE INTERNATIONAL Srl vakuuttaa, että tuote täyttää direktiivin 2014/53/UE. Vaatimuksenmukaisuusvakuutus on saatavilla http://www.midlandeurope.com/it/pagi-
na/10090-certifications -verkkosivuilla.HR
Cte International Srl ovime izjavljuje da je ime ovog modela u suglasnosti sa bitnim zahtjevima te ostalim rel-evantnim odredbama Propisa 2014/53/EU. Ova Izjava o suglasnosti je dostupna na web stranici http://www.mid-
landeurope.com/it/pagina/10090-certifications.
EEKäesolevaga kinnitab Cte International Srl selle mudeli vastavust direktiivi 2014/53/UE. Vastavusdeklaratsioon on kättesaadav veebilehel http://www.midlandeurope.
com/it/pagina/10090-certificationsLT
CTE International patvirtina, kad šis modelis atitinka visus esminius Direktyvos 2014/53 / UE. Atitikties deklaracija yra pateikiama internetinėje svetainėje http://www.
midlandeurope.com/it/pagina/10090-certificationsLV
CTE INTERNATIONAL Srl deklarē, ka produkts atbilst pamatprasībām un citiem ar to saistītajiem Direktīvas 2014/53 / UE. Atbilstības deklarācija ir pieejama mājas lapā: http://www.midlandeurope.com/it/pagina/10090-
certificationsSK
Týmto Cte International Srl prehlasuje, že tento názov model je v zhode so základnými požiadavkami a ďalšími príslušnými ustanoveniami smernice 2014/53 /UE. Vyhlásenie o zhode je k dispozícii na webových stránkach http://www.midlandeurope.com/it/pagina/10090-
certificationsSI
Cte International Srl deklarira da je ta model skladen z bistvenimi zahtevami in drugimi relevantnimi določili EU direktive 2014/53/UE. Deklaracija o skladnosti je na voljo na spletni strani http://www.midlandeurope.com/it/
pagina/10090-certificationsCZ
CTE INTERNATIONAL SRL prohlašuje, že výrobek je v souladu s 2014/53/UE. Prohlášení o shodě je k dispozici na webových stránkách http://www.midlandeurope.com/
it/pagina/10090-certificationsH
Mi, a CTE International Srl. saját felelősségre kijelentjük, hogy ezen elnevezésű termék megfelel az 2014/53 /UE. A megfelelőségi nyilatkozat elérhető weboldalunkon a http://www.midlandeurope.com/it/pagina/10090-
certifications címen.