it analytics 2.01 data warehouse administration guide€ search for knowledge documents of...
TRANSCRIPT

IT Analytics
for the Windows operating system
Software Version: 2.01
Data Warehouse Administration Guide
Document Release Date: February 2010 Software Release Date: February 2010

Legal Notices
Warranty
The only warranties for HP products and services are set forth in the express warranty statements accompanying such products and services. Nothing herein should be construed as constituting an additional warranty. HP shall not be liable for technical or editorial errors or omissions contained herein.
The information contained herein is subject to change without notice.
Restricted Rights Legend
Confidential computer software. Valid license from HP required for possession, use or copying. Consistent with FAR 12.211 and 12.212, Commercial Computer Software, Computer Software Documentation, and Technical Data for Commercial Items are licensed to the U.S. Government under vendor's standard commercial license.
Copyright Notices
© Copyright 2008–2010 Hewlett-Packard Development Company, L.P.
Trademark Notices
Adobe® is a trademark of Adobe Systems Incorporated.
Microsoft® and Windows® are U.S. registered trademarks of Microsoft Corporation.
Oracle is a registered trademark of Oracle Corporation and/or its affiliates.
Acknowledgements
This product includes ANTLR 3 software, which is Copyright © 2003-2008, Terence Parr All rights reserved.(www.antlr.org/)
This product includes software developed by the Apache Software Foundation. (www.apache.org/)
This product includes software developed by the OpenSymphony Group. (www.opensymphony.com/)
This product includes Sentry Spelling-Checker Engine, which is Copyright © 2000 Wintertree Software Inc.(www.wintertree-software.com)
2

Documentation Updates
This guide’s title page contains the following identifying information:
• Software Version number, which indicates the software version.
• Document Release Date, which changes each time the document is updated.
• Software Release Date, which indicates the release date of this version of the software.
To check for recent updates, or to verify that you are using the most recent edition of a document, go to:
http://h20230.www2.hp.com/selfsolve/manuals
This site requires that you register for an HP Passport and sign-in. To register for an HP Passport ID, go to:
http://h20229.www2.hp.com/passport-registration.html
Or click the New users - please register link on the HP Passport login page.
You will also receive updated or new editions if you subscribe to the appropriate product support service. Contact your HP sales representative for details.
3

Support
You can visit the HP Software Support web site at:
http://www.hp.com/go/hpsoftwaresupport
This web site provides contact information and details about the products, services, and support that HP Software offers.
HP Software Support Online provides customer self-solve capabilities. It provides a fast and efficient way to access interactive technical support tools needed to manage your business. As a valued support customer, you can benefit by using the HP Software Support web site to:
• Search for knowledge documents of interest
• Submit and track support cases and enhancement requests
• Download software patches
• Manage support contracts
• Look up HP support contacts
• Review information about available services
• Enter into discussions with other software customers
• Research and register for software training
Most of the support areas require that you register as an HP Passport user and sign in. Many also require a support contract.
To find more information about access levels, go to:
http://h20230.www2.hp.com/new_access_levels.jsp
To register for an HP Passport ID, go to:
http://h20229.www2.hp.com/passport-registration.html
4

Contents
1 Getting Started . . . . . . . . . . . . . . . . . . . . . . . . . . . . . . . . . . . . . . . . . . . . . . . . . . . . . . . . . . . . . . . . . . . . . . . 11
Administration Guide Overview . . . . . . . . . . . . . . . . . . . . . . . . . . . . . . . . . . . . . . . . . . . . . . . . . . . . . . . . . . 11Hardware and Software Requirements . . . . . . . . . . . . . . . . . . . . . . . . . . . . . . . . . . . . . . . . . . . . . . . . . . . . 12Server Configuration . . . . . . . . . . . . . . . . . . . . . . . . . . . . . . . . . . . . . . . . . . . . . . . . . . . . . . . . . . . . . . . . . . . 12
Multiple Servers . . . . . . . . . . . . . . . . . . . . . . . . . . . . . . . . . . . . . . . . . . . . . . . . . . . . . . . . . . . . . . . . . . . . 13Knowledge Requirements . . . . . . . . . . . . . . . . . . . . . . . . . . . . . . . . . . . . . . . . . . . . . . . . . . . . . . . . . . . . . . . 14Updates. . . . . . . . . . . . . . . . . . . . . . . . . . . . . . . . . . . . . . . . . . . . . . . . . . . . . . . . . . . . . . . . . . . . . . . . . . . . . . 15Other Documentation Resources. . . . . . . . . . . . . . . . . . . . . . . . . . . . . . . . . . . . . . . . . . . . . . . . . . . . . . . . . . 15
2 Working With a Data Warehouse. . . . . . . . . . . . . . . . . . . . . . . . . . . . . . . . . . . . . . . . . . . . . . . . . . . . . . 17
ETL . . . . . . . . . . . . . . . . . . . . . . . . . . . . . . . . . . . . . . . . . . . . . . . . . . . . . . . . . . . . . . . . . . . . . . . . . . . . . . . . . 17Data Warehouse Model . . . . . . . . . . . . . . . . . . . . . . . . . . . . . . . . . . . . . . . . . . . . . . . . . . . . . . . . . . . . . . . . . 18
Source Data Models . . . . . . . . . . . . . . . . . . . . . . . . . . . . . . . . . . . . . . . . . . . . . . . . . . . . . . . . . . . . . . . . . 19Data Integration Interface . . . . . . . . . . . . . . . . . . . . . . . . . . . . . . . . . . . . . . . . . . . . . . . . . . . . . . . . . . . . 20SAP BusinessObjects Data Services . . . . . . . . . . . . . . . . . . . . . . . . . . . . . . . . . . . . . . . . . . . . . . . . . . . . 20Audit, Balance, and Control . . . . . . . . . . . . . . . . . . . . . . . . . . . . . . . . . . . . . . . . . . . . . . . . . . . . . . . . . . . 20Staging Database . . . . . . . . . . . . . . . . . . . . . . . . . . . . . . . . . . . . . . . . . . . . . . . . . . . . . . . . . . . . . . . . . . . 20Target Database . . . . . . . . . . . . . . . . . . . . . . . . . . . . . . . . . . . . . . . . . . . . . . . . . . . . . . . . . . . . . . . . . . . . 21Queries . . . . . . . . . . . . . . . . . . . . . . . . . . . . . . . . . . . . . . . . . . . . . . . . . . . . . . . . . . . . . . . . . . . . . . . . . . . 21Presentation . . . . . . . . . . . . . . . . . . . . . . . . . . . . . . . . . . . . . . . . . . . . . . . . . . . . . . . . . . . . . . . . . . . . . . . 22
Other Data Warehouse Components. . . . . . . . . . . . . . . . . . . . . . . . . . . . . . . . . . . . . . . . . . . . . . . . . . . . . . . 22Data Models . . . . . . . . . . . . . . . . . . . . . . . . . . . . . . . . . . . . . . . . . . . . . . . . . . . . . . . . . . . . . . . . . . . . . . . 22Schemas. . . . . . . . . . . . . . . . . . . . . . . . . . . . . . . . . . . . . . . . . . . . . . . . . . . . . . . . . . . . . . . . . . . . . . . . . . . 22
Data Warehouse Files . . . . . . . . . . . . . . . . . . . . . . . . . . . . . . . . . . . . . . . . . . . . . . . . . . . . . . . . . . . . . . . . . . 23ETL Configuration Files. . . . . . . . . . . . . . . . . . . . . . . . . . . . . . . . . . . . . . . . . . . . . . . . . . . . . . . . . . . . . . 23Configurable Log Files . . . . . . . . . . . . . . . . . . . . . . . . . . . . . . . . . . . . . . . . . . . . . . . . . . . . . . . . . . . . . . . 23
3 Audit, Balance, and Control . . . . . . . . . . . . . . . . . . . . . . . . . . . . . . . . . . . . . . . . . . . . . . . . . . . . . . . . . . . 25
Audit . . . . . . . . . . . . . . . . . . . . . . . . . . . . . . . . . . . . . . . . . . . . . . . . . . . . . . . . . . . . . . . . . . . . . . . . . . . . . . . . 25Balance . . . . . . . . . . . . . . . . . . . . . . . . . . . . . . . . . . . . . . . . . . . . . . . . . . . . . . . . . . . . . . . . . . . . . . . . . . . . . . 25Control . . . . . . . . . . . . . . . . . . . . . . . . . . . . . . . . . . . . . . . . . . . . . . . . . . . . . . . . . . . . . . . . . . . . . . . . . . . . . . 25
ETL Overview . . . . . . . . . . . . . . . . . . . . . . . . . . . . . . . . . . . . . . . . . . . . . . . . . . . . . . . . . . . . . . . . . . . . . . 26ABC Utilities . . . . . . . . . . . . . . . . . . . . . . . . . . . . . . . . . . . . . . . . . . . . . . . . . . . . . . . . . . . . . . . . . . . . . . . 26
dw_abc_load_batch . . . . . . . . . . . . . . . . . . . . . . . . . . . . . . . . . . . . . . . . . . . . . . . . . . . . . . . . . . . . . . . 27dw_abc_batch_control . . . . . . . . . . . . . . . . . . . . . . . . . . . . . . . . . . . . . . . . . . . . . . . . . . . . . . . . . . . . . 27dw_abc_run_steps . . . . . . . . . . . . . . . . . . . . . . . . . . . . . . . . . . . . . . . . . . . . . . . . . . . . . . . . . . . . . . . . 27dw_abc_retry_step . . . . . . . . . . . . . . . . . . . . . . . . . . . . . . . . . . . . . . . . . . . . . . . . . . . . . . . . . . . . . . . . 28
Tracking Reports. . . . . . . . . . . . . . . . . . . . . . . . . . . . . . . . . . . . . . . . . . . . . . . . . . . . . . . . . . . . . . . . . . . . 28Scheduling. . . . . . . . . . . . . . . . . . . . . . . . . . . . . . . . . . . . . . . . . . . . . . . . . . . . . . . . . . . . . . . . . . . . . . . . . 28
5

Out-of-Box Files . . . . . . . . . . . . . . . . . . . . . . . . . . . . . . . . . . . . . . . . . . . . . . . . . . . . . . . . . . . . . . . . . . . . . . . 29
4 Initialization and ETL . . . . . . . . . . . . . . . . . . . . . . . . . . . . . . . . . . . . . . . . . . . . . . . . . . . . . . . . . . . . . . . . . . 31
Task 1: Modify the View Script (PPM Only). . . . . . . . . . . . . . . . . . . . . . . . . . . . . . . . . . . . . . . . . . . . . . . . . 32Task 2: Create the Source Data Views . . . . . . . . . . . . . . . . . . . . . . . . . . . . . . . . . . . . . . . . . . . . . . . . . . . . . 32Task 3: Customize the Data to Match the XREF Views . . . . . . . . . . . . . . . . . . . . . . . . . . . . . . . . . . . . . . . 33
Budgetline Data . . . . . . . . . . . . . . . . . . . . . . . . . . . . . . . . . . . . . . . . . . . . . . . . . . . . . . . . . . . . . . . . . . . . 33Expense Line Data . . . . . . . . . . . . . . . . . . . . . . . . . . . . . . . . . . . . . . . . . . . . . . . . . . . . . . . . . . . . . . . . . . 34
Task 4: Load the XREF Views. . . . . . . . . . . . . . . . . . . . . . . . . . . . . . . . . . . . . . . . . . . . . . . . . . . . . . . . . . . . 35Task 5: Create Directories for External Data Sources. . . . . . . . . . . . . . . . . . . . . . . . . . . . . . . . . . . . . . . . . 35Task 6: Configure the Reference Views . . . . . . . . . . . . . . . . . . . . . . . . . . . . . . . . . . . . . . . . . . . . . . . . . . . . 37Task 7: Edit the External Data Source Spreadsheets . . . . . . . . . . . . . . . . . . . . . . . . . . . . . . . . . . . . . . . . . 38
Updates . . . . . . . . . . . . . . . . . . . . . . . . . . . . . . . . . . . . . . . . . . . . . . . . . . . . . . . . . . . . . . . . . . . . . . . . 39APPLICATIONS.XLS . . . . . . . . . . . . . . . . . . . . . . . . . . . . . . . . . . . . . . . . . . . . . . . . . . . . . . . . . . . . . 39Budget.xls. . . . . . . . . . . . . . . . . . . . . . . . . . . . . . . . . . . . . . . . . . . . . . . . . . . . . . . . . . . . . . . . . . . . . . . 40CostCategory.xls . . . . . . . . . . . . . . . . . . . . . . . . . . . . . . . . . . . . . . . . . . . . . . . . . . . . . . . . . . . . . . . . . 42CURRENCY.xls . . . . . . . . . . . . . . . . . . . . . . . . . . . . . . . . . . . . . . . . . . . . . . . . . . . . . . . . . . . . . . . . . . 44EXCHANGE.xls. . . . . . . . . . . . . . . . . . . . . . . . . . . . . . . . . . . . . . . . . . . . . . . . . . . . . . . . . . . . . . . . . . 45ITFUNCTIONS.xls . . . . . . . . . . . . . . . . . . . . . . . . . . . . . . . . . . . . . . . . . . . . . . . . . . . . . . . . . . . . . . . 47PERIOD.xls . . . . . . . . . . . . . . . . . . . . . . . . . . . . . . . . . . . . . . . . . . . . . . . . . . . . . . . . . . . . . . . . . . . . . 48PROGRAMS.xls . . . . . . . . . . . . . . . . . . . . . . . . . . . . . . . . . . . . . . . . . . . . . . . . . . . . . . . . . . . . . . . . . . 53
Task 8: Set Consolidation Priorities . . . . . . . . . . . . . . . . . . . . . . . . . . . . . . . . . . . . . . . . . . . . . . . . . . . . . . . 54Task 9: Run Initial Sync . . . . . . . . . . . . . . . . . . . . . . . . . . . . . . . . . . . . . . . . . . . . . . . . . . . . . . . . . . . . . . . . 55
Step 1: Load ETL Batch . . . . . . . . . . . . . . . . . . . . . . . . . . . . . . . . . . . . . . . . . . . . . . . . . . . . . . . . . . . . . . 55 Step 2: Create a Windows Scheduled Task . . . . . . . . . . . . . . . . . . . . . . . . . . . . . . . . . . . . . . . . . . . . . . 55
Upstream.xml. . . . . . . . . . . . . . . . . . . . . . . . . . . . . . . . . . . . . . . . . . . . . . . . . . . . . . . . . . . . . . . . . . . . . . . . . 56Task 10: Check the Status of the ETL Job Steps . . . . . . . . . . . . . . . . . . . . . . . . . . . . . . . . . . . . . . . . . . . . . 56
5 ABC Administrative Tasks . . . . . . . . . . . . . . . . . . . . . . . . . . . . . . . . . . . . . . . . . . . . . . . . . . . . . . . . . . . . . 57
How Do I Update the Connection to Data Services? . . . . . . . . . . . . . . . . . . . . . . . . . . . . . . . . . . . . . . . . . . 57How Do I Validate Catalog and Stream Definitions?. . . . . . . . . . . . . . . . . . . . . . . . . . . . . . . . . . . . . . . . . . 58How Do I Load a Batch Job? . . . . . . . . . . . . . . . . . . . . . . . . . . . . . . . . . . . . . . . . . . . . . . . . . . . . . . . . . . . . . 58How Do I Run Job Steps? . . . . . . . . . . . . . . . . . . . . . . . . . . . . . . . . . . . . . . . . . . . . . . . . . . . . . . . . . . . . . . . 59How Do I Restart a Job Step? . . . . . . . . . . . . . . . . . . . . . . . . . . . . . . . . . . . . . . . . . . . . . . . . . . . . . . . . . . . . 59How Do I Start and Stop Batch Jobs?. . . . . . . . . . . . . . . . . . . . . . . . . . . . . . . . . . . . . . . . . . . . . . . . . . . . . . 60How Do I Change the Number of Retries? . . . . . . . . . . . . . . . . . . . . . . . . . . . . . . . . . . . . . . . . . . . . . . . . . . 60How Do I Change Data Warehouse Passwords?. . . . . . . . . . . . . . . . . . . . . . . . . . . . . . . . . . . . . . . . . . . . . . 62
Password Types. . . . . . . . . . . . . . . . . . . . . . . . . . . . . . . . . . . . . . . . . . . . . . . . . . . . . . . . . . . . . . . . . . . . . 62How Do I Improve Performance? . . . . . . . . . . . . . . . . . . . . . . . . . . . . . . . . . . . . . . . . . . . . . . . . . . . . . . . . . 63How Do I Check the Runtime Status of Batch Jobs? . . . . . . . . . . . . . . . . . . . . . . . . . . . . . . . . . . . . . . . . . . 63How Do I Resolve an ETL Error? . . . . . . . . . . . . . . . . . . . . . . . . . . . . . . . . . . . . . . . . . . . . . . . . . . . . . . . . . 63How Do I Monitor and Tune the Data Warehouse? . . . . . . . . . . . . . . . . . . . . . . . . . . . . . . . . . . . . . . . . . . . 63How Do I Purge Validation Tables? . . . . . . . . . . . . . . . . . . . . . . . . . . . . . . . . . . . . . . . . . . . . . . . . . . . . . . . 64How Do I Change the Location of External Source Files? . . . . . . . . . . . . . . . . . . . . . . . . . . . . . . . . . . . . . . 64
6 Error Handling . . . . . . . . . . . . . . . . . . . . . . . . . . . . . . . . . . . . . . . . . . . . . . . . . . . . . . . . . . . . . . . . . . . . . . . 67
Retry Handling. . . . . . . . . . . . . . . . . . . . . . . . . . . . . . . . . . . . . . . . . . . . . . . . . . . . . . . . . . . . . . . . . . . . . . . . 67
6

Automatic Step Retry . . . . . . . . . . . . . . . . . . . . . . . . . . . . . . . . . . . . . . . . . . . . . . . . . . . . . . . . . . . . . . . . 67Manual Step Retry . . . . . . . . . . . . . . . . . . . . . . . . . . . . . . . . . . . . . . . . . . . . . . . . . . . . . . . . . . . . . . . . . . 68
7 Data Warehouse Reports . . . . . . . . . . . . . . . . . . . . . . . . . . . . . . . . . . . . . . . . . . . . . . . . . . . . . . . . . . . . . . 69
Viewing Reports . . . . . . . . . . . . . . . . . . . . . . . . . . . . . . . . . . . . . . . . . . . . . . . . . . . . . . . . . . . . . . . . . . . . . . . 69Data Warehouse Administration Reports. . . . . . . . . . . . . . . . . . . . . . . . . . . . . . . . . . . . . . . . . . . . . . . . . . . 70
Data Model Reports . . . . . . . . . . . . . . . . . . . . . . . . . . . . . . . . . . . . . . . . . . . . . . . . . . . . . . . . . . . . . . . . . 70Data Model Overview . . . . . . . . . . . . . . . . . . . . . . . . . . . . . . . . . . . . . . . . . . . . . . . . . . . . . . . . . . . . . 70Extraction Model Details . . . . . . . . . . . . . . . . . . . . . . . . . . . . . . . . . . . . . . . . . . . . . . . . . . . . . . . . . . 73Consolidation Model Details . . . . . . . . . . . . . . . . . . . . . . . . . . . . . . . . . . . . . . . . . . . . . . . . . . . . . . . . 73Dimension Model Details . . . . . . . . . . . . . . . . . . . . . . . . . . . . . . . . . . . . . . . . . . . . . . . . . . . . . . . . . . 73Fact Model Report . . . . . . . . . . . . . . . . . . . . . . . . . . . . . . . . . . . . . . . . . . . . . . . . . . . . . . . . . . . . . . . . 77Source Model Details. . . . . . . . . . . . . . . . . . . . . . . . . . . . . . . . . . . . . . . . . . . . . . . . . . . . . . . . . . . . . . 77Aggregation Model Details . . . . . . . . . . . . . . . . . . . . . . . . . . . . . . . . . . . . . . . . . . . . . . . . . . . . . . . . . 77Platform Physical Schemas. . . . . . . . . . . . . . . . . . . . . . . . . . . . . . . . . . . . . . . . . . . . . . . . . . . . . . . . . 81
Platform Configuration Report . . . . . . . . . . . . . . . . . . . . . . . . . . . . . . . . . . . . . . . . . . . . . . . . . . . . . . . . . . . 87Data Warehouse Operational Reports . . . . . . . . . . . . . . . . . . . . . . . . . . . . . . . . . . . . . . . . . . . . . . . . . . . . . 87
Audit Reports . . . . . . . . . . . . . . . . . . . . . . . . . . . . . . . . . . . . . . . . . . . . . . . . . . . . . . . . . . . . . . . . . . . . . . 87ABC - Consolidation Tables Activity . . . . . . . . . . . . . . . . . . . . . . . . . . . . . . . . . . . . . . . . . . . . . . . . . 87ABC - Dimension Tables Activity . . . . . . . . . . . . . . . . . . . . . . . . . . . . . . . . . . . . . . . . . . . . . . . . . . . . 91ABC - Source Extraction Tables Activity . . . . . . . . . . . . . . . . . . . . . . . . . . . . . . . . . . . . . . . . . . . . . . 91
Control Reports . . . . . . . . . . . . . . . . . . . . . . . . . . . . . . . . . . . . . . . . . . . . . . . . . . . . . . . . . . . . . . . . . . . . 98ABC - Operational Status . . . . . . . . . . . . . . . . . . . . . . . . . . . . . . . . . . . . . . . . . . . . . . . . . . . . . . . . . . 98ABC - Batch Details. . . . . . . . . . . . . . . . . . . . . . . . . . . . . . . . . . . . . . . . . . . . . . . . . . . . . . . . . . . . . . 104ABC - Job Details. . . . . . . . . . . . . . . . . . . . . . . . . . . . . . . . . . . . . . . . . . . . . . . . . . . . . . . . . . . . . . . . 104ABC - Model Definitions . . . . . . . . . . . . . . . . . . . . . . . . . . . . . . . . . . . . . . . . . . . . . . . . . . . . . . . . . . 108ABC - Operational Duration History . . . . . . . . . . . . . . . . . . . . . . . . . . . . . . . . . . . . . . . . . . . . . . . . 108ABC - Operational Status History . . . . . . . . . . . . . . . . . . . . . . . . . . . . . . . . . . . . . . . . . . . . . . . . . . 113
8 ABC Command Reference . . . . . . . . . . . . . . . . . . . . . . . . . . . . . . . . . . . . . . . . . . . . . . . . . . . . . . . . . . . . 117
Syntax Conventions . . . . . . . . . . . . . . . . . . . . . . . . . . . . . . . . . . . . . . . . . . . . . . . . . . . . . . . . . . . . . . . . . . . 117Command Summary . . . . . . . . . . . . . . . . . . . . . . . . . . . . . . . . . . . . . . . . . . . . . . . . . . . . . . . . . . . . . . . . . . 117dw_abc_add_audit_measure . . . . . . . . . . . . . . . . . . . . . . . . . . . . . . . . . . . . . . . . . . . . . . . . . . . . . . . . . . . . 119dw_abc_add_audit_metric . . . . . . . . . . . . . . . . . . . . . . . . . . . . . . . . . . . . . . . . . . . . . . . . . . . . . . . . . . . . . . 120dw_abc_add_balance_measure . . . . . . . . . . . . . . . . . . . . . . . . . . . . . . . . . . . . . . . . . . . . . . . . . . . . . . . . . . 121dw_abc_add_balance_metric . . . . . . . . . . . . . . . . . . . . . . . . . . . . . . . . . . . . . . . . . . . . . . . . . . . . . . . . . . . . 122dw_abc_add_process_measure . . . . . . . . . . . . . . . . . . . . . . . . . . . . . . . . . . . . . . . . . . . . . . . . . . . . . . . . . . 123dw_abc_batch_control . . . . . . . . . . . . . . . . . . . . . . . . . . . . . . . . . . . . . . . . . . . . . . . . . . . . . . . . . . . . . . . . . 124dw_abc_enter_step_detail . . . . . . . . . . . . . . . . . . . . . . . . . . . . . . . . . . . . . . . . . . . . . . . . . . . . . . . . . . . . . . 125dw_abc_exit_step_detail . . . . . . . . . . . . . . . . . . . . . . . . . . . . . . . . . . . . . . . . . . . . . . . . . . . . . . . . . . . . . . . 126dw_abc_importdefs. . . . . . . . . . . . . . . . . . . . . . . . . . . . . . . . . . . . . . . . . . . . . . . . . . . . . . . . . . . . . . . . . . . . 127dw_abc_job_launcher . . . . . . . . . . . . . . . . . . . . . . . . . . . . . . . . . . . . . . . . . . . . . . . . . . . . . . . . . . . . . . . . . . 128dw_abc_load_batch. . . . . . . . . . . . . . . . . . . . . . . . . . . . . . . . . . . . . . . . . . . . . . . . . . . . . . . . . . . . . . . . . . . . 129dw_abc_retry_step . . . . . . . . . . . . . . . . . . . . . . . . . . . . . . . . . . . . . . . . . . . . . . . . . . . . . . . . . . . . . . . . . . . . 130dw_abc_run_steps . . . . . . . . . . . . . . . . . . . . . . . . . . . . . . . . . . . . . . . . . . . . . . . . . . . . . . . . . . . . . . . . . . . . 131dw_abc_set_status . . . . . . . . . . . . . . . . . . . . . . . . . . . . . . . . . . . . . . . . . . . . . . . . . . . . . . . . . . . . . . . . . . . . 132
7

9 Time Zone Configuration . . . . . . . . . . . . . . . . . . . . . . . . . . . . . . . . . . . . . . . . . . . . . . . . . . . . . . . . . . . . . 133
Time Zone Management . . . . . . . . . . . . . . . . . . . . . . . . . . . . . . . . . . . . . . . . . . . . . . . . . . . . . . . . . . . . . . . 133Task 1: Configure Data Source Time Zone Properties . . . . . . . . . . . . . . . . . . . . . . . . . . . . . . . . . . . . . 133Task 2: Configure Data Warehouse Time Zone Properties. . . . . . . . . . . . . . . . . . . . . . . . . . . . . . . . . . 134Task 3: (Optional) Capture the Data Source DST Information . . . . . . . . . . . . . . . . . . . . . . . . . . . . . . 134
Troubleshooting Date Conversion. . . . . . . . . . . . . . . . . . . . . . . . . . . . . . . . . . . . . . . . . . . . . . . . . . . . . . . . 135Updating Data Warehouse Server Time Zone Information. . . . . . . . . . . . . . . . . . . . . . . . . . . . . . . . . . . . 135Updating Data Warehouse Server Tables. . . . . . . . . . . . . . . . . . . . . . . . . . . . . . . . . . . . . . . . . . . . . . . . . . 136
10 Tracing and Logging . . . . . . . . . . . . . . . . . . . . . . . . . . . . . . . . . . . . . . . . . . . . . . . . . . . . . . . . . . . . . . . . . 137
The Java Logging Mechanism. . . . . . . . . . . . . . . . . . . . . . . . . . . . . . . . . . . . . . . . . . . . . . . . . . . . . . . . . . . 137Configure the Logs . . . . . . . . . . . . . . . . . . . . . . . . . . . . . . . . . . . . . . . . . . . . . . . . . . . . . . . . . . . . . . . . . 137
Trace Levels . . . . . . . . . . . . . . . . . . . . . . . . . . . . . . . . . . . . . . . . . . . . . . . . . . . . . . . . . . . . . . . . . . . . 137Other Log Parameters . . . . . . . . . . . . . . . . . . . . . . . . . . . . . . . . . . . . . . . . . . . . . . . . . . . . . . . . . . . . 138Sample Log Information . . . . . . . . . . . . . . . . . . . . . . . . . . . . . . . . . . . . . . . . . . . . . . . . . . . . . . . . . . 138SQL Command Logging Mechanism . . . . . . . . . . . . . . . . . . . . . . . . . . . . . . . . . . . . . . . . . . . . . . . . 138
XREF Log . . . . . . . . . . . . . . . . . . . . . . . . . . . . . . . . . . . . . . . . . . . . . . . . . . . . . . . . . . . . . . . . . . . . . . . . . . . 139Example . . . . . . . . . . . . . . . . . . . . . . . . . . . . . . . . . . . . . . . . . . . . . . . . . . . . . . . . . . . . . . . . . . . . . . . 139
Apache Tomcat Logs . . . . . . . . . . . . . . . . . . . . . . . . . . . . . . . . . . . . . . . . . . . . . . . . . . . . . . . . . . . . . . . . . . 140BOE Logs . . . . . . . . . . . . . . . . . . . . . . . . . . . . . . . . . . . . . . . . . . . . . . . . . . . . . . . . . . . . . . . . . . . . . . . . . . . 140
11 Backup and Re-Initialization . . . . . . . . . . . . . . . . . . . . . . . . . . . . . . . . . . . . . . . . . . . . . . . . . . . . . . . . . . 141
Daily Backup Process. . . . . . . . . . . . . . . . . . . . . . . . . . . . . . . . . . . . . . . . . . . . . . . . . . . . . . . . . . . . . . . . . . 141Source Tables . . . . . . . . . . . . . . . . . . . . . . . . . . . . . . . . . . . . . . . . . . . . . . . . . . . . . . . . . . . . . . . . . . . . . 141Staging Tables. . . . . . . . . . . . . . . . . . . . . . . . . . . . . . . . . . . . . . . . . . . . . . . . . . . . . . . . . . . . . . . . . . . . . 142
ABC Tables. . . . . . . . . . . . . . . . . . . . . . . . . . . . . . . . . . . . . . . . . . . . . . . . . . . . . . . . . . . . . . . . . . . . . 142XREF Tables . . . . . . . . . . . . . . . . . . . . . . . . . . . . . . . . . . . . . . . . . . . . . . . . . . . . . . . . . . . . . . . . . . . 143Lookup Tables . . . . . . . . . . . . . . . . . . . . . . . . . . . . . . . . . . . . . . . . . . . . . . . . . . . . . . . . . . . . . . . . . . 145Metadata Tables . . . . . . . . . . . . . . . . . . . . . . . . . . . . . . . . . . . . . . . . . . . . . . . . . . . . . . . . . . . . . . . . 146Snapshot Tables. . . . . . . . . . . . . . . . . . . . . . . . . . . . . . . . . . . . . . . . . . . . . . . . . . . . . . . . . . . . . . . . . 148Validation Tables . . . . . . . . . . . . . . . . . . . . . . . . . . . . . . . . . . . . . . . . . . . . . . . . . . . . . . . . . . . . . . . . 151XREFGEN Tables . . . . . . . . . . . . . . . . . . . . . . . . . . . . . . . . . . . . . . . . . . . . . . . . . . . . . . . . . . . . . . . 152
Export and Import ETL . . . . . . . . . . . . . . . . . . . . . . . . . . . . . . . . . . . . . . . . . . . . . . . . . . . . . . . . . . . . . . . . 158Re-Initialization . . . . . . . . . . . . . . . . . . . . . . . . . . . . . . . . . . . . . . . . . . . . . . . . . . . . . . . . . . . . . . . . . . . . . . 160
Related Entities and Tables . . . . . . . . . . . . . . . . . . . . . . . . . . . . . . . . . . . . . . . . . . . . . . . . . . . . . . . . . . 160Core Entities . . . . . . . . . . . . . . . . . . . . . . . . . . . . . . . . . . . . . . . . . . . . . . . . . . . . . . . . . . . . . . . . . . . 160FPA Entities. . . . . . . . . . . . . . . . . . . . . . . . . . . . . . . . . . . . . . . . . . . . . . . . . . . . . . . . . . . . . . . . . . . . 165
Re-Initialization Scenarios . . . . . . . . . . . . . . . . . . . . . . . . . . . . . . . . . . . . . . . . . . . . . . . . . . . . . . . . . . . 167Re-Initialize a Single Entity From a Single Source. . . . . . . . . . . . . . . . . . . . . . . . . . . . . . . . . . . . . 167Re-Initialize a Single Entity From All Sources . . . . . . . . . . . . . . . . . . . . . . . . . . . . . . . . . . . . . . . . 170Re-Initialize a Single Entity That Shares Tables . . . . . . . . . . . . . . . . . . . . . . . . . . . . . . . . . . . . . . 171Re-Initialize All Entities From a Single Source. . . . . . . . . . . . . . . . . . . . . . . . . . . . . . . . . . . . . . . . 175Re-Initialize All Entities From All Sources . . . . . . . . . . . . . . . . . . . . . . . . . . . . . . . . . . . . . . . . . . . 177
12 Recovery . . . . . . . . . . . . . . . . . . . . . . . . . . . . . . . . . . . . . . . . . . . . . . . . . . . . . . . . . . . . . . . . . . . . . . . . . . . 179
Restoring a Microsoft SQL Server Database . . . . . . . . . . . . . . . . . . . . . . . . . . . . . . . . . . . . . . . . . . . . . . . 179Scenario 1: Failed Job With Intact Source Data . . . . . . . . . . . . . . . . . . . . . . . . . . . . . . . . . . . . . . . . . . . . 180
8

Scenario 2: The ETL Job Fails. . . . . . . . . . . . . . . . . . . . . . . . . . . . . . . . . . . . . . . . . . . . . . . . . . . . . . . . . . . 181Before ETL Begins . . . . . . . . . . . . . . . . . . . . . . . . . . . . . . . . . . . . . . . . . . . . . . . . . . . . . . . . . . . . . . . . . 181Failure During the ETL Job . . . . . . . . . . . . . . . . . . . . . . . . . . . . . . . . . . . . . . . . . . . . . . . . . . . . . . . . . . 181Failure During the TSNP Phase . . . . . . . . . . . . . . . . . . . . . . . . . . . . . . . . . . . . . . . . . . . . . . . . . . . . . . 182Failure During the SSNP Phase . . . . . . . . . . . . . . . . . . . . . . . . . . . . . . . . . . . . . . . . . . . . . . . . . . . . . . 182Failure During the CSNP Phase . . . . . . . . . . . . . . . . . . . . . . . . . . . . . . . . . . . . . . . . . . . . . . . . . . . . . . 182
Scenario 3: Invalid Data . . . . . . . . . . . . . . . . . . . . . . . . . . . . . . . . . . . . . . . . . . . . . . . . . . . . . . . . . . . . . . . 183
13 Troubleshooting . . . . . . . . . . . . . . . . . . . . . . . . . . . . . . . . . . . . . . . . . . . . . . . . . . . . . . . . . . . . . . . . . . . . . 185
ABC Errors . . . . . . . . . . . . . . . . . . . . . . . . . . . . . . . . . . . . . . . . . . . . . . . . . . . . . . . . . . . . . . . . . . . . . . . . . . 185Initial Sync Failure . . . . . . . . . . . . . . . . . . . . . . . . . . . . . . . . . . . . . . . . . . . . . . . . . . . . . . . . . . . . . . . . . 185ABC Process Errors . . . . . . . . . . . . . . . . . . . . . . . . . . . . . . . . . . . . . . . . . . . . . . . . . . . . . . . . . . . . . . . . 185Batch Control . . . . . . . . . . . . . . . . . . . . . . . . . . . . . . . . . . . . . . . . . . . . . . . . . . . . . . . . . . . . . . . . . . . . . 186BODS Step Retry . . . . . . . . . . . . . . . . . . . . . . . . . . . . . . . . . . . . . . . . . . . . . . . . . . . . . . . . . . . . . . . . . . 186ABC and Operational Report Errors . . . . . . . . . . . . . . . . . . . . . . . . . . . . . . . . . . . . . . . . . . . . . . . . . . . 187ODBC and Dataflow Time Out Errors . . . . . . . . . . . . . . . . . . . . . . . . . . . . . . . . . . . . . . . . . . . . . . . . . 188Web Service Errors . . . . . . . . . . . . . . . . . . . . . . . . . . . . . . . . . . . . . . . . . . . . . . . . . . . . . . . . . . . . . . . . . 188
BODS Errors . . . . . . . . . . . . . . . . . . . . . . . . . . . . . . . . . . . . . . . . . . . . . . . . . . . . . . . . . . . . . . . . . . . . . . . . 189Connectivity Errors . . . . . . . . . . . . . . . . . . . . . . . . . . . . . . . . . . . . . . . . . . . . . . . . . . . . . . . . . . . . . . . . . . . 190
Verify Connectivity . . . . . . . . . . . . . . . . . . . . . . . . . . . . . . . . . . . . . . . . . . . . . . . . . . . . . . . . . . . . . . . . . 190Broken Web Service Connections. . . . . . . . . . . . . . . . . . . . . . . . . . . . . . . . . . . . . . . . . . . . . . . . . . . . . . 190
ETL Warnings . . . . . . . . . . . . . . . . . . . . . . . . . . . . . . . . . . . . . . . . . . . . . . . . . . . . . . . . . . . . . . . . . . . . . . . 190Job Warnings During Installation . . . . . . . . . . . . . . . . . . . . . . . . . . . . . . . . . . . . . . . . . . . . . . . . . . . . . 190
Password Errors. . . . . . . . . . . . . . . . . . . . . . . . . . . . . . . . . . . . . . . . . . . . . . . . . . . . . . . . . . . . . . . . . . . . . . 191Changing Database Passwords . . . . . . . . . . . . . . . . . . . . . . . . . . . . . . . . . . . . . . . . . . . . . . . . . . . . . . . 191Passphrase.txt File Missing . . . . . . . . . . . . . . . . . . . . . . . . . . . . . . . . . . . . . . . . . . . . . . . . . . . . . . . . . . 191
Source Data Errors . . . . . . . . . . . . . . . . . . . . . . . . . . . . . . . . . . . . . . . . . . . . . . . . . . . . . . . . . . . . . . . . . . . 194Validation Errors . . . . . . . . . . . . . . . . . . . . . . . . . . . . . . . . . . . . . . . . . . . . . . . . . . . . . . . . . . . . . . . . . . . . . 195XREF_GENERATOR Errors . . . . . . . . . . . . . . . . . . . . . . . . . . . . . . . . . . . . . . . . . . . . . . . . . . . . . . . . . . . . 195
Glossary . . . . . . . . . . . . . . . . . . . . . . . . . . . . . . . . . . . . . . . . . . . . . . . . . . . . . . . . . . . . . . . . . . . . . . . . . . . . . . . 197
A Data Warehouse Command Reference. . . . . . . . . . . . . . . . . . . . . . . . . . . . . . . . . . . . . . . . . . . . . . . . . 213
Syntax Conventions . . . . . . . . . . . . . . . . . . . . . . . . . . . . . . . . . . . . . . . . . . . . . . . . . . . . . . . . . . . . . . . . . . . 213Command Summary . . . . . . . . . . . . . . . . . . . . . . . . . . . . . . . . . . . . . . . . . . . . . . . . . . . . . . . . . . . . . . . . . . 213dw_app_config . . . . . . . . . . . . . . . . . . . . . . . . . . . . . . . . . . . . . . . . . . . . . . . . . . . . . . . . . . . . . . . . . . . . . . . 215dw_check_datasources_connectivity . . . . . . . . . . . . . . . . . . . . . . . . . . . . . . . . . . . . . . . . . . . . . . . . . . . . . . 216dw_cleandb . . . . . . . . . . . . . . . . . . . . . . . . . . . . . . . . . . . . . . . . . . . . . . . . . . . . . . . . . . . . . . . . . . . . . . . . . . 217dw_config_loader . . . . . . . . . . . . . . . . . . . . . . . . . . . . . . . . . . . . . . . . . . . . . . . . . . . . . . . . . . . . . . . . . . . . . 218dw_deploy_biar_files . . . . . . . . . . . . . . . . . . . . . . . . . . . . . . . . . . . . . . . . . . . . . . . . . . . . . . . . . . . . . . . . . . 219dw_ds_gen . . . . . . . . . . . . . . . . . . . . . . . . . . . . . . . . . . . . . . . . . . . . . . . . . . . . . . . . . . . . . . . . . . . . . . . . . . 220dw_ds_import . . . . . . . . . . . . . . . . . . . . . . . . . . . . . . . . . . . . . . . . . . . . . . . . . . . . . . . . . . . . . . . . . . . . . . . . 221dw-encryptpasswords. . . . . . . . . . . . . . . . . . . . . . . . . . . . . . . . . . . . . . . . . . . . . . . . . . . . . . . . . . . . . . . . . . 222dw_etl_export . . . . . . . . . . . . . . . . . . . . . . . . . . . . . . . . . . . . . . . . . . . . . . . . . . . . . . . . . . . . . . . . . . . . . . . . 224dw_etl_import. . . . . . . . . . . . . . . . . . . . . . . . . . . . . . . . . . . . . . . . . . . . . . . . . . . . . . . . . . . . . . . . . . . . . . . . 225dw_etl_update_containers . . . . . . . . . . . . . . . . . . . . . . . . . . . . . . . . . . . . . . . . . . . . . . . . . . . . . . . . . . . . . . 226dw_foundation_setup . . . . . . . . . . . . . . . . . . . . . . . . . . . . . . . . . . . . . . . . . . . . . . . . . . . . . . . . . . . . . . . . . . 227
9

dw_initdb . . . . . . . . . . . . . . . . . . . . . . . . . . . . . . . . . . . . . . . . . . . . . . . . . . . . . . . . . . . . . . . . . . . . . . . . . . . 228dw_tz_update_dst. . . . . . . . . . . . . . . . . . . . . . . . . . . . . . . . . . . . . . . . . . . . . . . . . . . . . . . . . . . . . . . . . . . . . 229dw_generateschemas . . . . . . . . . . . . . . . . . . . . . . . . . . . . . . . . . . . . . . . . . . . . . . . . . . . . . . . . . . . . . . . . . . 230dw_importdefs . . . . . . . . . . . . . . . . . . . . . . . . . . . . . . . . . . . . . . . . . . . . . . . . . . . . . . . . . . . . . . . . . . . . . . . 231
B Naming Conventions . . . . . . . . . . . . . . . . . . . . . . . . . . . . . . . . . . . . . . . . . . . . . . . . . . . . . . . . . . . . . . . . 233
Data Warehouse Naming Conventions . . . . . . . . . . . . . . . . . . . . . . . . . . . . . . . . . . . . . . . . . . . . . . . . . . . . 233BODS Naming Conventions . . . . . . . . . . . . . . . . . . . . . . . . . . . . . . . . . . . . . . . . . . . . . . . . . . . . . . . . . . . . 234Target and Staging Databases . . . . . . . . . . . . . . . . . . . . . . . . . . . . . . . . . . . . . . . . . . . . . . . . . . . . . . . . . . 236
10

1 Getting Started
The data warehouse is the repository for key business data that is cleansed, consolidated, and organized to support efficient queries, reports, and to populate a variety of business analytics. The contents of the data warehouse depend on the related HP applications that generate business data. For example, the data may originate with such HP Service Management applications as Asset Manager or HP Demand and Portfolio Management applications like Project and Portfolio Management.
The data warehouse consolidates the data from one or more of these applications and makes it available for business impact analysis.
Administration Guide Overview
This guide contains information about how to configure and use the HP Data Warehouse. Table 1 summarizes the content of each chapter.
Table 1 Document Map
Chapter Describes
Chapter 1, Getting Started Configuration and requirements overview.
Chapter 2, Working With a Data Warehouse General data warehouse information about layers, schemas, files, and models.
Chapter 3, Audit, Balance, and Control Managing the Audit, Balance, and Control processes.
Chapter 4, Initialization and ETL The first steps after installation.
Chapter 5, ABC Administrative Tasks How to complete typical data warehouse tasks.
Chapter 6, Error Handling What to do when an error occurs in an Audit, Balance, and Control job.
Chapter 7, Data Warehouse Reports Out-of-box administrative and operational reports about the data warehouse.
Chapter 8, ABC Command Reference A syntax reference for all Audit, Balance, and Control utilities used by data warehouse administrators.
Chapter 9, Time Zone Configuration How to configure time zone information for data sources and the data warehouse.
Chapter 10, Tracing and Logging How to customize logs and start traces.
11

Hardware and Software Requirements
There are specific requirements for the hardware, operating system, and third party software products that support the data warehouse. For complete information about required software that must be installed and configured before you install the data warehouse, see the data warehouse Support Matrix on the HP Software Support web site (http://support.openview.hp.com/sc/support_matrices.jsp).
Server Configuration
The data warehouse functions in a single or multiple application environment. Although it is possible to operate successfully in a single server environment, shown in Figure 1, it is primarily a simple configuration that works well for small operations, prototyping, and testing before you deploy to a production environment.
Chapter 11, Backup and Re-Initialization Daily data warehouse backup procedures and re-initialization scenarios.
Chapter 12, Recovery How to recover the data warehouse to a steady state when errors occur.
Chapter 13, Troubleshooting Tips, tricks, and problem solving strategies.
Glossary A list of Data Warehouse terms and definitions.
Appendix A, Data Warehouse Command Reference
A syntax reference for all data warehouse utilities used by ETL designers and developers.
Appendix B, Naming Conventions Naming conventions for the data warehouse, SAP BusinessObjects Data Services, and target and staging databases.
Table 1 Document Map
Chapter Describes
12 Chapter : Getting Started

Figure 1 Single server environment
Multiple Servers
The most common installation of the data warehouse occurs in a distributed server environment. This configuration involves networked servers that can be co-located or in diverse locations and time zones. For example, the source data repositories might be in different cities and time zones. The data warehouse can be in yet another location and time zone. There must be an SAP BusinessObjects server, RDBMS server, and web application server that can be in different locations.
Installation and configuration processes ensure that these differences are transparent in the production environment. Figure 2 shows a typical distributed server configuration.
13

Figure 2 Multiple server environment
For more information about the possible server configurations, see the HP IT Analytics Installation and Configuration Guide.
Knowledge Requirements
The administration tasks described in this guide assume that you have experience as a Database Administrator with responsibilities in these areas:
• Installation
• Configuration
• Administration
• Troubleshooting
SAP BusinessObjects Enterprise XI 3.1 expertise with emphasis in SAP BusinessObjects Data Services is highly recommended.
14 Chapter : Getting Started

Updates
HP makes hotfix and fix pack releases available to address defects and other software problems. Contact HP Support to verify that you have all the available post-release fix packs applied before you implement a production environment.
Other Documentation Resources
There are other documentation sources that you need to reference for data management and administration tasks.
For all data warehouse installation and configuration information, see the HP IT Analytics Installation and Configuration Guide. For more information about obtaining source data from external applications, see the HP IT Analytics ETL User Guide.
For all SAP BusinessObjects Enterprise XI 3.1 or SAP BusinessObjects Data Services tasks and troubleshooting, refer to the SAP BusinessObjects Enterprise XI 3.1 and SAP BusinessObjects Data Services documentation that is accessible from those installed products.
For basic RDBMS tasks and troubleshooting, see the appropriate vendor documentation.
15

16 Chapter : Getting Started

2 Working With a Data Warehouse
The data warehouse is the repository for key business data that support queries, reports, and populates business analytics. The data warehouse acquires, standardizes, enriches, and consolidates data based on the target model designed to satisfy the business analytic requirements. The data warehouse uses SAP BusinessObjects Data Services to complete the process that extracts data from one or more source applications.
The content of the data warehouse depends on the related HP applications that generate business data, and the analytic application that presents the data. Data can originate with external applications such as Asset Manager and Project and Portfolio Management. The data warehouse can consolidate similar data from these applications into a meaningful target model that populates relevant business analytics. Enabling multiple source applications to provide input data ensures that the application can produce robust and comprehensive results.
The data warehouse enables data integration and promotes data consolidation by using consistent data models regardless of the disparate data models among different data sources. The data warehouse software relies on common data models that support each phase of ETL. As the data is progressively aligned into a single target model, transformation processes assign common data names and attributes for each entity that appears in the target model.
The data warehouse is scalable, extensible, and modular. It can grow and respond to added processes and an increasing volume of data. It is maintainable with a set of tools that monitor processes, troubleshoot problems, and produce reports.
ETL
The Extract, Transform, and Load (ETL) process is an end-to-end transfer of external source data through several staging layers and into the target layer of the data warehouse. The source data can reside in a single database or multiple databases. The data warehouse uses the ETL process to extract, consolidate, and transform the source data into a meaningful target model that populates relevant business analytics. The ETL engine is SAP BusinessObjects Data Services.
The ETL process comprises eight primary stages. The stages that process depend on metadata and the nature of the sources. Figure 3 on page 18 shows the overall ETL process.
17

Figure 3 ETL Process
Data Warehouse Model
The data warehouse model is an end-to-end solution for extracting source data and consolidating disparate source data models into a consolidated data model. The data organized to reflect this model resides in target tables that become the source for IT Analytics.
The data warehouse relies on an external RDBMS to provide daily maintenance and backup support, SAP BusinessObjects Data Services to assist with ETL, an ABC infrastructure of utilities and processes to govern regularly scheduled ETL jobs, and internal data warehouse utilities to create the data warehouse and maintain data integrity.
Figure 4 on page 19 shows the principal data warehouse components and how they interact. Read the following sections for more information about each component, its role, and responsibilities.
18 Chapter : Working With a Data Warehouse

Figure 4 Data Warehouse Overview
Source Data Models
Source data originates in external application repositories. Data generated by an external application can be rich in business information, but unless you can integrate it with equally important business information generated by other applications, it is difficult to get a complete view of operational information.
The source data models describe the source and extraction format so that the data warehouse can consume this data and integrate it into a common view that you can use to populate comprehensive business intelligence reports and dashboards.
19

Data Integration Interface
The data integration interface (DII) is the access layer that stands between the source database models and the extraction models in the staging database. The DII uses a mapping model that transforms the source data to fit into extraction work tables. The DII can accommodate minor variations in the source model schemas from one version to another.
SAP BusinessObjects Data Services
SAP BusinessObjects Data Services is the access mechanism that performs the physical data extraction from the source repository to the staging database.
Audit, Balance, and Control
Audit, Balance, and Control (ABC) processes ensure that source data is not corrupted in the extraction process, and that the integrity of the extracted data is maintained as it progresses from the initial source extraction through the logical and physical transformation into target tables. SAP BusinessObjects Data Services can move the data but does not evaluate whether the final result is correct. ABC establishes checkpoints and provides feedback on each step to guarantee that each step is valid before the next step begins.
The Audit component ensures consistency during ETL processing. It measures the number of records in and the number of records out for each step and displays these runtime statistics in a collection of audit reports.
Balance verifies that data in the data warehouse matches data in the source system. For example, if the data warehouse stores project dollar amounts then the balance process verifies that the aggregate project dollars in the data warehouse matches the aggregate project dollars in the source application data.
Control governs ETL processes. Control makes sure that there is a proper restart and recovery when a system error occurs. Control also manages job dependencies at runtime.
ABC utilities are applications that you can invoke automatically or manually to run ETL, solve problems, and perform ETL-related tasks.
Staging Database
The staging database contains tables and snapshots that are critical to the ETL process. Metadata describes these tables. IT Analytics processes data in the staging database before loading it into the final target tables in the target database.
• Extraction (EXT) tables contain the initial version of source data. EXT tables are used during the stage of ETL when IT Analytics loads data from the extract flat files into the staging database.
• Validation (VALF) failure tables are used during the data validation process that ensures all of the data is usable. VALF tables store source data that is rejected by the ETL process due to validation failure. Data validation is part of the process to load the EXT tables.
• Identification (SSI and MSI) tables restructure the diverse source system data into a conformed structure. IT Analytics uses SSI and MSI tables to standardize the data and add an enterprise key.
20 Chapter : Working With a Data Warehouse

• Consolidation (MSC) tables integrate disparate source data into a consolidated entity. The MSC tables contain the uniform structure that IT Analytics uses to load the data into the target tables.
• Transformation (XFR) tables are load-ready tables that match the internal structure of the target tables. IT Analytics uses XFR tables while preparing the data to be loaded into the target tables in the target database.
• Lookup (LOOKUP) tables store durable keys and surrogate keys. IT Analytics uses these tables to establish dimension-to-dimension references in dimension tables and foreign key references in fact tables.
• Snapshot (TSNP, SSNP, and CSNP) tables are the persistent storage for ETL staging data. These snapshot tables capture the changed data and support the data warehouse recovery process. The data warehouse uses TSNP tables for source extraction staging, SSNP tables for single source integration staging, and CSNP tables for multiple source consolidation staging. The final ETL stage captures the snapshot data.
• Cross Reference (XREF) tables support the data integration processes that combine records from multiple sources into a single record in the consolidation model.
• Cross Reference Generator (XREFGEN) tables support data matching and cross reference inputs for the consolidation models.
• Metadata tables contain a logical model and describe how to translate that model into the physical implementation of tables and views.
• ABC tables support the ETL workflow and enable job control and sequencing. They also host audit information to ensure data quality.
Target Database
The target data models describe the format of the data that produces business intelligence analytics. The instantiated data models are dimension, fact, and hierarchy tables populated with data obtained through ETL processes.
• Dimension tables contain the data model to be queried and presented by IT Analytics in a variety of reports and analytics.
• Fact tables contain data that describes events, transactions, or other granular information.
• Hierarchy tables capture hierarchical relationships among levels of data.
Queries
You can use structured query language (SQL) to create a primary abstraction layer of data from the target tables and use that data to populate reports, dashboards, or resolve business questions. The SAP BusinessObjects Enterprise XI 3.1 suite of business tools simplify accessing this information and storing it in business-oriented views.
21

Presentation
SAP BusinessObjects Enterprise XI 3.1 uses a universe abstraction layer to organize data for presentation in out-of-box or user-designed analytics. The universe provides a business oriented view of the data that resides in the data warehouse target tables.
Other Data Warehouse Components
The language of the data warehouse includes other database concepts.
Data Models
Data models are the design for the source, extraction, consolidation and final format of the data warehouse entities:
• Source entity models: The source entity model is the data produced by an external application, such as Asset Manager or Project and Portfolio Management.
• Extraction models: ETL processes obtain the data in native format and stage it in intermediate tables that conform to the extraction data model for that entity. Extraction also validates the data to ensure that it is usable.
• Consolidation models: Consolidation transforms the data further by merging extracted data from diverse sources into meaningful data required by IT Analytics.
• Target models: The target models describe the final version of the data that adheres to the design required by IT Analytics.
For more information and to view entity relationship diagrams (ERDs) of the target data models, see the HP IT Analytics ETL User Guide.
Schemas
Logical schemas define entities and attributes. Along with the metadata, schemas become the blueprint for organizing data. This predictable organization enables IT Analytics to access and display the data to end users.
22 Chapter : Working With a Data Warehouse

Data Warehouse Files
The data warehouse contains these out-of-box .xml files in this directory:
C:\Program Files\HP\IT Analytics 2.00\Foundation\conf\
ETL Configuration Files
These two files describe the data sources, passwords, and other configuration information modified by your input to the Configuration Tool during installation.
Configurable Log Files
ABC utilities have customizable log files. For more information, see Configure the Logs on page 137.
Table 2 Out-of-box .xml files
File Name Description
dataSources.xml A comprehensive collection of data source connection information, including all the parameter values that define the ODBC data source connection (DNS). There is one complete definition for each known external data source. For example, if you access financial planning data, you would have an entry to describe your Asset Manager data source.
dwplatform.properties A comprehensive set of properties captured during the installation and configuration process. This file contains user-defined paths and passwords, version numbers, data source information, and RDBMS configuration information. Stored passwords are encrypted. If you change a password, you must run the dw-encryptpasswords tool to update the encrypted value.
23

24 Chapter : Working With a Data Warehouse

3 Audit, Balance, and Control
Audit, Balance, and Control (ABC) is a set of functions based on data warehousing best practices. Although SAP BusinessObjects Data Services (BODS) manages the ETL workflow, ABC ensures work flow integrity. It controls the overall ETL execution, provides error handling, and collects job progress statistics. Other ABC features are:
• Multiple job stream management
• Command line administration tools
• Generated ABC operational system reports
• Generated ABC historical system reports
Audit
ABC Audit collects metric information about the processed data that communicates success, warning, or error statuses. If the audit information shows data loss or inconsistency, an error or warning status tells you that the results of the job are invalid.
When an error occurs, the ABC Audit function locks the subsequent steps in the batch job to prevent possible data corruption and further invalid data processing.
The data warehouse generates audit reports that summarize the number of entities that were extracted from the source systems, processed during ETL and then updated in the data warehouse. You can use these reports to verify that ETL processing works correctly or determine where to make adjustments that improve the work flow.
For more information, see Audit Reports on page 87.
Balance
The ABC Balance component enables the administrator to verify that data is synchronized between the source systems and data warehouse. ABC Balance can obtain external reference data to validate the contents of the data warehouse against other information stores, or enterprise record systems, and generate related reports.
Control
The ABC Control feature consists of a data model that describes ETL job stream design, and run-time executables that monitor the sequencing of each ETL step according to the overall ETL design.
25

ETL workflow is a complex operation that requires precision in the execution order and specific synchronization points. ABC Control adds value to the ETL process by validating the execution status of each step before launching the next step.
ABC Control also leverages audit information to ensure that the data warehouse content is not corrupted by ETL processes.
ETL Overview
Figure 5 on page 27 shows the phases of a typical job stream that runs using BODS through a BODS web service.
The job stream is a workflow of individual job stream (execution) steps and a description of related dependencies. A job stream can have one or more start steps, one or more end steps, and contain parallel execution branches. Each job stream has an identifier used to reference the job stream.
The job stream step invokes a command line utility or executes a BODS job. Each job stream contains job stream steps that also have unique identifiers.
After importing the out-of-box job stream file (upstream.xml), ABC:
• Creates the execution ready batch.
• Compiles a list of parallel and sequential execution job steps that are ready to run.
• Launches each job step that is ready for execution.
• Monitors job step dependencies by verifying the successful execution of each step before a dependent step begins.
• Stops any running step that exceeds its maximum execution time and sets its status to Max_Execution_Time_Exceeded.
• Finds all steps that block the stream execution and reports them.
• Retries any step that terminates with an error but has not exceeded the maximum number of retries.
ABC Utilities
Although BODS runs the jobs that extract, transform, and load data, ABC manages the actual launch, execution, and sequencing of the steps in these jobs. If you run jobs using BODS only, there can be conflicts, sequence errors, and data corruption. Run-time statistics will be lost.
The data warehouse provides the out-of-box file (upstream.xml) that contains the required job steps. The primary ABC tasks are to launch ETL batch jobs at regularly scheduled intervals and ensure that the individual job steps run as soon as they are ready. There are four ABC utilities that govern this process:
• dw_abc_load_batch
• dw_abc_batch_control
• dw_abc_run_steps
• dw_abc_retry_steps
Read the following sections for a description of each utility.
26 Chapter : Audit, Balance, and Control

Figure 5 Process overview
dw_abc_load_batch
The dw_abc_load_batch utility loads the executable jobs identified in the catalog file (upstream.xml). You can run this utility manually at the command line, or create a Windows scheduled task to run at scheduled intervals.
Batch job streams can run concurrently if each job stream is independent of other job streams; however, if two concurrent batch jobs invoke the same job stream, they cannot run successfully. If the dw_abc_load_batch utility successfully loads a batch job, as long as that batch job is running, any attempt to load a second instance of the same batch job will fail. Running the out-of-box upstream.xml job stream in overlapping batches produces errors.
For more information, see How Do I Load a Batch Job? on page 58. For more information about the command line syntax options, see dw_abc_load_batch on page 129.
dw_abc_batch_control
The dw_abc_batch_control utility enables you to:
• Suspend an active batch job stream
• Resume a suspended batch job stream
• Abort a running batch job stream
For more information, see How Do I Start and Stop Batch Jobs? on page 60. For more information about the command line syntax options, see dw_abc_batch_control on page 124.
dw_abc_run_steps
The dw_abc_run_steps utility is the ABC engine. You can run this utility manually at the command line, but HP recommends that you create a Windows scheduled task to run at scheduled intervals.
27

The ABC engine verifies the successful execution of each step before a dependent step begins. It also compiles a list of parallel and sequential execution steps that are ready to run, then launches each step that is ready for execution. The ABC engine:
• Determines which steps are ready to run and starts them.
• Creates processes for each step in a batch job stream.
• Reports execution state for each process, then updates a final execution status for the batch.
• Sets a status of Max_Execution_Time_Exceeded if a step exceeds its maximum execution time.
• If Max_Execution_Time_Exceeded occurs, stops job step execution.
• Finds all steps that are blocking the execution of a job stream and reports them.
• Retries any step that terminates with an error and has not exceeded the specified maximum number of retries.
You can specify a maximum number of retries when an error occurs, and a maximum execution time for each step in the job stream definition file. Because they are optional parameters, they have default values of no retries and unlimited execution time.
For more information, see How Do I Run Job Steps? on page 59. For more information about the command line syntax options, see dw_abc_run_steps on page 131.
dw_abc_retry_step
The dw_abc_retry_step utility re-starts a job step. When you specify a maximum number of retries, the ABC engine blocks the job stream when that number is exceeded.
For more information, see How Do I Restart a Job Step? on page 59. For more information about the command line syntax options, see dw_abc_retry_step on page 130.
Tracking Reports
ABC reports monitor the batch jobs as they run. These reports display execution status, start and end times, error message information, and batch states. You can monitor jobs over time and use the reports to evaluate trends, workload variations, or compare operational data. For more information, see Data Warehouse Reports on page 69.
Scheduling
Although you can load batch job streams and run job steps manually, you should automate the scheduling process on a production system. The ABC engine should run every few minutes, depending on how long ETL job steps take to complete. You should schedule a complete ETL batch job to extract new or updated data from external data sources once or twice each day. The job steps within the ETL batch job should run as soon as they are ready.
Both dw_abc_run_steps and dw_abc_load_batch have syntax options that enable you to register a recurring job as a Windows scheduled task. For more information, see Step 2: Create a Windows Scheduled Task on page 55.
28 Chapter : Audit, Balance, and Control

Out-of-Box Files
The data warehouse provides all the tools, workflows, and related supporting files to run an end-to-end ETL process for each supported data source.
29

30 Chapter : Audit, Balance, and Control

4 Initialization and ETL
After you complete the installation, understand the basic data warehouse structure, and the ABC processes, you can synchronize the source databases with the data warehouse. Thereafter, the first ETL run verifies that you have a smooth extraction process configured. The required steps to run the first successful ETL are:
• Task 1: Modify the View Script (PPM Only) on page 32.
• Task 2: Create the Source Data Views on page 32.
• Task 3: Customize the Data to Match the XREF Views on page 33.
• Task 4: Load the XREF Views on page 35.
• Task 5: Create Directories for External Data Sources on page 35.
• Task 6: Configure the Reference Views on page 37.
• Task 7: Edit the External Data Source Spreadsheets on page 38.
• Task 8: Set Consolidation Priorities on page 54.
• Task 9: Run Initial Sync on page 55.
• Task 10: Check the Status of the ETL Job Steps on page 56.
31

Task 1: Modify the View Script (PPM Only)
Complete this task if you use Project and Portfolio Management (PPM) as a data source and your user name (dbUser in dataSources.xml) is different than the schema name that you want to create the views for. The view creation script is generated using the PPM user name in place of the schema name. Therefore, if the user name differs from the schema name, you must change the script to replace the user name with the schema name. If your data source is only Asset Manager, skip to Task 2.
To modify the view script
1 Navigate to this directory:
C:\Program Files\HP\IT Analytics 2.00\Foundation\generated\sql\interface
2 Open the CreateInterfaces_PPMxxx-PPMVIEW_DS-oracle.sql script.
For PPM 7.50: CreateInterfaces_PPM7.5-PPMVIEW_DS-oracle.sql script.
For PPM 8.00: CreateInterfaces_PPM8.0-PPMVIEW_DS-oracle.sql script.
3 Search for the login user name and replace it with the schema name. For example, if your PPM user name is PPM75 and the schema name is PPM, replace PPM75 with PPM.
To update the datastore connection in BODS Designer
1 From the Windows Start menu, click All Programs > BusinessObjects Enterprise XI 3.1 > BusinessObjects Data Services > Data Services Designer.
2 Login with the server, database, and authentication information.
3 In the Local Object Library section in the lower left pane, select Datastores.
4 Right-click the PPMVIEW_DS datastore.
5 Click Edit.
6 Click Advanced.
7 Click Edit.
8 Under Aliases > PPMVIEW_ALIAS, change the user name to the schema name. For example: replace PPM_USERNAME with PPM_SCHEMANAME.
9 Click Apply.
10 Click OK.
11 Click OK again.
Task 2: Create the Source Data Views
The IT Analytics installation creates a directory of SQL scripts that you can run to create views for each of your identified source databases. These views contain the key data that you will extract during ETL runs and use to populate analytics.
To create the source data views
1 Navigate to this directory:
C:\Program Files\HP\IT Analytics 2.00\Foundation\generated\sql\interface
32 Chapter : Initialization and ETL

2 Verify that you have administrative access to the remote data sources, or identify the database administrator for each data source who can run SQL scripts for you.
3 For each data source, run the applicable script:
a On the server that hosts the source data, use the appropriate RDBMS client to import the script or scripts in C:\Program Files\HP\IT Analytics 2.00\Foundation\generated\sql\interface:
– For PPM 7.50, run CreateInterfaces_PPM7.5-PPMVIEW_DS-oracle.sql
– For PPM 8.00, run CreateInterfaces_PPM8.0-PPMVIEW_DS-oracle.sql
– For AM 5.10 or AM 5.20, run CreateInterfaces_AM5.1-AMVIEW_DS-mssql.sql
b Verify that the script runs successfully. Look for the appropriate RDBMS message. If an error occurs, you must troubleshoot the error, and re-run the script successfully.
Task 3: Customize the Data to Match the XREF Views
In this task, you must add more information to fields in the external data source spreadsheets.
Budgetline Data
The Budgetline data to be consolidated from Asset Manager and Project and Portfolio Management cannot merge until you add more information to the Budget Category Names in the Cost Category external source spreadsheet.
In Asset Manager, Budgetline information is in two columns:
• amBudget.Name
• amBudgetCategory.Name
In Project and Portfolio Management 7.50, Budgetline information is in three columns:
• KCST_BUDGETS.BUDGET_NAME
• KCST_BUDGET_LINES.EXPENSE_TYPE_CODE
• KCST_BUDGET_LINES.CATEGORY_CODE
In Project and Portfolio Management 8.00, Budgetline information is in three columns:
• FM_FINANCIAL_SUMMARY. NAME
• FM_FORECAST_ACTUAL_LINES.EXPENSE_TYPE_CODE
• FM_FORECAST_ACTUAL_LINES.CATEGORY_CODE
Because the structure of Budgetline data differs in the two source systems, you must modify the structure of the Budegetline data in Asset Manager to consolidate it with Budgetline data in Project and Portfolio Management. The Budget Category Names in Asset Manager must include the following information:
• Capex/Opex indicator (CAPITAL or OPERATING)
Since AM 5.10 and AM 5.20 use the same source model, they also use the same view script.
33

• Category Code
For example, CAPITAL CONTRACTOR or OPERATING EMPLOYEE.
Expense Line Data
The Expense Line data to be consolidated in Asset Manager with Expense Line data in Project and Portfolio Management cannot merge until you add information to the Expense Line records from Asset Manager.
In Asset Manager, Expense Line information is in two columns:
• amExpenseLine.Title
• amExpenseLine.dBilling
In Project and Portfolio Management 7.50, Expense Line information is in five columns:
• KCRT_FG_PFM_PROJECT.PRJ_PROJECT_ID or KCRT_FG_PFM_ASSET.REQUEST_ID
• KCST_BUDGET_LINES.CATEGORY_CODE
• KCST_BUDGET_LINES.EXPENSE_TYPE_CODE
• KCST_BUDGET_LINES.LABOR_TYPE_CODE
• KCST_BUDGET_PERIOD_SUM.PERIOD_ID (KNTA_PERIODS.START_DATE)
In Project and Portfolio Management 8.00, Expense Line information is in five columns:
• KCRT_FG_PFM_PROJECT.PRJ_PROJECT_ID or KCRT_FG_PFM_ASSET.REQUEST_ID
• FM_FORECAST_ACTUAL_LINES.CATEGORY_CODE
• FM_FORECAST_ACTUAL_LINES.EXPENSE_TYPE_CODE
• FM_FORECAST_ACTUAL_LINES.LABOR_TYPE_CODE
• FM_FINANCIAL_LINE_CELLS.PERIOD_ID (PPM_FISCAL_PERIODS.START_DATE)
Because the structure of Expense Line data differs in the two source systems, you must modify the structure of the Expense Line data in Asset Manager to consolidate it with Expense Line data in Project and Portfolio Management. The Title for Expense Line records in Asset Manager must include the following:
• Project or Asset ID for the expense
• Category Code
• Capex/Opex indicator (- CAPEX or - OPEX)
• Labor/non-labor indicator (LABOR or NON-LABOR)
For example:
30514 Software - CAPEX NON-LABOR or 30514 Employee - OPEX LABOR.
34 Chapter : Initialization and ETL

Task 4: Load the XREF Views
The installation creates a directory of SQL scripts that create XREF views. These views expose appropriate information in the source databases that enable the ETL process to cross-reference an entity in one data source to a corresponding entity in another data source. For example, you may want to link a project identifier from Asset Manager with a project identifier from Project and Portfolio Management.
To create the XREF views
1 Navigate to this directory:
C:\Program Files\HP\IT Analytics 2.00\ContentPacks\Core\custom\schema\creation\CrossReference
2 Verify that you have administrative access to the remote data sources, or identify the database administrator for each data source who can run SQL scripts for you.
3 For each data source, do the following:
a On the server that hosts the source data, use the appropriate RDBMS client to import the scripts in this folder:
C:\Program Files\HP\IT Analytics 2.00\ContentPacks\Core\custom\schema\creation\CrossReference
b Verify that each script runs successfully. Look for the appropriate RDBMS message. If an error occurs, you must troubleshoot the error, and re-run the script successfully.
Task 5: Create Directories for External Data Sources
The installation folders contain Microsoft Excel spreadsheets that serve as external data sources. The content of these flat files is simple, but important, to the ETL workflow. You must stage these files in directories with names that are internally defined in the ETL workflow.
The following entities use external source information that you provide in Microsoft Excel spreadsheets.
• Application
• Budget
• Cost Category
• Currency
• Exchange
• IT Function
• Period
• Program
The spreadsheets have an out-of-box format that is not customizable. After editing the content, that data can be consolidated manually. The external source data in these spreadsheets is usually static. For example, currency and cost category information are good candidates for external source data.
35

The information that you must provide depends on the attributes of the consolidation model. In some cases, null values are not acceptable. In other cases, they are optional. This information is not necessarily unique because other sources can map to the same target.
To create the required directories
1 Use Windows Explorer to create these folders. The folder names must match, and be in upper case. Create them at the C:\ root.
— C:\ETL_EXTRACTIONS
— C:\ETL_EXTRACTIONS\AM
— C:\ETL_EXTRACTIONS\PPM
— C:\ETL_EXTRACTIONS\EXTERNAL
2 Navigate to C:\Program Files\HP\IT Analytics 2.00\ContentPacks\Core\ETL\flatfiles\spreadsheets. Copy and paste these files to C:\ETL_EXTRACTIONS\EXTERNAL:
— ConsolidatedXREF.xls
— CURRENCY.xls
— EXCHANGE.xls
— SourceAttrConsPriorityXREF.xls
— SourceConsPriorityXREF.xls
— SourceSysInstanceXREF.xls
3 Navigate to C:\Program Files\HP\IT Analytics 2.00\ContentPacks\FPA\ETL\flatfiles\spreadsheets. Copy and paste these files to C:\ETL_EXTRACTIONS\EXTERNAL:
— Application.xls
— ITFUNCTIONS.xls
— PROGRAMS.xls
4 Create a PERIOD.xls file in the C:\ETL_EXTRACTIONS\EXTERNAL folder:
• If you use one data source, copy PERIOD.xls from the appropriate directory and paste it in the C:\ETL_EXTRACTIONS\EXTERNAL folder:
— Asset Manager 5.10 or 5.20: C:\Program Files\HP\IT Analytics 2.00\ContentPacks\Core\ETL\flatfiles\AM\5.1\PERIOD.xls
— Project and Portfolio Management 7.50: C:\Program Files\HP\IT Analytics 2.00\ContentPacks\Core\ETL\flatfiles\PPM\7.5\PERIOD.xls
— Project and Portfolio Management 8.00: C:\Program Files\HP\IT Analytics 2.00\ContentPacks\Core\ETL\flatfiles\PPM\8.0\PERIOD.xls
• If you have Asset Manager and Project and Portfolio Management configured, you must merge the data from the appropriate spreadsheets into one PERIOD.xls file that you copy to the C:\ETL_EXTRACTIONS\EXTERNAL folder.
The data warehouse expects these paths and directories to exist. If you choose a different location for the required directories, see the additional instructions in How Do I Change the Location of External Source Files? on page 64.
36 Chapter : Initialization and ETL

For example, if you are using AM 5.20 and PPM 8.00 and you want to consolidate Periods, open PERIOD.xls for AM 5.20 and PERIOD.xls for PPM 8.00. Copy all of the rows in the PPM 8.00 spreadsheet except for the header and dummy rows, then paste the rows into the Period spreadsheet for AM 5.20. Place a copy of this merged spreadsheet in C:\ETL_EXTRACTIONS\EXTERNAL.
5 Create Budget.xls and CostCategory.xls files in the C:\ETL_EXTRACTIONS\EXTERNAL folder:
• If you use one data source, copy Budget.xls and CostCategory.xls from the appropriate directory and paste the files in the C:\ETL_EXTRACTIONS\EXTERNAL folder:
— Asset Manager 5.10 or 5.20: C:\Program Files\HP\IT Analytics 2.00\ContentPacks\FPA\ETL\flatfiles\AM\5.1\Budget.xls and CostCategory.xls
— Project and Portfolio Management 7.50: C:\Program Files\HP\IT Analytics 2.00\ContentPacks\FPA\ETL\flatfiles\PPM\7.5\Budget.xls and CostCategory.xls
— Project and Portfolio Management 8.00: C:\Program Files\HP\IT Analytics 2.00\ContentPacks\FPA\ETL\flatfiles\PPM\8.0\Budget.xls and CostCategory.xls
• If you have Asset Manager and Project and Portfolio Management configured, you must merge the data from the appropriate spreadsheets into one Budget.xls file and one CostCategory.xls file that you copy to the C:\ETL_EXTRACTIONS\EXTERNAL folder.
For example, if you are using AM 5.20 and PPM 8.00 and you want to consolidate Budgets, open Budget.xls for AM 5.20 and Budget.xls for PPM 8.00. Copy all of the rows in the PPM 8.00 spreadsheet except for the header and dummy rows, then paste the rows into the Budget spreadsheet for AM 5.20. Place a copy of this merged spreadsheet in C:\ETL_EXTRACTIONS\EXTERNAL.
Task 6: Configure the Reference Views
Complete this task only if you selected multiple external data sources during the installation process. You must assign the appropriate reference views (*_REF_V) for each consolidated entity because the out-of-box configuration assumes that you have two external data sources.
To configure the reference views
1 If the xref.properties file is not already open, navigate to this directory:
C:\Program Files\HP\IT Analytics 2.00\ContentPacks\Core\conf
2 Open the xref.properties file with a text editor.
3 Locate the properties section that describes the reference views for each consolidated entity. This section looks like this:
PERSON=AM_AMPERSON_REF_V,PPM_KNTA_USERS_REF_VLOCATION=AM_AMLOCATION_REF_V,PPM_KNTA_REGIONS_REF_VORG=AM_AMORG_REF_V,PPM_KRSC_ORG_UNITS_REF_VPROJECT=AM_AMPROJECT_REF_V,PPM_PM_PROJECTS_REF_VBUDGETLINE=AM_AMBUDGLINE_REF_V,PPM_KCST_BUDGET_LINES_REF_VACTUALCOST=AM_AMEXPENSELINE_REF_V,PPM_ACTUALCOST_REF_V
37

4 Copy this section and paste it below the original section.
5 Insert a comment character (#) at the beginning of each original line.
#PERSON=AM_AMPERSON_REF_V,PPM_KNTA_USERS_REF_V#LOCATION=AM_AMLOCATION_REF_V,PPM_KNTA_REGIONS_REF_V#ORG=AM_AMORG_REF_V,PPM_KRSC_ORG_UNITS_REF_V#PROJECT=AM_AMPROJECT_REF_V,PPM_PM_PROJECTS_REF_V#BUDGETLINE=AM_AMBUDGLINE_REF_V,PPM_KCST_BUDGET_LINES_REF_V#ACTUALCOST=AM_AMEXPENSELINE_REF_V,PPM_ACTUALCOST_REF_V
6 In the new pasted section, remove all references to the data source that you are not using. Keep only the references to the data source specified during installation. For example, if your source data is from Asset Manager, the section would look like this:
PERSON=AM_AMPERSON_REF_VLOCATION=AM_AMLOCATION_REF_VORG=AM_AMORG_REF_VPROJECT=AM_AMPROJECT_REF_VBUDGETLINE=AM_AMBUDGLINE_REF_VACTUALCOST=AM_AMEXPENSELINE_REF_V
If your source data is from Project and Portfolio Management, the section would look like this:
PERSON=PPM_KNTA_USERS_REF_VLOCATION=PPM_KNTA_REGIONS_REF_VORG=PPM_KRSC_ORG_UNITS_REF_VPROJECT=PPM_PM_PROJECTS_REF_VBUDGETLINE=PPM_KCST_BUDGET_LINES_REF_VACTUALCOST=PPM_ACTUALCOST_REF_V
7 Save and close the file.
Task 7: Edit the External Data Source Spreadsheets
HP recommends that you adhere to these rules for editing the external data source spreadsheets. In general, do not change the format of the spreadsheet. The edit process is only to add content to the out-of-box spreadsheets.
• Do not change the name of the file. The internal ETL process expects specific file names. User-defined file names are not supported.
• Do not add tabs or change the name of the Data tab in the out-of-box spreadsheet. The ETL process looks at the Data tab for the input data.
• Do not remove the header row. In addition, if the spreadsheet has a dummy row under the header row, do not edit or delete the dummy record. This record tells the ETL process what data type to use when processing the column.
• Do not add or remove columns.
• After pasting data into a spreadsheet from other applications, check the spreadsheet for incorrect formatting changes such as reformatted dates. If necessary, select all rows in a column except the header row, then set the cells to the appropriate format for the column.
• For each spreadsheet, be aware of what columns to use for consolidating records across applications. To treat two records from different sources as identical in the data warehouse, make sure that the consolidation columns have identical data, including
38 Chapter : Initialization and ETL

capitalization and format. For example, if a budget in Asset Manager and a budget in Project and Portfolio Management refer to the same real world budget, consolidate them in the data warehouse using the TGT_BUDGET_NAME column in the Budget spreadsheet.
• While multiple source records may map to one consolidated record, one source record MAY NOT map to multiple consolidated records.
• To avoid errors during ETL processing, make sure all of the spreadsheets are closed before ETL runs.
To edit the external data sources, navigate to the EXTERNAL directory created in Task 5: Create Directories for External Data Sources on page 35. Capture the required data that exists in an external application and record it in each related spreadsheet adhering to the guidelines in the following sections.
Updates
If the external source data changes, you must re-edit the affected spreadsheet to add or change the data. For example, currency exchange rate information can change at any time. New cost categories or any other changes in the source data that impacts the expected results requires updates to the Microsoft Excel spreadsheets.
APPLICATIONS.XLS
Applications are large scale software implementations that incur costs and generate dependencies. IT Analytics uses application information in allocation scenarios.
There is no source data about applications in Asset Manager or Project and Portfolio Management. You must enter the APPLICATION_NAME and optional APPLICATION_NAME_ALT manually. For example, if you have an enterprise installation of SAP software, maintenance of the application would incur costs and generate dependencies. In this example, the APPLICATION_NAME would be SAP Business Suite and the APPLICATION_NAME_ALT might be SAP.
Example
Table 3 APPLICATION.XLS columns
Consolidation Columns
APPLICATION_NAME APPLICATION_NAME_ALT
Unique name Alternate name (if any)
Required Optional
Table 4 APPLICATIONS.XLS Spreadsheet Example
Consolidation Columns
APPLICATION_NAME APPLICATION_NAME_ALT
Application name 1 Optional
Application name 2 Optional
39
Budget.xls
Budgets are high-level containers in source applications for planned costs. Budget data is in the amBudget table in Asset Manager and in the KCST_BUDGETS table in Project and Portfolio Management.
To edit the Budget spreadsheet
1 Open the Budget.xls spreadsheet.
2 Delete all rows except the header row.
For Asset Manager:
3 From the Windows Start menu, start the SQL Server client.
4 Run the following query against the Asset Manager source database to return the information that you need to populate the spreadsheet columns.
SelectlBudgId as SRC_PRIMARY_KEY,'AM' as SRC_APP,Name as SRC_BUDGET_NAME, Name as TGT_BUDGET_NAMEfrom itam.amBudget where lBudgId > 0
5 Paste the results into the appropriate columns in the spreadsheet.
For Project and Portfolio Management:
6 From the Windows Start menu, start the Oracle client.
7 Run the following query against the Project and Portfolio Management source database to return the information that you need to populate the spreadsheet columns.
For PPM 7.50:
Select BUDGET_ID as SRC_PRIMARY_KEY, 'PPM' as SRC_APP, BUDGET_NAME asSRC_BUDGET_NAME, BUDGET_NAME as TGT_BUDGET_NAME from PPM75.KCST_BUDGETS;
Table 5 Budget.xls Column Description
Source Data Consolidation Columns
SRC_PRIMARY_KEY SRC_APP
SRC_BUDGET_NAME
TGT_BUDGET_NAME
BUDGET_NAME_ALT
The unique key generated by the source application
The short name of the specific application (AM or PPM)
The descriptive name used in the source application
Unique name. Make sure the names for consolidated records match exactly. The column is case-sensitive.
Alternate name
Required Required Required Required Optional
40 Chapter : Initialization and ETL

For PPM 8.00:
Select FINANCIAL_SUMMARY_ID as SRC_PRIMARY_KEY, 'PPM' as SRC_APP, NAME asSRC_BUDGET_NAME, NAME as TGT_BUDGET_NAME from PPM8.FM_FINANCIAL_SUMMARYWHERE(PARENT_ENTITY_ID IN (526) AND ENTITY_TYPE IN ('FS'))OR (PARENT_ENTITY_ID IN (526) AND ENTITY_TYPE IN ('SNAPSHOT' ) AND PLAN_OF_RECORD_FLAG IN ('Y'))
8 Paste the results into the appropriate columns in the spreadsheet.
For all sources:
9 Enter the consolidation information as required. If you find multiple entries that refer to the same item, enter identical values in the consolidation columns for both entries to ensure proper mapping.
10 Save and close the spreadsheet.
Example
The queries return two records from Asset Manager and one record from Project and Portfolio Management.
After analysis, you might decide that the R&D 2009 budget information from the Asset Manager data source, and the Development 2009 budget information from the Project and Portfolio Management data source are the same budget information. You can keep the unique source information for both, but by filling in identical values in the consolidation columns of the spreadsheet the data is not duplicated, but used correctly.
Table 6 Budget Source Data Example
SRC_PRIMARY_KEY SRC_APP SRC_BUDGET_NAME
1001 AM Sales 2009
1002 AM R&D 2009
9999 PPM Development 2009
Table 7 Budget.xls Spreadsheet Example
Source Data Consolidation Columns
SRC_PRIMARY_KEY SRC_APP
SRC_BUDGET_NAME
TGT_BUDGET_NAME
BUDGET_NAME_ALT
1001 AM Sales 2009 Sales 2009 Optional
1002 AM R&D 2009 Development 2009 R&D 2009
9999 PPM Development 2009 Development 2009 R&D 2009
41

CostCategory.xls
Cost Categories describe and sort planned and actual costs. Cost Category data is in the amCostCategory table in Asset Manager and in the KNTA_LOOKUPS table in Project and Portfolio Management.
To edit the CostCategory spreadsheet
1 Open the CostCategory.xls spreadsheet.
2 Delete all rows except the header row and row 2, a dummy record that provides a workaround for a BODS defect.
For Asset Manager:
3 From the Windows Start menu, start the SQL Server client.
4 Run the following query against the Asset Manager source database to return the information that you need to populate the spreadsheet columns.
Select lBudgCatId as SRC_PRIMARY_KEY, 'AM_BudgetCat' as SRC_APP, Code asSRC_COSTCATEGORY_NAME, Code as TGT_COSTCATEGORY_NAME , Name as TGT_COSTCATEGORY_NAME_ALTfromitam.amBudgetCategory where lBudgCatId > 0UNIONSelect lCostCatId as SRC_PRIMARY_KEY, 'AM_CostCat' as SRC_APP, Name asSRC_COSTCATEGORY_NAME, Name as TGT_COSTCATEGORY_NAME, Name as TGT_COSTCATEGORY_NAME_ALTfromitam.amCostCategory where lCostCatId > 0
5 Paste the results into the appropriate columns in the spreadsheet.
For Project and Portfolio Management:
6 From the Windows Start menu, start the Oracle client.
7 Run the following query against the Project and Portfolio Management source database to return the information that you need to populate the spreadsheet columns.
For PPM 7.50 or PPM 8.00:
Table 8 CostCategory.xls Column Explanations
Source Data Consolidation Columns
SRC_PRIMARY_KEY SRC_APP
SRC_COSTCATEGORY_NAME
TGT_COSTCATEGORY_NAME
COSTCATEGORY_NAME_ALT
ACCOUNTING_CODE
The unique key generated by the source application
The short name of the specific application (AM or PPM)
The descriptive name used in the source application
Unique name. Make sure the names for consolidated records match exactly. The column is case-sensitive.
Alternative name
Special code (Chart of accounts or billing code)
Required Required Required Required Optional Optional
42 Chapter : Initialization and ETL

Select LOOKUP_TYPE || '|' || LOOKUP_CODE as SRC_PRIMARY_KEY, 'PPM' asSRC_APP, MEANING as SRC_COSTCATEGORY_NAME, MEANING asTGT_COSTCATEGORY_NAME from PPM75.KNTA_LOOKUPS whereLOOKUP_TYPE = 'BUDGET_LABOR_CATEGORY' or LOOKUP_TYPE ='BUDGET_NON_LABOR_CATEGORY'
8 Paste the results into the appropriate columns in the spreadsheet.
For all sources:
9 Enter the consolidation information as required. If you find multiple entries that refer to the same item, enter identical values in the consolidation columns for both entries to ensure proper mapping.
10 Save and close the spreadsheet.
Example
The queries return two records from Asset Manager and one record from Project and Portfolio Management.
Analysis shows that all three items refer to the same category. To preserve the unique source information for each, specify identical values in the consolidation columns.
Table 9 CostCategory Source Data Example
SRC_PRIMARY_KEY SRC_APP SRC_COSTCATEGORY_NAME
1001 AM_CostCat Travel
1002 AM_BudgetCat Travel
9999 PPM Business Travel
Table 10 CostCategory.xls Example
Source Data Consolidation Columns
SRC_PRIMARY_KEY
SRC_APP
SRC_COSTCATEGORY_NAME
TGT_COSTCATEGORY_NAME
COSTCATEGORY_NAME_ALT
ACCOUNTING_CODE
1001 AM_CostCat
Travel Travel Business Travel Optional
1002 AM_BudgetCat
Travel Travel Business Travel Optional
9999 PPM Business Travel
Travel Business Travel Optional
43

CURRENCY.xls
CURRENCY describes all supported national currencies used for display and conversion.
To edit the CURRENCY spreadsheet
1 Open the CURRENCY.xls spreadsheet.
For Asset Manager:
2 From the Windows Start menu, start the SQL Server client.
3 Run the following query against the Asset Manager source database to return a list of the International Organization for Standardization (ISO) codes that are used by all existing costs.
SELECT DebitCur AS CURRENCY_CODEFROM amExpenseLineWHERE DebitCur IS NOT NULL)UNIONSELECT BudgetCur AS CURRENCY_CODEFROM amBudgLineWHERE (BudgetCur IS NOT NULL)
4 Make note of the ISO codes that the query returns.
For Project and Portfolio Management:
5 From the Windows Start menu, start the Oracle client.
6 Run the following query against the Project and Portfolio Management source database to return a list of the ISO codes that are used by all existing costs.
(select KCST_CURRENCIES.CURRENCY_CODE from KCST_CURRENCY_CELLS inner join KCST_CURRENCIES on KCST_CURRENCIES.CURRENCY_ID = KCST_CURRENCY_CELLS.LOCAL_CURRENCY_ID)
UNION
(select KCST_CURRENCIES.CURRENCY_CODE from KCST_CURRENCY_LINES inner join KCST_CURRENCIES on KCST_CURRENCIES.CURRENCY_ID = KCST_CURRENCY_LINES.LOCAL_CURRENCY_ID)
7 Make note of the ISO codes that the query returns.
Table 11 CURRENCY.xls Column Explanations
Consolidation Columns
PK_CURRENCY_ID
CURRENCY_CODE
CURRENCY_NAME
CURRENCY_PRECISION
CURRENCY_SYMBOL
FLAG_SYMBOL_FIRST
FLAG_BASE_CURR
A unique number for this record
Three-letter ISO currency code
Descriptive name of the currency, such as US Dollar or Euro
Number of displayed decimal positions
Symbol to display with the amount
Y or N Choose Y to display the symbol left of the amount ($100)
Y or NChoose Y only once to assign a base currency
Required Required Required Required Required Required Required
44 Chapter : Initialization and ETL

For all sources:
8 Make sure all of the currencies returned by the above queries are listed in CURRENCY.XLS. Manually add rows for any unnamed currencies. Although you might not use all the listed currencies, do not delete them.
9 Select the currency that will be the base currency in the data warehouse. The data warehouse saves all costs in the original source currency and in the base currency. Type Y in the FLAG_BASE_CURR column only for the designated base currency. Type N in all other columns. Only one row must be marked Y in this column.
10 Save and close the spreadsheet.
EXCHANGE.xls
EXCHANGE describes the monetary exchange rates during a specified period of time. These rates can be actual or projected values.
Projected records (IS_CURRENT=N) may extend into the future. Actual records (IS_CURRENT=Y) are not processed beyond the current day.
To edit the EXCHANGE spreadsheet
1 Verify that the steps described in CURRENCY.xls on page 44 are complete.
2 Open the EXCHANGE.xls spreadsheet.
For Asset Manager:
3 From the Windows Start menu, start the SQL Server client.
4 Run the following query against the Asset Manager source database to return the date range than needs to be covered by your exchange rate table.
SELECT MIN(dBilling) AS MIN_DATE, MAX(dBilling) AS MAX_DATEFROM amExpenseLineUNIONSELECT MIN(amPeriod.dStart) AS MIN_DATE, MAX(amPeriod.dEnd)AS MAX_DATEFROM amBudgLine INNER JOIN amPeriodON amBudgLine.lPeriodId = amPeriod.lPeriodId
5 Make note of the dates that the query returns.
Do not delete any of the currencies listed in CURRENCY.XLS. The out-of-box currencies must remain in the spreadsheet.
Table 12 EXCHANGE.xls Column Explanations
Consolidation Columns
CURRENCY_CODE DATE_START DATE_END XXX_MULTIPLIER IS_CURRENT
Three-letter ISO currency code
Date and time the exchange rate begins
Date and time the exchange rate ends
where XXX is a target currency and the multiplier is the value to use when converting this currency to XXX
Y or N where Y specifies a real exchange rate (actual cost) and N specifies a projected rate (planned cost)
Required Required Required Required Required
45

For Project and Portfolio Management:
6 From the Windows Start menu, start the Oracle client.
7 Run the following query against the Project and Portfolio Management source database to return the date range than needs to be covered by your exchange rate table.
select min(K1.START_DATE) as MIN_DATE, max(K2.END_DATE) as MAX_DATE from KCST_BUDGETS inner join KNTA_PERIODS k1 on KCST_BUDGETS.START_PERIOD_ID = K1.PERIOD_ID inner join KNTA_PERIODS k2 on KCST_BUDGETS.END_PERIOD_ID = K2.PERIOD_ID
8 Make note of the dates that the query returns.
For all sources:
9 Following these guidelines, add exchange rates to the spreadsheet:
Exchange rates can be updated through a subscription service provided by a number of financial sites. You can find a daily grid at Oanda.com:
http://www.oanda.com/cgi/crossrate/crossrateresult.shtml?quotes=BRL"es=CAD"es=CHF"es=CNY"es=DKK"es=EUR"es=GBP"es=JPY"es=KRW"es=NOK"es=PLN"es=RUB"es=SEK"es=USD&go=Get+my+Table
The URL produces a grid for the current day only. To find exchange rates for past days, refer to this site:
http://www.oanda.com/convert/fxhistory
— You can delete and replace the existing exchange rates or append new exchange rates to the ones shipped in the spreadsheet.
— Make sure all dates are covered for any currencies you use. Do not overlap the date ranges for a single currency.
— Include both a projected and actual exchange rate for each currency, covering all time between the dates returned above.
— You must enter rates for the earliest cost date in your data source up to current cost date, then continue to refresh the rates in the spreadsheet according to the schedule you have decided on.
— Do not delete any columns.
10 Save and close the spreadsheet.
Example
The previous queries give the following information:
• The CURRENCY spreadsheet shows that applications have data in three currencies: CAD, EUR, and USD.
During the ETL process, IT Analytics will add to EXCHANGE_DIM only the exchange rates for dates later than those currently in the table. For example, if the Exchange table contains exchange rates from 1/1/2008 to 12/31/2008, and you attempt to add an exchange rate for 9/1/2008, it will be rejected. Therefore, if you add a new currency to the system, you cannot backfill exchange rates for that currency. You can only add exchange rates going forward.
46 Chapter : Initialization and ETL

• The queries against cost data showed that cost data exists for the period of January through December of 2008).
• The exchange rate table updates monthly, or 12 times each year.
Using this information, it is possible to calculate the number of records needed:
Number of records = Number of currencies (3) x
Frequency of updates (12) x
2 (actual and projected exchange rates)
72 records = 3 x 12 x 2
The result of the computation shows that 72 records are required.
ITFUNCTIONS.xls
IT functional domains are high-level divisions of your IT operations that may be different from traditional divisions, such as departments or locations. IT Analytics uses functional domain information in allocation scenarios.
There is no source data about applications in Asset Manager or Project and Portfolio Management. You must enter the ITFUNCTION_NAME and optional ITFUNCTION_NAME_ALT manually. For example, if you have a business function like XXX, the group would incur costs and generate dependencies. In this example, the ITFUNCTION_NAME would be XXX and the ITFUNCTION_NAME_ALT might be SAP.
Table 13 EXCHANGE.xls Column Explanations
Consolidation Columns
CURRENCY_CODE
DATE_START
DATE_END
CAD_MULTIPLIER
EUR_MULTIPLIER
USD_MULTIPLIER
IS_CURRENT
CAD 01/01/2008 12:00:00 AM
01/31/3008 11:59:59 PM
1 1.3 1.2 Y
EUR 01/01/2008 12:00:00 AM
01/31/3008 11:59:59 PM
8 1 .9 Y
USD 1/01/2008 12:00:00 AM
01/31/3008 11:59:59 PM
.9 1.1 1 Y
CAD 01/01/2008 12:00:00 AM
01/31/3008 11:59:59 PM
1 1.5 1.2 N
EUR 01/01/2008 12:00:00 AM
01/31/3008 11:59:59 PM
.75 1 .8 N
USD 01/01/2008 12:00:00 AM
01/31/3008 11:59:59 PM
.9 1.25 1 N
Table 14 ITFUNCTIONS.xls columns
Consolidation Columns
ITFUNCTION_NAME ITFUNCTION_NAME_ALT
Unique name Alternate name (if any)
Required Optional
47

Example
PERIOD.xls
Periods are a fiscal re-definition of calendar intervals for the purpose of financial planning. A period might be four weeks, one calendar month, or some other defined span of time. Table 16 shows the Source and Consolidation columns in the PERIOD.xls spreadsheet.
To edit the PERIOD spreadsheet
1 Open the PERIOD.xls spreadsheet.
2 Delete all unnecessary rows. Do not edit or delete the first record in the spreadsheet. The ETL process requires the dummy record to run correctly.
For Asset Manager:
3 From the Windows Start menu, start the SQL Server client.
4 Run the following query against the Asset Manager source database to return the information that you need to populate the spreadsheet columns.
SelectCAST(p.lPeriodId as VARCHAR(10)) as SOURCE_PRIMARYKEY,'AM' as SOURCE_NAME,p.Name AS SOURCE_PERIOD_NAME,CASE WHEN Month(p.dStart) > 9 THEN 'FY' + y.Name + '/' + CAST(Month(p.dStart) as VARCHAR(2)) ELSE 'FY' + y.Name + '/0' + CAST(Month(p.dStart) as VARCHAR(1)) END AS PERIOD_NAME_TARGET,CASE WHEN Month(p.dStart) > 9 THEN 'FY' + y.Name + '/' + CAST(Month(p.dStart) as VARCHAR(2)) ELSE 'FY' + y.Name + '/0' + CAST(Month(p.dStart) as VARCHAR(1)) END AS QUALIFIED_FISCAL_PERIOD,CASE WHEN Month(p.dStart) in (1,2,3) then 'FY' + y.Name + '/Q1' WHEN Month(p.dStart) in (4,5,6) then 'FY' + y.Name + '/Q2' WHEN Month(p.dStart) in (7,8,9) then 'FY' + y.Name + '/Q3' ELSE 'FY' + y.Name + '/Q4' END AS QUALIFIED_FISCAL_QTR,'FY' + y.Name AS QUALIFIED_FISCAL_YEAR,CASE WHEN Month(p.dStart) > 9 THEN 'FY' + y.Name + '/' + CAST(Month(p.dStart) as VARCHAR(2)) ELSE 'FY' + y.Name + '/0' + CAST(Month(p.dStart) as VARCHAR(1)) END AS QUALIFIED_FISCAL_PERIOD_ALT,CASE
Table 15 APPLICATIONS.xls Spreadsheet Example
Consolidation Columns
ITFUNCTION_NAME ITFUNCTION_NAME_ALT
IT function name 1 Optional
IT function name 2 Optional
48 Chapter : Initialization and ETL

WHEN Month(p.dStart) in (1,2,3) then 'FY' + y.Name + '/Q1' WHEN Month(p.dStart) in (4,5,6) then 'FY' + y.Name + '/Q2' WHEN Month(p.dStart) in (7,8,9) then 'FY' + y.Name + '/Q3' ELSE 'FY' + y.Name + '/Q4' END AS QUALIFIED_FISCAL_QTR_ALT,'FY' + y.Name AS QUALIFIED_FISCAL_YEAR_ALT,CONVERT(VARCHAR(10), p.dStart, 101) as DATE_START,CONVERT(VARCHAR(10), DATEADD(dd, -1, DATEADD(mm, 1, p.dStart)), 101) as DATE_END,'Month' as PERIOD_TYPE,Month(p.dStart) as FISCAL_PERIOD_NUMERIC,CASEWHEN Month(p.dStart) in (1,2,3) then 1WHEN Month(p.dStart) in (4,5,6) then 2WHEN Month(p.dStart) in (7,8,9) then 3ELSE 4ENDas FISCAL_QTR_NUMERIC,y.Name as FISCAL_YEAR_NUMERICfrom itam.amPeriod p left join itam.amFYDivision d on p.lFYDivisionId = d.lFYDivId left join itam.amFinancialYear y on d.lFinYearId = y.lFinYearIdWHERE p.lPeriodId > 0order by y.Name, d.Name
49

5 Paste the results into the appropriate columns in the spreadsheet.
For Project and Portfolio Management:
6 From the Windows Start menu, start the Oracle client.
7 Run the following query against the Project and Portfolio Management source database to return the information that you need to populate the spreadsheet columns.
For PPM 7.50:
Select CAST(p.PERIOD_ID as VARCHAR(10)) as SOURCE_PRIMARYKEY, 'PPM' as SOURCE_NAME,p.PERIOD_FULL_NAME AS SOURCE_PERIOD_NAME,'FY' || TO_CHAR(p.START_DATE, 'YYYY/MM') AS PERIOD_NAME_TARGET,'FY' || TO_CHAR(p.START_DATE, 'YYYY/MM') AS QUALIFIED_FISCAL_PERIOD,'FY' || TO_CHAR(p.START_DATE, 'YYYY') || '/Q' || TO_CHAR(CEIL(TO_NUMBER(TO_CHAR(p.START_DATE, 'MM')) / 3)) AS QUALIFIED_FISCAL_QTR,'FY' || TO_CHAR(p.START_DATE, 'YYYY') AS QUALIFIED_FISCAL_YEAR,'FY' || TO_CHAR(p.START_DATE, 'YYYY/MM') AS QUALIFIED_FISCAL_PERIOD_ALT,
Table 16 PERIOD.XLS columns
Source Consolidation Columns
SO
UR
CE
_PR
IMA
RY
KE
Y
SO
UR
CE
_NA
ME
SO
UR
CE
_PE
RIO
D_N
AM
E
PE
RIO
D_N
AM
E_T
AR
GE
T
QU
AL
IFIE
D_F
ISC
AL
_PE
RIO
D
QU
AL
IFIE
D_F
ISC
AL
_QT
R
QU
AL
IFIE
D_F
ISC
AL
_YE
AR
QU
AL
IFIE
D_F
ISC
AL
_PE
RIO
D_A
LT
QU
AL
IFIE
D F
ISC
AL
_QT
R_A
LT
QU
AL
IFIE
D_F
ISC
AL
_YE
AR
_AL
T
DA
TE
_ST
AR
T
DA
TE
_EN
D
PE
RIO
D_T
YP
E
FIS
CA
L_P
ER
IOD
_NU
ME
RIC
FIS
CA
L_Q
TR
_NU
ME
RIC
FIS
CA
L_Y
EA
R_N
UM
ER
IC
Un
ique key from
the sou
rce application
Sh
ort nam
e of the A
pplication (A
M or P
PM
)
Descriptive n
ame as it appears in
the sou
rce application
Un
ique n
ame. M
ake sure th
e nam
es match
exactly. T
he colu
mn
is case-sensitive.
Un
ique n
ame. M
ake sure th
e values m
atch
exactly. Th
e colum
n is case-sen
sitive.
Period n
ame form
atted for display
Year nam
e formatted for display
Altern
ate period nam
e formatted for display
Altern
ate quarter n
ame
Altern
ate fiscal year
Calen
dar period start date. Make su
re the
dates are identical in
format an
d precision.
Calen
dar period end date. M
ake sure th
e dates are iden
tical in form
at and precision
.
Mon
th, Q
uarter, or Y
ear
Sequ
ential n
um
ber of the period (1–12)
Sequ
ential n
um
ber of the qu
arter (1–4)
Nu
mber of th
e year (nn
nn
)
Required
50 Chapter : Initialization and ETL

'FY' || TO_CHAR(p.START_DATE, 'YYYY') || '/Q' || TO_CHAR(CEIL(TO_NUMBER(TO_CHAR(p.START_DATE, 'MM')) / 3)) AS QUALIFIED_FISCAL_QTR_ALT,'FY' || TO_CHAR(p.START_DATE, 'YYYY') AS QUALIFIED_FISCAL_YEAR_ALT,TO_CHAR(p.START_DATE, 'MM/DD/YYYY') as DATE_START,TO_CHAR(p.END_DATE, 'MM/DD/YYYY') as DATE_END,'Month' as PERIOD_TYPE,TO_NUMBER(TO_CHAR(p.START_DATE, 'MM')) as FISCAL_PERIOD_NUMERIC,CEIL(TO_NUMBER(TO_CHAR(p.START_DATE, 'MM')) / 3) as FISCAL_QTR_NUMERIC,TO_NUMBER(TO_CHAR(p.START_DATE, 'YYYY')) as FISCAL_YEAR_NUMERICfrom PPM75.KNTA_PERIODS p where p.PERIOD_TYPE = 'FISCAL_MONTH'order by p.START_DATE
For PPM 8.00:
Select CAST(p.FISCAL_PERIOD_ID as VARCHAR(10)) as SOURCE_PRIMARYKEY, 'PPM' as SOURCE_NAME,p.LONG_NAME AS SOURCE_PERIOD_NAME,'FY' || TO_CHAR(p.START_DATE, 'YYYY/MM') AS PERIOD_NAME_TARGET,'FY' || TO_CHAR(p.START_DATE, 'YYYY/MM') AS QUALIFIED_FISCAL_PERIOD,'FY' || TO_CHAR(p.START_DATE, 'YYYY') || '/Q' || TO_CHAR(CEIL(TO_NUMBER(TO_CHAR(p.START_DATE, 'MM')) / 3)) AS QUALIFIED_FISCAL_QTR,'FY' || TO_CHAR(p.START_DATE, 'YYYY') AS QUALIFIED_FISCAL_YEAR,'FY' || TO_CHAR(p.START_DATE, 'YYYY/MM') AS QUALIFIED_FISCAL_PERIOD_ALT,'FY' || TO_CHAR(p.START_DATE, 'YYYY') || '/Q' || TO_CHAR(CEIL(TO_NUMBER(TO_CHAR(p.START_DATE, 'MM')) / 3)) AS QUALIFIED_FISCAL_QTR_ALT,'FY' || TO_CHAR(p.START_DATE, 'YYYY') AS QUALIFIED_FISCAL_YEAR_ALT,TO_CHAR(p.START_DATE, 'MM/DD/YYYY') as DATE_START,TO_CHAR(p.END_DATE, 'MM/DD/YYYY') as DATE_END,'Month' as PERIOD_TYPE,TO_NUMBER(TO_CHAR(p.START_DATE, 'MM')) as FISCAL_PERIOD_NUMERIC,CEIL(TO_NUMBER(TO_CHAR(p.START_DATE, 'MM')) / 3) as FISCAL_QTR_NUMERIC,TO_NUMBER(TO_CHAR(p.START_DATE, 'YYYY')) as FISCAL_YEAR_NUMERICfrom PPM8.PPM_FISCAL_PERIODS p where p.PERIOD_TYPE = 4order by p.START_DATE
8 Paste the results into the appropriate columns in the spreadsheet.
For all sources:
9 Check the spreadsheet for incorrect formatting changes such as reformatted dates. In particular, check the DATE_START and DATE_END columns. If necessary, select all rows in the DATE_START and DATE_END columns except the header row, then right-click and select Format Cells. Make sure the Date format in the Format Cells dialog is set to a date-only format (for example, m/d/yyyy). Do not include time.
10 Enter the consolidation information as required. If you find multiple entries that refer to the same item, enter identical values in the consolidation columns for both entries to ensure proper mapping.
51

11 Save and close the spreadsheet.
Make sure that you follow these rules for consolidation by period:
• All resulting consolidated periods must be at the monthly granularity. Do not mix weekly, monthly, quarterly, or yearly periods. Source systems can use different accounting methods that organize information by years, quarters, months, or weeks. Your mappings must flatten these variances.
• The dates in DATE_START and DATE_END must match exactly in format and precision (to the second).
• Periods should not overlap, except when consolidating from different sources. Many ETL processes in the data warehouse will allocate costs incurred on a certain date to a period based on the DATE_START and DATE_END of the period. If the same date appears in two period ranges, results may be unpredictable.
Example 1
The queries returned several periods from Asset Manager and Project and Portfolio Management.
The data returned by the queries varies in granularity. There is semi-monthly and quarterly data. You must resolve the variation in granularity by aligning on a common accounting period. In this example, it is possible to organize it by month, which is optimal for the data warehouse.
Table 17 PERIOD.xls Source Data Example
SOURCE_PRIMARYKEY SOURCE_APP SOURCE_PERIOD_NAME
1001 AM Jan 2008
1002 AM Jan 1-15, 2008
1003 AM Jan 16-30, 2008
9998 PPM January 2008
9999 PPM Q1 2008
Table 18 PERIOD.xls Spreadsheet Example
Source Data Consolidation Columns
SOURCE_PRIMARYKEY
SOURCE_APP
SOURCE_PERIOD_NAME
PERIOD_NAME_TARGET DATE_START DATE_END
1001 AM Jan 2008 Jan 2008 01/01/2008 01/31/2008
1002 AM Jan 1-15, 2008 Jan 2008 01/01/2008 01/31/2008
1003 AM Jan 16-30, 2008 Jan 2008 01/01/2008 01/31/2008
9998 PPM January 2008 Jan 2008 01/01/2008 01/31/2008
9999 PPM Q1 2008 Jan 2008 01/01/2008 01/31/2008
52 Chapter : Initialization and ETL

Choosing a larger unit of time creates more accuracy because some periods are longer than one month. However, for those rows that contain only one month of results, accounting by quarter would force you to extrapolate one month of data into three months of data, which could produce flawed results. You must analyze the returned data and decide what is the best methodology for consolidating disparate data.
Example 2
Table 19 lists examples of incorrect periods:
PROGRAMS.xls
Programs are large collections of resources, projects, and other corporate initiatives. IT Analytics uses program information in allocation scenarios.
There is no source data about programs in Asset Manager or Project and Portfolio Management. You must enter the PROGRAM_NAME and optional PROGRAM_NAME_ALT manually. For example, if you have a corporate initiative like Energy Conservation, the group would incur costs and generate dependencies. In this example, the PROGRAM_NAME would be ENERGYCONS and the PROGRAM_NAME_ALT might be ENG.
Table 19 Incorrect Period Examples
Name Date Start Date End Issue
January (Calendar)January (Fiscal)
1/1/2009 00:00:001/15/2009 00:00:00
1/31/2009 23:59:59Jan 1-15, 2008
Dates overlap but are not identical.
Jan-09Feb-09Mar-09Q1
1/1/2009 00:00:002/1/2009 00:00:003/1/2009 00:00:001/1/2009 00:00:00
1/31/2009 23:59:592/28/2009 23:59:593/31/2009 23:59:593/31/2009 23:59:59
Dates are not the same level of granularity (months versus quarters).
Jan 2009 (AM)Jan 2009 (PPM)
1/1/2009 00:00:001/1/2009 00:00
1/31/2009 23:59:591/31/2009 23:59
Dates from AM and PPM do not have the same precision and will not match in the data warehouse.
Jan-09Feb-09Mar-09
1/1/20092/1/20093/1/2009
1/31/20092/28/20093/31/2009
The dates omit the time. Events happening on the last day of the month will not match a period lookup. <DATE> between DATE_START and DATE_END.
Table 20 PROGRAMS.xls columns
Consolidation Columns
PROGRAM_NAME PROGRAM_NAME_ALT
Unique name Alternate name (if any)
Required Optional
53

Example
Task 8: Set Consolidation Priorities
IT Analytics sets a default priority of 1 for Asset Manager and a default priority of 2 for Project and Portfolio Management for all data consolidated from two or more data sources.
You can change the priority at the entity level or attribute level. At the entity level all the attributes inherit the priorities of the entity. If you set priority at the attribute level, that priority overrides the entity level priority.
To change the entity level priority
1 Open this file with Microsoft Office Excel:
C:\Program Files\HP\IT Analytics 2.00\ContentPacks\Core\ETL\flatfiles\spreadsheets\SourceConsPriorityXREF.xls
2 For each source in column A, there is a corresponding priority in column C. You can change the priority value in column C for each source.
3 Save and close the file.
To change the attribute level priority
1 Open this file with Microsoft Office Excel:
C:\Program Files\HP\IT Analytics 2.00\ContentPacks\Core\ETL\flatfiles\spreadsheets\SourceAttrConsPriorityXREF.xls
2 For each consolidated attribute in column C, there is a corresponding priority in column D. You can change the priority value in column D for each attribute.
3 Save and close the file.
The ETL process uses the priority information in these files to create consolidated views. For more information about the ETL process, see the IT Analytics ETL User Guide.
Table 21 PROGRAMS.xls Spreadsheet Example
Consolidation Columns
PROGRAM_NAME PROGRAM_NAME_ALT
ENERGYCONS ENG
Program name 2 Optional
54 Chapter : Initialization and ETL

Task 9: Run Initial Sync
Follow these steps to load the ETL batch files and schedule a Windows task to run ETL.
Step 1: Load ETL Batch
1 Verify that the Tomcat server is running.
2 Verify that the BODS Job Server is running.
3 Open a Windows command line window.
4 Switch to this directory:
C:\Program Files\HP\IT Analytics 2.00\Foundation\bin
5 Run this command:
dw_abc_load_batch -streamId Upstream
Step 2: Create a Windows Scheduled Task
To avoid manually loading batch jobs or running job streams, register the utilities to run at regular intervals. You can specify a recurrent interval of time for dw_abc_run_steps and both a recurrent interval and a start time for dw_abc_load_batch. HP recommends that you register batch jobs to run automatically no more than two times a day and register job steps to run every few minutes. Do not attempt to schedule one instance of the same batch job to run concurrently with another instance of the same batch job.
To create a Windows scheduled task
1 Open a Windows command line window.
2 Switch to this directory:
C:\Program Files\HP\IT Analytics 2.00\Foundation\bin
3 Run this command:
dw_abc_run_steps -register -every nn
where Windows runs a task to start dw_abc_run_steps.bat every nn minutes.
Examples
• To start a specific batch job (Upstream) at 10:30PM, run this command to create the scheduled task:
dw_abc_load_batch -streamId Upstream -starttime 22:30
• To register a batch job of steps that run every 5 minutes, run this command to create the scheduled task:
dw_abc_run_steps -register -every 5
For more information, see dw_abc_load_batch on page 127 or dw_abc_run_steps on page 129. To create a more complex Windows task schedule, see the MSDN (http://msdn.microsoft.com/ web site.
55

Upstream.xml
The out-of-box upstream.xml file contains all the steps, in the proper sequence, to run a full ETL job.
To view upstream.xml
Navigate to this directory:
C:\Program Files\HP\IT Analytics 2.00\ContentPacks\Core\ABC
Open upstream.xml with a text editor to learn more about the out-of-box sequencing for ETL job steps. You can trace the execution of the ETL process. This file also provides the step IDs that you need if you run job steps separately.
Task 10: Check the Status of the ETL Job Steps
After running initial sync, and after subsequent ETL runs, use the Data Warehouse Administration Operations reports to check the job stream status and make sure there were no job step warnings or errors during batch processing.
To check the status of the ETL job steps
1 Open the operations reports. For more information, see Viewing Reports on page 69.
2 View the Operational Status report. For more information, see ABC - Operational Status on page 98.
3 Check the Status column for any WARNING or ERROR entries.
• If the Status column contains WARNING for a job, view the Recovery Recommended Action column for instructions about what to change.
— If the Recovery Recommended Action column contains, Check WARNING metrics, view the appropriate Audit Report for details. For more information, see Audit Reports on page 87.
— If the Recovery Recommended Action column is empty, log in to the SAP BusinessObjects Data Services Management Console, click Status, select the repository, and then select the error to view details.
• If the Status column contains ERROR for a job, view the Recovery Recommended Action column for instructions about what to change.
— If the Recovery Recommended Action column is empty, NULL, or NOT NULL, log in to the SAP BusinessObjects Data Services Management Console and view the status information for the error.
• If you see a warning in the xref_gen ETL step, view the dw_xref.log file for details. For more information, see XREF_GENERATOR Errors on page 195.
For more information about the Data Warehouse Administration Reports, see Data Warehouse Operational Reports on page 87. For more information about errors, see Error Handling on page 67 and Troubleshooting on page 185.
Do not attempt to customize this file. It is the complete template for extracting data from remote sources and storing that data in the data warehouse. HP recommends that you contact HP Services for assistance if you wish to introduce customizing.
56 Chapter : Initialization and ETL

5 ABC Administrative Tasks
The data warehouse administrator manages the ETL process by using the out-of-box ABC utilities to solve problems and produce reports. Read this chapter for information about typical data warehouse administration tasks.
How Do I Update the Connection to Data Services? (on this page).
How Do I Validate Catalog and Stream Definitions? on page 58.
How Do I Load a Batch Job? on page 58
How Do I Run Job Steps? on page 59
How Do I Restart a Job Step? on page 59.
How Do I Start and Stop Batch Jobs? on page 60
How Do I Change the Number of Retries? on page 60
How Do I Change Data Warehouse Passwords? on page 62.
How Do I Improve Performance? on page 63.
How Do I Check the Runtime Status of Batch Jobs? on page 63.
How Do I Resolve an ETL Error? on page 63
How Do I Monitor and Tune the Data Warehouse? on page 63
How Do I Purge Validation Tables? on page 64.
How Do I Change the Location of External Source Files? on page 64.
How Do I Update the Connection to Data Services?
The initial installation prompts you to configure the required connections. The ABC engine manages BODS jobs using the BODS Web Service interface. If you change the BODS host and port information, you must update the connection information in the dwplatform.properties file.
To update the BODS connection
1 Open this file with a text editor:
C:\Program Files\HP\IT Analytics 2.00\Foundation\conf\dwplatform.properties
2 Navigate to the Business Objects section and locate the URL parameter:
## Business Object
#########################################################
# Data Services Management Console Address,
# The url looks like: http://<host>:<port>/DataServices
57

DataServicesManagementConsoleAddress <url>
DataServicesManagementConsoleUser admin
DataServicesManagementConsolePassword TIoAmgMCVUbvZ_K7rtmqcQ.
3 Paste the updated Data Services port information into the DataServicesManagementConsoleAddress parameter <url> location. For example:
DataServicesManagementConsoleAddress http://localhost:8080/DataServices
4 If the user name for the new connection is different, replace the DataServicesManagementConsoleUser value. For example:
DataServicesManagementConsoleUser admin
5 Save and close the file.
6 If the console password is different, run the dw-encryptpasswords utility at the command line to encrypt the new password value and store it in the dwplatform.properties configuration file. For more information, see dw-encryptpasswords on page 222.
How Do I Validate Catalog and Stream Definitions?
ABC utilities automatically validate xml syntax and perform more sophisticated validation, such as loop detection in a job stream and valid catalog references to the job stream (dwid=Upstream).
If an error occurs, you can review the ABC Operational Status report to see where the process failed.
How Do I Load a Batch Job?
The dw_abc_load_batch.bat script loads the upstream.xml batch job. When the batch job loads, the job steps within the batch job run as they become ready. The dw_run_steps.bat (the ABC engine) utility looks for these ready steps at scheduled intervals and starts each one individually. The batch job manages the details of extracting entities from source databases like Asset Manager or Project and Portfolio Management.
All the job steps in the batch job reference the same batch ID. The initial state of the batch is Active. The initial state of all of the pending processes (job steps) is Waiting.
To load a batch job
1 Open a Windows command line window.
2 Switch to this directory:
C:\Program Files\HP\IT Analytics 2.00\Foundation\bin
3 Run this command:
dw_abc_load_batch -streamId Upstream
where -streamId and its value Upstream are required.
For more information, see dw_abc_load_batch on page 129.
58 Chapter : ABC Administrative Tasks

How Do I Run Job Steps?
The dw_abc_run_steps.bat utility is the ABC engine. It assesses the readiness of candidate job steps and runs them at the appropriate time.
To run job steps
1 Open a Windows command line window.
2 Switch to this directory:
C:\Program Files\HP\IT Analytics 2.00\Foundation\bin
3 To run a specific job stream (Upstream), run this command:
dw_abc_run_steps -streamId Upstream
where -streamId and its value Upstream are required.
The dw_abc_run_steps utility determines which step to run next. When the current step ends, the job stream waits until dw_abc_run_steps restarts to launch the next sequential step. If the next step does not start when launched, the dw_abc_run_steps utility tries maxretries times to run the job step. For example:
<ns1:JobStreamStep dwid="EXTERNAL_FILE" businessname="extract External Files" ... maxretries="4"/>
HP recommends that you create a scheduled task to run any pending job steps at frequent intervals. For more information, see dw_abc_run_steps on page 131.
How Do I Restart a Job Step?
The dw_abc_retry_step utility manually restarts a job step after the dw_abc_run_steps.bat utility exceeds the maxretries value for a job step.
To restart a job step
1 Open a Windows command line window.
2 Switch to this directory:
C:\Program Files\HP\IT Analytics 2.00\Foundation\bin
3 Run this command:
dw_abc_retry_step -streamId Upstream -stepId step_id
where step_id is the job step identifier in the upstream.xml file.
Example
To restart job step EXTERNAL_FILE in the upstream.xml job stream, type this command:
dw_abc_retry_step -streamId Upstream -stepId EXTERNAL_FILE
For more information, see dw_abc_retry_step on page 130.
59

How Do I Start and Stop Batch Jobs?
Batch jobs can start manually or with a Windows scheduled task. You can control a batch run with commands to suspend, resume, or abort the run.
To start or stop a batch job
1 Open a Windows command line window.
2 Switch to this directory:
C:\Program Files\HP\IT Analytics 2.00\Foundation\bin
3 To suspend a batch run (Upstream), run this command:
dw_abc_batch_control -suspend -streamid Upstream
4 To resume a batch run (Upstream), run this command:
dw_abc_batch_control -resume -streamid Upstream
5 To terminate a batch run (Upstream), run this command:
dw_abc_batch_control -abort -streamid Upstream
For more information, see dw_abc_batch_control on page 124.
How Do I Change the Number of Retries?
The job stream batch file has a job stream step for each required task in the end-to-end ETL process and for each data source. Each job stream step has a parameter value that specifies the number of retries allowable before the job step terminates with an error. You can manually edit this value to increase or decrease the number of retries.
To change the number of retries
1 Navigate to the installation directory structure to locate this file:
C:\Program Files\HP\IT Analytics 2.00\ContentPacks\Core\ABC\upstream.xml
2 Save a backup copy of the file before you proceed.
3 Open upstream.xml with a text editor. There is a sequential list of job stream steps that manage the entire ETL process.
<ns1:JobStreamSteps><ns1:JobStreamStep dwid="SYS_READY" businessname="ckeck ETL pre conditions" ... maxretries="4"/><ns1:JobStreamStep dwid="EXTERNAL_FILE" businessname="extract External Files" ... maxretries="4"/><ns1:JobStreamStep dwid="PPM_SOURCE_EXTRACT" businessname="extract PPM to FF"... " maxretries="4"/><ns1:JobStreamStep dwid="AM_SOURCE_EXTRACT" businessname="extract AM to FF" ... maxretries="4"/><ns1:JobStreamStep dwid="ENTERPRISE_XREF" businessname="load Xref table" ... maxretries="4"/><ns1:JobStreamStep dwid="PPM_EXT" businessname="load PPM FF" ... maxretries="4"/><ns1:JobStreamStep dwid="AM_EXT" businessname="load AM FF" ... maxretries="4"/>
60 Chapter : ABC Administrative Tasks

<ns1:JobStreamStep dwid="PPM_SSI" businessname="PPM Single Source Identity" ... maxretries="4"/><ns1:JobStreamStep dwid="AM_SSI" businessname="AM Single Source Identity" ... maxretries="12"/><ns1:JobStreamStep dwid="PPM_SSI_XREF" businessname="PPM SSI Xref" ... maxretries="4"/><ns1:JobStreamStep dwid="AM_SSI_XREF" businessname="AM SSI Xref" ... maxretries="4"/><ns1:JobStreamStep dwid="PPM_MSI" businessname="PPM Mutiple Source Identity"... maxretries="4"/><ns1:JobStreamStep dwid="AM_MSI" businessname="AM Mutiple Source Identity" ... maxretries="4"/><ns1:JobStreamStep dwid="PPM_BACKFILL_CTRL" businessname="PPM backfill keys" ... maxretries="4"/><ns1:JobStreamStep dwid="AM_BACKFILL_CTRL" businessname="AM backfill keys" ..." maxretries="4"/><ns1:JobStreamStep dwid="XREF_BACKFILL_CTRL" businessname="Xref backfill" ... maxretries="4"/><ns1:JobStreamStep dwid="PPM_BACKFILL" businessname="PPM backfill" ... maxretries="4"/><ns1:JobStreamStep dwid="AM_BACKFILL" businessname="AM backfill" ... maxretries="4"/><ns1:JobStreamStep dwid="PPM_CON" businessname="PPM Consolidation" ... maxretries="4"/><ns1:JobStreamStep dwid="AM_CON" businessname="AM Consolidation" ...maxretries="4"/><ns1:JobStreamStep dwid="MS_CON" businessname="Multi Source Consolidation" ... maxretries="4"/><ns1:JobStreamStep dwid="XFR_DIM" businessname="prepare load" .../maxretries="4"><ns1:JobStreamStep dwid="XFR_FACT" businessname="prepare load" ...maxretries="4"/> <ns1:JobStreamStep dwid="DW" businessname="load from staging to target" ...maxretries="4"/> <ns1:JobStreamStep dwid="CSNP" businessname="consolidated snapshot" ...maxretries="4"/><ns1:JobStreamStep dwid="SSNP" businessname="single source snapshot" ...maxretries="4"/><ns1:JobStreamStep dwid="TSNP" businessname="transactional snapshot" .../maxretries="4"><ns1:JobStreamStep dwid="SYS_CLOSE" businessname="check ETL post condition"...maxretries="4"/>
</ns1:JobStreamSteps>
4 Locate the job stream step that you want to modify and change maxretries="4" to maxretries="nn" where "nn" is the number of retries before the job step terminates.
5 Save and close the file.
6 You must re-load the updated job stream file. Open a Windows command line window.
7 Switch to this directory:
C:\Program Files\HP\IT Analytics 2.00\ContentPacks\Core\ABC\
8 Run this command:
dw_abc_importdefs -xmlfile Upstream.xml
61

How Do I Change Data Warehouse Passwords?
The installation and configuration process gathers all data warehouse and SAP Business Objects passwords, encrypts them, and stores them in the dwplatform.properties file. If you need to update these passwords, you must re-encrypt them. The encryption utility stores the new encrypted password in the dwplatform.properties file.
To change a password
1 Open a Windows command line window.
2 Switch to this directory:
C:\Program Files\HP\IT Analytics 2.00\Foundation\bin
3 To change the ABC database administrator password, type this command:
dw-encryptpasswords -AbcDBAdminPwd newPassword
where newPassword is the updated password value.
The existing value in the dwplatform.properties file is automatically replaced by an encrypted version of the paSSw0rd value.
Example
Type this command to change the existing password to “paSSw0rd.”
dw-encryptpasswords -AbcDBAdminPwd paSSw0rd
where paSSw0rd is the new password value.
The existing value in the dwplatform.properties file is automatically replaced by an encrypted version of “paSSw0rd.”
AbcDBAdminPwd smkOULucWUdLAa6Qupd2fQ..
Password Types
The dwplatform.properties or datasources.xml file contains the encrypted password values. Use the same dw-encryptpasswords syntax to change and encrypt these passwords:
• -AbcDBAdminPwd password
• -AbcDBOwnerPwd password
• -AllSchemasAdminPwd password
• -AllSchemasOwnerPwd password
• -DSManagementConsolePwd password
• -DSRepositoryPwd password
• -MetadataDBAdminPwd password
• -MetadataDBOwnerPwd password
• -RDSTargetDBAdminPwd password
• -RDSTargetDBOwnerPwd password
• -StagingDBAdminPwd password
• -StagingDBOwnerPwd password
62 Chapter : ABC Administrative Tasks

• -StagingTargetDBOwnerPwd password
• -AMPwd password
• -PPMPwd password
• -SMPwd password
How Do I Improve Performance?
Normal procedures require database administrators to set up aggregation, indices, and partitions that can enhance performance. Enhancing and tuning overall database performance will also improve the data warehouse performance.
Because the end-to-end ETL process involves accessing remote source databases and network connections, you may want to evaluate where performance degradation occurs and apply tuning strategies to these external connections.
How Do I Check the Runtime Status of Batch Jobs?
The data warehouse produces operational and administrative reports that contain information about job status and other critical data warehouse activities. When you view the ABC Operational Status report, you can see the global status and state of each ETL job stream and a snapshot of the runtime status of each job stream step.
For more information, see ABC - Operational Status on page 98.
How Do I Resolve an ETL Error?
ETL jobs contain stream steps that you can restart. If the stream step is ready for processing, the next scheduled execution of abc_run_steps.bat will restart the stream step automatically. If there is another impediment, such as source database or connection issues, you must resolve that issue before the step can complete successfully. If there is an obvious error with an executing step, you can terminate the process by following the steps in Chapter 6, Error Handling on page 67.
For more information, see dw_abc_retry_step on page 130.
How Do I Monitor and Tune the Data Warehouse?
The overall health of the data warehouse depends on the administrative skill of the RDBMS administrator. The Microsoft SQL Server 2005 database administrator uses standard operating procedures for daily database operations. The data warehouse is governed by these same processes and procedures. For monitoring and tuning information, consult the Microsoft SQL Server 2005 documentation.
63

How Do I Purge Validation Tables?
There is no automated process to purge these tables on a regular schedule. Because organizations require audit and validation information to be retained for varying amounts of time, you should verify what the appropriate retention period is in your organization. Use the following SQL script to delete all records in each of the validation tables that are older than the defined retention period.
< CREATE OR REPLACE PROCEDURE sp_del_valf_info AS--declare variablesBEGIN--Delete All Required records in selection DELETE FROM *.VALF WHERE --trunc(Date) < '09-FEB-06'); COMMIT;END sp_del_valf_info >
How Do I Change the Location of External Source Files?
To create the required directories
1 Use Windows Explorer to create these folders. The folder names must match, and be in upper case. Create them at the location of your choice. For example:
— C:\Program Files\HP\IT Analytics 2.00\ETL_EXTRACTIONS
— C:\Program Files\HP\IT Analytics 2.00\ETL_EXTRACTIONS\AM
— C:\Program Files\HP\IT Analytics 2.00\ETL_EXTRACTIONS\PPM
— C:\Program Files\HP\IT Analytics 2.00\ETL_EXTRACTIONS\EXTERNAL
2 From the Windows Start menu, click All Programs > BusinessObjects Enterprise XI 3.1 > BusinessObjects Data Services > Data Services Designer.
3 Login with the server, database, and authentication information.
4 In the Local Object Library section in the lower left pane, expand Batch Jobs.
5 Right-click an extraction job. For example, xx_EXT_JB or xx_SOURCE_EXTRACT_JB shown in Figure 6 on page 65.
6 Select Properties.
7 On the Global Variable tab, locate the $G_xx_FILELOCATION variable. For example, an Asset Manager job has a global variable named $G_AM_FILELOCATION.
8 In the Value column, type the path to the directory that contains the external source file spreadsheet. For this example, you would type C:\Program Files\HP\IT Analytics 2.00\ETL_EXTRACTIONS\AM.
9 For each relevant xx_EXT_JB or xx_SOURCE_EXTRACT_JB, repeat step 5 through step 8.
10 Save all jobs and exit Data Services Designer.
64 Chapter : ABC Administrative Tasks

Figure 6 Local Object Library
65

66 Chapter : ABC Administrative Tasks

6 Error Handling
If an error occurs when you run ABC through SAP BusinessObjects Data Services (BODS), the job stream is blocked. In this example, the list of batch jobs shows an error control status for the job stream ID ControlStreamWithError.
Figure 7 Job Stream Error
When an error occurs, the Failed Batch Job Details section shows the status of each step and the Process Status Info column provides more detailed information.
Retry Handling
The automatic retry restarts the step up to the maxretries limit specified in the job step definition in the upstream.xml file. Thereafter, you can switch to a manual retry method.
Automatic Step Retry
When a step has an error status, ABC automatically attempts to restart the step the next time dw_abc_run_steps.bat runs using a new process ID. Each time dw_abc_run_steps.bat runs, it automatically restarts the failed step until it reaches the maxretries value. The step status passes into a final state in the next run. In the example shown in Figure 7 on page 67, step21, with a maxretries value of 3, ends with a status of ERROR three times and then has a final FATAL_ERROR status after the last retry.
67

Manual Step Retry
After you correct the step error, you can retry the step manually with the dw_abc_retry_step.bat script.
• To put the batch into a suspended state
From the Windows command line interface, navigate to the installation directory that contains data warehouse scripts:
C:\Program Files\HP\IT Analytics 2.00\Foundation\bin
• To suspend the batch
Run this command:
dw_abc_batch_control.bat -suspend ControlStreamWithError
• To restart the step
Run this command:
dw_abc_retry_step.bat -stepId stepid -streamId Upstream
You can repeat the manual retry as many times as necessary to obtain a status of SUCCESS.
68 Chapter : Error Handling

7 Data Warehouse Reports
The data warehouse delivers different types of reports in a SAP BusinessObjects Enterprise XI 3.1 Web Intelligence format that report on administrative or Audit, Balance, and Control (ABC) activities.
Viewing Reports
BOE Infoview displays data warehouse reports as Web Intelligence (Webi) reports.
To view a report
1 From the Windows Start menu, click Programs > BusinessObjects XI 3.1 > BusinessObjects Enterprise > BusinessObjects Enterprise Java InfoView.
2 Type valid user credentials.
3 Click Log On.
4 Click Document List.
5 In the navigation pane, expand Public Folders. There are two folders that contain reports: DW xx Administration and DW xx Operations, where xx represents the localization abbreviation. For example, DW EN Administration if the selected language is English.
6 Expand these directories to see the sub-directories for Data Model Reports, Audit Reports, or Control Reports. The Platform Configuration report is at the root level of the DW xx Administration directory.
7 To print the report, or save it for future reference, you can click Document > Save to my computer as (or Save report to my computer as) > PDF.
Some reports contain more than one page. You can use the toolbar at the top of the InfoView window to advance through multiple pages or jump to the last page of the reports. Other toolbar buttons enable you to customize the display mode, save the reports, print, and complete other editing tasks.
69

Data Warehouse Administration Reports
The objective of the Administration reports is to provide:
• An overview of the current status of the data warehouse configuration.
• Detailed model definition descriptions.
• Generated schema descriptions
Read the following sections for information about each report.
Data Model Reports
The typical user of data model reports is the data warehouse administrator, data warehouse developer, or an HP Support representative who is gathering information about the current state of the data warehouse.
Data Model Overview
This query produces a complete view of extraction path for every fact and dimension entity. Run this report after you deploy a new application. It is the entry point for all data model reports. The links in the report enable you to link to reports that provide more detail.
To view the report
1 Click Public Folders > DW xx Administration > Data Model Overview.
2 Click Run Query.
3 On the Data Model Overview - Dimensions tab, click the drop-down list to choose an entity. For example, choose the PERSON entity. Figure 8 on page 71 shows the dimension data model for the PERSON entity when extracted from multiple sources and consolidated into a target dimension.
4 On the Data Model Overview - Facts tab, shown in Figure 9 on page 72, click the drop-down list to choose a view of the data, ACTUALCOST, PLANNEDCOST, or Facts (All values). For example, choose ACTUALCOST.
70 Chapter : Data Warehouse Reports

71
Figure 8 Data Model Overview - Dimensions report

72
Figure 9 Data Model Overview Facts report
Extraction Model Details
The report shows the extraction model for a selected extraction model.
To view the report
1 Click Public Folders > DW xx Administration > Extraction Model Details.
2 Select one or more Extraction Ids from the left list box. You can also type an Extraction Id value and click the Search icon.
3 Click the Right arrow (>) to move it into the Select Extraction Model list. For example, select AMBUDGET.
4 Click Run Query.
Figure 10 on page 74 shows the extraction model details for the source AMBUDGET entity.
Consolidation Model Details
Consolidation Model Details shows the final attributes for the selected entity, including the data type, length, and whether null values are permitted.
To view the report
1 Click Public Folders > DW xx Administration > Consolidation Model Details.
2 Select one or more Consolidation Ids from the left list box. You can also type a Consolidation Id value and click the Search icon.
3 Click the Right arrow (>) to move it into the Select Consolidation Model list. For example, select PERSON.
4 Click Run Query.
Figure 11 on page 75 shows the Consolidation Model details for the PERSON entity.
Dimension Model Details
When you select a dimension, the Dimension Model Details report displays the dimension attributes, hierarchies, and associated dimensions.
To view the report
1 Click Public Folders > DW xx Administration > Dimension Model Details.
2 Select one or more Dimension Ids from the left list box. You can also type a Dimension Id value and click the Search icon.
3 Click the Right arrow (>) to move it into the Select Dimension Model list. For example, select PERSON.
4 Click Run Query.
Figure 12 on page 76 shows the Dimension Model details for the PERSON entity.
73

74
Figure 10 Extraction Model Details report
75
Figure 11 Consolidation Model Details report
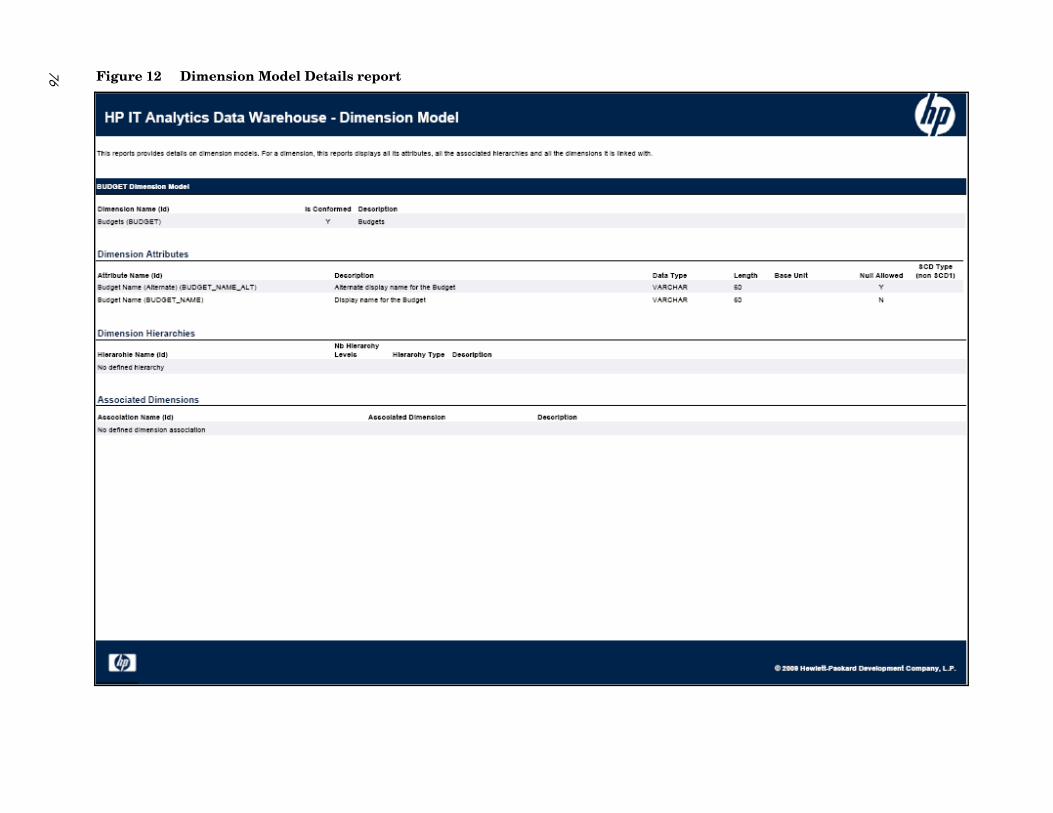
76
Figure 12 Dimension Model Details report
Fact Model Report
The report shows the details for a selected fact model.
To view the report
1 Click Public Folders > DW xx Administration > Fact Model Details.
2 Select one or more Fact Ids from the left list box. You can also type a Fact Id value and click the Search icon.
3 Click the Right arrow (>) to move it into the Select Extraction Model list. For example, select ACTUALCOST.
4 Click Run Query. Figure 13 on page 78 shows the fact model details for ACTUALCOST.
Source Model Details
When you run this report, you must choose one or more Source Model IDs from the list of available models and click the Right arrow (>) to move it into the Select Source Model list. Click Run Query.
The report shows the names of each column, how it was derived, the source table information, and other related information.
To view the report
1 Click Public Folders > DW xx Administration > Source Model Details.
2 Select one or more Source Model Ids from the left list box. You can also type a Source Model Id value and click the Search icon.
3 Click the Right arrow (>) to move it into the Select Source Model list. For example, select AMBUDGET.
4 Click Run Query. Figure 14 on page 79 shows the data source model details for AMBUDGET.
Aggregation Model Details
To view the report
1 Click Public Folders > DW xx Administration > Aggregation Model Details.
2 Choose one or more Aggregate IDs from the left list box. You can also type an Aggregate ID value and click the Search icon.
3 Click the Right arrow (>) to move it into the Select Aggregate ID list.
4 Click Run Query.
Figure 15 on page 80 shows aggregation model details in a summary format that is organized by aggregate name.
77

78
Figure 13 Fact Model Details report
79
Figure 14 Source Model Details report

80
Figure 15 Aggregation Model Details report
Platform Physical Schemas
This report enables you to diagnose whether the ETL staging or target models are aligned with the metadata. The Platform Physical Schemas report has five information tabs:
• Data Integration Interface (DII). Shows connection information for the data sources and status of the generated views.
• Staging Source - Extract Identity. For each data source, shows the status of the extraction process, including the number of extraction tables created and defined.
• Staging Source - Consolidation. Shows the status of the consolidation tables by application.
• Staging Target. Shows the status of the data warehouse target staging tables organized by application.
• DW Target. Shows the status of the target data warehouse tables and views.
Red and green color cues help you locate problems and issues quickly. Run this report after you deploy a new application. An HP Support engineer can diagnose the platform state after a model customization.
To view the report
1 Click Public Folders > DW xx Administration > Data Model Overview.
2 Click Run Query.
3 On the Data Model Overview - Dimensions tab, click the drop-down list to choose an entity. For example, choose the PERSON entity.
Figure 16 on page 82 shows the dimension data model for the PERSON entity when extracted from multiple sources and consolidated into a target dimension.
Figure 17 on page 83 shows the number of extraction tables created and defined for each data source and whether table errors occurred during the ETL process.
Figure 18 on page 84 shows the status of all consolidation related tables and any error conditions.
Figure 19 on page 85 shows the Staging Target tab that reports on the status of ETL staging tables.
Figure 20 on page 86 shows the Data Warehouse Target tab that shows the status of ETL target tables.
81

82
Figure 16 Platform Physical Schemas report - DII tab
83
Figure 17 Staging Source for Extraction and Identity report

84
Figure 18 Staging Source for Consolidation report
85
Figure 19 Staging Target report

86
Figure 20 Data Warehouse Target report
Platform Configuration Report
The Platform Configuration report shows the names of configured data sources and the connection information about those data sources. The report contains:
— A list of data sources
— Connectivity status
The information in this report should match the connection configuration information in the dataSources.xml file. Run this report after you deploy a new application.
To view the report
1 Click Public Folders > DW xx Administration > Platform Configuration.
2 Click Run Query. Figure 21 on page 88 shows connection information for the Asset Manager and Project and Portfolio Management source data servers.
Data Warehouse Operational Reports
ABC operational reports report different aspects of ABC governance of ETL job streams. The objectives of these reports are to display:
• ETL stream definitions, such as catalogs, stream, and stream step information.
• Operational information about ETL batch jobs and processes.
Audit Reports
ABC Audit reports display ETL audit measure and metric information. You can define the length of time included in the audit history by specifying the number of days in the Batch run history field. The typical user is the data warehouse administrator or an HP Support engineer. Run the reports after multiple ETL runs produce historical results.
ABC - Consolidation Tables Activity
The Job Streams Consolidations Activity report displays volume information ETL consolidation. To view the report
1 Click Public Folders > DW xx Operations > Audit Reports > ABC - Consolidation Tables Activity.
2 Type the number of days of history to appear in the report. The default value is 1 day.
3 Click Run Query.
Figure 22 on page 89 shows the Measure/Batch per Measure Name tab that displays a bar chart view of the number of input rows and output rows for each affected consolidation table by batch ID and start time over the specified duration.
Figure 23 on page 90 shows the Measure/Measure Name per Entity tab that displays a bar chart view of the number of input rows and output rows by entity over the specified duration.
You can navigate between the tabs and select a view of the data by entity if you click the drop-down list box at the top of the report and select All values, or a single entity.
87

88
Figure 21 Platform Configuration - Data Source Connections report
89
Figure 22 Job Streams Consolidations Activity report

90
Figure 23 Job Streams Consolidations Activity report
ABC - Dimension Tables Activity
This report measures the volume of data processed by the data warehouse.
To view the report
1 Click Public Folders > DW xx Operations > Audit Reports > ABC - Dimension Tables Activity.
2 Type the number of days of history to appear in the report. The default value is 2 days.
3 Click Run Query.
Figure 24 on page 92 shows the Measure/Batch per Measure Name tab that displays a bar chart view of the number of rows processed for each dimension table by batch ID and start time over the specified duration.
Figure 25 on page 93 shows the Measure/Measure Name per Entity tab that displays a bar chart view of the number of rows processed by entity over the specified duration.
You can navigate between the tabs and select a view of the data by the number of sources or the entity. Click the drop-down list box at the top of the report and select All values, or a specific entity.
ABC - Source Extraction Tables Activity
This report shows the ETL activity on the source data tables.
To view the report
1 Click Public Folders > DW xx Operations > Audit Reports > ABC - Source Extraction Tables Activity.
2 Type the number of days of history to appear in the report. The default value is 2 days.
3 Click Run Query.
Figure 26 on page 94 shows the Measure/Batch per Measure Name tab that displays a bar chart view of the measures processed from source tables over the specified duration.
Figure 27 on page 95 shows the Measure/Batch per Source Table tab that displays a bar chart view of the number of data rows in source tables processed over the specified duration.
Figure 28 on page 96 shows the Measure/Measure Name per Source product tab that displays a bar chart view of the extraction activity by source over the specified duration.
Figure 29 on page 97 shows the Measure/Measure Name per Source Table tab that displays a bar chart view of the extraction activity by source table over the specified duration.
You can navigate between the tabs and select a view of the data by the number of sources. Click the drop-down list box at the top of the report and select All values, or a specific number of sources.
91

92
Figure 24 ABC - Dimension Tables Activity report
93
Figure 25 ABC - Dimension Tables Activity - report

94
Figure 26 Measure/Batch per Measure Name report
95
Figure 27 Measure/Batch per Source Table report

96
Figure 28 Measure/Measure Name per Source product report
97
Figure 29 Measure/Measure Name per Source Table report

Control Reports
Control reports describe historic or operational aspects of the data warehouse. Historic reports contain status information gathered over time for the purpose of analysis and performance improvements. Operational reports contain snapshot information about current jobs and other data warehouse activity. You can edit, save, or export the following ABC Control reports.
ABC - Operational Status
The ABC Operational Status report displays the runtime information about the out-of-box Upstream.xml file, which contains all the job stream steps for a complete ETL run.
To view the report
1 Click Public Folders > DW xx Operations > Control Reports > ABC - Operational Status. Figure 30 on page 99 shows the Job Stream Status tab of the ABC Job Stream Status report.
2 On the Job Stream Status tab, click the Batch ID value in the first column. In this example, the batch ID value is 2. A new window and dialog box appear.
3 In the Prompts dialog box, type the number of the Process ID that you want to review in the job stream.
4 Click Run Query. The new window displays the ABC Batch Control report for the Batch ID that you selected in step 2. Figure 31 on page 100 shows an example of the ABC Batch Control report.
If you click any Process ID value in the ABC Batch Control report, the ABC Job Process Audit report, shown in Figure 32 on page 101, appears to display all audit measures and metrics associated with that Process ID.
5 On the original Job Stream Status report, click the Job Stream Progress tab to display a snapshot of the runtime status of each job stream step in a graphic format, as shown in Figure 33 on page 102.
6 On the Job Stream Progress tab, click any ETL job name to display the ETL Job Process Audit report, shown in Figure 34 on page 103, which shows all audit measures and metrics associated with that Process ID.
If the ABC database runs on a different system than SAP® Business Objects Data Services, and these two systems run in different timezones, you may see a discrepancy in the Duration column on the Control reports. For example, if you check a Control report while a step is processing, the report might show that the step has been processing for several hours even though the step has actually been running for only minutes. Once the step terminates, however, the duration becomes accurate.
98 Chapter : Data Warehouse Reports

99
Figure 30 ABC - Operational Status report (Job Stream Status tab)

100 t
Figure 31 ABC - Operational Status report (Job Stream Status tab) - ABC Batch Control repor
101
Figure 32 ABC Job Process Audit report

102
Figure 33 ABC Job Stream Progress report
103
Figure 34 ABC Job Process Audit report

ABC - Batch Details
This report displays control information for a batch job.
To view the report
1 Click Public Folders > DW xx Operations > Control Reports > ABC - Batch Details.
2 Select a Batch ID from the left list box. You can also type a Batch Id value and click the Search icon.
3 Click the Right arrow (>) to move it into the Enter the Batch ID list.
4 Click Run Query.
Figure 35 on page 105 shows the ABC Batch Control report.
ABC - Job Details
The ABC Job Details report displays operation information, such as the Stream Step ID and workflow information.
To view the report
1 Click Public Folders > DW xx Operations > Control Reports > ABC - Job Details. You can also view by clicking the link in the batch detail report or the ABC - Operational Status report.
2 Select a Process ID from the left list box. You can also type a Process Id value and click the Search icon.
3 Click the Right arrow (>) to move it into the Enter the Process ID list.
4 Click Run Query.
Figure 36 on page 106 shows the Job Process Control (Control Details tab) information for the selected process ID.
Figure 37 on page 107 shows the Job Process Audit (Audit Details tab) information for the same process ID.
104 Chapter : Data Warehouse Reports

105
Figure 35 ABC Batch Control report

106
Figure 36 ABC - Job Details - Job Process Control report
107
Figure 37 ABC - Job Details - Job Process Audit report
ABC - Model Definitions
The ABC Model Definitions report displays the executable catalogs to be processed by ABC.
To view the report
Click Public Folders > DW xx Operations > Control Reports > ABC - Model Definitions.
Figure 38 on page 109 shows the information on the Executable Catalogs tab.
Figure 39 on page 110 shows the information on the Stream Definitions tab.
ABC - Operational Duration History
This report describes the duration history of job stream batches during a specified period.
To view the report
1 Click Public Folders > DW xx Operations > Control Reports > ABC - Operational Duration History.
2 In the Prompts dialog, select Batch run history for last X days and type a value for X.
3 In the Prompts dialog, select Batch statistics for last Y days and type a value for Y.
4 Click Run Query.
Figure 40 on page 111 shows the Job Streams Duration tab with historical job stream information. The aborted job streams are red.
Figure 41 on page 112 shows the Job Details Duration tab with the amount of time consumed by individual jobs within the job stream.
108 Chapter : Data Warehouse Reports

109
Figure 38 ABC - Model Definitions - ABC Executable Catalogs report

110
Figure 39 ABC - Model Definitions - ABC Job Stream Definitions report
111
Figure 40 ABC - Operational Duration History - Job Streams Duration History report

112
Figure 41 ABC - Operational Duration History - Job Streams Duration History report
ABC - Operational Status History
This report displays a batch run history for ABC ETL job streams during a specified period. The report shows run-time duration, status, and error frequency.
To view the report
1 Click Public Folders > DW xx Operations > Control Reports > ABC - Operational Status History.
2 In the Prompts dialog, select Batch run history for last X days and type a value for X.
3 Click Run Query.
Figure 42 on page 114 shows the Job Streams Status report, which is a bar chart that uses these status values:
• Success (Green): The number of jobs with no error condition or inconsistency detected.
• Warning (Orange): The number of jobs where a minor error condition exists, although there are no data inconsistencies or corruption detected, and, there is no loss of data.
• Error (Red): The number of jobs with a critical error status.
• Max Time Exceeded (Pink): Number of jobs that exceed max execution time.
• Remaining: Number of jobs that are waiting to be started.
Figure 43 on page 115 shows the Jobs and Work Flows Errors Frequency report that shows how often job and work flow errors occur (in descending order). The reports lists only jobs and workflows that produce error conditions.
113

114
Figure 42 ABC - Operational Status History - Job Streams Status History report
115
port
Figure 43 BC - Operational Status History - Job Streams and Work Flows Errors Frequency re
116 Chapter : Data Warehouse Reports

8 ABC Command Reference
This chapter describes all of the out-of-box ABC command files that are available to administer the ABC functions. Table 22 lists these out-of-box files that you can use to accomplish ABC tasks.
Syntax Conventions
Command options in square brackets ([ ]) are optional.
Italicized lowercase expressions are variable values.
If a command option argument is a text string that contains blank spaces, you must enclose it in quotation marks. Otherwise, the text before the blank space is considered the entire argument and the remaining text becomes an undefined option.
Command Summary
The following command script files are available in this directory:
C:\Program Files\HP\IT Analytics 2.00\Foundation\bin
Table 22 ABC Script Files
Name Purpose Primary User
dw_abc_add_audit_measure on page 119 Add an audit measure. Administrator or ETL developer
dw_abc_add_audit_metric on page 120 Add an audit metric. Administrator or ETL developer
dw_abc_add_balance_measure on page 121 Add a balance measure. Administrator or ETL developer
dw_abc_add_balance_metric on page 122 Add a balance metric. Administrator or ETL developer
dw_abc_add_process_measure on page 123 Add a process measure. Administrator or ETL developer
dw_abc_batch_control on page 124 Start and stop batch job streams.
Administrator
dw_abc_enter_step_detail on page 125 Record the details of a job step.
Administrator or ETL developer
117

dw_abc_exit_step_detail on page 126 Exit from a step. Administrator or ETL developer
dw_abc_importdefs on page 127 Load ABC definition files into the metadata repository.
Administrator
dw_abc_job_launcher on page 128 Start or stop job steps within a job stream.
Administrator or ETL developer
dw_abc_load_batch on page 129 Load a batch job stream or register it as a Windows scheduled task.
Administrator
dw_abc_retry_step on page 130 Restart a job stream step. Administrator
dw_abc_run_steps on page 131 Run job stream steps (the ABC engine) or register it as a Windows scheduled task.
Administrator
dw_abc_set_status on page 132 Capture the status of job stream steps that are implemented as batch scripts.
Administrator or ETL developer
Table 22 ABC Script Files
Name Purpose Primary User
118 Chapter : ABC Command Reference

dw_abc_add_audit_measure
Purpose
Use this script to add an audit measure.
User
Administrator or ETL developer
Syntax
dw_abc_add_audit_measure [-category <string>] [-description <string>]-jobstreamstepdetailname <string> -name <string>[-process <long>] -unit <string> -value <string> [-help]
:
If you omit the -process option, you must set an environment variable %DW_PROCESS_ID% that contains the value of the process ID. The description field is free text and optional.
Example
dw_abc_add_audit_measure -process %DW_PROCESS_ID% -jobstreamstepdetailname "PPM_BUDGETS_EXT_DF" -name "RowCount" -value 25 -unit "INTEGER" -category "PPM_BUDGETS_EXT" -description "Inserted rows in table from category"
Table 23 dw_abc_add_audit_measure.bat options
Option Required? Description
-category string N Category for aggregation.
-description string N Description of record.
-jobstreamstepdetailname string Y Job stream step detail name.
-name string Y Name.
-process process_id N Process ID value.
-unit string Y Unit.
-value string Y Value.
-help N Display command syntax.
119
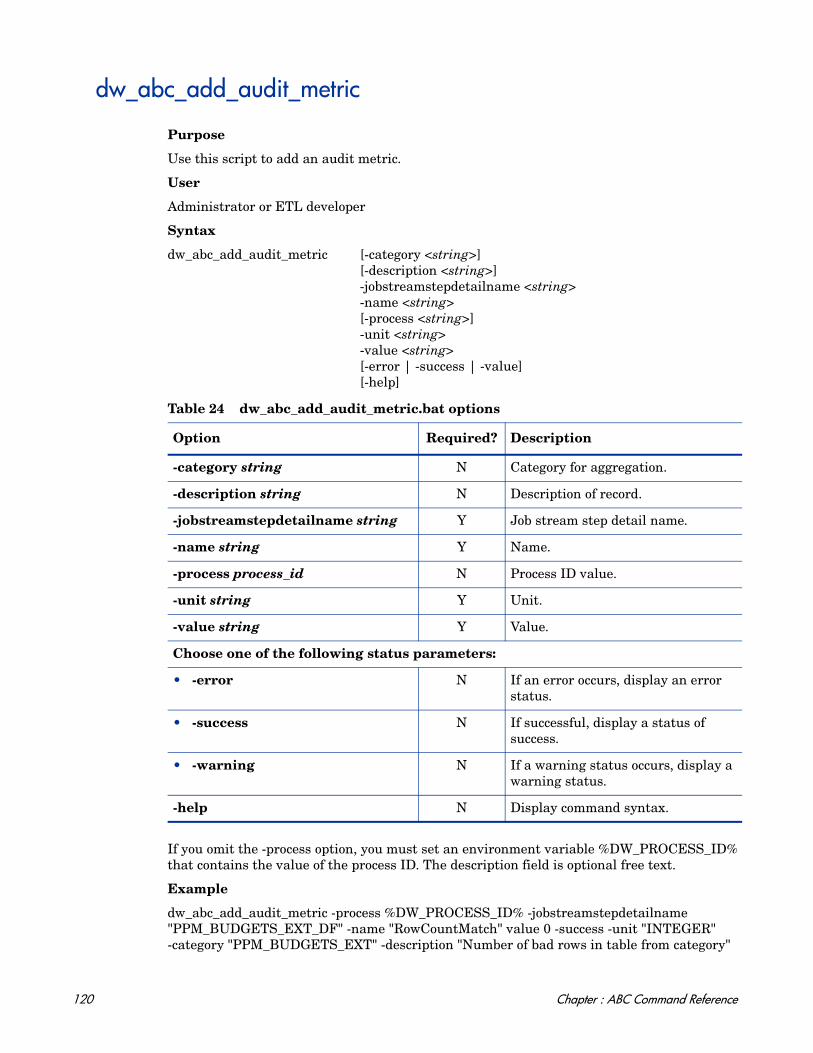
dw_abc_add_audit_metric
Purpose
Use this script to add an audit metric.
User
Administrator or ETL developer
Syntax
dw_abc_add_audit_metric [-category <string>][-description <string>]-jobstreamstepdetailname <string>-name <string>[-process <string>]-unit <string>-value <string>[-error | -success | -value][-help]
:
If you omit the -process option, you must set an environment variable %DW_PROCESS_ID% that contains the value of the process ID. The description field is optional free text.
Example
dw_abc_add_audit_metric -process %DW_PROCESS_ID% -jobstreamstepdetailname "PPM_BUDGETS_EXT_DF" -name "RowCountMatch" value 0 -success -unit "INTEGER" -category "PPM_BUDGETS_EXT" -description "Number of bad rows in table from category"
Table 24 dw_abc_add_audit_metric.bat options
Option Required? Description
-category string N Category for aggregation.
-description string N Description of record.
-jobstreamstepdetailname string Y Job stream step detail name.
-name string Y Name.
-process process_id N Process ID value.
-unit string Y Unit.
-value string Y Value.
Choose one of the following status parameters:
• -error N If an error occurs, display an error status.
• -success N If successful, display a status of success.
• -warning N If a warning status occurs, display a warning status.
-help N Display command syntax.
120 Chapter : ABC Command Reference

dw_abc_add_balance_measure
Purpose
Use this script to add a balance measure.
User
Administrator or ETL developer
Example
dw_abc_add_balance_measure [-batch <long>] [-category <string>][-description <string>]-name <string> [-systemname <string>]-unit <string> -value <string> [-help]
:
If you omit the -batch option, you must set an environment variable %DW_BATCH_ID% that contains the value of the batch ID. The description field is optional free text.
Example
dw_abc_add_balance_measure -batch %DW_BATCH_ID% -name "Expense" -value 2500 -unit "USD" -category "PPM" -description "New expenses since previous run" -systemname "somewhere.hp.com"
Table 25 dw_abc_add_balance_measure.bat options
Option Required? Description
-batch batch_id N Batch ID value.
-category string N Category for aggregation.
-description string N Description of record.
-name string Y Name.
-systemname string N System name value.
-unit string Y Unit.
-value string Y Value.
-help N Display command syntax.
121

dw_abc_add_balance_metric
Purpose
Use this script to add a balance metric.
User
Administrator or ETL developer
Syntax
dw_abc_add_balance_metric [-batch <long>][-category <string>][-description <string>]-name <string>-unit <string>-value <string>[-error | -success | -value][-help]
:
If you omit the -batch option, you must set an environment variable %DW_BATCH_ID% that contains the value of the batch ID. The description field is optional free text.
Example
dw_abc_add_balance_metric -batch %DW_BATCH_ID% -name "Expense Check" -value 304 -warning -unit USD -category PPM -description "Category expense in DW vs in source product"
Table 26 dw_abc_add_balance_metric.bat options
Option Required? Description
-batch batch_id N Batch ID value.
-category string N Category for aggregation.
-description string N Description of record.
-name string Y Name.
-unit string Y Unit.
-value string Y Value.
Choose one of the following status parameters:
• -error N If an error occurs, display an error status.
• -success N If successful, display a status of success.
• -warning N If a warning status occurs, display a warning status.
-help N Display command syntax.
122 Chapter : ABC Command Reference

dw_abc_add_process_measure
Purpose
Use this script to add a process measure.
User
Administrator or ETL developer
Syntax
dw_abc_add_process_measure [-category <string>]
[-description <string>]
-name <string>
[-process <long>]
-unit <string>
-value <string>
[-help]:
If you omit the -process option, you must set an environment variable %DW_PROCESS_ID% that contains the value of the process ID.
The description field is free text and optional.
Example
dw_abc_add_process_measure -process %DW_PROCESS_ID% -name DatasetSize -value 204 -unit KBytes -category Extraction -description "Total processed data set size for this job"
Table 27 dw_abc_add_process_measure.bat options
Option Required? Description
-category string N Category for aggregation.
-description string N Description of record.
-name string Y Name.
-process process_id N Process ID value.
-unit string Y Unit.
-value string Y Value.
-help N Display command syntax.
123

dw_abc_batch_control
Purpose
Use this script to start and stop batch job streams.
User
Administrator
Syntax
dw_abc_batch_control (-abort | -resume | -suspend)
(streamID <streamid> | -all)
[-help]:
Examples
dw_abc_batch_control -suspend -streamid Stream1
dw_abc_batch_control -resume -all
Table 28 dw_abc_batch_control.bat options
Option Required? Description
Choose one of the following options:
• -abort N Terminate -all or a specific streamIDwhere the streamID value is the catalog parameter value for dwid="xxxx".
• -resume N Re-start -all or a specific streamIDwhere the streamID value is the catalog parameter value for dwid="xxxx".
• -suspend N Temporarily stop -all or a specific streamIDwhere the streamID value is the catalog parameter value for dwid="xxxx".
Choose one of the following options:
• -streamId streamId N The streamID value is the catalog parameter value for dwid="xxxx"
• -all N All streams currently executing.
-help N Display command syntax
124 Chapter : ABC Command Reference

dw_abc_enter_step_detail
Purpose
Use this script to record the details of a job step.
User
Administrator or ETL developer
Syntax
dw_abc_add_process_measure -detailname <string>
[-process <long>]
[-help]:
If you omit the -process option, you must set an environment variable %DW_PROCESS_ID% that contains the value of the process ID.
Example
dw_abc_enter_step_detail -detailname "Extractor"
Table 29 dw_abc_enter_step_detail.bat options
Option Required? Description
-detailname string Y Job stream step detail name.
-process process_id N Process ID value.
-help N Display command syntax.
125

dw_abc_exit_step_detail
Purpose
Use this script to exit from a step.
User
Administrator or ETL developer
Syntax
dw_abc_exit_step_detail -detailname <string>
[-info <string>]
[-process <long>]
(-error | -success | -warning)
[-help]:
The description field is optional free text.
Example
dw_abc_exit_step_detail - detailname "Extractor" -error -info "Error description"
Table 30 dw_abc_exit_step_detail.bat options
Option Required? Description
-detailname string Y Job stream step detail name.
-info string N Additional status information.
-process process_id N Process ID value.
Choose one of the following status parameters:
• -error N If an error occurs, display an error status.
• -success N If successful, display a status of success.
• -warning N If a warning status occurs, display a warning status.
-help N Display command syntax.
126 Chapter : ABC Command Reference

dw_abc_importdefs
Purpose
Use this script to Load ABC definition files (catalogs, streams) into the metadata repository.
User
Administrator
Syntax
dw_abc_importdefs [-xmlfile <xml_file_name> | -topdir <directory>]
[-verbose]
[-help]:
Return codes:
0 – Success
1 – Success with warnings
>1 – Errors
Example
abc_importdefs -xmlfile C:\Program Files\HP\IT Analytics 2.00\Foundation\xmldir\filename.xml
abc_importdefs -topdir C:\Program Files\HP\IT Analytics 2.00\Foundation\xmldir\
Table 31 dw_abc_importdefs.bat options
Option Required? Description
-topdir "directory_name" N Load all the XML files in the specified directory and sub-directories into the metadata repository.
-verbose N Verbose output.
-xmlfile path_and_file name
N Load a single XML file into the metadata repository.
-help N Display command syntax.
127

dw_abc_job_launcher
Purpose
Use this script to start or stop a job stream.
User
Administrator or ETL developer
Syntax
dw_abc_job_launcher_detail -jobname <string>
[-stop]
[-help]:
If you omit the -process option, you must set an environment variable %DW_PROCESS_ID% that contains the value of the process ID.
Example
dw_abc_job_launcher -jobname Upstream
dw_abc_job_launcher -stop -jobname Upstream
Table 32 dw_abc_job_launcher.bat options
Option Required? Description
-jobname job_name Y Name of the job that you want to run.
-stop job_name N Stop job execution.
-help N Display command syntax.
128 Chapter : ABC Command Reference

dw_abc_load_batch
Purpose
Use this script to load a batch job stream or register it as a Windows scheduled task.
User
Administrator
Syntax
dw_abc_load_batch -streamId <string>
[-register (-every <string> |-starttime <string>)]
[-help]
Examples
dw_abc_load_batch -streamId streamId
dw_abc_load_batch -streamId streamId -register -every 720
dw_abc_load_batch -streamId streamId -register -starttime 22:30
Table 33 dw_abc_load_batch.bat options
Option Required? Description
-every nnn No Start the batch load task every nnn minutes.
Choose one of the following options:
• -register No Create a Windows scheduled task to run dw_abc_load_batch at regular intervals.
• -starttime hh:mm No Start the task to load the batch where the value for hh is 00–24 and the value for mm is 00–59.
-streamid stream_id Yes Identify the stream ID value that is specified in the stream file parameter dwid="xxxx".
-help No Display command syntax.
129

dw_abc_retry_step
Purpose
Use this script to restart a job stream step.
User
Administrator
Syntax
dw_abc_load_batch -streamId <string>
-stepId <string>
-prepareonly
[-help]:
Example
dw_abc_retry_step -streamId Upstream -stepId step_id
Table 34 dw_abc_retry_step.bat options
Option Required? Description
prepareonly N Allocate a new process for the step but do not run the step.
-stepId step_id Y Step ID value for the step to restart.
-streamId stream_id Y Stream ID value for the step to restart.
-help N Display command syntax.
130 Chapter : ABC Command Reference

dw_abc_run_steps
Purpose
Use this script to run job stream steps or register the action as a Windows scheduled task.
User
Administrator
Syntax
dw_abc_run_steps [-streamId <string>]
[-every <interval>]
[-register]
[-help]:
Examples
To run all the steps that are ready within a loaded batch job:
dw_abc_run_steps
To create a Windows scheduled task that starts the dw_abc_run_steps utility every five minutes:
dw_abc_run_steps -register -every 5
To run all possible steps with a ready status:
dw_abc_run_steps -streamId Upstream
To create a Windows scheduled task that executes the dw_abc_run_steps command every 60 minutes:
dw_abc_run_steps -register -every 60 -streamId Upstream
Table 35 dw_abc_run_steps.bat options
Option Required? Description
-every nnn N Start the batch load task every nnn minutes.
-register N Create a Windows scheduled task to run dw_abc_run_steps at regular intervals.
-streamId stream_id N Stream ID value for the step to restart.
-help N Display command syntax for this command.
131

dw_abc_set_status
Purpose
Use this script to capture the status of job stream steps that are implemented as batch scripts.
User
Administrator or ETL developer
Syntax
dw_abc_set_status (-error | -final | running | -success | -warning)
[-info <string>]
[-help]
:
The -info "message_text" is optional free text that you can display.
This script requires the DW_PROCESS_ID environment variable to be set with the value of the process ID before you run this script.
Example
dw_abc_set_status -error -info "Job failed"
Table 36 dw_abc_set_status.bat options
Option Required? Description
-info "message_text" N Display text status message.
Choose one of the following status parameters:
• -error N If an error occurs, update the data warehouse with the error status.
• -final N If an error occurs, update the data warehouse with the most severe status.
• -running N If an error occurs, update the data warehouse with the run status.
• -success N If successful, update the data warehouse with the success status.
• -warning N If a warning status occurs, update the data warehouse with the warning status.
-help N Display command syntax.
132 Chapter : ABC Command Reference

9 Time Zone Configuration
The data warehouse contains data extracted from external sources. The original data sources can be repositories in disparate locations. It is important that the data warehouse maintain accurate date and time stamps that normalize the differences between the source time zones and the current time of the data warehouse location. These differences include both Coordinated Universal Time (UTC) offset and daylight savings time (DST) variations.
The data warehouse foundation has transparent internal functions that convert a source time zone value to a UTC value, and convert the UTC value to the data warehouse local time zone during the ETL process.
Time Zone Management
The data warehouse foundation contains tools and configuration files that help you manage time zone issues. For each data source, there are two time zones to track: the data source time zone and the data warehouse time zone. You must also collect the DST information for the time zone associated with the data source.
Task 1: Configure Data Source Time Zone Properties
To configure time zone properties for a data source
1 Open this file with a text editor:
C:\Program Files\HP\IT Analytics 2.00\Foundation\conf\dataSources.xml
2 Edit the time zone property for each data source.
The dataSources.xml file supports a configurable property for each data source connection. This property specifies the source application name, version, and local time zone. For example, to specify an Asset Manager data source that exists in the same time zone as Los Angeles, you would edit the timeZone property for Asset Manager:
<dw:DataSourceConnection productName="AM" productVersion="5.1" timeZone="America/Los_Angeles" >
The timeZone property value must conform to the requirements of the java.util.TimeZone class. For more information, see php.net (//www.php.net) for a list of supported time zones and the valid naming convention used to specify the time zone. For example, for Paris, New York, or Singapore, you must specify Europe/Paris, America/New_York, or Asia/Singapore.
133

3 Repeat step 2 on page 133 for the Project and Portfolio Management dw:DataSourceConnection parameters.
You can configure the timeZone value for one data source connection associated with a single application. The dataSources.xml file has only one set of productName, productVersion, and timeZone properties for each supported data source.
4 Save and close the file.
Task 2: Configure Data Warehouse Time Zone Properties
To configure time zone properties for the data warehouse
1 Open this file with a text editor:
C:\Program Files\HP\IT Analytics 2.00\Foundation\conf\dwplatform.properties
2 Navigate to the ## Other properties section. The platform.properties file stores the local time zone for the data warehouse.
3 Edit these properties:
DSTManagementPeriodStart yyyyDSTManagementPeriodEnd yyyyDWTimeZone xxxxxxx/xxxxxx
where xxxxxxx/xxxxxx conforms to the requirements of the java.util.TimeZone class. For more information, see php.net (//www.php.net) for a list of supported time zones and the valid naming convention used to specify the time zone.
4 Save and close the file.
This information becomes part of the data warehouse metadata at initialization time.
Task 3: (Optional) Capture the Data Source DST Information
When the installation process runs the utilities to create the data warehouse, the dw_tz_update_dst utility captures the time zone information for the data sources and the data warehouse. You can update this information as needed if there are time zone changes to the data sources or data warehouse. For example, if you replace your original data source with a new repository in a different time zone, you must update the time zone information.
To update existing, or capture new DST information
1 Repeat the steps in Task 1: Configure Data Source Time Zone Properties on page 133.
2 Repeat the steps in Task 2: Configure Data Warehouse Time Zone Properties on page 134.
3 Open a Windows command line window.
4 Switch to this directory:
C:\Program Files\HP\IT Analytics 2.00\Foundation\bin
5 Run this command:
dw_tz_update_dst
134 Chapter : Time Zone Configuration

Run dw_tz_update_dst when you:
• Change the time zone attribute for a data source in the dataSources.xml file.
• Change the DST or time zone parameters in the dwplatform.properties file. For example, if you change the DSTManagementPeriodEnd value.
For more information, see dw_tz_update_dst on page 229.
Troubleshooting Date Conversion
If time zone conversion errors occur, verify that none of the following apply.
• If you specify a null date that is passed for conversion, the conversion function returns a null date. Verify that you formatted the dates correctly in any properties file value or conversion command.
• The ETL process uses special dates like 01/01/1900 00:00:01. All dates prior to 1900 are ignored for conversion purposes.
• If you do not update DST information, the ETL attempts date calculation for unmanaged years. The conversion function creates an exception that is caught by the containing workflow and propagated to the BODS job by ABC. The exception appears in the ABC reports. It is an error that locks batch execution.
• For global time zones that convert to DST, the return to standard time occurs at 2 AM. Clocks reset backwards one hour to 1 AM. When a data change occurs between 1 AM – 2 AM while you are still on DST, the time stamp is the same as a data change that occurs between 1 AM – 2 AM after the clock resets back to standard time (ST).
You can have two data events with the same time stamp, but one occurs before the clock turns back and one occurs after the clock turns back. Source data repositories may not clearly specify whether the data event occurred pre- or post-DST conversion. This issue occurs only during that one overlapping hour from 1 AM – 2 AM during the year. When a data event occurs within this window, the data warehouse time zone management feature assigns the time stamp after the conversion to standard time.
Updating Data Warehouse Server Time Zone Information
The administrator must make sure that time zone information is current on the server hosting the data warehouse. Although the definition of time zones and DST rules are fairly static, changes can occur. For example, moving the DST conversion date on a country-wide basis.
You can capture changes to the Olson Timezone Database by obtaining and running the Java TZUpdater Tool that is available on the Sun Developer Network (SDN). For more information, visit the Java SE Timezone Updater Tool home page.
After you run the TZUpdater tool, complete Task 3: (Optional) Capture the Data Source DST Information on page 134.
HP recommends that administrators suspend ETL processing during this interval to avoid conflicts.
135

Updating Data Warehouse Server Tables
If the daylight savings time (DST) rules change after the initial configuration, you can update these tables by re-running the dw_tz_update_dst.bat utility. For more information, see dw_tz_update_dst on page 229.
136 Chapter : Time Zone Configuration

10 Tracing and Logging
This chapter describes the Data Warehouse logging and tracing mechanism.
Data warehouse scripts have different types of output log files:
• One log file for each data warehouse batch utility, using the Java application Log4J.
• One log file for each SQL command.
The Java Logging Mechanism
The data warehouse generates one log file for each batch utility, and stores it in this directory:
C:\Program Files\HP\IT Analytics 2.00\Foundation\conf\
For example:
• dw_initdb.log
• dw_importdefs.log
• dw_generateschemas.log
Configure the Logs
For data warehouse utilities, you can customize logging behavior by editing a related log configuration file with this naming convention: xxx-log4j.xml. For example, importdefs-log4j.xml. The log configuration files are in this directory:
C:\Program Files\HP\IT Analytics 2.00\Foundation\conf
Open the related xxx-log4j.xml file with a text editor to choose the trace levels and to change other parameter values. If you make changes, save the file before you close it.
For ABC utilities, (abc-xxxx) there is a single log configuration file: abc-log4j.xml. The values that you specify in this file apply to all log files generated by any ABC utility.
Trace Levels
You can choose one of the following trace levels to control the amount of information stored in the logs:
• trace
• debug
• info
• warn
137

• error
• fatal
The default value is info. You can experiment with different levels to see how much information that you want to display or suppress.
Other Log Parameters
The logging mechanism allows each new block of log information to be appended to the existing log until it reaches the maximum size of 1 MB. At that point, new logging information is stored in a backup file. There can be a maximum of five log files for a single script. You can change the log file name, size, and maximum number of backup files.
Sample Log Information
The following examples show the type of information you can find in these log files. The first example shows that a fatal error has occurred.
2008-07-02 13:33:10,652 INFO [com.hp.bto.dw.sqlbatch.SqlBatch] - Checking database options...2008-07-02 13:33:10,949 FATAL [com.hp.bto.dw.dbcreate.DbCreateCommandLine] - Problem during DB options check: An error that can be corrected by the user has been found. Check the log file to correct the problem.Check the error log file 'C:\...\\foundation\log\mssql_check_db_options_LastRun.log', line number 2
008-07-02 13:33:10,949 FATAL [com.hp.bto.dw.dbcreate.DbCreateCommandLine] - Exit code: 6
The second example shows successful execution.
2008-07-02 13:36:27,136 INFO [com.hp.bto.dw.dbmetadatatool.DbMetadatatool] - Creating Date and Time stored procedures and populating the dimension tables...2008-07-02 13:36:30,511 INFO [com.hp.bto.dw.commons.dblogparser.LogParserStatus] - Command successfully executed.
It is possible to change the format of the reported information by changing the corresponding configuration files.
SQL Command Logging Mechanism
All the SQL commands that are executed at the direction of the data warehouse software are redirected to simple log file. You can view the log file to trace the execution of all SQL commands. All log files are in this directory:
C:\Program Files\HP\IT Analytics 2.00\Foundation\conf
• mssql_TablesAndSeqsResult.log
• mssql_create_dw_schema_LastRun.log
138 Chapter : Tracing and Logging

The prefix of the log file name is the RDBMS type: mssql. The suffix of the log file name is _LastRun. This suffix indicates that the file contains the last run output of the SQL command.
To simplify interpreting SQL errors, the data warehouse applications parse the log files to report the most critical SQL error to the user. For more information, you can review the entire log file. Because the data warehouse appends log information in a history format in certain log files, you can review prior errors. Other log files retain only the history of the most recent execution. These files always have the _LastRun suffix. For example:
• mssql_check_db_options_LastRun.log
• mssql_create_dw_schema_date_time_dim_LastRun.log
These history log files contain the date and time the SQL command runs, the date and time it completes, and the returned status of the SQL command. For example:
-----------------------------------------------------------Start of command: sqlcmd -S localhost -d BTODW -U dwmetadata -P **** -i "C:\...\\foundation\etc\sql\mssql\create_dw_staging_resources.sql" -o "C:\...\\foundation\log\mssql_create_dw_staging_resources_LastRun.log"At: Wed Jul 02 13:35:59 PDT 2009----------------------------------------------------------- 1: 2: ********** Creating staging resources **********-----------------------------------------------------------End of command: sqlcmd -S localhost -d BTODW -U dwmetadata -P **** -i "C:\...\\foundation\etc\sql\mssql\create_dw_staging_resources.sql" -o "C:\...\\foundation\log\mssql_create_dw_staging_resources_LastRun.log"At: Wed Jul 02 13:35:59 PDT 2009Returned code is: 0-----------------------------------------------------------
XREF Log
The ETL process generates a dw_xref.log that you can locate in this directory:
C:\Program Files\HP\IT Analytics 2.00\ContentPacks\Core\conf
Example
The following example shows an Oracle connection error.
2009-06-12 06:26:51,937 [INFO ] com.hp.bto.dw.etl.xrefgen.XREFGenerator - 2009-06-12 06:26:51,937 [INFO ] com.hp.bto.dw.etl.xrefgen.XREFGenerator - ************** Begin XREFGenerator table Processing *****************2009-06-12 06:26:52,093 [DEBUG] com.hp.bto.dw.etl.xref.util.DBHelper - Loading Configuration Properties from file: R:\FOUNDA~1\etc\ABC\..\..\..\ContentPacks\Core\conf\xref.properties2009-06-12 06:26:52,234 [DEBUG] com.hp.bto.dw.etl.xrefgen.XREFGenerator - consolidatedName is PERSON Batch ID = 1.02009-06-12 06:26:52,234 [INFO ] com.hp.bto.dw.etl.xrefgen.XREFGenerator - Executing XREFGenerator, consolidatedName = PERSON,md_batch_id = 1.02009-06-12 06:26:56,391 [ERROR] com.hp.bto.dw.etl.xrefgen.XREFGenerator - --- Errors caught in XREFGenerator ----
139

2009-06-12 06:26:56,391 [ERROR] com.hp.bto.dw.etl.xrefgen.XREFGenerator - e.getMessage()2009-06-12 06:26:56,391 [ERROR] com.hp.bto.dw.etl.xrefgen.XREFGenerator - Exception: ORA-12560: TNS:protocol adapter error
Apache Tomcat Logs
Tomcat jobs write messages about web server events in separate logs. You can locate these logs in the BOE\Tomcat directory structure:
C:\Program Files\HP\IT Analytics 2.00\BO\boe\Tomcat55\logs
Look for task-specific logs related to web tier functionality.
BOE Logs
BODS produces many run-time logs. You can locate these logs in the BODS directory structure:
C:\Program Files\HP\IT Analytics 2.00\BO\bods\BusinessObjects Data Services\log
The \log folder has sub-directories to further organize the BODS logs.
140 Chapter : Tracing and Logging

11 Backup and Re-Initialization
When you back up the data warehouse, you must save not only the content, but also the data warehouse infrastructure, staging databases, and configuration files.
Before you begin the backup process, make sure that no ETL process or data warehouse utility is running.
A best practice for data warehouse administrators is to back up critical data on a regular basis. Read this chapter for information about backup and re-initialization processes.
Recovery of the data warehouse is more complicated. Read Chapter 12, Recovery for information about data warehouse recovery processes.
Daily Backup Process
There are certain data warehouse tables that you should back up daily after you complete the daily scheduled ETL jobs. The backup strategy depends on the RDBMS. The backup involves selecting the following tables from source to target. The backup process includes backup of:
• Selected source tables
• Selected staging tables
• The external files in these directories:
C:\ETL_EXTRACTIONS\AM\*.TXT
C:\ETL_EXTRACTIONS\PPM\*.TXT
• The full data warehouse
Source Tables
Source tables are those tables that contain content to be extracted from those external sources. The following tables should be backed up daily.
Table 37 Source Tables
AM Tables PPM 7.50 Tables PPM 8.00 Tables
amAsset KCRT_FG_PFM_ASSET KCRT_FG_PFM_ASSET
amModel KCRT_FG_PFM_PROJECT KCRT_FG_PFM_PROJECT
amNature KCRT_REQUESTS KCRT_REQUESTS
amBudgCenter KCST_BUDGET_LINE_CELLS FM_FINANCIAL_LINE_CELLS
amBudget KCST_BUDGET_LINES FM_FORECAST_ACTUAL_LINES
141

Staging Tables
Staging tables are temporary tables that contain the data before the ETL process loads it into target tables. You should back up the data warehouse staging tables listed in Table 38 through Table 44 daily.
ABC Tables
ABC tables contain measure, metric, and other information that supports the execution of ABC jobs.
amBudgLine KCST_BUDGET_LINKED_ENTITIES PFM_LIFECYCLE_PARENT_ENTITY
amCompany KCST_BUDGET_PERIOD_SUM FM_FORECAST_ACTUAL_PERIOD_SUM
amContact KCST_BUDGETS FM_FINANCIAL_SUMMARY
amContract KCST_CURRENCY_CELLS FM_FINANCIAL_LINE_CELLS
amCostCenter KCST_CURRENCY_LINES KNTA_REGIONS
amCountry KNTA_REGIONS KNTA_USERS
amEmplDept KNTA_USERS KRSC_ORG_UNITS
amCostCategory KRSC_ORG_UNITS PM_PROJECT_TYPES
amExpenseLine PM_PROJECT_TYPES PM_PROJECTS
amLocation PM_PROJECTS PM_PROJECTS_CONTAINERS
amModel PM_PROJECTS_CONTAINERS
amNature
amPortfolio
amProject
Table 37 Source Tables
AM Tables PPM 7.50 Tables PPM 8.00 Tables
Table 38 ABC Tables
ABC Table Name Schema Name
AUDIT_MEASURE dwabc
AUDIT_MEASURE_METRIC_ASSOC dwabc
AUDIT_METRIC dwabc
BALANCE_MEASURE dwabc
BALANCE_MEASURE_METRIC_ASSOC dwabc
BALANCE_METRIC dwabc
CONTACT dwabc
EXEC_CATALOG dwabc
142 Chapter : Backup and Re-Initialization

XREF Tables
Cross reference (XREF) tables are ancillary tables that describe various relationships that support ETL processing. For example, cross reference tables contain descriptions of enterprise key-to-business key relationships, source entities, consolidated entities, or priority relationships among source systems consolidated entities.
EXEC_CONTACT_ASSOC dwabc
EXECATALOG_MODEL_AUDIT dwabc
EXECUTABLE dwabc
JOB_STREAM_DT dwabc
JOB_STREAM_LINK_DT dwabc
JOB_STREAM_RT dwabc
JOB_STREAM_STEP_DETAIL_RT dwabc
JOB_STREAM_STEP_DT dwabc
JOB_STREAM_STEP_MEASURE dwabc
JOB_STREAM_STEP_RT dwabc
RPT_JOB_STATUS_LIST dwabc
STREAM_MODEL_AUDIT dwabc
Table 38 ABC Tables
ABC Table Name Schema Name
Table 39 Enterprise XREF Tables
Enterprise XREF Table Name Schema Name
ACTUALCOST_ENTERPRISE_XREF dwst
ACTUALCOST_HISTORY_ENTERPRISE_XREF dwst
APPLICATION_ENTERPRISE_XREF dwst
BUDGET_ENTERPRISE_XREF dwst
BUDGET_HISTORY_ENTERPRISE_XREF dwst
BUDGETLINE_ENTERPRISE_XREF dwst
BUDGETLINE_HISTORY_ENTERPRISE_XREF dwst
BUSSERVICE_HISTORY_ENTERPRISE_XREF dwst
CFGITEM_ENTERPRISE_XREF dwst
CFGITEM_HISTORY_ENTERPRISE_XREF dwst
CONSOLIDATED_XREF dwst
CONSOLIDATION_ATTRIBUTE_XREF dwst
CONTRACT_ENTERPRISE_XREF dwst
CONTRACT_HISTORY_ENTERPRISE_XREF dwst
143

COSTCATEGORY_ENTERPRISE_XREF dwst
COSTCATEGORY_HISTORY_ENTERPRISE_XREF dwst
COSTCENTER_ENTERPRISE_XREF dwst
CURRENCY_ENTERPRISE_XREF dwst
EXCHANGE_ENTERPRISE_XREF dwst
ITFUNCTION_ENTERPRISE_XREF dwst
ITFUNCTION_HISTORY_ENTERPRISE_XREF dwst
LOCATION_ENTERPRISE_XREF dwst
LOCATION_HISTORY_ENTERPRISE_XREF dwst
MODEL_ENTERPRISE_XREF dwst
MODEL_HISTORY_ENTERPRISE_XREF dwst
ORG_ENTERPRISE_XREF dwst
ORG_HISTORY_ENTERPRISE_XREF dwst
PERIOD_ENTERPRISE_XREF dwst
PERSON_ENTERPRISE_XREF dwst
PERSON_HISTORY_ENTERPRISE_XREF dwst
PLANNEDCOST_ENTERPRISE_XREF dwst
PLANNEDCOST_HISTORY_ENTERPRISE_XREF dwst
PROGRAM_ENTERPRISE_XREF dwst
PROGRAM_HISTORY_ENTERPRISE_XREF dwst
PROJECT_ENTERPRISE_XREF dwst
PROJECT_HISTORY_ENTERPRISE_XREF dwst
SCENARIO_ENTERPRISE_XREF dwst
SOURCE_CONS_PRIORITY_XREF dwst
SOURCE_INTEGRATION_XREF dwst
SOURCE_SYS_INSTANCE_XREF dwst
SRC_ATTR_CONS_PRIORITY_XREF dwst
XREF_EXTT dwst
XREF_TRACK dwst
XREF_UPDATE_AUDIT dwst
Table 39 Enterprise XREF Tables
Enterprise XREF Table Name Schema Name
144 Chapter : Backup and Re-Initialization

Lookup Tables
The data warehouse uses lookup tables to retrieve the ID of an entity using the enterprise or durable key. Lookup tables are mainly used in the XFR process.
Table 40 Lookup Tables
Lookup Table Name Schema Name
APPLICATION_KEY_LOOKUP dwst
BUDGET_KEY_LOOKUP dwst
BUDGETLINE_KEY_LOOKUP dwst
BUSSERVICE_KEY_LOOKUP dwst
CFGITEM_KEY_LOOKUP dwst
CONTRACT_KEY_LOOKUP dwst
COSTCATEGORY_KEY_LOOKUP dwst
COSTCENTER_KEY_LOOKUP dwst
CURRENCY_KEY_LOOKUP dwst
DNFLAG_KEY_LOOKUP dwst
EXCHANGE_KEY_LOOKUP dwst
ITFUNCTION_KEY_LOOKUP dwst
LOCATION_KEY_LOOKUP dwst
MODEL_KEY_LOOKUP dwst
OCFLAG_KEY_LOOKUP dwst
ORG_KEY_LOOKUP dwst
PERIOD_KEY_LOOKUP dwst
PERSON_KEY_LOOKUP dwst
PROGRAM_KEY_LOOKUP dwst
PROJECT_KEY_LOOKUP dwst
SCENARIO_KEY_LOOKUP dwst
145

Metadata Tables
Metadata tables describe logical models used to create the data warehouse tables.
Table 41 Metadata Tables
Metadata Table Name Schema Name
AggCollapsedDimAttribute dwmetadata
Aggregation dwmetadata
AGGREGATION_AUDIT dwmetadata
AGGREGATION_AUDIT_DETAILS dwmetadata
AggregationMeasure dwmetadata
AggTableGeneration dwmetadata
AggTableGenerationDetail dwmetadata
Catalog dwmetadata
CONSOLIDATION_MODEL_AUDIT dwmetadata
CONSOLIDATION_MODEL_AUDIT_DETAILS dwmetadata
ConsolidationColumn dwmetadata
ConsolidationDimRef dwmetadata
ConsolidationFactRef dwmetadata
ConsolidationModel dwmetadata
DATABASE_CONFIGURATION dwmetadata
DataSourceConnection dwmetadata
DatasourceMssqlInstance dwmetadata
DatasourceOracleInstance dwmetadata
DATATYPE_MAPPING dwmetadata
DATATYPE_MAPPING_REVERSE dwmetadata
DDL_DEFINITION dwmetadata
Dimension dwmetadata
DimensionAssociatedDimension dwmetadata
DimensionAttribute dwmetadata
DML_DEFINITION dwmetadata
DS_CONNECTION_AUDIT dwmetadata
DW_CONFIGURATION dwmetadata
EXTRACTION_MODEL_AUDIT dwmetadata
EXTRACTION_MODEL_AUDIT_DETAILS dwmetadata
ExtractionColumn dwmetadata
146 Chapter : Backup and Re-Initialization

ExtractionConsRef dwmetadata
ExtractionModel dwmetadata
Fact dwmetadata
FactAssociatedDimension dwmetadata
FactMeasure dwmetadata
FixedHierarchy dwmetadata
FixedHierarchyLevel dwmetadata
FixedHierarchyLevelMember dwmetadata
FixedHierarchyLevelPosition dwmetadata
IMPORTED_STATIC_TABLE dwmetadata
MODEL_TO_DDL_ASSOC dwmetadata
RecursiveHierarchy dwmetadata
SOURCE_MODEL_AUDIT dwmetadata
SourceModel dwmetadata
SourceModelColumnMapping dwmetadata
SourceModelMapping dwmetadata
STATIC_ATTRIBUTE_PROPERTY dwmetadata
STATIC_COL dwmetadata
STATIC_DIMENSION dwmetadata
STATIC_TABLE dwmetadata
STATUS_EXPLANATION dwmetadata
TARGET_DIMENSION_AUDIT dwmetadata
TARGET_DIMENSION_AUDIT_DETAILS dwmetadata
TARGET_FACT_AUDIT dwmetadata
TARGET_FACT_AUDIT_DETAILS dwmetadata
TIMEZONE_INFO dwmetadata
Table 41 Metadata Tables
Metadata Table Name Schema Name
147

Snapshot Tables
Snapshot (TSNP, SSNP, and CSNP) tables are the persistent storage for ETL staging data. These snapshot tables capture the changed data and support the data warehouse recovery process. The data warehouse uses TSNP tables for source extraction staging, SSNP tables for single source identity staging, and CSNP tables for single or multiple source consolidation staging. The final ETL stage captures the snapshot data.
Table 42 Snapshot Tables
Snapshot Table Name Schema Name
AM_ACTUALCOST_SSNP dws
AM_AMASSET_TSNP dws
AM_AMBUDGCENTER_TSNP dws
AM_AMBUDGET_TSNP dws
AM_AMBUDGLINE_TSNP dws
AM_AMCOMPANY_TSNP dws
AM_AMCONTACT_TSNP dws
AM_AMCONTRACT_TSNP dws
AM_AMCOSTCENTER_TSNP dws
AM_AMCOUNTRY_TSNP dws
AM_AMEMPLDEPT_TSNP dws
AM_AMEXPENSELINE_TSNP dws
AM_AMLOCATION_TSNP dws
AM_AMMODEL_TSNP dws
AM_AMNATURE_TSNP dws
AM_AMPORTFOLIO_TSNP dws
AM_AMPROJECT_TSNP dws
AM_BUDGET_SSNP dws
AM_BUDGETLINE_SSNP dws
AM_CFGITEM_SSNP dws
AM_CONTRACT_SSNP dws
AM_COSTCENTER_SSNP dws
AM_LOCATION_SSNP dws
AM_MODEL_SSNP dws
AM_ORG_SSNP dws
AM_PERSON_SSNP dws
AM_PLANNEDCOST_SSNP dws
AM_PROJECT_SSNP dws
148 Chapter : Backup and Re-Initialization

PPM_ACTUALCOST_SSNP dws
PPM_BUDGET_SSNP dws
PPM_BUDGETLINE_SSNP dws
PPM_KCRT_FG_PFM_ASSET_TSNP dws
PPM_KCRT_FG_PFM_PROJECT_TSNP dws
PPM_KCRT_REQUESTS_TSNP dws
PPM_KCST_BUDG_LINE_CELLS_TSNP dws
PPM_KCST_BUDG_PERIOD_SUM_TSNP dws
PPM_KCST_BUDGET_LINES_TSNP dws
PPM_KCST_BUDGET_LNK_ENT_TSNP dws
PPM_KCST_BUDGETS_TSNP dws
PPM_KCST_CURRENCY_CELLS_TSNP dws
PPM_KCST_CURRENCY_LINES_TSNP dws
PPM_KNTA_REGIONS_TSNP dws
PPM_KNTA_USERS_TSNP dws
PPM_KRSC_ORG_UNITS_TSNP dws
PPM_LOCATION_SSNP dws
PPM_ORG_SSNP dws
PPM_PERSON_SSNP dws
PPM_PLANNEDCOST_SSNP dws
PPM_PM_PROJECT_TYPES_TSNP dws
PPM_PM_PROJECTS_CONT_TSNP dws
PPM_PM_PROJECTS_TSNP dws
PPM_PROGRAM_SSNP dws
PPM_PROJECT_SSNP dws
SM_CFGITEM_SSNP dws
SM_COMPANYM1_TSNP dws
SM_CONTCTSM1_TSNP dws
SM_DEPTM1_TSNP dws
SM_DEVICE2M1_TSNP dws
SM_LOCATION_SSNP dws
SM_LOCM1_TSNP dws
SM_MODEL_SSNP dws
Table 42 Snapshot Tables
Snapshot Table Name Schema Name
149

SM_MODELM1_TSNP dws
SM_ORG_SSNP dws
SM_PERSON_SSNP dws
SM_VENDORM1_TSNP dws
ACTUALCOST_CSNP dws
APPLICATION_CSNP dws
BUDGET_CSNP dws
BUDGETLINE_CSNP dws
CFGITEM_CSNP dws
CONTRACT_CSNP dws
COSTCATEGORY_CSNP dws
COSTCENTER_CSNP dws
CURRENCY_CSNP dws
EXCHANGE_CSNP dws
ITFUNCTION_CSNP dws
LOCATION_CSNP dws
MODEL_CSNP dws
ORG_CSNP dws
PERIOD_CSNP dws
PERSON_CSNP dws
PLANNEDCOST_CSNP dws
PROGRAM_CSNP dws
PROJECT_CSNP dws
SCENARIO_CSNP dws
Table 42 Snapshot Tables
Snapshot Table Name Schema Name
150 Chapter : Backup and Re-Initialization

Validation Tables
Validation Failed (VALF) tables contains the records that fail validation. You can use these failed records to research data errors and potential remedies. Data validation is part of the process to load the EXT tables.
Table 43 Validation Tables
Validation Table Name Schema Name
AM_AMASSET_VALF dws
AM_AMBUDGCENTER_VALF dws
AM_AMBUDGET_VALF dws
AM_AMBUDGLINE_VALF dws
AM_AMCOMPANY_VALF dws
AM_AMCONTACT_VALF dws
AM_AMCONTRACT_VALF dws
AM_AMCOSTCENTER_VALF dws
AM_AMCOUNTRY_VALF dws
AM_AMEMPLDEPT_VALF dws
AM_AMEXPENSELINE_VALF dws
AM_AMLOCATION_VALF dws
AM_AMMODEL_VALF dws
AM_AMNATURE_VALF dws
AM_AMPORTFOLIO_VALF dws
AM_AMPROJECT_VALF dws
PPM_KCRT_FG_PFM_ASSET_VALF dws
PPM_KCRT_FG_PFM_PROJECT_VALF dws
PPM_KCRT_REQUESTS_VALF dws
PPM_KCST_BUDG_LINE_CELLS_VALF dws
PPM_KCST_BUDG_PERIOD_SUM_VALF dws
PPM_KCST_BUDGET_LINES_VALF dws
PPM_KCST_BUDGET_LNK_ENT_VALF dws
PPM_KCST_BUDGETS_VALF dws
PPM_KCST_CURRENCY_CELLS_VALF dws
PPM_KCST_CURRENCY_LINES_VALF dws
PPM_KNTA_REGIONS_VALF dws
PPM_KNTA_USERS_VALF dws
PPM_KRSC_ORG_UNITS_VALF dws
151

XREFGEN Tables
Cross Reference Generator (XREFGEN) tables support data matching and cross reference inputs for the consolidation models.
PPM_PM_PROJECT_TYPES_VALF dws
PPM_PM_PROJECTS_CONT_VALF dws
PPM_PM_PROJECTS_VALF dws
SM_COMPANYM1_VALF dws
SM_CONTCTSM1_VALF dws
SM_DEPTM1_VALF dws
SM_DEVICE2M1_VALF dws
SM_LOCM1_VALF dws
SM_MODELM1_VALF dws
SM_VENDORM1_VALF dws
VALIDATION_REF dws
Table 43 Validation Tables
Validation Table Name Schema Name
Table 44 XREFGEN Tables
XREFGEN Table Name Schema Name
ACTUALCOST_QUALIFIER xrefgen
ACTUALCOST_REFERENCE xrefgen
ACTUALCOST_SOURCEREFERENCE1 xrefgen
ACTUALCOST_SOURCEREFERENCE2 xrefgen
ACTUALCOST_SOURCEREFERENCE3 xrefgen
ACTUALCOST_STG_QUALIFIER xrefgen
ACTUALCOST_STG_SOURCE_BUSINESSKEY xrefgen
ACTUALCOST_STG_SOURCE1_BUSINESSKEY xrefgen
ACTUALCOST_STG_SOURCE2_BUSINESSKEY xrefgen
ACTUALCOST_STG_SOURCE3_BUSINESSKEY xrefgen
ACTUALCOST_XREF_INPUT xrefgen
BUDGET_QUALIFIER xrefgen
BUDGET_REFERENCE xrefgen
BUDGET_SOURCEREFERENCE1 xrefgen
BUDGET_SOURCEREFERENCE2 xrefgen
BUDGET_SOURCEREFERENCE3 xrefgen
152 Chapter : Backup and Re-Initialization

BUDGET_STG_QUALIFIER xrefgen
BUDGET_STG_SOURCE_BUSINESSKEY xrefgen
BUDGET_STG_SOURCE1_BUSINESSKEY xrefgen
BUDGET_STG_SOURCE2_BUSINESSKEY xrefgen
BUDGET_STG_SOURCE3_BUSINESSKEY xrefgen
BUDGET_XREF_INPUT xrefgen
BUDGETLINE_QUALIFIER xrefgen
BUDGETLINE_REFERENCE xrefgen
BUDGETLINE_SOURCEREFERENCE1 xrefgen
BUDGETLINE_SOURCEREFERENCE2 xrefgen
BUDGETLINE_SOURCEREFERENCE3 xrefgen
BUDGETLINE_STG_QUALIFIER xrefgen
BUDGETLINE_STG_SOURCE_BUSINESSKEY xrefgen
BUDGETLINE_STG_SOURCE1_BUSINESSKEY xrefgen
BUDGETLINE_STG_SOURCE2_BUSINESSKEY xrefgen
BUDGETLINE_STG_SOURCE3_BUSINESSKEY xrefgen
BUDGETLINE_XREF_INPUT xrefgen
BUSSERVICE_QUALIFIER xrefgen
BUSSERVICE_REFERENCE xrefgen
BUSSERVICE_SOURCEREFERENCE1 xrefgen
BUSSERVICE_SOURCEREFERENCE2 xrefgen
BUSSERVICE_SOURCEREFERENCE3 xrefgen
BUSSERVICE_STG_QUALIFIER xrefgen
BUSSERVICE_STG_SOURCE_BUSINESSKEY xrefgen
BUSSERVICE_STG_SOURCE1_BUSINESSKEY xrefgen
BUSSERVICE_STG_SOURCE2_BUSINESSKEY xrefgen
BUSSERVICE_STG_SOURCE3_BUSINESSKEY xrefgen
BUSSERVICE_XREF_INPUT xrefgen
CFGITEM_QUALIFIER xrefgen
CFGITEM_REFERENCE xrefgen
CFGITEM_SOURCEREFERENCE1 xrefgen
CFGITEM_SOURCEREFERENCE2 xrefgen
CFGITEM_SOURCEREFERENCE3 xrefgen
Table 44 XREFGEN Tables
XREFGEN Table Name Schema Name
153

CFGITEM_STG_QUALIFIER xrefgen
CFGITEM_STG_SOURCE_BUSINESSKEY xrefgen
CFGITEM_STG_SOURCE1_BUSINESSKEY xrefgen
CFGITEM_STG_SOURCE2_BUSINESSKEY xrefgen
CFGITEM_STG_SOURCE3_BUSINESSKEY xrefgen
CFGITEM_XREF_INPUT xrefgen
CONTRACT_QUALIFIER xrefgen
CONTRACT_REFERENCE xrefgen
CONTRACT_SOURCEREFERENCE1 xrefgen
CONTRACT_SOURCEREFERENCE2 xrefgen
CONTRACT_SOURCEREFERENCE3 xrefgen
CONTRACT_STG_QUALIFIER xrefgen
CONTRACT_STG_SOURCE_BUSINESSKEY xrefgen
CONTRACT_STG_SOURCE1_BUSINESSKEY xrefgen
CONTRACT_STG_SOURCE2_BUSINESSKEY xrefgen
CONTRACT_STG_SOURCE3_BUSINESSKEY xrefgen
CONTRACT_XREF_INPUT xrefgen
COSTCATEGORY_QUALIFIER xrefgen
COSTCATEGORY_REFERENCE xrefgen
COSTCATEGORY_SOURCEREFERENCE1 xrefgen
COSTCATEGORY_SOURCEREFERENCE2 xrefgen
COSTCATEGORY_SOURCEREFERENCE3 xrefgen
COSTCATEGORY_STG_QUALIFIER xrefgen
COSTCATEGORY_STG_SOURCE_BUSINESSKEY xrefgen
COSTCATEGORY_STG_SOURCE1_BUSINESSKEY xrefgen
COSTCATEGORY_STG_SOURCE2_BUSINESSKEY xrefgen
COSTCATEGORY_STG_SOURCE3_BUSINESSKEY xrefgen
COSTCATEGORY_XREF_INPUT xrefgen
ITFUNCTION_QUALIFIER xrefgen
ITFUNCTION_REFERENCE xrefgen
ITFUNCTION_SOURCEREFERENCE1 xrefgen
ITFUNCTION_SOURCEREFERENCE2 xrefgen
ITFUNCTION_SOURCEREFERENCE3 xrefgen
Table 44 XREFGEN Tables
XREFGEN Table Name Schema Name
154 Chapter : Backup and Re-Initialization

ITFUNCTION_STG_QUALIFIER xrefgen
ITFUNCTION_STG_SOURCE_BUSINESSKEY xrefgen
ITFUNCTION_STG_SOURCE1_BUSINESSKEY xrefgen
ITFUNCTION_STG_SOURCE2_BUSINESSKEY xrefgen
ITFUNCTION_STG_SOURCE3_BUSINESSKEY xrefgen
ITFUNCTION_XREF_INPUT xrefgen
LOCATION_QUALIFIER xrefgen
LOCATION_REFERENCE xrefgen
LOCATION_SOURCEREFERENCE1 xrefgen
LOCATION_SOURCEREFERENCE2 xrefgen
LOCATION_SOURCEREFERENCE3 xrefgen
LOCATION_STG_QUALIFIER xrefgen
LOCATION_STG_SOURCE_BUSINESSKEY xrefgen
LOCATION_STG_SOURCE1_BUSINESSKEY xrefgen
LOCATION_STG_SOURCE2_BUSINESSKEY xrefgen
LOCATION_STG_SOURCE3_BUSINESSKEY xrefgen
LOCATION_XREF_INPUT xrefgen
MODEL_QUALIFIER xrefgen
MODEL_REFERENCE xrefgen
MODEL_SOURCEREFERENCE1 xrefgen
MODEL_SOURCEREFERENCE2 xrefgen
MODEL_SOURCEREFERENCE3 xrefgen
MODEL_STG_QUALIFIER xrefgen
MODEL_STG_SOURCE_BUSINESSKEY xrefgen
MODEL_STG_SOURCE1_BUSINESSKEY xrefgen
MODEL_STG_SOURCE2_BUSINESSKEY xrefgen
MODEL_STG_SOURCE3_BUSINESSKEY xrefgen
MODEL_XREF_INPUT xrefgen
ORG_QUALIFIER xrefgen
ORG_REFERENCE xrefgen
ORG_SOURCEREFERENCE1 xrefgen
ORG_SOURCEREFERENCE2 xrefgen
ORG_SOURCEREFERENCE3 xrefgen
Table 44 XREFGEN Tables
XREFGEN Table Name Schema Name
155
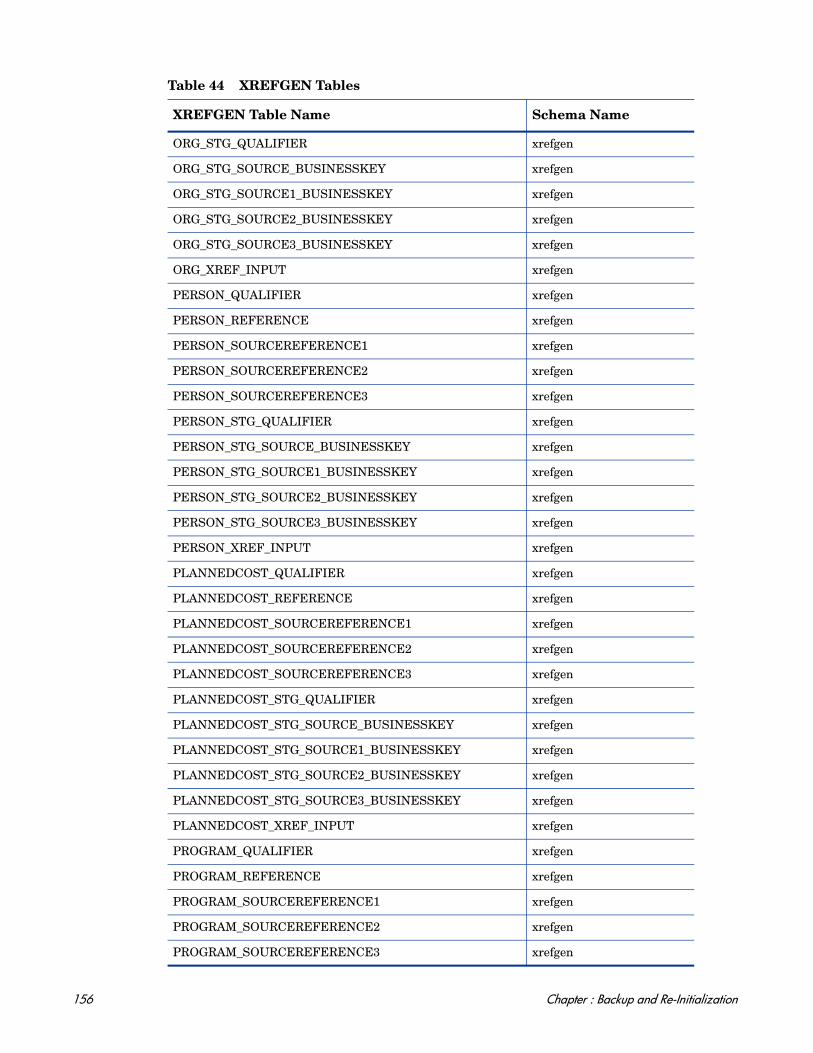
ORG_STG_QUALIFIER xrefgen
ORG_STG_SOURCE_BUSINESSKEY xrefgen
ORG_STG_SOURCE1_BUSINESSKEY xrefgen
ORG_STG_SOURCE2_BUSINESSKEY xrefgen
ORG_STG_SOURCE3_BUSINESSKEY xrefgen
ORG_XREF_INPUT xrefgen
PERSON_QUALIFIER xrefgen
PERSON_REFERENCE xrefgen
PERSON_SOURCEREFERENCE1 xrefgen
PERSON_SOURCEREFERENCE2 xrefgen
PERSON_SOURCEREFERENCE3 xrefgen
PERSON_STG_QUALIFIER xrefgen
PERSON_STG_SOURCE_BUSINESSKEY xrefgen
PERSON_STG_SOURCE1_BUSINESSKEY xrefgen
PERSON_STG_SOURCE2_BUSINESSKEY xrefgen
PERSON_STG_SOURCE3_BUSINESSKEY xrefgen
PERSON_XREF_INPUT xrefgen
PLANNEDCOST_QUALIFIER xrefgen
PLANNEDCOST_REFERENCE xrefgen
PLANNEDCOST_SOURCEREFERENCE1 xrefgen
PLANNEDCOST_SOURCEREFERENCE2 xrefgen
PLANNEDCOST_SOURCEREFERENCE3 xrefgen
PLANNEDCOST_STG_QUALIFIER xrefgen
PLANNEDCOST_STG_SOURCE_BUSINESSKEY xrefgen
PLANNEDCOST_STG_SOURCE1_BUSINESSKEY xrefgen
PLANNEDCOST_STG_SOURCE2_BUSINESSKEY xrefgen
PLANNEDCOST_STG_SOURCE3_BUSINESSKEY xrefgen
PLANNEDCOST_XREF_INPUT xrefgen
PROGRAM_QUALIFIER xrefgen
PROGRAM_REFERENCE xrefgen
PROGRAM_SOURCEREFERENCE1 xrefgen
PROGRAM_SOURCEREFERENCE2 xrefgen
PROGRAM_SOURCEREFERENCE3 xrefgen
Table 44 XREFGEN Tables
XREFGEN Table Name Schema Name
156 Chapter : Backup and Re-Initialization

PROGRAM_STG_QUALIFIER xrefgen
PROGRAM_STG_SOURCE_BUSINESSKEY xrefgen
PROGRAM_STG_SOURCE1_BUSINESSKEY xrefgen
PROGRAM_STG_SOURCE2_BUSINESSKEY xrefgen
PROGRAM_STG_SOURCE3_BUSINESSKEY xrefgen
PROGRAM_XREF_INPUT xrefgen
PROJECT_QUALIFIER xrefgen
PROJECT_REFERENCE xrefgen
PROJECT_SOURCEREFERENCE1 xrefgen
PROJECT_SOURCEREFERENCE2 xrefgen
PROJECT_SOURCEREFERENCE3 xrefgen
PROJECT_STG_QUALIFIER xrefgen
PROJECT_STG_SOURCE_BUSINESSKEY xrefgen
PROJECT_STG_SOURCE1_BUSINESSKEY xrefgen
PROJECT_STG_SOURCE2_BUSINESSKEY xrefgen
PROJECT_STG_SOURCE3_BUSINESSKEY xrefgen
PROJECT_XREF_INPUT xrefgen
XREFGEN_TRACK xrefgen
Table 44 XREFGEN Tables
XREFGEN Table Name Schema Name
157

Export and Import ETL
The ETL export scripts, dw_etl_backup.bat and dw_etl_restore.bat, enable you to export ETL processes and then re-import the processes after an IT Analytics upgrade. You can export the ETL workflows for a particular entity or for the entire SAP BusinessObjects Data Services repository. The export tool saves each workflow as an XML file and includes the dependent objects, such as data flows and other workflows, but does not include data stores and shared functions.
To export ETL workflows
1 Make sure ETL is not running.
2 Open a Windows command line window.
3 Switch to this directory:
C:\Program Files\HP\IT Analytics 2.00\Foundation\bin
4 Run this command:
dw_etl_backup.bat -option
where option is one or more of the following options:
To import the ETL workflows into the SAP BusinessObjects Data Services repository
1 Make sure ETL is not running.
2 Open a Windows command line window.
3 Switch to this directory:
C:\Program Files\HP\IT Analytics 2.00\Foundation\bin
Option Description
-help Display the command syntax.
-verbose Verbose output.
-entity <entity> Export ETL for this entity. This option is exclusive and cannot be used with other options.
-allentities Export ETL for all entities. This option is exclusive and cannot be used with other options.
-workflow <workflow> Export ETL for this workflow.
-allfunctions Export all custom functions.
-allflatfileformats Export all custom file formats.
-alljobs Export all jobs.
-alldatastores Export all data stores.
-todir <directory> Export all files to this directory.
For example
dw_etl_backup.bat -entity PERSON -todir c:\BTO\ETLBackup\1dw_etl_backup.bat -allentities -todir c:\BTO\ETLBackup\2dw_etl_backup.bat -alljobs -allflatfileformats -todir c:\BTO\ETLBackup\3
158 Chapter : Backup and Re-Initialization
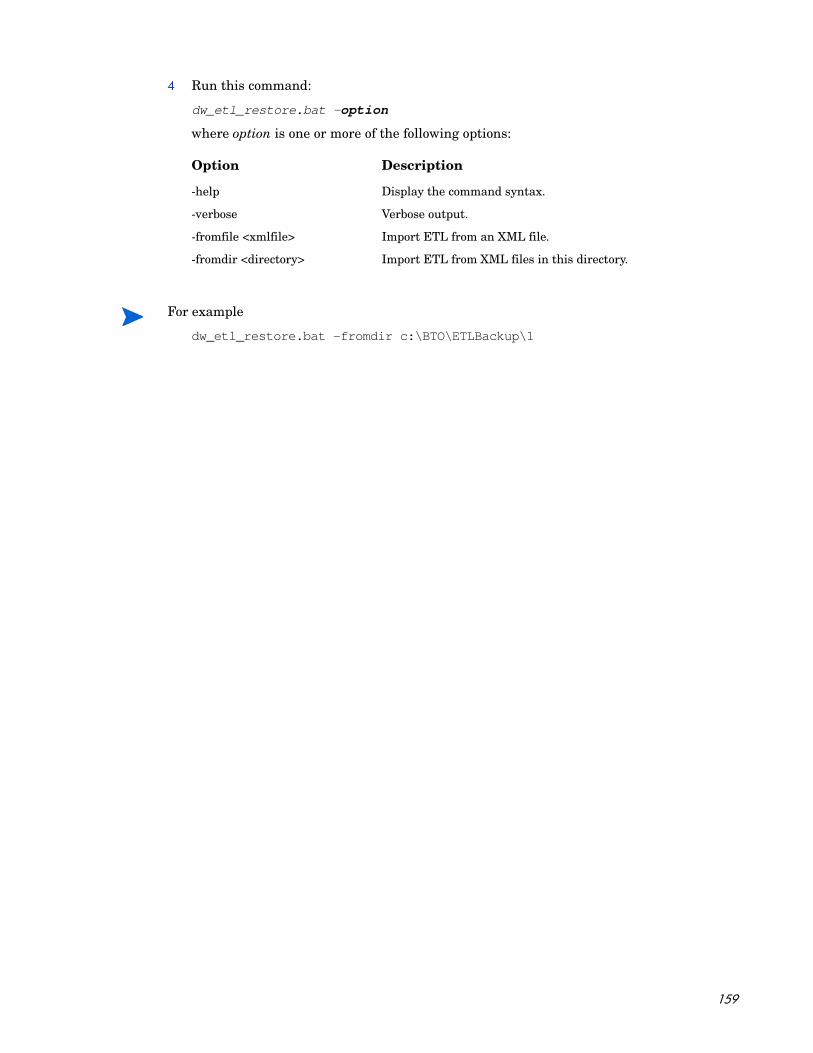
4 Run this command:
dw_etl_restore.bat -option
where option is one or more of the following options:
Option Description
-help Display the command syntax.
-verbose Verbose output.
-fromfile <xmlfile> Import ETL from an XML file.
-fromdir <directory> Import ETL from XML files in this directory.
For example
dw_etl_restore.bat -fromdir c:\BTO\ETLBackup\1
159

Re-Initialization
This process is important when you identify corrupted data in data warehouse tables. The objective is to re-initialize the data warehouse tables with current source data. There are two possible strategies to accomplish this objective.
• You can truncate the affected data warehouse tables and repeat the ETL process to re-load those tables. If you truncate the affected tables, you will lose the history for those tables.
• You can delete only the corrupt source records from the affected tables and repeat the ETL process to re-load the deleted records. The deleted records are replaced with the current source data records. Replacing corrupted data at the record level is preferable because you will not lose the table history, although this action does not correct any historical inactive data.
When you start the ETL process, you assume that external data sources have updated data since the last scheduled ETL. Therefore, entities that you do not re-initialize may have updates, deletes, or new records to store in the data warehouse. When you re-initialize one or more entities, you may also lose some history data.
Related Entities and Tables
The following entities are candidates for re-initialization using the truncate or delete method.
Core Entities
Table 45 BUSSERVICE Entity
Table Name Type Schema Source System
BUSSERVICE_DIM DW DWT N/A
Table 46 CFGITEM Entity
Table Name Type Schema Source System
CFGITEM_CSNP CSNP DWST N/A
CFGITEM_DIM DW DWT N/A
CFGITEM_ENTERPRISE_XREF ENTERPRISE_XREF DWST N/A
CFGITEM_KEY_LOOKUP KEY_LOOKUP DWST N/A
AM_CFGITEM_SSNP SSNP DWS AM
SM_CFGITEM_SSNP SSNP DWS SM
AM_AMASSET_TSNP TSNP DWS AM
AM_AMMODEL_TSNP TSNP DWS AM
AM_AMNATURE_TSNP TSNP DWS AM
AM_AMPORTFOLIO_TSNP TSNP DWS AM
SM_DEVICE2M1_TSNP TSNP DWS SM
160 Chapter : Backup and Re-Initialization

PPM_KCST_BUDGETS_TSNP TSNP DWS PPM
PPM_KCST_CURRENCY_CELLS_TSNP TSNP DWS PPM
PPM_KCST_CURRENCY_LINES_TSNP TSNP DWS PPM
Table 46 CFGITEM Entity
Table Name Type Schema Source System
161

Table 47 LOCATION Entity
Table Name Type Schema Source System
LOCATION_CSNP CSNP DWST N/A
LOCATION_DIM DW DWT N/A
LOCATION_ENTERPRISE_XREF ENTERPRISE_XREF DWST N/A
LOCATION_KEY_LOOKUP KEY_LOOKUP DWST N/A
AM_LOCATION_SSNP SSNP DWS AM
PPM_LOCATION_SSNP SSNP DWS PPM
SM_LOCATION_SSNP SSNP DWS SM
AM_AMLOCATION_TSNP TSNP DWS AM
PPM_KNTA_REGIONS_TSNP TSNP DWS PPM
SM_LOCM1_TSNP TSNP DWS SM
Table 48 MODEL Entity
Table Name Type Schema Source System
MODEL_CSNP CSNP DWST N/A
MODEL_DIM DW DWT N/A
MODEL_ENTERPRISE_XREF ENTERPRISE_XREF DWST N/A
MODEL_KEY_LOOKUP KEY_LOOKUP DWST N/A
AM_MODEL_SSNP SSNP DWS AM
SM_MODEL_SSNP SSNP DWS SM
AM_AMMODEL_TSNP TSNP ITAM AM
SM_MODELM1_TSNP TSNP DBO SM
162 Chapter : Backup and Re-Initialization

Table 49 ORG Entity
Table Name Type Schema Source System
ORG_CSNP CSNP DWST N/A
ORG_DIM DW DWT N/A
ORG_ENTERPRISE_XREF ENTERPRISE_XREF DWST N/A
ORG_KEY_LOOKUP KEY_LOOKUP DWST N/A
AM_ORG_SSNP SSNP DWS AM
PPM_ORG_SSNP SSNP DWS PPM
SM_ORG_SSNP SSNP DWS SM
AM_AMCOMPANY_TSNP TSNP DWS AM
AM_AMEMPLDEPT_TSNP TSNP DWS AM
PPM_KRSC_ORG_UNITS_TSNP TSNP DWS PPM
SM_COMPANYM1_TSNP TSNP DWS SM
SM_DEPTM1_TSNP TSNP DWS SM
SM_VENDORM1_TSNP TSNP DWS SM
Table 50 PERSON Entity
Table Name Type Schema Source System
PERSON_CSNP CSNP DWST N/A
PERSON_DIM DW DWT N/A
PERSON_ENTERPRISE_XREF ENTERPRISE_XREF DWST N/A
PERSON_KEY_LOOKUP KEY_LOOKUP DWST N/A
AM_PERSON_SSNP SSNP DWS AM
PPM_PERSON_SSNP SSNP DWS PPM
SM_PERSON_SSNP SSNP DWS SM
AM_AMCONTACT_TSNP TSNP DWS AM
AM_AMEMPLDEPT_TSNP TSNP DWS AM
PPM_KNTA_USERS_TSNP TSNP DWS PPM
SM_CONTCTSM1_TSNP TSNP DWS SM
163

Table 51 PROJECT Entity
Table Name Type Schema Source System
PROJECT_CSNP CSNP DWST N/A
PROJECT_DIM DW DWT N/A
PROJECT_ENTERPRISE_XREF ENTERPRISE_XREF DWST N/A
PROJECT_KEY_LOOKUP KEY_LOOKUP DWST N/A
AM_PROJECT_SSNP SSNP DWS AM
PPM_PROJECT_SSNP SSNP DWS PPM
AM_AMPROJECT_TSNP TSNP DWS AM
PPM_KCRT_FG_PFM_PROJECT_TSNP TSNP DWS PPM
PPM_PM_PROJECT_TYPES_TSNP TSNP DWS PPM
PPM_PM_PROJECTS_TSNP TSNP DWS PPM
Table 52 CURRENCY Entity
Table Name Type Schema Source System
CURRENCY_DIM DW DWT N/A
Table 53 EXCHANGE Entity
Table Name Type Schema Source System
EXCHANGE_DIM DW DWT N/A
EXCHANGE_KEY_LOOKUP KEY_LOOKUP DWST N/A
Table 54 PERIOD Entity
Table Name Type Schema Source System
PERIOD_CSNP CSNP DWST N/A
PERIOD_DIM DW DWT N/A
PERIOD_ENTERPRISE_XREF ENTERPRISE_XREF DWST N/A
PERIOD_KEY_LOOKUP KEY_LOOKUP DWST N/A
PERIOD_EXTT TSNP DWS N/A
Table 55 PROGRAM Entity
Table Name Type Schema Source System
PROGRAM_DIM DW DWT N/A
164 Chapter : Backup and Re-Initialization
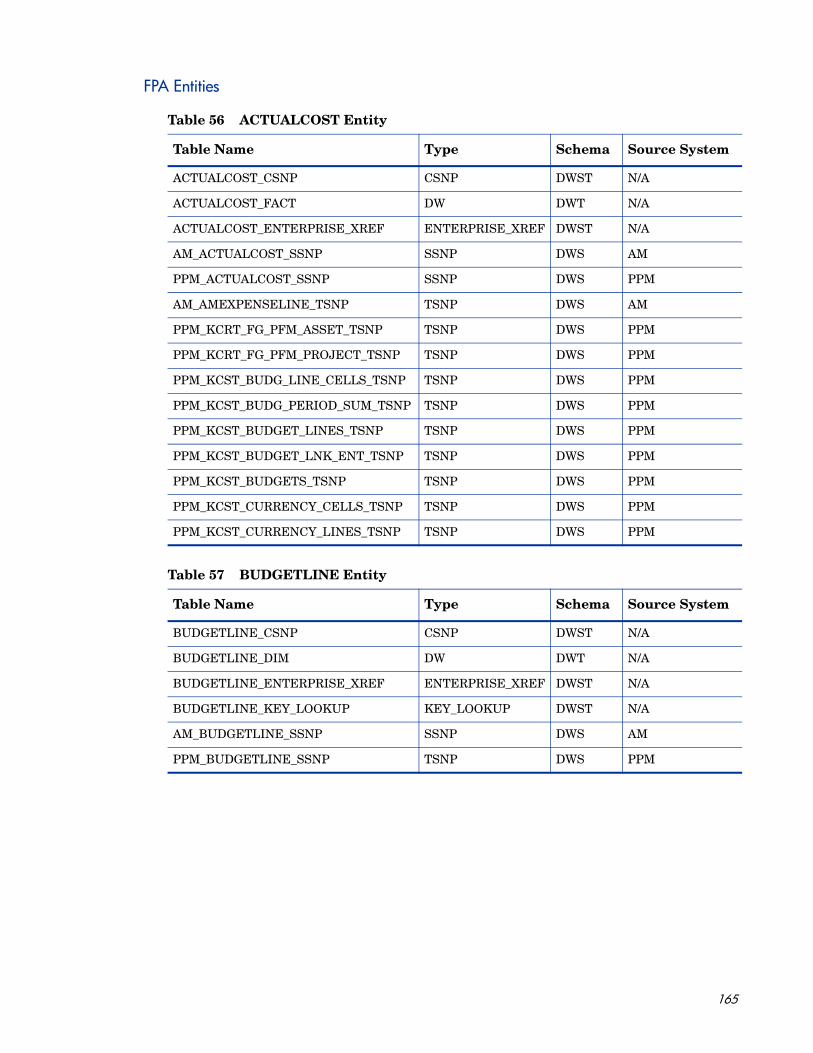
FPA Entities
Table 56 ACTUALCOST Entity
Table Name Type Schema Source System
ACTUALCOST_CSNP CSNP DWST N/A
ACTUALCOST_FACT DW DWT N/A
ACTUALCOST_ENTERPRISE_XREF ENTERPRISE_XREF DWST N/A
AM_ACTUALCOST_SSNP SSNP DWS AM
PPM_ACTUALCOST_SSNP SSNP DWS PPM
AM_AMEXPENSELINE_TSNP TSNP DWS AM
PPM_KCRT_FG_PFM_ASSET_TSNP TSNP DWS PPM
PPM_KCRT_FG_PFM_PROJECT_TSNP TSNP DWS PPM
PPM_KCST_BUDG_LINE_CELLS_TSNP TSNP DWS PPM
PPM_KCST_BUDG_PERIOD_SUM_TSNP TSNP DWS PPM
PPM_KCST_BUDGET_LINES_TSNP TSNP DWS PPM
PPM_KCST_BUDGET_LNK_ENT_TSNP TSNP DWS PPM
PPM_KCST_BUDGETS_TSNP TSNP DWS PPM
PPM_KCST_CURRENCY_CELLS_TSNP TSNP DWS PPM
PPM_KCST_CURRENCY_LINES_TSNP TSNP DWS PPM
Table 57 BUDGETLINE Entity
Table Name Type Schema Source System
BUDGETLINE_CSNP CSNP DWST N/A
BUDGETLINE_DIM DW DWT N/A
BUDGETLINE_ENTERPRISE_XREF ENTERPRISE_XREF DWST N/A
BUDGETLINE_KEY_LOOKUP KEY_LOOKUP DWST N/A
AM_BUDGETLINE_SSNP SSNP DWS AM
PPM_BUDGETLINE_SSNP TSNP DWS PPM
165

Table 58 COSTCENTER Entity
Table Name Type Schema Source System
COSTCENTER_CSNP CSNP DWST N/A
COSTCENTER_DIM DW DWT N/A
COSTCENTER_ENTERPRISE_XREF ENTERPRISE_XREF DWST N/A
COSTCENTER_KEY_LOOKUP KEY_LOOKUP DWST N/A
AM_AMCOSTCENTER_TSNP TSNP DWS AM
Table 59 PLANNEDCOST Entity
Table Name Type Schema Source System
PLANNEDCOST_CSNP CSNP DWST N/A
PLANNEDCOST_FACT DW DWT N/A
PLANNEDCOST_ENTERPRISE_XREF ENTERPRISE_XREF DWST N/A
AM_PLANNEDCOST_SSNP SSNP DWS AM
PPM_PLANNEDCOST_SSNP SSNP DWS PPM
PPM_KCRT_FG_PFM_ASSET_TSNP TSNP DWS PPM
PPM_KCRT_FG_PFM_PROJECT_TSNP TSNP DWS PPM
PPM_KCST_BUDG_LINE_CELLS_TSNP TSNP DWS PPM
PPM_KCST_BUDGET_LINES_TSNP TSNP DWS PPM
PPM_KCST_BUDGET_LNK_ENT_TSNP TSNP DWS PPM
PPM_KCST_BUDGETS_TSNP TSNP DWS PPM
PPM_KCST_CURRENCY_CELLS_TSNP TSNP DWS PPM
Table 60 BUDGET Entity
Table Name Type Schema Source System
BUDGET_CSNP CSNP DWST N/A
BUDGET_DIM DW DWT N/A
BUDGET_ENTERPRISE_XREF ENTERPRISE_XREF DWST N/A
BUDGET_KEY_LOOKUP KEY_LOOKUP DWST N/A
BUDGET_EXTT TSNP DWS N/A
Table 61 APPLICATION Entity
Table Name Type Schema Source System
APPLICATION_DIM DW DWT N/A
166 Chapter : Backup and Re-Initialization

Re-Initialization Scenarios
There are four typical re-initialization scenarios:
• Re-Initialize a Single Entity From a Single Source (on this page).
• Re-Initialize a Single Entity From All Sources on page 170.
• Re-Initialize All Entities From a Single Source on page 175.
• Re-Initialize All Entities From All Sources on page 177.
Re-Initialize a Single Entity From a Single Source
When all the data for a single entity in a single data warehouse table from a single source system is corrupt, you must clean the data warehouse tables to ensure a successful refresh of source data. If the entity with corrupt data shares tables with other entities, you may need to clean and refresh those tables, too. The defective data resides in the data warehouse tables and TSNP, SSNP, and CSNP tables. The first step is to clean the affected tables and then re-run the ETL process to re-populate the tables.
Table 64 on page 167 shows those entities that have dependent entities.
Table 62 CONTRACT Entity
Table Name Type Schema Source System
CONTRACT_CSNP CSNP DWST N/A
CONTRACT_DIM DW DWT N/A
CONTRACT_ENTERPRISE_XREF ENTERPRISE_XREF DWST N/A
CONTRACT_KEY_LOOKUP KEY_LOOKUP DWST N/A
AM_AMCONTRACT_TSNP TSNP DWS AM
Table 63 ITFUNCTION Entity
Table Name Type Schema Source System
ITFUNCTION_DIM DW DWT N/A
These re-initialization scenarios apply to non-consolidated records.
Table 64 Entities With Shared Source Tables
Entity Name External Data Source Dependent Entity
ACTUALCOST
AM No Other AM Entity Affected
PPMBUDGETLINE
PLANNEDCOST
PROJECT
167

For example, if the PROJECT entity data from Project and Portfolio Management is corrupt, you must re-populate not only PROJECT, but also the PLANNEDCOST, ACTUALCOST and BUDGETLINE entities from the Project and Portfolio Management source database because these entities share source tables.
To complete the required tasks
1 Delete the corrupt records from the dimension tables.
/* Microsoft SQL Server 2005 template to delete dimension tables */
DELETE FROM <DW_DB_NAME>.<SCH_NAME>.<ENTITY_NAME>_DIMWHERE MD_DURABLE_KEY in (
SELECT en_xref.ENTERPRISE_KEY AS MD_DURABLE_KEYFROM <STAGING_DB_NAME>.<SCH_NAME>.<ENTITY_NAME>_ENTERPRISE_XREF en_xref,<STAGING_DB_NAME>.<SCH_NAME>.SOURCE_INTEGRATION_XREF src_xrefWHERE en_xref.SOURCE_INTEGRATION_XREF_ID = src_xref.SOURCE_INTEGRATION_XREF_ID
BUDGETLINE
AM PLANNEDCOST
PPMPROJECT
PLANNEDCOST
ACTUALCOST
CONTRACT AM No Other AM Entity Affected
COSTCENTER AM No Other AM Entity Affected
LOCATION
AM No Other SM Entity Affected
PPM No Other PPM Entity Affected
SM No Other SM Entity Affected
MODELAM PROJECT
SM No Other SM Entity Affected
ORG
AM PERSON
PPM No Other PPM Entity Affected
SM No Other SM Entity Affected
PERSON
AM ORG
PPM No Other Entity Affected
SM No Other Entity Affected
PROJECT
AM MODEL
PPMACTUALCOST
BUDGETLINE
PLANNEDCOST
Table 64 Entities With Shared Source Tables
Entity Name External Data Source Dependent Entity
168 Chapter : Backup and Re-Initialization

AND src_xref.SINGLE_SOURCE_IDENTITY_NAME = '<SRC_SYS_NAME>_<ENTITY_NAME>');
Example: Run the following script to delete corrupt dimension data from the ORG entity.
DELETE FROM DC_DW.dwt.ORG_DIMWHERE MD_DURABLE_KEY in (
SELECT en_xref.ENTERPRISE_KEY AS MD_DURABLE_KEYFROM DC_STAGING.dwst.ORG_ENTERPRISE_XREF en_xref, DC_STAGING.dwst.SOURCE_INTEGRATION_XREF src_xrefWHERE en_xref.SOURCE_INTEGRATION_XREF_ID = src_xref.SOURCE_INTEGRATION_XREF_IDAND src_xref.SINGLE_SOURCE_IDENTITY_NAME = 'AM_ORG');
2 Delete all corrupt records in the CSNP tables.
/*Microsoft SQL Server 2005 template to delete CSNP tables*/
DELETE FROM <STAGING_DB_NAME>.<SCH_NAME>.<ENTITY_NAME>_CSNPWHERE MD_ENTERPRISE_KEY in (
SELECT en_xref.ENTERPRISE_KEY AS MD_ENTERPRISE_KEYFROM <STAGING_DB_NAME>.<SCH_NAME>.<ENTITY_NAME>_ENTERPRISE_XREF en_xref,<STAGING_DB_NAME>.<SCH_NAME>.SOURCE_INTEGRATION_XREF src_xrefWHERE en_xref.SOURCE_INTEGRATION_XREF_ID = src_xref.SOURCE_INTEGRATION_XREF_IDAND src_xref.SINGLE_SOURCE_IDENTITY_NAME = '<SRC_SYS_NAME>_<ENTITY_NAME>');
Example: Run the following SQL script to delete corrupt data from the ORG CSNP table.
DELETE FROM DC_STAGING.dwst.ORG_CSNPWHERE MD_ENTERPRISE_KEY in (
SELECT en_xref.ENTERPRISE_KEY AS MD_ENTERPRISE_KEYFROM DC_STAGING.dwst.ORG_ENTERPRISE_XREF en_xref, DC_STAGING.dwst.SOURCE_INTEGRATION_XREF src_xrefWHERE en_xref.SOURCE_INTEGRATION_XREF_ID = src_xref.SOURCE_INTEGRATION_XREF_IDAND src_xref.SINGLE_SOURCE_IDENTITY_NAME = 'AM_ORG');
3 Delete all corrupt records from the SSNP tables.
/*Microsoft SQL Server 2005 template to delete SSNP tables*/
DELETE FROM <STAGING_DB_NAME>.<SCH_NAME>.<SRC_SYS_NAME>_<ENTITY_NAME>_SSNPWHERE MD_BUSINESS_KEY in (
SELECT en_xref. BUSINESS_KEYVALUE AS MD_BUSINESS_KEYFROM <STAGING_DB_NAME>.<SCH_NAME>.<ENTITY_NAME>_ENTERPRISE_XREF en_xref,<STAGING_DB_NAME>.<SCH_NAME>.SOURCE_INTEGRATION_XREF src_xrefWHERE en_xref.SOURCE_INTEGRATION_XREF_ID = src_xref.SOURCE_INTEGRATION_XREF_IDAND src_xref.SINGLE_SOURCE_IDENTITY_NAME = '<SRC_SYS_NAME>_<ENTITY_NAME>');
Example: Run the following script to delete corrupt data from the ORG SSNP table.
169

DELETE FROM DC_STAGING.dws.AM_ORG_SSNPWHERE MD_BUSINESS_KEY in (
SELECT en_xref.BUSINESS_KEYVALUE AS MD_BUSINESS_KEYFROM DC_STAGING.dwst.PLANNEDCOST_ENTERPRISE_XREF en_xref, DC_STAGING.dwst.SOURCE_INTEGRATION_XREF src_xrefWHERE en_xref.SOURCE_INTEGRATION_XREF_ID = src_xref.SOURCE_INTEGRATION_XREF_IDAND src_xref.SINGLE_SOURCE_IDENTITY_NAME = 'AM_ORG');
4 Delete all corrupt records from the TSNP tables.
Example: If the ORG entity is corrupt, you must truncate all related TSNP tables described in Related Entities and Tables on page 160. Table 65 lists the TSNP tables for the ORG entity.
5 Start a complete ETL job. Repeat the steps in Task 9: Run Initial Sync on page 55.
Re-Initialize a Single Entity From All Sources
If you need to refresh a single entity from all external data sources, complete these tasks. This process truncates all the staging tables associated with a single entity. The data warehouse tables will be re-populated entirely by the most current source data from their dependent systems (Asset Manager or Project and Portfolio Management).
If a single entity that acquires source data from multiple sources, such as Asset Manager or Project and Portfolio Management, is corrupt, you must clean up all tables that process delta records, key lookup tables, and related data warehouse tables. The basic steps are to remove the corrupt data and then re-populate these tables with current source data.
There are a few entities that share tables from the same source database. When this occurs, all data warehouse tables associated with these entities sharing the same source system tables must also be refreshed, but only for the shared source system. This is similar to the scenario described in Re-Initialize All Entities From a Single Source on page 175. You must complete some extra steps to delete defective data from the related data warehouse and staging tables related to the single entity. If the single entity has no shared tables, follow these steps. If the single entity shares tables with other entities, skip the following steps and proceed to Re-Initialize a Single Entity That Shares Tables on page 171.
You can refresh these entities independently.
• CONTRACT
• COSTCENTER
To re-initialize a single entity from all sources
1 Run the following SQL script to truncate all records from the tables listed in Related Entities and Tables on page 160. For example, if you need to refresh the LOCATION entity, you must truncate these tables to refresh the LOCATION entity with current source data.
Table 65 PLANNED_COST Entity
Table Name Type Schema Source System
AM_AMCOMPANY_TSNP TSNP DWS AM
AM_AMEMPLDEPT_TSNP TSNP DWS AM
If you truncate records from data warehouse tables, you will lose some table history.
170 Chapter : Backup and Re-Initialization

/*SQL Example for Microsoft SQL Server 2005 to truncate LOCATION*/
TRUNCATE TABLE <DW_DB_NAME>.<SCH_NAME>.AM_AMLOCATION_DIM;TRUNCATE TABLE <STAGING_DB_NAME>.<SCH_NAME>.AM_AMLOCATION_TSNP;TRUNCATE TABLE <STAGING_DB_NAME>.<SCH_NAME>.PPM_KNTA_REGIONS_TSNP;TRUNCATE TABLE <STAGING_DB_NAME>.<SCH_NAME>.SM_LOCM1_TSNP;TRUNCATE TABLE <STAGING_DB_NAME>.<SCH_NAME>.AM_LOCATION_SSNP;TRUNCATE TABLE <STAGING_DB_NAME>.<SCH_NAME>.PPM_LOCATION_SSNP;TRUNCATE TABLE <STAGING_DB_NAME>.<SCH_NAME>.SM_LOCATION_SSNP;TRUNCATE TABLE <STAGING_DB_NAME>.<SCH_NAME>.LOCATION_CSNP;TRUNCATE TABLE <STAGING_DB_NAME>.<SCH_NAME>.LOCATION_ENTERPRISE_XREF;TRUNCATE TABLE <STAGING_DB_NAME>.<SCH_NAME>.LOCATION_KEY_LOOKUP;
2 Start a complete ETL job. Repeat the steps in Task 9: Run Initial Sync on page 55.
Re-Initialize a Single Entity That Shares Tables
The following table lists those entities that obtain data from multiple sources and share source tables with other entities. When there are shared tables, you must refresh them when the entity has corrupt data.
Table 66 Entities With Shared Tables
Entity Name External Data Source Dependent Entity
ACTUALCOST
AM No Other Entity Affected
PPM
BUDGETLINE
PLANNEDCOST
PROJECT
BUDGETLINE
AM PLANNEDCOST
PPM
PROJECT
PLANNEDCOST
ACTUALCOST
LOCATION
AM No Other SM Entity Affected
PPM No Other PPM Entity Affected
SM No Other SM Entity Affected
PLANNEDCOST
AM BUDGETLINE
PPM
ACTUALCOST
BUDGETLINE
PROJECT
PROJECT
AM MODEL
PPM
ACTUALCOST
BUDGETLINE
PLANNEDCOST
171

For example, if the PROJECT entity is corrupt, you must:
• Refresh the AM MODEL table, as well as the PPM ACTUALCOST, BUDGETLINE, and PLANNEDCOST tables.
• Remove corrupt data from the AM MODEL, PPM ACTUALCOST, PPM BUDGETLINE, and PPM PLANNEDCOST data warehouse tables and staging tables.
To re-initialize a single entity that shares tables
1 Run the following SQL script to truncate (delete) all records from the related PROJECT tables listed in Related Entities and Tables on page 160.
/*Microsoft SQL Server 2005 template to truncate related tables*/
TRUNCATE TABLE <DW_DB_NAME>.<SCH_NAME>.AM_AMPROJECT_DIM;TRUNCATE TABLE <STAGING_DB_NAME>.<SCH_NAME>.AM_AMPROJECT_TSNP;TRUNCATE TABLE <STAGING_DB_NAME>.<SCH_NAME>.PPM_PM_PROJECTS_TSNP;TRUNCATE TABLE <STAGING_DB_NAME>.<SCH_NAME>.PPM_PM_PROJECT_TYPES_TSNP;TRUNCATE TABLE <STAGING_DB_NAME>.<SCH_NAME>.PPM_KCRT_FG_PFM_PROJECT_TSNP;TRUNCATE TABLE <STAGING_DB_NAME>.<SCH_NAME>.AM_PROJECT_SSNP;TRUNCATE TABLE <STAGING_DB_NAME>.<SCH_NAME>.PPM_PROJECT_SSNP;TRUNCATE TABLE <STAGING_DB_NAME>.<SCH_NAME>.PROJECT_CSNP;TRUNCATE TABLE <STAGING_DB_NAME>.<SCH_NAME>.PROJECT_ENTERPRISE_XREF;TRUNCATE TABLE <STAGING_DB_NAME>.<SCH_NAME>.PROJECT_KEY_LOOKUP;
ORG
AM PERSON
PPM No Other Entity Affected
SM No Other Entity Affected
PERSON
AM ORG
PPM No Other Entity Affected
SM No Other Entity Affected
CFITEMAM BUSSERVICE
SM BUSSERVICE
BUSSERVICEAM CFGITEM
SM CFGITEM
Table 66 Entities With Shared Tables
Entity Name External Data Source Dependent Entity
172 Chapter : Backup and Re-Initialization

2 Delete all corrupt records from the data warehouse tables.
/*Microsoft SQL Server 2005 template to delete related data warehouse tables*/
DELETE FROM <DW_DB_NAME>.<SCH_NAME>.<ENTITY_NAME>_DIM /*OR _FACT*/WHERE MD_DURABLE_KEY in (
SELECT en_xref.ENTERPRISE_KEY AS MD_DURABLE_KEYFROM <STAGING_DB_NAME>.<SCH_NAME>.<ENTITY_NAME>_ENTERPRISE_XREF en_xref,<STAGING_DB_NAME>.<SCH_NAME>.SOURCE_INTEGRATION_XREF src_xrefWHERE en_xref.SOURCE_INTEGRATION_XREF_ID = src_xref.SOURCE_INTEGRATION_XREF_IDAND src_xref.SINGLE_SOURCE_IDENTITY_NAME = '<SRC_SYS_NAME>_<ENTITY_NAME>');
Example: If the corrupt entity is PROJECT, then all the data warehouse tables related to AM MODEL, PPM ACTUALCOST, PPM BUDGETLINE, and PPM PLANNEDCOST must be deleted.
/*Microsoft SQL Server 2005 example to delete tables related to PROJECT*/
DELETE FROM <DW_DB_NAME>.<SCH_NAME>.<ENTITY_NAME>_DIM /*OR _FACT*/WHERE MD_DURABLE_KEY in (
SELECT en_xref.ENTERPRISE_KEY AS MD_DURABLE_KEYFROM <STAGING_DB_NAME>.<SCH_NAME>.<ENTITY_NAME>_ENTERPRISE_XREF en_xref,<STAGING_DB_NAME>.<SCH_NAME>.SOURCE_INTEGRATION_XREF src_xrefWHERE en_xref.SOURCE_INTEGRATION_XREF_ID = src_xref.SOURCE_INTEGRATION_XREF_IDAND src_xref.SINGLE_SOURCE_IDENTITY_NAME = '<SRC_SYS_NAME>_<ENTITY_NAME>');
173

Example: Run the following SQL script to delete corrupt fact data from the PLANNEDCOST entity:
DELETE FROM DC_DW.dwt.PLANNEDCOST_FACTWHERE MD_DURABLE_KEY in (
SELECT en_xref.ENTERPRISE_KEY AS MD_DURABLE_KEYFROM DC_STAGING.dwst.PLANNEDCOST_ENTERPRISE_XREF en_xref, DC_STAGING.dwst.SOURCE_INTEGRATION_XREF src_xrefWHERE en_xref.SOURCE_INTEGRATION_XREF_ID = src_xref.SOURCE_INTEGRATION_XREF_IDAND src_xref.SINGLE_SOURCE_IDENTITY_NAME = 'AM_PLANNEDCOST');
3 Delete all corrupt records in the CSNP tables.
/*Microsoft SQL Server 2005 template to delete CSNP tables*/
DELETE FROM <STAGING_DB_NAME>.<SCH_NAME>.<ENTITY_NAME>_CSNPWHERE MD_ENTERPRISE_KEY in (
SELECT en_xref.ENTERPRISE_KEY AS MD_ENTERPRISE_KEYFROM <STAGING_DB_NAME>.<SCH_NAME>.<ENTITY_NAME>_ENTERPRISE_XREF en_xref,<STAGING_DB_NAME>.<SCH_NAME>.SOURCE_INTEGRATION_XREF src_xrefWHERE en_xref.SOURCE_INTEGRATION_XREF_ID = src_xref.SOURCE_INTEGRATION_XREF_IDAND src_xref.SINGLE_SOURCE_IDENTITY_NAME = '<SRC_SYS_NAME>_<ENTITY_NAME>');
Example: Run the following SQL script to delete corrupt data from the PLANNEDCOST CSNP table.
DELETE FROM DC_STAGING.dwst.PLANNEDCOST_CSNPWHERE MD_ENTERPRISE_KEY in (
SELECT en_xref.ENTERPRISE_KEY AS MD_ENTERPRISE_KEYFROM DC_STAGING.dwst.PLANNEDCOST_ENTERPRISE_XREF en_xref, DC_STAGING.dwst.SOURCE_INTEGRATION_XREF src_xrefWHERE en_xref.SOURCE_INTEGRATION_XREF_ID = src_xref.SOURCE_INTEGRATION_XREF_IDAND src_xref.SINGLE_SOURCE_IDENTITY_NAME = 'AM_PLANNEDCOST');
4 Delete all corrupt records from the SSNP tables.
/*Microsoft SQL Server 2005 template to delete SSNP tables*/DELETE FROM <STAGING_DB_NAME>.<SCH_NAME>.<SRC_SYS_NAME>_<ENTITY_NAME>_SSNPWHERE MD_BUSINESS_KEY in (
SELECT en_xref. BUSINESS_KEYVALUE AS MD_BUSINESS_KEYFROM <STAGING_DB_NAME>.<SCH_NAME>.<ENTITY_NAME>_ENTERPRISE_XREF en_xref,<STAGING_DB_NAME>.<SCH_NAME>.SOURCE_INTEGRATION_XREF src_xrefWHERE en_xref.SOURCE_INTEGRATION_XREF_ID = src_xref.SOURCE_INTEGRATION_XREF_IDAND src_xref.SINGLE_SOURCE_IDENTITY_NAME = '<SRC_SYS_NAME>_<ENTITY_NAME>');
174 Chapter : Backup and Re-Initialization

Example: If the PROJECT entity is corrupt, run the following SQL script to delete corrupt data from the PLANNEDCOST SSNP table. You must repeat the process for AM MODEL, PPM ACTUALCOST, and PPM BUDGETLINE.
DELETE FROM DC_STAGING.dws.AM_PLANNEDCOST_SSNPWHERE MD_BUSINESS_KEY in (
SELECT en_xref.BUSINESS_KEYVALUE AS MD_BUSINESS_KEYFROM DC_STAGING.dwst.PLANNEDCOST_ENTERPRISE_XREF en_xref, DC_STAGING.dwst.SOURCE_INTEGRATION_XREF src_xrefWHERE en_xref.SOURCE_INTEGRATION_XREF_ID = src_xref.SOURCE_INTEGRATION_XREF_IDAND src_xref.SINGLE_SOURCE_IDENTITY_NAME = 'AM_PLANNEDCOST');
5 Delete all corrupt records from the TSNP tables.
Example: If the PROJECT entity is corrupt, you must truncate all TSNP tables related to AM MODEL, PPM ACTUALCOST, PPM BUDGETLINE, and PPM PLANNEDCOST described in Related Entities and Tables on page 160. Table 67 lists the TSNP tables for the PLANNEDCOST entity.
6 Start a complete ETL job. Repeat the steps in Task 9: Run Initial Sync on page 55.
Re-Initialize All Entities From a Single Source
If all data in a data warehouse table from a single source, such as Asset Manager or Project and Portfolio Management, is corrupt, you must clean up the data warehouse tables to refresh with the current source data. The corrupt data is in the data warehouse tables and related staging tables (TSNP, SSNP, and CSNP). The basic steps are to remove the corrupt data and then re-populate these tables with valid data.
To delete corrupt data and re-initialize the tables
1 Run the following SQL script to delete corrupt records from the dimension tables.
/*Microsoft SQL Server 2005 template to delete corrupt records for dimension tables*/
DELETE FROM <DW_DB_NAME>.<SCH_NAME>.<ENTITY_NAME>_DIMWHERE MD_DURABLE_KEY in (
SELECT en_xref.ENTERPRISE_KEY AS MD_DURABLE_KEYFROM <STAGING_DB_NAME>.<SCH_NAME>.<ENTITY_NAME>_ENTERPRISE_XREF en_xref,
<STAGING_DB_NAME>.<SCH_NAME>.SOURCE_INTEGRATION_XREF src_xrefWHERE en_xref.SOURCE_INTEGRATION_XREF_ID = src_xref.SOURCE_INTEGRATION_XREF_IDAND src_xref.SINGLE_SOURCE_IDENTITY_NAME = '<SRC_SYS_NAME>_<ENTITY_NAME>');
Table 67 PLANNED_COST Entity
Table Name Type Schema Source System
AM_AMBUDGCENTER_TSNP TSNP DWS AM
AM_AMBUDGET_TSNP TSNP DWS AM
AM_AMBUDGLINE_TSNP TSNP DWS AM
175
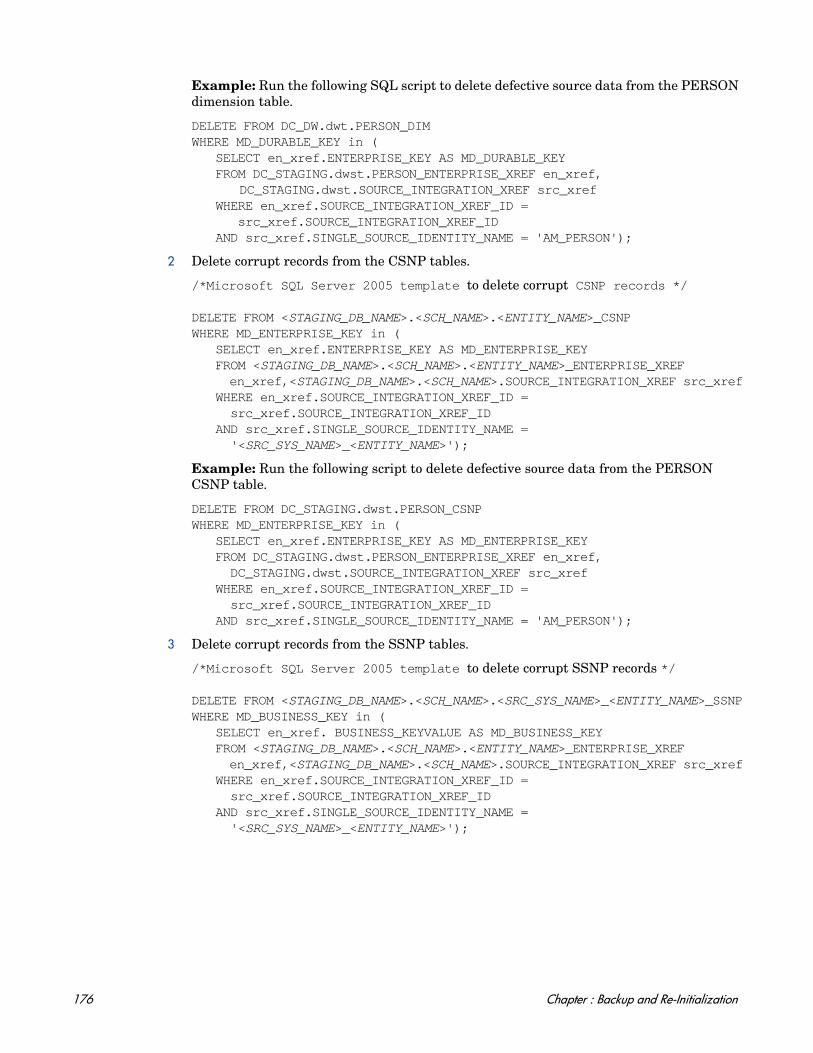
Example: Run the following SQL script to delete defective source data from the PERSON dimension table.
DELETE FROM DC_DW.dwt.PERSON_DIMWHERE MD_DURABLE_KEY in (
SELECT en_xref.ENTERPRISE_KEY AS MD_DURABLE_KEYFROM DC_STAGING.dwst.PERSON_ENTERPRISE_XREF en_xref,
DC_STAGING.dwst.SOURCE_INTEGRATION_XREF src_xrefWHERE en_xref.SOURCE_INTEGRATION_XREF_ID = src_xref.SOURCE_INTEGRATION_XREF_IDAND src_xref.SINGLE_SOURCE_IDENTITY_NAME = 'AM_PERSON');
2 Delete corrupt records from the CSNP tables.
/*Microsoft SQL Server 2005 template to delete corrupt CSNP records */
DELETE FROM <STAGING_DB_NAME>.<SCH_NAME>.<ENTITY_NAME>_CSNPWHERE MD_ENTERPRISE_KEY in (
SELECT en_xref.ENTERPRISE_KEY AS MD_ENTERPRISE_KEYFROM <STAGING_DB_NAME>.<SCH_NAME>.<ENTITY_NAME>_ENTERPRISE_XREF en_xref,<STAGING_DB_NAME>.<SCH_NAME>.SOURCE_INTEGRATION_XREF src_xrefWHERE en_xref.SOURCE_INTEGRATION_XREF_ID = src_xref.SOURCE_INTEGRATION_XREF_IDAND src_xref.SINGLE_SOURCE_IDENTITY_NAME = '<SRC_SYS_NAME>_<ENTITY_NAME>');
Example: Run the following script to delete defective source data from the PERSON CSNP table.
DELETE FROM DC_STAGING.dwst.PERSON_CSNPWHERE MD_ENTERPRISE_KEY in (
SELECT en_xref.ENTERPRISE_KEY AS MD_ENTERPRISE_KEYFROM DC_STAGING.dwst.PERSON_ENTERPRISE_XREF en_xref, DC_STAGING.dwst.SOURCE_INTEGRATION_XREF src_xrefWHERE en_xref.SOURCE_INTEGRATION_XREF_ID = src_xref.SOURCE_INTEGRATION_XREF_IDAND src_xref.SINGLE_SOURCE_IDENTITY_NAME = 'AM_PERSON');
3 Delete corrupt records from the SSNP tables.
/*Microsoft SQL Server 2005 template to delete corrupt SSNP records */
DELETE FROM <STAGING_DB_NAME>.<SCH_NAME>.<SRC_SYS_NAME>_<ENTITY_NAME>_SSNPWHERE MD_BUSINESS_KEY in (
SELECT en_xref. BUSINESS_KEYVALUE AS MD_BUSINESS_KEYFROM <STAGING_DB_NAME>.<SCH_NAME>.<ENTITY_NAME>_ENTERPRISE_XREF en_xref,<STAGING_DB_NAME>.<SCH_NAME>.SOURCE_INTEGRATION_XREF src_xrefWHERE en_xref.SOURCE_INTEGRATION_XREF_ID = src_xref.SOURCE_INTEGRATION_XREF_IDAND src_xref.SINGLE_SOURCE_IDENTITY_NAME = '<SRC_SYS_NAME>_<ENTITY_NAME>');
176 Chapter : Backup and Re-Initialization

Example: Run the following script to delete corrupt records from the SSNP table.
DELETE FROM DC_STAGING.dws.AM_PERSON_SSNPWHERE MD_BUSINESS_KEY in (
SELECT en_xref.BUSINESS_KEYVALUE AS MD_BUSINESS_KEYFROM DC_STAGING.dwst.PERSON_ENTERPRISE_XREF en_xref, DC_STAGING.dwst.SOURCE_INTEGRATION_XREF src_xrefWHERE en_xref.SOURCE_INTEGRATION_XREF_ID = src_xref.SOURCE_INTEGRATION_XREF_IDAND src_xref.SINGLE_SOURCE_IDENTITY_NAME = 'AM_PERSON');
4 Delete the TSNP tables related to the entity. For example, the TSNP tables for the Asset Manager PERSON entity, are
— AM_AMEMPLDEPT_TSNP
— AM_AMCONTACT_TSNP
5 Start a complete ETL job. Repeat the steps in Task 9: Run Initial Sync on page 55.
Re-Initialize All Entities From All Sources
This is the same process as the original initialization of all entities. Complete these steps only when you want to refresh all entities from all data sources. The objective is to truncate all the necessary staging tables. Those include all tables used to process delta records, key lookup tables and data warehouse tables. The data warehouse tables are re-populated with the most current data from their original source systems (Asset Manager or Project and Portfolio Management).
To re-populate all entities
1 Run the following SQL script to truncate (delete) all records from the tables listed in Related Entities and Tables on page 160.
/* Microsoft SQL Server 2005 template */
TRUNCATE TABLE <DW_DB_NAME>.<SCH_NAME>.AM_AMLOCATION_DIM;TRUNCATE TABLE <STAGING_DB_NAME>.<SCH_NAME>.AM_AMLOCATION_TSNP;TRUNCATE TABLE <STAGING_DB_NAME>.<SCH_NAME>.PPM_KNTA_REGIONS_TSNP;TRUNCATE TABLE <STAGING_DB_NAME>.<SCH_NAME>.SM_LOCM1_TSNP;TRUNCATE TABLE <STAGING_DB_NAME>.<SCH_NAME>.AM_LOCATION_SSNP;TRUNCATE TABLE <STAGING_DB_NAME>.<SCH_NAME>.PPM_LOCATION_SSNP;TRUNCATE TABLE <STAGING_DB_NAME>.<SCH_NAME>.SM_LOCATION_SSNP;TRUNCATE TABLE <STAGING_DB_NAME>.<SCH_NAME>.LOCATION_CSNP;TRUNCATE TABLE <STAGING_DB_NAME>.<SCH_NAME>.LOCATION_ENTERPRISE_XREF;TRUNCATE TABLE <STAGING_DB_NAME>.<SCH_NAME>.LOCATION_KEY_LOOKUP;
2 Start a complete ETL job. Repeat the steps in Task 9: Run Initial Sync on page 55.
177

178 Chapter : Backup and Re-Initialization

12 Recovery
The basic difference between the re-initialization process and recovery process is the amount of history lost and the effort required to bring the data warehouse to the steady state. Recovery processes assume the data is correct but the ETL job introduced errors. There are three typical recovery scenarios. These scenarios are independent from the external data sources and entities. Recovering from an ETL error means that the data warehouse returns to a stable state and is ready for the next scheduled ETL job.
These typical scenarios are:
Scenario 1: The latest ETL job result appears to be invalid but the source data is intact.
Scenario 2: There is a failure in the middle of the ETL job.
Scenario 3: There is invalid data in the warehouse, but you know the last time when the data was correct.
When you start the recovery process, you must have complete backups of the data warehouse that are readily available. It is possible that you will lose history data, especially in Scenario 3.
This chapter is a reference for the data warehouse recovery process. The recovery process for your environment may vary according to your business needs and may require customization. Verify that the following processes are consistent with your architecture and environment before you proceed with real data.
Restoring a Microsoft SQL Server Database
Each recovery scenario requires different steps that may include this RDBMS recovery procedure. For more information, see the Microsoft SQL Server 2005 documentation.
To restore a Microsoft SQL Server 2005 database
1 Connect to the Microsoft SQL Server 2005 database.
2 Click the server_name to display the Summary information in the main pane.
3 Expand Databases.
4 In the left pane, right-click one of the IT Analytics databases.
5 Click Tasks > Restore > Database.
6 If necessary, click General.
7 The name of the database to be restored appears in the To database drop-down list. The default value is the database you selected in Step 4. Type a new name if you want to restore into a new database or select another from the drop-down list.
8 From database identifies the source to be restored. The default value is the database you selected in Step 4. You can select another database from the drop-down list.
179

9 To specify the source and location of the backup to restore, click the From device option.
10 Click Browse to open the Specify Backup dialog.
11 Click the drop-down Backup media list to select a device type.
12 To select one or more devices for the Backup location, click Add.
13 When the list is complete, click OK to return to the General page.
14 Select the backup sets to restore displays a list of available backups. Select the backup to restore. The application suggests a recovery plan by pre-selecting backups. You can change these selections, but if you choose a backup that depends on a de-selected backup, both are de-selected.
15 Click OK to return to the General page.
16 In the list of Restore options, select Overwrite the existing database.
17 Click OK.
Scenario 1: Failed Job With Intact Source Data
This scenario is appropriate when the ETL job produces an intermediate warning or non-critical error, the job completes successfully but the target data appears to be incorrect.
To recover from a failed job that has intact source data
1 Complete the steps in Restoring a Microsoft SQL Server Database on page 179.
2 After you complete the backup restoration procedure, associate the database users and logins by running these scripts on the staging and target databases. For example, if you used the sample names in the HP IT Analytics Installation and Configuration Guide, you would run these scripts on the “staging” and “target” databases:
For the staging database:
EXEC sp_change_users_login 'Update_One', 'dws', 'dws'EXEC sp_change_users_login 'Update_One', 'dwst', 'dwst'EXEC sp_change_users_login 'Update_One', 'dwmetadata', 'dwmetadata'EXEC sp_change_users_login 'Update_One', 'dwabc', 'dwabc'EXEC sp_change_users_login 'Update_One', 'xrefgen', 'xrefgen'EXEC sp_change_users_login 'Update_One', 'dwt', 'dwt'
For the target database:
EXEC sp_change_users_login 'Update_One', 'dwt', 'dwt'EXEC sp_change_users_login 'Update_One', 'dwmetadata', 'dwmetadata'EXEC sp_change_users_login 'Update_One', 'itaapp', 'itaapp'EXEC sp_change_users_login 'Update_One', 'itafpaqry', 'itafpaqry'
3 Start a complete ETL job. Repeat the steps in Task 9: Run Initial Sync on page 55.
180 Chapter : Recovery

Scenario 2: The ETL Job Fails
There are five probable points of failure:
• Failure before the dwid="DW" job stream step begins.
<ns1:JobStreamStep dwid="DW" businessname="load from staging to target" catalog="dw" executableidentifier="ds_job" arguments="DW_JB" maxretries="4"/>
• Failure during the dwid="DW" job stream step.
• Failure during the Transactional snapshot (TSNP) phase.
• Failure during the Single Source Identity snapshot (SSNP) phase.
• Failure during the Consolidated snapshot (CSNP) phase.
Before ETL Begins
The data warehouse ABC processes enable you to restart a job stream or a step within a job stream. For more information, see one of these topics:
Task 9: Run Initial Sync on page 55
dw_abc_load_batch on page 129
dw_abc_retry_step on page 130
dw_abc_run_steps on page 131
Failure During the ETL Job
If a BODS error occurs, BODS rolls back automatically. If the error is not caused or caught by BODS, follow these steps.
To recover from a failure during an ETL job
1 Delete all the new records in the data warehouse tables inserted by the current batch job. Updated and deleted records are ignored. Use this example to delete the records from all FACT and DIM tables.
DELETE FROM <TARGET DB>.<TARGET SCHEMA>.<TABLENAME>_FACT WHERE MD_BATCH_ID = (SELECT MAX(MD_BATCH_ID)
FROM <STAGING DB>.<ABC SCHEMA>.JOB_STREAM_STEP_RT) AND MD_LASTMODDATE IS NULL AND MD_DELETEDDATE IS NULL
Where <TABLENAME>_FACT (or <TABLENAME>_DIM) varies depending on the table you are cleaning up.
At this point, the warehouse is not in a usable state until you complete the next step.
2 Re-start the ETL job. Repeat the steps in Task 9: Run Initial Sync on page 55.
181

Failure During the TSNP Phase
If a BODS error occurs, BODS rolls back automatically. If the error is not caused or caught by BODS, follow these steps.
To recover from a failure during the TSNP phase
1 Delete all the new records in the TSNP tables inserted by the current batch job. Updated and deleted records are ignored. Use this example to delete the records from all tables that have a _TSNP suffix.
DELETE FROM <STAGING DB>.<SRC STAGING SCHEMA>.<TABLENAME>_TSNP WHERE MD_BATCH_ID = (SELECT MAX(MD_BATCH_ID)
FROM <STAGING DB>.<ABC SCHEMA>.JOB_STREAM_STEP_RT)
Where <TABLENAME>_TSNP varies depending on the table you are cleaning up.
At this point, the warehouse is not in a usable state until you complete the next step.
2 Re-start the ETL job. Repeat the steps in Task 9: Run Initial Sync on page 55.
Failure During the SSNP Phase
If a BODS error occurs, BODS rolls back automatically. If the error is not caused or caught by BODS, follow these steps.
To recover from a failure during the SSNP phase
1 Delete all the new records in the SSNP tables inserted by the current batch job. Updated and deleted records are ignored. Use this example to delete the records from all tables that have an _SSNP suffix.
DELETE FROM <STAGING DB>.<SRC STAGING SCHEMA>.<TABLENAME>_SSNPWHERE MD_BATCH_ID = (SELECT MAX(MD_BATCH_ID)
FROM <STAGING DB>.<ABC SCHEMA>.JOB_STREAM_STEP_RT)
Where <TABLENAME>_SSNP varies depending on the table you are cleaning up.
At this point, the warehouse is not in a usable state until you complete the next step.
2 Re-start the ETL job. Repeat the steps in Task 9: Run Initial Sync on page 55.
Failure During the CSNP Phase
If a BODS error occurs, BODS rolls back automatically. If the error is not caused or caught by BODS, follow these steps.
To recover from a failure during the SSNP phase
1 Delete all the new records in the CSNP tables inserted by the current batch job. Updated and deleted records are ignored. Use this example to delete the records from all tables that have a _CSNP suffix.
DELETE FROM <STAGING DB>.<DW STAGING SCHEMA>.<TABLENAME>_CSNPWHERE MD_BATCH_ID = (SELECT MAX(MD_BATCH_ID)
FROM <STAGING DB>.<ABC SCHEMA>.JOB_STREAM_STEP_RT)
Where <TABLENAME>_CSNP varies depending on the table you are cleaning up.
At this point, the warehouse is not in a usable state until you complete the next step.
2 Re-start the ETL job. Repeat the steps in Task 9: Run Initial Sync on page 55.
182 Chapter : Recovery

Scenario 3: Invalid Data
This scenario assumes that:
• There is a backup of the last steady state of the warehouse available.
• The source data is correct or has been corrected.
• It is acceptable to lose the history between the last steady state backup and the current date.
This scenario is appropriate when the ETL job produces an intermediate warning or non-critical error, the job completes successfully but the target data appears to be incorrect.
To recover from invalid data
1 Complete the steps in Restoring a Microsoft SQL Server Database on page 179.
2 After you complete the backup restoration procedure, associate the database users and logins by running these scripts on the data warehouse server. For example, if you used the sample names in the HP IT Analytics Installation and Configuration Guide, you would run these scripts on the “staging” and “target” databases:
For the staging database:
EXEC sp_change_users_login 'Update_One', 'dws', 'dws'EXEC sp_change_users_login 'Update_One', 'dwst', 'dwst'EXEC sp_change_users_login 'Update_One', 'dwmetadata', 'dwmetadata'EXEC sp_change_users_login 'Update_One', 'dwabc', 'dwabc'EXEC sp_change_users_login 'Update_One', 'xrefgen', 'xrefgen'EXEC sp_change_users_login 'Update_One', 'dwt', 'dwt'
For the target database:
EXEC sp_change_users_login 'Update_One', 'dwt', 'dwt'EXEC sp_change_users_login 'Update_One', 'dwmetadata', 'dwmetadata'EXEC sp_change_users_login 'Update_One', 'itaapp', 'itaapp'EXEC sp_change_users_login 'Update_One', 'itafpaqry', 'itafpaqry'
3 Start a complete ETL job. Repeat the steps in Task 9: Run Initial Sync on page 55.
183

184 Chapter : Recovery

13 Troubleshooting
Read this chapter for troubleshooting information about:
• ABC Errors (on this page)
• BODS Errors on page 189
• Connectivity Errors on page 190
• ETL Warnings on page 190
• Password Errors on page 191
• Source Data Errors on page 194
• Validation Errors on page 195
• XREF_GENERATOR Errors on page 195
Make sure that you check all logs for error messages. For more information, see Chapter 10, Tracing and Logging on page 137.
ABC Errors
The errors described in this section relate to problems running ETL.
Initial Sync Failure
Problem: The initial sync fails.
User Action: Verify that the external source directories exist at the root level, and that you followed the steps to prepare the external source files. For more information, see Chapter 4, Initialization and ETL.
ABC Process Errors
Problem: A process fails.
User Action: Follow these steps to correct the error:
1 Run the dw_abc_batch_control.bat script using the command to suspend the batch run. At that point, take corrective action. For example, fix a data connection error or database problem.
2 Re-run the job stream step by running the dw_abc _retry_step.bat script.
When the problem is resolved, the administrator can run the dw_abc_batch_control.bat script to resume the batch run.
185

HP recommends that you do not attempt to change the ETL processing logic because the interrelated actions are complex and results may be unpredictable.
Batch Control
Problem: The dw_abc_batch_control.bat script changes the run state of one or all job streams.
User Action: To suspend, resume, or abort the job stream, you must specify the streamId value. For example, the out-of-box job stream is upstream.xml:
dw_abc_batch_control -commandName alldw_abc_batch_control -abort upstreamdw_abc_batch_control -resume upstreamdw_abc_batch_control -suspend upstream
You can change the state of job streams with a status of ACTIVE or SUSPENDED. When you suspend a stream, the stream steps no longer appear as candidate steps to run.
BODS Step Retry
Problem: The dw_abc_retry_step.bat script restarts a job step that failed in a prior run.
User Action: To re-run a step, you must specify the streamId and the stepId values. For example:
dw_abc_retry_step -streamId -stepId stepIddw_abc_retry_step -streamId streamId -stepId stepId -prepareonly
Option Required? Description
-commandName all No Complete the named command action on all loaded job streams.
-abort streamId No Stop the job stream with the streamId value that is specified in the stream file parameter dwid=’’xxxx”. Terminate the current running process.
-help No Display the command syntax in the command window.
-resume streamId No Resume the job stream with the streamId value that is specified in the stream file parameter dwid=’’xxxx”.
-suspend streamId No Suspend the job stream with the streamId value that is specified in the stream file parameter dwid=’’xxxx”. Allow the current process to finish.
Option Required? Description
-help No Display the command syntax in the command window.
186 Chapter : Troubleshooting

ABC and Operational Report Errors
Problem: ABC reports errors and they also appear in the operational reports. These errors may be due to a web service time out where ABC detected the time out but BODS started the job just before the time out occurred. The time out of the job overlaps the restart of the job. The error message states:
Error: [50316] ERROR: This job is not in a runnable state. This may come from Web Service time out, the job will not execute and a new one will be triggered by ABC (if not already done).
Parallel execution of the same job is not supported. ABC infrastructure permits only one job to proceed. It will flag the second one as an error and prevent that job from completing an ETL step to avoid any corruption.
User Action: The retry mechanism automatically manages these errors but the error still appears in the operational report.
Problem: An error message appears in an ABC log or report to report a “null” server condition:
Web Services sent the request to start batch job 'AM_SOURCE_EXTRACT_JB' on server 'null'. The Job Server refused the request with error: Connection refused: connect
User Action: Follow these steps:
1 From the Windows Start menu, click All Programs > BusinessObjects Data Services > Data Services Server Manager.
2 Click Restart.
3 Close Data Services Server Manager.
4 Retry the ETL job.
If the same error message appears
1 From the Windows Start menu, click All Programs > BusinessObjects Data Services > Data Services Server Manager.
2 Click Edit Job Server Config.
3 Select JobServer_1.
4 Verify that there is an associated repository. If it exists, click Resync.
5 If there is no associated repository, click Add.
6 Add the information about the BODS database:
— Database type (Microsoft SQL Server is the default value).
— Database server name.
-prepareonly No Allocate a new process for the step but do not run the step.
-stepId stepId Yes Restart the job stream step with the stepId value that is specified in the stream file parameter dwid=’’stepId”.
-streamId streamId Yes Restart the job stream with the streamId value that is specified in the stream file parameter dwid=’’streamId”.
Option Required? Description
187

— Database name.
— Authentication information.
7 Click Apply to re-establish the connection between the BODS application and the bods database.
8 Click Restart.
9 Close Data Services Server Manager.
Problem: This execution status appears: Executable is taking too long to launch ( > 180 seconds).
User Action: Change the Maximum Time to Launch parameter in the data warehouse configuration file to increase the maximum time to launch:
1 Navigate to C:\Program Files\HP\IT Analytics 2.00\Foundation\conf, and open dwplatform.properties.
2 Search for the Abc_DataServicesWSMaxTimeToLaunch parameter.
3 Change the value for the parameter from 180 to 360.
4 Save and close dwplatform.properties.
ODBC and Dataflow Time Out Errors
Problem: The ODBC connection times out or the dataflow terminates.
User Action:
1 From the Windows Start menu, click All Programs > BusinessObjects Enterprise XI 3.1 > BusinessObjects Data Services > Data Services Designer.
2 Login with the server, database, and authentication information.
3 Click Tools > Options.
4 Expand Job Server.
5 Click General.
6 The default value of SQLServerLoginTimeout is 60 seconds. Type these new values:
Section: AL_ENGINE
Key: SQLServerQueryTimeout
Value: 180 (or a value greater than 60)
7 Click OK.
8 From the Windows Start menu, click All Programs > BusinessObjects Enterprise XI 3.1 > BusinessObjects Data Services > Data Services Server Manager.
9 Select JobServer 1.
10 Click Restart.
Web Service Errors
Problem: This execution status appears: Web Service job is taking too long to launch ( > 180 seconds).
188 Chapter : Troubleshooting

User Action: Change the Maximum Time to Launch parameter in the data warehouse configuration file to increase the maximum time to launch:
1 Navigate to C:\Program Files\HP\IT Analytics 2.00\Foundation\conf, and open dwplatform.properties.
2 Search for the Abc_DataServicesWSMaxTimeToLaunch parameter.
3 Change the value for the parameter from 180 to 360.
4 Save and close dwplatform.properties.
BODS Errors
Problem: BODS jobs were not configured for Web Services. If you did not complete this installation step to register the BODS database on the BODS Management Console, ETL jobs end with an error status, as shown in Figure 44.
Figure 44 ABC - Operational Status report
Solution: You must register the BODS database that you defined on the RDBMS server on the BODS Management Console.
1 Restart the data warehouse server.
2 From the Windows Start menu, click All Programs > BusinessObjects XI 3.1 > BusinessObjects Data Services > Data Services Management Console.
3 Type your login and password. The default login for BODS is admin and the default password is admin.
4 Click Login.
5 Select Administrator.
6 In the left navigation pane, expand Management and select Repositories.
7 In the main pane, click Add.
189

8 Type the Repository name.
9 Choose the Database type. It should be Microsoft_SQL_Server.
10 If appropriate, select Windows authentication.
11 Type the Machine name.
12 Type the Database port (1433 is the default value).
13 Type the Database name.
14 Type the User name.
15 Type the Password.
16 Click Apply.
The MS SQL Server default port number value is 1433. BODS verifies that a connection exists using the port number that you specify.
After you complete the registration, the first batch run may fail. If this occurs, restart the job stream. The second run should be successful.
Connectivity Errors
Verify Connectivity
The dw_check_datasources_connectivity.bat tool can run a check to validate data source connections.
Broken Web Service Connections
If you modify and save a job with SAP BusinessObjects Data Services Designer, you will break the associated Web Service connection. You can do one of the following:
• Restart the Business Objects Tomcat service.
• Open the SAP BusinessObjects Data Services Management Console and refresh the Web Services Configuration tab.
ETL Warnings
Job Warnings During Installation
Problem: Some warnings may be displayed in SAP BusinessObjects Data Services when running the ETL jobs on a case-sensitive SQL Server instance. For example:
Job warning with remote DW DBs: ODBC data source <SQL Server server name> warning message for operation <bulkExecSql>: <>, SQLState <>.
190 Chapter : Troubleshooting

This indicates that some or all of the permissions were not properly granted to the following SQL Server logins during the IT Analytics installation.
User Action: Grant the following permissions to the SQL Server logins:
Run these commands to grant the ALTER ANY DATABASE permission to the dws, dwst, and dwt logins. On a distributed environment, these logins can be located on different SQL Server instances.
USE masterGOGRANT ALTER ANY DATABASE TO <login name>GO
Run the following commands to grant the bulkadmin server role to the dwt login:
USE masterGOEXEC sp_addsrvrolemember N'dwt', N'bulkadmin'GO
Password Errors
Changing Database Passwords
Problem: If you attempt to redefine a password after running the dw_initdb.bat script, an error may occur.
User Action: Because SQL Server saves the credentials in the database, you must remove them from the Security tab before you re-encrypt the password by running dw-encryptpasswords.bat and then re-running the dw_initdb.bat script to create a new password.
Passphrase.txt File Missing
Problem: The data warehouse generates the following error message.
FATAL - com.hp.bto.dw.atlimportexport.AtlImportExportException: Error while decoding Data Services Repository Password.Message is: The file (C:\Test\foundation\etc\conf\passphrase.txt) containing the passphrase used to encode/decode passwords is missing. Please use the dw-encryptpasswords.bat tool to recreate this file and do not forget to re-encrypt all your passwords.dw_ds_import.bat: Failure. See dw_atlimportexport.log for details
User Action: The passphrase.txt file contains the encrypted passwords. If this file is not available, data warehouse tools and utilities do not run successfully.
You must re-encrypt all passwords.
Login Missing Permission
dws, dwst, dwt ALTER ANY DATABASE
dwt bulkadmin server role
191

To encrypt all passwords
1 Run dw-encryptpasswords.bat with the proper command line options to encrypt the passwords in dwplatform.properties and dataSources.xml. For more information, see dw-encryptpasswords on page 222.
2 Open a Windows command line window, and switch to this directory:
C:\Program Files\HP\IT Analytics 2.00\Foundation\bin
3 Encrypt the passwords in the following properties files:
• db-itaapp.properties
• db-itafpaqry.properties
• db-xrefgen.properties
• xref.properties
• db-dwabc.properties
• db-dwmetadata.properties
• db-dws.properties
• db-dwst.properties
• db-dwt.properties
To encrypt the passwords, type dw-encryptpasswords.bat -encrypt <password> where <password> is the password that you want to encrypt.
The encrypted password is displayed on standard output.
4 Copy the password from the standard output and paste it into the proper file in each place where the password is listed. Table 68 lists the passwords in each properties file.
Table 68 Property File Passwords
Properties File Property Password
db-itaapp.properties SystemUserPassword The system administrator login (usually the sa login) for accessing the target database that contains the itaapp schema.
UserPassword The itaapp login that owns the itaapp schema in the target database.
db-itafpaqry.properties SystemUserPassword The system administrator login (usually the sa login) for accessing the target database, which contains the itafpaqry schema.
UserPassword The itafpaqry login that owns the itafpaqry schema in the target database.
192 Chapter : Troubleshooting

db-xrefgen.properties SystemUserPassword The system administrator login (usually the sa login) for accessing the staging database, which contains the xrefgen schema.
UserPassword The xrefgen login that owns the itafpaqry schema in the staging database.
xref.properties AMDB_UserPassword The login used to access Asset Manager. See property AMDB_User for the name of the login.
PPMDB_UserPassword The login used to access Project and Portfolio Management. See property PPMDB_User for the name of the login.
SMDB_UserPassword The login used to access Service Manager. See property SMDB_User for the name of the login.
etl.password The dwst login that owns the dwst schema in the staging database.
xrefetl.password The xrefgen login that owns the itafpaqry schema in the staging database.
db-dwabc.properties SystemUserPassword The system administrator login (usually the sa login) for accessing the database (usually the staging database) that stores the dwabc schema.
UserPassword The dwabc login that owns the dwabc schema (usually in the staging database).
db-dwmetadata.properties SystemUserPassword The system administrator login (usually the sa login) for accessing the database (usually the staging database) that stores the dwmetadata schema.
UserPassword The dwmetadata login that owns the dwmetadata schema (usually the staging database).
Table 68 Property File Passwords
Properties File Property Password
193

Source Data Errors
Problem: The out-of-box source data schema limits field sizes. For example, the maximum length for an Asset Manager name field is 30 characters, but some databases may contain longer name fields and truncating the name will not produce desirable results.
User Action: The remedy for this problem may require help from HP Services to customize either the source data, the source data schema, or both.
Problem: The execution status for a job is “Web Service job is taking too long to launch (>180 seconds).”
User Action: Do one of the following:
• Retry the job.
• Change the time out value.
• Use BODS Designer to validate the job. For more information, see Web Service Errors on page 188.
Problem: The initial installation supports only one connection to each source data application. You can have a connection to one instance of Asset Manager and one instance of Project and Portfolio Management.
User Action: The out-of-box configuration limits these connections. The remedy for this problem may require help from HP Services.
Problem: The source data contains more than 10 hierarchy levels.
db-dws.properties SystemUserPassword The system administrator login (usually the sa login) for accessing the staging database, which contains the dws schema.
UserPassword The dws login that owns the dws schema in the staging database.
db-dwst.properties SystemUserPassword The system administrator login (usually the sa login) for accessing the staging database, which contains the dwst schema.
UserPassword The dwst login that owns the dwst schema in the staging database.
db-dwt.properties SystemUserPassword The system administrator login (usually the sa login) for accessing the target database, which contains the dwt schema.
UserPassword The dwt login that owns the dwt schema in the target database.
Table 68 Property File Passwords
Properties File Property Password
194 Chapter : Troubleshooting

User Action: The remedy for this problem may require help from HP Services to reduce the number of hierarchy levels in the source database before you can complete the ETL process successfully.
Validation Errors
ABC reports validation errors in the ABC - Operational Status or ABC - Job Details (Audit Details tab) report, or in a dws.xxx_xxx_VALF file. If source data validation errors occur, you must go back to the original source data to fix the error before you restart the ETL job. for more information about validation tests, see the IT Analytics 2.01 ETL User Guide.
XREF_GENERATOR Errors
It is helpful to be familiar with the log files that capture error and warning messages generated during XREF processing.
Problem: An XREF_GENERATOR job ends with a WARNING, but the warning text does not explain the error or point to a related log file.
User Action:
1 Navigate to this directory:
C:\Program Files\HP\IT Analytics 2.00\ContentPacks\Core\log\
2 Open this file with a text editor:
dw_xref.log
3 Examine this log for specific error messages that suggest remedial action.
Problem: Operational reports display XREF_GEN warning messages.
User Action:
1 Navigate to this directory:
C:\Program Files\HP\IT Analytics 2.00\ContentPacks\Core\log\
2 Open this file with a text editor:
dw_xref.log
3 Examine this log for specific error messages that suggest remedial action.
195

196 Chapter : Troubleshooting

Glossary
IT Analytics uses a variety of terms to describe its functionality and objectives. Click any term to view the definition.
A
ABC
ABC Batch
ABC Job stream
ABC Job stream step
Ad hoc query
Aggregation
Allocation engine
Allocation scenario
Allocation stage
Analytic
Analytic application
Assignment groups
B
Backfill record
Business driver
Business impact analysis report
Business intelligence
Business process
Business service
Business service downtime impact
C
Catalog
Change data capture
Composite key
Configuration item
Configuration Management Database
A B C D E F G H I J L M N O P R S T U W X
197

Conformed dimension
Consolidated model
Core model
Corporate information factory
CSNP
Crosstab
Cube
D
Dashboard
Data architecture
Data flow
Data integration
Data quality
Data mart
Data mining
Data model
Data quality
Data warehouse
Dimension
Downstream
E
Efficiency and effectiveness
Enterprise key
ETL
Executable
EXT
Extract (ETL)
F
Fact table
Financial Planning & Analysis
Foreign key
198

G
Governance
Granularity
H
Hierarchy
Historical data
I
Impact analysis
Impact rules
ITIL best practices
J
Join
L
Load (ETL)
Log
M
Measure
Merge
Metadata
Metric
MSC
MSI
Multi-dimensional
N
Near-real-time
O
OLAP
Organization
199

P
Predictive analysis
Primary key
Prioritization
Process
R
Real-time
Reconciliation
Report
Report library
Resource allocation
Risk
S
Slowly changing dimension
Snowflake schema
SSI
SSNP
Staging
Star schema
Stream step detail
Surrogate key
T
Transform (ETL)
TSNP
U
Union
Universe
Upstream
W
Work flow
200

X
XFR
XREF
ABC
Audit, Balance, and Control (ABC). ABC is an application that triggers the ETL processes.
Audit ensures consistency during ETL processing. It measures the number of records in and the number of records out for each step and displays these runtime statistics in a collection of audit reports.
Balance verifies that data in the data warehouse matches data in the source system. For example, if the data warehouse stores project dollar amounts then the balance process verifies that the aggregate project dollars in the data warehouse matches the aggregate project dollars in the source application data.
Control governs ETL processes. Control makes sure that there is a proper restart and recovery when a system error occurs. Control also manages job dependencies at runtime.
ABC Batch
An instantiated ABC job stream built from the job stream definition. The execution is sequential: one batch must finish execution before a new batch for the same job stream can start. In the case where there is both upstream and downstream ETL, an upstream batch and a downstream batch can run concurrently. Each executable batch has a unique ID.
ABC Job stream
A flow of individual execution (job stream) steps and a description of related dependencies. A job stream can have one or more start steps, one or more end steps, and execute several parallel branches. A stream ID value identifies the individual stream. The ABC job stream contains one-to-many job stream steps.
ABC Job stream step
An individual step that invokes a command line utility or executes anSAP BusinessObjects Data Services job. An ABC job stream step is unique within an ABC job stream.
Ad hoc query
Ad hoc queries are spontaneous requests for information that are normally formulated and run a single time. Ad hoc queries are constructed with a SQL statement or by using a data access tool.
Aggregation
Aggregation is the accumulation of related data into a single table.
Allocation engine
The allocation engine is a process that communicates with the Financial Planning & Analysis (FPA) web application. It provides status information about allocations when changes are made to stages or rules. It selects costs, updates relationships, and splits costs across the data model.
201

By using allocation scenarios, stages, and rules, financial analysts can allocate the costs to compare planned versus actual costs and use the results for proper cost and budget management.
Allocation scenario
An allocation scenario is a tool that enables you to analyze planned costs and actual costs by categorizing them. You can use categorized costs to compare planned (budgeted) costs to the actual costs.
Allocation stage
Allocation stages are a required component of the allocation engine. They identify a dimension that is associated with a Cost fact table. You can define Actual Cost and Planned Cost stages.
Analytic
Analytics are reports that summarize or aggregate data. Analytics help managers to identify trends, analyze volumes of data, plan, forecast, and make business or strategic decisions.
Analytic application
Analytic applications produce a series of logically integrated interactive reports, including dashboards and scorecards. These reports support management decisions that usually involve demographic analysis, trend analysis, pattern recognition, drill-down analysis, and profiling. For example, Financial Planning & Analysis (FPA), IT Performance Analytics (ITPA), and IT Financial Management (ITFM) are analytic applications.
Assignment groups
Assignment groups are lists of users who are responsible for an incident. When an incident opens or escalates, a notification mechanism alerts the users in the group.
Example: A service desk operator receives a request to fix a disabled workstation. The operator creates an incident and assigns it to the IT assignment group. The IT technician determines that the hard drive must be replaced. Because the drive must be purchased, the technician updates the incident and assigns it to a Materials Management assignment group for acquisition. If the hard drive purchase is delayed, and the incident cannot be closed in a reasonable amount of time, a pre-defined process can escalate the incident to the operations manager for intervention.
Incident category definitions can include a default assignment group for all incidents in that category. For example, the hardware category can list IT as the assignment group if the IT department is always the first group to handle hardware incidents.
Backfill record
Backfill records are used to complete partial data entities in the change data capture (CDC) records for a given cycle. Backfill records are used to ensure that completed data is loaded into the target environment.
Business driver
1 Business drivers are the tasks, information, and people that support and promote the goals of the enterprise.
202
2 Business drivers are the requirements that describe the business goals, for example, more quality data and faster response to queries.
3 Business drivers are problems that are important enough to mean the difference between success and failure for an organization.
Business impact analysis report
A business impact analysis report describes potential risks to the organization. A good business impact analysis report should identify the cost of outages in terms of lost revenue, replacement of equipment, salaries, and other opportunity costs.
Business intelligence
Business intelligence describes the result of in-depth analysis of detailed business data, including database and application technologies and analysis practices. Business intelligence is sometimes used synonymously with decision support but is much broader, potentially encompassing knowledge management, enterprise resource planning, data mining, and other practices.
Business process
Business processes are a set of business services that support a single corporate purpose.
Business service
A business service is the combination of one or more business applications plus the supporting configuration items that enable delivery of the business service to the customer. The products that IT offers its customers are internal and external business services. A business service supports zero-to-many organizations, and a business service incident usually impacts associated organizations. An organization can rely on one-to-many business services; however, an incident that affects the organization may not always affect the associated business service.
Enterprise resource planning (ERP) is a good example of a business service. ERP is a business management system that integrates all facets of the business, including planning, manufacturing, sales, and marketing. There can be many component business applications such as inventory control, order tracking, customer service, finance, and human resources.
Business service downtime impact
Business service downtime impact (BSDI) is a metric that quantifies the cost of service downtime in monetary terms, including productivity and business opportunity impact.
Catalog
A list of declared available executables.
Change data capture
IT Analytics uses the change data capture (CDC) technique to detect inserts and updates from source data based on the previously extracted change timestamp for each entity. Delete records are detected using a full key compare against the Transactional Snapshot (TSNP).
Composite key
Composite keys are primary keys that consist of more than one column. Composite keys are also known as concatenated keys or aggregate keys.
203

Configuration item
Configuration items (CI) are components of your infrastructure or a business service. CIs are catalogued in your Configuration Management Database (CMDB). A CI can be a hardware component in a larger hardware system, a software application, or any other identifiable item that supports a business service. For example, a CI can be items such as operating systems, monitors, accounting applications, routers, and telephones.
Configuration Management Database
A well-designed Configuration Management Database (CMDB) is a critical building block that stores configuration, asset, and incident data. The CMDB integrates information about assets, incidents, problems, change requests, and configuration items (CIs).
IT Analytics uses the data in the CMDB to run scenarios and produce analytics that suggest how to tune your business services and IT infrastructure. Historical information about assets and CIs, and how well they meet performance commitments, helps you make decisions about future IT investments and cost-saving strategies. The more robust your data, the more precise these scenarios and analytics will be.
A well-tuned CMDB can relate assets to CIs, provide information about asset class availability and CI performance cost, and relate asset and service availability to business service performance.
Conformed dimension
A conformed dimension is used in more than one cube and has the same meaning and data regardless of the fact table that references it.
Consolidated model
IT Analytics uses the consolidated model. During the ETL process, IT Analytics gathers information from one or more source systems and conforms the data into a single consolidated entity before loading it into the data warehouse.
Core model
In the core model, data marts are architected to share the same master set of conformed dimensions and standardized facts across the enterprise.
Corporate information factory
Corporate information factories are the framework that surrounds the data warehouse. Corporate information factories typically contain an operational data store, a data warehouse, data marts, decision support systems applications, exploration warehouses, data mining warehouses, alternate storage, and other data management systems. IT Analytics uses the Ralph Kimball methodology.
CSNP
Consolidated Snapshot.
Crosstab
Crosstab (cross tabulation), also known as a contingency table, is a combination of two or more variable tables. A contingency table analyzes whether the value of one variable is associated with or contingent on another.
204

Cube
Cubes are groups of related dimensions and measures that are used for data analysis.
Dashboard
Dashboards are reporting tools that consolidate, aggregate, and arrange measurements and metrics on a single screen so information can be monitored at-a-glance.
Data architecture
1 Data architecture is the framework design used to organize data resources for collection and future access.
2 Data architecture is the data, processes, and technologies that an organization uses to create and operate information systems.
Data flow
Data flow is a reusable object that contains steps to define the transformation of data from source to target. Data flows are called from inside a work flow or job. You can pass information into or out of data flows using parameters.
You can store data flows inside work flows, but you cannot store data flows inside other data flows.
Source: SAP® Business Objects. SAP Help Portal (http://help.sap.com).
Data integration
Data integration consolidates records with similar information to produce a single version of data in the data warehouse.
Data integration includes the steps from acquisition through publication, such as extraction, cleansing, consolidation, removing duplication, key generation, transformation, and aggregation, of source data before loading to the target table.
Data quality
Data quality is the degree of data excellence. For example, the data is stored according to data type, it is consistent, complete, not redundant, follows business rules, and corresponds to established domains. The data should be timely, well understood, and satisfy the needs of the business. The user should be satisfied with the validity of the data and the information derived from that data.
Data mart
Data marts are highly focused versions of a data warehouse. They are data stores that contain data for a specific business function within an organization, for example, finance or sales.
Data mining
Data mining is the process of analyzing data to identify relationships, trends, or patterns in the data.
Data model
Data models describe the source, extraction, consolidation, and target components for a single entity.
205

Data quality
Data quality is the degree of data excellence. For example, the data is stored according to data type, it is consistent, complete, not redundant, follows business rules, and corresponds to established domains. The data should be timely, well understood, and satisfy the needs of the business. The user should be satisfied with the validity of the data and the information derived from that data.
Data warehouse
Data warehouses are a repository of integrated information that is available for queries and analysis. Users can run queries against a database without having to know anything about the underlying data structures in the database.
Dimension
1 Dimensions are entities that describe, qualify, or otherwise add meaning to facts in a star schema fact table. Dimensions are the items in the analysis of facts by product, market, time, and period, for example.
2 Dimensions describe the measurements (facts) that business users want to analyze.
Downstream
Downstream ETL is a process that retrieves data from the data warehouse and passes it to a consumer application.
Efficiency and effectiveness
Efficiency describes how well IT meets customer expectation with minimal resources, expense, or unnecessary effort. Effectiveness measures the degree of success in achieving a given goal.
Unlike efficiency, effectiveness does not measure the resources expended, the expense incurred, or the effort, but only the degree of success.
IT can be effective without being efficient. IT Analytics enables you to construct scenarios that alter resources, expenses, or other efficiency components to improve effectiveness.
Enterprise key
The enterprise key is used to generate the durable key in the target entities.
ETL
The Extract, Transform, and Load (ETL) process is an end-to-end transfer of external source data through several staging layers and into the target layer of the data warehouse. The source data can reside in a single database or multiple databases. The data warehouse uses the ETL process to extract, consolidate, and transform the source data into a meaningful target model that populates relevant business analytics.
Executable
A program that executes an ETL task:
• Any custom script or program that complies with the data warehouse ABC API.
• An SAP BusinessObjects Data Services job that complies with the data warehouse ABC utilities.
206

EXT
Extract Staging.
Extract (ETL)
The extract process extracts delta data from the source systems and writes it to delimited flat files on the file system. The data warehouse uses the Change Data Capture (CDC) technique for extracting data from the source tables. IT Analytics extracts data if the last modification date is greater than or equal to the maximum last modification date value.
Fact table
Fact tables are the central tables in star schemas. Facts are information about the business that are typically numeric and additive. Fact tables contain the measures that the business users wish to analyze to find new trends or to understand the success or failure of the organization.
Financial Planning & Analysis
Financial Planning & Analysis (FPA) is a component of IT Analytics that helps organizations make better IT financial decisions by reducing the effort involved with managing IT finance and giving business the financial transparency it demands. FPA does this by consolidating and allocating planned and actual costs from HP Asset Manager and HP Project and Portfolio Management to help IT manage those costs more effectively.
Foreign key
A foreign key is the field in a table that refers to the primary key of another table in the same data source. Every relationship in the model must be supported by a foreign key. Foreign keys enforce referential integrity by completing an association between two entities.
Governance
Governance is a structures process or group used to control change and provide oversight. Governance groups are commonly used to control changes in data models, data modeling practices, and architecture standards.
Granularity
Granularity is the level of the measures within a fact table represented by the lowest level of the dimensions.
Hierarchy
Hierarchies use ordered levels to organize data. For example, in a time dimension, a hierarchy might be used to aggregate data from the month level to the quarter level to the year level.
Historical data
Historical data is data from previous time periods. It is used for trend analysis and for comparisons to other time periods.
Impact analysis
Impact analysis is the process of analyzing the effect if a business process fails or loses efficiency.
207

Impact rules
Impact rules define the effect of an incident on a business service, application, or the organization. Impact rules are associated with these characteristics:
• Incident type, such as degraded performance, limited capacity, corruption, an outage, or a request for information.
• Scope of the impact. For example, the impact might affect one user, an entire department, a business unit, or the entire enterprise.
• A schedule that defines when the rule applies. An outage at midnight might not be as expensive as an outage during normal business hours.
• Fixed amount, fixed rate, or stepped rate impact calculation.
These variables make each rule unique. As you expand the number of impact rules to cover different scenarios, your impact calculations become more precise. For example, if all variables are the same except for the scope, the impact cost is exponentially greater as a larger segment of the organization is affected. Different rules also enable you to calculate the impact of an outage at these levels:
• Business service level, which has immediate impact.
• Organization level, which extends the impact to include customer good will, lost revenue, and more.
IT Analytics uses impact rules to calculate the impact of historical events as well as hypothetical scenarios.
ITIL best practices
IT Analytics users need to adhere to the best practices advocated by the IT Infrastructure Library (ITIL). When you adhere to the ITIL best practices and processes for problem, change, and service level management, you have a business maturity model that is compatible with IT Analytics processes and objectives. To validate the benefits of ITIL best practices, you can evaluate comparative industry process metrics to confirm the improved efficiency and effectiveness of your internal processes.
IT Analytics follows ITIL version 3 guidelines for naming conventions and to categorize analytics.
Join
Tables from a single data source where one table is considered the parent or primary table are consolidated with a join. In a join, all records from the parent table are imported, and records that have a matching foreign key are imported from child tables.
Load (ETL)
The load process adds new records, updates existing records, and flags deleted records in the data warehouse target layer fact and dimension tables.
Log
A log displays an alert that an issue occurred during execution. The information in the execution log can become an alert when configured by the alert system.
208

Measure
A value collected by the executable during execution, such as the number of rows processed during an ETL job, or an amount extracted from a table that describes expenses in a source application.
The ABC application does not make any assumptions about the business tasks performed by the executable or impose any semantic requirements on computed measure values. The ABC application provides an interface for the executable to store measures. The ABC reports provide drill-down capabilities into the stored measures.
Merge
Tables that exist across multiple data sources and where reconciliation is done are consolidated with a merge. In a merge, all records from all tables are imported, and reconciliation is done where appropriate. Merges join tables where they overlap and also import all other records.
Metadata
1 Metadata includes a description of data models, a description of the layouts used in database design, the definition of the system of record, the mapping of data from the system of record to other places in the environment, and specific database design definitions.
2 Metadata usually refers to agreed-upon definitions and business rules stored in a centralized repository to ensure that business users across departments and systems use common terminology for key business terms. Metadata can include information about data currency, ownership, source system, derivation (such as profit equals revenues minus costs), or usage rules. Metadata prevents data misinterpretation and poor decision making due to limited understanding of the true meaning and use of corporate data.
Source: SAP® Business Objects. SAP Help Portal (http://help.sap.com).
Metric
1 Metrics measure quality. They establish and collect measurements of success or failure.
2 The executable that collects the measures and generates the status. The ABC application provides an interface for the executable to store metrics.
MSC
Multiple Source Consolidated.
MSI
Multiple Source Identity.
Multi-dimensional
Multi-dimensional is the aggregation of data by the dimensions of the business. For example, sales by region by product by time.
Near-real-time
Near-real-time provides users with rapid updates from transactional systems.
209

OLAP
Online analytical processing (OLAP) is an application that enables multidimensional analysis and visualization of data.
Organization
Organizations are parts of your business that provide a product or service to an internal or external customer. It can be an entire business unit, a cost or profit center, or a functional department. It is an entity that adds value directly or indirectly to your customer community.
Predictive analysis
Predictive analysis uses data mining techniques to predict future behavior, probability, and trends. The more historical data that you have, the more accurately you can predict the likelihood of future events.
For example, auto insurance companies use safety predictors such as age, gender, and driving record when they issue car insurance policies. Mortgage underwriters use financial predictors such as income, debt ratio, and payment history when they issue home mortgages.
Primary key
Primary keys are the field or fields that make up the unique value for each record. In the source application, this is represented by the business key. In the data warehouse, it is the surrogate key.
Prioritization
When the number of services required exceeds your capacity, you must establish rules to organize open incidents into a work queue. The most urgent incidents are at the beginning of the queue; incidents with lower priority are at the bottom of queue.
Process
A process is an execution of a job stream step in a specific batch. A single job stream step may lead to multiple processes in cases of retries.
Real-time
Real-time reporting is on demand reporting versus scheduled, prebuilt reporting.
Reconciliation
Data reconciliation helps ensure the quality of the data.
Report
Reports are pre-defined documents that target a specific audience or user.
Report library
Report libraries are sets of programs that have been created, fully tested, quality assured, documented, and made available to the user community. The programs in these libraries are called canned, predefined, parameterized, or skeleton queries. They are launched by a user who enters only a variable such as a date, region number, range of activity, or some other set or sets of values the program needs to generate a query or report.
210

Resource allocation
The challenge for IT is to reduce costs without compromising services. Reducing personnel can reduce costs, but may seriously affect services that require high service levels and minimal outages. IT Analytics enables you to plan for resource needs, the cost of reducing head count, and validate that resources levels are correct for your service requirements.
For example, increased revenues may mean increased demand for services and more unplanned outages. How much budget do you need to assign enough technicians to cover expected demand?
Risk
Risk is the possibility of loss that is measurable in monetary terms. Risk can also be an intangible opportunity cost. The business service owner must define the level of risks, such as the amount of acceptable downtime or economic impact. IT must set expectations for how it will support the applications and infrastructure of business service and mitigate risks.
Examples of risks include a corrupt database, a power outage, or a natural disaster. The list of business risks is large. Some are common to all enterprises, like a natural disaster; some are specific to your organization or line of business.
Slowly changing dimension
A slowly changing dimension (SCD) is a dimension that contains data that changes over time. For SCD type 1 changes, the new data overwrites the original data. For SCD type 2 changes a new record is generated. IT Analytics makes a copy of the record and flags the original record as historical. Both the new and old record share the same durable key, indicating that they are the same piece of data.
Snowflake schema
A snowflake schema is a data model that has a centralized fact table that references multiple dimension tables, and the dimension tables reference multiple related tables.
SSI
Single Source Identity.
SSNP
Single Source Snapshot.
Staging
Staging areas are collection areas where data is transformed for presentation, integration, or enhancement. For example, data might be staged until all relevant components are in place.
Star schema
Star schemas are simpler than snowflake schemas. A star schema is a data model that has one or more centralized fact tables that reference a single layer of dimension tables. The dimension tables do not reference other tables.
Stream step detail
A sub-task of the executable job stream step. There are no assumptions about the content of the executable; therefore, the stream step detail is not modeled. The ETL designer is responsible to define the job stream step details.
211

Surrogate key
A surrogate key is a primary key for the dimension tables. It is the field that makes up the unique value for each record in the data warehouse. Surrogate keys are numeric and are controlled by the ETL process.
Transform (ETL)
During the transformation process, IT Analytics transforms data into the format of the target tables and populates the load-ready target staging tables. The Transformation layer contains load-ready tables that match the internal structure of the data warehouse target tables.
TSNP
Transactional Snapshot.
Union
Tables that occur in either single or multiple data sources and have records that are assumed to be equal and independent are consolidated with a union. In a union, all records from all sources are imported but are not reconciled. They are simply added to the rowset.
Universe
The universe is the result of a semantic layer of metadata that creates a business oriented view of the data. The universe contains a schema of the tables and joins that make up the universe and dimension and measurement objects. The universe is an interface between the data warehouse and the analytics that display the data.
The universe contains analytic views that enable you to see published and up-to-date allocation cost and planned cost data as well as unpublished data or published data that is not up-to-date. The views also ensure the consistency of data warehouse quality by showing only data that is successfully extracted, transformed, and loaded. Analytic views provide the mechanism to reduce the dependencies of analytic semantic models to data warehouse physical models.
Upstream
Upstream ETL retrieves data from one or more external applications, consolidates it into a target data model, and stores it in the data warehouse.
Work flow
A work flow is a reusable object containing steps to define the order of job execution. Work flows call data flows but cannot manipulate data. You can call work flows from inside other work flows or jobs and can pass information into or out of work flows using parameters. You can reuse work flows by dragging existing ones from the object library.
Source: SAP® Business Objects SAP Help Portal (http://help.sap.com)
XFR
Dimensional Transform.
XREF
Cross Reference.
212

A Data Warehouse Command Reference
This appendix is a syntax reference for the out-of-box scripts that are available to ETL designers and developers. Table 1 lists the out-of-box scripts that you can use to accomplish command line tasks. These scripts produce specific results. Changing them may produce unpredictable results when they run.
Syntax Conventions
Command options in square brackets ([ ]) are optional.
Italicized lowercase expressions are variable values.
If a command option argument is a text string or path that contains blank spaces, you must enclose it in quotation marks. Otherwise, the text before the blank space is considered the entire argument and the remaining text becomes an undefined option.
Command Summary
The following command script files are available in this directory:
C:\Program Files\HP\IT Analytics 2.00\Foundation\bin\
Table 1 Data Warehouse Script Files
Name PurposePrimary User
dw_app_config on page 215 Configure the application.
Installer
dw_check_datasources_connectivity on page 216 Verify database connections.
Administrator
dw_cleandb on page 217 Remove the staging and target data for all consolidated entities related to the specified data source.
Administrator
dw_config_loader on page 218 Load dataSources.xml into the metadata repository.
Administrator
213

dw_deploy_biar_files on page 219 Deploy .biar files to a remote SAP BusinessObjects Enterprise XI 3.1 server.
ETL developer
dw_ds_gen on page 220 Generate the metadata repository.
ETL developer
dw_ds_import on page 221 Import source files into the metadata repository
ETL developer
dw-encryptpasswords on page 222 Encrypt data warehouse passwords.
Administrator
dw_etl_export on page 224 Export the BODS jobs, workflows, and other ETL components.
ETL developer
dw_etl_import on page 225 Import the BODS jobs, workflows, and other ETL components.
ETL developer
dw_etl_update_containers on page 226 Build an ETL workflow container.
ETL developer
dw_foundation_setup on page 227 Build the data warehouse foundation
Installer
dw_initdb on page 228 Initialize the data warehouse database schema
Administrator
dw_tz_update_dst on page 229 Update time zone information
Administrator
dw_generateschemas on page 230 Generate schemas and tables.
ETL developer
dw_importdefs on page 231 Load entity model definition files into the metadata repository
ETL developer
Table 1 Data Warehouse Script Files
Name PurposePrimary User
214 Chapter : Data Warehouse Command Reference

dw_app_config
Purpose
Installation script used to configure the application.
User
ETL developer
Syntax
dw_app_config [-descriptorFile <descriptorFile>]
-taskName <taskName>
[-verbose]
[-help] :
Return codes
0 – Success
1 – Success with warnings
>1 – Errors
Examples
dw_app_config -taskName "My Task" -verbose
dw_app_config -taskName task1 -descriptorFile c:\...\directory\descriptorfile_name
Table 2 dw_app_config.bat options
Option Required? Description
-descriptorFile descriptor_file_name N Name of the descriptor file.
-taskName name_of_task Y Name of the task.
-verbose N Produce more detailed output.
-help N Display command syntax.
215

dw_check_datasources_connectivity
Purpose
Use this script to verify database connections.
User
Administrator
Syntax
dw_check_datasources_connectivity [-verbose]
[-help] :
Return codes
0 – All data sources are connected
>0 – Error connecting data sources
<0 – Number of unconnected data sources
If an error occurs, verify that this directory contains the required jdbc.jar file:
C:\Program Files\HP\IT Analytics 2.00\Foundation\lib\
Example
dw_check_datasources_connectivity -verbose
Table 3 dw_check_datasources_connectivity.bat options
Option Required? Description
-verbose N Produce more detailed output.
-help N Display command syntax.
216 Chapter : Data Warehouse Command Reference

dw_cleandb
Purpose
Remove the staging and target data for all consolidated entities related to the specified data source.
User
Administrator
Syntax
dw_cleandb [-help>]
[-file <file>]
[-listonly]
[-product <product>] :
Return codes
0 – Success
2 – Error
If an error occurs, verify that this directory contains the required jdbc.jar file:
C:\Program Files\HP\IT Analytics 2.00\Foundation\lib\
Example
dw_cleandb.bat -product PPM
Table 4 dw_cleandb.bat options
Option Required? Description
-help N Display command syntax.
-file <file> N File name for the list output.
-listonly N Only list the affected tables. Write the affected tables to a file but do not execute the SQL. If you use listonly without specifying a product file, IT Analytics writes the list of tables to the dw_cleandb.log file in C:\Program Files\HP\IT Analytics 2.00\ContentPacks\Core\Foundation\log.
-product <product>
N Name of the product for which to clean the data from the database.
217

dw_config_loader
Purpose
Use this script to load this file into the metadata repository:
C:\Program Files\HP\IT Analytics 2.00\Foundation\conf\dataSources.xml
User
Administrator
Syntax
dw_config_loader [-verbose]
[-help] :
Return codes
0 – Success
1 – Success with warnings
>1 – Errors
Examples
dw_config_loader -verbose
Table 5 dw_config_loader.bat options
Option Required? Description
-verbose N Produce more detailed output.
-help N Display command syntax.
218 Chapter : Data Warehouse Command Reference

dw_deploy_biar_files
Purpose
Use this script to deploy biar files to a local or remote BOE server. The deployment process automatically customizes the universe data connections and the Query as a Web Service URLs.
User
ETL developer
Syntax
dw_deploy_biar_files [-BOEAdminPwd <password>]
-BOEAdminUser <user>
-BOEHostname <hostname>
[-BOEPort <webport>]
-file <filename> | -topdir <directory>
[-help] :
Example
dw_deploy_biar_files -BOEHostname xxxxxx.xxx.com -BOEAdminUser Administrator -BOEAdminPwd secret -BOEPort 9090 -topdir “C:\FPA\presentation files”
Table 6 dw_deploy_biar_files.bat options
Option Required? Description
-BOEAdminPwd password N Password for the SAP BusinessObjects Enterprise XI 3.1 administrator. The default password is blank.
-BOEAdminUser user Y Name of the user with the rights to import .biar files.
-BOEHostname hostname Y SAP BusinessObjects Enterprise XI 3.1 server name where the .biar files are to be imported.
-BOEPort webport N SAP BusinessObjects Enterprise XI 3.1 web application port number where the .biar files are to be imported. The default value is 8080.
Choose one of the following: Y
• -file path_and_file name File name and path to a single .biar file to be deployed.
• -topdir path_and_directory_name Directory and path to collection of .biar files to be deployed.
-help N Display command syntax.
219

dw_ds_gen
Purpose
Use this script to generate one or more datastores. BODS imports these datastores to enable BODS jobs to connect to the database.
User
ETL developer
Syntax
dw_ds_gen -datastore <dws | dwst | dwt | dwabc | PPM | AM | SM | all>
-outputdir <directory>
[-verbose]
[-help] :
Examples
dw_ds_gen -datastore all -outputdir c:\datastores
dw_ds_gen -datastore PPM -outputdir c:\datastores\PPM
Table 7 dw_ds_gen.bat options
Option Required? Description
-datastore Y Generate the specified data source (dws, dwst, dwt, dwabc, PPM or AM). Specify all to generate all sources.
-outputdir directory_name Y Path and name of the target directory where the data source files are to be generated.
-verbose N Produce more detailed output.
-help N Display command syntax.
220 Chapter : Data Warehouse Command Reference

dw_ds_import
Purpose
Use this script to import source files from a named directory into the metadata repository. For example, to import a collection of files into the datastore directory.
User
ETL developer
Syntax
dw_ds_import -inputdir directory
[-help]:
Example
dw_ds_import -inputdir "c:\datastore\Source Files"
Table 8 dw_ds_import.bat options
Option Required? Description
-inputdir directory_name Y Path and name of the directory where the data source files are to be imported.
-help N Display command syntax.
221

dw-encryptpasswords
Purpose
This utility runs during the data warehouse Foundation setup process to complete the initial password encryption. Thereafter, if you change any of the related user passwords, you must run dw-encryptpasswords again to replace the old value with the new value.
The affected passwords control access to the data warehouse and data warehouse sources, such as Asset Manager or Project and Portfolio Management. When you specify a new password value, the utility replaces the existing password value with an encrypted value in these files:
C:\Program Files\HP\IT Analytics 2.00\Foundation\conf\dataSources.xml or C:\Program Files\HP\IT Analytics 2.00\Foundation\conf\dwplatform.properties
User
Administrator
Syntax
dw-encryptpasswords (-option <password> -option <password> ...| -encrypt <password>)
[-help] :
Table 9 dw-encryptpasswords.bat options
Option Required? Description
Choose one of the following options to update the data warehouse configuration (dwplatform.properties) file:
• -AbcDBAdminPwd password
N Encrypt the ABC database administration login password.
• -AbcDBOwnerPwd password
N Encrypt the ABC database owner login password.
• -AllSchemasAdminPwd password
N Encrypt the passwords for all non-specific administrator accounts with the same password value.
• -AllSchemasOwnerPwd password
N Encrypt the passwords for all non-specific owner accounts with the same password value.
• -DSManagementConsolePwd password
N Encrypt the BODS Management Console login password.
• -DSRepositoryPwd password
N Encrypt the BODS repository login password.
• -MetadataDBAdminPwd password
N Encrypt the metadata repository administration login password.
• -MetadataDBOwnerPwd password
N Change the metadata repository owner login password.
222 Chapter : Data Warehouse Command Reference

The encrypted password value is limited to the associated properties or configuration file. Even if you use the same password text string in successive installations of the same software, the encrypted value is unique. Therefore, properties and configuration files are not portable as-is. You must re-encrypt the password for each instance.
Examples
To change the ABC database administrator password, run this command with a new password value:
dw-encryptpasswords -AbcDBAdminPwd paSSw0rd
The existing value in the dwplatform.properties file is replaced by an encrypted version of paSSw0rd:
AbcDBAdminPwd smkOULucWUdLAa6Qupd2fQ..
• -RDSTargetDBAdminPwd password
N Change the target database administration login password.
• -RDSTargetDBOwnerPwd password
N Encrypt the target database owner login password.
• -StagingDBAdminPwd password
N Encrypt the staging database administration login password.
• -StagingDBOwnerPwd password
N Encrypt the staging database owner login password.
• -StagingTargetDBOwnerPwd password
N Encrypt the staging database owner staging -target login password.
Choose one of the following options to update the source products configuration (dataSources.xml) file:
• -AMPwd password N Encrypt the Asset Manager login password.
• -PPMPwd password
N Encrypt the Project and Portfolio Management login password.
• -SMPwd password N Encrypt the Service Manager login password.
Other options:
-encrypt password N Display the encrypted value of a password text string.
-help N Display command syntax.
Table 9 dw-encryptpasswords.bat options
Option Required? Description
223

dw_etl_export
Purpose
Use this script to export Data Services jobs, workflows, data flows, and functions to a zip file.
User
ETL developer
Syntax
dw_etl_export -zip <zipfile>
[-help]:
Example
dw_etl_export -zip c:\etlFiles.zip
Table 10 dw_etl_export.bat options
Option Required? Description
-zip zip_file_name Y Export to the specified archive file.
-help N Display command syntax.
224 Chapter : Data Warehouse Command Reference

dw_etl_import
Purpose
Use this script to import Data Services jobs, workflows, data flows, and functions to a zip file.
User
ETL developer
Syntax
dw_etl_import [-atl <atlFile>]
-topdir <directory>
[-zip <zipfile>]
[-help]:
Examples
dw_etl_import -topdir c:\etlFiles
dw_etl_import -topdir "c:\ETL Files"
dw_etl_import -zip c:\etlFiles.zip
dw_etl_import -atl c:\functions.atl
Table 11 dw_etl_import.bat options
Option Required? Description
-atl atl_file_name N Import the specified .atl file.
-topdir directory_name Y Import all .atl files under a specified directory and subdirectory.
-zip zip_file_name N Import the contents of the archive file.
-help N Display command syntax.
225

dw_etl_update_containers
Purpose
This script loads .atl files during the installation process.
User
ETL developer
Syntax
dw_etl_update_containers -topdir <directory>
[-verbose]
[-help]:
Return codes
0 – Success
1 – Success with warnings
>1 – Errors
Examples
dw_etl_update_containers -topdir "c:\My Application"
dw_etl_update_containers -topdir c:\MyApplication
Table 12 dw_etl_update_containers.bat options
Option Required? Description
-topdir directory_name Y Name of the directory that contains all application-specific .atl files.
-verbose N Produce more detailed output.
-help N Display command syntax.
226 Chapter : Data Warehouse Command Reference

dw_foundation_setup
Purpose
Use this script to call the scripts that encrypt passwords, initialize the data warehouse, or load the metadata for data source connections into the database.
Syntax
dw_foundation_setup [-args <taskArguments>]
-taskName <taskName>
[-verbose]
[-help]:
You can see the individual tasks and associated arguments called by dw_foundation_setup if you open this file with a text or xml editor:
C:\Program Files\HP\IT Analytics 2.00\Foundation\etc\xml\dw_foundation_setup.xml
Return codes
0 – Success
1 – Success with warnings
>1 – Errors
Examples
dw_foundation_setup -taskName encryptPasswords -args "MetadataDBSystemUserPassword=xxxxxxxxxx"
In this example, the existing value in the dwplatform.properties file is replaced by an encrypted version of xxxxxxxxxx:
MetadataUserPassword FtS3qnLI2uppwOWWIkSBgQ
To change multiple passwords, run the command with a different taskName and password value:
dw_foundation_setup -taskName encryptPasswords -args "MetadataDBAdminPwd=Vb208"dw_foundation_setup -taskName encryptPasswords -args "RDSTargetDBAdminPwd=Vb208"dw_foundation_setup -taskName encryptPasswords -args "StagingDBAdminPwd=Vb208"dw_foundation_setup -taskName encryptPasswords -args "AbcDBAdminPwd=Vb208"dw_foundation_setup -taskName encryptPasswords -args "AllSchemasOwnerPwd=DwSch1;"dw_foundation_setup -taskName encryptPasswords -args "DSRepositoryPwd=DsRep1;"dw_foundation_setup -taskName encryptPasswords -args "DSManagementConsolePwd=M1;"
Table 13 dw_foundation_setup.bat options
Option Required? Description
-args task_argument N Name of the task argument.
-taskName task_name Y Name of the requested task.
-verbose N Produce more detailed output.
-help N Display command syntax.
227

dw_initdb
Purpose
Use this script to initialize data warehouse foundation database schemas.
Syntax
dw_init.bat [-confdir <directory>]
[-schema <schemaname>]
-sqldir <directory>
[-help]:
Examples
dw_init.bat -sqldir c:\myDbDirectory
dw_init.bat -sqldir c:\myDbDirectory -schema dwmetadata -confdir “c:\my Config Directory”
Table 14 dw_init.bat option
Option Required? Description
-confdir directory N Name of the directory that contains the .properties file for the designated schemaname.
-schema schemaname N Name of the schema, such as dwmetadata, dws, dwst, or dwt.
-sqldir directory Y Name of the directory that contains the schema and .properties file.
-help N Display command syntax.
228 Chapter : Data Warehouse Command Reference

dw_tz_update_dst
Purpose
Load or update the time zone information for a data source and the data warehouse. Run this utility whenever you deploy new source data or when you change the DwTimeZone value in the dwplatform.properties file. Time zone is expressed in GMT format: GMT +\-nn:nn.
Syntax
dw_tz_update_dst.bat [-help]
[-verbose]:
Return codes:
0 – Success
1 – Success with warnings
>1 – Errors
Example
dw_tz_update_dst -verbose
Table 15 dw_tz_update_dst.bat option
Option Required? Description
-help N Display command syntax.
-verbose N Produce more detailed output.
229

dw_generateschemas
Purpose
Use this script to generate schemas and tables.
Syntax
dw_generateschemas [-aggregates]
[-application <application>|all]
[-autoloadingmode true|false]
[-interface]
[-noninteractive]
[-product <product>|all]
[-staging]
[-target]
[-verbose]
[-help]:
Interfaces will always be written to a file, whether autoloadingmode is on or not. Each interface for a Data Source Connection is written to a separate file. If you do not specify a specific phase, all phases execute.
Example
dw_generateschemas -application myApp -autoloadingmode true -target
Table 16 dw_generateschemas.bat options
Option Required? Description
-aggregates N Generate or update the aggregation tables.
-application application_name | all
N Load the named application or load all applications. All is the default if you are in non-interactive mode.
-autoloadingmode N Specify true or false. True is the default value.
-interface N Generate the SQL script files to create the interface.
-noninteractive N Run this script without prompting for user input. Use all default values.
-product product_name | all
N Load the specified product. All is the default value.
-staging N Generate or update the staging tables.
-target N Generate or update the target tables.
-verbose N Produce more detailed output.
-help N Display command syntax.
230 Chapter : Data Warehouse Command Reference

dw_importdefs
Purpose
Use this script to load entity model definition files (dimensions, facts, consolidations, aggregations, extractions, and source integrations) into the metadata repository.
Syntax
dw_importdefs [-xmlfile <xmlfile> | -topdir <directory>]
[-verbose]
[-help]:
Return codes
0 – Success
1 – Success with warnings
>1 – Errors
Examples
dw_importdefs -xmlfile "..\sampledata\sample file.xml"
dw_importdefs -topdir c:\sampledir
dw_importdefs
Table 17 dw_etl_update_containers.bat options
Option Required? Description
-topdir directory_name N Name of the directory that contains all the XML files (and subdirectories) to load into the metadata repository.
-xmlfile file_name N Name of the file to load into the metadata repository.
-verbose N Produce more detailed output.
-help N Display command syntax.
231

232 Chapter : Data Warehouse Command Reference

B Naming Conventions
IT Analytics uses a variety of naming conventions for consistency in the data warehouse.
Data Warehouse Naming Conventions
Table 18 describes table and field naming conventions.
Table 18 Naming Conventions
Type _Value Description
Table Name Suffixes _DIM_FACT_MS
_HIER_AGG
Dimension or bridge table.Fact table.Monthly snapshot table that shows the last known value for the data at the end of a month.Hierarchy table.Aggregate roll up table.
Field Name Prefixes MD_
SRC_
PK_FLAG_ DATE_ DURATION_ COUNT_AVG_MAX_MIN_PCT_
Metadata. Used for all fields that exist just for data warehouse internal processes.Source. Used for all field drawn from the source for ETL purposes only (not pushed to the target).Primary key.A binary field: Y/N.A date type.A measure representing a length of time.A measure representing a raw count.A measure representing an average roll up.A measure representing a maximum roll up.A measure representing a minimum roll up.A measure representing a percentage.
Field Name Suffixes _ID _BASE
_UTC_LOC
A surrogate key field that is primary or foreign.A financial amount, currency, or exchange rate in the default currency of the data warehouse.A date expressed in the UTC time zone.For dates: a date expressed in the default display time zone for the data warehouse. For money: a financial amount, currency, or exchange rate in the original currency of the source data.
233

234
ess.
nd a suffix of _DS. The format is:
e and a suffix of _ALIAS. The
me or purpose of the project and a
BODS Naming Conventions
Table 19 describes the naming conventions used by tables that are part of the BODS ETL proc
Table 19 Naming Conventions
Category Description Naming Convention and Examples
Datastore Connection to database with source application views
Datastore names have a prefix with the datastore name a<SOURCE APP>_DSExamples:• AMVIEW_DS• PPMVIEW_DS• SMVIEW_DS
Connection to transactional entity staging database
• SRCSTAGING_DS
Connection to target entity staging database
• DWSTAGING_DS
Connection to data warehouse database
• DW_DS
Datastore Alias Alias user for source application view
Alias names have a prefix with the source application namformat is: <SOURCE APP>_ALIASExamples:
• AMVIEW_ALIAS
Alias user for transactional entity staging database
• SRCSTAGING_ALIAS
Alias user for target entity staging database
• DWSTAGING_ALIAS
Alias user for data warehouse database
• DW_ALIAS
Project Allows you to group jobs that have dependent schedule or belong to the same application
Project names have a prefix with the source application nasuffix of _PJ. The format is: <DESCRIPTION>_PJExample: FPA_PJ

235
cation. An internal segment can at is:
me. A SUB-CATEGORY segment at is:
me. A SUB-CATEGORY segment at is:
TION>_DF
the type of variable (G for global, rpose or identifying parameter
> or $P_<PURPOSE>
rpose of the function. and a suffix
Job Names Data Integrator job which is a group of objects that you can schedule and execute together
Job names have a prefix with the name of the source applidescribe the job purpose. There is a suffix of _JB. The form<SOURCE APP>_<PURPOSE>_JB or <PURPOSE>_JBExamples:
• AM_SOURCE_EXTRACT_JB
• DW_JB
Workflows Defines a decision making process to execute a dataflow
Workflow names have a prefix with the source or target nadescribes the ETL phase. There is suffix of _WF. The form<SRC NAME/TARGET NAME>_<SUB-CATEGORY>_WFExamples:
• AM_AMRIGHTSUSESCOUNT_EXT_WF
• AM_MSI_CONTAINER_WF
Dataflows Data flows extract, transform and load data
Dataflow names have a prefix with the source or target nadescribes the ETL phase. There is a suffix of _DF. The form<SRC NAME/TARGET NAME><SUB_CATEGORY>_<ACExamples:
• AM_AMRIGHTSUSESCOUNT_EXT_DF
• AM_SWAUDITDETAIL_MSI_DF
Variables - Global - Local Variables
- Parameters
Variables defined in a jobVariables defined in a job/workflowParameters in a workflow/dataflow
Variable names have a dollar sign ($) and prefix to identifyL for local, or P for parameter). The suffix identifies the puname. The format is: $G_<PURPOSE> or $L_<PURPOSEExamples:
• $G_BATCH_ID
• $L_STARTDATE
• $P_STATUS
Custom Functions
Script functions in Data Integrator scripting language
Custom function names have a prefix that describes the puof _FN. The format is: <PURPOSE>_FNExample: STARTJB_FN
Table 19 Naming Conventions
Category Description Naming Convention and Examples
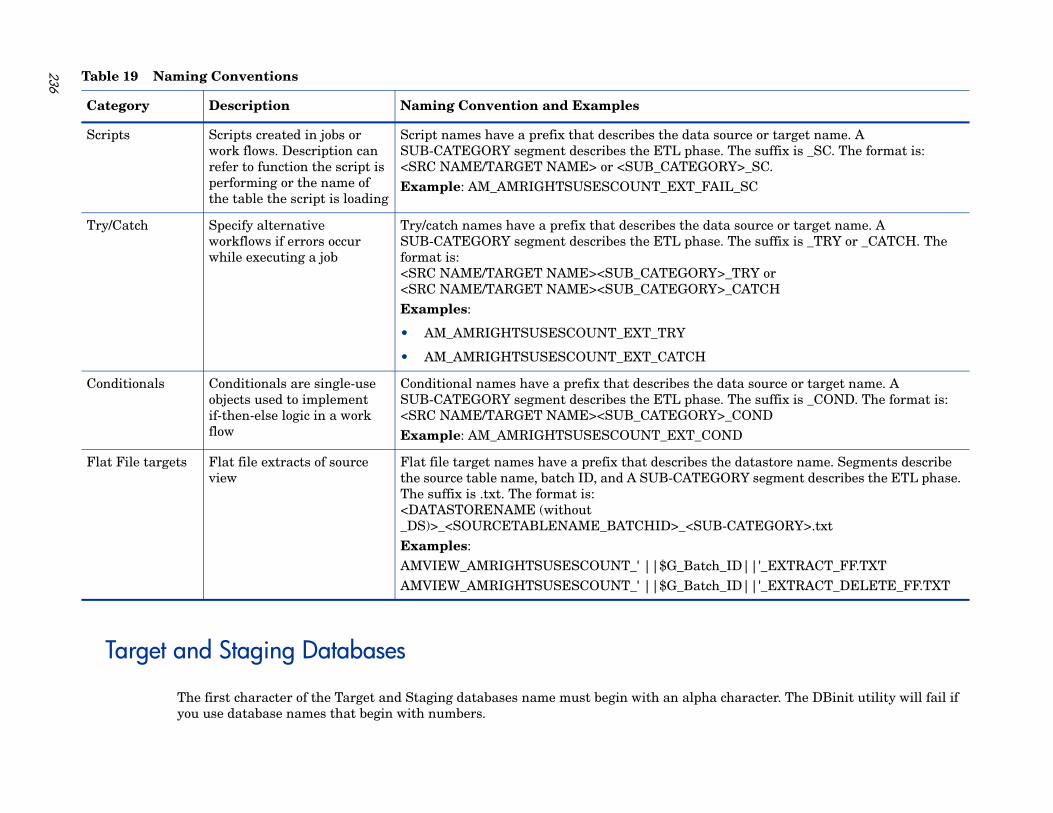
236
cter. The DBinit utility will fail if
or target name. A suffix is _SC. The format is: C.
rce or target name. A suffix is _TRY or _CATCH. The
orCH
ource or target name. A suffix is _COND. The format is:
D
astore name. Segments describe egment describes the ETL phase.
EGORY>.txt
'_EXTRACT_FF.TXT'_EXTRACT_DELETE_FF.TXT
Target and Staging Databases
The first character of the Target and Staging databases name must begin with an alpha charayou use database names that begin with numbers.
Scripts Scripts created in jobs or work flows. Description can refer to function the script is performing or the name of the table the script is loading
Script names have a prefix that describes the data source SUB-CATEGORY segment describes the ETL phase. The <SRC NAME/TARGET NAME> or <SUB_CATEGORY>_SExample: AM_AMRIGHTSUSESCOUNT_EXT_FAIL_SC
Try/Catch Specify alternative workflows if errors occur while executing a job
Try/catch names have a prefix that describes the data souSUB-CATEGORY segment describes the ETL phase. The format is: <SRC NAME/TARGET NAME><SUB_CATEGORY>_TRY<SRC NAME/TARGET NAME><SUB_CATEGORY>_CATExamples:
• AM_AMRIGHTSUSESCOUNT_EXT_TRY
• AM_AMRIGHTSUSESCOUNT_EXT_CATCH
Conditionals Conditionals are single-use objects used to implement if-then-else logic in a work flow
Conditional names have a prefix that describes the data sSUB-CATEGORY segment describes the ETL phase. The <SRC NAME/TARGET NAME><SUB_CATEGORY>_CONExample: AM_AMRIGHTSUSESCOUNT_EXT_COND
Flat File targets Flat file extracts of source view
Flat file target names have a prefix that describes the datthe source table name, batch ID, and A SUB-CATEGORY sThe suffix is .txt. The format is: <DATASTORENAME (without _DS)>_<SOURCETABLENAME_BATCHID>_<SUB-CATExamples:AMVIEW_AMRIGHTSUSESCOUNT_' ||$G_Batch_ID||AMVIEW_AMRIGHTSUSESCOUNT_' ||$G_Batch_ID||
Table 19 Naming Conventions
Category Description Naming Convention and Examples