itar notice - lancer systems
TRANSCRIPT

© 2014 Lancer Systems all rights reserved

Page 2
PROPRIETARY NOTICE: This contains Lancer Systems’ confidential, proprietary and/or competition sensitive data. Lancer Systems is AS9100C:2009 ISO9001:2008 CERTIFIED
ITAR NOTICE: “Warning – This document contains technical data whose export is restricted by the Arms Export Control Act (Title 22, U.S.C. Sec. 2751, et. Seq.) or the Export Administration Act of 1979 as amended, Title 50 U.S.C. App. 2401 et, seq. Violations of these export laws are subject to severe criminal penalties. Disseminate in Accordance with provisions of DOD Directive 5230.25.”

Page 3
Table of Contents
Safety……………………………………………………………………………… 4 Carbon Fiber Handguards……...……………………………………………… 5 - 9 Description ……………………………………………………………… 5 Features and options…….……………………………………………… 6 - 9 DPMS Quad Rail Replacement ……………………………......................... 9 - 19 Tool box…………………………………………………………………… 10 Disassembly ……………………………………………………………… 10 - 13 Assembly…..……………………………………………………………… 14 - 18 Function check……………………………………………………. 19

Page 4
Safety Rules
Cardinal Rules of Firearms Safety 1. Treat every firearm as if it were loaded until positively ascertained
otherwise by you 2. Never point a firearm at anything or anybody that you do not intend to
shoot, or in a direction where an unintentional discharge may do harm 3. Never place your finger into the trigger guard until ready and justified to
fire 4. Be sure of your threat, backstop and beyond
Rendering a Firearm Safe 1. Always point a firearm in the safest direction (MUZZLE AWARENESS) 2. Safety ON (if applicable) 3. Magazine removed (or cylinder open, unload cylinder) 4. Bolt, slide or cocking lever locked to the rear 5. Visually and physically inspect the chamber
NOTE: Wear eye protection during disassembly and reassembly of your firearm.

Page 5
Carbon Fiber Handguards Description: The Lancer Lightweight Carbon Fiber Handguard (LCH) is a custom profiled free float handguard system designed for 5.56mm and .308 caliber AR type rifles. Applying our experience in carbon-fiber product design and lightweight component development we’ve created a robust free float handguard that weighs less than comparable aluminum handguard systems without sacrificing rigidity or impact strength. Available in carbine, mid-length, rifle length, rifle length plus, and extra-long (15"), the Lancer Lightweight Carbon Fiber Handguard can be applied to a variety of rifle configurations and used in many different applications.
Advanced Design • Carbon Fiber Handguard Tube – We’ve selected a carbon fiber layup/resin combination that will
resist the heat associated with high volumes of small arms fire, and is rigid enough for heavy use. Cooling slots have been provided to manage barrel temperature.
• 7075-T6 Aluminum Components – Where necessary aircraft grade 7075-T6 aluminum has been
used to ensure the durability and reliability of the handguard assembly, such as the upper receiver extension and the end cap. The carbon-fiber tube is precision fit to the upper receiver extension and secured with fasteners to ensure a rigid connection.

Page 6
FEATURES & OPTIONS • An end cap is provided to protect the end of the tube from rough handling damage. • Free float design ensures that the
barrel is not affected by pressure on the handguard eliminating point of impact deviations.
• Low profile, octagon shaped carbon-
fiber tube, is as rigid and impact resistant as lightweight aluminum free float tube designs.
• Available with or without cooling slots; cooling slots will accept accessory rail hardware. • Available with or without a picatinny rail at 12 o’clock. • Attachment points for quick-detach sling swivels at 3 and 9 o’clock. • Slots at six o'clock for an accessory
rail and holes for sling swivel stud so a bi-pod can be attached.
• Fits 5.56mm/.223rem AR, DPMS LR-308 AR and Armalite / Rock River AR-10 308 Cal AR rifles. • Available in carbine, mid-length, rifle length, rifle length plus, and extra-long (15").

Page 7
5.56mm/.308 AR HANDGUARD DATA
5.56MM AR OCTAGON
PART NUMBER DESCRIPTION
INSIDE/OUTSIDE DIMENSIONS LENGTH WEIGHT SIGHT RAIL
LCH5-03-X-1-NR LCH5 Pistol Handguard, no slots 1.8” / 2.0” 4.2” 8.2 oz NO LCH5-06-V-1-NR LCH5 Carbine Handguard 1.8” / 2.0” 7.2“ 9.2 oz NO LCH5-08-V-1-NR LCH5 Midlength Handguard 1.8” / 2.0” 9.5“ 10.0 oz NO LCH5-12-V-1-NR LCH5 Rifle Handguard 1.8” / 2.0” 12.5“ 11.0 oz NO LCH5-13-V-1-NR LCH5 Rifle PLUS Handguard 1.8” / 2.0” 14.6“ 11.6 oz NO LCH5-15-V-1-NR LCH5 Extra Long Handguard 1.8” / 2.0” 16.25“ 12.1 oz NO LCH5-15-X-1-NR Extra-Long Varmint, No Cooling Slots 1.8” / 2.0” 16.25“ 13.5 oz NO LCH5-06-V-1-2R LCH5 Carbine Handguard 1.8” / 2.0” 7.2“ 9.6 oz 2” Sight Rail LCH5-08-V-1-2R LCH5 Midlength Handguard 1.8” / 2.0” 9.5“ 10.4 oz 2” Sight Rail LCH5-12-V-1-2R LCH5 Rifle Handguard 1.8” / 2.0” 12.5“ 11.4 oz 2” Sight Rail LCH5-13-V-1-2R LCH5 Rifle PLUS Handguard 1.8” / 2.0” 14.6“ 12.0 oz 2” Sight Rail LCH5-15-V-1-2R LCH5 Extra Long Handguard 1.8” / 2.0” 16.25“ 12.5 oz 2” Sight Rail LCH5-06-V-1-FR LCH5 Carbine Handguard 1.8” / 2.0” 7.2“ 10.5 oz Full Length LCH5-08-V-1-FR LCH5 Midlength Handguard 1.8” / 2.0” 9.5“ 11.7 oz Full Length LCH5-12-V-1-FR LCH5 Rifle Handguard 1.8” / 2.0” 12.5“ 13.3 oz Full Length LCH5-13-V-1-FR LCH5 Rifle PLUS Handguard 1.8” / 2.0” 14.6“ 13.5 oz Full Length LCH5-15-V-1-FR LCH5 Extra Long Handguard 1.8” / 2.0” 16.25“ 14.1 oz Full Length
5.56MM AR ROUNDED
PART
NUMBER DESCRIPTION INSIDE/OUTSIDE DIMENSIONS LENGTH WEIGHT
SIGHT RAIL
LCR5-06-V-0-NR Carbine Handguard, Standard Slots 1.8” / 2.0” 7.2” 8 oz NO
LCR5-08-V-0-NR Midlength Handguard, Standard Slots 1.8” / 2.0” 9.5” 8.6 oz NO
LCR5-12-V-0-NR Rifle Handguard, Standard Slots 1.8” / 2.0” 12.5” 9.6 oz NO
LCR5-13-V-0-NR Rifle PLUS Handguard, Standard Slots 1.8” / 2.0” 14.6” 10.1 oz NO
LCR5-15-V-0-NR Extra Long Handguard, Standard Slots 1.8” / 2.0” 16.25” 10.7 oz NO
LCR5-12-PV-0-2R Rifle Handguard, Premium Slots 1.8” / 2.0” 12.5” 9.4 oz NO
LCR5-13-PV-0-2R Rifle PLUS Handguard, Premium Slots 1.8” / 2.0” 14.6” 9.9 oz NO
LCR5-15-PV-0-2R Extra Long Handguard, Premium Slots 1.8” / 2.0” 16.25” 10.2 oz NO
Length
Length

Page 8
5.56MM AR, OCTAGON, REDUCED WEIGHT
PART NUMBER DESCRIPTION
INSIDE/OUTSIDE DIMENSIONS LENGTH WEIGHT
SIGHT RAIL
LCH5-03-X-0-NR Pistol Handguard, reduced weight, no slots 1.8” / 2.0” 4.2” 7.3 oz NO
LCH5-06-V-0-NR Carbine Handguard, reduced weight 1.8” / 2.0” 7.2” 8.3 oz NO
LCH5-08-V-0-NR Midlength Handguard, reduced weight 1.8” / 2.0” 9.5” 9.1 oz NO
LCH5-12-V-0-NR Rifle Handguard, reduced weight 1.8” / 2.0” 12.5” 10.1 oz NO
LCH5-13-V-0-NR Rifle PLUS Handguard, reduced weight 1.8” / 2.0” 14.6” 10.7 oz NO
LCH5-15-V-0-NR Extra Long Handguard, reduced weight 1.8” / 2.0” 16.25“ 11.2 oz NO
LCH5-15-X-0-NR Varmint 15”, reduced weight, no slots 1.8” / 2.0” 16.25” 12.6 oz NO
LCH5-06-V-0-2R Carbine Handguard, reduced weight 1.8” / 2.0” 7.2” 8.7 oz 2” Front Sight
LCH5-08-V-0-2R Midlength Handguard, reduced weight 1.8” / 2.0” 9.5” 9.5 oz 2” Front Sight
LCH5-12-V-0-2R Rifle Handguard, reduced weight 1.8” / 2.0” 12.5” 10.5 oz 2” Front Sight
LCH5-13-V-0-2R Rifle PLUS Handguard, reduced weight 1.8” / 2.0” 14.6” 11.1 oz 2” Front Sight
LCH5-15-V-0-2R Extra Long Handguard, reduced weight 1.8” / 2.0” 16.25” 11.6 oz 2” Front Sight
LCH5-06-V-0-FR Carbine Handguard, reduced weight 1.8” / 2.0” 7.2” 9.6 oz Full Length
LCH5-08-V-0-FR Midlength Handguard, reduced weight 1.8” / 2.0” 9.5” 10.8 oz Full Length
LCH5-12-V-0-FR Rifle Handguard, reduced weight 1.8” / 2.0” 12.5” 12.4 oz Full Length
LCH5-13-V-0-FR Rifle PLUS Handguard, reduced weight 1.8” / 2.0” 14.6” 12.6 oz Full Length
LCH5-15-V-0-FR Extra Long Handguard, reduced weight 1.8” / 2.0” 16.25“ 13.2 oz Full Length
LENGHT
Length

Page 9
.308 AR – DPMS 16TPI UPPER- OCTAGON
.308 AR – DPMS 16TPI UPPER- OCTAGON
PART NUMBER DESCRIPTION INSIDE/OUTSIDE DIMENSIONS LENGTH WEIGHT
SIGHT RAIL
LCH7-06-V-0-NR-16 Carbine Length, Cooling Slots, 16 TPI 2.0” / 2.2” 7.2“ 11.5 oz NO
LCH7-08-V-0-NR-16 Midlength Length, Cooling Slots, 16 TPI 2.0” / 2.2” 9.5“ 12.1 oz NO
LCH7-12-V-0-NR-16 Rifle Length, Cooling Slots, 16 TPI 2.0” / 2.2” 12.5“ 13.3 oz NO
LCH7-13-V-0-NR-16 Rifle Length Plus, Cooling Slots, 16 TPI 2.0” / 2.2” 14.6“ 14.1 oz NO
LCH7-15-V-0-NR-16 Extra-Long, Cooling Slots, 16 TPI 2.0” / 2.2” 16.25“ 14.6 oz NO
PART NUMBER DESCRIPTION INSIDE/OUTSIDE DIMENSIONS LENGTH WEIGHT
SIGHT RAIL
LCH7-06-V-0-NR-18 Carbine Length, Cooling Slots, 16 TPI 2.0” / 2.2” 7.2“ 11.5 oz NO
LCH7-08-V-0-NR-18 Midlength Length, Cooling Slots, 16 TPI 2.0” / 2.2” 9.5“ 12.1 oz NO
LCH7-12-V-0-NR-18 Rifle Length, Cooling Slots, 16 TPI 2.0” / 2.2” 12.5“ 13.3 oz NO
LCH7-13-V-0-NR-18 Rifle Length Plus, Cooling Slots, 16 TPI 2.0” / 2.2” 14.6“ 14.1 oz NO
LCH7-15-V-0-NR-18 Extra-Long, Cooling Slots, 16 TPI 2.0” / 2.2” 16.25“ 14.6 oz NO
Length

Page 10
DPMS Quad Rail Handguard Replacement Tool Box: 3/32, 1/16 inch hex key/torque wrench; torque screw driver (low profile gas block and new handguard) 3/4 inch open end wrench (flash suppressor) Hammer Flat blade screw driver AR upper receiver vise block or Lancer Systems handguard extension nut alignment tool DMPS barrel wrench AR barrel wrench Torch wrench Red Loctite Anti-seize compound Synthetic scrub pad

Page 11
Disassembly 1. Conduct a clearing procedure to ensure the rifle
is clear, safe and empty
2. Field strip the rifle and
place the upper receiver into a vice block and secure it.
3. Using a
3/4 inch open end wrench, loosen and remove the flash suppressor and crush washer.
4. Locate the handguard set screw
(right side).

Page 12
5. Remove the set screw with a flat blade
screw driver. 6. Unscrew the quad rail from
the barrel extension then slide handguard off the receiver.
7. Using a 3/32 inch hex key or torque wrench,
loosen the gas block screws located on the bottom of the gas block.
NOTE: These set screws are most likely Loctited and may need heat to loosen.
8. Slide the gas block and tube off the
barrel.
Page 13
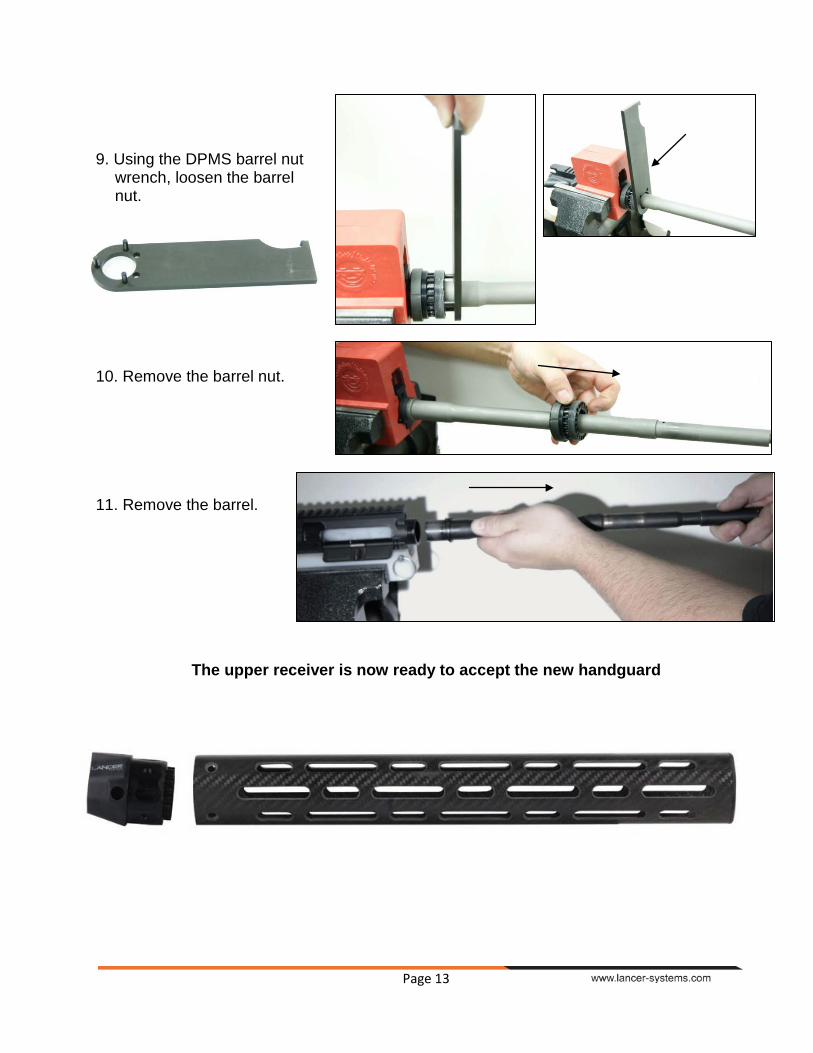
9. Using the DPMS barrel nut
wrench, loosen the barrel nut.
10. Remove the barrel nut. 11. Remove the barrel.
The upper receiver is now ready to accept the new handguard
Page 14
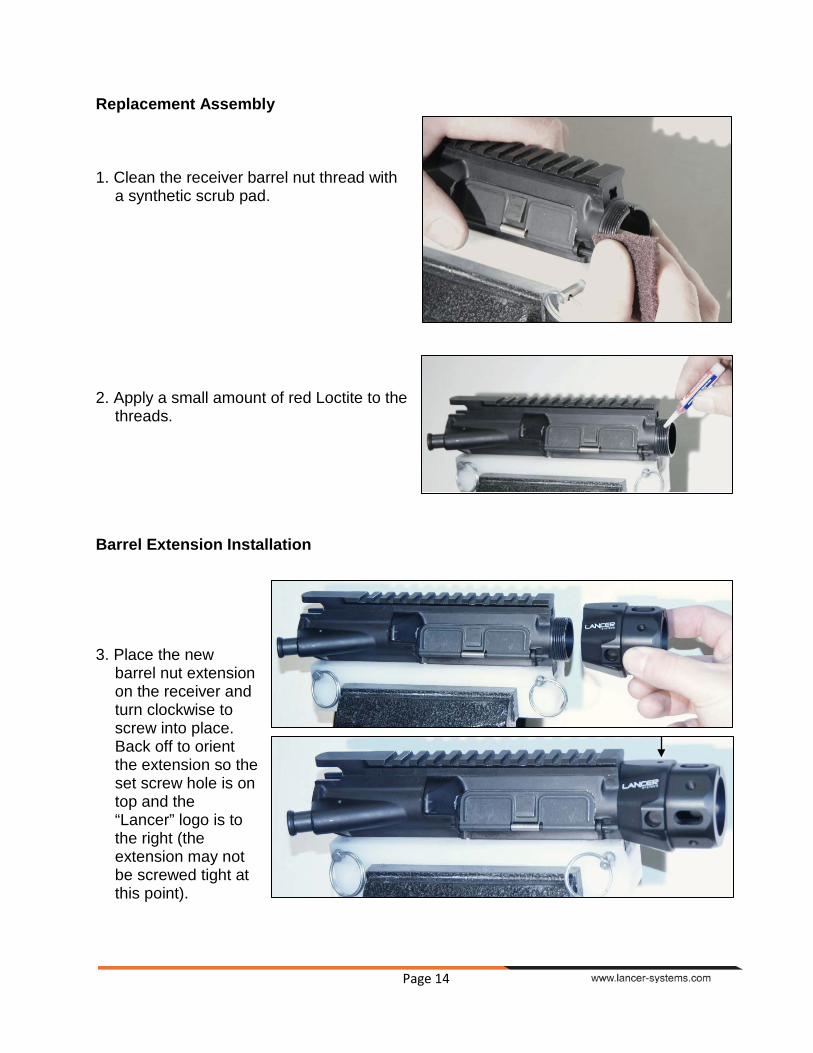
Replacement Assembly 1. Clean the receiver barrel nut thread with
a synthetic scrub pad. 2. Apply a small amount of red Loctite to the
threads. Barrel Extension Installation 3. Place the new
barrel nut extension on the receiver and turn clockwise to screw into place. Back off to orient the extension so the set screw hole is on top and the “Lancer” logo is to the right (the extension may not be screwed tight at this point).

Page 15
4. Using the Lancer
alignment tool, thread the flat end of the tool through the receiver from back to front so that the flat tab will align with the set screw hole on the top of the extension.
5. Using a 1/16 inch hex key, tighten the set screw
against the flat tab of the alignment tool. Barrel Installation 6. Insert the barrel into the barrel
extension assembly ensuring the barrel alignment stud is facing up and seat the barrel.

Page 16
7. With the barrel seated, apply a small amount of anti-seize on the barrel nut threads, then slide the barrel nut over the barrel.
8. Hand tighten the barrel nut.
9. Using the barrel nut
combination tool with a torque wrench, tighten the barrel nut to 30 – 35 ft lbs; loosen and re-tighten to 35 - 80 ft lbs.
10. Check the barrel nut
alignment. There must be clearance for the gas tube.
Either tighten or loosen the barrel nut to obtain the proper alignment. Torque on the barrel nut must be a minimum of 35 ft lbs. and never over 80 ft. lbs.

Page 17
11. Using a 1/16 inch hex key unscrew the set screw from the alignment tool and remove the alignment tool.
12. Slide on and install the gas block and
gas tube. Apply a small amount of red Loctite onto the set screws, then tighten the set screws on the bottom of the gas block with a 3/32” hex key or torque wrench.
13. Slide on the new handguard. 14. Align the screw holes and seat. 15. Insert and torque the set screws to 20 inch lbs.

Page 18
16. Apply a small amount of red Loctite to the barrel
extension set screw. Using a 1/16 inch hex key, turn until firm, and then back off 1/2 turn and leave.
17. Reinstall the flash suppressor and crush
washer. 18. Using a 3/4 inch
open end wrench tighten and align the flash suppressor. Solid on the bottom, vents on the sides and top.
19. Remove from vice block. Reattach to lower receiver. Function check. The rifle is ready for field testing.

Page 19
Function Check On SAFE 1. Point the rifle in the safest direction. 2. Pull charging handle to rear and release several times to ensure the
bolt is not binding on anything. 3. With the rifle on Safe. 4. Press the trigger. The hammer should not fall. On FIRE 1. Place selector on Fire. 2. Press trigger and hold to the rear. The hammer should fall. 3. Pull charging handle to rear and release. 4. Release trigger, listen for a “click” then press again. The hammer
should fall.
Your rifle is now ready for field testing
NOTES