it’s all about crystal - conner ash p.c
TRANSCRIPT

Conner Ash P.C. © 2015 Page 1
It’s All About Crystal
You want a list of the new Customers added during the previous week. You’ve looked at the Customer Listing, but it doesn’t let you filter on the ‘Date Created’. More importantly, you need it tweaked to meet your company’s needs. Sounds like it’s time to launch Crystal Reports and design a report that will meet your needs! First you should think about the fields that you need on your report, the tables that include
those fields and if there are multiple tables, what are the relationships between the tables For our example, we need Customer Name, Number, Phone, Email, Credit Limit and Price Level,
Salesperson Name and Number and all of the Customer Contacts We know that the Customer information, except the Contacts, is in the AR_Customer table The Salesperson Number is in the AR_Customer table, but we need the AR_Salesperson table
for the Salesperson Name and Phone The Customer Contacts are in the AR_CustomerContact table, but since there is a one to many
relationship – One Customer Can Have Many Contacts, we will need a Subreport. Open Crystal Reports and select File -> New -> Standard Report… Create Your Connection
• The Standard Report Creation Wizard will open; if you don’t see a connection to the SOTAMAS90 database, click the plus sign that precedes ‘Create New Connection’
• Click the plus sign that precedes ‘ODBC (RDO)’
Conner Ash P.C. © 2015 Page 2
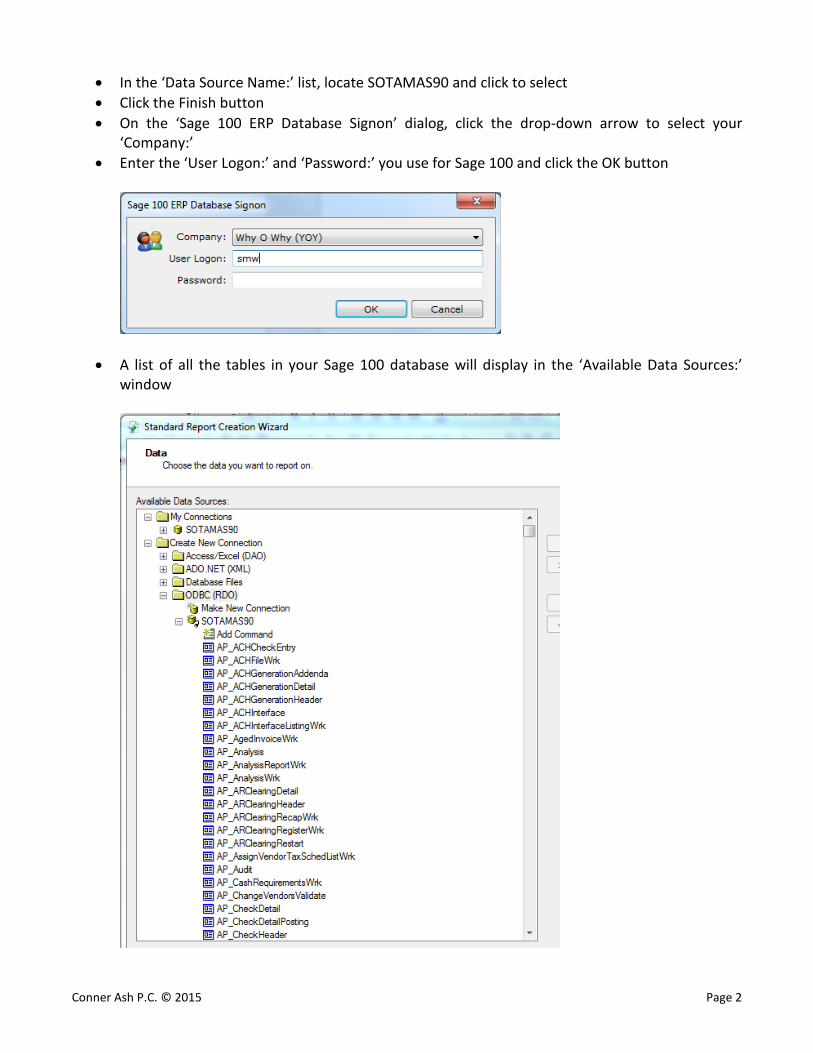
• In the ‘Data Source Name:’ list, locate SOTAMAS90 and click to select • Click the Finish button • On the ‘Sage 100 ERP Database Signon’ dialog, click the drop-down arrow to select your
‘Company:’ • Enter the ‘User Logon:’ and ‘Password:’ you use for Sage 100 and click the OK button
• A list of all the tables in your Sage 100 database will display in the ‘Available Data Sources:’ window
Conner Ash P.C. © 2015 Page 3
Select Your Tables • Scroll and locate the AR_Customer table
• Click to select the AR_Customer table and click the Add button • Scroll and locate the AR_Salesperson table
• Click to select the AR_Salesperson table and click the Add button • Click the Next> button to display the Links between the two tables
NOTES: By default, all fields in common between the two tables are a Link You may elect to eliminate some of the Links Join Types:
Inner Join – Includes only records that have a matching value in the linked field Left Outer Join – Includes a row for every record in the table on the left side of the join, even if there is no matching value in the linked table Right Outer Join – includes a row for every record in the table on the right side of the join, even if no matching value appears in the table on the left Full Outer Join – includes a row for every record in both tables even if there is no matching record between them
Select Your Fields, Groupings and Filters
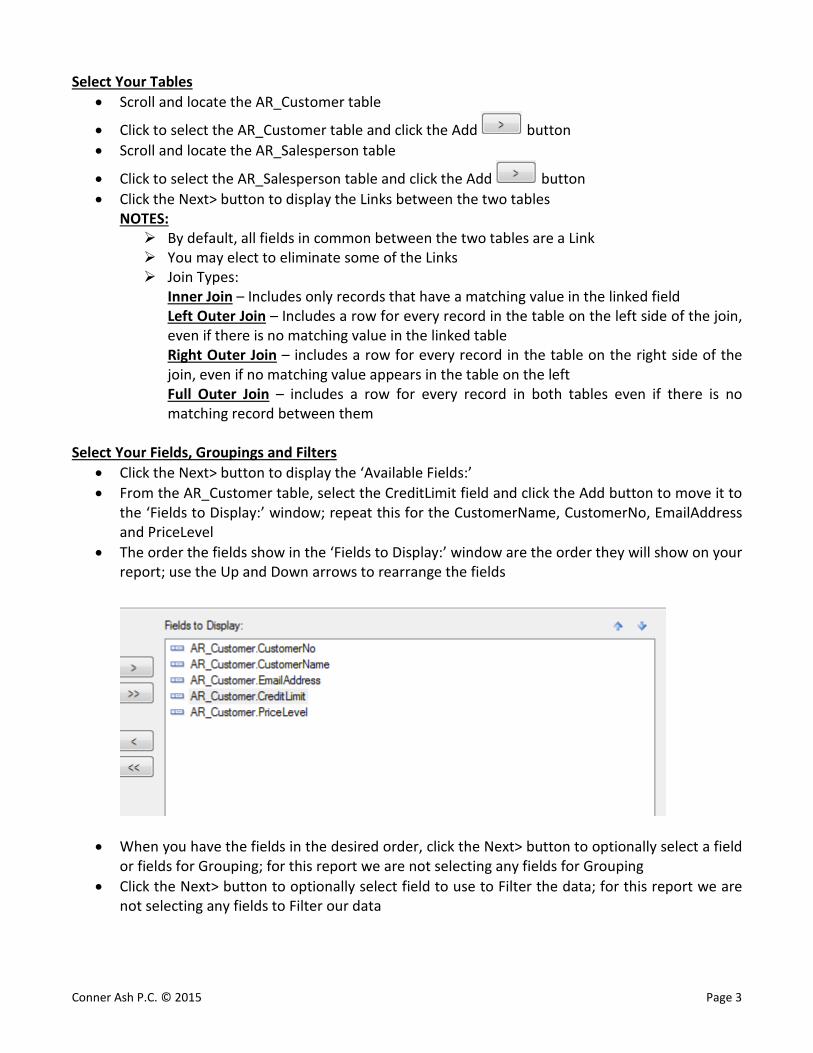
• Click the Next> button to display the ‘Available Fields:’ • From the AR_Customer table, select the CreditLimit field and click the Add button to move it to
the ‘Fields to Display:’ window; repeat this for the CustomerName, CustomerNo, EmailAddress and PriceLevel
• The order the fields show in the ‘Fields to Display:’ window are the order they will show on your report; use the Up and Down arrows to rearrange the fields
• When you have the fields in the desired order, click the Next> button to optionally select a field or fields for Grouping; for this report we are not selecting any fields for Grouping
• Click the Next> button to optionally select field to use to Filter the data; for this report we are not selecting any fields to Filter our data

Conner Ash P.C. © 2015 Page 4
Preview the Report • Click the Finish button to open the report in the Preview Tab
• All columns show in this view • Data is truncated if there is more information than will fit on one page • If the report is exported to Excel, the data is not truncated; all you need to do is widen the
columns to view the full contents of the field
Modify the Layout
• Click the Design Tab to make changes to the layout
Conner Ash P.C. © 2015 Page 5
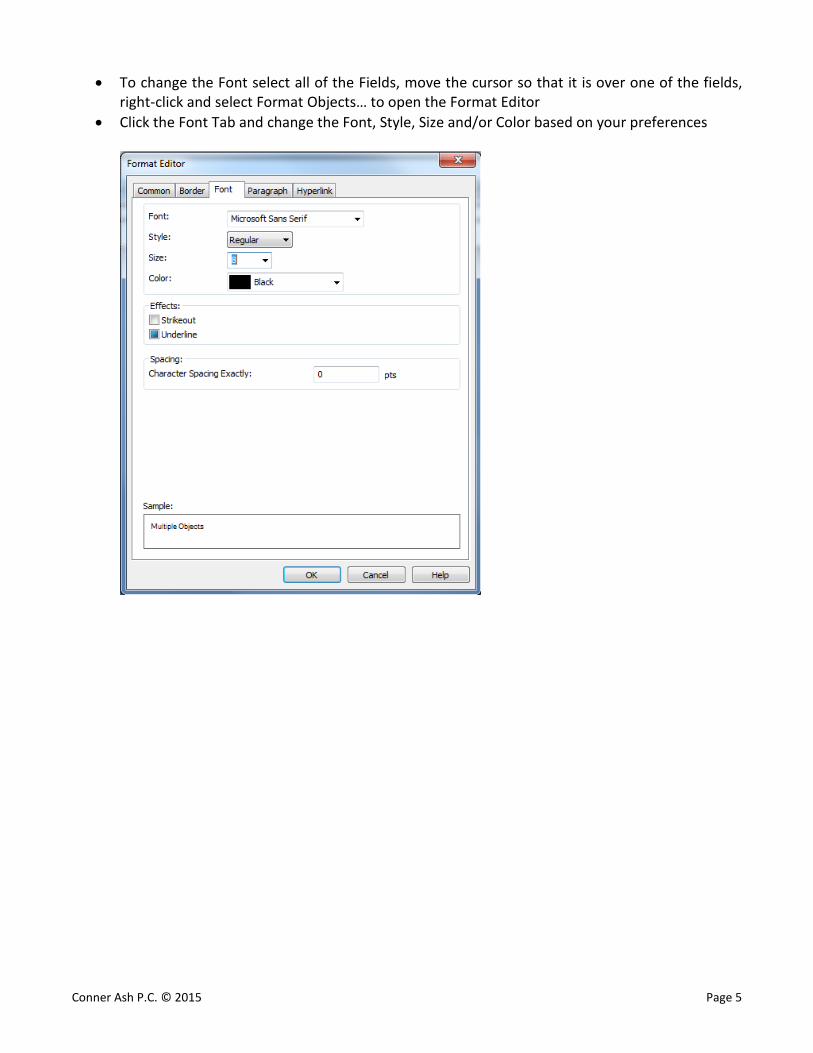
• To change the Font select all of the Fields, move the cursor so that it is over one of the fields, right-click and select Format Objects… to open the Format Editor
• Click the Font Tab and change the Font, Style, Size and/or Color based on your preferences
Conner Ash P.C. © 2015 Page 6
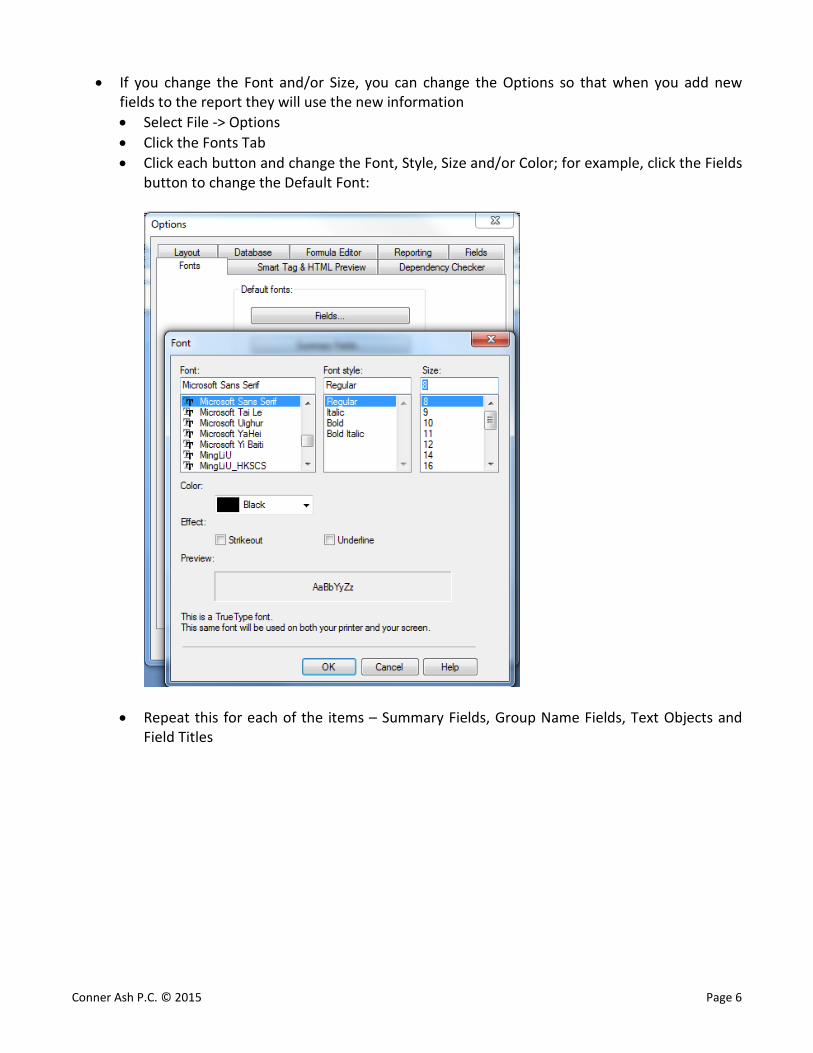
• If you change the Font and/or Size, you can change the Options so that when you add new fields to the report they will use the new information • Select File -> Options • Click the Fonts Tab • Click each button and change the Font, Style, Size and/or Color; for example, click the Fields
button to change the Default Font:
• Repeat this for each of the items – Summary Fields, Group Name Fields, Text Objects and Field Titles
Conner Ash P.C. © 2015 Page 7
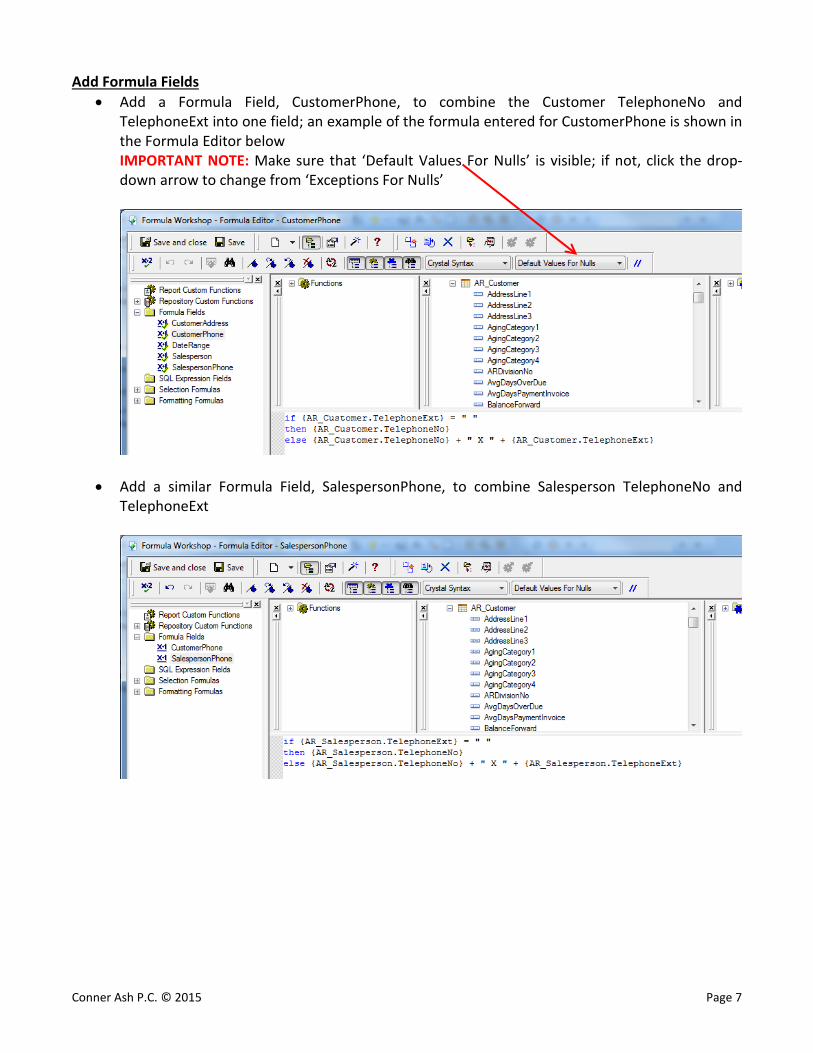
Add Formula Fields • Add a Formula Field, CustomerPhone, to combine the Customer TelephoneNo and
TelephoneExt into one field; an example of the formula entered for CustomerPhone is shown in the Formula Editor below IMPORTANT NOTE: Make sure that ‘Default Values For Nulls’ is visible; if not, click the drop-down arrow to change from ‘Exceptions For Nulls’
• Add a similar Formula Field, SalespersonPhone, to combine Salesperson TelephoneNo and TelephoneExt
Conner Ash P.C. © 2015 Page 8
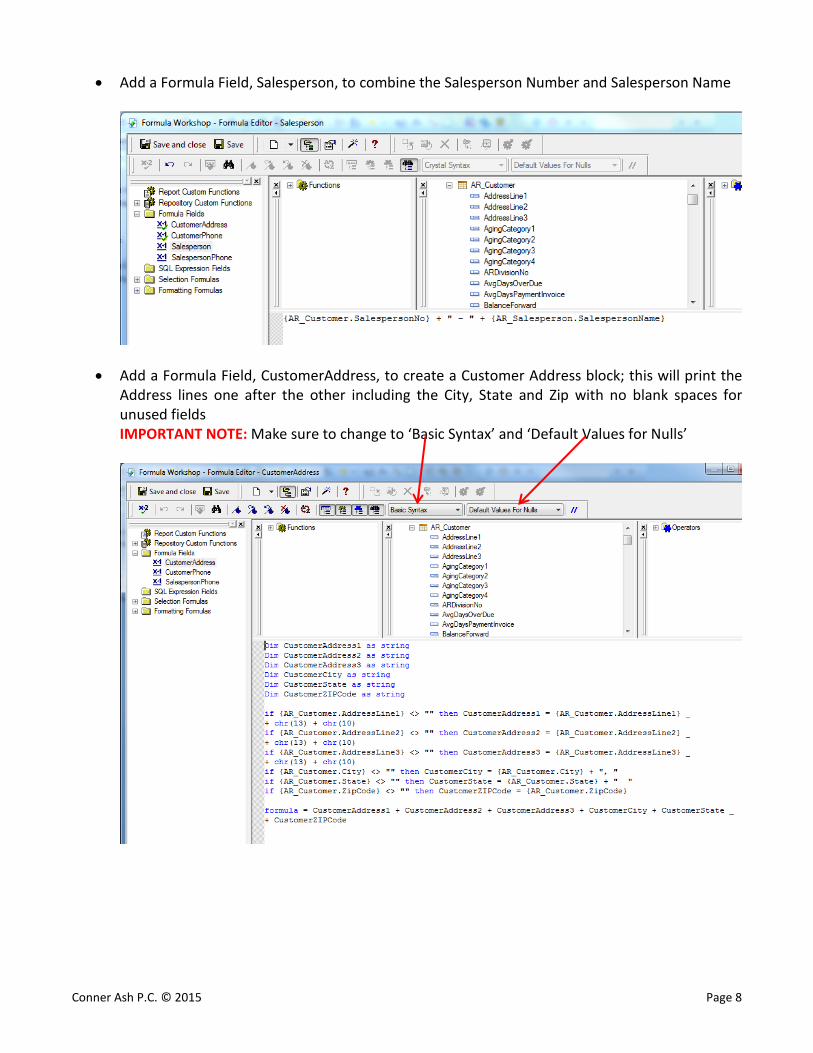
• Add a Formula Field, Salesperson, to combine the Salesperson Number and Salesperson Name
• Add a Formula Field, CustomerAddress, to create a Customer Address block; this will print the Address lines one after the other including the City, State and Zip with no blank spaces for unused fields IMPORTANT NOTE: Make sure to change to ‘Basic Syntax’ and ‘Default Values for Nulls’
Conner Ash P.C. © 2015 Page 9
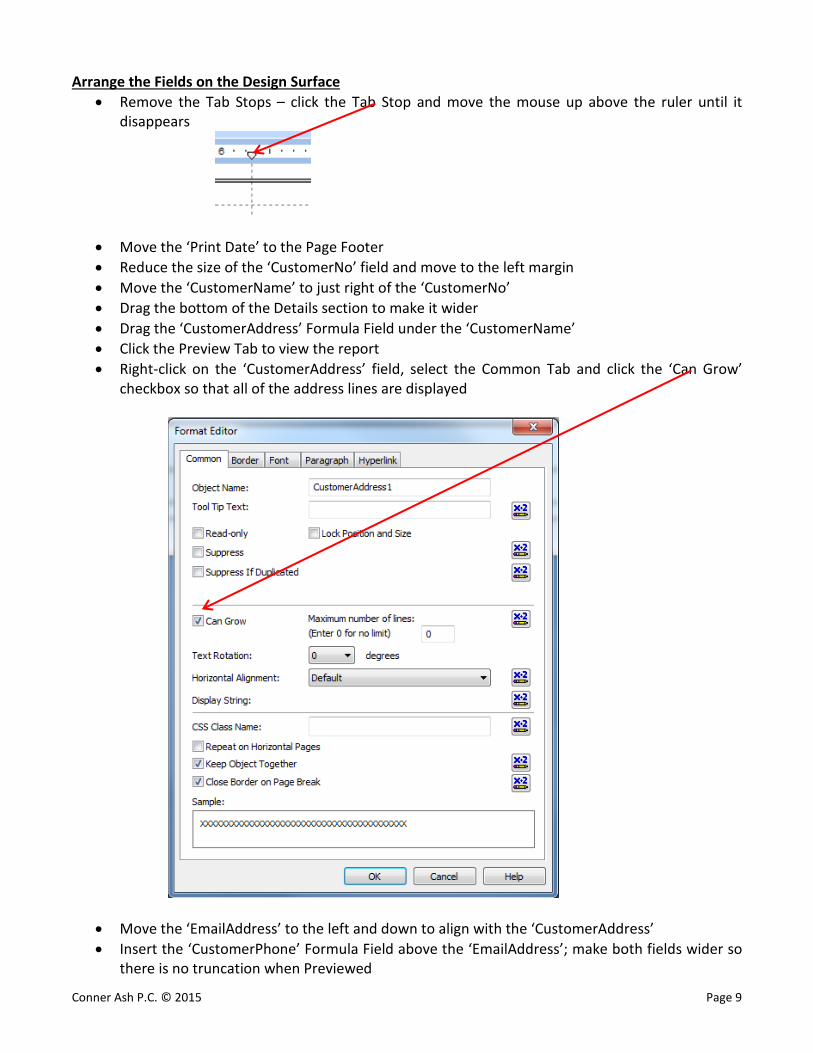
Arrange the Fields on the Design Surface • Remove the Tab Stops – click the Tab Stop and move the mouse up above the ruler until it
disappears
• Move the ‘Print Date’ to the Page Footer • Reduce the size of the ‘CustomerNo’ field and move to the left margin • Move the ‘CustomerName’ to just right of the ‘CustomerNo’ • Drag the bottom of the Details section to make it wider • Drag the ‘CustomerAddress’ Formula Field under the ‘CustomerName’ • Click the Preview Tab to view the report • Right-click on the ‘CustomerAddress’ field, select the Common Tab and click the ‘Can Grow’
checkbox so that all of the address lines are displayed
• Move the ‘EmailAddress’ to the left and down to align with the ‘CustomerAddress’ • Insert the ‘CustomerPhone’ Formula Field above the ‘EmailAddress’; make both fields wider so
there is no truncation when Previewed
Conner Ash P.C. © 2015 Page 10
• Move the ‘CreditLimit’ to the left and widen • Move the ‘PriceLevel’ to the left and widen • Move the ‘Salesperson’ Formula Field to the right of the ‘Price Level’ • Move the ‘SalespersonPhone’ Formula Field under the ‘Salesperson’
Change the Column Headings
• Remove the ‘CustomerNo’, ‘CustomerName’ and ‘CustomerAddress’ labels and replace with one label, ‘Customer Number, Name and Address’, that spans both columns
• Remove the ‘CustomerPhone’ and ‘EmailAddress’ labels and replace with one label, ‘Customer Phone and Email’
• Remove the ‘Salesperson’ and ‘SalespersonPhone’ labels and replace with one label, ‘Salesperson’
• Select all of the column labels Right-click and select Size -> Same Height Right-click and select Align -> Bottoms Click the Align Center button to align the column headings in the center of the columns Click the Underline button to add an underline to all of the column headings Click the Bold button to bold the column headings
Modify the Page Footer
• Insert a label, ‘Run Date: ‘, to the left of Print Date; move the Print Date inside the label • Insert a label, ‘Page: ‘, to the left of the Page Number; move the Page Number inside the label • Align the two fields in the Page Footer • Preview the results • Make changes to the size of the labels, if necessary
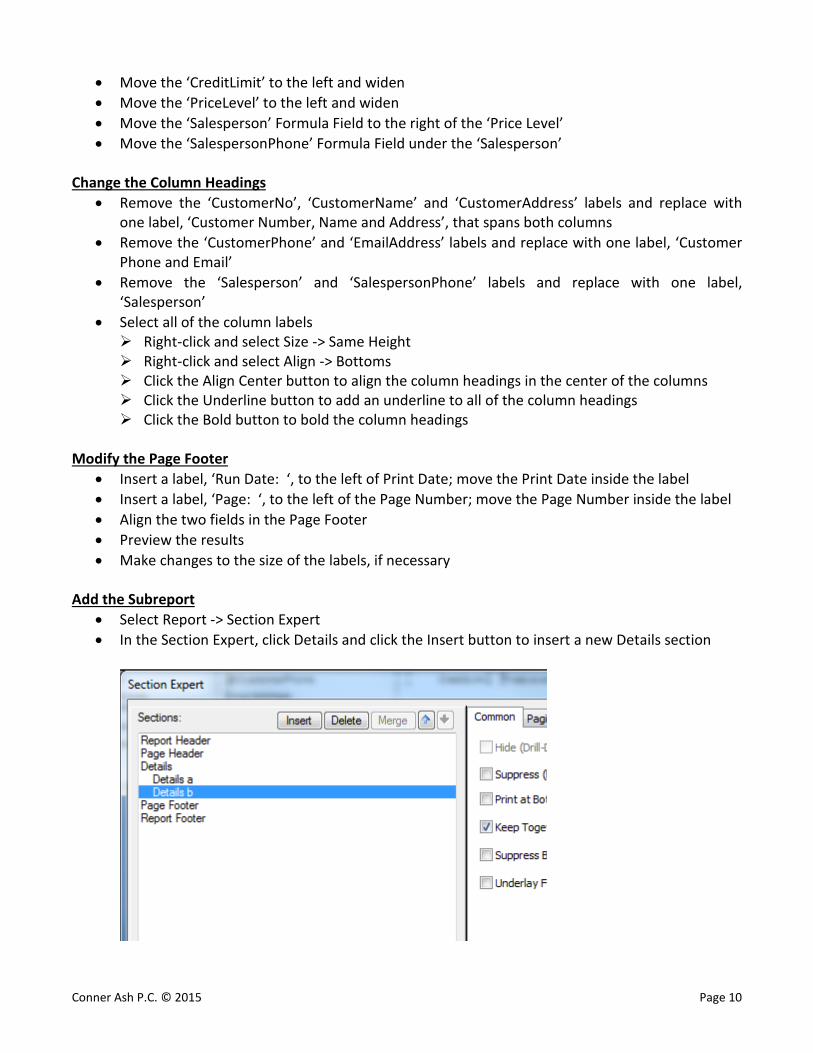
Add the Subreport
• Select Report -> Section Expert • In the Section Expert, click Details and click the Insert button to insert a new Details section
Conner Ash P.C. © 2015 Page 11
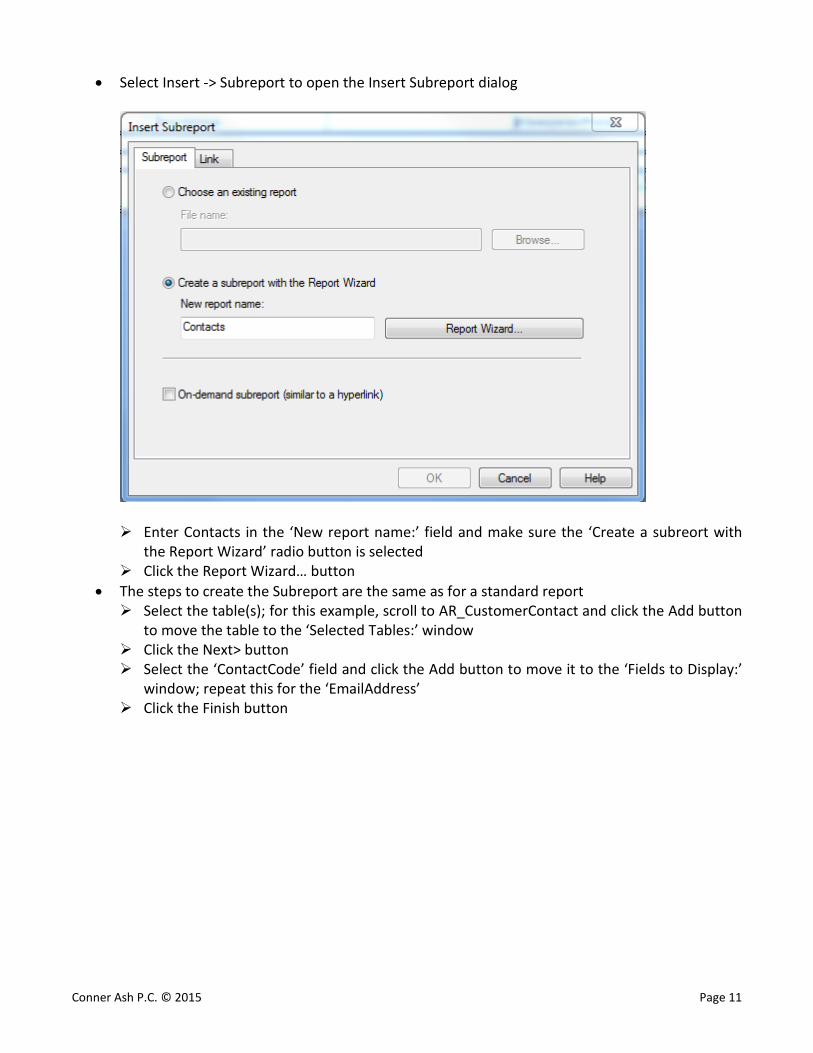
• Select Insert -> Subreport to open the Insert Subreport dialog
Enter Contacts in the ‘New report name:’ field and make sure the ‘Create a subreort with
the Report Wizard’ radio button is selected Click the Report Wizard… button
• The steps to create the Subreport are the same as for a standard report Select the table(s); for this example, scroll to AR_CustomerContact and click the Add button
to move the table to the ‘Selected Tables:’ window Click the Next> button Select the ‘ContactCode’ field and click the Add button to move it to the ‘Fields to Display:’
window; repeat this for the ‘EmailAddress’ Click the Finish button
Conner Ash P.C. © 2015 Page 12
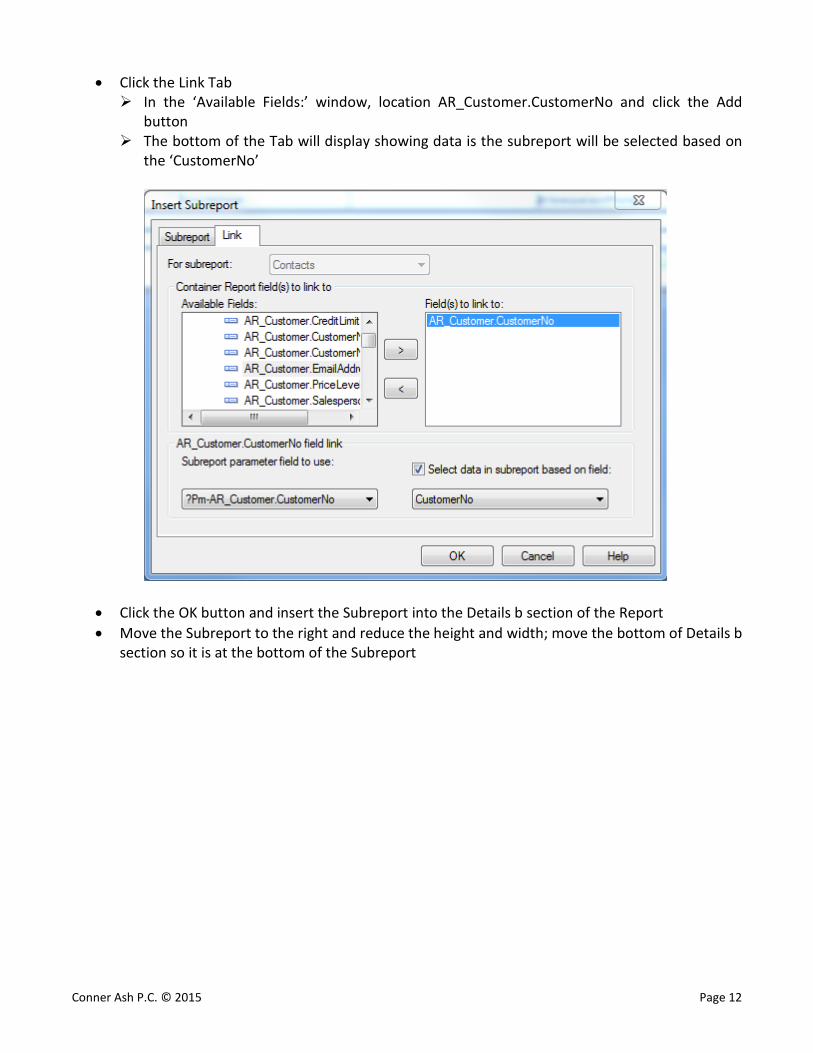
• Click the Link Tab In the ‘Available Fields:’ window, location AR_Customer.CustomerNo and click the Add
button The bottom of the Tab will display showing data is the subreport will be selected based on
the ‘CustomerNo’
• Click the OK button and insert the Subreport into the Details b section of the Report • Move the Subreport to the right and reduce the height and width; move the bottom of Details b
section so it is at the bottom of the Subreport
Conner Ash P.C. © 2015 Page 13
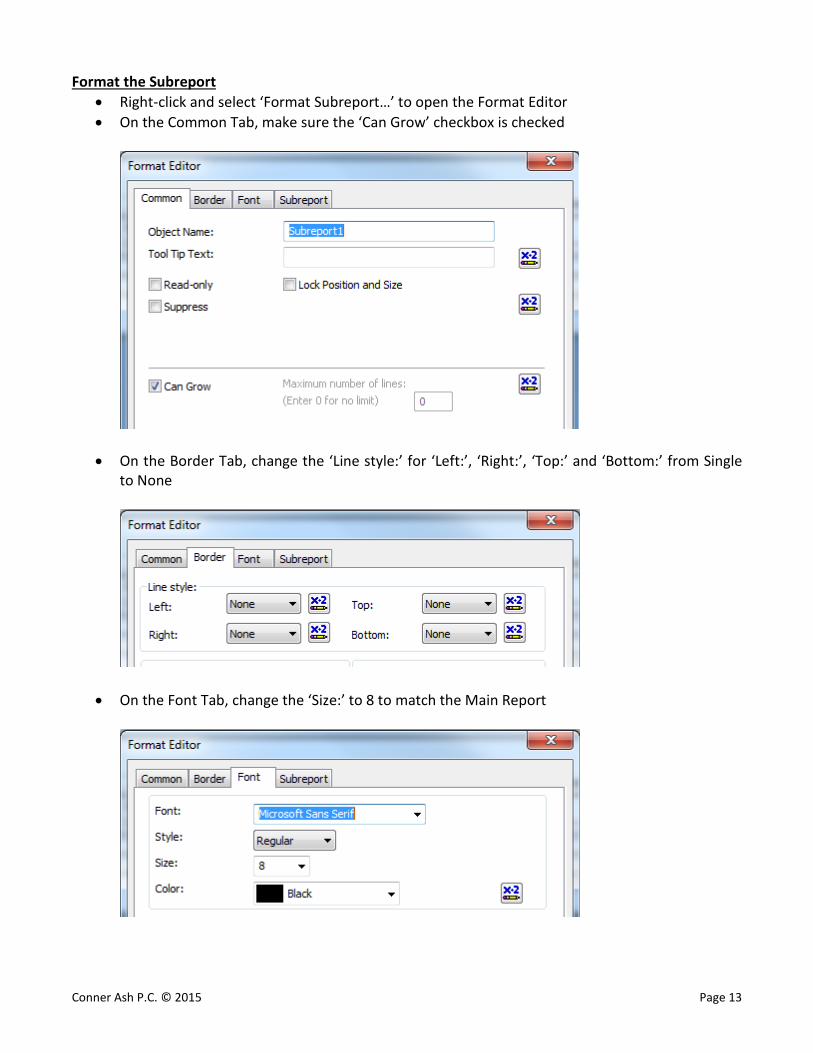
Format the Subreport • Right-click and select ‘Format Subreport…’ to open the Format Editor • On the Common Tab, make sure the ‘Can Grow’ checkbox is checked
• On the Border Tab, change the ‘Line style:’ for ‘Left:’, ‘Right:’, ‘Top:’ and ‘Bottom:’ from Single to None
• On the Font Tab, change the ‘Size:’ to 8 to match the Main Report
Conner Ash P.C. © 2015 Page 14
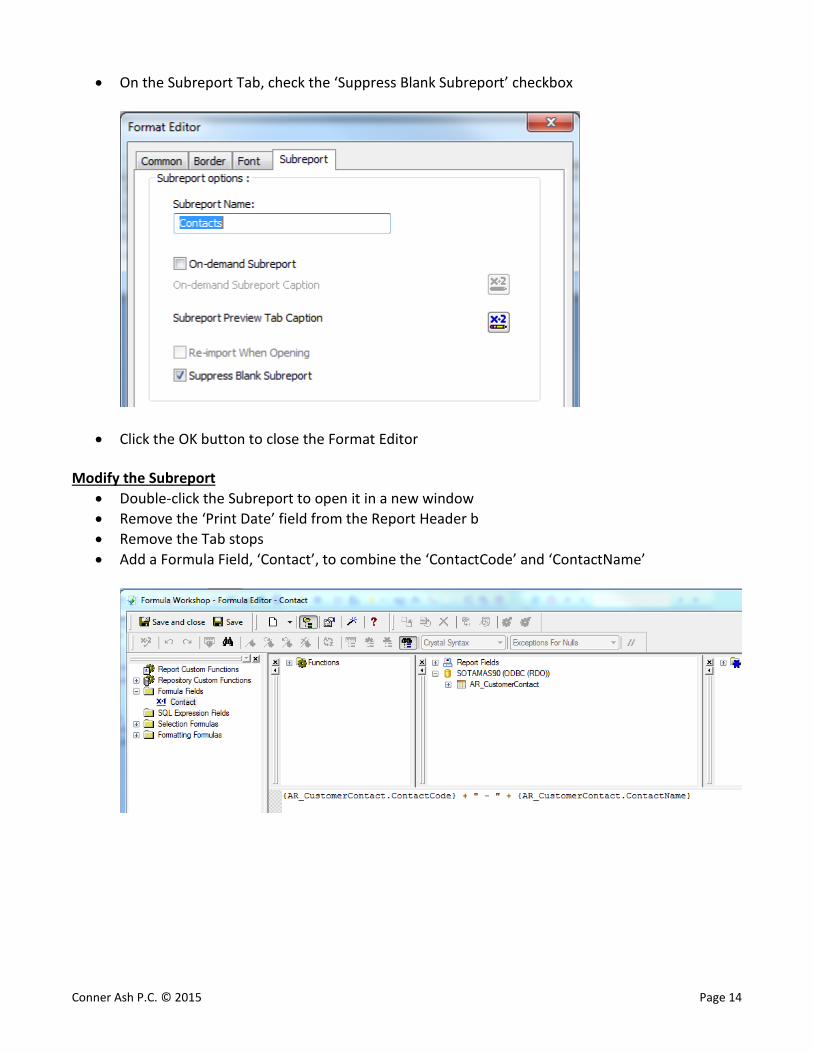
• On the Subreport Tab, check the ‘Suppress Blank Subreport’ checkbox
• Click the OK button to close the Format Editor
Modify the Subreport • Double-click the Subreport to open it in a new window • Remove the ‘Print Date’ field from the Report Header b • Remove the Tab stops • Add a Formula Field, ‘Contact’, to combine the ‘ContactCode’ and ‘ContactName’
Conner Ash P.C. © 2015 Page 15
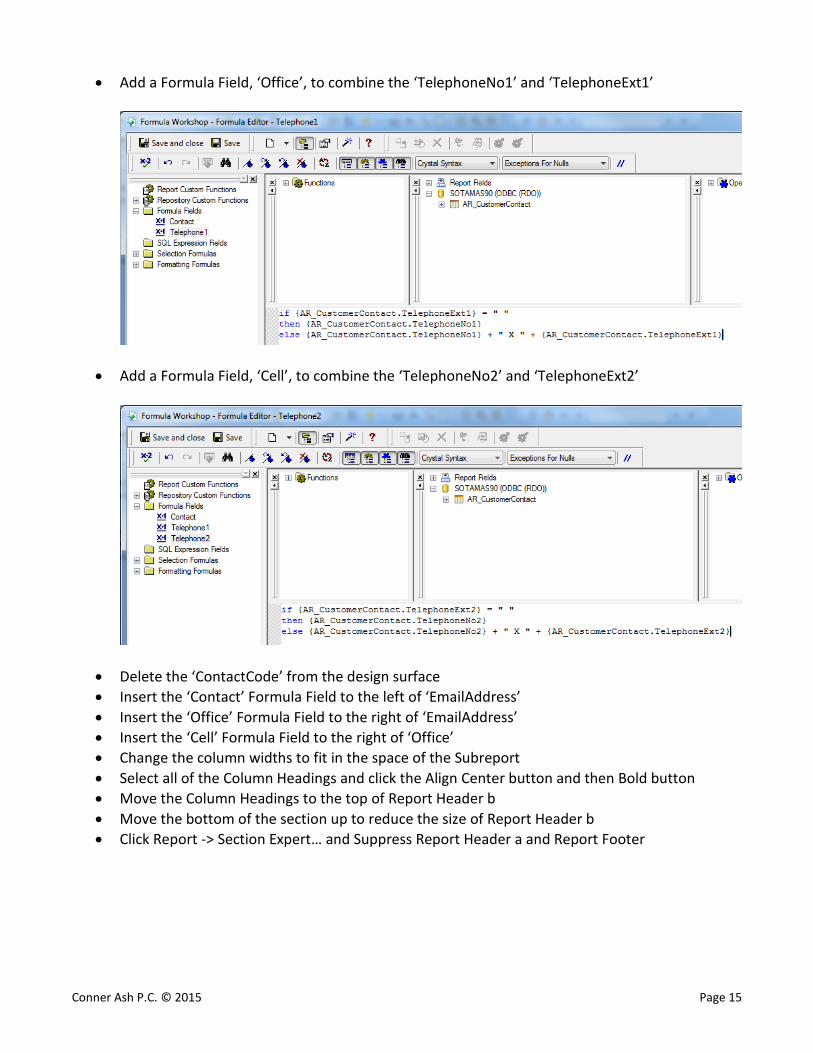
• Add a Formula Field, ‘Office’, to combine the ‘TelephoneNo1’ and ‘TelephoneExt1’
• Add a Formula Field, ‘Cell’, to combine the ‘TelephoneNo2’ and ‘TelephoneExt2’
• Delete the ‘ContactCode’ from the design surface • Insert the ‘Contact’ Formula Field to the left of ‘EmailAddress’ • Insert the ‘Office’ Formula Field to the right of ‘EmailAddress’ • Insert the ‘Cell’ Formula Field to the right of ‘Office’ • Change the column widths to fit in the space of the Subreport • Select all of the Column Headings and click the Align Center button and then Bold button • Move the Column Headings to the top of Report Header b • Move the bottom of the section up to reduce the size of Report Header b • Click Report -> Section Expert… and Suppress Report Header a and Report Footer
Conner Ash P.C. © 2015 Page 16
Add a Line Between Customers • Select Report -> Section Expert… • Click Details b • Click the Insert button to add a new Details section – Details c • Click the OK button • Click the Insert Line button and draw a line at the top of Details c from the left to the right side
of the section • Move the bottom of Details c up to reduce the size of the section
Insert a Page Header
• Select Report -> Section Expert… • Click Page Header • Click the Insert button to add a new Page Header section – Page Header b • Click the Up arrow to move the new section above the existing Page Header • Insert a Parameter Field to enter the Company Name Right-click on Parameter Fields and select ‘New…’ to open the Create New Parameter dialog Enter ‘CompanyName’ in the ‘Name: ‘ field In the Value Options:, the ‘Prompt Text’ Setting should be ‘Enter Company Name:’ Click the OK button
• Insert the ‘CompanyName’ Parameter Field in Page Header a • Change the Font Size to 10; increase the field height and width; click the Align Center button
and the Bold button • Insert a Text Object and enter the Report Title, ‘New Customer Listing’; change the Font Size to
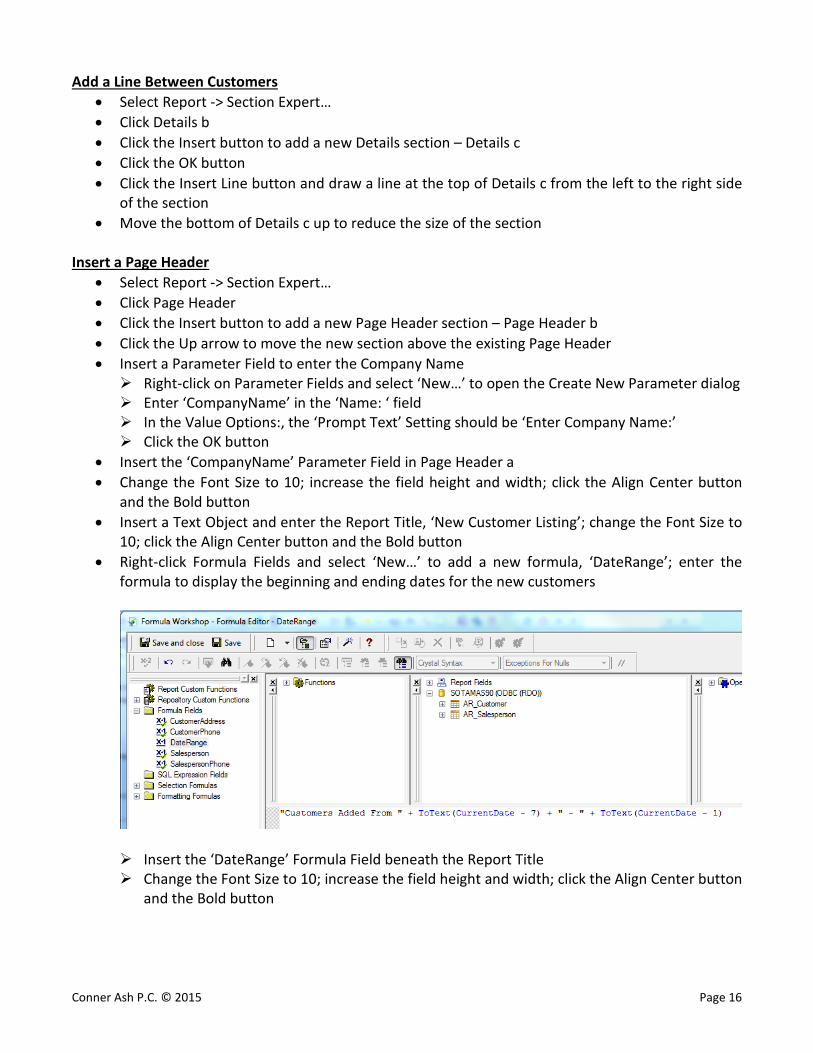
10; click the Align Center button and the Bold button • Right-click Formula Fields and select ‘New…’ to add a new formula, ‘DateRange’; enter the
formula to display the beginning and ending dates for the new customers
Insert the ‘DateRange’ Formula Field beneath the Report Title Change the Font Size to 10; increase the field height and width; click the Align Center button
and the Bold button
Conner Ash P.C. © 2015 Page 17
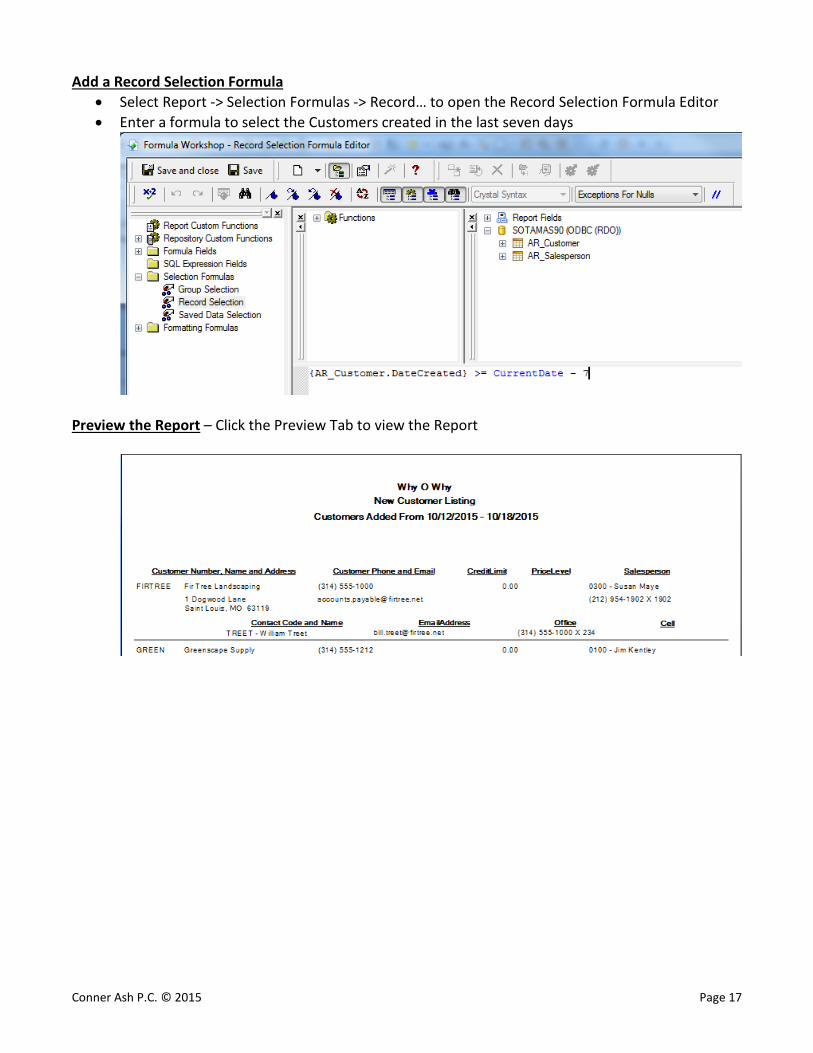
Add a Record Selection Formula • Select Report -> Selection Formulas -> Record… to open the Record Selection Formula Editor • Enter a formula to select the Customers created in the last seven days
Preview the Report – Click the Preview Tab to view the Report
Conner Ash P.C. © 2015 Page 18
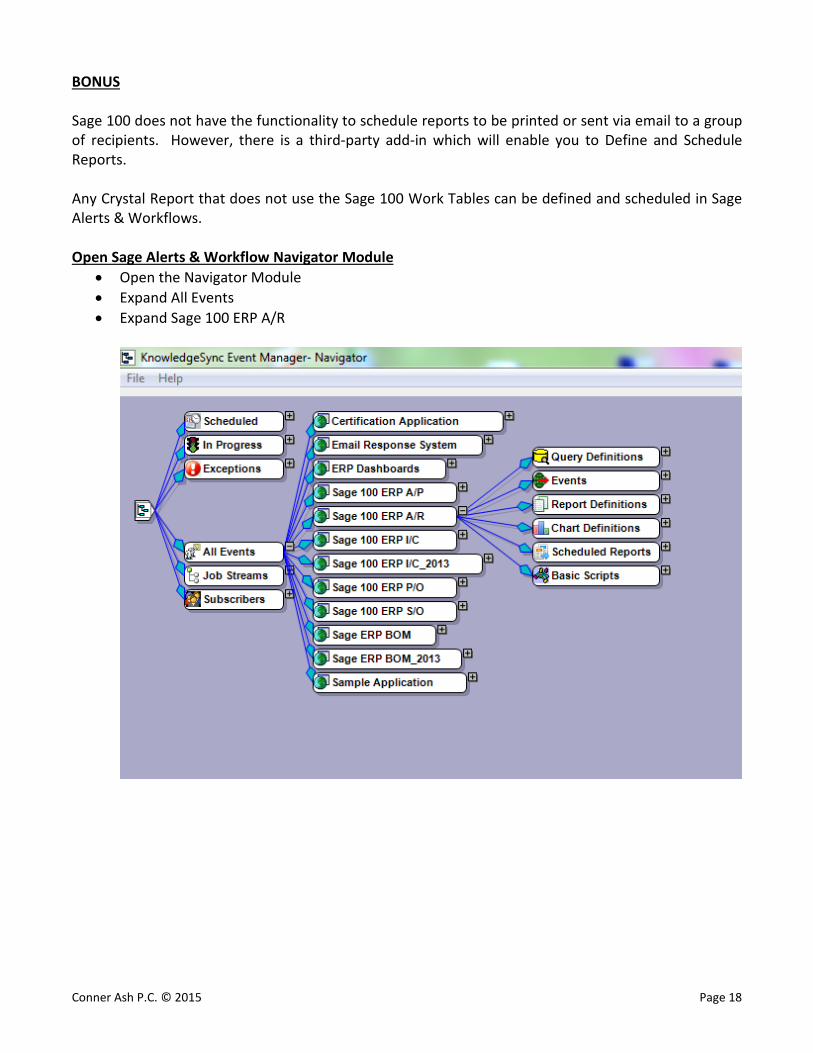
BONUS Sage 100 does not have the functionality to schedule reports to be printed or sent via email to a group of recipients. However, there is a third-party add-in which will enable you to Define and Schedule Reports. Any Crystal Report that does not use the Sage 100 Work Tables can be defined and scheduled in Sage Alerts & Workflows. Open Sage Alerts & Workflow Navigator Module
• Open the Navigator Module • Expand All Events • Expand Sage 100 ERP A/R
Conner Ash P.C. © 2015 Page 19
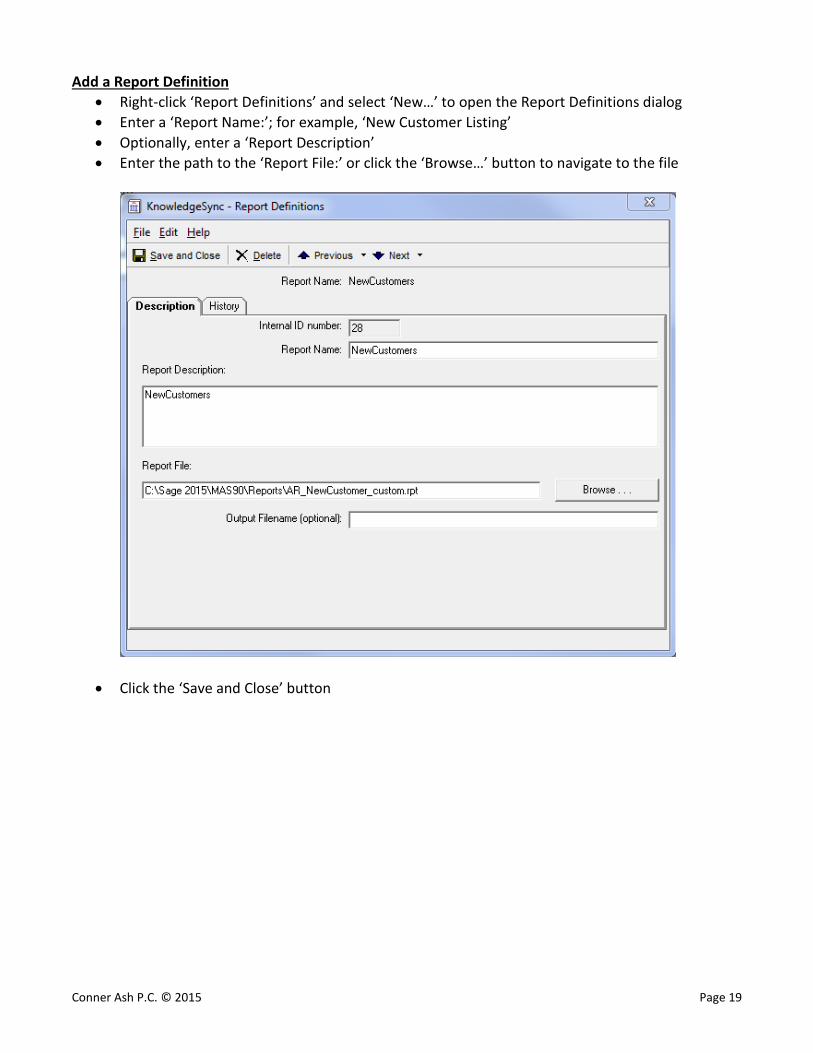
Add a Report Definition • Right-click ‘Report Definitions’ and select ‘New…’ to open the Report Definitions dialog • Enter a ‘Report Name:’; for example, ‘New Customer Listing’ • Optionally, enter a ‘Report Description’ • Enter the path to the ‘Report File:’ or click the ‘Browse…’ button to navigate to the file
• Click the ‘Save and Close’ button

Conner Ash P.C. © 2015 Page 20
Schedule the Report • Right-click ‘Scheduled Reports’ and select ‘New…’ • Description Tab Enter the ‘Scheduled Report Description:’ Select a ‘Priority:’ between 0 and 9 where 0 is the highest Click the ‘Active’ checkbox Click the ‘Keep only last checked record in Monitor’
Conner Ash P.C. © 2015 Page 21
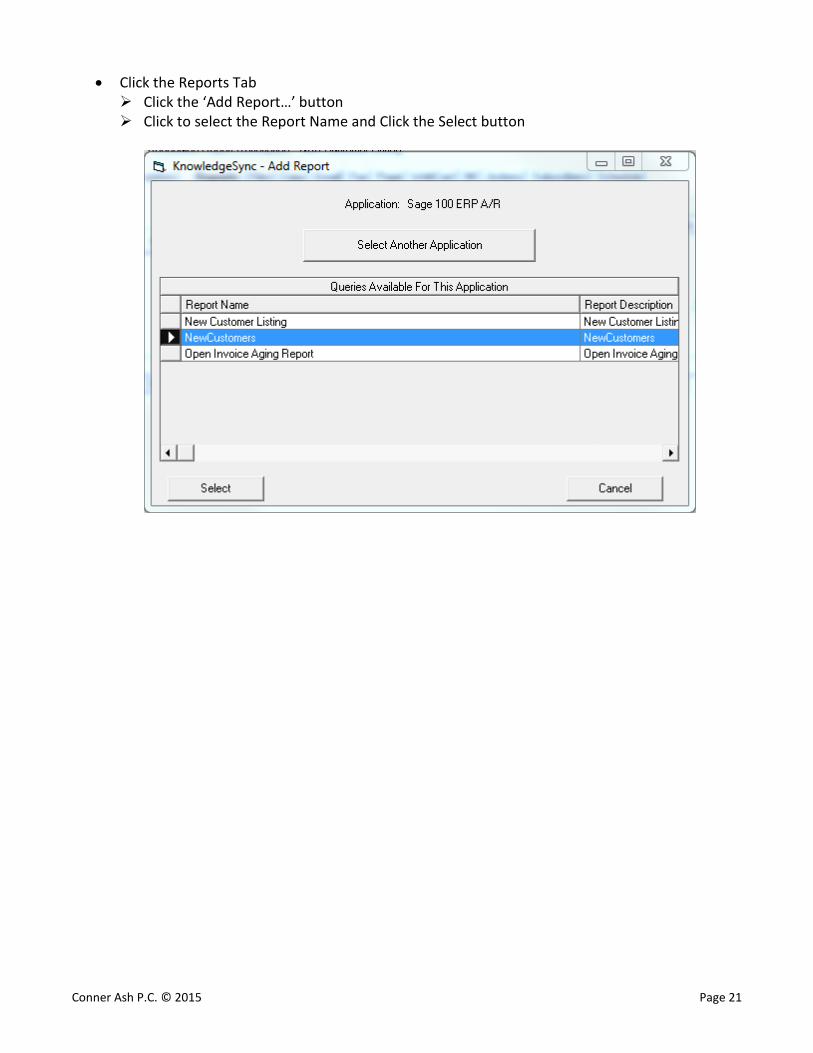
• Click the Reports Tab Click the ‘Add Report…’ button Click to select the Report Name and Click the Select button
Conner Ash P.C. © 2015 Page 22
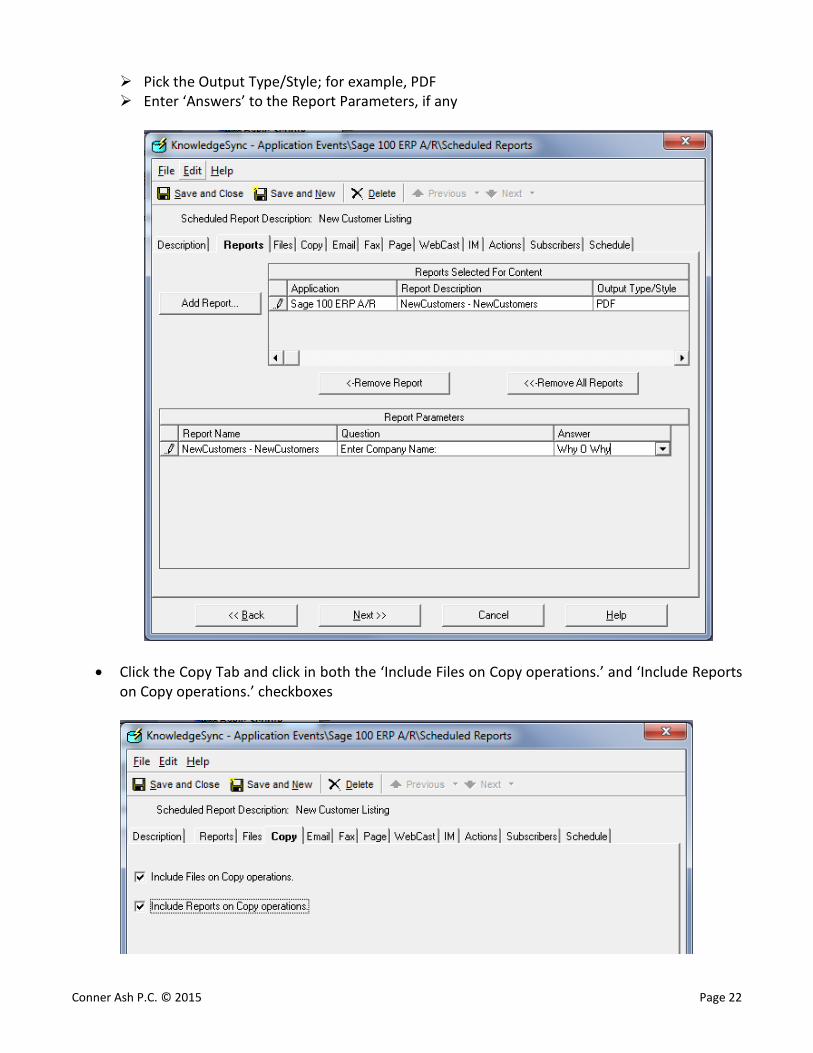
Pick the Output Type/Style; for example, PDF Enter ‘Answers’ to the Report Parameters, if any
• Click the Copy Tab and click in both the ‘Include Files on Copy operations.’ and ‘Include Reports on Copy operations.’ checkboxes
Conner Ash P.C. © 2015 Page 23
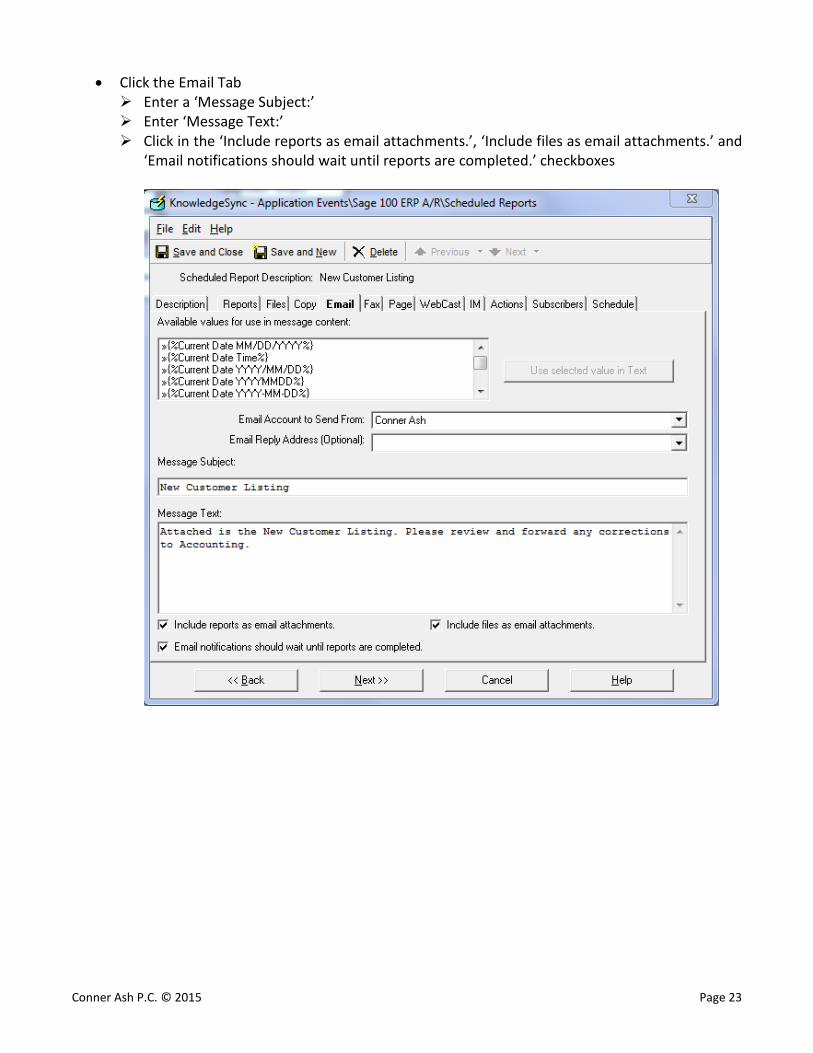
• Click the Email Tab Enter a ‘Message Subject:’ Enter ‘Message Text:’ Click in the ‘Include reports as email attachments.’, ‘Include files as email attachments.’ and
‘Email notifications should wait until reports are completed.’ checkboxes
Conner Ash P.C. © 2015 Page 24
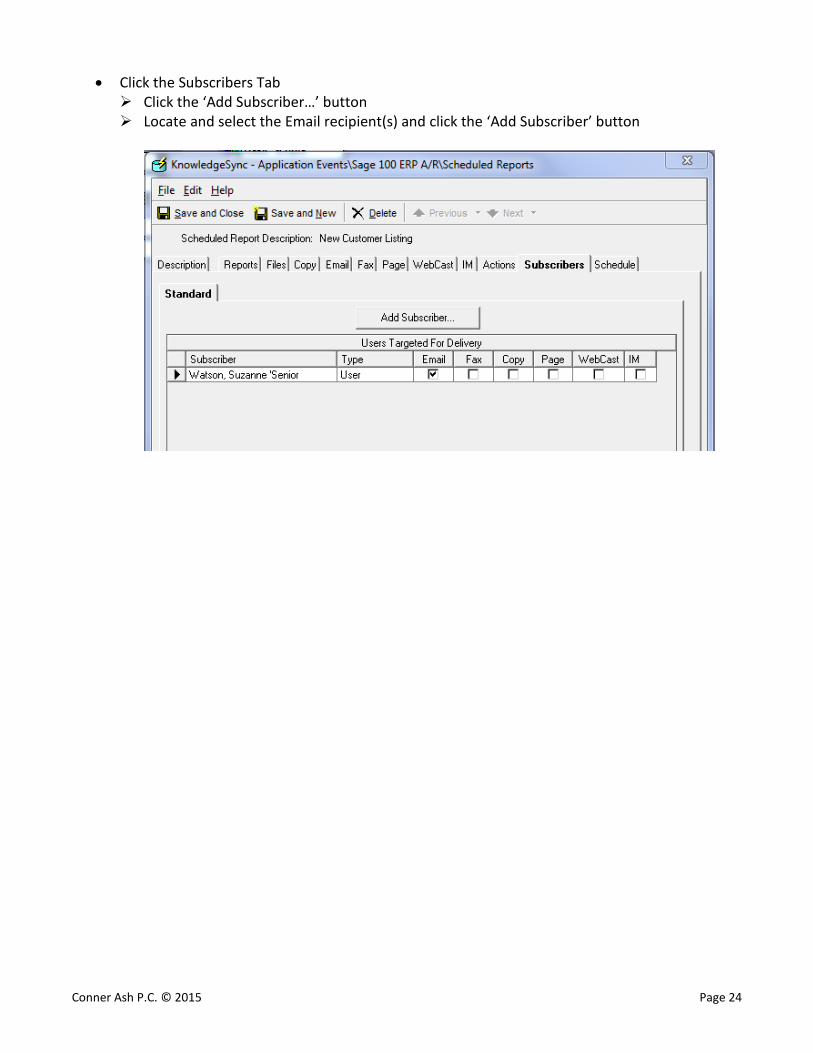
• Click the Subscribers Tab Click the ‘Add Subscriber…’ button Locate and select the Email recipient(s) and click the ‘Add Subscriber’ button
Conner Ash P.C. © 2015 Page 25
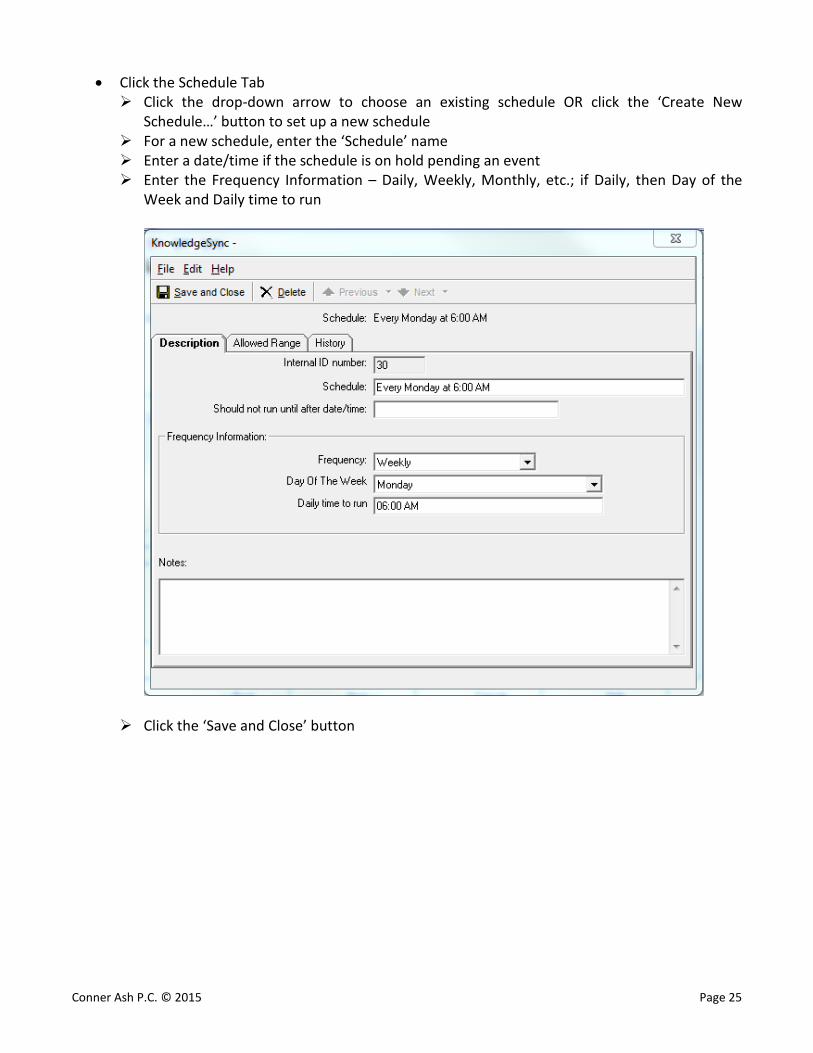
• Click the Schedule Tab Click the drop-down arrow to choose an existing schedule OR click the ‘Create New
Schedule…’ button to set up a new schedule For a new schedule, enter the ‘Schedule’ name Enter a date/time if the schedule is on hold pending an event Enter the Frequency Information – Daily, Weekly, Monthly, etc.; if Daily, then Day of the
Week and Daily time to run
Click the ‘Save and Close’ button
Conner Ash P.C. © 2015 Page 26
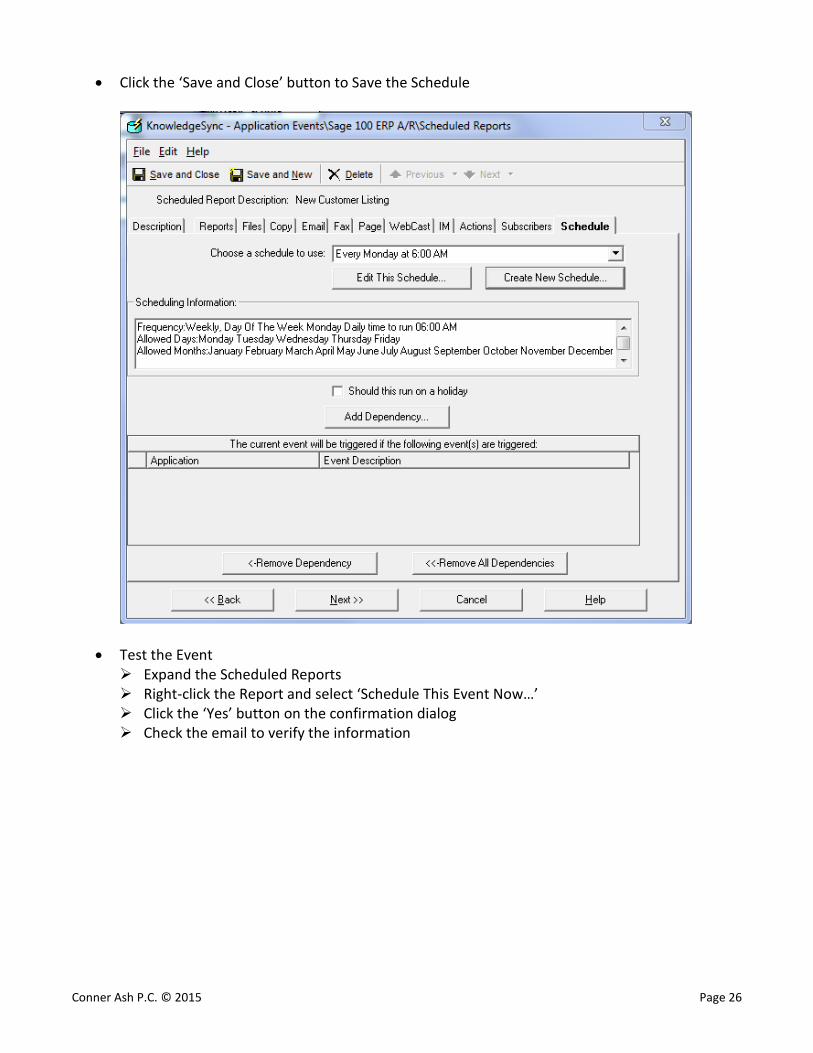
• Click the ‘Save and Close’ button to Save the Schedule
• Test the Event Expand the Scheduled Reports Right-click the Report and select ‘Schedule This Event Now…’ Click the ‘Yes’ button on the confirmation dialog Check the email to verify the information