jedox olap server · pdf filejedox olap server version 4.0 . jedox olap server ... 3.2 the...
TRANSCRIPT

Jedox OLAP Server
Version 4.0

Jedox OLAP Server
Version 4.0
Jedox AG
Dated: 20-Feb-2013
Copyright © Jedox AG Copyright Reserved. Reproduction including electronic reproduction and substantive recovery - even of parts - only with the approval of Jedox AG. Legal steps may be taken in case of non-compliance. Jedox, Worksheet-Server™, Supervision Server and Palo are trademarks or registered trademarks of Jedox GmbH. Microsoft and Microsoft Excel are trademarks or registered trademarks of the Microsoft Corp. All other trademarks are property of the respective companies. For the purpose of readability, brand names and trademarks are not explicitly stressed. If a relevant description (e.g. TM or ®) is missing, it is not to be concluded that the name is freely available.

Table of Contents
1 Introduction ....................................................................................................................... 6
2 User management and licensing ..................................................................................... 6
2.1 Users and password management ................................................................................. 6
2.2 License activation in Jedox for Excel .............................................................................. 7
2.3 License activation in Jedox Web ..................................................................................... 8
2.4 Serial number and mode of activation ............................................................................ 8
2.4.1 Online activation ................................................................................................... 8
2.4.2 Email activation .................................................................................................... 9
2.4.3 Manual activation ................................................................................................ 10
2.5 License management in Jedox Web .............................................................................. 11
2.5.1 Assign licenses and delete licenses .................................................................... 11
2.5.2 Automatic assignment of licenses ...................................................................... 12
2.5.3 Remove licenses ................................................................................................ 12
3 Administration of Jedox ................................................................................................. 13
3.1 Locations of files and databases on Windows .............................................................. 13
3.2 The palo.ini file .............................................................................................................. 14
3.2.1 Client-Connection with a Jedox-Server .............................................................. 14
3.2.2 Autosave............................................................................................................. 15
3.2.3 Further options ................................................................................................... 16
3.3 Connection with the API and with the server browser ................................................... 18
3.4 Database and log files .................................................................................................. 20
3.4.1 Database files ..................................................................................................... 20
3.4.2 Log files .............................................................................................................. 22
3.5 Starting Palo Service via the console ........................................................................... 22
3.6 Cache settings of the server ......................................................................................... 23
3.6.1 Cube-Caches ...................................................................................................... 23
3.6.2 Parameters in the palo.ini ................................................................................... 23
3.7 Multithreading ............................................................................................................... 23

4 Administration of user rights ......................................................................................... 24
4.1 Cubes of the database ‘System’ ................................................................................... 24
4.1.1 Cube #_USER_GROUP ..................................................................................... 25
4.1.2 Cube #_GROUP_ROLE ..................................................................................... 25
4.1.3 Cube #_ROLE_RIGHT_OBJECT ....................................................................... 26
4.1.4 Description of Right Objects ............................................................................... 27
4.1.5 More System Cubes ........................................................................................... 35
4.1.6 Summary User Rights Cubes ............................................................................. 36
4.2 Restriction of rights in single databases........................................................................ 36
4.2.1 Standard value cells ........................................................................................... 36
4.2.2 Attribute value cells ............................................................................................ 37
4.2.3 Additional rules ................................................................................................... 37
4.2.4 Summary ............................................................................................................ 38
4.3 Applying user rights ...................................................................................................... 38
5 Filter functions with subsets ......................................................................................... 39
5.1 Paste Subset ................................................................................................................ 39
5.1.1 Top Ten Products ................................................................................................ 40
5.1.2 ABC Analysis ...................................................................................................... 45
5.1.3 Details on selected Subset Editor tabs ............................................................... 51
5.1.4 Manual editing of subset editor expressions ....................................................... 54
5.2 Saving Subsets ............................................................................................................. 55
5.3 Insert a subset in the area of an existing subset ........................................................... 56
5.4 Details of PALO.SUBSET() ........................................................................................... 56
5.4.1 Indent ................................................................................................................. 56
5.4.2 Alias .................................................................................................................... 57
5.4.3 Filters and their effects ....................................................................................... 57
5.4.4 Sequence of execution ....................................................................................... 58
5.4.5 Base Subset Function ........................................................................................ 58
5.4.6 Indent ................................................................................................................. 60
5.4.7 Alias .................................................................................................................... 62
6 Working with enterprise rules ........................................................................................ 65
6.1 General information on rules ......................................................................................... 65
6.2 Creating a simple rule ................................................................................................... 66
6.3 Operators of the Rule-Editor ......................................................................................... 67
6.4 Restricting the target area ............................................................................................. 67
6.5 Restricting the target area to an element type .............................................................. 69
6.6 Deactivation in the case of references to removed elements ........................................ 69
6.7 Accessing a different cube via rule ............................................................................... 70

6.8 Usage of markers ......................................................................................................... 70
6.8.1 How are markers defined?.................................................................................. 71
6.8.2 Advantages of markers ....................................................................................... 71
6.8.3 Disadvantages of markers .................................................................................. 72
6.8.4 Arguments of PALO.MARKER() ......................................................................... 72
6.8.5 Markers for expressions ..................................................................................... 73
6.8.6 Markers for STET() function ............................................................................... 73
6.8.7 Processing of the rules ....................................................................................... 73
6.9 Drill Server Rule ............................................................................................................ 73
6.10 Rule statistics ............................................................................................................ 74
6.11 Examples of rules using the Jedox database Demo2 ............................................... 76
6.11.1 Example Rule 1 .................................................................................................. 76
6.11.2 Example rule 2 .................................................................................................... 77
6.11.3 Example rule 3 .................................................................................................... 78
6.11.4 Example rule 4 .................................................................................................... 79
6.12 Supported functions for rules .................................................................................... 80
7 Overview of Jedox / Palo functions ............................................................................... 85
7.1 Classification of functions ............................................................................................. 85
7.2 Input parameters ........................................................................................................... 86
7.3 Table functions .............................................................................................................. 87
7.4 Array functions .............................................................................................................. 92
7.5 Filter functions .............................................................................................................. 93
7.5.1 PALO.SUBSET() ................................................................................................ 93
7.5.2 PALO.HFILTER() ................................................................................................ 94
7.5.3 PALO.TFILTER() ................................................................................................. 95
7.5.4 PALO.PICKLIST() ............................................................................................... 95
7.5.5 PALO.AFILTER() ................................................................................................ 96
7.5.6 PALO.DFILTER() ................................................................................................ 96
7.5.7 PALO.SORT() ..................................................................................................... 98
7.6 Auxiliary functions ......................................................................................................... 98
7.7 Splitting functions .......................................................................................................... 99
8 Index ............................................................................................................................... 100

Introduction -6-
1 Introduction
This manual includes the following topics:
User management and Licensing
Administration of Jedox
Administration of User Rights
Enterprise Rules
Filter Functions with Subsets
Overview of Palo Functions
2 User management and licensing
After initial installation, Jedox for Excel and Jedox Web will run on a 30-day trial license. This trial license allows anyone to extensively test all modules of the Jedox Suite. All users who sign on will automatically be associated with that trial license. When a full license is acquired and activated fort the first time, it will automatically replace the trial license. The association of all users with the trial license is removed and the new license can be assigned to the users manually. Unassigned users who sign on will automatically be associated with the first open license slot.
2.1 Users and password management
Important prerequisite is that you have sufficient rights. User management in Jedox Web is done through a convenient user interface which can be used intuitively without further explanation. In Jedox for Excel user management is done through the Modeller and requires some explanation. In order to create a new user, choose the tab "Database" and the button "User management":
Now you can see the system cubes and system dimensions #_USER, #_GROUP, and #_ROLE. In these dimension you can see the elements created during installation. If necessary you can create new elements here. Chapter 4 describes how to manage rights. The view of cube #_USER_USER_PROPERTIES, which is also shown there, will be deactivated in coming versions in order to make sure that passwords are encrypted before they are inserted

User management and licensing -7-
Therefore, passwords in Jedox for Excel should be managed only through the "Set Password …" dialog which can be found in the context menu of a user element in the Modeller:
All users (both in Jedox Web and Jedox for Excel) can change their own password through the button in the "Options" dialog box (Jedox for Excel: see red arrow):
2.2 License activation in Jedox for Excel
In the "Options" dialog box you can find the button "Activate license" (see above).

User management and licensing -8-
2.3 License activation in Jedox Web
When choosing "Licenses" in the System Manager component of Jedox Web, you will get an overview of your licenses, where all licenses can be activated and managed:
If you have purchased a license, please choose the button "Add License".
2.4 Serial number and mode of activation
Here you can enter the serial number of your license and choose a mode of activation. The figure above shows the dialog box of Jedox for Excel. The dialog in Jedox Web is called "Add License" and offers the same options. If your license activation should fail for any reason (e.g. crash of your browser or email client), you can repeat the procedure by choosing "Add License" until the licenses belonging to the given serial number have been activated.
2.4.1 Online activation
The most convenient way to activate your licenses is online activation. It is fully automatic and your licenses will be activated within a few minutes. Online activation requires internet access from the PC or server where Jedox Web or Jedox for Excel is installed.

User management and licensing -9-
2.4.2 Email activation
When choosing email activation, you will first see an email preview:
Pressing the "Open in Mail" button will open your standard email client, with the above email message ready to be sent. Please send it without changes. Within 15 minutes you should get a response message including your activation code:

User management and licensing -10-
Copy the activation code and switch to the "Activate License" dialog. In Jedox for Excel: In the "Options" dialog you find the button "Activate License". Choose "Manual activation" in order to enter the code. In Jedox Web: In the license module, mark the line for which you want to enter the activation code and choose "Activate License":
Now you can paste your activation code in the respective field and confirm with "Activate" or "OK" in order to activate your licenses.
2.4.3 Manual activation
When using manual activation you get the following dialog:
Please tell your serial number and hardware key to the Jedox support via telephone and you will receive your activation key.

User management and licensing -11-
2.5 License management in Jedox Web
2.5.1 Assign licenses and delete licenses
When activating a license line, you will see the area "Sessions" displaying all current sessions using a given license. The star is showing your own session:
By clicking the tab "Assigned Users" you will see the respective information about the selected license: The user _internal_suite does not require an assignment and is not counted towards the number of seats or sessions.
In order to assign a license to a user, first select a license with available seats. Then assign users by checking the corresponding boxes at "Sessions/Assigned Users" and close by pressing "Save". To delete a license assignment, uncheck the respective box in the tab "Assigned Users" and click "Save".

User management and licensing -12-
2.5.2 Automatic assignment of licenses
If you deactivate "Group by Serial Number" you can position the licenses using the cursor keys. If a user logs on without a license, the license list is checked from top to bottom and the license with the first free seat is assigned to the user. There is no check whether this license may have expired! Therefore the license administrator has to take care of which licenses should be used automatically and that expired licenses are moved down to the bottom of the list.
2.5.3 Remove licenses
As of 4.0 SR1 users can select a license and remove it via the tab "Remove License". The right "D" on the right object "system operations" and the right "D" on the right object "ste_licenses" are required.

Administration of Jedox -13-
3 Administration of Jedox
3.1 Locations of files and databases on Windows
The location of the databases (=location of the palo.ini) is set during the installation process.
The default folder of the "Standard-Installation" is C:\Program Files\Jedox\Jedox Suite\olap\data
After completion of installation you will find the info of the location under Start - Control Panel - Administrative Tools - Services the service Palo Server Service. When you double-click Palo Server Service you see in the Palo Server Service Properties dialog box the "Path to executable":
At the end of this line you will find the path where the databases and palo.ini are stored:

Administration of Jedox -14-
With regedit, you will find more information, such as where PaloServer.log is stored: If you Jedox installed for all users, under HKEY_USERS\.DEFAULT\Software, if you installed Jedox only for the current user, then under HKEY_CURRENT_USER\Software, and then in both cases below Jedox\Palo\XlAddin:
3.2 The palo.ini file
The configuration of Jedox can be changed in the file palo.ini, which is located in C:\Program Files\Jedox\Jedox Suite\olap\data by default. This directory also contains a sample file, palo.ini.sample, which explains the available parameters briefly.
3.2.1 Client-Connection with a Jedox-Server
In order to access a Jedox-Server over the network, you have to modify the file palo.ini in the directory ...\data of the Jedox-Server. In the palo.ini file you’ll find the line
http "127.0.0.1" 7777
These are the default settings. They mean that the http-interface of the server (over which client connections are made) expects connections over IP-address 127.0.0.1 (the standard IP-address of your computer, also called "localhost") on port 7777. These settings can be altered already during the installation of Jedox. Bear in mind that this IP address does not specify the address(es) of the client-computer(s). Rather it is established here over which IP-address(es) access to the server is made possible. Therefore the meaning of the entry 127.0.0.1 (or "localhost") is that access to Jedox is only possible from the server itself. If you enter the network-IP of the server (e.g. 192.168.2.100) instead, other computers will have access to Jedox over this IP, but access of the server itself over the localhost connection would not work anymore – the network-IP would also have to be used in the Jedox-Client. If only two empty quotation marks are declared instead of an IP-address, then access over all IP-addresses of the server are permitted (e.g... over different network cards and also over "localhost"). Also several connections can be declared one after the other, for example
http "127.0.0.1" 7777
http "192.168.2.100" 7778

Administration of Jedox -15-
However, different connections must be declared with different port numbers. The port number can be selected freely but it cannot yet be in use and must moreover possibly be released in the firewall. Quotation marks must be used only if a server name contains blanks or special characters or in case that the server name should be left out completely.
Important: After every modification of palo.ini, the Jedox-Server must be started again in order that the
modifications become effective.
3.2.1.1 Jedox-Server and Client on the same computer
If the access should take place only from an Excel-Client, which is installed on the same computer as the Jedox-Server, it is sufficient to enter the following line in palo.ini
http "127.0.0.1" 7777
This setting is done automatically during the installation of Jedox, provided it is not altered explicitly in the corresponding dialog.
3.2.1.2 Jedox-Server and Client on different computers
Suppose the computer on which the Jedox-Server is installed has the network IP-address 192.168.2.100 and associated name palosv0001. In order to make communication with the Jedox-Server possible for other computers, open the palo.ini file of the server with an editor. Then perform the following modification:
Below the line: http "127.0.0.1" 7777
Insert the following new line: http "192.168.2.100" 7778
Save the file and then start the Palo service of the server again. Later, you can register a new server with these connection data in the Jedox-Client. If the connection doesn't work, then you please unlock the corresponding port in the firewall.
3.2.2 Autosave
In the Palo.ini you can specify that the data from the Jedox databases, which are in memory of the server, are automatically saved to the hard drive. Therefore you have two options:
Autosaves every day at a certain time:
Entry generally palo.ini: autosave T HH:MM Example entry in palo.ini: autosave: T 04:00
Autosaves cyclically with a fixed time interval:
Entry generally palo.ini: autosave L HH:MM Example entry in palo.ini: autosave: L 02:30

Administration of Jedox -16-
3.2.3 Further options
The "palo.ini" file manages all options which are communicated to JEDOX at start-up. When you start JEDOX as server service, this file is used in any case. When you start Jedox from the control panel, you can add the option "-n", so that only the options in the command line are used and not "palo.ini". If any of the options are not listed, either in the command line or in the "palo.ini", a default value is used. We distinguish between three types of options. The first option type refers to "switch parameters". If any of the options is given more than once, e.g., one time in the command line and one or two times in the "palo.ini", the value is switched to "on" or "off" each time. The following parameters are examples of "switch parameters":
Chdir
Auto-load The second type is the options with additional parameters. In this case, the last value read by JEDOX is used. Be advised that the command line options and then the "palo.ini" are read if both are used. The options of the third and last group are an exception to that. Here are two examples of the options listed above:
worker
workerlogin The third and last type refers to the options which collect additional parameters and use all of them. This means that in case the option is entered several times with parameters, each parameter is used. For example, these include:
admin
http
Command Line Parameters
These parameters can be abbreviated using individual letters. If you start Jedox on the command line with "-?", these abbreviations are listed. The complete names should be used in the configuration file.
Example for Using Options
1. "add-new-database" is a switch parameter. If we enter this parameter in the command line and in the "palo.ini", it is switched on, because it is the default value for this option and it is switched off upon first entry in the command line and then switched on again in the configuration file.
2. "workerlogin" is an option with additional parameters. For example, if we enter the same one twice in the "palo.ini", only one option, the last one in the file, is used with its parameters.
3. The option "http" is additive. In other words, if you enter "http" including parameters several times, e.g. once in the command line and once in the configuration file, the parameters of both entries are used.

Administration of Jedox -17-
Switch Options:
"auto-load": Determines whether Jedox should automatically load all in file "palo.csv" listed databases that are contained in the directory, set by "data-directory". Default: true
"auto-commit": Determines whether all changes made to databases in memory should be saved by Jedox to the hard disk when shutting down the Server. Default: true
"chdir": Determines whether Jedox should switch to the directory, which was set by "data-directory". All paths listed in the configuration file are relative to the directory in which Jedox is executed. Consequently, this is either relative to the directory where the binary file is stored, or relative to the "data-directory". Default: true
"add-new-databases": Determines whether Jedox automatically recognizes directories containing OLAP databases in the "data-directory", loads these databases and adds them in palo.csv.
"use-cube-worker": Determines whether a "cube worker" is used. Default: false
"load-init-file": Only in the command line. Determines whether a configuration file is used. Default: true
Options with Non-Additive Parameters:
"data-directory": Path to data directory that contains the databases and "palo.ini". Default: "Data"
"template-directory": Path to directory that contains online documentation. Default: "Api"
"log": The file that Jedox log is written to. If you enter "+" as the parameter, log writes to stderr, if you enter "-", to stdout. Default: "-"
"verbose"": Determines how much information Jedox writes into the log file.
"worker": Complete path to worker binary file. This contains the name of the executable file and possible worker arguments.
"workerlogin": Determines how much of login tasks are handled by worker. Default: No "workerlogin" at all: Jedox handles all login tasks.
"init-file": Complete path (incl. name) to the configuration file.
Options with Additive Parameters
"admin": Determines the ports to server browser and online documentation (Important: The admin interface does not require any authentication and thus should be used only in safe networking!)
"http": Determines the ports that allow general access to Jedox The default setting of the current ini file is as follows: http "127.0.0.1" 7777 log "C:\Programme\Jedox\Jedox Suite\log\olap_server.log" verbose info splash-limit 1000 500 100 goalseek-limit 1000 goalseek-timeout 10000 cache-barrier 1000000 clear-cache-cells 100000 template-directory "C:\Programme\Jedox\Jedox Suite\olap\Api"

Administration of Jedox -18-
3.3 Connection with the API and with the server browser
Beside the connections from Excel-Clients to Jedox Servers (described in the manual "First steps with Jedox for Excel"), it is also possible to define connections to the Admin-Interface of the Jedox-Server in the palo.ini file. This is addressed with the prefix "admin" instead of the prefix "http". For example, for a connection from the server machine itself: admin "127.0.0.1" 7778 (the port number must be different from other port numbers used) Important: The admin interface does not require any authentication and thus should be used only in safe networking! Over the Admin-Interface and the http-API of Jedox, the server can be controlled and data can be retrieved from it, from other computers as well as from the server itself. This is even possible without an Excel-Client installed. For this purpose you have to enter the server IP address, followed by the port number, in your browser. For example, for access from the server itself: "http://127.0.0.1:7778/" or "http://localhost:7778/". There you find the start page of the API:

Administration of Jedox -19-
You can use the server browser for the administration of the databases via a browser. For example, you can delete a database via the browser.
If you click the database, you get an overview of the cubes and dimensions of this database. You can also find the API documentation on the website:
The access from other computers to the API is made possible in an analogous fashion as the access for Excel-Clients. The entry
admin "192.168.2.100" 7778
would allow access over the URL http://192.168.2.100:7778/ The entry
admin "" 7778
would allow access over all IP-addresses of the computer, including 127.0.0.1 / localhost. You can communicate with the Jedox-Server by using the HTTP 1.1 protocol. You then receive the result in an easy-to-parse CSV display.

Administration of Jedox -20-
3.4 Database and log files
3.4.1 Database files
Jedox databases consist of 3 different data types: csv, log and archived files. The CSV files contain the data last saved. The values currently in storage are registered in the log files. After stopping Jedox-Server, the values will be transferred from the log file into the csv file, whereas the data from the csv file will be carried over to the archived files. If your database takes up a lot of space on the server, you can delete the archived files from the database directory after stopping Jedox-Server. After restarting Jedox-Server, the needed archived files will be created anew. Before deleting these files from your database directory, we recommend that you always do a Backup. Comma Separated Values (CSV): The structure of the Jedox database is set in database.csv. It is here that cubes, dimensions and elements and their characteristics are described. For each cube that exists in database.csv (entries under [CUBES]) there is in turn its own csv file in which structure and values are specified further. These files contain the currently saved Jedox values. For each Jedox rule there is also a unique csv file which contains the description of the rule. Excerpt from the Jedox Demo database with the following entries in database.csv: [CUBES] 0,"#_GROUP_CUBE_DATA",0,1,1,0,0, 1,"#_Months",3,2,3,0,0, 2,"#_GROUP_DIMENSION_DATA_Months",0,2,1,0,0, 3,"#_Years",5,4,3,0,0, 4,"#_GROUP_DIMENSION_DATA_Years",0,4,1,0,0, 5,"#_Regions",7,6,3,0,0, 6,"#_GROUP_DIMENSION_DATA_Regions",0,6,1,0,0, 7,"#_Datatypes",9,8,3,0,0, 8,"#_GROUP_DIMENSION_DATA_Datatypes",0,8,1,0,0, 9,"#_Measures",11,10,3,0,0, 10,"#_GROUP_DIMENSION_DATA_Measures",0,10,1,0,0, 11,"#_Products",13,12,3,0,0, 12,"#_GROUP_DIMENSION_DATA_Products",0,12,1,0,0, 13,"Sales",12,6,2,4,8,10,2,1,1, 14,"#_#_CUBE_",14,1,3,0,0, There is another csv file for each entry.

Administration of Jedox -21-
Short description of the individual cubes: 0,"#_GROUP_CUBE_DATA",0,1,1,0,0, Contains the dimension cubes and groups and the rights of the groups to the cubes. 1,"#_Months",3,2,3,0,0, 3,"#_Years",5,4,3,0,0, 5,"#_Regions",7,6,3,0,0, 7,"#_Datatypes",9,8,3,0,0, 9,"#_Measures",11,10,3,0,0, 11,"#_Products",13,12,3,0,0, These six cubes contain the attribute cube for each dimension: 2,"#_GROUP_DIMENSION_DATA_Months",0,2,1,0,0, 4,"#_GROUP_DIMENSION_DATA_Years",0,4,1,0,0, 6,"#_GROUP_DIMENSION_DATA_Regions",0,6,1,0,0, 8,"#_GROUP_DIMENSION_DATA_Datatypes",0,8,1,0,0, 10,"#_GROUP_DIMENSION_DATA_Measures",0,10,1,0,0, 12,"#_GROUP_DIMENSION_DATA_Products",0,12,1,0,0, These cubes contain the user group and the dimensions. The rights for each element for each group are registered here. 13,"Sales",12,6,2,4,8,10,2,1,1, Contains the data for the cube ‚Sales’. 14,"#_#_CUBE_",14,1,3,0,0, This cube contains the data for the attribute cube for each cube dimension. Log Files: A log file is created for each cube defined in Jedox. All values entered in Jedox are stored directly in this file. If the database is saved, the value stored in here moves to the respective csv file. Archived Files: All changes are written into the archived files. Both value changes as well as structural changes are logged together with the name of the user. In case the database corrupts, Jedox-Server can reinstate it with the archived files. Archived files may be deleted regularly (after a backup), to keep the data quantity in the server system low. A Jedox Services restart will create these files anew.

Administration of Jedox -22-
3.4.2 Log files
Olap_server.log is the log file of the Jedox-Server. This file can grow in size relatively quickly. The detail level of logging can be set in palo.ini. The different detail levels for this log are: error, warning, info, trace and debug. The default setting is "info". A short description of the various levels:
error: Output of fatal errors: If this occurs, Jedox-Server should be stopped (the Server may stop itself) to correct the error. It is not advisable to ignore the error as it may lead to database corruption. Example: no storage space left on the disc.
warning: Output of warnings: This error as well should be examined. However, it should not generally lead to a corrupt DB.
info: Output of general notes concerning the mode of operation.
trace & debug: This output is very detailed and serves the Jedox development. After changes in palo.ini have been made, Jedox-Server has to be restarted to make the changes effective. After stopping Jedox-Server this log file can also be deleted or saved. Jedox-Server will create olap_server.log anew if it does not exist when the servers starts. PaloXLL.log is the log file of the Jedox Excel-Add In. This log file can be deleted or copied every time Excel is idle. Excel-Addin will create this file anew if it does not exist and if it is necessary.
3.5 Starting Palo Service via the console
Palo Service can be started directly via the Windows Console and Net Start. The commands are:
net start PaloSuiteMolapService net stop PaloSuiteMolapService

Administration of Jedox -23-
3.6 Cache settings of the server
Ideally, Jedox-Server is run on a target system with a lot of memory and a fast processor as Jedox loads the data into RAM when starting. The memory capacity depends on the size of the databases and the calculation of consolidated values.
3.6.1 Cube-Caches
The base cells of the cubes that have been loaded by Jedox are always stored inside the main memory of the machine the Server is running on. The aggregated cells, however, have to be calculated whenever their value is requested. The cache improves on this situation by storing previously requested aggregations. The cache is divided into logical cube-caches. There is one cube-cache for every cube.
To set the values for any of the parameters, please use the palo.ini file (palo -? at the command line
shows the parameters for the command line input, if for some reason the palo.ini is not used).
3.6.2 Parameters in the palo.ini
There are two parameters that can be changed to improve the Server Side Cache performance of Jedox.
cache-barrier: The higher this value, the smaller the probability that an aggregated cell is cached. If the number of base elements of an aggregated cell exceeds the value of cache_barrier, Palo stores the calculated cell value inside the cache. Otherwise it does not. The general idea behind this parameter is that consolidations with few base elements are less expensive to calculate than those with many. Therefore, the performance hit is greater for aggregations whose values are computed from many cells. If the cache is used to store the expensive cell values only, the efficiency is higher than when using it to store any kind of aggregation. However, the parameter should not be set to a value that is too high. This will result in the cache not being used to its full capacity.
clear-cache-cells: Determines the number of changed based cells (a special kind of invalidation) after which a cube-cache is cleared completely. Works like clear cache, except that only base-cells are considered.
3.7 Multithreading
Multithreading means that processes and tasks can be distributed on multiple processors / cores. This ability of the Jedox OLAP Server is available only in the Enterprise version. The settings can be found at the end of the file palo.ini.sample.

Administration of user rights -24-
4 Administration of user rights
4.1 Cubes of the database ‘System’
The administration of users and rights takes place in the system database in system cubes and their dimensions for all databases, to which the PaloSuiteMolapService has access, at first. In order to see the structure of the system database, please invoke the Modeller and select an arbitrary database, for example "Demo".
Then click on the "User administration" icon:
The system database contains the 10 cubes #_USER_USER_PROPERTIES, #_USER_GROUP, #_ROLE_RIGHT_OBJECT, #_GROUP_ROLE, #_ROLE_ROLE_PROPERTIES, #_GROUP_GROUP_PROPERTIES, #_SERVER_LOG_, #_SESSIONS_, #_JOBS_, #_LICENSES. The following cubes are relevant for user rights: #_USER_GROUP, #_GROUP_ROLE und #_ROLE_RIGHT_OBJECT (red arrows).

Administration of user rights -25-
Access to right-objects is granted through roles. For roles are registered user groups, for this again users. If a user has access to a right-object, so this means that this user is a member of a group of users, which is assigned to a role with access rights to that right object. This rights-chain is shown in the view of three cubes from the database ‘System’: #_USER_GROUP, #_GROUP_ROLE und #_ROLE_RIGHT_OBJECT.
4.1.1 Cube #_USER_GROUP
View of the cube #_USER_GROUP:
You can see the groups in the range A5: A9 and the users in line 4.
Here is entered to which group a user belongs to. A user is allocated to a group by putting "1" into the cell.
The user "admin" belongs to the group "admin". This cannot be changed. Users who belong to the admin group can always see and edit cube data, even if appropriate rights for the group "admin" have been deleted.
A user can be a member of several groups. Then he is equipped with the highest rights resultant from it.
4.1.2 Cube #_GROUP_ROLE
View of the cube #_GROUP_ROLE:
You can see the roles in the range A5:A9 and the groups in line 4.
Here it is recorded which roles a group get. A group is allocated to a role by putting "1" into the cell.
The group ‘admin’ belongs to the role ‘admin’. This cannot be changed. Groups can belong to multiple roles, but the highest right from any defined role wins in a given situation.

Administration of user rights -26-
4.1.3 Cube #_ROLE_RIGHT_OBJECT
View of the cube #_ROLE_RIGHT_OBJECT:
You can see the right objects in the range A5:A32 and the roles in line 4.
The rights are hierarchically defined as follows:
S (splash): Exists only for the rights object "cell data". It includes writing into consolidated cells and (indirectly) their children down to the lowest level.
D (delete): Permits the deletion of rights objects.
W (write): Permits the writing of rights objects.
R (read): Permits the reading of rights objects.
N (none): No type of access permitted.
Higher rights include the subordinate rights automatically. The highest access right is expressed by "splash ", but it refers only to the cell data. For all other rights objects, "delete" is the highest access right. A right-entry can be overwritten or edited by double clicking (e.g. to remove an entry).

Administration of user rights -27-
It is also possible not to make any entry in the cell of a system cube. The meaning of an empty cell depends on the respective system cube. In the cube #_ROLE_RIGHT_OBJECT results of an empty cell the right ‘N’. With all rights objects, the role of "admin" has the highest access rights at her disposal: "delete" or "splash" respectively. The user "admin" is firmly anchored in the system and cannot be altered. That is, the user "admin" cannot be deleted and his rights are firmly predetermined. The roles "poweruser", "editor" and "viewer" have standard predetermined rights at first. They can be adapted to your needs. In addition, further roles can be created.
4.1.4 Description of Right Objects
For rights objects prefixed with "ste_", which control access to various components of Jedox Web, it is also relevant what the license assigned to a user permits. For example, while the user might have sufficient access to an ste_* rights object to view its according Manager Panel in Jedox Web, the license which is assigned to that user might still prohibit him from using that Manager component. The same is true vice versa, if a license grants access but the rights object access does not. If a setting is noted in square brackets in the following list, it is possible to use it, but achieves the same setting as the one before the square brackets, which is recommended. Example:
N [R, W]: ...
In this case, N, R, W would have the same described effect, but it is recommended to only use N.
Please also see chapter 7 in the manual "Jedox Web advanced topics" for an explanation of how rights objects relate to actions in Jedox Web File Manager and Report Manager.
4.1.4.1 user
Controls the access to the #_USER_ dimension in System database, which is used for handling of users in the OLAP server.
N: Users have no access to #_USER_ dimension1).
R: Users can see "user" objects in the #_USER_ dimension of System DB, but cannot edit / delete them.
W: Users are allowed to change "user" objects (rename users) and create new users
D: Users are allowed to delete users.
Related right objects: password, group, rights, sub-set view.
1) Note: The #_USER_ dimension is also necessary for storing and reading so-called "local" subsets, i.e.
subsets that are private to each user (see chapter 5.2 in this manual). Because of that, if a user has at least "R" access on the "sub-set view", he also has "R" access to the #_USER_ dimension.

Administration of user rights -28-
4.1.4.2 password
Controls the handling of passwords in the OLAP server. Note: Users are always allowed to change their own password.
N: Users have no rights on passwords. They cannot see or edit them.
R: Users can read passwords in the System Database, but they cannot change them. Note: as of Jedox 4, passwords are stored in encrypted form in System DB if users change them themselves.
W: Users are allowed to read and change passwords for other users, but not delete them.
D: Users are allowed to delete read, change, and delete passwords.
Related right objects: user, group, cube, rights.
4.1.4.3 group
Controls the handling of groups in the OLAP server.
N: Users have no access to #_USER_ dimension.
R: User can see "group" objects in the #_GROUP_ dimension of System DB, but cannot edit / delete them.
W: Users are allowed to change "group" objects (rename users) and create new groups.
D: Users are allowed to delete groups.
Related right objects: user, password, rights.
4.1.4.4 database
Controls general access to databases in OLAP.
N: Users are not allowed to see any databases.
R: Users are allowed to see databases, but not edit them. Note: This only concerns the database objects themselves, not contents like cubes etc.
W: Users are allowed to edit (rename) database.
D: Users are allowed to delete databases.
4.1.4.5 cube
Controls general access to cubes in OLAP databases. Access to data in specific cubes can be restricted within databases (see chapter 4.2).
N: Users are not allowed to see any cubes.
R: Users are allowed to see cubes, but not edit them. Note: this only concerns the cube objects themselves, not contents like cells etc.
W: Users are allowed to edit (rename) cubes.
D: Users are allowed to delete cubes. This right is also required if a service attempts to completely clear a cube.

Administration of user rights -29-
4.1.4.6 dimension
Controls general access to dimensions in OLAP databases.
N: Users are not allowed to see dimensions.
R: Users are allowed to see dimension, but not edit them. Note: this only concerns the dimension objects themselves, not contents like elements.
W: Users are allowed to edit (rename) dimensions, users are allowed to change attribute values on dimensions2).
D: Users are allowed to delete dimensions.
Related right objects: cube, dimension element, cell data.
2) Editing attribute values also requires at least "R" access on the objects "cube", "dimension element" and "cell data".
4.1.4.7 dimension element
Controls general access to elements in database dimensions.
N: Users are not allowed to see elements in dimensions.
R: Users are allowed to see elements in dimensions, but not allowed to edit them.
W: Users are allowed to see, create and edit (rename) elements in dimensions. Users are allowed to create attributes on dimensions3).
D: Users are allowed to see, create, edit (rename) and delete elements in dimensions, as well as attributes.
Related right objects: cube, dimension.
3) Editing attributes also requires at least "R" access on the objects "cube" and "dimension".
4.1.4.8 cell data
Controls general access to the data cells in all cubes on the system. Some exceptions apply e.g. for attribute cubes; see documentation of other rights objects.
N: Users are not allowed to view any cell data in any cube.
R: Users are generally allowed to read cell data.
W: Users are allowed to edit base-level cell data.
D: Users are allowed to delete base-level cell data (i.e. write 0 as value into cells). Note that, if the User should also be able to clear complete cubes, he also needs "D" access on the "cube" right object.
S: Users are allowed to splash values on consolidated-level cells (including 0).
Related right objects: cube.

Administration of user rights -30-
4.1.4.9 rights
Controls access to user rights structures, on a system as well as database level, i.e. access to System Database, access to user-right related, database-specific cubes, and access to Security settings on Jedox Web objects (Files, Folders etc.).
N: Users are not allowed to access rights-related structures.
R: Users are allowed to read rights-related structures.
W: Users are allowed to edit rights-related structures, e.g. set database-specific rights in #_GROUP_DIMENSION_DATA cubes4).
D: Users are allowed to delete rights related structures. Users are allowed to view the "Security" dialogue for objects (files, folder etc.) in Jedox Web and edit the security settings.
Related right objects: user, group, password.
4) Editing data in those cubes requires at least "R" access on the rights objects "dimension" and "dimension element".
4.1.4.10 system operations
Controls various aspects on administrative level: 1) Access to the #_CONFIGURATION cubes of databases. 2) Access to system related OLAP server operations 3) Access to monitoring information (sessions, jobs).
N: Users have no access to system operations5).
R: Users have read access to system operations, i.e. is allowed to retrieve system monitoring information.
W: Users are allowed to edit #_CONFIGURATION cubes. Users are allowed to execute the following OLAP API methods: /cube/save, /database/save, /server/save. Users are allowed to close sessions and to stop jobs.
D: Users are allowed to commit and to rollback changes on "Undo" areas in cubes. Users are allowed to remove licenses. Users are allowed to execute following OLAP API methods: /server/shutdown, /svs/restart, /cube/load, /cube/unload, /database/load, /database/unload.
Related right objects: ste_licenses, ste_sessions
5) Exception: all users always can retrieve data from #_CONFIGURATION cubes, regardless of what is defined as access right.
4.1.4.11 event processor
Controls usage of the "event processor" parameter in Writeback requests to the OLAP server. This parameter allows users to circumvent triggering Supervision-Server when changing cube data.
N [R, W]: Users are not allowed to circumvent SVS events.
D: Users are allowed to circumvent SVS events.

Administration of user rights -31-
4.1.4.12 sub-set view
Controls access to stored subsets on the OLAP server. If users have R right or higher on "subset view", they have also automatically "R" right to the "user" and "group" right objects.
N: Users are not allowed access to stored subsets.
R: Users are allowed to read stored subsets, both local (private) and global subsets.
W: Users are allowed to store and edit local (private) subsets on the OLAP server.
D: Users are allowed to store and edit global subsets.
Related right objects: user, group.
4.1.4.13 user info
Controls the access to objects (databases, dimensions, cubes) of type "user info". This is normally not relevant in end-user scenarios.
N: Users have no access to user info objects6).
R: Users have read access to user info objects.
W: Users have write access to user info objects.
D: Users have delete access to user info objects.
6) Even with N access, every user is still generally allowed to access user info objects created by Jedox Web
(necessary for access to File Manager and Report Manager and other Metadata).
4.1.4.14 rule
Controls the access to cube rules
N: Users are not allowed to access list of rules on a cube (Note: rules will still be used in calculations requested by this user).
R: Users are allowed to access list of rules on a cube, but can’t edit them.
W: Users are allowed to create and edit rules.
D: Users are allowed to delete rules.
4.1.4.15 ste_reports
Controls access to the Report Manager component of Jedox Web.
N: Users are not allowed to see the Report Manager.
R: Users are allowed to access the Report Manager in "user" mode. He can browse report groups and hierarchies, and open reports, but can’t modify Report group contents.
D [W]: Users are allowed to access the Report Manager in "admin" mode. He can browse report groups and hierarchies, and open reports. Additionally, he can modify Report group contents.

Administration of user rights -32-
4.1.4.16 ste_files
Controls access to the File Manager component of Jedox Web.
N: Users are not allowed to access File Manager.
D [R, W]: Users are allowed to access File Manager with generally full capabilities (may be restricted on specific items).
4.1.4.17 ste_palo
Controls access to the Olap Manager component of Jedox Web.
N: Users are not allowed to access Olap Manager.
D [R, W]: Users are allowed to access Olap Manager with generally full capabilities (may be restricted on specific items).
4.1.4.18 ste_users
Controls access to the User Manager, Group Manager, and Role Manager component of Jedox Web.
N: Users are not allowed to access User / Group / Role Manager.
D [R, W]: Users are allowed to access User / Group / Role Manager with generally full capabilities (may be restricted on specific items) 7).
Related right objects: user, password, group, rights.
7) Note: To work in User Manager, the user’s role also must have full access (D) on the objects "user", "group",
"password" and "rights".
4.1.4.19 ste_etl
Controls access to the ETL Manager component of Jedox Web.
N: Users are not allowed to access ETL Manager.
D [R, W]: Users have full access to ETL Manager, is allowed to create, edit, and delete ETL projects. Also, Users are allowed to create ETL Tasks.
4.1.4.20 ste_conns
Controls access to the Connection Manager component of Jedox Web.
N: Users are not allowed to access Connection Manager.
D [R, W]: Users have full access to Connection Manager8).
Related right objects: user, password, group, rights.
8) Note: To work in Connection Manager, the user’s role also must have full access (D) on the objects "user", "group", "password" and "rights".
4.1.4.21 drillthrough
Controls whether users are allowed to send Drillthrough requests via Supervision-Server.
N, R, W: Users are not allowed to send Drillthrough requests.
D: Users are allowed to send Drillthrough requests.

Administration of user rights -33-
4.1.4.22 ste_scheduler
Controls access to the Task Manager component of Jedox Web9).
N: Users are not allowed to access Task Manager, and they are not allowed to create tasks in other components.
R: Users are allowed to access the Task Manager for reading, and they are allowed to execute private and global tasks10).
W: Users are allowed to access Task Manager. They are allowed to execute tasks, and furthermore they are allowed to create and edit tasks.
D: Users are allowed to access Task Manager. They are allowed to execute, create and edit tasks, and furthermore allowed to delete both private and global tasks.
Related right objects: ste_reports, ste_etl.
9) For more information on access rights in Task Manager, see Chapter 8.4 in the manual "Jedox Web - Advanced Topics".
10) Exception: If users are allowed to Access ETL-Manager, they are also allowed to create ETL Tasks.
4.1.4.23 ste_logs
Controls access to the Logs component of Jedox Web.
N: Users have no access this component.
D [R, W]: Users have full access to this component.
4.1.4.24 ste_licenses
Controls access to the component "Licenses" of Jedox Web.
N: Users have no access to this component.
R: Users are allowed to view the component "Licenses", but they are not allowed to add, activate, remove or assign licenses.
D [W]: Users have full access to this component.
Related right objects: system operations, ste_sessions.
4.1.4.25 ste_mobile
Controls access to the Mobile Touch Interface of Jedox Web (used for Browsers on Tablets and handheld devices).
N: Users have no access this component.
D [R, W]: Users are allowed to use the Mobile Touch interface.
4.1.4.26 ste_analyzer
Controls the general access to Analyzer Reports in Jedox Web.
N: Users have full access to this component.
D [R, W]: Users are generally allowed to use Analyzer Reports.

Administration of user rights -34-
4.1.4.27 ste_sessions
Controls access to the component "Sessions" of Jedox Web.
N: Users have no access this component.
R: Users are allowed to view the component "Sessions", but they are not allowed to close sessions or to stop running jobs
D [W]: Users have full access to this component.
Related right objects: system operations, ste_licenses.
4.1.4.28 ste_settings
Controls access to the component "Settings" of Jedox Web.
N: Users have no access to this component.
R: Users are allowed to view the component "Settings", but they are not allowed to add, edit or remove settings.
D [W]: Users have full access to this component.

Administration of user rights -35-
4.1.5 More System Cubes
The entries of the following 3 system cubes have no effect on user rights. But they have the column "inactive". This offers the possibility to switch specific Users, Groups or Roles of the Jedox Server to inactive. This is very helpful to disable a login during maintenance activity like ETL jobs.
4.1.5.1 Cube #_USER_USER_PROPERTIES
The password column which is still shown here will be hidden in future versions in order to guarantee that only encrypted password entries are possible.
4.1.5.2 Cube #_ ROLE_ROLE_PROPERTIES
4.1.5.3 Cube #_ GROUP_GROUP_PROPERTIES

Administration of user rights -36-
4.1.6 Summary User Rights Cubes
Users, groups and roles are administered system wide. This information has validity for all databases. These rights, granted by the system database, can be restricted further (but not extended!) for each single database. Consequently, the system-cubes can be divided into two categories: The system-cubes in the system-database grant the rights to all databases administered by the PaloSuiteMolapService (general rights = role area). The system-cubes in the respective database can restrict the access rights of this database further (individual database rights = data area).
4.2 Restriction of rights in single databases
4.2.1 Standard value cells
The main cubes for rights restriction in each database for standard value cells are:
#_GROUP_CUBE_DATA
#_GROUP_DIMENSION_DATA_<Name of the dimension>
#_GROUP_CELL_DATA_< Name of the cube>
#_CONFIGURATION
Important: These restrictions refer to the "cell data"-rights object only. The values "D", "W", "R" und "N" can be entered in this cube, or the cell can be left empty. For the cubes #_GROUP_CUBE_DATA, #_GROUP_DIMENSION_DATA_<dimension name> and #_GROUP_CELL_DATA, an empty cell does not mean "N" but the right corresponds to the entry "DefaultRight" in cube #_CONFIGURATION. In order to be able to "splash", a user must have at least the right "W" in these cubes and the right "S" on the rights object "cell data" in cube #_ROLE_RIGHT_OBJECT.
4.2.1.1 Cube #_CONFIGURATION
In this user rights cube, the default right for users can be set regarding elements and cells in the corresponding database:
"DefaultRight" is set to "D" by default. This gives users the permission to delete, if that right is not restricted from the system righty cubes. This setting can be changed into W, R, or N. For example, if it is changed into R, all users in this database will only have read permission.
For certain groups, this R-right could be extended, e.g. to W. For such a group all the entries of cubes #_GROUP_CUBE_DATA, #_GROUP_CELL_DATA and #_GROUP_DIMENSION_DATA_<dimension name> will have to be set to "W".
If HideElements is set to "Y", elements without read rights will be hidden in a newly created view.

Administration of user rights -37-
If users are allowed to change element rights and HideElements is active, those users can lock themselves out by setting the N access right to their own group. After this, the elements will be hidden and the users will have no possibility to re-assign the access rights to themselves. Users in the "admin" group do not have these restrictions. They can always see elements, even if this right was removed for the admin group.
4.2.1.2 Cube #_GROUP_CUBE_DATA
In this user rights cube, standard rights regarding cubes for individual groups can be restricted but not extended.
4.2.1.3 Cube #_GROUP_DIMENSION_DATA_< Name of the dimension >
In this user rights cube standard rights regarding dimension elements for individual groups can be restricted but not extended. The following rules apply: The right for a child element is the same as that for the parent element, unless a different right was assigned explicitly. If an element has more than one parent, the least restrictive of the parent rights applies.
4.2.1.4 Cube #_GROUP_CELL_DATA_< Name of the cube >
In this user rights cube standard rights for individual groups regarding each single cell of a cube can be restricted but not extended. There is no inheritance here. Please use Jedox rules in order to manage inheritance for cell-based rights.
4.2.2 Attribute value cells
The user rights cubes for rights restrictions in individual databases are:
#_GROUP_CUBE_DATA
#_GROUP_DIMENSION_DATA_#_< Dimension name>_
#_CONFIGURATION The restriction of rights works similar as for standard value cells. However, the rights cannot be edited down to each single cube cell but only to the level of attribute elements.
4.2.3 Additional rules
Effects of Rights on Calculations Rights of any kind never affect computations or consolidations. For example, a "none" right in the cube #_GROUP_DIMENSION_DATA_ <Name of dimension> does not influence the calculation of dependent contents in consolidated cells. Effects of Rights on hierarchy views Please note that, in complex hierarchies, removing access rights for a user does affect the structure of the dimension hierarchy, and, subsequently, also influences Subset results. For example, if for a user group the rights on the four "Qtr." elements are set to "N" and for the base elements (months) to "R", then the user would not see the base elements as descendants of the "Year" element anymore; instead, they would be listed as elements on the highest hierarchy level. Thus, a subset filtering for children of "Year" would not return these base elements. However, the aggregated result of "Year" would not be influenced by this constraint, it would still be the sum of all base elements.
Administration of user rights -38-
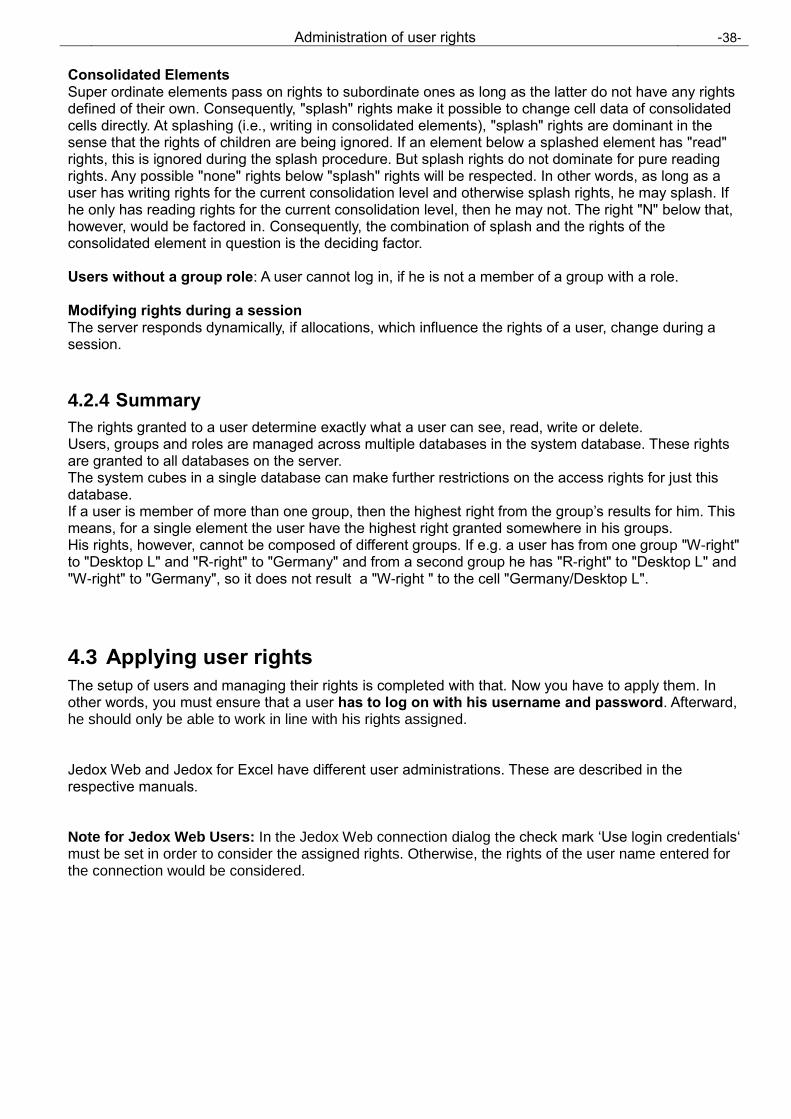
Consolidated Elements Super ordinate elements pass on rights to subordinate ones as long as the latter do not have any rights defined of their own. Consequently, "splash" rights make it possible to change cell data of consolidated cells directly. At splashing (i.e., writing in consolidated elements), "splash" rights are dominant in the sense that the rights of children are being ignored. If an element below a splashed element has "read" rights, this is ignored during the splash procedure. But splash rights do not dominate for pure reading rights. Any possible "none" rights below "splash" rights will be respected. In other words, as long as a user has writing rights for the current consolidation level and otherwise splash rights, he may splash. If he only has reading rights for the current consolidation level, then he may not. The right "N" below that, however, would be factored in. Consequently, the combination of splash and the rights of the consolidated element in question is the deciding factor. Users without a group role: A user cannot log in, if he is not a member of a group with a role. Modifying rights during a session The server responds dynamically, if allocations, which influence the rights of a user, change during a session.
4.2.4 Summary
The rights granted to a user determine exactly what a user can see, read, write or delete. Users, groups and roles are managed across multiple databases in the system database. These rights are granted to all databases on the server. The system cubes in a single database can make further restrictions on the access rights for just this database. If a user is member of more than one group, then the highest right from the group’s results for him. This means, for a single element the user have the highest right granted somewhere in his groups. His rights, however, cannot be composed of different groups. If e.g. a user has from one group "W-right" to "Desktop L" and "R-right" to "Germany" and from a second group he has "R-right" to "Desktop L" and "W-right" to "Germany", so it does not result a "W-right " to the cell "Germany/Desktop L".
4.3 Applying user rights
The setup of users and managing their rights is completed with that. Now you have to apply them. In other words, you must ensure that a user has to log on with his username and password. Afterward, he should only be able to work in line with his rights assigned. Jedox Web and Jedox for Excel have different user administrations. These are described in the respective manuals. Note for Jedox Web Users: In the Jedox Web connection dialog the check mark ‘Use login credentials‘ must be set in order to consider the assigned rights. Otherwise, the rights of the user name entered for the connection would be considered.

Filter functions with subsets -39-
5 Filter functions with subsets
A subset is a set within a dimension. With a subset you can select elements or sets of elements and sort them according to certain criteria. You can for example display the Top 10 of a product list or you can display the list of products above / below a defined threshold.
5.1 Paste Subset
With "Paste Subset" you get the Subset Editor. This allows you to filter data from a database with your criteria:
In the individual register-cards, you can simply click on the arguments or enter expressions for the individual filters. In the dialog-window "Subset Editor", you have the areas "Stored Subsets" on the left and "Preview" on the right. For these areas you can use the switches "Hide" resp. "Unhide".
The preview area displays all subset-modifications at once, provided that the option "Auto" is activated. If the option "Auto" is not activated, then you can update the preview by clicking on the button shown on the right.
In the lower left corner you can see the PALO.SUBSET-function and its sub-functions and how they change during the creation of a subset. With the "Paste Into"-button, the subset-function will be inserted into the Excel-table. Please mark a sufficiently large area at first, in order that the display of the subset will not get truncated!

Filter functions with subsets -40-
The settings in the register-cards "General" and "Sort" will always be taken over to the subset – other filters have to be activated explicitly (red arrow):
With the filters from "Hierarchy" up to "Data", check marks indicate which of these filters are activated:
5.1.1 Top Ten Products
As a first subset example we want to display the top ten products of the 4th quarter of 2007 from the database Demo. First we create a control view with the command "Jedox - Paste View":
Select the basic elements of the dimension "Products" as row titles and "Qtr. 4" of the dimension "Months" as column title. Activate "Show element selector on double click" and then click on "Paste".

Filter functions with subsets -41-
Set with double-click 2007 instead of All Years, Actual instead of All Datatypes and Turnover instead of Units .Then click in B9 and choose the Excel command "Sort Descending". We get the following view:
Please calculate although the following cells: the total in E35, the cumulative turnover in column E and their percentages in column F.

Filter functions with subsets -42-
Then mark H9:H33 and select "Jedox – Paste Subset" Make the following settings in the tab "General":
Server/Database Selection: Demo Dimension: Products Layout: Flat
Make the following settings in the tab "Hierarchy": Activate this filter Filter elements by type Base elements

Filter functions with subsets -43-
Make the following settings in the tab "Data": Activate this filter Select Cube : Sales Regions: Europe Months: Qtr. 4 Years: 2007 Datatypes: Actual Measures: Turnover Criteria: SUM OF THE ELEMENTS Take topmost elements: 10
The function PALO.DFILTER() requires a large computing power. Therefore "Auto" preview is disabled by default when you activate this filter.
Activate in the tab "Sort" the following points:
By Value Reverse

Filter functions with subsets -44-
With "Paste" we receive the following elements:
The subset shows exactly the top ten elements which we have received in the control view (A9: A18).

Filter functions with subsets -45-
5.1.2 ABC Analysis
With the second subset example we want to display the upper products of the 4th quarter of 2007 which made 80% of the total turnover. We mark H9:H33 in the previous example and choose "Jedox – Paste Subset". We retain the previous settings and change only the tab "Data" as follows:
Disable: Take topmost elements: 10 Enable: Take all upper elements up to %: 80

Filter functions with subsets -46-
With "Paste" we get the following elements
The subset shows the largest elements with which the 80% turnover mark is being just exceeded. To identify these A-elements we enter A in column C.

Filter functions with subsets -47-
With the third subset example we want to display the lower products of the 4th quarter of 2007 which made only 10% of the total turnover. For this we change the order in B9: B33 to ascending. Then we mark H9:H33 and select "Jedox – Paste Subset". We retain the previous settings and change only the tab "Data" as follows:
Disable: Take all upper elements up to %: 80 Enable: Take all lower elements up to %: 10
Additionally we disable "Reverse" in the tab "Sort".

Filter functions with subsets -48-
Then we get the following elements:
The subset shows smallest elements with which the 10% turnover mark is being just exceeded. To identify these C-elements we enter C in column C.

Filter functions with subsets -49-
To obtain the elements which are between the bottom 10% turnover limit and the upper 80% limit we have to enable both borders simultaneously in the tab "Data":

Filter functions with subsets -50-
The subset shows the remaining B-elements. To identify these elements we enter B in column C.
So the ABC-turnover analysis of the products is complete for the 4th quarter of 2007 for the region Europe.

Filter functions with subsets -51-
5.1.3 Details on selected Subset Editor Tabs
Most entries in the subset editor tabs are self-explanatory. More sophisticated entries are explained here in more detail.
5.1.3.1 Subset Editor Tab General
Starting with Jedox Version 4.0 the Subset Editor has a new variable to specify the Server/Database entry. Thereby it is possible to define/change the Server/Database settings through an external variable (a named range in the spreadsheet). This is useful if a Jedox application is developed in a development environment and later will be used in a production system with a different server name.
5.1.3.2 Subset Editor Tab Text
You can enter standard text patterns using the wildcards * and ? If you click PERL regular expressions, these will be used. Some examples are provided.
5.1.3.3 Subset Editor Tab Picklist
Here you can either add elements to the subset which will not be deleted by other filters, or you can define some elements as a preselection, to which the other subset editor tab options will be applied.
5.1.3.4 Subset Editor tab Data
PALO.DFILTER() is compute-intensive. Hence the auto refresh option of the preview is deactivated by default when the data filter is activated. For this filter the criterion, operator, and value for comparison can be defined.
As an example, a simple "slice" over the months "Jan, Feb, Mar" and the other elements shown above are selected here.

Filter functions with subsets -52-
The following is a screenshot showing the output of the subset editor with several setting for criteria and different compare operators and values:
E.g., for the criterion "All elements > 200" all those elements are returned for which the value of "Jan" AND the value for "Feb" AND the value for "Mar" are all greater than 200. Also keep in mind, that all dimensions must be specified. Using wildcards (" *") in PALO.SUBCUBE() results in errors.
Wildcards in PALO.SUBCUBE() must not be retained!
Note for using variables in the Subset Data Filter:
The variables in the section "Slice operators" can only contain the comparison value. This value and the operator will be written in an array entry within PALO.DFILTER(). This entry is preceded by the function CHOOSE().

Filter functions with subsets -53-
5.1.3.5 Subset Editor Tab Sort
Not all arguments of PALO.SORT() can be selected in the tab "Sort" by clicking on them, but some of them can be found directly in the tab "General" (With duplicates) or they are generated by a combination of the settings in "General" and "Sort". The latter is true when displaying all elements with parents below children and alphabetic sorting on each level:
The following settings for sorting are available: By order of definition, by name (alphabetically), by consolidation (as seen in Modeller when displaying the hierarchy), by value, or by attribute.

Filter functions with subsets -54-
5.1.4 Manual editing of subset editor expressions
Take, for example, the subset from the last section:
Suppose you only need lines 8 to 15.
In this case you cannot simply delete cells because those are part of an array. However, you can deactivate the array function using the key combination CTRL+SHIFTLOCK+ENTER. Then A1 can be edited and in the edit line you can click the PALO.SORT() part and open the function editor.
Now you can enter arguments which are not available in the subset editor:
Number of elem.: 14. Start with: 4.
If you finish this, select the changed function and reactivate the array function using CTRL+SHIF+ENTER, you will get the desired elements:

Filter functions with subsets -55-
5.2 Saving Subsets
Subset-settings can be saved only for current user or for all users. In order to do that, click on "Private Subsets" or on "Global Subsets" first. Then click on the button "New Subset", give the subset a name and finally click on "Save" to save the settings.
New Subset
Delete Subset
Rename Subset
Save
Private Subsets: Save only for current user
Global Subsets: Save for all users
If you have saved a subset, you can use it later elsewhere. Both types of subsets you can insert from the Subseteditor as follows:
1. You select a sufficient large area in the spreadsheet for the subset. 2. Then you call the subset editor. 3. You select the desired database. 4. You select the dimension for which the subset is stored. 5. You select the group Private* Subsets or Global Subsets (*former name: Local Subsets). 6. Select the stored subset. 7. Paste this subset.
In Jedox for Excel are saved global subsets offered in the "Paste View" dialogue in the respective dimension below the selection of elements. Private subsets are not offered here. In Jedox Web this isn’t implemented yet.

Filter functions with subsets -56-
5.3 Insert a subset in the area of an existing subset
Note:
The features described in this subchapter are not yet implemented in the Subseteditor of Jedox Web. When inserting a subset in the range of an existing subset, in Jedox for Excel the existing subset settings will be read and passed to the Subseteditor. If you select exactly on cell within the matrix of an existing subset and then insert a new subset with the subset editor, the new subset will use the exact area of the existing subset. If you select several cells partially or wholly overlapping an existing subset and then insert a new subset with the subset editor, then all previous subset matrix cells are deleted and the new subset will be inserted in the selected area.
5.4 Details of PALO.SUBSET()
The principal structure of this function is:
=PALO.SUBSET(Server/Database,Dimension,Indent,Alias, Filter1,Filter2,Filter3,Filter4,Filter5,Filter6).
The function PALO.SUBSET() is the basic filter, which all the other filters require to display data. Filters can have an impact on a subset in three different ways:
Restricting by removing elements
Structuring by changing the order and possibly the frequency of the elements or by directly adding elements
Indirectly by changing the behavior of other filters The function PALO.SUBSET() has the following arguments:
PALO.SUBSET()
Argument Form Description
Server/Database Text e.g. localhost/Demo or A1 (the cell which contains the entry)
Dimension Text E.g. Products or A2 (the cell which contains the name of the dimension).
Indent Number The allowed values are 1 (equivalently: empty), 2 and 3. The argument alters the numbering of the hierarchy-level.
Alias Text / Array
Contains at most two aliases. {"Alias1","Alias2"} or "Alias". Alternatively, it is allowed to use a reference to the cell, e.g. {A1} or {A1:A2}. If empty, aliases are deactivated.
Filter Filter
name() Allowed are: PALO.HFILTER(), PALO.TFILTER(), PALO.AFILTER(), PALO.DFILTER(), PALO.PICKLIST() und PALO.SORT().
5.4.1 Indent
The use of "Indent" alters the numbering of the hierarchy-level of the elements. This affects the subset, where the hierarchy-level is specified in the filter.

Filter functions with subsets -57-
5.4.2 Alias
The use of "Alias" has the effect that the sorting-filters do not use the original names of the elements for their operations, but that they use the aliases defined in the attribute-cube instead.
5.4.3 Filters and their effects
All the other filters are sub-functions of PALO.SUBSET(), which means, that they cannot work independently but require PALO.SUBSET() as base filter.
5.4.3.1 Hierarchy filter PALO.HFILTER()
This filter is both structuring as well as restricting. It is possible to define the restrictions of a subset via the hierarchy within the dimension (e.g. all elements below a specific element) (restricting feature). Further, it is here that you can define for the subset to revolve. This means that the elements are being repeated until a defined number of elements has been reached (structuring).
5.4.3.2 Text filter PALO.TFILTER()
The text filter is restricting. Elements which fit a particular pattern, will be included, the rest will be eliminated from being displayed.
5.4.3.3 Picklist filter PALO.PICKLIST()
With the pick list-filter one can
either add elements directly, so that they cannot be removed from the subset by any means
or make a pre-selection of elements. The remaining filters of the subset will only be applied to the selected elements.
5.4.3.4 Attribute filter PALO.AFILTER()
This filter has a restrictive impact. Element attributes may be used as selective criteria. It differs from Alias, which also draws on attribute elements, insofar as the Alias has an indirect impact in terms of sorting (e.g. in connection with the text filter). The attribute filter, however, is an independent filter that has a restrictive impact. You can use this filter e.g. to eliminate elements from a selection if they don’t match a particular attribute.
5.4.3.5 Data filter PALO.DFILTER()
The data filter acts restrictive and indirectly. For each element a data value is calculated. If the data value meets the criteria, the element will be kept, otherwise it will be dismissed (restricting). And further, it can be sorted by the calculated data values using the sort filter (indirect).
5.4.3.6 Sorting filter PALO.SORT()
With the sorting-filter one can determine the sequence of the elements in the subset (e.g. sorting by data-value, alphabetically or by alias). If the sorting-filter is not used, the elements will be displayed in the order of definition (corresponds to the unordered list view in Modeller).

Filter functions with subsets -58-
5.4.4 Sequence of execution
First the restricting filters will be applied. If the "Preselecting" argument is chosen in the pick list-filter, only the selected elements are passed on to the further filtering of the subset, otherwise all elements of the chosen dimension are passed on. With filters that have several characteristics, e.g. restricting and structuring, only the restricting part will be executed. The order of execution is irrelevant, because elements get merely removed from the selection. Then the structuring filters are applied. Here, there is an exactly defined sequence that results inevitably from the filters:
At first, there is a list of those elements which have not been eliminated by the previous filters. The sequence is the sequence in which they are defined in the Modeller.
If the argument "Insert" has been chosen in the PALO.PICKLIST()-function, its elements will inserted in the order of definition.
If PALO.SORT() has been specified with arguments, then its instructions will be executed now.
If the argument "Insert before the list" or "Insert after the list" has been chosen in the PALO.PICKLIST()-function, this instruction will be executed afterwards.
Finally, the revolving–arguments of the hierarchical filter will be executed.
5.4.5 Base Subset Function
PALO.SUBSET() is an array-function which means, that you have to copy it into a cell area after you have created it and then you must activate the array-functionality. Make sure that the cell area includes enough cells to display all elements of the subset. In order to create a subset without the help of the Subset Editor, proceed as follows:
1. Create the function with the function-assistant of Excel. 2. Copy the function to the area, in which the subset shall be displayed. 3. Mark this area. 4. In the formula bar, click behind the function. 5. Then press CTRL+SHIFT+ENTER, in order to activate the array-functionality. The key
combination CTRL+CAPSLOCK+ENTER deactivates the array-functionality.

Filter functions with subsets -59-
Below you can see a base-subset. If no sorting-filter is specified, elements will be displayed in the order of definition (creation). Take a look at the structure of the function in the formula bar. There you can see the base-filter that is the pure Subset part: =PALO.SUBSET(Server/Database,Dimension,Indent,Alias). In this example, the "Alias" argument is left empty.

Filter functions with subsets -60-
5.4.6 Indent
If you want to display the indent-information, then you must extend the array function over three columns:
With Indent 1 (or empty) and without other functions, the indent information of the elements is 0 for all.
Depending on the argument 1, 2 or 3, different indent information will be displayed. For the filter-displays themselves, the indent argument only takes effect if the hierarchy-level has been specified in a subset-filter.

Filter functions with subsets -61-
Indent 1: The indent information of the elements is 0 for all with Indent 1 alone. Indent 1 needs PALO.SORT() or PALO.HFILTER() to display the hierarchical numbers. The hierarchical numbers 1, 2, 3 will be displayed for example in combination with PALO.SORT() in the case that its first argument is 1 or 2. In general: In the written case the elements of the highest hierarchy-level get the number 1, these of the second highest 2 and so on.
Indent 2: With indent 2, the hierarchy-numbering of the elements is: 0,1, 2 In general: Elements in the lowest hierarchy-level(base elements) get the number 0. The number is incremented by 1 for every step up in the hierarchy.
Indent 3: With indent 3, the hierarchy-numbering of the elements is: 2, 1, 0 In general: The elements of the highest hierarchy-level get the number 0, these of the second highest 1 and so on.
Notes: The subset for Indent 1 is shortened. Due to the sorting of PALO.SORT (1), all hierarchical numbers are displayed in the first three lines. Indent 2 and Indent 3 don’t require a combination with other functions to display the hierarchical numbers.

Filter functions with subsets -62-
5.4.7 Alias
Prerequisite for this section on using aliases are the attributes created in section 3.7 of the manual "Jedox for Excel Advanced Topics".
So far, you have created a subset without utilizing the argument "Alias". Now we would like to supplement the subset with Alias and compare the effect. To this end, we create the following subset in cell C9: =PALO.SUBSET ($A$1, $C$2, $C$5) Copy this function into the area C9:C25 and then activate the array-functionality (Ctrl+Shift+Enter). Enter "Alias" into cell E1 and "German" into cell E2.
Copy the area C9:C25 to the area E9:E25. Deactivate the array-functionality for the area E9:E25 (Ctrl+Capslock+Enter), then mark E9. In the formula bar, click inside the PALO.SUBSET()-function. Now click on the function-assistant. It opens and you can now supplement the entry for "Alias" with $E$2.
Confirm the changes with "OK". If you want to make the aliases visible, you must extend the return-area of the array-function to two columns. Therefore, copy this function into the area E9:F25. Leave the area marked and click in the formula bar. Then activate the array-functionality for this area by pressing Ctrl+Shift+Enter.

Filter functions with subsets -63-
When using "Alias", the following applies: The Alias impacts the Text Filter and the Sort Filter indirectly. It will be applied to the Text Filter automatically. In regards to the Sort Filter, a sort by Aliases can be activated separately. In other words: Aliases will not be displayed directly, but will only be used as sort criteria. In case you would like to see the Aliases, you must extend the output area of the matrix formula to 2 columns. Two attributes, which function as Aliases, may be specified at a maximum. In that case, the second attribute will be searched first. In case the corresponding cell in the attribute cube is empty, the first attribute will be searched. Should that cell be empty as well, the original name of the element will be used instead. Let’s update our demo-application at first: We already have created the attributes "German", "English" and "French" for the dimension "Months". As well as the attribute "Color" for the dimension "Products" (see chapter: "Working with Attributes"). Create the following view and supplement missing entries for our further examples:

Filter functions with subsets -64-
At first, we will sort using the attributes of the dimension "Months".
The array-function for the table displayed above is:
C9:C38: {=PALO.SUBSET($A$1,$C$2,$C$5)}
E9:F25: {=PALO.SUBSET($A$1,$C$2,$C$5,$E$2)}
H9:I25: {=PALO.SUBSET($A$1,$C$2,$C$5,$H$2,PALO.SORT(,3))}
K9:L25: {=PALO.SUBSET($A$1,$C$2,$C$5,$K$2,PALO.SORT(,3))}
N9:O25 {=PALO.SUBSET($A$1,$C$2,$C$5,$N$2,PALO.SORT(,3),PALO.TFILTER({"a*","j*","s*","t*"}))}
In order to get the aliases displayed, the array-function has to be entered in two columns. The comparison of two different aliases shows the changes in the sorting. Because the sorting-argument is "3=ALIAS" in each case, column H is sorted using German names, column K is sorted using English names and column N is sorted using French names. Important update:
In column L you see that upper case letters and lower case letters are not sorted separately. They are treated identically! In the current example you can also see, how the usage of "Alias" affects the TFilter. As you can see, the elements "Qtr.*" and "year", for example, are kept, because their aliases are respectively "trimestre" and "année". These elements are correctly recognized by the Text-Filter.

Working with enterprise rules -65-
6 Working with enterprise rules
6.1 General information on rules
Jedox Enterprise Rules enhance this functionality and enable you to execute complex calculations (division/multiplication, logical and various functions).
The general syntax of Rules is [Target] = f[Source]
i.e. [Target] is a function of [Source], Whereas [Target] is the area in the cube that is to be calculated using rules. This target area is defined by dimension elements. Elements are not to be listed, if a rule is to apply to all dimension elements. Rules are mapped out per cube. IMPORTANT: If a target area is defined in a rule, subsequent rules, which describe the same or an overlapping target area, are no longer effective. This means that specific rules have to be stored before general rules. Only exception is rule function CONTINUE that can switch from one rule into another rule defined on overlapping target areas. You can get to the Rule Editor via the context menu after a right-click on the cube in the Modeller, or alternatively, you can click on the symbol after you have selected a cube:

Working with enterprise rules -66-
6.2 Creating a simple rule
Simplified example using the Sales cube of the database "Demo": RULE 1
['2012'] = 123
The target area is the year 2012 of the dimension "Years". This rule has the effect that all cells in the cube now contain the value 123 in the year 2012. The other years are not affected by this rule. Since for all other dimensions the elements were omitted, the rule applies in the other dimensions to all elements. For a new rule click on “New…” in the Rule Editor. Then enter he rule and confirm the entry.
"Jedox for Excel" includes the advanced rule editor. This component is not yet available in Jedox Web. The steps are the same or similar in both software versions. Now create a view in order to check the result. Organize the view in such a way that the years 2006 up to 2009 become column headers. Place "Products" in the Row titles and select all products.
Some comments on this view: The values in column E are retrieved from the corresponding cube-cell by the PALO.DATAC()-function. For 2009, this value was zero throughout. The values currently displayed in this view are computed using the rule, but the values stored in the data-base remain zero (i.e. the displayed values are not being written back to the data-base (Which is the case with entries made in cells!).
The current computation of this view, using the rule, also shows that consolidated values are not computed: The rule simply overwrites the values.
If you delete the rule again, the values according to their consolidation will be displayed again.

Working with enterprise rules -67-
6.3 Operators of the Rule-Editor
The following operators can be used in rules:
+ - * / == != < <= > <= @
The operators which are not yet known from Excel will now be described: == is equal to (in Excel = is used) != is not equal (in Excel <> is used) These operators may be used in the IF function. @ is used only for markers (this is described in chapter "Markers for Expressions")
6.4 Restricting the target area
In the next step, please create a rule that will show for "Desktop L" in the year 2009 a value that is 10% higher than in 2006. The target area is "2009" and "Desktop L". The function for the source is "2006", "Desktop L" multiplied by 1.1. If the target area contains a part of the source area, as in the example "Desktop L", it does not have to be repeated in the source area.
The conclusion is the following rule (RULE 2): ['2009','Desktop L'] = ['2006']*1.1 The target area is the year 2009 of the dimension "Years" of the product "Desktop L". This rule has the effect, that in 2009 all "Desktop L" cells of this cube show the 2006 value multiplied by 1.1. The other years and products respectively, are not affected by this rule. IMPORTANT: Since you already defined the target area for the entire year of 2009 in the previous rule (Rule 1), Rule 2 will only have an impact if you place it in front of the more general rule for 2009. You can change the order of execution using the arrows in the rule editor. In general we can advise to restrict target in as many dimensions as possible. This reduce total amount of rule calculated cells and should improve performance. The target area reduction should be considered even if it means to define more rules instead of one. Amount of defined rules has usually much smaller negative impact on performance than bigger size of target area of one rule. Besides a short notation, element names can be submitted along with dimension name.
Short form:
['2009','Desktop L'] = ['2006']*1.1
Long form:
['Years':'2009','Products':'Desktop L'] = ['Years':'2006']*1.1
This makes sense only when the same element name occurs under several dimensions.

Working with enterprise rules -68-
In order to get the correct ordering, the new rule must be placed before the rule ['2009'] = 123.
Now please verify the result in your view:
If the general rule ['2009'] = 123were to occur before, then that rule would be applied to all cells in ['2009'] and the more specific rule standing further down in the list,
['2009','Desktop L'] = ['2006']*1.1 would be ignored for calculation. Possible prior consolidations will be consistently overwritten by the rules without any error message (cells E9 and E10).

Working with enterprise rules -69-
6.5 Restricting the target area to an element type
If a rule is to apply to base elements only (consolidated elements will be aggregated as usual), the target area may be defined as follows:
[Target]=B: f[Source]
Vice versa, it is also possible to restrict the target area to consolidated elements.
[Target]=C: f[Source]
Please change both rules as follows: ['2009'] = B:123
['2009','Desktop L'] = B:['2006'] * 1.1
Now compute the table anew. Since the target area is now reduced to base elements, the consolidated elements will be aggregated as usual.
6.6 Deactivation in the case of references to removed elements
Rules with element entries that were removed will only be disabled and are still available on the server for manual correction.

Working with enterprise rules -70-
6.7 Accessing a different cube via rule
For the following example, please create a cube with the name "Sales2" (same dimensions and order of dimensions as in "Sales"). Now please create the following rule for the "Sales2" cube: The ‚Budget’-values for 2008 of the cube Sales2 should be twice as large as the ‚Actual’-values for 2006 of the cube Sales:
['2008','Budget'] =PALO.DATA("Demo","Sales",!'Products',!'Regions',!'Months',"2006","Actual",!'Measures')*2
To check it, create the following view:
6.8 Usage of markers
Markers are labels in rules, set in order to process performance-critical rules preferentially. In Jedox, markers are defined within the rule. Markers can only be defined for B:Rules respectively in rules with markers are only computed the base elements. Typical scenarios when markers are used are rules restricted on base cells defined on large target areas – millions of cells and more. This is the case when target areas cannot be reduced sufficiently. Then markers can be used to mark in the target area only cells that make sense to calculate.

Working with enterprise rules -71-
6.8.1 How are markers defined?
Ordinarily, a B:Rule is usually defined as follows:
['Turnover'] = B: ['Quantity'] * ['Price']
Now, If one of the source-areas involved shall be labeled with a marker, the pair of double-braces "[[" "]]" is used instead of the pair "[" "]". If "Quantity" should get a marker, one writes:
['Turnover'] = B: [['Quantity']] * ['Price']
This defines a marker from ['Quantity'] to ['Turnover']. This means that the value ['turnover'] is calculated only for those basic cells, where the value of ['quantity'] is not 0. (This makes sense, since with a quantity of 0 the turnover will also be 0). It can happen, that more dimensions are specified in the marker than in the target area:
['2005', 'Turnover'] = B: [['2003','Turnover','Cola']] + ['2004','Turnover']
In this case, the marker will be restricted correspondingly, i.e. from ['2003', 'Turnover', 'Cola'] to ['2005','Turnover','Cola']. It is possible to define several markers:
['2005','Turnover'] = B: [['2003','Turnover']] + [['2004','Turnover']]
In this case, two markers are defined. One marker from ['2003','Turnover'] to ['2005','Turnover'] and one marker from ['2004','Turnover'] to ['2005','Turnover']. In this case, the rule is calculated only if at least one of the marked arguments on the right side is different from 0. In rules multiple PALO.MARKER instances can be listed delimited by argument-separator when markers are added to the end of rule:
[rule_target_area] = rule_formula @ PALO.MARKER(...), PALO.MARKER(...), PALO.MARKER(...)
Also the following syntax is supported:
[target] = formula @ [[marker_source]], [[marker_source2]], PALO.MARKER(...)
It is also possible to define markers for entire cubes. The simplest case is the case in which both cubes have the same dimensions:
['2005','Turnover'] = B: PALO.MARKER("Database","Planning-cube",'2004','Turnover')
In this case, a marker from ['2004','Turnover'] in the Planning-cube to ['2005','Turnover'] is defined. In case that the marker-cube has additional dimensions, these have to be specified with constants. It follows an example with the name of the planner, Mr. Miller:
['2005','Turnover'] = B: PALO.MARKER("Database","Planning-cube",'Mr. Miller','2004','Turnover')
It defines the marker from ['Mr. Miller', '2004', 'Turnover'] in the Planning-cube to ['2005','Turnover']. If the marker-cube has fewer dimensions than the target cube, the target area can be specified without any restrictions or it can be restricted by specifying a base element:
['Turnover'] = B: PALO.MARKER("Database","Planning-cube", 'Mr. Miller', 'Turnover')
or
['2005','Turnover'] = B: PALO.MARKER("Database","Planning-cube", 'Mr. Miller', 'Turnover')
6.8.2 Advantages of markers
Definition of markers reduces significantly amount of calculated cells. If the markers are defined correctly, results are identical to rules without markers, but calculation is many times faster. Important note:
When defining marker for one rule we have to make sure that all other rules calculating source data for currently marked rule are using markers too.

Working with enterprise rules -72-
Example:
Rule with new marker: ['Budget','2011'] = B: [['Actual','2010']] * 1.35
Second rule without marker: ['2010','Actual','Revenue'] = B: ['Price'] * ['Units']
We have to define marker for second rule too, because of this chain of depending cells:
Budget, 2011, Revenue <= Actual, 2010, Revenue <= Actual, 2010, Price/Units
Let's choose Units for marking, because it is more probably that result will not be null when some units are sold and price is defined:
['2010', 'Actual','Revenue'] = B: ['Price'] * [['Units']]
Marking of complete chain of depending rules is important for correct results even when rules are referencing cells from other cubes. With many rules in multiple cubes it can be hard to guarantee that no marker is missing.
Accelerated calculation of Marker-Rules is achieved in these Rules shall be calculated based only on those cells whose value is not 0 (zero). All the basic cells with a value of 0 will be ignored. The result is a massive acceleration, but also the following restriction: For correct results, only those rules may be provided with markers, whose result is always 0 if all marked arguments have the value 0.
6.8.3 Disadvantages of markers
If markers are used, the initial loading of the databases can be slowed down. If too many markers are used, too much memory will be consumed, thereby destroying the performance gain (so called over marking). Creating, modifying and deleting rules with markers takes more time than it would take without markers. Important note: In case when target area is much bigger than marked source area markers can cause data explosion. It means that for single value existing in source area will server generate multiple target cells and store them in list of cells that are worth to calculate. Rule example:
['OpenValue'] = [['DefaultOpenValue','ProductA','January','2010']]
This rule written to cell DefaultOpenValue,ProductA,January,2010 will fill the server with many marked cells. Let's assume dimension Product has 1000 base elements, 12 months as base elements and 10 years as base elements. Single cell will explode into 1000x12x10=120 000 cells that can use several megabytes in memory.
6.8.4 Arguments of PALO.MARKER()
Only constants and variables can be used as arguments for PALO.MARKER(). General expressions are not allowed. Example:
['2005','Turnover'] = B: IF (['Price']>10, PALO.MARKER(…) * 2, PALO.MARKER(…) * 3)
This is allowed, because the IF-expression does not occur in the argument of the marker.
['2005','Turnover'] = B: PALO.MARKER(…, IF (['Price'] > 10, '2004', '2003'), 'Turnover')
This is not allowed, because the IF-expression does occur in the argument of the marker.

Working with enterprise rules -73-
6.8.5 Markers for expressions
If you wish to mark expressions (Formulas/Functions), you can, for example, append "@" PALO.MARKER() to PALO.DATA(). The following rule gives an example:
['2005', 'Turnover'] = B: PALO.DATA("Database","Planning-cube",MID(!'Year',1,4),'Turnover')
Here you can define a marker as follows:
['2005', 'Turnover'] = B: PALO.DATA("Database","Planning-cube",MID(!'Year',1,4),'Turnover') @ PALO.MARKER("Database","Planning-cube", 'AllYears%', 'Turnover')
In this case, a marker from [all children of 'AllYears%', 'Turnover'] of the planning-cube to ['2005','Turnover'] is defined.
6.8.6 Function STET() and Markers
The function STET() when used in rules with markers should be also marked. The simplest syntax is:
[target] = stet() @ [[]]
In some cases when we are using STET() function in rule restricted to base cell, we have to ensure that rule will be calculated only when the cell contains any value. The only valid way to do this is using @PALO.MARKER. For example a base rule for cube Sales of Demo database that will be executed for all cells with a value in year 2010:
['2010']= B: STET() @ PALO.MARKER("Demo","Sales",!'Products',!'Regions',!'Months',!'Years',!'Datatypes',!'Measures')
6.8.7 Processing of the rules
In case that more than one rule is defined in a cube, the rules will be processed as follows:
Is the cell to be calculated a base cell, the first this cell matching rule is used. Its result is the value of the base cell.
Is the cell to be calculated a consolidated cell and exists a matching rule, which isn't a B-Rule, this rule will be used. Its result is the value of the consolidated cell.
If a consolidated cell is concerned and if there exists a base cell in the set of base cells of the consolidation, for which a B:Rule with marker fits, the marker-consolidation-algorithm will be used. In this case, only cells which have been marked with a marker will be used for consolidation. However, the first fitting rule will be used as value of the marked base cells, irrespective of the presence of markers in that rule.
In all other cases, the standard algorithm is used.
6.9 Drill Server Rule
This command is available only in "Jedox for Excel". If you right-click a cell affected by a rule, the command "Drill Server Rule" can be applied and will show information about the rule.
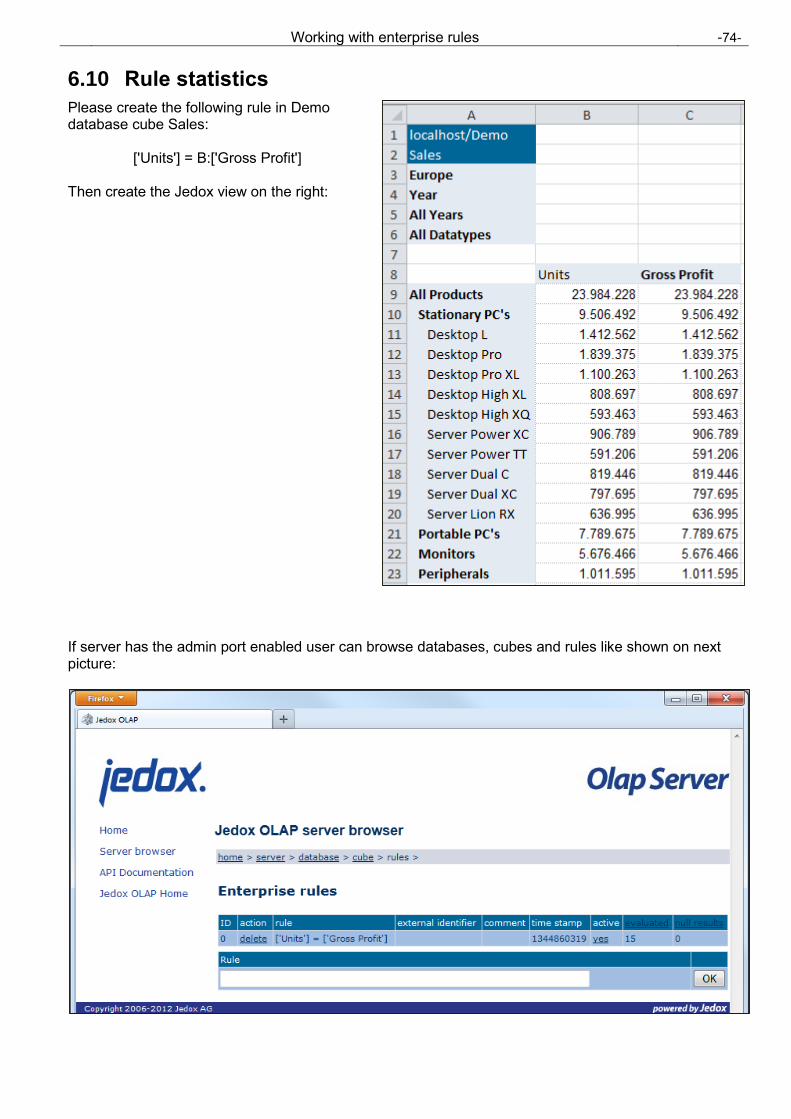
Working with enterprise rules -74-
6.10 Rule statistics
Please create the following rule in Demo database cube Sales:
['Units'] = B:['Gross Profit'] Then create the Jedox view on the right:
If server has the admin port enabled user can browse databases, cubes and rules like shown on next picture:

Working with enterprise rules -75-
Starting with Jedox version 3.2 every rule displays additional information saying how many cells were calculated using the rule and how many of these calculated results were zero. This information is very important for detection of slow performing rules. The greater the calculation time for the rules, the greater is the total computing time. A too high second number (amount of null rules results) indicates that markers should be used. In our first case we can see that the rule was calculated 15 times (once for every cell in column "Units") and in 0 cases the result was null. Let's change the rule to:
['Units'] = B:['Gross Profit']
This means that for the consolidated cells all base cells must be calculated.
Counters of the rule execution are set to 0 when rule text changes. You can also reset the counter of all rules in cube clicking on text "evaluated" or "null results" in header of the column. After recalculation of report in excel and refreshing page of Administration module you can see that for the same report this rule was calculated 359100 times and had null result in 271598 cases. It means that over 75% of all cases the rule calculation was not necessary. The high amount of null results says that we should use markers:
['Units'] = B:[['Gross Profit']] After recalculation we get following rule statistics: 87502 evaluations and 0 with null result. It means that by adding one marker we reduced calculation complexity to a quarter and all calculated results had a value – there was no time wasted on calculation results with value null. Please note: In Jedox Version 4.0 some types of simple B:Rules are pre-optimized and do require markers. These rules do not show any numbers in the statistics, unless markers are explicitly defined. One example of such a rule is the one used in previous versions of this section (['2011'] = B:['2010']).

Working with enterprise rules -76-
6.11 Examples of rules using the Jedox database Demo2
In the following section, we will use examples to describe a few rules for the Jedox database Demo2. You can download the database from http://www.jedox.com.
6.11.1 Example Rule 1
The following rule is to calculate the variance between act and bud in per cent. Target area is the element "variance%" in dimension "opstmt_type". The rule applies to both base elements and also consolidated elements.
['variance%'] = (['variance'] / ['bud']) * 100
Below a test view with the results of Rule 1 in column E:

Working with enterprise rules -77-
6.11.2 Example rule 2
Rule 2 puts the P&L Report positions into a percentile ratio to the turnover (Position "A00140"). The element "as%ofSales" is included in dimension "opstmt_curr".
['as%ofSales'] = (['localcurr'] / ['A00140','localcurr']) * 100
Below a view for testing purposes with the result of Rule 2 in column C:

Working with enterprise rules -78-
6.11.3 Example rule 3
Rule 3 is somewhat more complicated, as it contains nested PALO.DATA formulas. The rule converts "localcurr" values into Euros (on the basis of exchange rates stored in the "currency" cube). You will find sample exchange rates in the month "06" of the year 2007. The currency applicable to the corporation is stored in the attribute "local currency" of the dimension "opstmt_entity". The PALO.DATA formulas are represented in different colors:
['EUR'] = B:['localcurr'] * PALO.DATA("Demo2","CURRENCY", PALO.DATA("Demo2","#_opstmt_entity","local currency",!'opstmt_entity'), !'opstmt_year',!'opstmt_month')
The outer PALO.DATA-formula is retrieving the exchange rate from the cube "currency", whereas one of the parameters is defined by another PALO.DATA formula to obtain the currency sign contained in the attribute cube "#_opstmt_entity". Here the results of the exchange rate calculation in column C:

Working with enterprise rules -79-
6.11.4 Example rule 4
The 4th rule fills the elements with values depicting the variation of 2 years in percentage – example VAR_08-07% - in the dimension "opstmt_year". The rule for the variation VAR_08-07% as follows:
['VAR_08-07%'] = (['VAR_08-07','localcurr'] / ['2008','localcurr']) * 100

Working with enterprise rules -80-
6.12 Supported functions for rules
Functions supported by the Server are listed under the API-Functions. Please open your browser and enter "localhost:7777/api". The functions are listed in the API documentation under /rule/functions Server Rules have a time system with 1.1.1970 as start time and have seconds as unit. e.g.: 1.1.1970 00:00:00 = 0, 2.1.1970 00:00:00 = 86400 (= 24h * 60min * 60sec).
Please find below a summary of the functions with a brief description:
ABS Returns the absolute value of a number. The absolute value of a number is the number without its sign.
ACOS Inverse cosine function. Return value in radians.
ADD Returns the sum of the two arguments.
AND AND(Expression1, expression2). If both expressions are true, then TRUE, otherwise FALSE is returned.
ASIN Inverse sine function. Return value in radians.
ATAN Inverse tangents function. Return value in radians.
AVERAGE Returns the average of its arguments.
CEILING Rounds a number to the nearest integer or to the nearest multiple of significance.
CHAR Returns the character specified by a number.
CLEAN Removes all nonprintable characters from a string.
CODE Returns the code number of the first character in the string argument.
CONCATENATE Joins 2 strings together.
CONTINUE If a rule evaluates to CONTINUE then that rule is skipped and search for valid rule is continued.
COS Returns the cosine of the argument which is in radians.
COUNT Returns the number of values provided.
DATE Returns the serial number of a particular date.
DATEFORMAT Converts date (serial number) to date in text format.
DATEVALUE Converts a string to a date.
DEL Returns the second argument subtracted from the first argument
DIV Returns the quotient and remainder of the first value divided by the second

Working with enterprise rules -81-
EQ Checks if the two arguments, which can be of type string or double, are exactly equal.
EVEN Returns number rounded up to the nearest even integer
EXACT Compares two text strings and returns TRUE if they are exactly the same. FALSE otherwise. Case-Sensitive
EXP Returns e raised to the power of number applied.
FACT Returns the factorial of a number
FIRST Returns first of its arguments.
FLOOR Rounds number down, toward zero
GE Checks if first argument is greater than or equal to the second. Both arguments must be of the same type which can be double or string.
GT Checks if first argument is greater than the second. Both arguments must be of the same type which can be double or string.
IF IF checks, if the first parameter is TRUE. In this case, the second parameter is returned. Otherwise, the third parameter is returned.
INT Rounds a number down to the nearest integer.
ISERROR ISERROR returns TRUE if the expression cannot be evaluated or the evaluation isn’t a string or a numeric value.
LAST Returns last of its arguments.
LE Checks if first argument is less than or equal to the second. Both arguments must be of the same type which can be double or string.
LEFT Returns the first character or characters in a text string, based on the number of characters specified.
LEN Returns the number of characters in a text string.
LN Returns the natural logarithm of the integer argument.
LOG Returns the logarithm of a number to the base specified.
LOG10 Returns the base-10 logarithm of the argument.
LOWER Converts all uppercase letters in a text string to lowercase.
LT Checks if first argument is less than the second. Both arguments must be of the same type which can be double or string.
MAX Returns the maximum value of its arguments.
MID Returns a specific number of characters from a text string, starting at the position you specify, based on the number of characters you specify.

Working with enterprise rules -82-
MIN Returns the minimum value of its arguments.
MOD Returns the remainder after number is divided by divisor. The result has the same sign as divisor.
MUL Returns the arithmetic product of the two arguments.
NE Checks if first argument is equal to the second. Returns True if not equal.
NOT NOT(Boolean expression): Returns the logical inversion of the Boolean expression back.
NOW Returns the serial number of the current date and time.
ODD Returns number rounded up to the nearest odd integer.
OR OR(Expression1, expression2). If at least one expression is true, then TRUE, otherwise FALSE is returned.
PALO.CUBEDIMENSION Retrieves the name of the nth dimension in a specified hypercube.
PALO.DATA Retrieves the value of the specified element from the cube
PALO.ECHILD Retrieves the name of the specified child element
PALO.ECHILDCOUNT Retrieves the number of children in the specified consolidated element
PALO.ECOUNT Retrieves the amount of dimension elements in the specified dimension
PALO.EFIRST Retrieves the first element in the specified child dimension
PALO.EINDENT Retrieves the indention level of the specified element
PALO.EINDEX Retrieves the position of the specified dimension element
PALO.EISCHILD Checks, whether a consolidated element contains a specified base element. It returns 0 or 1.
PALO.ELEVEL Checks if a consolidated element contains the specified element, results in 0 or 1
PALO.ENAME Retrieves the name of the element at the specified position (First Position is 1)
PALO.ENEXT Retrieves the name of the succeeding element of a dimension element

Working with enterprise rules -83-
PALO.EOFFSET Returns the name of the element with the distance "Integer" to the specified element.
This function works only in rules and cannot be used inside of markers. It has the following syntax:
PALO.EOFFSET("DatabaseName","DimensionName","ElementName",Integer)
with Integer:..-2,-1,0,1,2, … "Integer" specifies the number of steps up (negative) or down (positive) in the list of elements. If "Integer" steps exceed the element list limit, then an empty string will be returned.
The short form ['Dimensionname': offset(integer)] can be used in static cell references. Example: ['Datatypes';'Budget'] = ['Datatypes':'Actual', 'Years':offset(-1)]
The Rule Editor (Advanced) does not support the short form!
PALO.EPARENT Retrieves the name of the n’th parent of the specified element
PALO.EPARENTCOUNT Retrieves the number of consolidated elements which contain the specified element.
PALO.EPREV Retrieves the name of the preceding element of a dimension element
PALO.ESIBLING Retrieves the name of the specified sibling
PALO.ETOPLEVEL Returns the level number of the highest element in the consolidation hierarchy of a dimension.
PALO.ETYPE Retrieves the type of the specified element (numeric, string or consolidated)
PALO.EWEIGHT Returns the consolidation weight of a specified component of an element.
PALO.MARKER Adds marker for a slice.
PI Returns the value of the constant pi
POWER Returns the result of a number raised to a power
PROPER Capitalizes the first letter in a text string and any other letters in text that follow any character other than a letter. Converts all other letters to lowercase
QUOTIENT Returns the integer portion of a division
RAND Returns a random number between 0 and 1
RANDBETWEEN Returns a random number between the numbers you specify
REPLACE Replaces part of a text string, based on the number of characters specified, with a different text string
REPT Repeats text a given number of times
RIGHT Returns the last character or characters in a text string, based on the number of characters specified
ROUND Rounds a number to a specified number of digits.
SEARCH Finds one text value within another (not case-sensitive). Find_text is the text you want to find, e.g. SEARCH("x","Text") returns 1 (TRUE).

Working with enterprise rules -84-
SIGN Returns the sign of a number.
SIN Returns the sine of the given angle
SQRT Returns a positive square root
STET if a rule evaluates to STET, then the resulting cell behave like no rule is existent for this cell
STR Converts number to string.
SUBSTITUTE Substitute new_text for old_text in a text string.
SUM Returns sum of values provided through function arguments.
TAN Returns the tangent of the given angle
TRIM Removes spaces from text
TRUNC Truncates a number to an integer by removing the fractional part of the number
UPPER Converts text to uppercase
VALUE Converts a text string to a number. Returns 0 if conversion fails.
VALUEDATE Return a date_text for a given serial number in the format MM-TT-YY
WEEKDAY Returns the day of the week corresponding to a date. The day is given as an integer, ranging from 1 (Sunday) to 7 (Saturday), by default.
You can find details on the individual functions in the Rules section of the API.

Overview of Jedox / Palo functions -85-
7 Overview of Jedox / Palo functions
7.1 Classification of functions
The functions of the Jedox Software can be classified as follows: 1. According to how they are called:
Via the function wizard in Excel (Paste/Function – Category: Palo)
Direct entry 2. According to their purpose:
Data input, data output
Data management, information on and overview of structures
Calculations and splits 3. According to their area of use:
Table functions
Array functions
Filter functions
Splitting functions You already learned the most important table functions in the previous chapters. Simply put, they serve data input and output. Consequently, you will use them again and again when you work with Jedox. In addition to the table functions, there are also numerous functions that primarily serve data management. For example, they enable you to check data structures, determine dependencies and similar matters. These functions are described below, one example each. Array functions help to control and analyze structures. You can call both table and array functions via the function wizard of Excel. The required parameters are described in the table below. You can find these above the list of functions. The filter functions filter the data according to specified criteria and they are mainly used as arguments of the function PALO.SUBSET(). The pure splitting functions can only be used via direct entry. This includes the functions on the topics of splash, copy and like. "Palo.Setdata" is also one of the functions, which you can use to calculate.

Overview of Jedox / Palo functions -86-
7.2 Input parameters You can find parameters and their description in the table below.
Name Possible entry
Server/Database A text (Name) such as "localhost/Demo" or a coordinate such as A1
Cube: A text (Name) such as "Sales" or a coordinate such as A2
Dimension A text (Name) such as "Europe" or a coordinate such as A4
Element/consolidated element A text (Name) such as "Variance" or a coordinate such as B8
Coordinate Can be an element, for example:
Type "n" for numeric, "s" for String/Text and "c" for consolidated
Weighting factor A number
Delete True or false (true if existing entries should be deleted)
Position of base element A number
Position A number
Number of consolidated element. A number
Old name, new name Two coordinates such as A1,B1. Note: the names to be changed are in the coordinates.
Position of the sibling element A number
Value The coordinate that holds the value to be written. Note: Instead of a coordinate such as A1, you can also use a formula such as A1*B1. This is explained in the push rules.
Splash True or false (true = write in consolidated element)
Error A coordinate, e.g., B10. This refers to the cell, in which the appropriate Palo.Setdata function is executed.
Storage location (path) A path such as C:\Documents and Setting\Own Files\Error log.txt. Then the faulty data records of an import are saved in the "Error log.txt" file.
Empty String In the current version, various functions have been extended to accept the argument "Empty String". If you enter "TRUE" as actual argument here, an error message, if it occurs, will not be displayed – the cell will be "left empty"!
Notes:
You might have to replace the comma (,) with a semicolon (,) and the apostrophe (‘) with quotation marks ("). This depends on the country settings. If an argument remains blank in a formula, two quotation marks ("") are normally set to generate a blank string.

Overview of Jedox / Palo functions -87-
7.3 Table functions
PALO.CONNECTIONUSER("connectionname") Example: PALO.CONNECTIONUSER("localhost") This function displays the user of the connection "connectionname". This function is hidden (i.e. not displayed in the function wizard). PALO.DATA(Server/Database,Cube, Coordinate1, Coordinate2,… Coordinate16) Reads the value of the described data cell from the cube, e.g.: PALO.DATA("localhost/Demo","Sales","Desktop L","Germany","Oct",2002,"Actual","Units")
PALO.DATAC(Server/Database,Cube, Coordinate1, Coordinate2,… Coordinate16) Reads the value of the described data cell from the cube, e.g.: PALO.DATAC("localhost/Demo","Sales","Desktop L","Germany","Oct",2002,"Actual","Units")
Contrary to PALO.DATA, all PALO.DATAC functions of a cube in one file are updated with a single call of the server and this is consequently faster as with PALO.DATA functions. This function may only be used to display values from the cube. PALO.DATAC() or her value may not be used in formulas, as this leads to incorrect results. If, instead of a coordinate, an empty string is used as function argument (or if an empty cell is referenced), then the result will be no error message but an empty string. This is true for both "Jedox for Excel" and "Jedox Web". PALO.DATAT(Server/Database,Cube, Coordinate1, Coordinate2,… Coordinate16) Reads the value of the descriptive text cell from the cube, e.g.: PALO.DATAT("localhost/Demo","Market","Comment","Year","Units","All Products","2006","Total") This function enables display of more than 255 characters if they are entered in an array function. In this case, the continuation of the text is displayed in the next cell of the array.
PALO.DATAV(Server/Database,Cube, Coordinate1, Coordinate2,… Coordinate16,) Returns the value of a data cell from a cube when you use an Excel array formula. It is similar to PALO.DATA and PALO.DATAC, but the function works even faster because a single array formula is generated for the complete area. Use of PALO.DATAV is only possible in related cell areas. PALO.DATAX(Server/Database,Cube, coordinate1, coordinate2,… coordinate16,) Returns the value of the described element from the cube, if the corresponding cell is on the currently active work sheet. Note: This function corresponds to the PALO.DATA-function. However, the computation is limited to the currently active table. This speeds up the computation, because it is not necessary any more to compute the whole workbook. If however, you switch to a different work sheet and later come back to the work sheet which contains such PALO.DATAX-formulas, it may be necessary to manually trigger a re-computation of the work sheet. This will always be necessary, if calling the work sheet returns "#NV", instead of a value.

Overview of Jedox / Palo functions -88-
PALO.DATA.AVG(Server/Database,Cube,Coordinationarray,Expandtypearray) Returns the average value of the cells of the specified cell range whose value is not zero, e.g. PALO.DATA.AVG("localhost/Demo","Sales",
PALO.COORD("All Products","Europe","Year","2010","Actual","Units"),PALO.EXPANDTYPE(1,4,2))
PALO.EXPANDTYPE() specifies the coordinates of PALO.COORD().
Explanation for PALO.EXPANDTYPE(1,4,2)
1=SELF (All Products) 4=LEAFS (Base cells of Europe: 19 countries)
2=CHILDREN (Children von Year: Qtr.1,Qtr.2,Qtr.3,Qtr.4)
Other coordinates have the default value 1 (=SELF)
Calculation: In the specified area all cells, which have not the value zero, will be added and divided by the number of terms of the sum. Exception: If all cell values are 0, then the output is 0. PALO.DATA.CNT(Server/Database,Cube,Coordinationarray,Expandtypearray) Returns the number of cells of the specified range whose value is not zero, e.g. PALO.DATA.CNT("localhost/Demo","Sales",
PALO.COORD("All Products","Europe","Year","2010","Actual","Units"),PALO.EXPANDTYPE(1,4,2)) PALO.DATA.MAX(Server/Database,Cube,Coordinationarray,Expandtypearray) Returns the maximum of the cells of the specified range of cells whose value is not zero, e.g. PALO.DATA.MAX("localhost/Demo","Sales",
PALO.COORD("All Products","Europe","Year","2010","Actual","Units"),PALO.EXPANDTYPE(1,4,2))
Calculation: The largest value of a cell in the specified area is returned. Zero values are ignored. Exception: If all cell values are 0, then the output is 0. PALO.DATA.MIN(Server/Database,Cube,Coordinationarray,Expandtypearray) Returns the minimum of the cells of the specified range of cells whose value is not zero, e.g. PALO.DATA.MIN("localhost/Demo","Sales",
PALO.COORD("All Products","Europe","Year","2010","Actual","Units"),PALO.EXPANDTYPE(1,4,2))
Calculation: The smallest value of a cell in the specified area is returned. Zero values are ignored. Exception: If all cell values are 0, then the output is 0. PALO.DATA.SUM(Server/Database,Cube,Coordinationarray,Expandtypearray) Returns the sum of cells in the specified range of cells. e.g. PALO.DATA.SUM("localhost/Demo","Sales",
PALO.COORD("All Products","Europe","Year","2010","Actual","Units"),PALO.EXPANDTYPE(1,4,2))
PALO.DATA.SUM is only used internally for average calculation. PALO.DATA.SUM returns the aggregated sum. The result isn't different from normal PALO.DATA. The example returns the same value as PALO.DATA("localhost/Demo","Sales","All Products","Europe","Year","2010","Actual","Units").

Overview of Jedox / Palo functions -89-
PALO.EADD(Server/Database,Dimension,Type,Element,Consolidated Element,Weighting factor,Delete) Adds the described dimension element or structures to a database. Example 1: PALO.EADD("localhost/Demo","Years","n","2010","",1,FALSE) – consolidated element = BLANK here. Example 2: PALO.EADD("localhost/Demo","Months","c","Qtr.1","Year",1,FALSE)
Possible parameters values are 0 (or FALSE), 1 (or TRUE) and 2 0: Removes no elements of the dimension before importing 1: Removes all elements of the existing dimension before importing 2: Removes all existing elements of the C-dimension before importing, basic elements are not deleted.
Note 1: Make sure that all EADD functions referring to the same dimension use identical parameters (true or false). Otherwise, Palo would execute that parameter for the complete dimension that happens to be found first. Reason: the sequence, in which Excel formulas are processed, cannot be determined. During an import the command delete will only be executed one time with the first PALO.EADD () and then it will be ignored.
Note 2: The function PALO.EADD can only be used in connection with an import, because the import wizard recalculates the database. Compare the description in the "Importing and Exporting Data" chapter. PALO.ECHILD(Server/Database,Dimension,Consolidated Element,Position of base element) Returns the name of the described base element. Example: PALO.ECHILD("localhost/Demo","Regions","South",3) returns "Spain"
PALO.ECHILDCOUNT(Server/Database,Dimension,Consolidated Element) Returns the number of base elements in a described consolidated element. Example: PALO.ECHILDCOUNT("localhost/Demo","Regions","South") returns "3". PALO.ECOUNT(Server/Database,Dimension) Returns the total number of elements in the described dimension. Example: PALO.ECOUNT("localhost/Demo","Years") returns "8"
PALO.EDELETE(Server/Database,Dimension,Element) Deletes the described element Example: PALO.EDELETE("localhost/Demo","Products","Subnote XK" Note: The function PALO.EDELETE can only be used in connection with an import, because the deletion is controlled via the import. Compare the example in the "Importing and Exporting Data" chapter. PALO.EFIRST(Server/Database,Dimension) Returns the element in the described dimension. Example: PALO.EFIRST("localhost/Demo","Regions") returns "Germany". PALO.EINDENT(Server/Database,Dimension,Element) Returns the hierarchy level of an element within the dimension. Example: PALO.EINDENT("localhost/Demo","Regions","Italy") returns "3". PALO.EINDEX(Server/Database,Dimension,Element) Returns the described element in the dimension. Example: PALO.EINDEX("localhost/Demo","Regions","France") returns "2". PALO.EISCHILD(Server/Database,Dimension,Consolidated Element,Element) Checks whether a consolidated element contains the described element. Example: PALO.EISCHILD("localhost/Demo","Regions","West","Germany") returns TRUE.

Overview of Jedox / Palo functions -90-
PALO.ELEVEL(Server/Database,Dimension,Element) Returns the number of hierarchy levels within the dimension, which follow after the element. Example: PALO.ELEVEL("localhost/Demo","Regions","Germany") returns "0". Example: PALO.ELEVEL("localhost/Demo","Regions","West") returns "1".
PALO.ENAME(Server/Database,Dimension,Position) Returns the name of the element of a specific position. (The first position is 1) Example: PALO.ENAME("localhost/Demo","Regions",2) returns "France". Except the name of the item at a specific position may also be returned the attribute name of a specific item. For example: PALO.ENAME("localhost/Demo";"Products";"Desktop L";0;"";"Price Per Unit") returns 500. The same notation with a one returns the element name: PALO.ENAME("localhost/Demo";"Products";"Desktop L";1;"";"Price Per Unit") returns "Desktop L". PALO.ENEXT(Server/Database,Dimension,Element) Returns the name of the following element within the dimension. Example: PALO.ENEXT("localhost/Demo","Regions","Italy") returns "Portugal". PALO.EPARENT(Server/Database,Dimension,Element, Number of Consolidated Element) Returns the name of the nth parent of the specified element. Example: PALO.EPARENT("localhost/Demo","Regions","Italy",1) returns "South". Note: If an element occurs only in one consolidation, only the parameter "number" = "1" is possible. If an element occurs in several consolidations, the "Number" determines which consolidated element is returned. Example: PALO.EPARENT("localhost/Demo","Regions","Italy",2) returns "New Group", because this has been created and "Italy" is consolidated in it. PALO.EPARENTCOUNT(Server/Database,Dimension,Element) Returns the number of consolidated elements, in which the described element is contained. Example 1: PALO.EPARENTCOUNT("localhost/Demo","Regions","Italy") returns "1". Example 2: PALO.EPARENT("localhost/Demo","Regions","Italy",2) returns "2" if there is a consolidated element "New Group" and "Italy" is consolidated in it. PALO.EPREV(Server/Database,Dimension,Element) Returns the name of the preceding base element. Example: PALO.EPREV("localhost/Demo","Regions","Italy") returns "Austria". PALO.ERENAME(Server/Database,Dimension,Old Name,New Name) Renames the described element. Example: PALO.ERENAME("localhost/Demo","Products","Notebook TT","Notebook TS" Renames the element "Notebook TT" to "Notebook TS". Note: The function PALO.ERENAME can only be used in connection with an import, because the renaming is controlled via the import. Compare the example in the "Importing and Exporting Data" chapter. PALO.ERROR_LOG(Error,Storage Location,Value,Cube,Coordinate1, Coordinate2,… Coordinate15) Example: PALO.ERROR_LOG (F3,"c:\Error.txt",A1,B1,C1,D1,E1,F1) Writes the data records of an import file, which does not adhere to import specifications, into an error file. Note: The function PALO.SETDATA_Error can only be used in connection with an import.

Overview of Jedox / Palo functions -91-
PALO.ESIBLING(Server/Database,Dimension,Element,Position of Sibling Element) Returns a sibling element of the specified element. The sibling, which is to be returned is specified with a position number. The element itself has the position 0, the sibling in the hierarchy view found directly below has the position 1, etc., the sibling found directly above has the position -1, etc.
Example: PALO.ESIBLING("localhost/Demo","Regions","Portugal",1) returns "Spain". PALO.ESIBLING("localhost/Demo","Regions","Portugal",-1) returns "Italy". Note: This function can also be used to verify whether an element exists in a dimension. Therefore the name of the element and the position "0" is entered. If the element exists, the name of the element is returned, if not, "# Name?" is returned.
Example: PALO.ESIBLING("localhost/Demo","Regions","Italy",0) returns "Italy". PALO.ESIBLING("localhost/Demo","Regions","Greece", 0) returns "#Name?". PALO.ETOPLEVEL(Server/Database,Dimension) Returns the number of hierarchy levels in a dimension. Example: PALO.ETOPLEVEL("localhost/Demo","Regions") returns "2". PALO.ETYPE(Server/Database,Dimension,Element) Returns the type of the described element (numeric, text or consolidated). The return is in English (numeric, string or consolidated). Example: PALO.ETYPE("localhost/Demo","Regions","Italy") returns "numeric". PALO.EUPDATE(Server/Database,Dimension,Element,Elementype,{Element, Consolidationfactor,Element,Consolidationfactor,…}) Updates an element after the specified data. To demonstrate this function here a nonsense example: PALO.EUPDATE=("localhost/demo","Months","Jan","C",{"Feb",1,"Jun",2}) After this import command is Jan a C-element, consolidated with 1xFeb and 2xJun. A correction of the last nonsense example would be the following import: =PALO.EUPDATE("localhost/Demo","Months","Jan","N",{0,0}). PALO.EWEIGHT(Server/Database,Dimension,Consolidated Element,Element) Returns the weighting factor of the described element at consolidation. Example: PALO.EWEIGHT("localhost/Demo","Regions","West","Germany") returns "1". PALO.SETDATA(Value,Splash,(Server/Database,Cube,Coordinate1,Coordinate2,…..) Example 1: PALO.SETDATA($G$1,FALSE,"localhost/Demo","Market",$D$2,$C$1,$A$1,$E$2,"Units",$B$1) Example 2: Palo.SETDATA(B10*C10*$D$7,False,$A$1,$A$2,$A10,$A$4,$A$5,$A$6,$A$7,D$9) Writes the values of elements into a cube. They are written into the cells specified through the coordinates. Set SPLASH to "True" if you want to write in a consolidated element. Otherwise, set it to "False". The "Value" parameter is a cell of the Excel worksheet, e.g., A1. Alternatively, it can be a formula. PALO.SETDATAIF(Condition,Value,Splash,Server/Database,Cube,Coordinate1,Coordinate2,…) If condition is TRUE, this function writes the values of the elements in the cube – same as PALO.SETDATA () - and if the condition is FALSE, nothing happens.

Overview of Jedox / Palo functions -92-
7.4 Array functions
You must absolutely adhere to the following: The array functions require some preparatory steps:
1. You must highlight an empty range in a worksheet. The results are then returned in this area. But you can also define the area somewhat bigger. Cells not required remain blank in the output.
2. When you enter the function, you must close it with the keyboard shortcut CTRL+SHIFT+ENTER.
3. If you call the function via Paste/Function, close it with CTRL+SHIFT+clicking OK using the mouse.
The Procedure is explained using the example of PALO.CUBE_LIST_DIMENSIONS. It is the same for all other functions in principle. PALO.CUBE_LIST_DIMENSIONS (Server/Database,Cube) Example: PALO.CUBE_LIST_DIMENSIONS ("localhost/Demo","Sales") The function lists the dimensions of a cube in an area you define in advance. Define the corresponding area of an Excel worksheet (e.g., B3:B11). Then enter this function in the first cell of the area. Conclude the entry by pressing the CTRL+SHIFT+ENTER keys. You are already familiar with this from the comment fields. If you call the function via Paste/Function, you must close it with CTRL+SHIFT+clicking OK using the mouse. PALO.DATABASE_LIST_CUBES(Server/Database) Example: PALO.DATABASE_LIST_CUBES("localhost/Demo") The function lists the cubes of a database in an area you define in advance. PALO.DATABASE_LIST_DIMENSIONS(Server/Database) Example: PALO.DATABASE_LIST_DIMENSIONS("localhost/demo") The function lists the dimensions of a database in an area you define in advance. PALO.DIMENSION_LIST_CUBES(Server/Database,Dimension) Example: PALO.DIMENSION_LIST_CUBES("localhost/Demo","Months") The function lists, in an area you define in advance, in which cubes a dimension is contained. PALO.DIMENSION_LIST_ELEMENTS(Server/Database,Dimension) Example: PALO.DIMENSION_LIST_ELEMENTS("localhost/demo","months") The function lists, in an area you define in advance, which elements are contained in a dimension. PALO.EALIAS(Server/Database,Dimension,Attribute,Alias,Index) The function lists, in an area you define in advance, all elements with the matching alias. Example: In the database "Demo" was created the attribute "Color" for "Products" and nine products have received the attribute "black". PALO.EALIAS("localhost/Demo","Products","Color","black") displays these nine products, PALO.EALIAS("localhost/Demo","Products","Color","black", 3) displays the 3rd of the nine products, PALO.EALIAS("localhost/Demo","Products","Color","black", 10) displays again the nine products, because the index 10 does not exist. PALO.ELEMENT_LIST_ANCESTORS(Server/ Database,Dimension,Element,Empty String) Example: PALO.ELEMENT_LIST_ANCESTORS("localhost/Demo","Months","Jan") The function lists in a predefined area all ancestors of the given element.

Overview of Jedox / Palo functions -93-
PALO.ELEMENT_LIST_CHILDREN (Server/ Database,Dimension,Consolidated Element) Example: PALO.DIMENSION_LIST_CHILDREN("localhost/Demo","Regions","West") The function lists in a predefined area all child elements of a consolidated element. PALO.ELEMENT_LIST_DESCENDANTS(Server/ Database,Dimension,Element, Empty String) Example: PALO.ELEMENT_LIST_DESCENDANTS("localhost/Demo","Products","Monitors") The function lists in a predefined area all children and grandchildren of an element. PALO.ELEMENT_LIST_PARENTS(Server/ Database,Dimension,Element) Example: PALO.ELEMENT_LIST_PARENTS("localhost/Demo","Months","Jan") The function lists in a predefined area all parents of an element. PALO.ELEMENT_LIST_SIBLINGS (Server/ Database,Dimension,Element) The function lists in a predefined area all siblings of an element. PALO.ROOT_LIST_DATABASES(Server) Example: PALO.ROOT_LIST_DATABASES("localhost") The function lists the databases that exist on the server, in an area you define in advance. Note: Even if "Server/Database" is written in the formula editor, entry of the server suffices. PALO.USERGROUPS("connectionname") Example: PALO.USERGROUPS("localhost") This feature lists all user groups of the user of the connection "connectionname". This function is hidden (i.e. not displayed in the function wizard).
7.5 Filter functions
The filter functions PALO.HFILTER(), PALO.TFILTER(), PALO.PICKLIST(), PALO.AFILTER(), PALO.DFILTER() and PALO.SORT() are sub-functions of PALO.SUBSET (). They do not work independently, but need PALO.SUBSET() as the basic function. In addition, the function PALO.SUBCUBE() is required when using PALO.DFILTER().
7.5.1 PALO.SUBSET()
The function PALO.SUBSET() has the following arguments:
PALO.SUBSET()
Argument Form Description
Server/Database Text e.g. localhost/Demo or A1 (the cell which contains the entry)
Dimension Text E.g. Products or A2 (the cell which contains the name of the dimension).
Indent Number The allowed values are 1 (equivalently: empty), 2 and 3. The argument alters the numbering of the hierarchy-level.
Alias Text / Array
Contains at most two aliases. {"Alias1","Alias2"} or "Alias". Alternatively, it is allowed to use a reference to the cell, e.g. {A1} or {A1:A2}. If empty, aliases are deactivated.
Filter Filter
name() Allowed are: PALO.HFILTER(), PALO.TFILTER(), PALO.AFILTER(), PALO.DFILTER(), PALO.PICKLIST() und PALO.SORT().

Overview of Jedox / Palo functions -94-
7.5.2 PALO.HFILTER()
PALO.HFILTER() defines hierarchically a subset with criteria relative to 1. ELEMENT or 2. REVOLVE_ELEMENT. Case 1 and Case 2 should not be combined.
PALO.HFILTER()
Argument Form Description
Element Element name Activates the selection of elements which are above or below of "Element" within the dimension hierarchy
Above TRUE/FALSE
This argument can only be used in combination with "Element". If TRUE, the elements will be selected that are above the "Element" within the hierarchy. Otherwise the elements below (FALSE or BLANK). Above / Below means that the elements have to be direct or indirect children or parents of "Element" respectively.
Exclusive TRUE/FALSE
This argument can only be used in combination with "Element". TRUE = Do not show the element itself, i.e. Element indicated in "Element". Blank or FALSE = Show the element.
Hide Number
This argument can only be used in combination with "Element". It hides either the base elements (HIDE = 1) or the consolidations (HIDE = 2). Blank = nothing will be hidden.
Revolve element Element name
The effect of this argument is that it will remove elements from the subset, if elements are not on the same level as "Revolve element". Therefore this argument should not be used in combination with "Element". Blank = None. "Revolve element" additionally requires the specification of "Revolve count". Otherwise, an error message will be returned.
Revolve count Number Determines how long the revolving list should be. The length of the list is dictated by the number in "Revolve count". Blank = None.
Revolve add Number
At first, display elements at a lower level (= 1) or at a higher level (=2), respectively. Here, the level-fields of the elements, assigned by the Jedox Server, are used as criterion. "Revolve add" additionally requires the specification of "Revolve count". Otherwise, an error message will be returned. Blank = nothing.
Level start Number Elements that do not meet the level entered in "Level start" at a minimum and the level in "End level" at a maximum, will be removed.
End level Number 2nd argument belonging to "Level start".

Overview of Jedox / Palo functions -95-
7.5.3 PALO.TFILTER()
PALO.TFILTER() remove elements, which do not match a particular string (restricting). Upper case letters and lower case letters are distinguished throughout.
PALO.TFILTER()
Argument Form Description
Regex Text
In case of a list of regular expressions, those elements will be omitted from the subset which does not correspond with either expression in the list. Only the characters "*" and "?" are wildcards.
Extended TRUE/FALSE
If EXTENDED = TRUE, Perl regular expressions will be used. Signs such as "[" or "$" have an impact. If EXTENDED = blank, the regular expression will be handled as simple DOS expressions and only "*" and "?" have an impact.
Examples of regular expressions in PERL:
^K = Everything that begins with a "K".
X$ = The expression ends with an X.
X* = X followed by an arbitrary number of characters.
XP+ = "XP" must occur at least once but may occur several times. (Upper case and lower case letters are distinguished!)
7.5.4 PALO.PICKLIST()
With PALO.PICKLIST(), you can either add elements to the subset, which then by no means will be removed. Or you can determine a set of elements as pre-selection – only these elements will be passed on to further filters of the subset.
PALO.PICKLIST()
Argument Form Description
Definition Name of elements
Elements which belong to the pick list. The definition is essential to the pick list.
Type Number 0/empty =Insert before the list, 1 =Insert after the list, 2 = insert into the list, 3 = As pre-selection for the subset.

Overview of Jedox / Palo functions -96-
7.5.5 PALO.AFILTER()
PALO.AFILTER() removes elements that do not match defined attributes.
PALO.AFILTER()
Argument Form Description
Advanced Filter Text-Array
In case a table containing attributes is rendered, only those elements will be selected, the attributes of which correspond with either row in the matrix. The table’s first column contains the name of the attribute. The criteria next to it. The following operators for numeric criteria are supported: <, > and '=. Please pay attention to ' in front of = !
7.5.6 PALO.DFILTER()
PALO.DFILTER() calculates a value for each of the elements of the subset. It is either a numeric value or a string value. In case of numeric values, a slice can be defined for each of the elements of the subset. The slice is always the same except for the element itself. Now you can do operations using the cell values within the slices, such as Total Sum, Maximum or Minimum based on all cells. This results in a value for each of these elements. The elements can now be filtered based on their values, whereby operations such as "<100" will be applied. The filtering is similar for string values, e.g. you could filter by applying ">w", whereas lexicographical rules apply. However, the slice may only contain one cell. The reason is obvious: You cannot summarize strings.
PALO.DFILTER()
Argument Form Description
PALO.SUBCUBE() Function
PALO.SUBCUBE is an essential selection criterion when using DFilter. The arguments are the name of the cube and the dimensions excluding the dimension which is covered by the subset. The elements are entered in the sequence, in which the dimensions are defined in the cube. The place in the dimension, which is already determined by the subset, remains empty.
Operations Take a look
at the examples:
It is checked, whether the values determined for the elements satisfy the criteria.
Possible operators:=,<,>,<=,>=,<>
Example 1 for a data value: {">=".3000}
Example 2 for a string: {"="."Super"}
(Here, "Super" is an entry in a text-element)
Top Number
This is another possible argument. In case an integer value TOP is passed, only a number of TOP elements with the highest values are displayed. If the argument is left blank, the elements will not be restricted.
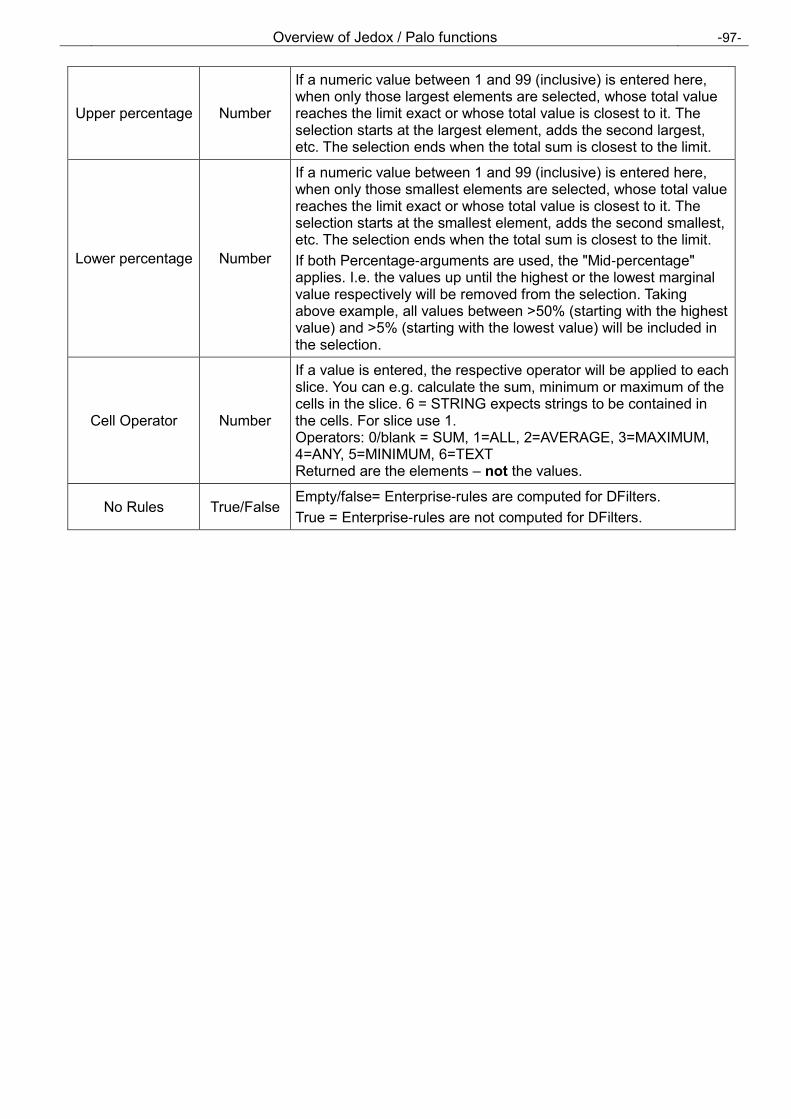
Overview of Jedox / Palo functions -97-
Upper percentage Number
If a numeric value between 1 and 99 (inclusive) is entered here, when only those largest elements are selected, whose total value reaches the limit exact or whose total value is closest to it. The selection starts at the largest element, adds the second largest, etc. The selection ends when the total sum is closest to the limit.
Lower percentage Number
If a numeric value between 1 and 99 (inclusive) is entered here, when only those smallest elements are selected, whose total value reaches the limit exact or whose total value is closest to it. The selection starts at the smallest element, adds the second smallest, etc. The selection ends when the total sum is closest to the limit.
If both Percentage-arguments are used, the "Mid-percentage" applies. I.e. the values up until the highest or the lowest marginal value respectively will be removed from the selection. Taking above example, all values between >50% (starting with the highest value) and >5% (starting with the lowest value) will be included in the selection.
Cell Operator Number
If a value is entered, the respective operator will be applied to each slice. You can e.g. calculate the sum, minimum or maximum of the cells in the slice. 6 = STRING expects strings to be contained in the cells. For slice use 1. Operators: 0/blank = SUM, 1=ALL, 2=AVERAGE, 3=MAXIMUM, 4=ANY, 5=MINIMUM, 6=TEXT Returned are the elements – not the values.
No Rules True/False Empty/false= Enterprise-rules are computed for DFilters.
True = Enterprise-rules are not computed for DFilters.

Overview of Jedox / Palo functions -98-
7.5.7 PALO.SORT()
PALO.SORT() is a structuring filter. It can, for example, sort by the order of definition, by data-values, by elementnames, by aliasnames or by the order of consolidations. In addition, it can produce a hierarchical order, which takes parallel hierarchies in the subset into account. Without the sorting filter, the elements are displayed in the order of definition (corresponds to the unordered list view in Modeller).
PALO.SORT()
Argument Form Description
Whole Number
0/empty = Order of definition. 1 = Builds a hierarchic order and shows the children of elements, the elements which have been removed from the subset. It is a prerequisite that the children are contained in the subset.
2 = Will not show the children, but will cut the view at those particular positions.
Criteria Number Sort by 0/blank= Definition, 1=Value, 2=Elementname, 3=Alias, 4=Consolidation (Order of the elements in the hierarchical view in Modeller).
Attribute Text Does not sort by Aliases if defined, but by the terms defined by the attribute. Note: This filter should not be used in combination with "Criteria"!
Type limitation Number
0/blank = no impact, 1 = sorts base elements only, 2 = sorts consolidations only
In order to do a sort, it is necessary to indicate the sort criteria. Therefore, this argument works only in connection with the arguments "Whole" and "Criteria".
Level element Text
If not blank, sorting takes place only at the level of this element. In order to do a sort, it is necessary to indicate the sort criteria. Therefore, this argument works only in connection with the arguments "Whole" and "Criteria".
Reverse Number
0/empty = without effect 1 = Hierarchical presentation of parents below the children and on every level, sorted using criteria. 2 = complete reversal of the sorting criteria. 3 = Hierarchical presentation and reversal of sorting using criteria, on every level. 1 or 3 as argument only works in conjunction with "Whole <> 0/empty". With 2 as an argument, it is allowed that "Whole = 0/empty".
Show duplicates Number 0/empty = don’t display duplicates 1 = display duplicates
Number of elem. Number Number of returned elements.
Start with Number Element position with which the display of elements begins (element 1 has element position 0, element 2 has 1, etc.).
7.6 Auxiliary functions
The functions PALO.AGR.CHILDREN(), PALO.AGR.LEAVES(), PALO.AGR.SELF(), PALO.COORD() and PALO.EXPANDTYPE() are auxiliary functions. They are needed for the statistical functions PALO.DATA.AVG and PALO.DATA.CNT.

Overview of Jedox / Palo functions -99-
7.7 Splitting functions
The splash functions such as COPY and LIKE belong to the splitting functions. Contrary to the previously cited groups, they cannot be controlled via the function wizard from Excel (Paste/Function). Splash Parameter #
Example: #250 Equally splits the entered value among all subsequent base elements." If the consolidated element is "0" at entry, splitting is uniform. Otherwise, splitting is according to existing shares. Splash Parameter ##
Examples: ##1000 adds 1000 to the actual value (also possible # #+1000). ##-1000 subtract 1000 of the current value. Splash Parameter # … %
Examples: #10%, #-20% This parameter changes the existing values of a consolidated element by the entered percentage. As a result, 570 becomes with #10% = 627.
Splash Parameter !
Example: !10 You overwrite all following base elements with this value. Splash Parameter !!
Example: !!10 Two exclamation marks followed by a value add this value to the existing values of all subsequent base elements. If you assume that a consolidated element has the value 120 and is composed of 19 base elements, then entry of "!!10" results in 120+10*19 =310. Copy
The COPY function copies the contents and splitting structures of a consolidated element into another one. This can be meaningful, for example, if the actual data for one year should be used for planning the subsequent year. The formula is: Copy Element,Year. If you want to enter the description more precisely, you can also use Copy Dimension:Element,Year. Example: Copy Actual,2006 or alternatively: Copy Datatypes:Actual,2006 Like
The LIKE command contains the COPY command. It uses the shares of the base elements to split the values placed before LIKE. As a result, a different value estimate is possible than that in COPY. The formula is: NUMBER Like Element,Year Example: 12000000 Like Actual,2006 Please note: When you enter a number with a sign you have to put an apostrophe in front of the sign. Example: '-12000 Like Actual,2006

Index -100-
8 Index
A
ABC Analysis · 45 activate the array-functionality · 58 Alias · 56, 57, 62, 93 array-function · 62, 64 array-functionality · 58 autosave · 15
B
base elements · 89, 99
C
cell data · 38 Client-Connection with a Jedox-Server · 14 command line parameters · 16 Connection with the API · 18 consolidated · 86 consolidated element · 89, 90, 91, 99 coordinate · 86 copy · 85, 99 cube · 19, 37, 86, 87, 91, 92 Cube · 36 Cube #_ GROUP_GROUP_PROPERTIES · 35 Cube #_ ROLE_ROLE_PROPERTIES · 35 Cube #_CONFIGURATION · 36 Cube #_GROUP_CELL_DATA · 37 Cube #_GROUP_CUBE_DATA · 37 Cube #_GROUP_DIMENSION_DATA_<Name of the
Dimension> · 37 Cube #_GROUP_ROLE · 25 Cube #_ROLE_RIGHT_OBJECT · 26 Cube #_USER_GROUP · 25 Cube #_USER_USER_PROPERTIES · 35
D
database · 17, 19, 86, 87, 89, 90, 91, 92, 93 deactivates the array-functionality. · 58 delete · 19 dimension · 19, 37, 86, 89, 90, 91, 92, 99 directories · 13
E
elements · 38, 86, 89, 90, 91, 92
F
filter functions · 39
G
groups · 99
I
import · 89, 90 Indent · 56, 60 input parameter · 86
L
like · 85, 99 locations of files · 13
M
marker · 70 marker arguments · 72 marker definition · 71 marker for expressions · 73 Multithreading · 23
N
numeric · 86
O
order of definition · 57, 58, 59, 98
P
PALO.AFILTER · 56, 57, 93, 96 PALO.CUBE_LIST_DIMENSIONS · 92 PALO.DATA · 87, 92 PALO.DATA.AVG · 88 PALO.DATA.CNT · 88 PALO.DATA.MAX · 88 PALO.DATA.MIN · 88 PALO.DATA.SUM · 88 PALO.DATABASE_LIST_CUBES · 92 PALO.DATABASE_LIST_DIMENSIONS · 92 PALO.DATAC · 87 PALO.DATAT · 87 PALO.DATAV · 87 PALO.DATAX · 87 PALO.DFILTER · 56, 57, 93, 96 PALO.DFILTER() · 96 PALO.DIMENSION_LIST_CUBES · 92 PALO.DIMENSION_LIST_ELEMENTS · 92 PALO.EADD · 89 PALO.EALIAS · 92 PALO.ECHILD · 89

Index -101-
PALO.ECHILDCOUNT · 89 PALO.ECOUNT · 89 PALO.EDELETE · 89 PALO.EFIRST · 89 PALO.EINDENT · 89 PALO.EINDEX · 89 PALO.EISCHILD · 89 PALO.ELEMENT_LIST_CHILDREN · 93 PALO.ELEMENT_LIST_DESCENDANTS · 93 PALO.ELEMENT_LIST_PARENTS · 93 PALO.ELEMENT_LIST_SIBLINGS · 93 PALO.ELEVEL · 90 PALO.ENAME · 90 PALO.ENEXT · 90 PALO.EPARENT · 90 PALO.EPARENTCOUNT · 90 PALO.EPREV · 90 PALO.ERENAME · 90 PALO.ERROR_LOG · 90 PALO.ESIBLING · 91 PALO.ETOPLEVEL · 91 PALO.ETYPE · 91 PALO.EUPDATE · 91 PALO.EWEIGHT · 91 PALO.EXPANDTYPE · 88 PALO.HFILTER · 57 palo.ini · 14, 16, 17 PALO.PICKLIST · 56, 57, 58, 93, 95 PALO.ROOT_LIST_DATABASES · 93 PALO.SETDATA · 90, 91 PALO.SETDATAIF · 91 PALO.SORT · 53, 56, 57, 58, 93, 98 PALO.SUBSET · 56, 93 PALO.TFILTER · 56, 57, 93, 95 parameters · 17 password · 38 Paste Subset · 39 path · 13 Pick list filter · 57 push rules · 86
R
rights · 37, 38
rights modifying · 38 rule · 37, 66, 67, 68, 97 Rule · 66 Rule Editor (Advanced) · 69 rules · 65 rules processing · 73
S
server · 16, 17, 19, 86, 87, 89, 90, 91, 92, 93 Server · 91 Server Browser · 18 splash · 38, 86, 91 splash parameter ! · 99 splash parameter !! · 99 splash parameter # · 99 splash parameter # …% · 99 splash parameter ## · 99 structures · 85, 89 Subset Editor · 39 Subset Editor tab Data · 51 Subset Editor tab Picklist · 51 Subset Editor tab Sort · 53 Subset Editor tab Text · 51 Subset Editor tabs · 51 subsets · 39 Subsets · 39 system-cubes · 36
T
text · 86 Top Ten Products · 40
U
user · 38 user name · 38 user rights · 38