kenpo christian youth curriculum manual -...
TRANSCRIPT
Kenpo Christian
Youth Curriculum Manual
White Belt to 1st Class Brown Belt
By
Michael Deslongchamps
Revised August 2014

Disclaimer: The author and publisher of this instructional manual ARE NOT RESPONSIBLE in any
manner for the injury may occur by reading and/or following the instructions presented in this
instructional manual.
Table of Contents:
I. Introduction
II. Basic Strikes
III. Basic Kicks
IV. Basic Blocks
V. Basic Stances
VI. Self Defense Techniques
VII. Forms
VIII. Training Tips
IX. Exercises
X. How to tie your belt
XI. Curriculum Segments
Chapter I. Introduction
All advanced martial artists and martial arts instructors should invest in kids. Not just because kids will determine the future of our sport, but also because they will choose our nursing home when we get old. Anyone who has taught or observed a kids’ martial arts class, however, knows that they are not just “little adults.” They often get into martial arts for different reasons. They learn differently. And they stay in or drop out for different reasons also. Effective advertising and marketing may bring kids to your school, but their experience, the climate of the class and their relationships with the instructor and other students is what will keep them there. Over the past 25 years numerous studies have explored why kids participate and continue in sports. Having fun is consistently at the top of the list. They also want to achieve and improve their skills and to hang out in a positive environment with other kids (and an instructor) that they like. Winning doesn’t even make the top ten. Young people enjoy the excitement of competition, but winning isn’t the most important thing or the “only thing.” In fact, most kids say they would rather get to play more on a losing team than have to sit on the bench more on a winning team. Participation rates in youth sports peak between the age of 11 and 13, then steadily decline through adolescence. The main reason that kids drop out of organized sports, research shows, is that they are no longer having fun. The other specific reasons that kids cite include a perceived lack of ability, too much pressure, and poor coaching. All of those things might understandably take some of the fun out of sport participation. Parents are also a big part of the equation. Studies show that when parents support and encourage their kids’ sport participation that the kids enjoy the sport more, and tend to have more positive feelings about their own performance. On the other hand, when parents create pressure for the kids, it reduces their enjoyment and increases their stress about how they perform – both factors that cause dropout. What are the implications of this research for martial arts instructors and parents? First, when teaching kids, consider how you might make learning fun and enjoyable. This does not mean that you only do “fluffy” drills or never critique students’ performance. It does mean that you can choose to create an instructional climate in which kids are more or less inclined to learn and retain what you are teaching. Second, consider how you can provide regular feedback to students about their progress. As an instructor, you understand the difference between effort, skill and ability. Young kids often do not. They think if they lose it is because they did not try hard enough. Without correction, they may just continue to repeat the same mistakes but with greater effort. When they continue not to do as well as they would like to do, they may conclude, they just don’t have the ability…and
drop out. Young people - particularly in a competitive environment – may only gauge how well they are doing by whether they win. As an instructor, you can help kids find other ways to monitor and assess their progress and give them specific feedback so that they can focus on their performance, not just on the outcome. Third, remember the power of specific, positive feedback. Being specific is an important part of making feedback effective. If we equally praise good and poor performance and effort, then it loses its impact. This may mean that you will have to look more actively and more closely for specific signs of improvement. Correction will also work better when delivered along with positive feedback. Some have recommended a “sandwich” technique in which corrective feedback is embedded between two positive comments. For example, an instructor might say: “You were giving really good effort right there. Remember to keep your hips low on that move. Your timing is excellent.” In general, you can consider the ratio of positive to negative comments you make in any given class or lesson, as well as the tone and manner in which they are delivered. You might even videotape a class and count them for yourself. If they are out of balance, try to even them out a bit more. Some research suggests that positive feedback from the instructor may be even more important for male than female students. This may be – as other research shows – because girls’ sport participation tends to be more strongly motivated by intrinsic factors – like enjoyment – than is boys’ participation, which may be driven more by needs for achievement and status. Finally, martial arts training provides a venue for kids to learn and apply important life skills. Instructors and parents will model these lessons whether or not they intend to do it. How we handle frustration, how we treat and speak to others, and how we exercise our authority will not only affect how kids learn martial arts, but also how they navigate the challenges of youth and develop their character.
Source: Psychology of Teaching Martial Arts to Kids (Column appears in Black Belt Magazine, March, 2008) By Dr. Randy Borum
Chapter II. Basic Strikes
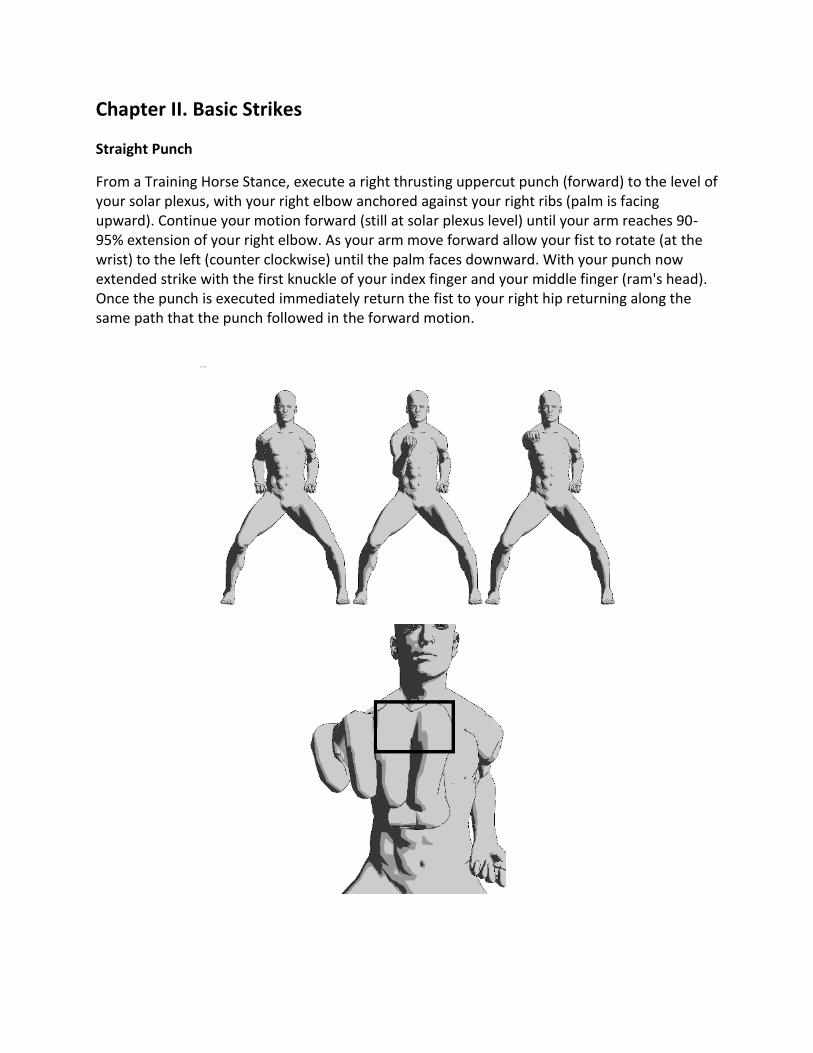
Straight Punch
From a Training Horse Stance, execute a right thrusting uppercut punch (forward) to the level of your solar plexus, with your right elbow anchored against your right ribs (palm is facing upward). Continue your motion forward (still at solar plexus level) until your arm reaches 90-95% extension of your right elbow. As your arm move forward allow your fist to rotate (at the wrist) to the left (counter clockwise) until the palm faces downward. With your punch now extended strike with the first knuckle of your index finger and your middle finger (ram's head). Once the punch is executed immediately return the fist to your right hip returning along the same path that the punch followed in the forward motion.
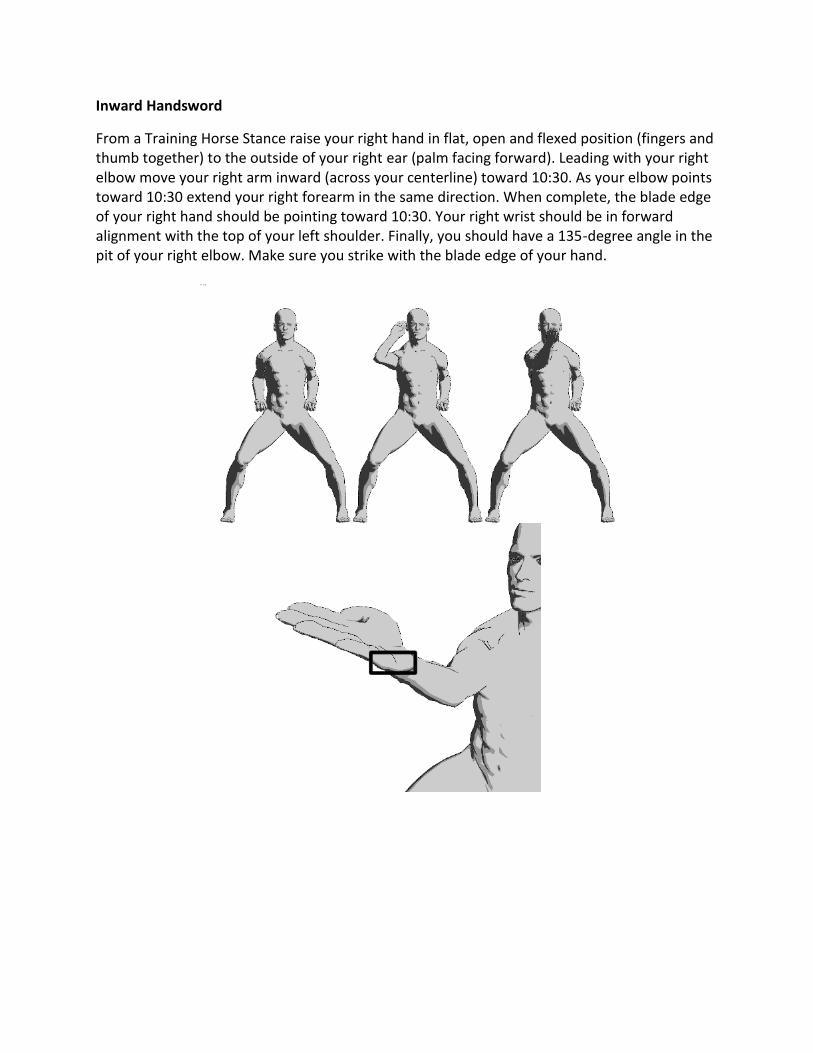
Inward Handsword
From a Training Horse Stance raise your right hand in flat, open and flexed position (fingers and thumb together) to the outside of your right ear (palm facing forward). Leading with your right elbow move your right arm inward (across your centerline) toward 10:30. As your elbow points toward 10:30 extend your right forearm in the same direction. When complete, the blade edge of your right hand should be pointing toward 10:30. Your right wrist should be in forward alignment with the top of your left shoulder. Finally, you should have a 135-degree angle in the pit of your right elbow. Make sure you strike with the blade edge of your hand.
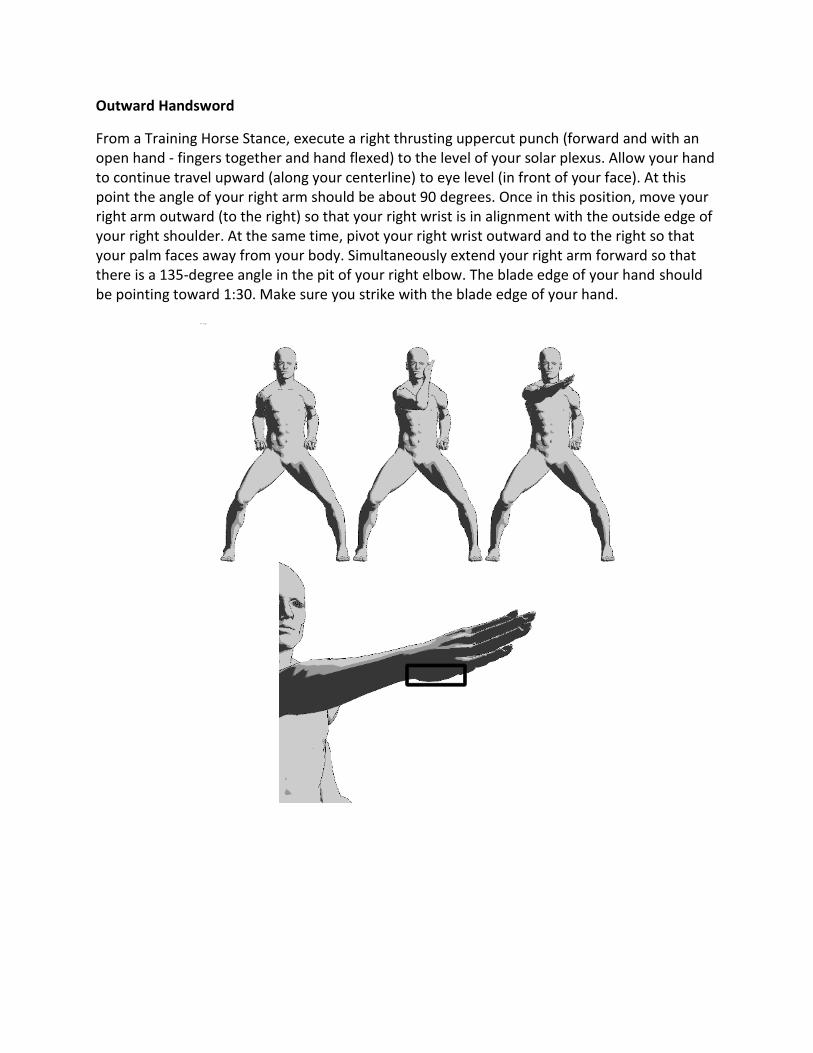
Outward Handsword
From a Training Horse Stance, execute a right thrusting uppercut punch (forward and with an open hand - fingers together and hand flexed) to the level of your solar plexus. Allow your hand to continue travel upward (along your centerline) to eye level (in front of your face). At this point the angle of your right arm should be about 90 degrees. Once in this position, move your right arm outward (to the right) so that your right wrist is in alignment with the outside edge of your right shoulder. At the same time, pivot your right wrist outward and to the right so that your palm faces away from your body. Simultaneously extend your right arm forward so that there is a 135-degree angle in the pit of your right elbow. The blade edge of your hand should be pointing toward 1:30. Make sure you strike with the blade edge of your hand.
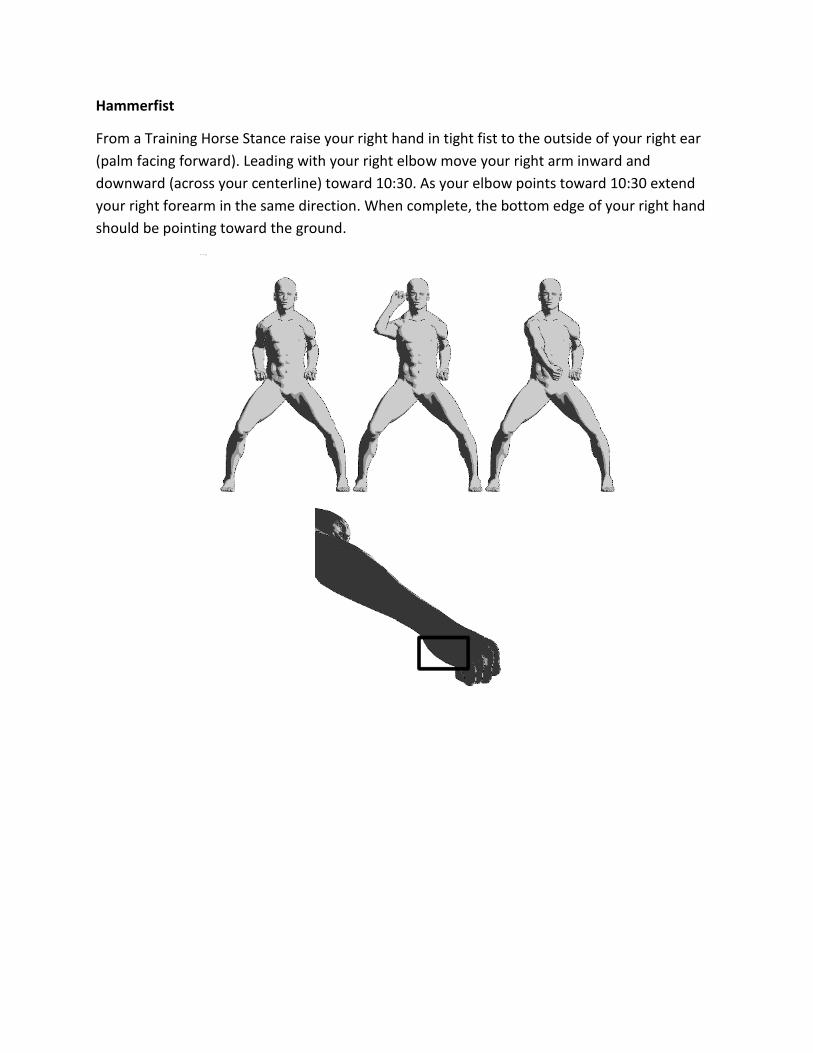
Hammerfist
From a Training Horse Stance raise your right hand in tight fist to the outside of your right ear
(palm facing forward). Leading with your right elbow move your right arm inward and
downward (across your centerline) toward 10:30. As your elbow points toward 10:30 extend
your right forearm in the same direction. When complete, the bottom edge of your right hand
should be pointing toward the ground.
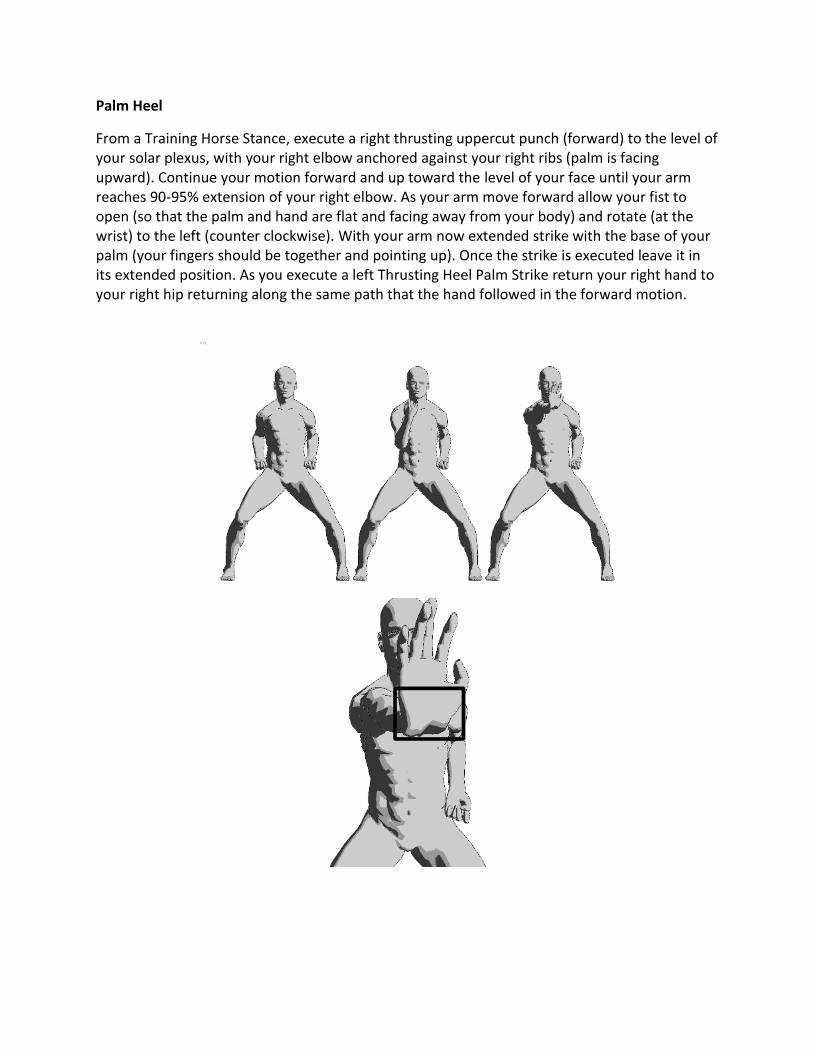
Palm Heel
From a Training Horse Stance, execute a right thrusting uppercut punch (forward) to the level of your solar plexus, with your right elbow anchored against your right ribs (palm is facing upward). Continue your motion forward and up toward the level of your face until your arm reaches 90-95% extension of your right elbow. As your arm move forward allow your fist to open (so that the palm and hand are flat and facing away from your body) and rotate (at the wrist) to the left (counter clockwise). With your arm now extended strike with the base of your palm (your fingers should be together and pointing up). Once the strike is executed leave it in its extended position. As you execute a left Thrusting Heel Palm Strike return your right hand to your right hip returning along the same path that the hand followed in the forward motion.
Chapter III. Basic Kicks
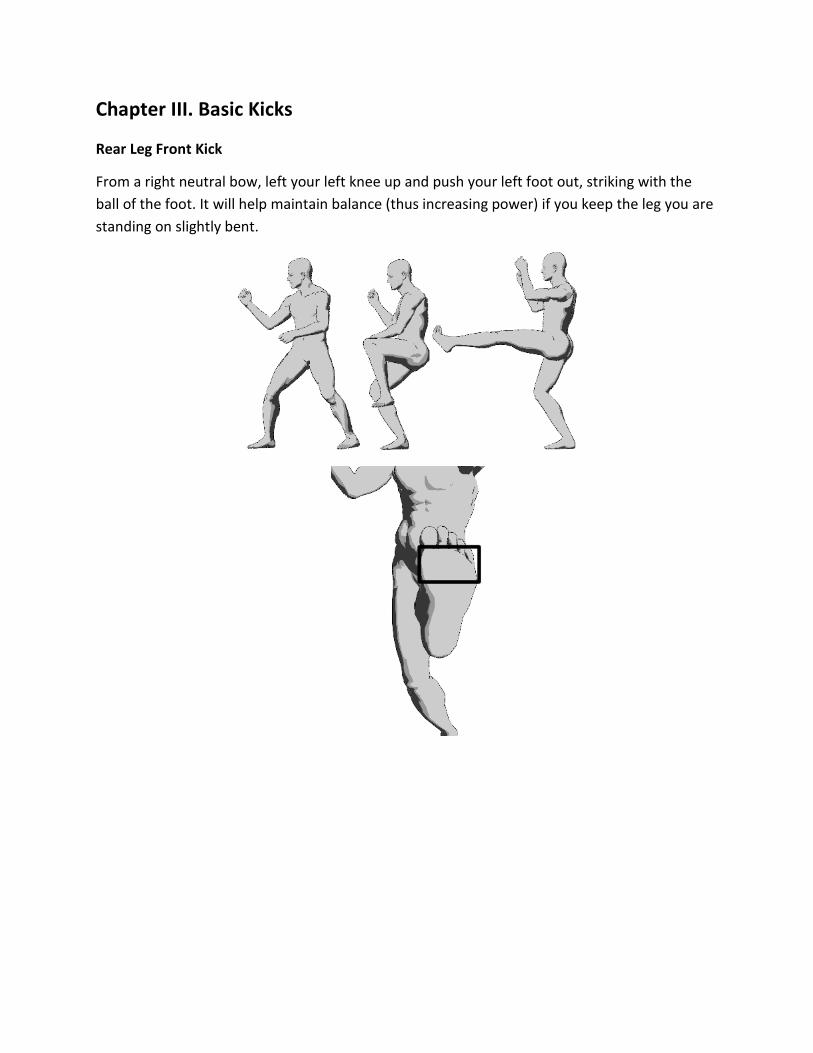
Rear Leg Front Kick
From a right neutral bow, left your left knee up and push your left foot out, striking with the
ball of the foot. It will help maintain balance (thus increasing power) if you keep the leg you are
standing on slightly bent.
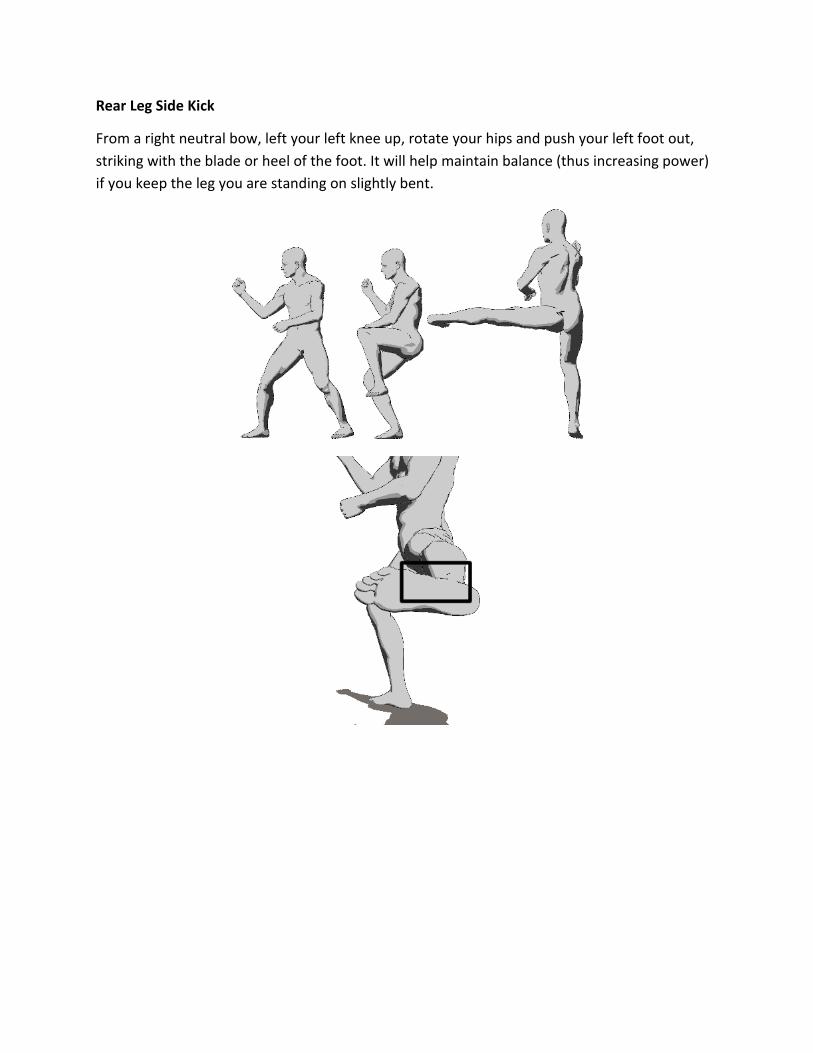
Rear Leg Side Kick
From a right neutral bow, left your left knee up, rotate your hips and push your left foot out,
striking with the blade or heel of the foot. It will help maintain balance (thus increasing power)
if you keep the leg you are standing on slightly bent.
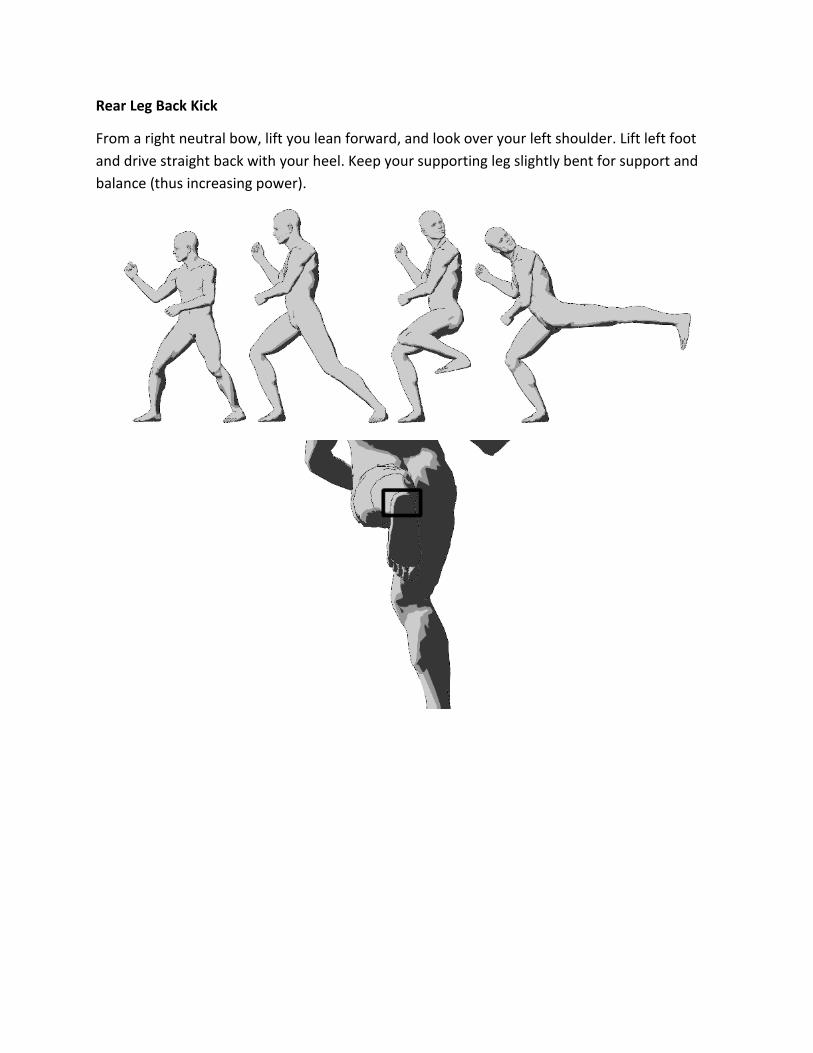
Rear Leg Back Kick
From a right neutral bow, lift you lean forward, and look over your left shoulder. Lift left foot
and drive straight back with your heel. Keep your supporting leg slightly bent for support and
balance (thus increasing power).
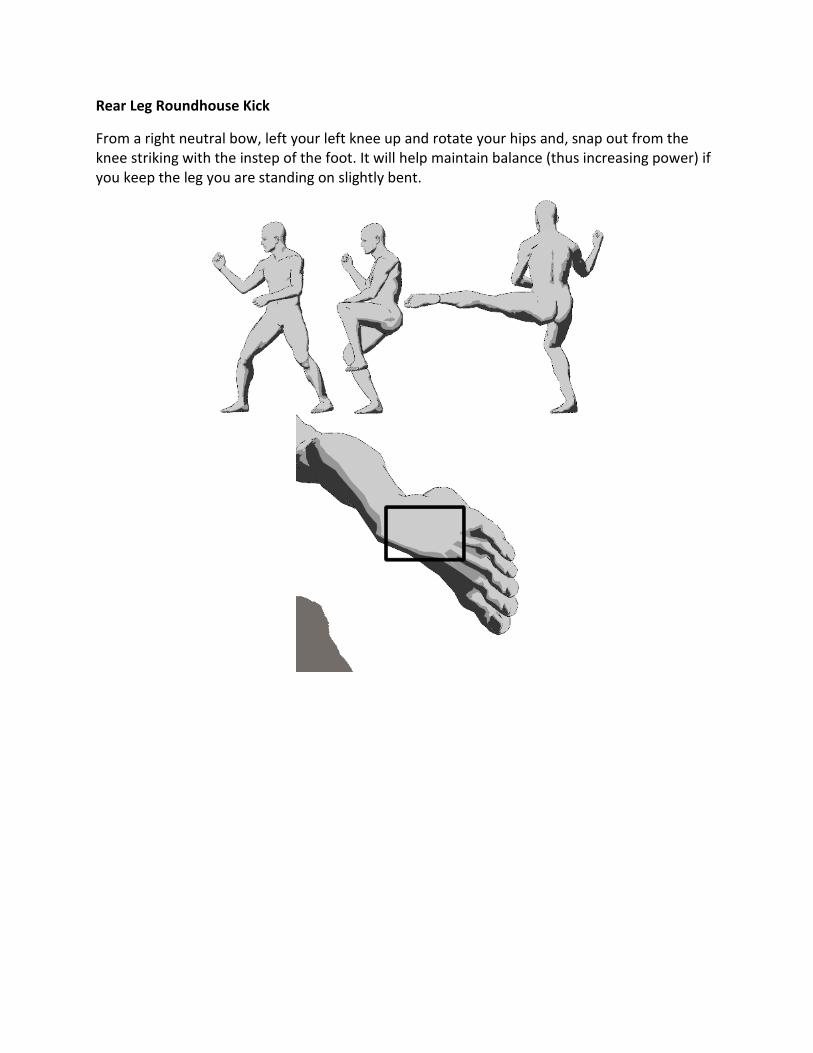
Rear Leg Roundhouse Kick
From a right neutral bow, left your left knee up and rotate your hips and, snap out from the knee striking with the instep of the foot. It will help maintain balance (thus increasing power) if you keep the leg you are standing on slightly bent.

Chapter IV. Basic Blocks
Inward
From a Training Horse Stance raise your right hand in a fist to the outside of your right ear. Leading with your right elbow move your right arm inward (across your centerline) toward 10:30. As your elbow points toward 10:30 extend your right forearm in the same direction. When complete, the Hammer portion of your right fist should be pointing toward 10:30. Your right wrist should be in forward alignment with the top of your left shoulder. Finally, you should have a 135-degree angle in the pit of your right elbow.
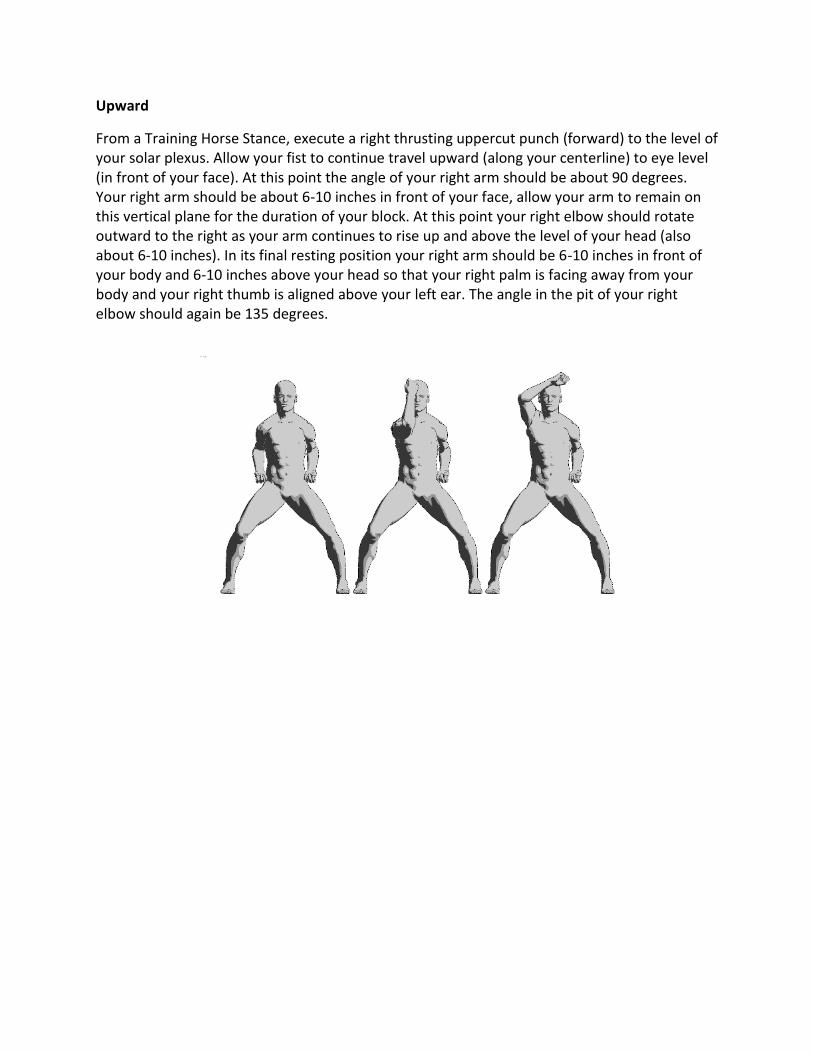
Upward
From a Training Horse Stance, execute a right thrusting uppercut punch (forward) to the level of your solar plexus. Allow your fist to continue travel upward (along your centerline) to eye level (in front of your face). At this point the angle of your right arm should be about 90 degrees. Your right arm should be about 6-10 inches in front of your face, allow your arm to remain on this vertical plane for the duration of your block. At this point your right elbow should rotate outward to the right as your arm continues to rise up and above the level of your head (also about 6-10 inches). In its final resting position your right arm should be 6-10 inches in front of your body and 6-10 inches above your head so that your right palm is facing away from your body and your right thumb is aligned above your left ear. The angle in the pit of your right elbow should again be 135 degrees.
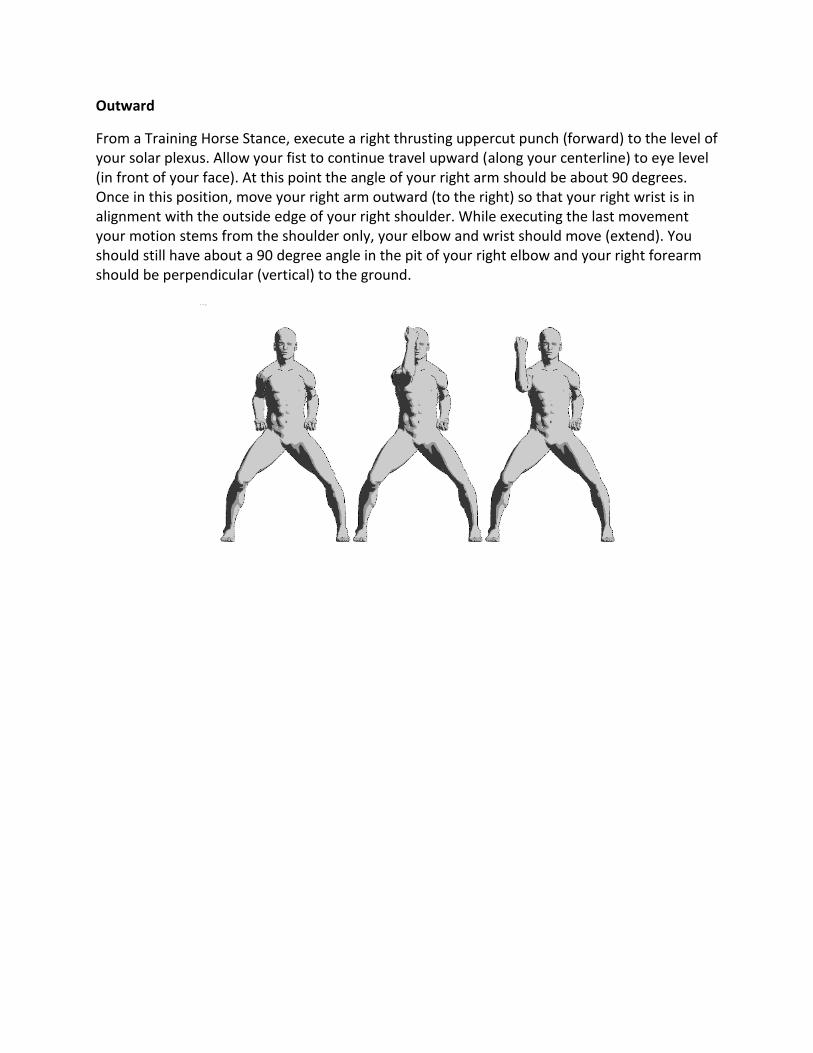
Outward
From a Training Horse Stance, execute a right thrusting uppercut punch (forward) to the level of your solar plexus. Allow your fist to continue travel upward (along your centerline) to eye level (in front of your face). At this point the angle of your right arm should be about 90 degrees. Once in this position, move your right arm outward (to the right) so that your right wrist is in alignment with the outside edge of your right shoulder. While executing the last movement your motion stems from the shoulder only, your elbow and wrist should move (extend). You should still have about a 90 degree angle in the pit of your right elbow and your right forearm should be perpendicular (vertical) to the ground.
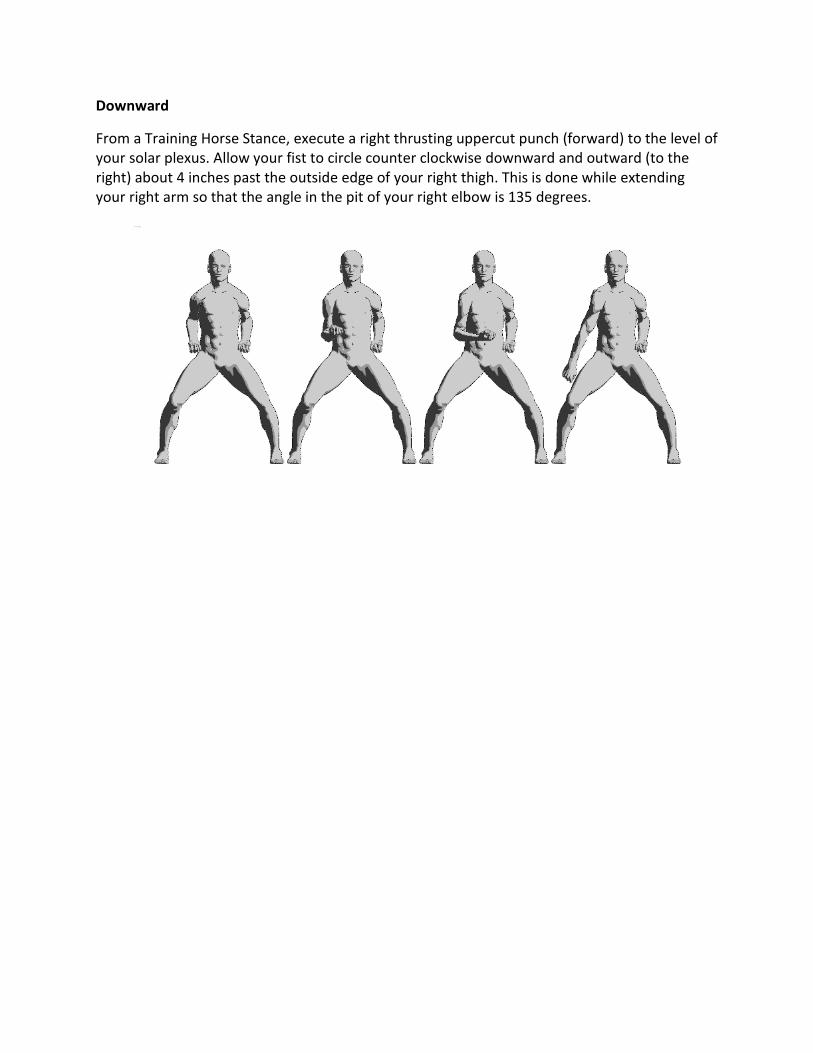
Downward
From a Training Horse Stance, execute a right thrusting uppercut punch (forward) to the level of your solar plexus. Allow your fist to circle counter clockwise downward and outward (to the right) about 4 inches past the outside edge of your right thigh. This is done while extending your right arm so that the angle in the pit of your right elbow is 135 degrees.
Chapter V. Basic Stances
Stances are important because they establish the foundation from which the style is developed. Everything from self-defense techniques to sparring requires the proper use of stances to ensure mobility, stability and power.
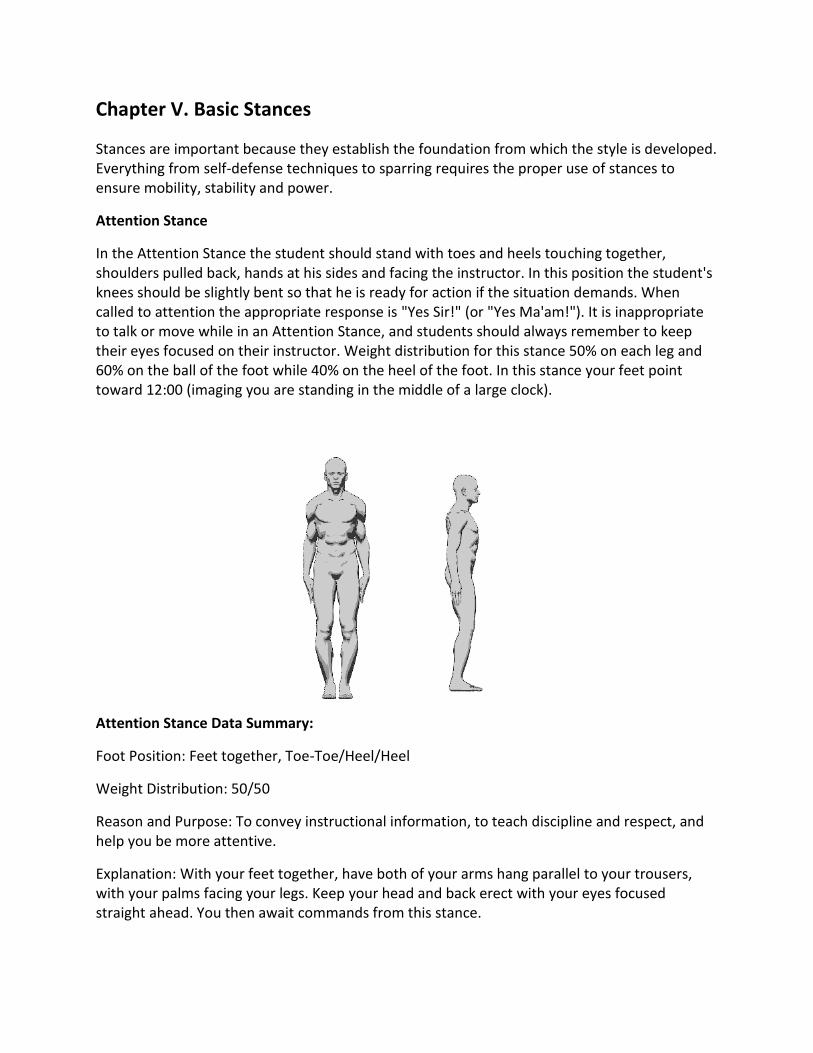
Attention Stance
In the Attention Stance the student should stand with toes and heels touching together, shoulders pulled back, hands at his sides and facing the instructor. In this position the student's knees should be slightly bent so that he is ready for action if the situation demands. When called to attention the appropriate response is "Yes Sir!" (or "Yes Ma'am!"). It is inappropriate to talk or move while in an Attention Stance, and students should always remember to keep their eyes focused on their instructor. Weight distribution for this stance 50% on each leg and 60% on the ball of the foot while 40% on the heel of the foot. In this stance your feet point toward 12:00 (imaging you are standing in the middle of a large clock).
Attention Stance Data Summary:
Foot Position: Feet together, Toe-Toe/Heel/Heel
Weight Distribution: 50/50
Reason and Purpose: To convey instructional information, to teach discipline and respect, and help you be more attentive.
Explanation: With your feet together, have both of your arms hang parallel to your trousers, with your palms facing your legs. Keep your head and back erect with your eyes focused straight ahead. You then await commands from this stance.

Horse Stance
When in a Horse Stance a student's feet should be slightly wider than shoulder width apart. A student should always step to the left with his left foot when moving into a Horse Stance (unless otherwise directed). As the student moves to his Horse Stance his hands will raise from a resting position at his sides to a clenched fist position on his hips. Make sure that your hands remain in contact with your body as you execute this movement. The "Hammer" portion of your fist should touch the top of your hip (both hands - right hand to right hip, left hand to left hip). Your knees should be bent outward over your feet and your toes should be pointed slightly inward. Weight distribution for this stance 50% on each leg and 60% on the ball of the foot while 40% on the heel of the foot. In this stance your feet point toward 12:00 (imaging you are standing in the middle of a large clock).
Horse Stance Data Summary:
Foot Position: Feet should be slightly wider than the width of your shoulders-toes in heels out, toe-toe/heel-heel.
Weight Distribution: 50/50, weight is forced out to outside edges of feet.
Reason and Purpose: To teach stamina and patience; a training stance which allows one to concentrate on hand movements only without being distracted by the synchronization of foot maneuvers.
Explanation: With shoulder width apart, clench both fists with palms up. Keep your head and back erect with your knees bent and forced out. It is from this stance that all other stances evolve.
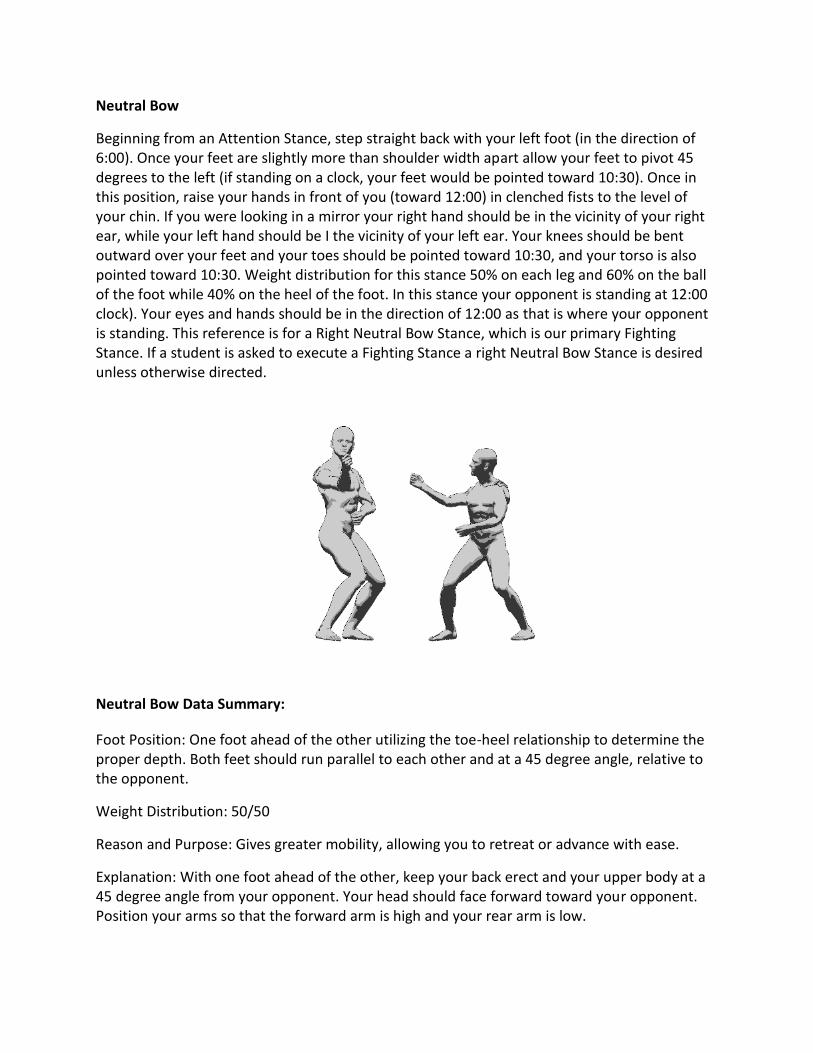
Neutral Bow
Beginning from an Attention Stance, step straight back with your left foot (in the direction of 6:00). Once your feet are slightly more than shoulder width apart allow your feet to pivot 45 degrees to the left (if standing on a clock, your feet would be pointed toward 10:30). Once in this position, raise your hands in front of you (toward 12:00) in clenched fists to the level of your chin. If you were looking in a mirror your right hand should be in the vicinity of your right ear, while your left hand should be I the vicinity of your left ear. Your knees should be bent outward over your feet and your toes should be pointed toward 10:30, and your torso is also pointed toward 10:30. Weight distribution for this stance 50% on each leg and 60% on the ball of the foot while 40% on the heel of the foot. In this stance your opponent is standing at 12:00 clock). Your eyes and hands should be in the direction of 12:00 as that is where your opponent is standing. This reference is for a Right Neutral Bow Stance, which is our primary Fighting Stance. If a student is asked to execute a Fighting Stance a right Neutral Bow Stance is desired unless otherwise directed.
Neutral Bow Data Summary:
Foot Position: One foot ahead of the other utilizing the toe-heel relationship to determine the proper depth. Both feet should run parallel to each other and at a 45 degree angle, relative to the opponent.
Weight Distribution: 50/50
Reason and Purpose: Gives greater mobility, allowing you to retreat or advance with ease.
Explanation: With one foot ahead of the other, keep your back erect and your upper body at a 45 degree angle from your opponent. Your head should face forward toward your opponent. Position your arms so that the forward arm is high and your rear arm is low.
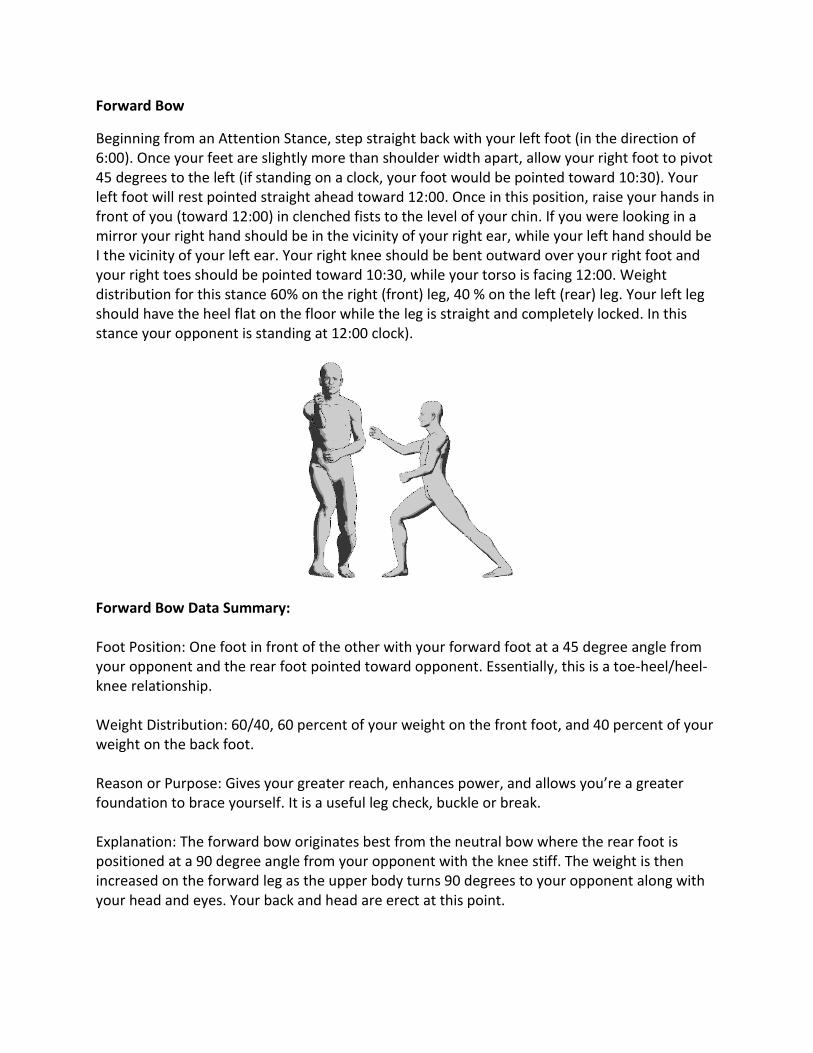
Forward Bow
Beginning from an Attention Stance, step straight back with your left foot (in the direction of 6:00). Once your feet are slightly more than shoulder width apart, allow your right foot to pivot 45 degrees to the left (if standing on a clock, your foot would be pointed toward 10:30). Your left foot will rest pointed straight ahead toward 12:00. Once in this position, raise your hands in front of you (toward 12:00) in clenched fists to the level of your chin. If you were looking in a mirror your right hand should be in the vicinity of your right ear, while your left hand should be I the vicinity of your left ear. Your right knee should be bent outward over your right foot and your right toes should be pointed toward 10:30, while your torso is facing 12:00. Weight distribution for this stance 60% on the right (front) leg, 40 % on the left (rear) leg. Your left leg should have the heel flat on the floor while the leg is straight and completely locked. In this stance your opponent is standing at 12:00 clock).
Forward Bow Data Summary: Foot Position: One foot in front of the other with your forward foot at a 45 degree angle from your opponent and the rear foot pointed toward opponent. Essentially, this is a toe-heel/heel-knee relationship. Weight Distribution: 60/40, 60 percent of your weight on the front foot, and 40 percent of your weight on the back foot. Reason or Purpose: Gives your greater reach, enhances power, and allows you’re a greater foundation to brace yourself. It is a useful leg check, buckle or break. Explanation: The forward bow originates best from the neutral bow where the rear foot is positioned at a 90 degree angle from your opponent with the knee stiff. The weight is then increased on the forward leg as the upper body turns 90 degrees to your opponent along with your head and eyes. Your back and head are erect at this point.
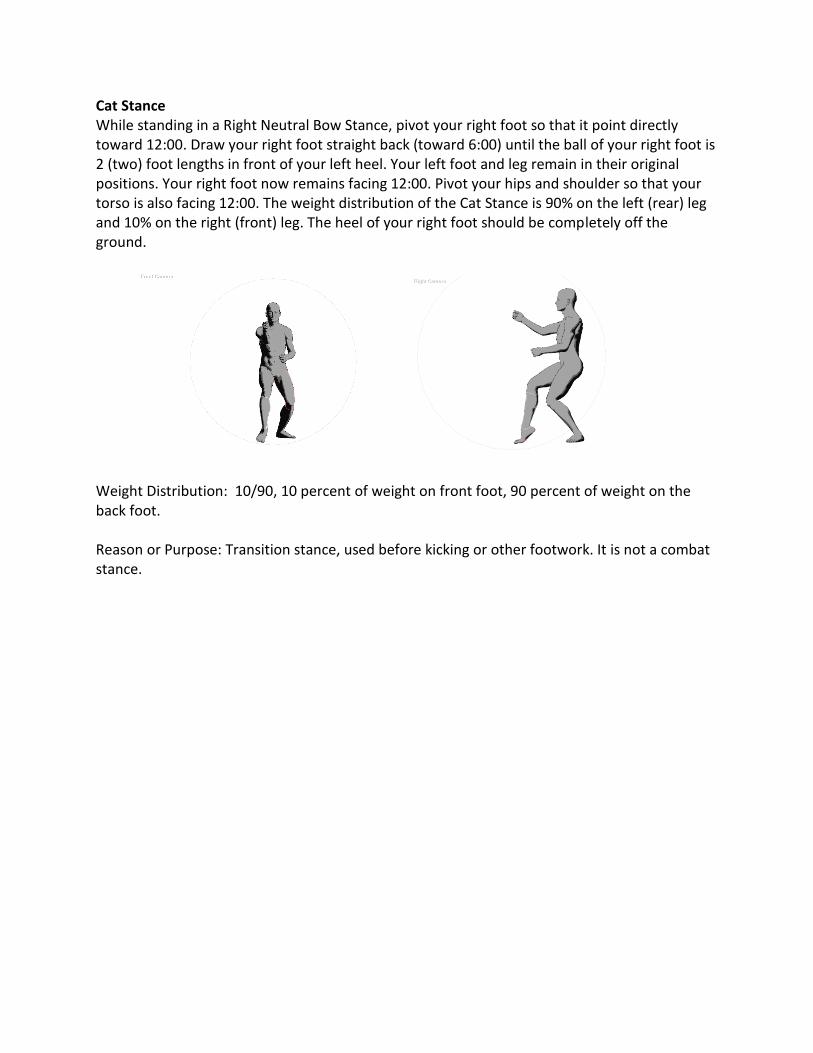
Cat Stance While standing in a Right Neutral Bow Stance, pivot your right foot so that it point directly toward 12:00. Draw your right foot straight back (toward 6:00) until the ball of your right foot is 2 (two) foot lengths in front of your left heel. Your left foot and leg remain in their original positions. Your right foot now remains facing 12:00. Pivot your hips and shoulder so that your torso is also facing 12:00. The weight distribution of the Cat Stance is 90% on the left (rear) leg and 10% on the right (front) leg. The heel of your right foot should be completely off the ground.
Weight Distribution: 10/90, 10 percent of weight on front foot, 90 percent of weight on the back foot. Reason or Purpose: Transition stance, used before kicking or other footwork. It is not a combat stance.

Chapter VI. Self Defense Techniques
I. DELAYED SWORD (front- right lapel grab) 1. With your feet together step back with your left foot toward 6:00 into a right
neutral bow stance, facing 12:00, while simultaneously executing a right inward block to the right inner wrist of your opponent. At the same time position your left hand at solar plexus level as a precautionary check against further action.
2. Immediately slide your right foot back into a cat stance. 3. Without hesitation deliver a right front snapping ball kick to your opponent's
groin. 4. Plant your right foot (back to its point of origin) into a right neutral bow, facing
12:00, while employing Gravitational Marriage, as you strike with a right outward hand sword to the right side of your opponent's neck. Immediately slide your right hand (after the strike) to the right wrist of your opponent as a precautionary check.
II. ALTERNATING MACES (front- low two handed push) 1. With your feet together, and as your opponent pushes you, step back with your
left foot toward 6:00 into a right neutral bow stance, facing 12:00, while simultaneously executing a right inward block to the outside of your opponent's left arm, while your left hand cocks to your left hip.
2. Immediately collapse your right arm across the lop of both of your opponent's arms (to act as a check), as you deliver a left vertical thrust punch to your opponent's sternum or solar plexus, while using torque go into a right forward bow stance. Remember both stance change and punch must work in synchronization with each other in order to maximize the force of the punch.
3. Have your left hand (after the punch, shift palm open and down) on top of both your opponent's arms (to check) while simultaneously having your right hand rapidly travel inside of your left arm and out into a right outward back knuckle strike to the right temple of your opponent, while pivoting back into a right neutral bow stance. (The torque stemming from the stance change will greatly increase the whipping action of your right hand).
4. Immediately have your right hand snap back into a checking position. III. SWORD OF DESTRUCTION (front- left straight or round house punch)
1. With your feet together, step back with your left foot toward 6:00 into a right neutral bow stance, facing 12:00, as you simultaneously execute a right outward extended block to the left inner wrist of your opponent's left punch. Your left hand should be in a positional check, covering your solar plexus.
2. Immediately slide your right foot back into a cat stance. 3. Without hesitation deliver a right front snapping ball kick to your opponent's
groin. 4. Plant your right foot forward (to its point of origin) into a right neutral bow,
facing 12:00 and while employing Gravitational Marriage execute a right inward hand sword strike to the left side of your opponent's neck.
5. Immediately snap your right hand back to the left inner wrist of your opponent to act as a check.
IV. DEFLECTING HAMMER (front- right front thrusting ball kick) 1. With your feet together step back with your left foot toward 7:00 into a right
neutral bow stance (to move out of the Line of Attack), while simultaneously executing a right downward diagonal block, against the outside of your opponent's right kicking leg. Your left hand checks at your solar plexus.
2. Without hesitation and while still in your right neutral bow, shuffle forward as your left hand checks inward and toward your opponent's biceps. Your right hand cocks at the right hip in preparation for an elbow strike.
3. Just as you conclude the shuffle execute a right inward horizontal elbow strike to your opponent's face, "with" a left sliding check down and onto your opponent's right elbow.
V. CAPTURED TWIGS (rear- bear hug around waist with arms pinned) 1. With your feet together and your opponent's arms around you, step toward 9:00
with your left foot into a horse stance, facing 12:00, as you simultaneously pin your opponent's hands (to your body) with your left hand. Just as your weight settles into your horse stance execute a right back hammer fist strike to your opponent's groin.
2. Immediately bring your right foot into a right cat stance (turning 90 degrees while facing 3:00) as your left hand releases the pin, clears your opponent's left arm and covers the front of your face as a check if needed. Simultaneous with the action of your left arm have your right hand cover your groin and proceed to clear opponent's right arm.
3. Execute a right heel stomp to your opponent's right instep. 4. Slide your right foot toward 4:30 into a horse stance, facing 1:30. Immediately
have your right forearm contour up the middle of your opponent's body as you execute a right vertical obscure elbow strike to the underside of your opponent's chin. Have your right arm snap back after the strike and cover your groin
VI. THE GRASP OF DEATH (left flank right arm headlock) 1. With you bent forward and your opponent to your left applying a headlock with
his right arm, initiate your action by tucking your chin to the left and against your chest, as you grab your opponent's right wrist with your right hand. All of this is done as your right foot steps forward toward 12:00 into a right close kneel stance while simultaneously grabbing your opponent's right inner thigh with your left hand and pinching the flesh of that leg with as much strength as possible. Your opponent will experience a horse bite effect if it is done correctly. Be sure you continue checking the outside of your opponent's right leg with your left knee.
2. As your opponent reacts to your pinch and releases his grip, have your right hand bring his right arm over your head and down to your chest, making sure that your right forearm angles diagonally while acting as a check.
3. Immediately release the grip of your left hand and have your left foot step forward toward 11:00 into a left neutral bow stance as you simultaneously strike
the back of your opponent's right elbow with your left forearm while pulling in and toward you with your right hand. This action should cause your opponent to step forward with his left foot prior to bending over at the waist.
4. Roll your left forearm on the back of your opponent's right elbow until your left forearm is parallel to the ground. Now slide your left hand to your opponent's right elbow. While controlling your opponent's right elbow with your left hand, pivot into a transitional left forward bow, facing 11:00 as you immediately execute a right snapping vertical punch to the base of your opponent's skull, behind his right mastoid bone.
VII. CHECKING THE STORM (front - right step through overhead club) 1. Standing naturally with your feet together, as your opponent swings his club in
an overhead fashion, quickly step off the line of attack, to your right toward 3:00 with your right foot. Simultaneously drag your left foot toward your right foot as you form a 45 degree cat stance facing 10:30. Without a break in the flow of your action execute a right inward hand parry followed by a left extended outward block (employing the "Double Factor" principle) to the right inner wrist of your opponent's right arm.
2. During the natural flow of your motion have your right hand stop, hand open, to act as a check in front of your solar plexus.
3. Immediately execute a left front snapping ball kick to your opponent's groin. 4. Plant your left foot (toward 10:00) as a gauging leg toward your opponent (twist
stance), as you deliver a right snapping knife edge kick to the inside of the opponent's right knee.
VIII. MACE OF AGGRESSION (front- two hand lapel grab - pulling in) 1. With your feet together and your opponent grabbing your lapel with both of his
hands, while pulling you in and toward him, execute a right stomp on the arch of your opponent's right foot while simultaneously striking diagonally across the bridge of your opponent's nose (from 1:00 to 7:00) with a right inward downward raking back knuckle strike. Have your left hand pin and check both of your opponent's hands at the same time the stomp and strike are taking place.
2. Continue the motion of your right arm so that it travels horizontally and down, striking both of your opponent's forearms in the process which in turn will force your opponent to bend forward.
3. Immediately execute a right inward horizontal elbow strike to your opponent's left jaw making sure that you follow through with your action.
4. Without hesitation return with a right outward horizontal elbow strike to the right jaw of your opponent.
IX. ATTACKING MACE (front - right step through straight punch) 1. With your feet together, step forward with the left to 10:30-11:00 into a left
neutral bow stance, facing 12:00, as you execute a left inward parry to the outside of your opponent's right punch. During this action your right hand cocks to your hip (fist clenched and palm up).
2. Circle your right hand clockwise down, in, over, and around your opponent's right arm as you counter grab the outside of your opponent's wrist. Immediately
pull your opponent toward you while simultaneously delivering a right roundhouse kick to the groin. During this action cock your left hand at your left hip (fist clenched and palm up).
3. Drop forward into a right neutral bow, facing 12:00, while simultaneously executing a left snapping vertical punch to your opponent's right kidney, "with" your right leg On and Over the Line of Entry. (your right knee is inside of your opponent's right knee and pressing up against it). Simultaneously pull the opponent's right arm down and to the right checking their height, width, and depth zones.
X. SWORD AND HAMMER (right flank- left hand shoulder grab) 1. While you are standing naturally, your opponent (standing between 3:00 and
4:00) grabs your right shoulder with his left hand. Step off and to your right with your right foot toward 3:00 into a horse stance, facing 12:00 while striking your opponent's throat with a right upward outward diagonal hand sword. Simultaneous with this action pin your opponent's left hand to your right shoulder with your left hand.
2. As your opponent reacts to your hand sword strike and bends backward, execute a right back hammer fist strike to your opponent's groin as you settle your stance utilizing Gravitational Marriage.
Chapter VII. Forms
Attacking Circle
Use the clock reference for attacks. Execute a chop to the throat followed by a chop to the groin.
1. Attention 2. Bow 3. Stay at Attention 4. Step to 12 o’clock into a right neutral bow, execute a right outward hand-sword
followed by a right outward hand-sword to the groin. 5. Back to Attention Stance facing 12 o’clock 6. Step to 3 o’clock into a right neutral bow, execute a right outward hand-sword followed
by a right outward hand-sword to the groin. 7. Back to Attention Stance facing 12 o’clock 8. Step to 6 o’clock into a right neutral bow, execute a right outward hand-sword followed
by a right outward hand-sword to the groin. 9. Back to Attention Stance facing 12 o’clock 10. Step to 9 o’clock into a left neutral bow, execute a left outward hand-sword followed by
a left outward hand-sword to the groin. 11. Back to Attention Stance facing 12 o’clock 12. Step to 1:30 into a right neutral bow, execute a right outward hand-sword followed by a
right outward hand-sword to the groin. 13. Back to Attention Stance facing 12 o’clock 14. Step to 4:30 into a right neutral bow, execute a right outward hand-sword followed by a
right outward hand-sword to the groin. 15. Back to Attention Stance facing 12 o’clock 16. Step to 7:30 into a left neutral bow, execute a left outward hand-sword followed by a
left outward hand-sword to the groin. 17. Back to Attention Stance facing 12 o’clock 18. Step to 10:30 into a left neutral bow, execute a left outward hand-sword followed by a
left outward hand-sword to the groin. 19. Back to Attention Stance facing 12 o’clock 20. Bow 21. Relax
Blocking Set #1
The concepts focused on in this set are those of "Point of Origin." In other words, you do not have to re-chamber to execute another block. You can instantly and quickly turn one block into another. Try to imagine a star as you do this.
1. Attention 2. Bow 3. Step out with left into a Meditating Horse Stance, facing 12 o’clock 4. Right arm first
a. Upward block. b. Inward block. c. Outward block. d. Downward block. e. Chamber the arm(s) executing a back elbow. f. Execute a push-down block. g. Execute a position check.
5. Repeat (a-g) using left arm. 6. Repeat (a-g) using both arms. 7. Attention 8. Bow 9. Relax
Kicking Set
1. Attention 2. Bow 3. Attention 4. Step back into a left neutral bow facing 12 o’clock 5. Right rear leg front kick to 12 o’clock 6. Right side kick to 3 o’clock 7. Right back kick to 6 o’clock-Yell! 8. Right Front-Side-Rear Combo 9. Switch Feet, right neutral bow facing 12 o’clock 10. Left rear leg front kick to 12 o’clock 11. Left side kick to 3 o’clock 12. Left back kick to 6 o’clock-Yell! 13. Left Front-Side-Rear Combo 14. Attention 15. Bow 16. Relax

Short Form 1 (Right Side Only)
1. Attention
2. Bow
3. Announce
4. Salute
5. Salutation
6. Meditating Horse Stance
7. Drop left leg back toward 6:00 to form a RNB while simultaneously executing a right inward block and a left back elbow
8. Drop right leg back toward 6:00 into a LNB while simultaneously executing a left inward block and a right back elbow
9. Cover to the left by moving your right leg forward towards 3:00 into a transitory LNB facing 9:00, while executing a transitory right inward block, simultaneous with a left back elbow strike
10. Settle into your LNB facing 9:00 while executing a left vertical outward block simultaneous with a right back elbow strike
11. Your left foot the slides back as you form a transition left 45 degree cat stance facing 9:00, while executing a transition left inward block with your right elbow remaining in place
12. Continue to have your left leg travel backward towards 3:00 as you settle into a RNB facing 9:00 while executing a right vertical outward block simultaneous with a left back elbow strike
13. Cover to your rear by moving your right foot forward to 9:00 into a transitory LNB facing 3:00, while executing a transitory right inward block, while your left elbow remains in place
14. Settle into your LNB facing 3:00 while executing a left upward block simultaneous with a right back elbow
15. Have your left leg slide back as you form a transitory left 45 degree cat stance facing 3:00 while executing a transitory left inward block with your right elbow remaining in place
16. Continue to have your left leg travel back towards 9:00 as you settle into a RNB facing 3:00 while executing a right upward block with a left back elbow strike
17. Cover to your right by moving your left foot toward 12:00 into a transitory RNB facing 6:00 while cocking your right arm horizontally across your waist palm up with the left arm slightly forward
18. Settle into your RNB facing 6:00 while executing a right downward block simultaneous with a left back elbow strike
19. Have your right foot slide back as you form a transitionary right 45 degree cat stance facing 6:00, while executing a transitionary right inside downward block palm up with your left arm cocked horizontally across your waist, palm up
20. Continue to have your right foot travel back towards 12:00 as you settle into a LNB facing 6:00 while executing a left downward block simultaneous with a right back elbow strike
21. Move your left foot clockwise into a horse stance facing 12:00 with your left open hand placed on your right clenched fist

Short Form #1(Right and Left Side):
1. Attention
2. Bow.
3. Announce.
4. Salute
5. Salutation
6. Mediating Horse Stance
RIGHT SIDE
7. Drop left leg back toward 6:00 to form a RNB while simultaneously executing a right inward block and
a left back elbow
8. Drop right leg back toward 6:00 into a LNB while simultaneously executing a left inward block and a
right back elbow
9. Cover to the left by moving your right leg forward towards 3:00 into a transitory LNB facing 9:00,
while executing a transitory right inward block, simultaneous with a left back elbow strike
10. Settle into your LNB facing 9:00 while executing a left vertical outward block simultaneous with a
right back elbow strike
11. Your left foot the slides back as you form a transition left 45 degree cat stance facing 9:00, while
executing a transition left inward block with your right elbow remaining in place
12. Continue to have your left leg travel backward towards 3:00 as you settle into a RNB facing 9:00
while executing a right vertical outward block simultaneous with a left back elbow strike
13. Cover to your rear by moving your right foot forward to 9:00 into a transitory LNB facing 3:00, while
executing a transitory right inward block, while your left elbow remains in place
14. Settle into your LNB facing 3:00 while executing a left upward block simultaneous with a right back
elbow
15. Have your left leg slide back as you form a transitory left 45 degree cat stance facing 3:00 while
executing a transitory left inward block with your right elbow remaining in place
16. Continue to have your left leg travel back towards 9:00 as you settle into a RNB facing 3:00 while
executing a right upward block with a left back elbow strike
17. Cover to your right by moving your left foot toward 12:00 into a transitory RNB facing 6:00 while
cocking your right arm horizontally across your waist palm up with the left arm slightly forward
18. Settle into your RNB facing 6:00 while executing a right downward block simultaneous with a left
back elbow strike
19. Have your right foot slide back as you form a transitionary right 45 degree cat stance facing 6:00,
while executing a transitionary right inside downward block palm up with your left arm cocked
horizontally across your waist, palm up
20. Continue to have your right foot travel back towards 12:00 as you settle into a LNB facing 6:00 while
executing a left downward block simultaneous with a right back elbow strike
21. Move your left foot clockwise into a meditating horse stance facing 12:00 with your left open hand
placed on your right clenched fist
LEFT SIDE
22. Drop right leg back toward 6:00 to form a LNB while simultaneously executing a left inward block
and a right back elbow
23. Drop left leg back toward 6:00 into a RNB while simultaneously executing a right inward block and
a left back elbow
24. Cover to the right by moving your left leg forward towards 9:00 into a transitory RNB facing 9:00,
while executing a transitory left inward block, simultaneous with a right back elbow strike
25. Settle into your RNB facing 3:00 while executing a right vertical outward block simultaneous with
a left back elbow strike
26. Your right foot the slides back as you form a transition right 45 degree cat stance facing 3:00, while
executing a transition right inward block with your left elbow remaining in place
27. Continue to have your right leg travel backward towards 9:00 as you settle into a LNB facing 3:00
while executing a left vertical outward block simultaneous with a right back elbow strike
28. Cover to your rear by moving your left foot forward to 3:00 into a transitory RNB facing 9:00, while
executing a transitory left inward block, while the right elbow remains in place
29. Settle into your RNB facing 9:00 while executing a right upward block simultaneous with a left back
elbow

30. Have your right leg slide back as you form a transitory right 45 degree cat stance facing 9:00 while
executing a transitory right inward block with your left elbow remaining in place
31. Continue to have your right leg travel back towards 3:00 as you settle into a LNB facing 9:00 while
executing a left upward block with a right back elbow strike
32. Cover to your left by moving your right foot toward 12:00 into a transitory LNB facing 6:00 while
cocking your left arm horizontally across your waist palm up with the right arm slightly forward
33. Settle into your LNB facing 6:00 while executing a right downward block simultaneous with a left
back elbow strike
34. Have your left foot slide back as you form a transitionary left 45 degree cat stance facing 6:00, while
executing a transitionary left inside downward block palm up with your right arm cocked horizontally
across your waist, palm up
35. Continue to have your left foot travel back towards 12:00 as you settle into a RNB facing 6:00 while
executing a right downward block simultaneous with a left back elbow strike
36. Move your right foot clockwise into a horse stance facing 12:00 with your left open hand placed on
your right clenched fist
Long Form 1
1. Salutation
2. Meditation stance
3. Left leg back into a RNB while executing a right inward block with a left back elbow then move into a RFB and a left straight thrust punch
4. Right leg back into a LNB while executing a left inward block with a right back elbow then into a LFB and a right straight punch
5. Left leg to 9:00, pivot to your left into a LNB with a left outward block and a right back elbow then into a LFB and a right straight thrust punch
6. Left leg back into a RNB with a right outward block and a left back elbow then into a RFB and a left straight thrust punch
7. Step right leg back to 11:00 as you pivot to the left facing 9:00 into a horse stance with a left outward elbow then pivot left to face 6:00 into a LNB with a left upward block and a right back elbow then into a LFB with a right straight thrust punch
8. Left leg back into a RNB with a right upward elbow and a left back elbow then into a RFB with a left straight thrust punch
9. Right leg then steps to 3:00 as you pivot to the right into a RNB with a right downward block and a left back elbow then into a RFB with a left straight thrust punch
10. Right leg back into a LNB with a left downward block and a right back elbow then into a LFB with a right straight thrust punch
11. Remaining in a LNB execute; left then right then left inward blocks
12. Left leg back into a RNB and execute right then left then right inward blocks… then step your left leg to 9:00 and pivot to your right to face 3:00 into a RNB then execute right then left then right outward blocks
13. Right leg back into a LNB then execute left then right then left outward blocks
14. Step left leg to 2:00 as you pivot to your right into a RNB facing 6:00 then execute right then left then right upward blocks

15. Right leg back into a LNB as you execute left then right then left upward blocks…then move your right leg to 3:00 as you pivot towards 9:00 into a LNB as you execute left then right then left downward blocks
16. Left leg back into a RNB as you execute right then left then right downward blocks
17. Left leg forward into a horse stance as you execute left then right then left downward blocks (palm down)
18. Next execute right then left then right downward blocks (palm up)
19. Next execute left then right then left pushdown blocks
20. Then right then left straight thrust punches
21. Continue with right then left 45 degree straight thrust punches
22. Follow with right then left 90 degree straight thrust punches and then right and left uppercuts
23. Meditation stance
24. Closing salutation

Coordination Set 1
Note: during the execution of coordination set 1, you are pivoting on your left foot for the entire set.
Set 1 (12 o’clock):
1. Drop your right foot back to 6 o'clock, into a LNB while simultaneously delivering a left outward block
and a right back elbow
2. Extend your left outward block forward into a head level punch
3. Shift into a LFB while simultaneously delivering a mid-section level right reverse punch with a left back
elbow strike
4. Simultaneously deliver a waist level right front ball kick and a midsection level right reverse punch
with a left back elbow strike
Set 2 (12 o’clock):
1. Step through with your right foot into a RNB while delivering a right outward block. Keep your left
hand palm up on your hip.
2. Extend your right outward block forward into a head level right punch
3. Shift into a RFB while simultaneously delivering a midsection level left reverse punch with a right back
elbow
4. Simultaneously deliver a waist level left front ball kick and a midsection level right reverse punch
keeping the left palm on the hip palm up
5. Plant into a RFB while delivering a midsection level left reverse punch with a right back elbow strike
Set 3 (9 o’clock):
1. Drop your right foot back to 3:00, turn and face 9:00 into a LNB while simultaneously delivering a left
outward block an a right back elbow
2. Extend your left outward block forward into a head level punch
3. Shift into a LFB while simultaneously delivering a midsection level right reverse punch with a left back
elbow strike
4. Simultaneously deliver a waist level right front ball kick and a midsection level left reverse punch with
a right back elbow strike Plant into a LFB while delivering a midsection level right reverse punch with a
left back elbow strike
Set 4 (9 o’clock):
1. Step through with your right foot into a RNB while delivering a right outward block. Keep your left
hand on your hip with palm up.
2. Extend your right outward block into a right punch at head level
3. Shift into a RFB while simultaneously executing a midsection level left reverse punch with a right back
elbow strike
4. Simultaneously deliver a waist level left front ball kick and a midsection level right reverse punch
keeping the left hand on the hip with palm up
5. Plant into a RFB while delivering a midsection level left reverse punch with a right back elbow strike
Set 5 (6 o’clock):
1. Drop your right foot back to 12 o'clock, turn and face 6:00 into a LNB while delivering a left outward
block with a right back elbow strike
2. Extend your outward block into a head level punch
3. Shift into a LFB while simultaneously delivering a midsection level right reverse punch with a left back
elbow strike
4. Simultaneously deliver a waist level right front ball kick and a midsection level left reverse punch with
a right back elbow strike
5. Plant into a LFB while delivering a midsection level right reverse punch with a left back elbow strike
Set 6 (6 o’clock):
1. Step through with your right foot into a RNB while delivering a right outward block. Keep your left
hand on your hip with palm up
2. Extend your right outward block into a head level punch
3. Shift into a RFB while simultaneously delivering a midsection level left reverse punch with a right back
elbow strike
4. Simultaneously deliver a waist level front ball kick and a midsection level right reverse punch keeping
the left hand on the hip with palm up
5. Plant forward into a RFB while delivering a midsection level left reverse punch with a right back elbow
strike
Set 7 (3 o’clock):
1. Drop your right foot back to 9 o'clock, turn and face 3 o'clock into a LNB while delivering a left
outward block with a right back elbow strike

2. Extend your outward block into a head level punch
3. Shift into a LFB while simultaneously delivering a midsection level right reverse punch with a left back
elbow strike
4. Simultaneously deliver a waist level right front ball kick and a midsection level left reverse punch with
a right back elbow strike
5. Plant into a LFB while delivering a midsection level right reverse punch with a left back elbow strike
Set 8 (3 o’clock):
1. Step through with your right foot into a RNB while delivering a right outward block. Keep your left
hand on your hip with palm up
2. Extend your right outward block into a head level punch
3. Shift into a RFB while simultaneously delivering a midsection level left reverse punch with a right back
elbow strike
4. Simultaneously deliver a waist level front ball kick and a midsection level right reverse punch keeping
the left hand on the hip with palm up
5. Plant forward into a RFB while delivering a midsection level left reverse punch with a right back elbow
strike
Set 9 (12 o’clock):
1. Drop your right foot back to 6 o'clock, turn and face 12 o'clock into a LNB while delivering a left
outward block with a right back elbow strike
2. Extend your outward block into a head level punch
3. Shift into a LFB while simultaneously delivering a midsection level right reverse punch with a left back
elbow strike
4. Simultaneously deliver a waist level right front ball kick and a midsection level left reverse punch with
a right back elbow strike
5. Plant into a LFB while delivering a midsection level right reverse punch with a left back elbow strike
Set 10 (12 o’clock):
1. Step through with your right foot into a RNB while delivering a right outward block. Keep your left
hand on your hip with palm up
2. Extend your right outward block into a head level punch

3. Shift into a RFB while simultaneously delivering a midsection level left reverse punch with a right back
elbow strike
4. Simultaneously deliver a waist level front ball kick and a midsection level right reverse punch keeping
the left hand on the hip with palm up
5. Plant forward into a RFB while delivering a midsection level left reverse punch with a right back elbow
strike
6. Step, clockwise, with your right foot to move into a horse stance
7. Attention
8. Bow

Short Form 2
1. Start from a horse stance facing 12 o'clock
2. With your right foot, step forward, toward 12 o'clock, into a RNB while executing a right inward block with a left hand cover. Execute a right outward chop
3. With your left foot, step forward, toward 12 o'clock, into a LNB while executing a left inward block with a right hand cover. Execute a left outward chop
4. Slide your left foot back, towards 3:00, into a transitional cat stance (facing 9 o’clock) while covering
your right fist (on hip palm up) with your left fist (palm down). Step out to LNB facing 9 o'clock while simultaneously executing a left outward block and a right reverse punch
5. Slide your right foot back towards 9 o'clock, into a transitional cat stance (facing 3 o’clock) while covering your left fist (on hip palm up) with your right fist (palm down). Step out to RNB facing 3 o'clock while simultaneously executing a right outward block and a left reverse punch
6. Adjust left foot, to about 5:30, turn counter clockwise into a wide kneel, facing 6 o'clock, while simultaneously executing a left rising block and a right hand middle knuckle vertical downward snap
7. Adjust right foot, to about 12:30, turn counter clockwise into a wide kneel, facing 12 o'clock, while simultaneously executing a right rising block and a left middle knuckle vertical downward snap
8. Slide left foot back into cat stance and turn to 4:30 while executing a right inward downward block ( palm up ) and cocking the left hand at the right shoulder
9. Step out to 4:30 into a LNB while executing a left downward block and a right back elbow strike
10. Step through, toward 4:30, into a RNB while executing a right Palm heel thrust with the left hand covering at your mid-section
11. Slide right foot back into a cat stance and turn to 7:30 while executing a left inward downward block ( palm up ) and cocking the right hand at the left shoulder
12. Step out towards 7:30 into a RNB while executing a right downward block and a left back elbow strike
13. Step through, towards 7:30, into a LNB while executing a left palm heel thrust with your right hand covering at mid-section
14. Slide your right foot back into a cat stance and turn, counter clockwise, to 1:30 while executing a left inward block with the right hand cocking palm up at your waist
15. Step forward into a RNB while executing a right extended outward block with the left hand cocked in a palm up half-fist at your left side rib cage
16. Shift into a RFB and drop your right extended outward into a check while executing a left half-fist at throat level
17. Slide your left foot forward into a cat and turn, counterclockwise, to 10:30 while executing a right inward block with the left hand cocked palm up at your waist
18. Step forward into a LNB while executing a left extended outward block with the right hand cocked in a palm up half-fist at your right side rib cage
19. Shift into a LFB and drop your left extended outward into a check while executing a right half-fist at throat level
20. Step forward with your right foot into a horse stance facing 12 o'clock
Closing salutation
Tiger’s Fury
Section 1:
1. Attention
2. Bow
3. Meditating Horse Stance
Section 2: Locked Wing, Right Arm Hammerlock (Attack from 6 O’clock)
Section 3: Clutching Feathers, Left Hand Hair Grab (Attack from 12 O’clock)
Section 4: Thrusting Salute, Right Front Kick (Attack from 12 O’clock)
Section 5: Scrapping Hoof, Full Nelson (Attack from 3 O’clock, right then left side)
Section 6: Five Swords, Right Roundhouse Punch (Attack from 9 O’clock)
Section 7: Buckling Branch, Left Front Kick (Attack from 6 O’clock)
Section 8: Crashing Wings, Rear Bear Hug Arms are Free (Attack from 3 O’clock)
Section 9: Grip of Death, Right Arm Headlock from behind (Attack from 6 O’clock)
Section 10:
1. Step right foot up to Meditating Horse Stance, facing 12 O’clock.
2. Attention
3. Bow

Youth Staff Set #1
1. Attention (Staff in Right Hand held tightly against body vertically) 2. Bow 3. Step Left into Horse Stance, staff held by both hands chest level. 4. Right Horizontal Strike to Head 5. Left Horizontal Strike to Head 6. Right Outward Block 7. Left Outward Block 8. Staff down and to the right figure 8 strike
9. Thrusting Strike Right hand forward
10. Right Outward Strike to head.
11. Left Outward Strike to head.
12. Downward Block
13. Upward Block
14. Attention
15. Bow
Youth Staff Set #2
1. Attention (Staff in Right Hand held tightly against body vertically) 2. Bow 3. Step Left into Horse Stance, staff held by both hands chest level. 4. Step forward into right neutral bow, Left Horizontal Strike to Head 5. Step Forward into left neutral bow, Right Horizontal Strike to Head 6. Step back into right neutral bow, Left Outward Block 7. Step back into left neutral bow, Right Outward Block 8. Staff down and to the right figure 8 spin, stay in left neutral bow.
9. Step forward into right neutral bow, continue figure 8 spin.
10. Step forward with left foot into left forward bow, Thrusting Strike Right hand forward-Yell!
11. Step up with right foot into horse stance facing 12:00, weapon chambered at chest with both hands.
12. Holding staff in both hands put weapon behind head.
13. Holding weapon with the right hand execute 3-360 degree overhead strikes.
14. On the 3rd strike spin with the weapon, pivoting on left foot, ending in a left neutral bow holding the weapon in both hands, left hand forward.
15. Step right foot up into horse stance, Downward Block
16. Upward Block
17. Attention
18. Bow
19. Relax
Chapter VIII. Training Tips
1. Remember to warm up. Warming up gives the body a chance to deliver plenty of nutrient rich blood to areas about to be exercised, to actually warm the muscles and lubricate the joints.
2. Stretch - Increases or maintains muscle flexibility. 3. During the first week of starting an exercise program keep it light. Work on technique-
good body mechanics and slowly work up to heavier weights. 4. Quick tips to maintain good body mechanics: go through the complete range of motion,
move slowly and with control, breathe, and maintain a neutral spine. Never sacrifice form just to add more weight or repetitions.
5. The intensity of your workout depends on a number of factors, including the number of sets and repetitions, the overall weight lifted, and the rest between sets. You can vary the intensity of your workout to fit your activity level and goals.
6. Listen to your body. Heart rate is not a good way to determine your intensity when lifting weights, it is important to listen to your body based on an overall sense of feeling of exertion.
7. The MINIMUM amount of strength training recommended by the American College of Sports Medicine is eight to twelve repetitions of eight to ten exercises, at a moderate intensity, two days a week. You will get more overall gains with more days per week, sets and resistance, but the progression is one in which you must listen to your body.
8. Strength training sessions are recommended to last one hour or less. 9. As a general rule, each muscle that you train should be rested one to two days before
being exercised further in order for the fatigued muscles to rebuild. 10. "No pain, no gain." This statement is not only false, but can be dangerous. Your body
will adapt to strength training, and will reduce in body soreness each time you workout.
Information from: http://www2.gsu.edu/~wwwfit/strength.html
Chapter IX. Exercises
1. 2-Count Legs Stretch 2. 10 Push-Ups 3. 10 Sit-ups 4. 10 Leg-Raises 5. Chinese splits 6. Hip Rotations 7. Knee rotations 8. Trunk Twists 9. Instructor Extra (Optional) 10. Punching Drill 11. Kicking Drill
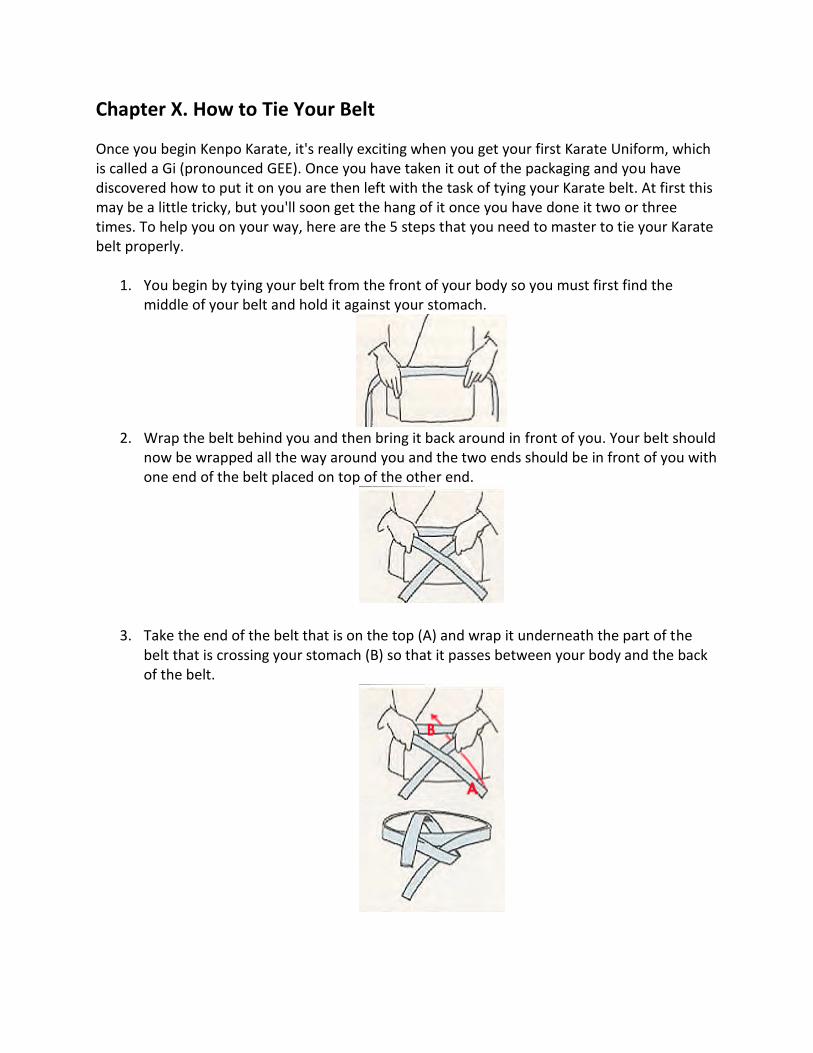
Chapter X. How to Tie Your Belt
Once you begin Kenpo Karate, it's really exciting when you get your first Karate Uniform, which is called a Gi (pronounced GEE). Once you have taken it out of the packaging and you have discovered how to put it on you are then left with the task of tying your Karate belt. At first this may be a little tricky, but you'll soon get the hang of it once you have done it two or three times. To help you on your way, here are the 5 steps that you need to master to tie your Karate belt properly.
1. You begin by tying your belt from the front of your body so you must first find the middle of your belt and hold it against your stomach.
2. Wrap the belt behind you and then bring it back around in front of you. Your belt should
now be wrapped all the way around you and the two ends should be in front of you with one end of the belt placed on top of the other end.
3. Take the end of the belt that is on the top (A) and wrap it underneath the part of the belt that is crossing your stomach (B) so that it passes between your body and the back of the belt.
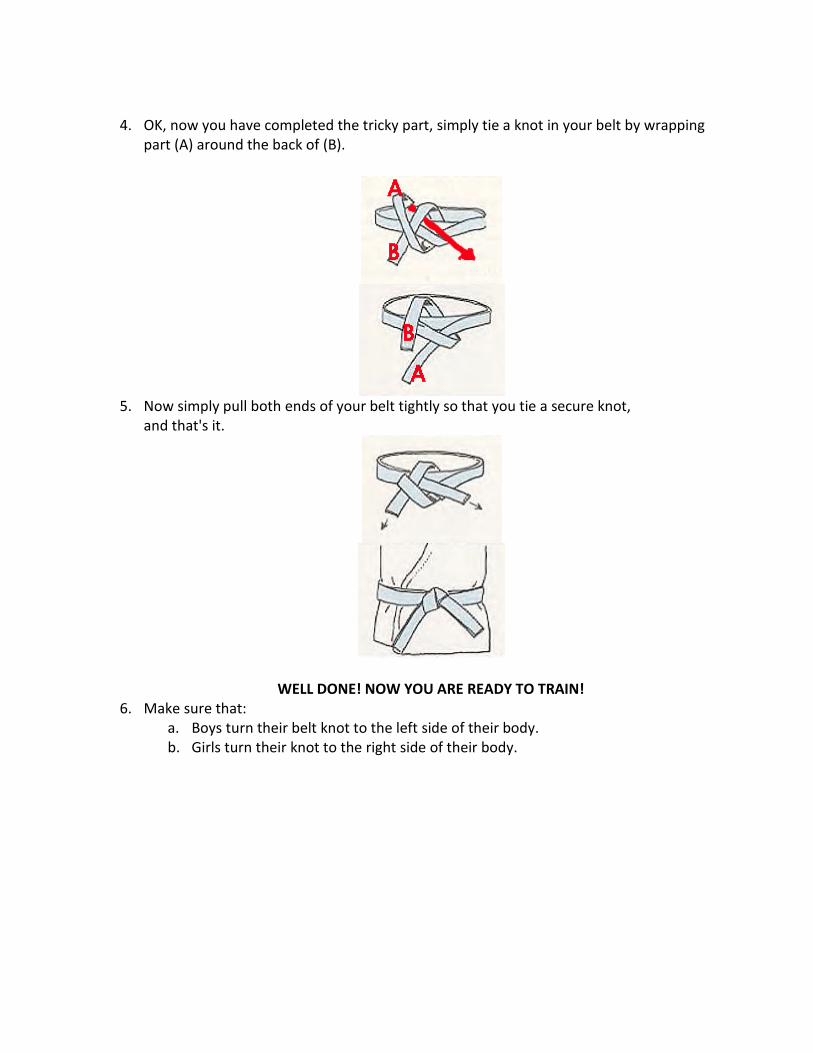
4. OK, now you have completed the tricky part, simply tie a knot in your belt by wrapping
part (A) around the back of (B).
5. Now simply pull both ends of your belt tightly so that you tie a secure knot,
and that's it.
WELL DONE! NOW YOU ARE READY TO TRAIN! 6. Make sure that:
a. Boys turn their belt knot to the left side of their body. b. Girls turn their knot to the right side of their body.
Chapter XI: Curriculum Segments
Basic Strikes:
Straight Punch Inward Handsword Outward Handsword Hammer Fist Palm Heel
Basic Kicks:
Front Kick Side Kick Roundhouse Kick Back Kick
Basic Blocks:
Inward Block
Outward Block
Downward Block
Upward Block
Basic Stances:
Neutral Bow
Forward Bow
Horse Stance
Cat Stance