key stage 2 (years 3 & 4) - somerset activity & sports ... · pdf filekey stage 2...
TRANSCRIPT

Athletic Activities
“In this unit children concentrate on developing good basic running, jumping & throwing techniques. They are set challenges for distance and time that involve using different styles & combinations of running, jumping & throwing. As in all athletic activities, children think about how to achieve the greatest speed, height, distance or accuracy.” Acquiring & Developing Skills Children should learn:
o to consolidate & improve the quality, range & consistency of the techniques they use for particular activities. Selecting & Applying Skills Children should learn:
o to develop their ability to choose & use simple tactics & strategies in different situations. Knowledge & Understanding of Fitness and Health Children should learn:
o to know, measure & describe the short-term effects of exercise on the body o to describe how the body reacts to different types of activity
Evaluating & Improving Performance Children should learn :
o to describe & evaluate the effectiveness of performances, & recognise aspects of performance that need improving
Lesson Overview
No. Main Objectives Activities & References Equipment & Resources
1
Running for Speed developing awareness of time, distance & speed developing fluency & coordination in running for speed learn how to accelerate quickly from a stationary position
Developing Fast Running (TOP) How Far? (EA) Shuttle Run (EA)
bibs cones or markers batons & beanbags stop watches
2 Running Over Obstacles developing fluency & rhythm in their movements developing spatial awareness, judge height & distance choose & apply appropriate stride patterns
Running over Hurdles (TOP) How many strides? (EA) Under/Over (EA)
cones or markers hurdles canes gym tables, hoops
KEY STAGE 2 (Years 3 & 4)

No. Main Objectives (of the 4 throws 2 in yrs 3 & 4 2in yrs 5/6) Activities & References Equipment & Resources
3
Running for Distance developing awareness of speed & pace judgement developing fluency in running & walking activities understanding what happens to our bodies with exercise
Dishes & Domes (TOP) Tick-tag Relays (TOP)
cones or markers whistles batons or beanbags stopwatches
4
Throwing (Push & Pull Throws) learning how to send an object with force developing awareness of distance using different throwing techniques
Throwing for Distance (TOP) Shark Infested Waters (EA) Heavy or Light (EA)
cones or markers hoops large & small balls foam javelins, beanbags
5
Throwing (Fling & Heave) learning how to send an object for accuracy developing awareness of distance using different throwing techniques
Throwing for Accuracy (TOP) Human Bowling (EA)
cones or markers large & small balls
6 Jumping for Distance learning to take off and land in a fluent & coordinated way developing body position in flight using a variety of jumps in different games & activities
Heads, Shoulders, Knees & Toes (EA) Jump the Stream (TOP)
cones or markers chalk gym mats tape measures
7
Jumping for Height learning a variety of jumping techniques learning to jump with coordination & control Exploring different body positions in flight
Target Jump (EA) Jumping for Height (TOP)
tape measures chalk hurdles, cone & canes
8
Combination exploring different combinations of jumps developing fluency & control in putting together jumps choosing different combinations for games & activities
Stepping, Striding & Jumping (TOP) Dice Jump (EA) Jumping Jack Rabbits (EA)
cones or markers tape measures dice
9 Relays working together as a team passing & receiving the baton using changeovers in different relay games
Tick-tag Relay (TOP) Conga (EA) Passing & Receiving the Baton (EA)
cones or markers batons & beanbags
10
Multi-Event Team Challenge working together as a team applying a variety of techniques in competition trying to improve personal performance
Triathlon Challenge Quadrathlon Challenge
cones or markers recording sheets, clipboards, pencils, tapes stop watches

ATHLETICS Key Stage 2 (Years 3 & 4) Running for Speed Lesson No. 1
Learning Outcomes
Children learn to: A & D Develop awareness of time, duration, distance and speed A & D Develop fluency and coordination in running for speed S & A Choose and apply the best starting position and stride length for the activity K & U Carry out warm up and stretching activities safely E & I Watch and describe specific actions of an effective running technique
Running for Speed
Running for speed is covering a short distance in the fastest possible time. It relates to the sprint events in athletics and to the approaches in the jumps events. Other examples might include the wing sprinting for the try in rugby, the return to defend for the footballer or the approach to a tumble turn in floor gymnastics.
Warm Up:
1. Cat & Mouse Tag Define an area. Choose four children to be cats who wear bibs so as to be distinguished from the rest of the children who are the mice. The cats start in the centre of the area on and command from the teacher/coach make chase for the mice. Once caught the mice must stand still. Caught mice can be freed by other mice circling them twice. The aim of the cats is to capture all of the mice so that they are stood still. * Alternatively the mice could wear bibs tucked into their shorts like tails and the cats aim to capture all the tails. Mice whose tails have been caught may continue to run as decoys to help the surviving mice!
2. Mobility Exercises Discuss the importance of a good arm action and fast arms when running for speed. Take children through simple mobility exercises for the shoulders and arms. Illustrate how arms lead legs by demonstrating fast arms from a standing position. Ask children to stand in a space on their own with their feet slightly apart and their knees slightly bent. Keeping their feet on the ground show them a good running arm action and ask them to copy starting slowly and gradually building speed. Emphasise how the legs want to move with the arms.
Health & Safety
Ensure: there is adequate space for the game children keep their heads up and eyes ahead
Rules of the Game
captured mice must be circled twice to be set free tails must be clearly visible no holding tails down with hands
Teaching Points
Encourage children to: swing the arms from the shoulders keep arms bent at the elbow (approx. 90
degrees) to keep the hands relaxed (as though holding a
crisp between thumb and first finger)
Skills/Game Activity
4. Fish & Chips (Reaction Starts) Organise children into pairs. One person is the coach and they must watch their partner to look for low body position, driving arms or quick reactions. Using a starting line of 15 to 20 metres in length mark a second line parallel to this at a distance of 5 to 10 metres apart. One child from each pair lines up on the first line lying in the prone position with their head towards the direction of the second line. On command “Fish” they jump to their feet and run to the second line as quickly as possible. If “Chips” is called they must remain still. The partners now swap roles.
3. Questions & Answers
Discuss the importance of a good start. A good start is one where the runner is ready for the command or stimulus. The runner should have good reactions and should keep low at the start until they have picked up speed. Think of the sprinter coming out of the starting blocks.

Each time vary the starting position so that the children gradually move from a lying down starting position to a crouch position. For example the first starting position one would be lying prone, the second sitting with legs straight out in front, third would be kneeling, fourth with one knee on the ground, fifth crouching with both hands on the floor, sixth standing in a crouch position with hands off the floor. This activity could also be done starting in a tall straight position with feet together and each time asking the children to start in a lower body position.
5. Sprint Stations Set up three sprint stations these can be repeated to accommodate groups of three to six children. Children measure and record speed and distance in their groups or estimate duration by counting “One banana, two banana, etc” (roughly seconds). Beanbag Shuttle: children take turns to run from a cone to a hoop and back (about 5 metres apart), as quickly as possible collecting as many beanbags as they can from the hoop in 20 seconds and returning them to a box or hoop at the start. They may only move one beanbag at a time. One child times or counts 20 seconds. Criss-Cross: using cones/markers set up a diamond shape (with a diameter of approx. 10 metres). A cone is placed in the centre. The runner starts at the centre cone and runs to one of the points of the diamond, touches the cone and returns to the centre. They then run to the next point on the diamond returning to the centre cone each time until all four points have been touched. One child times the duration. How Far?: Mark a starting line and from that line place cones at every metre from the start line in the direction of the run for a distance of about 30 metres. One child is the starter and calls “On your marks”, and then calls “Go”. Another child times five seconds. The runner runs along the line of cones as far as they can in 5 seconds. The third child marks the spot with a cone. The children then aim to beat their target.
Teaching Points
Encourage children to: listen for the command (and not to guess!) keep a low body position until they pick up speed drive the arms and legs quickly
Health & Safety
Ensure: there is an adequate deceleration zone there is adequate space between runners
Teaching Points
Encourage children to: push off the balls of their feet drive their arms quickly like pistons
Competition
5. Stepped Relay Organise the class into teams of four or six runners. Set out rows of coloured cones with beanbags on top of the cones. The teams organise themselves into an order so that Child 1 runs the shortest distance to the first cone (approx. 5 metres from start) Child 2 runs to the second cone (approx. 10 metres from start), Child 3 runs to the third cone (approx. 15 metres from the start), and so on. The winning team is the team to collect all of the beanbags first and be seated.
Health & Safety
Cool Down Teacher/coach take class through simple stretches.
Evaluation/Post Lesson Notes
Equipment
bibs, cones or markers batons, beanbags, stop watches
Think STEP Space, Task, Equipment, People CF/03/06
CORE TASKS 1 & 2 – elements of both core tasks for Years 3 & 4 are tackled in this lesson with particular reference to measuring of time or duration in different ways and to sharing distances and times as a team.

ATHLETICS Key Stage 2 (Years 3 & 4) Running Over Obstacles Lesson No. 2
Learning Outcomes
Children learn to: A & D Develop spatial awareness by judging the height and approach to obstacles A & D Develop fluency and rhythm in their running style S & A Choose and apply appropriate stride patterns K & U Carry out stretching and warm up activities safely E & I Watch and describe specific aspects of running over obstacles
Running over Obstacles
The runner’s aim is to take the obstacles in their stride with the minimum disruption to a fluent & coordinated running style. These activities relate directly to the athletics events of hurdling, steeplechase and cross-country running. They also apply to most team games where players must jump to avoid collisions with other players or avoid fallen players, hockey sticks, balls, etc
Warm Up:
1. Horse of the Year Show In a defined area set out approximately fifteen gateways using pairs of cones of the same colour. Children move around the area in and out of the gateways at a walking pace and gradually increasing the speed to a jog. Introduce galloping and skipping and encourage children only to move through the empty gateways. Once the children are warmed up allow them to jump over imaginary or real barriers in the gateways (low cones with a cane across could be used). Encourage children to vary their pathways and to look for empty gateways. Encourage children to bound (1 foot to the other foot) taking the obstacles in their running stride.
2. Show Jumping Challenge Children find a partner and one person is the horse/rider whilst the other stands from the side as the judge. The children have 30 seconds from the coach/teacher’s command to clear as many different gateways as they can in that time. Their partner must keep the score and count how many obstacles they clear in the time given. The two swap around. The game could be repeated to allow the children to try to improve the score.
Health & Safety Ensure: adequate space between the gateways children keep their heads up and eyes ahead
Skills/Game Activity
3. Hurdles Grid/How many Strides? Set up four to six rows of hurdles or assorted obstacles in a grid (see diagram). Allow space between the rows for the children to run back to the start. Each row should vary in terms of the distance between the obstacles. An approximate distance between obstacles would be between 3 - 6 adult strides. Children take turns in their group to walk and then run over the obstacles thinking about which leg they lead with. Children move up the hurdle grid when they can comfortably manage a three stride pattern between the obstacles?
Health & Safety
Ensure: the obstacles can fall easily when hit there is adequate space for returning runners runners only hurdle the obstacles in one direction children allow at least three hurdles between them
and the runner in front before they start their go * Spotters could be used to pick up any fallen hurdles once the path is clear.

A stride pattern is counted from the moment the lead leg touches the ground after clearing the hurdle until the same lead leg prepares for take off at the next obstacle. Odd number stride patterns are encouraged for sprint hurdles where the runner leads with the same lead leg throughout the race. Children sometimes find counting 3 strides difficult, because they tend to count the flight phase as an extra stride. Encourage them to count 1, 2, 3, Over, 1, 2, 3, Over. The diagram below aims to illustrate this with a left leg lead runner. The letters show the point at which the foot touches the ground Flight Phase Flight Phase Flight Phase R L R L R L R L R L
Spot markers or cones can be used to highlight the stride pattern for children having difficulties in finding rhythm.
In setting up rows of hurdles the children who are able to make long stride patterns will generally be the same children who are able to clear the taller obstacles.
Hurdles Grid
*The space between each row of hurdles gets progressively longer and obstacles could get higher.
Teaching Points
Encourage children to: practise leading with both their left and right legs find a good rhythm before applying speed maintain an even stride length throughout
Competition
4. Under/Over Obstacle Relays In teams of four to eight organise simple relays. Each team should have a similar set of obstacles which involve obstacles to go over and to go through (eg. hoops) or under (eg. gymnastic tables). Use beanbags as a baton. Children run down the side of the obstacles on return.
Cool Down
Children collect the equipment and put it away. Teacher/coach takes class through simple stretches.
Evaluation/Post Lesson Notes
Equipment
cones or markers hurdles, canes, gym tables beanbags
Think STEP Space, Task, Equipment, People CF/03/06

ATHLETICS Key Stage 2 (Years 3 & 4) Running for Distance Lesson No. 3
Learning Outcomes
Children learn to: A & D Develop awareness of speed and pace judgement in relation to distance A & D Develop fluency in running and walking skills A & D Work together in pairs and as teams S & A Choose appropriate pace for a given distance K & U Understand the benefits of this type of activity on their bodies E & I Record performance and set individual targets to improve
Running for Distance
Running for distance is an endurance activity & relates specifically to athletics events of 600 metres & longer, including cross-country and marathons. The runner aims to pace himself in order to complete the distance in the quickest possible time. Endurance or stamina is required in most team games where the players are required to keep going for up to 90 minutes or more. For example, David Beckham has been recorded running up to six miles in a single football match.
Warm Up:
1. Dishes and Domes Organise the class into two teams. In a defined area scatter about twenty cones of which half should be turned over the wrong way (Dishes). One team is Dishes and their job is to turn over as many cones into dish shapes as they can in the duration of the game. The other team is Domes and their job is to turn over as many cones to make dome shapes as they can in the duration of the game. On command “Stop or Time Up” both teams return to their starting position and the two types of cones are counted to decide a winner. Play the best of three games with the games lasting anything from 30 to 90 seconds.
Teaching Points
Encourage children to: keep their heads up and eyes ahead only turn one cone at a time avoid body contact with other players
Skills/Game Activity
2. Race Walking Parlauf In pairs the children practise race walking along a line of a playground or along an imaginary line. One child is the coach and the other is the walker. See teaching notes overleaf. After a few minutes the children swap roles. Mark a track with cones (ideally 200 to 300 metres perimeter). One child from each pair goes to point A and the other to point B on the track. The children at point A are number 1, the children at point B are number 2. The walkers at point A are given a bean bag or relay baton and walk the distance from A to B around the outside of the track as quickly as possible passing the beanbag to their partner stood at B who then walks the remainder of the circuit. On reaching point B, Child 1 then makes their way across the middle of the track as quickly as possible to be ready to receive the beanbag from Child 2, who then does the same in the opposite direction to return to point B. Set a range of challenges which could be time or distance based. Eg. How many complete laps can you and your partner cover in 3 minutes? How quickly can you and your partner complete 3 whole laps?
A B Each one of the pair only ever walk one half of the
circuit crossing the middle on the right of the cones
* For large groups and small spaces stagger the starts or have half a class at a time allowing the other half to rest and recover before setting them a new challenge. This should also be encouraged as a running activity Children could be encouraged to record their total distance or time walking or running during a lesson. Make children aware of the distances they have covered. For example if each child walks 150 metres x 10 in a lesson then they have covered 1500 metres. (1600 metres = I mile)
Teaching Points Encourage children to: place one foot in front of the other has if walking
along a straight line push their opposite hip forward to the driving leg plant the heel to the ground first and push away
with the ball of the foot carry the arms higher than a normal walking pace
and drive the elbows back
Competition/Game
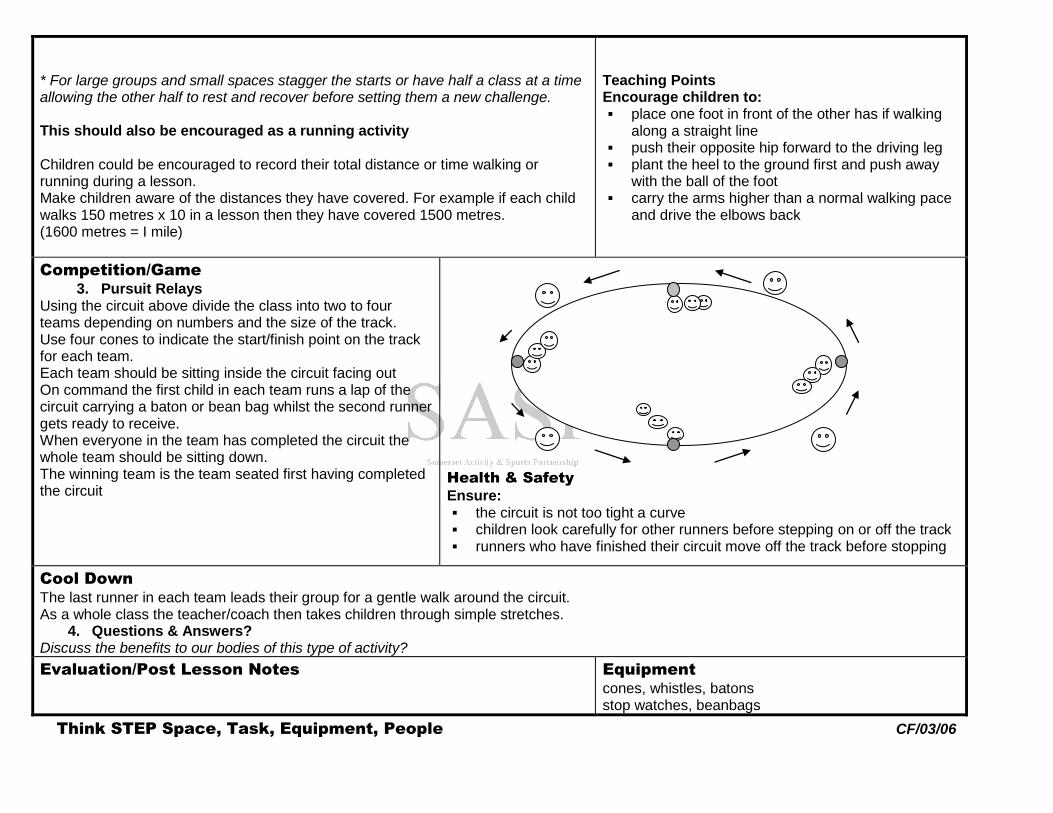
3. Pursuit Relays Using the circuit above divide the class into two to four teams depending on numbers and the size of the track. Use four cones to indicate the start/finish point on the track for each team. Each team should be sitting inside the circuit facing out On command the first child in each team runs a lap of the circuit carrying a baton or bean bag whilst the second runner gets ready to receive. When everyone in the team has completed the circuit the whole team should be sitting down. The winning team is the team seated first having completed the circuit
Health & Safety
Ensure: the circuit is not too tight a curve children look carefully for other runners before stepping on or off the track runners who have finished their circuit move off the track before stopping
Cool Down
The last runner in each team leads their group for a gentle walk around the circuit. As a whole class the teacher/coach then takes children through simple stretches.
4. Questions & Answers? Discuss the benefits to our bodies of this type of activity?
Evaluation/Post Lesson Notes
Equipment
cones, whistles, batons stop watches, beanbags
Think STEP Space, Task, Equipment, People CF/03/06

ATHLETICS Key Stage 2 (Yrs 3 & 4) Throwing (Push & Pull) Lesson No. 4
Learning Outcomes
Children learn to: A & D Develop the ability to throw for both distance and accuracy A & D Throw using a range of techniques S & A Choose the most appropriate technique for the throwing implement K & U Understand how throwing activities develop strength E & I Watch and describe how to perform specific aspects of the push & pull throw
Throwing
The thrower aims to throw for accuracy, distance or both by applying a force to a throwing implement. Different implements require different techniques, although the fundamental principles remain the same. The push throw relates to the athletic event of shot putt and to a chest pass in netball. Pull throws relate to the athletic event of javelin and to a cricketer fielding a ball from the boundary.
Warm Up:
1. Flying Birds, Creeping Caterpillars & Crawling Crabs Children move around a defined area starting at a walking pace, gradually increasing to a jog or a run. On command “Flying Birds” the children find a space and with arms stretched wide make circles with the arms which start small and gradually get bigger. Children resume movement around the area. On command “Creeping Caterpillars” children find a space on the floor and lie front down. With their arms by their shoulders they then perform push ups with the legs remaining straight on the floor. (Push Ups could be done against a wall if the ground is wet). Children resume movement around the area. On command “Crawling Crabs” children sit on their bottoms and raise themselves off the floor by supporting themselves on their hands and feet. Children try to move forwards, backwards and sideways. Push & Pull
Two-handed PushThrow The child stands facing the direction of the throw with one foot in front of the other. The fingers are spread behind the ball which is held at the chest, and the ball is then pushed away from the body quickly by fast extension of the arms. One-handed Push Throw The child stands sideways on to the direction of the throw. The ball is held close to or touching the neck The elbow of the throwing arm is held high and the arm is extended forwards on release of the ball. Two-Handed Pull Throw The child stands facing the direction of the throw with one foot in front of the other. The ball is held high above the head and behind the shoulder line. One- Handed Pull Throw
The child stands side on to the direction of the throw. The palm of the throwing hand is up-turned
Skills Activity
2. Push & Pull The teacher/coach introduces the push throws. Organise children into pairs in a space with a large and a small ball between them. The children explore a variety of one and two-handed push throws to each other. Discuss which throws worked best with the two different balls. The teacher/coach then introduces the pull throw. The children now explore pull throws using the different balls.
3. Questions & Answers Discuss which of the throws works best for the different throwing implements. Discuss why different throws are needed for different implements & purposes? Can you think in which activities/games a two-handed push throw might be used? Can you think in which activities/games a pull throw might be used?
Teaching points
Encourage children to: transfer their body weight from the back leg to the front
leg on release of the object keep eyes focused on the target & their head still generate force by moving the legs first, then hips,
shoulders and the arms fast and last follow through the pathway of the throw after release of
the object with their arm and fingers

4. Shark Infested Waters
Set up a large throwing area with a throwing line from which to start the throw. Two metres in front of the line mark a zone of about ten metres in width. This is the shark infested water. Each pair has a selection of three throwing implements (eg. tennis ball, beanbag, footballs or foam javelins) Child A is the thrower whilst Child B is the coach. On command from the teacher Child A takes all three of their throws aiming to get their throwing implements clear of the shark infested waters. Each time they clear the water they can award themselves one point. When Child A has completed their throws Child B raises their hand to indicate the thrower has finished. When all throwers have finished the teacher/coach gives the command to collect. Child A & Child B now swap roles. Allow several turns for each thrower. * Hoops or islands could be created for children who struggle to clear the zone.
Health & Safety
Safe rules are of paramount importance when it comes to throwing activities. Even where children are throwing soft athletic equipment it is important to instill good practice for the future. Ensure: children wait for instruction and check the area is clear
before throwing
children wait for instruction and check the area is clear before collecting throwing implements
children walk when collecting implements there is adequate space between throwers
Teaching Points
Encourage children to: think before throwing whether they are going to use a
one or two-handed push or pull throw find a balanced stance to start keep their eyes fixed on their target transfer weight from the back to the front leg follow through with the arm, hands and fingers
Cool Down Children collect the equipment and put it away.
Teacher/coach takes the class through simple stretches with particular emphasis on the arms and raising awareness of the effects of throwing activities on the body.
Evaluation/Post Lesson Notes Equipment cones or markers
large and small balls (heavy & light), shuttlecocks foam javelins, soft shots 600g/1kg, beanbags
Shark Infested Waters
10 metres
CORE TASK 1 - in small groups children investigate the effectiveness of different throwing techniques and decide which is best for distance or for accuracy. Children throw different implements, heavy and light, long and short, and make choices about the best technique for the throwing implement and the purpose (eg. accuracy or distance).

ATHLETICS Key Stage 2 (Years 3 & 4) Throwing (Fling & Heave) Lesson No. 5
Learning Outcomes
Children learn to: A & D Develop the ability to throw for distance and for accuracy A & D Develop the ability to throw using a range of techniques S & A Choose appropriate techniques for the throwing implement K & U Understand the effects of throwing activities on the body E & I Watch and describe how to perform specific aspects of fling & heave throws
Throwing The thrower aims to throw for distance, accuracy or both, by applying a force to a throwing implement. Fling throws relate specifically to the athletic event of discus, but also to a pass in rugby and to throwing a frisbee. The heave throw relates to the athletic event of hammer.
Warm Up:
1. Human Bowling Define a rectangular space with a central safety zone of approx. five metres wide. Divide the class into two teams. Each team occupies one half of the pitch and must not move into the other half of the pitch or into the safety zone during the game. Players from each team take turns to bowl a large ball (preferably one that is sof) along the ground (below the knee) to eliminate the players from the other team. A player is knocked out of the game if the ball touches them below the knee Once eliminated they become side line ball collectors as the balls go off the pitch. The aim of the game is to eliminate as many players from the other team with accurate bowling or fling throws. Players avoid elimination by dodging and jumping to avoid the balls. * More than one ball can be used to make the game more difficult
Skills/Game Activity
2. Working in Pairs (Fling Throw) Mark out a safe throwing area in a fan shape (see diagram overleaf) with approximate metre markers to indicate the distances being thrown. The teacher/coach introduces the fling throw using beanbags, small balls or quoits. In pairs children line up long a throwing line with three throwing implements each. On command from the teacher/coach Child A in each pair takes three throws whilst Child B takes on the role of the coach. Once all three throws have been made Child B raises a hand to indicate the thrower has finished. When the teacher/coach is satisfied the area is safe the throwers collect their equipment. The children then swap roles.
Teaching Points
Encourage children to: stand side on to the direction of the throw start in a low position and finish the throw in a high position follow through in the direction of the throw with the arms and fingers
Health & Safety
Fling & Heave throws tend to be more difficult to control in terms of accuracy. Ensure: adequate space is available there is plenty of space between throwers
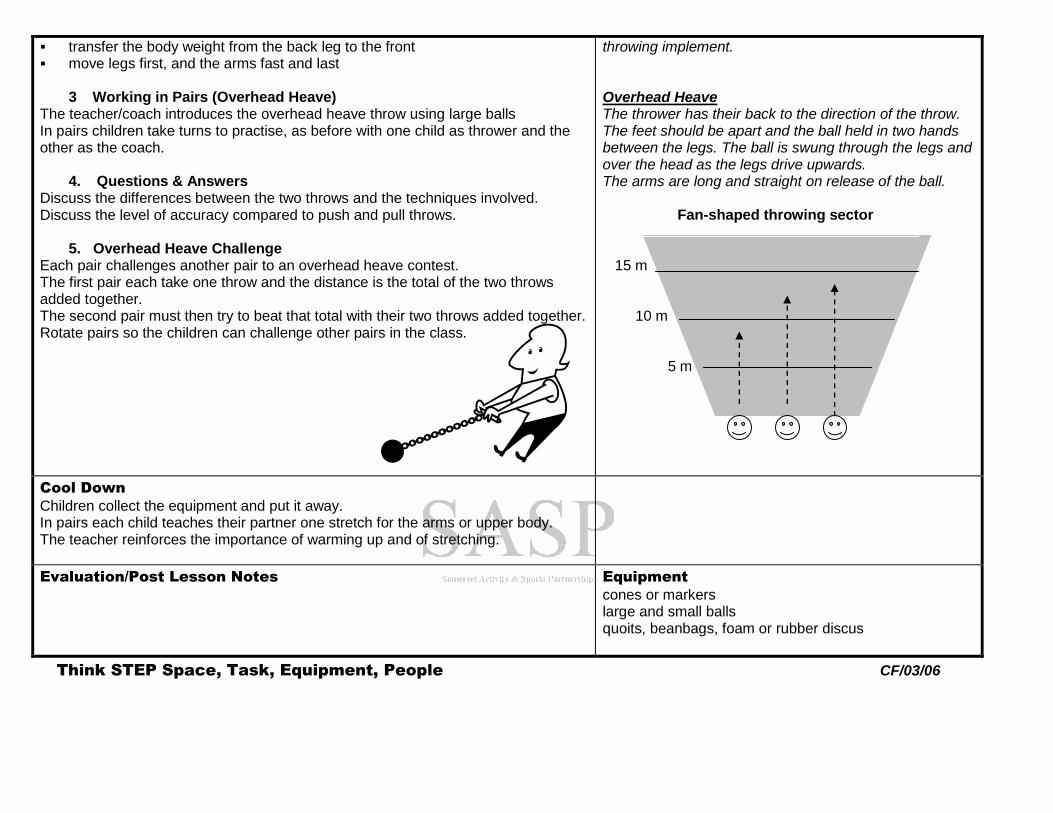
* If space is limited children could throw towards a target on a wall instead of into a space. Fling Throw The child stands side on to the direction of the throw with their body weight on the back leg. The throwing arm starts low from level with the knee of the back leg and travels from low to high so that the release point is around shoulder height as the weight transfers onto the front foot. The arm is long and straight on release of the
Safety Zone
transfer the body weight from the back leg to the front move legs first, and the arms fast and last
3 Working in Pairs (Overhead Heave) The teacher/coach introduces the overhead heave throw using large balls In pairs children take turns to practise, as before with one child as thrower and the other as the coach.
4. Questions & Answers Discuss the differences between the two throws and the techniques involved. Discuss the level of accuracy compared to push and pull throws.
5. Overhead Heave Challenge Each pair challenges another pair to an overhead heave contest. The first pair each take one throw and the distance is the total of the two throws added together. The second pair must then try to beat that total with their two throws added together. Rotate pairs so the children can challenge other pairs in the class.
throwing implement. Overhead Heave The thrower has their back to the direction of the throw. The feet should be apart and the ball held in two hands between the legs. The ball is swung through the legs and over the head as the legs drive upwards. The arms are long and straight on release of the ball. 15 m 10 m 5 m
Cool Down
Children collect the equipment and put it away. In pairs each child teaches their partner one stretch for the arms or upper body. The teacher reinforces the importance of warming up and of stretching.
Evaluation/Post Lesson Notes
Equipment
cones or markers large and small balls quoits, beanbags, foam or rubber discus
Think STEP Space, Task, Equipment, People CF/03/06
Fan-shaped throwing sector

ATHLETICS Key Stage 2 (Years 3 & 4) Jumping for Distance Lesson No. 6
Learning Outcomes
Children learn to: A & D Develop fluency and coordination in taking off and landing A & D Develop body position in the flight phase of the jump S & A Use a variety of jumps in different games and activities K & U Understand how their bodies respond to jumping activities K & U Understand the importance of warming up before physical activity E & I Describe the basic techniques for jumping E & I Watch, copy and describe good examples of jumping technique
Jumping for Distance
The jumper aims to leap the furthest distance possible by applying an efficient approach, take off, flight and landing. Jumping for distance relates specifically to the athletic event of Long Jump, but there are many examples of other sports or activities where a player must jump for distance. The cross-country runner often has to jump streams or ditches, whilst the rugby player often jumps and dives for a ball or to avoid a tackle.
Warm Up:
1. Beans Warm Up In a defined space children move around the area looking to move into spaces. Starting at a walk, gradually increase the tempo to a jog or an easy run. On command the children perform the following movements or body positions. “Jumping Beans” – children bounce up & down on the spot lightly with two feet “Broad Beans” – children do jumping jacks (star shape, feet together, star, together) “String Bean” – children make a long thin shape “Baked Bean” – children curl up small making a tuck shape “ Beans on Toast” – children make a wide, star shape on the floor “Frozen Bean” – children become statues “Jelly Bean” – children shake their bodies “Chilli Bean” – children rub themselves as if cold “French Bean” – children call “Oo La La!”
2. Questions & Answers Why do we warm up? Discuss the effects of exercise on our bodies? Emphasise the importance of warming up, including the mental preparation for the activity ahead.
Skills/Game Activity
3. How many ways? Introduce the 2 feet to 2 feet jump Ask children to see if they can come up with four more standing jumps with a partner. Discuss with and demonstrate with the class the four remaining jumps. 2 feet to 1 foot 1 foot to 2 feet 1 foot to the other foot (bound) 1 foot to same foot (hop) 4. Questions & Answers Which jump from a standing position will enable you to travel the furthest? (2 to 2) Why might this be? (Balanced start and two legs generate more power than one) Discuss when the other jumps might be used and in what games or activities they might be used.
Jumping can be a demanding activity. Where possible use soft surfaces for landing. However, jumping activities can be performed on hard surfaces and children can be seen jumping, bounding and hopping in the playground at most break times.
Health & Safety
Ensure: gym mats do not move excessively, use tape to secure
them to the floor if necessary children jump away from walls or apparatus children are wearing appropriate footwear when working on small mats that only one child jumps
at a time

5 Heads, Shoulders, Knees & Toes Organise the class into groups of three or four. Each group collects a gym mat. One child lies on the mat with their feet level with the jumping end of the mat whilst another draws around their partner with chalk or marks their height with a line. In their groups the children take turns to see if they can jump the body length of that child using a standing jump (2 feet to 2 feet). Children mark their progress with chalk. The groups could be encouraged to record and measure each others progress. This might involve using a tape measure at the end of the lesson to record their results. Once the group have begun to develop and improve their technique a one step approach into the jump could be introduced. Children start with one foot forward and rock back and then forward, transferring their weight onto the front foot at take off (1 foot to 2 feet jump).
This activity could be progressed to a short run up of three to five strides.
5 Questions & Answers Pick out good examples of jumping technique for the class to observe. Ask the children to look for good examples of bent knees, driving arms, long and thin body shapes in flight and soft landings.
Teaching Points
Encourage children to: adopt a balanced stance with feet slightly apart bend their knees & drive arms forward at take off make a long thin shape in the air land softly on their feet with bent knees
Competition/Challenge
5 World Record Long Jump Challenge Organise the children into teams of four. Three jumpers and one recorder. Measure and mark with cones the distance of the men’s or women’s long jump World Record or British Record distances across the area. The first person in the team jumps and the recorder marks where they land. The second person then jumps from that marker and so on until the distance is completed. The recorder counts how many jumps it took the team to complete the distance. Repeat the challenge with a different child as the recorder.
Current Men’s World Record Current Women’s World Record Current Men’s British Record Current Women’s World Record
8 metres 95 cms Mike Powell USA 1991
7 metres 52 cms Galona Chistyakova RUSSIA 1988
8 metres 27 cms Chris Tomlinson 2002
6 metres 90 cms Bev Kinch 1983
Cool Down
Children collect the equipment and put it away. The teacher/coach takes class through simple stretches with emphasis on the legs. The teacher/coach raises awareness of the effect of jumping activities on the body.
Evaluation/Post Lesson Notes
Equipment
cones, chalk, gym mats, tape measures
Think STEP Space, Task, Equipment, People CF/03/2006
CORE TASKS 1 & 2 – children investigate the effectiveness of jumping off one or two feet deciding which enables them to travel furthest. Children measure distance in different ways. Children share distances as a team.

ATHLETICS Key Stage 2 (Years 3 & 4) Jumping for Height Lesson No. 7
Learning Outcomes
Children learn to: A & D Develop fluency & technique in a range of approaches & take off positions A & D Learn a variety of different jumping techniques S & A Explore body positions in flight and apply to different jumps S & A Choose and apply techniques to suit the challenge K & U Understand why warming up is an important part of physical activity E & I Watch and copy each other and describe good technique
Jumping for Height
The jumper aims to cover the greatest height possible, with Olympic athletes jumping at least their own height. Jumping for height relates specifically to the athletic events of High Jump and Pole Vault. Examples of jumping for height in other sports or activities might include: a tennis player jumping to make a smash hit; the footballer jumping for a header; or the basketball player performing a lay up.
Warm Up:
1. One, Two, Three, Four, Five Explain the code to the children “One” means touch the ground with your hand “Two” means jump in the air “Three” means skip high touching your thighs with opposite hands “Four” means kick your legs in front of you “Five” means High Five someone close to you Children begin by walking around the area and gradually increase the tempo of the activity to a jog, skip, side step etc.
Health & Safety
Ensure: adequate space and suitable ground surface equipment which gives easily on being struck children use only a standing jump for Target Jump
Teaching Points
Encourage children to: drive the knee fast and high at take off drive the arms forwards and upwards at take off explore different body shapes in the air try jumping from different sides and using both left and
right as the take off leg try a range of approaches to the jump (with the
exception of the Target Jump which must be done from a standing start for safety reasons)
swing their legs fast and straight when performing the scissor jump
reach above their head with their arms in flight
Skills/Game Activity Introduce three or four stations with two sets of equipment at each station. These stations can be repeated two or three times depending on the class size and the equipment available to you In groups of four, but working in pairs children take turns at each activity station. Encourage children to explore a range of different take off positions or approaches. 2. Jumping Stations Target Jump (2 feet to 2 feet): Using clear wall space children take turns to make a standing jump to reach as high up the wall as possible. Children stand side on to the wall reaching their inside arm to the wall. Targets might include chalk markings, post-its, or laminated signs for the children to reach for. A bench will be needed to enable children to reposition the targets or mark the height with chalk. High Bounce (2 feet to 2 feet): Using a small foam wedge, mini-hurdles, or cones and a cane, children take turns to make standing tuck jumps over the obstacle. Encourage children to keep their feet together and drive their arms at take off. The activity could be extended to three or four tuck jumps being performed in row over a set of obstacles. Children might explore making one or two bounces between obstacles or hopping instead.
CORE TASK 1 – children investigate different jumping styles, decide which they like best and which help generate the greatest height. Children measure and record in different ways

Edward Scissor Legs (1 foot to the other): Using the lines of the playground, ropes or mini hurdles children take turns to scissor jump the obstacle. In the scissor jump the legs are swung fast and straight from the hip. Children begin with a standing start for take off and should be encouraged to try leading with both legs. The approach should be a straight line and a diagonal pathway to the obstacle. Children could be encouraged to explore the best approach for themselves by trying different approaches or pathways to the obstacles from three or four strides. These could include straight approach, diagonal or curved line. The beginnings of the Fosbury Flop can be introduced by progressing into a curved approach with a bent leg and driving knee at take off instead of the straight leg scissor approach. Jump & Reach (2 to 2, 1 to the other, 1 to 2): Using something suspended from the ceiling or a beam the children take turns to jump for the target. Alternatively a uni-hoc stick or broom handle with something dangling from the end as a target with one child holding the end whilst the other jumps and reaches. Alternatively a soft ball or balloon thrown into the air by a partner could be used as a target for which to jump and reach.
3. Questions & Answers Which approach & which technique worked best for the different jumps? Which body shapes worked
High Jump Approach The diagram illustrates the correct diagonal approach for the scissor jump depending upon take off leg. The inside leg to the barrier clears the obstacle first. If approaching from the right the child will drive off the left leg with the right leg clearing the obstacle first. If approaching from the left the child will drive off the right leg with the left leg clearing the obstacle first. The same applies for a curved approach. Left Right
Competition/Challenge
4. Vertical Jump Challenge Children record and measure each other’s performances using the Vertical Jump which is the same jump as the Target Jump station. This is recorded by first marking the reaching height of the child on the wall. This is done by the child standing with their back to the wall, feet flat to the floor and arms reaching above the head. Mark the furthest point of the finger tips with chalk. The child then stands side on to the wall and when ready jumps and reaches to touch the wall at the highest point possible. The recorder marks the point with chalk and the height jumped is the measurement from the reaching height of the child to the mark reached with a jump (usually between 20 – 50 centimetres).
Cool Down
Children collect the equipment and put it away. Teacher/coach takes children through simple stretches
Evaluation/Post Lesson Notes Equipment
hurdles, canes, cones, unihoc sticks, chalk, rulers
Think STEP Space, Task, Equipment, People CF/03/06

ATHLETICS Key Stage 2 (Yeas 3 & 4) Combination Jumping Lesson No. 8
Learning Outcomes
Children learn to: A & D Explore combinations of different jumps A & D Develop fluency and control in putting together different combinations S & A Choose different combinations of jumps for different games and activities K & U Understand how jumping activities affect our bodies E & I Watch and copy each other and try to improve performance
Combination Jumping The jumper aims to link more than one jump together in a sequence to cover a distance. It relates to the athletic event of Triple Jump, which consists of a hop, a bound and a jump following a running approach. However, many sports people use combination jumps without evening thinking about it, when they jump or hop to gain balance or positioning.
Warm Up
Children walk around the area (stroll in the park pace), Children walk on tip toes without making any noise, children walk with loud giant steps, children walk faster (late for school walk). 1. Mirror Me Reinforce the five different standing jumps (see opposite). Organise the class into pairs. Children stand face to face about two metres apart. One child is the leader and jumps forwards, backwards, sideways, upwards, whilst the other child must try to mirror their actions. Children swap roles.
2. Shadow Me This time the children move around the room with one child leading and putting together a sequence of jumps whilst the other child follows behind, trying to keep up with their partner as if they are their partner’s shadow. Children swap roles.
3. Copy Me This time the leader puts together a sequence of three or four jumps and the other child watches and then copies the sequence. The sequences could get longer and more difficult to remember. Children swap roles.
Teaching Points
Encourage children to: make their movements fluent and coordinated keep their heads up and eyes ahead explore different body shapes in flight land softly with bent knees 5 Basic Jumps Two feet to two feet Two feet to one foot One foot to two feet One foot to the same foot (hop) One foot to the other foot (bound)
Skills Activities
4. Combination Jumping Stations Children work in small groups & set themselves challenges to improve performance. Encourage children to take turns and to watch each other and to give each other ideas about how they could improve their performance at the different challenges. Jumping Jack Rabbits: Children take turns to hop to a cone and back (total distance 10 metres). Children could time each other as to how long it takes or count how many hops (without stopping) it takes them. Can they do it faster? Can they do it in fewer hops? Try hopping on the other leg? What happens then? Can they play the game using different jumps?
Teaching Points
Encourage children to: touch the ground lightly with their feet have minimum contact time with the ground use their arms to help drive themselves forward land softly with bent knees
CORE TASK 1 & 2 – children try mirror someone so that actions are performed in synchronisation. Children explore different types of jumps and their effectiveness. Children share distances as a team.

Stepping Stones: Set up a jumping grid using cones or spot markers so that children start at the beginning of the grid where the stones are close together and work their way up the grid to where the stones are further apart & the river wider. Children take turns to make a three part combination jump across the stepping stones and finish with a jump onto the bank. Encourage the children to make each of the three phases of the jump roughly equal. Dice Jump: One child rolls the die and the others take turns to make a combination of jumps corresponding to the number called out. Children have several attempts to see if they can beat their first distance. Children could watch each other and copy the same combination and see if they can beat that distance or use different combinations to try to get further.
Stepping Stones Grid
Competition/Challenge
5. Jonathan Edwards World Record Challenge Current Triple Jump World Record: 18 metres 29 cms, 1995, Gothenburg Measure and mark the length of the world record distance. Explain that this is the distance Jonathan Edwards covered in a single hop, bound and jump following a run up. Use long jump records instead, if the space is not adequate. Organise the class into teams of four. One child is the recorder the other three are the jumpers. The first member of the team makes three hops from the start line and the recorder marks where they land with a cone. The second child in the team then does three hops from that marker and the cone is then moved to where they landed. This continues until the world record distance has been covered by the three jumpers. The recorder must count the total number of hops it took his team to complete the distance. Repeat the game this time using a different team member to record.Can the team reduce the number of hops it takes to complete the world record distance? The winning team is the team who completes the distance in the fewest number of hops or individual attempts at the full distance added together to give a team total. * Variations on the game might include bounds or bunny jumps
Cool Down
Children collect the equipment and put it away. Teacher/coach leads children through simple stretches and reinforces the importance of warming up and cooling down after physical activity.
Evaluation/Post Lesson Notes
Equipment
cones or markers mats dice, tape measure
Think STEP Space, Task, Equipment, People CF/03/06

ATHLETICS Key Stage 2 (Years 3 & 4) Relays Lesson No. 9
Learning Outcomes
Children learn to: A & D Develop the skills to make relay changeovers A & D Develop communication skills when working together as a team S & A Choose the best changeover technique for the relay event K & U Understand how their bodies respond to running activities E & I Discuss as a team how improvements could be made to performance
Relays
The aim of the relay team is to cover a given distance as fast as possible as a team. Relays usually involve passing a baton around a circuit. The key to a successful relay team is good organisation, timing, communication and smooth changeovers. The main relay events in athletics are 4 x 100m, 4 x 400m, but cross-country and road relays events are also very popular and good fun.
Warm Up:
1. Trains, Drop & Pick Up Organise children into groups of four or five with a bean bag between them. One child is the leader, whilst the others form a train behind. Starting at a walking pace the leader makes a pathway through the space and the train keeps in close contact. The leader chooses when to drop the beanbag in their path and then continues along their chosen route. All of the children pass over the beanbag until the last person in the train picks it up and runs to the front becoming the leader. Repeat several times gradually increasing the speed from a walk to a jog. After several goes ask the children to come up with different ways of communicating to the rest of the team that they are going to drop the beanbag
Light plastic batons could be used if running on grass
Teaching Points
Encourage children to: work together as a team by checking to see if the
train is kept close together communicate clearly to each other drop (not throw) the beanbag or baton keep their heads up and eyes ahead try both dropping and picking up with their non-
dominant hand
Skills/Game Activity
2. Stand and Deliver Organise children into pairs with a beanbag between two. Child A stands about a metre in front of Child B, both children facing the same way. Child B holds the bean bag and when ready calls “hand” and Child A responds quickly by putting their hand out behind them without turning around. Child B places the beanbag in their hand and quickly moves to a position a metre in front of Child A, who now repeats the task. Extend the activity by encouraging children to call left or right hand. Extend the activity to a walk or a jog. Swap beanbags for batons. Join another pair and make a train of four and practice the activity on the move.
Teaching Points
Encourage children to: listen for the command from their partner hold their arm out long with the palm open and up react quickly without looking around attempt the task using both dominant and non-
dominant hands pass the baton at arms length holding it at one
end so there is free baton to grasp on passing

3. Continuous Relay Changeover Station In fours children set up simple relay changeover stations using four markers or cones placed in a line. Cones 1 to 2 should be approximately 5 metres apart. Cones 2 to 3 should be approximately 2 – 3 metres apart. Cones 3 to 4 should be approximately 5 metres apart. Child A starts at cone 1 and runs to cone 3 to pass the baton to Child B. Child B starts running when Child A reaches cone 2 and on receiving the baton runs on to cone 4 and back around cone 1. Child A has now stepped off the track and Child C has now stepped up to cone 3 ready to receive the baton from Child B. The children continue to practice changeovers by rotating at cone 3. Start/Finish 1 2 3 4 Child A Child B Child D & C
Teaching points
Encourage children to: start moving quickly when the incoming runner
has reached the second marker practise changeovers at full speed practise using both left and right hands for passing
and receiving Relay events require runners to be able to pass and receive with both hands and it is important children are encouraged to practice using both. The right hand will pass to left and left will pass to right. This is so that runners don’t have to reach across their body when passing the baton which is awkward and inefficient. Children should be encouraged to position themselves in lanes as below. The letters indicate hands in which the baton is held.. R L R L
Competition
4. Shuttle Relays with End Turn Using the layout above children compete as teams of four. Each child runs once. The runners gets ready to step onto the track once the previous changeover has taken place. When all four runners have run the children should sit down in their teams.
5. Pursuit Relay See lesson 3.
Cool Down
Children collect the equipment and put it away. The teacher/coach takes children through simple stretches. Discuss what makes for good team work (eg. good communication, cooperation, etc)
Evaluation/Post Lesson Notes
Equipment
cones or markers batons, beanbags
Think STEP Space, Task, Equipment, People CF/03/06
CORE TASK 2 – in teams of four children find out ways of running the fastest time as a relay team. They run for longer and shorter distances and tackle different types of relay courses.

ATHLETICS Key Stage 2 (Years 3 & 4) Multi-event Team Challenge Lesson No. 10
Learning Outcomes
Children learn to: A & D Acquire and develop skills in recording and measuring performance S & A Select and apply running, jumping and throwing techniques in competition S & A Select the best technique for the event K & U Understand the benefits of exercise to their bodies E & I Describe the basic techniques which make for a good performance
Multi-event Challenge
Multi-events or combined events competitions are when an athlete competes over a range of running, jumping and throwing events over one or two sessions. They relate to the athletic events of the Heptathlon (7 events) and Decathlon (10 events) which take place over two days. It also relates to sports such as the Triathlon and the Modern Pentathlon.
Warm Up
1. Changing Gears In a defined space children move around the area at a relaxed walking pace and on command or signal they must stop and the teacher/coach leads the class through a simple mobility exercise. Children walk around the area more quickly (late for school walk) and on command stop to perform a simple mobility exercise. Increase the pace to a jog and a run. Introduce skipping and side stepping.
Skills/Game Activity
Organise the class into six or eight equal groups depending on whether the class are attempting the Run, Jump, Throw Challenge (6 teams) or the Quadrathlon Challenge (8 teams). Two teams work together at one of the stations with one team recording and measuring times and distances whilst the other team contests the challenge. The two teams then swap roles. When everyone on both teams has completed the challenge they move onto the next station. The teacher/coach should explain the rules of the events and how they should be measured and recorded at the start of the session. The events can be adapted and changed, but the events listed below would enable schools to use the data for events in the Norwich Union Shine:Awards. This is the UK Athletics award scheme and schools registered on the scheme can use the recorded results to apply for individual performance awards at Level 2. See. www.ukathletics.net for more information about the award scheme. 2. Run, Jump, Throw Competition (Star:Track Award) 50 metre Run: You will need a stop watch, tape measure and cones. Mark out a 50 metres stretch with a tape and using cones to mark the start & finish. Starters should call “On your marks”, then “Go” or blow the whistle. The stop watch should be started on the G of the “Go” and should be stopped as the chest of the runner passes through the line. Record to the nearest 10th of a second.
Health & Safety
Ensure: there is adequate space between the events that children throw away from other events
Teaching Points/Rules of Competition
Timekeeping (NB most people give times which are too fast): slow reactions in starting the watch will give results
which are faster than was achieved predicting the finish and stopping the watch early are
also reasons for unrealistically quick times timekeepers should watch the finish line and not the
athletes times should be rounded up eg. 10.23 seconds
becomes 10.3 seconds recall runners if there is a false start the teacher/coach may want to record the running
event to ensure some consistency is maintained Throwing Events record distance to the nearest 50 centimetres eg. 10.
50 metres

Standing Long Jump: You will need a pit or a mat and a tape measure. Jumpers take turns to record the best of two or three jumps. The measurement is taken from back edge of the take off line to the part of the body which landed nearest to the take off line. See opposite. Record distance to the nearest centimetre. Soft Javelin: You will need soft javelins and a throwing area of about 25 metres. Place cones at metre marks from the throwing line. Throwers take turns to record the best of two or three throws. The throw is recorded from the point at which the javelin first touched the ground (allow any part of the soft javelin to touch the ground for a legal throw). 3. Quadrathlon Competition (Agility Award) For the quadrathlon add one agility event. Speed Bounce: You will need foam wedges or mini hurdles of about 25 centimetres in height and a stop watch. Competitors start side on to the obstacle with two feet together and make as many jumps side to side over the obstacle they can in 20 seconds. One child should keep the time whilst another counts the number of clean bounces made. Have one attempt each.
4. Relay Event Finish the competition or challenge with a shuttle relay
Speed Bounce only two-footed bounce jumps can be counted if the obstacle is knocked over obstacle it should be
replaced quickly and the competitor continues Jumping Events horizontal jumps should be measured from the back
edge of the take-off line to the nearest point where any part of the body touched the ground
distance should be recorded to the nearest centimetre eg. 1.52 metres
a no jump should be recorded if the jumper starts with their feet over the line
Competition & Team Challenges could took place over several weeks or as part of the run, jump, or throw lessons. Event recording sheets are enclosed in the lesson packs. Event Specific Team Results could be scored in the following way:
o The best jump from each team member is added together to give a total distance which can be compared against the other teams. o The same can be done for the throwing events and for the speed bounce. o For the running event the total time would be added together and the team who took the least time would win the running event.
Overall Team Results could be scored in the following way: o If six teams are competing give the winning team for each event 6 points, 5 for second, 4 for third and so on. o The team with the most points wins.
Cool Down Children collect the equipment away and put it away.
Teacher/coach takes children through simple stretches.
Evaluation/Post Lesson Notes
Equipment
cones or markers, whistles, stop watches, tape measures, beanbags, batons, foam javelin, mini hurdle
Think STEP Space, Task, Equipment, People CF/03/06